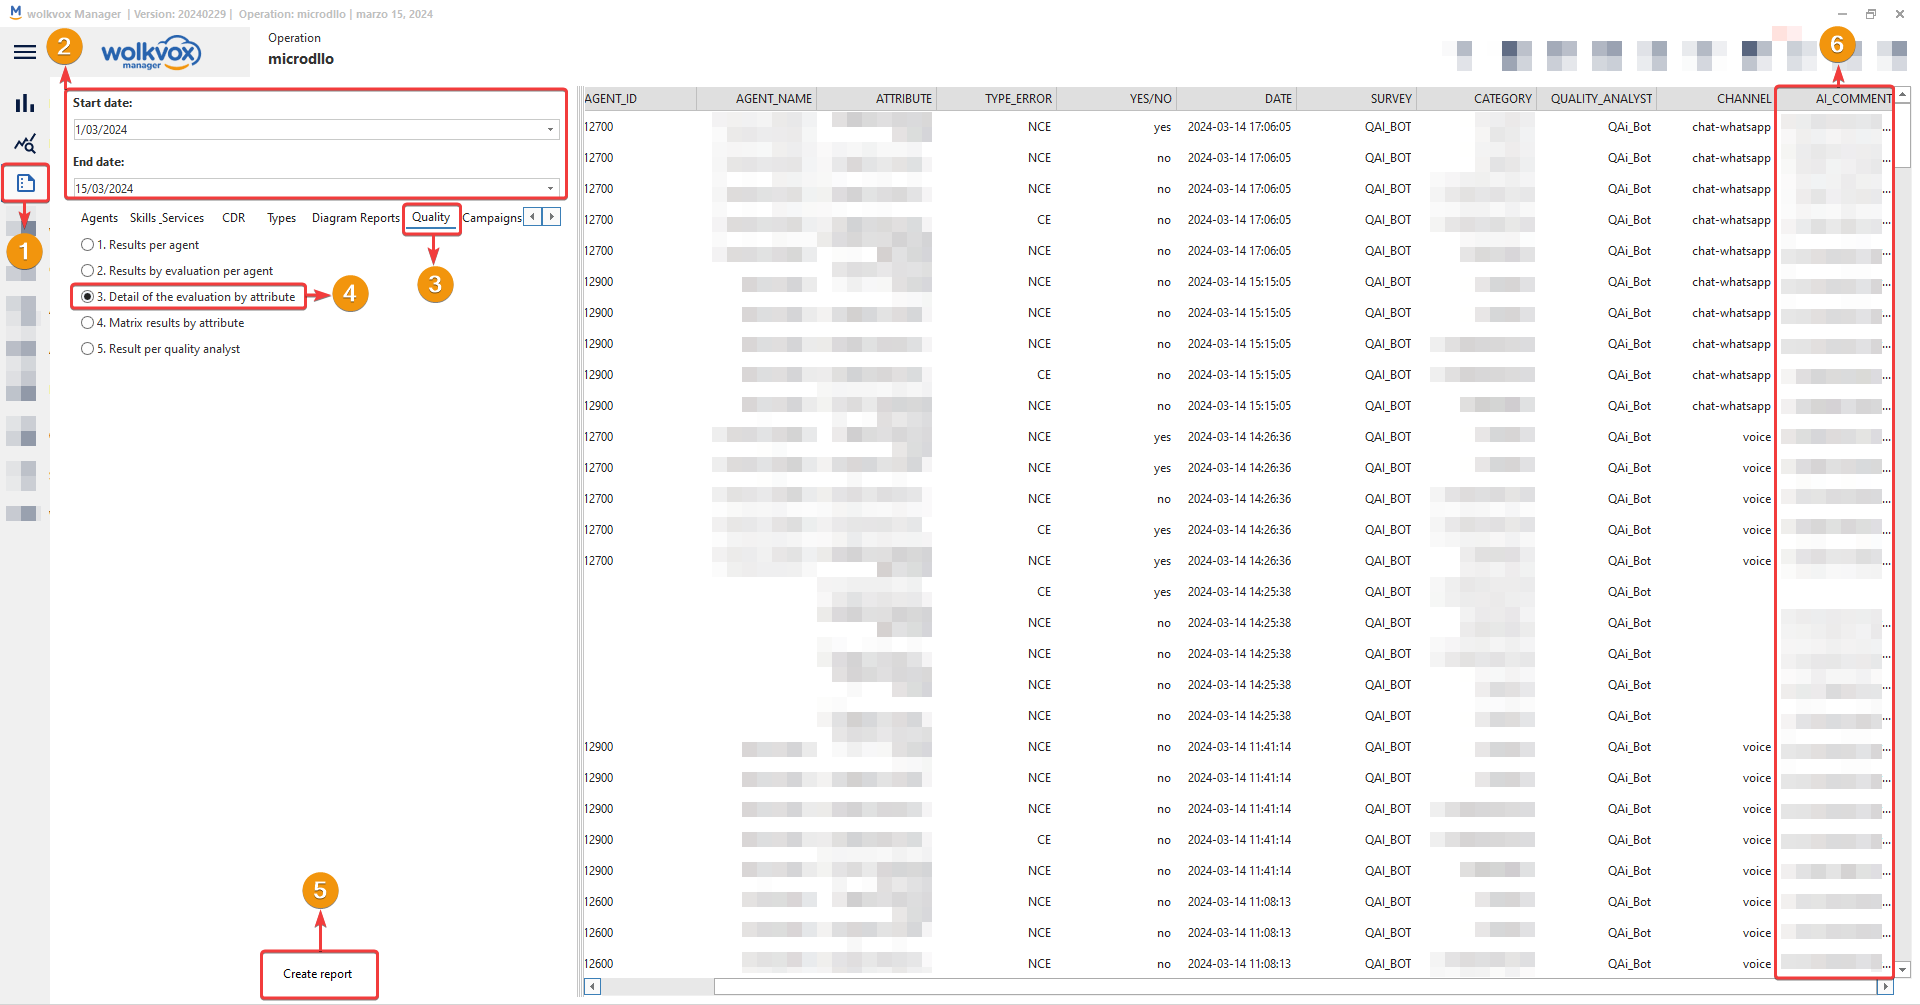
 New Information Column for Quality Report 3: Attribute Evaluation Detail #

- A new column called “ai_comment” has been added to the Quality Report #3: Attribute Evaluation Detail.
- This new column provides the comment left by the quality analyst or the automatic artificial intelligence quality analysis system regarding the agent’s interaction with the customer.
- Thanks to this update, you benefit from seeing such an important feature for interaction analysis, such as the final comment from the quality analysis.
- This update also applies to its corresponding API. You can access the API documentation by clicking here.
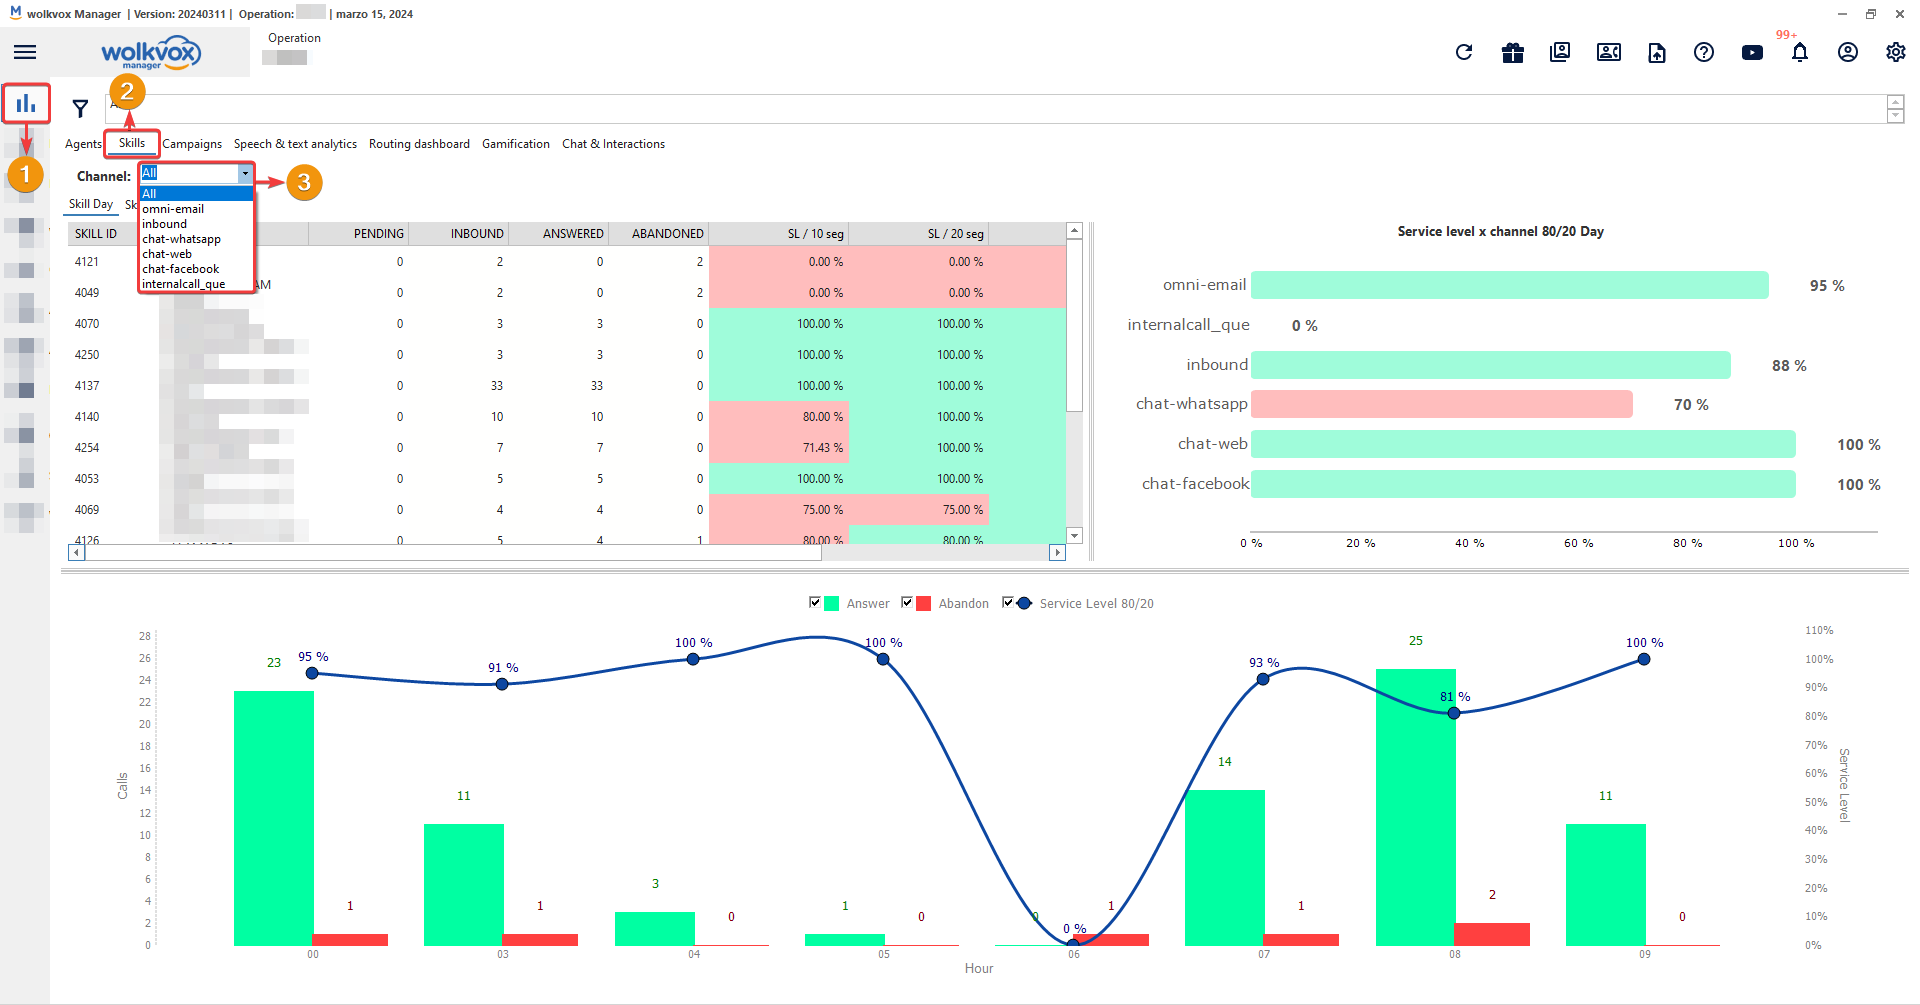
New filter for real-time statistics of skills or agent groups #
- A new way to filter real-time statistics of skills or agent groups in your operation has been added. Now you can filter by channel type.
- Remember that in this section, real-time statistics of skills or agent groups about pending, queued, answered, abandoned interactions, service level, abandonment rate, average response time, and also a line graph about the quantity of answered, abandoned interactions, and service level over time are obtained.
- The channel type listed in the filter will depend on whether there has been any interaction in that channel type during the current day (since we are talking about real-time statistics).
- Therefore, the following options can be listed here: chat-configurationbox (internal chat), chat-email, chat-facebook (interaction from a messenger chat), chat-instagram (Instagram chat), chat-transferSkill (chat transferred from another skill), chat-web, chat-whatsapp, chat-telegram, chat-line (chat from the Line messaging service), inbound (incoming call), internalcall_que (internal call from a queue), omni-email (email interaction), omni-facebook_page (interaction on a Facebook page post), omni-instagram (interaction on an Instagram page post), omni-twitter (interaction on a Twitter post), and out_pre (outbound call in predictive campaign).
- This provides greater flexibility and customization in data analysis, allowing you to focus on specific metrics related to each type of interaction.
New option for public access to folders stored in Wolkvox Storage #
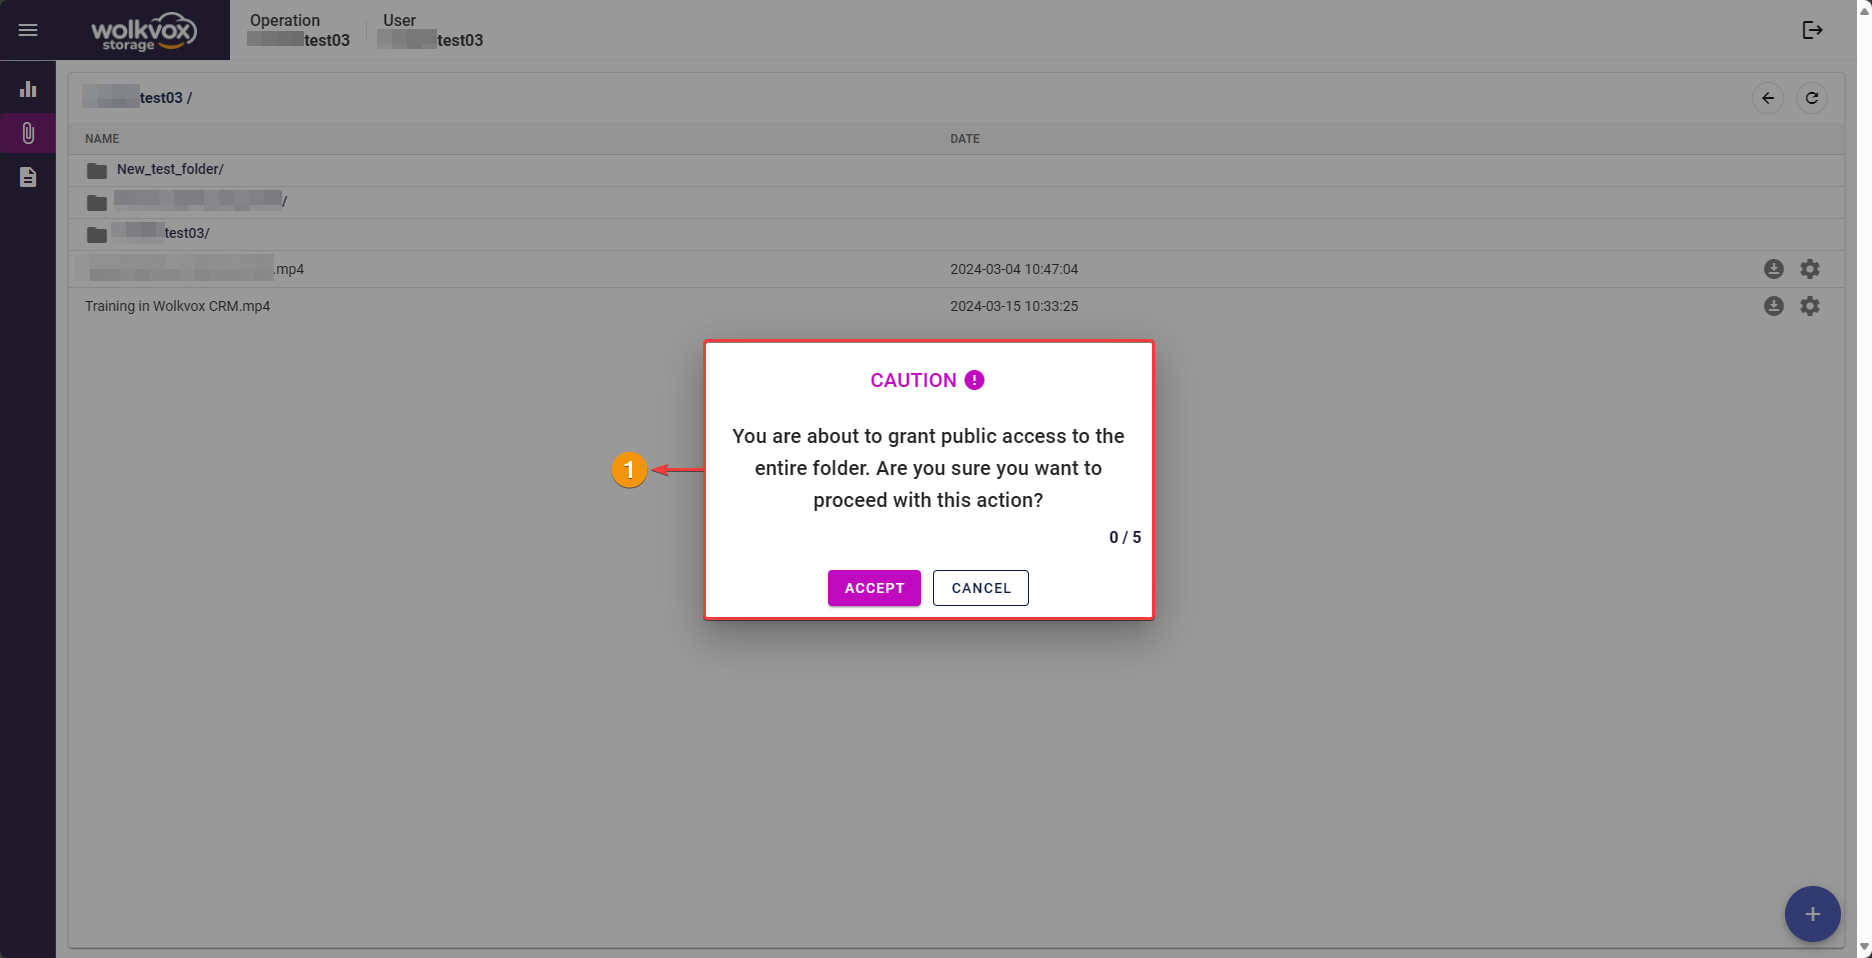
- From now on, you’ll be able to grant public access to an entire folder in Wolkvox Storage. Previously, you could only grant public access to individual files, but now you can do so for all files within a folder, providing public access to the entire folder.
- To grant public access to a folder, right-click on it and select the option “Grant public access.”
- Remember that with this action, anyone who obtains the URL of the folder with public access enabled will be able to access its contents.
- Thanks to this enhancement, you gain simplification and expansion of access to files stored in Wolkvox Storage.
- This folder access change action will be logged in the audit log.

As a security measure, you will be asked to confirm this permission change five times.
New feature in the Manager (Agents) reports API called 1. Agent Time by State #
- This API provides a comprehensive overview of agent management by summarizing the activity of each advisor, indicating the total number of handled calls (inbound/outbound/internal), the time spent in each phase of customer service (Ring time, ACW, and AHT), login/logout date and time, as well as the number of hits and RPC.
- Although consuming the URL https://wv{{wolkvox_server}}.wolkvox.com/api/v2/reports_manager.php?api=agent_1&date_ini={{YYYYmmddHHiiss}}&date_end={{YYYYmmddHHiiss}} will generate the complete report for all agents, now you can add ‘agent_id’ to obtain the report for a specific agent.
- For this, use the following URL: https://wv{{wolkvox_server}}.wolkvox.com/api/v2/reports_manager.php?api=agent_1&agent_id={{agent_id}}&date_ini={{date_ini}}&date_end={{date_end}}
- Thanks to this update, you gain a detailed and comprehensive insight into the individual performance of each agent in terms of time management and activity within the system.
- To go to the official API documentation, click here.
New integration with Microsoft Entra ID service (Azure Active Directory) #
- Microsoft Entra ID is a cloud service that manages employee identities and access. With Entra ID, employees can securely and conveniently access a variety of both external and internal resources.
- Among the external resources employees can access are popular tools like Microsoft 365, Azure Portal, and thousands of other software as a service (SaaS) applications.
- In addition to external resources, Entra ID also facilitates access to internal company applications and tools, such as those on the corporate intranet network. It also allows access to cloud applications developed specifically for the organization.
- Integration Objectives:
- Enhance security: Integration with Azure AD provides a robust and scalable solution for identity management. This means the company can ensure the security of its data and more effectively comply with regulatory requirements. By leveraging advanced security capabilities of Azure AD, such as multi-factor authentication and access monitoring, confidential information can be more effectively protected.
- Increase productivity: Integration with Azure AD can boost employee productivity by streamlining access to Wolkvox resources. By using Azure AD credentials, employees can securely access Wolkvox and other business applications without needing to remember multiple passwords. This not only simplifies the login process but also enhances the user experience by providing quicker and more convenient access to the tools needed to perform their work efficiently.
- Integration Benefits:
- The integration between Wolkvox and Azure AD (also known as Entra ID) makes it easier to log in to Wolkvox applications using the same credentials you use for other services, such as email or Microsoft Teams.
- With this integration, you can use your Azure AD credentials to securely log in to Wolkvox without having to remember another password. It’s like having a single key that opens many different doors.
- Requirements before integrating Entra ID with Wolkvox:
- Active services of both Wolkvox and Azure Active Directory (now called “Entra ID”).

#
Setting up in Entra ID #
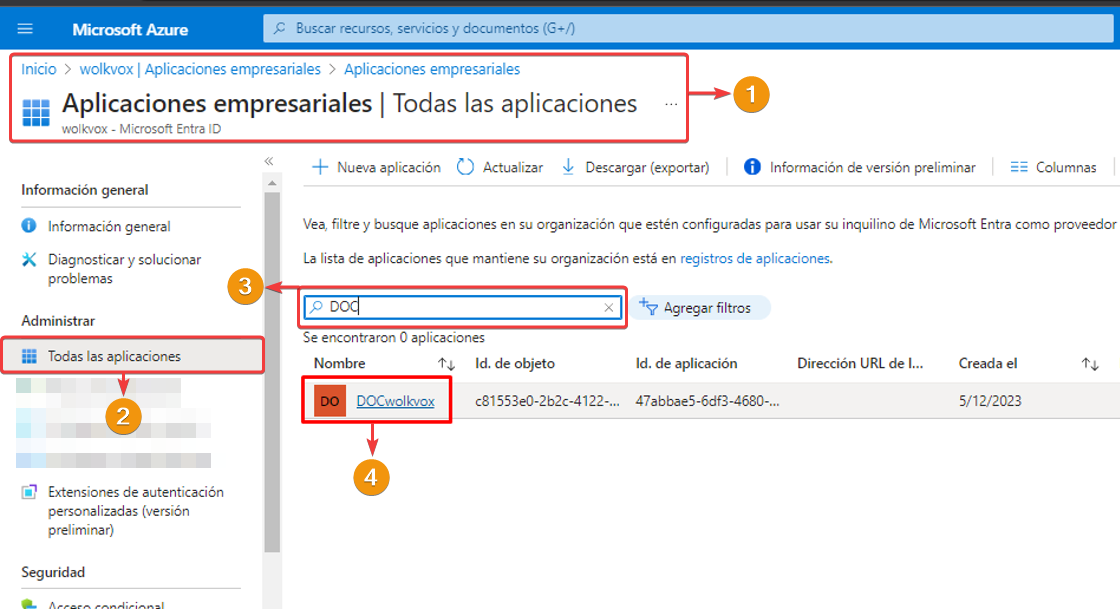
Step 1: Create Application in Entra ID with the desired name for integration identification. #
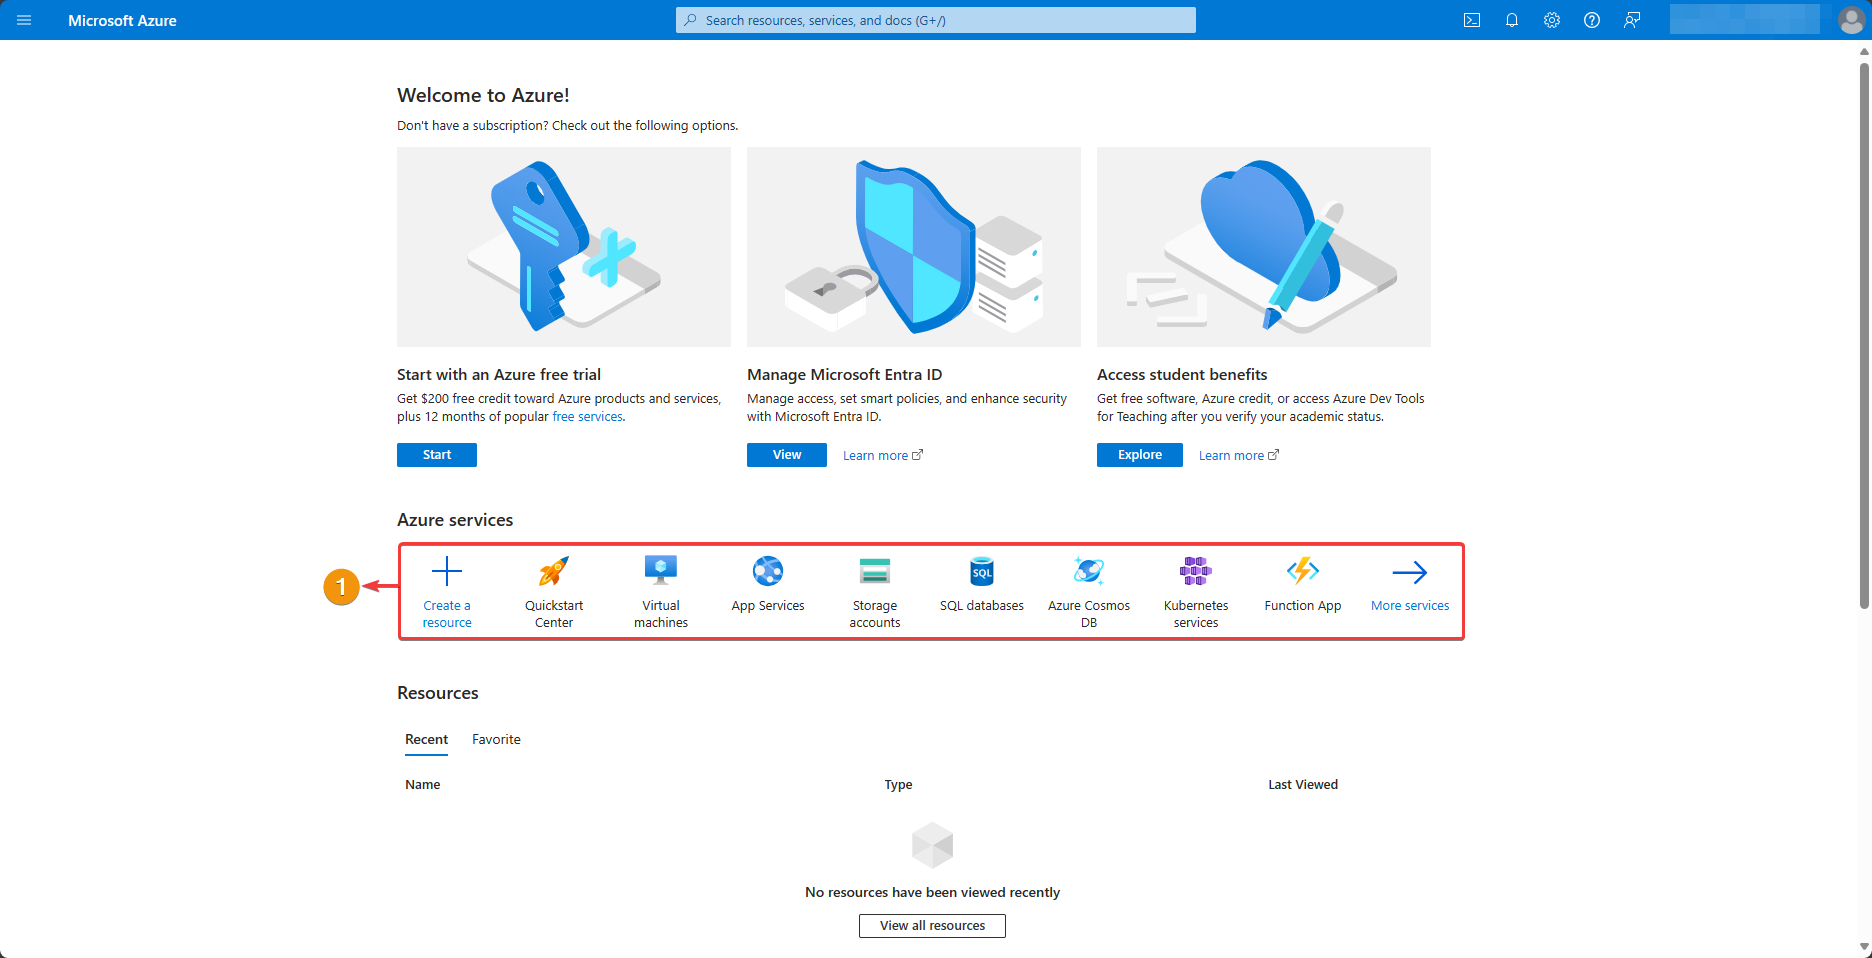
Within the Microsoft Azure platform, create a resource of type “Microsoft Entra ID”.
Note: If “Microsoft Entra ID” is not listed in this initial view of the site, then access “Create a resource” or “More services” and then use the search field “Search services and marketplace” to look for “Microsoft Entra ID”.
Create a new application.

In the Microsoft Entra ID Gallery, create an application.
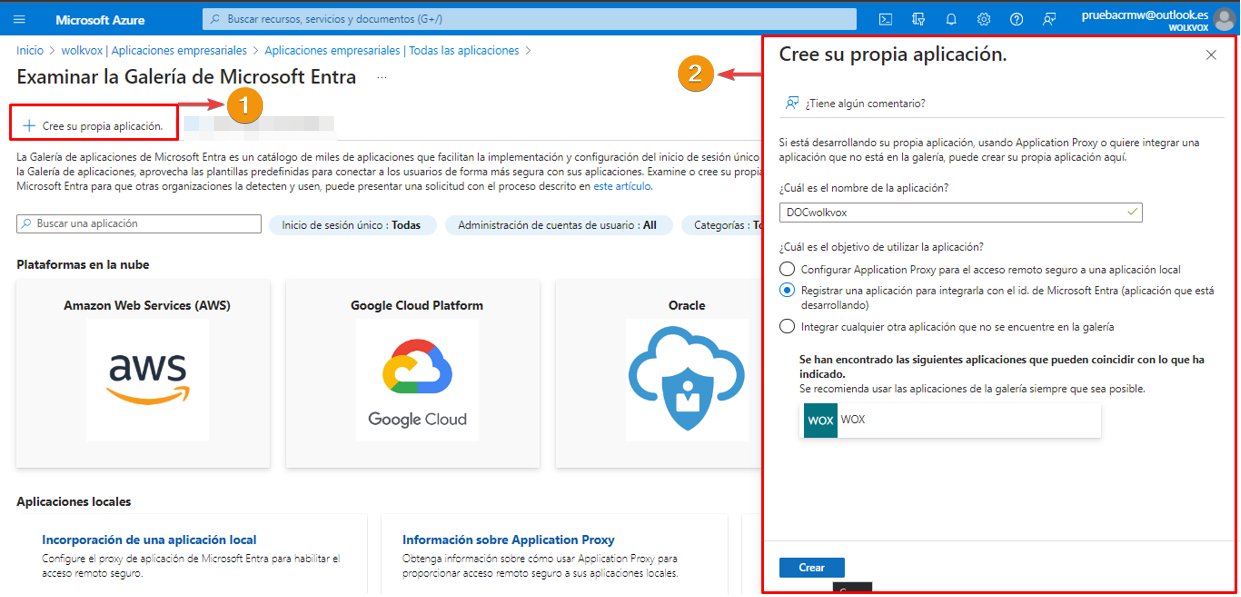
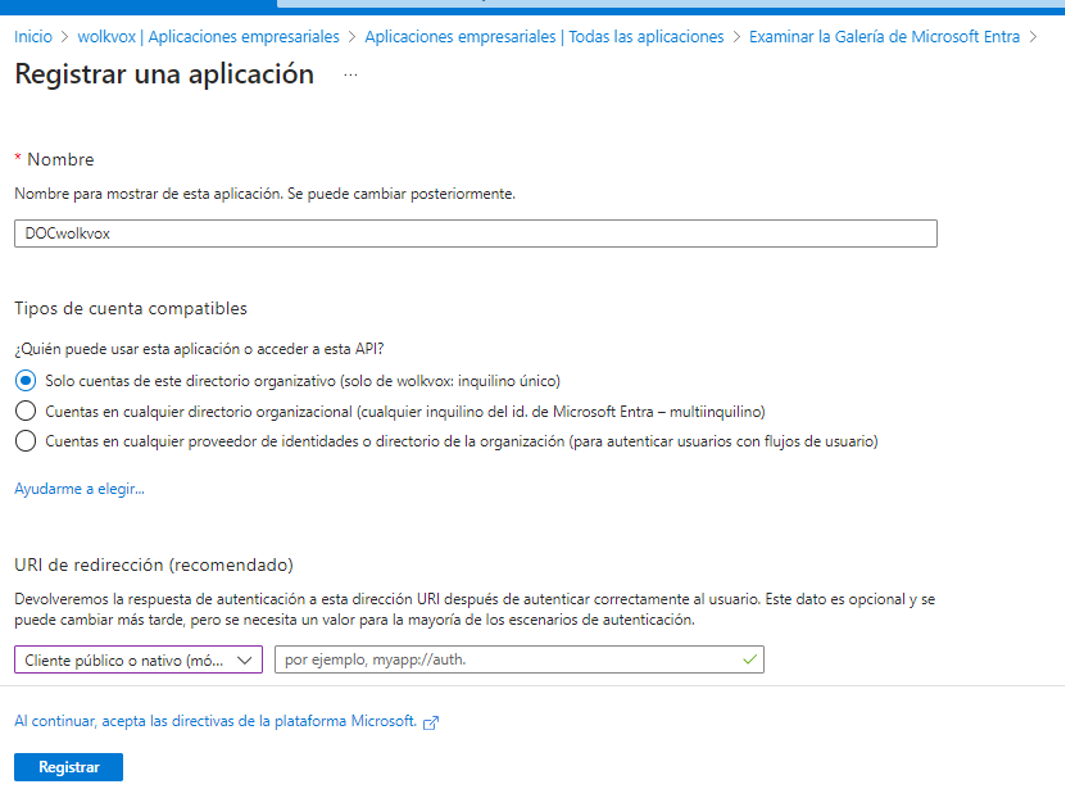
Register the new application.
Now enter the new enterprise application you have created.
Step 2: Obtain the Application ID and Object ID #
After the previous step, you will access the application’s overview panel. Here you can obtain the Application ID and Object ID.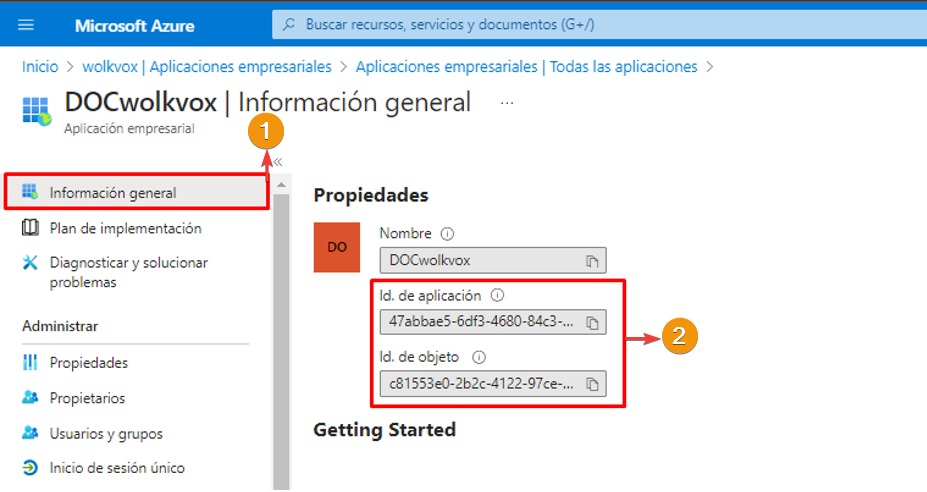
#
Step 3: Add API Permissions #
- To add API permissions, go to the “API permissions” section under “Manage” in the left-hand side menu.
- Then, click on “Add a permission”.
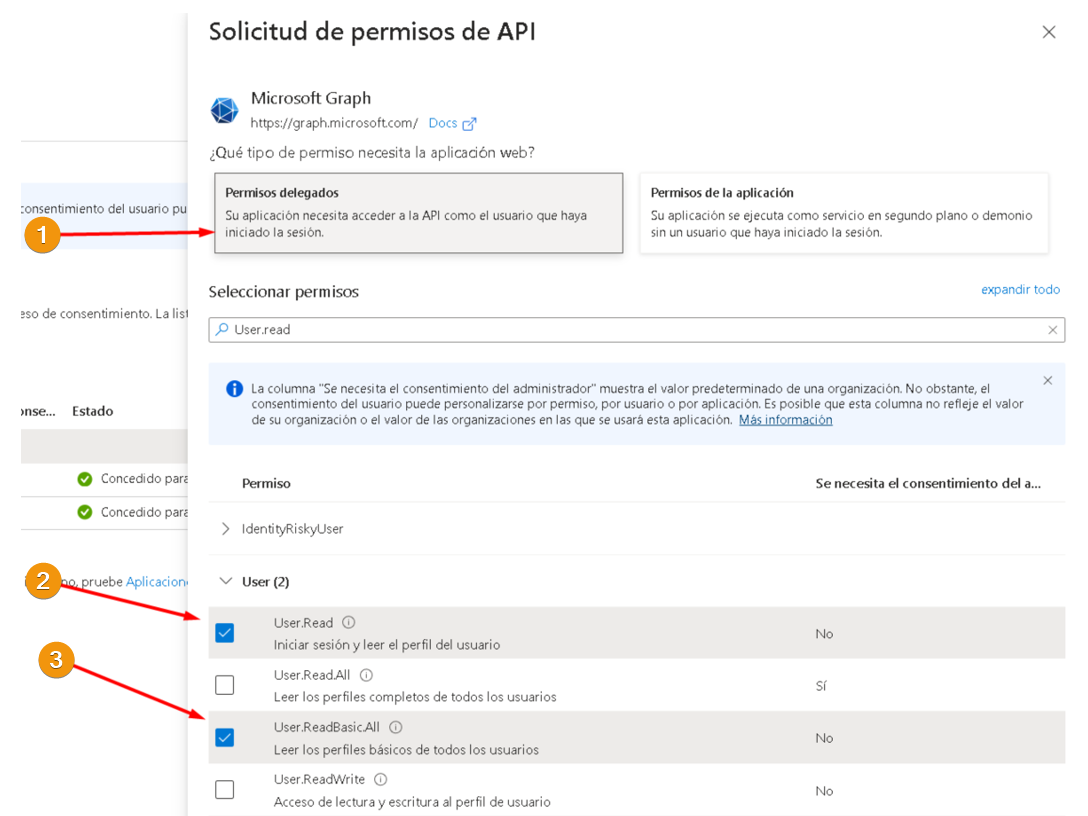
Note: We will be delegating permissions to Microsoft Graph.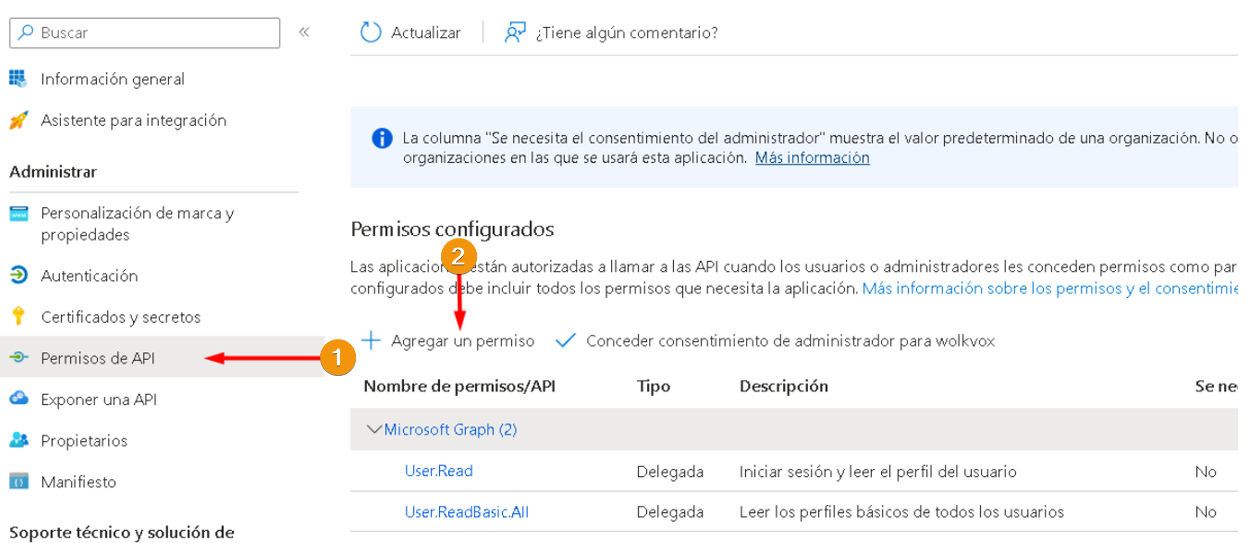
- Click on “Delegated permissions”.
- Enable the “User.Read” permission (Sign in and read user profile).
- Enable the “User.ReadBasic.all” permission (Read all users’ basic profiles).
Step 4: Authentication Configuration #
Now, let’s grant permissions for mobile and desktop applications.
- Access the “Authentication” settings in the “Manage” section of the left sidebar menu.
- Enable “MSAL” and “URL NativeClient”.
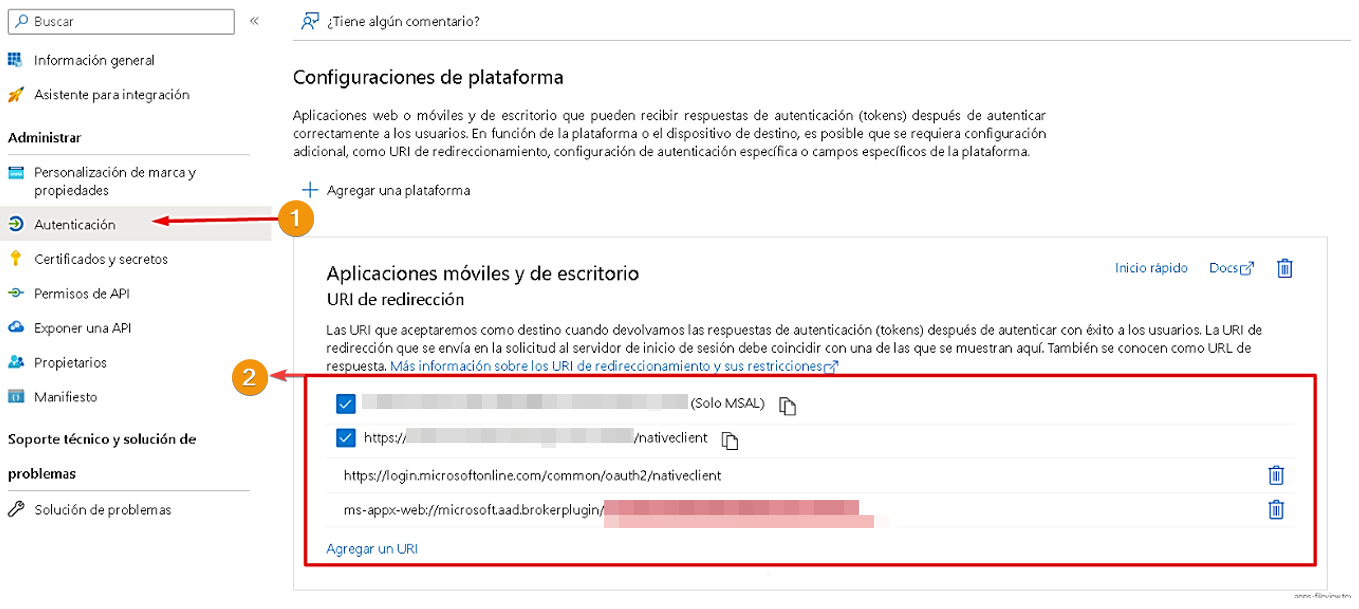
Set the supported account type to single tenant.
Configuration within wolkvox Manager #
- Go to “Settings” in wolkvox Manager.
- Click on the “Integrations” tab.
- Click on the “Microsoft Entra ID” tab.
- Check the box “Enable Microsoft Entra ID integration”.
- Enter the “Tenant ID” as the tenant identification and the “Client ID” as the application ID.
- Click on “Save” to apply the changes.
Note: You should perform this configuration with the superadministrator user of wolkvox Manager.
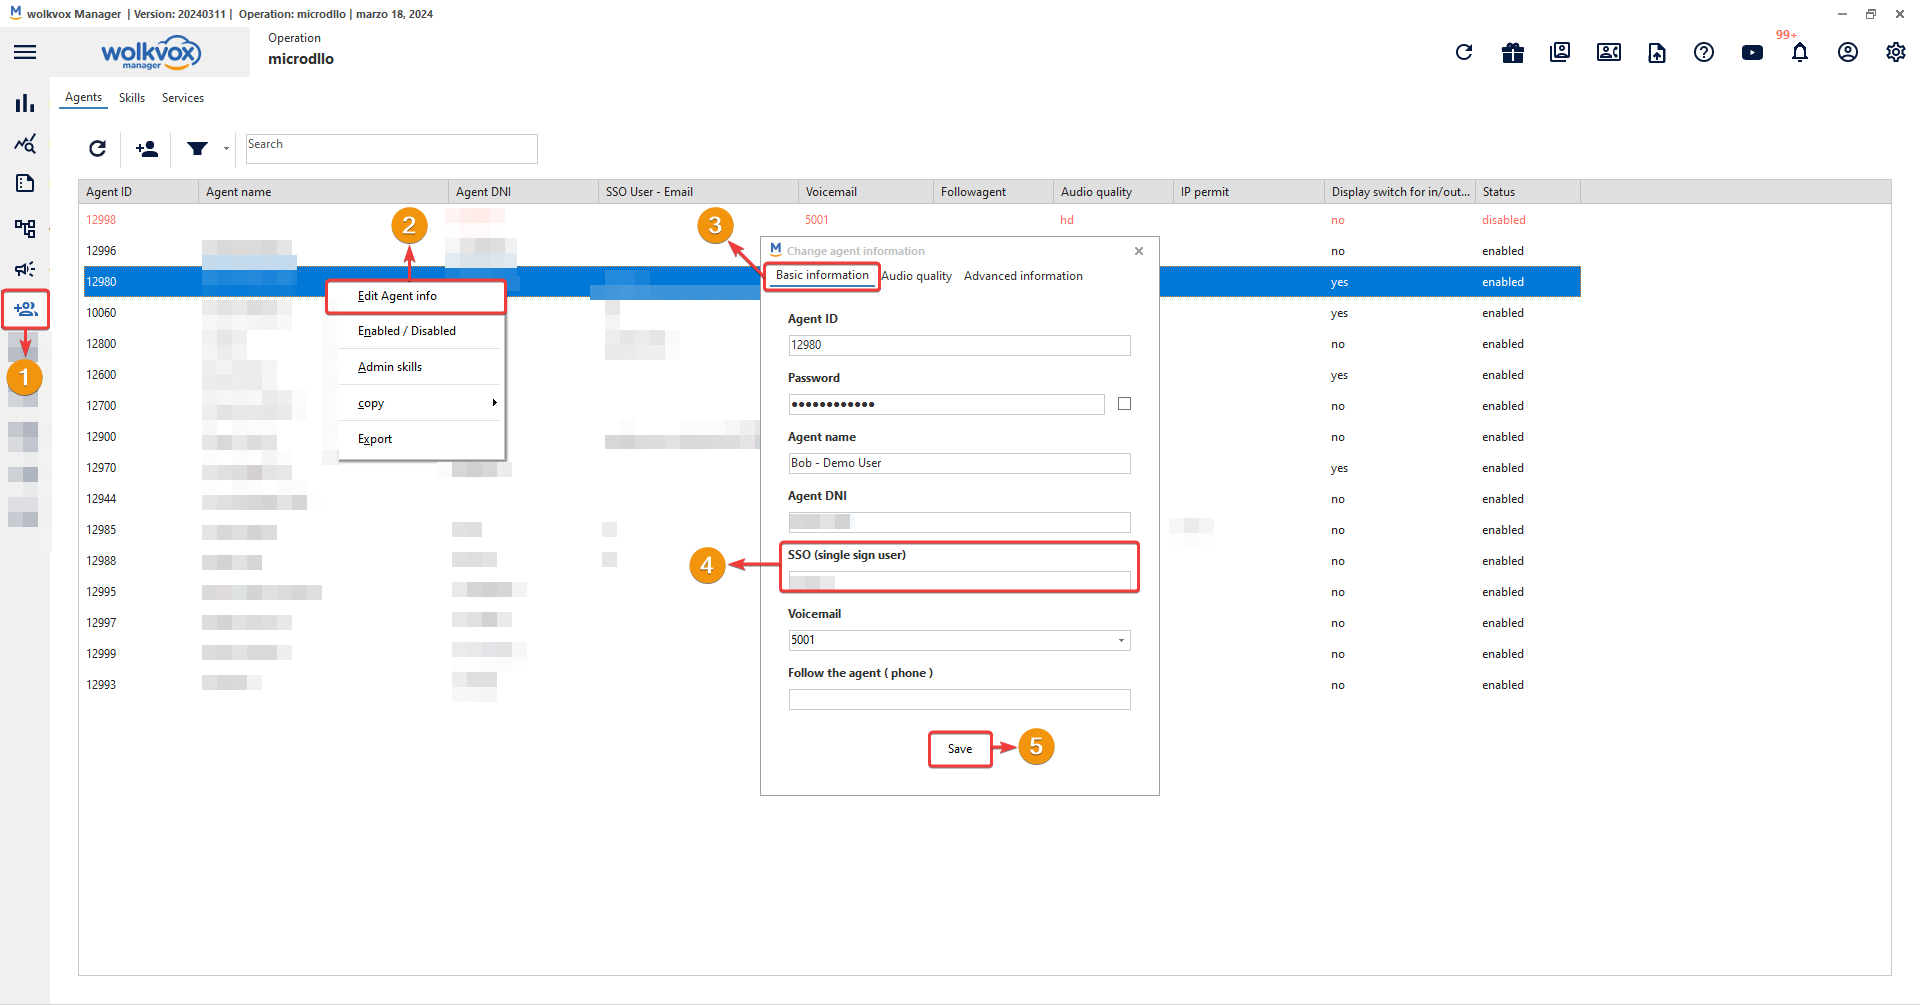
Link agents with Entra ID #
- Go to the “Agents & Skills” section.
- Right-click on the agent to configure and select the option “Edit agent information”.
- Access the “Basic information” tab in the agent configuration window.
- In the “SSO (single sign user)” field, enter the “UserPrincipalName” of Entra ID.
- Click on “Save” to apply the changes.
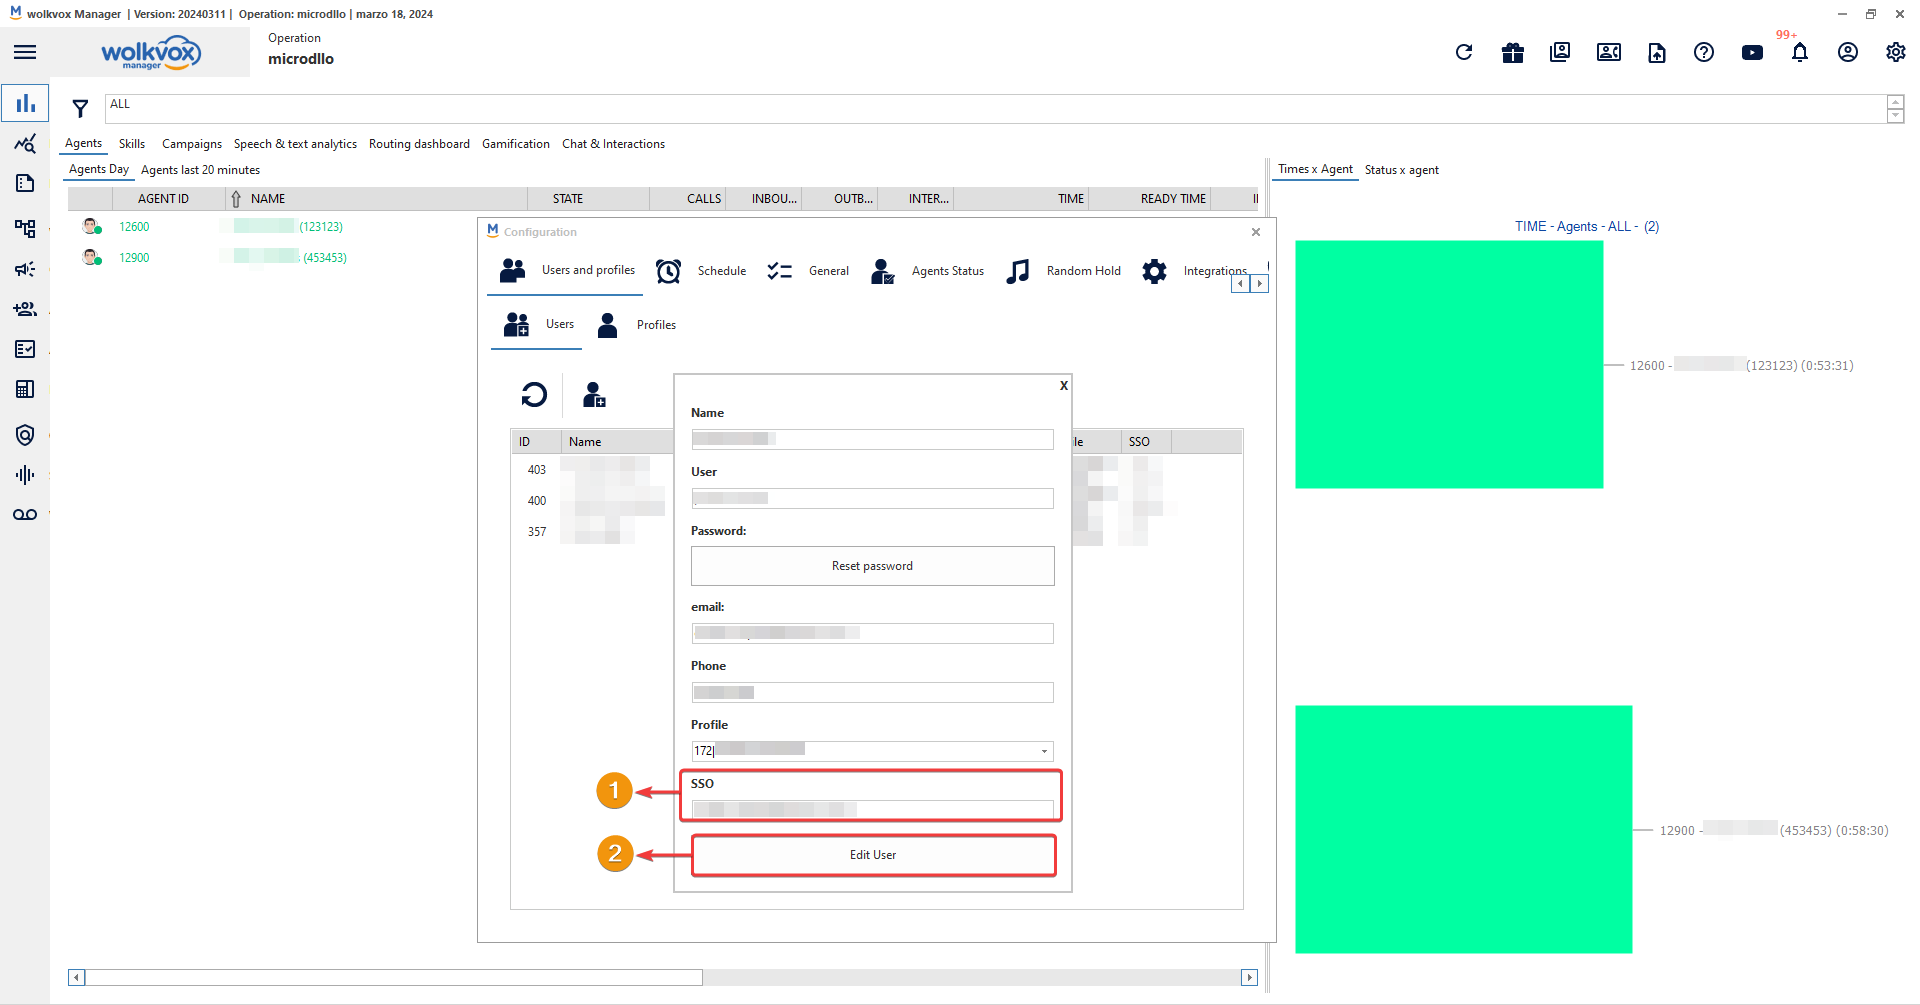
Link Wolkvox Manager users with Entra ID #
- Go to the settings of Wolkvox Manager.
- Navigate to the “Users and Profiles” tab.
- Select the “Users” tab.
- Right-click on the desired user and choose “Edit user”.

- In the ‘SSO (single sign user)’ field, enter the ‘UserPrincipalName’ of Entra ID.
- Click ‘Save’ to apply the changes.
Authentication with Entra ID #
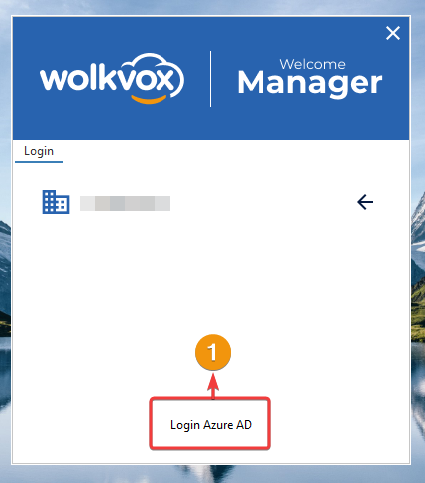
When enabling the Entra ID integration in the wolkvox operation, the “Login Azure AD” button will be enabled to log in using the integrated and configured service. Note: The option to log in with Wolkvox credentials is always enabled. The management and delivery of these credentials to users are the responsibility of the operation. It is possible to associate the “UserPrincipalName” with different users, but this configuration must be done by the operation manager.

Clicking on “Login Azure AD” will open a pop-up window where the user must enter the user credentials that have been configured and authorized in the previously set up Entra ID application.
If the login through Entra ID is successful, the user will be granted access to the Wolkvox application.
Note: Once the service is configured, you will be able to log in to Wolkvox using your Entra ID (Azure AD) credentials. In case errors occur during the login process, such as an incorrect password, invalid user, or authorization issues, you will see an error message indicating the nature of the problem. If you encounter an error during login, you will be given the opportunity to try again using your Wolkvox credentials. This will allow you to resolve any issues and access your account securely.
Setting Entra ID as the sole login method #
If you activate the “Enable single sign-on” checkbox, it will allow access to your operation only through logging in with Entra ID.

As you can see in the following image, the user trying to log in to the operation with the “Enable single sign-on” option activated will only see the “Login Azure AD” option as the sole choice to log in and access the wolkvox tools.