

In this section, databases are uploaded for the operation to work with through predictive, preview, and progressive dialing.
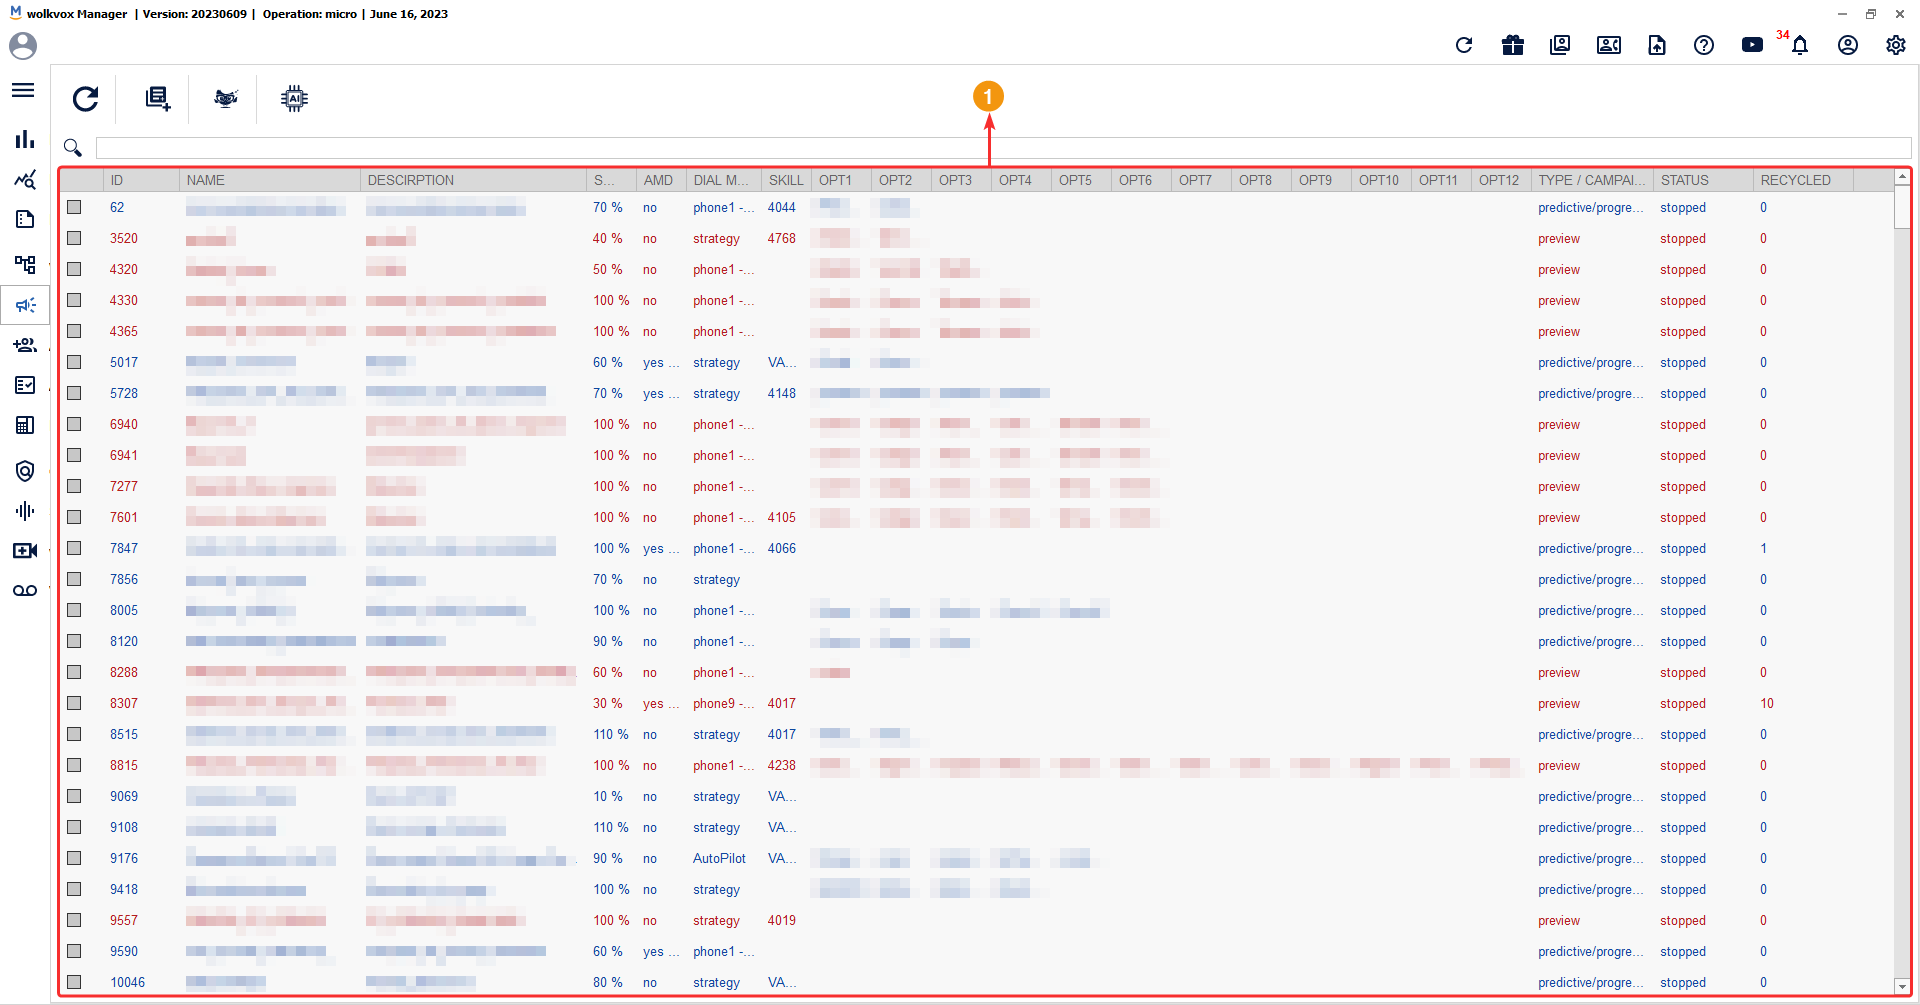
![]() Preview campaigns are identified with the color red, while predictive and progressive campaigns are identified with the color blue.
Preview campaigns are identified with the color red, while predictive and progressive campaigns are identified with the color blue.
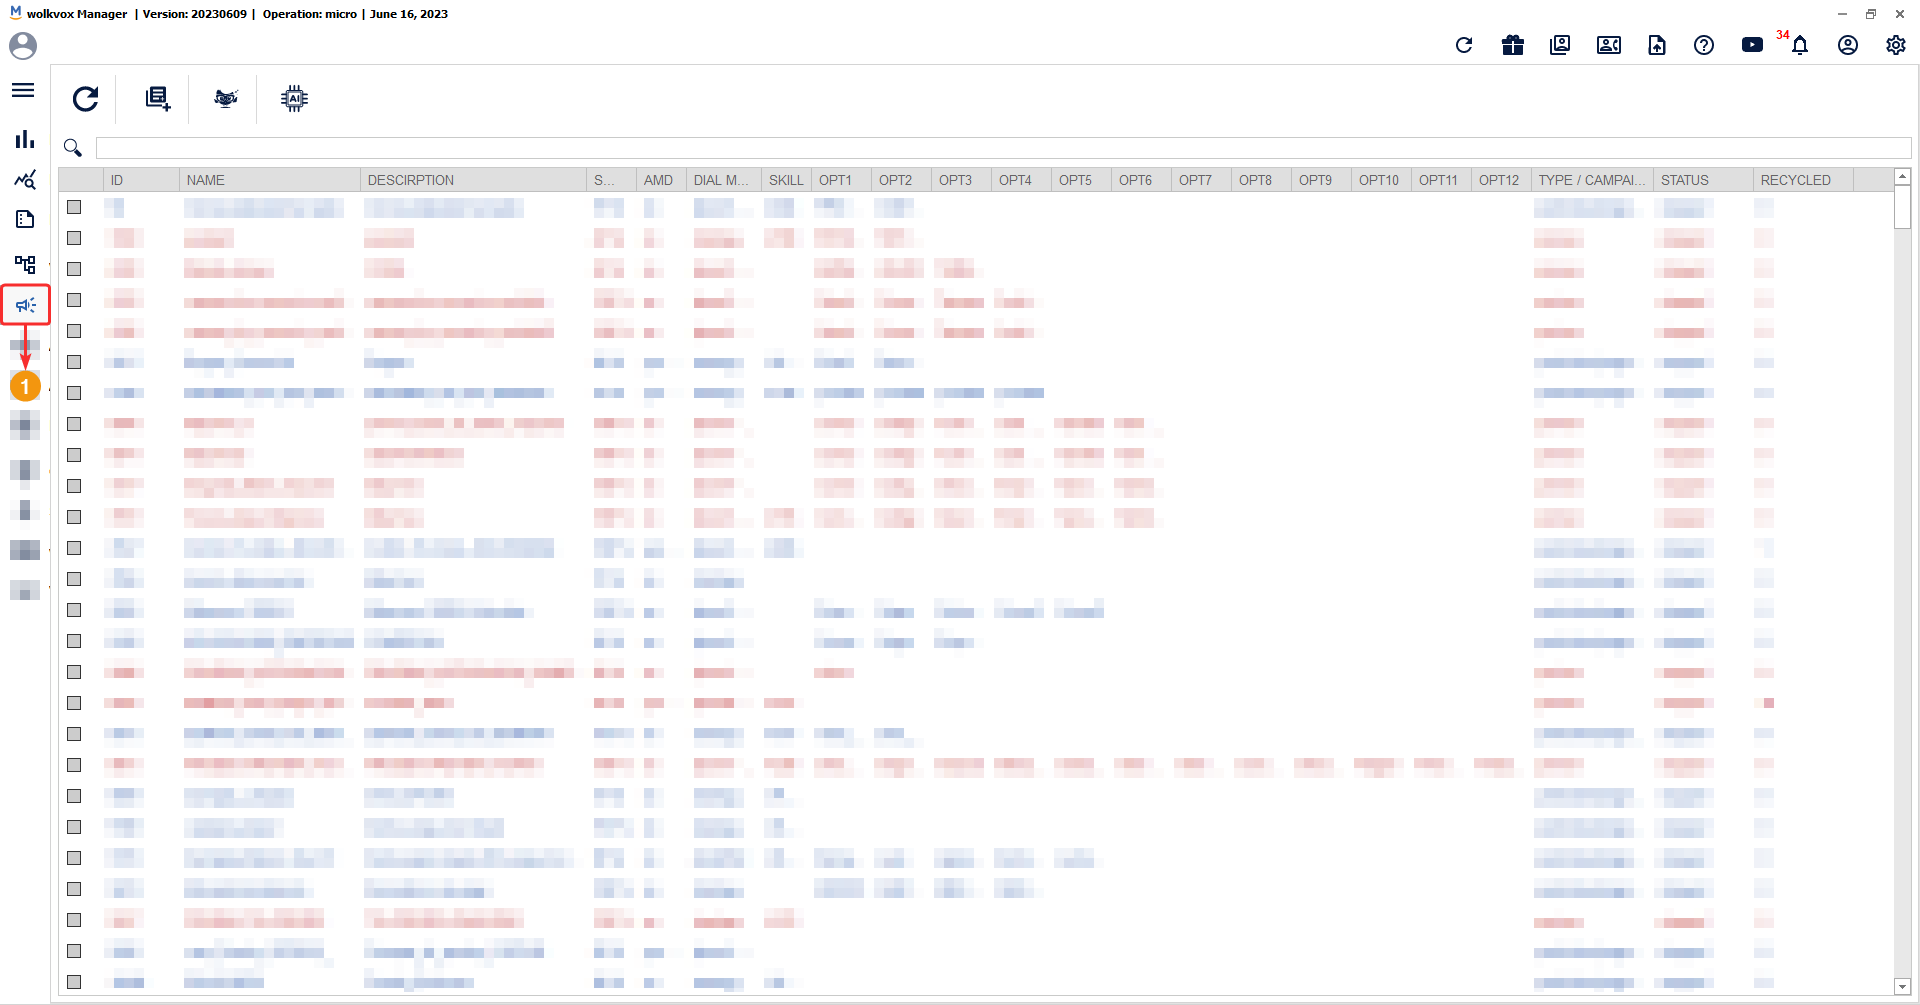
 Create a campaign #
Click on the “Add New Campaign” button, a new window will appear with three tabs, where you must set the campaign parameters.

General campaign configuration #
In the “Campaign” tab, you set general aspects such as:
- Campaign name.
- Campaign description.
- Start time for the campaign to begin operating. To be a valid time, the format should be Hour:Minutes:Seconds (including the colons to separate each time component).
- End time for the campaign to stop operating. To be a valid time, the format should be Hour:Minutes:Seconds (including the colons to separate each time component).
- Agent group that will handle the campaign’s calls.
- Select the campaign type, whether it is predictive, progressive, or preview. Predictive and progressive types are grouped together as they can be configured with the same aspects, while the preview type, being a manual dialing type, has different aspects to configure. When editing a campaign, it is possible to switch it from predictive or progressive to preview, and vice versa.
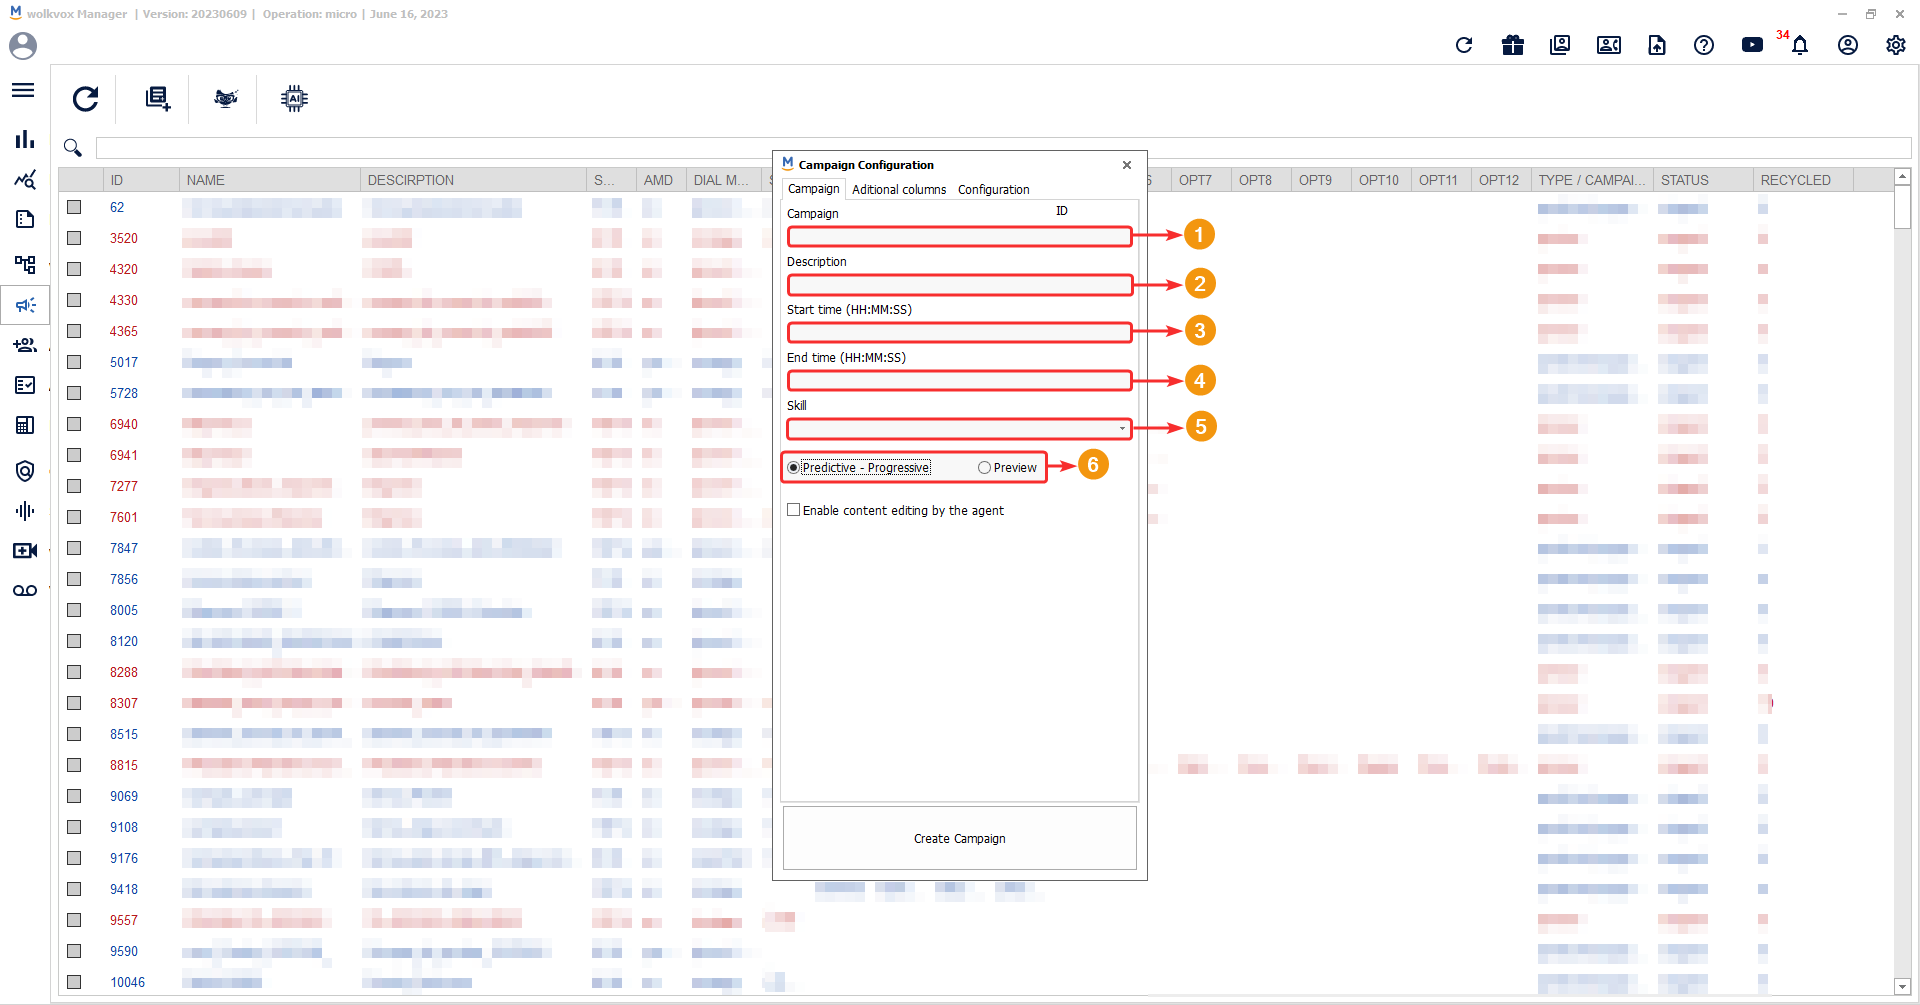
Options for the “Predictive – Progressive” campaign type #
In the “Campaign” tab, you set general aspects such as:
“Enable content editing by the agent”: if this option is enabled, the agent can edit information from the database. This option is available for both preview and progressive campaigns.
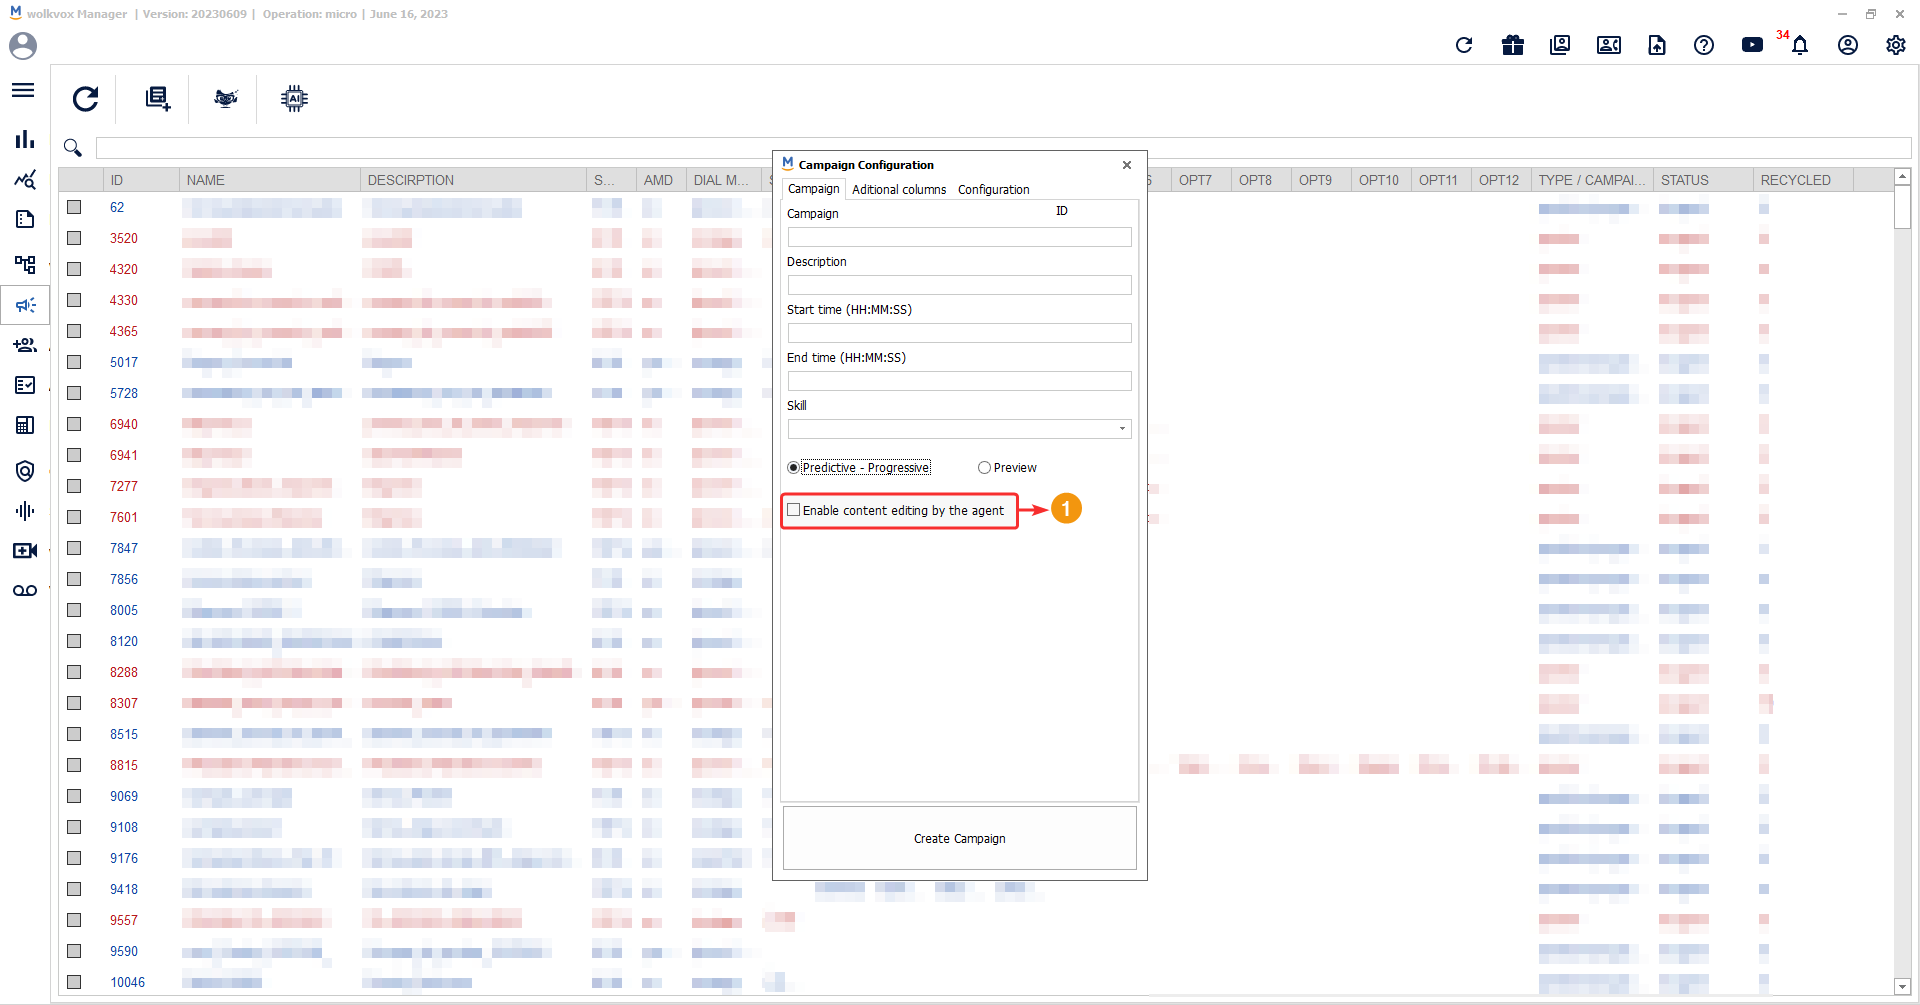
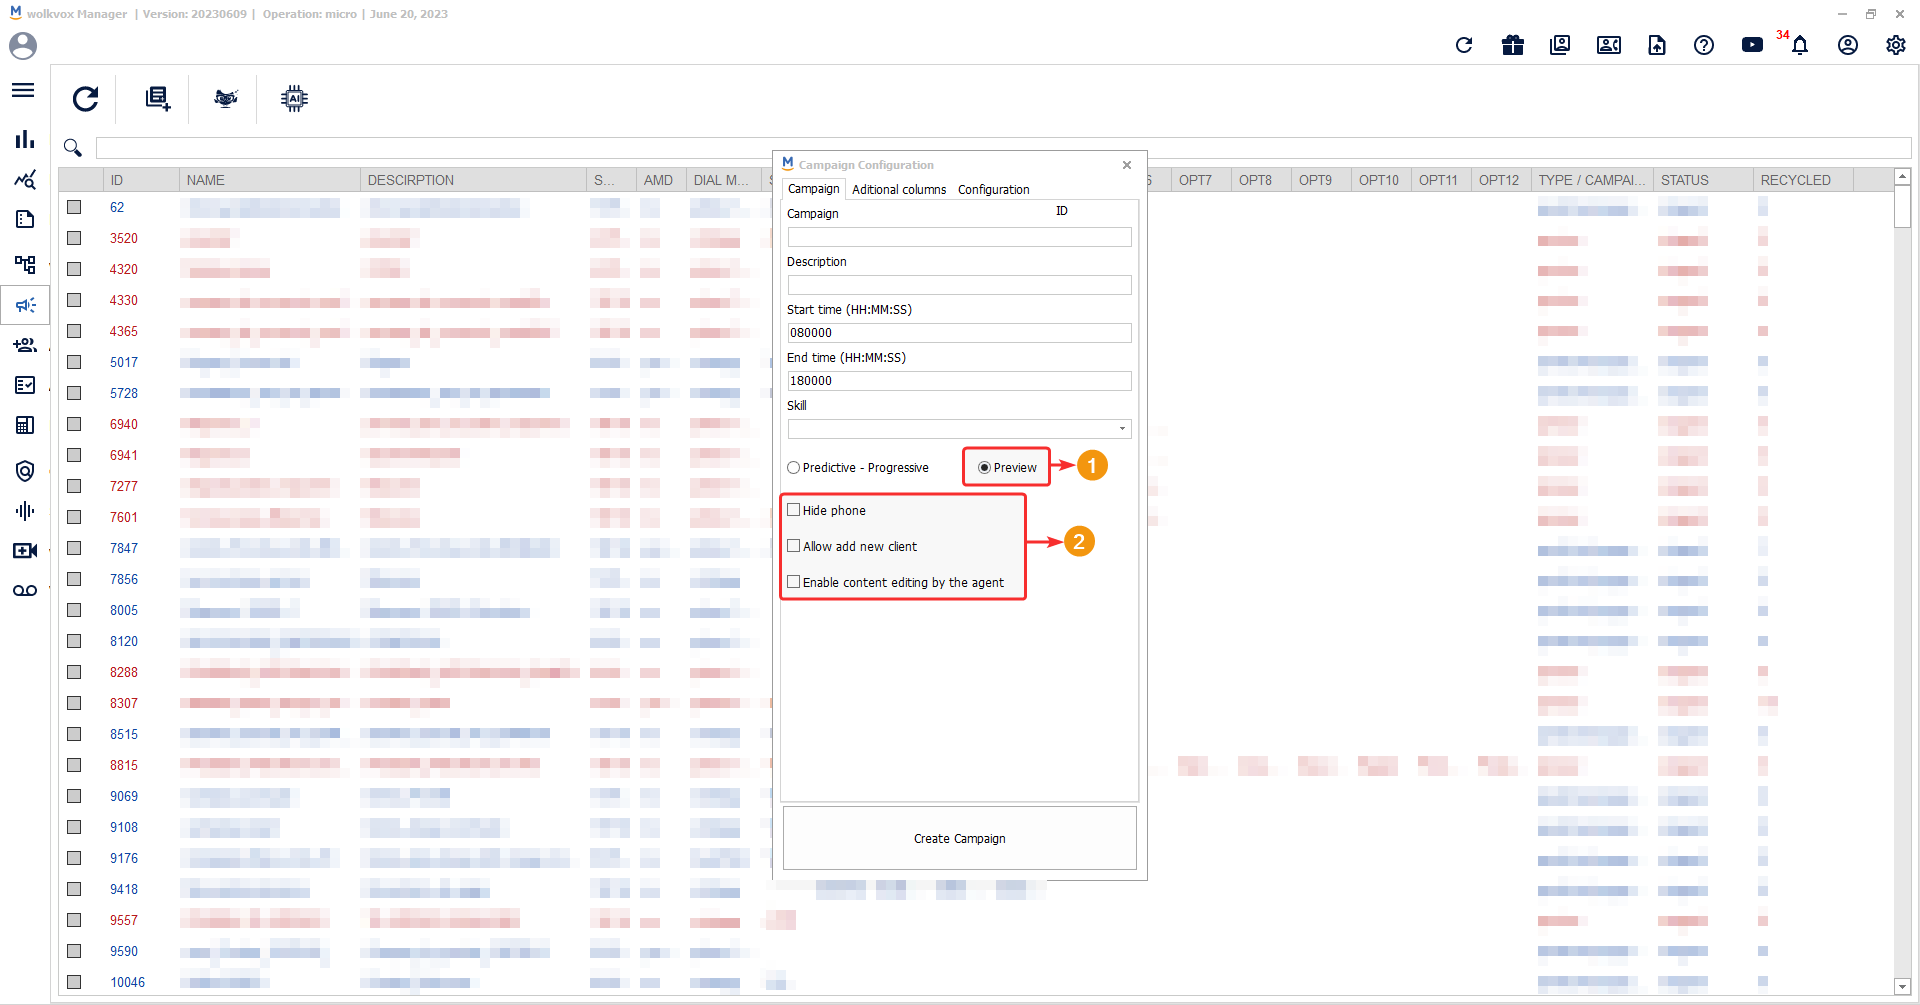
Options for the “Preview” campaign type #
In the “Campaign” tab, you set general aspects such as:
Option to “Enable agent content editing,” where if this option is enabled, the agent can edit information from the database. This option is available for both preview and progressive campaigns.
- Hide phone: By enabling this option, the agent will not be able to view the customer’s phone number.
- Allow add new client: By enabling this option, the agent will be able to add new clients to the campaign’s database.
- Enable content editing: By enabling this option, the agent will be able to edit the contact information of the customer.
Additional Fields Configuration (optional) #
In the “Additional Columns” tab, you can add titles for additional information fields that will be included in the campaign’s database. This option allows you to add up to 12 additional fields in the database.

AMD Configuration #
AMD, or Answer Machine Detection, is a technology that detects when a call is answered by a machine, ensuring the performance of your operation. In this tab, you can configure the following:
- Go to the “Configuration” tab.
- Select the AMD configuration according to the country or leave it as “default” for a general configuration.
- Enable or disable call-back routing. If this option is checked or enabled, agents will not be able to make call-backs.
- “Artif-Inte” option: Allows you to request a new AMD configuration for your country. If you select this option, some fields will appear where you need to add the country you want to add and the phone numbers that will go to voicemail. Subsequently, a member of the Wolkvox support team will contact you to notify the creation of the new AMD configuration.

Fields in the Campaigns Table #
The fields shown in the table are as follows:
- ID: Campaign ID.
- Name: Campaign name.
- Description: Campaign description.
- Speed: Campaign speed.
- AMD: Answer Machine Detection (AMD) status and corresponding action.
- Dial Mode: Dialing mode for the campaign.
- Skill: Agent group or queue assigned to the campaign.
- Opt1, Opt2, Opt3, Opt4, Opt5, Opt6, Opt7, Opt8, Opt9, Opt10, Opt11, Opt12: Optional fields in the campaign database.
- Type/Campaign: Campaign type.
- Status: Campaign status (running or stopped).
Predictive – Progressive Dialing Campaigns #
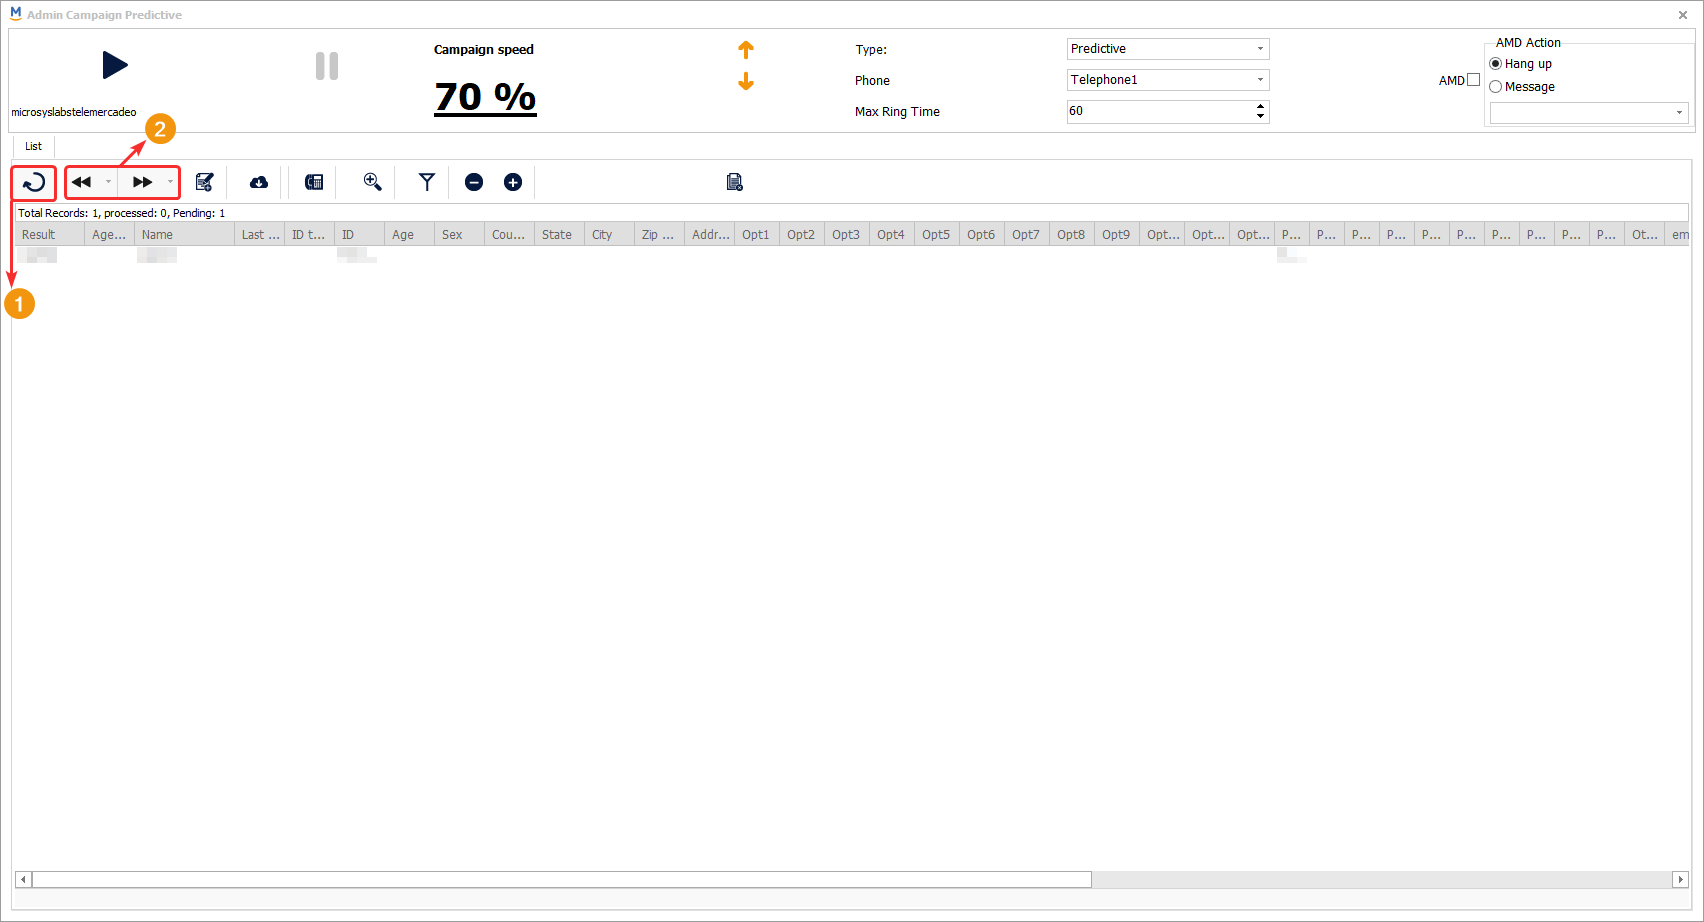
These types of campaigns are characterized by automatic dialing. In this type of campaign, unlike preview campaigns, agents cannot manually call customers from the database. Instead, the intelligent system automatically makes the calls based on the assigned configuration. To access the administration panel for this type of campaign, right-click on the desired campaign and select the “Admin Predictive” option. A new window will open, similar to the one shown below:
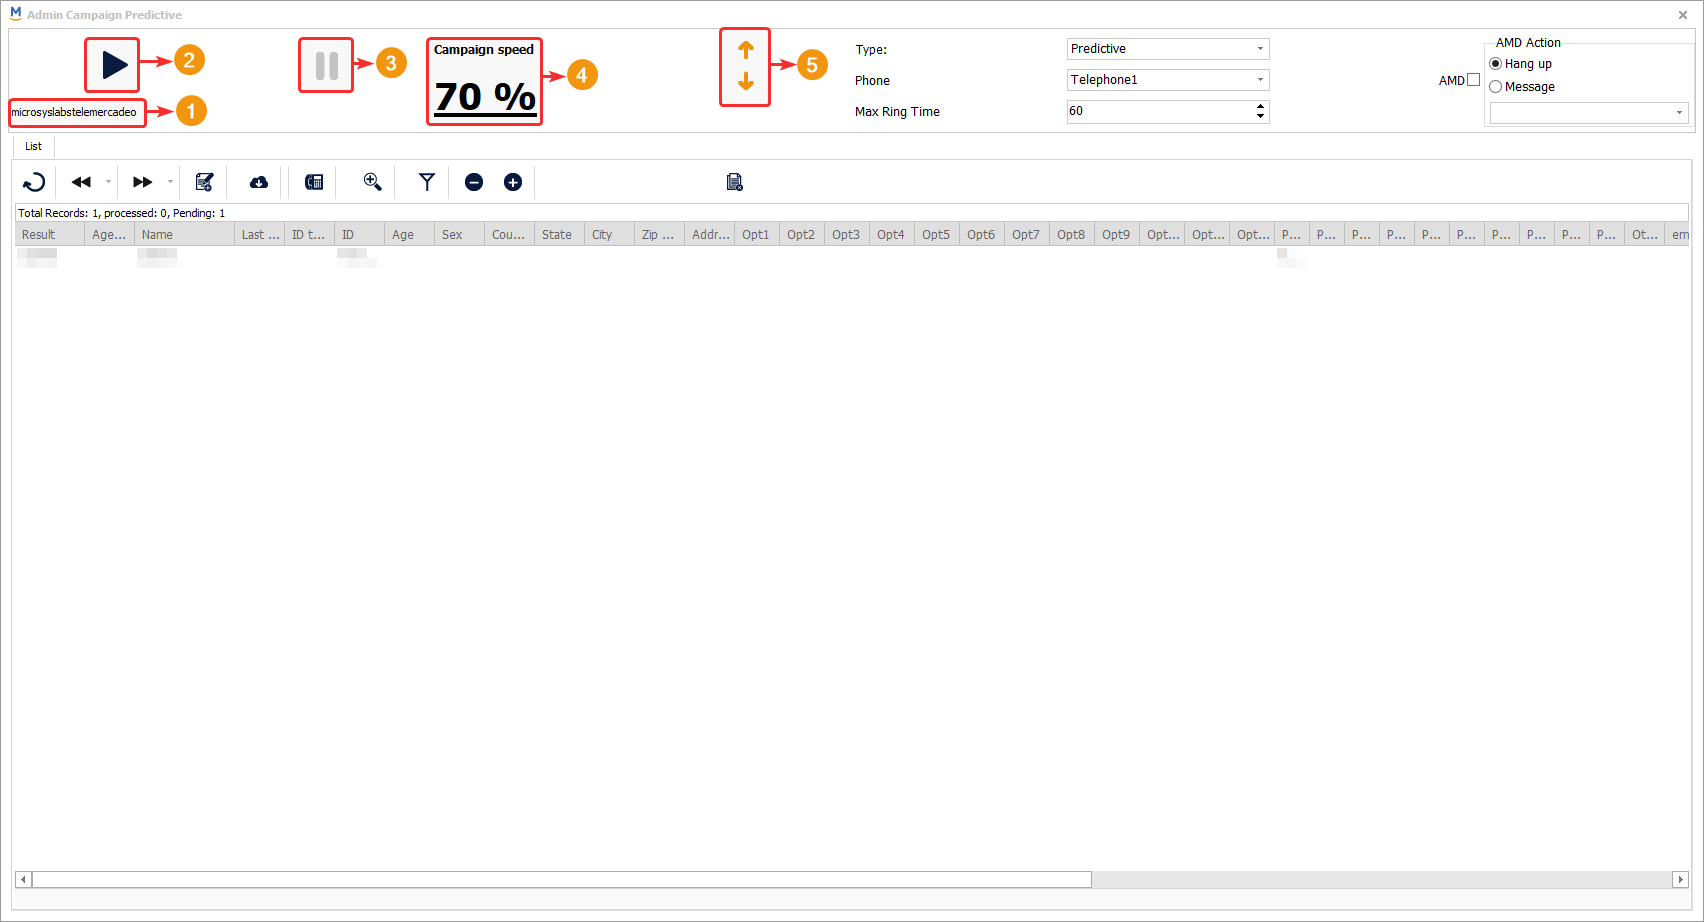
- Identify the campaign you are managing.
- With this button, you can start the campaign if it has not started or is paused.
- With this button, you can pause the campaign.
- Identify the speed at which the campaign is operating.
- You can increase or decrease the campaign speed using the arrows.
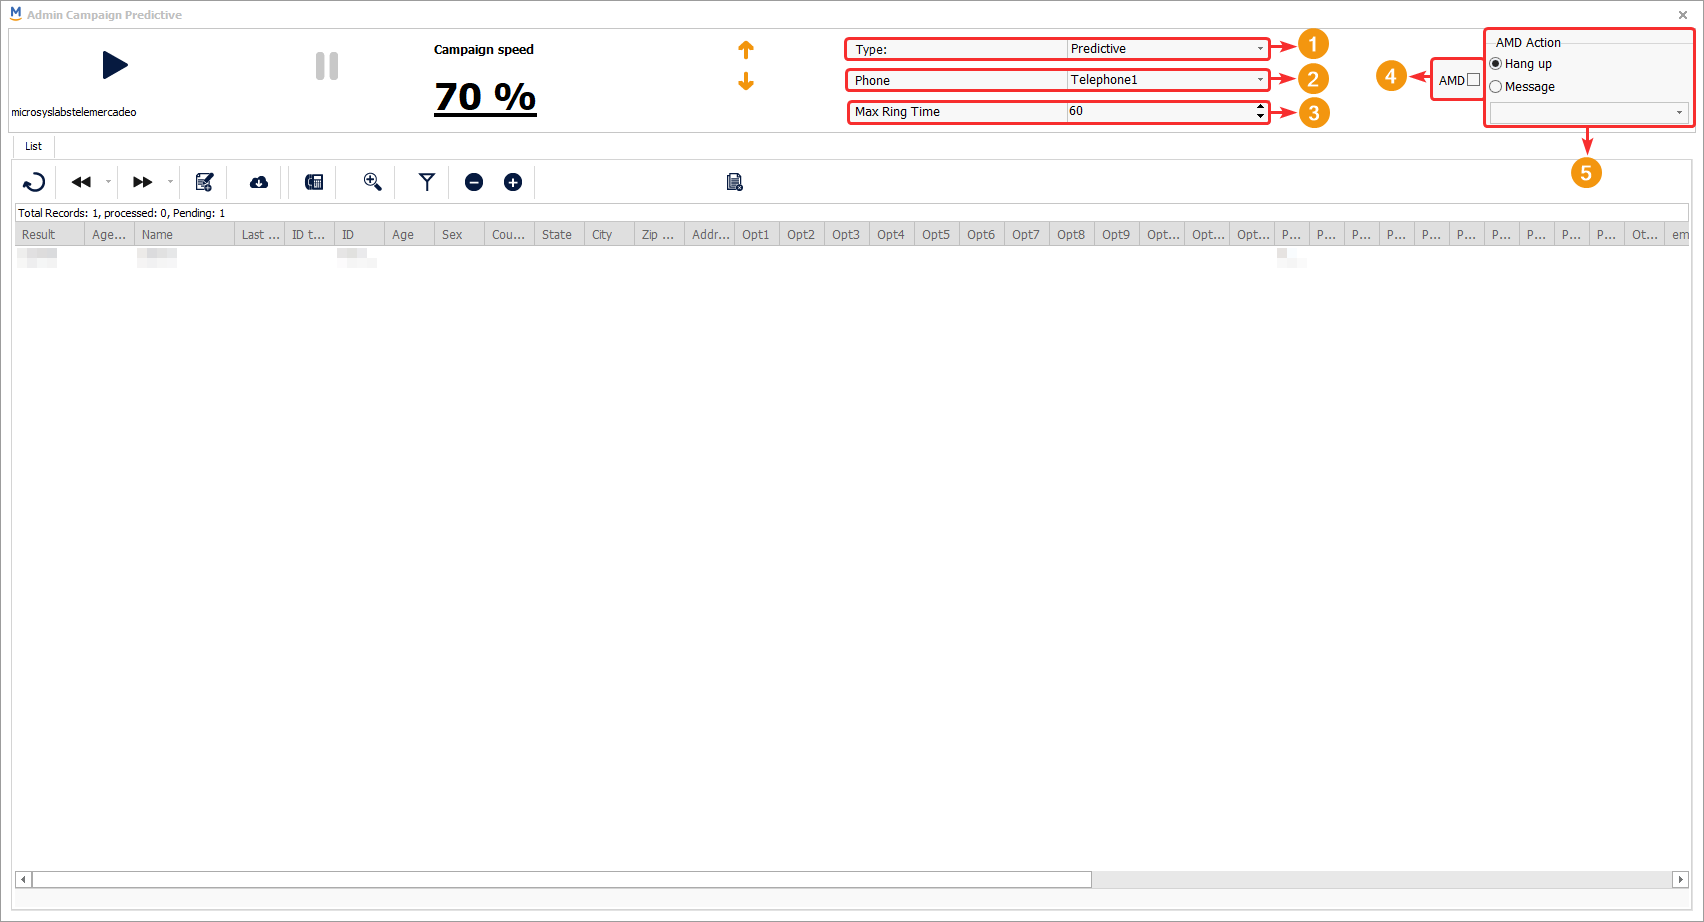
Continue with the following campaign configuration:
- Select the type of dialing, either predictive or progressive.
- Choose a dialing strategy. If you select any of the “Telephone” options, ranging from 1 to 10, the system will dial the phone number found in that field of the database. If you choose “Autopilot,” a new window will open where you must configure a series of parameters for this automatic dialing. Finally, you can select the “Strategy” option, which allows you to create an omnichannel dialing strategy.
- Set a maximum ring time, which is the maximum waiting time before hanging up if the customer does not answer.
- Enable or disable the AMD (Answer Machine Detection) technology. This service allows you to set parameters for when a machine answers the customer’s telephone number.
- Configure the AMD technology parameters in the campaign.
- Reload the campaign’s database.
- Navigate through the pages of the database if it contains many records.
The database for predictive and progressive campaigns contains the following fields:
- Result: Call outcome. This column is only available when the agent has already contacted the client.
- Agent code: Agent’s extension number.
- Name: Client’s first name.
- Last Name: Client’s last name.
- ID Type: Client’s identification type.
- ID: Client’s identification number.
- Age: Client’s age.
- Sex: Client’s gender.
- Country: Client’s country location.
- Department: Client’s department location.
- City: Client’s city location.
- Zone: Client’s residential zone.
- Address: Client’s residential address.
- Opt1, Opt2, Opt3, Opt4, Opt5, Opt6, Opt7, Opt8, Opt9, Opt10, Opt11, Opt12: Additional information fields about the client in the database.
- Tel1, Tel2, Tel3, Tel4, Tel5, Tel6, Tel7, Tel8, Tel9, Tel10: Client’s phone numbers.
- Other tel: Additional phone number.
- Email: Client’s email address.
- Date call: Date when the call was made.
- Total calls: Number of times the client was called.
- ID Call: Call identification number.
- Cod1: Activity code #1 that the client assigned to the call.
- Desc1: Description of activity code #1 used by the agent.
- Cod2: Activity code #2 assigned by the client to the call.
- Desc2: Description of activity code #2 used by the agent.
- Comments: Comments left by the agent.
- Date Recall: Date of the recall.
- Total Recalls: Total number of recall attempts.
- Telephone Recall: Phone number used for the recall.

Upload customer list to the database (Predictive or Progressive campaign) #
Requeriments to consider #
List separator configuration #
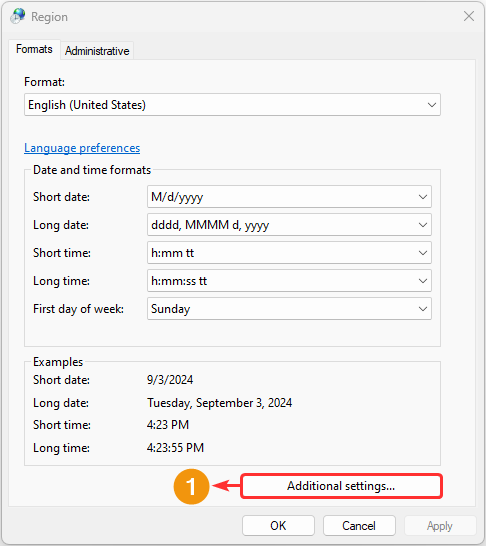
First, ensure that the bulk import of customer lists into a campaign is error-free. To achieve this, it’s essential to correctly verify and configure the Windows regional settings. This procedure ensures that numerical data, dates, and other formats are correctly interpreted by the software. To access the regional settings window, follow these steps:
- Go to “Start”.
- Type “Control Panel” in the search bar.
- If the search is successful, click on the “Control Panel” button, which is a system app.
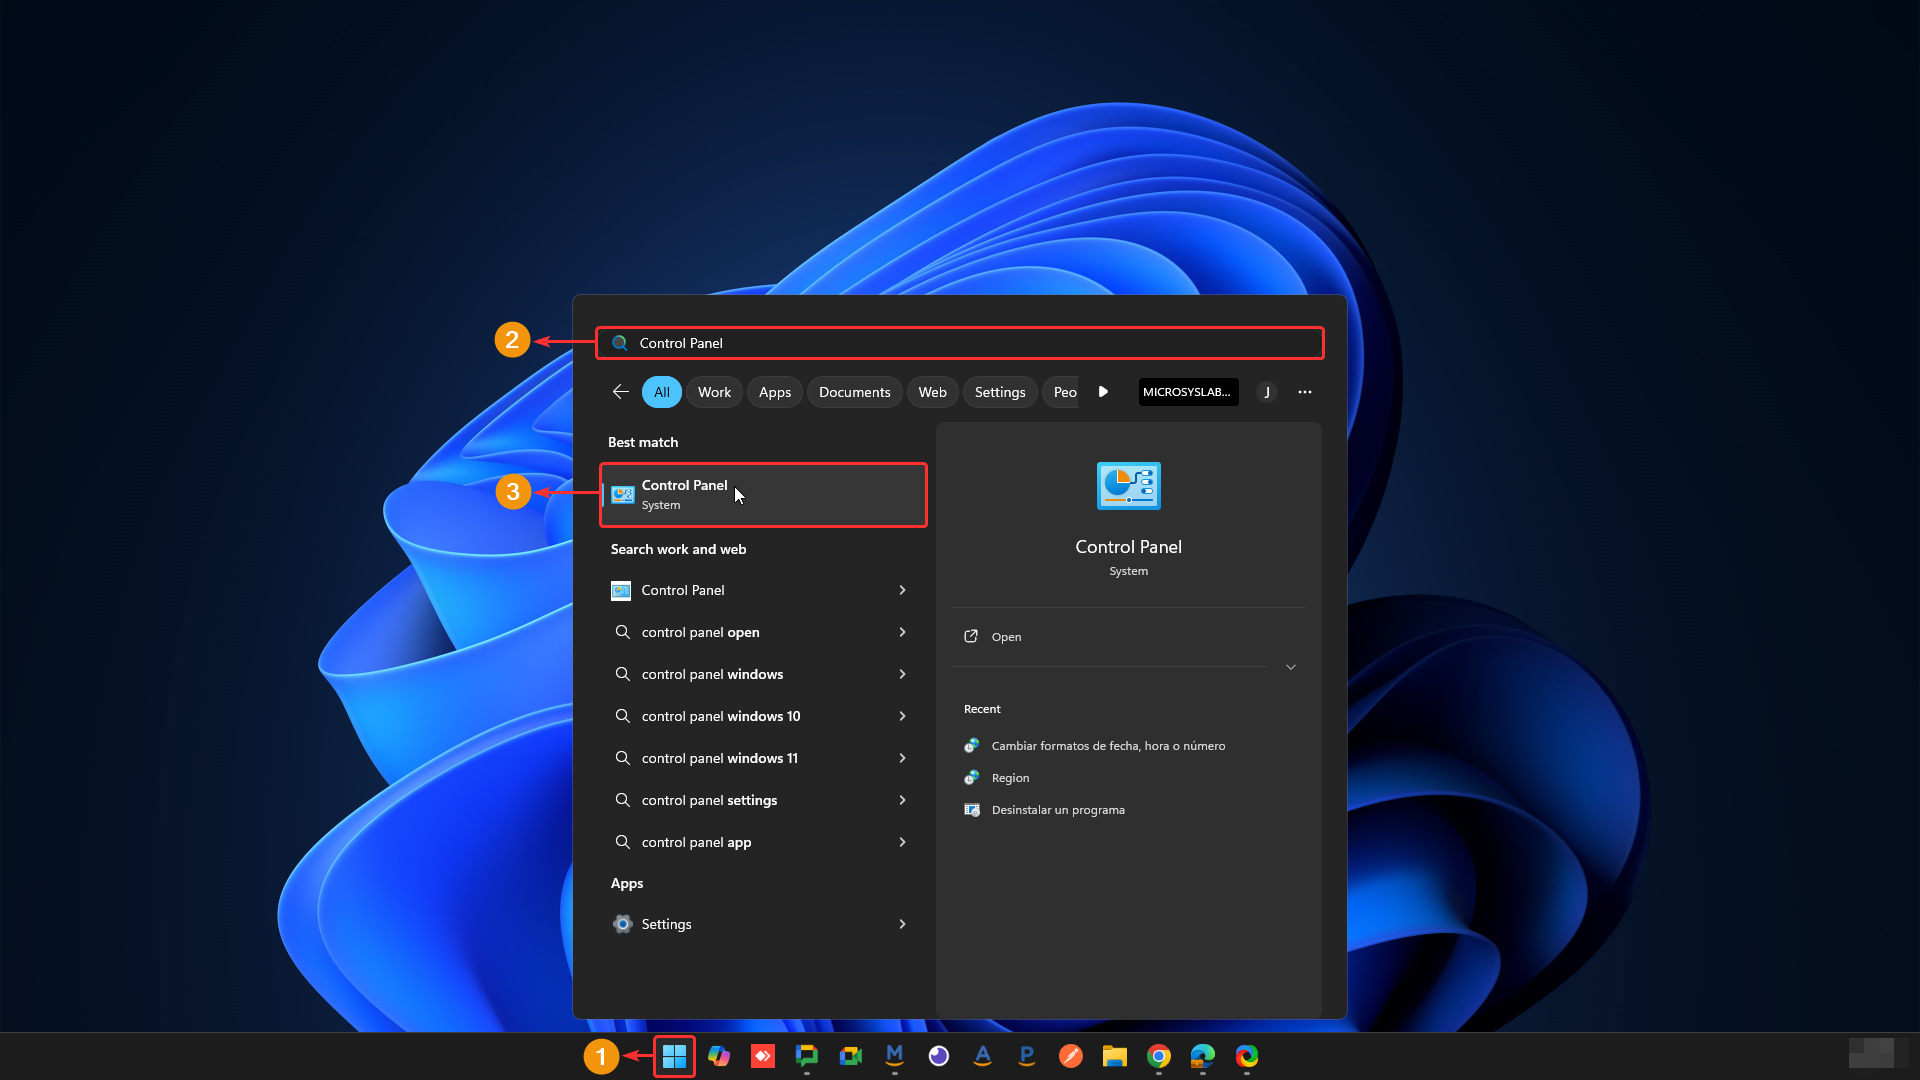
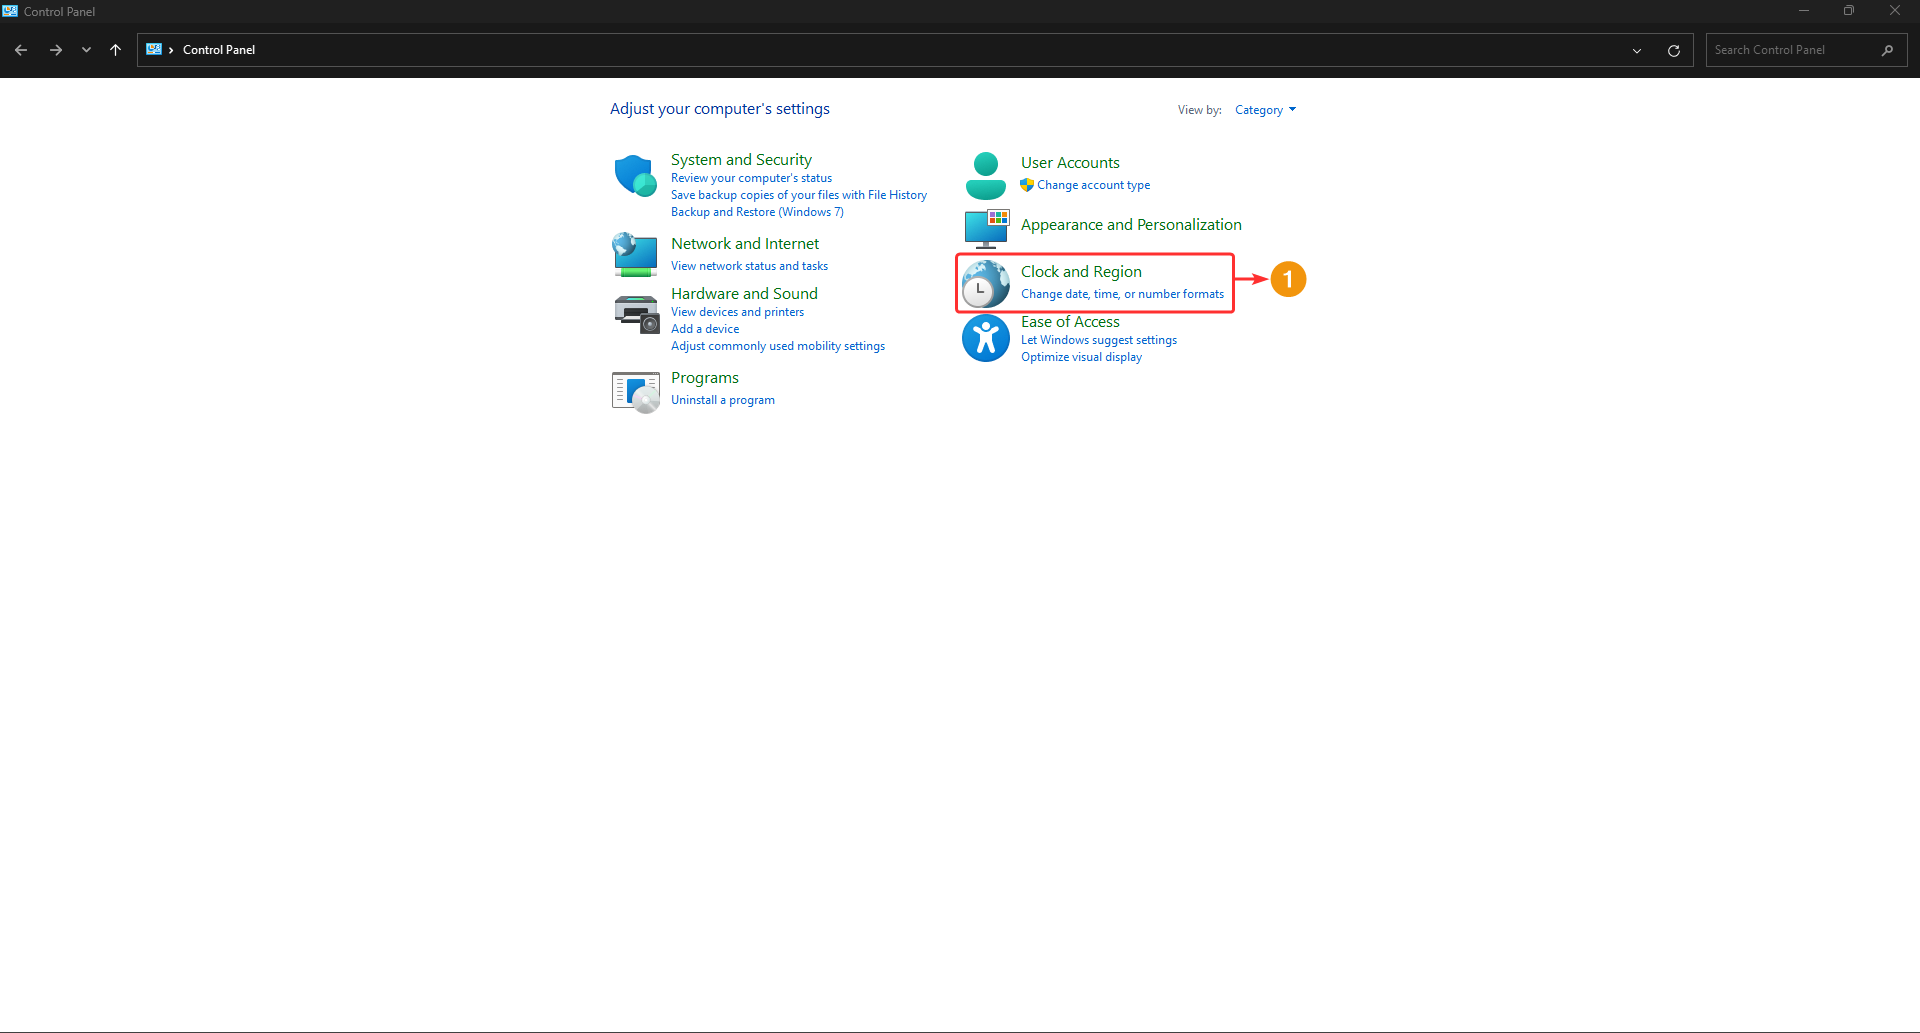
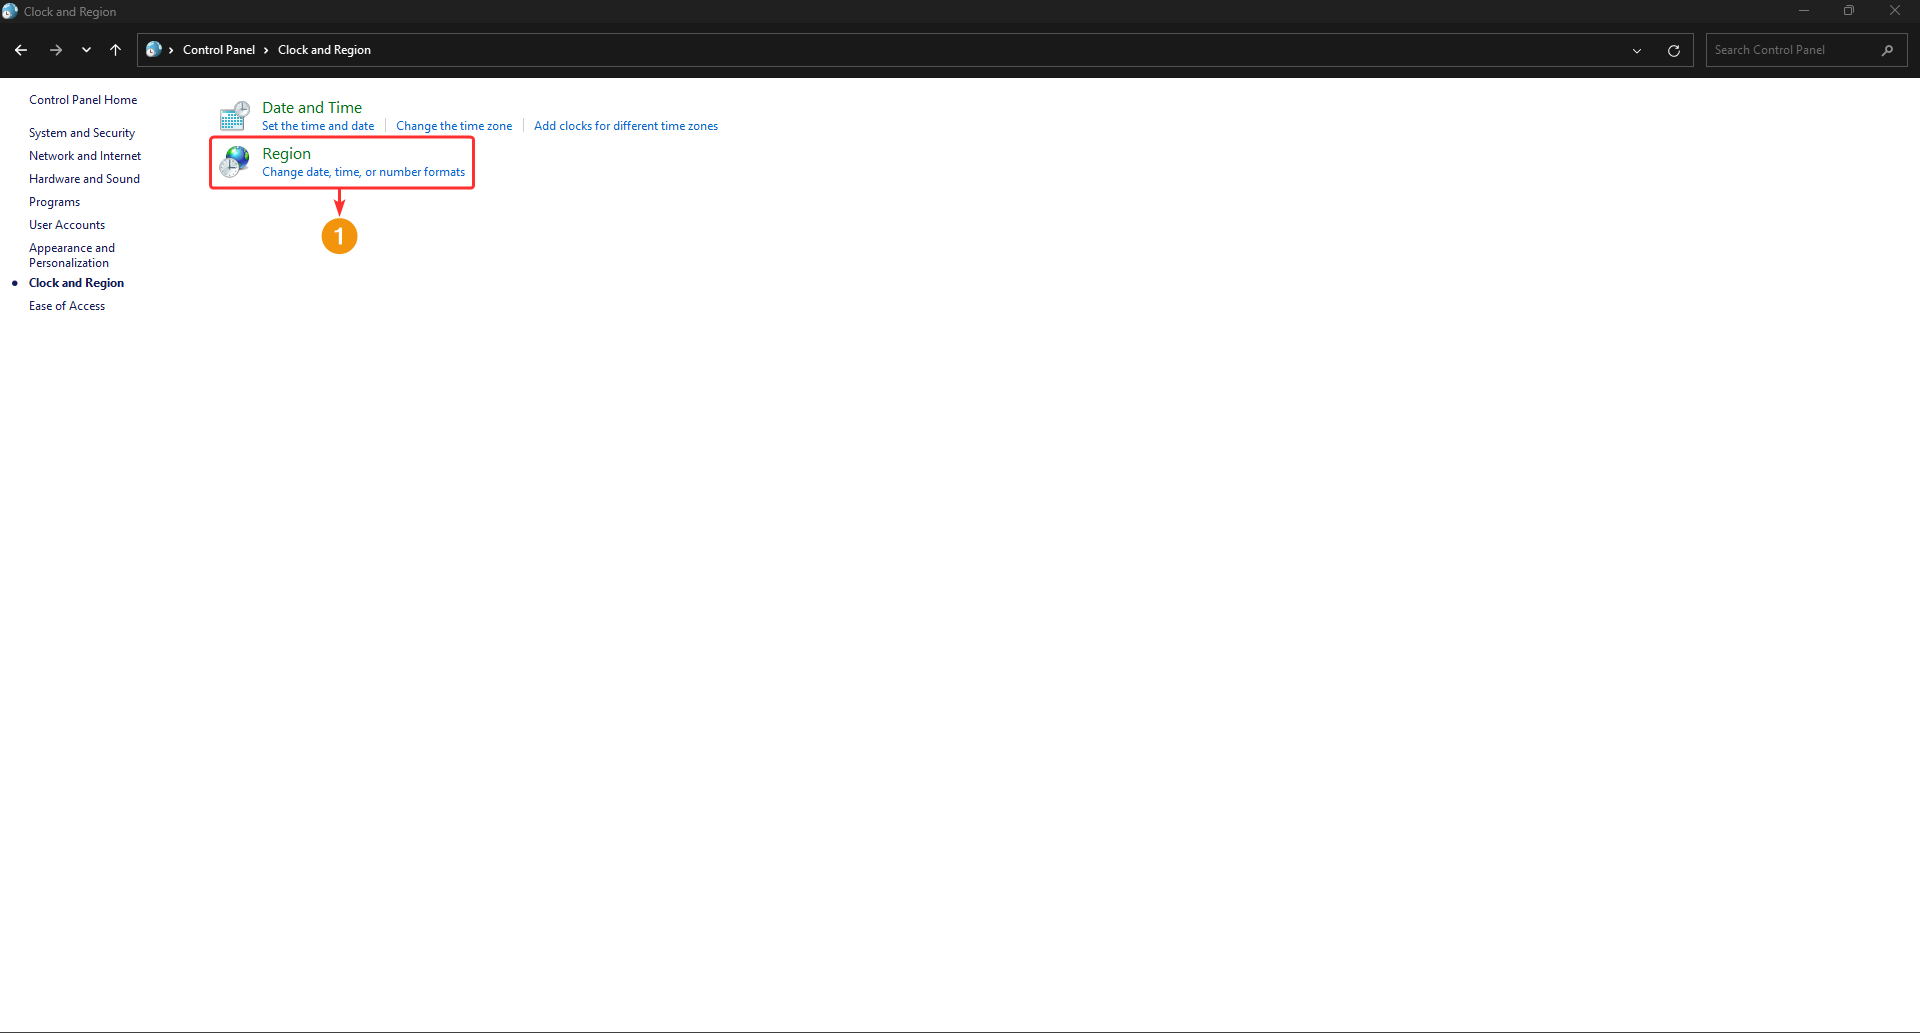
Within the Windows “Control Panel,” you need to go to the “Clock and Region” option. You can also click directly on “Change date, time, or number formats” to quickly open the settings window.
Click on the “Region” button.
In the “Region” settings window, click on the “Additional settings” button.
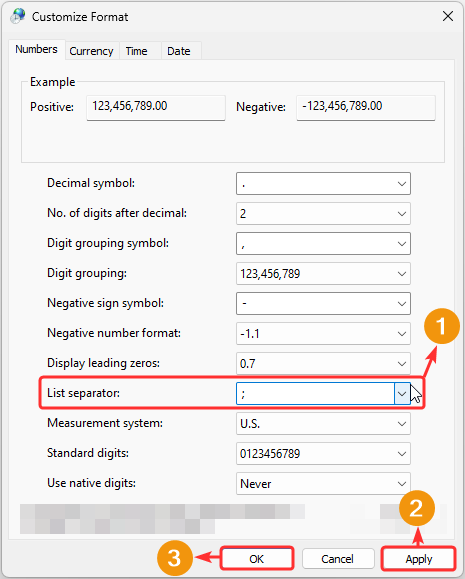
Within the “Numbers” tab, configure the following:
- In the “List separator” option, select the semicolon “;”. If the semicolon is not listed as an option, you can type it in manually.
- Click on “Apply”.
- Click on “OK”.
Empty Cell Verification #
Ensure the quality of data imported into Wolkvox Manager by removing empty cells from the template before uploading it. The presence of empty cells can cause import errors and affect data accuracy.
- Identify Empty Cells:
- Visually inspect the spreadsheet to locate cells that do not contain any data.
- Use the spreadsheet’s search function to find empty cells. In Excel, you can use the “Find & Select” option to locate blank cells.
- Select All Empty Cells:
- Method 1: Manual Selection.
- Click on the first empty cell and drag the cursor to the last empty cell to select them all.
- Method 2: Use the Search Function.
- In Excel, use the “Find & Select” option to automatically find and select all blank cells.
- Delete the Empty Cells.
- Press the “Delete” key on your keyboard. This will remove the content of the selected cells but will not delete entire rows or columns.
- Method 1: Manual Selection.
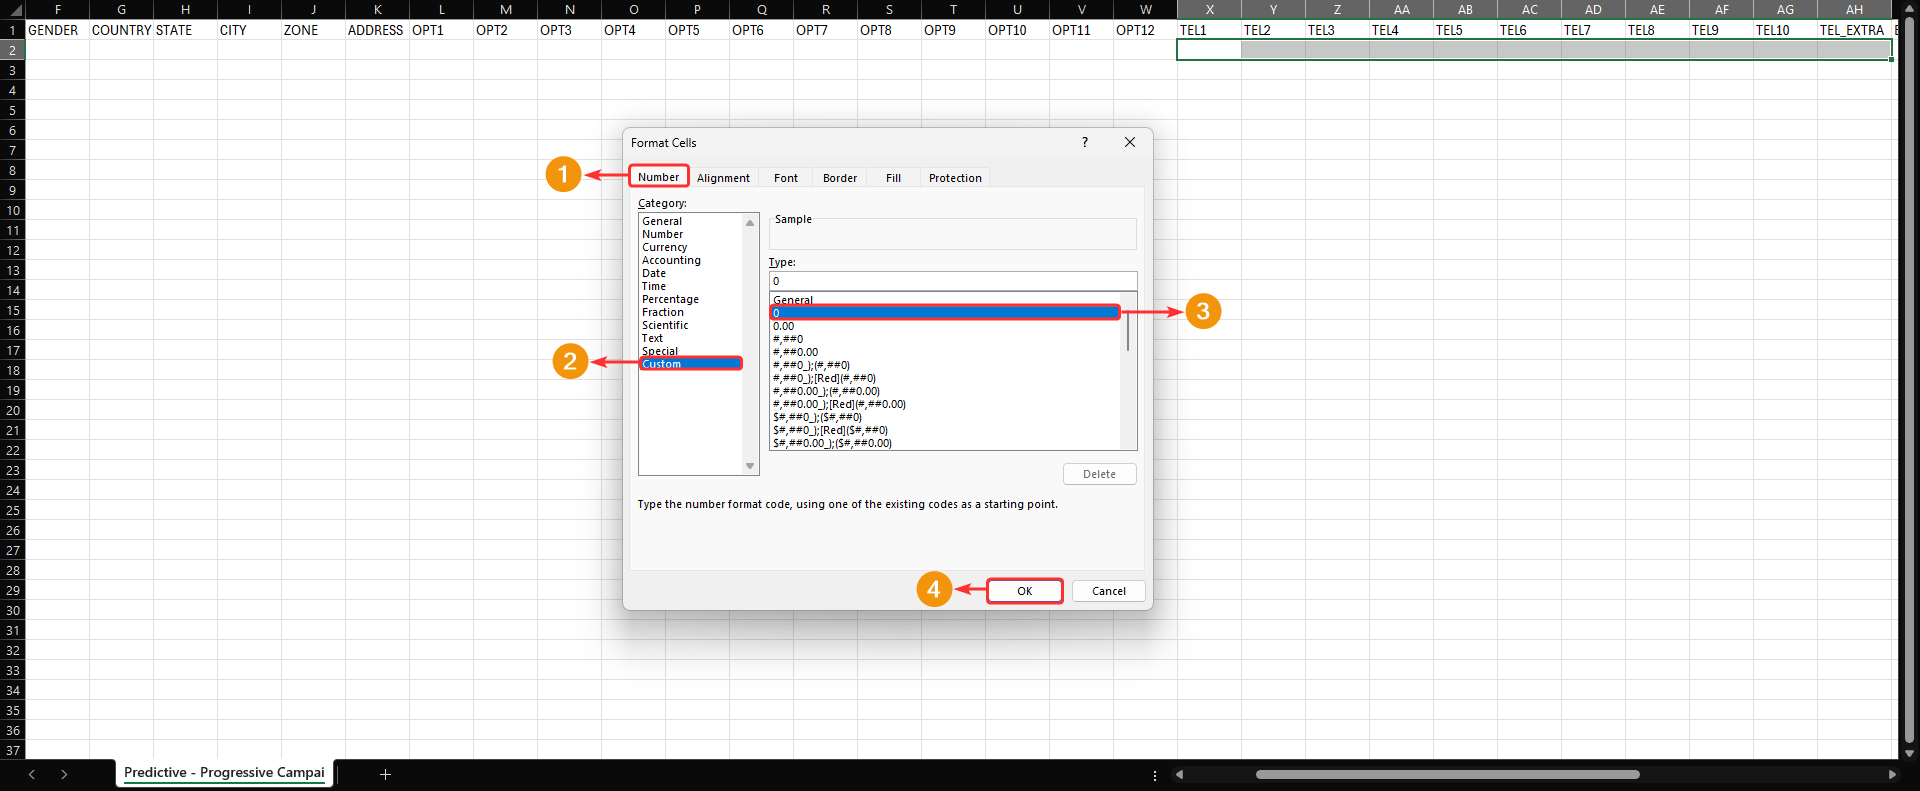
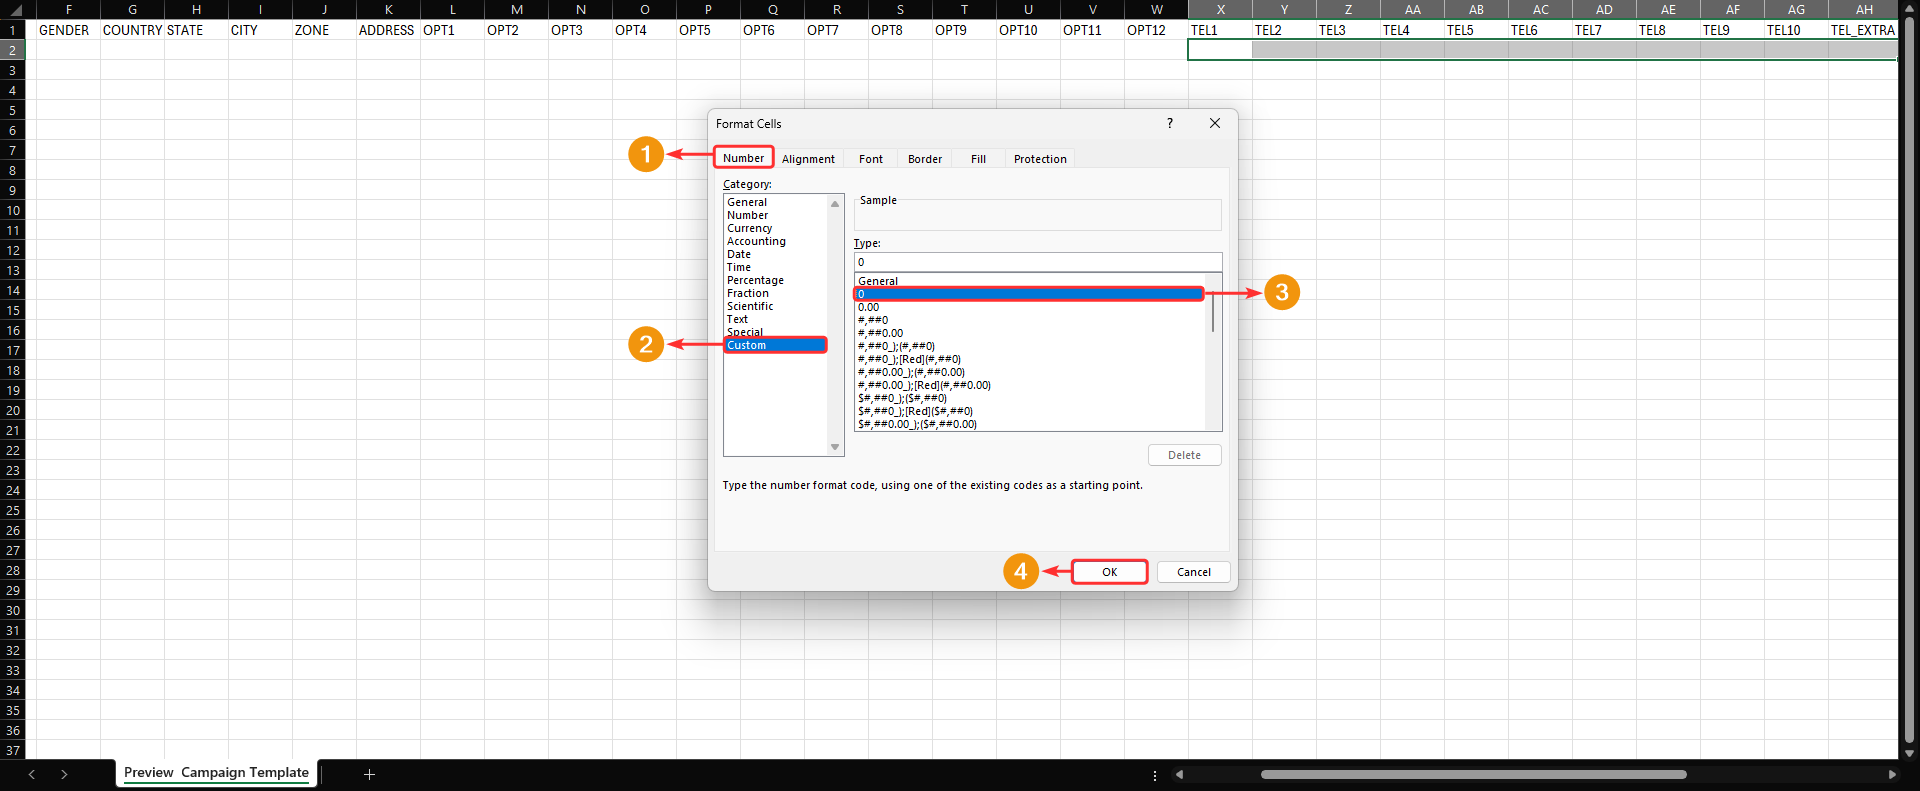
Phone Number Cell Format Configuration #
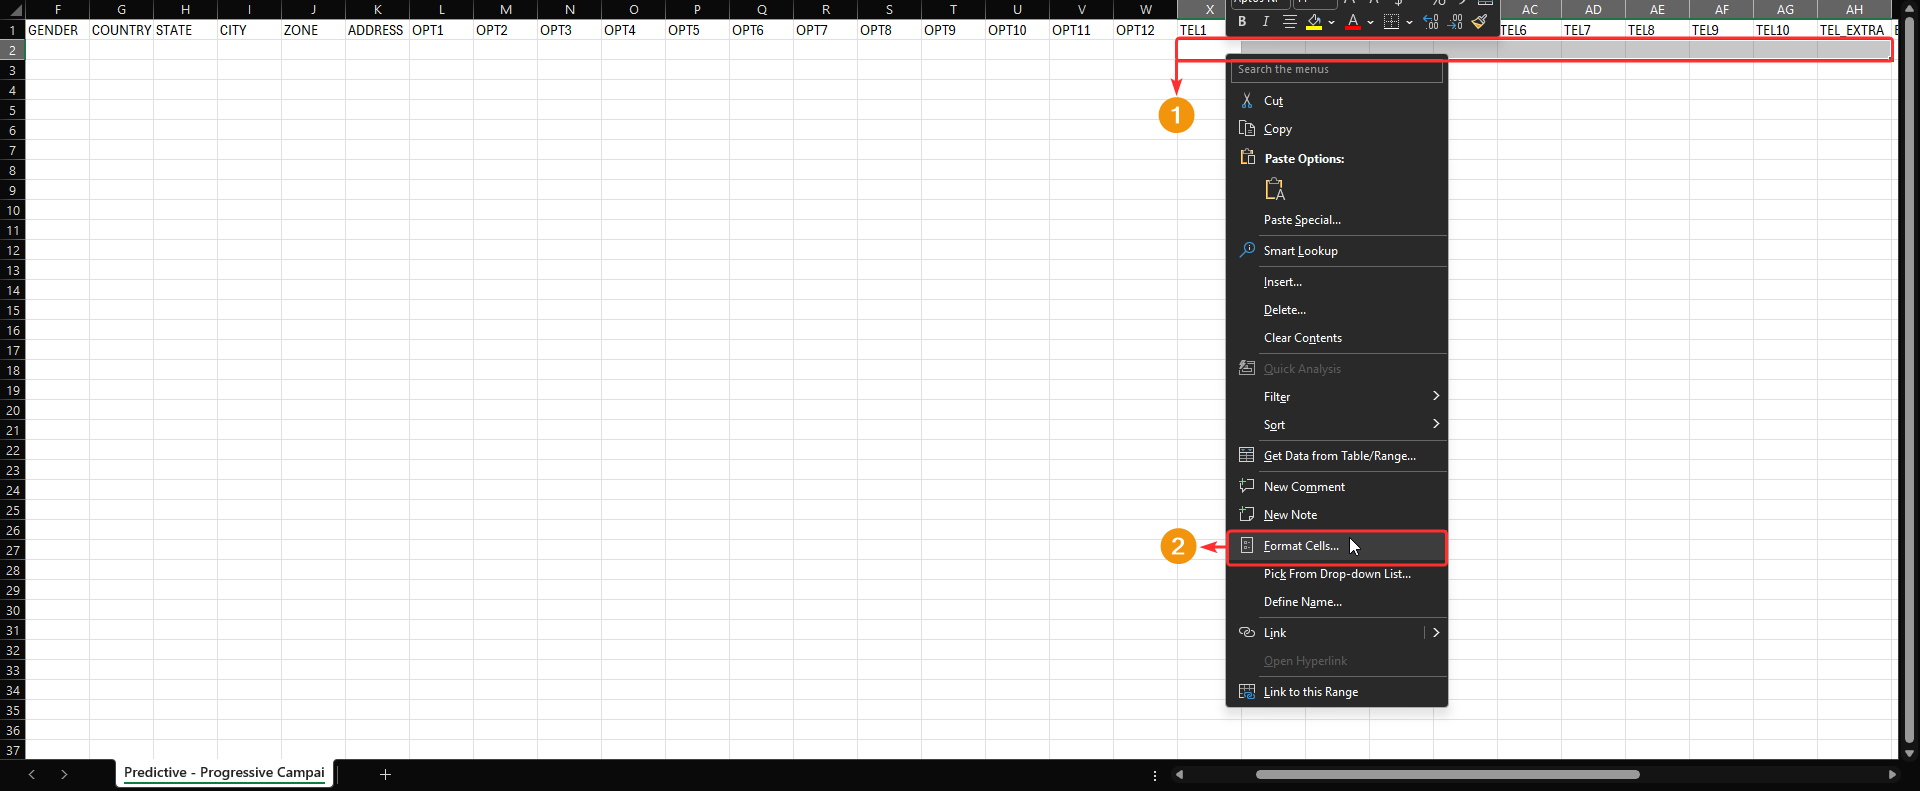
- In the “Format Cells” window, go to the “Number” tab.
- Select the “Custom” category.
- Choose the zero format “0” without decimals.
- Click “OK” to apply the changes.
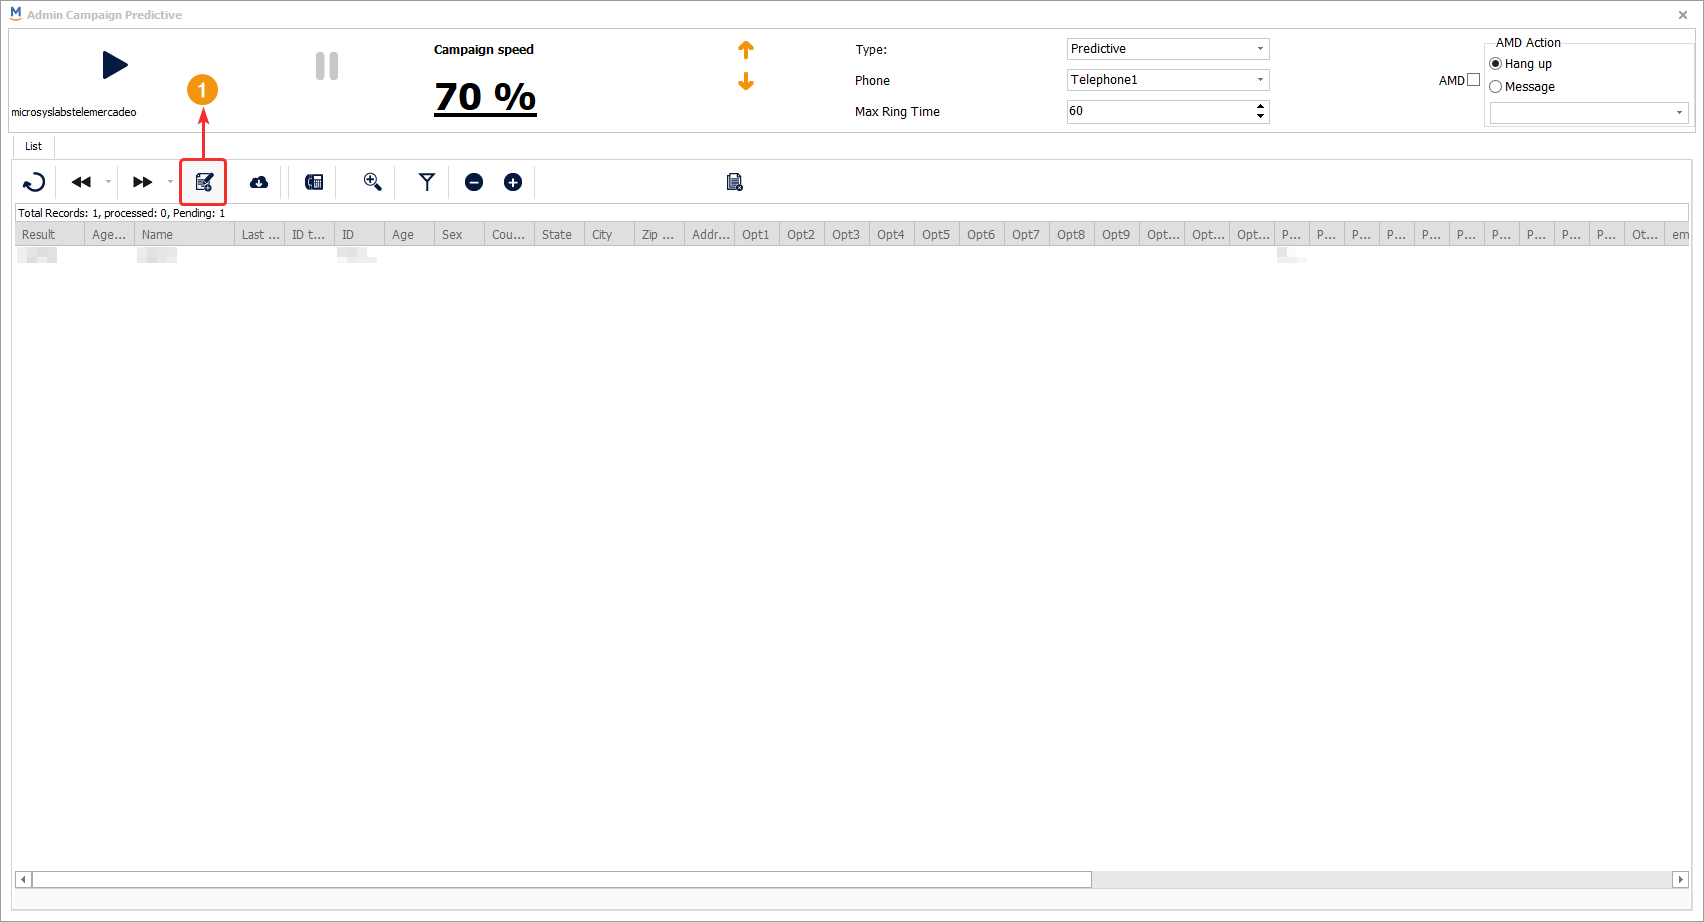
To upload the list that you will use as the campaign’s database, click on the highlighted button in the following image. The database file should be in CSV (comma-separated values)
format and follow a specific order. This order will be explained below.
Important: Customer data in phone number fields must be numeric only.
It is important to remember that when creating the list you will use in the campaign, you should respect the order of the data in their respective columns. Below is the order of the columns you should follow when entering customer records to include in the campaign:
Customer_name
Customer_last_name
id_type
Customer_id
Age
Gender
Country
State
City
Zone
Address
Opt1
Opt2
Opt3
Opt4
Opt5
Opt6
Opt7
Opt8
Opt9
Opt10
Opt11
Opt12
Tel1
Tel2
Tel4
Tel5
Tel6
Tel7
Tel8
Tel9
Tel10
Tel_Extra
Email
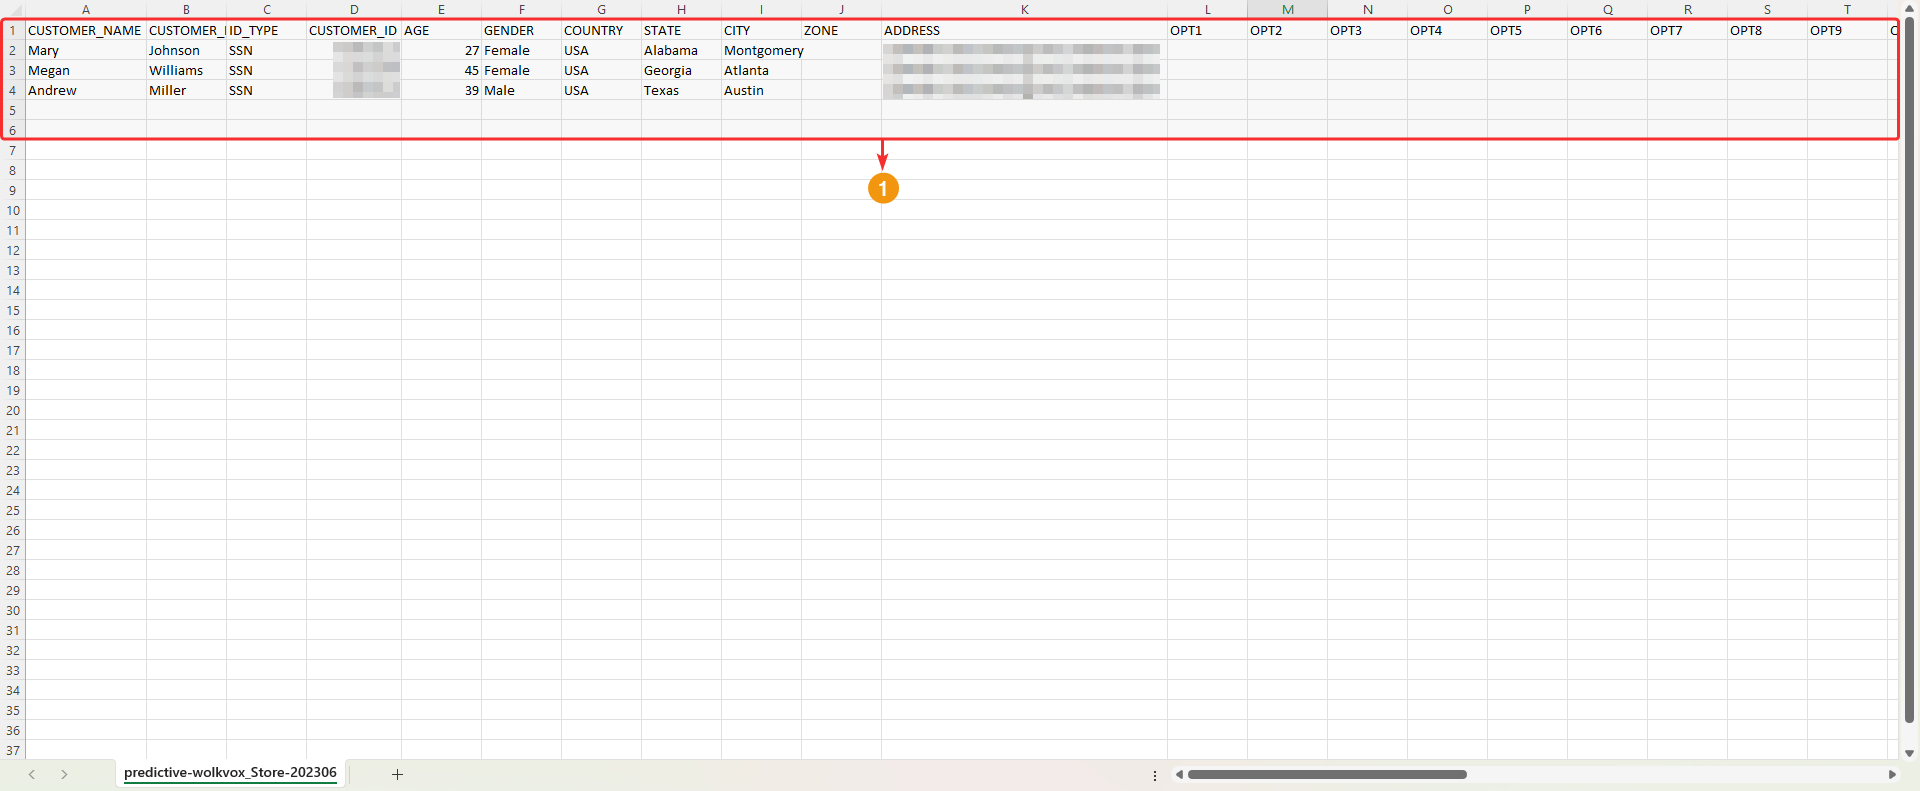
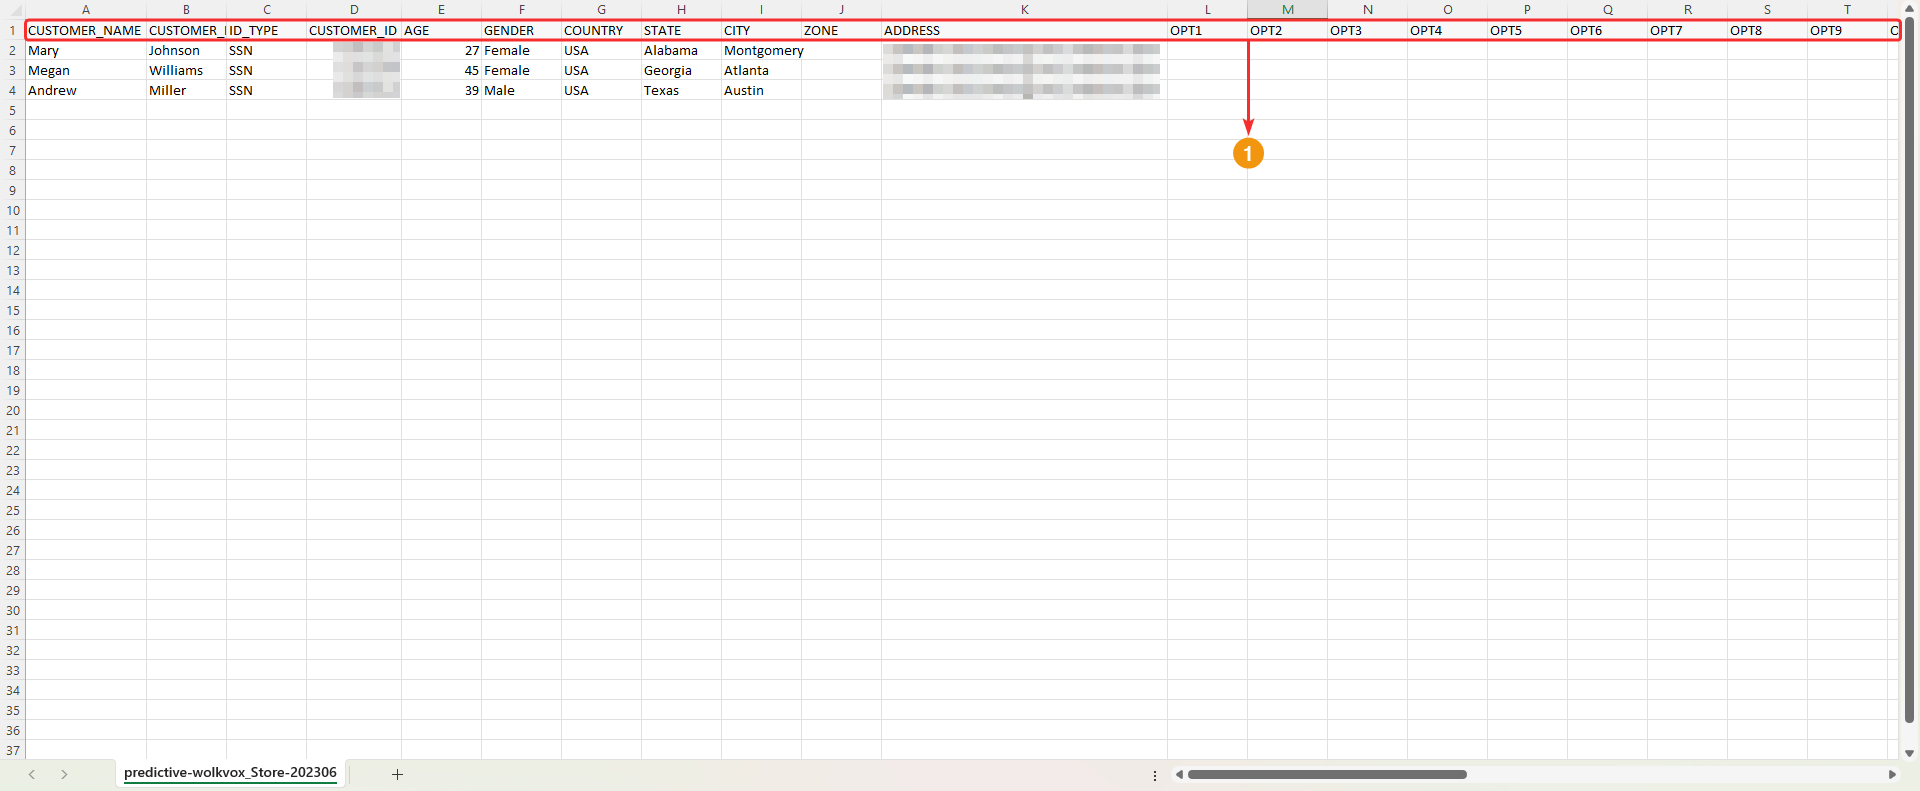
Before uploading the list, it is recommended to delete the top row, that is, the column titles, so that the system does not add that row as an additional client.
Important: Customer data in phone number fields must be numeric only.
A new window opens where the requirements for the file to be uploaded are explained. The file to be uploaded must be in CSV format and follow the specified order: customer’s first name, customer’s last name, customer’s identification type, customer’s identification number, age, gender, country, department, city, zone, address, optional fields from 1 to 12, phone numbers from 1 to 10, additional phone number, and email.
The “Choose File” button opens the file explorer to select the file to be uploaded.
The “Upload CSV file to the campaign” button allows you to upload the selected file from the file explorer.
![]() The “Lot Name” field is optional and refers to a batch name you want to assign to the uploaded database.
The “Lot Name” field is optional and refers to a batch name you want to assign to the uploaded database.
Important: Customer data in phone number fields must be numeric only.

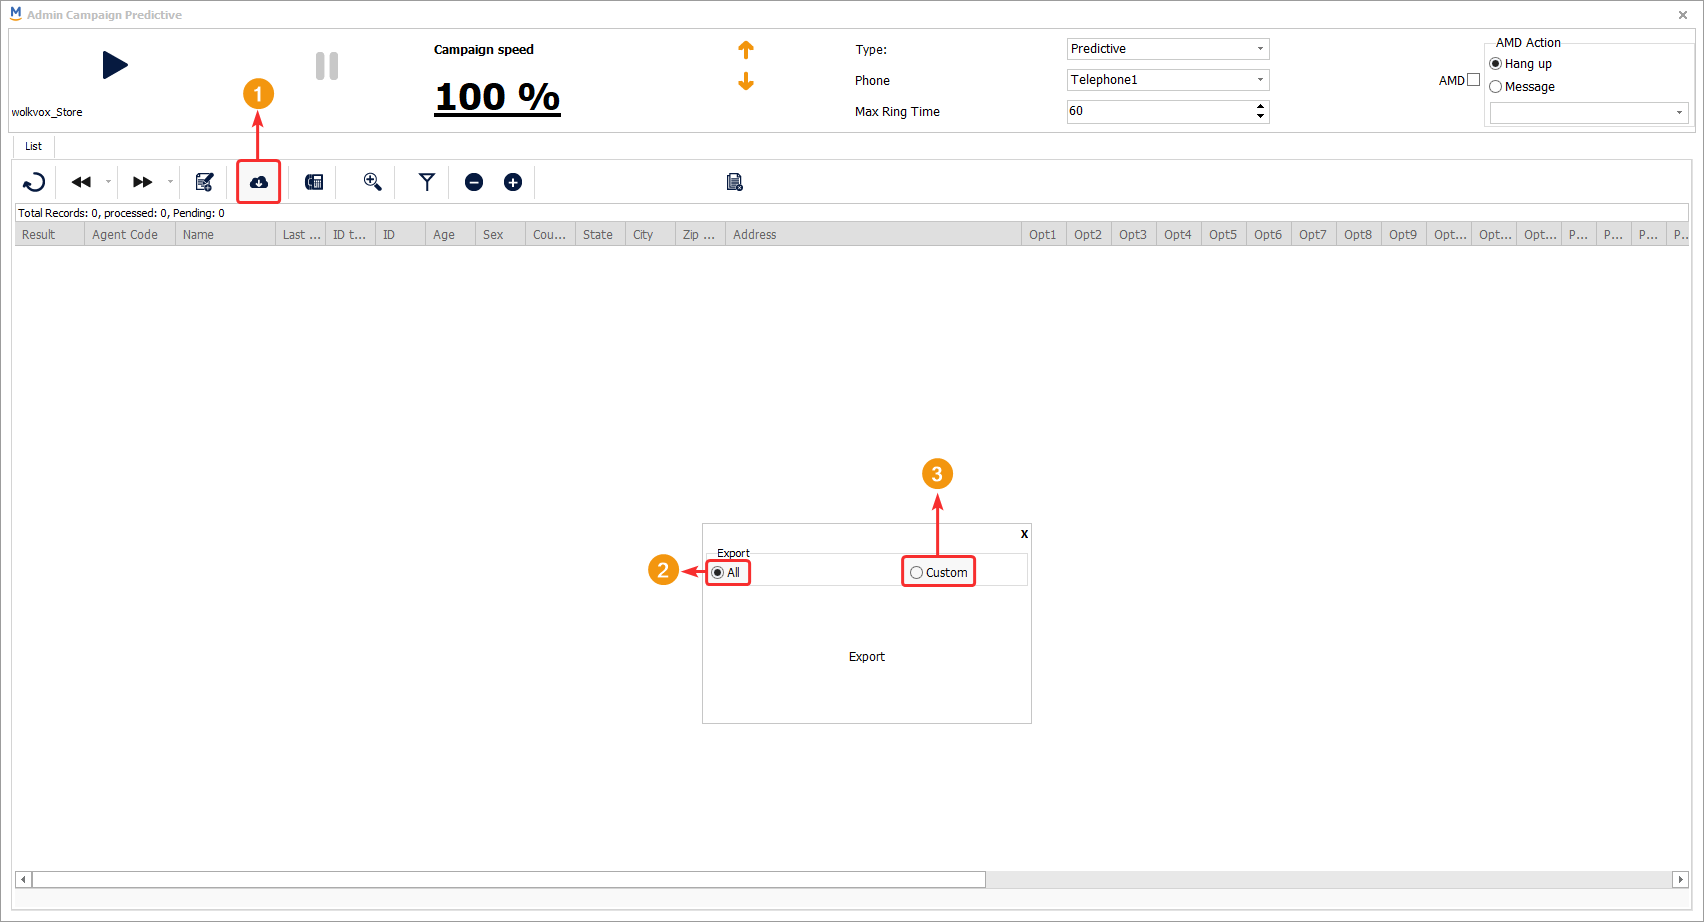
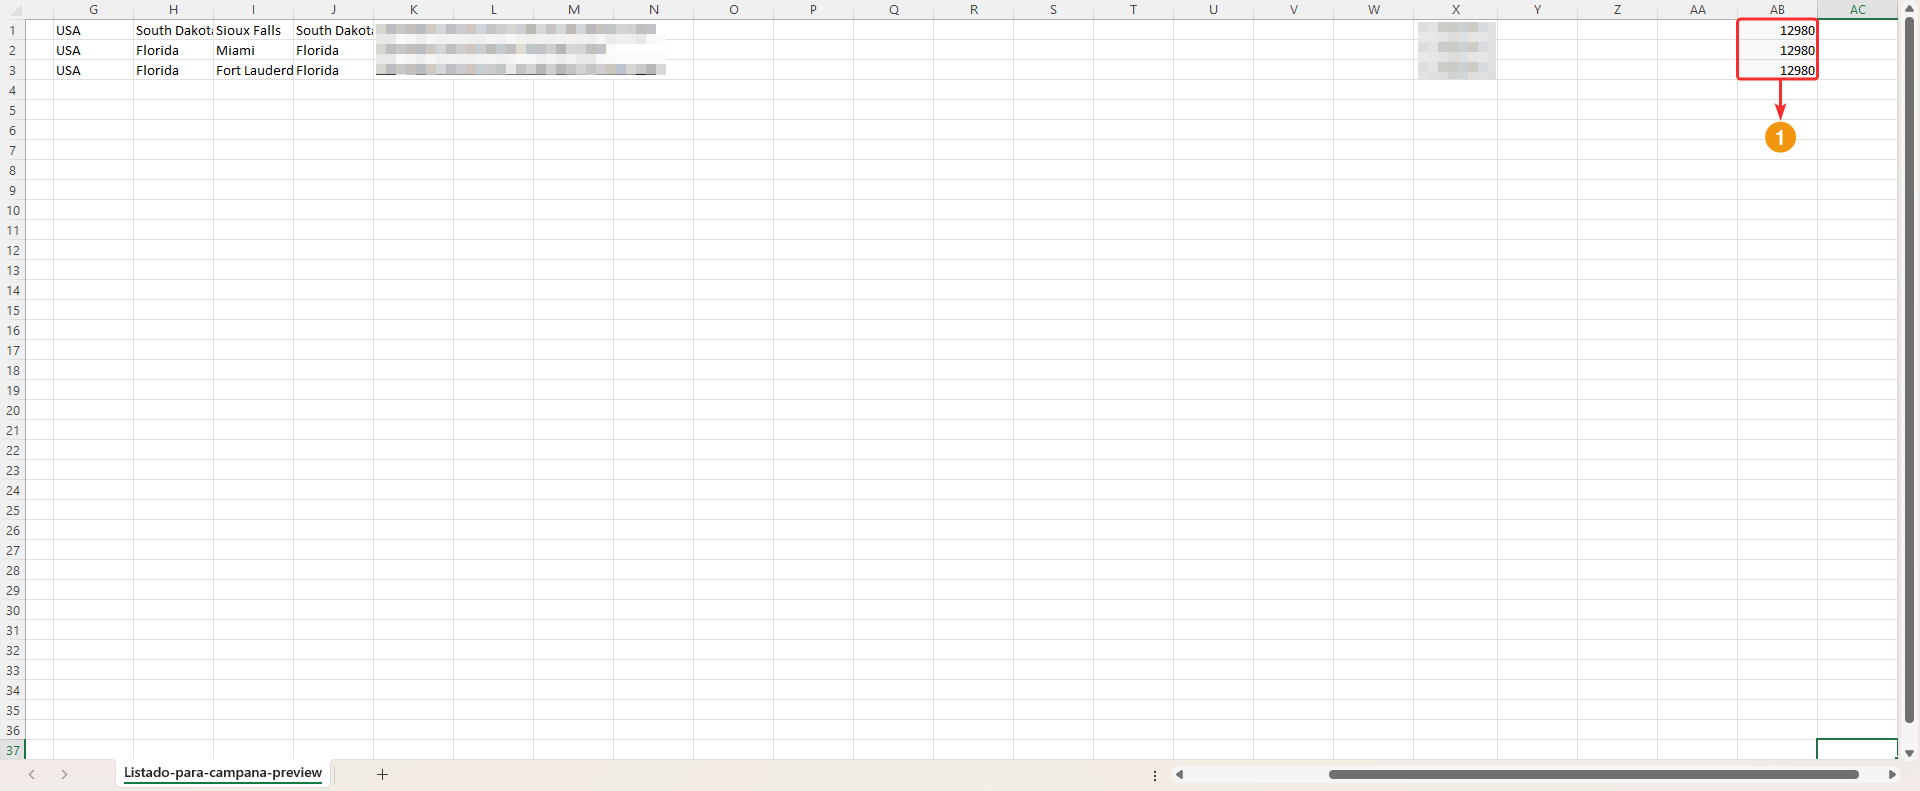
Export the database list #
- Click on the button to export the table of records with their respective updated information to a comma-delimited CSV file.
- You can download the complete list generated over time.
- You can download the complete table considering a date range.
![]() The downloaded document will be in CSV format, which can be used as a template to generate a new database and subsequently upload it.
The downloaded document will be in CSV format, which can be used as a template to generate a new database and subsequently upload it.
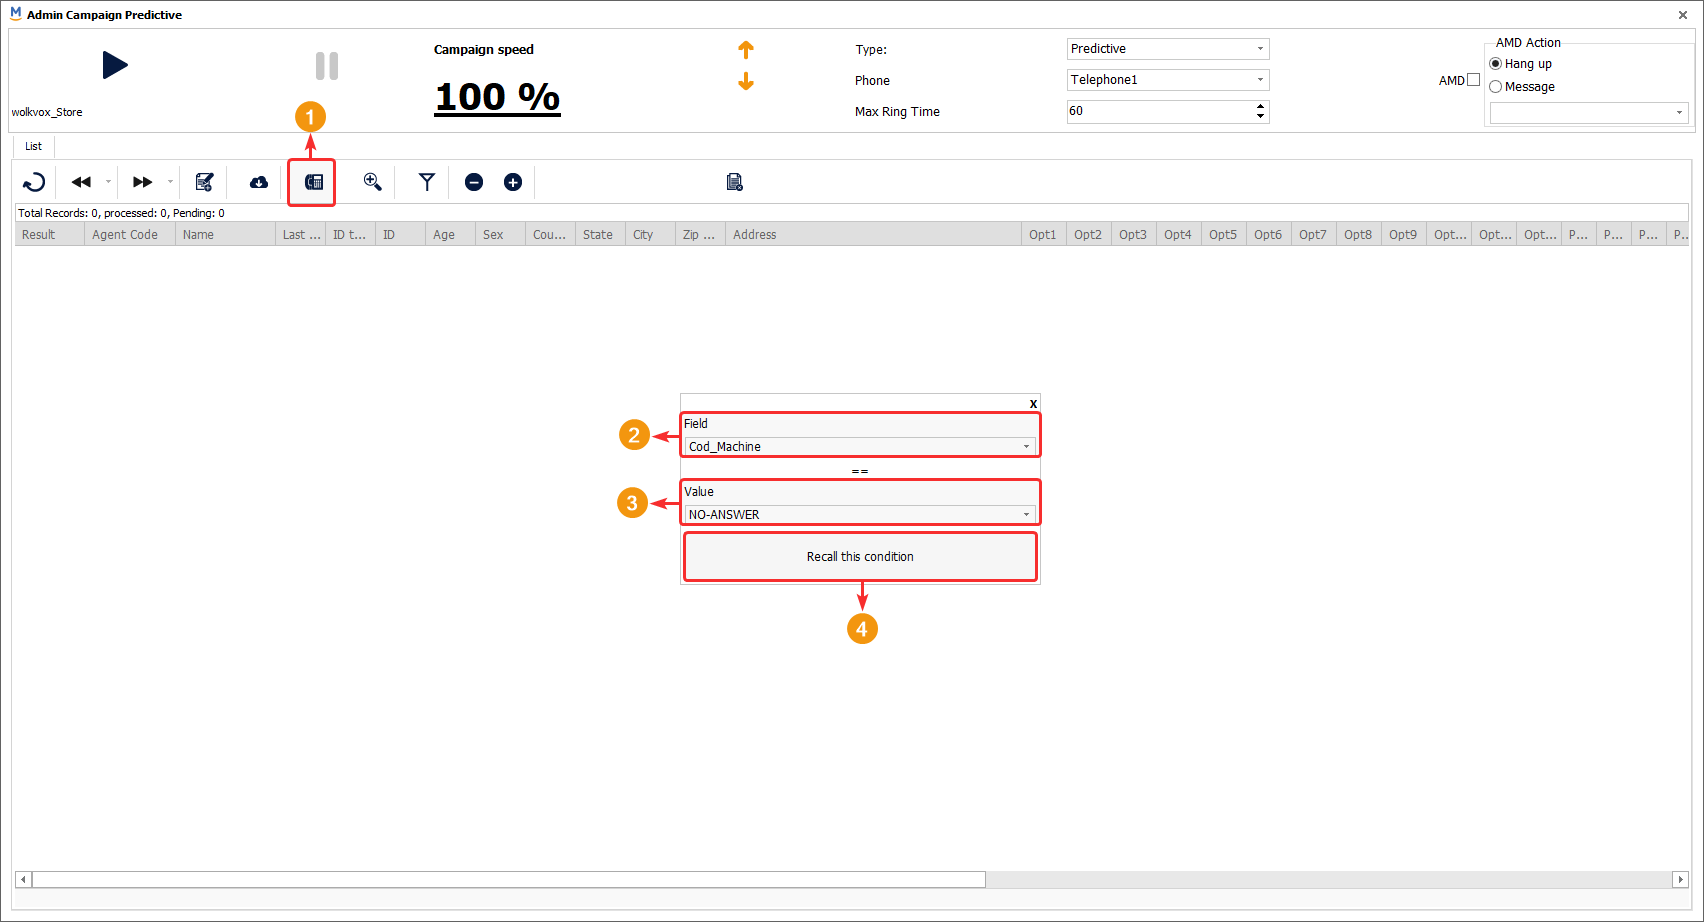
Schedule callbacks based on machine code or activity code #
In the “Recall Registers” option, you can make the system call back the numbers of the calls that have been tagged with a specific code or a result of the machine code. The machine codes are: No answer, answer machine, abandon, busy, congestion, unknown, failed, do not call, chanunavail, and answer.
For example, if you want to call back all the numbers that have been marked with the machine code “No-Answer,” meaning unanswered calls, you should configure the tool as follows:
Search for an item #
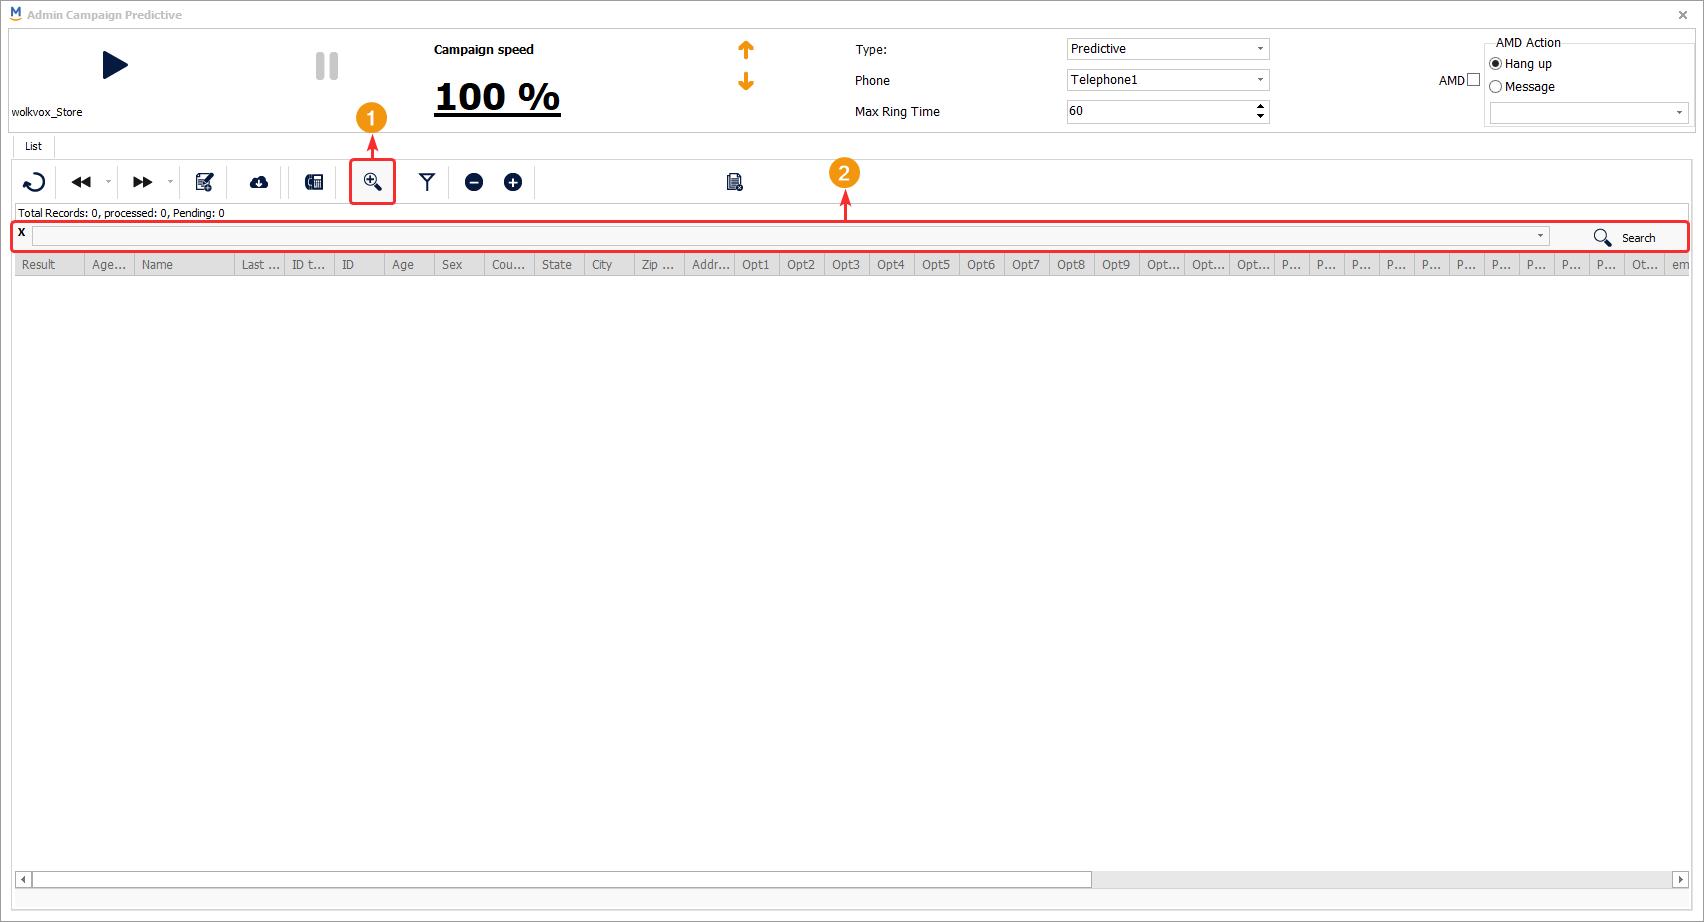
By clicking on the highlighted button in the following image, you can search for an item within the current campaign list. Once you click the button, a text field and the “Search” button appear for you to enter a value and the system will proceed to search for that value within the list.
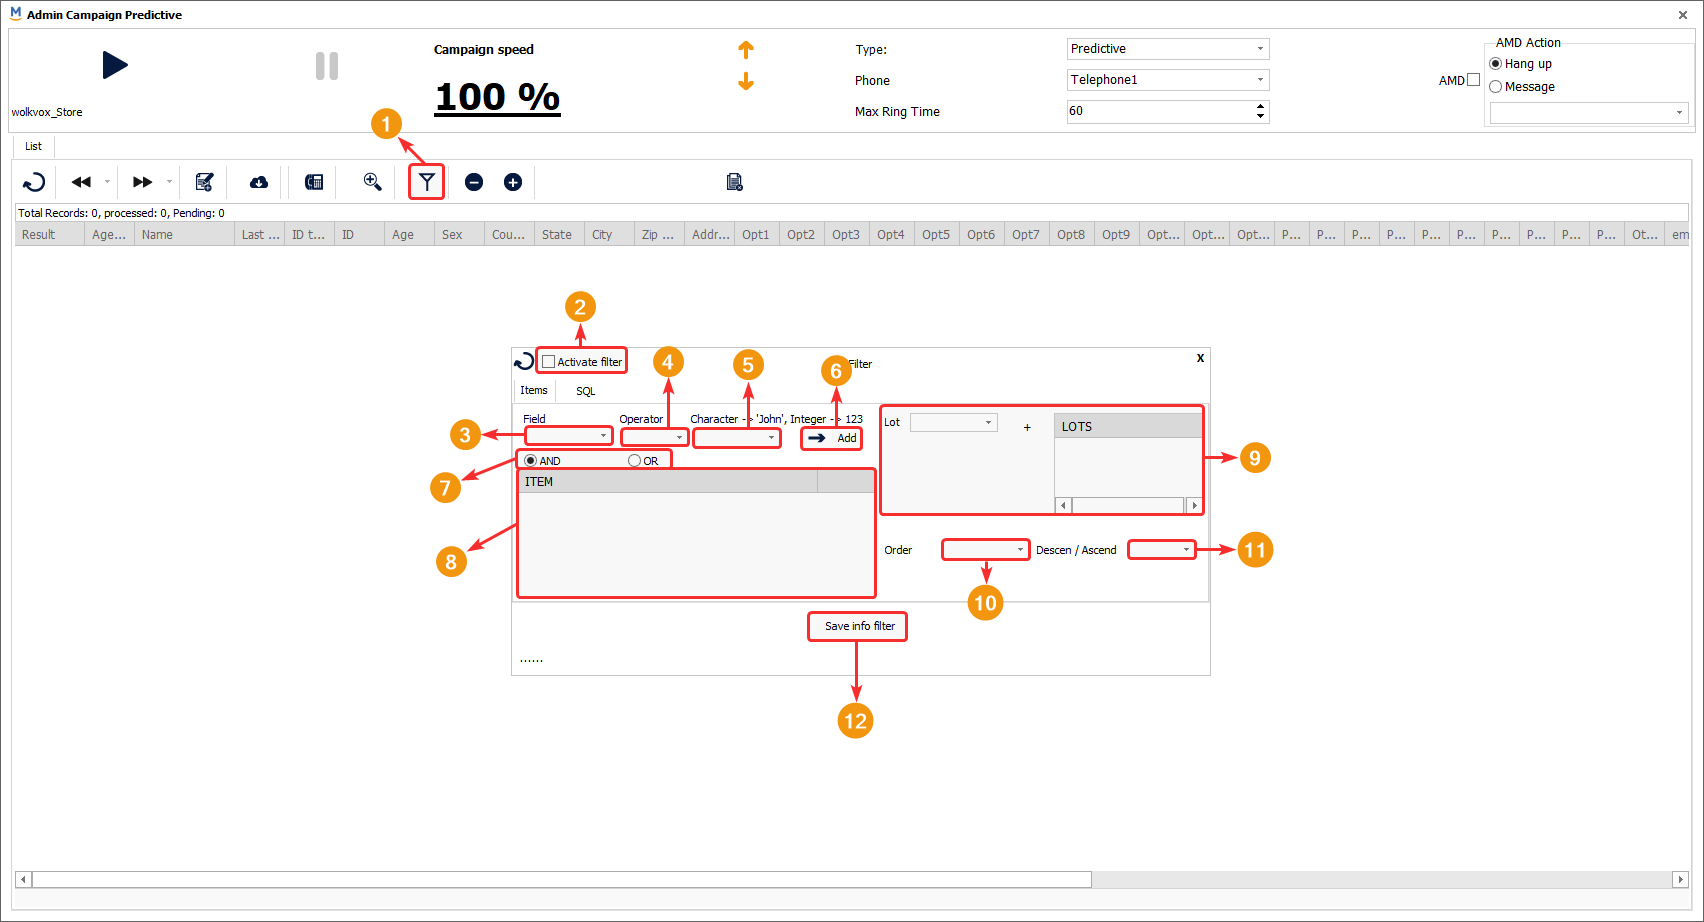
Filtering for a more personalized search #
El botón “Filter” permite hacer una búsqueda más personalizada gracias a todos los criterios que se definen en los campos.
A continuación, se explican las opciones que puedes parametrizar:
- Click the “Filter” button to open the filter window.
- Enable or disable the filtering.
- Choose the field by which you want to filter the search.
- Select the relational operator to compare the “Field” with the “string” or “integer”. Here you can choose:
- = : Will search for all values that are equal (in the selected field type) to the text or number you will enter in “string” or “integer”.
- < : Will search for all values that are less than (in the selected field type) the text or number you will enter in “string” or “integer”.
- <= : Will search for all values that are less than or equal to (in the selected field type) the text or number you will enter in “string” or “integer”.
- > : Will search for all values that are greater than (in the selected field type) the text or number you will enter in “string” or “integer”.
- >= : Will search for all values that are greater than or equal to (in the selected field type) the text or number you will enter in “string” or “integer”.
- != : Will search for all values that are different (in the selected field type) from the text or number you will enter in “string” or “integer”.
- is : Will search for all values that are exactly equal (in the selected field type) to the text or number you will enter in “string” or “integer”.
- like : Will search for all values that are almost equal (in the selected field type) to the text or number you will enter in “string” or “integer”.
- In the “string” or “integer” field, enter the value you want to search for, you can enter text or numbers.
- Click “Add” to add the previously created item with its values (field, operator, and string).
- Select “And” for the system to filter values that meet all the added items. You can select “Or” to filter values that contain any of the items.
- View the added items in the highlighted table.
- You can specify a batch name from a database you have uploaded (provided you have assigned a batch name to it).
- You can sort the search based on a field from the dropdown menu.
- Sort the table in ascending or descending order.
- Click “Save filter info” to apply the changes.
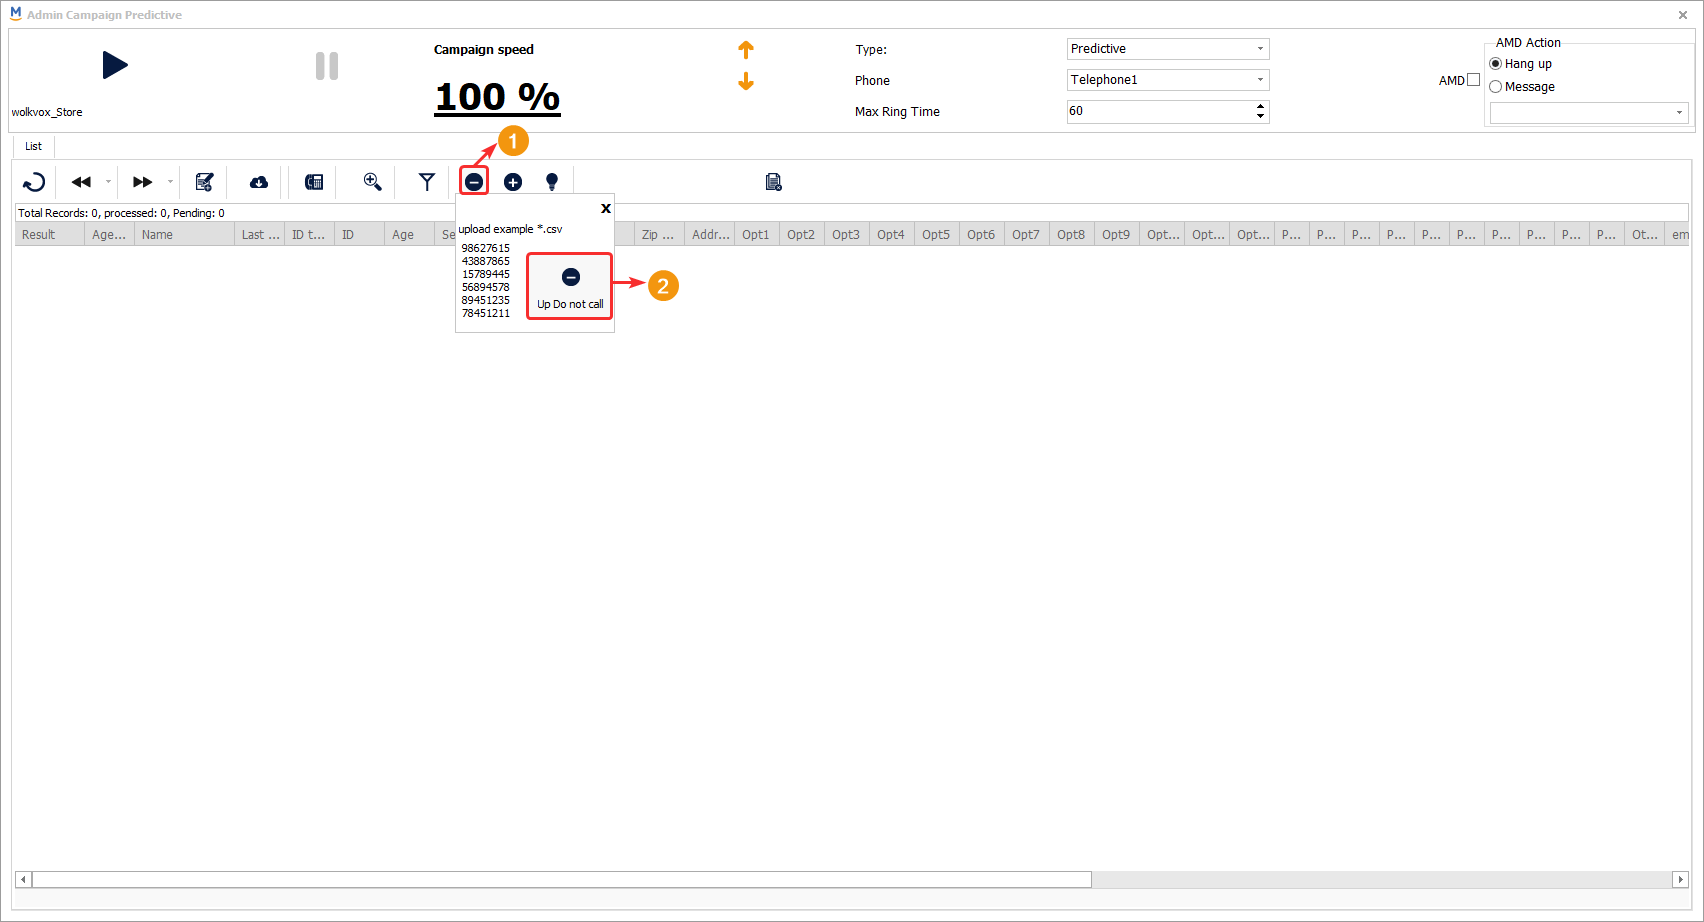
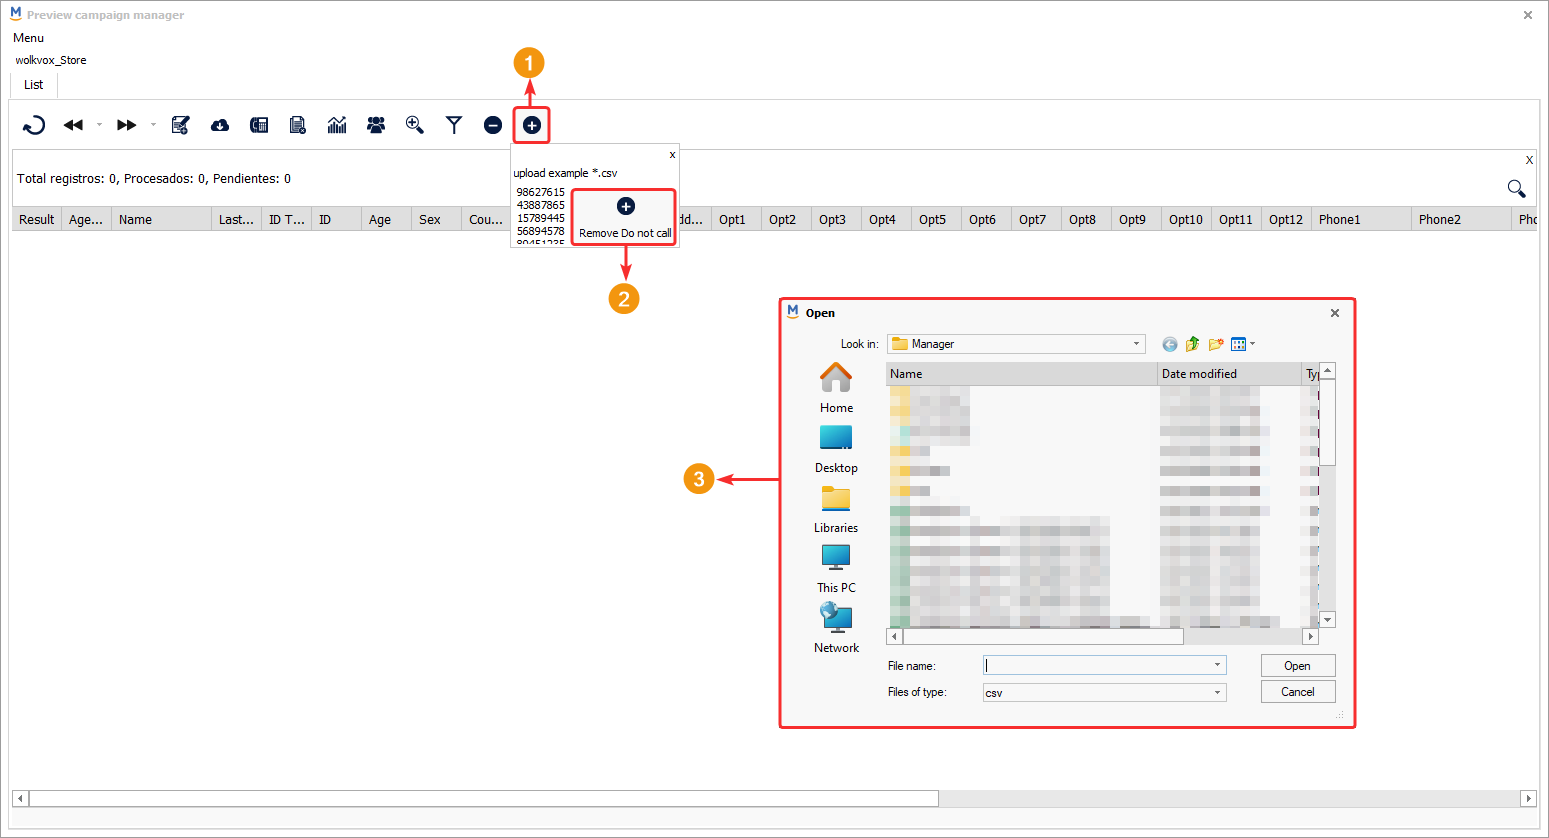
Upload a blacklist of numbers to block #
Using the “Do Not Call” button, you can import a CSV file containing customer identification numbers that you want to block in your operation. This means that the system will never dial the numbers entered through this option.
Important: Customer data in phone number fields must be numeric only.
Remove items from the blacklist #
The “Remove Do Not Call” button allows you to remove customer numbers that have been added to the Do Not Call blacklist. Files in CSV format containing the identification numbers of the customers to be unblocked must be uploaded.

Delete all items from the list #
You can delete all the records you have in the campaign list using the button called “Delete list.”
A confirmation message will appear four times in a row for added security.

Phone dialing strategy #
If you select one of the following options from the dropdown menu of the “Phone” option: Telephone1, Telephone2, Telephone3, Telephone4, Telephone5, Telephone6, Telephone7, Telephone8, Telephone9, or Telephone10, the system will dial the phone number of each customer found in the selected phone column.

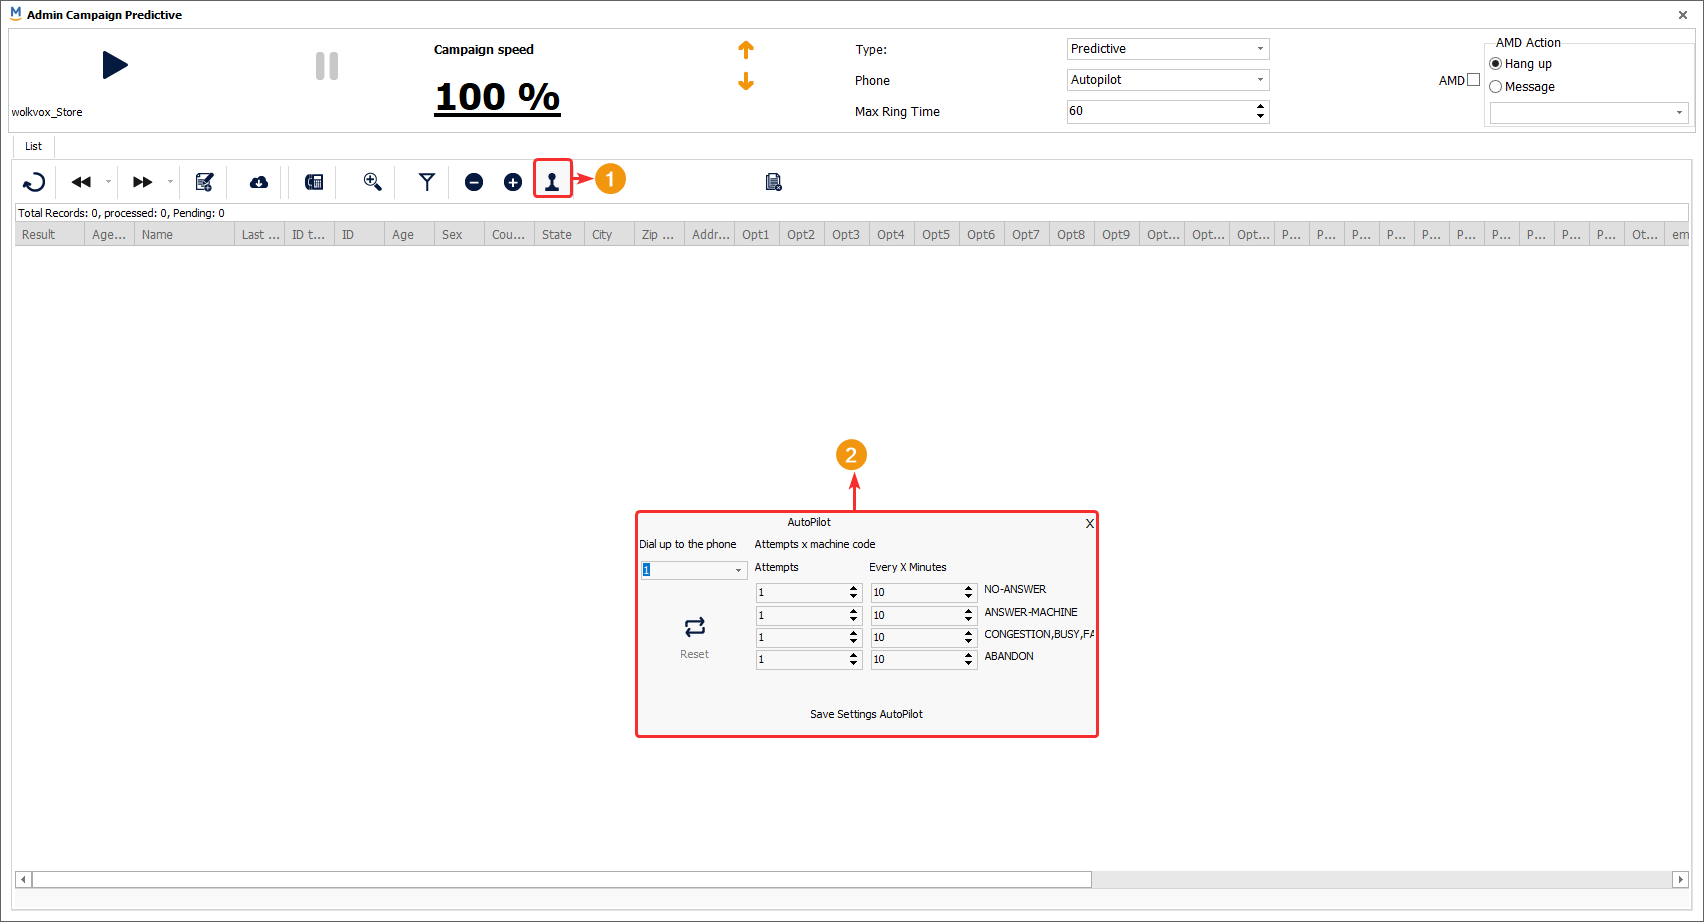
Autopilot dialing strategy #
By selecting the “Autopilot” dialing strategy from the dropdown menu of the “Phone” option, you will have an automatic dialing system at your disposal that will make calls according to the configuration set in the corresponding window.
You will need to configure the following:
- Select “Autopilot” from the dropdown menu of the “Phone” option.
- Specify up to which phone to dial, i.e., if set to (1), the system will only dial the phones of each customer located in the “Tel1” column. If set to (2) or more, the system will start dialing each number in each phone column of the customer’s record and will not move on to the next customer until the goal is met or the attempts are exhausted according to the configuration.
- No Answer: Set the number of attempts and how often to call back the customer in case the call result is “No answer”.
- Answer Machine: Set the number of attempts and how often to call back the customer in case the call result is “Answer Machine,” indicating a machine answered the call.
- Congestion, Busy: Set the number of attempts and how often to call back the customer in case the call result is “Congestion” or “Busy,” indicating a congested line or busy signal.
- Abandon: Set the number of attempts and how often to call back the customer in case the call result is “Abandon”.
Once you finish configuring the Autopilot, click on “Save Settings Autopilot”.

In case you lose the Autopilot configuration window, you can return to it by clicking on the highlighted button in the following image.
Omnichannel dialing strategy (Strategy) #
The contact method called “Strategy” involves creating communication attempts with the customer in each phone column added to the database. In other words, the contact strategy will be configured for cases where it is not possible to reach the customer or when they do not respond. There are multiple contact options available, such as text messages, emails, WhatsApp messages, and routing to an IVR.
It is important to note that this type of dialing strategy is based on the call disposition codes. If an agent classifies the call as RPC (Right Party Contact), the system will end the contact with that customer. However, if the agent classifies the call as WPC (Wrong Party Contact), the system will attempt to communicate with the customer based on the parameters assigned in the “Strategy” configuration window. The advantage of this option is the ability to utilize multiple omnichannel options to reach the customer if direct communication with the account holder is not achieved. For example, it is possible to specify that if the account holder does not answer, communication can be attempted via text message, WhatsApp, email, or routing to a specific contact point.
Note: If the “Strategy” configuration window is closed, you can click on the lightbulb icon to access it again.
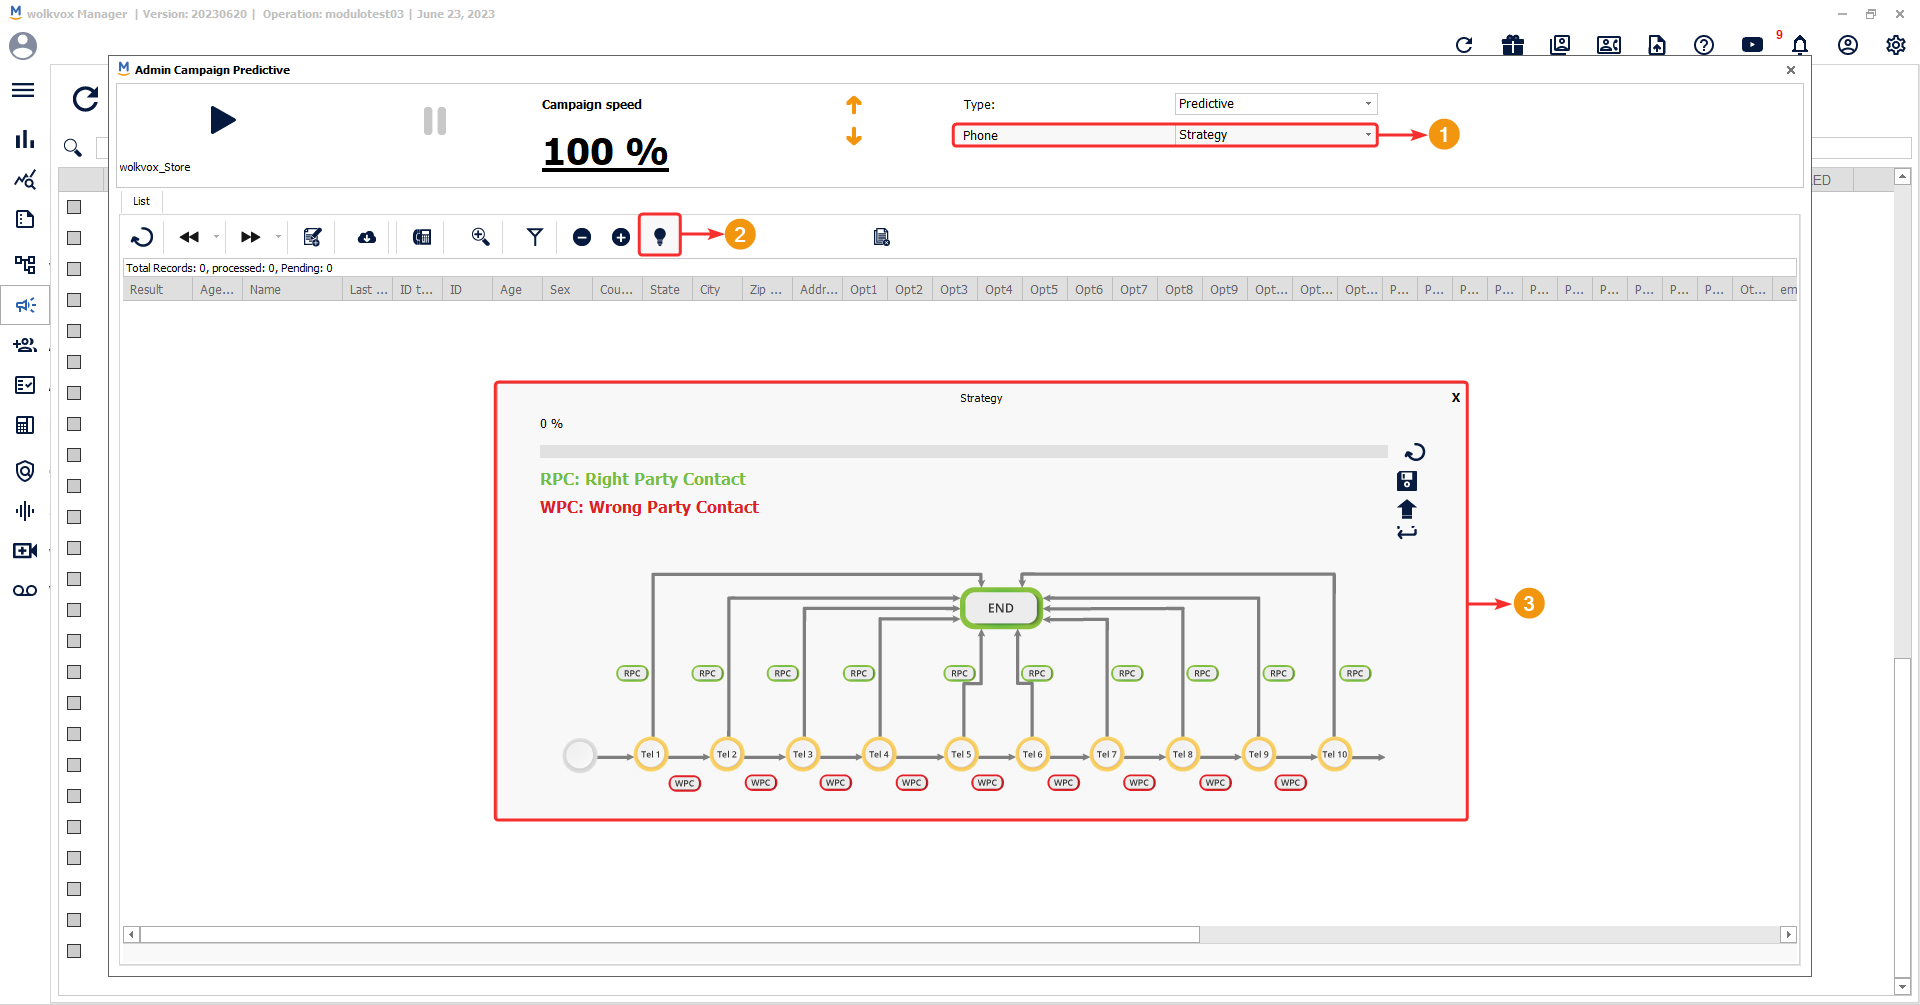
First, identify the map that explains the navigation during the strategy.
The system will initiate the strategy as follows:
The first number in the customer’s database will be dialed. If the call is coded as RPC (meaning successful contact with the account holder), the strategy will be terminated (END). If the call is coded as WPC (meaning contact was not made with the account holder but with someone else), the next column number, which is phone 2, will be dialed. This process continues based on the outcome, whether the system will dial the next customer’s number or not.
Note: For each phone (Tel 1, Tel 2, Tel 3, Tel 4, Tel 5, Tel 6, Tel 7, Tel 8, Tel 9, and Tel 10), it is possible to configure the system to send an email, text message, WhatsApp message, audio message via call (tel), and/or send the customer to a routing point.

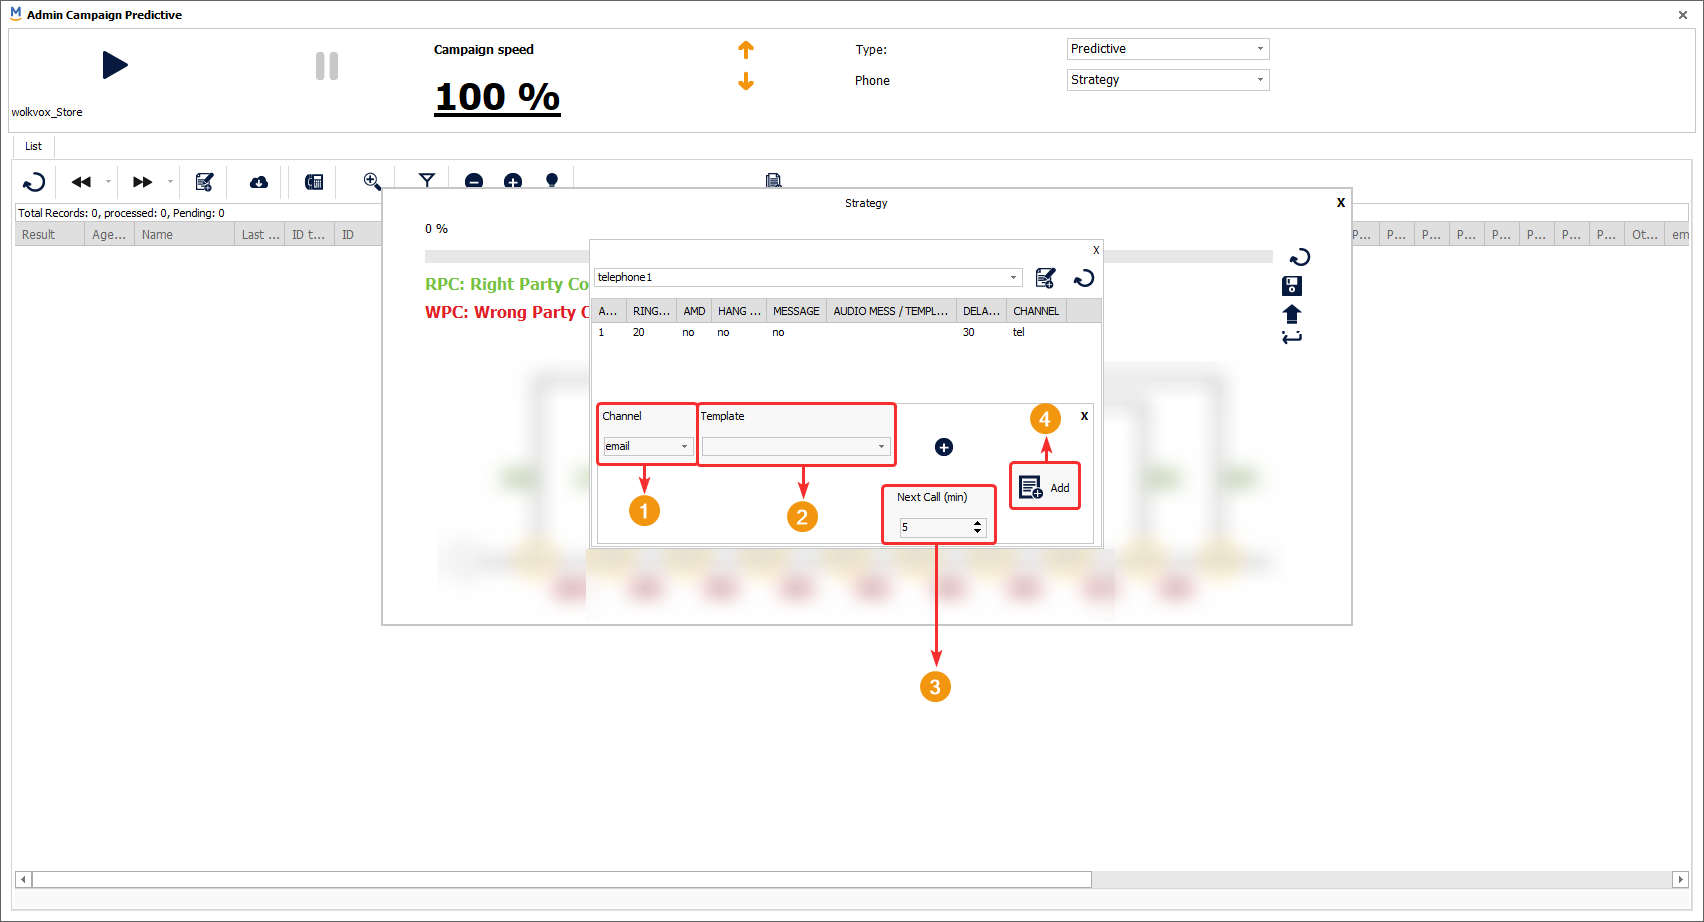
You need to edit the configuration of the strategy for each phone. To do this, left-click on each phone circle.
Note: Remember that these numbers refer to the phone numbers in each column of your database. For example, if you only have one phone number in your customers’ database and they are all listed in that column, then you only need to configure “Tel 1”. Within the configuration of “Tel 1”, you can set up your dialing strategy.

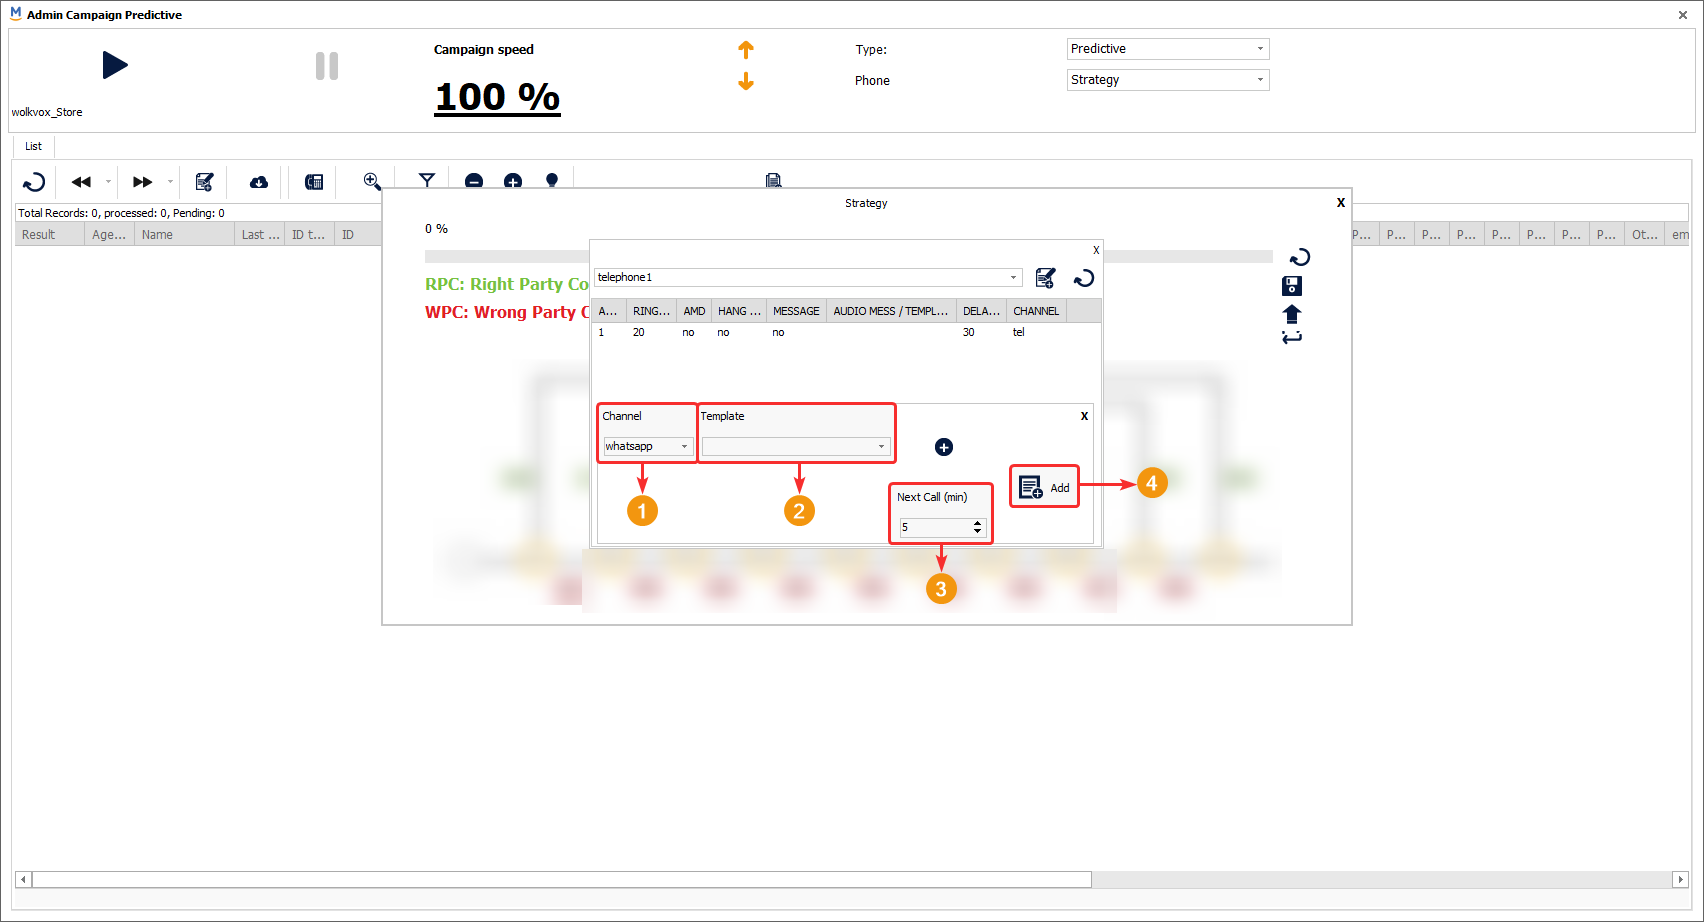
A small section appears where you can select the channel for the contact attempt you are creating. Each channel has specific settings, and below we provide details for each channel. So, in this section, you configure the contact attempts with your client for each phone column.
You can easily switch between strategies for each phone number using the dropdown menu.
In the table, the following elements are identified:
- Try: Number of contact attempt.
- Ring Time: Maximum ring or wait time in case the channel is the telephone.
- AMD: Answering Machine Detection activated or deactivated.
- Hang Up: If AMD service is enabled, this column indicates whether it is configured for the system to hang up if it detects that the call has been answered by a machine.
- Message: As an alternative to “Hang Up” for AMD service, this option allows the system to leave a message on the answering machine.
- Audio Mess/Template: Displays the template that the system will use to leave the message on the answering machine.
- Delay Next Call: Delay in the system for making the next call.
- Channel: Chosen channel for communication in the selected attempt.

You can easily switch between strategies for each phone number using the dropdown menu.

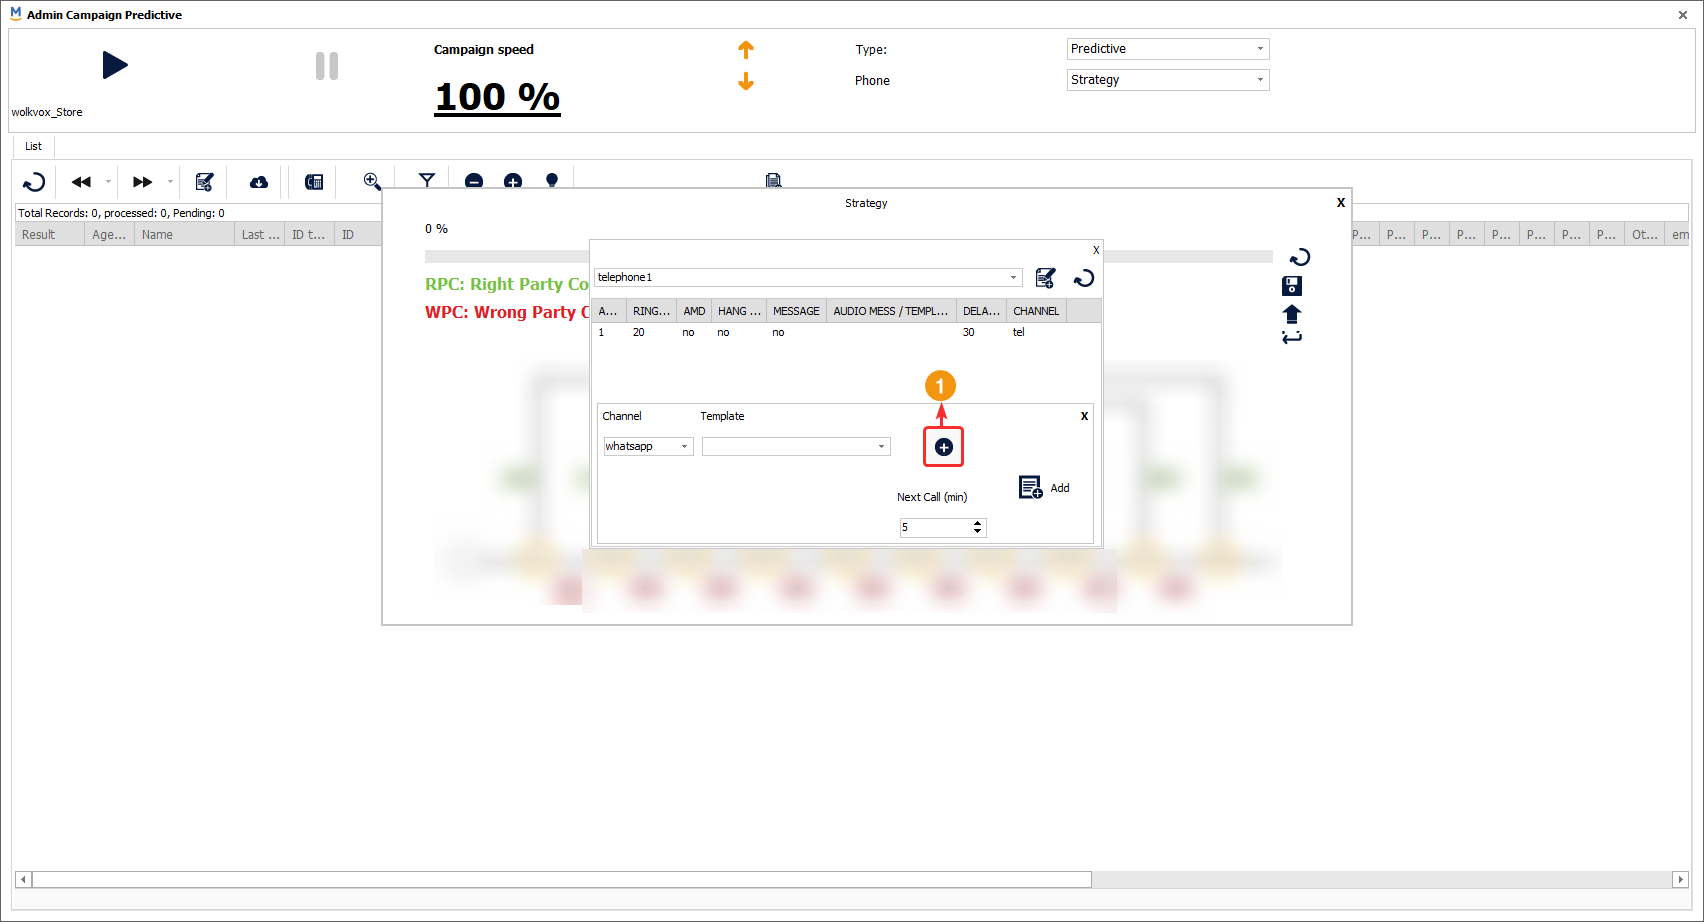
- Click on the button located on the right side to add a new contact alternative.
- A panel will open where you can configure what will be done during the contact attempt.
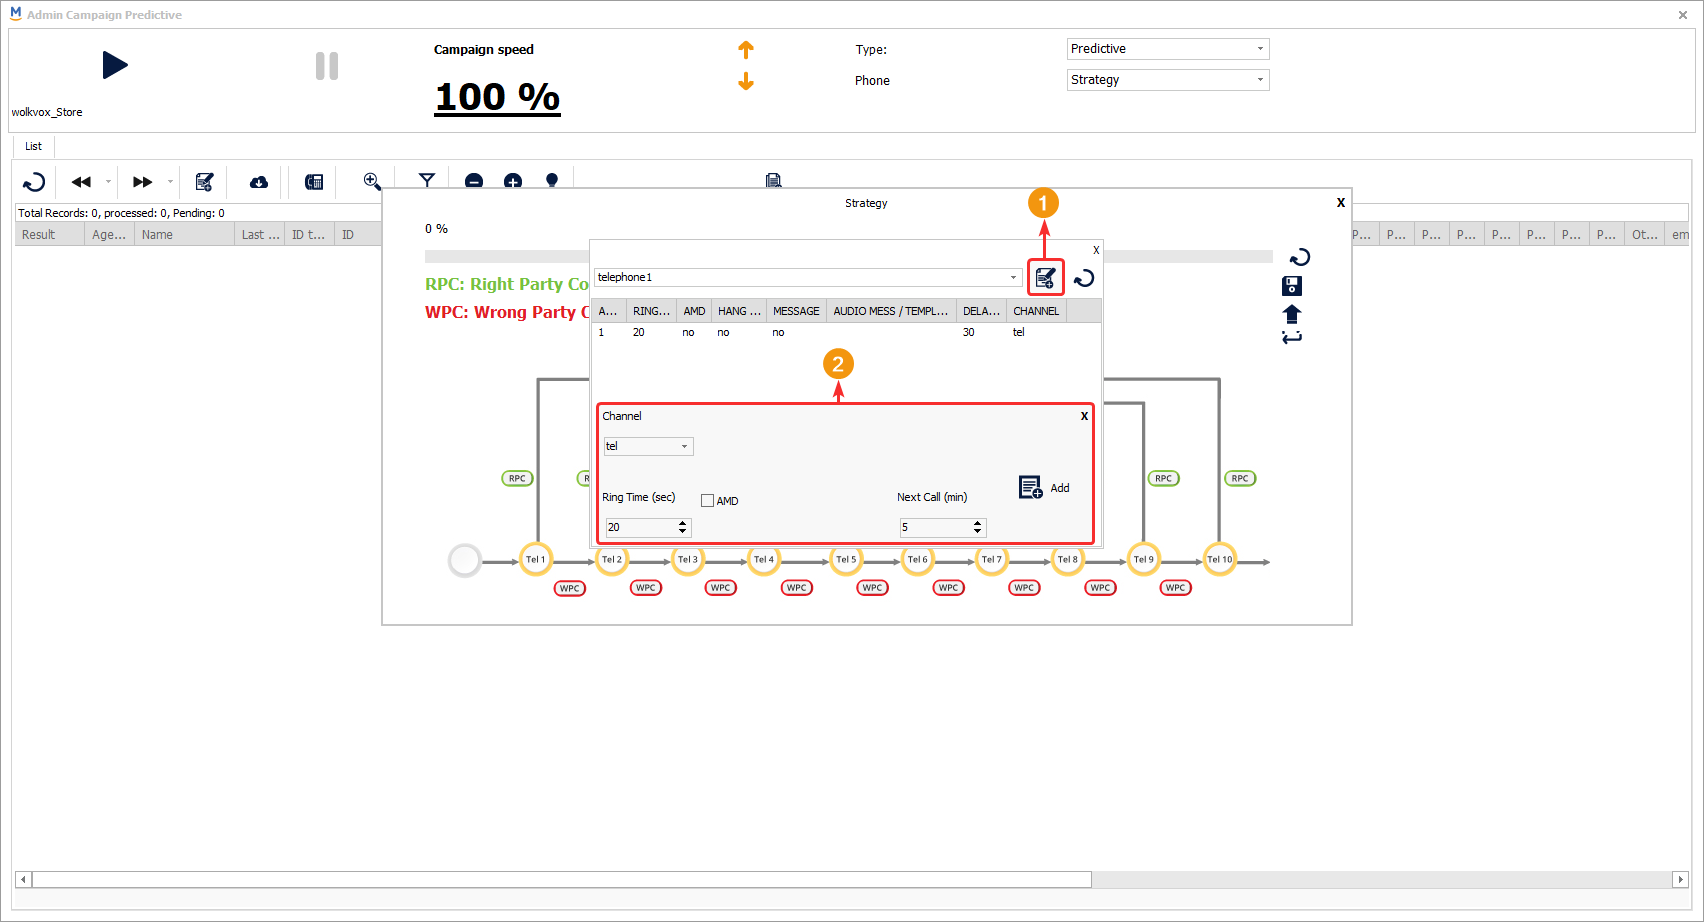
Phone contact attempt: Call the same number again a few minutes later #
#
The “Tel” attempt allows you to call the contact’s phone number again.
- In the “Channel” field, select “Tel”.
- In the “Ring Time (Sec)” field, specify the maximum time the system can ring the phone number without receiving a response.
- Activate the “AMD” option if you want the system to identify if the call has been answered by an answering machine.
- By activating the “AMD” option, you will have the “Hang Up” option available for the system to hang up the call if it detects that a machine has answered the call.
- By activating the “AMD” option, you will have the “Message” option available to leave a voicemail in the customer’s mailbox if the system detects that a machine has answered the call.
- The “Next call (min)” option allows you to specify how many minutes the system should wait before calling the customer again if they did not answer the call.
- Click on “Add” to add the contact attempt to the list of attempts in the upper table.

Communication attempt on SMS channel #
- Through this option, the system will send a text message to the customer.
- For sending a text message, you should select an SMS template or create a new one.
- In the “Next Call (Min)” field, you should specify the time interval after which you want this contact attempt to be activated.
- Click on “Add” to add the attempt.

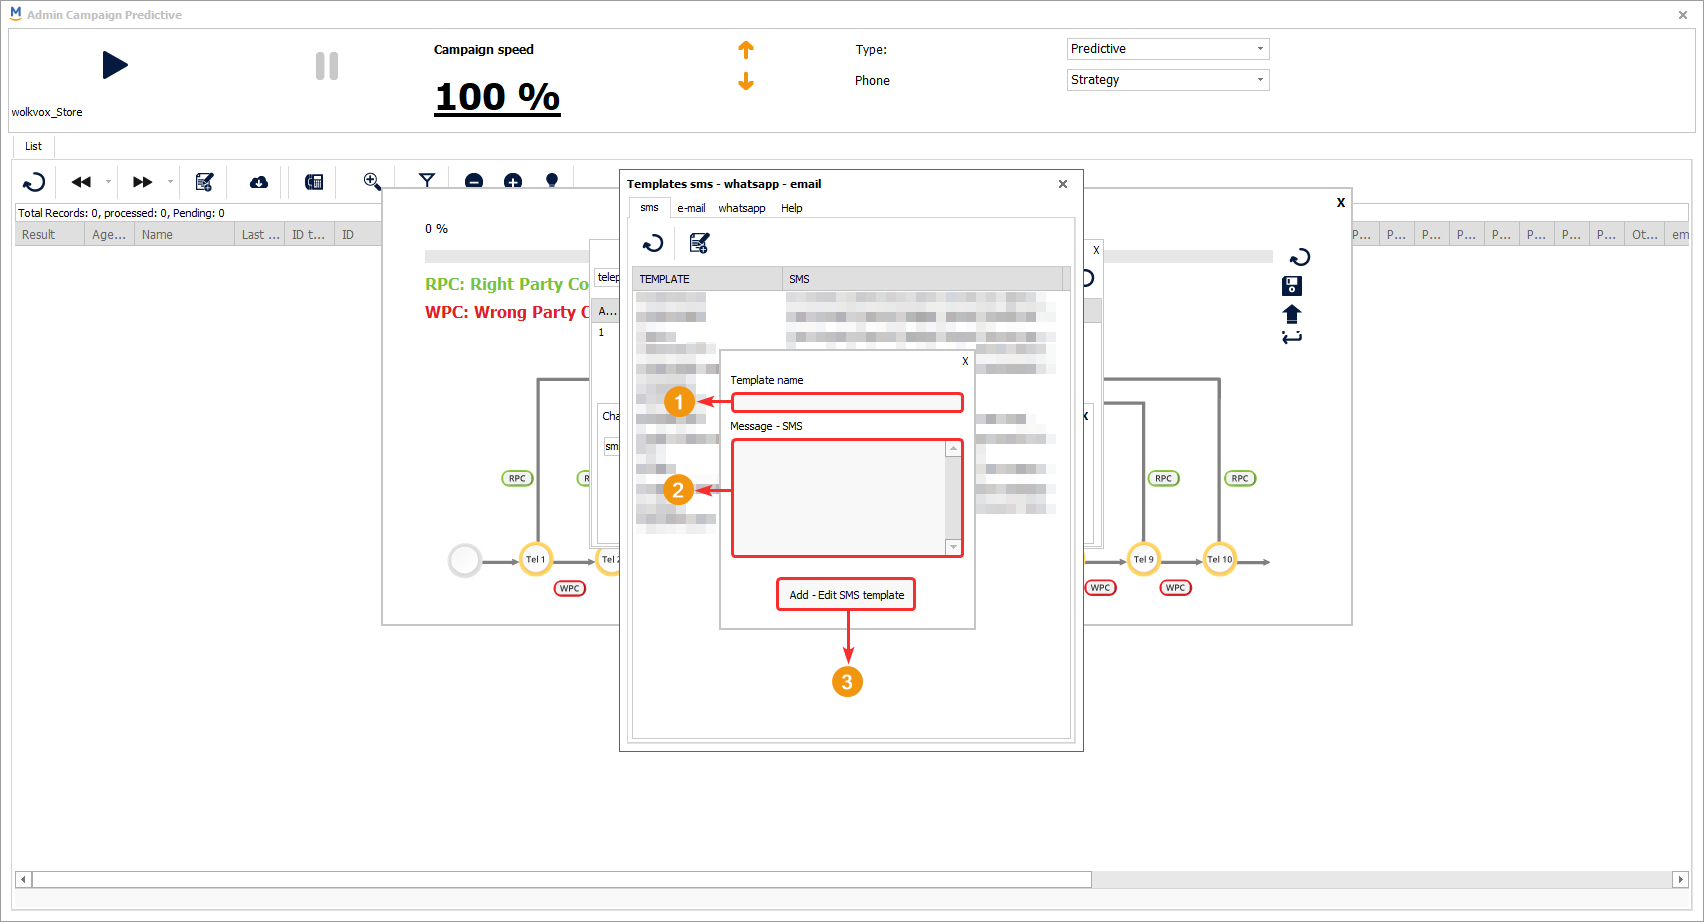
Create a new SMS template #
From this tool, it is possible to create new text message templates if none are available or if the desired one is not available.

Click on the following button:
- A new window opens where you can see the list of created SMS templates (make sure you are in the “sms” tab) with their respective messages that will be sent.
- The existing templates can be edited or deleted by right-clicking on each one and selecting the desired option.
- Click on the button to add a new template.
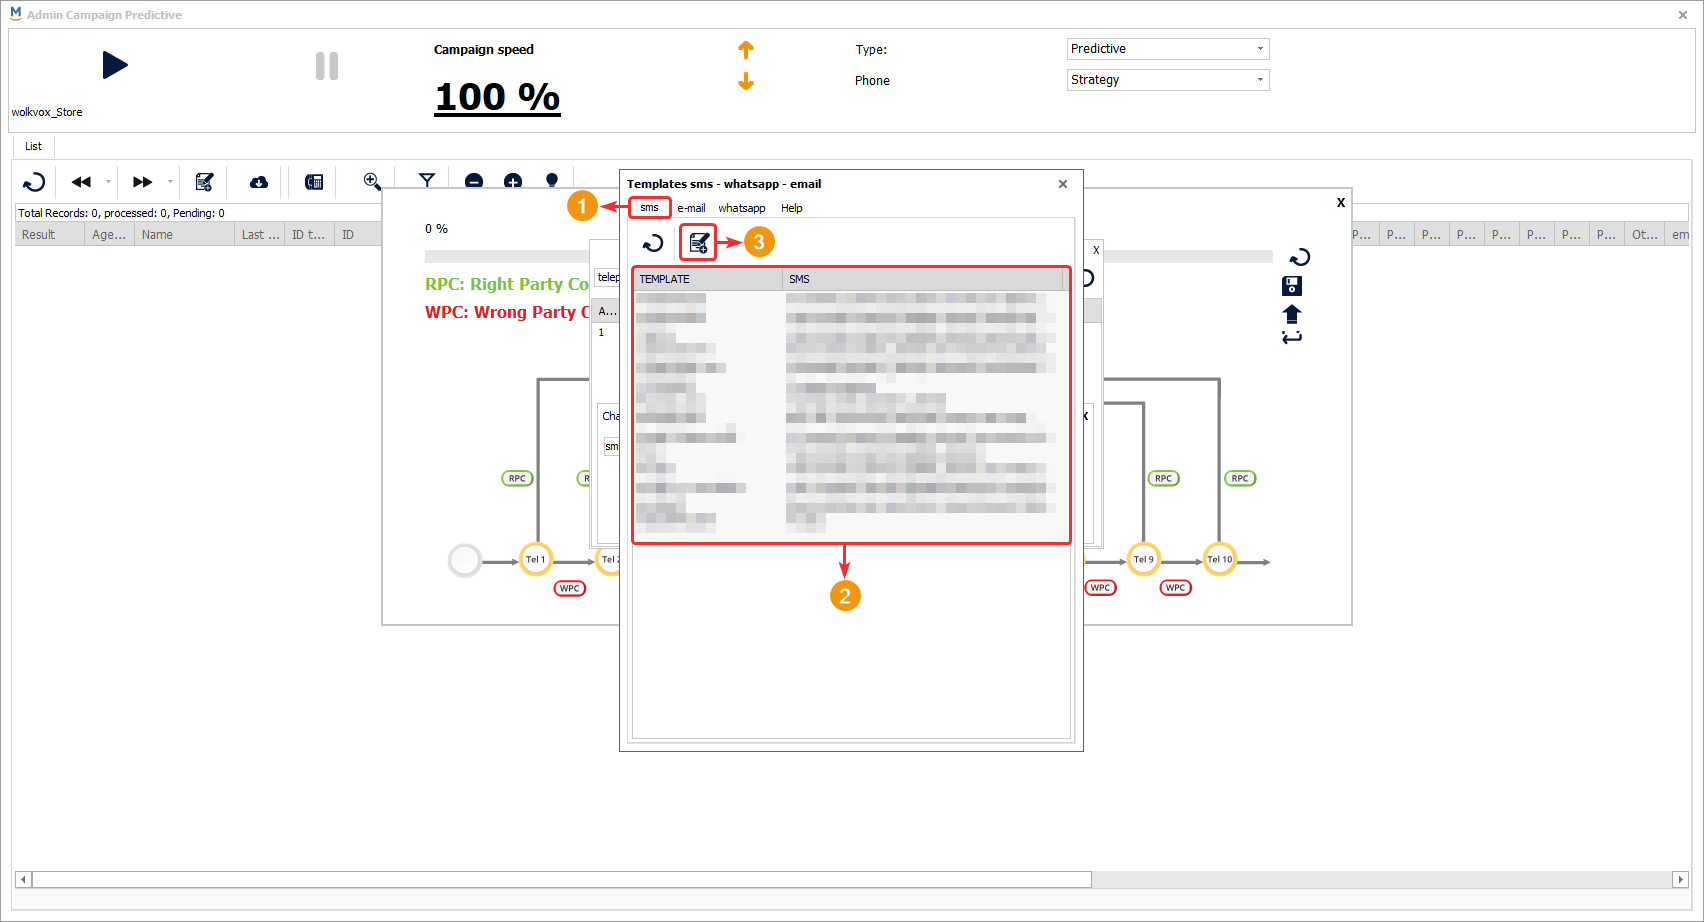
When you click on the “Add template” button, a small window opens where you need to enter a template name and create the structure or layout of the message. Finally, click on “Add – Edit SMS template” to finalize the changes.
Note: For these templates, you can use wolkvox variables to personalize the messages. You can find the variables in the “Help” tab.
The variables are:
{customer_name} // First name of the record in the campaign
{last_name} //Last name of the record in the campaign
{id_customer} // identifier of the record in campaign
{age} // Age of the record
{sex} //Gender of the record
{country} // Country of the record
{city} // City of record
{department} //State of the record
{zone} // Zone of record
{address} //Address of the record
{id_type} //Document type of the record
{opt1} //Optional 1
{opt2} //Optional 2
{opt3} //Optional 3
{opt4} //Optional 4
{opt5} //Optional 5
{opt6} //Optional 6
{opt7} //Optional 7
{opt8} //Optional 8
{opt9} //Optional 9
{opt10} //Optional 10
{opt11} //Optional 11
{opt12} //Optional 12
{tel1} //Telephone 1 of the registry
{tel2} //Telephone 2 of the registry
{tel3} //Telephone 3 of the register {tel4} //Phone 3 of the register
{tel4} //Telephone 4 of the registry
{tel5} //Telephone 5 of record
{tel6} //Telephone 6 of record
{tel7} //Telephone 7 of record
{tel8} //Telephone 8 of record
{tel9} //Telephone 9 of record
{tel10} //Telephone 10 of record
{email} // E-mail address of record
Communication attempt using WhatsApp channel type #
This type of attempt makes the system send a message via WhatsApp based on a selected template.
- Select the “WhatsApp” channel.
- Choose the template you want to use.
- In the “Next Call (Min)” field, you should specify the time interval after which you want this contact attempt to be activated.
- Click on “Add” to add the attempt.
Create a new WhatsApp template #
Click on the indicated button, then a new window appears where you should switch to the “WhatsApp” tab.
![]() These are templates for WhatsApp campaigns. They are directly associated with the templates of the connectors but are not approved templates by META.
These are templates for WhatsApp campaigns. They are directly associated with the templates of the connectors but are not approved templates by META.
![]() The existing templates can be edited or deleted by right-clicking on each one and selecting the desired option.
The existing templates can be edited or deleted by right-clicking on each one and selecting the desired option.
The columns in the template list provide the following information:
- Name: Template name.
- Add Prefix: Added prefix.
- Remove Prefix: Removed prefix.
- WhatsApp Template: Selected template name according to the chosen WhatsApp connector.
- WhatsApp Template Vars: Variables available in the selected template.
- URL Attach: Selected URL address to be attached in the message.

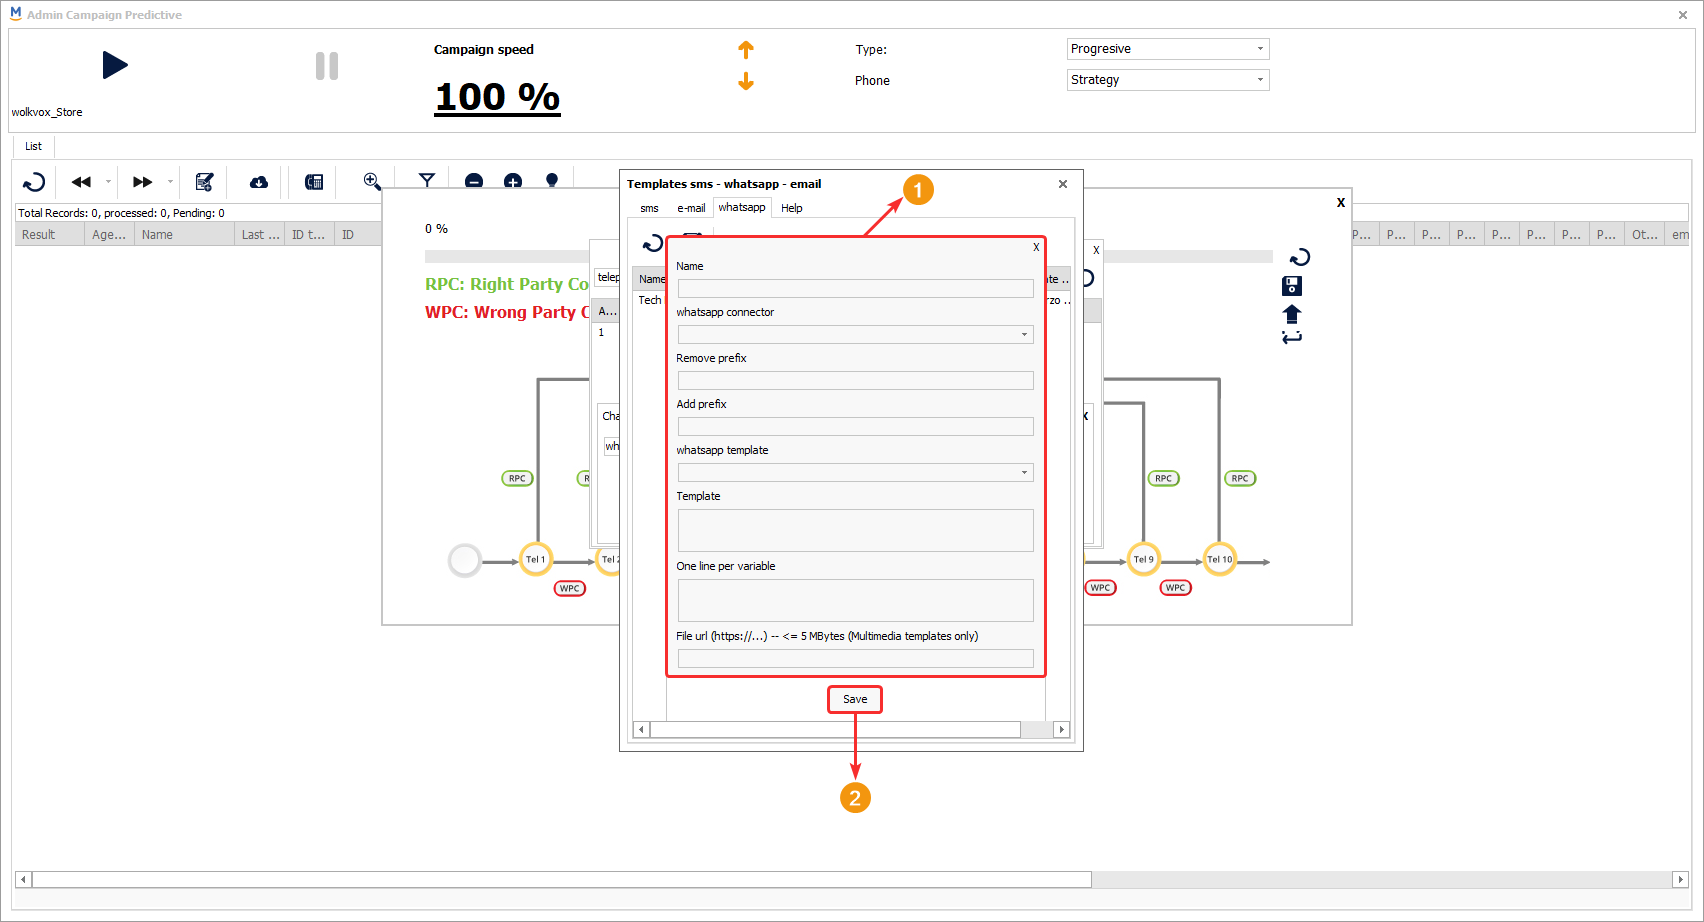
When you click on “Create new template,” another window opens where you need to provide the following information:
- Name: Assign a name to the template.
- WhatsApp Connector: Select the WhatsApp connector you want to use. If you don’t have a connector, you need to request it from the help desk.
- Remove prefix: You can remove a prefix.
- Add prefix: You can add a prefix.
- WhatsApp Template: Select the desired WhatsApp template. If you don’t have any in the dropdown menu, you need to request one from the help desk.
- Important:Using database information with variables These templates must be previously approved by the support team.
- Template: You can see how the message structure will look like based on the selected template. Variables that haven’t been changed are displayed as numbers (1), (2), (3), (4), and so on.
- One line per variable: In the “One line per variable” field, you should add the information that will replace the default values of the template variables. Each value is changed with each line break.
- File URL: You can add a URL of a file you want to attach to the message. It should weigh 5 MB or less, and this option is only enabled for multimedia templates. If you want to have such a template, you need to request it from the help desk.
- Click on “Save” to save the template.
Note: For these templates, you can use wolkvox variables to personalize the messages. You can find the variables in the “Help” tab.
The variables are:
{customer_name} // First name of the record in the campaign
{last_name} //Last name of the record in the campaign
{id_customer} // identifier of the record in campaign
{age} // Age of the record
{sex} //Gender of the record
{country} // Country of the record
{city} // City of record
{department} //State of the record
{zone} // Zone of record
{address} //Address of the record
{id_type} //Document type of the record
{opt1} //Optional 1
{opt2} //Optional 2
{opt3} //Optional 3
{opt4} //Optional 4
{opt5} //Optional 5
{opt6} //Optional 6
{opt7} //Optional 7
{opt8} //Optional 8
{opt9} //Optional 9
{opt10} //Optional 10
{opt11} //Optional 11
{opt12} //Optional 12
{tel1} //Telephone 1 of the registry
{tel2} //Telephone 2 of the registry
{tel3} //Telephone 3 of the register {tel4} //Phone 3 of the register
{tel4} //Telephone 4 of the registry
{tel5} //Telephone 5 of record
{tel6} //Telephone 6 of record
{tel7} //Telephone 7 of record
{tel8} //Telephone 8 of record
{tel9} //Telephone 9 of record
{tel10} //Telephone 10 of record
{email} // E-mail address of record
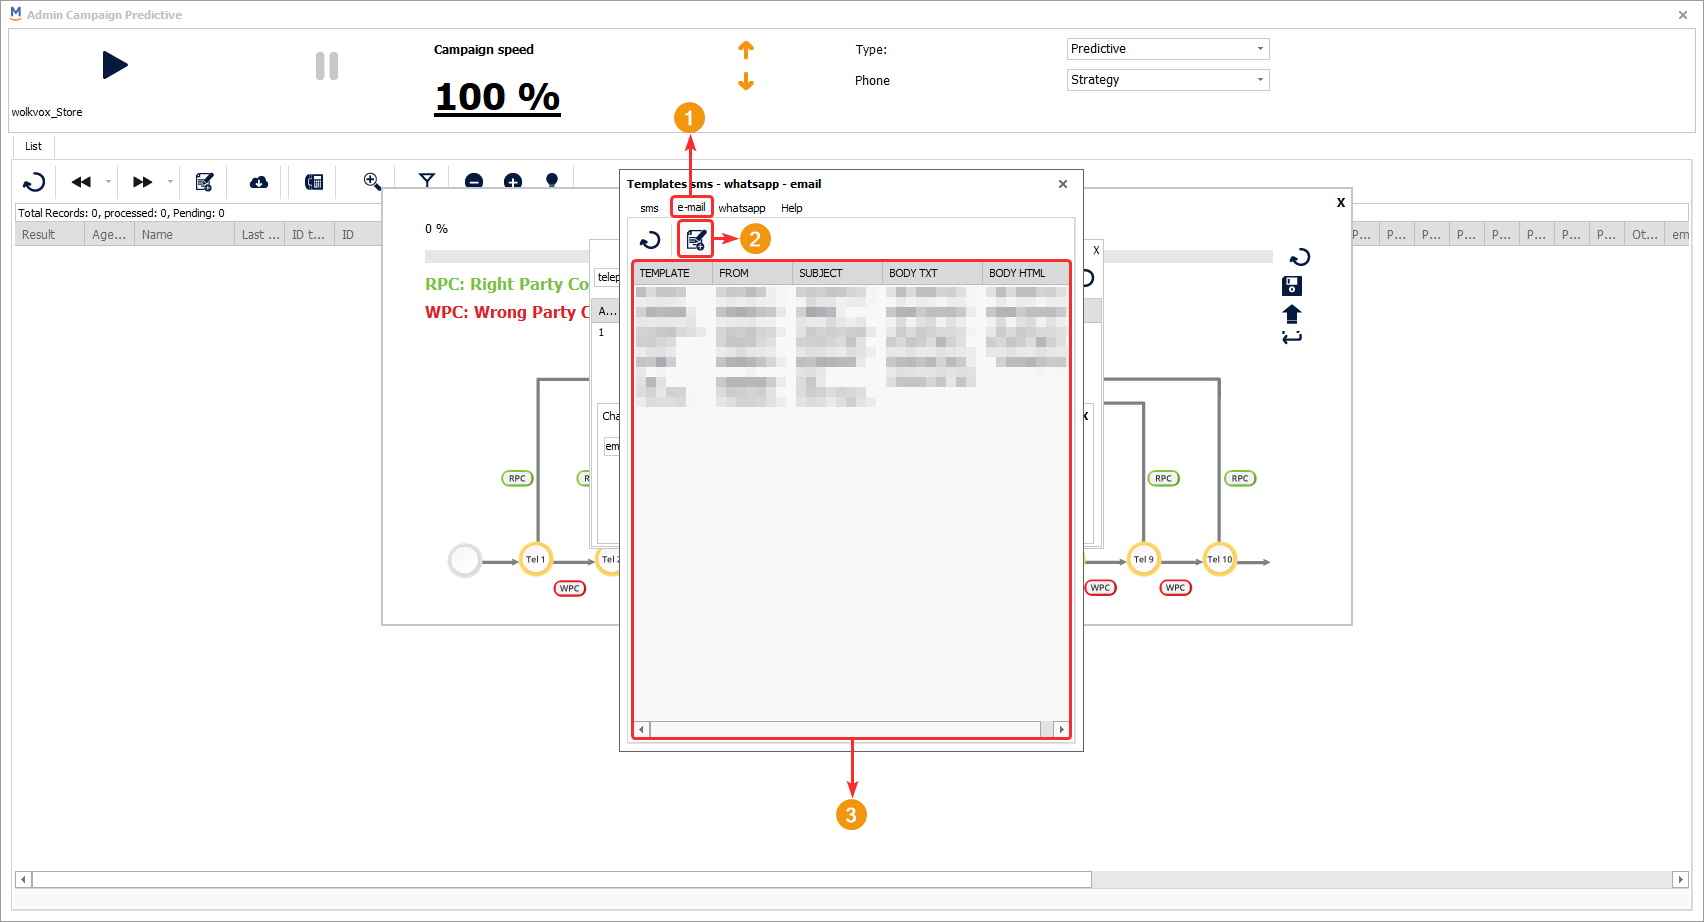
Communication attempt in email channel type #
If you select the “email” channel, the customer will receive an email with a structured message based on the selected template.
Create a new email template #
- When you click on “Create email template,” the following window appears, and you need to navigate to the “email” tab.
- Click on the button to create a new email template.
- Click on the button to create a new email template. Existing templates can be edited or deleted by right-clicking on each one and selecting the desired option.
When creating a new template, another window will open where you need to fill in the following fields:
- Assign a name to the template you are creating.
- Define the sender’s email address.
- Specify a subject for the emails sent using the template.
- Write the HTML code for your message. You can also go to the “Text” tab instead of “HTML” to edit only the text in your email template.
- Preview the email design you have created on different screen types, such as large screens, mobile phones, and tablets.
- You can send a test email to preview how it will appear.
- Finally, click on “Edit email Template” to create the template.

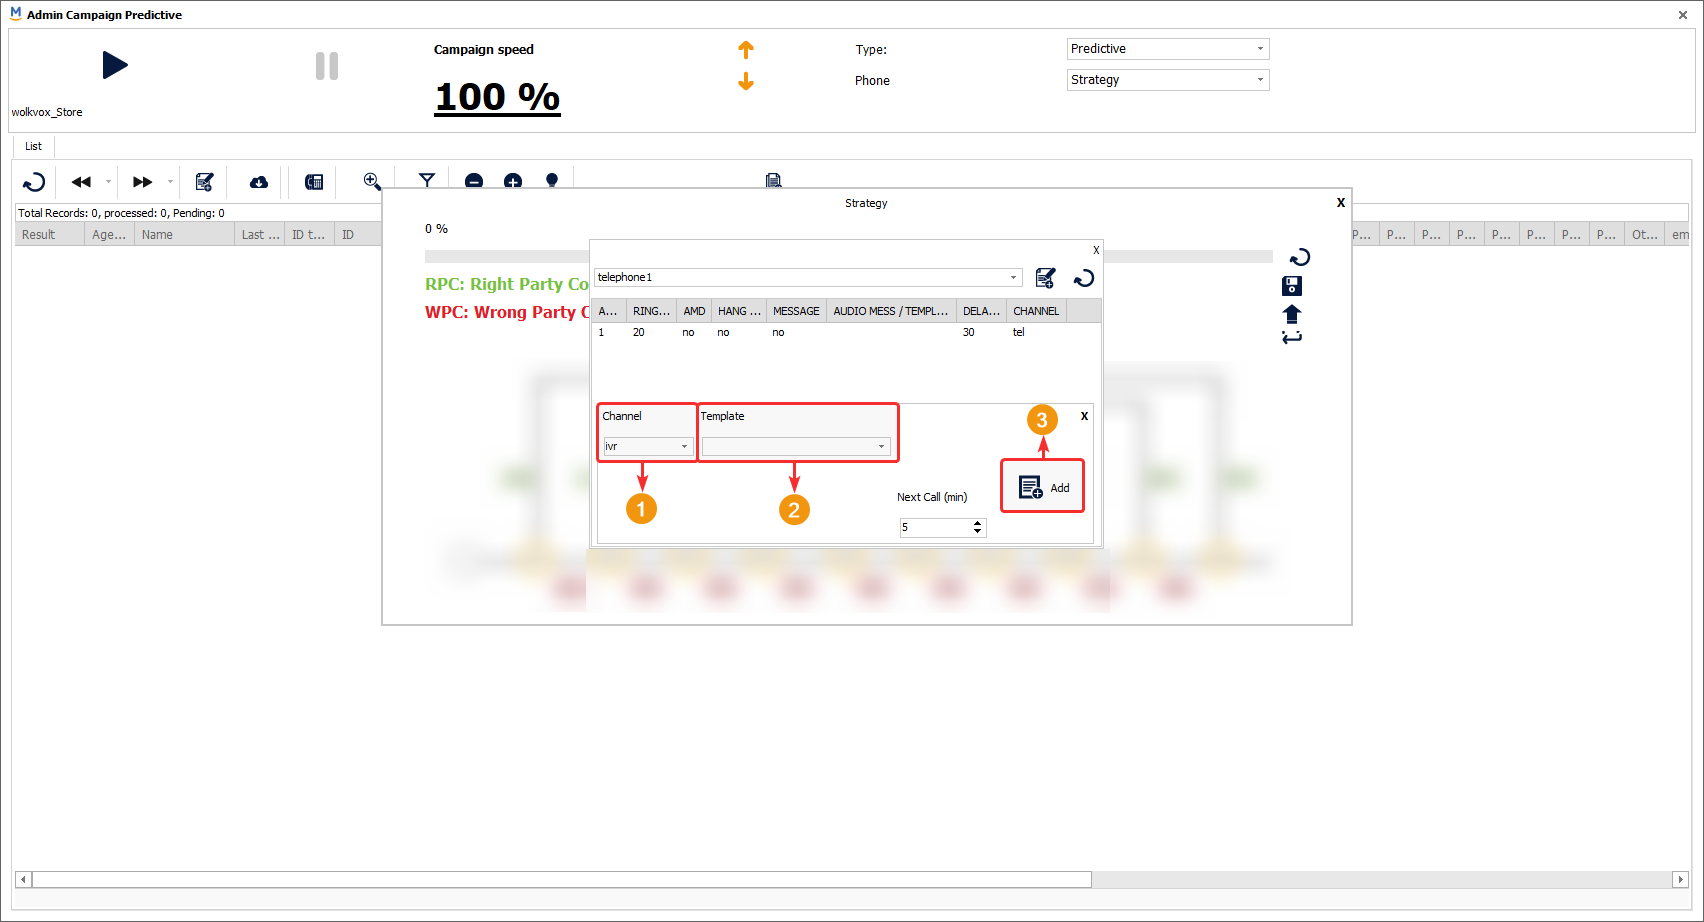
Attempt of communication through IVR #
Through this option, you can have the system route the customer to an IVR (Routing Point) that has been previously created in wolkvox Studio.
You simply need to select the desired Routing Point from the “Template” dropdown menu for the customer to be routed through.
Next Call (min): Esta opción
Using database information with variables #
Remember that you can use variables in these communication channels to have personalized message styles and structure the message based on customer data that has been previously loaded into the campaign’s database. For this purpose, keep in mind the following variables:
The use of variables in the predictive templates is performed as follows.
{customer_name} // First name of the record in the campaign
{last_name} //Last name of the record in the campaign
{id_customer} // identifier of the record in campaign
{age} // Age of the record
{sex} //Gender of the record
{country} // Country of the record
{city} // City of record
{department} //State of the record
{zone} // Zone of record
{address} //Address of the record
{id_type} //Document type of the record
{opt1} //Optional 1
{opt2} //Optional 2
{opt3} //Optional 3
{opt4} //Optional 4
{opt5} //Optional 5
{opt6} //Optional 6
{opt7} //Optional 7
{opt8} //Optional 8
{opt9} //Optional 9
{opt10} //Optional 10
{opt11} //Optional 11
{opt12} //Optional 12
{tel1} //Telephone 1 of the registry
{tel2} //Telephone 2 of the registry
{tel3} //Telephone 3 of the register {tel4} //Phone 3 of the register
{tel4} //Telephone 4 of the registry
{tel5} //Telephone 5 of record
{tel6} //Telephone 6 of record
{tel7} //Telephone 7 of record
{tel8} //Telephone 8 of record
{tel9} //Telephone 9 of record
{tel10} //Telephone 10 of record
{email} // E-mail address of record
Send mass messages on WhatsApp using campaigns #
- Access the campaigns module in wolkvox Manager.
- Select the campaign, right-click on it, and select the “Manage Predictive” option.
- In the new window, locate the “Type” field at the top and select the “Strategy” option.
- In the new window, select the first phone number “Tel1”.
- In the new window, click the “New Attempt” button.
- From the “Channel” dropdown menu, select the “WhatsApp” option.
- Choose the WhatsApp template you want to use.
- Click “Add” to add this configuration to the list of attempts.
- If you haven’t created a WhatsApp template before, you can use the button that takes you to the template creation and management menu.
- With these steps, you will have set up your WhatsApp mass messaging campaign.
Preview Dialing Campaigns #
This type of campaign is characterized by manual dialing.
In the configuration of this type of campaign, there are two additional options compared to predictive-progressive campaigns, and they are as follows:
- Assign the “Preview” type to the campaign.
- Allow add new client: If this option is enabled, it allows the agent to add a new client to the database.
- Enable contect editing by the agent: If enabled, the agent will not be able to see the client’s phone number.
- Hide phone: Similar to predictive-progressive campaigns, if this option is activated, the agent can edit the content of the client stored in the database.
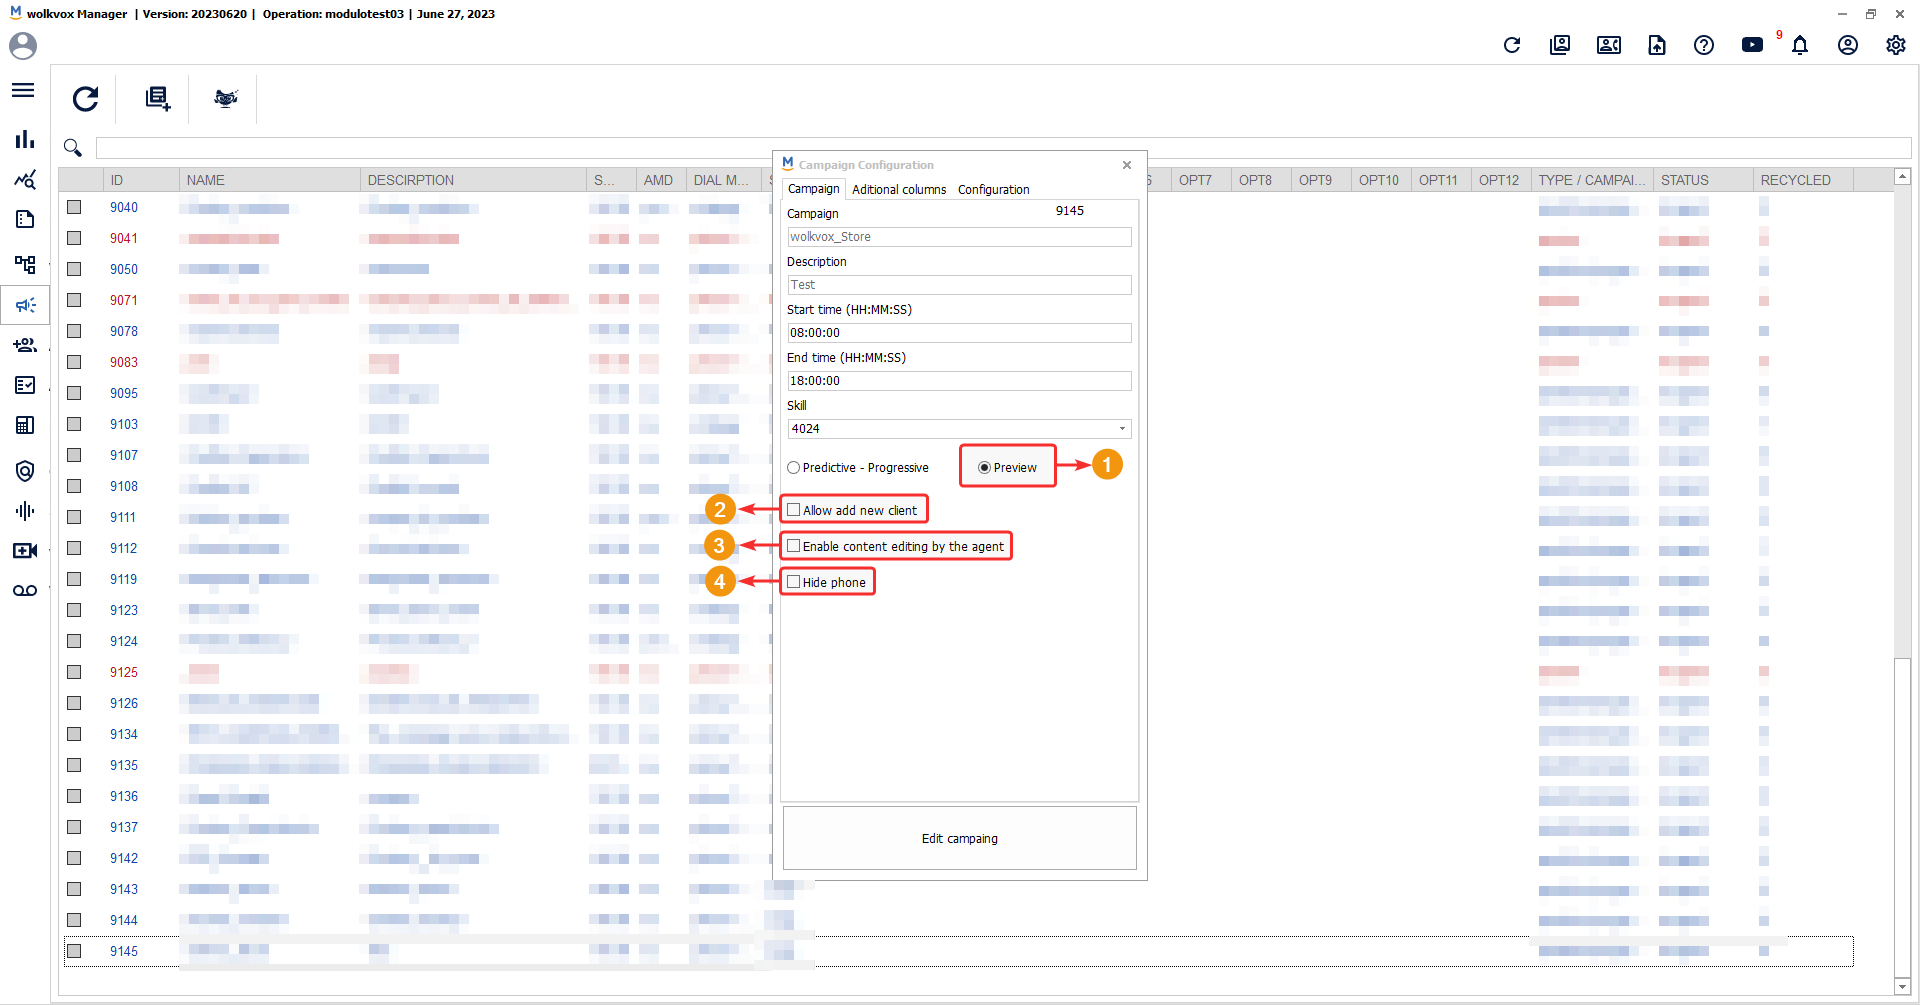
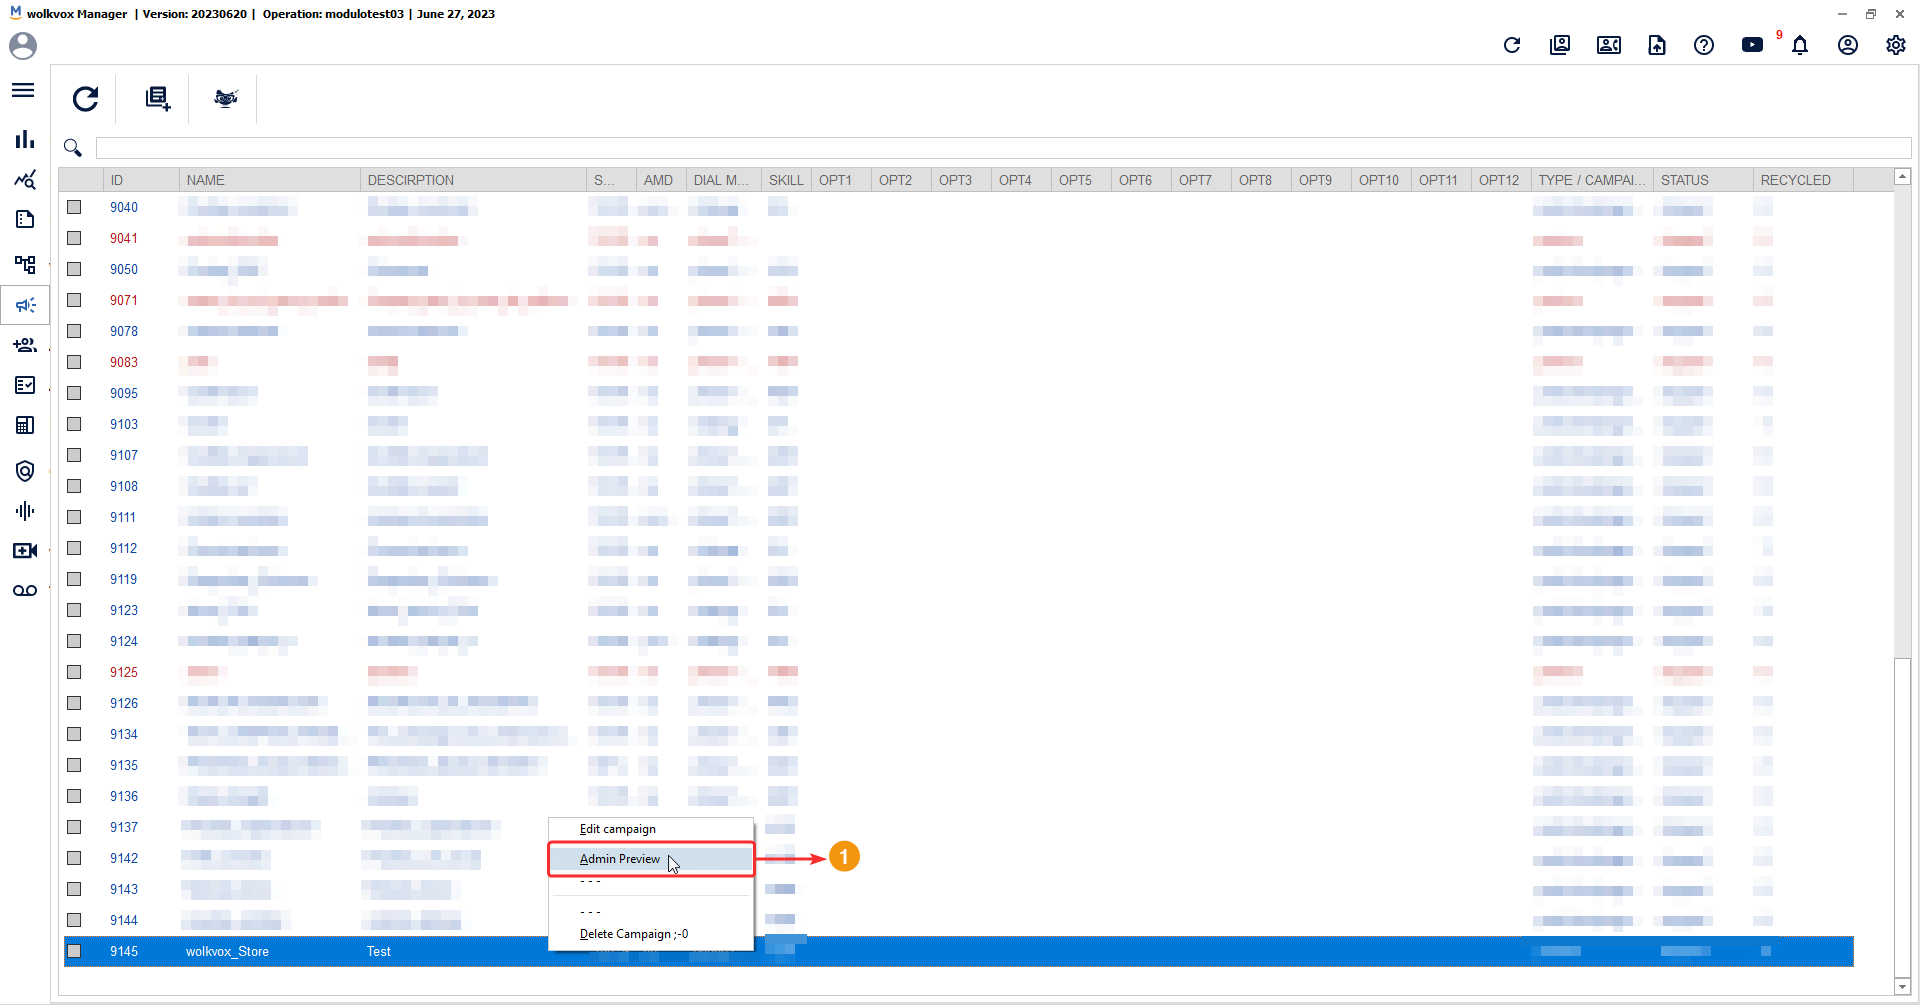
To access the administration panel of this type of campaign, right-click on the desired campaign and then select the “Admin Preview” option.
The database for predictive and progressive campaigns contains the following fields:
- Result: Indicates the outcome of the call, so this column is only available after the call has been made.
- Agent Code: Extension number of the agent who made the call. In preview campaigns, you must specify the agent ID to which you want to assign a record.
- Name: Indicates the client’s first name.
- Last Name: Indicates the client’s last name.
- ID Type: Type of identification for the client.
- ID: Client’s identification number.
- Age: Indicates the client’s age.
- Sex: Indicates the client’s gender.
- Country: Indicates the country where the client is located.
- State: Indicates the state or province where the client is located.
- City: Indicates the city where the client is located.
- Address: Indicates the client’s address.
- Opt1, Opt2, Opt3, Opt4, Opt5, Opt6, Opt7, Opt8, Opt9, Op10, Opt11, Opt12: Additional fields to add information about the client.
- Phone1, Phone2, Phone3, Phone4, Phone5, Phone6, Phone7, Phone8, Phone9, Phone10: Fields for the client’s phone numbers. The first phone column will always be mandatory for the campaign upload to be successful. The other phone columns are optional. Phone type columns must have at least 7 numeric digits.
- Other Phones: Additional field to add other phone numbers.
- Call Date: Indicates the date when the call was made.
- Calls: Number of times the client was called.
- Call ID: Call identification number.
- Recalls: Number of times the agent used the callback feature.
- Code 1: Activity code #1 used by the agent to categorize the call.
- Description 1: Description of activity code #1 used by the agent to categorize the call.
- Code 2: Activity code #2 used by the agent to categorize the call.
- Description 2: Description of activity code #2 used by the agent to categorize the call.
- Counter recalls: Total number of callbacks.
- Comments: Indicates comments left by the agent when categorizing the call.
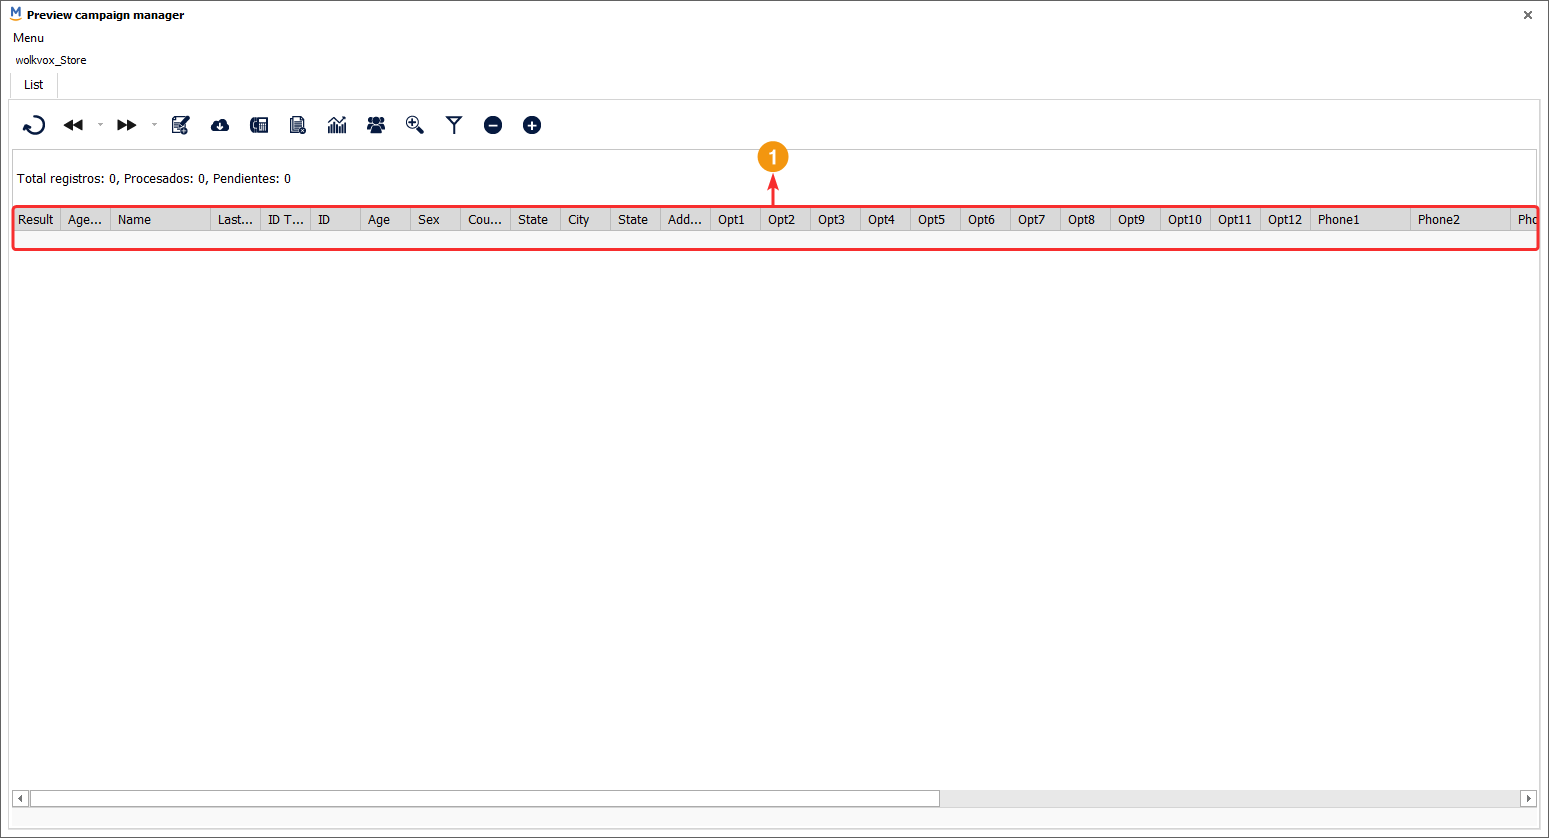
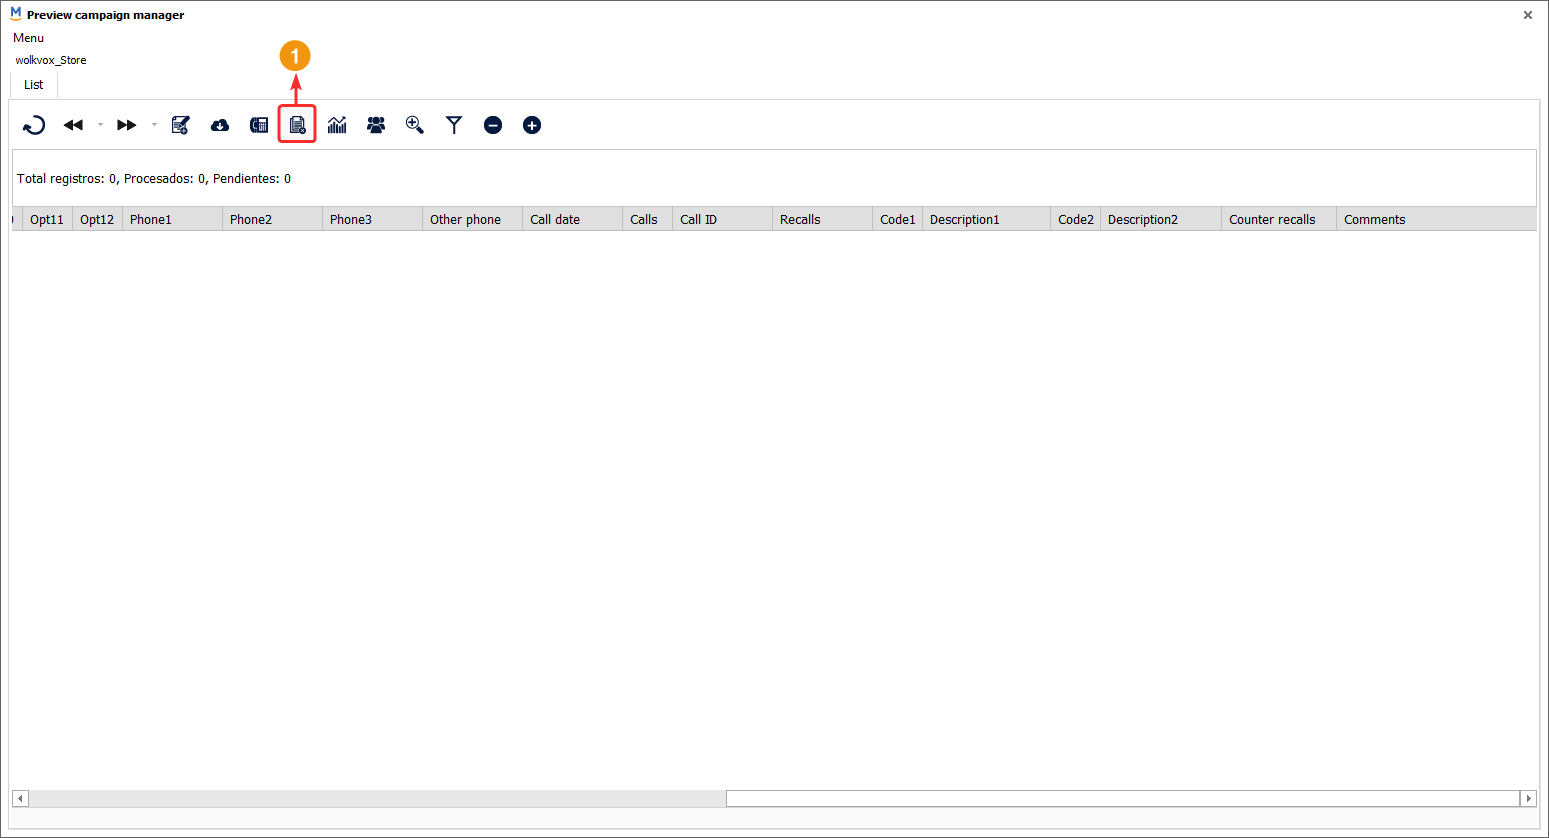
Identify the following buttons:
- Refresh: Reloads the information in the campaign’s database.
- “Previous page” and “Next page”: Allow to navigate forward or backward in the database table if there are multiple records.
Upload client list to the database (Preview Campaign) #
Requeriments to consider #
List separator configuration #
First, ensure that the bulk import of customer lists into a campaign is error-free. To achieve this, it’s essential to correctly verify and configure the Windows regional settings. This procedure ensures that numerical data, dates, and other formats are correctly interpreted by the software. To access the regional settings window, follow these steps:
- Go to “Start”.
- Type “Control Panel” in the search bar.
- If the search is successful, click on the “Control Panel” button, which is a system app.
Within the Windows “Control Panel,” you need to go to the “Clock and Region” option. You can also click directly on “Change date, time, or number formats” to quickly open the settings window.
Click on the “Region” button.
In the “Region” settings window, click on the “Additional settings” button.
Within the “Numbers” tab, configure the following:
- In the “List separator” option, select the semicolon “;”. If the semicolon is not listed as an option, you can type it in manually.
- Click on “Apply”.
- Click on “OK”.
Empty Cell Verification #
Ensure the quality of data imported into Wolkvox Manager by removing empty cells from the template before uploading it. The presence of empty cells can cause import errors and affect data accuracy.
- Identify Empty Cells:
- Visually inspect the spreadsheet to locate cells that do not contain any data.
- Use the spreadsheet’s search function to find empty cells. In Excel, you can use the “Find & Select” option to locate blank cells.
- Select All Empty Cells:
- Method 1: Manual Selection.
- Click on the first empty cell and drag the cursor to the last empty cell to select them all.
- Method 2: Use the Search Function.
- In Excel, use the “Find & Select” option to automatically find and select all blank cells.
- Delete the Empty Cells.
- Press the “Delete” key on your keyboard. This will remove the content of the selected cells but will not delete entire rows or columns.
- Method 1: Manual Selection.
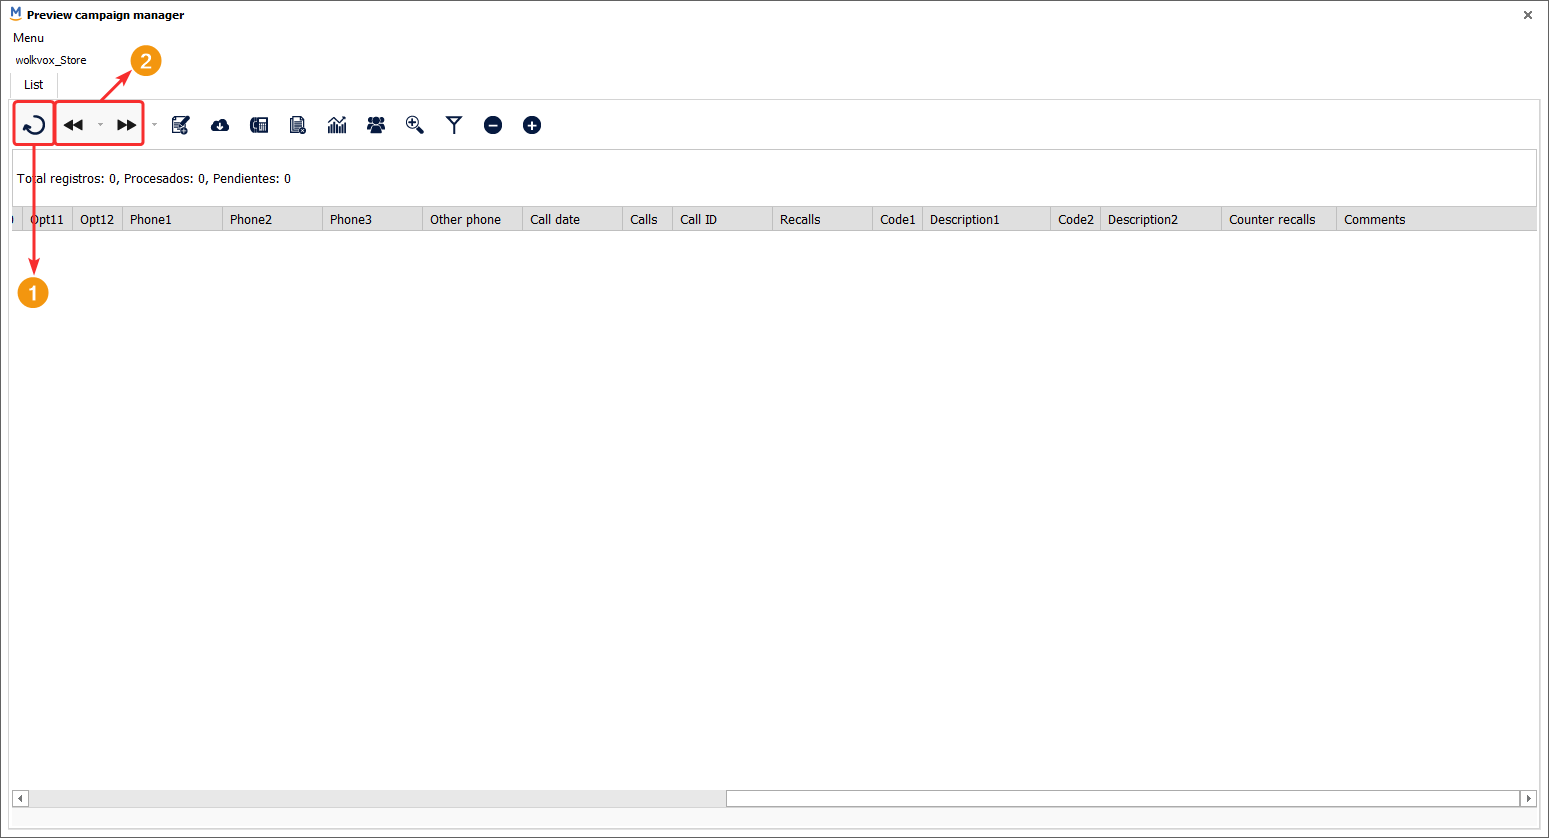
Phone Number Cell Format Configuration #
- In the “Format Cells” window, go to the “Number” tab.
- Select the “Custom” category.
- Choose the zero format “0” without decimals.
- Click “OK” to apply the changes.
In the highlighted button in the following image, you can upload the database that you will use in the campaign. Remember to respect the order of each column so that the system can recognize and link the data of each client correctly.
Important: Customer data in phone number fields must be numeric only.

It is important to remember that when creating the list you will use in the campaign, you should respect the order of the data in their respective columns. Before uploading the list, it is recommended to remove the top row, i.e., the column titles, so that the system does not consider that row as a client.
The first phone column will always be mandatory for the campaign upload to be successful. The other phone columns are optional. Phone type columns must have at least 7 numeric digits.

![]() It is also important to clarify that for this type of campaign, the client must be assigned to an agent using the “Agent” column. In this column, the agent’s extension number should be added so that they are linked, and in AgentBox, the agent can see the assigned preview records and proceed to manually call the client.
It is also important to clarify that for this type of campaign, the client must be assigned to an agent using the “Agent” column. In this column, the agent’s extension number should be added so that they are linked, and in AgentBox, the agent can see the assigned preview records and proceed to manually call the client.
- Click on the “Upload List” button.
- A new window opens where you need to upload the database file in CSV format (comma-delimited). The “Choose File” button opens the file explorer to select the file you need to upload.
- The “Upload csv file to the campaign” button allows you to upload the selected file from the file explorer.

Export the database list #
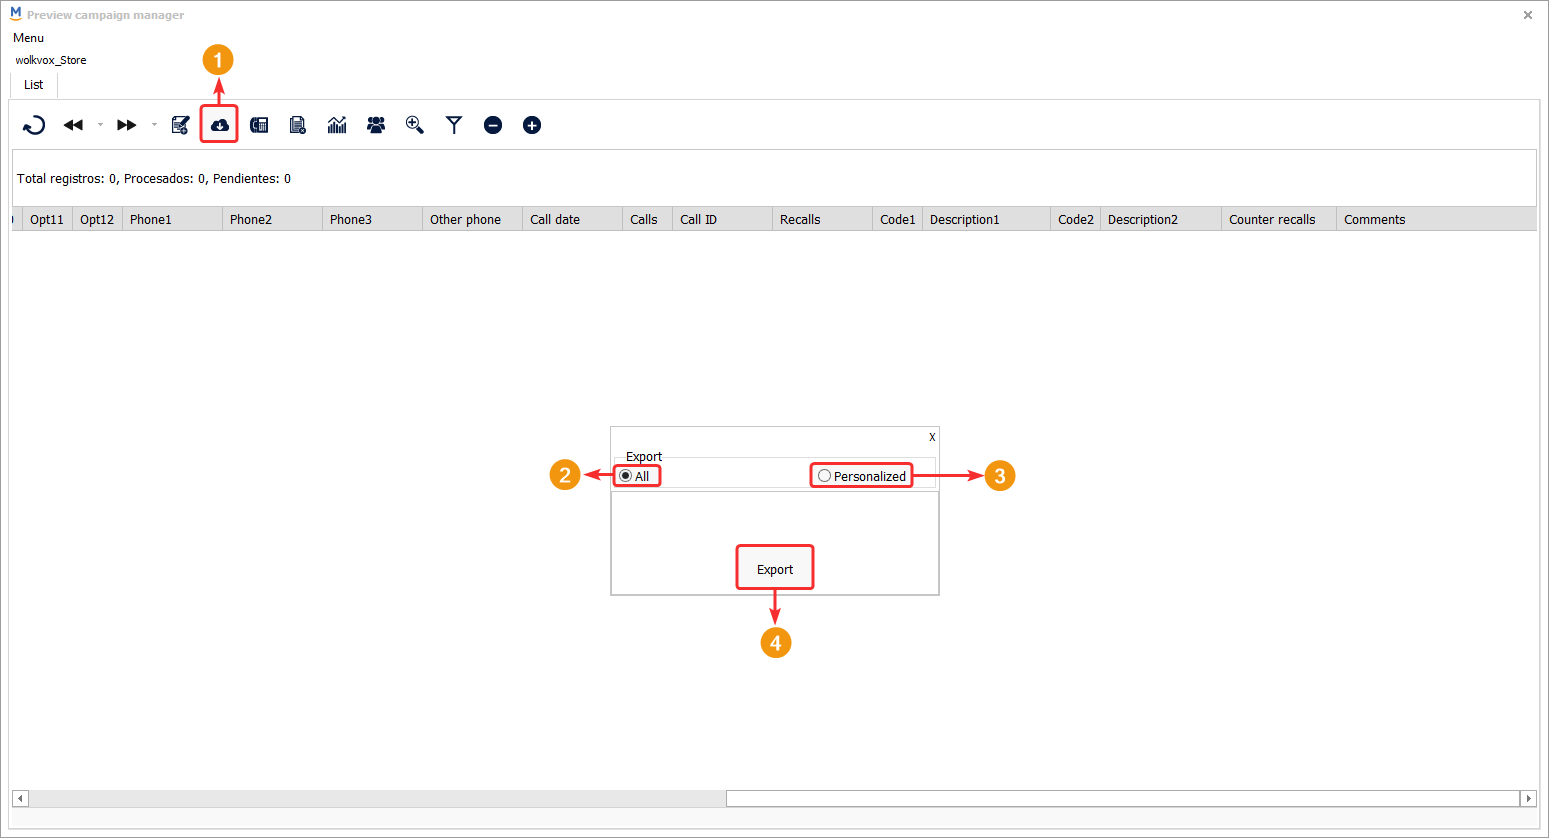
The highlighted button in the following image allows you to download the entire list from the campaign’s database.
You can download the complete list generated over time or within a specific date range (customized).
![]() The downloaded document will be in CSV format, which can serve as a template for generating a new database and uploading it later.
The downloaded document will be in CSV format, which can serve as a template for generating a new database and uploading it later.
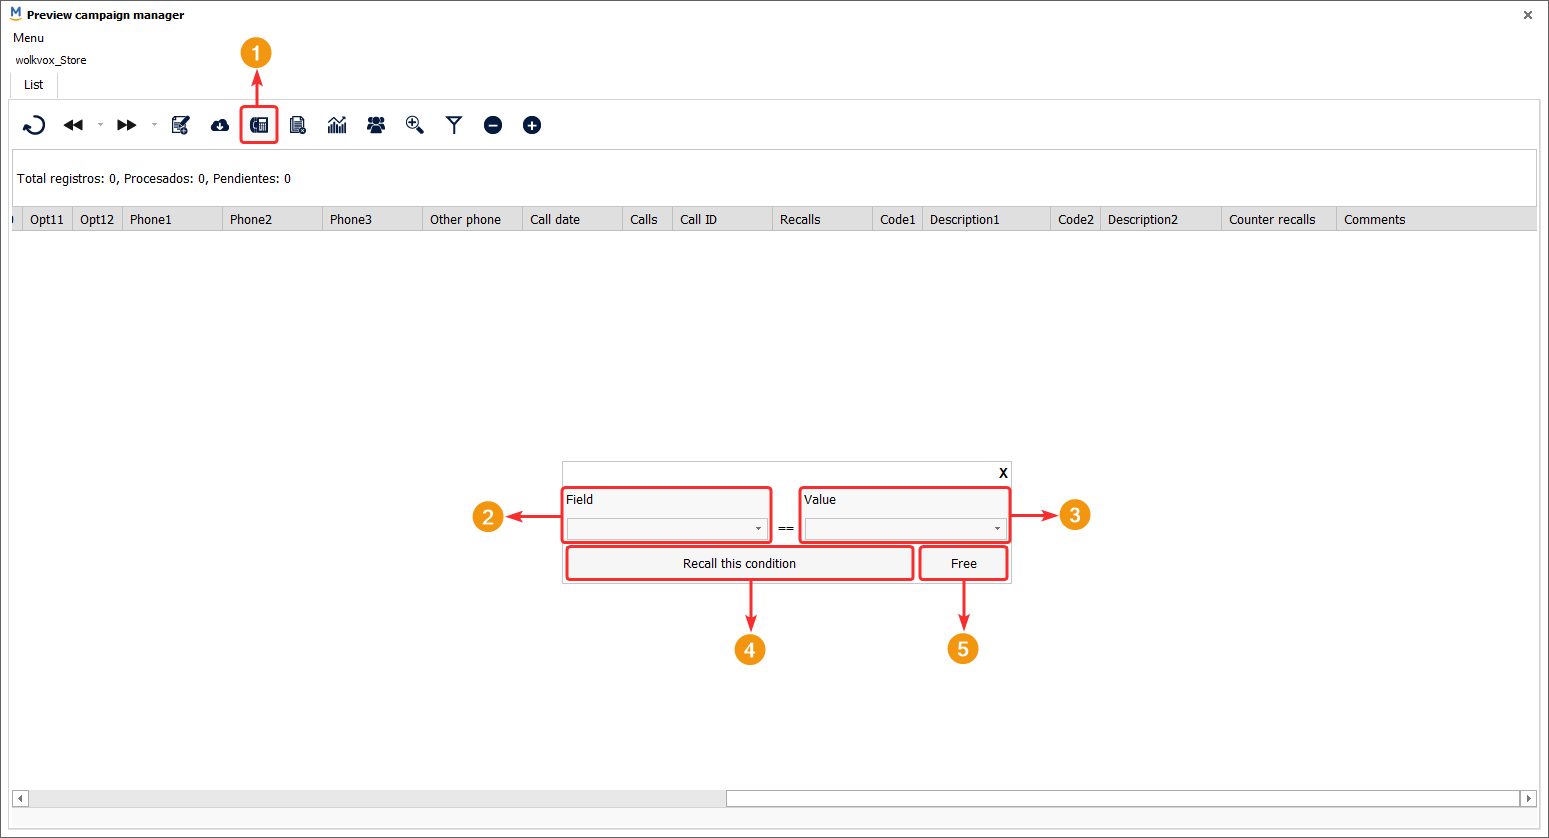
Schedule callback based on machine code or activity code result #
In the “Callback” option, you can make the system call back the numbers that have been tagged with a specific machine code or activity code. For example, if you want to schedule callbacks for all numbers marked with the machine code “No Answer,” you should configure the tool as follows:
- Click on the “Callback” button.
- Field: Select “customer closing code” if you want the callback to be based on the encoding code used in the call. Select “Last call code” if you want the callback to be based on the last encoding code used in the previous call.
- Value: Select the value that must be met to initiate the callback.
Delete All Records #
The “Delete List” button allows you to delete all the records in the current campaign. The system will ask you four times if you really want to delete all the records.
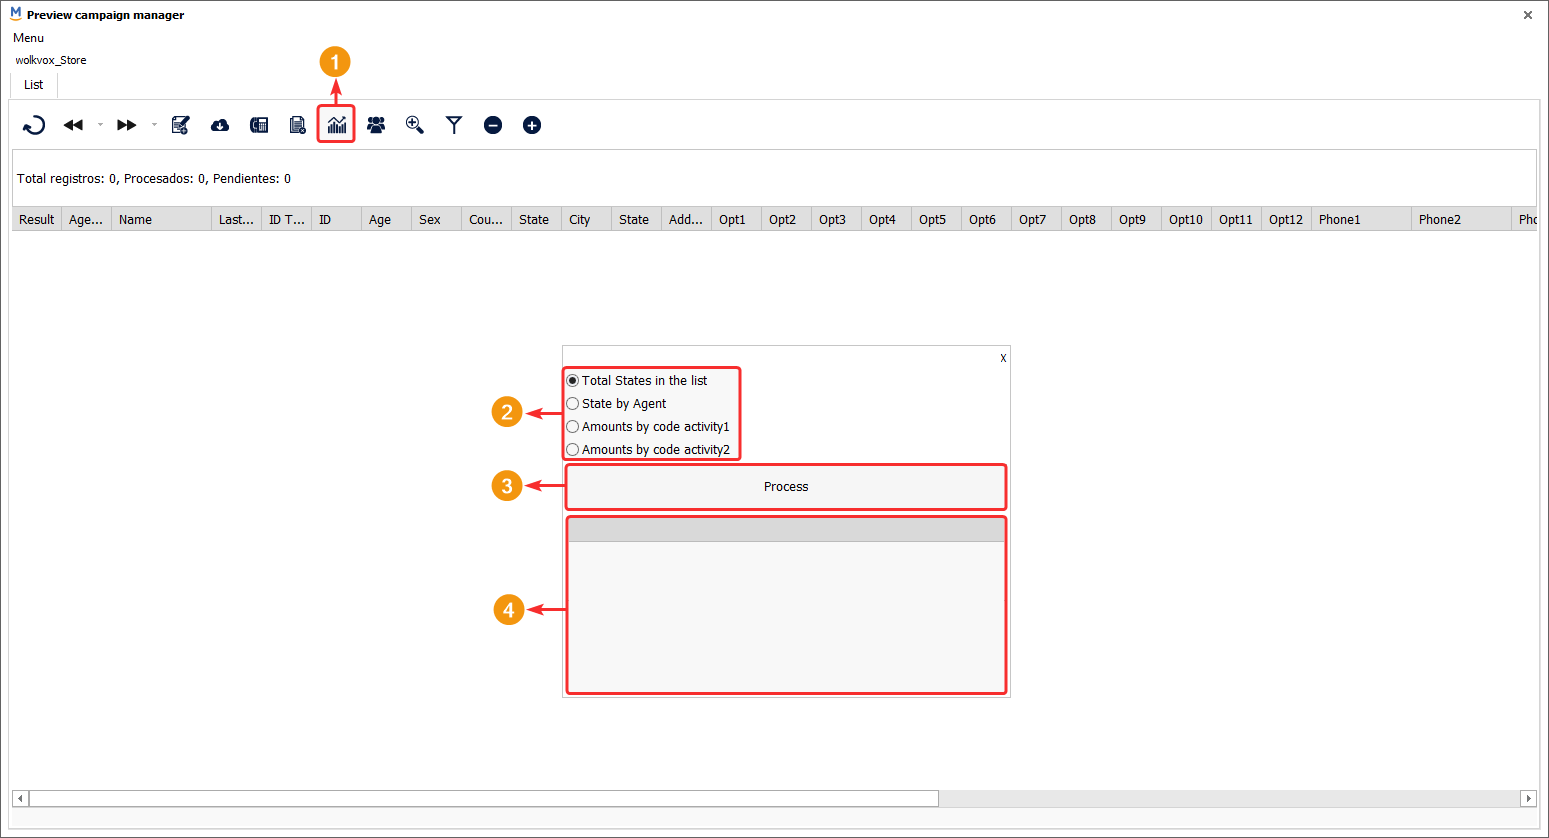
Campaign Preview Statistics #
You can obtain statistical information about the campaign using the “statistics” button. The statistical options you can find are:
- Total States in the list: Displays the number of agents in a specific state.
- State by Agent: Shows the state in which each agent is located.
- Amounts by code activity 1: Displays the number of categorized calls with activity code 1.
- Amounts by code activity 2: Displays the number of categorized calls with activity code 2.
Note: This tool is used to obtain quick statistics of the campaigns you have in your operations center.
Transferring records from a database in a campaign preview #
Using the “Spending records from one user to another” button, you can transfer the clients you have in the agent’s database to another agent. Follow these steps to transfer these records:
- Click on the respective button to open the window.
- Select the agent who owns the database you want to transfer.
- Choose the agent to whom you want to send the database or records.
- You can choose whether to send all the records or a specific number (ranging from 5 to 100,000).
- Click on “Move records between these users” to complete the transfer.

Search for an item #
Using the button highlighted in the following image, you can search for an item within the current campaign’s list. Once you click the button, a field appears for entering text and the “Search” button, allowing the system to search for the entered value within any element of the list.

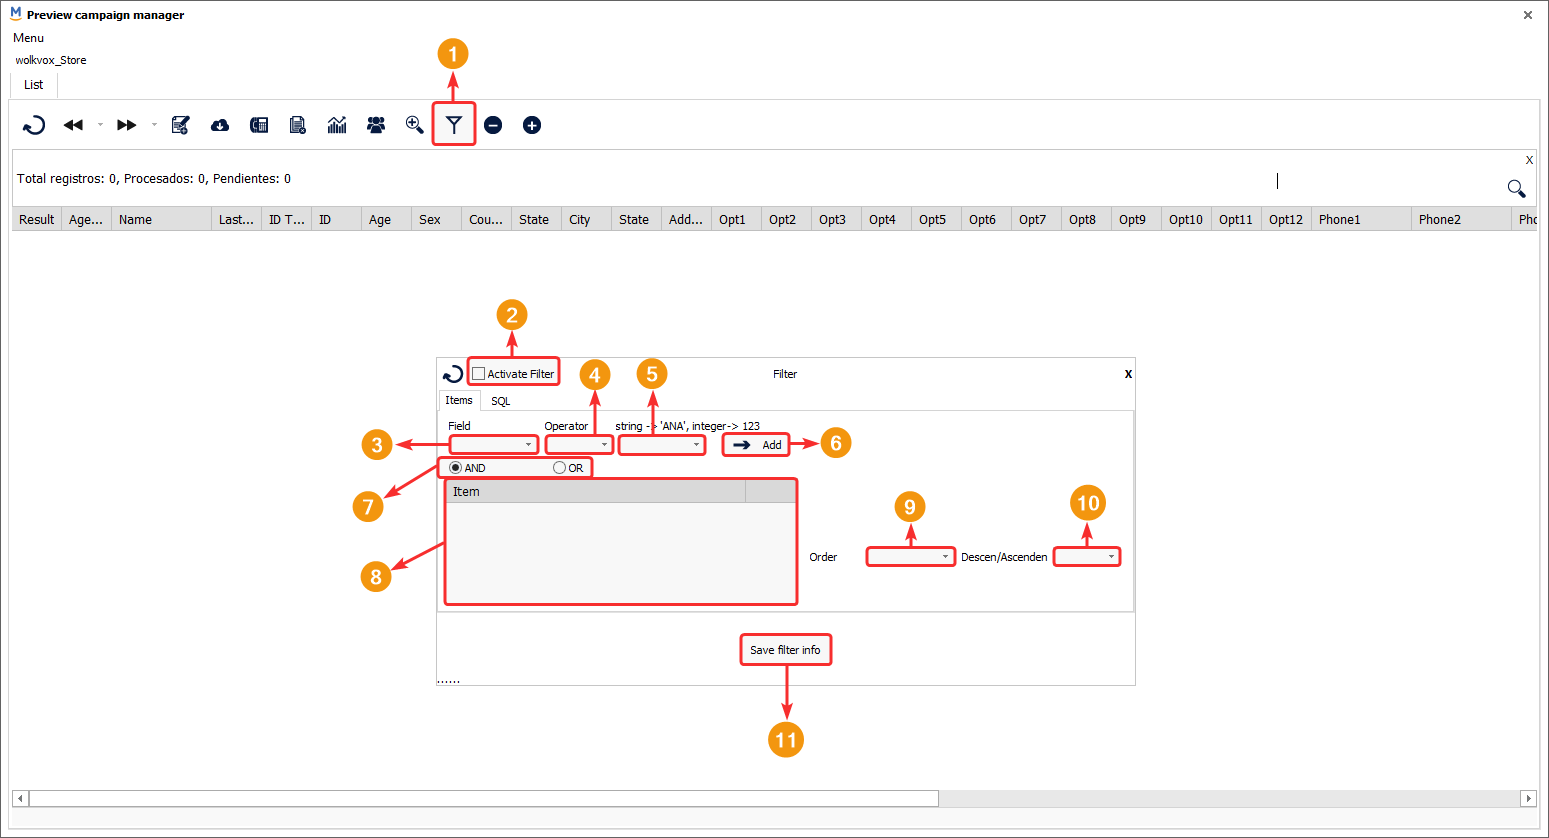
Filtering and conducting a more personalized search #
The “Filter” button allows for a more personalized search based on the criteria defined in the fields. The following explains each parameter:
- Click on the “Filter” button to open the filter window.
- Activate or deactivate the filtering.
- Choose the field by which you want to filter the search.
- Select the relational operator to compare the “Field” with the “string” or “integer”. Here you can choose:
- = : Will search for all values that are equal (in the selected field type) to the text or number you will enter in “string” or “integer”.
- < : Will search for all values that are less than (in the selected field type) the text or number you will enter in “string” or “integer”.
- <= : Will search for all values that are less than or equal to (in the selected field type) the text or number you will enter in “string” or “integer”.
- > : Will search for all values that are greater than (in the selected field type) the text or number you will enter in “string” or “integer”.
- >= : Will search for all values that are greater than or equal to (in the selected field type) the text or number you will enter in “string” or “integer”.
- != : Will search for all values that are different (in the selected field type) from the text or number you will enter in “string” or “integer”.
- is : Will search for all values that are exactly equal (in the selected field type) to the text or number you will enter in “string” or “integer”.
- like : Will search for all values that are almost equal (in the selected field type) to the text or number you will enter in “string” or “integer”.
- In the “string” or “integer” field, enter the value you want to search for, you can enter text or numbers.
- Click “Add” to add the previously created item with its values (field, operator, and string).
- Select “And” for the system to filter values that meet all the added items. You can select “Or” to filter values that contain any of the items.
- View the added items in the highlighted table.
- You can sort the search according to a field from the dropdown menu.
- Sort the table in ascending or descending order.
- Click “Save filter info” to apply the changes.
For example, in the following image, you can see that based on the added parameters, only fields containing the word “Mario” in their value would be displayed.
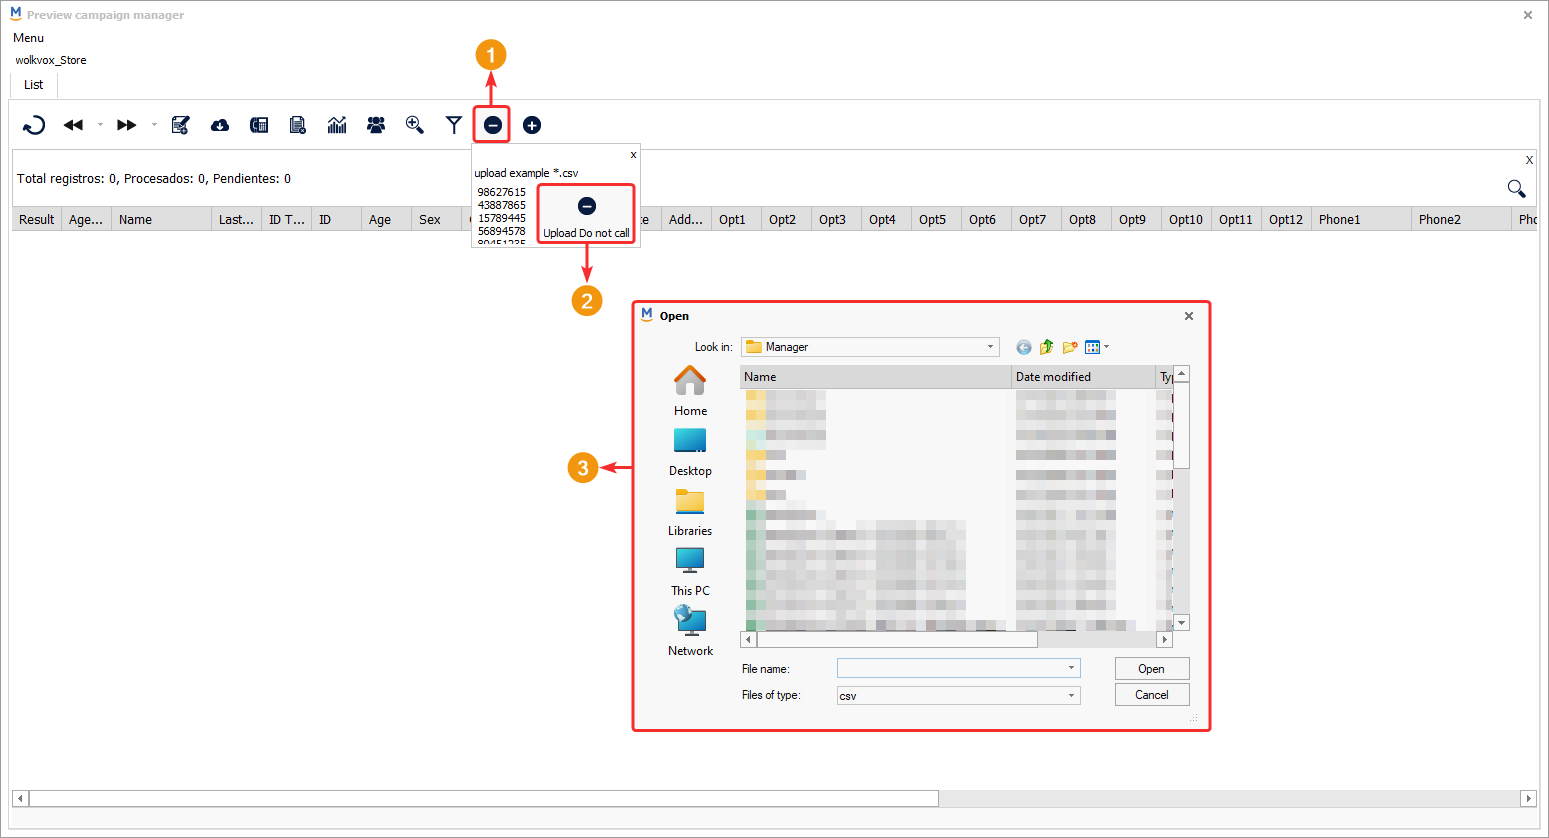
Uploading a blacklist of numbers to block #
Using the “Do Not Call” button, you can import a CSV file (comma-delimited) that contains customer identification numbers you wish to block in your operation center. This means the system will never dial the numbers entered in this option.
Important: Customer data in phone number fields must be numeric only.
Removing numbers from the “Do Not Call” blacklist #
The “Remove Do Not Call” button allows you to remove customer numbers that have been added to the Do Not Call blacklist. Files must be uploaded in CSV format (comma-delimited) with the identification numbers of the customers to be unblocked.
Smart Dial #
Allows you to obtain the most contactable numbers from the database you wish to upload.
To obtain this information, it is necessary to upload a CSV file with the customer identification numbers. Then, the system will display a new window to select the download location for a plain text file that will contain the phone numbers, time, and contact percentage for each record.

