This service allows you to perform a quality analysis of the interactions in your operation. These interactions are the result of a calculation based on specific activity code typifications in the matrix. In other words, with this tool, you can rate interactions that took place and have a record that enables you to understand the performance of your advisors.
Quality Analyzer Configuration #
Enable or disable the automatic quality analysis service #
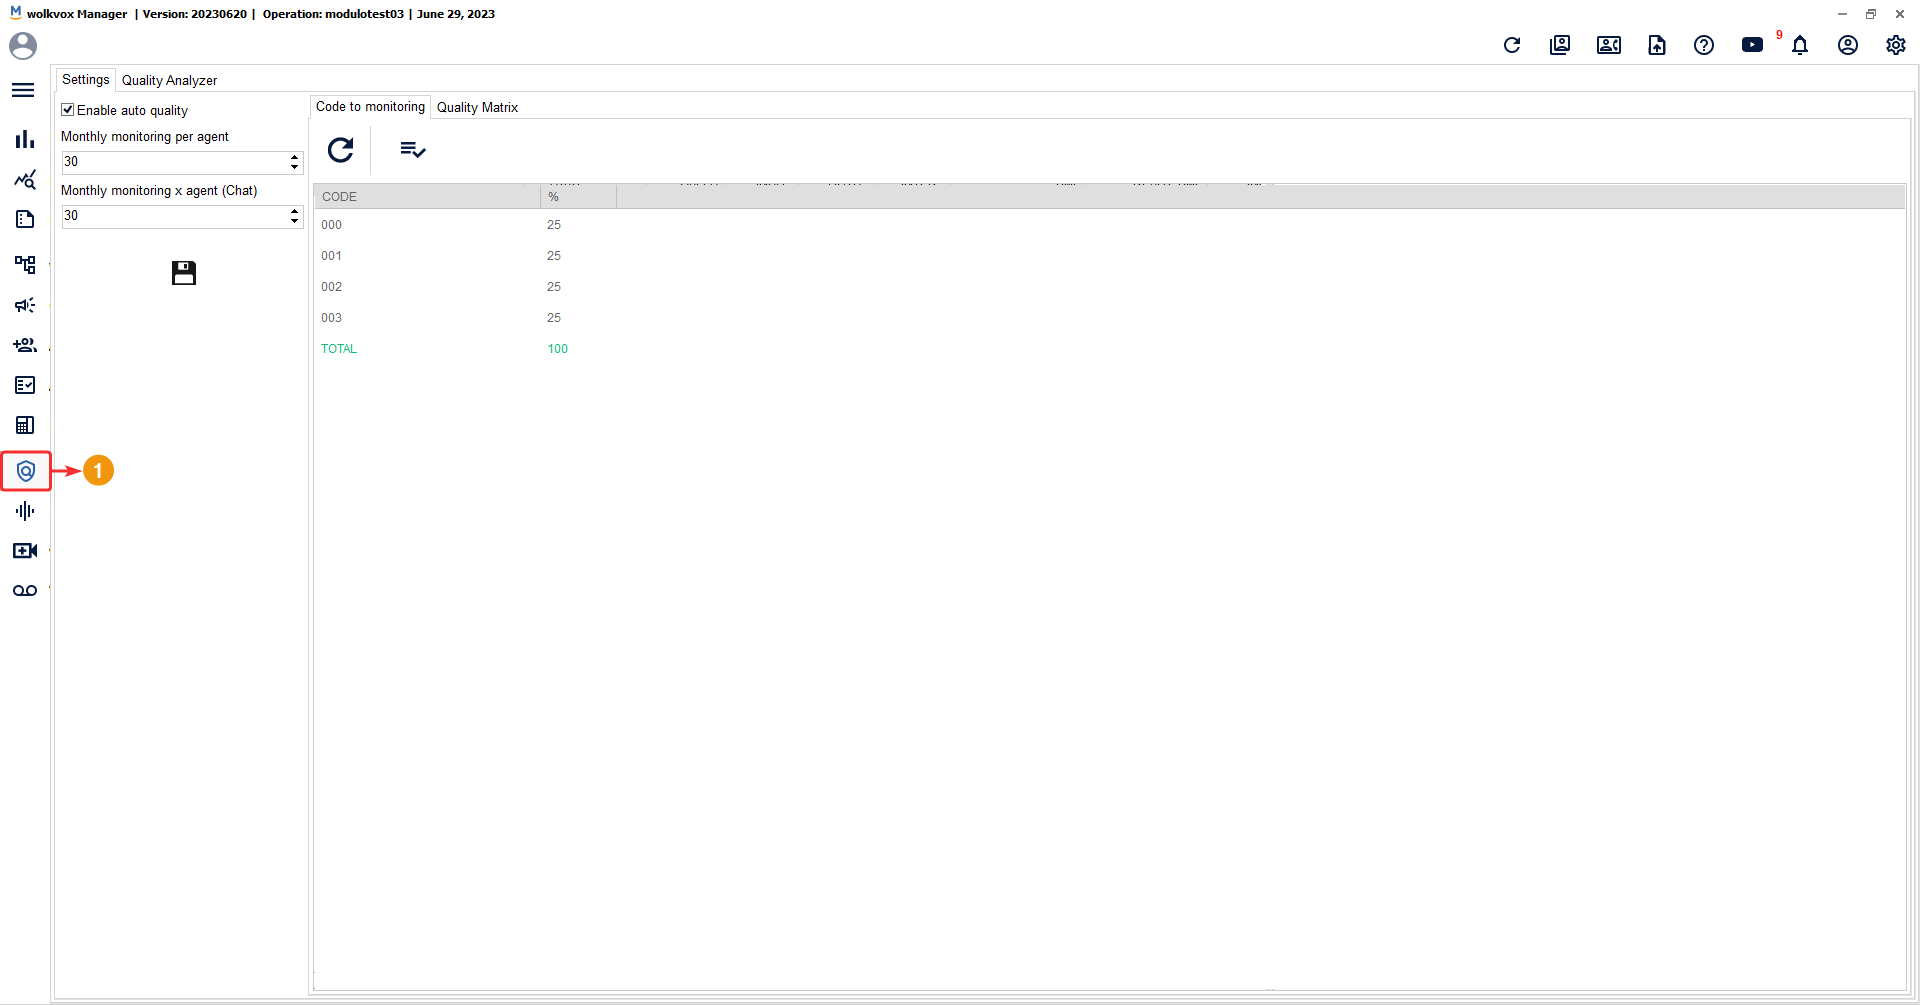
In the highlighted area in the following image, you can activate and configure the service that analyzes calls and chats to rate the assistance provided by agents in these channels, all done automatically.
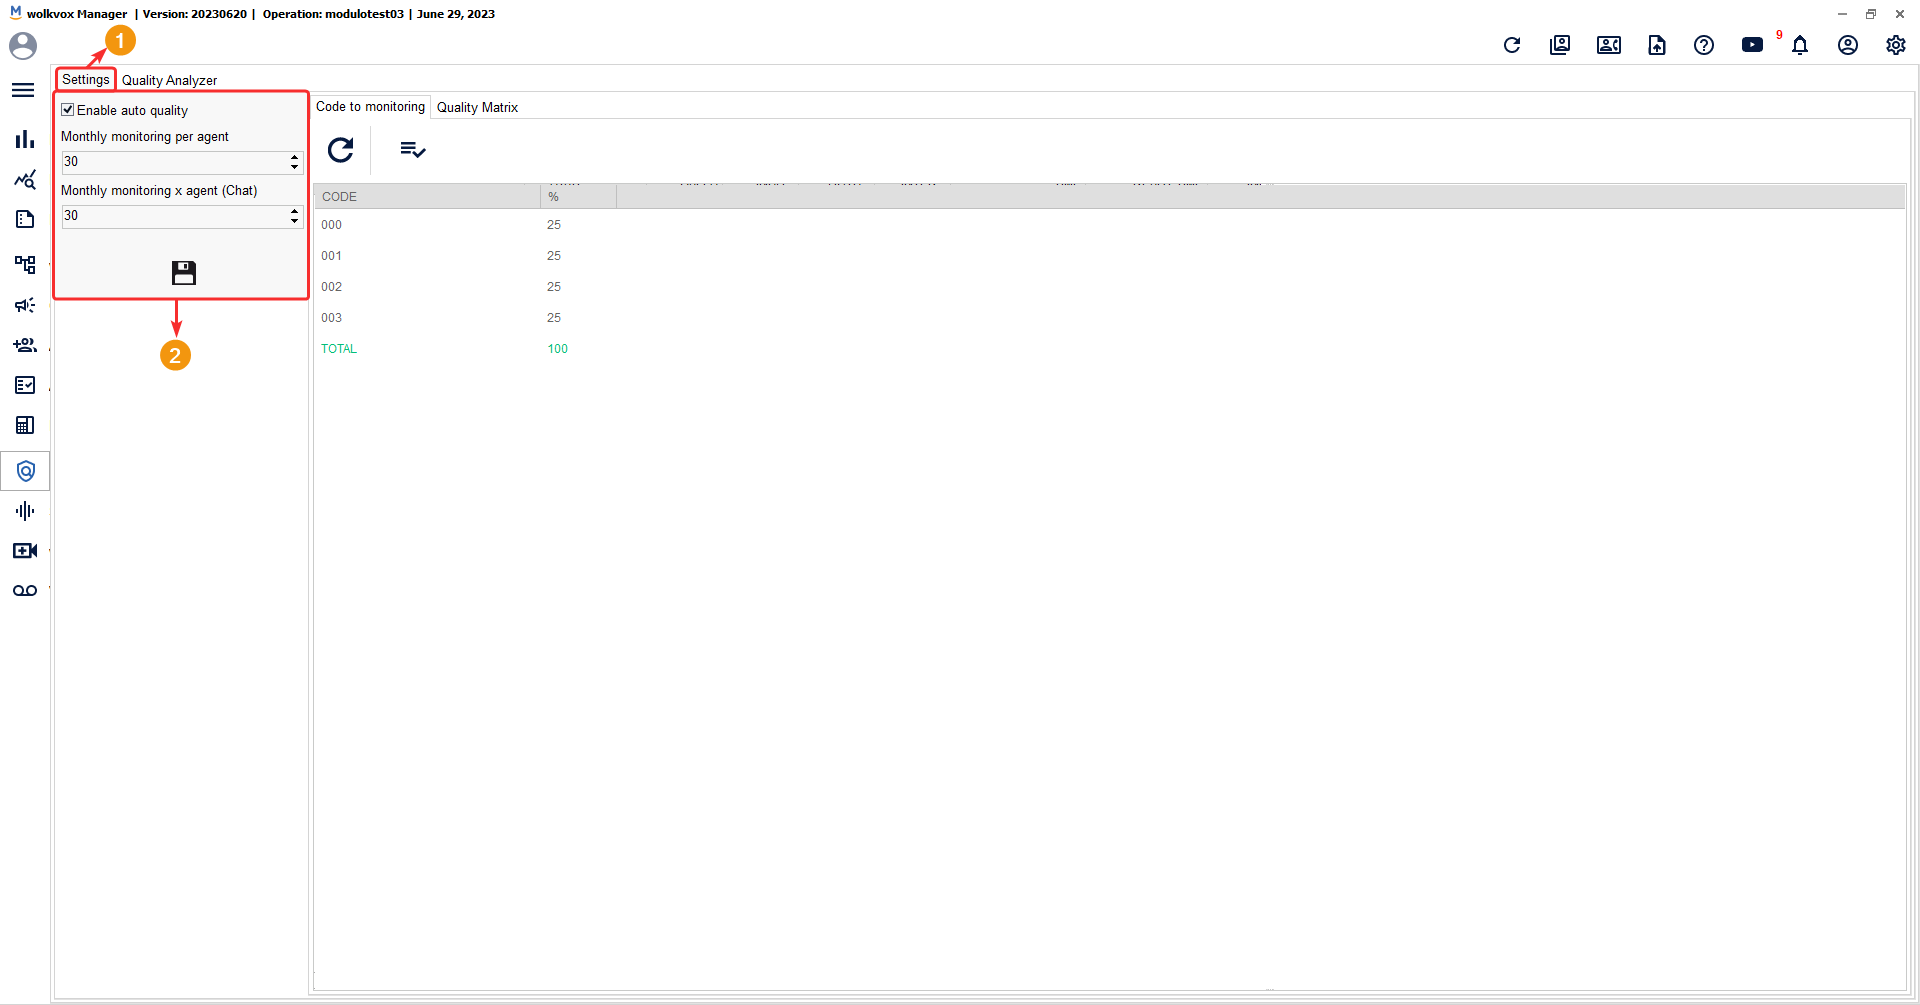
- Make sure you are on the “Settings” tab.
- Enable or disable the service using the checkbox located in the “Enable Automatic Quality” field.
- In “Monthly Monitoring per Agent (Voice)”, specify the number of calls you want to rate for each agent.
- In “Monthly Monitoring per Agent (Chat)”, specify the number of chats you want to be rated for each agent.
- Click the floppy disk icon to save the automatic quality analysis configuration.
Define the activity codes or categorization to monitor #
In the “Codes to Monitor” tab, you need to add the activity codes (previously created) and the percentage of coded calls with those activity codes that you want to consider for quality analysis. In other words, the system takes into account the percentage of coded calls with the specified activity codes.
- First, go to the “Codes to Monitor” tab.
- Then, click on the highlighted button in the following image.
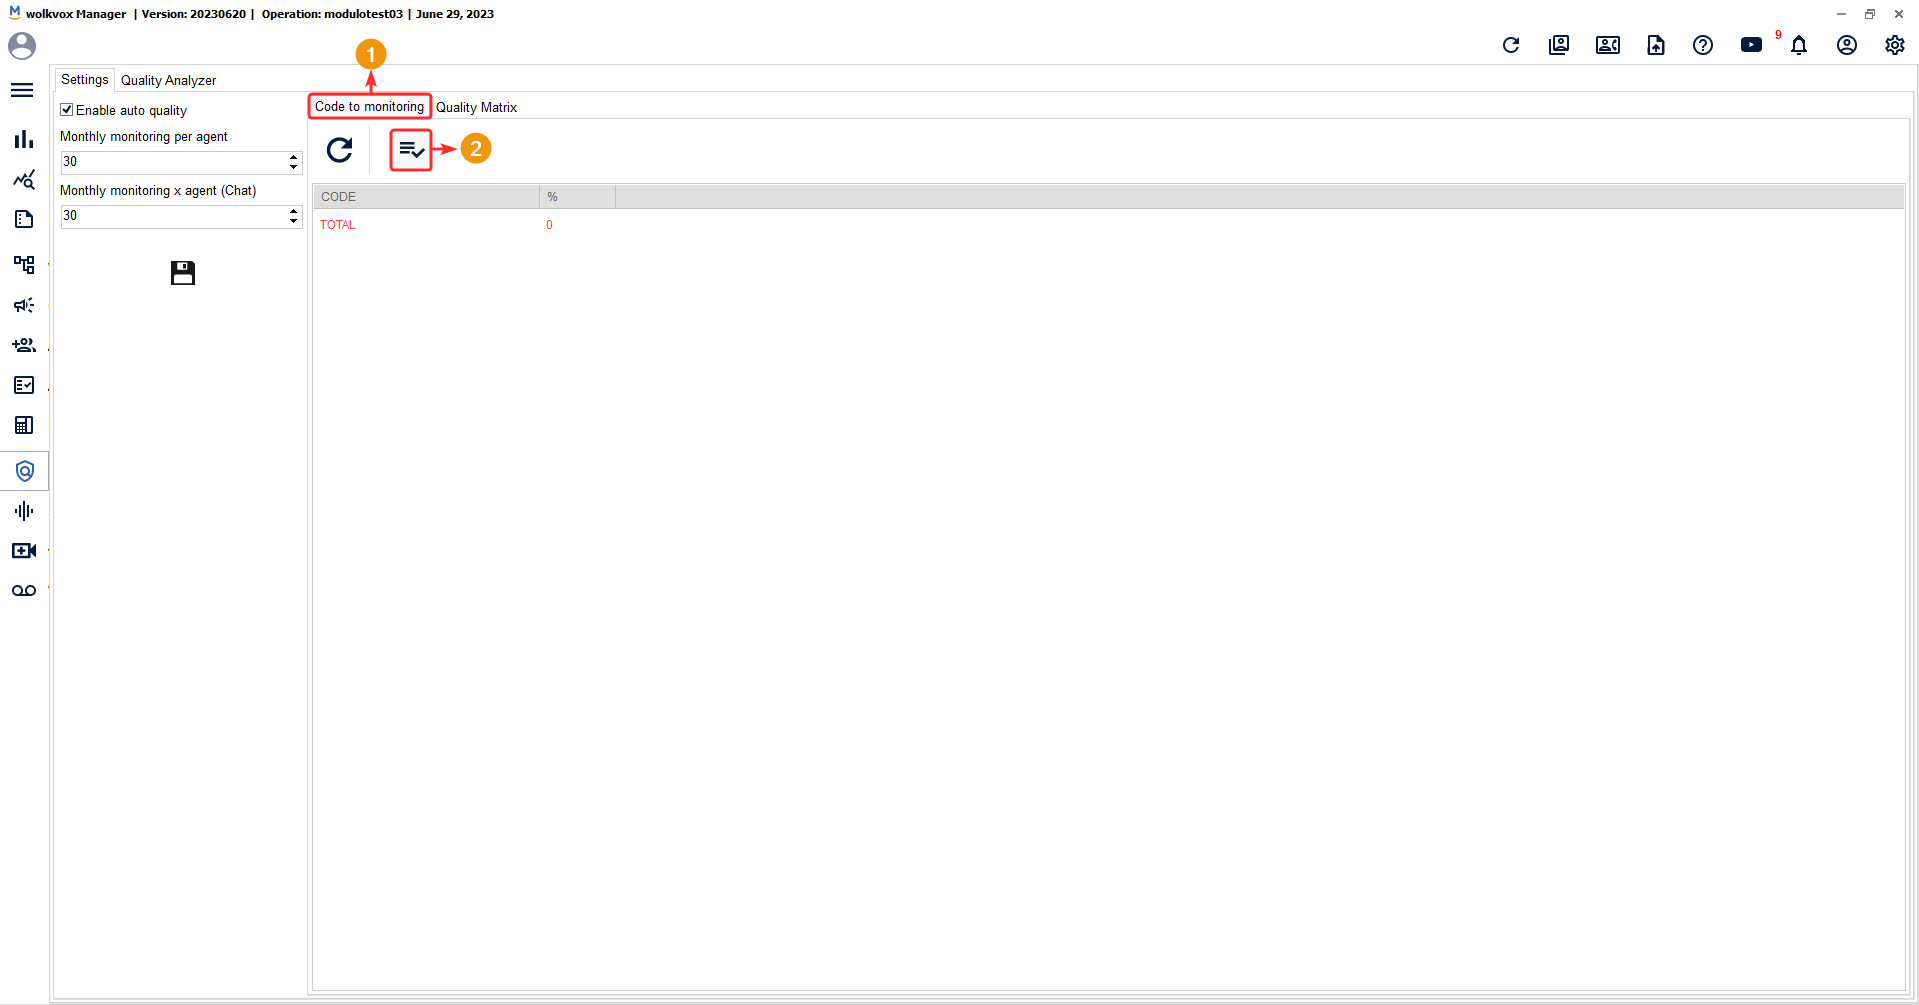
A window will appear where you need to configure the quality code to assign to the service:
- Select an activity code or classification from which the system will take a percentage of calls.
- Assign a percentage of classified calls with the previous activity code for the system to include them in the quality analysis.
- Click on “Add percentage in classification” to add the configured settings.
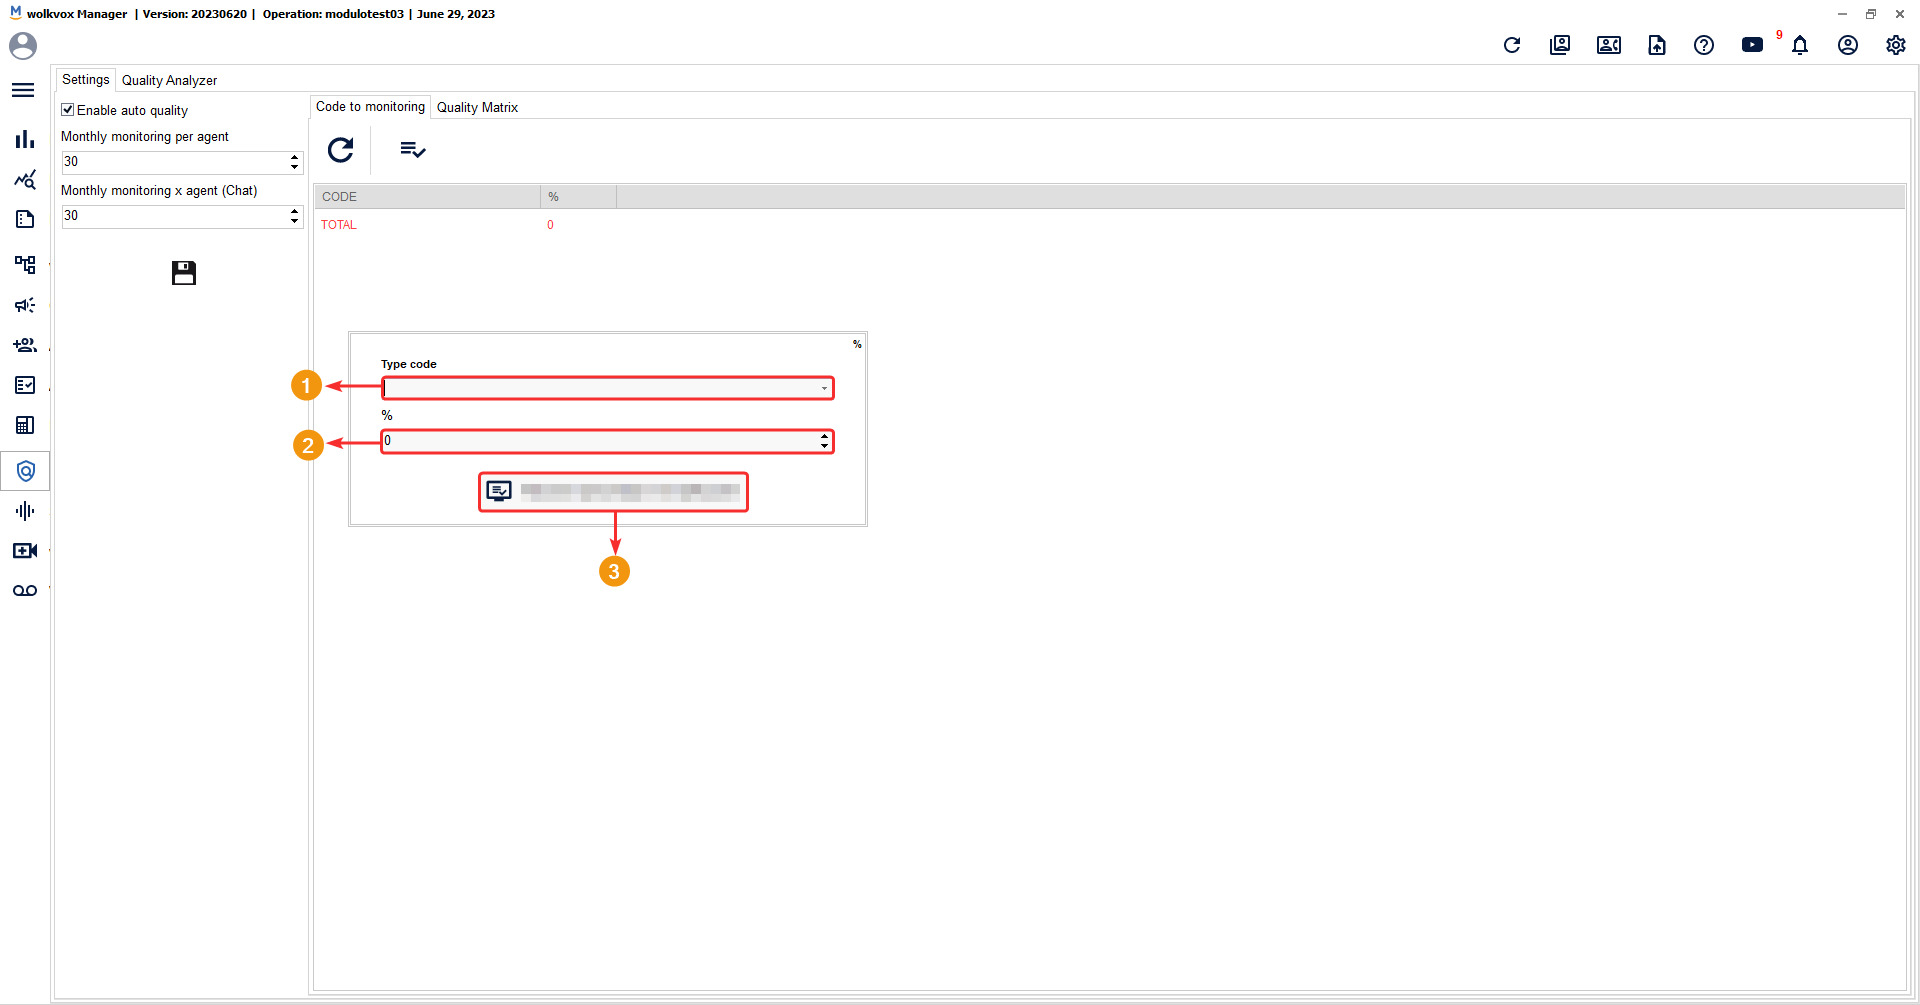
It is important to clarify that the total percentage should not exceed 100%.
- Below are four activity codes that should be considered for quality analysis: 001, 007, 009, and 010.
- Each activity code in this example has a weight of 25% of the total.
- The total percentage assigned to each code adds up to 100%.
- Note: Although this example only includes 4 activity codes, remember that you can add as many activity codes as you want as long as the total does not exceed 100%. Distribute the percentage weight assigned to each activity code according to your objectives.

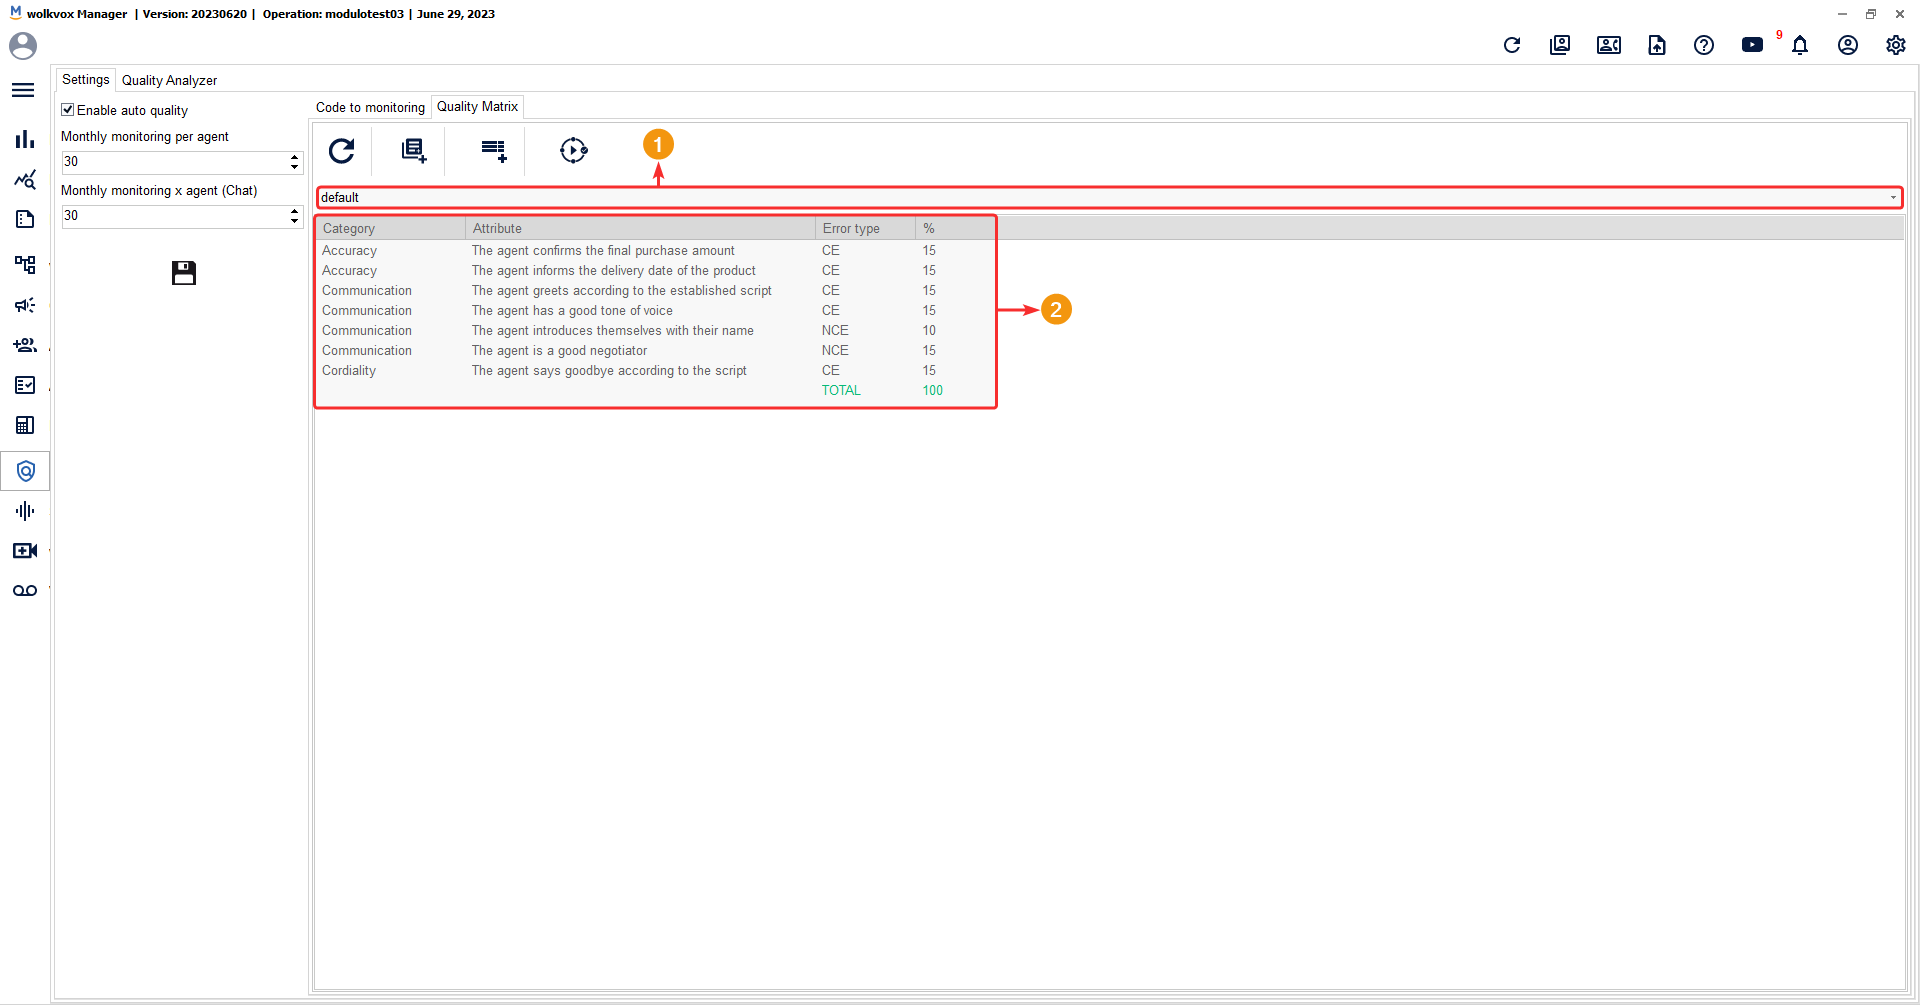
Add a quality matrix #
In the “Quality Matrix” tab, you can create surveys that contain the conditions or attributes to consider when rating agent actions.
Through this survey, you can evaluate the agent’s performance based on the evaluation criteria you create in this section.

Create a quality survey #
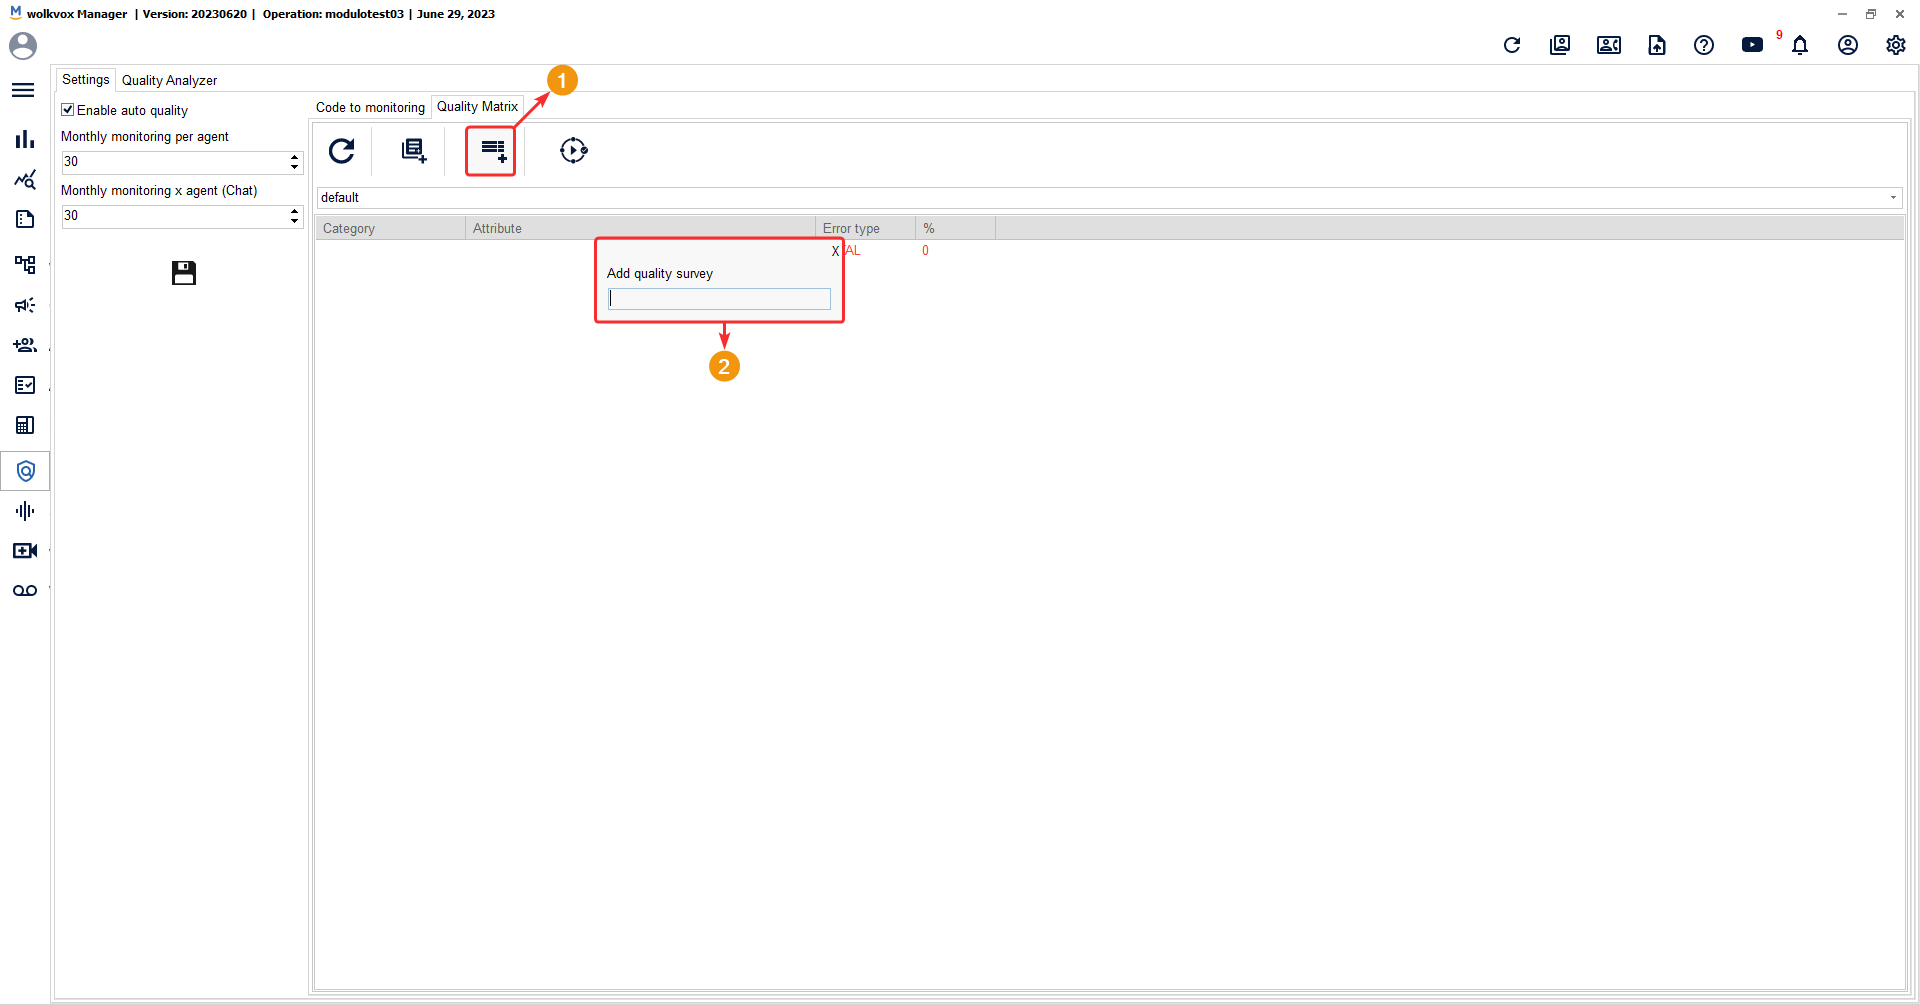
To create a quality survey, follow these steps:
- Click on the “Create new survey” button.
- Assign a name to the new survey using the window that appears.
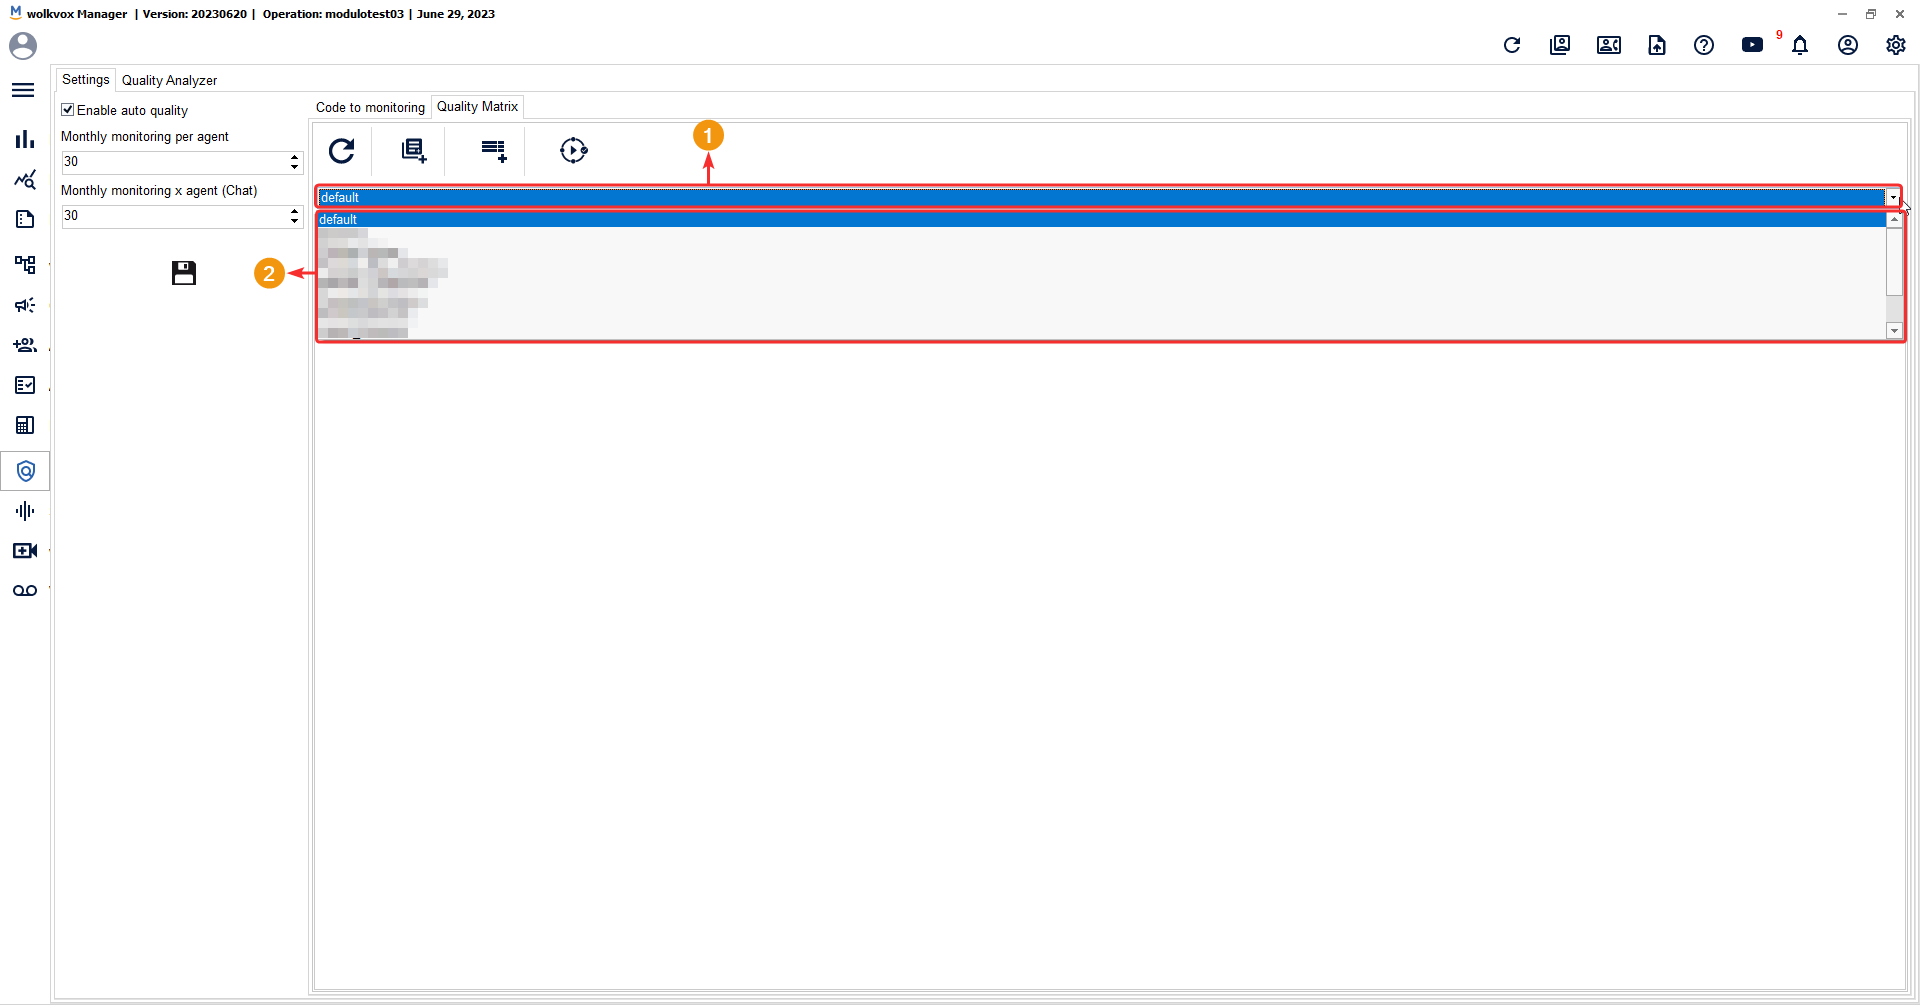
To edit the new survey, select it from the dropdown menu in the designated field as shown in the image.
Add attributes to the quality surveys #
Add attributes to the selected quality survey by following these steps:
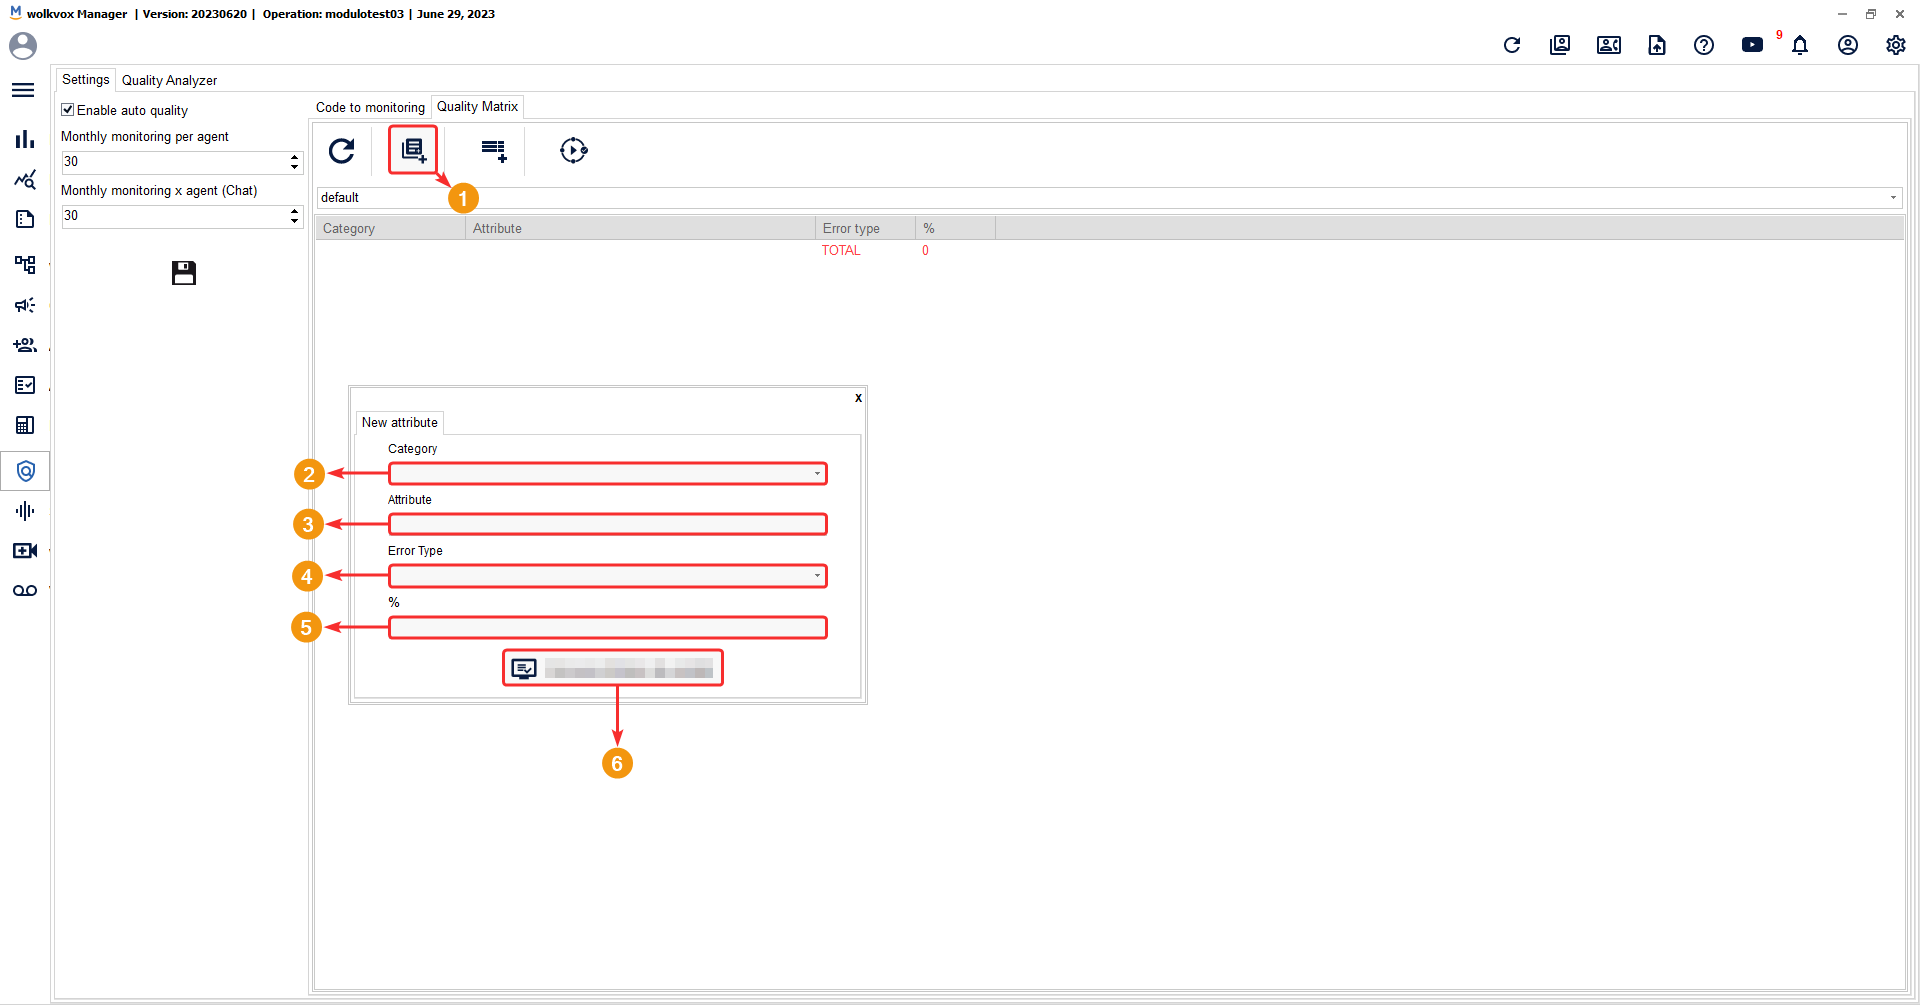
- Click on the “Add Attribute” button.
- In the “Category” field, enter a new category for the attribute. If you have already created one, you can click on it and a menu will appear where you can select the desired category.
- In the “Attribute” field, enter the attribute or condition to be assessed.
- In the “Error Type” field, you can select “CE” to establish that non-compliance with the attribute is defined as a critical error. Or select “NCE” to establish that non-compliance with the attribute is defined as a non-critical error.
- In the percentage sign field, define the percentage weight you want the attribute to have on the rating. You can also identify this field as the importance of the attribute on the rating.
![]() The total value of the attribute percentages should not be less than 100% or exceed 100%.
The total value of the attribute percentages should not be less than 100% or exceed 100%.
Below you can see an example of a “Quality Matrix”.
Note that in the selected survey (default), seven attributes have been created, well categorized, and with their respective weight on the overall evaluation.
This survey is well-structured as the total does not exceed 100 or fall below 100.
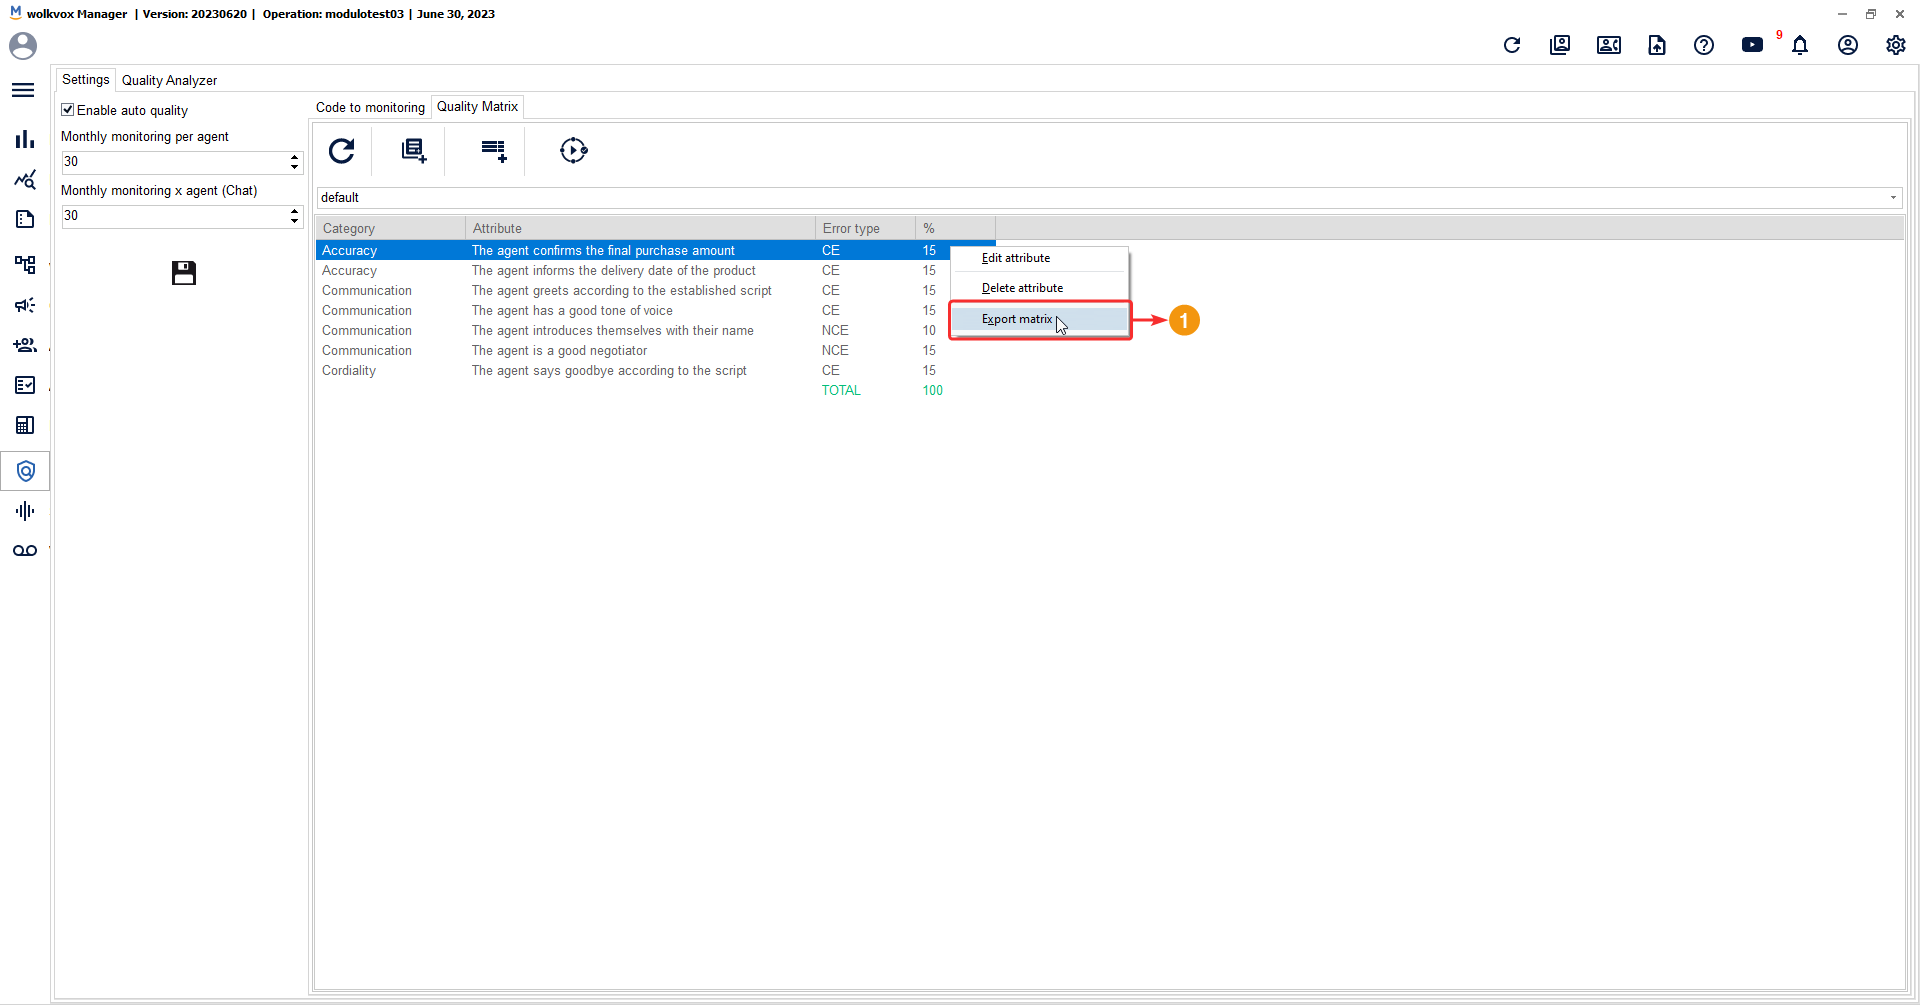
Edit or Delete Attributes #
To edit or delete attributes, right-click on an attribute in a survey, and you will have the options to “Edit attribute” and “Delete attribute”.

Export Quality Matrix to HTML Format #
The quality matrix can be exported in HTML format. To do this, right-click on the quality matrix and select the “Export Matrix” option.
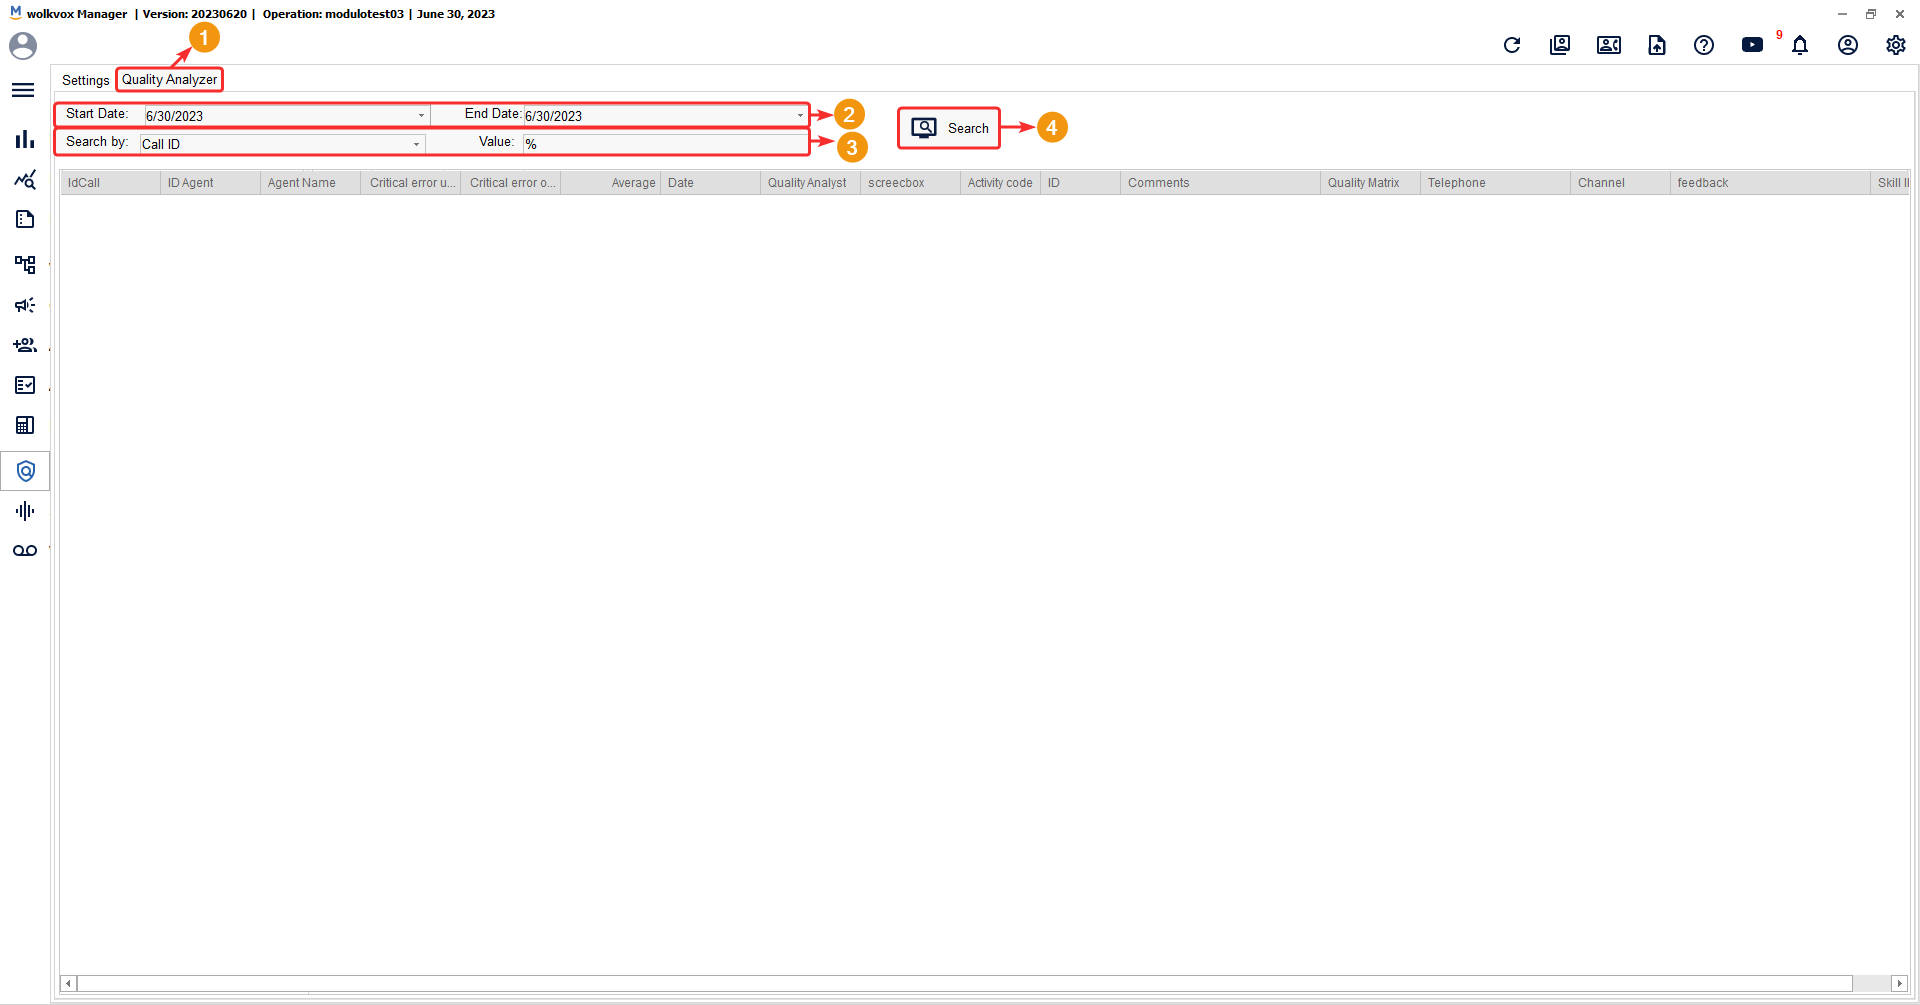
Perform Quality Analysis on Agent Performance #
In the “Quality Analysis” tab, you can search for calls and/or chats to evaluate the quality provided by the agents in those channels.
Follow these steps:
- Go to the “Quality Analysis” tab.
- Select a date range in the “Start Date” and “End Date” fields.
- In the “Search By” field, choose whether to search by call identification number (Call ID), agent extension number (Agent ID), quality analyst, or channel type. Enter the specific value you want to find based on the selected search parameter in the “Value” field.
- Click on “Search” to initiate the search for records.
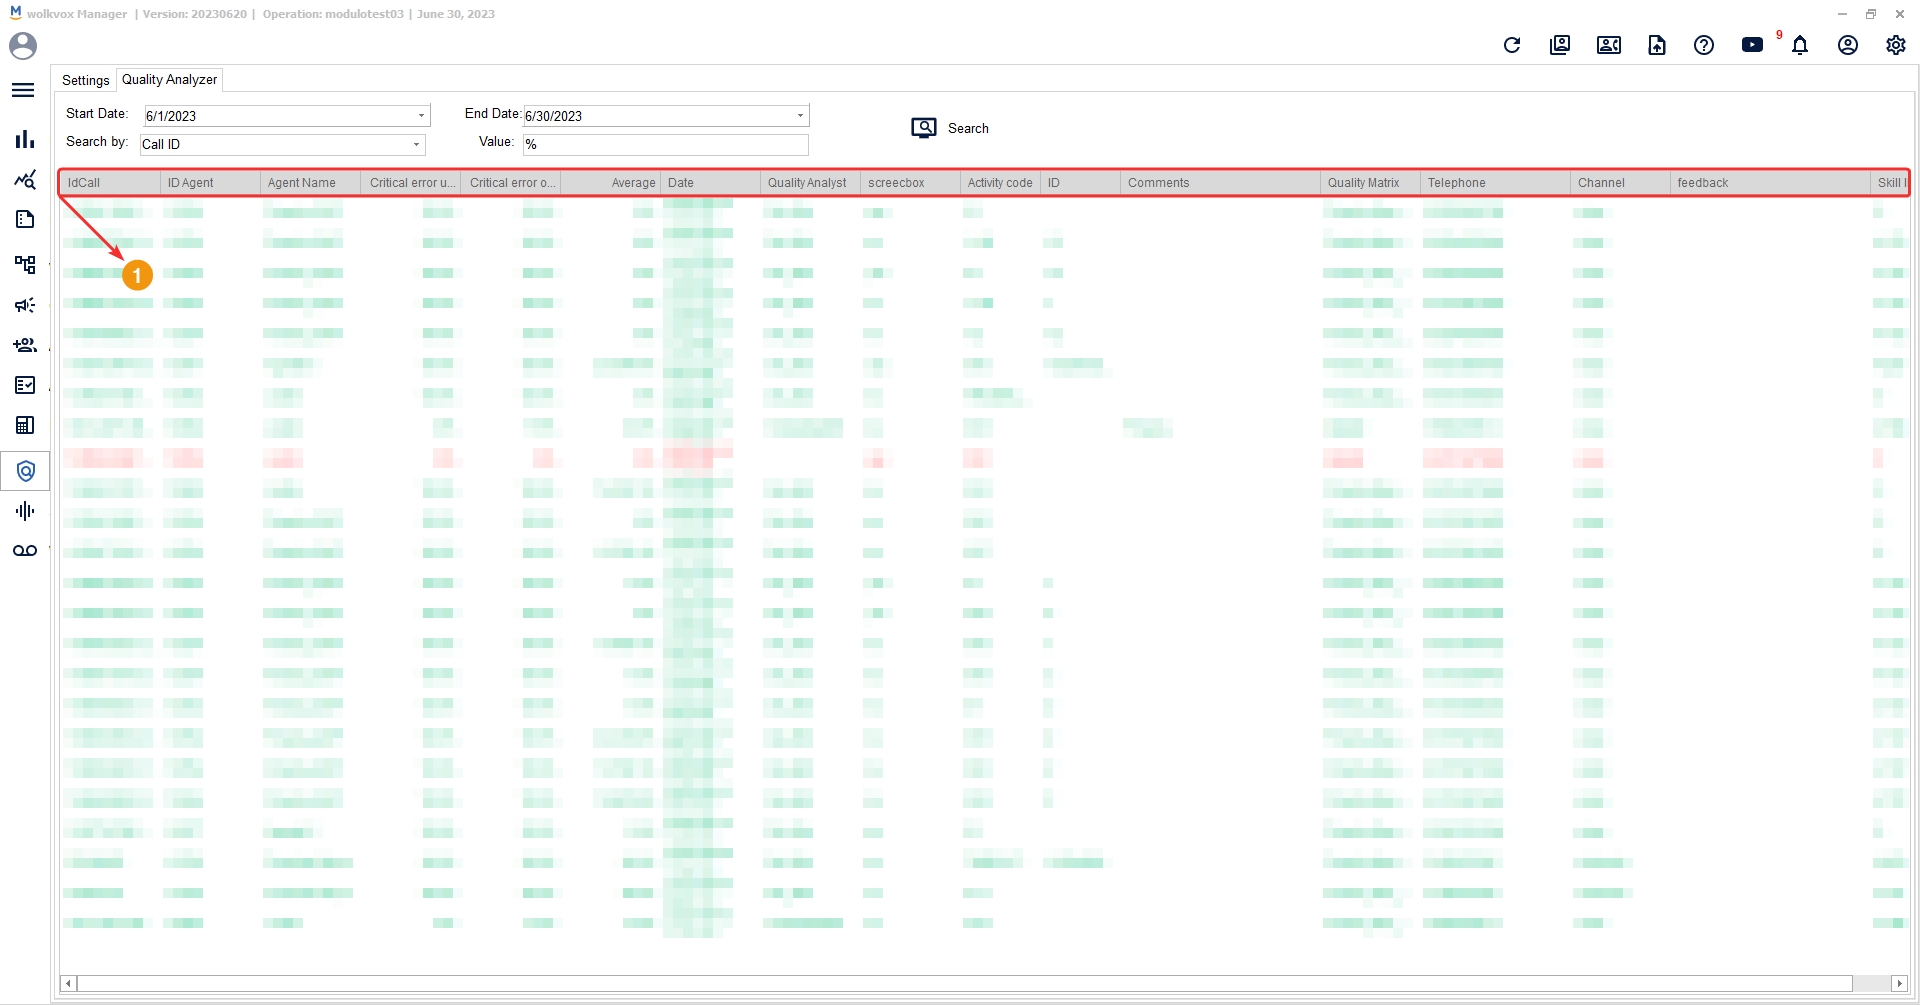
The information columns included in the table are as follows:
- ID Call: Identification number of the call.
- ID Agent: Agent’s extension number.
- Agent Name.
- Critical Error Unit: Indicates the total percentage of critical errors in the call.
- Critical Error Opportunity: Indicates the percentage of opportunity for improvement in the indicator.
- Average: The average of the sum of critical errors.
- Date: Shows the date when the call occurred.
- Quality Analyst: Indicates the quality analyst who evaluated the call.
- Screenbox: Indicates whether there was a screen recording of the agent who handled the call.
- Activity Code: The activity code used to categorize the call.
- ID: Customer identification number.
- Comments: Displays the comment left by the agent when categorizing the call.
- Quality Matrix: Indicates the quality matrix used to evaluate the service.
- Phone: Customer’s phone number.
- Channel: Type of channel through which the customer was assisted. It can be voice or chat.
- Feedback: Provided feedback.
- Skill ID: Identification number of the skill to which the call belongs.
Evaluation of agent calls and interactions #
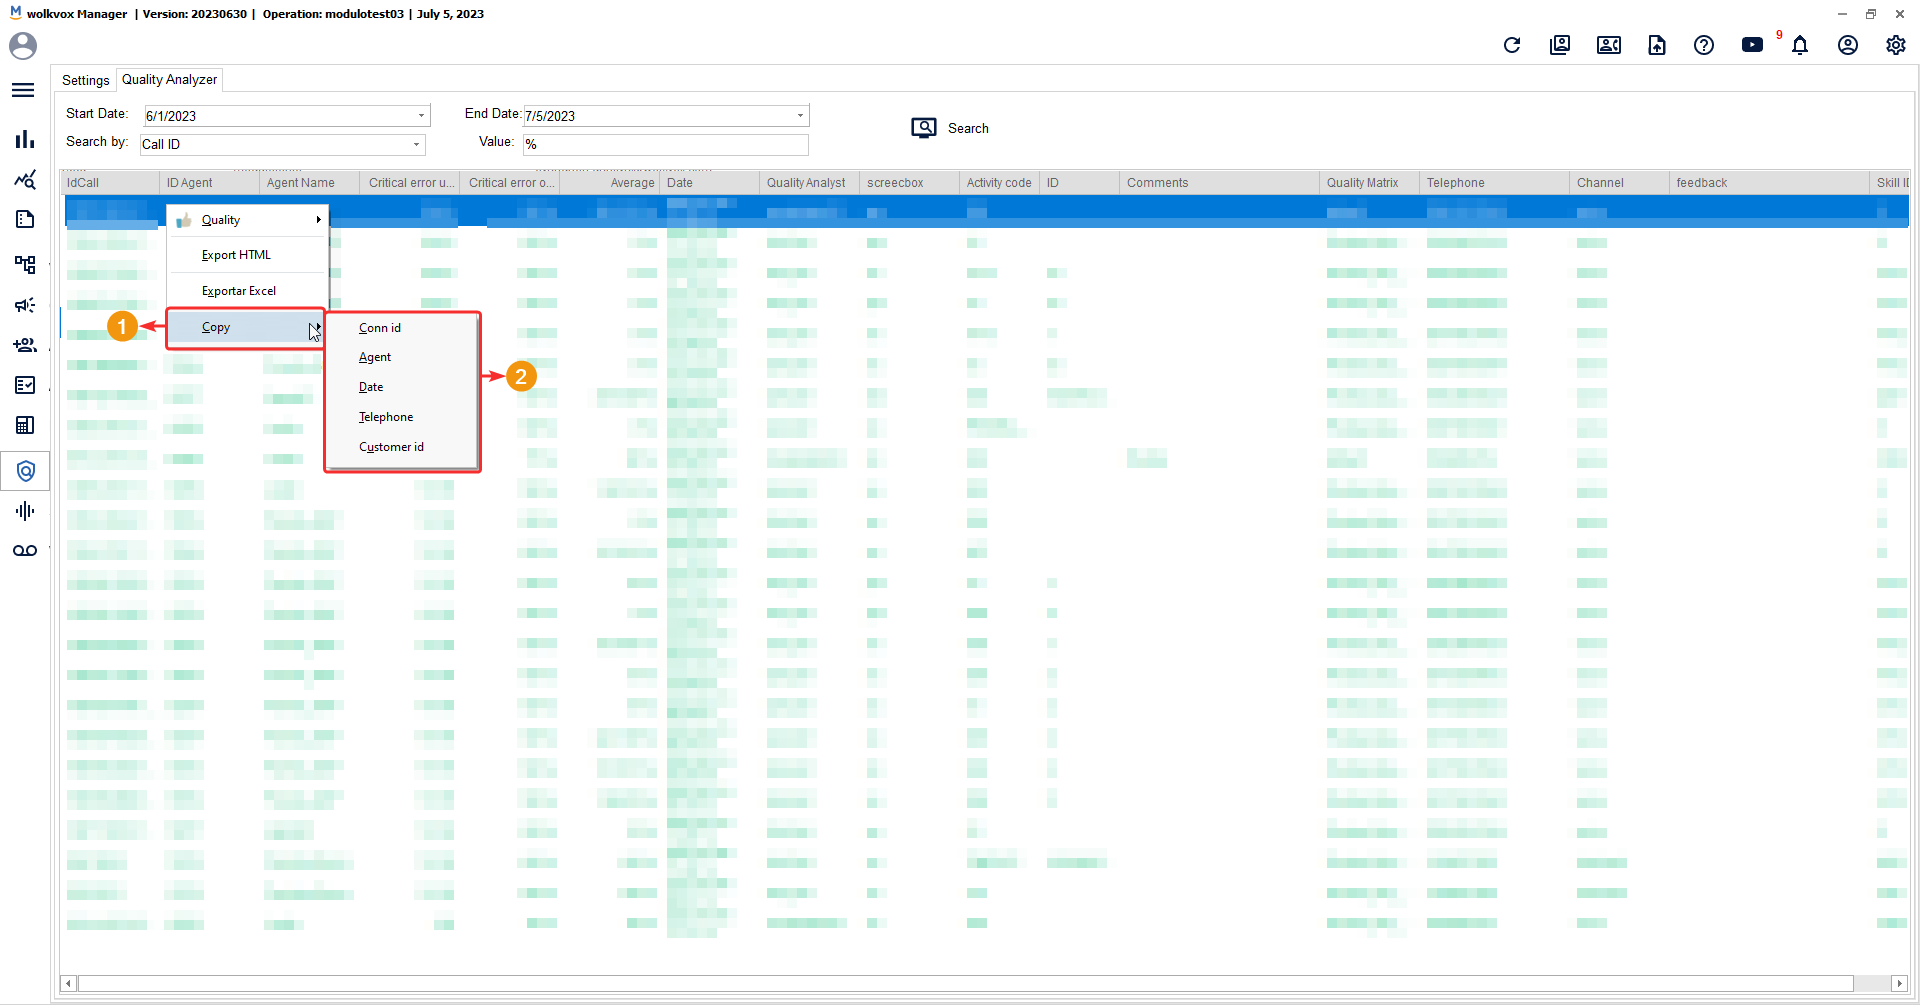
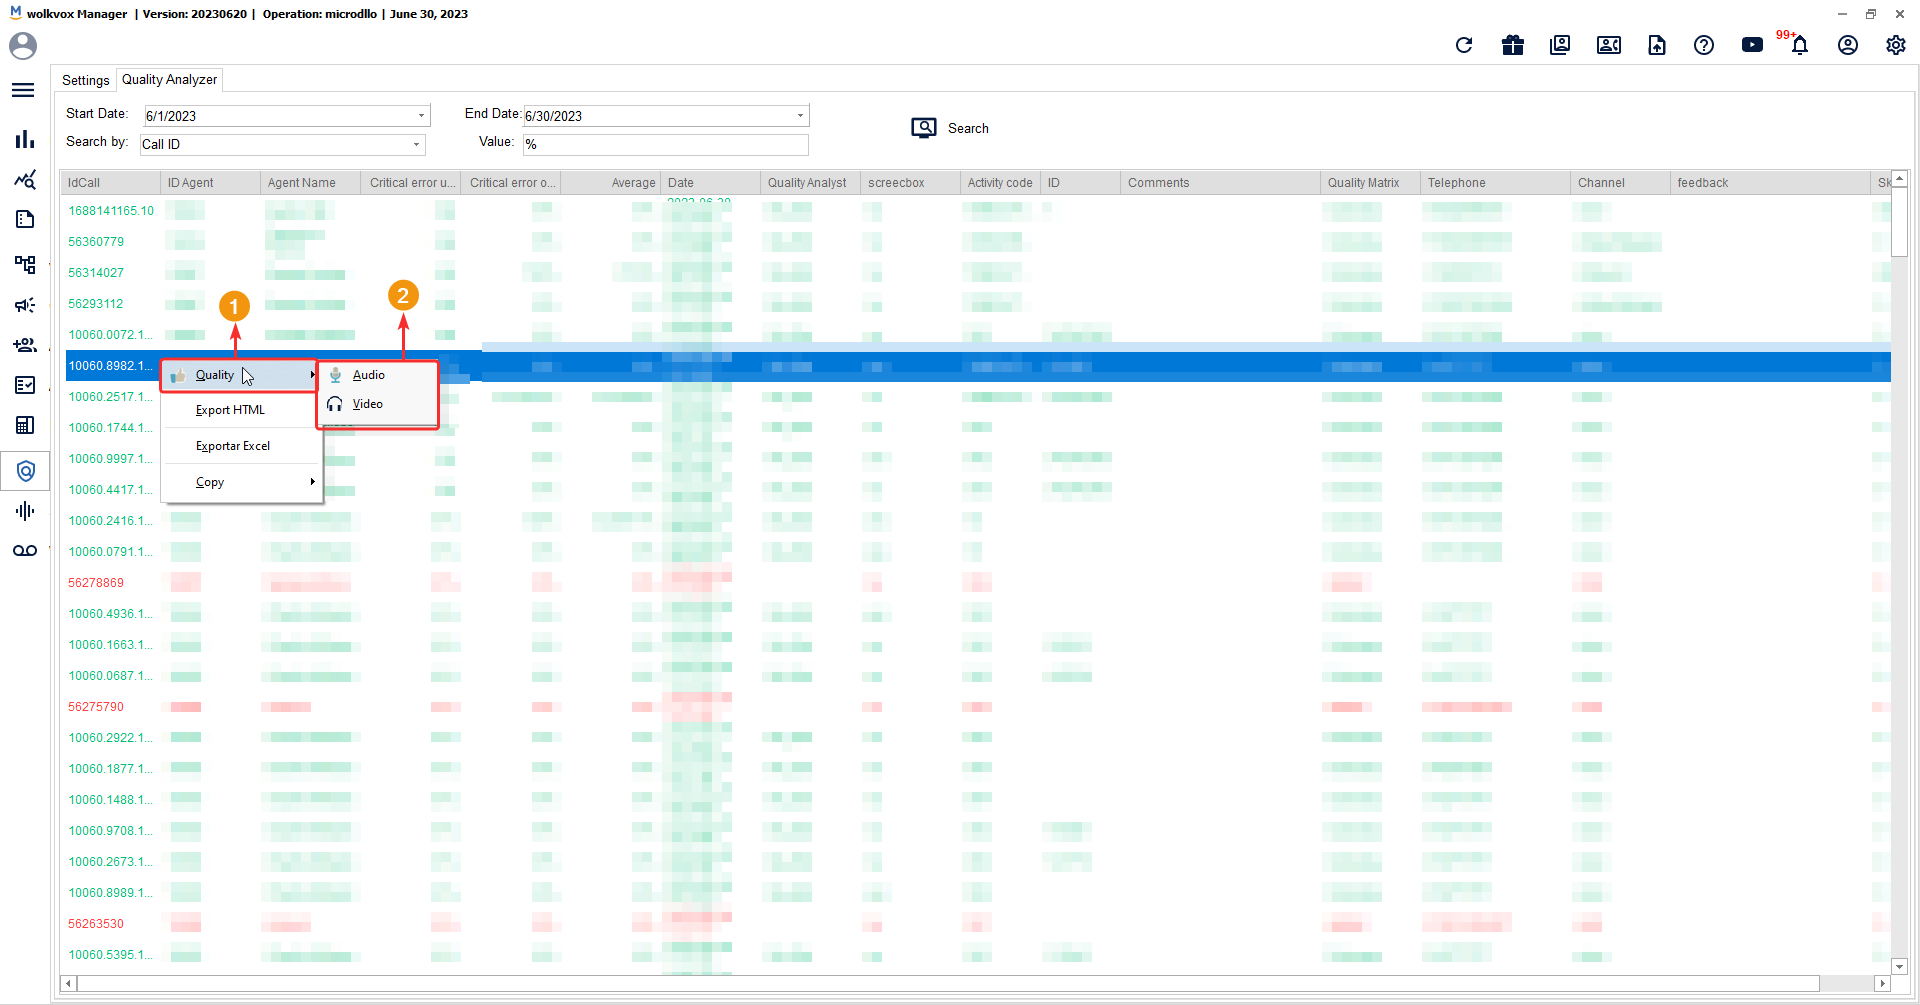
To rate the quality of an interaction, right-click on the call or chat and select the “Quality” option, then choose “Audio” for voice interactions and “Chat” for chat interactions.
Note: Calls highlighted in green indicate that they have already been evaluated, while calls highlighted in red indicate that they have not been evaluated yet.
When starting the call quality analysis, two windows are opened. One window is used for conducting the quality analysis, while the other window, which appears on top, allows you to preview the call audio. This window has a “Speed” field that allows you to increase the playback speed of the audio. It also includes buttons to start, pause, stop, or resume the recording, as well as a button with a folder icon that opens the Windows Explorer to access the recording file.
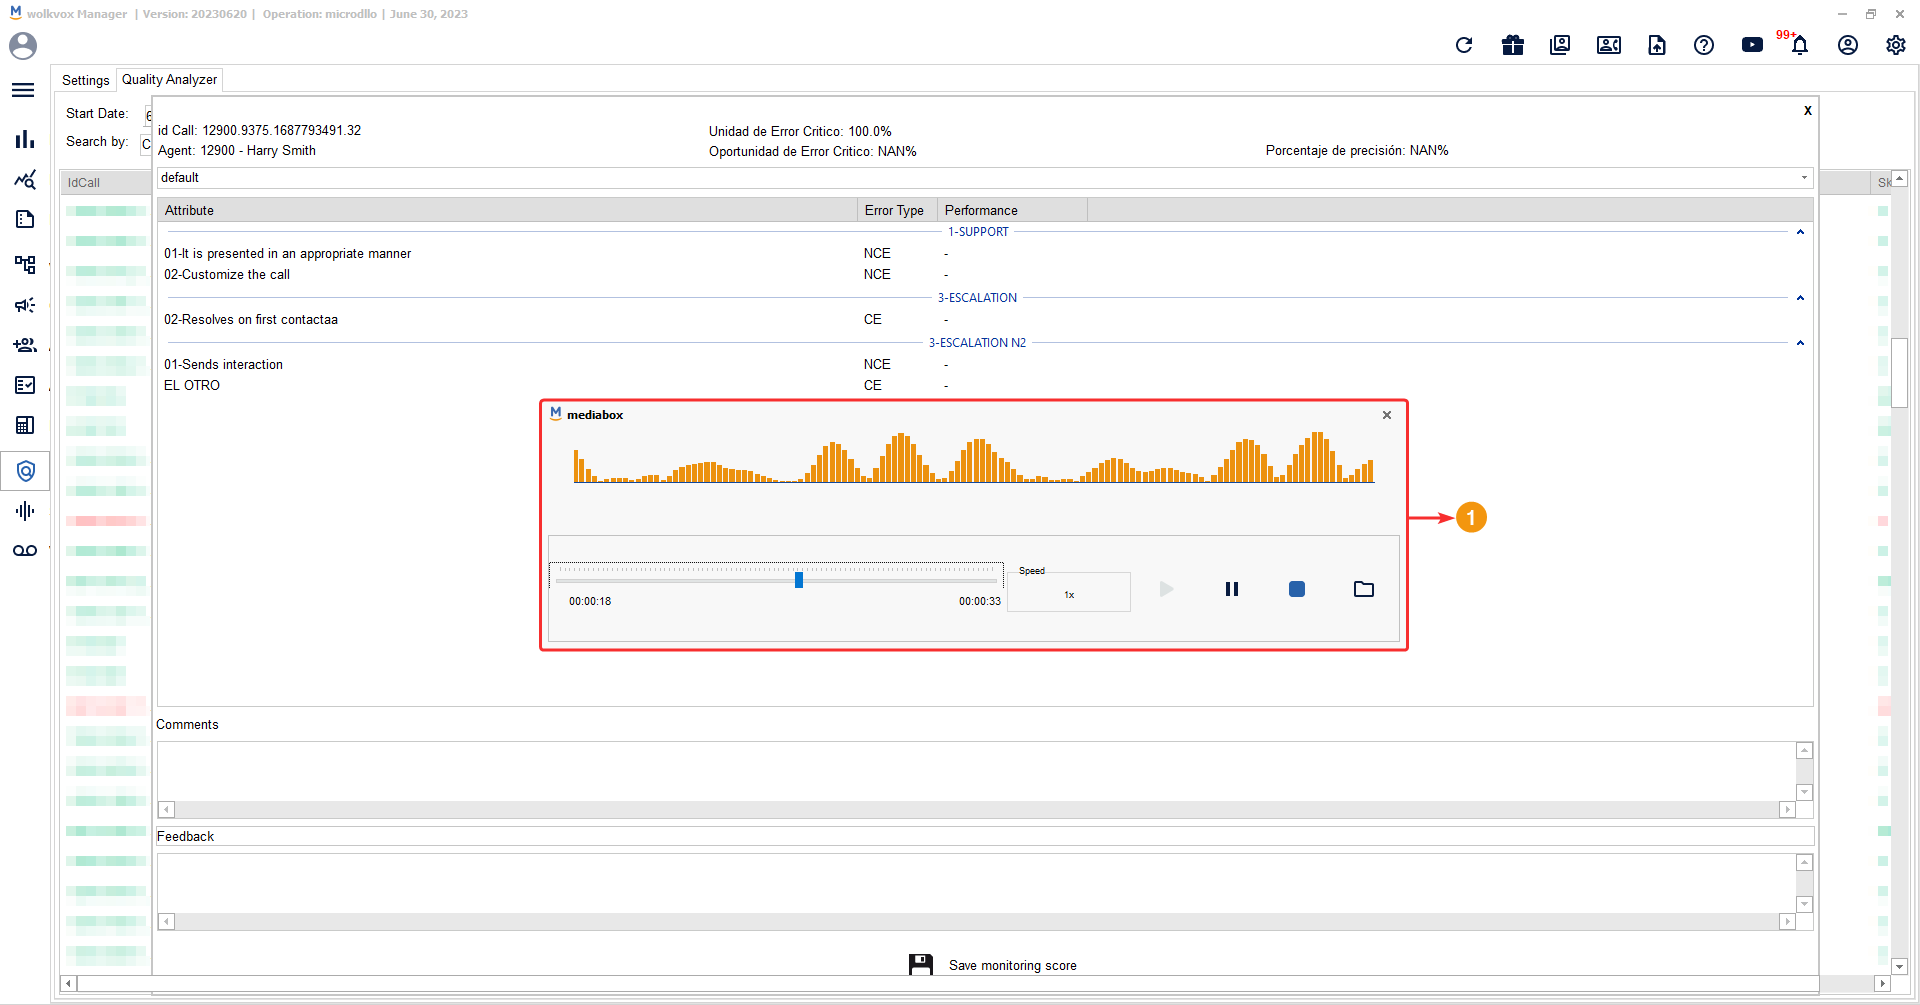
In the rating window, you will find the following at the top:
- Under the general information section of the analysis:
- ID Call: Identification number of the call.
- Agent: Extension number and name of the agent who handled the call.
- Critical Error Unit: Total percentage of critical errors.
- Critical Error Opportunity: Percentage of opportunity for improving the indicator.
- Accuracy percentage.
- In the highlighted field, you should left-click to open a dropdown menu where you select the quality survey to apply to the call.

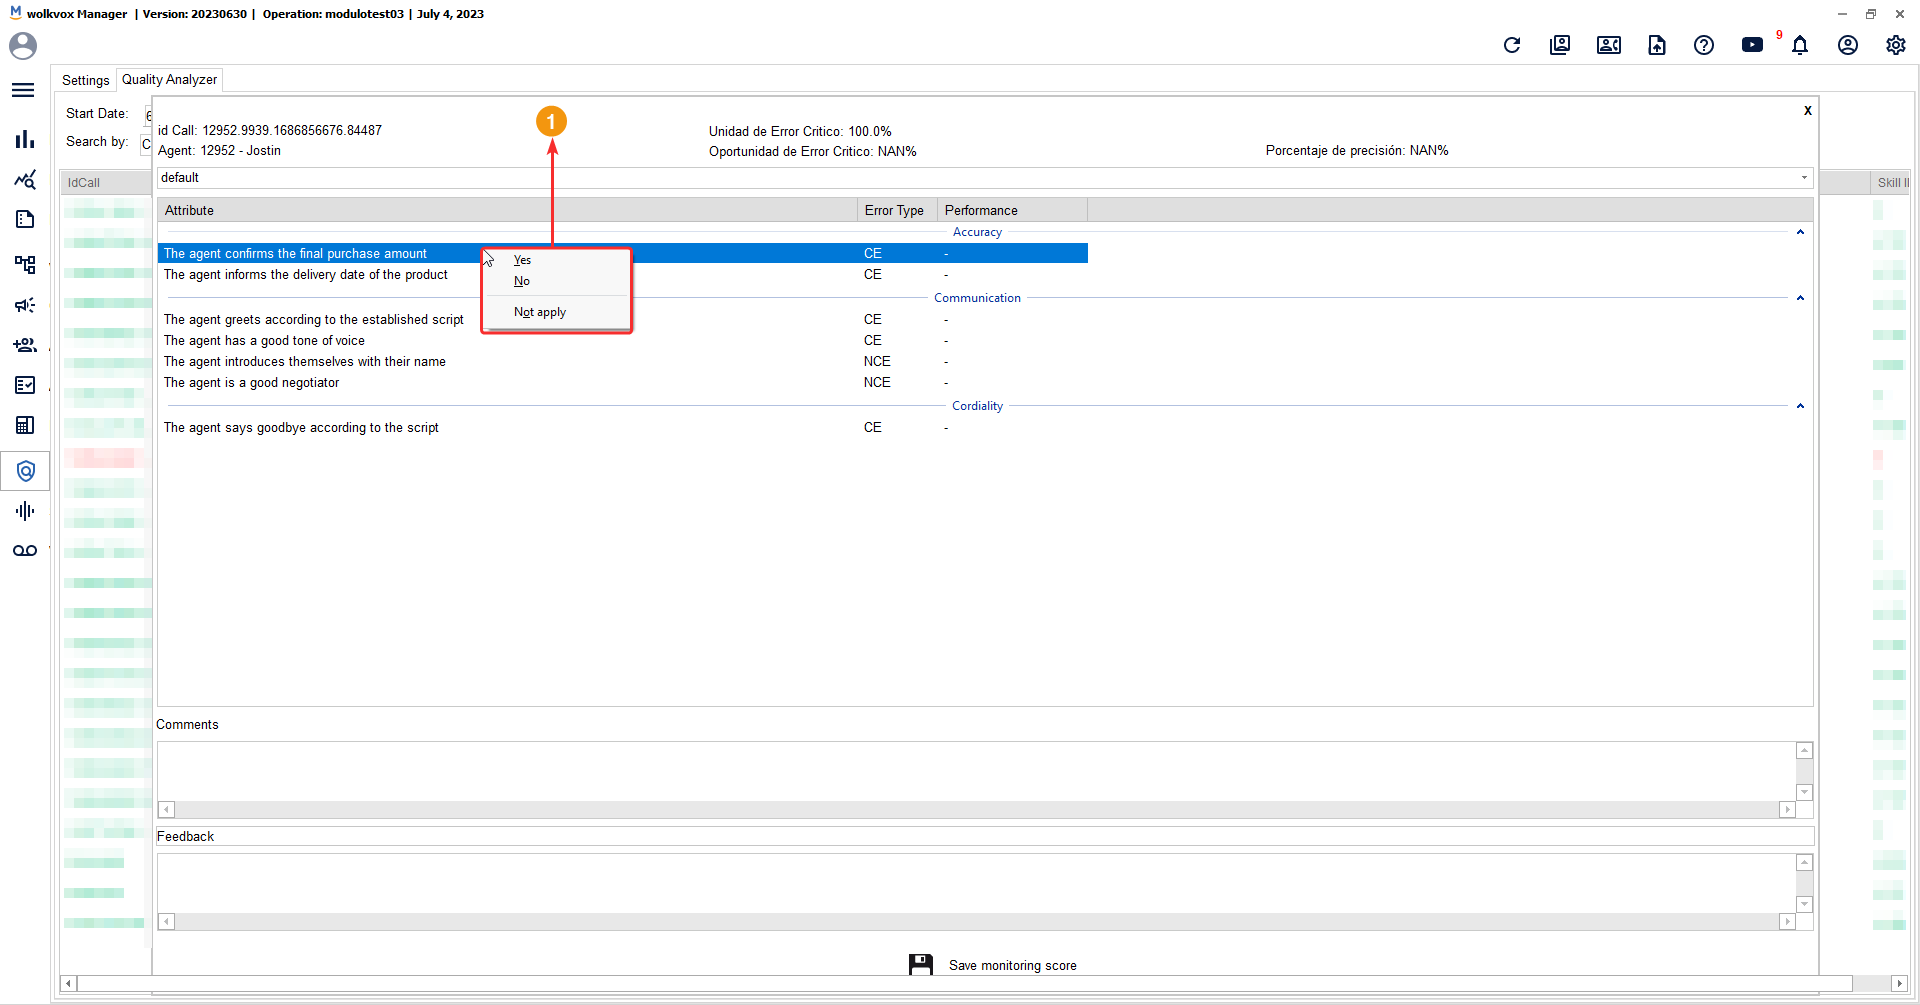
In the highlighted area, the following columns are displayed:
- Attribute: Name of the attribute to be rated.
- Error Type: Indicates the configured error type for the attribute, i.e., whether non-compliance with the attribute would be a critical or non-critical error.
- Compliance: Indicates whether the agent complied with the attribute or not. The value “NotA” means it does not apply in the given case.
- %: Indicates the weight of the attribute on the overall rating.

To rate the compliance or non-compliance of the attribute, right-click on it and select “Yes” to indicate that the agent complied, “No” to indicate non-compliance, and “Not apply” to indicate that the attribute does not apply to the case.
At the bottom, there are two fields, one to leave comments about the analysis and another to provide feedback to the agent.

For chat interactions, when starting the quality analysis, the chat preview window or conversation between the agent and the customer will open.

If you want to obtain a report of the results obtained in the quality rating, you need to go to the “Reports” section and select the “Quality” tab.
Note: The reports generated in this section can be downloaded in HTML or Excel (XLS) format.
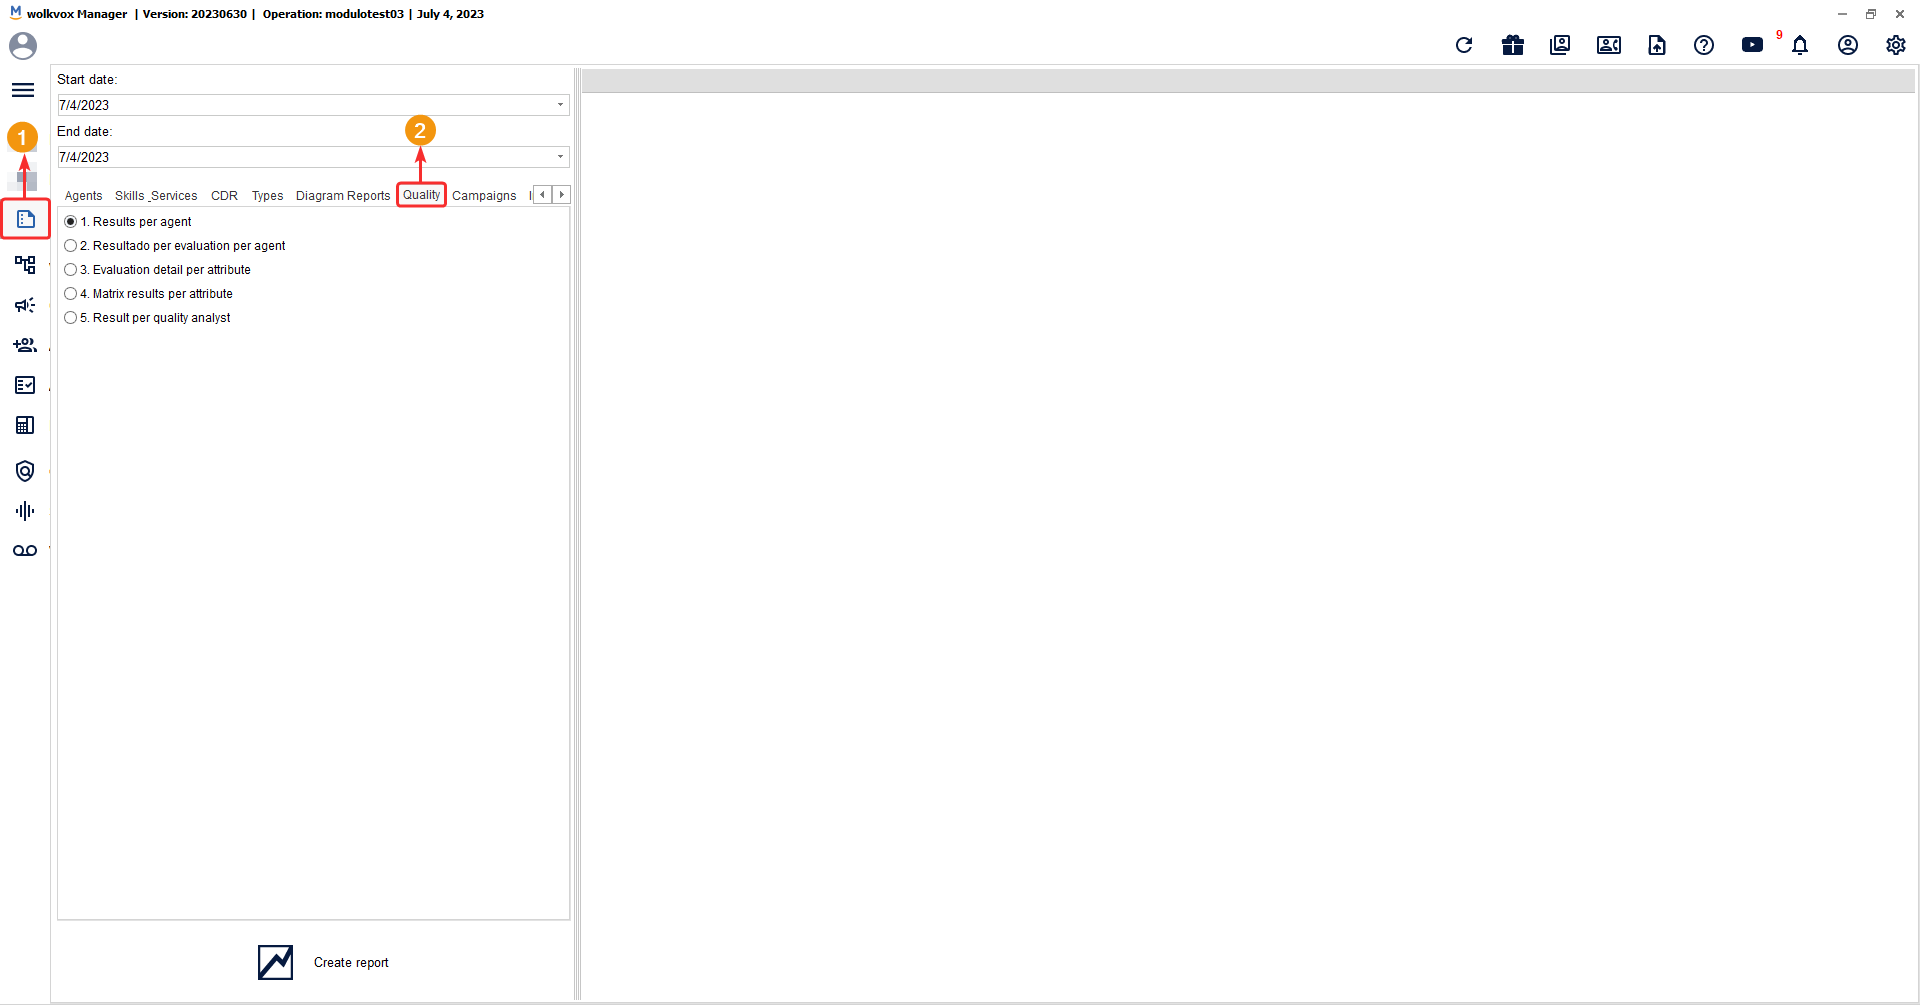
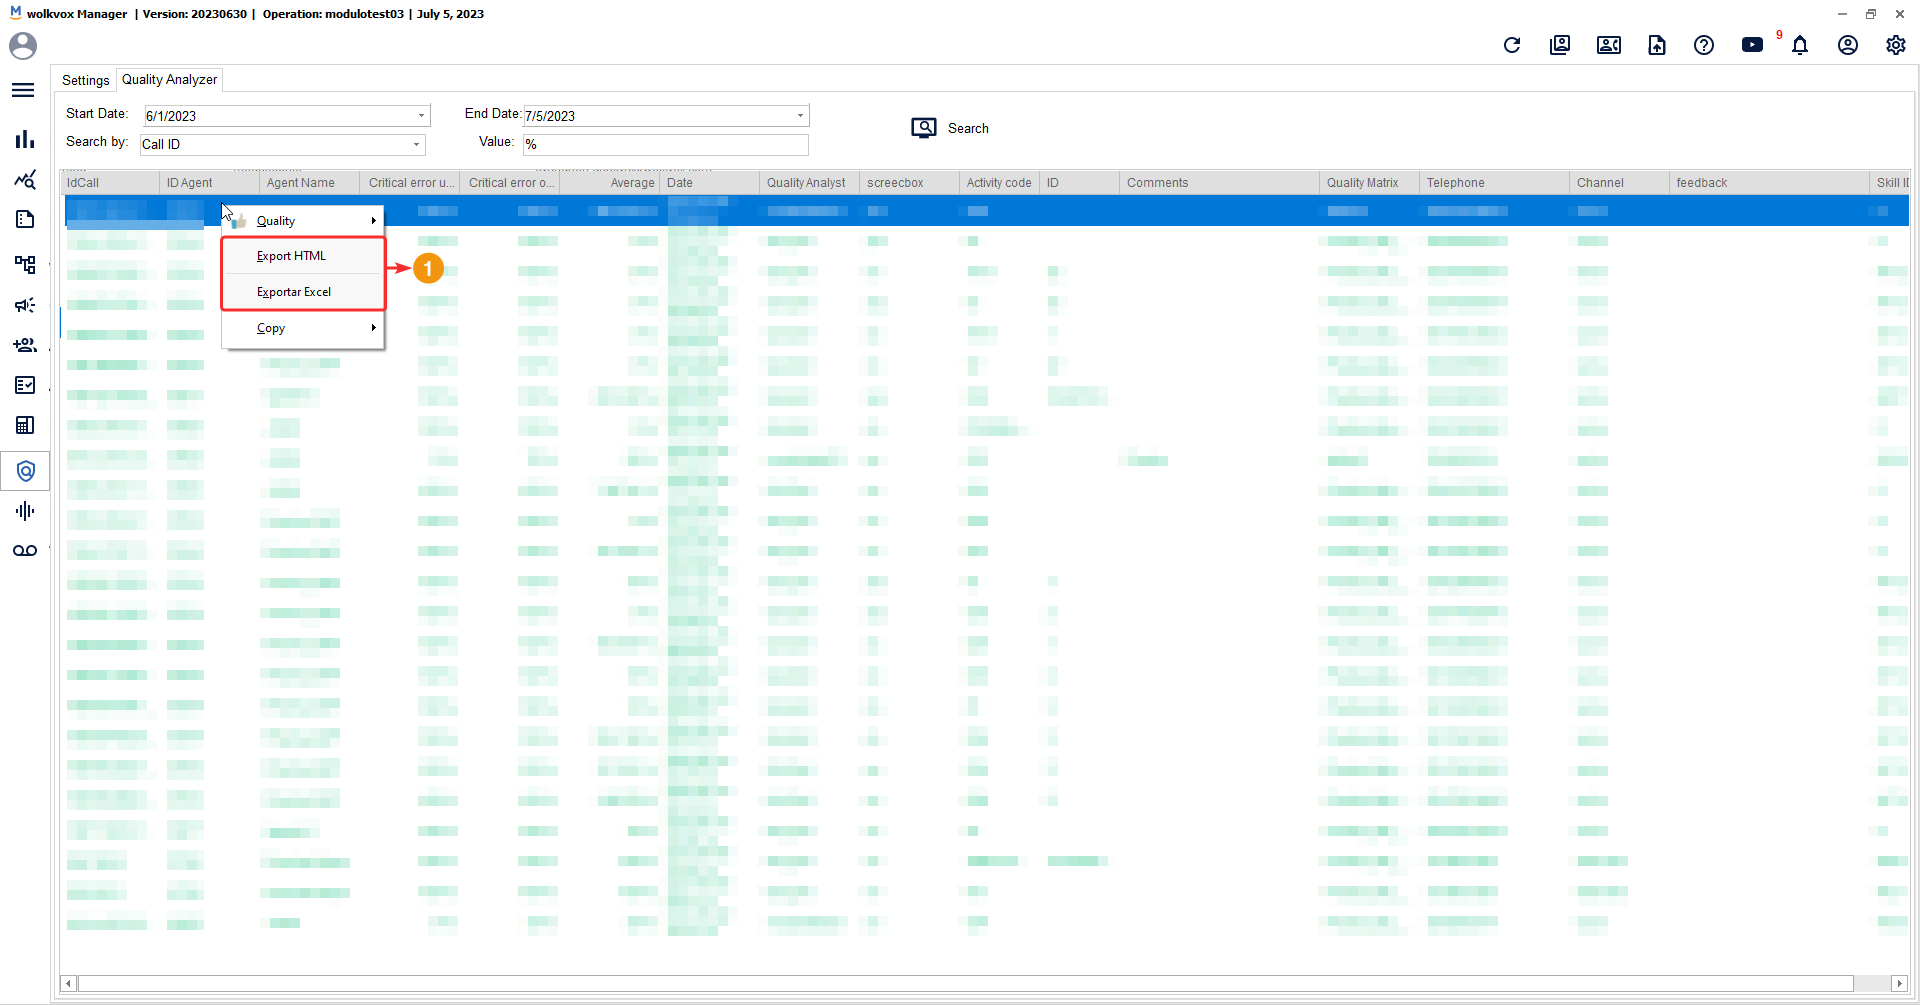
The entire call and interaction rating report for the selected date range can be exported in HTML and Excel format.
You will also be able to copy the five most important data points from each call:
- Conn ID: It is the identification number of the call or interaction connection.
- Agent: Name of the agent.
- Date: Date of the call or interaction.
- Telephone: Customer’s telephone number.
- Customer ID: Customer’s identification number.