

 About Wolkvox Manager Web #
 About Wolkvox Manager Web
Wolkvox Manager Web is the platform where you can configure everything related to agent operations and contact with their clients. This application has a wide variety of functionalities necessary for its solution, such as:
- Incorporation of artificial intelligence.
- Voice recognition and analysis.
- Text recognition and analysis.
- Database queries.
- Connections through API.
- Creation and management of predictive, progressive, and preview campaigns.
- Visualization and export of historical and real-time reports.
Basic recommendations for the workstation #
Wolkvox Manager Web is the alternative application for clients who prefer not to log in from the desktop application. Below are some recommendations for its use:
- Use the latest version of the Google Chrome or Mozilla Firefox web browser.
- Enable permissions for devices you may use, such as the microphone and webcam.
- The workstation should be connected via Ethernet cable. Wireless connection is not recommended.
- The optimal screen size required for proper functionality visualization should be 1366×768 or higher. Our application adapts to different screen types (equal to or greater than the aforementioned resolution). If some sections do not fit within the container, a scrollbar is enabled on the right side of the screen for vertical navigation.
- Like desktop applications, Manager Web has login restrictions. Only users with their IP address enabled will be able to access the modules or operations. Therefore, it is important to verify access with the support team.
Glossary of Terms #
Before starting with the reading of the following documentation, it is recommended to read the glossary of terms to have a better context of the situations presented. To view the glossary of terms, click here.
#
Accessing Manager Web #
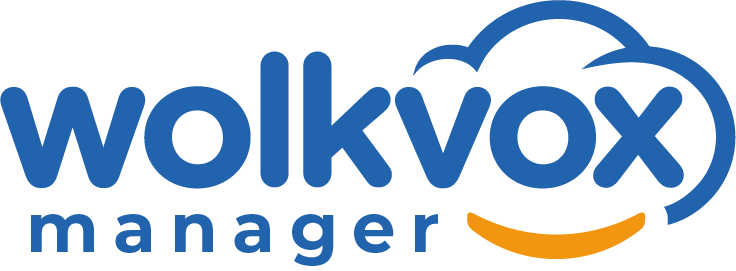
In the web address bar of your favorite browser, type the following URL: https://manager.wolkvox.com/
Once you enter the above web address, the AgentBox login section will appear as shown in the following image.
First, you must enter the name of your operation.
Note #1: If the operation name is misspelled, the application displays a message that the operation does not exist.
Note #2: If upon entering the page, it does not load or shows an error, it could be that the situation is occurring where your IP address from which you are connecting is not allowed for access, so you should contact the support team. 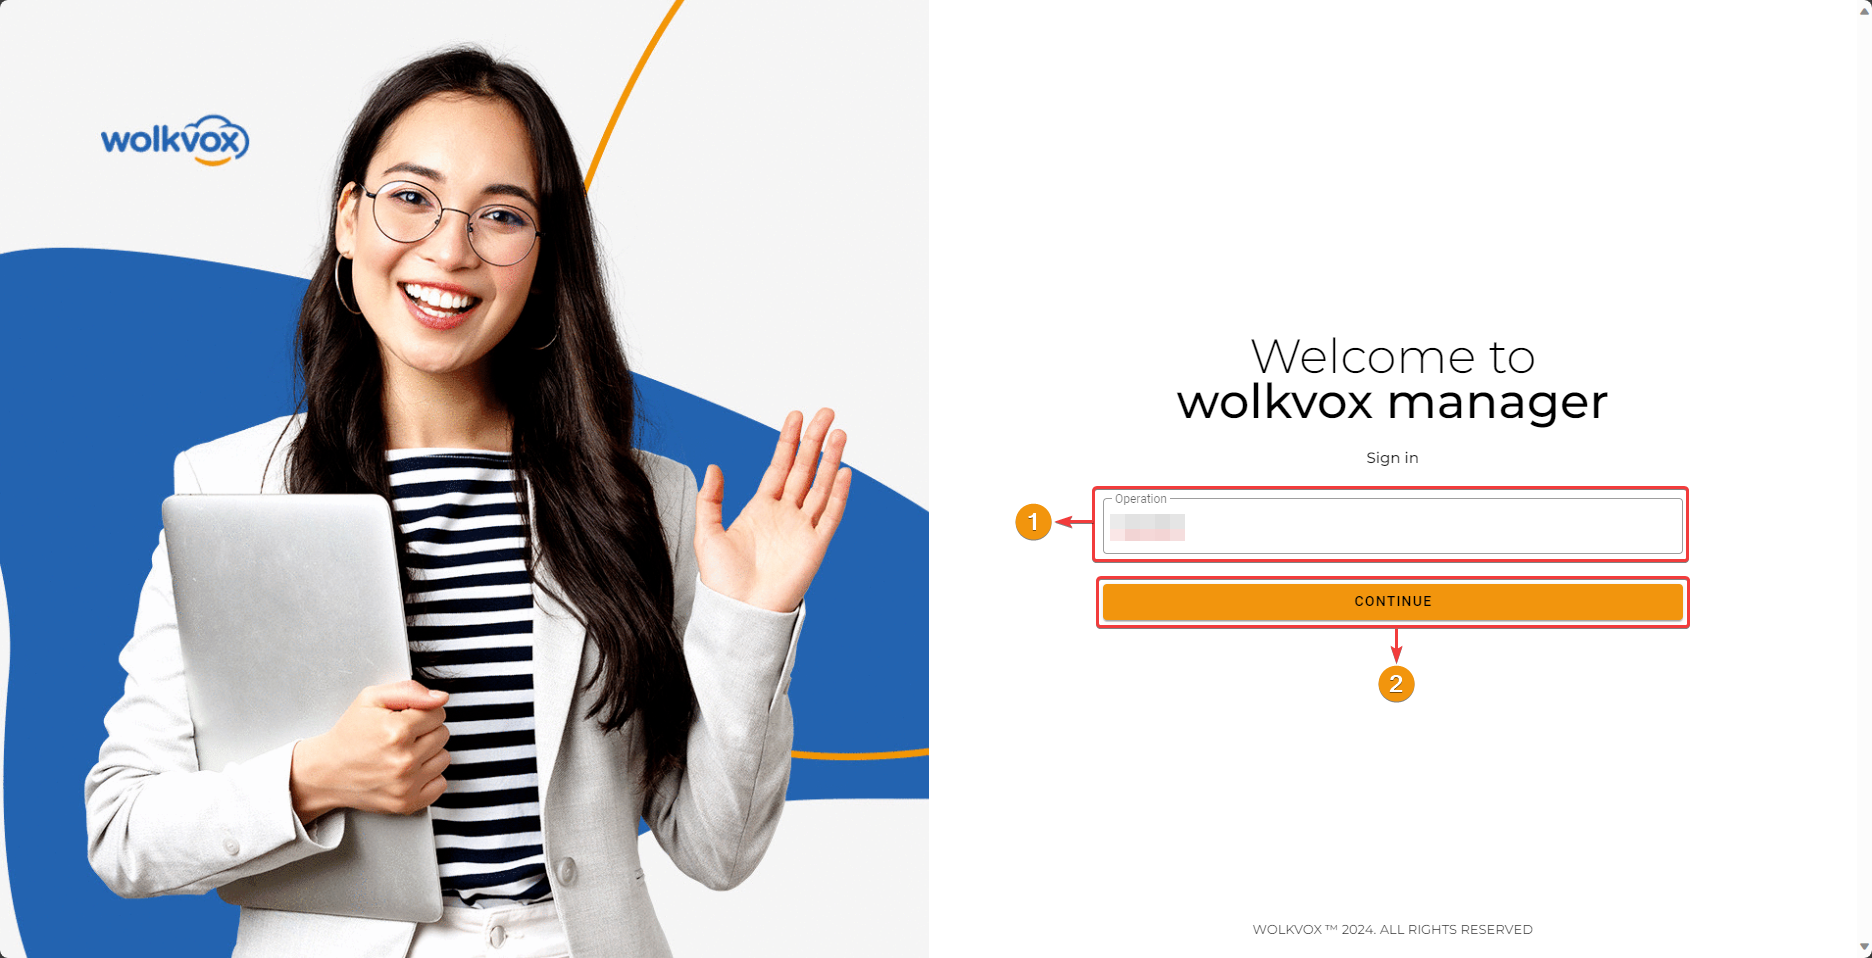
After correctly entering the operation’s name, the following section appears where you must enter the username and password assigned by the person in charge of your process.
Once you enter the username and password, you must click on ‘Continue’.
If for any reason you need to change the name of the operation you are entering, you can do so by clicking on the ‘Change Operation’ button, which takes you back to the section where the operation or module name is entered.
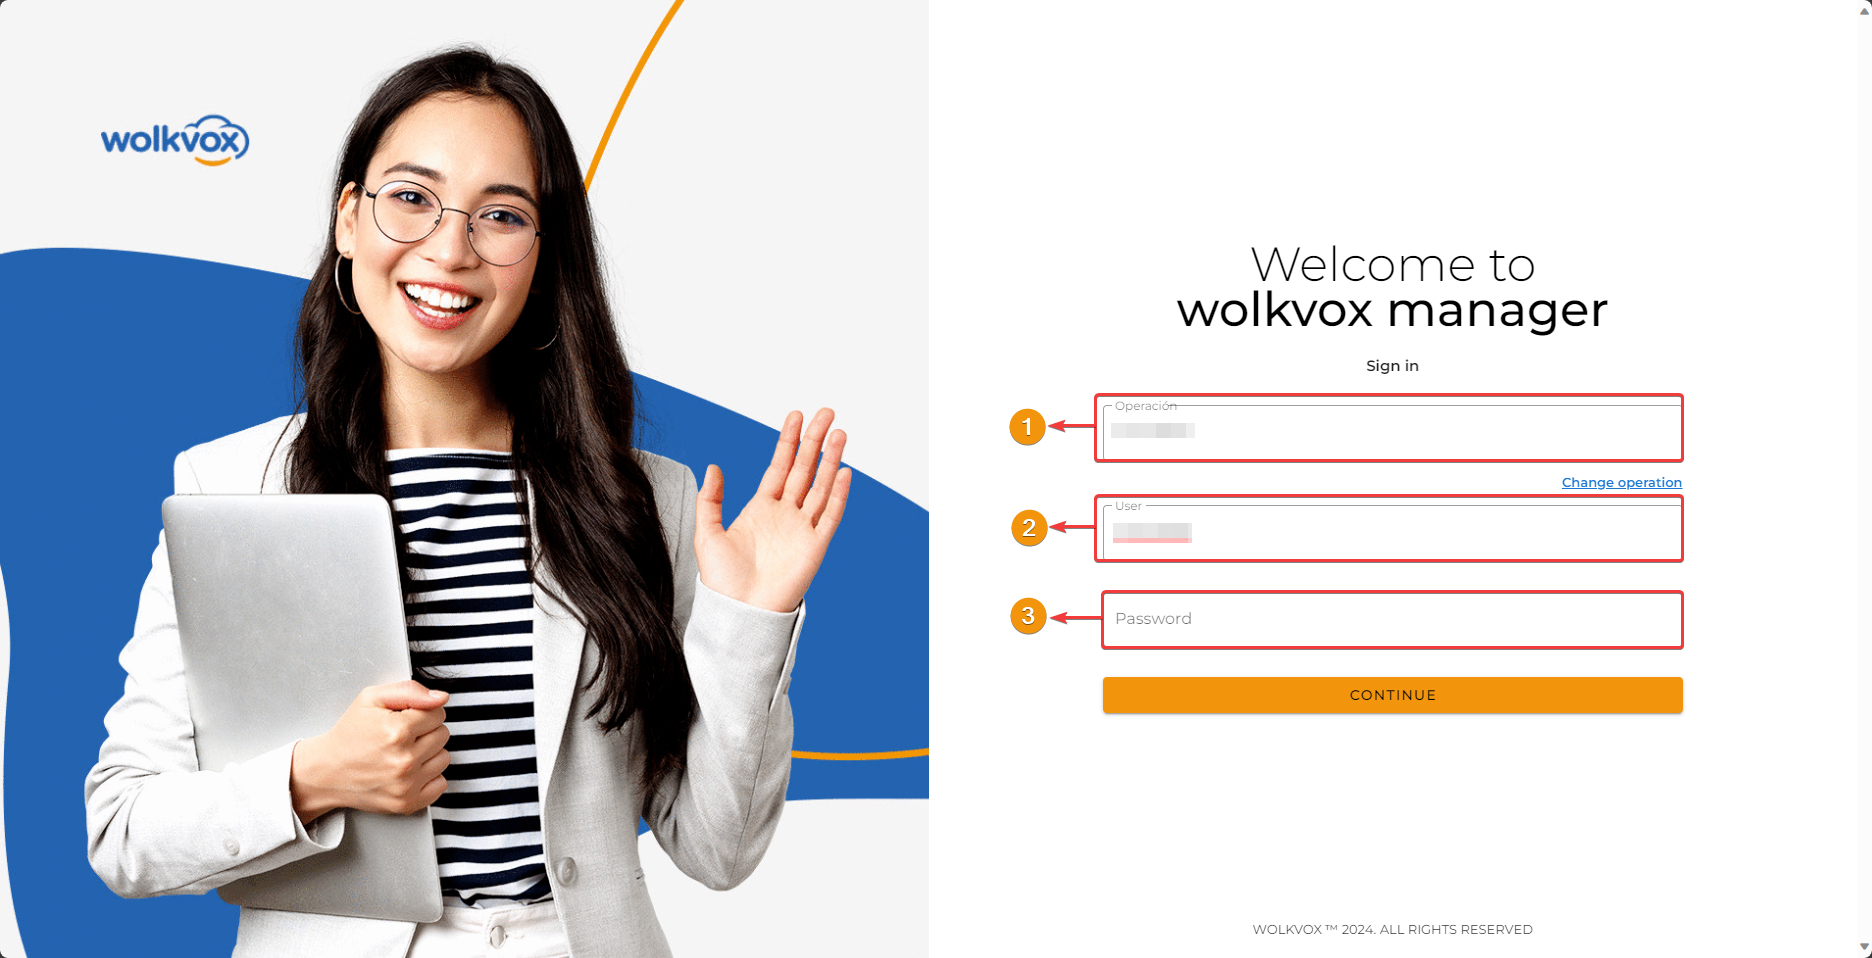
If you attempt to access your account and incorrectly enter the password five (5) times in a row, your access will be blocked for three (3) minutes. Once this lockout period has elapsed, you can attempt to log in again. This lockout is based on the device and does not take into account your IP address.
General Options #
Set hold music #
The button highlighted in the image allows you to add an audio file to set it as the music that will play when the customer is put on hold.
The formats supported by the application are: WAV or GSM (Monophonic at 8KHZ). It’s important that the audio has mono output and not stereo.

If you have uploaded the audio with the requirements met, a message will appear notifying you that the audio file has been successfully loaded.
If there is an error in loading the file, the following error message appears in the bottom center of the screen. In this case, an attempt was made to upload an audio file in MP3 format. Remember that the audio type must be WAV or GSM, mono output, and the maximum file size should not exceed 50000 KB or 50 MB.
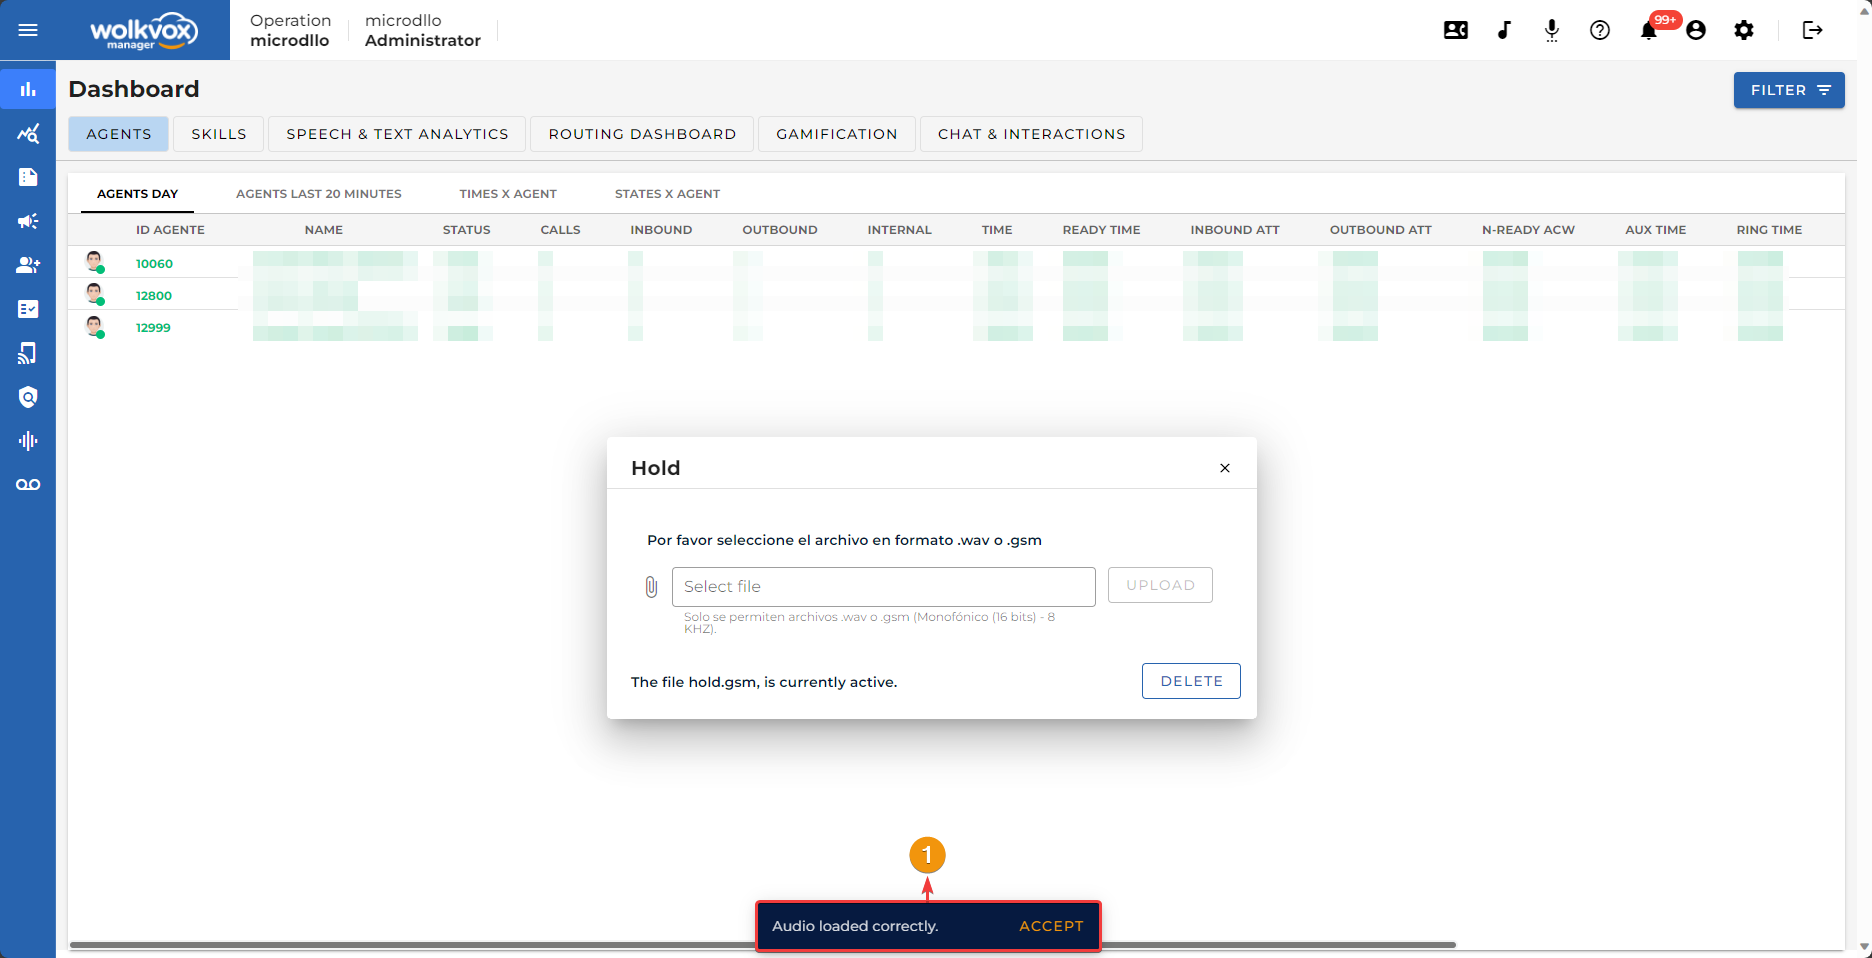
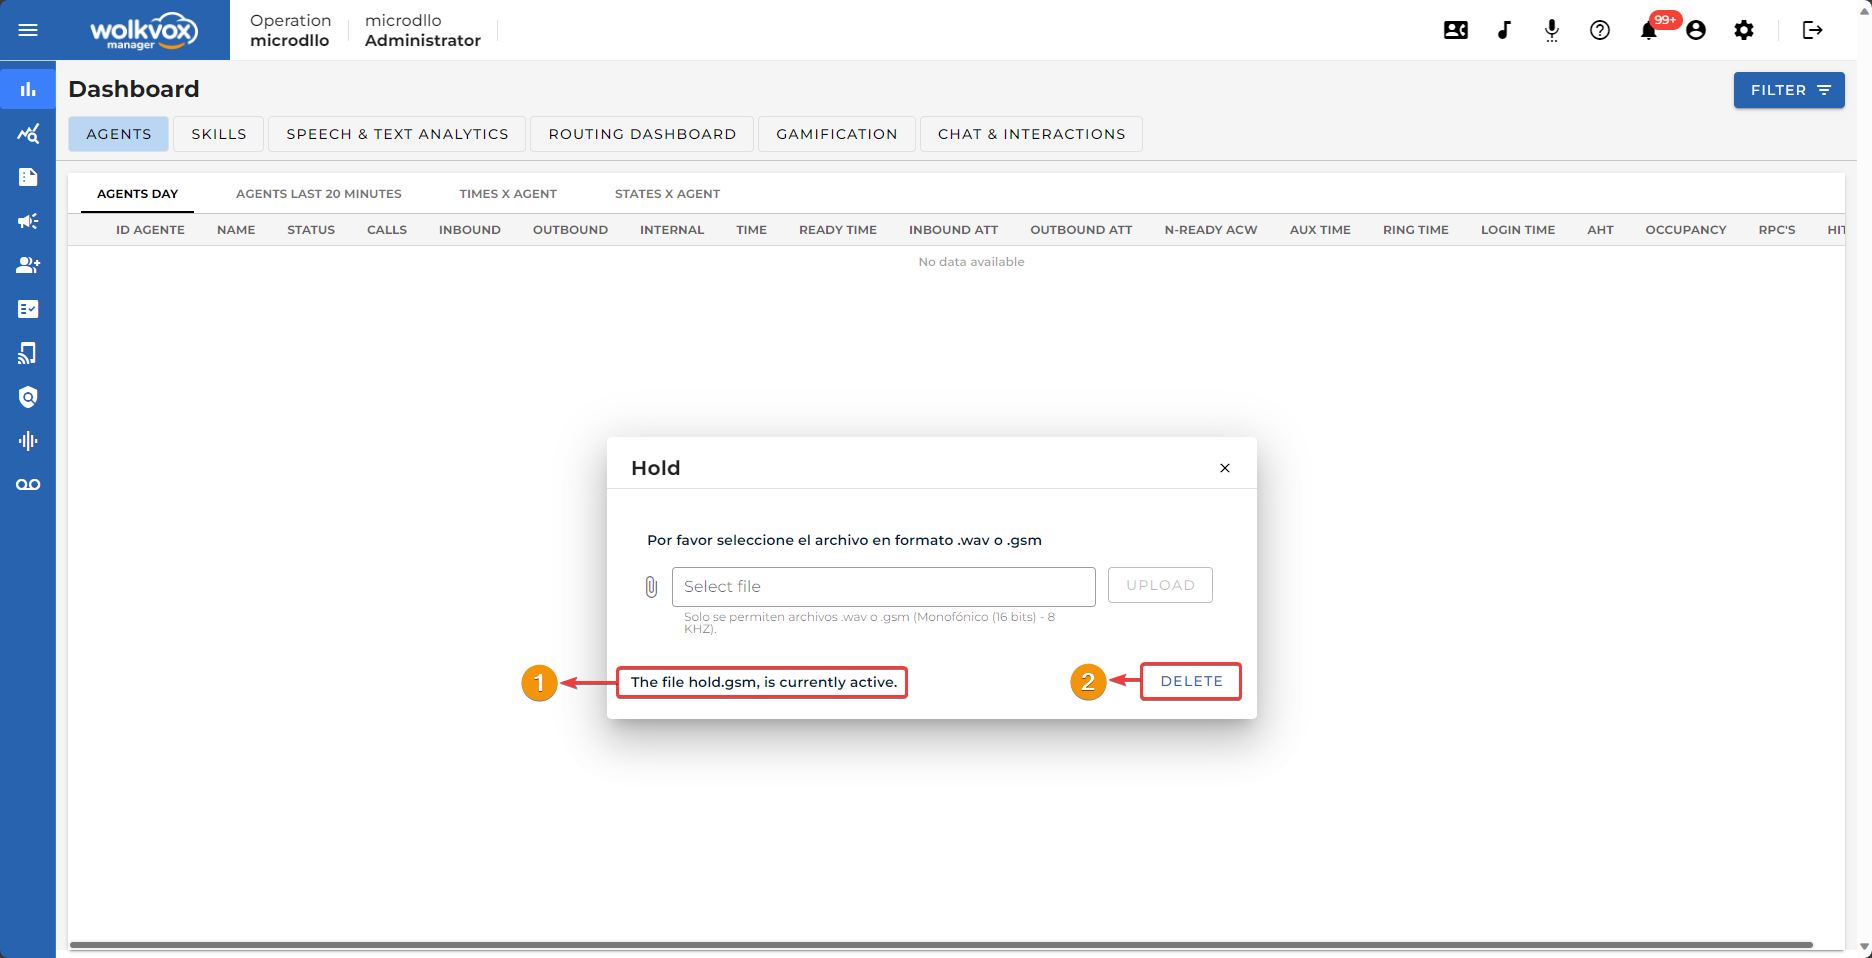
- If you see this message, it means that there is already an audio assigned as hold music.
- You can click on “Delete” and the assigned audio will be removed. You will need to upload a new audio file.
Upload Audio #
This option allows you to upload an audio file that will be saved in the application’s storage and can then be used in various tools of wolkvox Manager such as wolkvox Studio.
- Open the “Upload Audio” window.
- Go to the “Upload Audio” tab.
- Click on the clip icon or in the “Select file” field.
- Click on the “Upload” button.

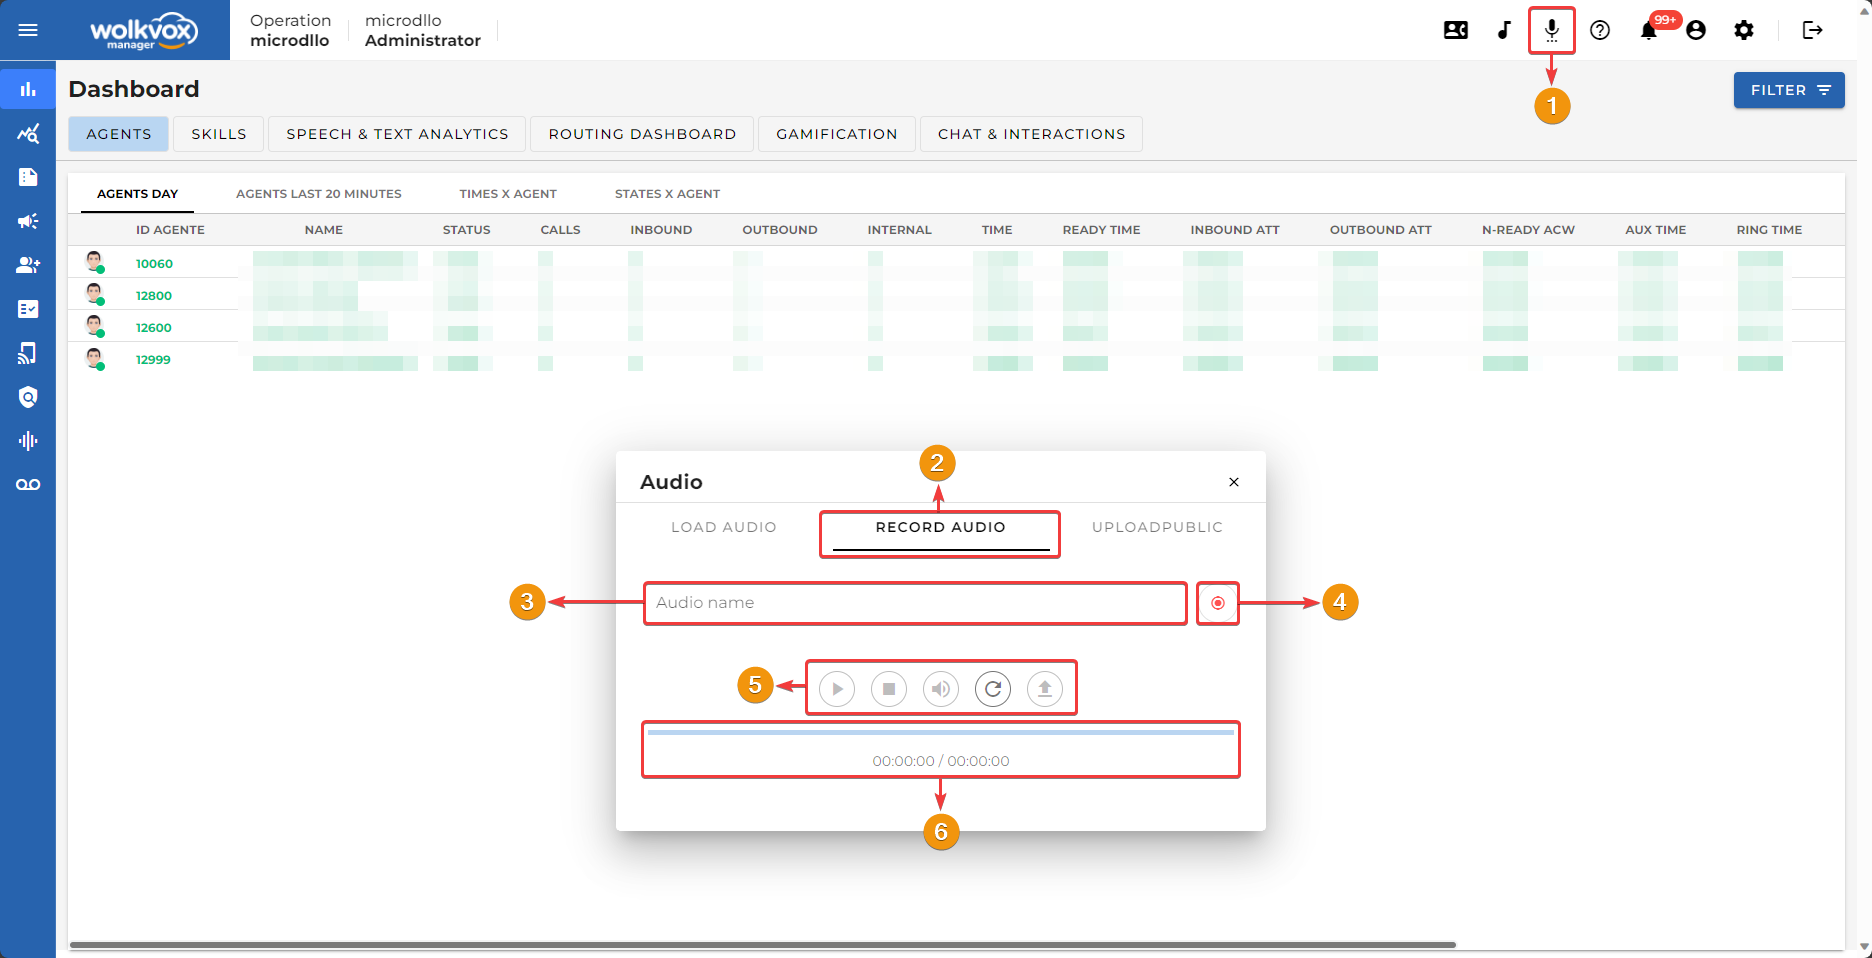
Record Audio #
This option allows you to record an audio file that will be saved in the application’s storage and can then be used in various tools of wolkvox Manager such as wolkvox Studio.
- Open the “Upload Audio” window.
- Go to the “Record Audio” tab.
- In “Audio Name,” assign the desired name for the audio.
- Click on the highlighted icon to start recording. When you start recording, the icon will change its shape to a blue square, allowing you to stop the recording and leave the audio at that point where you stopped it.
- In the highlighted area, you will find buttons to: Play audio, stop playback, mute, download recorded audio, and upload recorded audio. If you want to upload the audio, you must assign a name before clicking the button. If the audio is uploaded successfully, a message will appear at the bottom center of the page.
- The bottom section displays the timeline of the player and the total duration of the recorded audio.
Store your files directly on our servers with the new wolkvox Storage tool #
- With this new tool, you won’t need an external server to store the files you need to use, such as audio, images, documents, or videos.
- You will have better management of the files you need to send via URL to your clients.
- Up to 5 files are allowed per license.
- Supported file formats are: JPG, PNG, BMP, and AVI.
- For now, there is no specified file size limit or dimensions for images.
- You can find the tool in the top menu, under the “Upload Audio” option.
- Go to the “Upload public file (wolkvox storage)” tab.
- All uploaded files will be listed in the table.
- The button to upload the file “Upload file” can be found in the following image.
- Use the “Refresh” button to reload the items listed in the table.
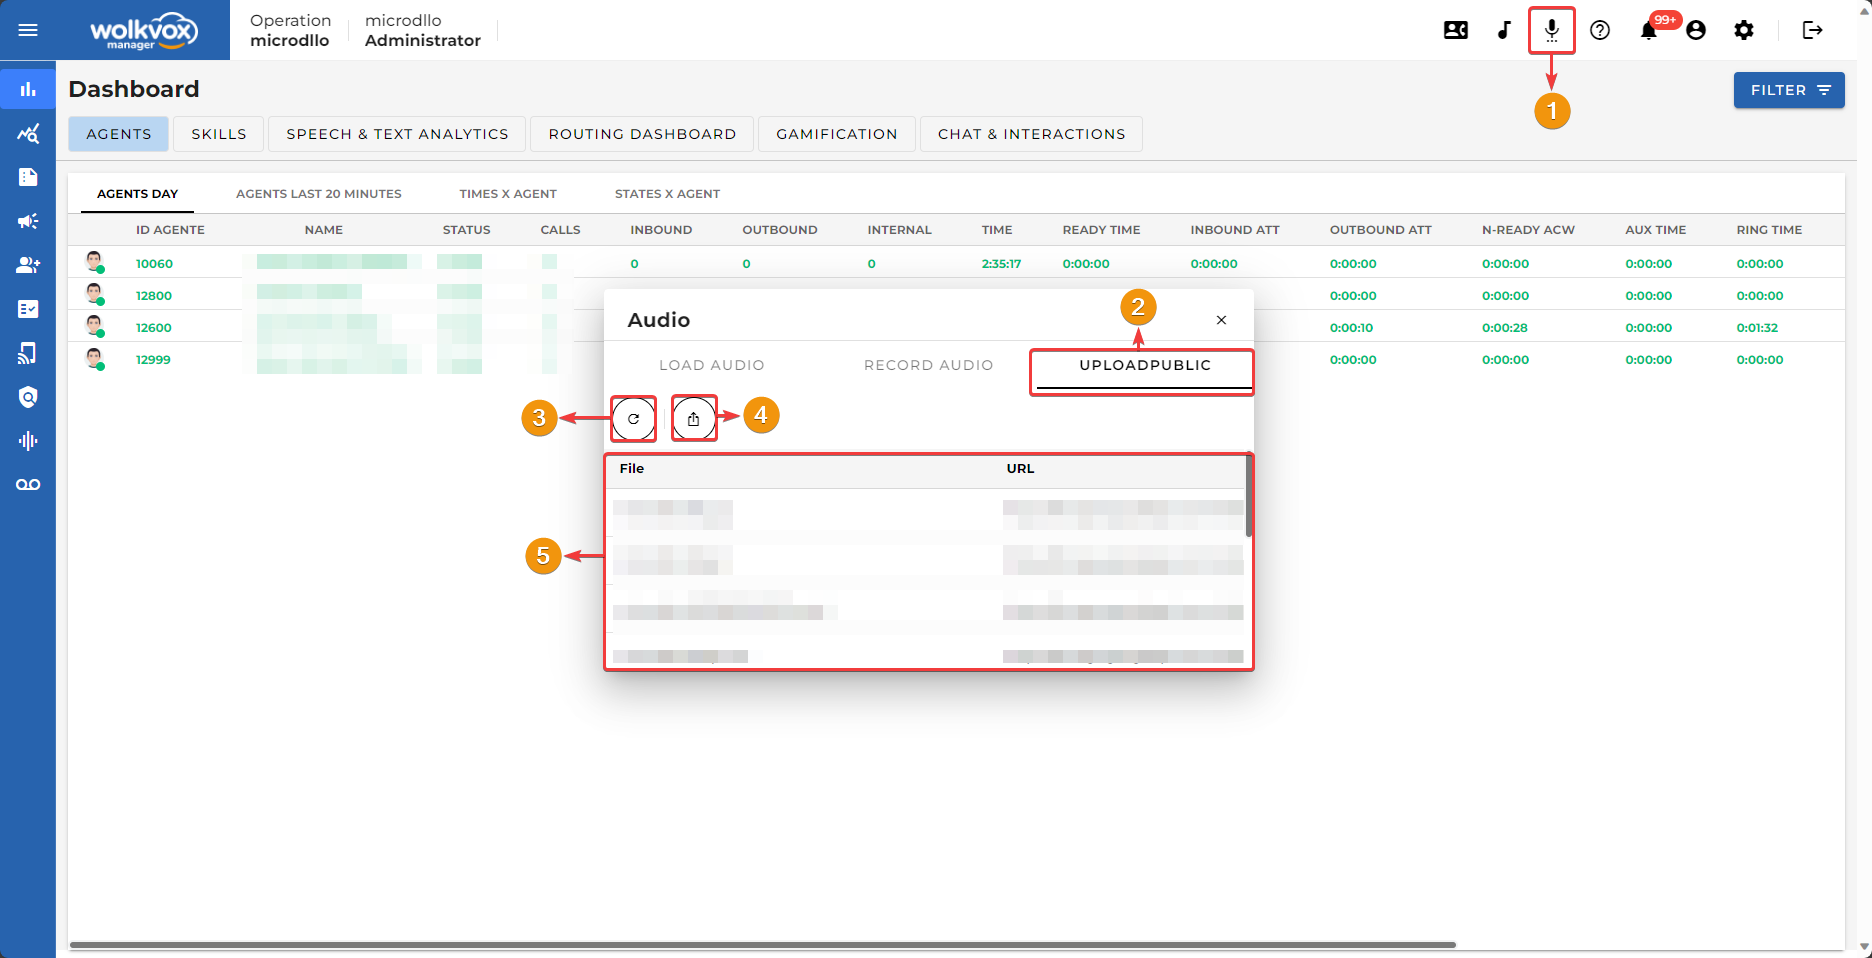
If you right-click on any item in the table, you can copy the file URL, copy the file name, open the file, or delete the file.

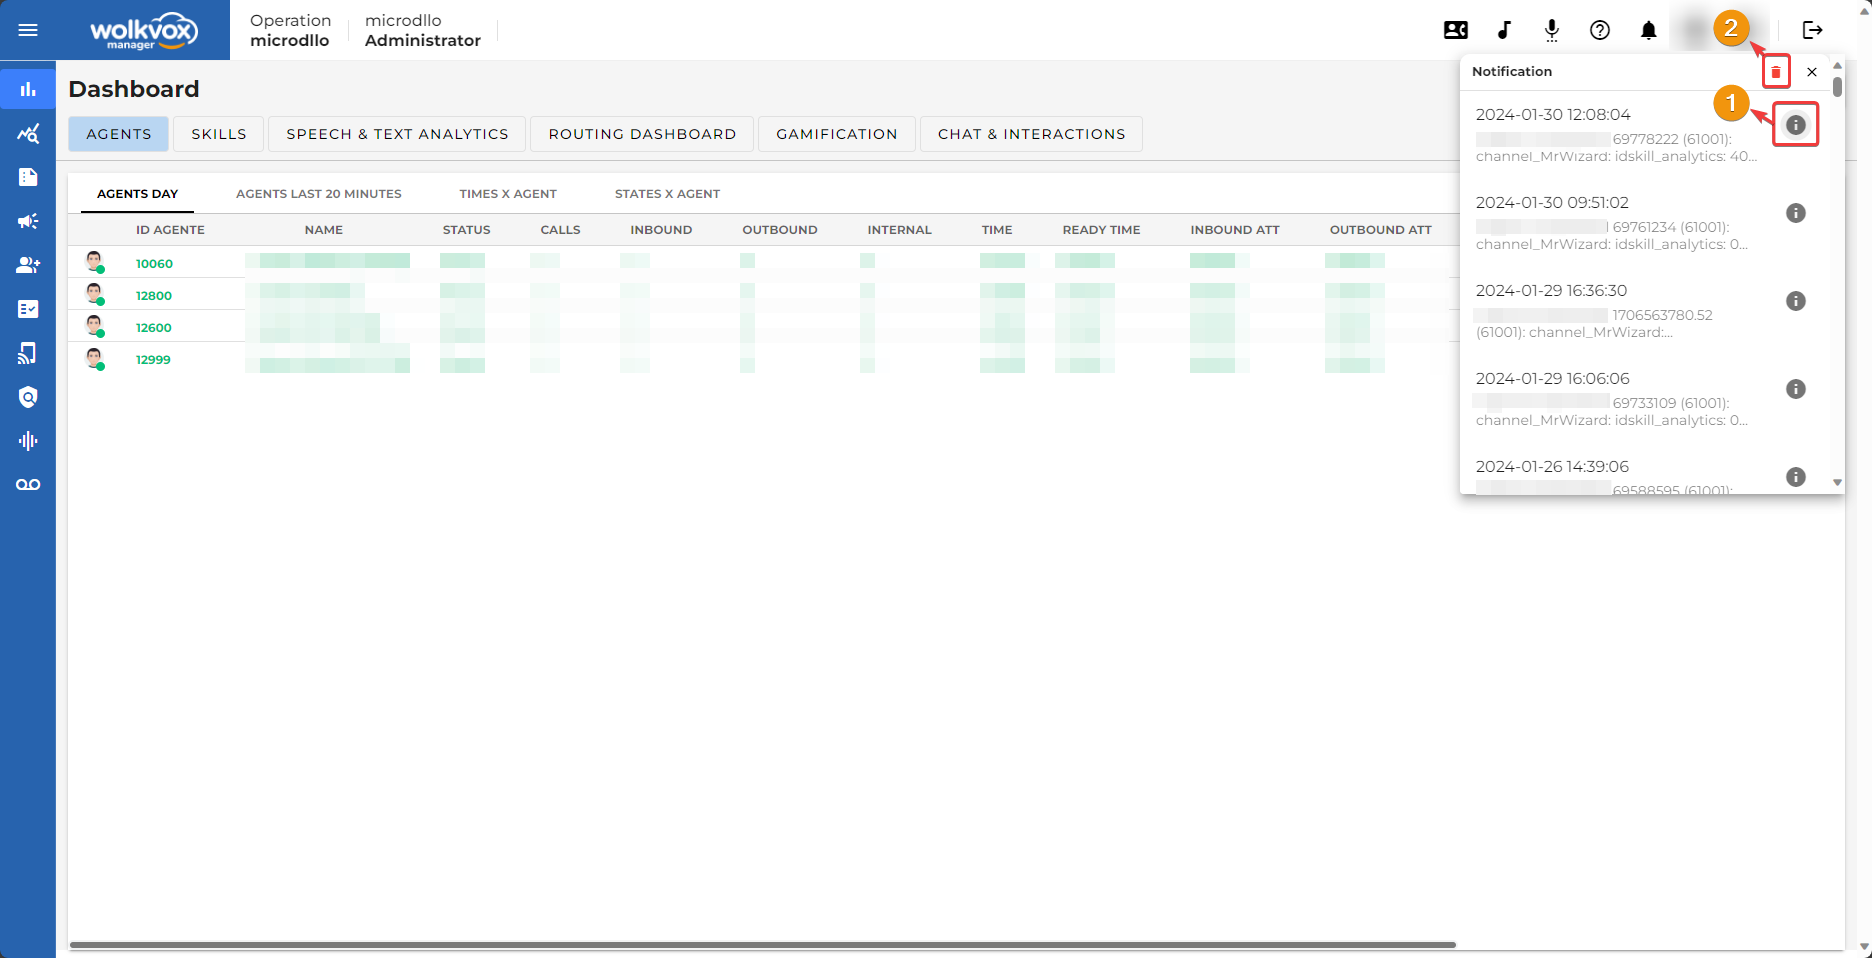
Notifications #
In this notifications section, you will find all communications sent by wolkvox related to wolkvox Manager, including announcements of updates, new features in the application, or any other necessary messages.
It will also display notifications configured in the wolkvox Notification component of wolkvox Studio.
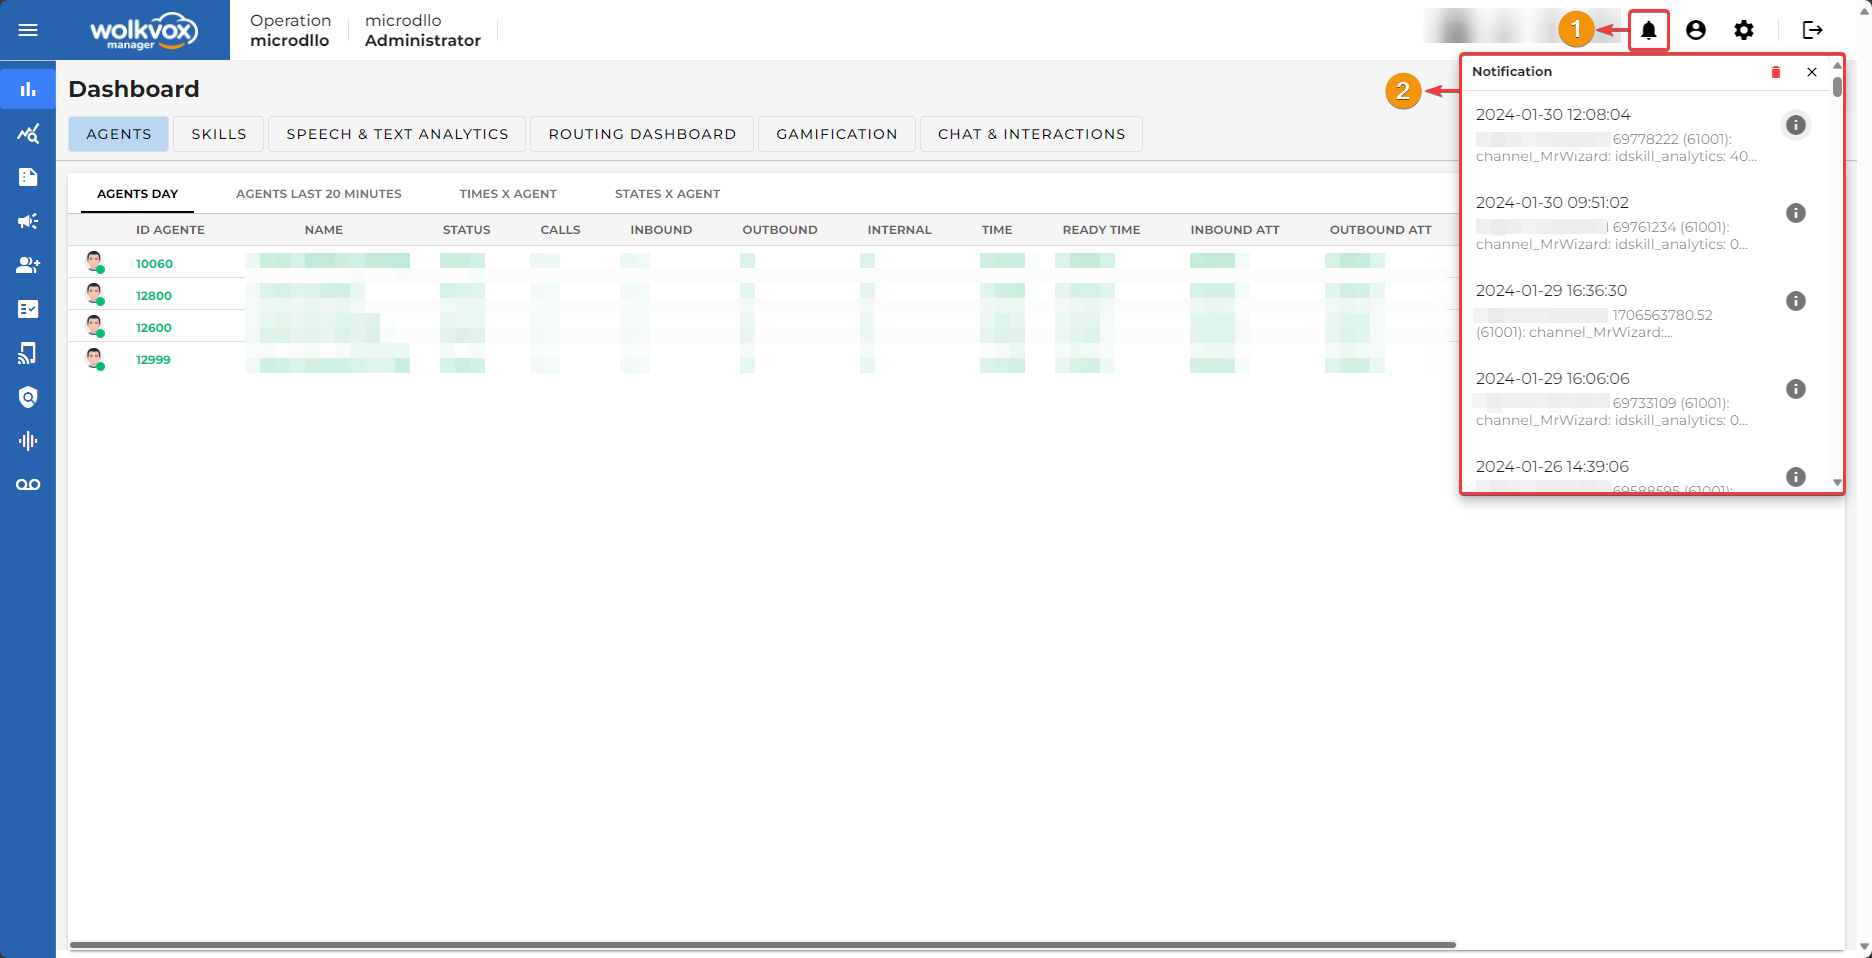
- By clicking on the button with the ‘i’ icon, you can view the full notification message.
- By clicking on the icon with a trash can symbol, you can delete the notification history.
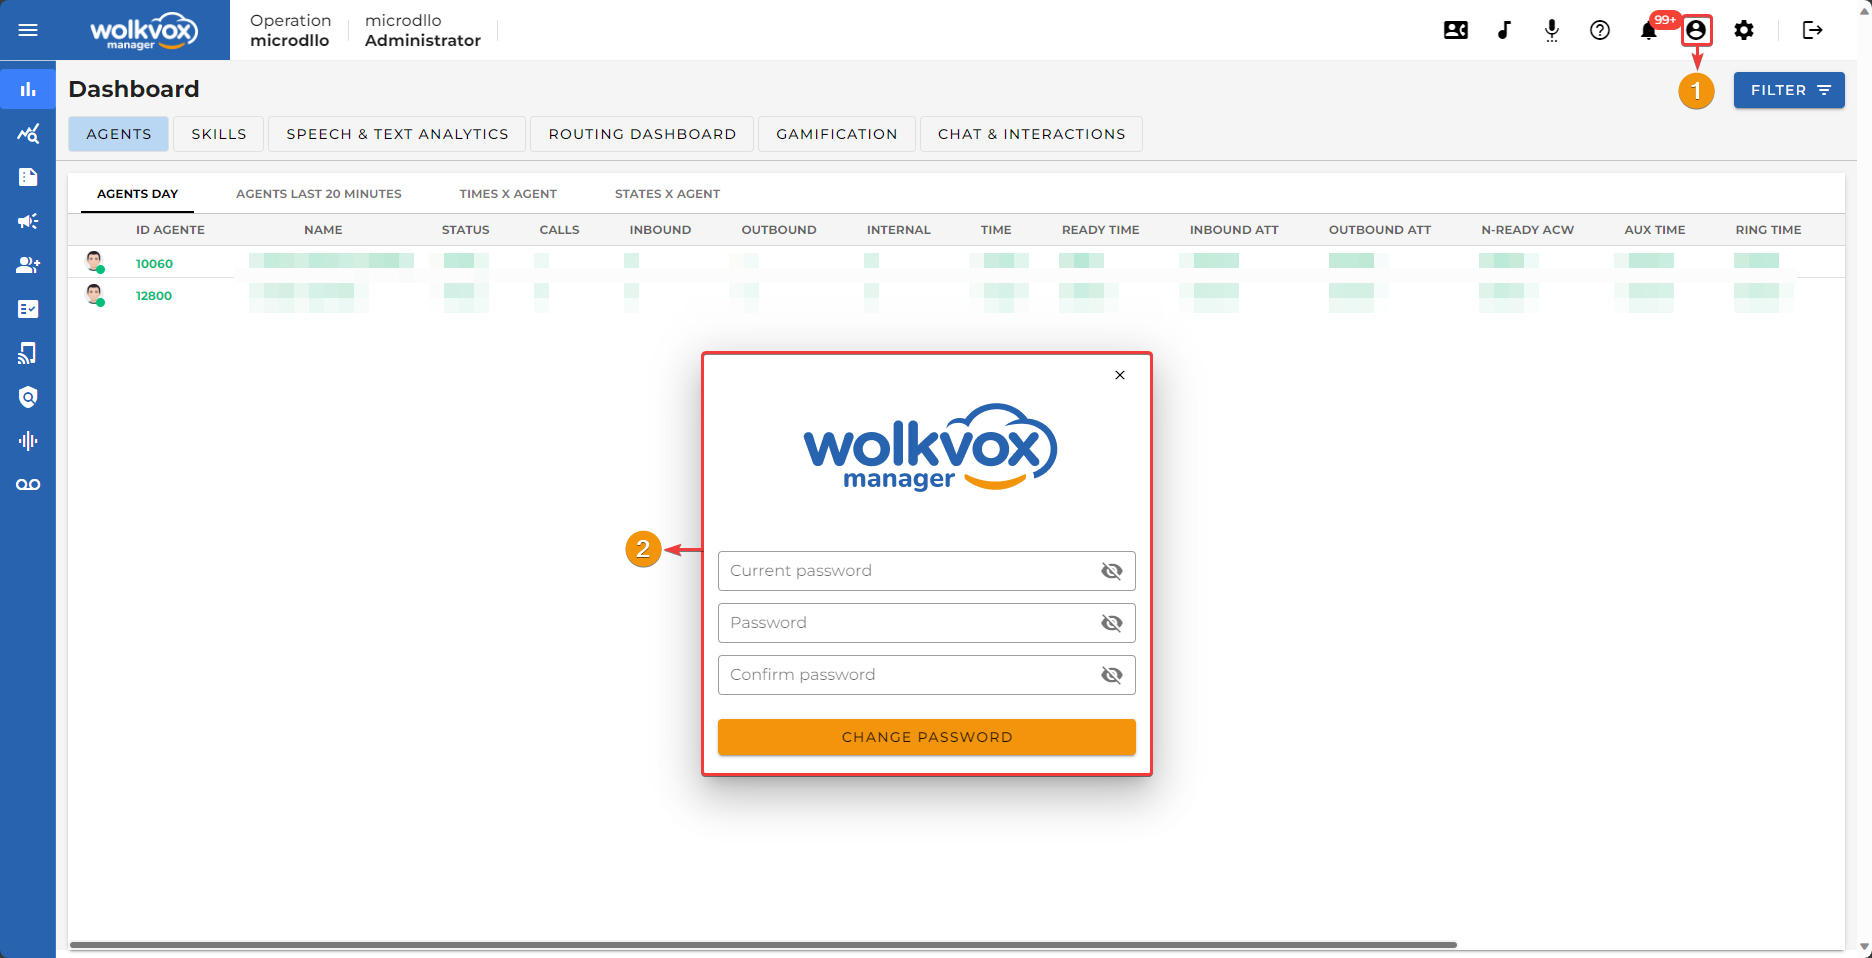
Change user password in Wolkvox Manager #
If you wish to change your current password, you can do so by clicking on the “Profile Settings” button, highlighted in the following image.
You should enter the new password and retype it to ensure that the same characters are being entered.
We recommend using a set of characters with a high level of security to prevent unwanted access. You can combine lowercase and uppercase letters, numbers, and special characters (these add an extra layer of security to the password).
User and Profile Settings #
All configuration related to the creation and management of profiles can be found at the following path:
- Button “Settings”.
- Tab “Users and Profiles”.

Profile Creation #
The user profile is used to distinguish users in Wolkvox Manager by group and to assign specific permissions to certain sections of the application to each user. That is, you can create a profile called “Sales Leader,” “Supervisor,” “Trainer,” “Technical Support,” among others. These profiles are assigned to each user according to their role, and permissions are granted based on the function they will perform. These permissions control access to the various sections and tools of Wolkvox Manager.
You can grant permissions for:
- Access to Performance Measurement Tools:
- Dashboard: Tool for real-time report visualization about agents, skills, routing points, chat and interactions, text and voice analysis, call monitoring, and viewing reports in a gamified manner.
- Data Monitor: Tool for monitoring your operation by generating important information about activities occurring within a specific time range. Here you can view important data for each call that occurred in your operation, listen to audio recordings of each call, and view screen and webcam recordings if you have this service. You can also view statistics and listen to recordings of survey mailboxes, view interactions for each channel, and all chats.
- Reports: Here you can generate reports (selecting a date range) for every activity occurring in your operation, such as advanced and detailed statistics of agents, skills, calls, typifications, routing points, quality analysis, interactions, chats, voice, among others.
- Access to Service Design Tools:
- wolkvox Studio: A set of advanced graphical tools that allow the construction of various routing flows, IVRs, virtual agents, agent scripts, interactions, chatbots, routes with omnichannel and artificial intelligence features, among others.
- Campaigns: Powerful tool for creating predictive, progressive, and preview campaigns. All with advanced features that will optimize the customer service management of your operation.
- Agents: Section of the wolkvox Manager application for the creation and management of agents in your operation.
- Skills: Section of the wolkvox Manager application for the creation and management of skills in your operation, these are the groups of agents configured with specific characteristics.
- Activity Codes: Section of the wolkvox Manager application for the creation and management of activity codes in your operation, these are the different codes that agents use to determine the outcome of contact with a customer.
- PBX: Section of the wolkvox Manager application for the creation and management of administrative extensions.
- Access to other wolkvox tools:
- Quality Analyzer: Tool for conducting quality analysis of your operation.
- Speech Analytics: Tool for conducting conversation analysis.
- Conference Rooms: Tool for making calls with agents.
- Voicemail: Tool for creating voicemail boxes.

- Go to “Settings”.
- Navigate to the “Users and profiles” tab.
- Click on the “Profiles” button.
- Click on the “Add profile” button.
- Assign a name to the new profile.
- In this part, there are three tabs, one for editing permissions related to performance information, another for those related to service design, and the last one for granting access permissions to other wolkvox Suite tools such as Quality Analyzer, Speech Analytics, etc.
- Each tab lists permissions individually along with a switch button, which allows you to activate or deactivate the respective access permission to that service.
- Click on the “Save new profile” button.
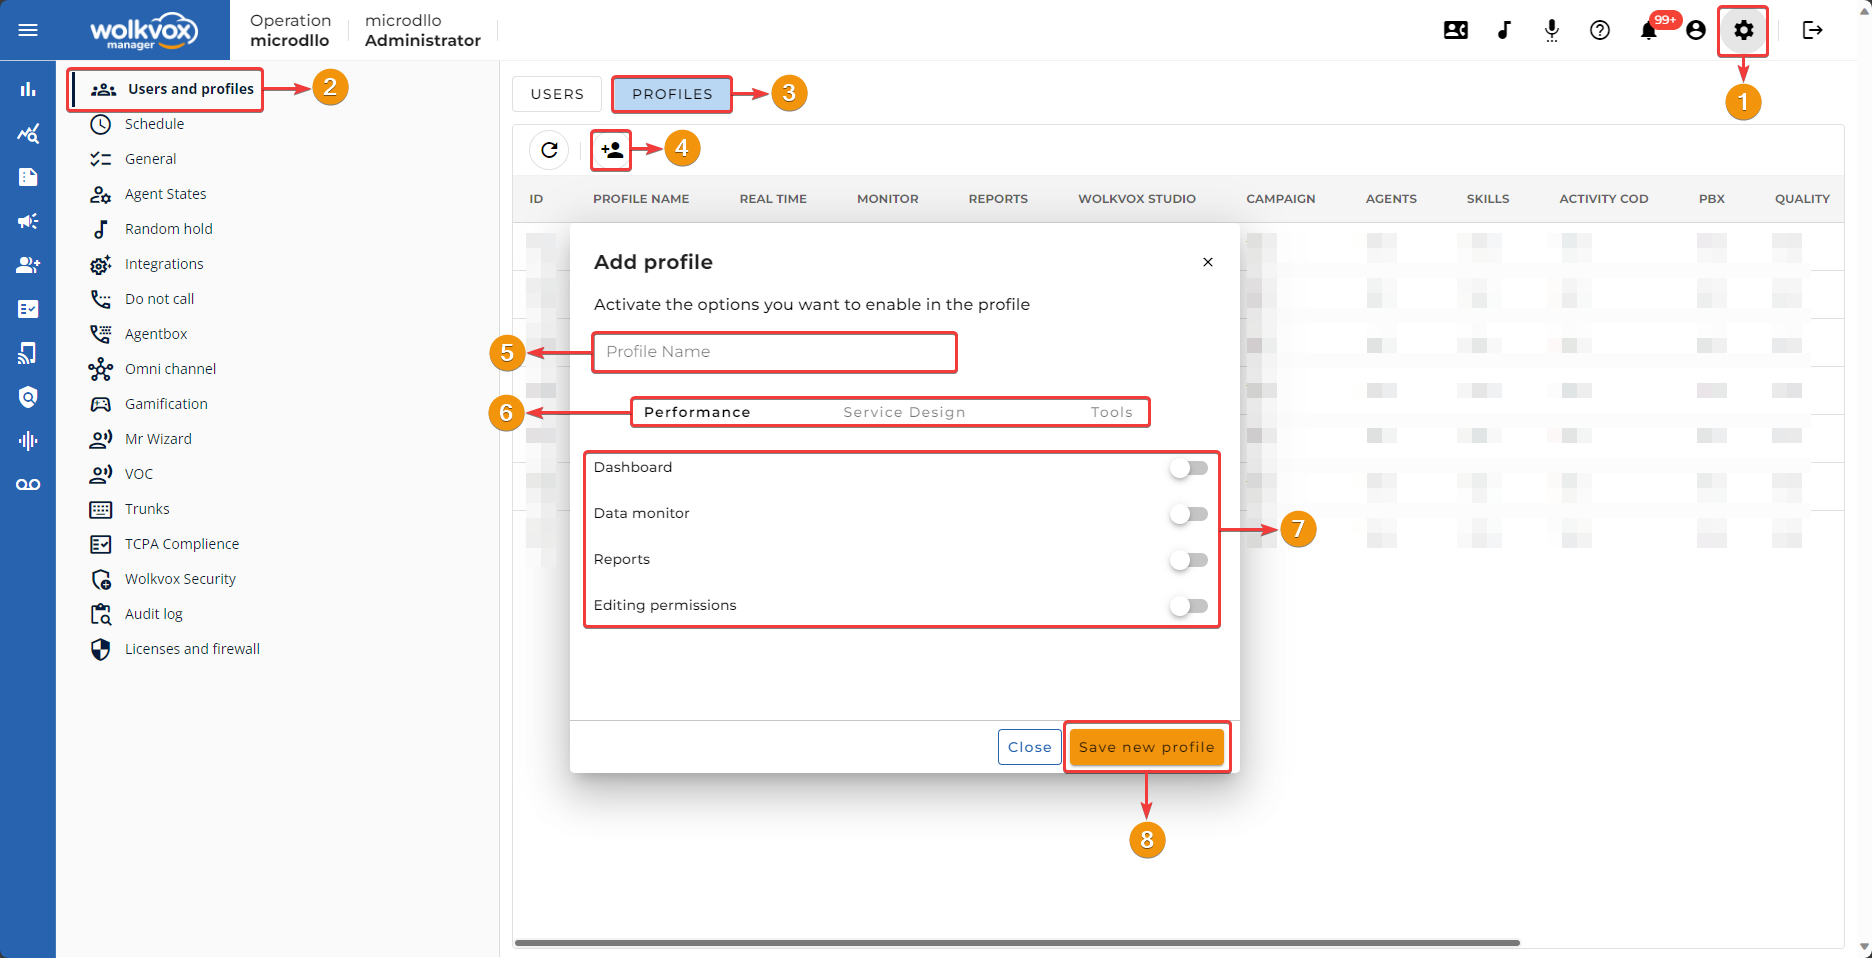
Once the profile has been created, it is listed in the table with each column indicating whether the profile has access permissions to the various tools and sections or not.
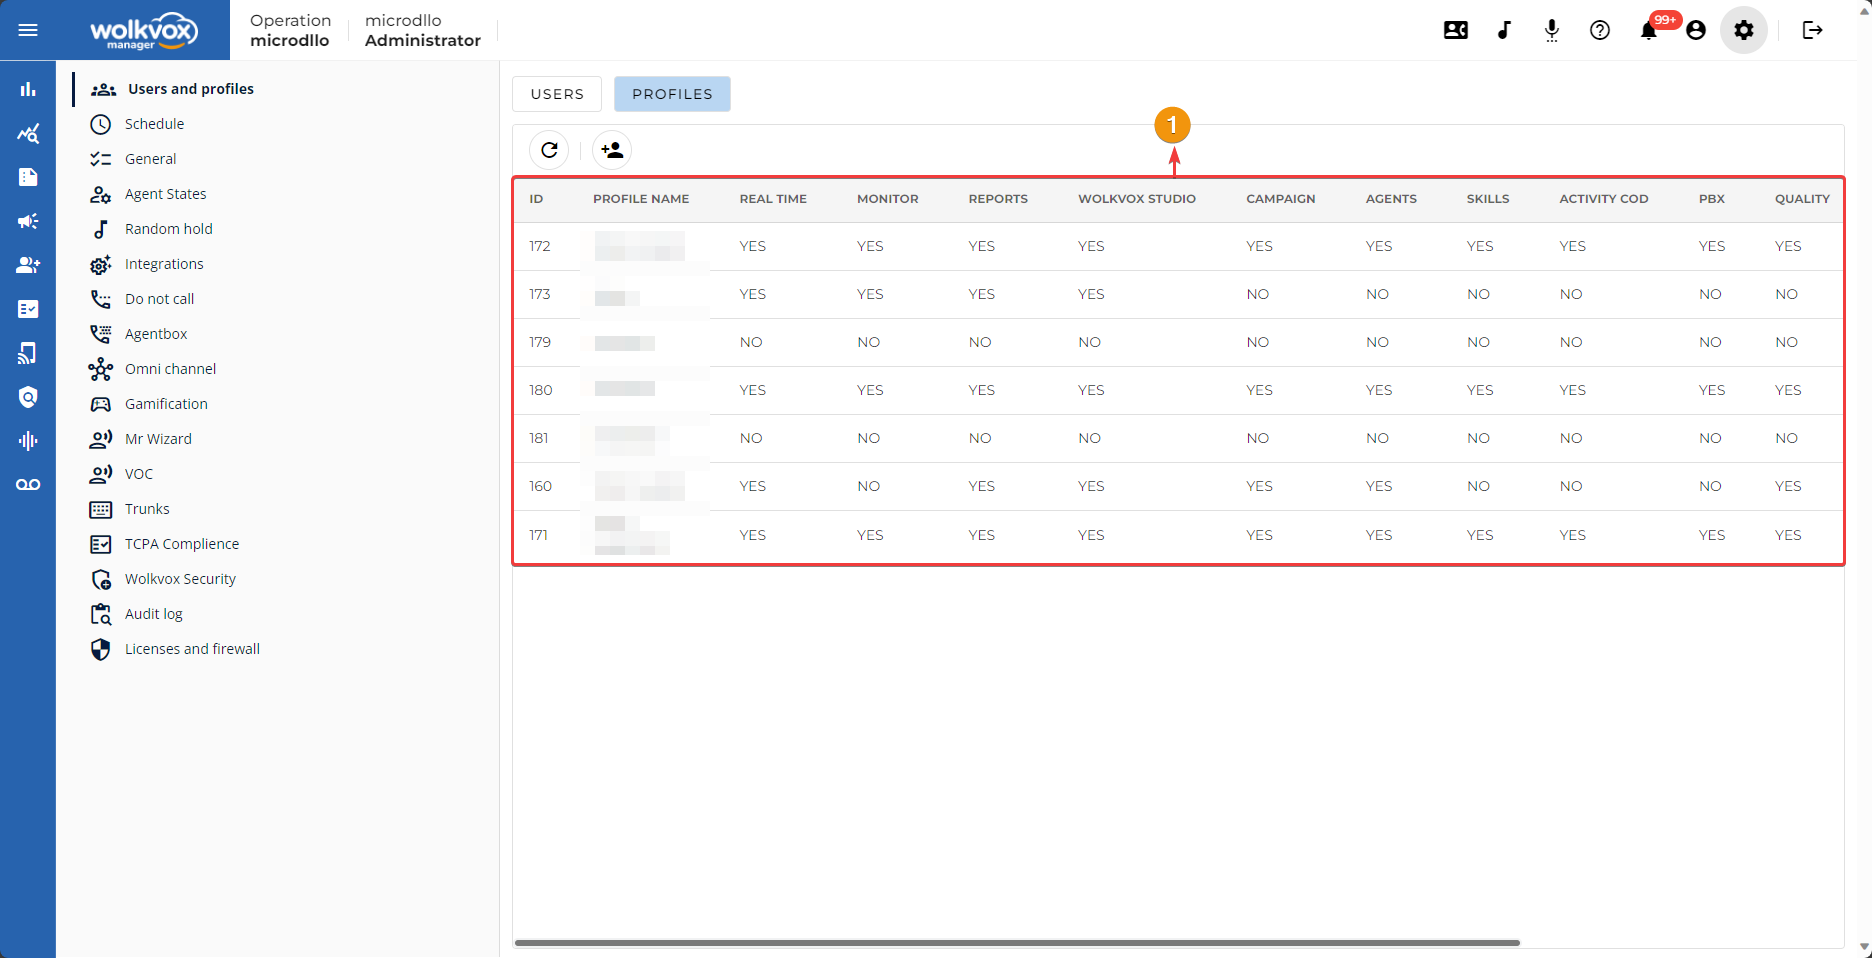
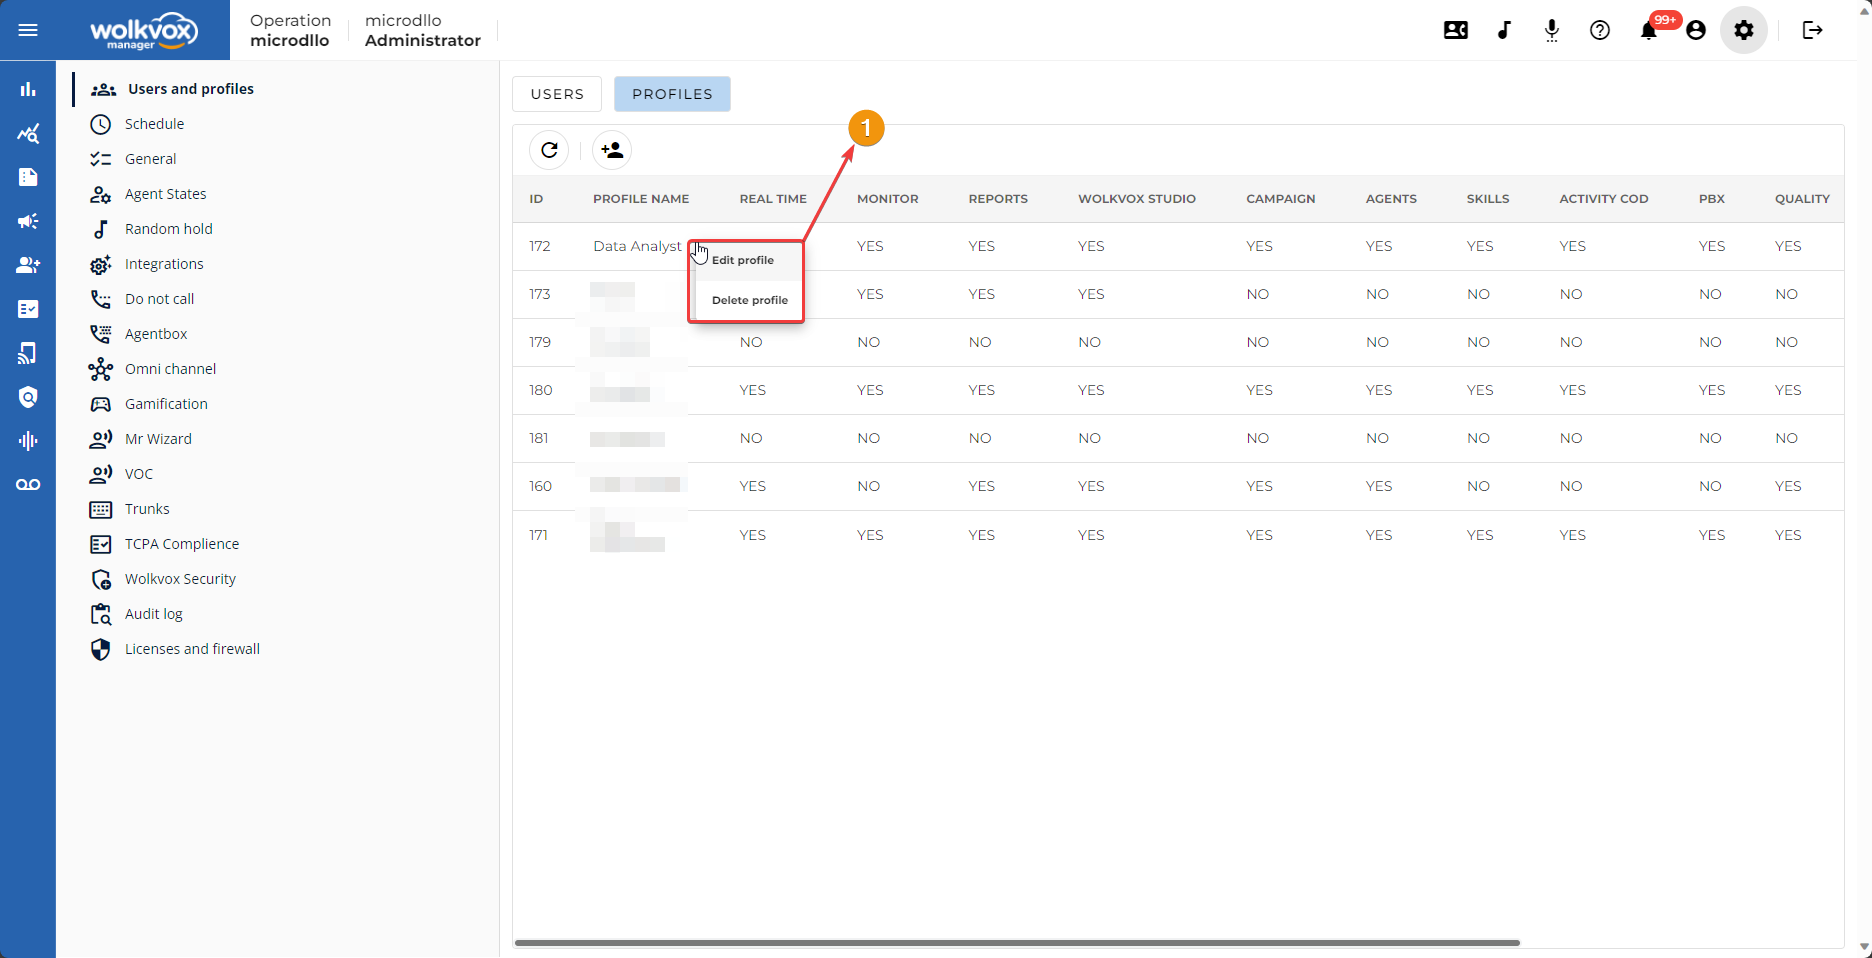
Profile Management #
By right-clicking on a profile, you can edit or delete it.
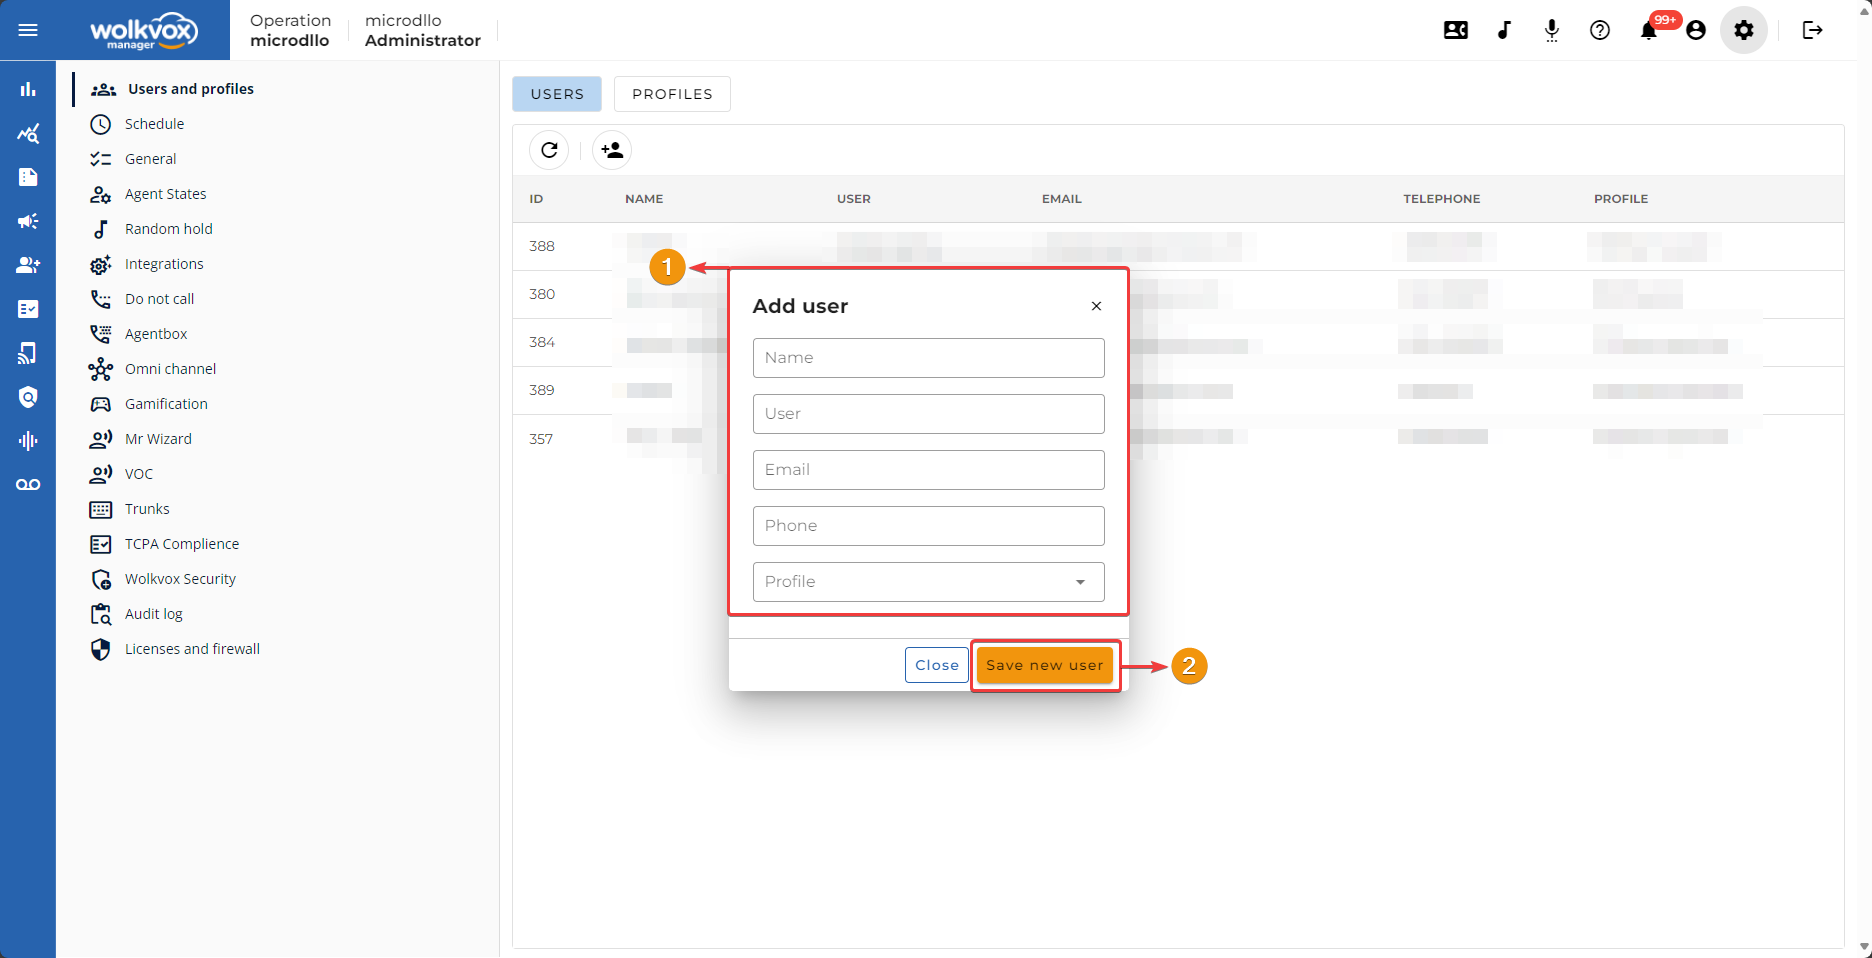
User Creation #
Users will be the individuals who will log into wolkvox Manager and will have authorization to access different sections of the application according to the assigned profile and configured permissions for each type of profile.

In the window that opens, you must enter the following data:
- Name of the person who will use the user.
- Username (no spaces allowed).
- The password is generated automatically and sent via email.
- Contact email.
- Contact phone number.
- Selection of the profile to assign.
User Management #
By right-clicking on a user, you can edit or delete it. You can also export the list of users in HTML format by selecting the “Export User” option.

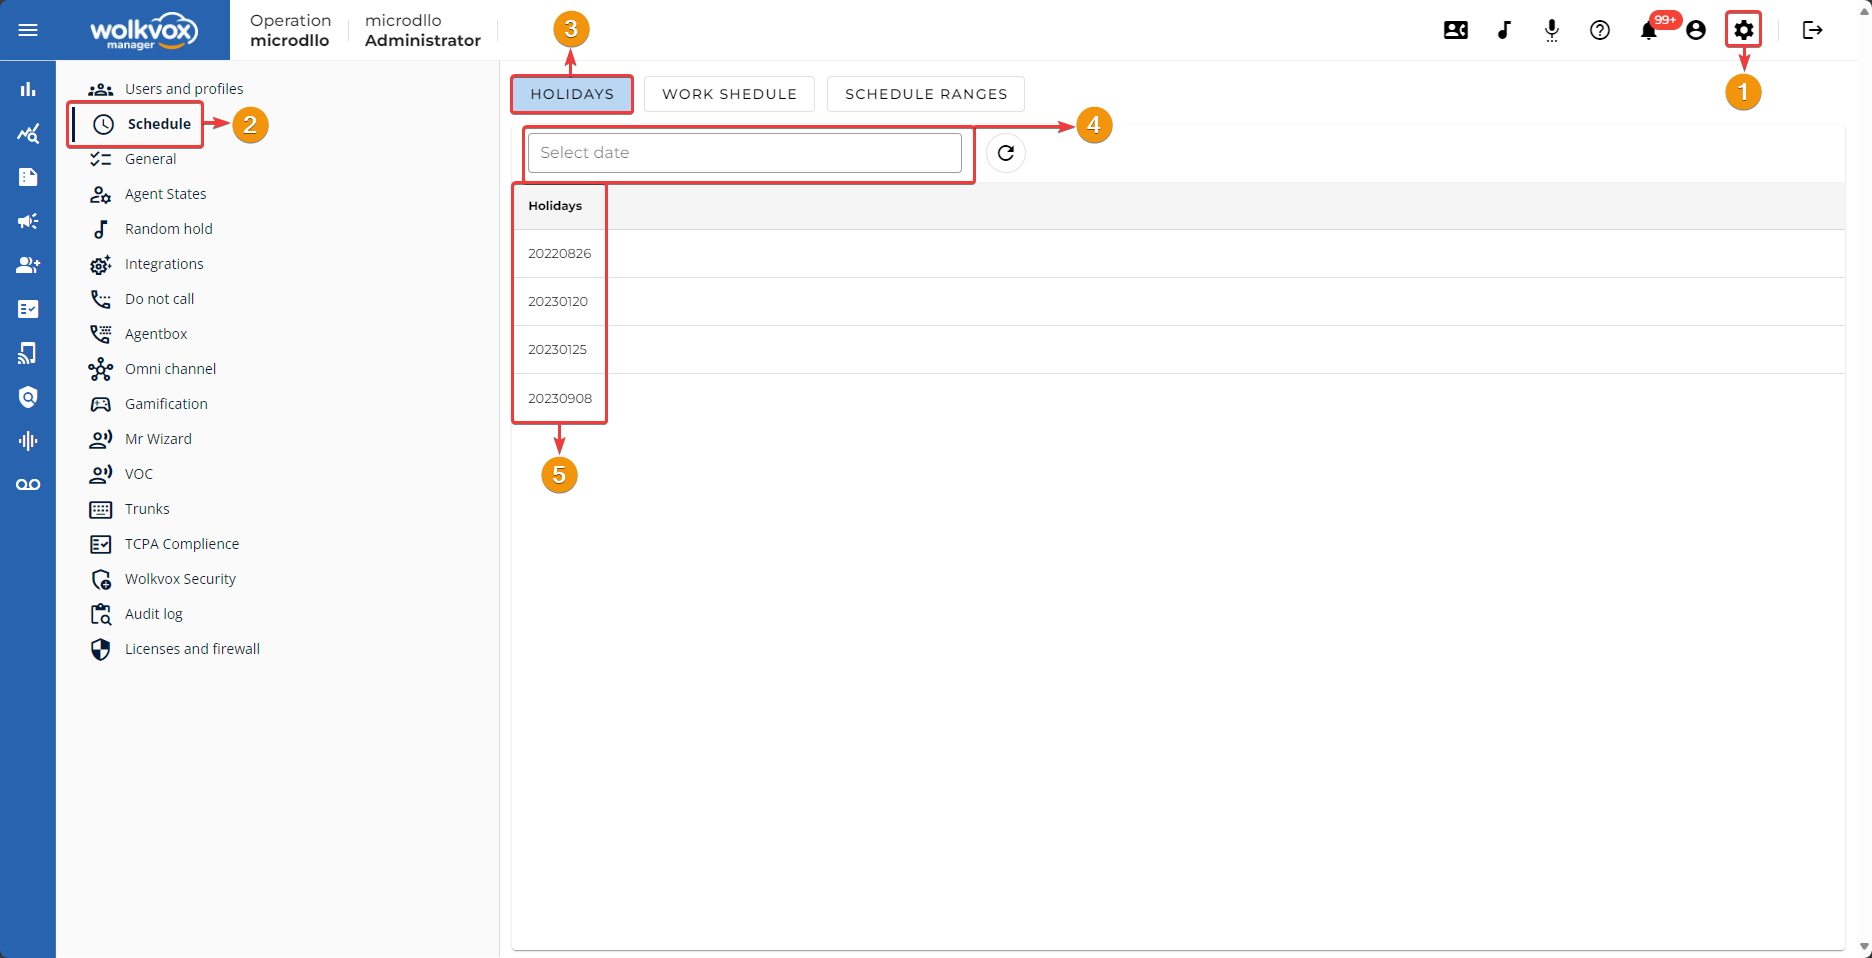
Schedule Configuration #
Definition of Holidays #
This option allows you to establish holidays or days when the operation will not provide its services.
In the “Select date” field, you must left-click to display the calendar and choose the holiday.
Note 1: Each holiday must be added manually, and during these days, inbound calls will be blocked to prevent calls from being received.
Note 2: By right-clicking on a listed holiday, you will have the option to delete the holiday.
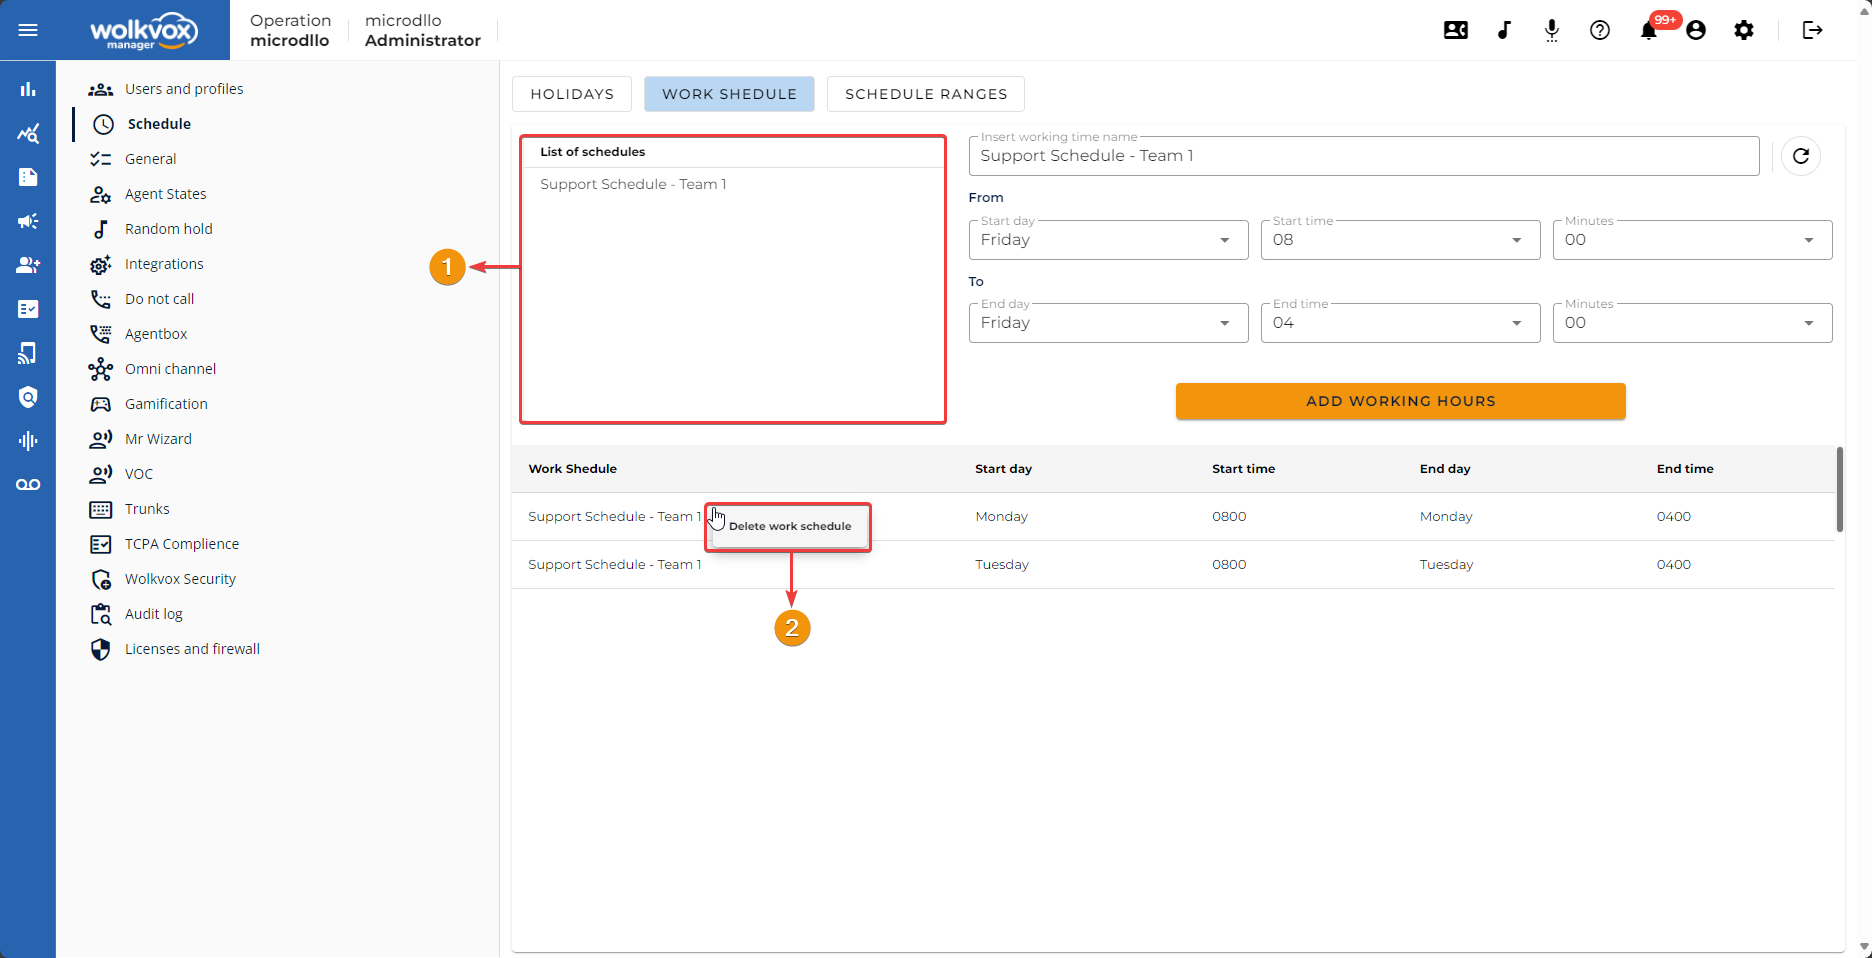
Set work schedules #
Creating work schedules is important to define the operating hours for a skill. This helps to prevent incoming calls when a skill is not operational. Additionally, within the settings of each skill, there is the option to transfer the call to another skill or redirect the customer to a voicemail when the customer calls the skill outside of working hours.
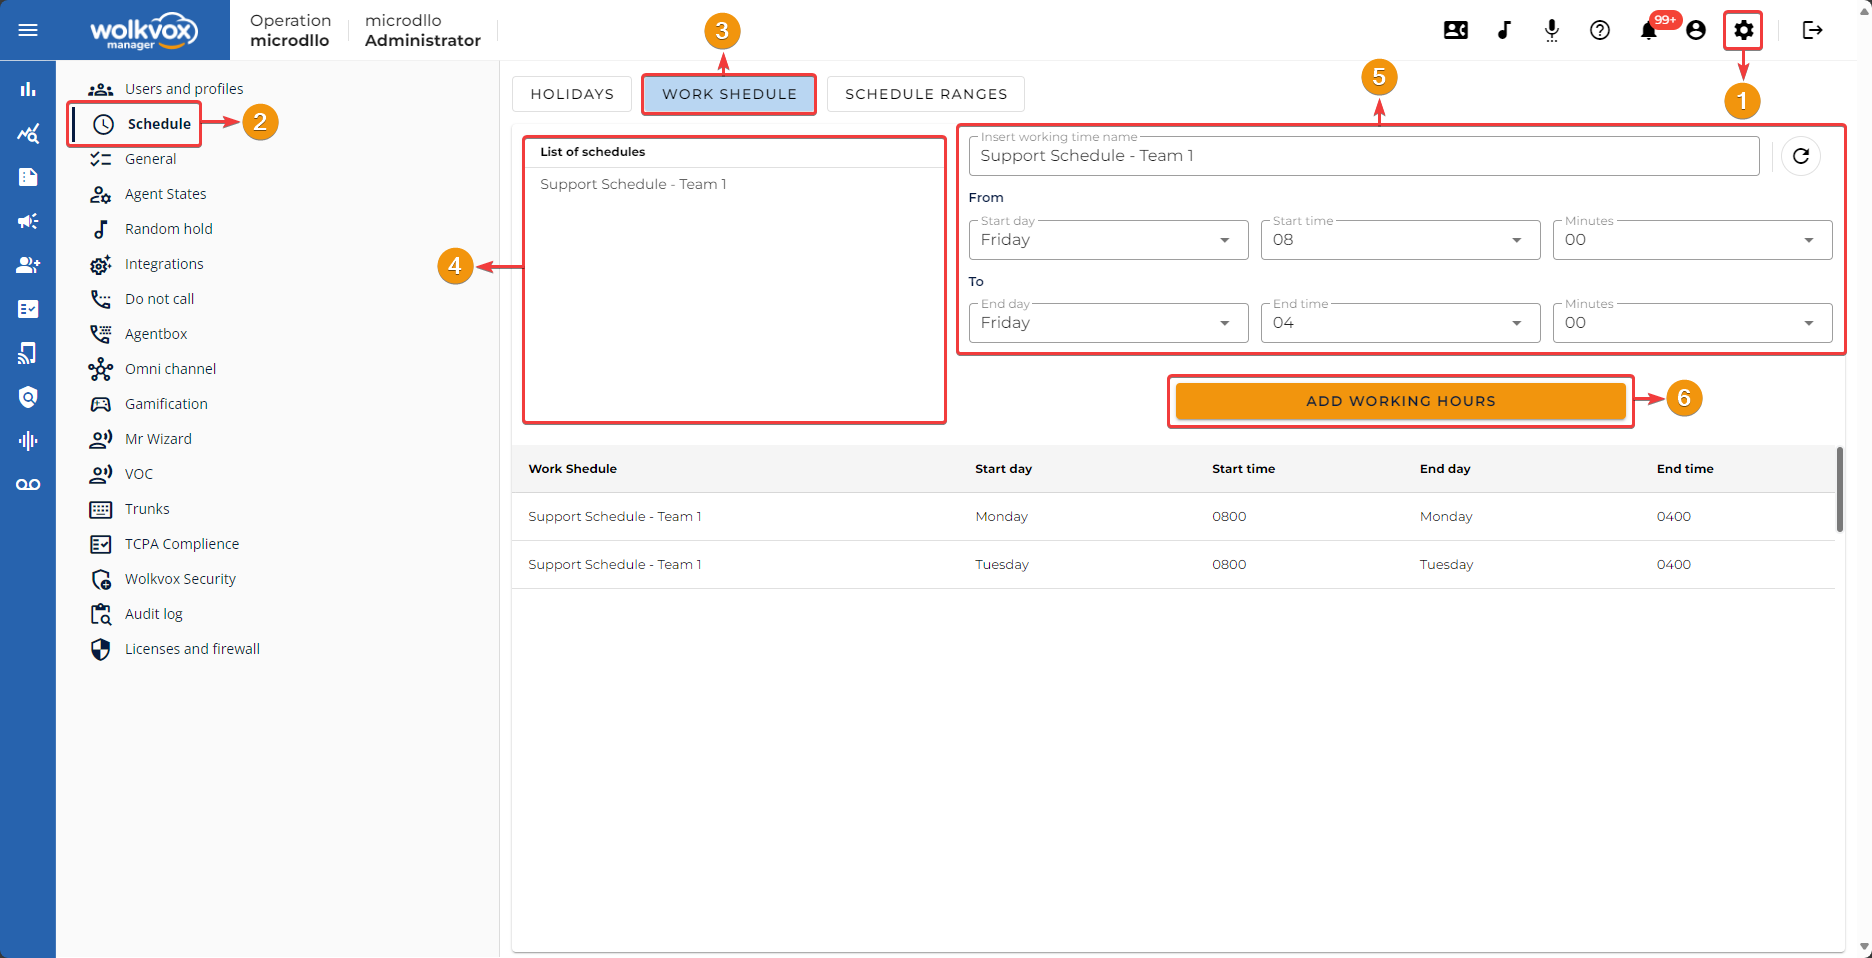
#
To delete a work schedule, select the desired item in the “Schedule List,” it will be listed at the bottom, right-click, and select the option “Delete work schedule.”
Set Time Ranges #
In this section, you have the configuration of the weekly schedule, the hours of rest (Hour holidays), and the GMT time zone.

General Settings #
In this section, general but important features for your operation are configured, such as screen recording, video calling, stereo recording, and enabling a second group of activity codes for call categorization.
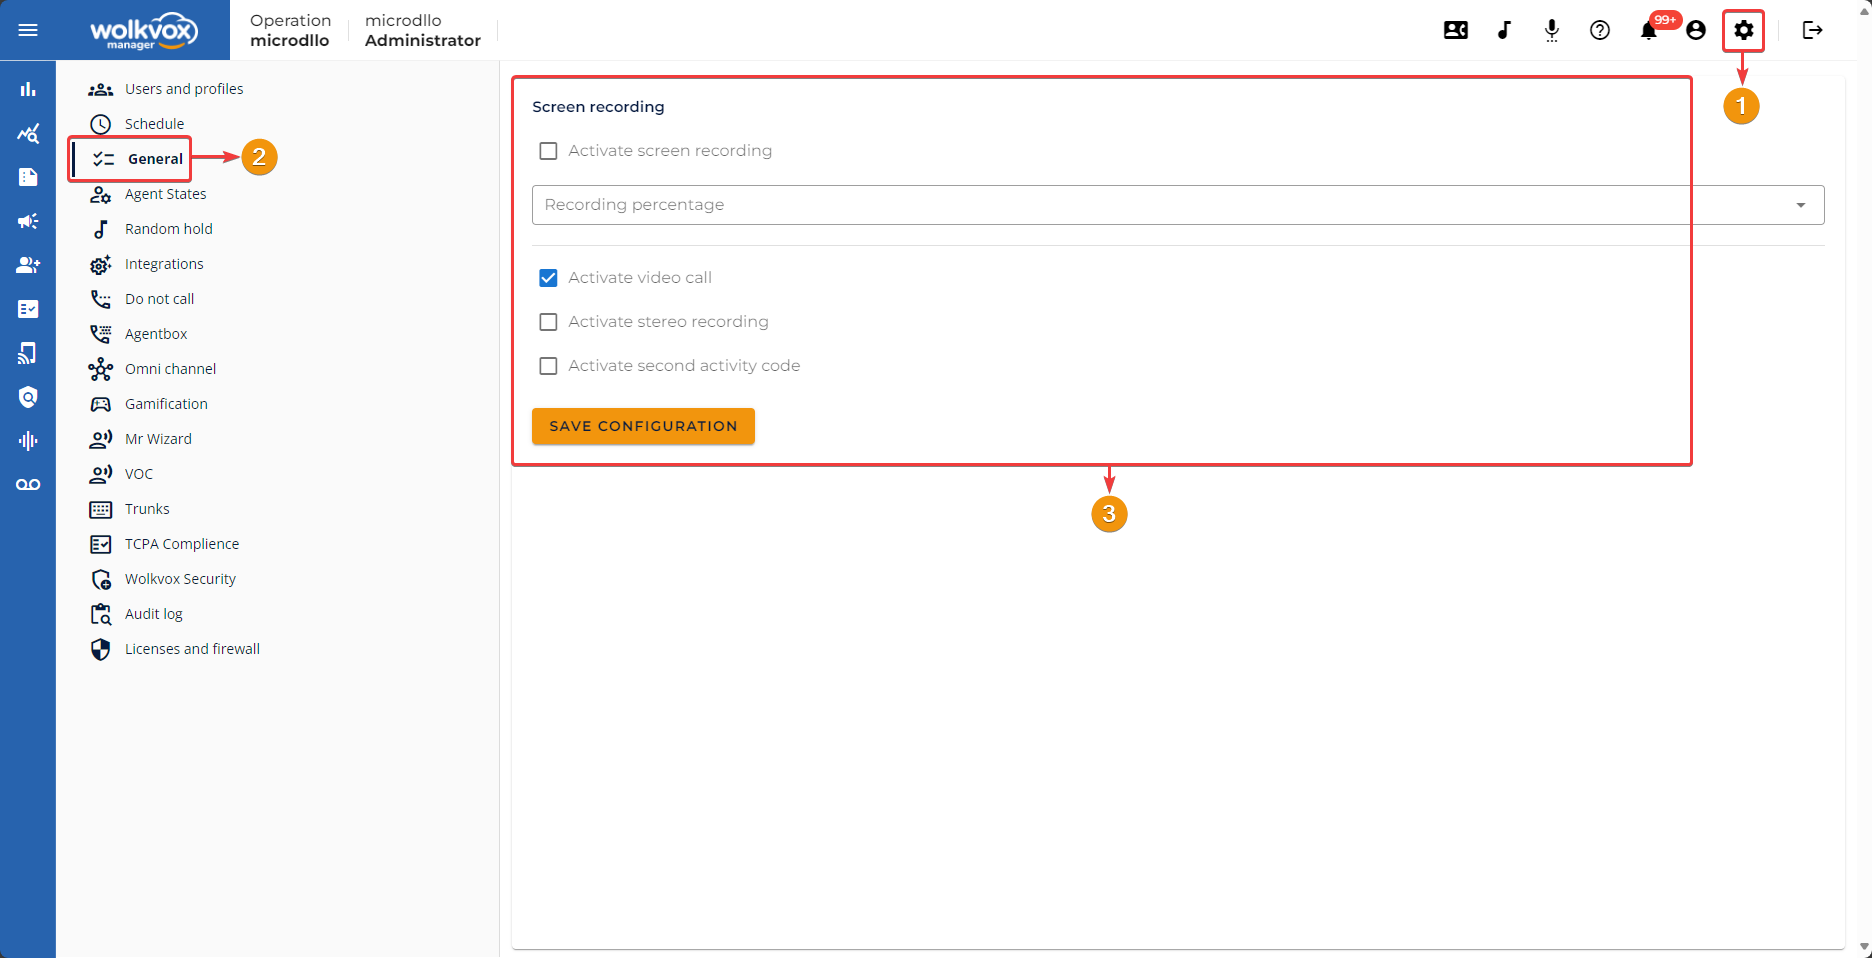
Screen Recording #
This option allows you to record the screen of a percentage of your operation. With this feature, you’ll gain several benefits, one of which is the ability to verify how your agents are operating during customer service.
- The allowed percentages range from 0 to 100 in intervals of 10.
- This feature has an additional cost.
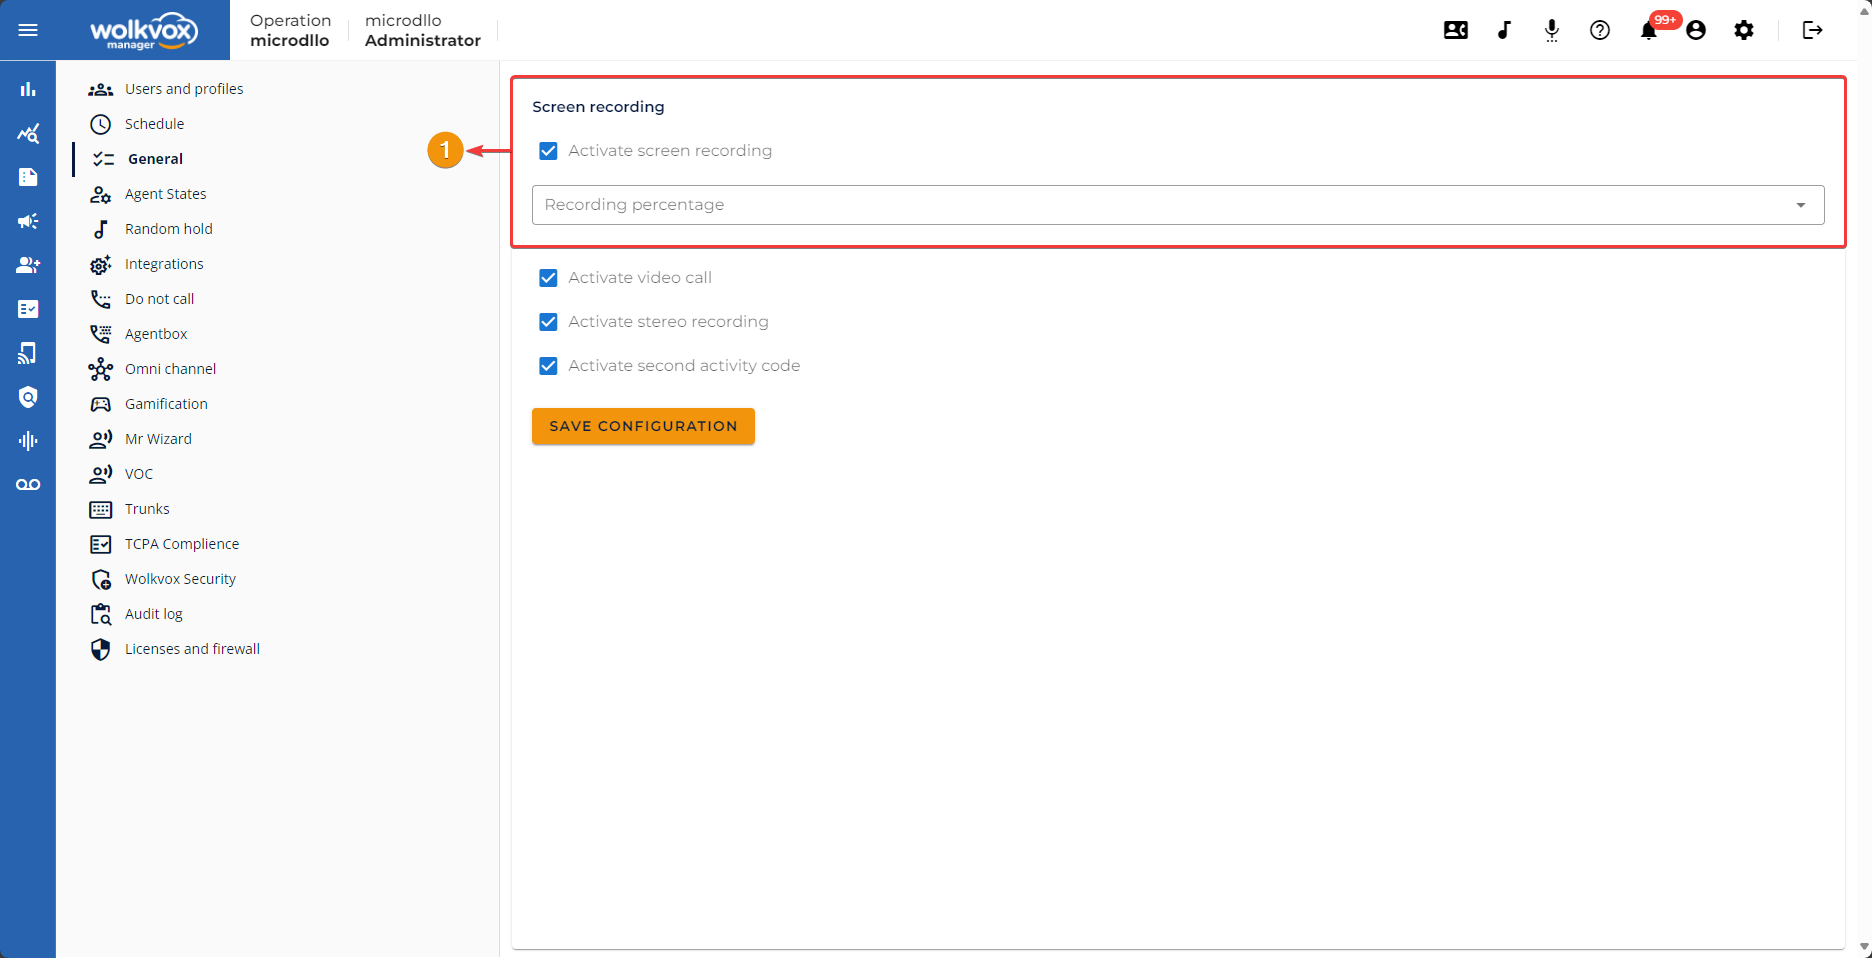
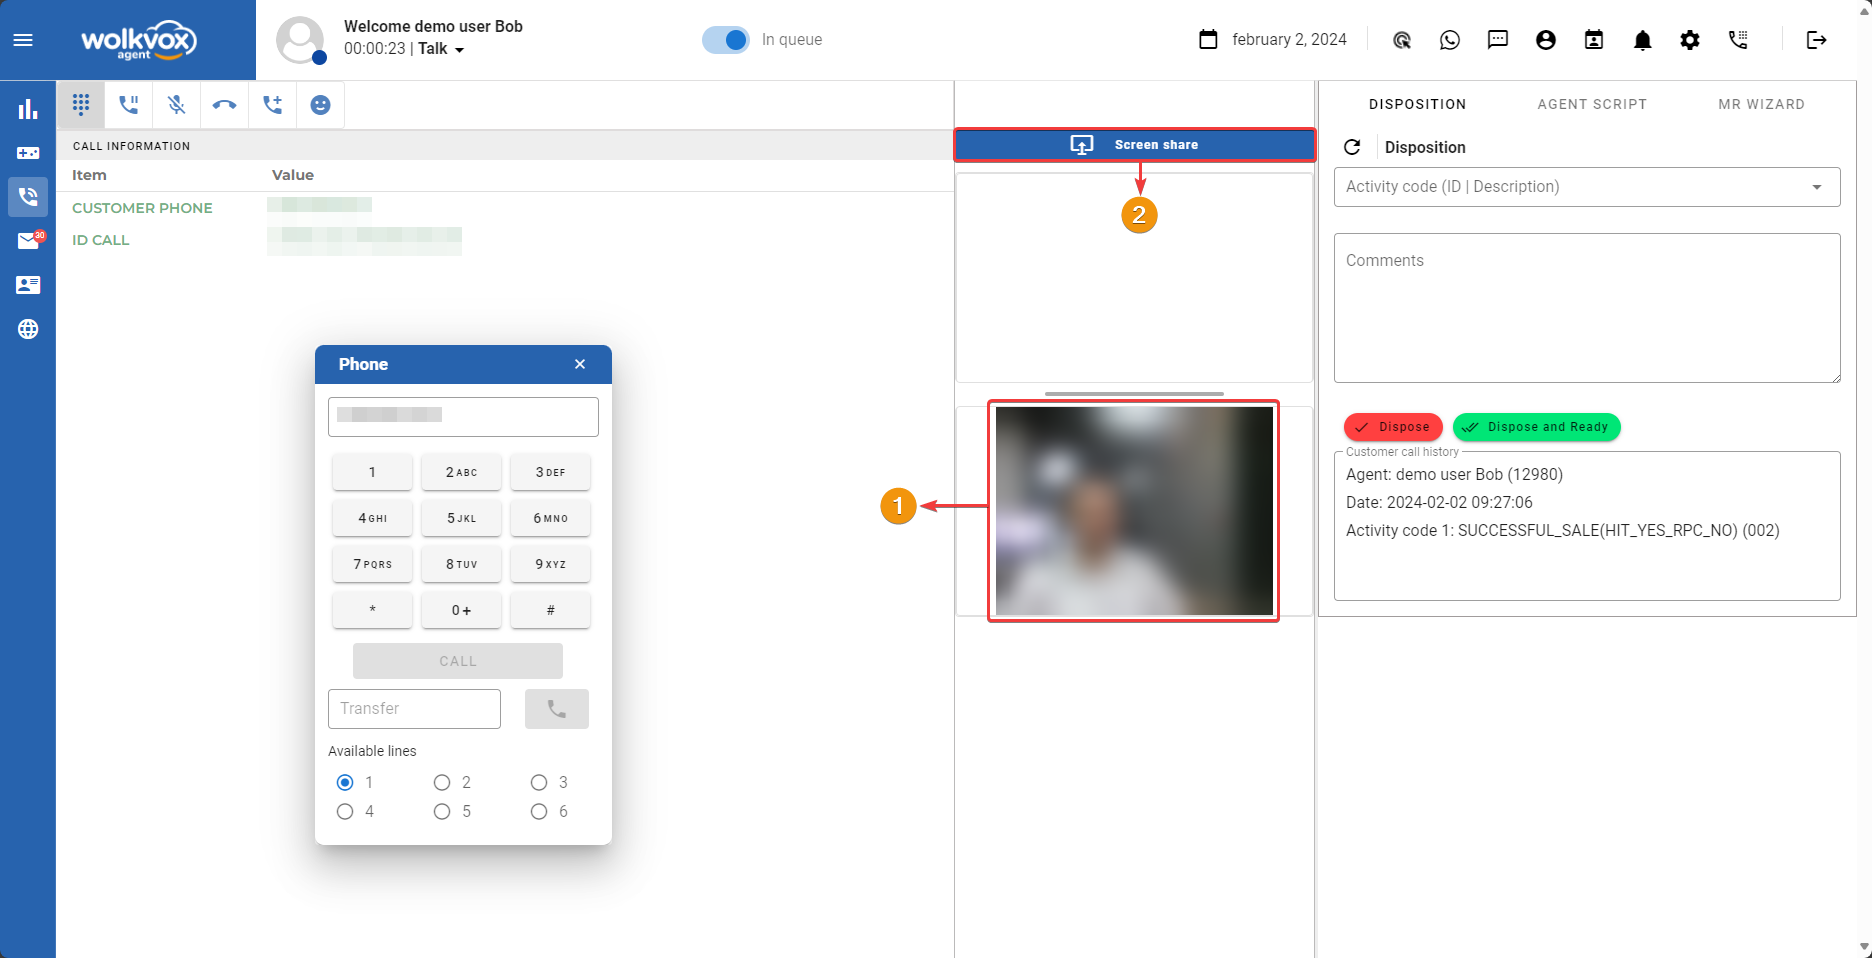
Enable Video Call #
Activating this option allows the agent to have their webcam active during calls.
- This feature has an additional cost.

Below is an example of this feature active and working in the AgentBox of an agent.
- Camera activated for the video call.
- The agent can share their screen.
Enable stereo recording #
By enabling this option, the system will record calls in stereo format, playing the agent’s voice on one side and the customer’s voice on the other side. This allows for more detailed monitoring of calls and analysis of each participant in the conversation separately.
- This feature has an additional cost.

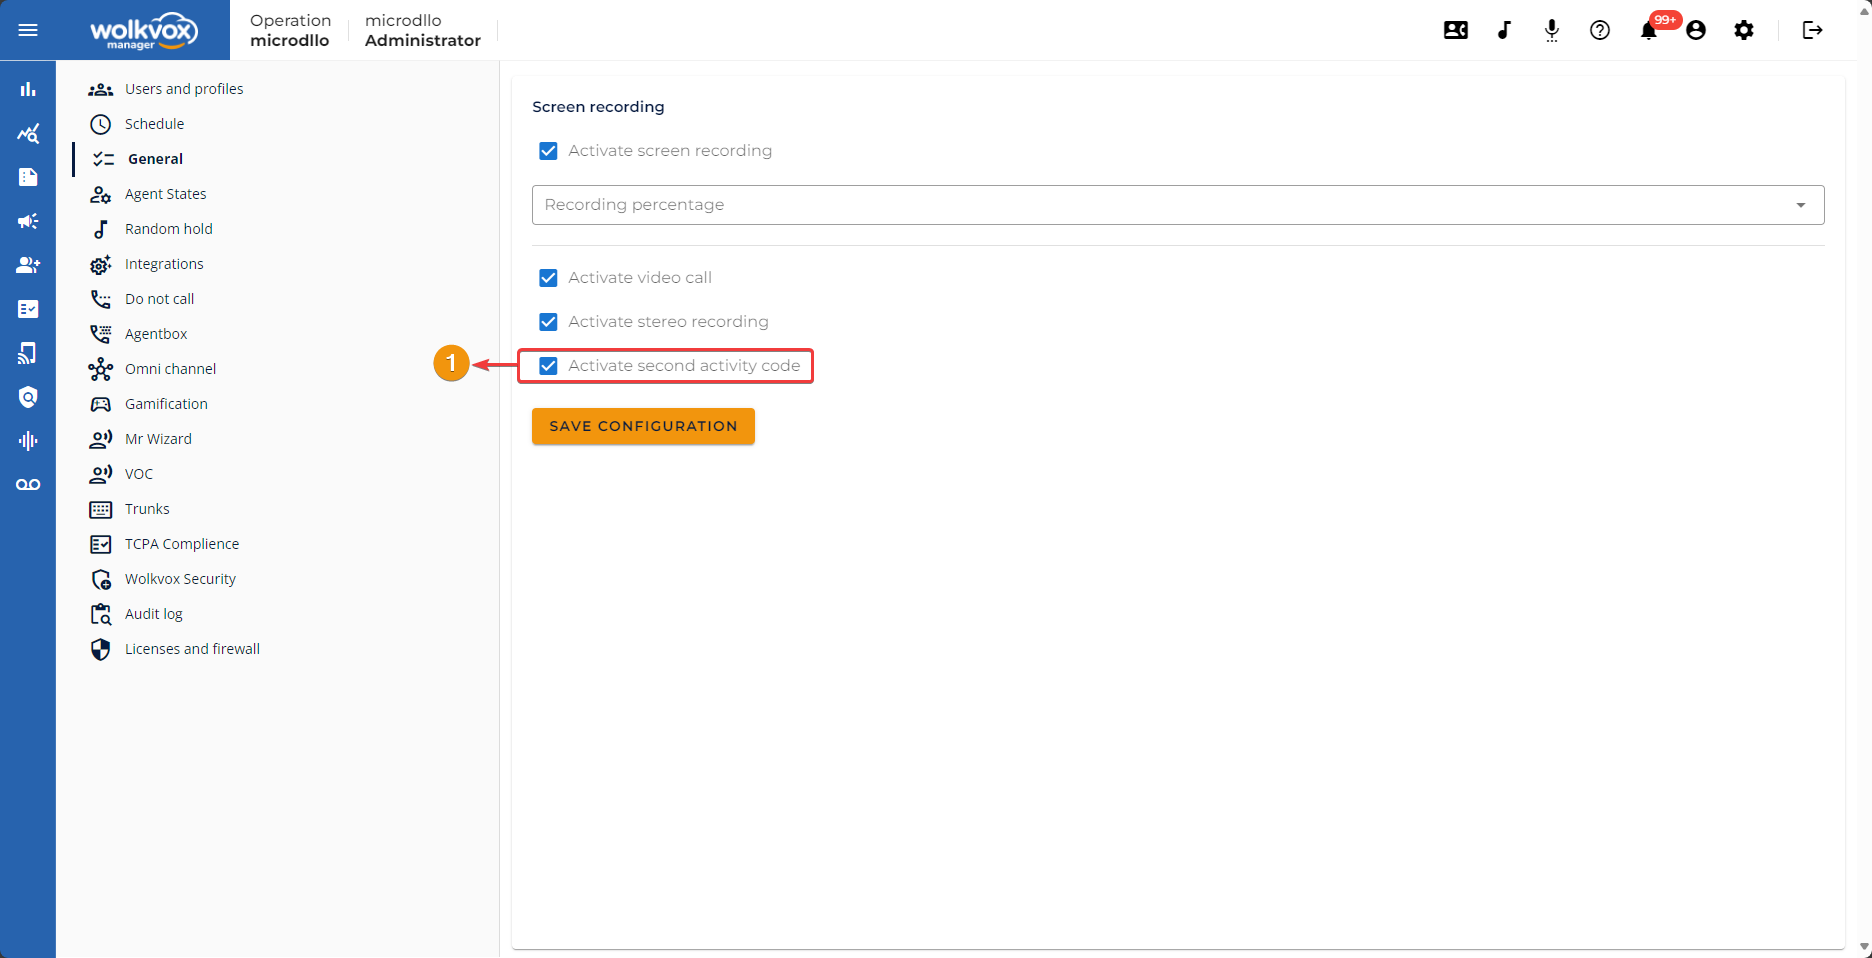
Activate second activity code #
By enabling this option, you can add new activity codes to a second group, allowing agents to disposition calls with two activity codes.
- This feature has an additional cost.
Agent States #
States represent the situations in which agents find themselves. They have the ability to set each state so that others in the operation are aware of what they are doing. Auxiliary states are created there, as by default, agents have the ability to be in three (3) states: Ready, ACW, and Logout.
Creating a state for agents #
![]() Please note that up to 15 auxiliary states can be created.
Please note that up to 15 auxiliary states can be created.
Follow this path to create an auxiliary state: Configuration > Agent States > Create New State
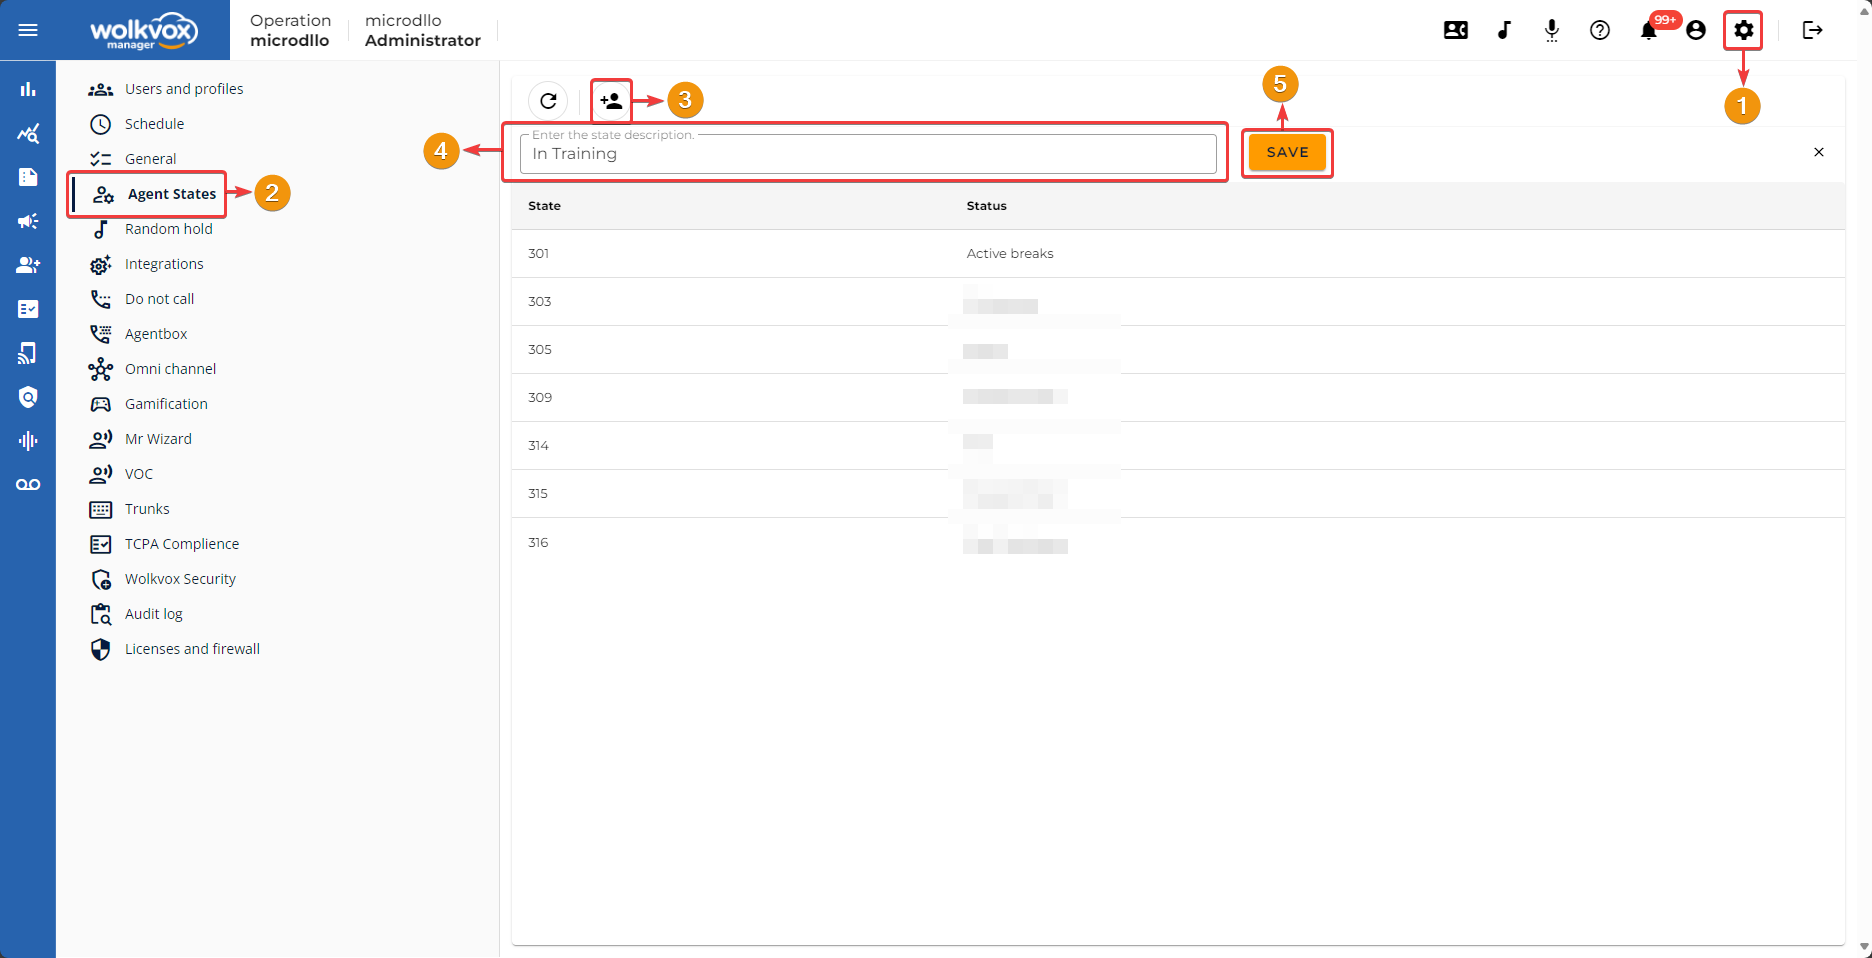
If you right-click on a state, you can delete it or edit it.

Random hold #
This option is activatable and is used if you want to play multiple music files randomly for each customer while they are put on hold by the agent.

To add a file to the hold music list, click on the “Select file” field, a new window will open where you must choose the music to upload, then click on “Upload” and wait for the file upload to complete successfully.
Please note that the supported audio format is WAV or GSM (in mono and with a sampling frequency of 8KHZ), and the file can have a maximum size of up to 50000 KB or 50MB.
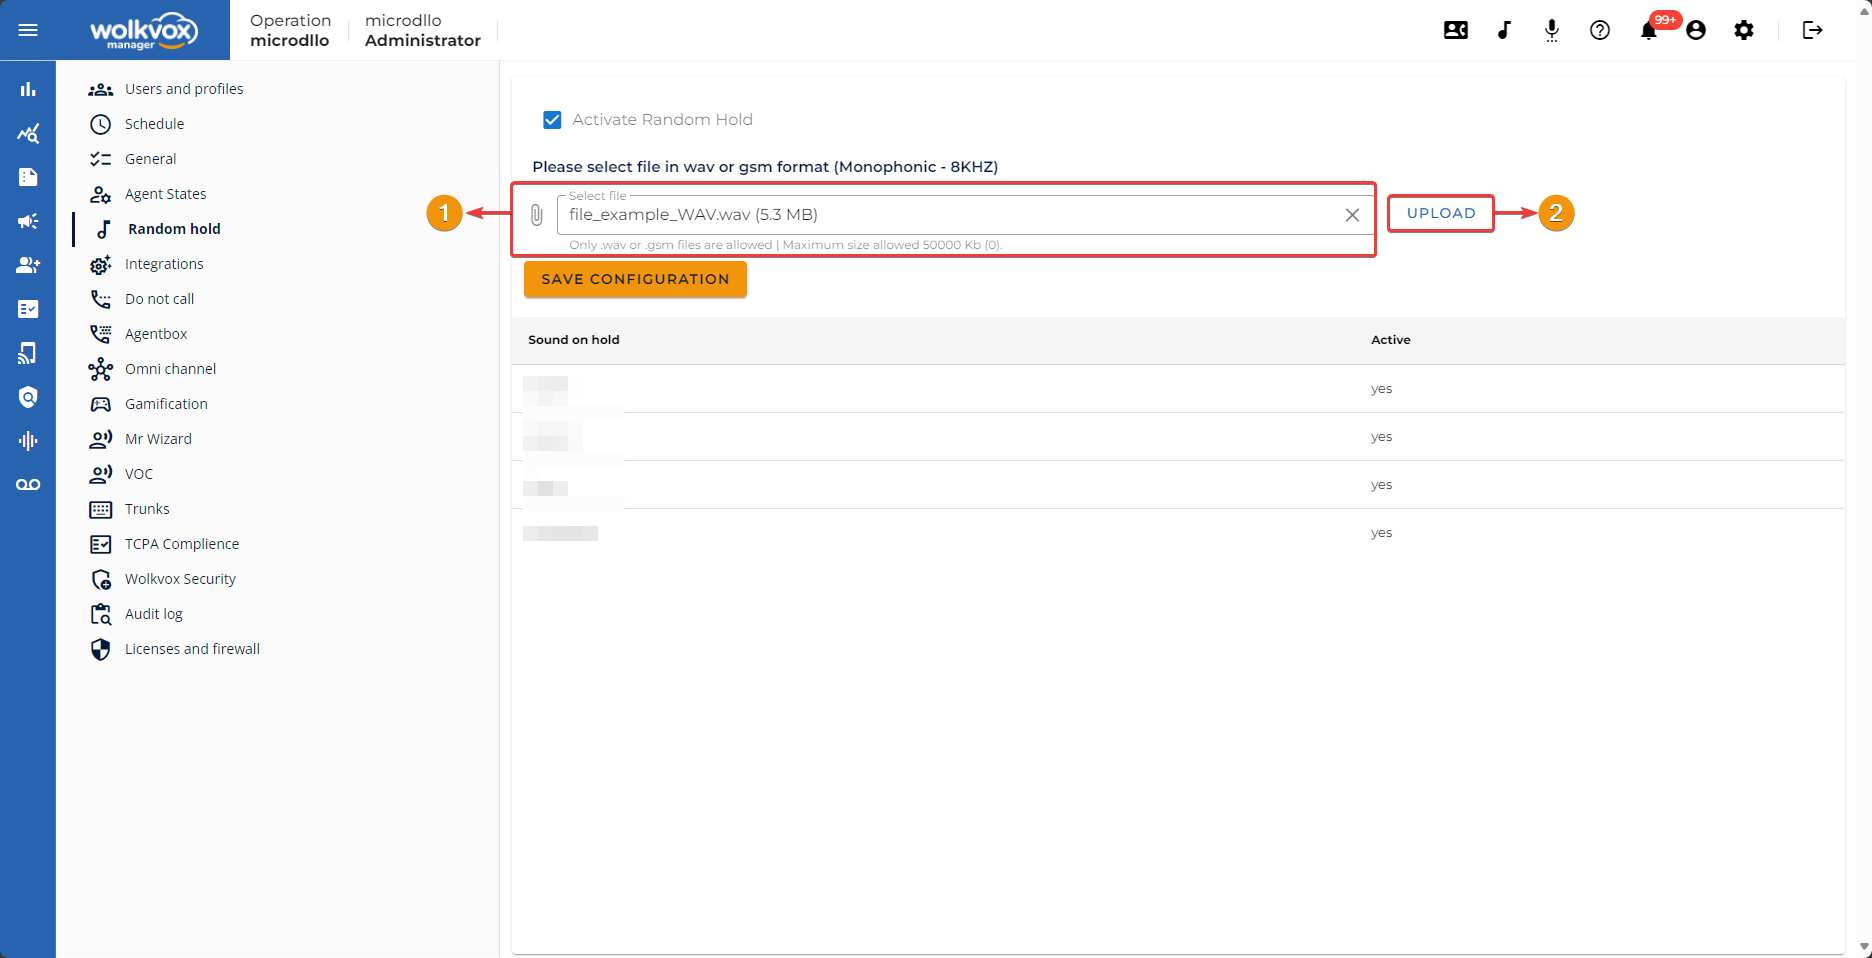
If you right-click on any item in the sound list, you can:
- Refresh the list using the “Refresh” option.
- Delete the selected music.
- Enable or disable the selected music. In the ‘Active’ column, you can see the current state of the selected music.

Integrations #
In this section, you can integrate your external services with the wolkvox Manager application to enhance the efficiency of your operation and expand the functionalities of your application.
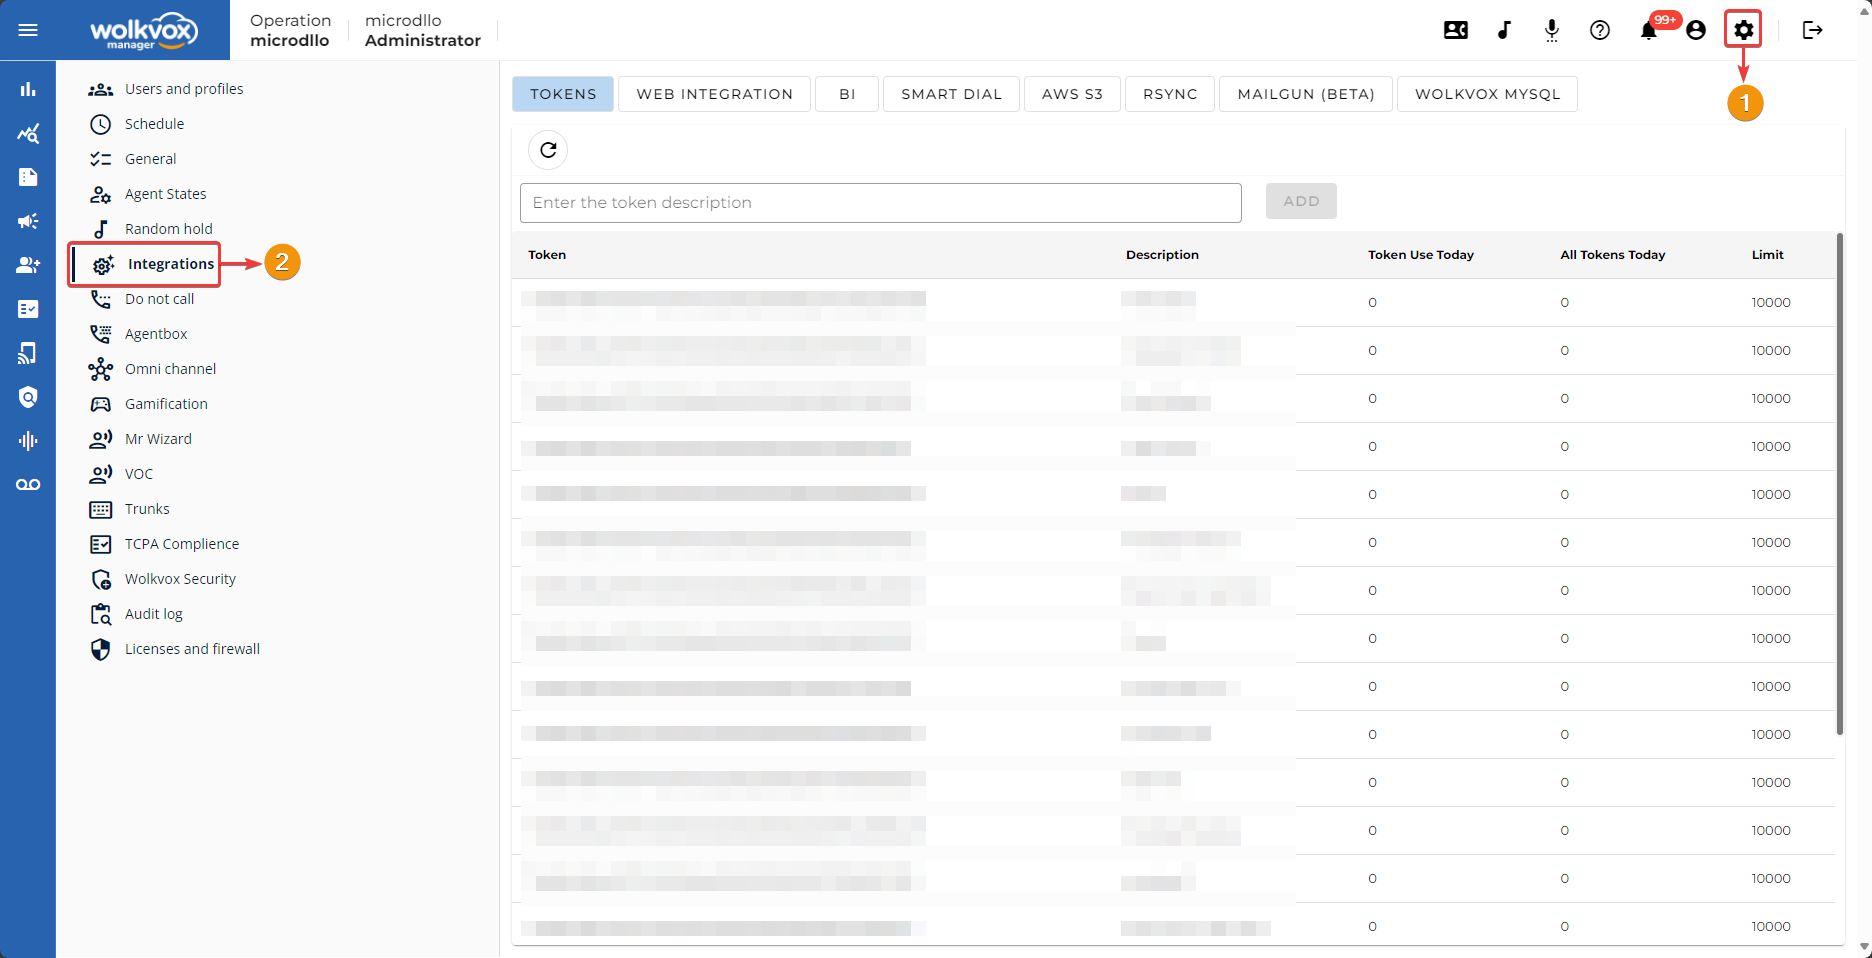
Tokens #
This service allows you to integrate Wolkvox with your own services.

To create a token, simply assign a description to differentiate the token from others and click on “Add.” The token code will be generated automatically and listed in the first column of the token table.
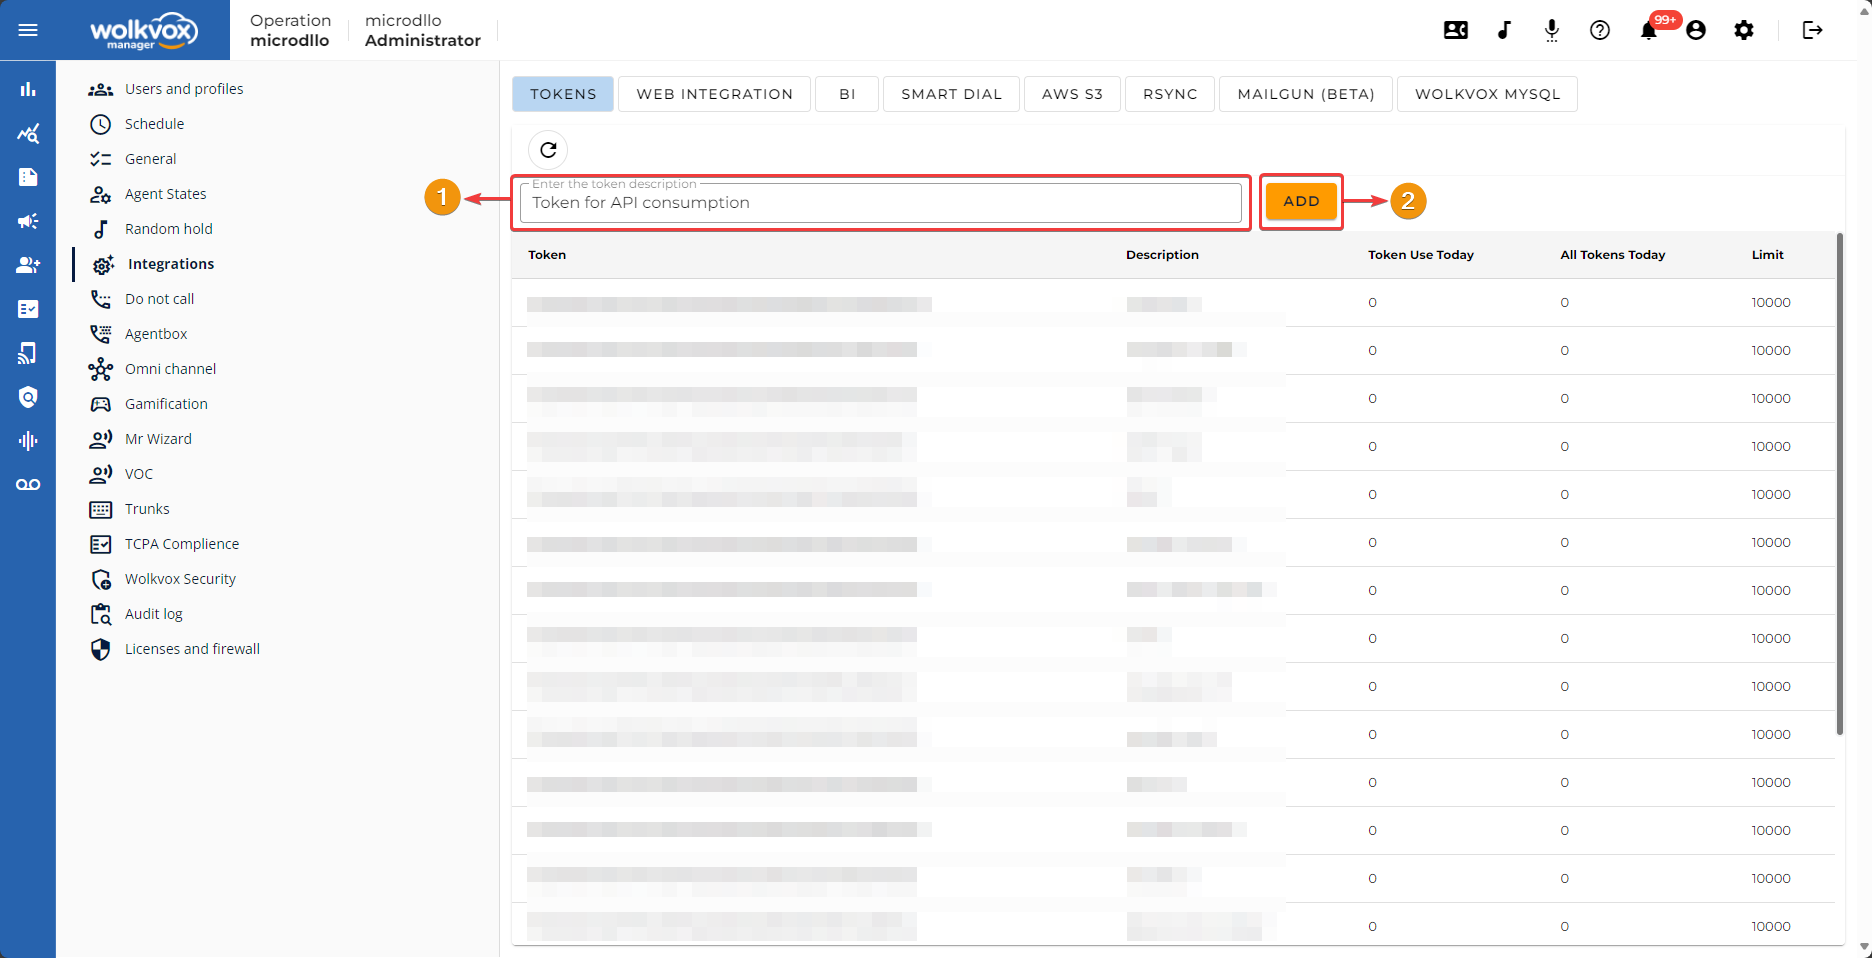
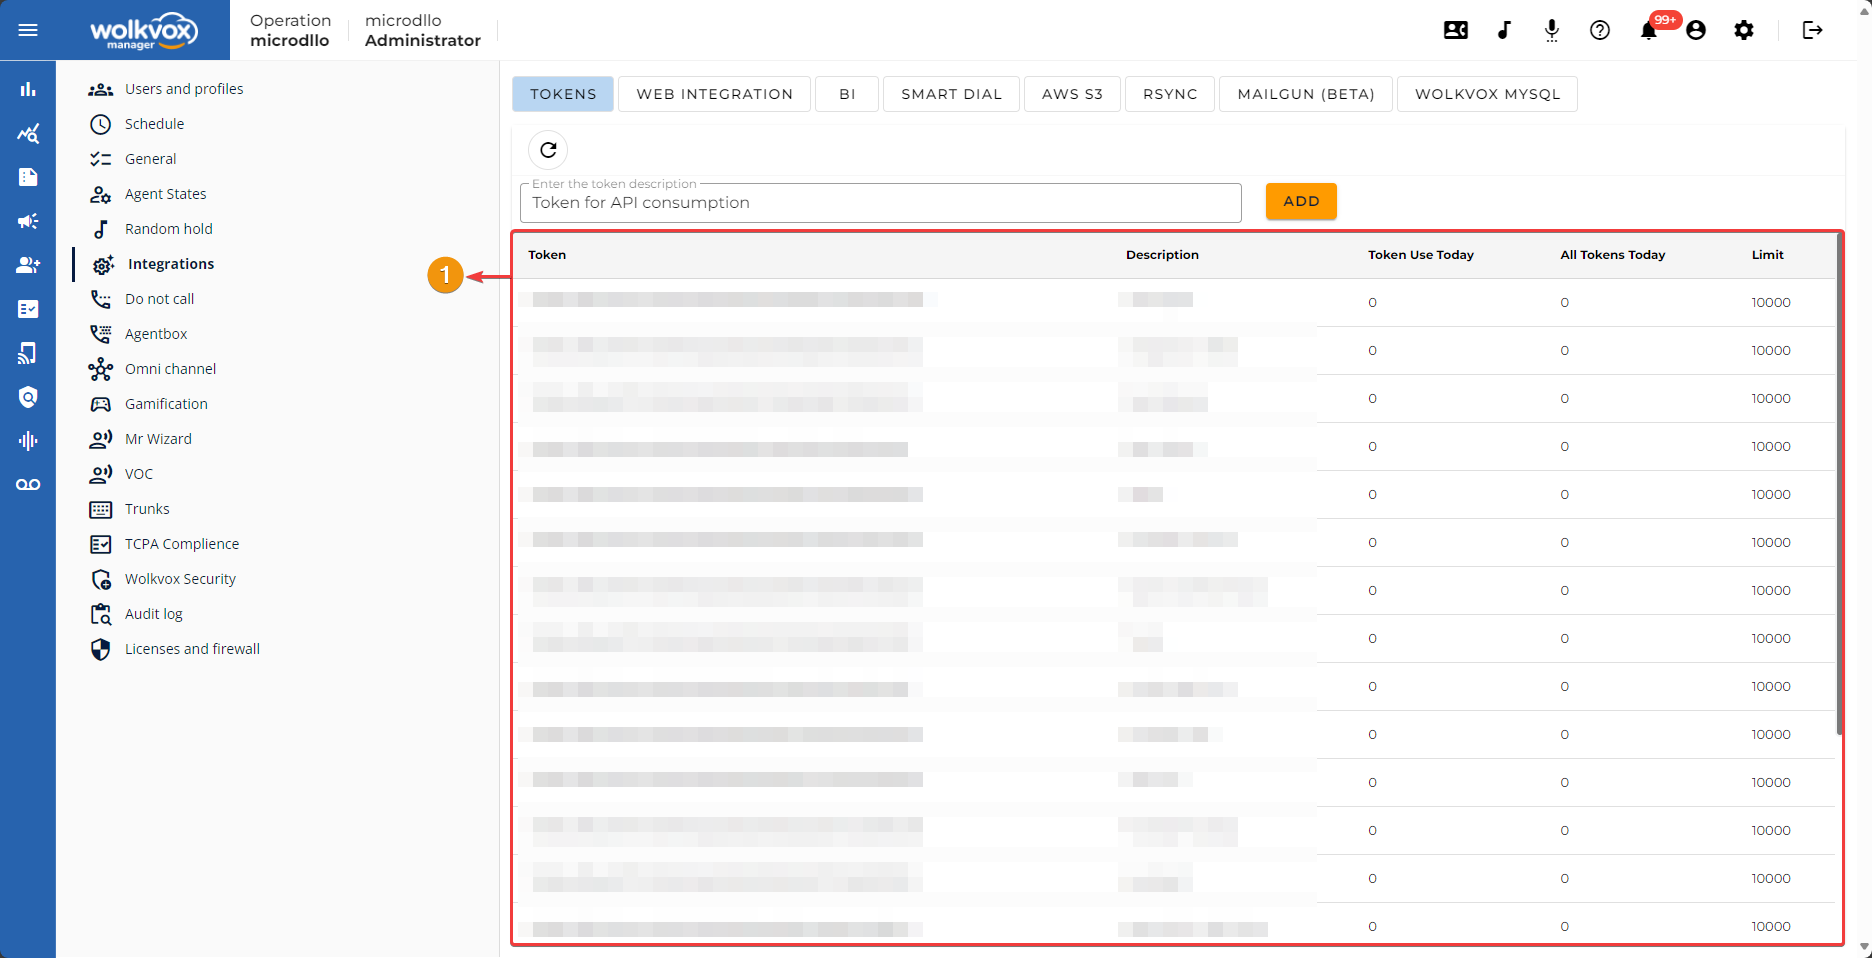
The token table will provide you with important details about your created tokens.
- Token: This column displays the token code for integrating services. This code is randomly generated for increased security.
- Description: It’s the description you assigned to the token when you created it.
- Token Use Today: Counts the number of times the token has been used during the day.
- All Tokens Today: Counts the total number of times all tokens in your operation have been used.
- Limit: Usage limit for each token per day.
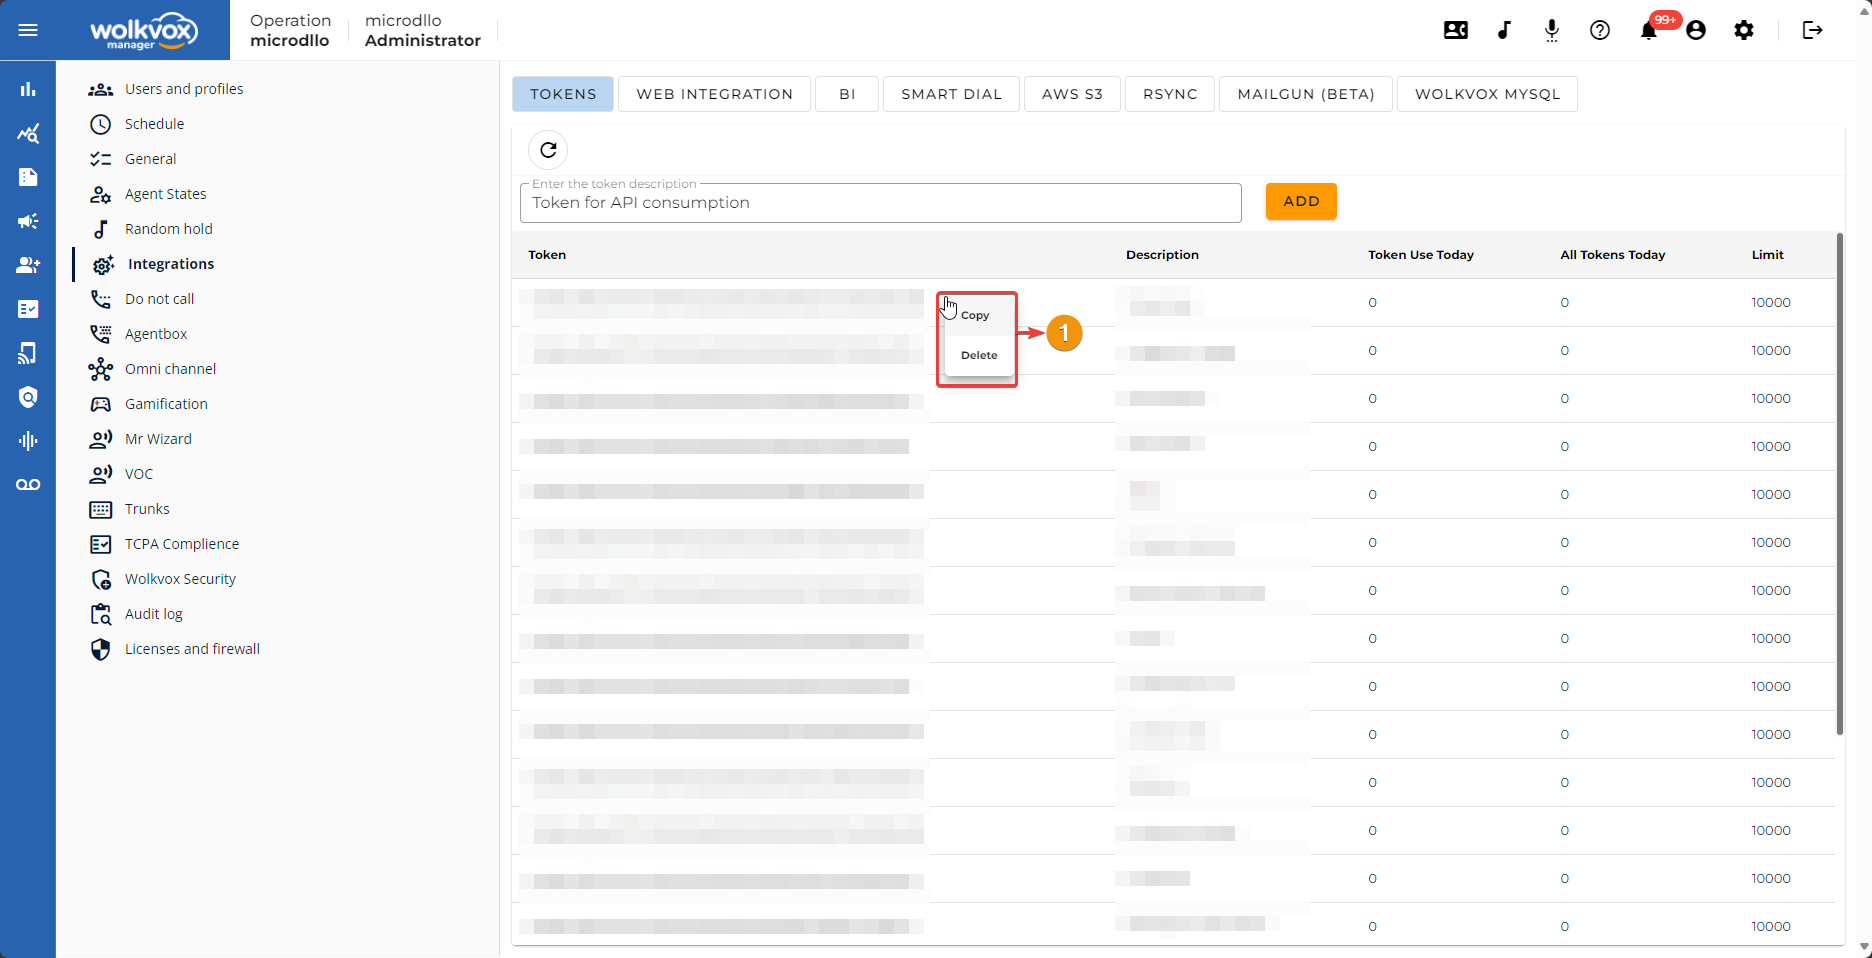
If you click on each generated token, you will have the options to copy the token code and delete the token.
Web Integration #
This service allows you to integrate Wolkvox with your own services.
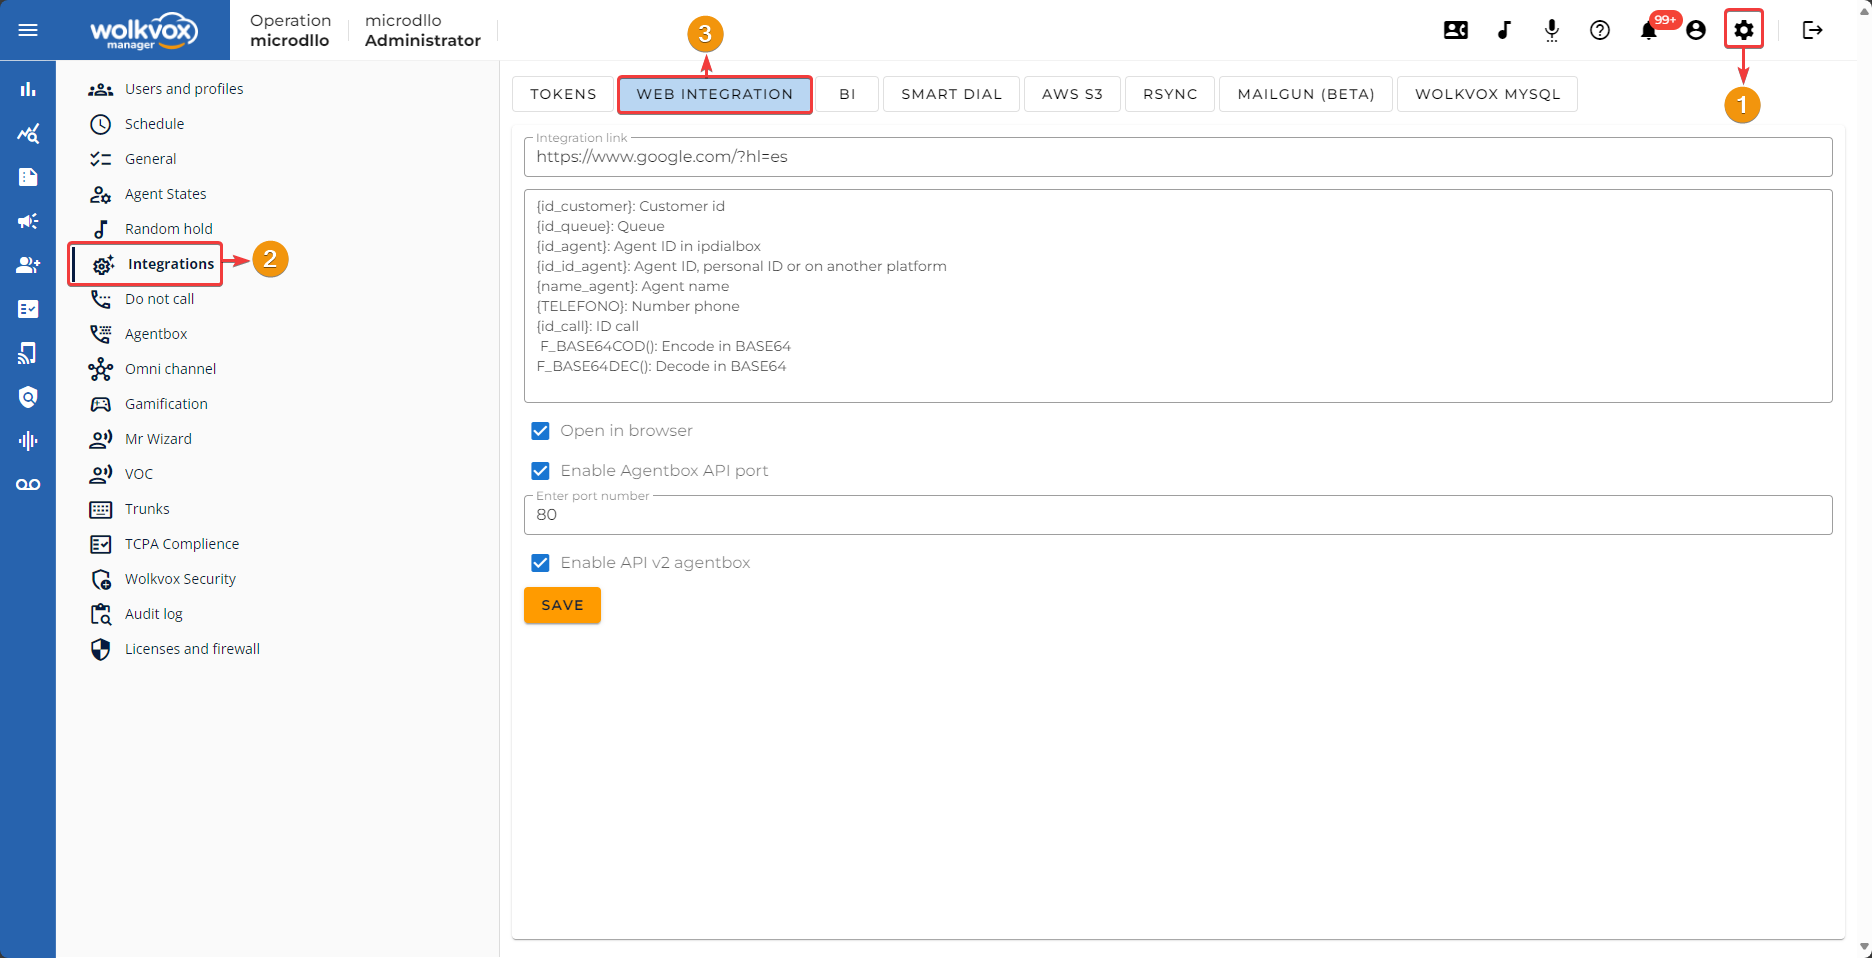
External Link Integration #
- Place the link that integrates the service. This will be sent to each agent who starts a call.
- The selected field lists the variables that bring the information of each call.
- The toggleable checkbox “Open in browser” allows the integration link to be opened for the client via the web browser.
- Click “Save” to apply the changes.

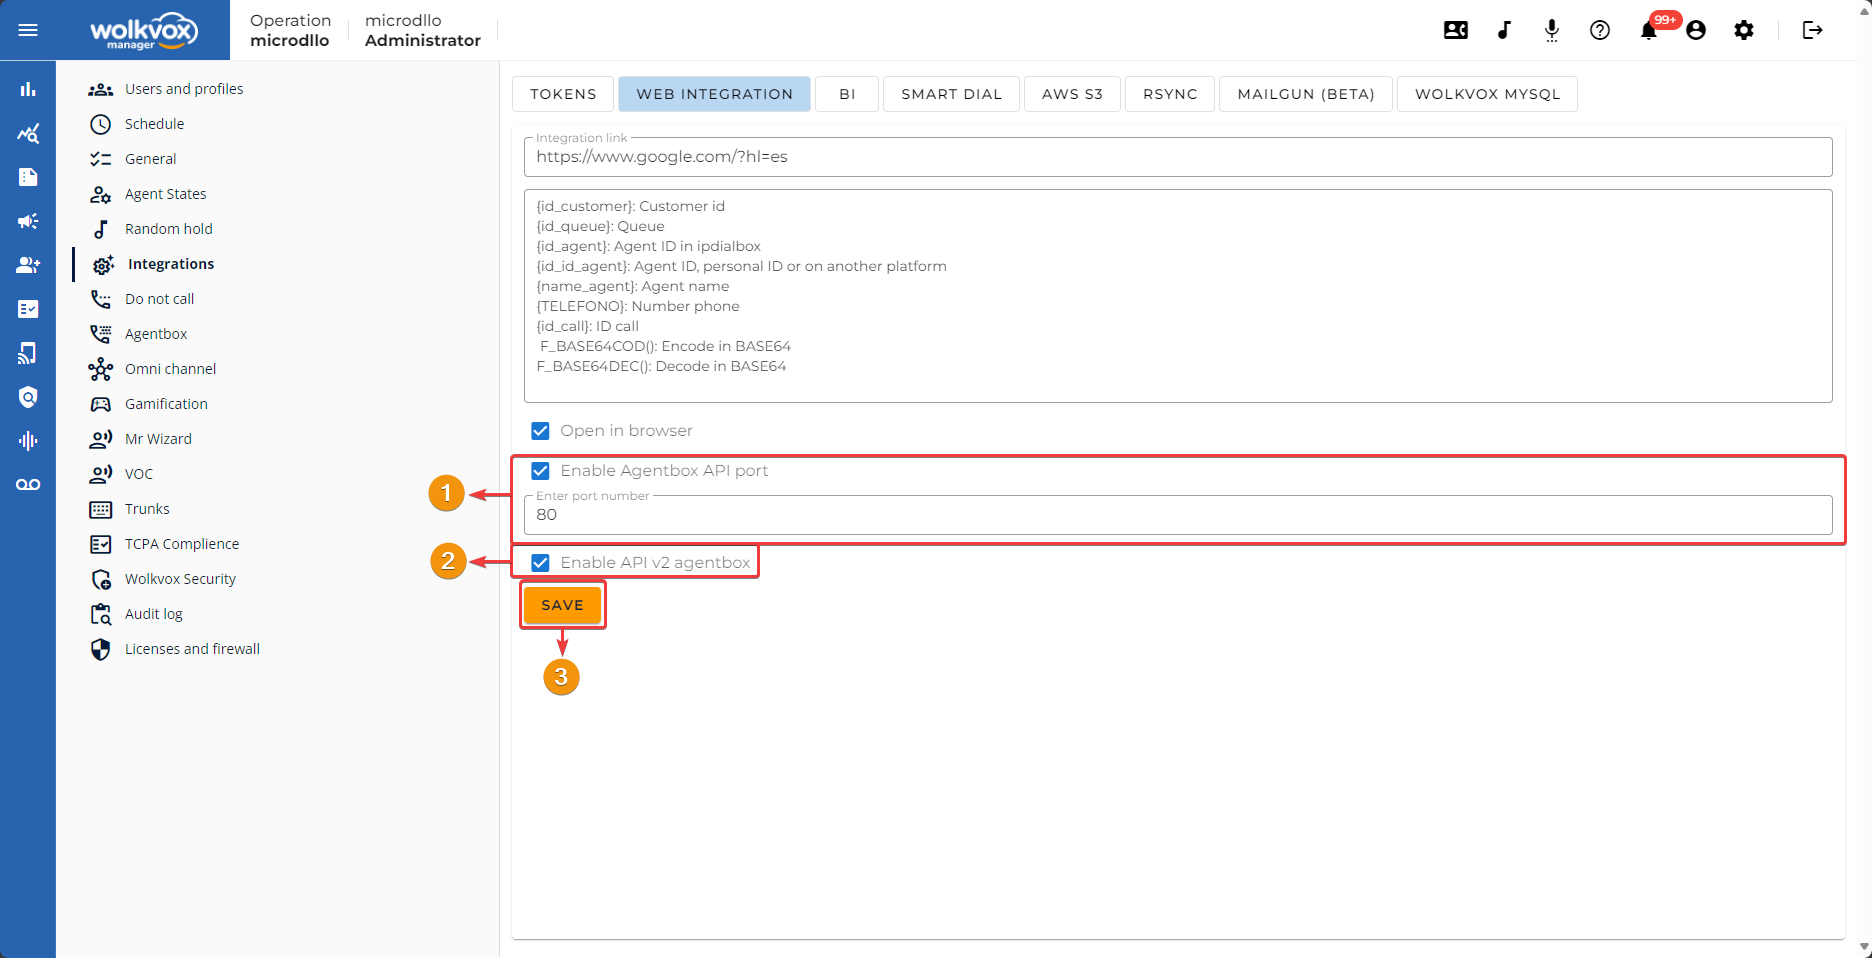
Using Agentbox via APIs #
- You can activate the connection port to consume the APIs of the agent application and also change the port number.
- Enable API V2 Agentbox for version 2 of the agent APIs.
- Enter the port you wish to use for the Agentbox connection service via API.
- Click “Save” to apply the changes.
- Click here to go to the documentation about the functionalities you obtain through version 1 of the agent APIs, which you can find at the following link.
- Click here to go to the documentation about the functionalities you obtain through version 2 of the agent APIs, which you can find at the following link. Navigate through the Agent V2 menu on the left side of the page.
wolkvox BI #
wolkvox BI is a product in the wolkvox suite that allows you to leverage the data from the operations you manage through our contact center platform, simplifying real-time decision-making. This product facilitates the interpretation of performance and key indicators of your operations and agents, optimizing processes and enhancing your customers’ experience.

With the token activated, you can observe that you can:
- View the token assigned to the wolkvox BI integration.
- Change the token.
- Deactivate the wolkvox BI integration.
- Select the desired report format.
- Download a report either in Power BI format or Excel Power Pivot (Excel).

Smart Dialing #
Smart dialing is a process whereby the system consolidates data into a single database, which is analyzed daily to gather basic call information and organize it for future reference.
This system learns from experience to become more accurate over time, gaining insights from new customer interactions.
To activate the service, you must check the box and generate a token.
Note: This service incurs an additional cost.

Create a backup of your audio files with Amazon Web Services (S3) #
If you have a license for Amazon’s secure cloud data storage service (S3), you can integrate it with Wolkvox Manager to create backups of your recordings.
- Go to the Manager settings.
- Enter the “Integrations” section.
- Go to the “AWS S3” tab.
- Activate or deactivate the Amazon Web Service S3 (Audio copying) service.
- Object container name.
- S3 Access Key.
- Secret Key.
- Activate or deactivate copying in MP3 format.
- Click on “Save” to apply the changes.
Note: The use of this service incurs an additional cost.

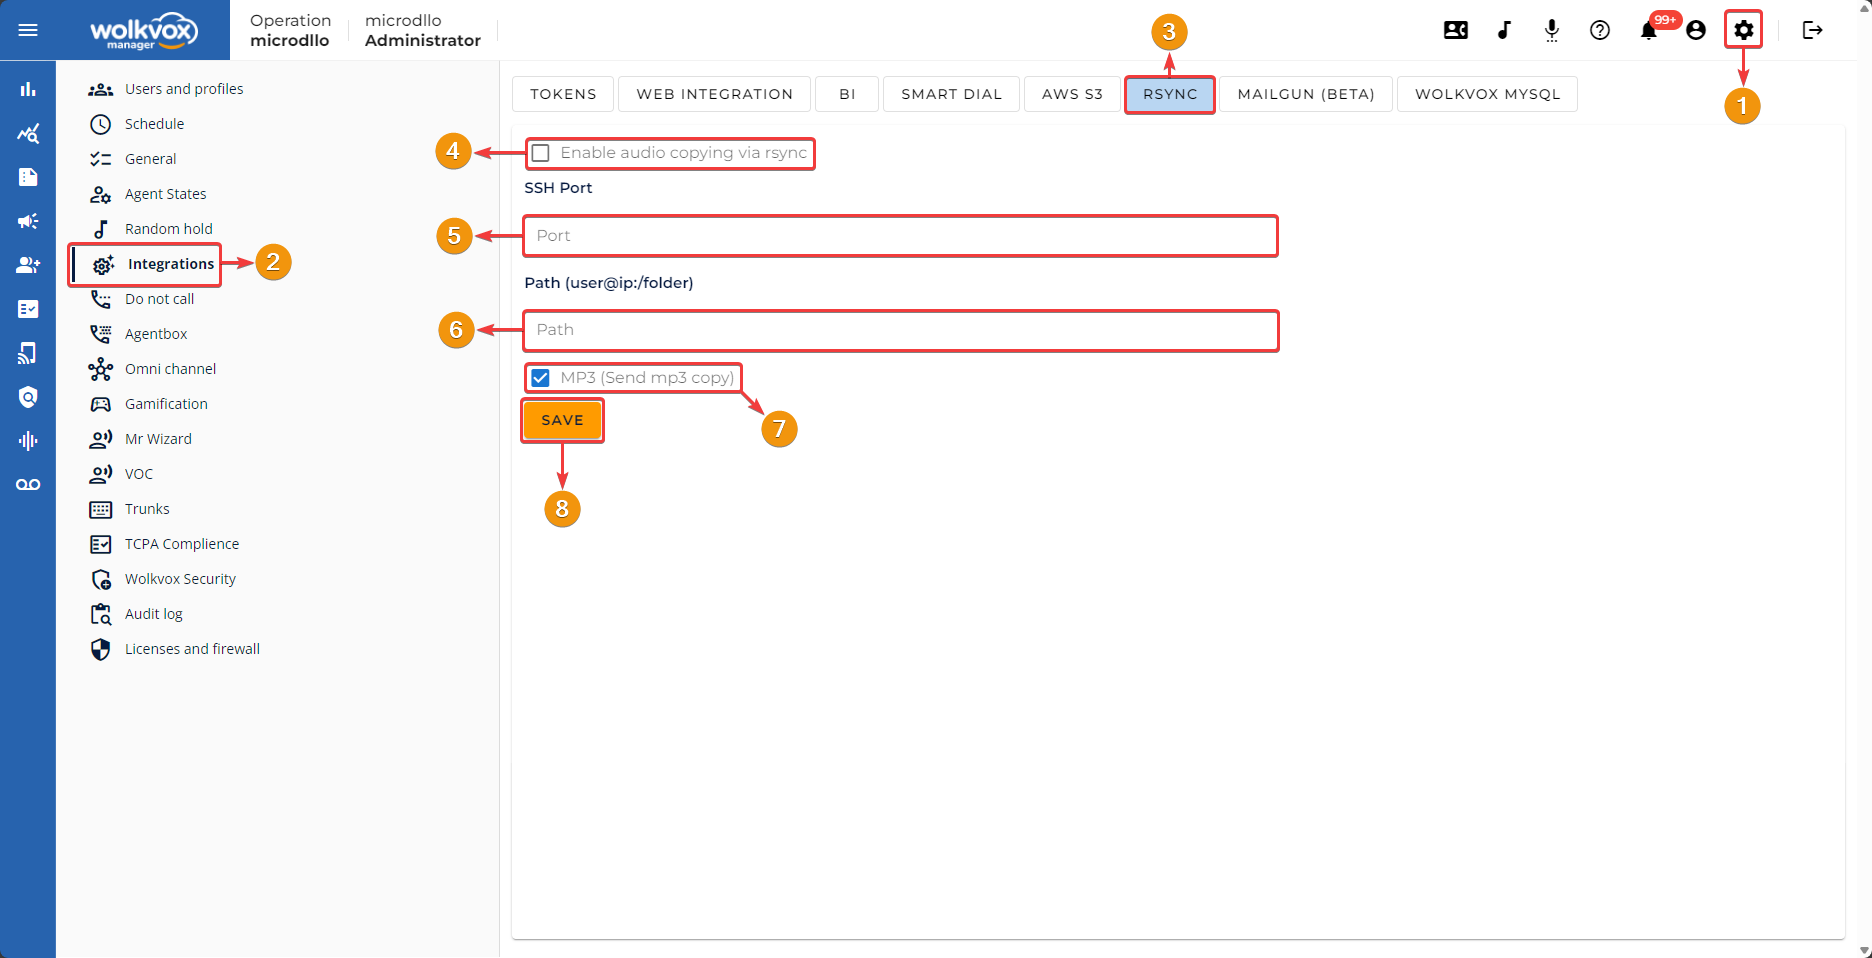
RSYNC: Create a backup of your audio files on your NAS or local storage server #
This service allows you to link wolkvox Manager with a Network Attached Storage (NAS) or local storage server. To begin the process, you must first set up the server where the recordings will be stored.
Then, enter the following data:
- Go to the Manager settings.
- Enter the “Integrations” section.
- Go to the “RSYNC” tab.
- You must check the “Enable audio copy via RSYNC” box to activate the service.
- SSH Port.
- Storage directory.
- Optional: You can enable copying of files in MP3 format.
- Click on “Save” to apply the changes.
Note: This service has an additional cost.
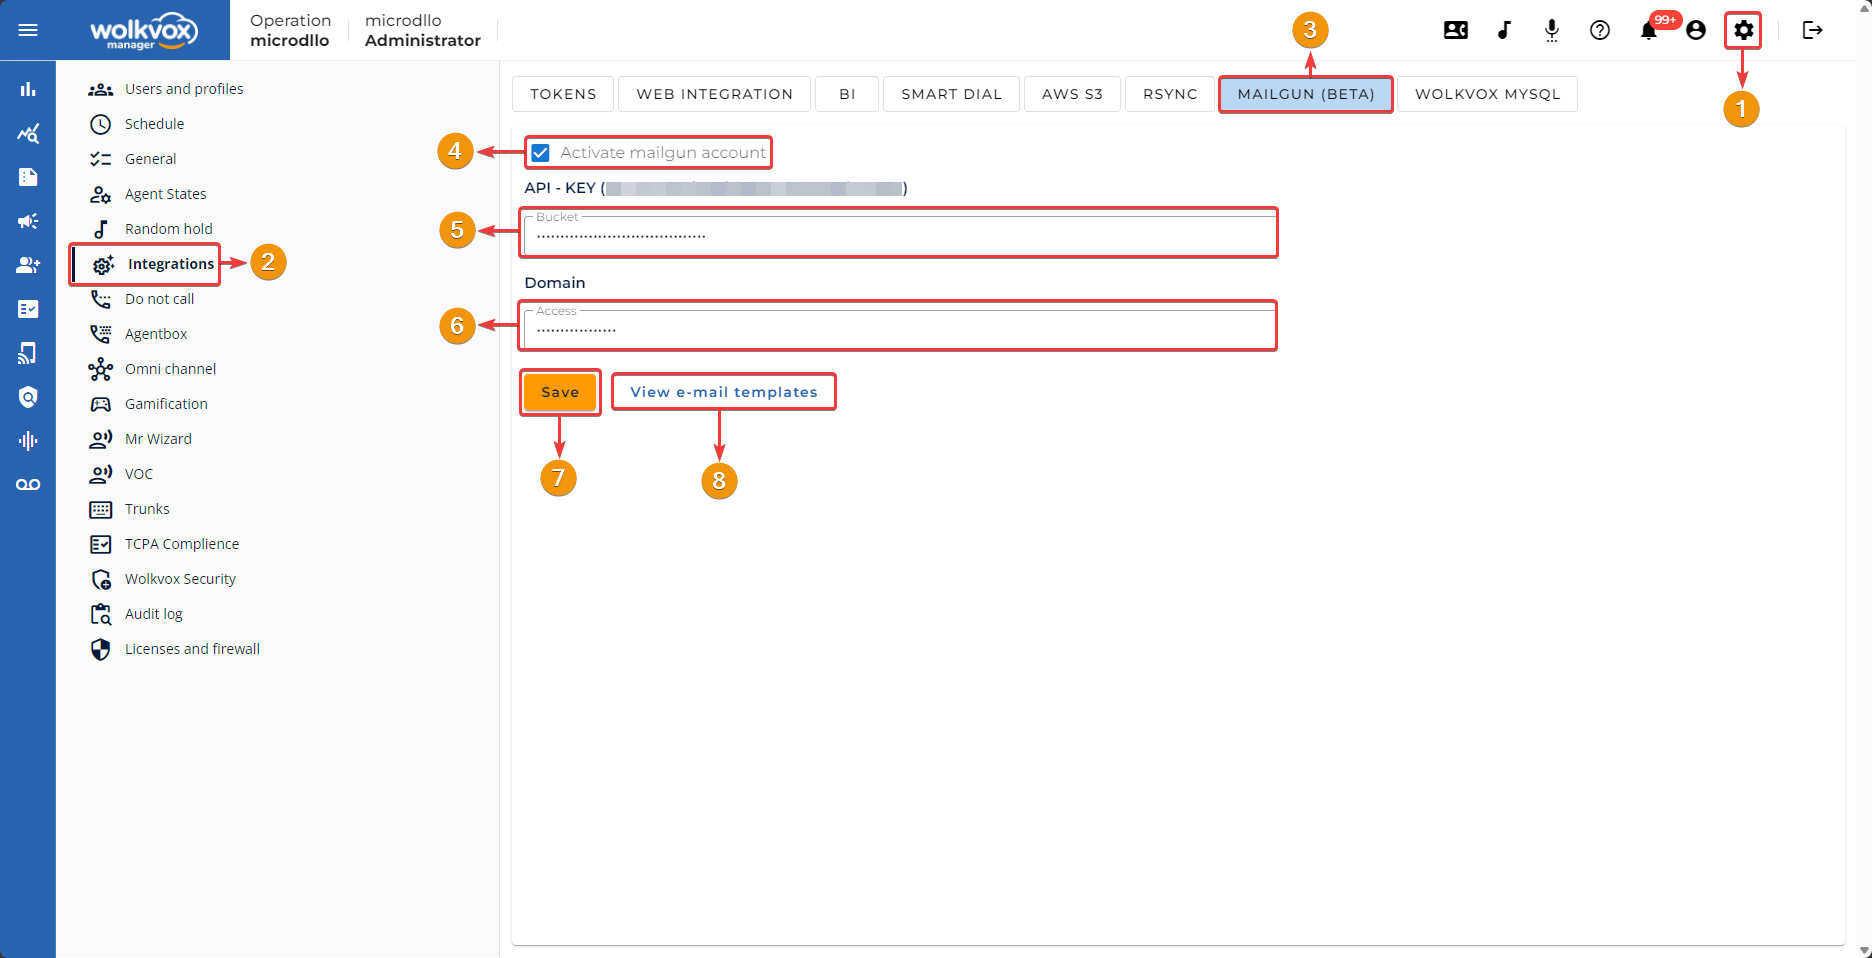
Send mass emails with Mailgun #
You can integrate your Mailgun license with wolkvox Manager for bulk email sending, preventing your emails from ending up in your clients’ spam folder.
Follow these steps:
- Go to Manager settings.
- Enter the “Integrations” section.
- Navigate to the “Mailgun (Beta)” tab.
- Check the Mailgun account checkbox.
- Enter the API KEY acquired from your Mailgun account page. The API Key is a unique and secret authentication key that provides access to Mailgun’s functions and services through its Application Programming Interface (API). The API Key acts as a password to ensure that only authorized individuals can send emails through your Mailgun account. It’s important to keep the API Key confidential and not share it with unauthorized persons, as it grants full access to your Mailgun account.
- Enter the email domain name. This is the domain from which the emails will be sent, such as “yourdomain.com” or “company.com.” When setting up Mailgun, it’s necessary to authenticate and verify the domain you plan to use to ensure that you have control over it and permission to send emails from that address. This helps prevent unauthorized use of domains and increases the delivery rate of emails sent through Mailgun.
- Click on “Save” to apply the changes.
- If you don’t have email templates created, you can click on the “View e-mail templates” button and then go to the “Email” tab.
Crear plantillas de correo electrónico #
To create templates for email delivery, click on the “view e-mail templates” button.
- Once the window opens, go to the “Email” tab.
- Click on the “Create email template” button.
- Here, you’ll find all the email templates created in your operation listed.
Note: Keep in mind that all email templates created here will be available for use in all other wolkvox tools.
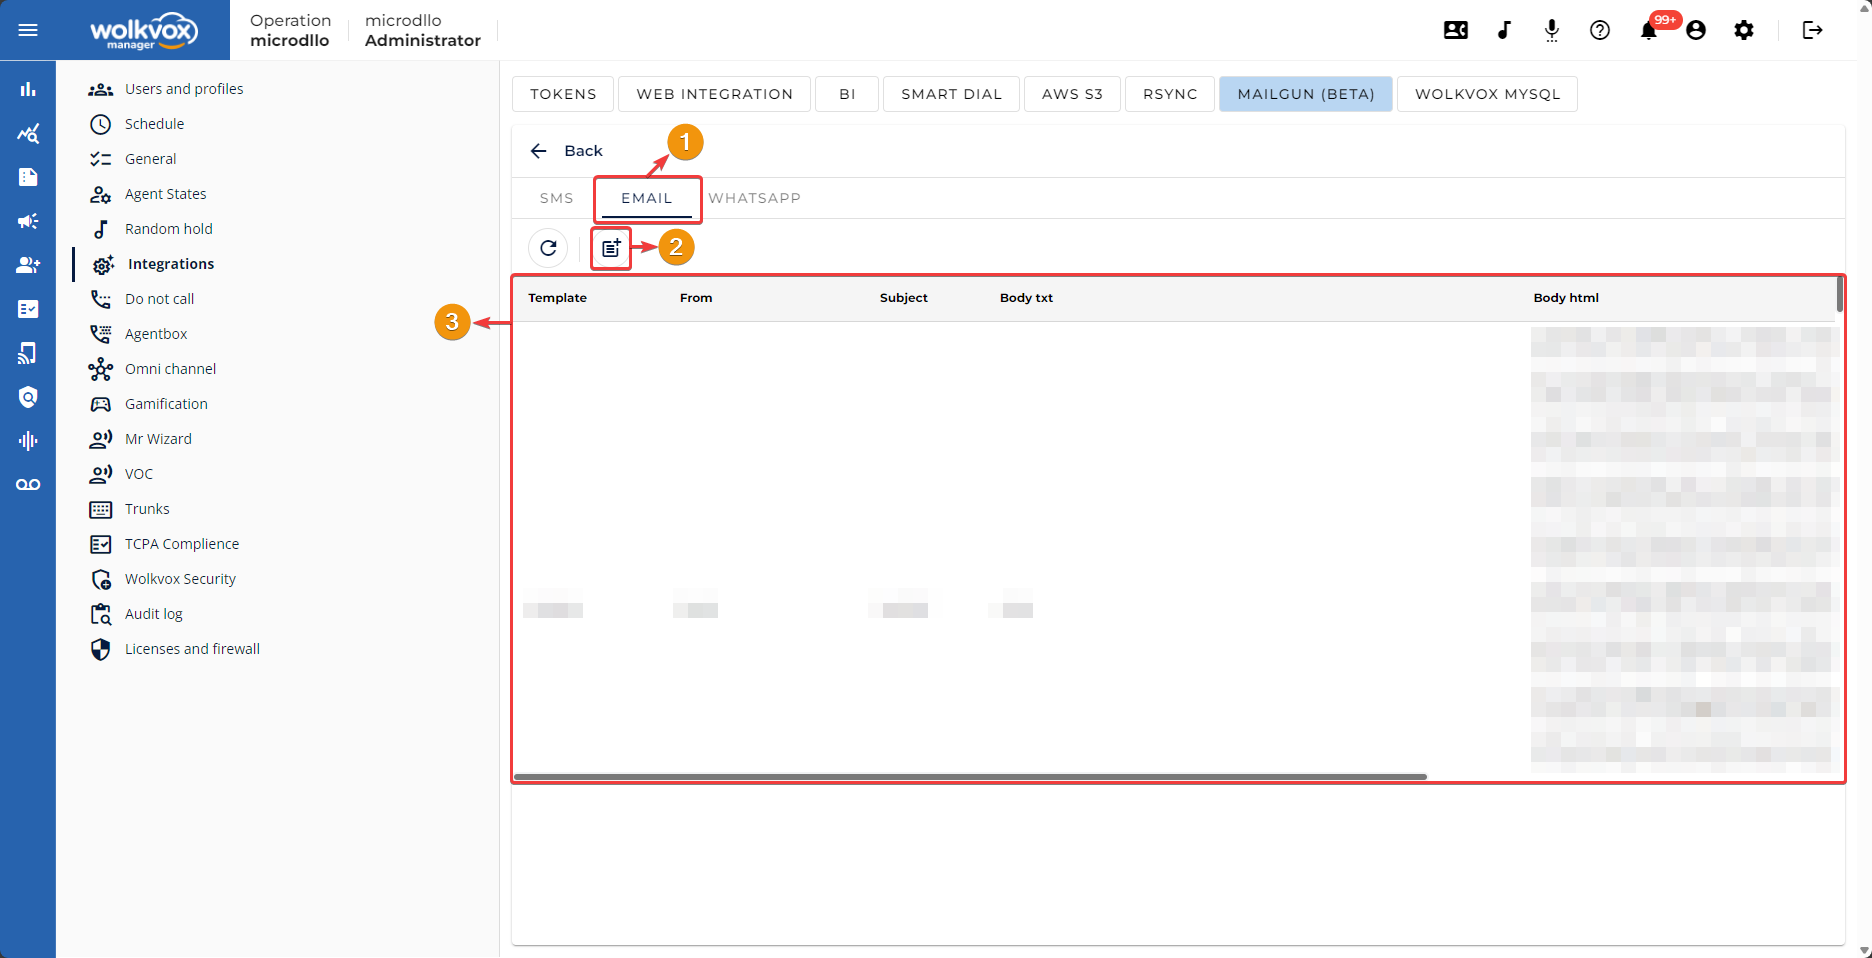
If you right-click on an item in the table, you’ll have the options to edit the selected email template or delete it.

Clicking on create or edit an email template will bring up a window with the following configuration options:
- Enter the name of the email template.
- Enter the sender’s email address.
- Enter the message subject.
- You can write the message body in both HTML format (HTML tab) and plain text (TEXT tab).
- In the bottom field, enter the message body according to the format chosen in the previous step.
- Click the “Save” button to save the changes.

wolkvox MySQL for storing databases on wolkvox’s own servers #
Now you can have all your database information on wolkvox servers.
- With this new service, you will have all the data centralized on wolkvox servers without having to manage databases through external tools.
- It is important to have knowledge of the MySQL language for managing the service.
- This service is not reversible, meaning if activated, it will remain activated without the possibility of deactivation, so it is important to consider whether the service is needed before activating it.
- The activation of the service will be recorded in the “Audit Log”.
- The connection IP or host will always be 34.138.118.166
- The access user will be provided when the service is activated.
- The initial access password will be provided when the service is activated (it can be changed from the client where you connect to the database).
- The connection port is 3306.
- The database name will be the name of the operation.
- This service is only available in the wolkvox Manager application locally.

Do Not Call (DNC) list or blocked numbers #
In the “Do Not Call” service, blacklists of phone numbers are added so that agents avoid calling the numbers included in that list, and additionally, numbers can be added so that agents do not receive calls from the added numbers. In other words, all numbers added to this list will be blocked, and you can select whether the block will apply to inbound or outbound calls.
The table in this section displays the added number and the type of call for which it is blocked (it can be inbound for incoming calls and outbound for outgoing calls).

Add a phone number to the Do Not Call list #
Click the highlighted button in the following image to add a phone number.
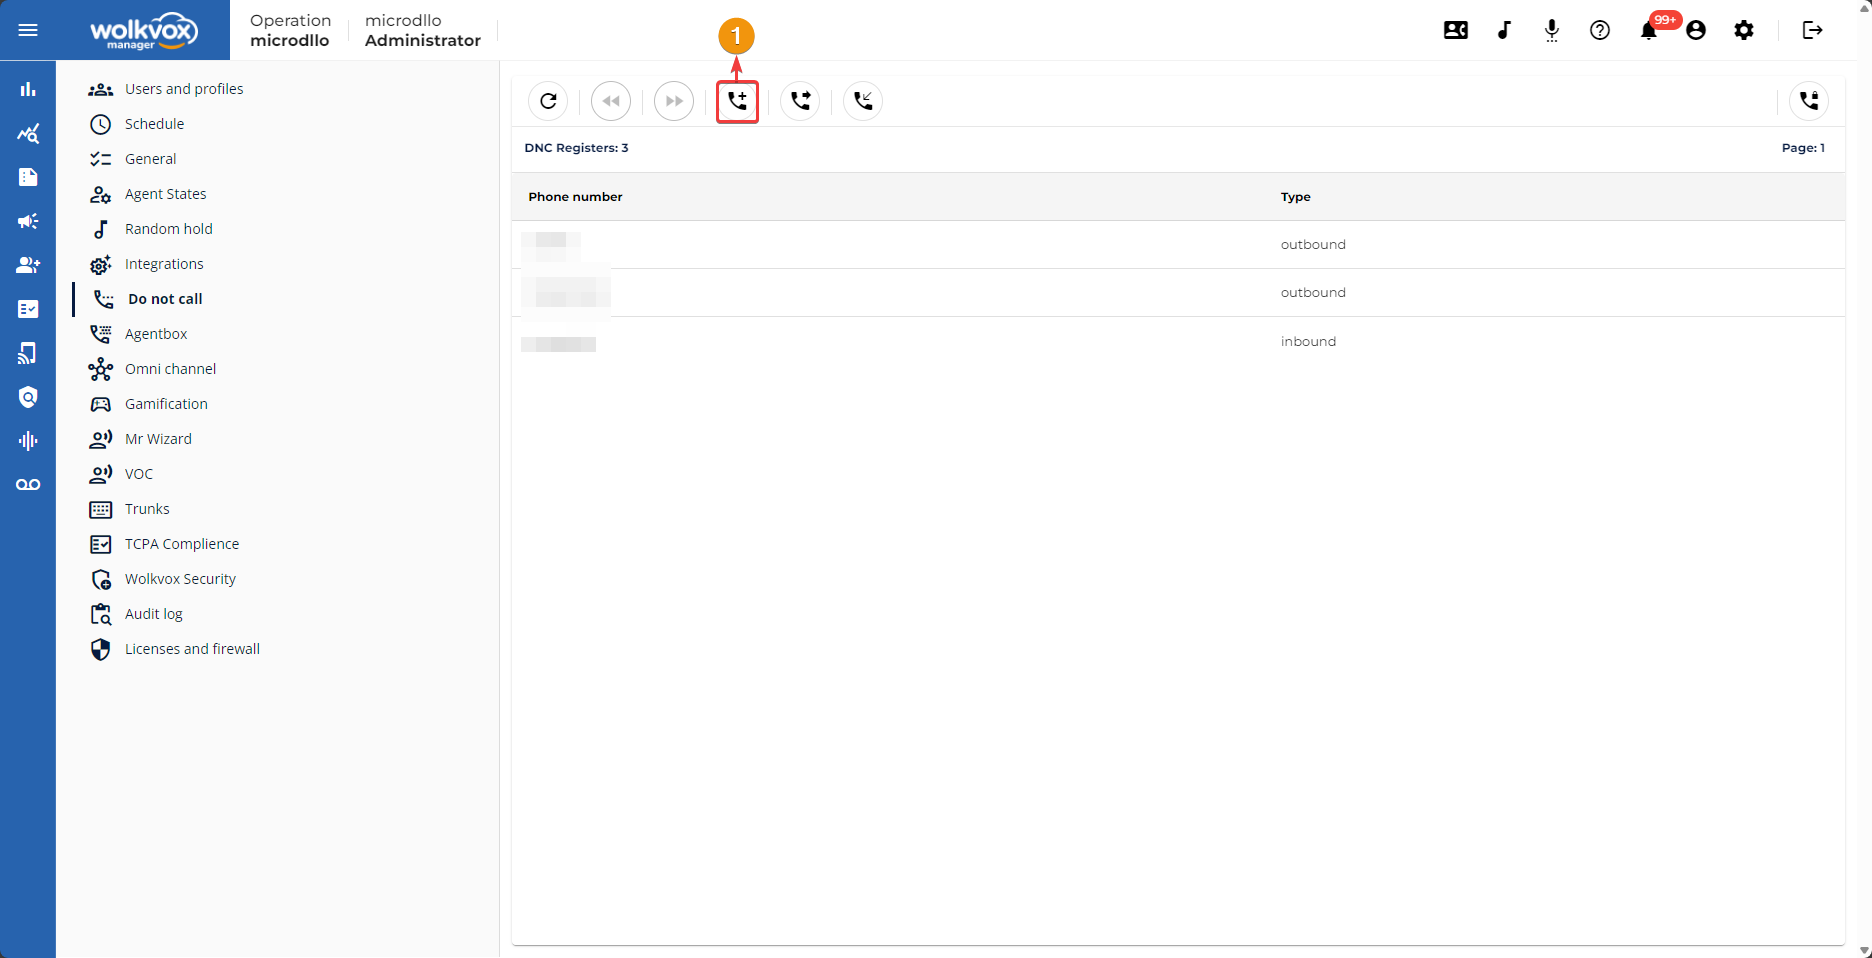
You’ll see a window where you should:
- Enter the phone number to add.
- Select whether you want to block the number for inbound or outbound calls.
- Click the ‘Add phone’ button.

Add phone numbers to the Do Not Call list in bulk to block them on outbound calls #
- Click on the highlighted button in the following image.
- The operating system’s file explorer will open, where you should select the file containing the Do Not Call list. It must be in .csv format and comma-separated.

Adding phone numbers in bulk to the Do Not Call list to block them from incoming calls #
- Click the highlighted button in the following image.
- The operating system’s file explorer will open, where you should select the file containing the Do Not Call list. It must be in .csv format and comma-delimited.

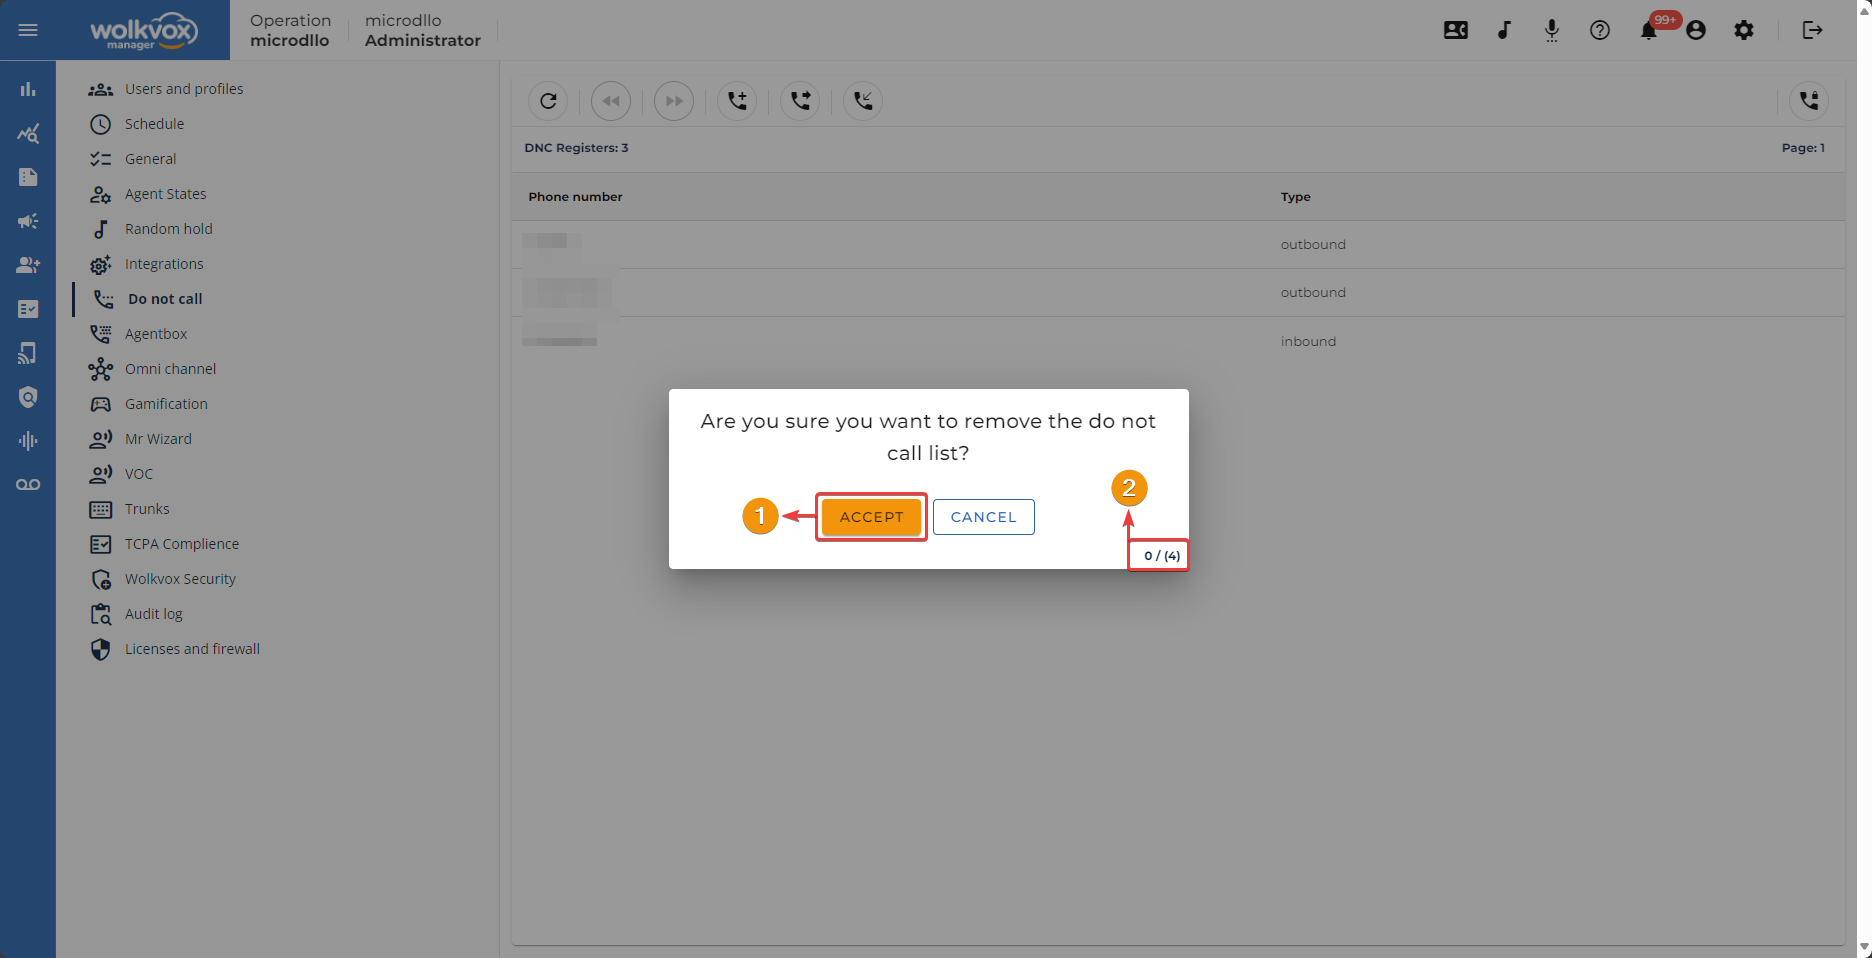
Bulk delete of phone numbers listed as Do Not Call #
The highlighted button in the following image allows you to delete all phone numbers added to the Do Not Call list.

- The system will ask you if you really want to delete the entire list of numbers added to the Do Not Call.
- You will be asked the same question four times to ensure that you want to proceed with the action.
- With the buttons highlighted in the following image, you can navigate forward and backward through pages if you have multiple pages due to the number of added numbers.
- DNC Registers: Here you’ll have a counter of the number of phones added to the table.
- On the right side of the screen, you’ll see the page you’re on.
- If there are multiple records added on the page, the scroll bar is enabled to view all the data.

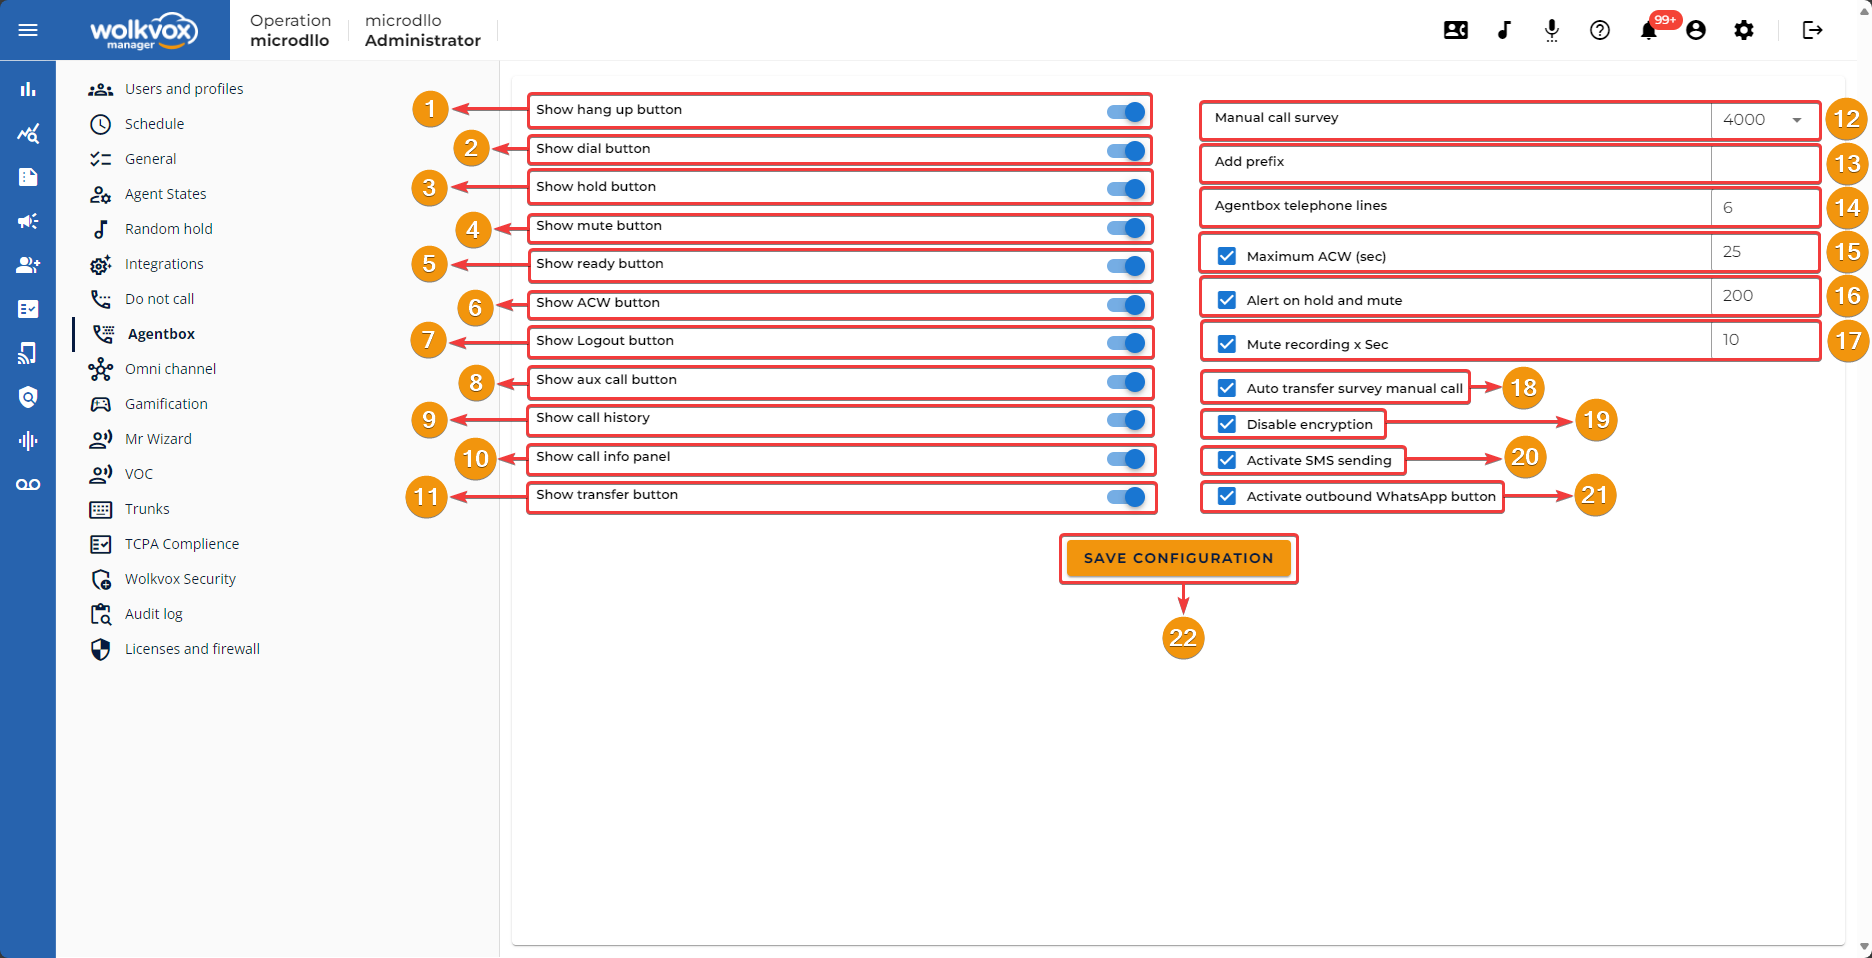
Agentbox: Configure the general parameters for the Agentbox application of the agents #
In the “AgentBox” section, you can configure all parameters related to the agents’ platform. Here, buttons and functions are enabled or disabled, and aspects related to the service provided from the agent’s application are configured.

Here are the options to configure:
- Show hang-up button: Allows the agent to see or not see the button to hang up the call.
- Show dial button: Allows the agent to have the button to dial independently in the AgentBox.
- Show hold button: Allows the agent to see or not see the button to put the client on hold.
- Show mute button: Allows the agent to see or not see the mute button to mute themselves during a call.
- Show ready button: Allows the agent to see or not see the “Ready” button in their status list. Type of status to receive calls.
- Show ACW button: Allows the agent to see the button for call disposition.
- Show logout button: Allows the agent to see or not see the “Logout” button in their status list. Type of status to show as logged out.
- Show aux call button.
- Show call history: Shows or hides the button to access the call history.
- Show call info panel.
- Show transfer button.
- Manual call survey: Allows selecting the skill that contains the desired survey.
- Add prefix: In this field, a prefix must be written to be added to the calls that the agent will make.
- Agentbox phone lines: Here, enter the number of phone lines that the agent will have available for making calls in the softphone.
- Maximum ACW (sec): In this field, set the maximum time agents have to disposition or encode the call. Once the agent exceeds the specified time, they will automatically be in “Ready” status.
- Hold and mute alert.
- Mute recording x Sec: Here, set the time in seconds to pause call recording.
- Auto survey transfer for manual call.
- Disable encoding: Allows disabling call disposition by the agent.
- Activate SMS sending: Activates the text message sending service.
- Activate outbound WhatsApp button: Displays a button for agents to initiate a WhatsApp chat.
- Remember to click on the “Save configuration” button to apply the changes.
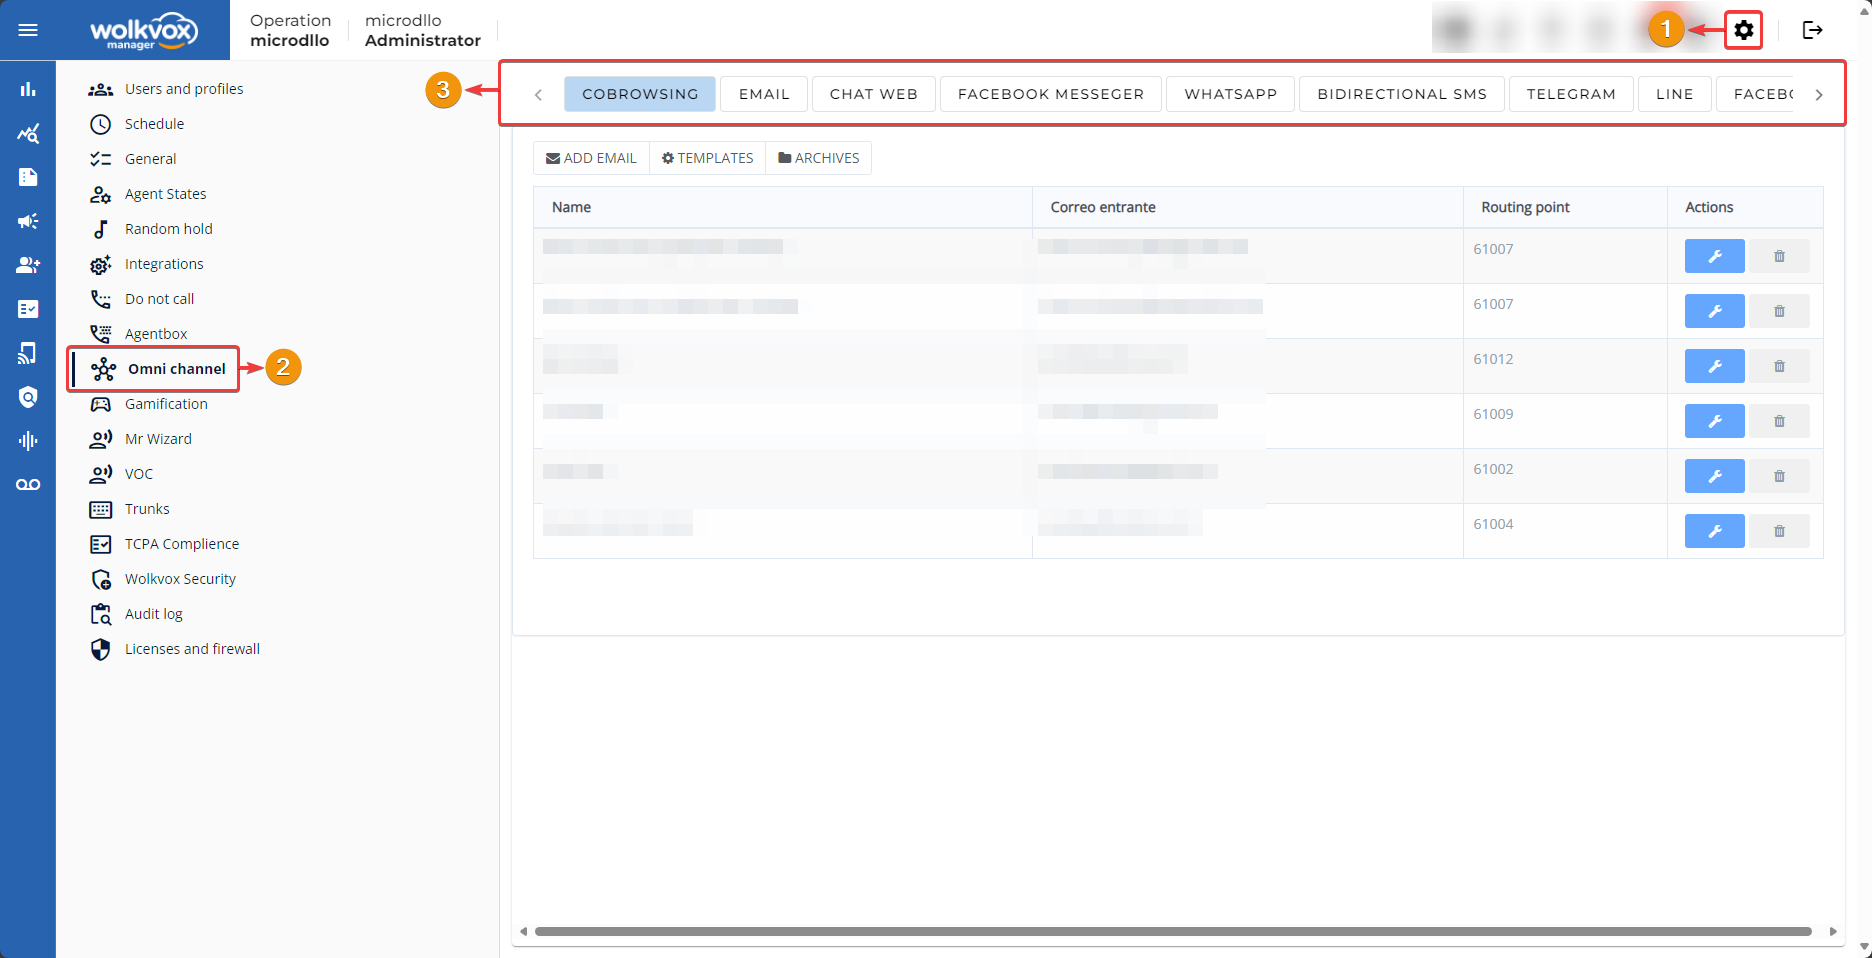
Omni Channel: Configure operation omnichannelity #
The Omni Channel section allows you to integrate various external services to operate them within wolkvox Manager to avoid working with them independently and generate loss of productivity. The services that can be integrated are: Email, Web Chat, Facebook Messenger, Whatsapp, Bidirectional SMS (only in countries that allow this feature), Telegram, Facebook Page, Instagram, and Twitter.
Cobrowsing #
- Co-browsing is a new advanced feature that allows customers to share their screen with agents to receive real-time assistance. The setup is simple, and its usage is straightforward for both the customer and the agent.
- The Co-browsing tool is installed on a desired web page so that the agent can explain to the customer any process taking place on the target web page.
- The timeline for using the tool is as follows:
- The customer clicks on the “Co-browsing” button.
- The customer provides the agent with the code generated after clicking the button.
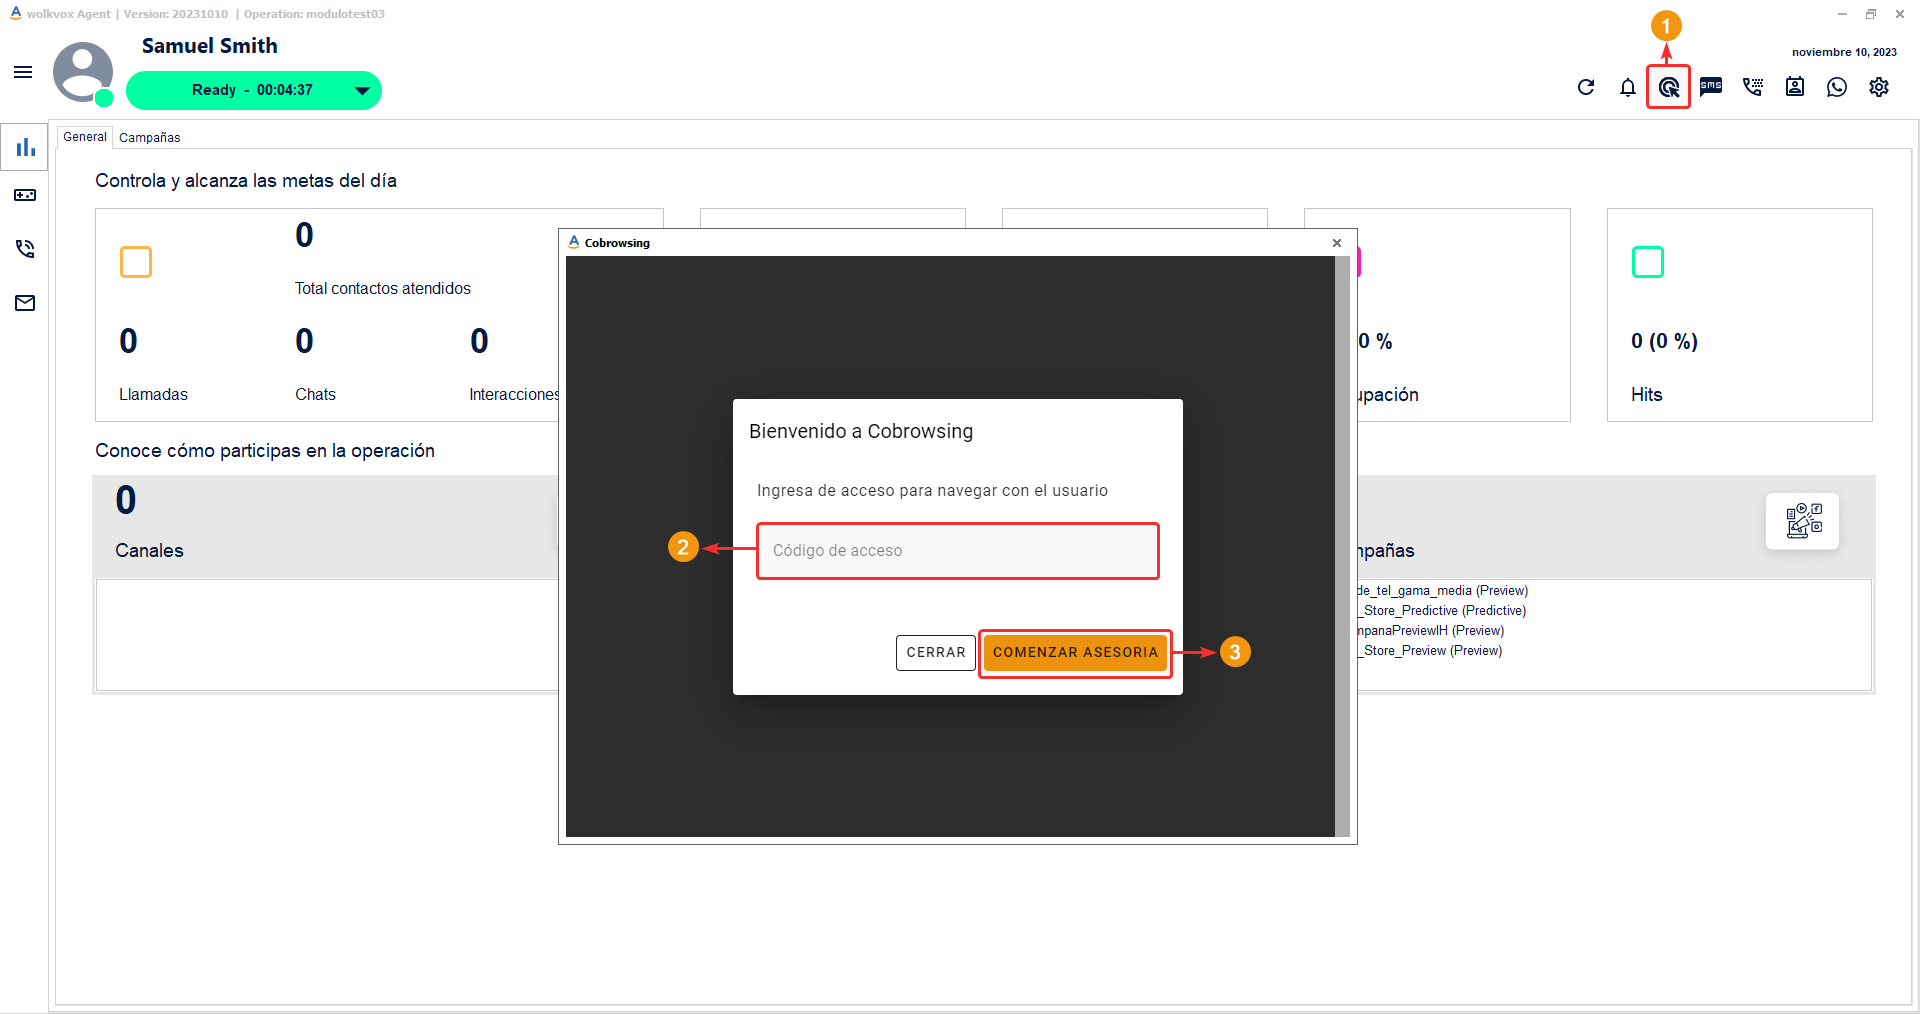
- The agent clicks on the “Co-browsing” button within the wolkvox Agent application.
- A window displaying the customer’s screen view is loaded in wolkvox Agent.
- The agent guides the customer through the process they are resolving together.
- Thanks to this new tool, you benefit from real-time assistance functionality, ease of use for the customer, flexible customization, and privacy protection by being able to hide desired fields.
- To activate the tool, follow these steps:
- Go to wolkvox Manager settings.
- Click on the “Omni Channel” tab.
- Go to the “Co-browsing” tab.
- Click on the “Activate service” button.
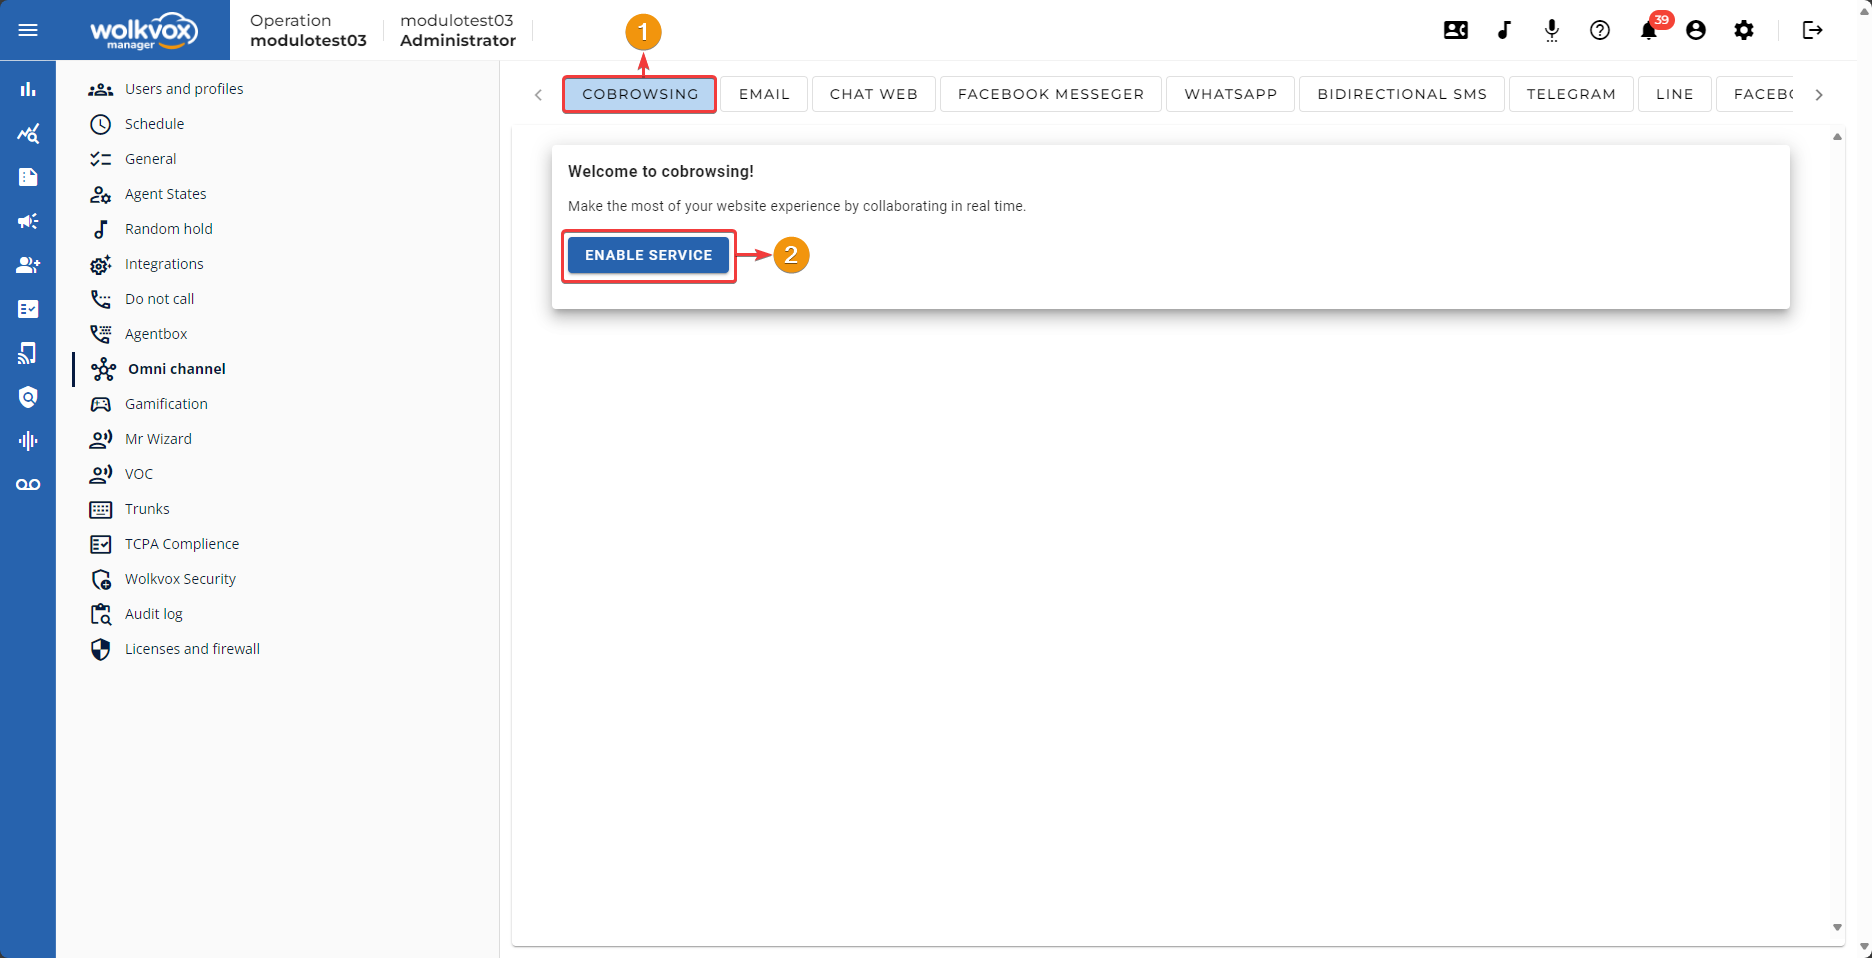
The following view will be loaded:
- On the “Home” tab, you will see the button to deactivate the “Co-browsing” tool, a brief introduction to it, and the Script code to include it on the desired web page.
- The Script code generated in your operation must be inserted within the HTML tags <head></head> of the web page where you want the agent to be able to assist or guide the customer in carrying out a process, such as completing a form on the website.

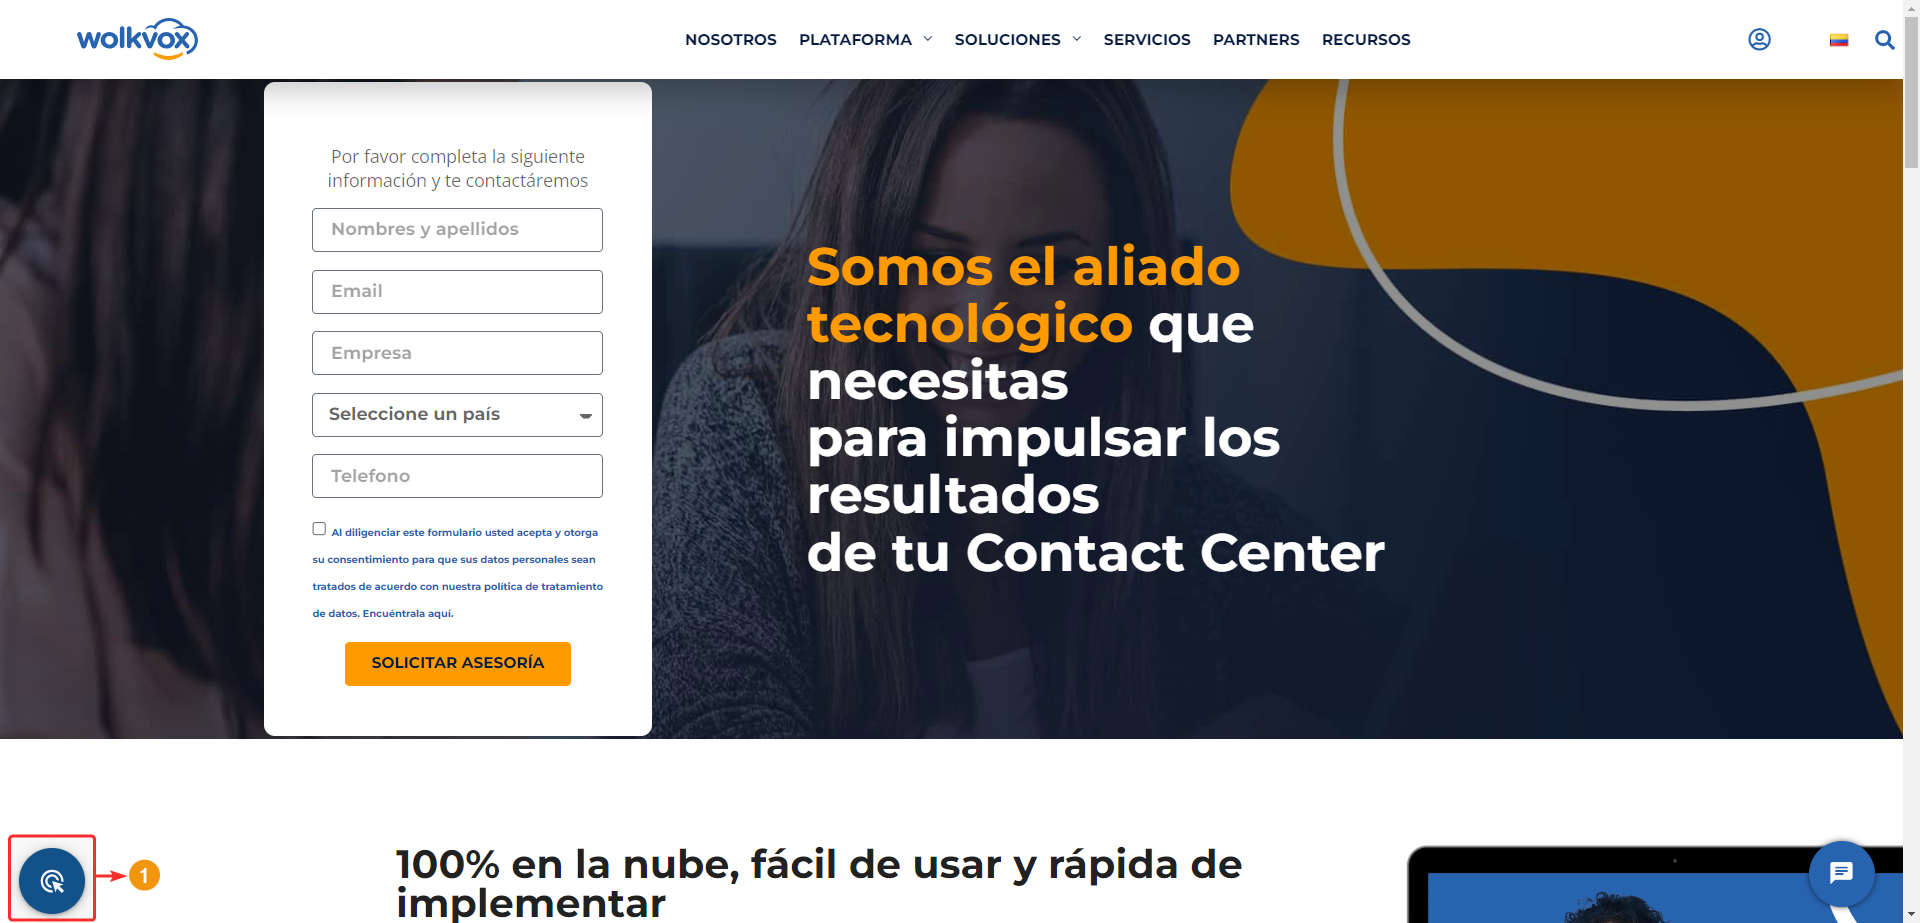
En la siguiente imagen podrás ver cómo quedaría visualmente la herramienta. El botón quedará ubicado en la parte inferior izquierda del sitio web.
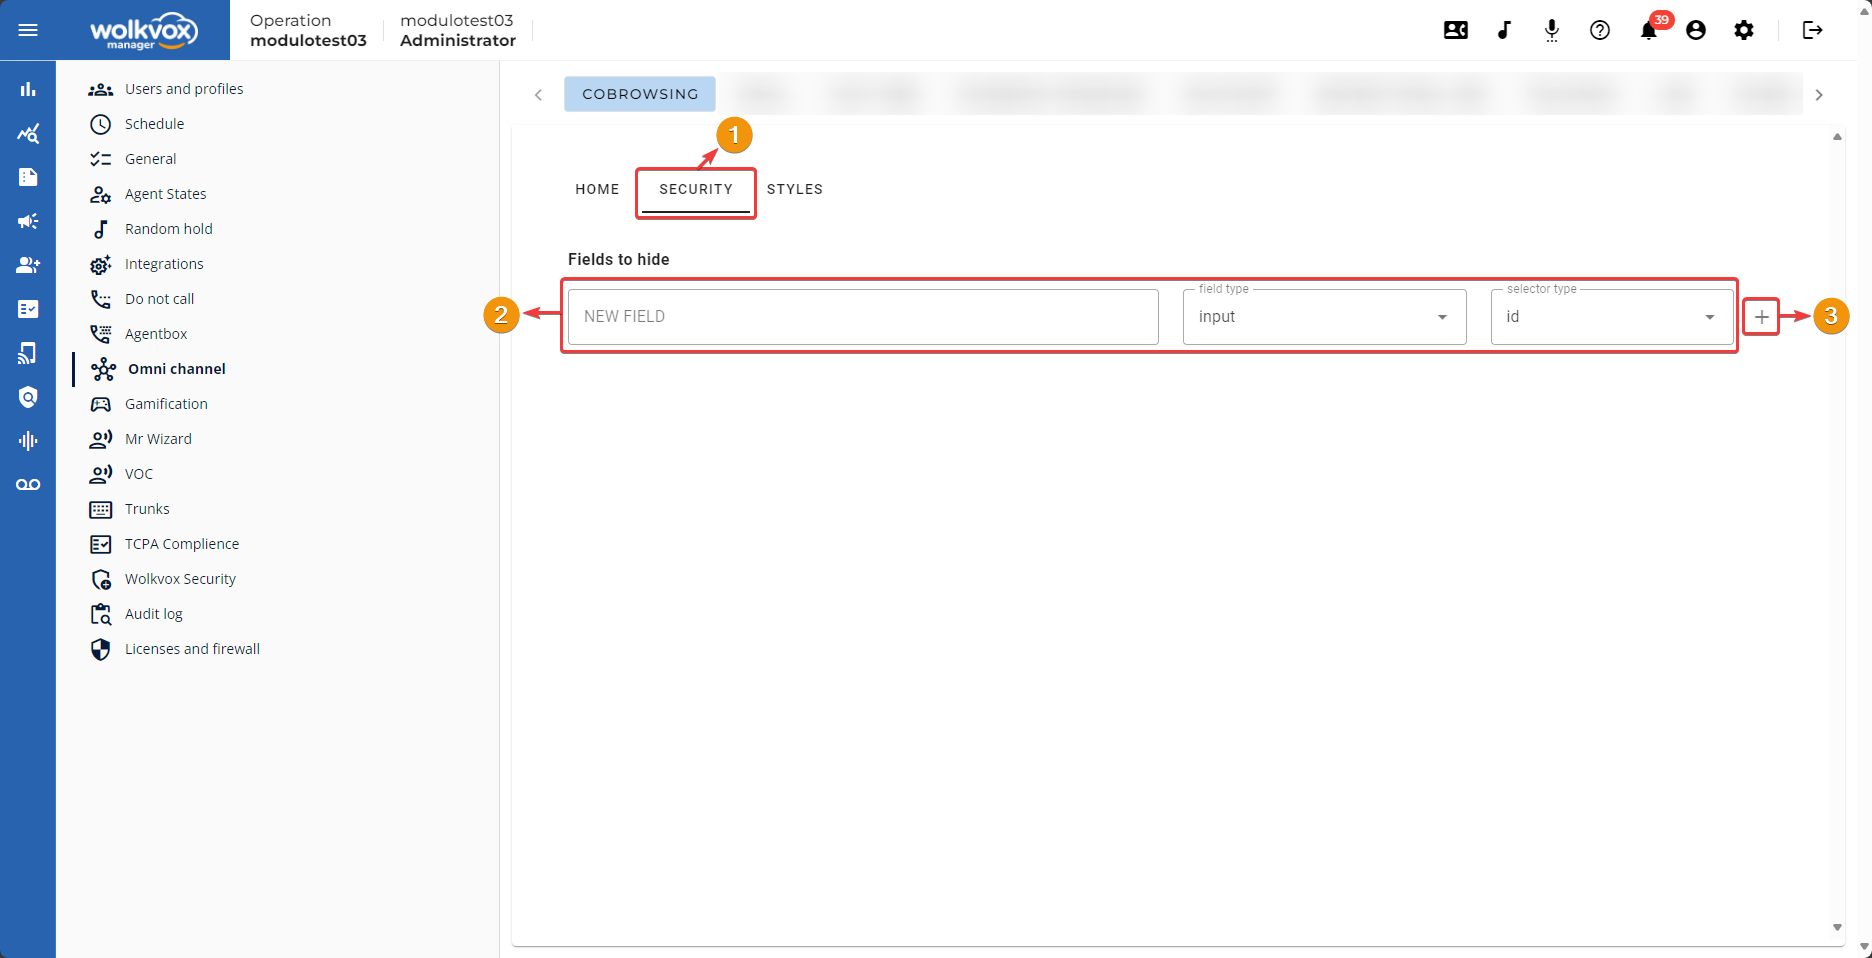
The design of the button to initiate Cobrowsing is customizable in the “Styles” tab within the configuration of the “Cobrowsing” tool in the wolkvox Manager application.
You can change the button’s color, icon, and size.

If you want to hide fields, follow these steps:
- In the “Security” tab, configure fields as hidden to protect the client’s privacy and prevent sensitive information from being revealed to the agent.
- Each field to be hidden will have the following options to reference the desired field:
- New field: Here you should enter the field’s identification name.
- Field type: Specify if the field is an “input” or “select” type.
- Selector type: Set whether the field has “ID,” “Class,” or “XPath” as its selector.
- You can use the “+” button to add more fields you wish to hide.
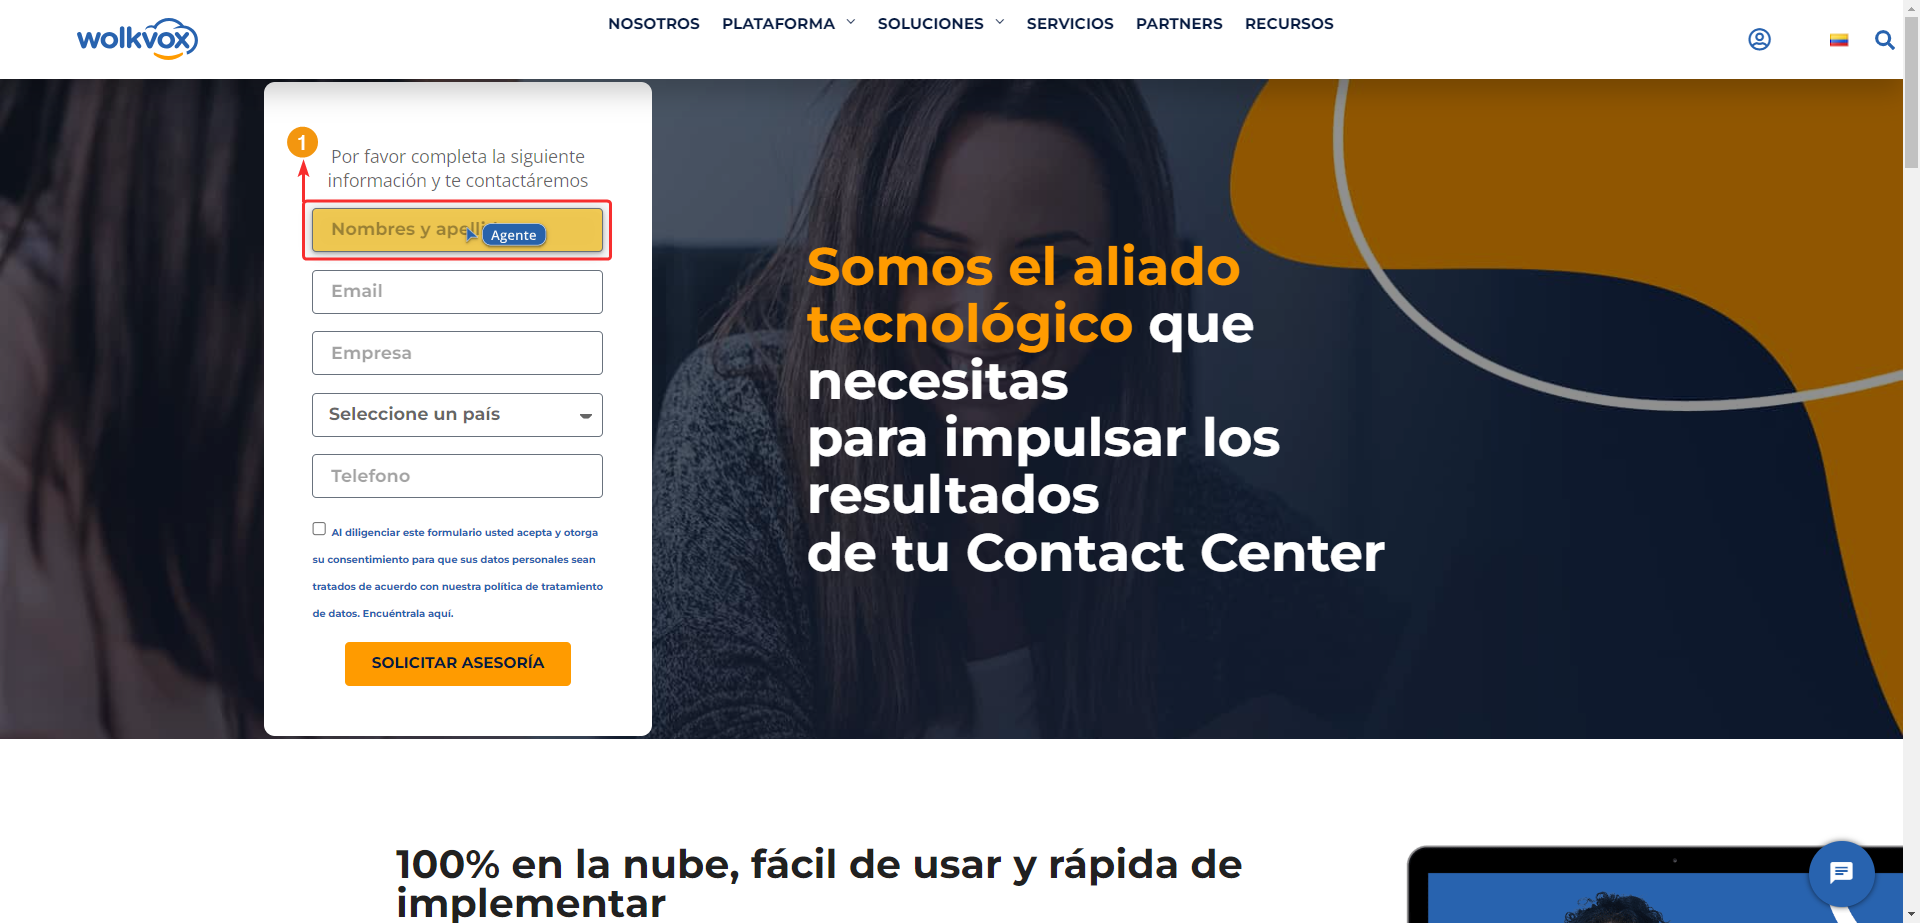
En la siguiente imagen puedes ver la ventana emergente que le aparece al cliente una vez da clic al botón de “Cobrowsing” en el sitio web donde está instalado.

En wolkvox Agent, el agente debe seguir los siguientes pasos para iniciar la visualización de la pantalla de cliente que le suministró el código de acceso.
- En wolkvox Agent hay un botón llamado “Cobrowsing” en el menú superior derecho.
- Se abrirá una ventana emergente donde el agente deberá escribir en el campo “Código de acceso” el código suministrado por el cliente.
- El agente debe dar clic en “Comenzar asesoría” para iniciar la visualización de la pantalla del cliente.
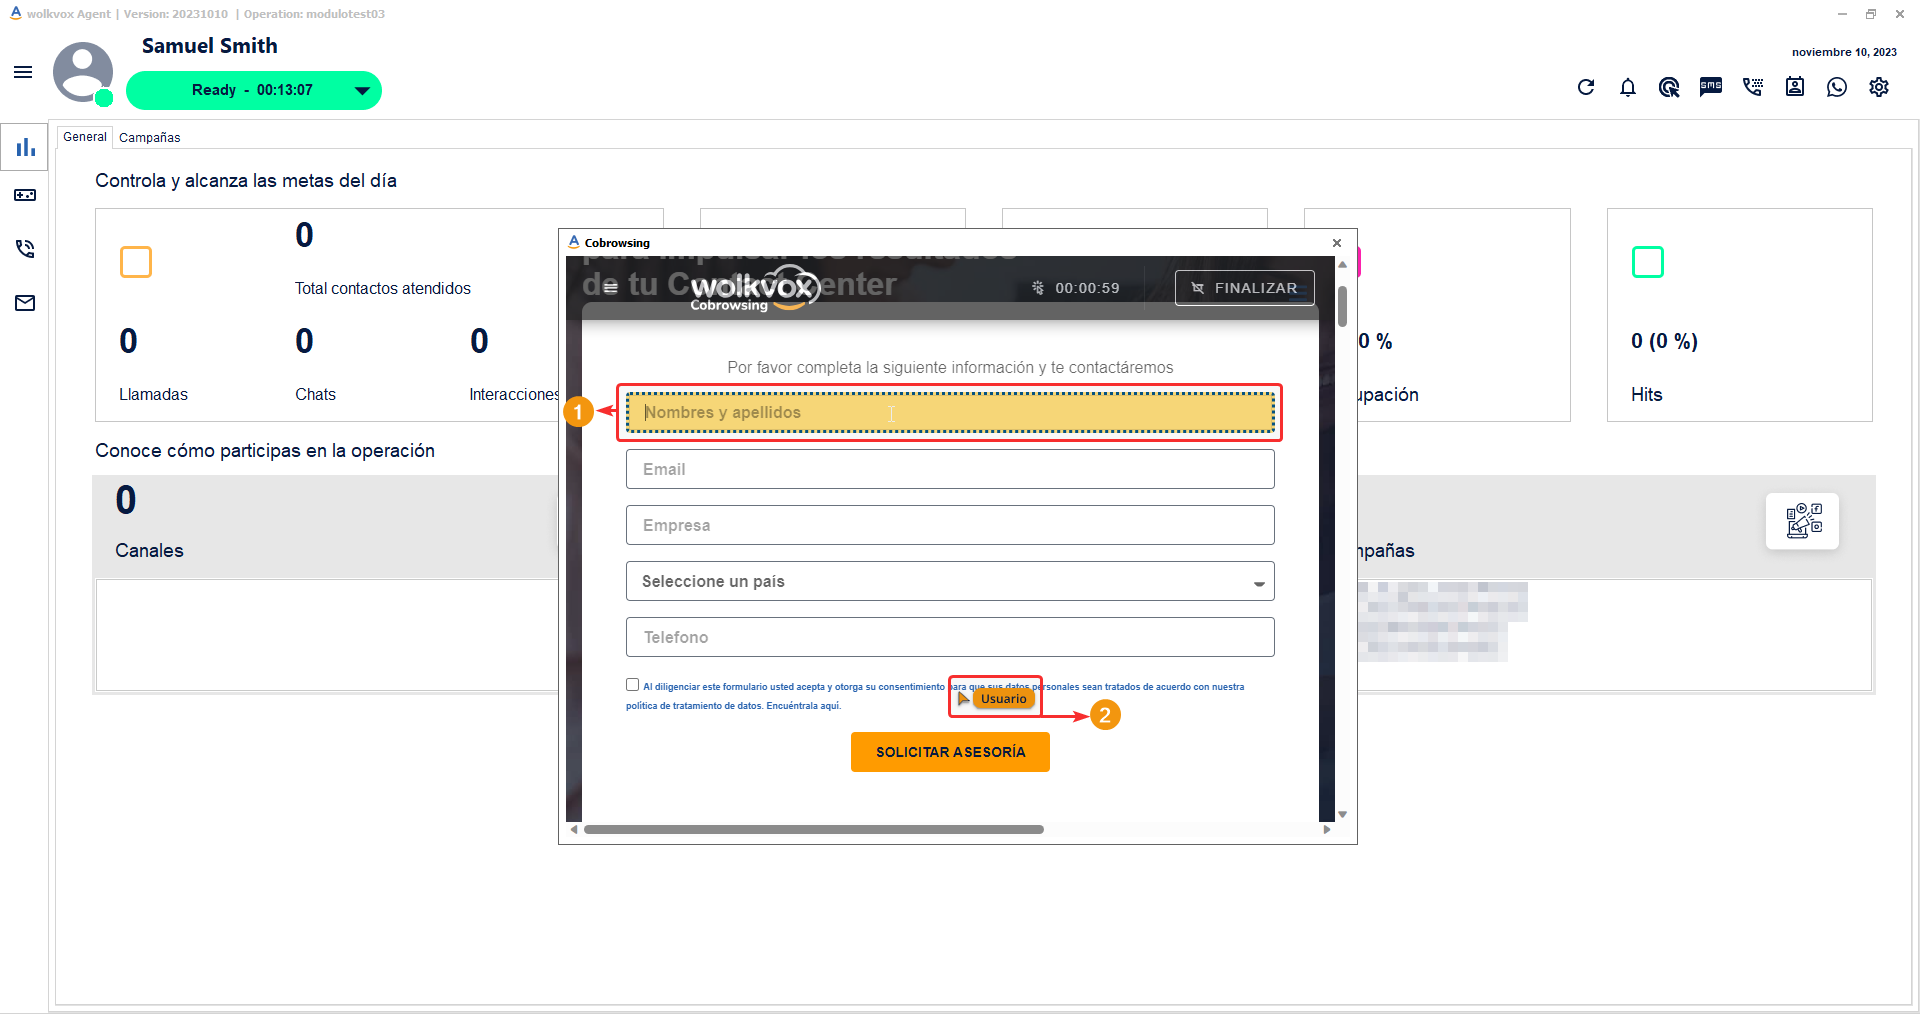
Se abre la vista de la pantalla del cliente para iniciar la guía del proceso.
- El agente puede dar clic o señalar partes o campos del sitio web para ir guiando al cliente en el proceso. La sección que esté resaltada en color naranja claro es el área que tiene señalada el agente y el cliente también tendrá resaltado ese campo o área en dicho color.
- El agente también puede ver el puntero del mouse donde el cliente esté apuntando.
Nota: Los campos ocultos no se podrán visualizar en esta ventana con la finalidad de proteger la información delicada.
El cliente podrá ver el puntero del mouse donde está apuntando el agente.
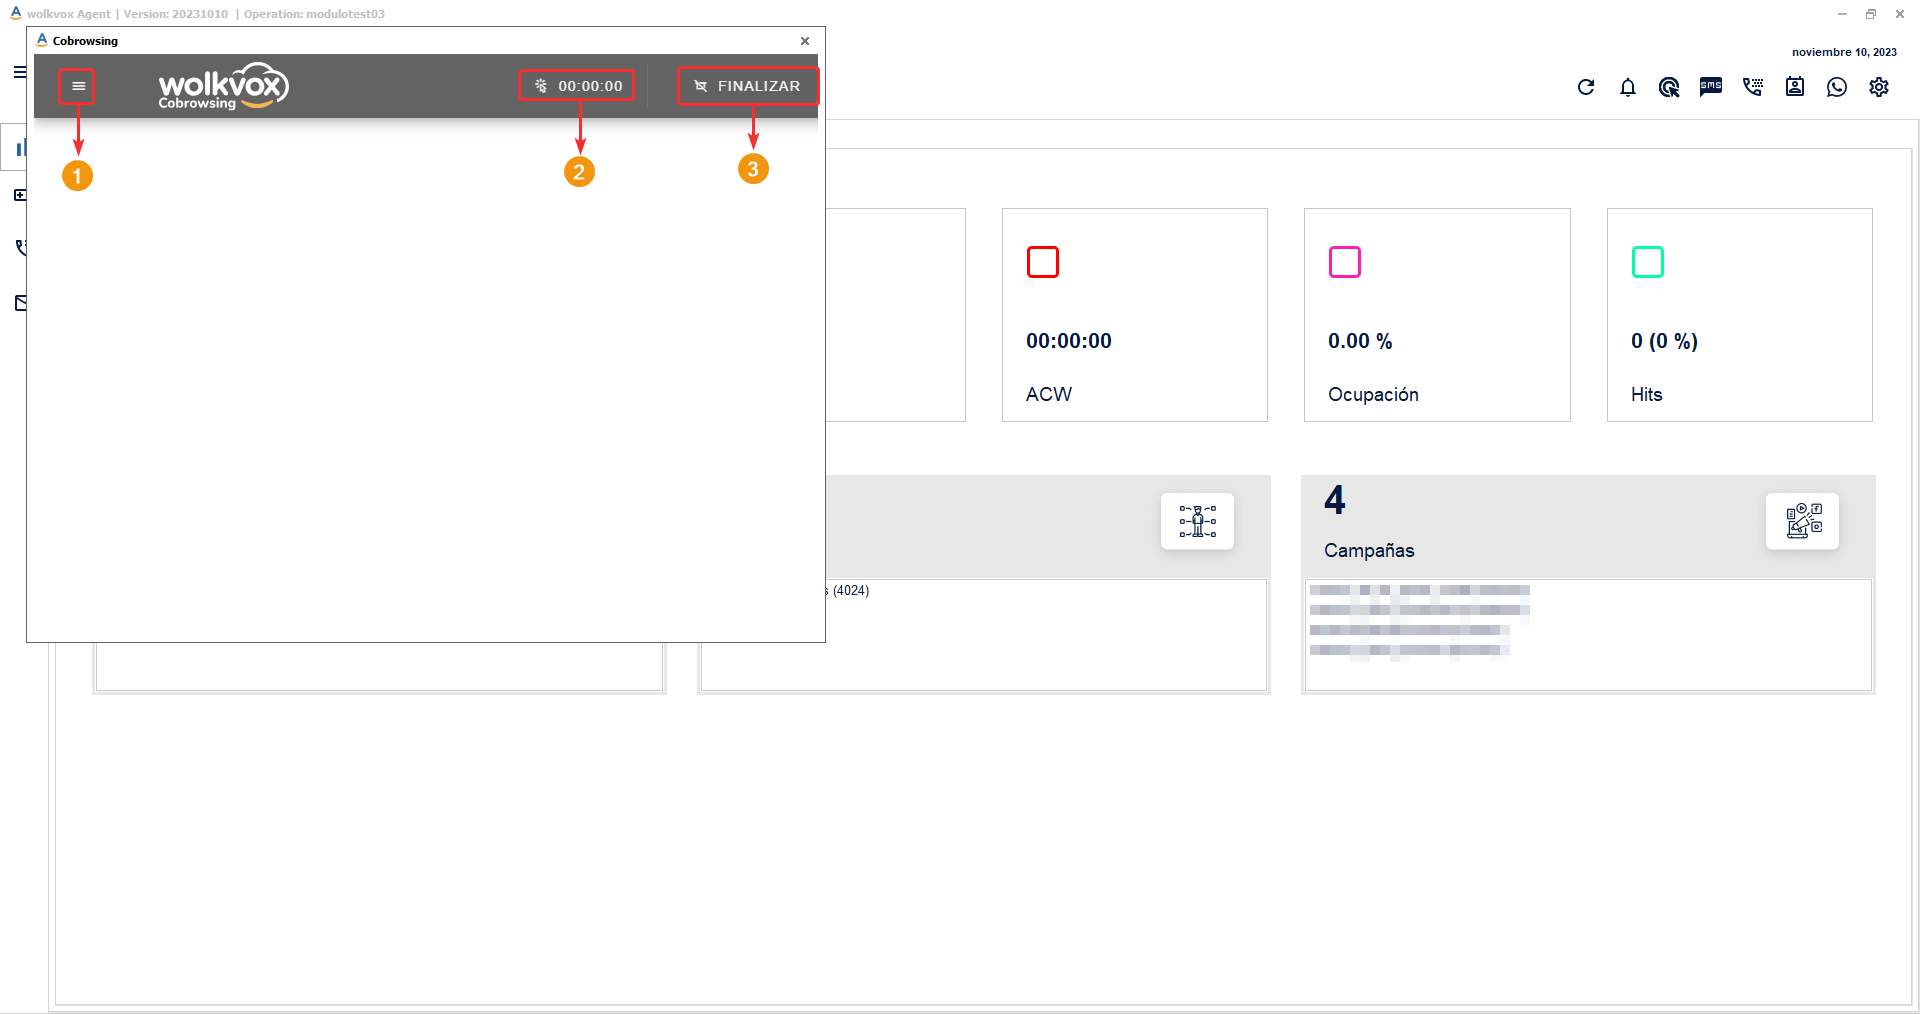
En la ventana de “Cobrowsing” tienes a tu disposición un menú en el que tienes las siguientes opciones.
- El botón tipo hamburguesa te permite reducir el menú de “Cobrowsing” si está encima de alguna información importante para visualizar.
- Puedes ver el tiempo transcurrido desde el inicio del uso de la herramienta con el cliente.
- Una vez hayas finalizado el proceso de colaboración con el cliente da clic en el botón “Finalizar”.
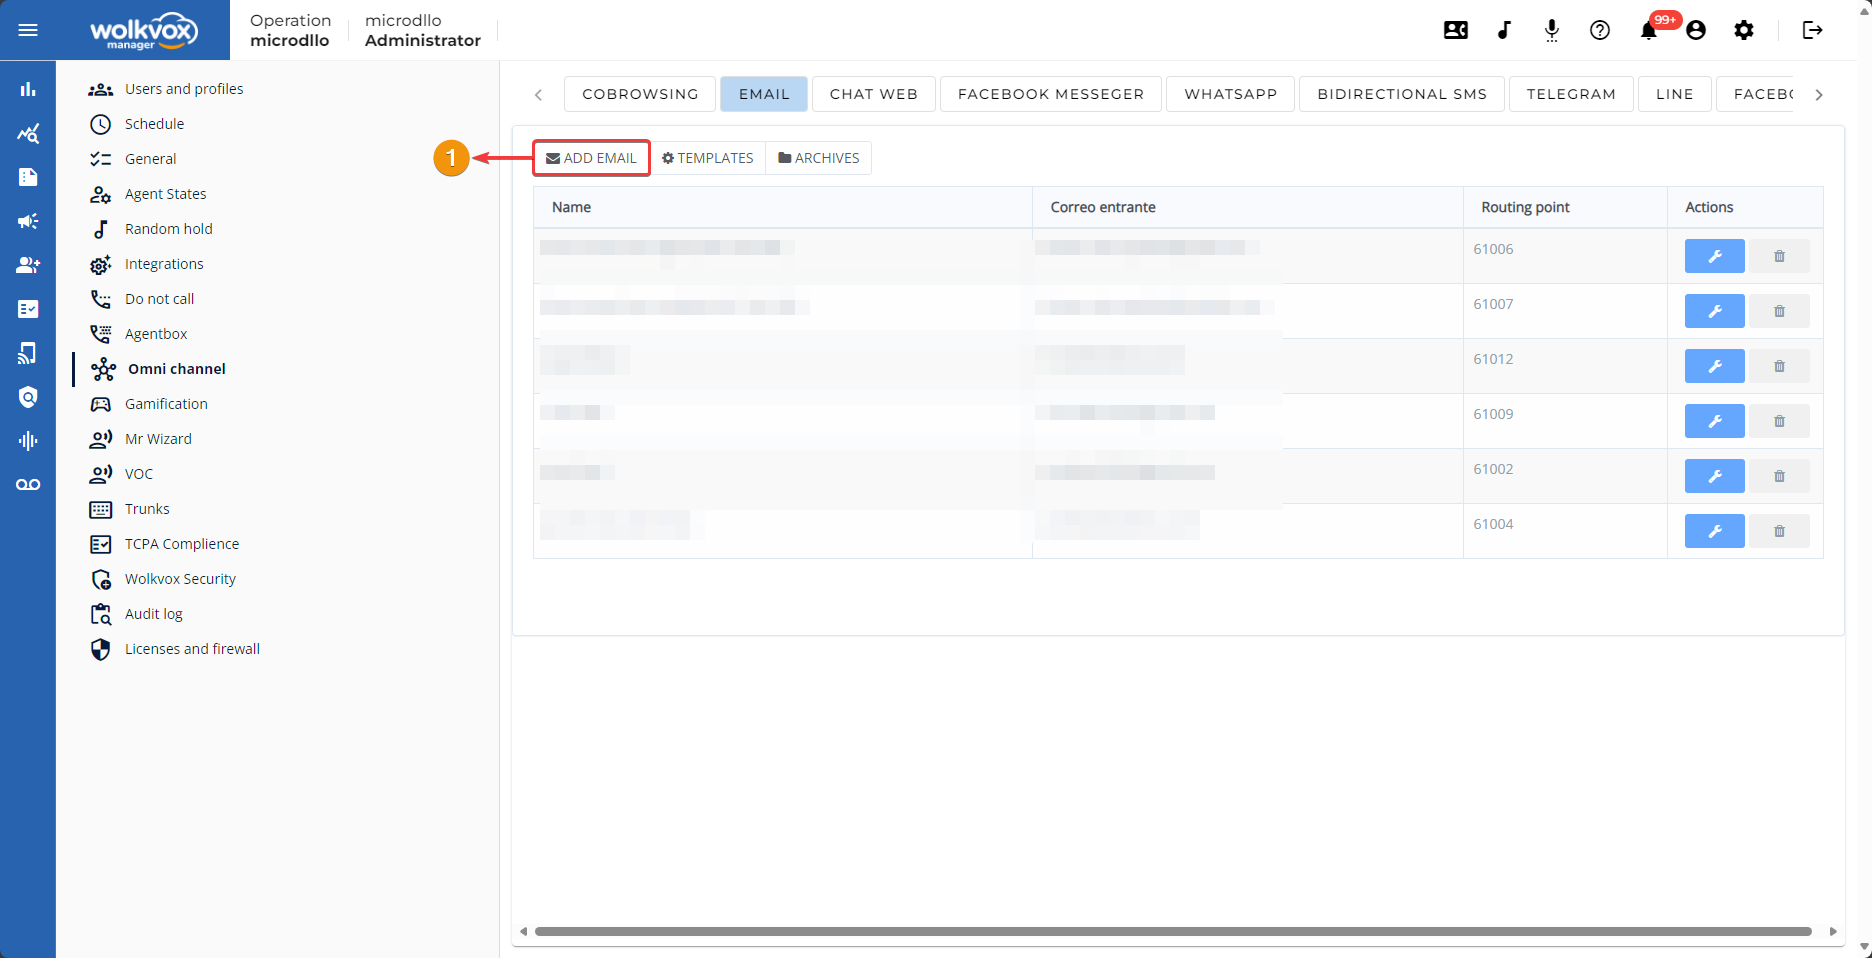
Add your email to the Omnichannel service #
The first channel you can integrate into your wolkvox Manager is email. With this channel, your agents will have an email inbox where they will receive all emails and manage this service from wolkvox Manager without having to access the channel through another application. It also allows for sending emails. That is, they can manage both calls and emails from the Agentbox (applies to the desktop and web version).
![]() This service has an additional cost.
This service has an additional cost.

Add email #
To integrate an email, you must follow these steps:
In the fields provided, you should configure the following:
- Daily HITS Target per Agent: Set the minimum number of daily successful hits (calls) an agent must achieve to surpass the indicator.
- Calls per day target per Agent: How many minimum daily calls do you want the agent to make to surpass the indicator.
- AHT Target per Agent Day (SEC): How many seconds in daily AHT should the agent not exceed to meet the indicator.
- ACW Target per Agent Day (SEC): How many seconds in daily ACW should the agent not exceed to meet the indicator.
- Occupation Target per Agent Day: What percentage of daily occupancy do you want the agent to have to meet the indicator.
- Login Time per Day per Agent (Minutes): How many minutes of daily login time should the agent achieve to surpass the indicator.
- Quality Assurance Results: Set the percentage weight for compliance with quality standards.
- Post-call Survey Results: Set the percentage weight for results in surveys conducted at the end of the customer interaction.
Note: For each option, you must assign the percentage weight the indicator will have on the total.
Mr. Wizard for real-time voice analysis and response chat #
In this section, you have access to real-time voice tools, Mr. Wizard in voice, Mr. Wizard in chats, Mr. Wizard in interactions, and Mr. Wolkvox – Wolkvox Studio – Business Logic.
- Mr. Wizard in voice allows you to activate a section in Wolkvox Agent where the agent can type a question, and the system responds based on the training it receives.
- Thanks to Mr. Wizard, you’ll optimize the productivity of your operation and the quality of customer service provided by your agents.

- Go to the “Settings” tab.
- In “Language,” select the language for text and voice analysis.
- In “Real-time Voice Analysis,” you can enable or disable the sentiment analysis and call transcription service in real-time.
- In “Mr. Wizard in Voice,” you can activate or deactivate the new tool that allows the agent to type a question and receive a response from the system, the response depends on the information provided in the “Training” tab. The Mr. Wizard in Voice tool also allows the agent to have an informative field to check the overall sentiment of the call and its transcription for conversation history in text format.
- In “Mr. Wizard in Chat,” you can activate or deactivate the new Mr. Wizard tool that gives the agent the ability to ask questions to the artificial intelligence (the response depends on the training given).
- In “Enable Automatic Chat Checker,” you have a new functionality for Mr. Wizard with artificial intelligence that automatically corrects the texts sent by the agent to the client.
- In “Mr. Wizard in Interactions,” you can activate or deactivate the new tool that allows the agent to bring the body text of the received email into a window to get help from artificial intelligence in drafting the response message. Also, the agent will have a button available to check the spelling and grammar of the text to be sent.
- Don’t forget to click the “Save” button to apply the changes.

Training Mr. Wizard #
- To train Mr. Wizard, go to the tab called “Training.”
- Select the tone of the response, which can be professional, neutral, funny, or poetic. Choose the response tone that best fits what you want Mr. Wizard to respond with.
- In “Company Information,” you should write all the knowledge you want to train Mr. Wizard with. Mr. Wizard’s artificial intelligence will answer the agent’s questions based on the knowledge acquired in this field.
- Note: Training cannot exceed 10,000 characters.
- Click “Save” to apply the changes.
VOC #
In this section, you can activate and configure the voice and text analysis service. Thanks to this tool, you can obtain a comprehensive and detailed analysis of the conversations that occur in your operation. For example, you can get a summary of the conversation, understand its sentiment, obtain a text transcription of the call, know if the agents made the protocol greeting, the speed of the greeting, find out if the agent used certain keywords, etc.
- Select the language for conducting the conversation analysis.
- Text Analytics: Allows you to obtain a comprehensive analysis of all conversations in your operation that occur through text channels.
- Speech Analytics: Allows you to obtain a comprehensive analysis of all conversations in your operation that occur through voice channels.
- You can enable email notifications to receive emails each time text and/or audio analyses are performed, and also when there is any incorrect procedure within the VOC flow.
- Select the wolkvox Studio routing point you want to associate with text and audio analysis.
- Click on “Save configuration” to apply the changes.

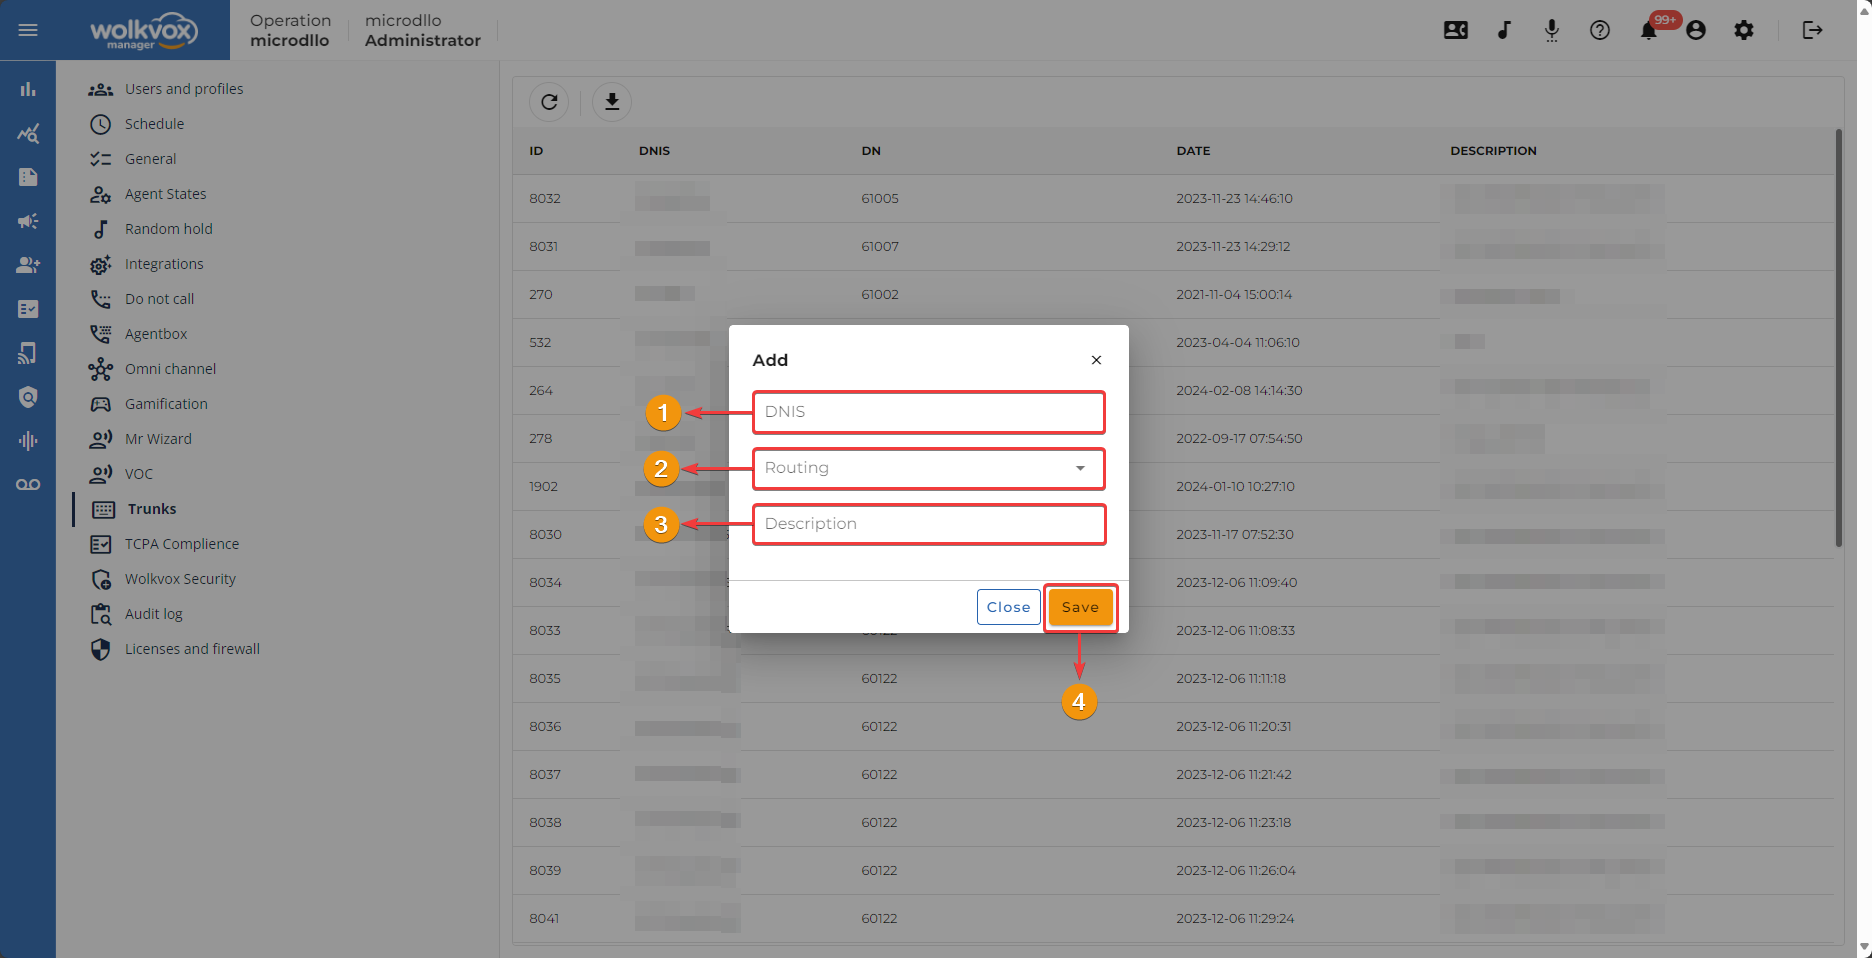
Trunks #
- Here you can configure all the SIP trunks that will be used for making outgoing calls.
- To add a new trunk, click on the button.

- Enter the DNIS or incoming call identification number of the trunk.
- Select the wolkvox Studio routing point to which you want to assign the DNIS.
- Write a brief description to identify the DNIS.
- Click “Save” to add the DNIS.
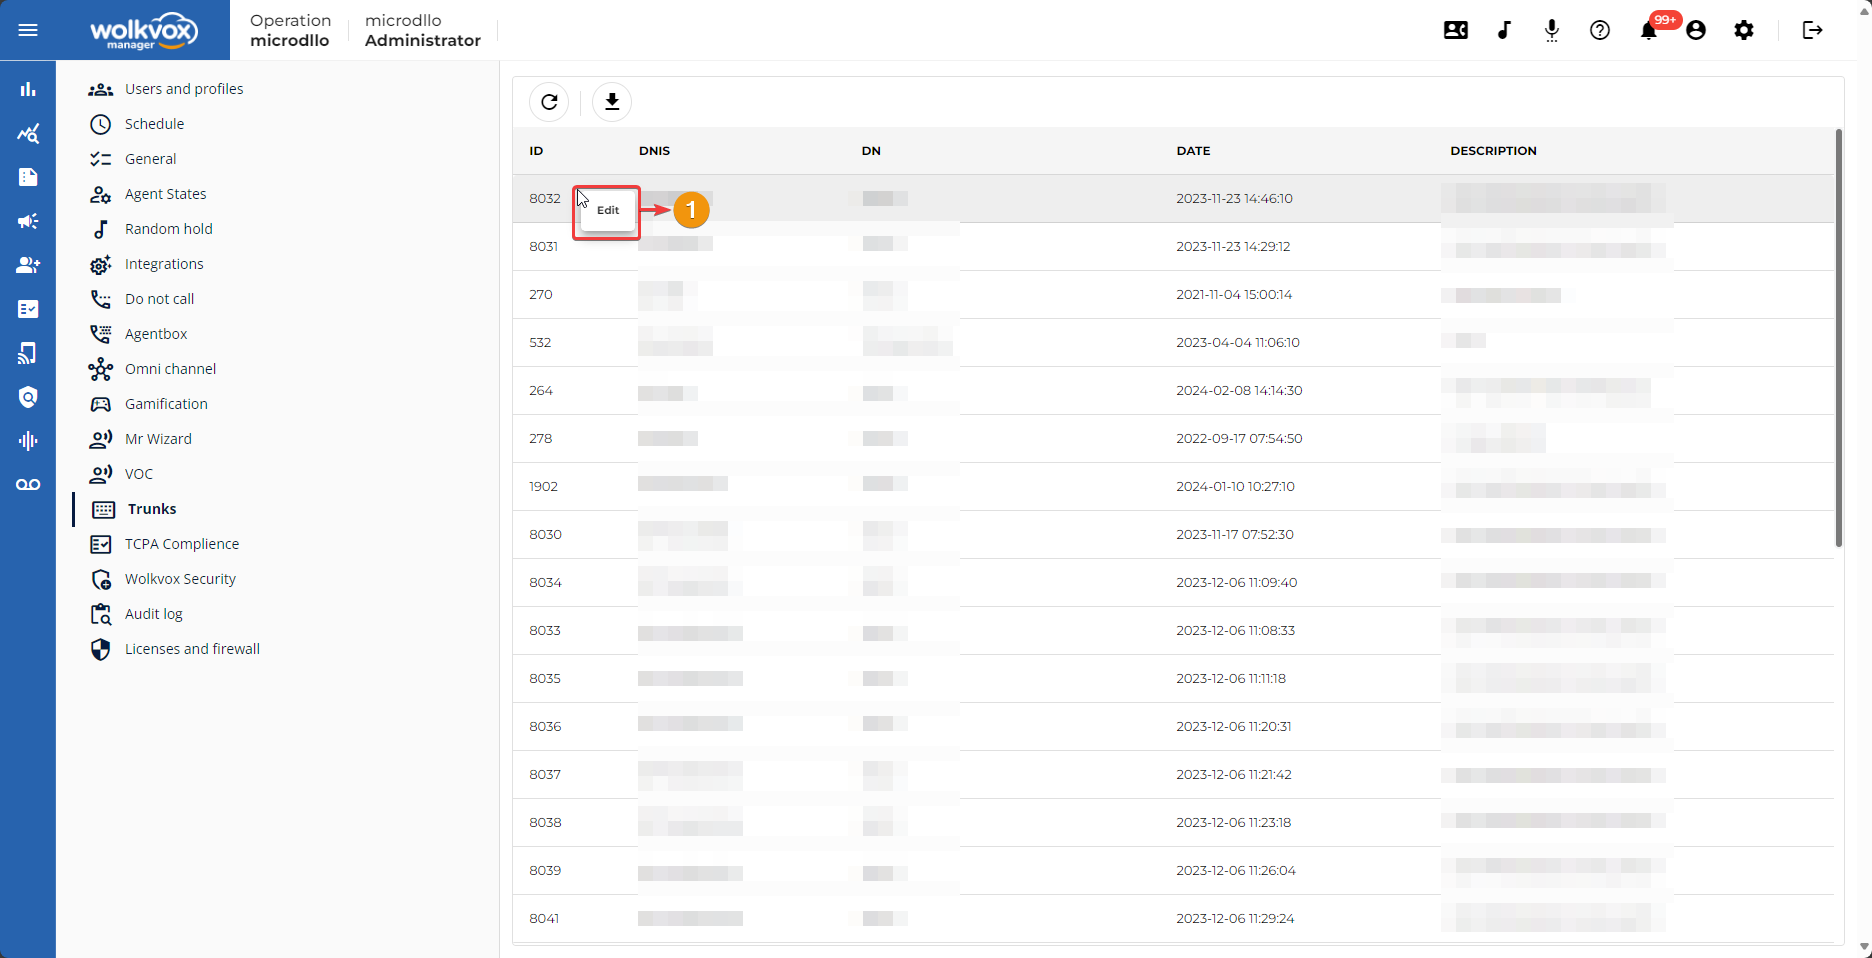
In the table of the added trunk list, you will get the following data for each:
- ID: Trunk identification number.
- DNIS: Incoming call identification number (DNIS) of the trunk.
- DN: Domain name of the trunk. This is linked to the selected routing point for the trunk.
- Date: Creation date of the trunk.
- Description: Description of the trunk.

You can right-click on an already created trunk if you wish to edit its data, thus being able to change the DNIS, routing point, and the trunk’s description.
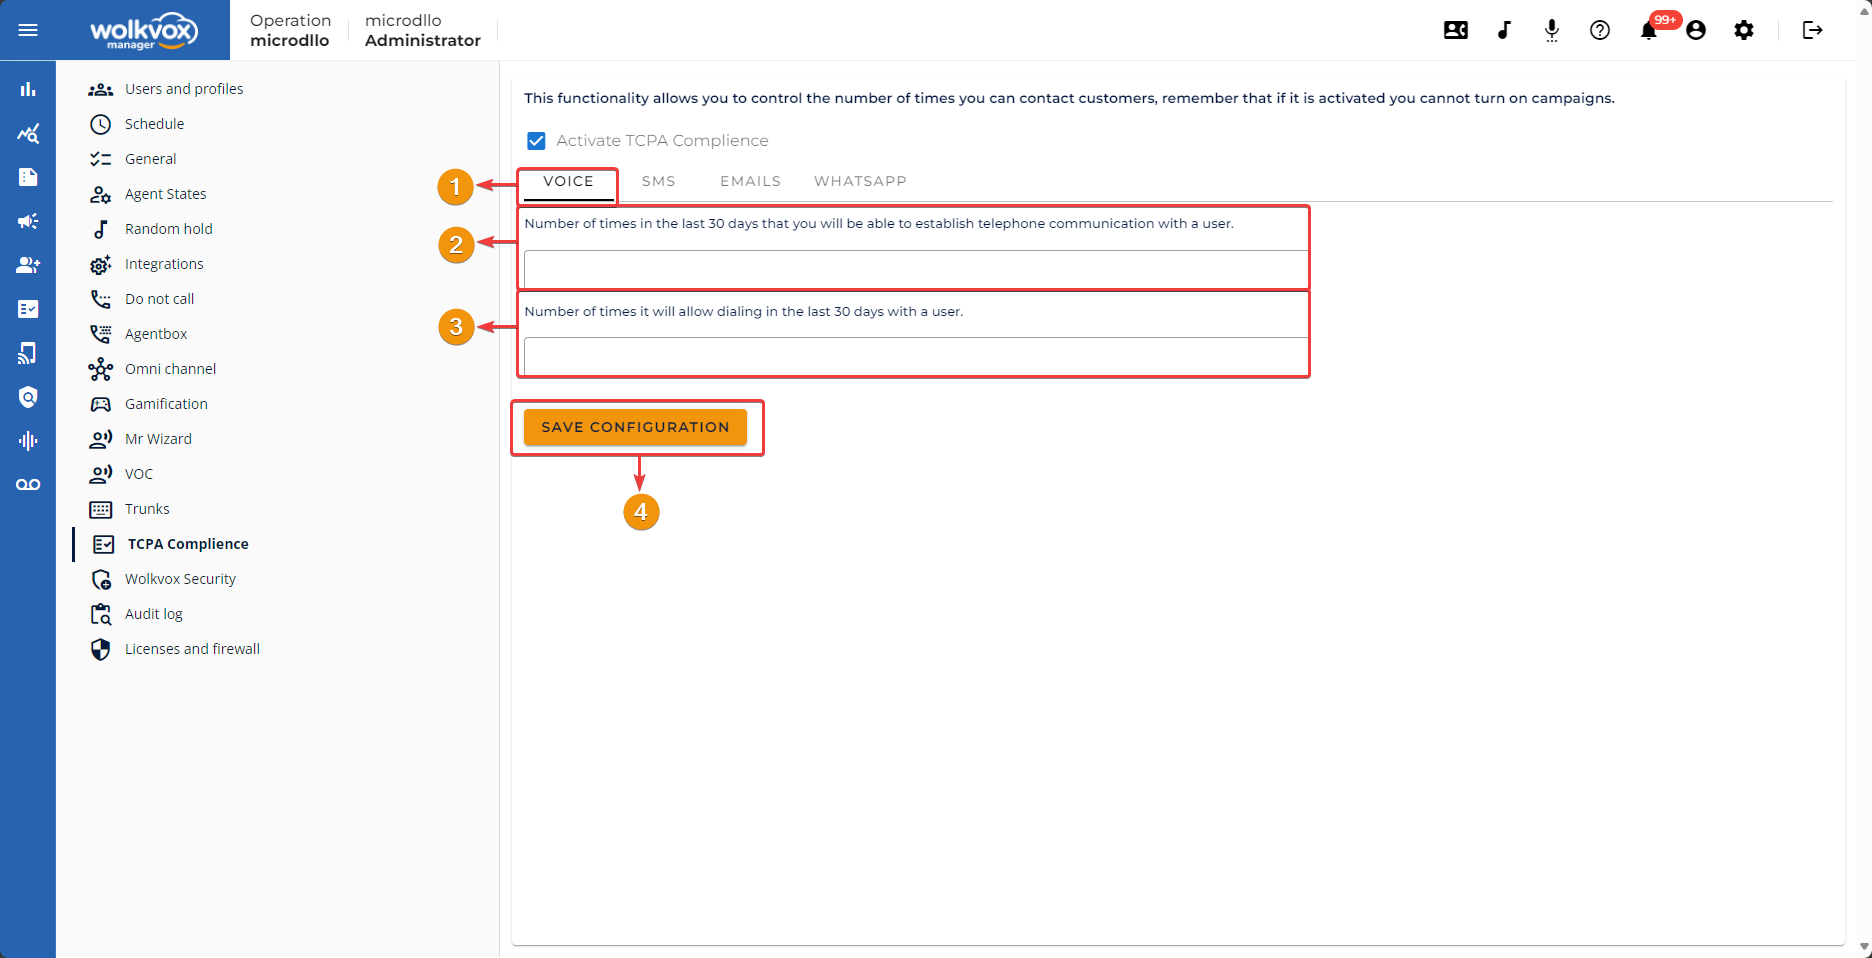
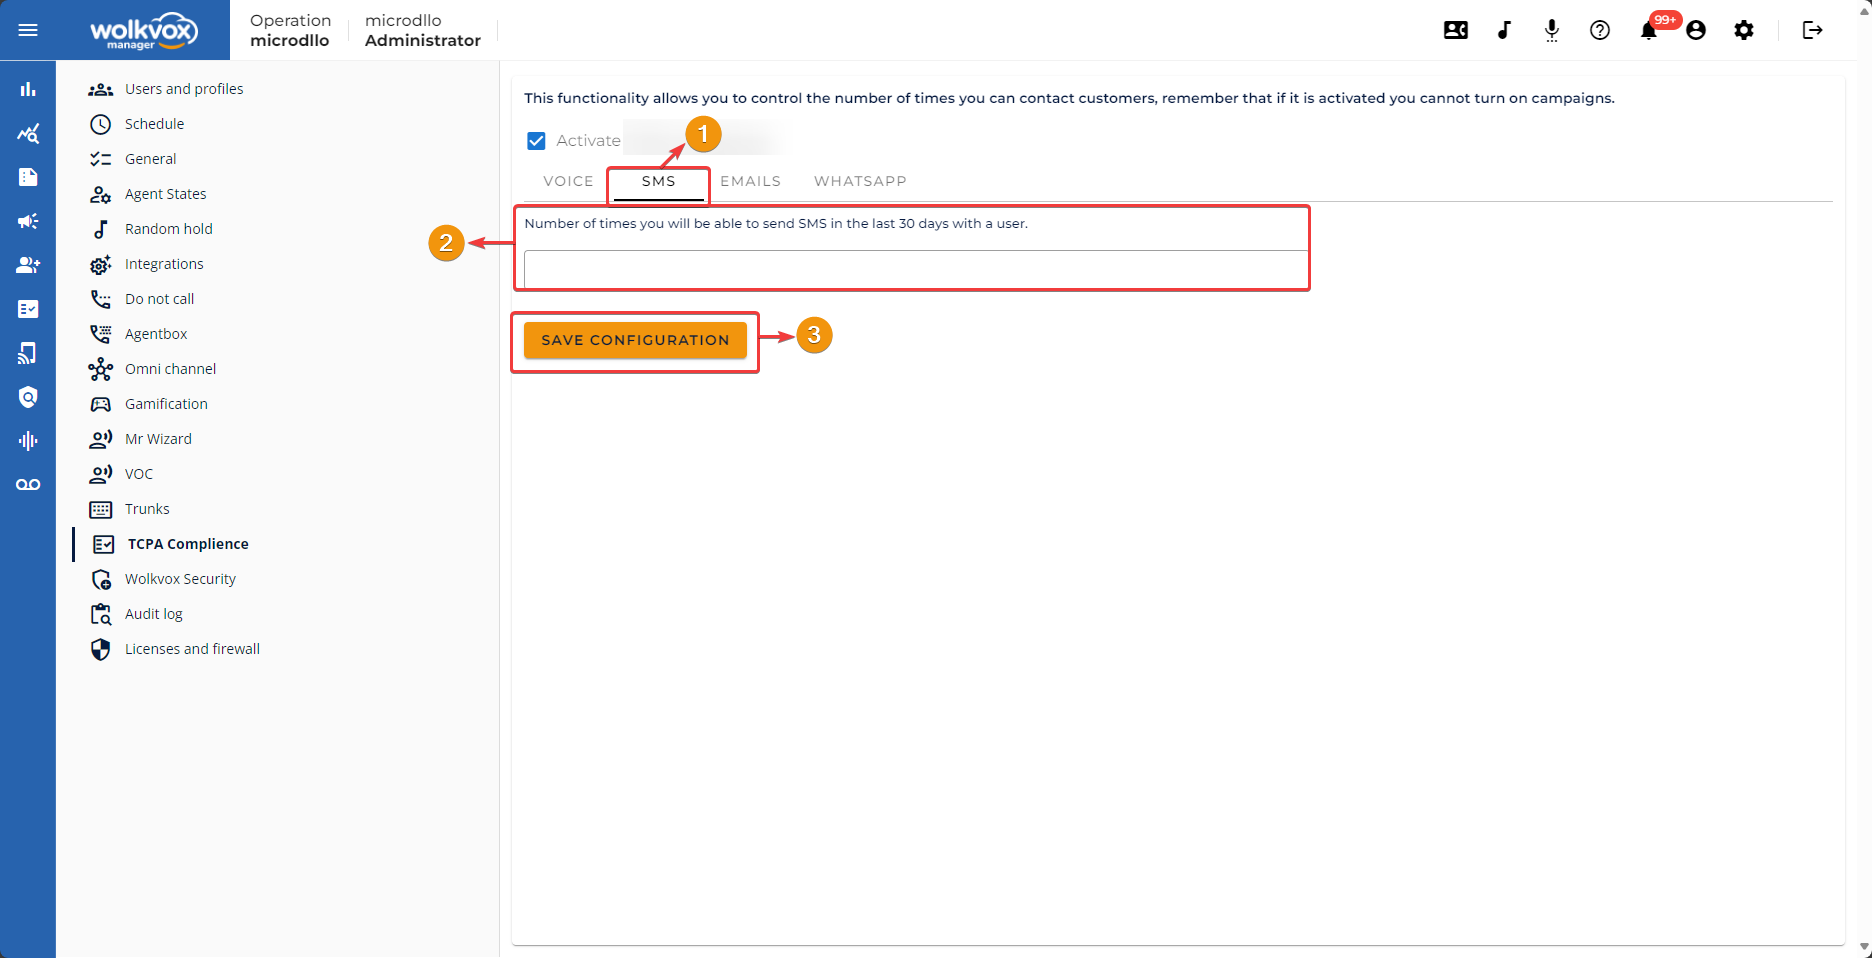
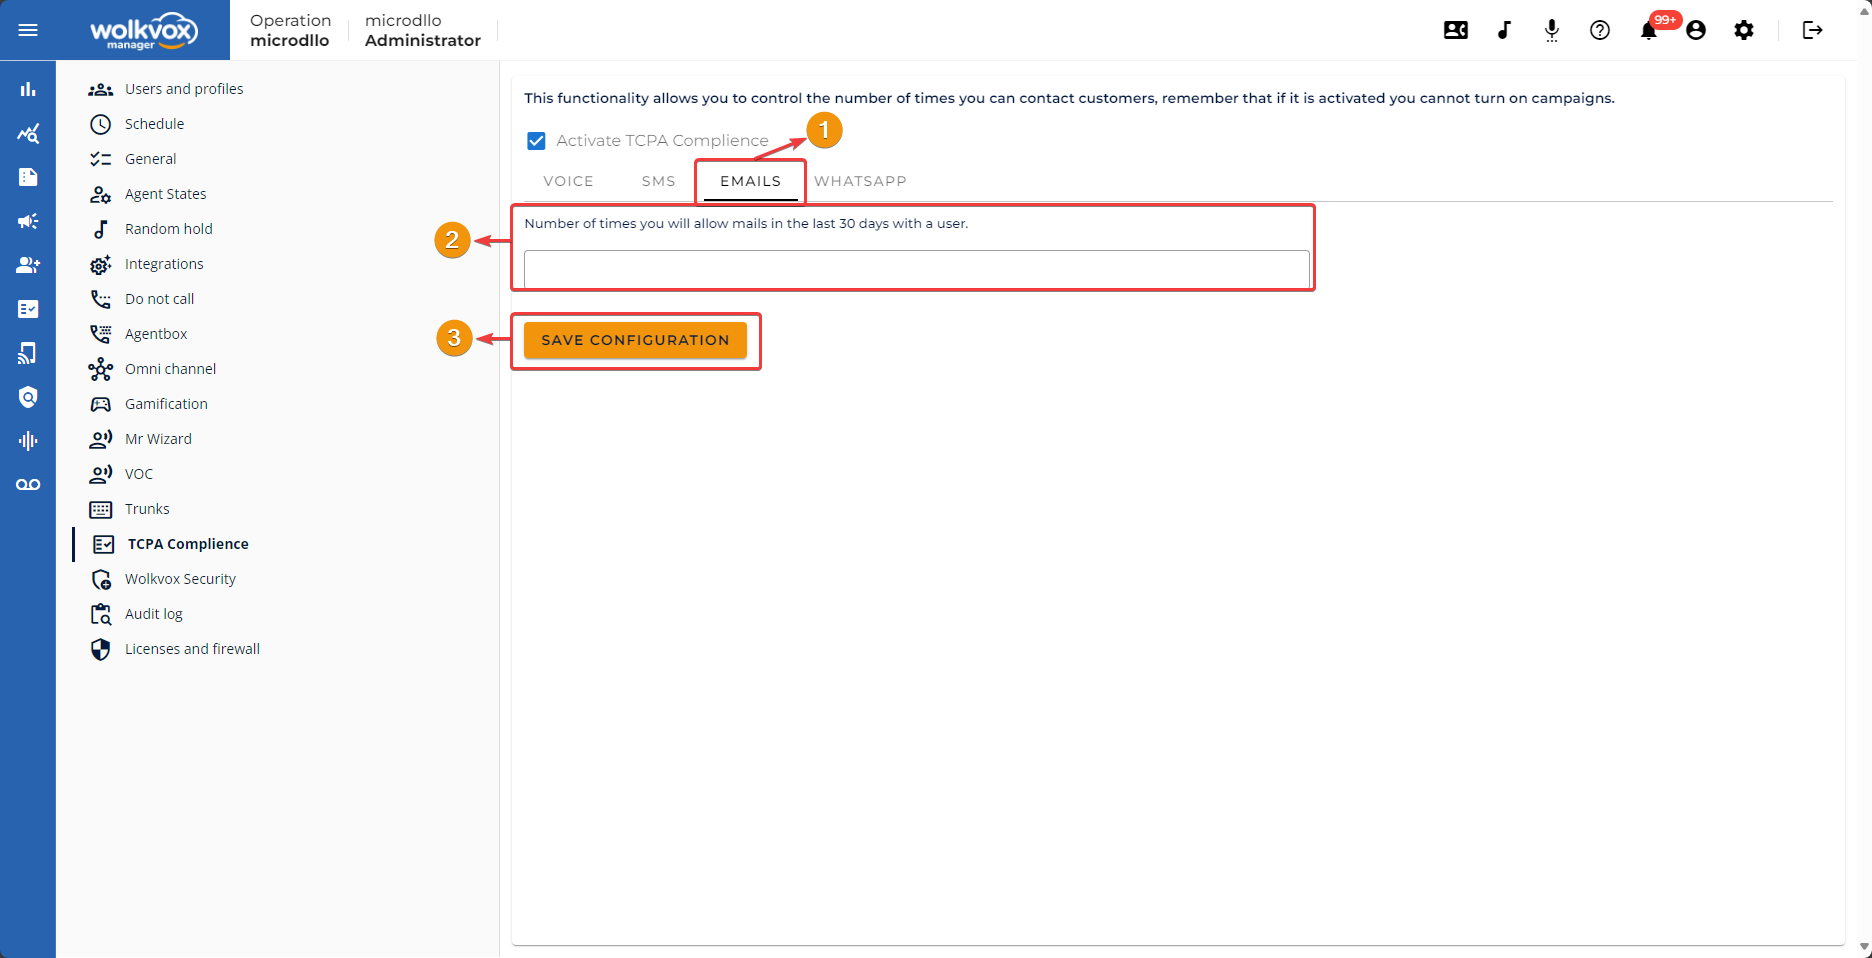
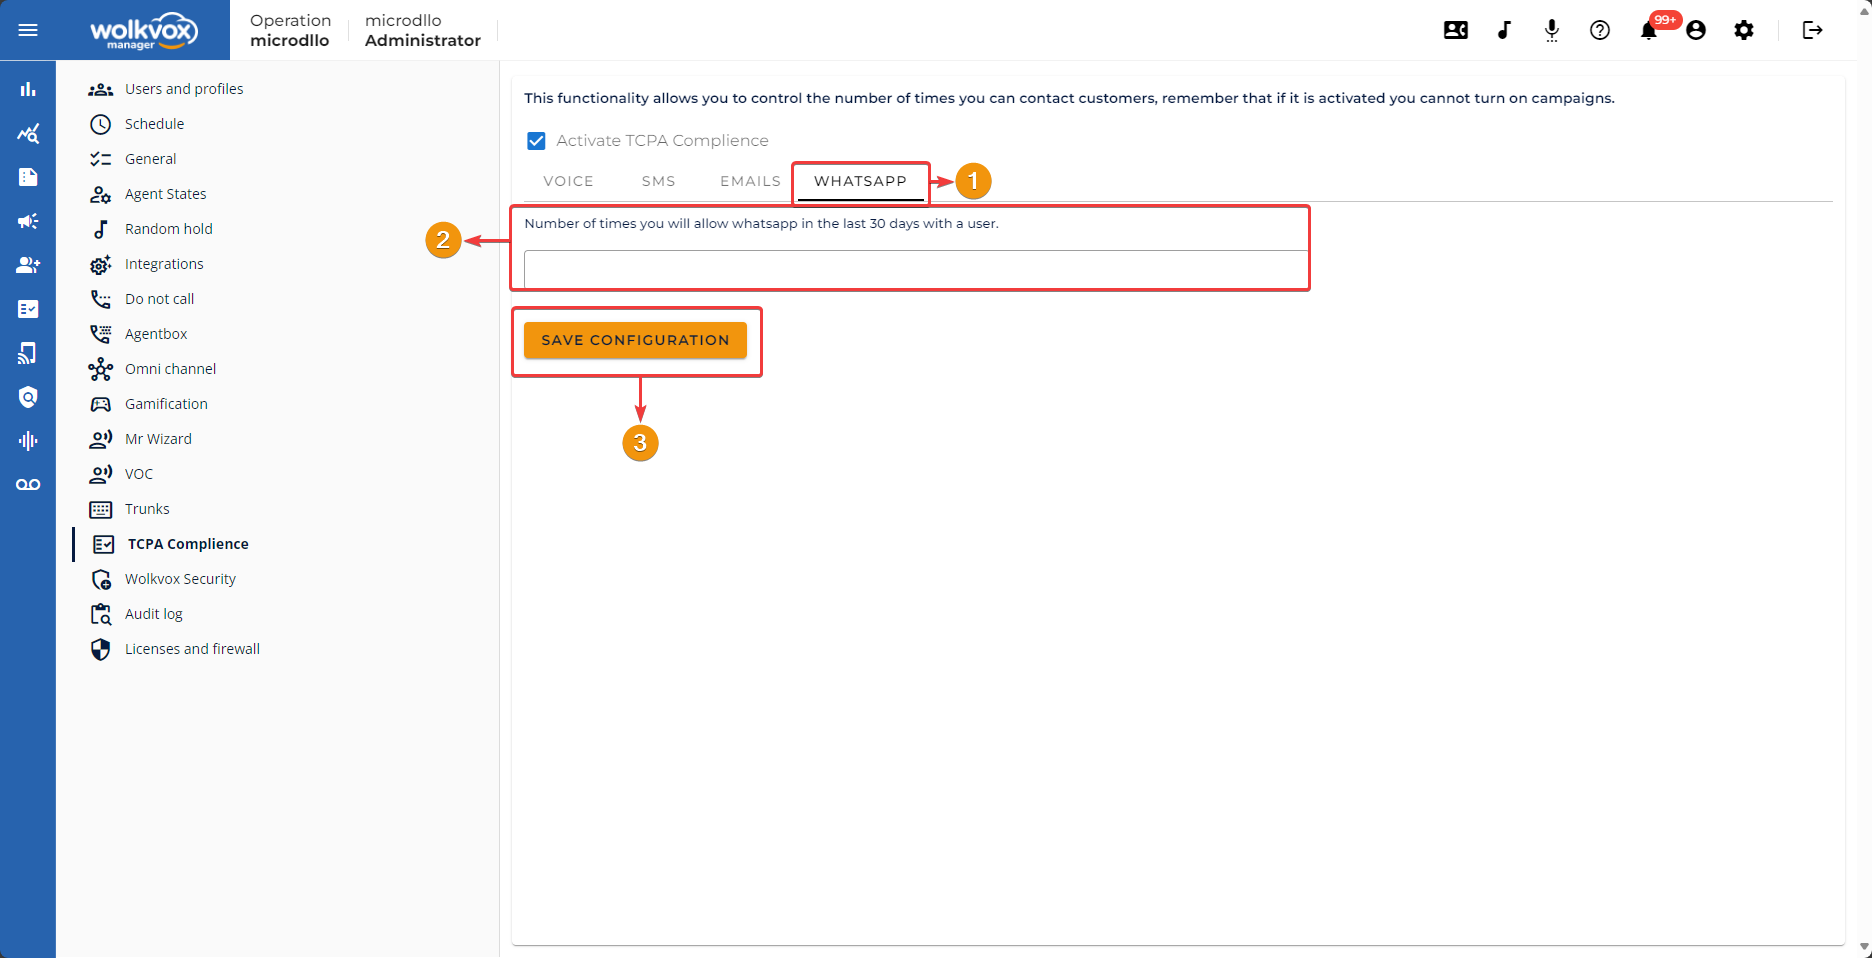
TCPA Compliance #
Through this section, you can regulate interactions with your customers to comply with the laws of telephone consumer protection that apply in your operating country.
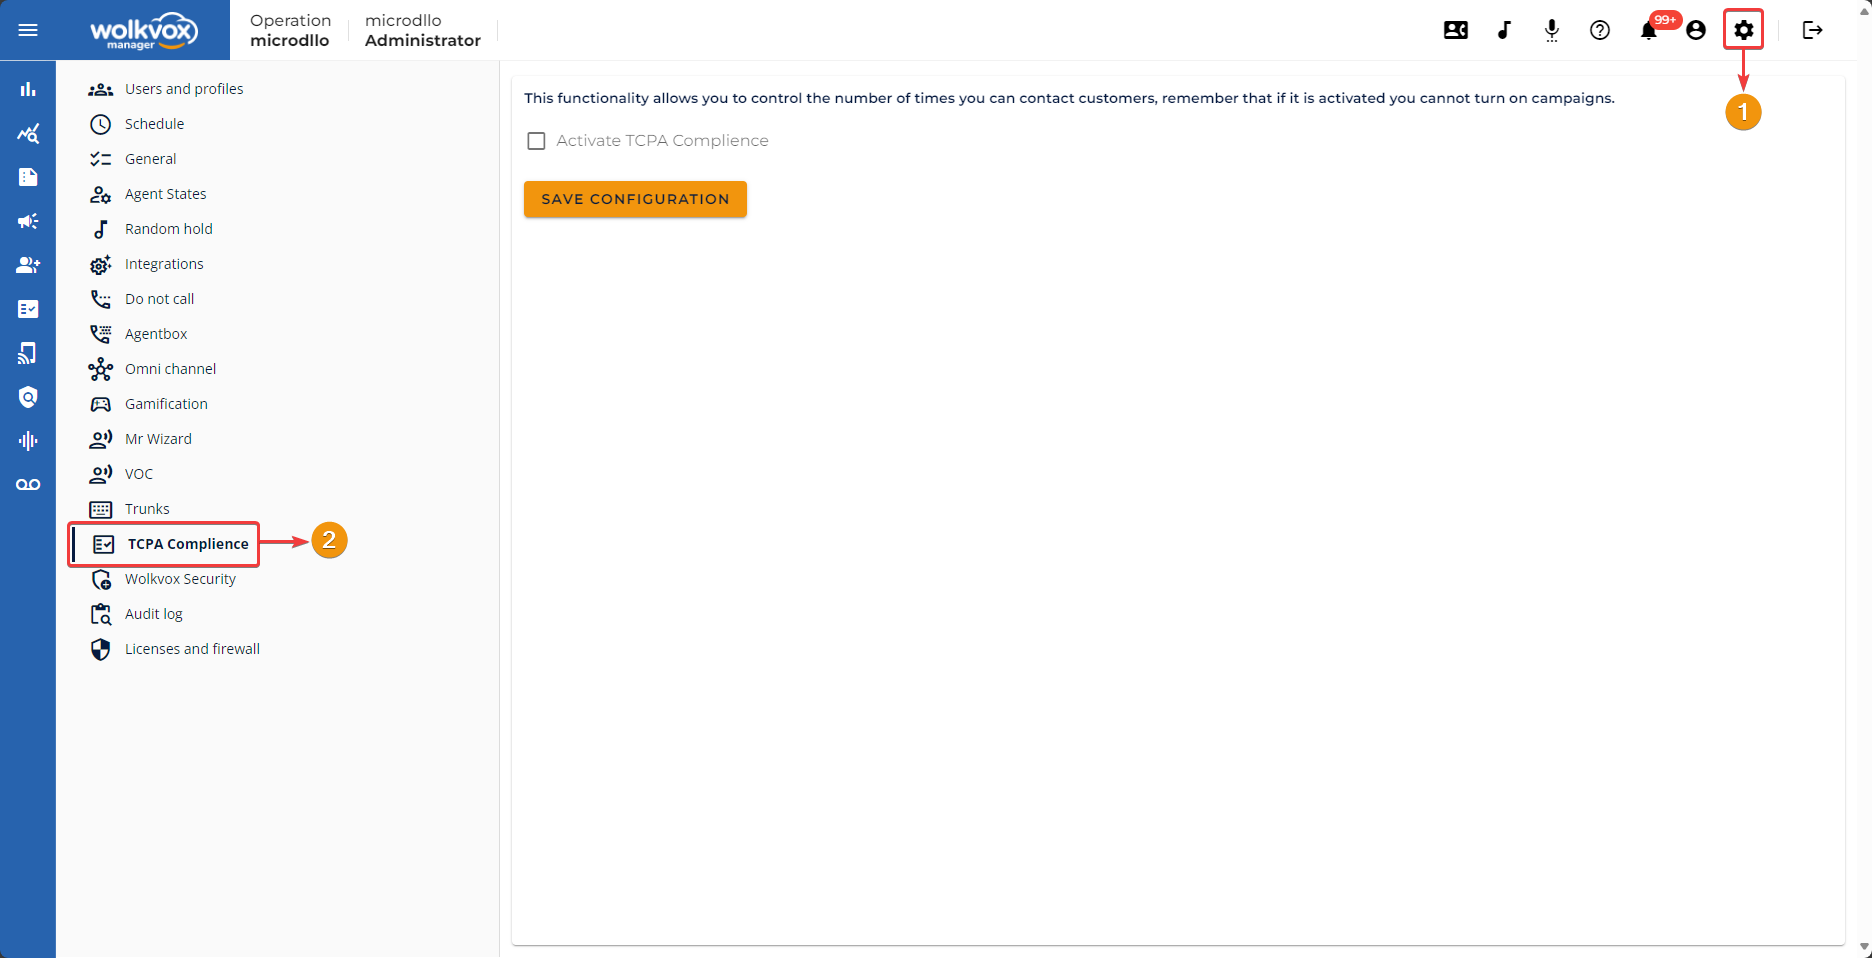
- To activate TCPA Compliance, simply check the corresponding box.
- Then, click “Save Settings” to apply the changes.
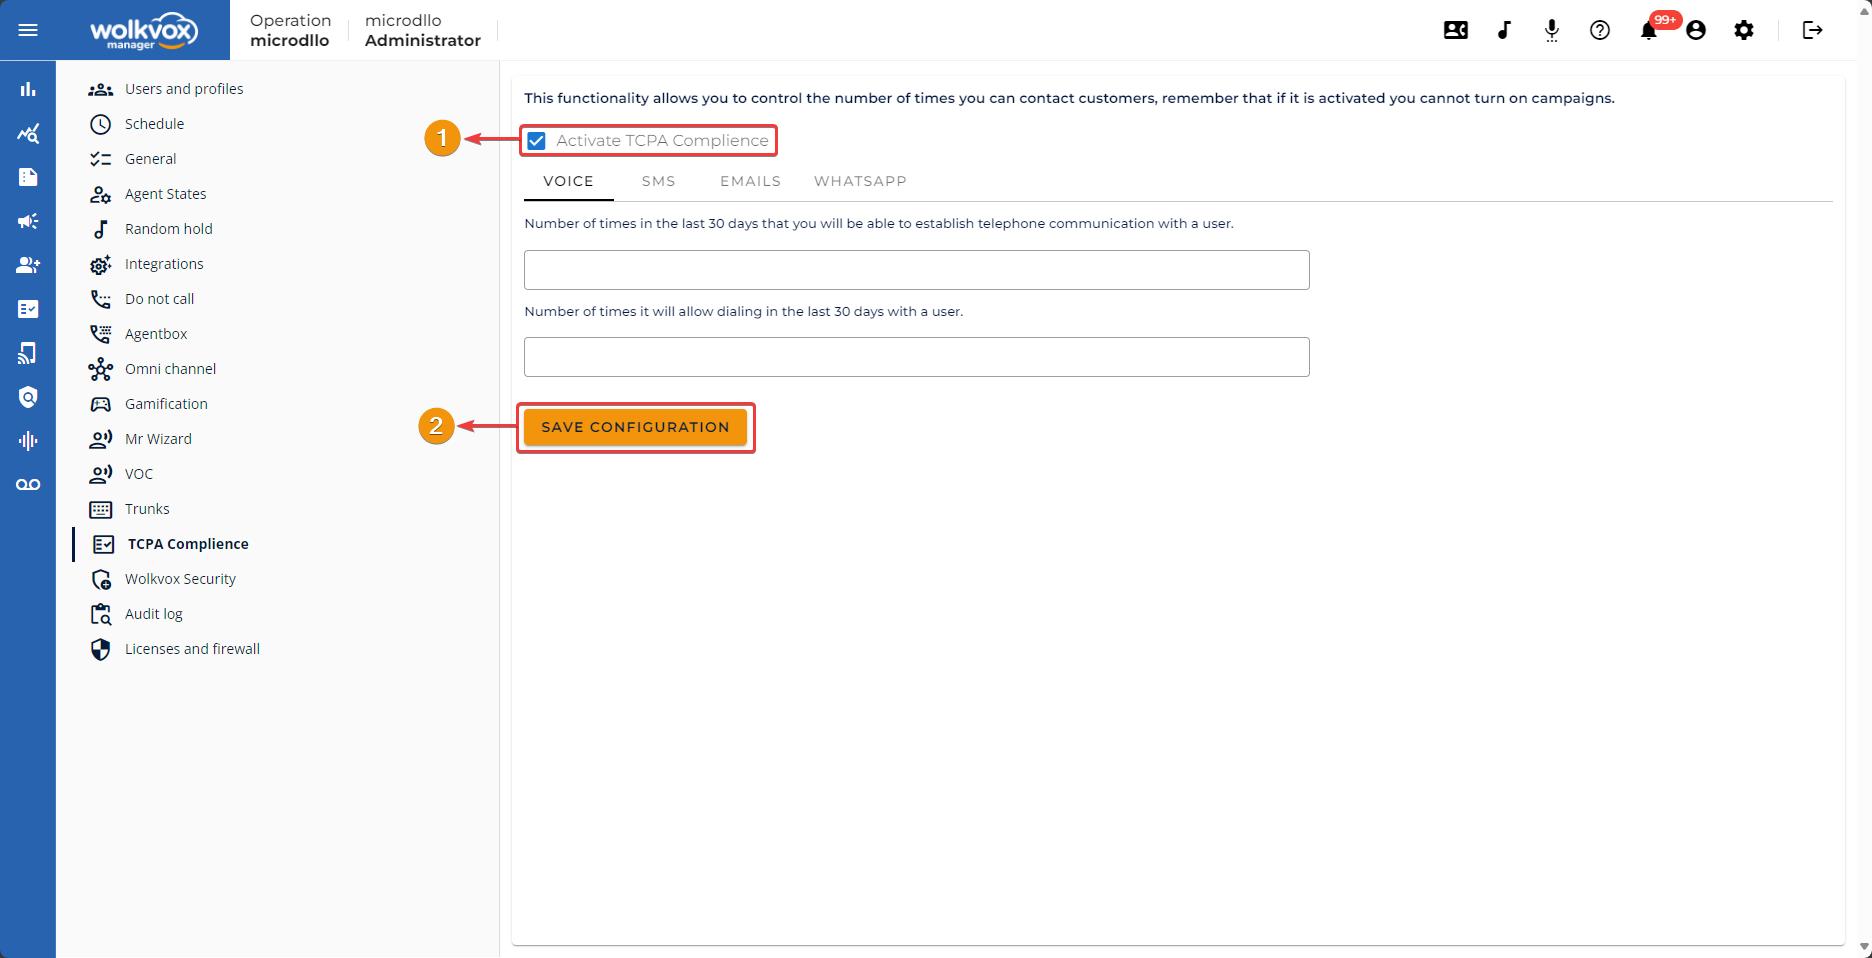
- The first type of communication channel you can regulate is “Voice”.
- This setting limits the frequency with which the system will allow a phone communication to be established with a particular user during a 30-day period. In other words, it limits the number of times a call can be made to that user within that specific period.
- In this case, the setting focuses on the number of times dialing (i.e., attempting to make a call) to a user is allowed in the last 30 days. This can include not only successful calls but also call attempts, regardless of whether a telephone connection is established.
- Don’t forget to save the changes made.
- The second type of communication channel you can regulate is SMS or text messaging.
- Set a limit on the number of interactions via text messages that the system can have with a particular user within a month.
- Don’t forget to click “Save settings.”
- The third type of communication channel you can regulate is email.
- Set a limit on the number of interactions via email that the system can have with a particular user within a month.
- Don’t forget to click “Save settings.”
- The fourth type of communication channel you can regulate is WhatsApp.
- Set a limit on the number of times WhatsApp can be used to communicate with each user in a month.
- Don’t forget to click “Save Settings.”
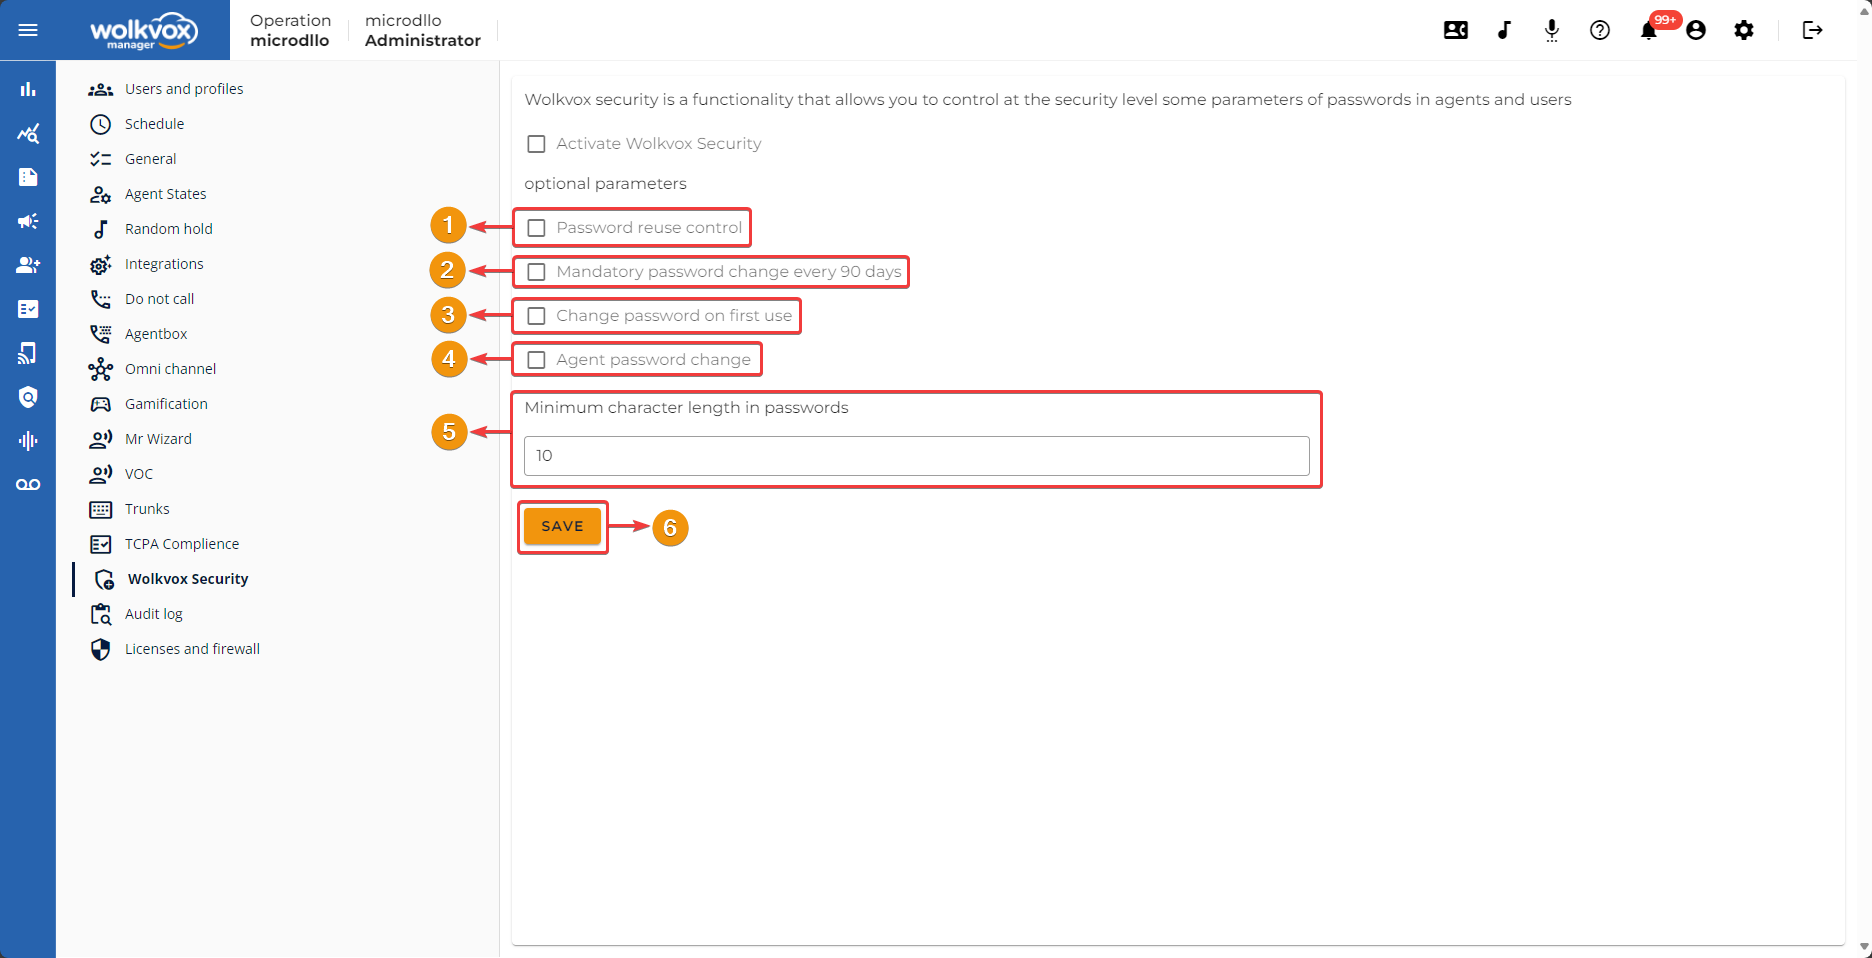
wolkvox Security #
This tool allows you to apply specific security measures to certain aspects of user and agent passwords in order to control and enhance their security.
First, check the box to enable the use of optional parameters.
- Note 1: On free, shared, and dedicated servers, this tool will be optional, and activation of the service will depend on the administrator of your operation.
- Note 2: On PCI servers, this tool will always remain active, does not require initial activation, cannot be deactivated, and the various options provided by the tool cannot be disabled.
- Note 3: These activities recorded by the tool will be logged in the “Audit Log” section.

- Password reuse control: The last 4 passwords cannot be reused when changing a password.
- Mandatory password change every 90 days: After 90 days from the last password change, users will be prompted to change their password.
- Password change on first use: When logging in for the first time, users will be prompted to change their password. Similarly, when resetting a password for a wolkvox Manager user, they will be asked to change their password.
- Password change for agents: Agents can change their password on their own without relying on the operation administrator.
- The minimum password length is 10 characters and the maximum length is 20 characters. At least one uppercase letter, one lowercase letter, one digit, and one special character (! # % & * @ %) must be included.
- Click “Save” to apply the changes.
Note: These options apply to both wolkvox Manager and wolkvox Agent users.
Audit Log #
This tool allows you to view all actions recorded in the application. You can see each change listed by user, date, and the user who performed the action. Additionally, you can view the name of the workstation and the public IP address from which the action was performed.

- Select the date range to consider for generating the audit log.
- Click on the “Generate” button.

In the central table, all actions performed in your operation will be listed.
- Date: Indicates the date and time when the action was performed.
- IP: Shows the public IP address from which the action was performed.
- User: Displays the wolkvox Manager user who performed the action.
- Action: Specifies the specific action carried out by the wolkvox Manager user.
- Workstation: Indicates the name of the workstation from which the action was performed.

In this tool, you have a field available to search for specific actions. You can search by IP, user, action, or workstation name.

If you right-click on the table, you can export the generated report to HTML format for download.

Licenses and Firewall #
In this section, you can manage the licenses for the Call Center, PBX, and the operation’s firewall rules.
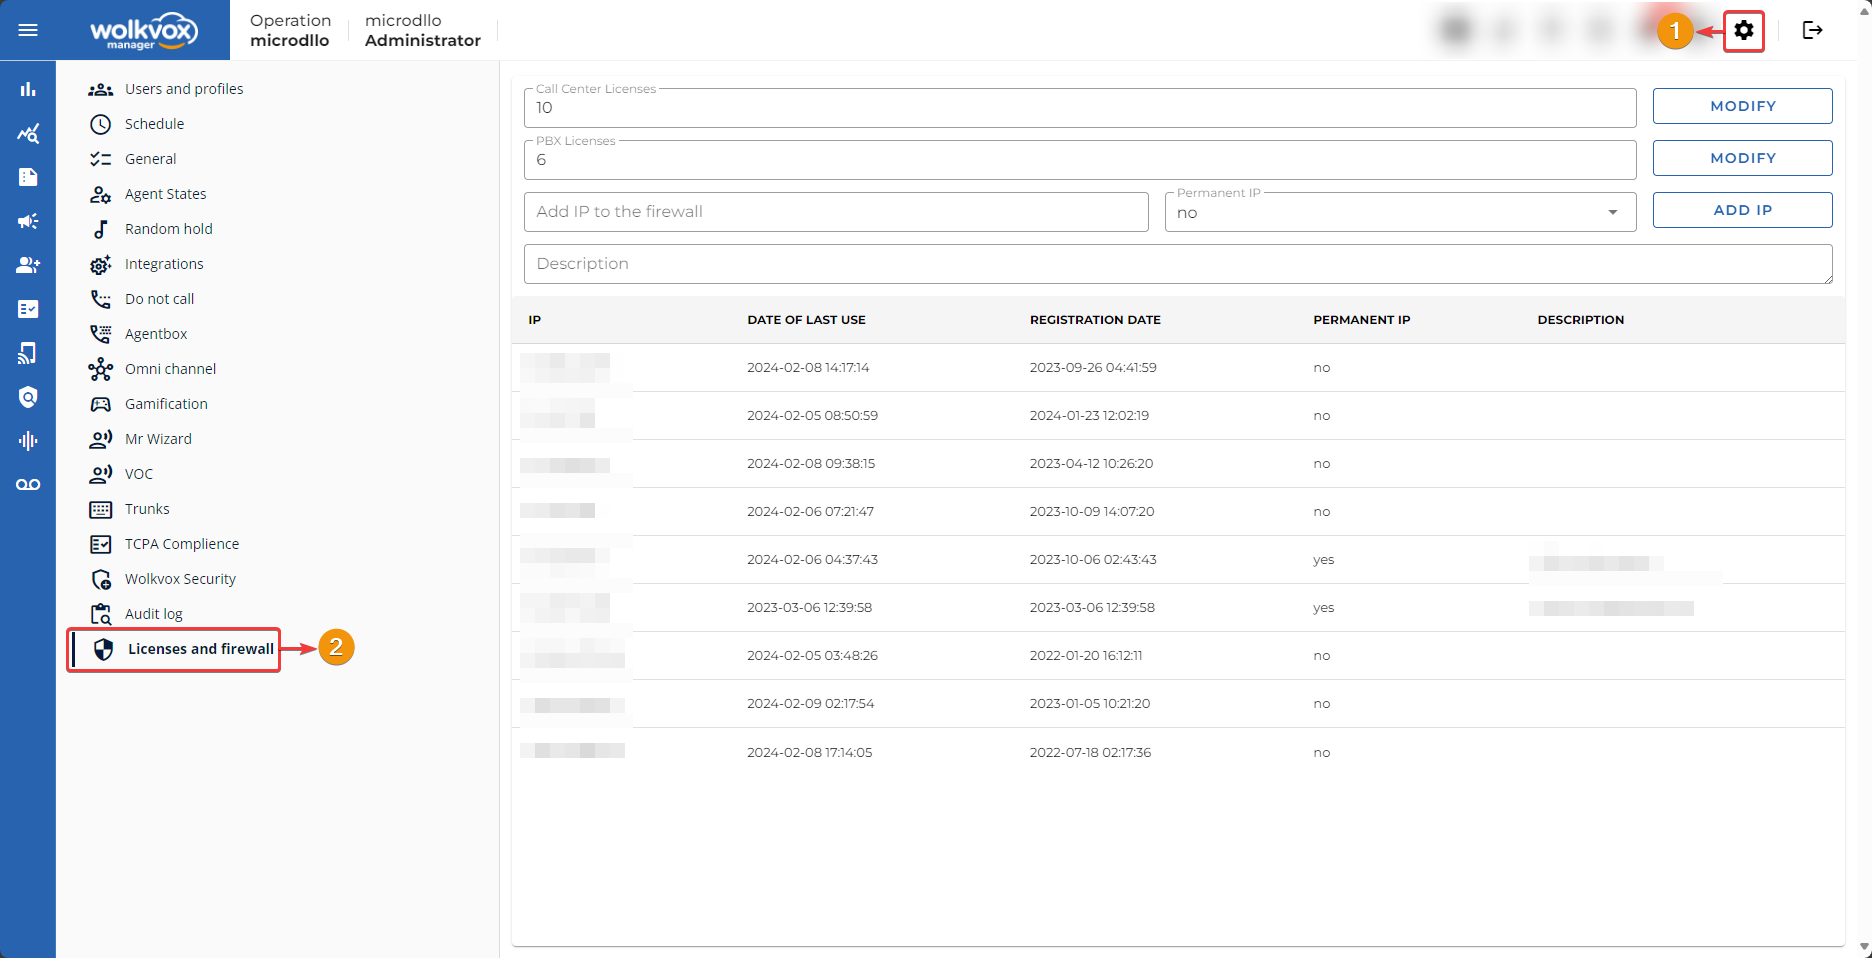
To configure the Call Center licenses to use, follow these steps:
- Set up the Call Center licenses.
- Click on the “Modify” button.

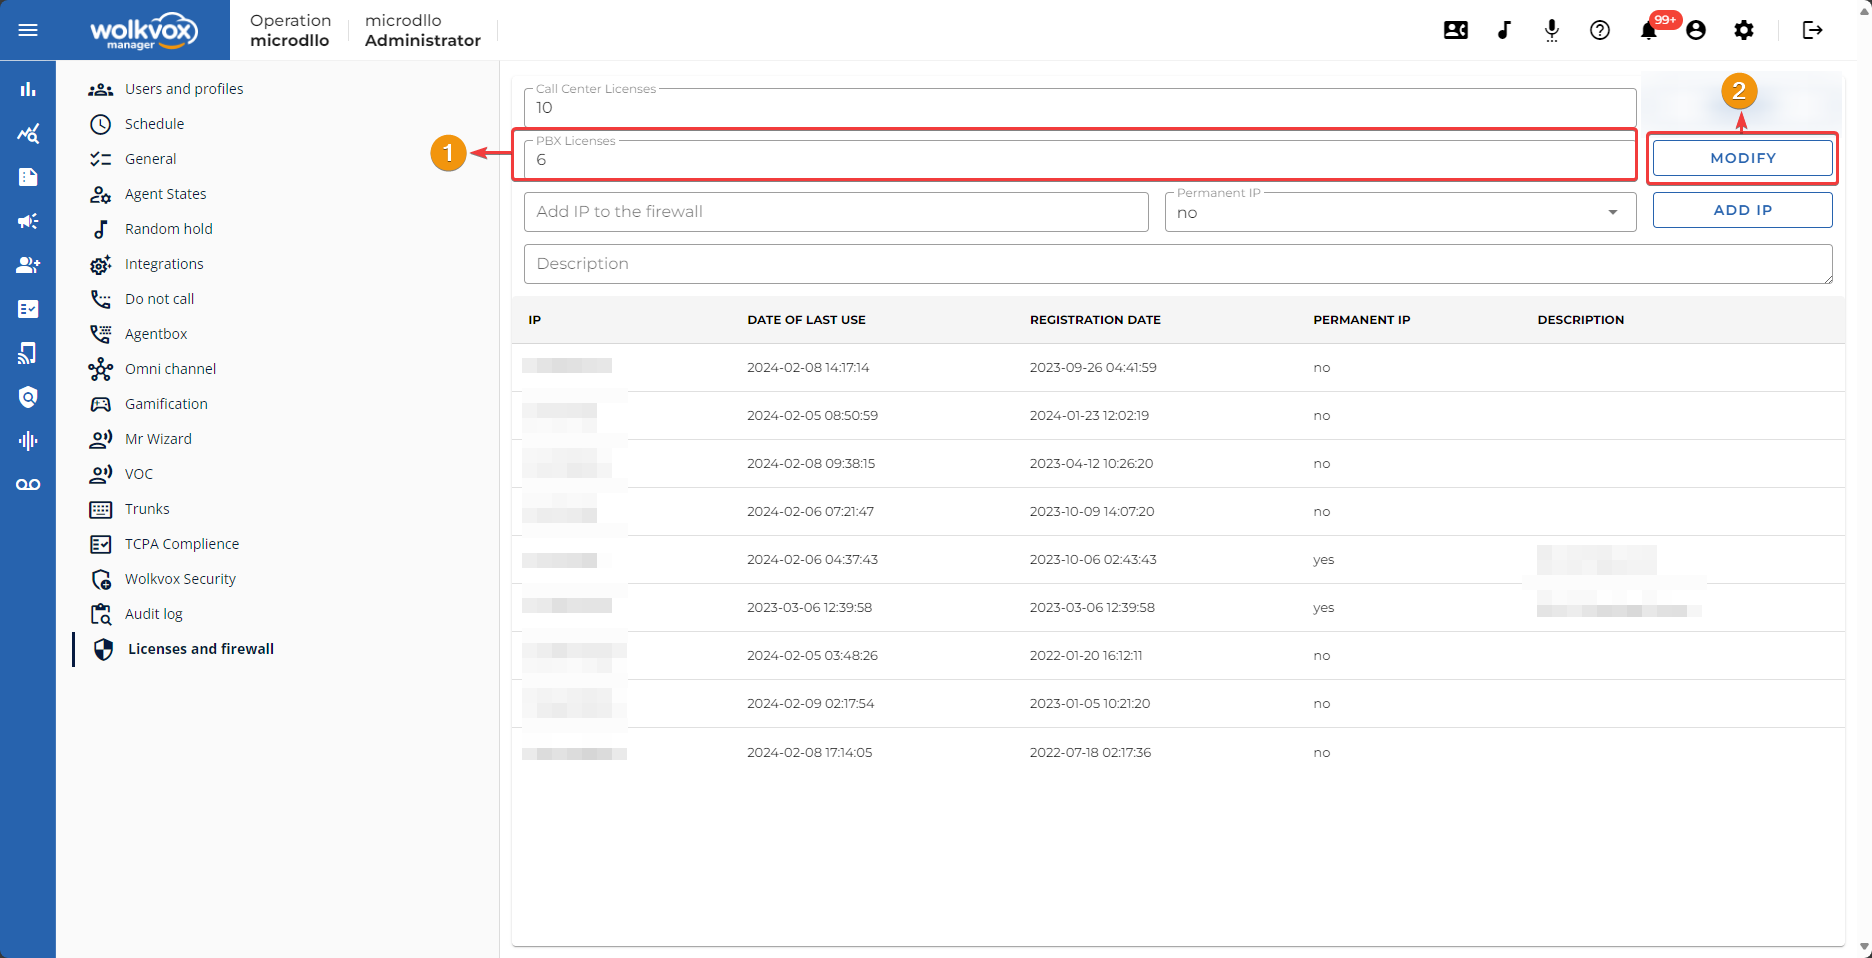
To configure the PBX licenses to use, follow these steps:
- Set the number of PBX licenses.
- Click on “Modify”.
To add an IP to the Firewall, follow these steps:
- Enter the IP number you want to add.
- Select whether the IP will be permanent or not.
- Add a description to clearly identify why the IP was added.
- Click on “Add IP”.
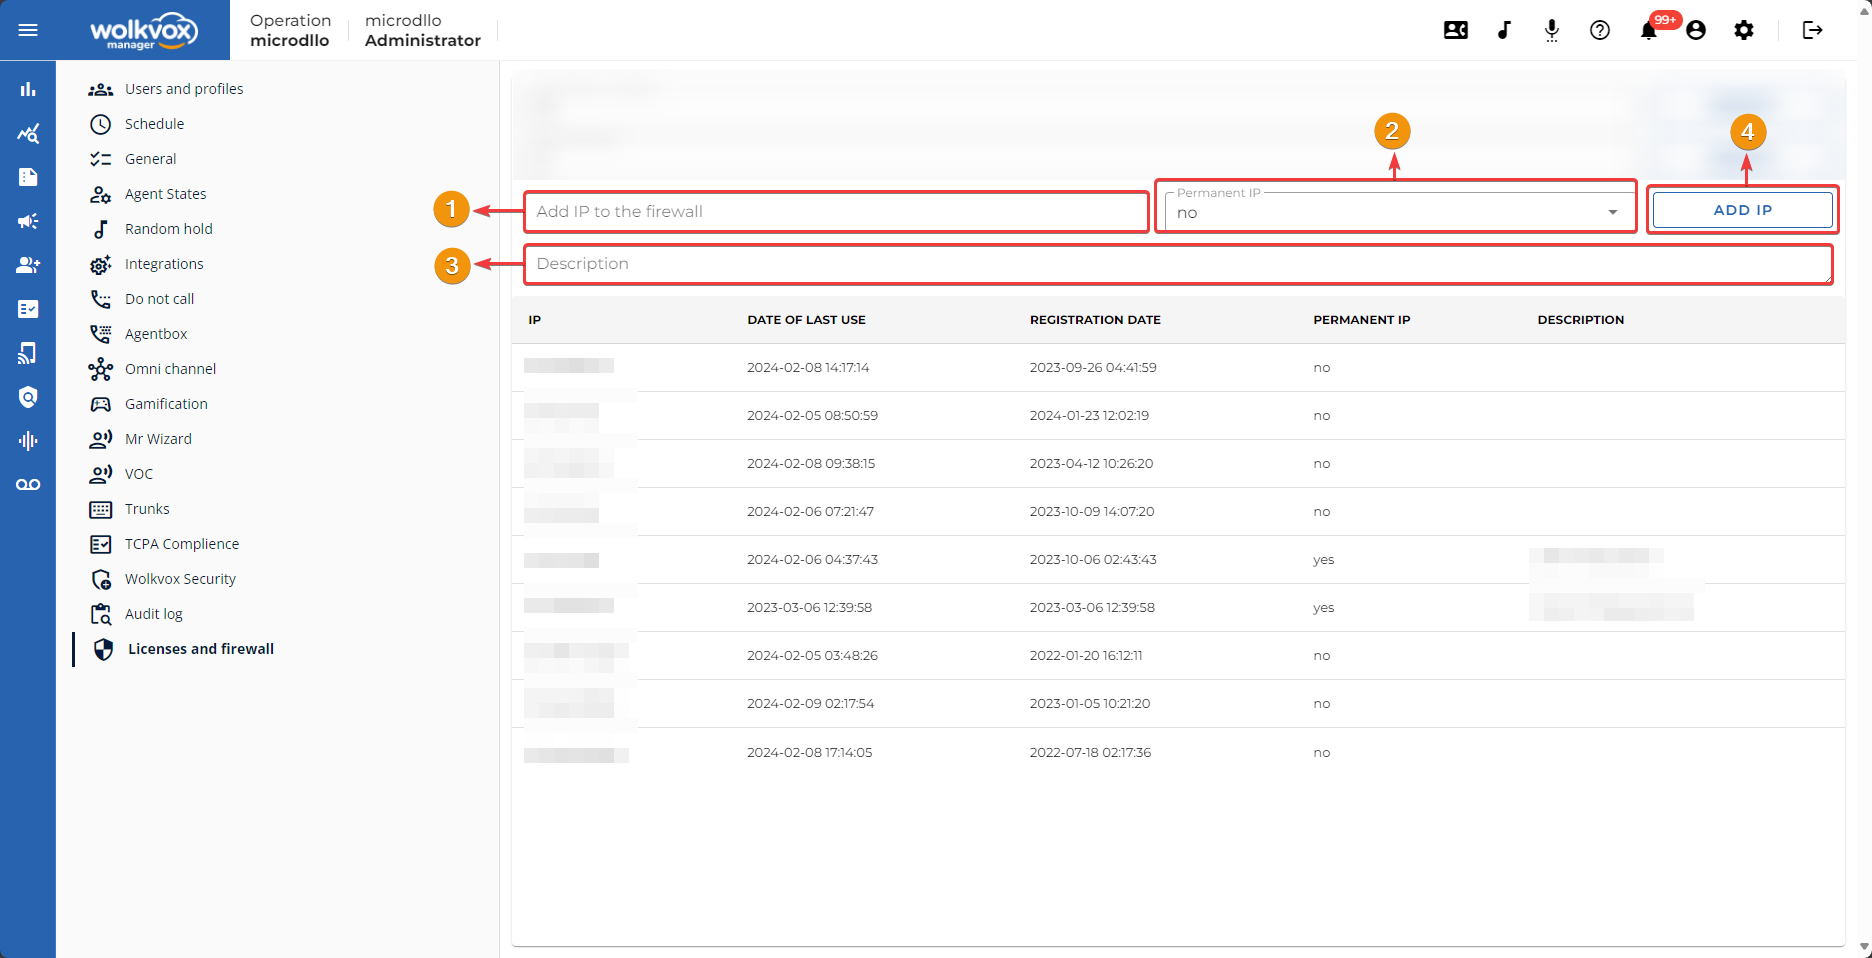
If you right-click on an item in the list, you can:
- Delete the selected IP.
- Refresh the table to get an updated list of IPs added to the Firewall.

- Display Name: Specify the name you want the client to see when interacting with you in the email service.
- Incoming Mail: Specify the email address you want CXAnswer to verify and download so you can receive incoming emails on the CXAnswer platform.
- Forward to: Specify the email address you want CXAnswer to verify and download so you can receive incoming emails on the CXAnswer platform. This field is divided into “User” and “Subdomain”.
- This button allows you to copy the entire “Forward to” email address so you can paste it into the configuration of the email you want to use.
- Link a routing point to the email.
- This field is part of the integration with Mailgun and refers to the API key provided by Mailgun to authenticate email sending requests through the platform.
- This field is also part of the integration with Mailgun and likely refers to the domain associated with the Mailgun account, which is used to send emails through the platform.
- Activate or deactivate this option depending on whether you want advisors to be able to add or remove recipients in their email responses.
- Activate or deactivate this option depending on whether you want advisors to be able to compose new emails, view sent and archived emails.
- Click the “Save” button if you wish to apply the changes.
![]() Note: Required fields are marked with an asterisk (*).
Note: Required fields are marked with an asterisk (*).

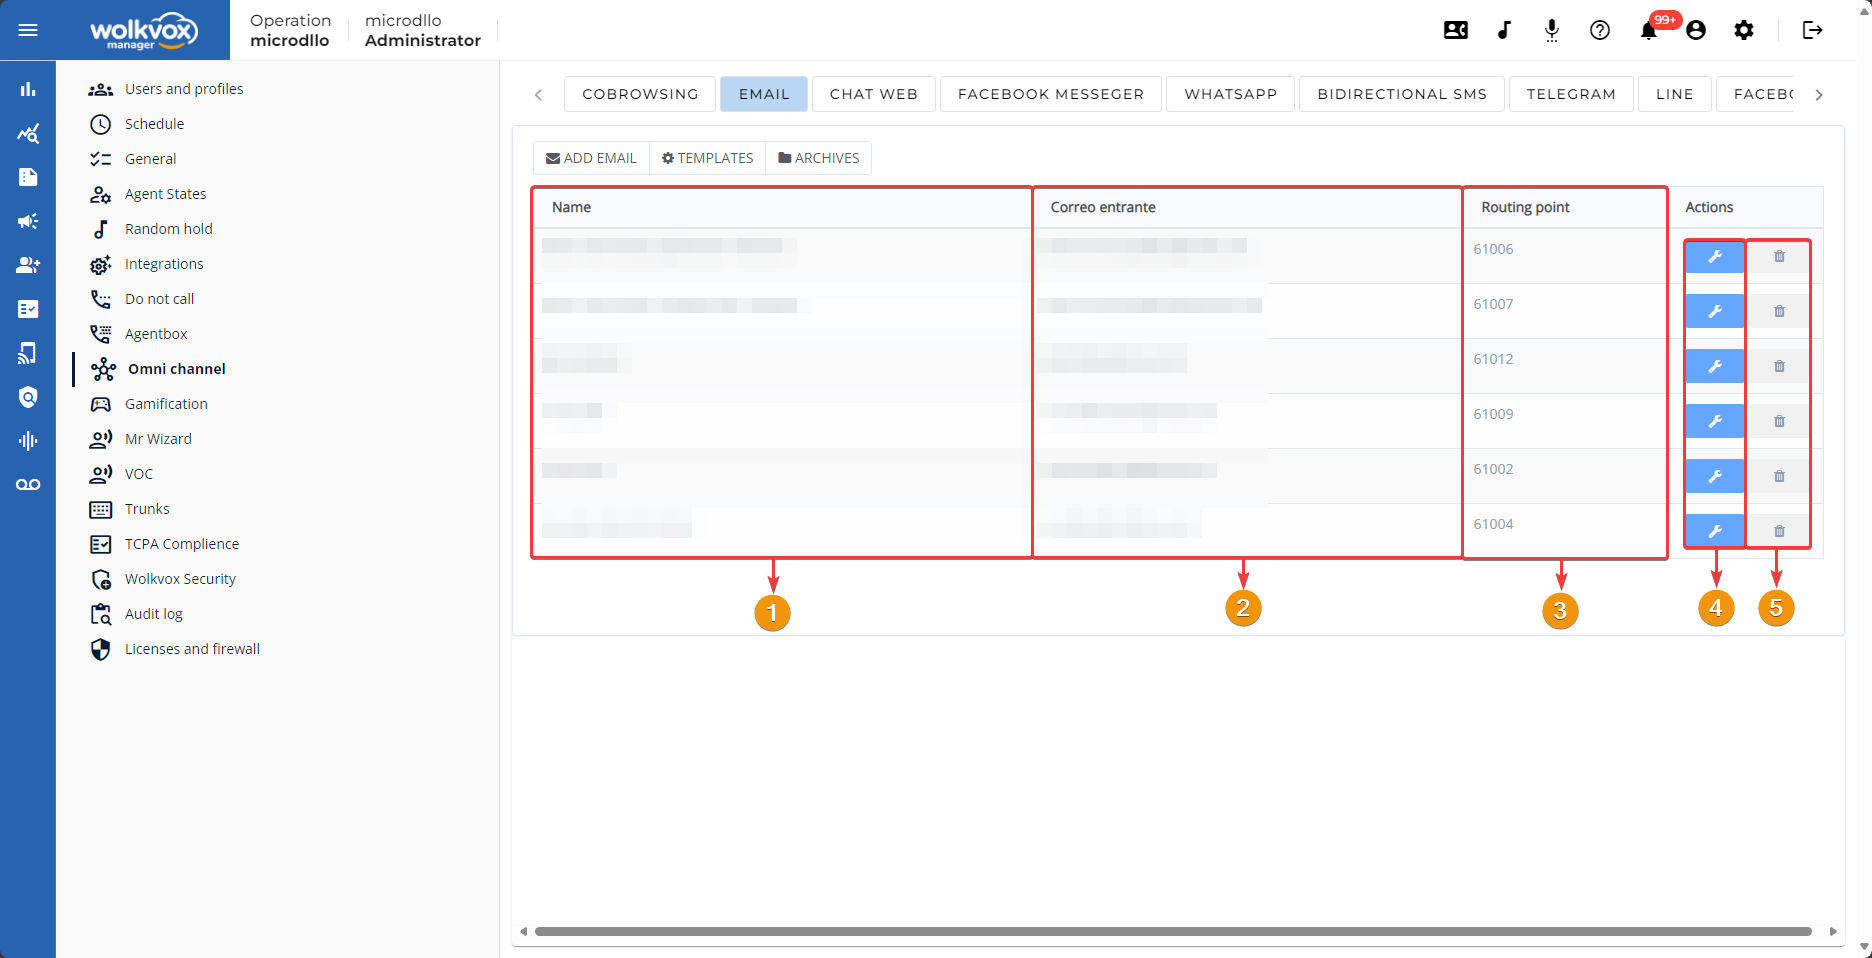
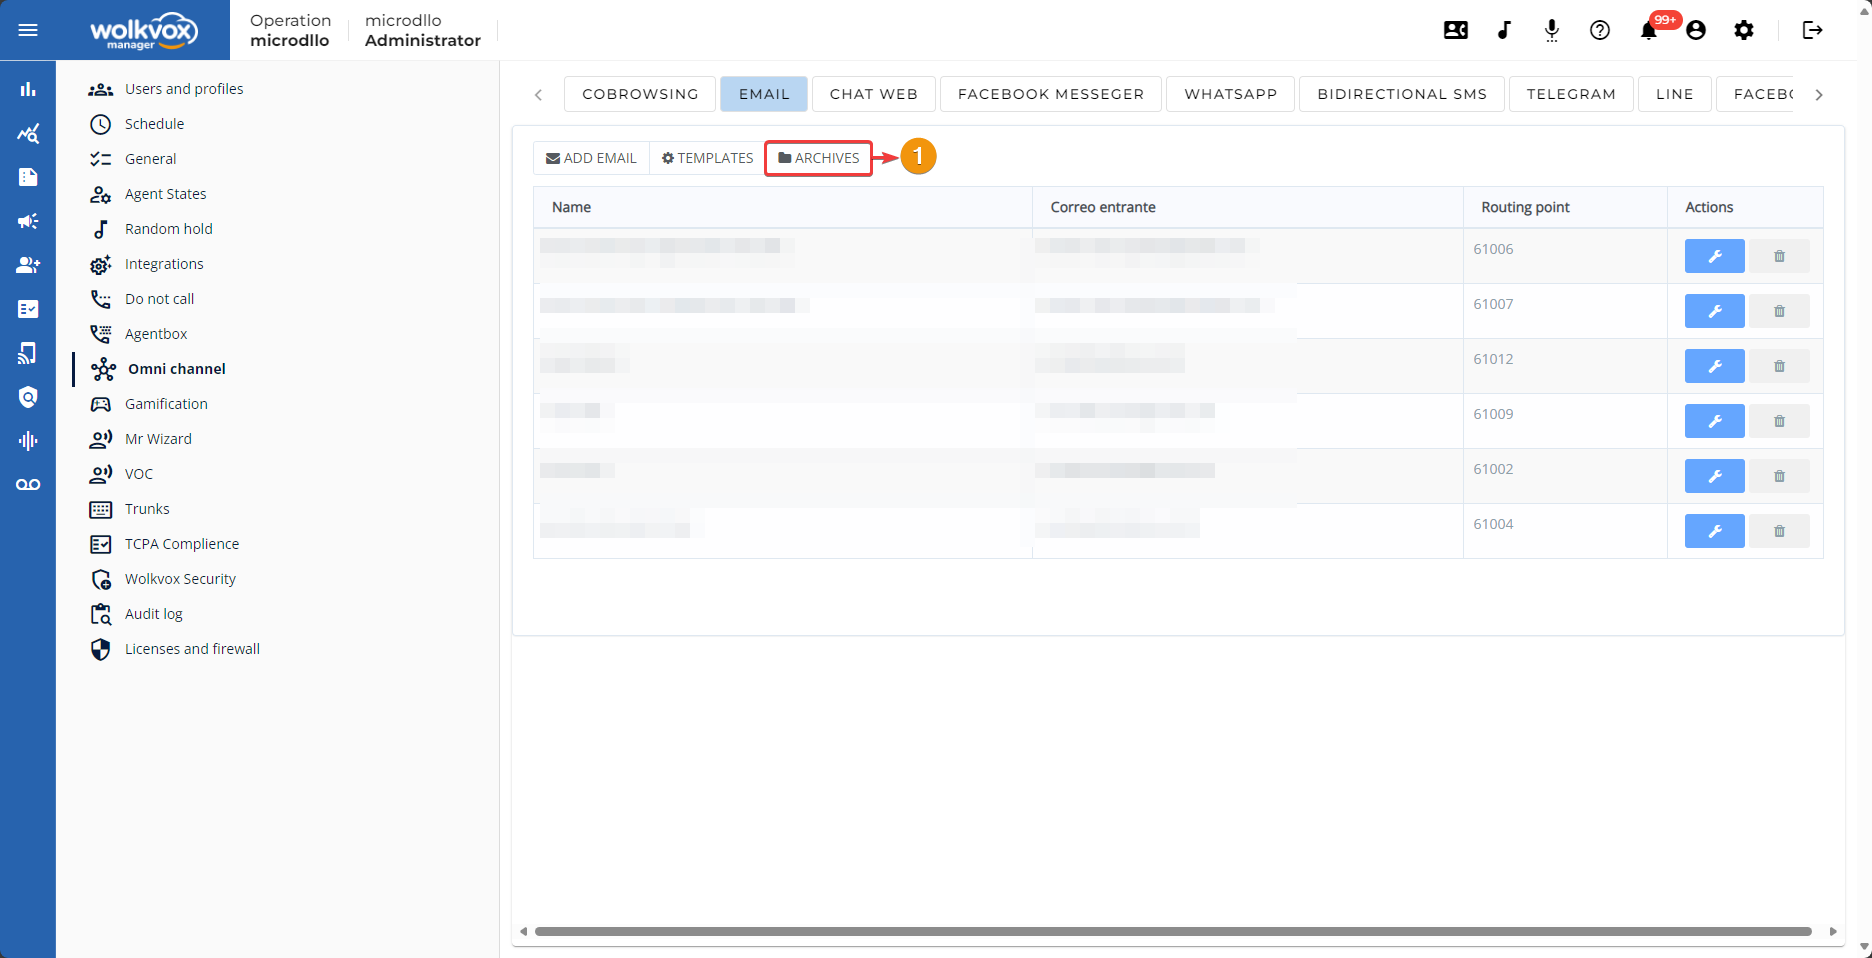
In the table of added email services, you have:
- The first column displays the name of each added email service.
- Under “Incoming Email,” you can see the linked email address.
- In “Routing,” you can see the number of the routing point to which the email is linked.
- The first action you can take is to edit the selected email service.
- You can also delete the email linkage in wolkvox Manager.
Edit the layout for the messages to be sent #
To modify the layout of the email messages sent by the agent through this service, follow these steps:
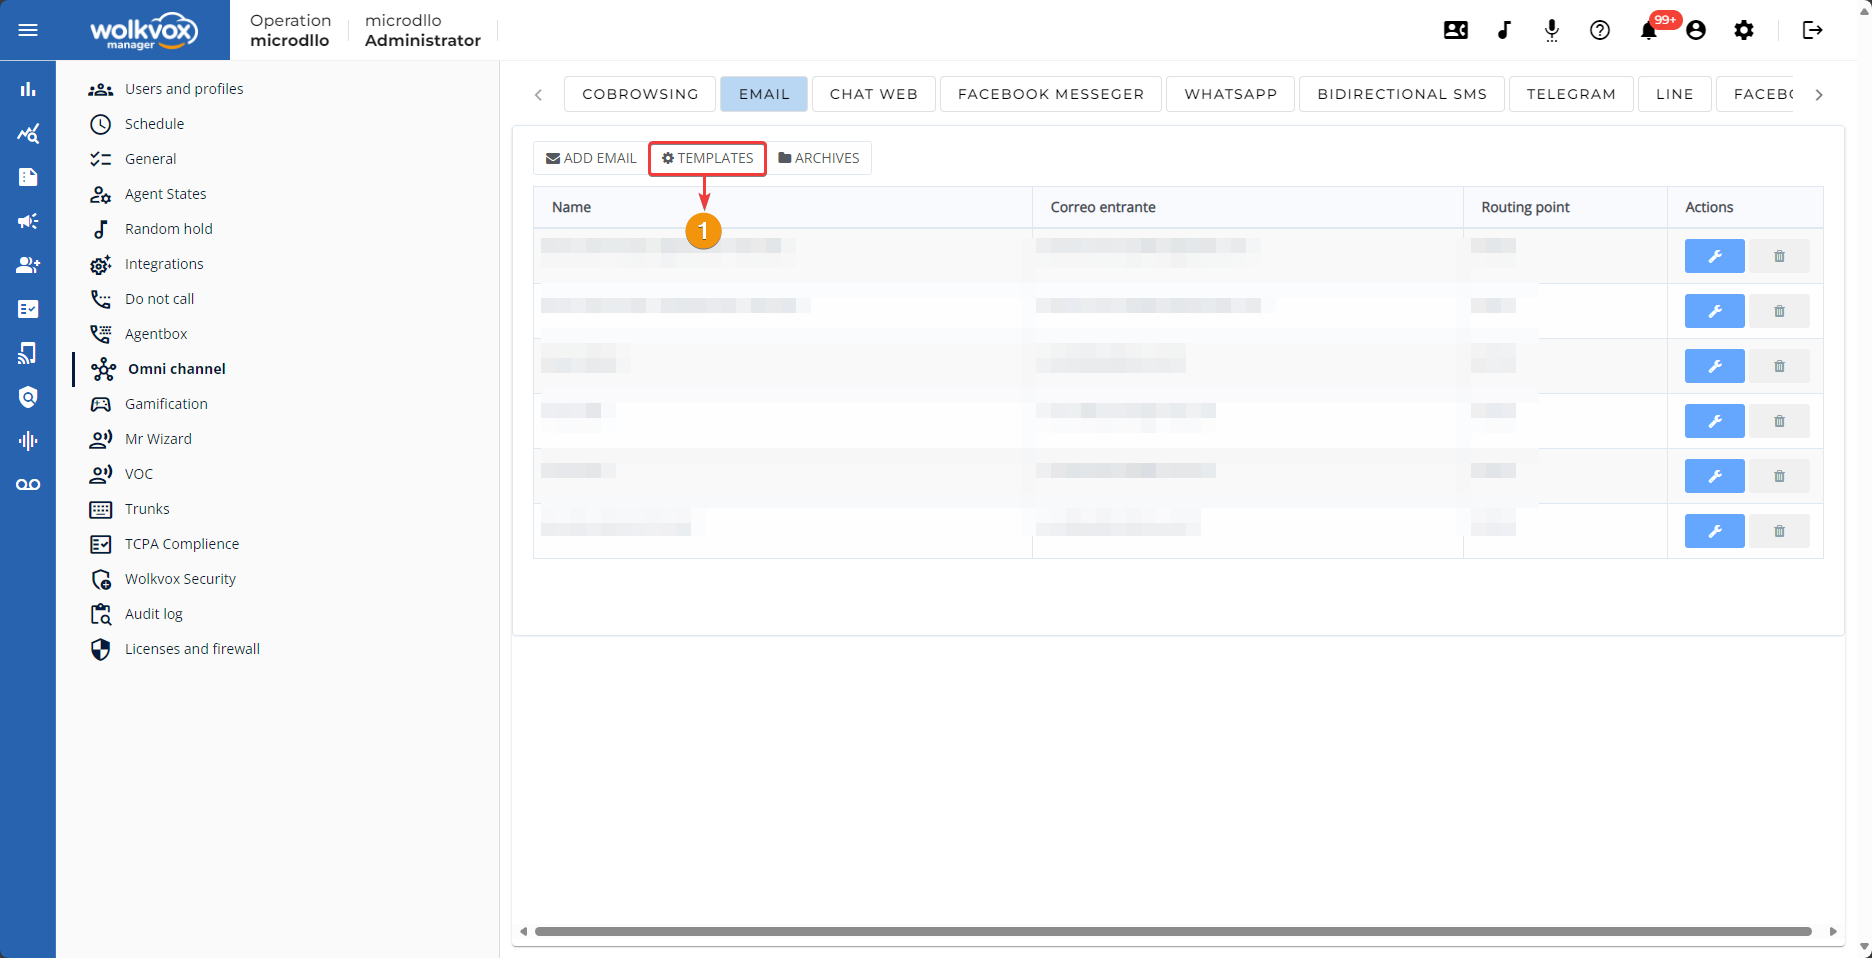
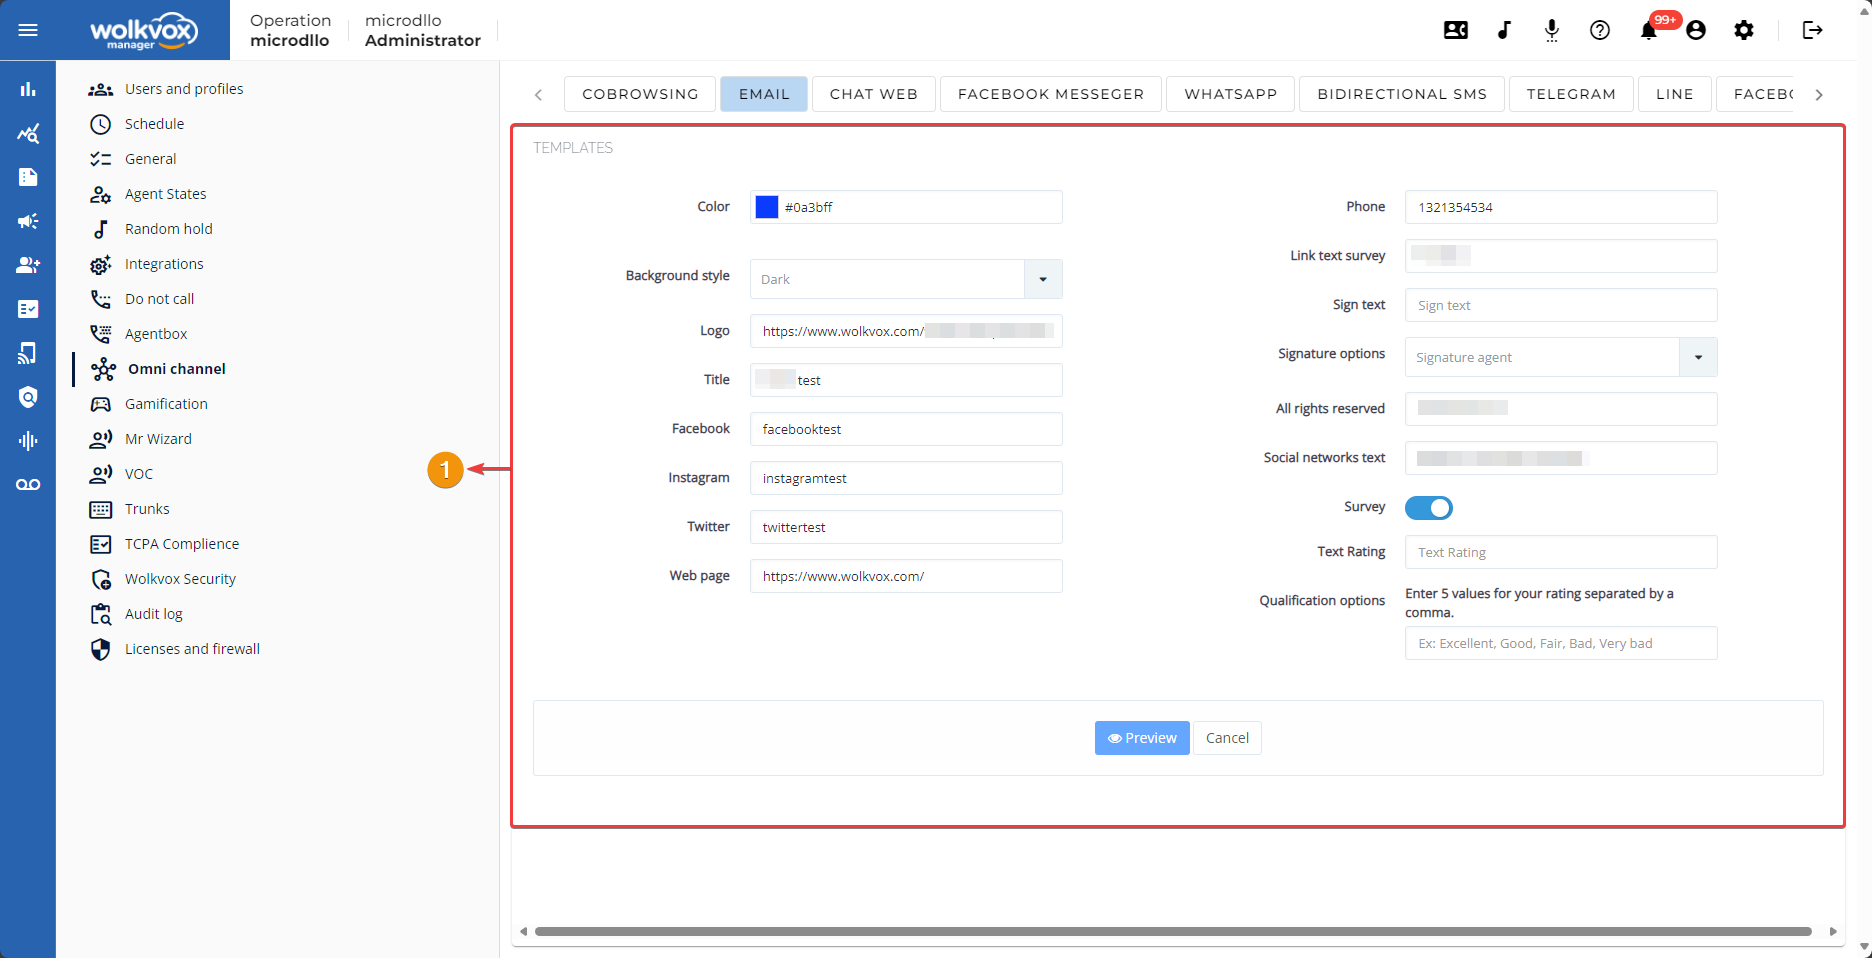
The options you can configure are:
- Color: Background color of the message.
- Background style: Default background color. It can be Light, Dark, or None.
- Logo: URL containing the image you want to use as a logo. It should end in an image format such as .png or .jpg.
- Title: Title of the template.
- Facebook: Enter the username of your Facebook page here.
- Twitter: Enter the username of your Twitter account here.
- Web page: URL of your webpage.
- Phone: Contact phone number.
- Link text survey: Text for the link that the client clicks to take the survey if enabled.
- Sign text: Plain text signature for the email.
- Signature options: You can make the email signature appear in different ways.
- Name agent: The signature will be the name of the agent handling the interaction with the client.
- Signature agent: The signature will be the image configured in the agent’s interaction options in Agentbox.
- None: No information will be displayed.
- All rights reserved: Copyright protection text.
- Survey: Enable or disable the satisfaction survey that you can have in each email sent so that the client can evaluate the customer service via email.
- The questions for this survey are edited at the following path: wolkvox Manager Settings > Omni Channel > Web Chat > Button with three vertically distributed dots icon > “SURVEY” section located at the bottom.
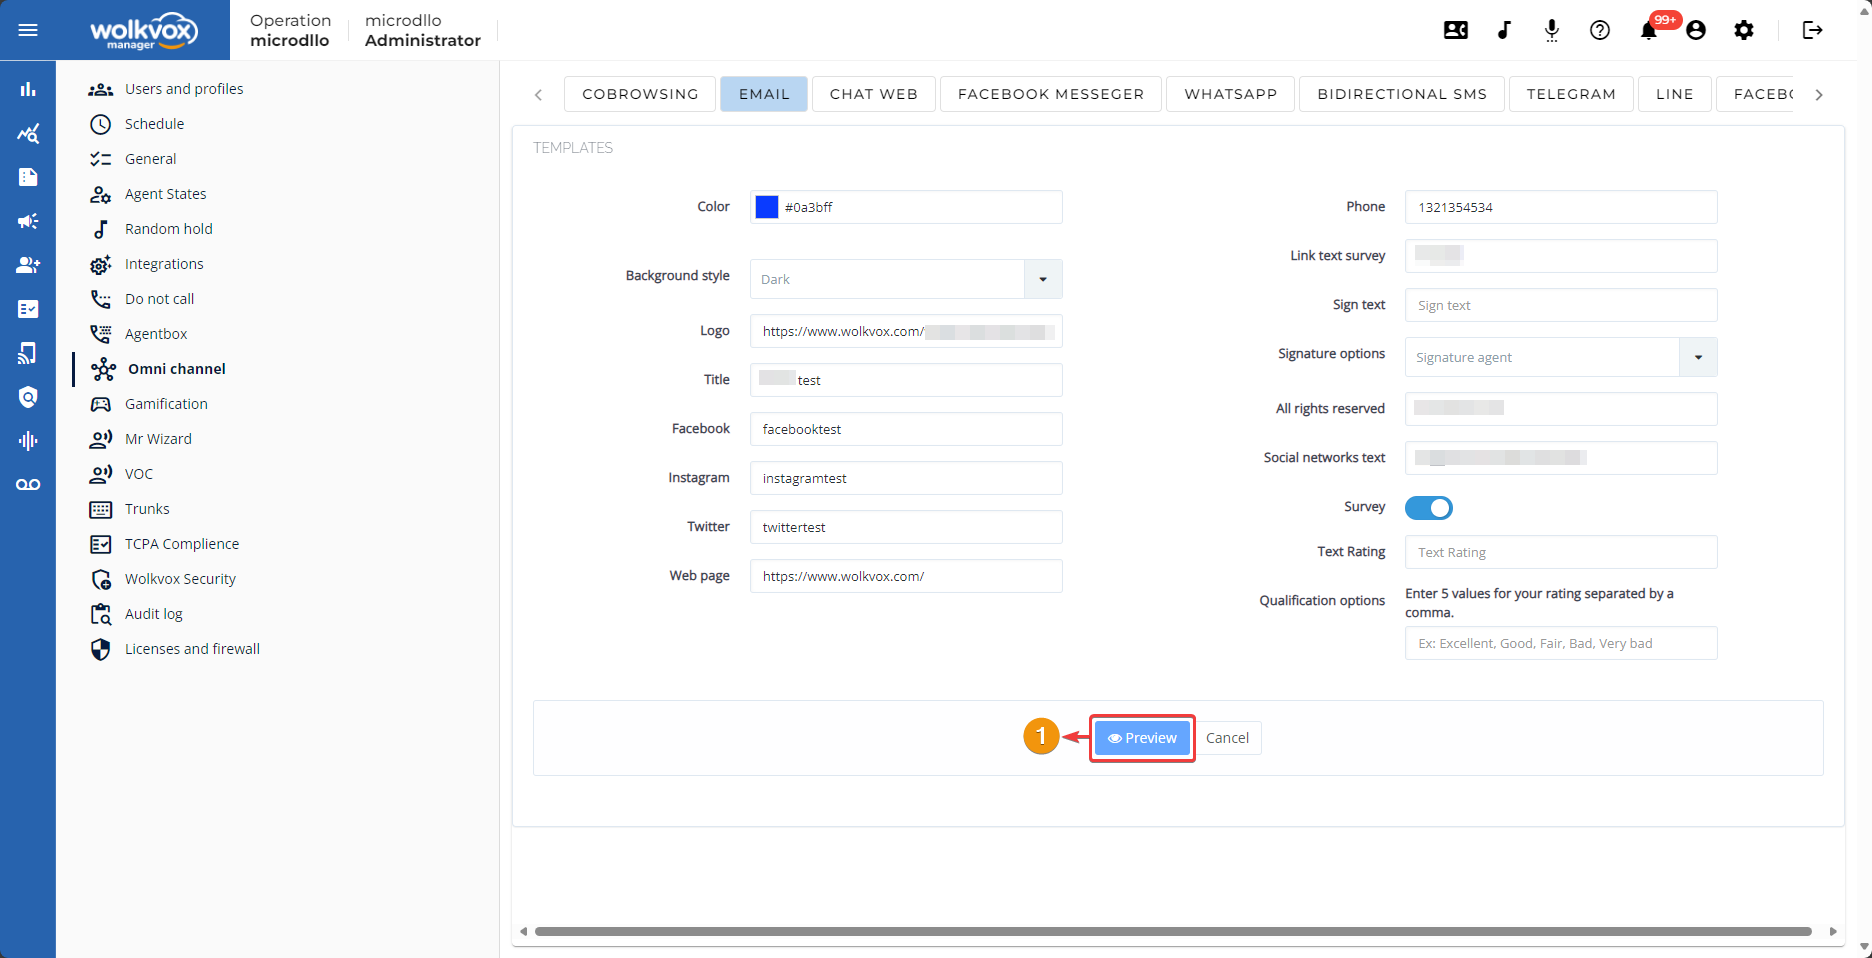
You can preview how the email message design would look like based on the configuration made using the button located at the bottom.
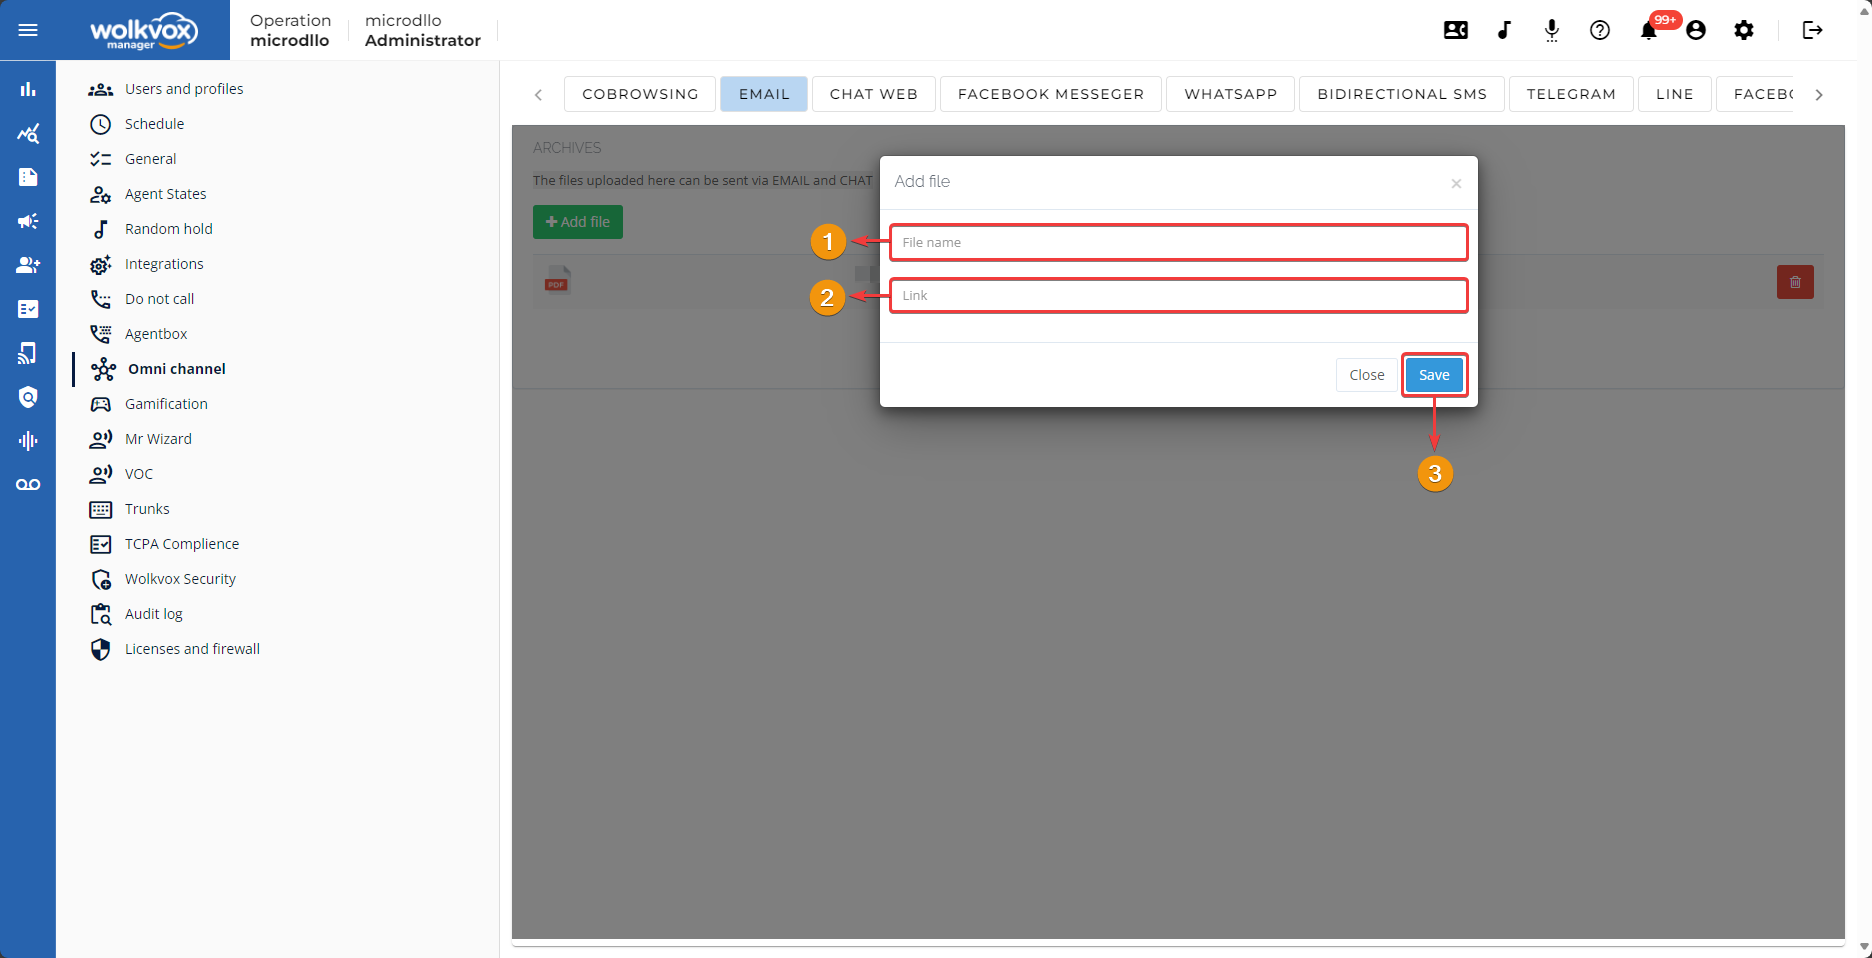
Add files for agents to attach #
In this section, you can add files for agents to attach to the emails as needed.
In the new section that loads, click on the “Add file” button.

- Write the name of the file.
- Write the URL where the file is hosted.
- Click on the “Save” button to apply the changes.
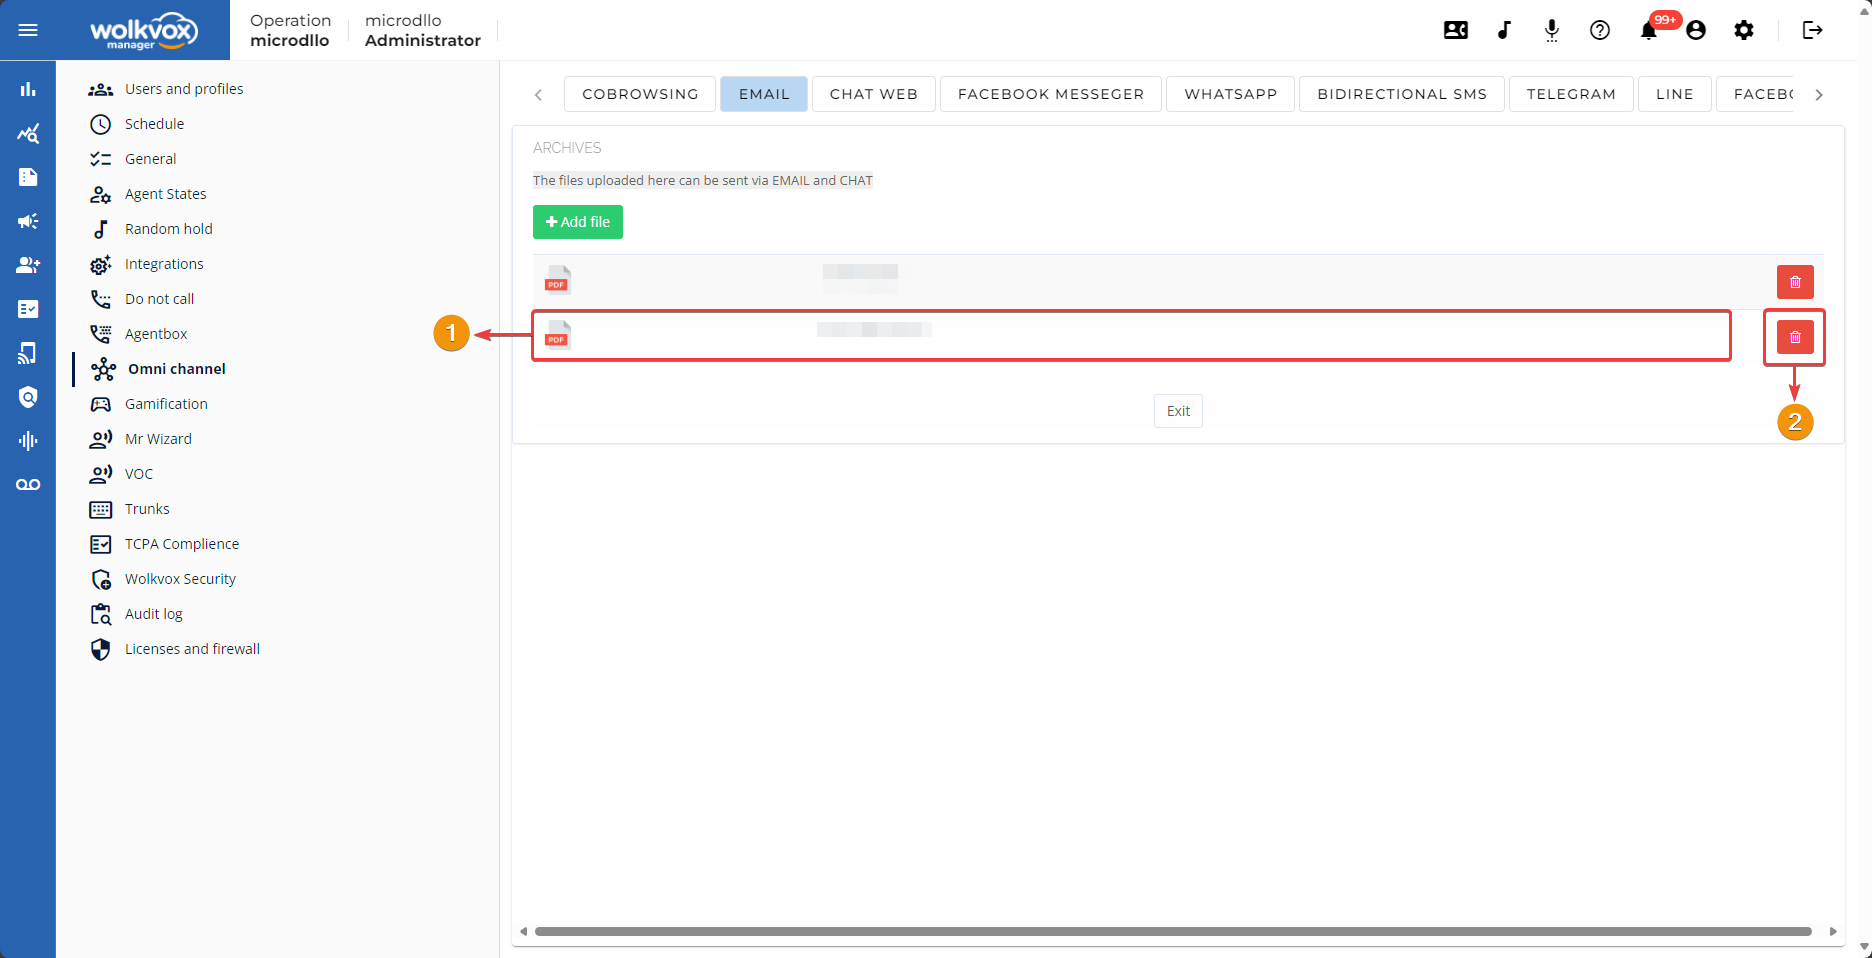
In the “Archives” table, all the files you add will be listed and available for all agents in the operation to attach the files they need in the email messages they intend to send.
Note: You can delete each file you upload in this section.
Add an advanced web chat to your communication channels #
The second channel you can integrate into your wolkvox Manager is the chat for your website. If you use this service, you will benefit from having a fully integrated web chat with your operation.

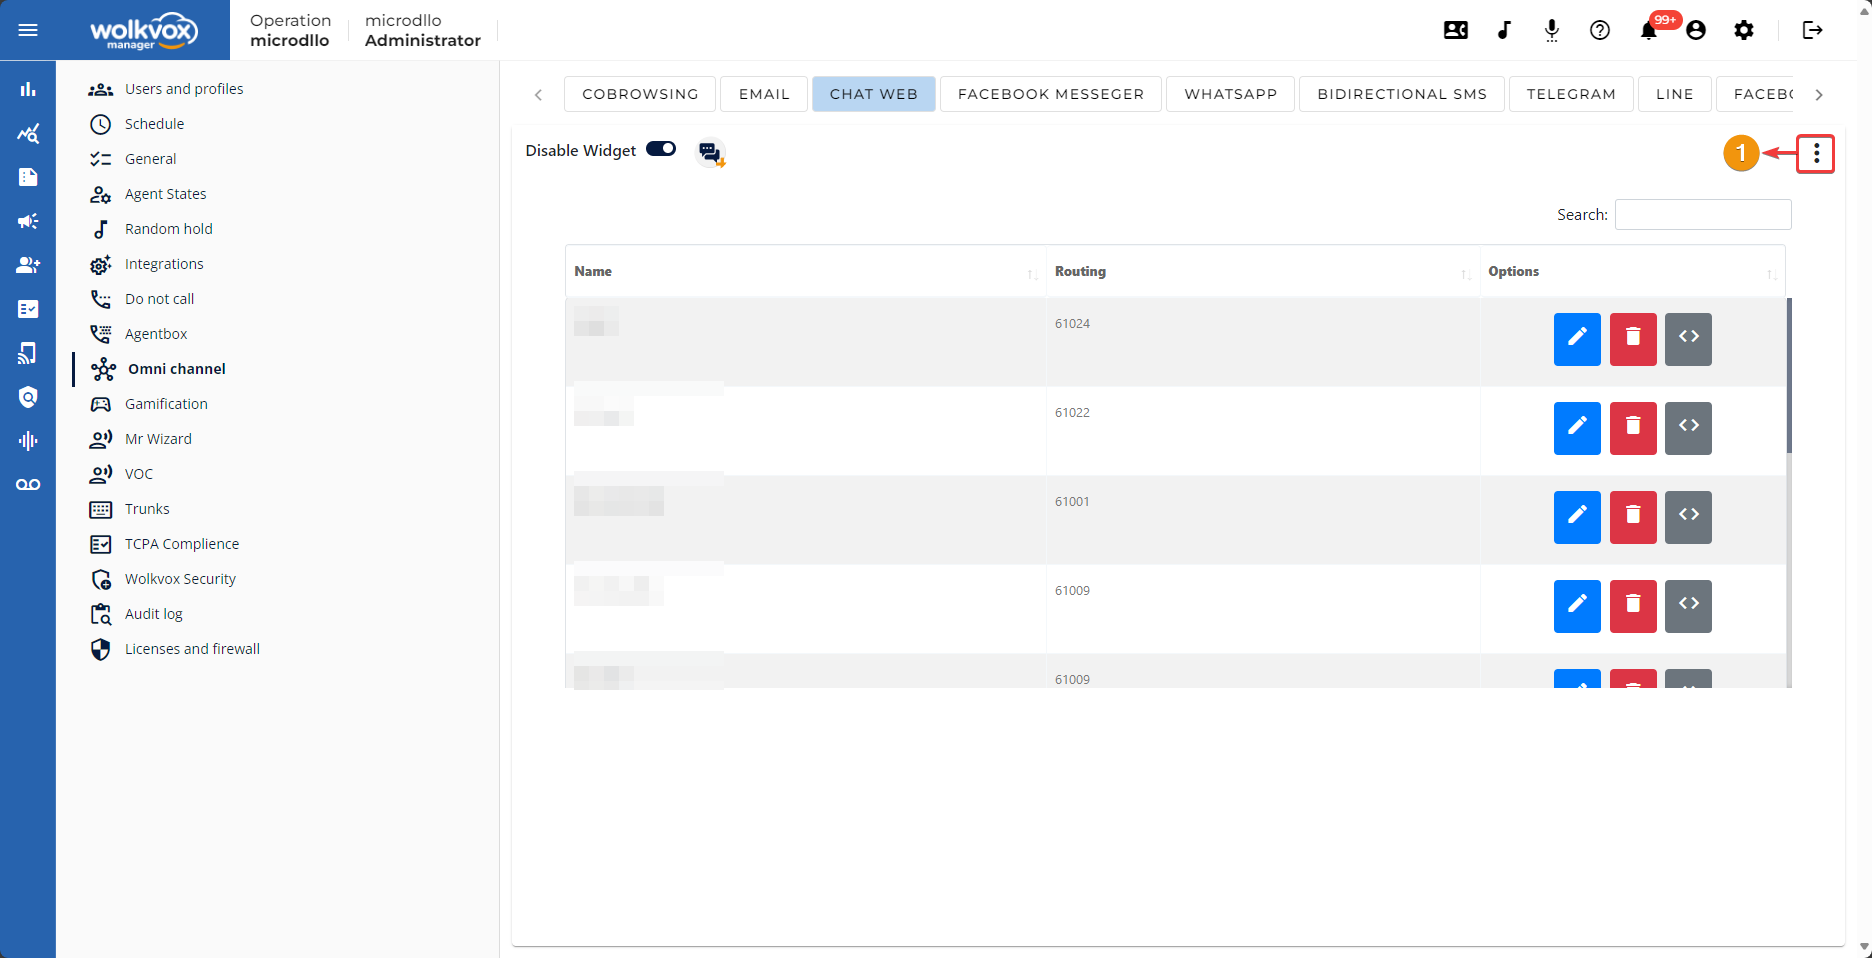
Activate the service #
To activate the service, simply click on the highlighted button in the following image.

General configuration of Web Chats #
To access the general configuration of Web Chats, click on the button located on the right side of the screen.
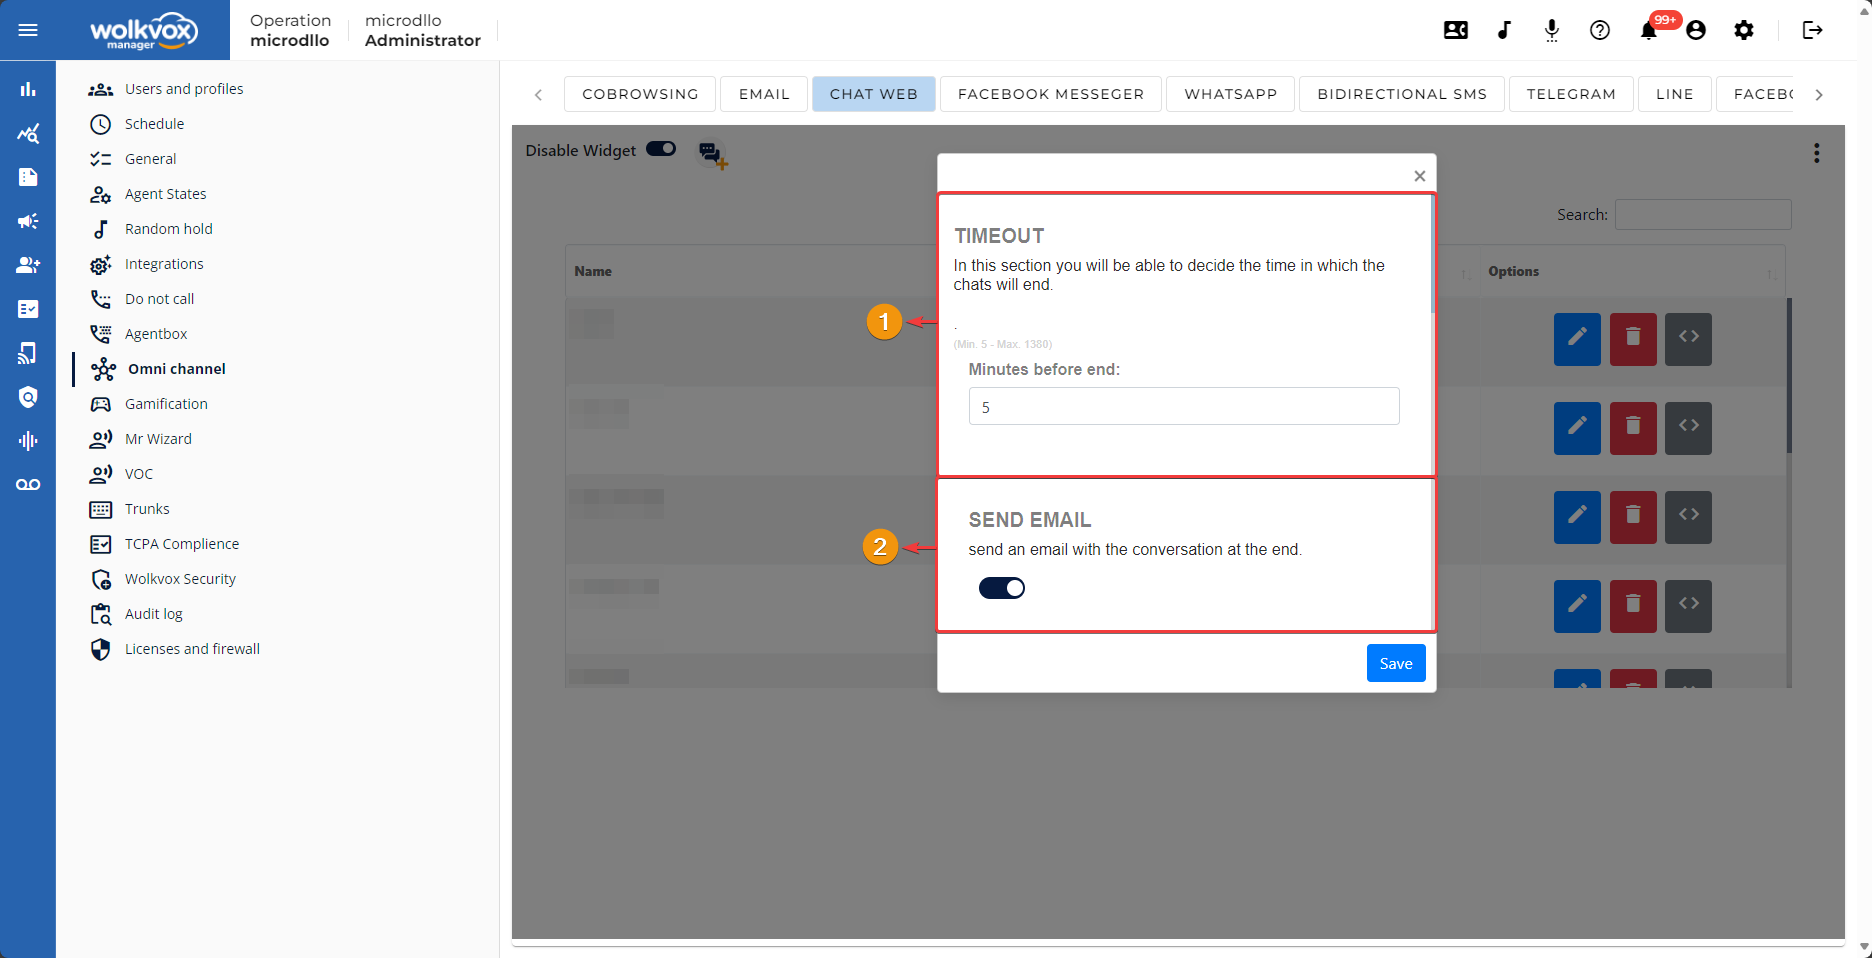
- Timeout: In this field, you assign the time that must elapse from when the chat started for it to close. For example, if you enter “60” here, and a chat starts at 10:00 a.m., then the chat will close at 11:00 a.m.
- The minimum time you can set in this field is 5 minutes, and the maximum is 1380 minutes (23 hours).
- The chat will close whether or not there is activity from the client. The main reference is the time elapsed since the chat started.
- Note: If the message was sent by campaign and not passed to an agent, then the timeout will not apply to the message, and therefore the client should not receive a message that the chat was ended.
- Send email: This option is a toggle button. If enabled, an email with the entire chat history is sent to both the agent and the client once the chat is finished.
In the “Messages” section, you can change the text that the system sends to the client whenever an event occurs, for example, when a transfer is successful, the client is transferred to another chat, etc.

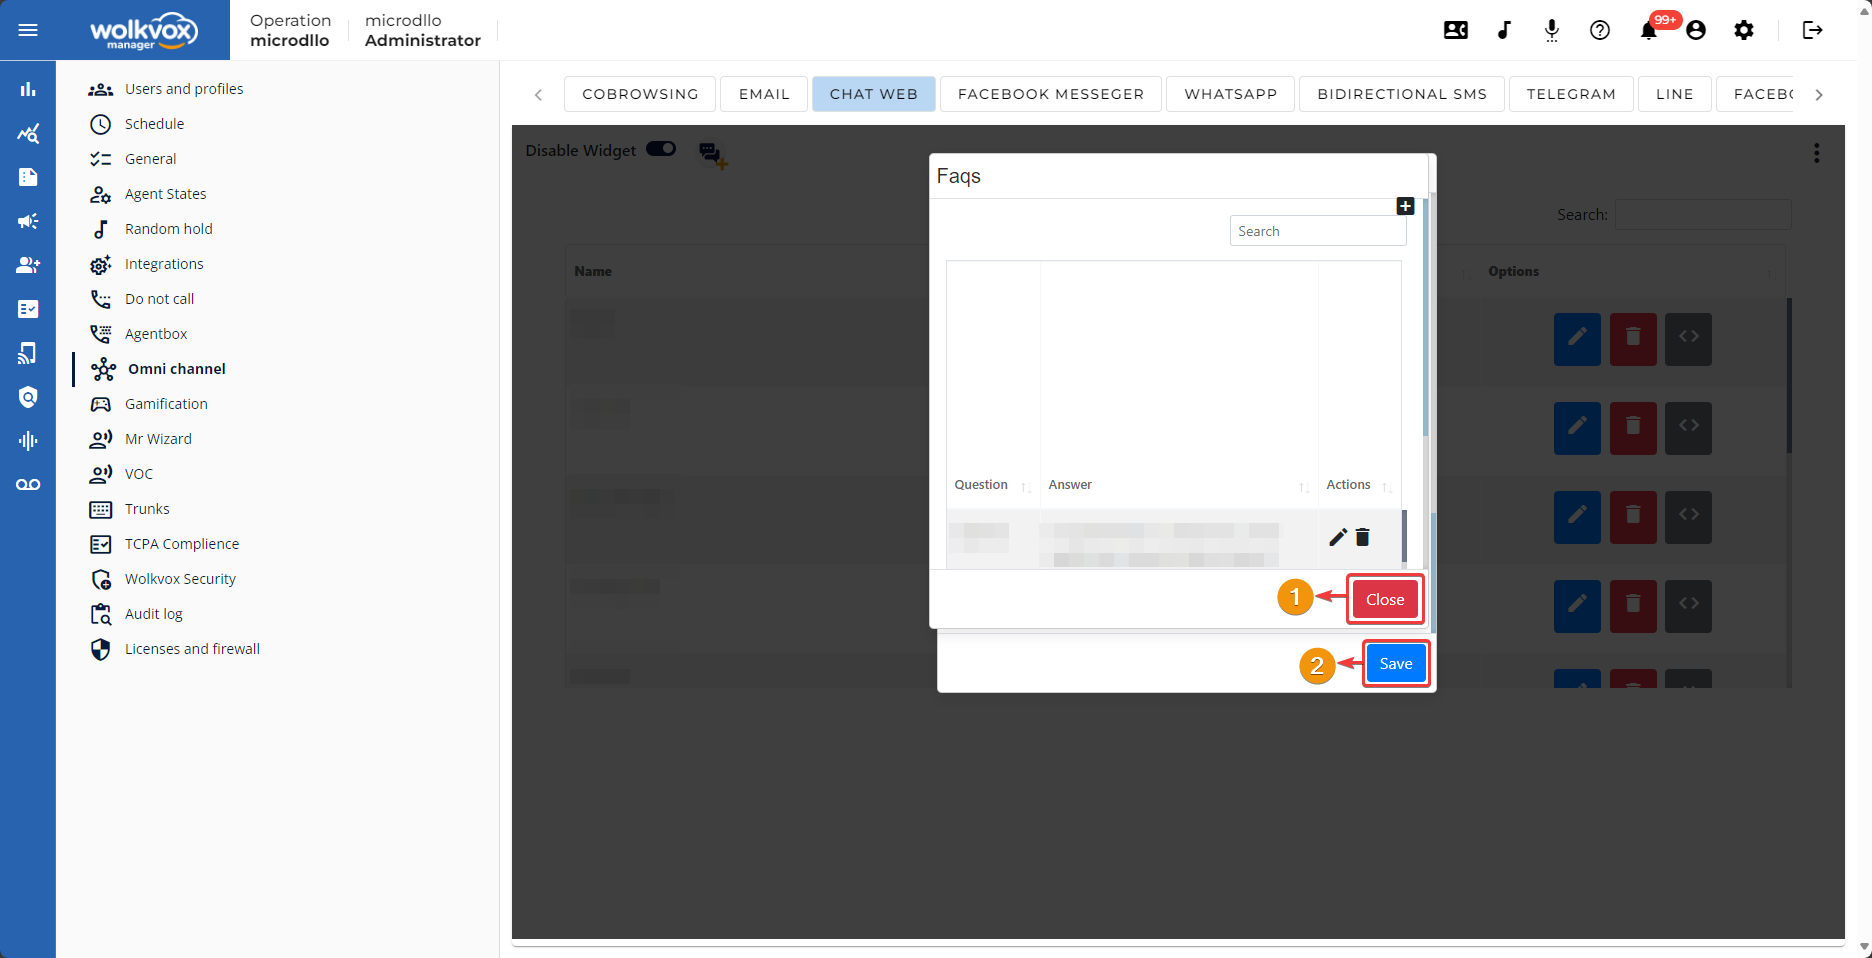
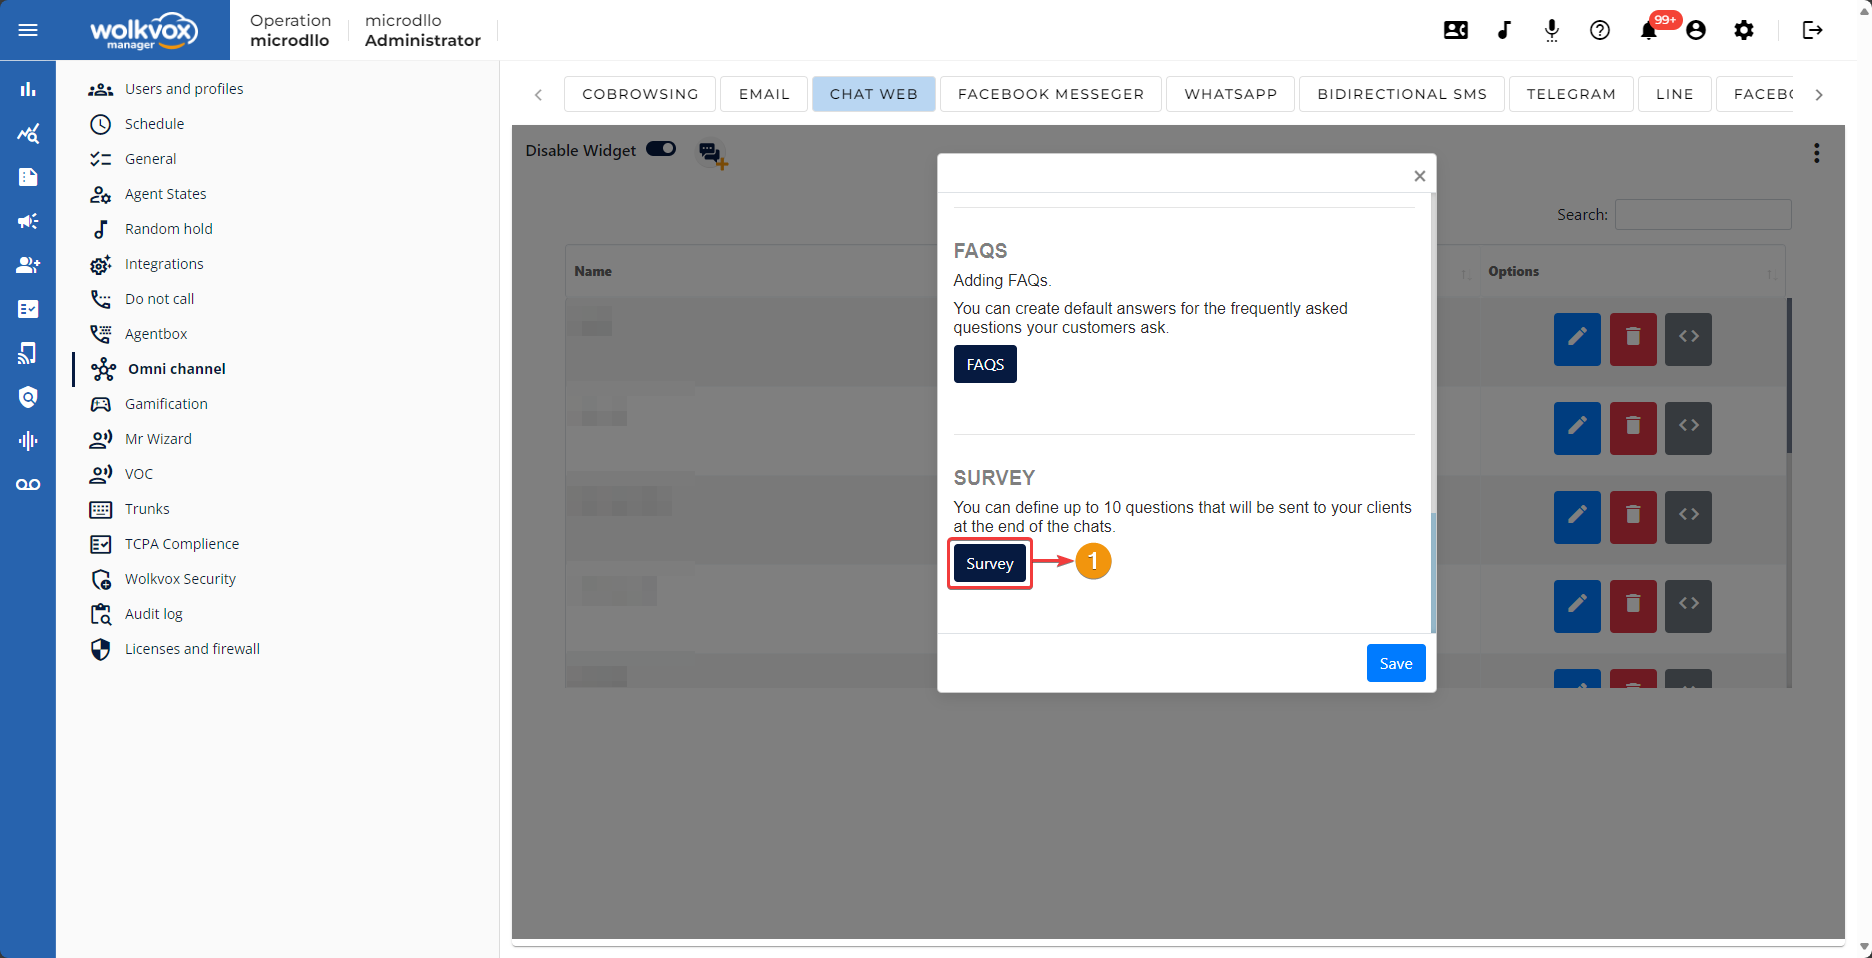
FAQs Management #
In the FAQs section, frequently asked questions are configured for the agent. This tool allows the agent to have pre-established information based on the question asked by the client and respond quickly. It’s very useful for when clients frequently ask certain questions.
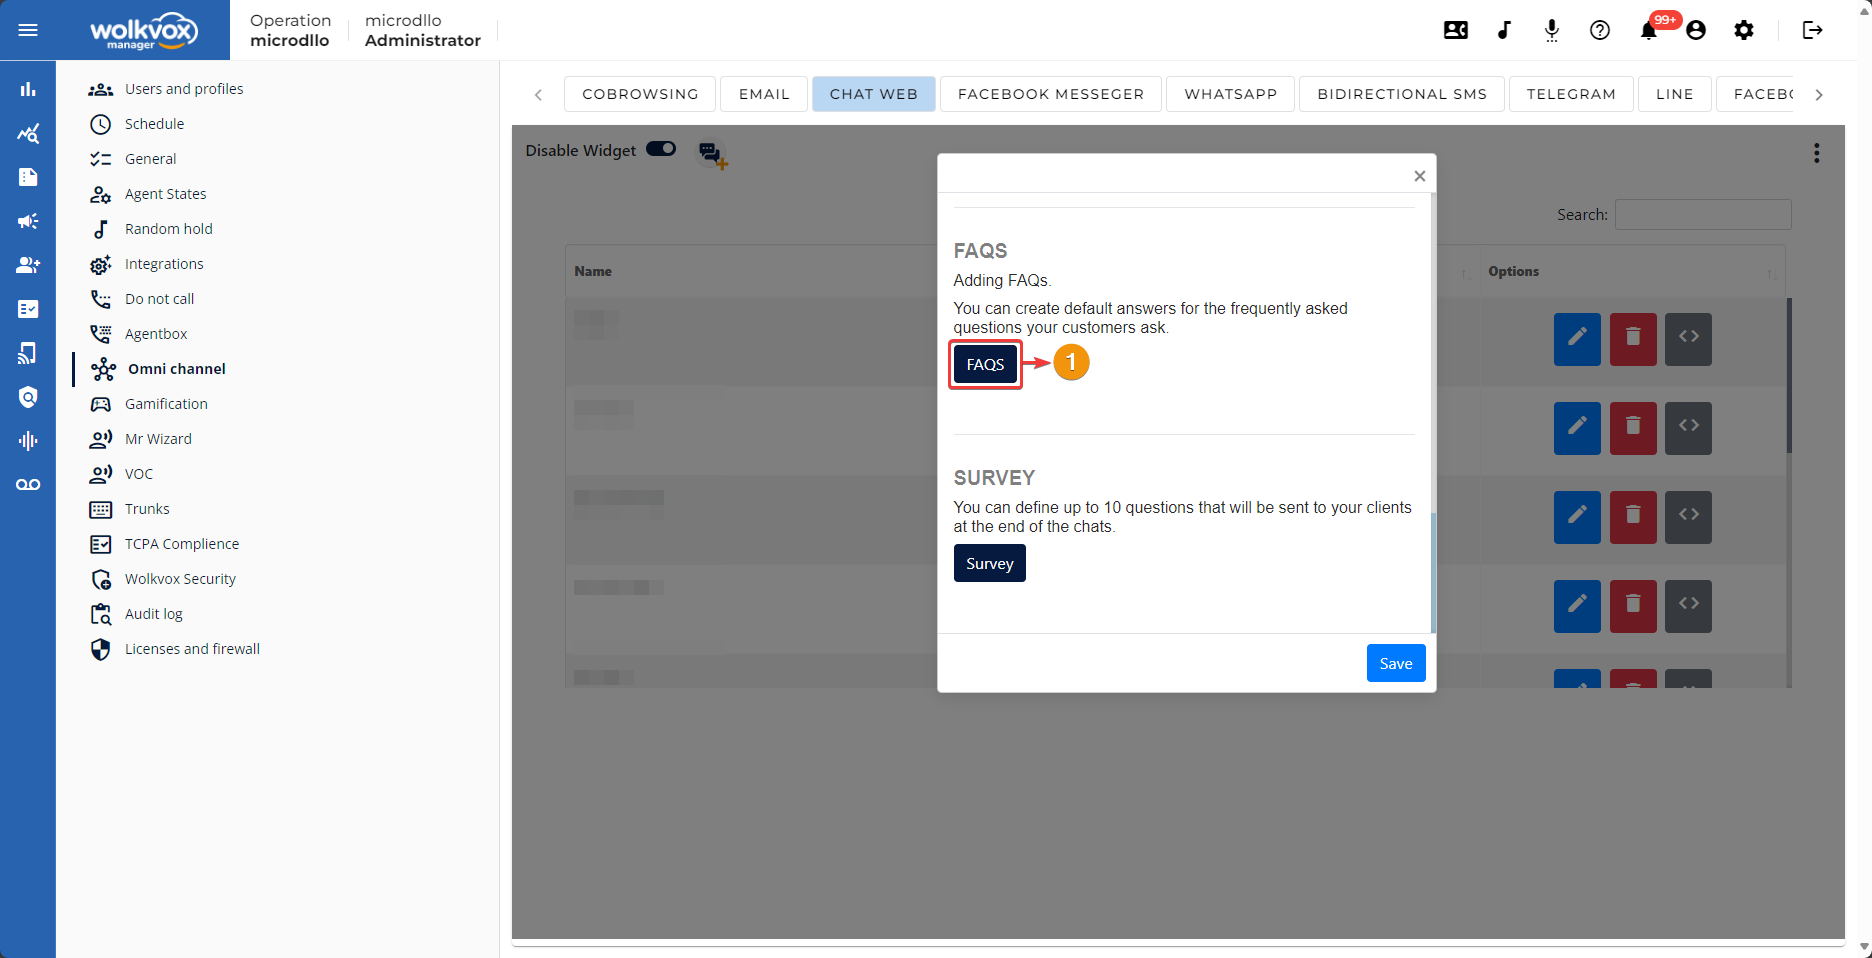
- In the new section, you’ll have the list of questions with their answers. The available actions for these listed items include delete and edit.
- Click on the button located at the top to add a new question with its answer.

- In the first field, you enter the new question.
- The second field is where you should enter the answer to the question or title. The text you add will be appended to the agent’s chat field so that they only need to click the send button to quickly respond to a frequently asked question.
- Click “Save” to apply the changes.

- Close the FAQs creation section.
- Don’t forget to click “Save” to save the configuration.
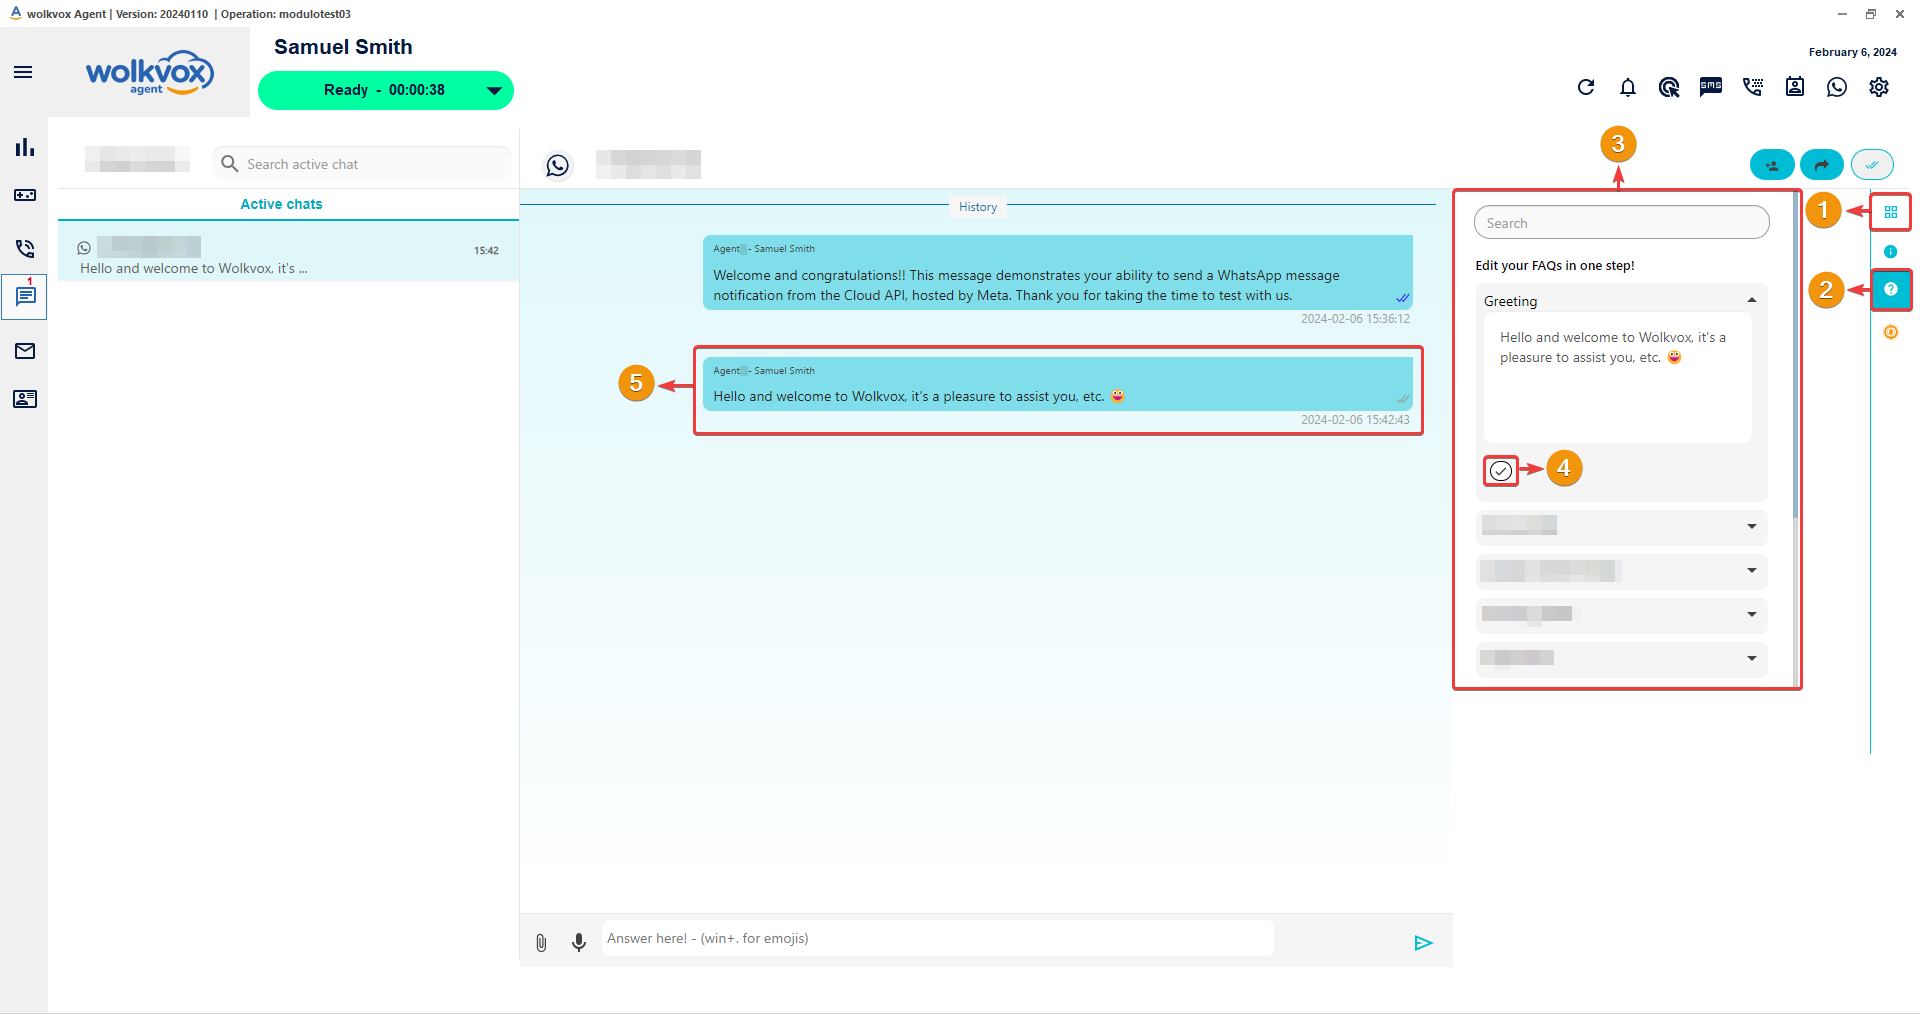
- Through this button, the agent can open the panel of the following buttons.
- With this button, the agent opens the FAQ section.
- Here, all FAQ items added from the Wolkvox Manager application in the omni-channel chat configuration will be listed. By clicking on the arrow on the right side of the element label, the agent can open it and get the complete data.
- With this button, the agent can directly send the text of the selected item to the client.
- You can see that the FAQ is sent directly to the client without needing to confirm the sending.
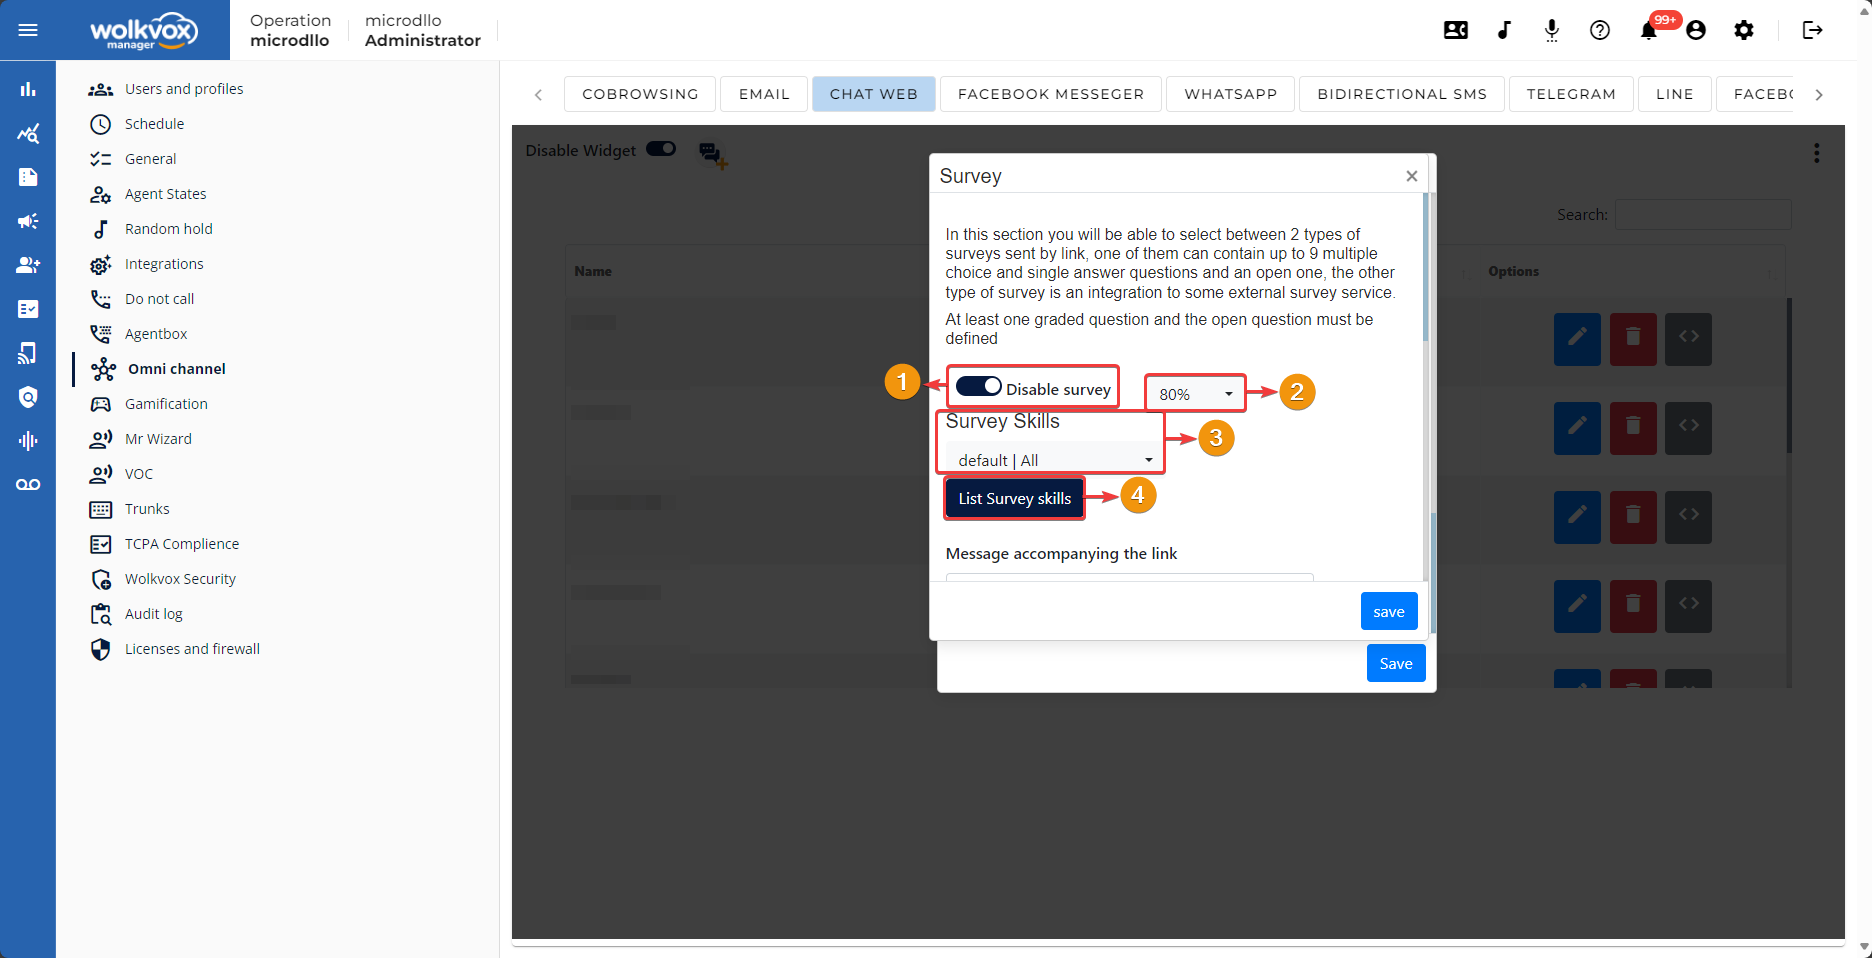
In the “Survey” section, the satisfaction survey options for the customer are configured, both for the one accessed from the web chat and the one sent via email. The surveys for these two channels are configured here.
- Enable or disable the survey.
- If the survey service is enabled, a button will appear on its right side allowing you to select different percentages. This percentage corresponds to the chats in which you want the survey to be applied. If it’s set to 100%, the survey will be available for all created chats.
- In “Survey Skills,” select which skill you want to configure the survey service for. The “default | All” option applies the configuration to all skills in the operation.
- In “List Survey skills,” you can remove external survey configurations from the skills.
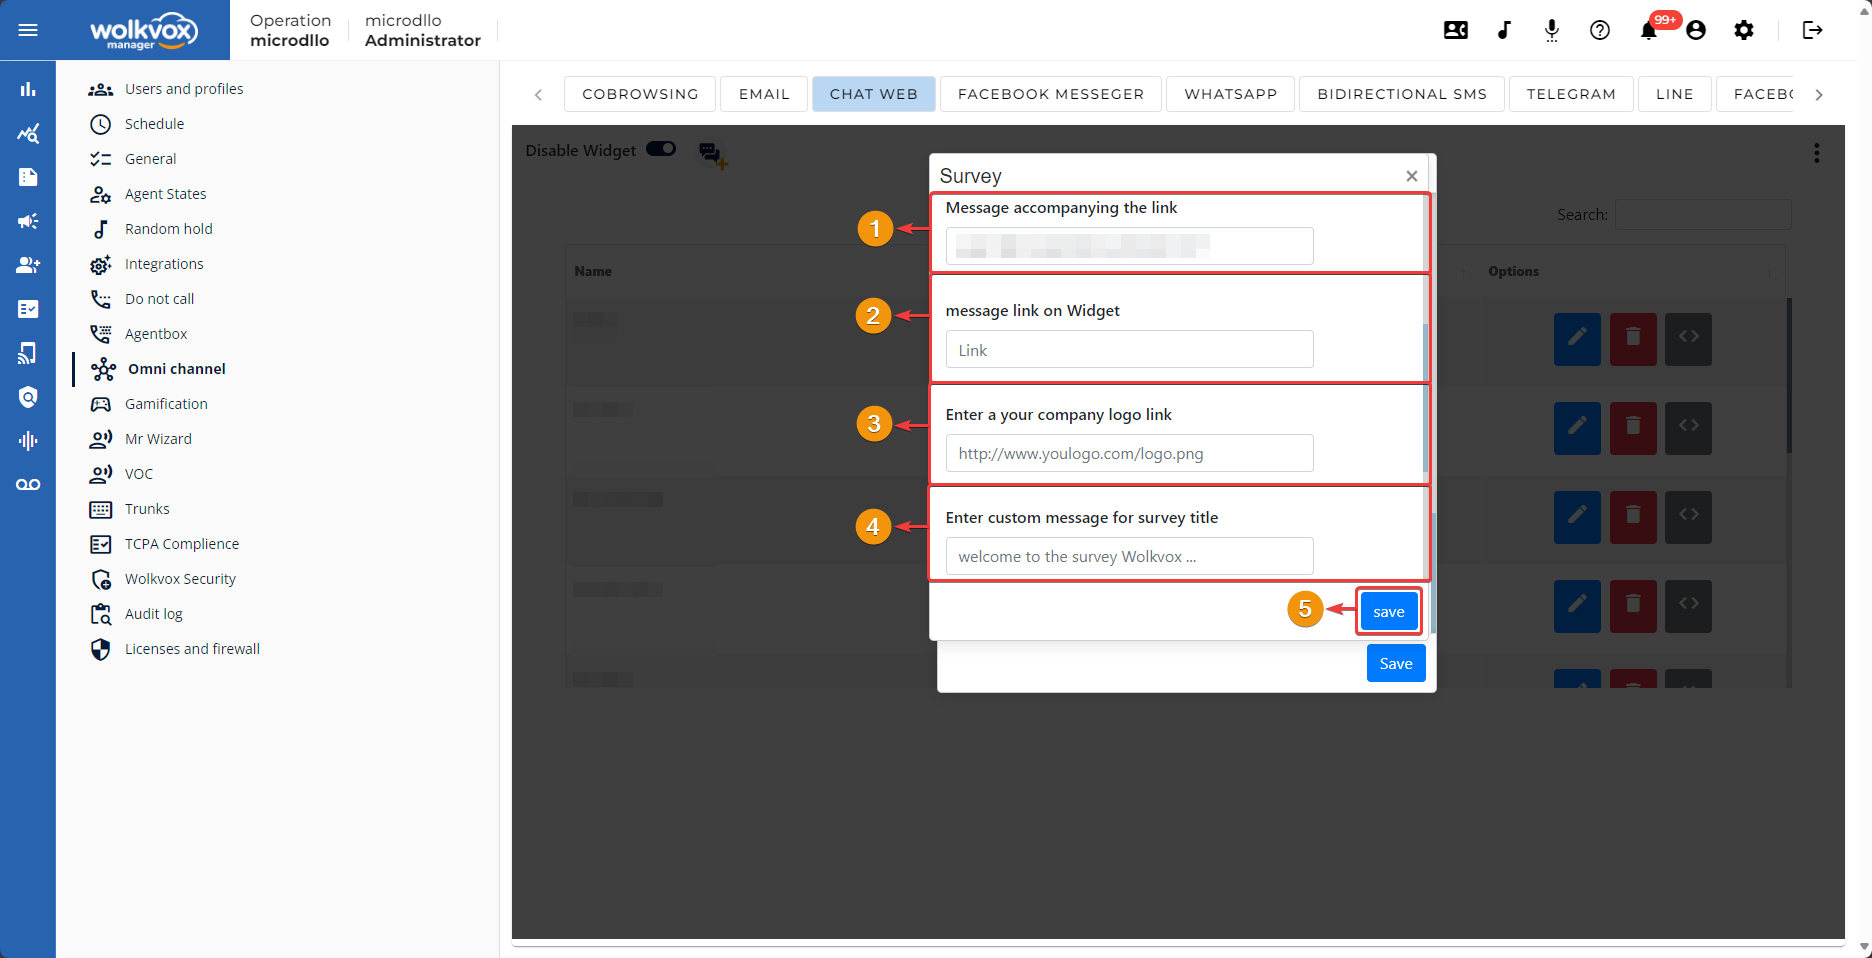
After the previous options, you can configure the following:
- Change the message accompanying the link.
- Insert a link into the message.
- Add a logo to the survey using a URL linking to a PNG image.
- Enter a customized message for the survey title.
- Don’t forget to click “Save” to apply the changes.
You can switch between integrated survey and external survey.
- In the integrated survey, you can configure the following:
- In “Rating Questions,” you write the question in the first field, and in the next one (indented to the left), you enter the rating values. Separate the values with commas.
- The “Open Question” field serves as a text field where the client can manually enter text and leave an opinion or write something according to the instruction given.
- The “-” and “+” buttons are used to delete the last question and add a new question, respectively.
- There must be at least one question, and a maximum of up to 9 questions can be added.
- Don’t forget to click “Save” to apply the changes.

Use an external survey if you don’t want to use the tool incorporated into the application.
- In the external survey, you can configure the following:
- Enter the link that leads to the external survey.
- There is a list of variables that you can apply in the external survey.

To create a new web chat, click on the highlighted button in the following image. It will immediately jump to the section where you configure the new web chat.

- At the bottom right of the screen, you’ll always preview how the web chat design is coming along.
- The button at the bottom center allows the client to open the web chat.
- On the left side, configuration options are listed as you scroll down. The first field to configure is “Name.” Here, you should enter the name by which to identify the web chat you’re setting up in Wolkvox Manager.
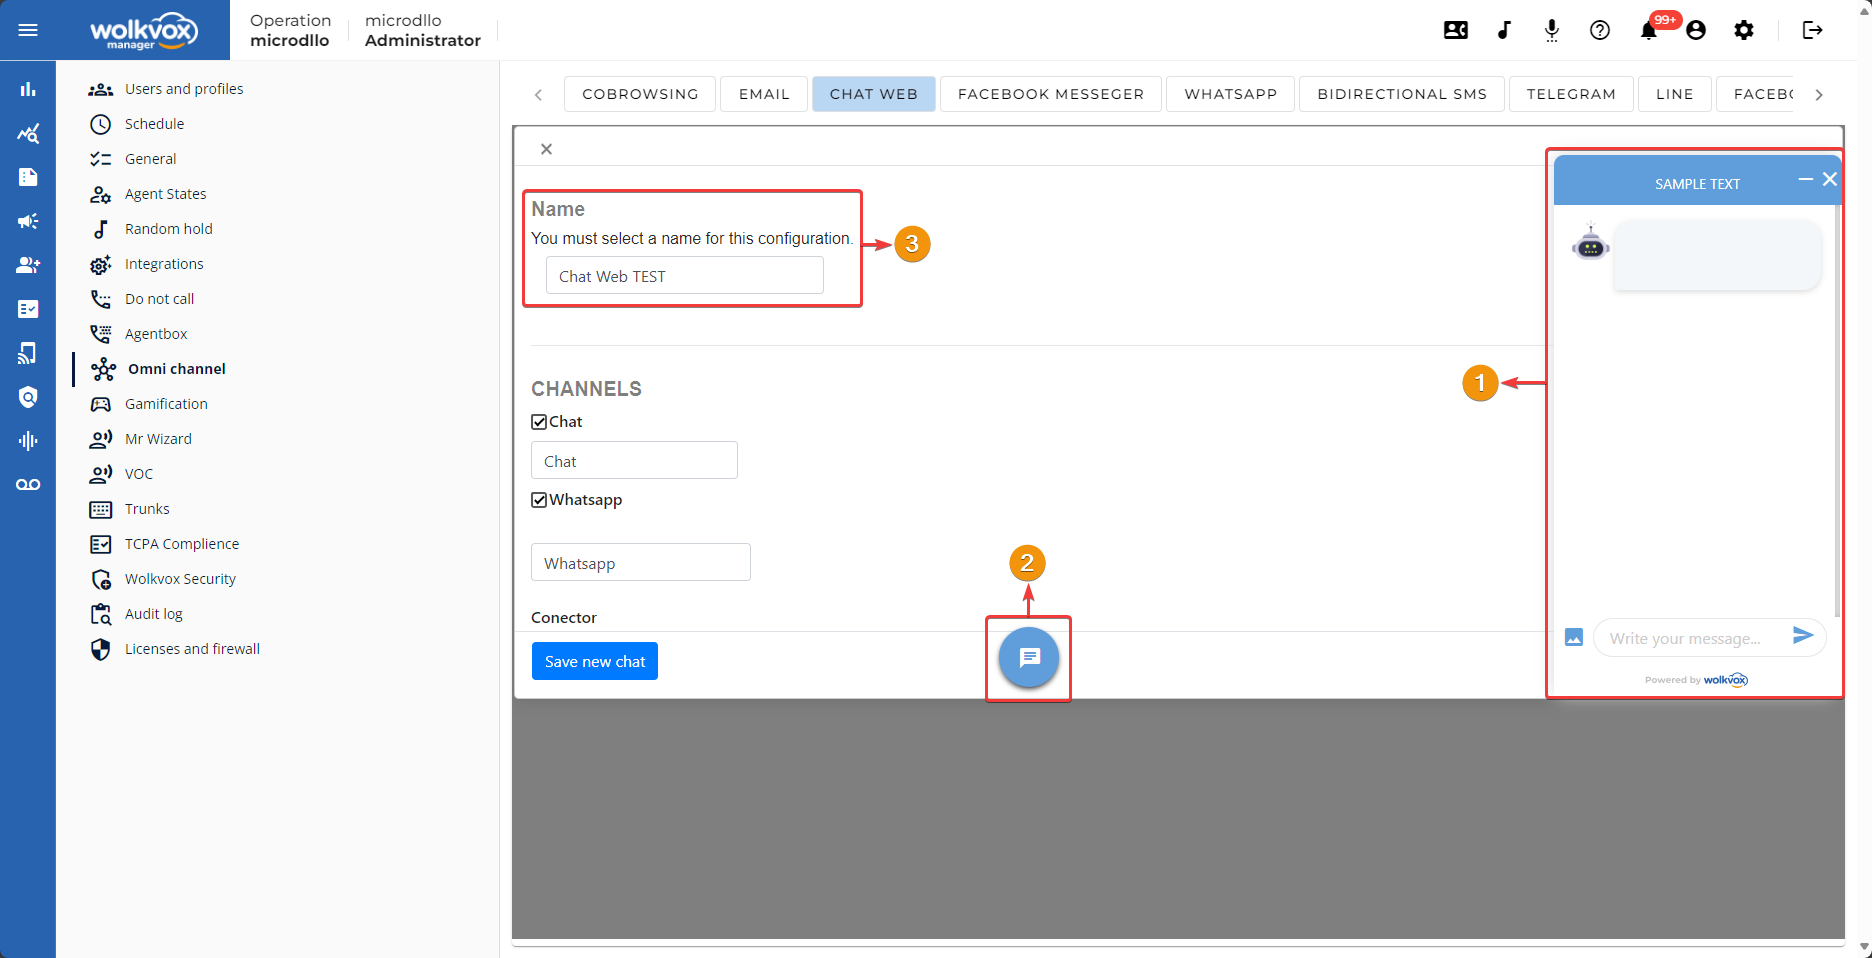
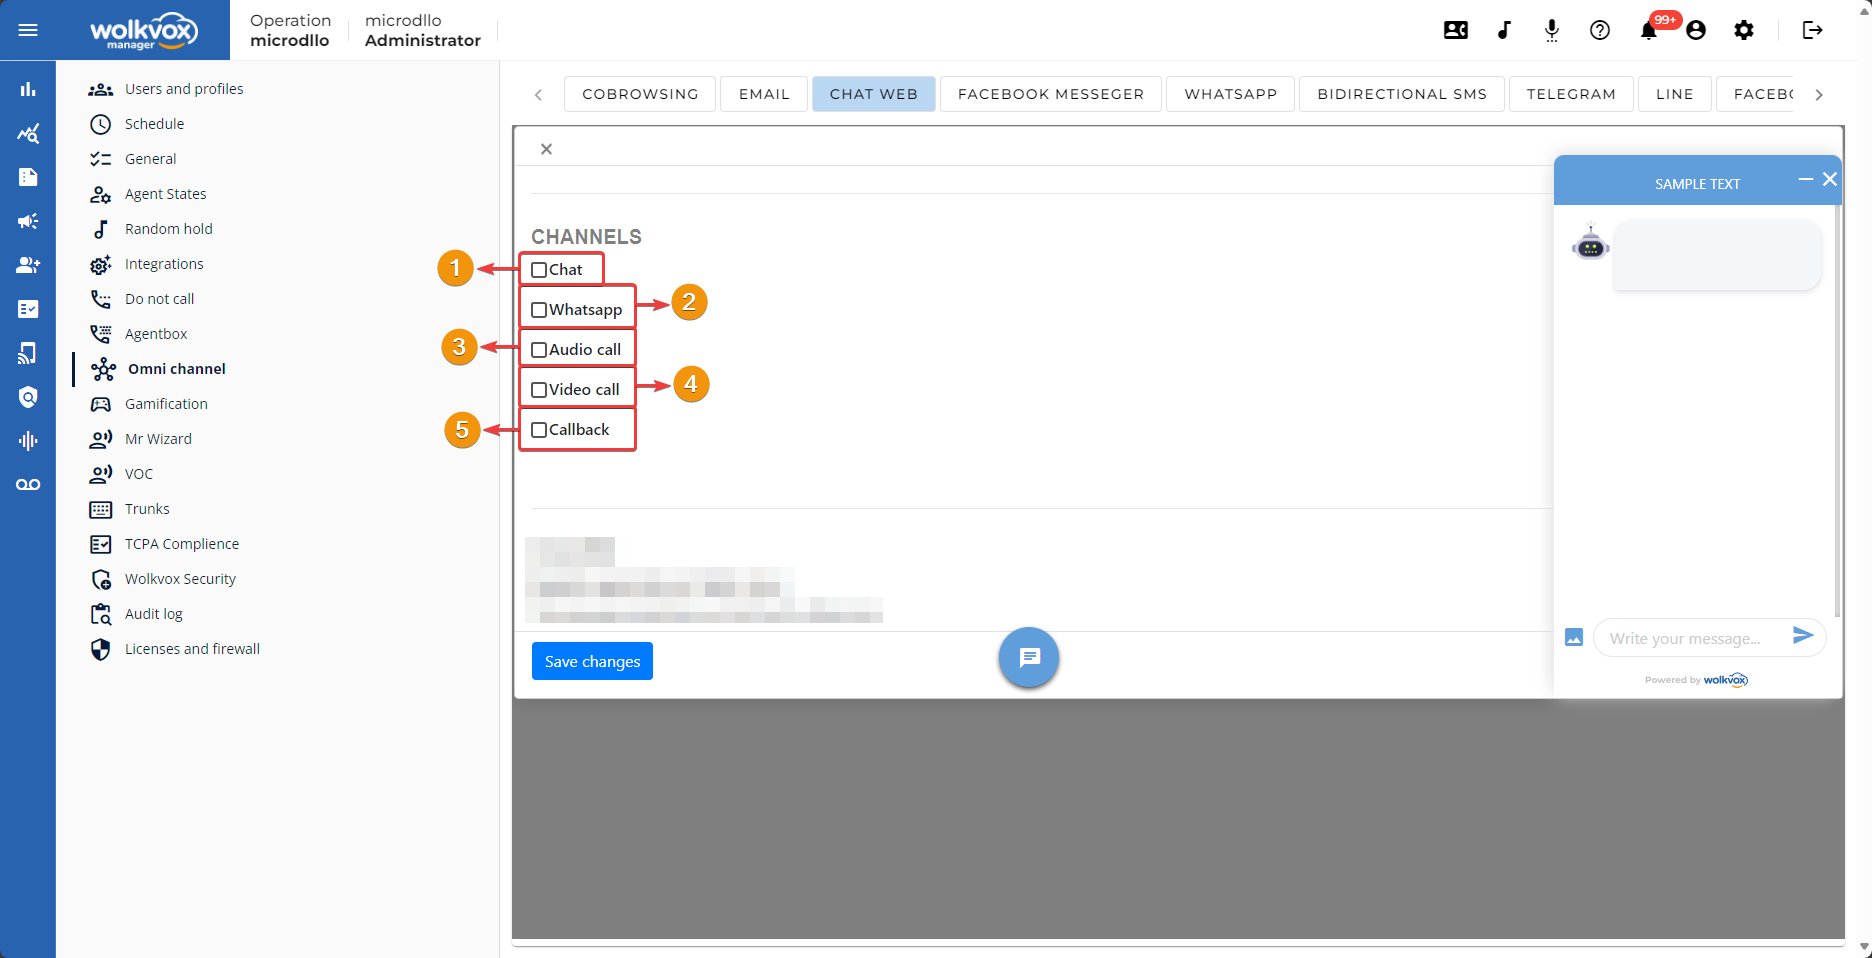
- Enable/Disable Chat Channel: When activated, you can customize the tool’s name.
- Enable/Disable WhatsApp Channel: When activated, you can customize the tool’s name. Another field appears where you must select the WhatsApp connector you want to use in the web chat.
- Enable/Disable Audio Call Channel: When activated, you can customize the tool’s name.
- Enable/Disable Video Call Channel: When activated, you can customize the tool’s name.
- Enable/Disable Callback Channel: This channel allows calling the client if there are no agents available in the web chat or to notify that they want to be called. When activated, you can customize the tool’s name. There is also a field where you must enter a token generated in Wolkvox Manager to integrate it into the operation and an “ID Campaign” field where you must enter the identification number of the campaign where the client who left their personal data would be added to be contacted.
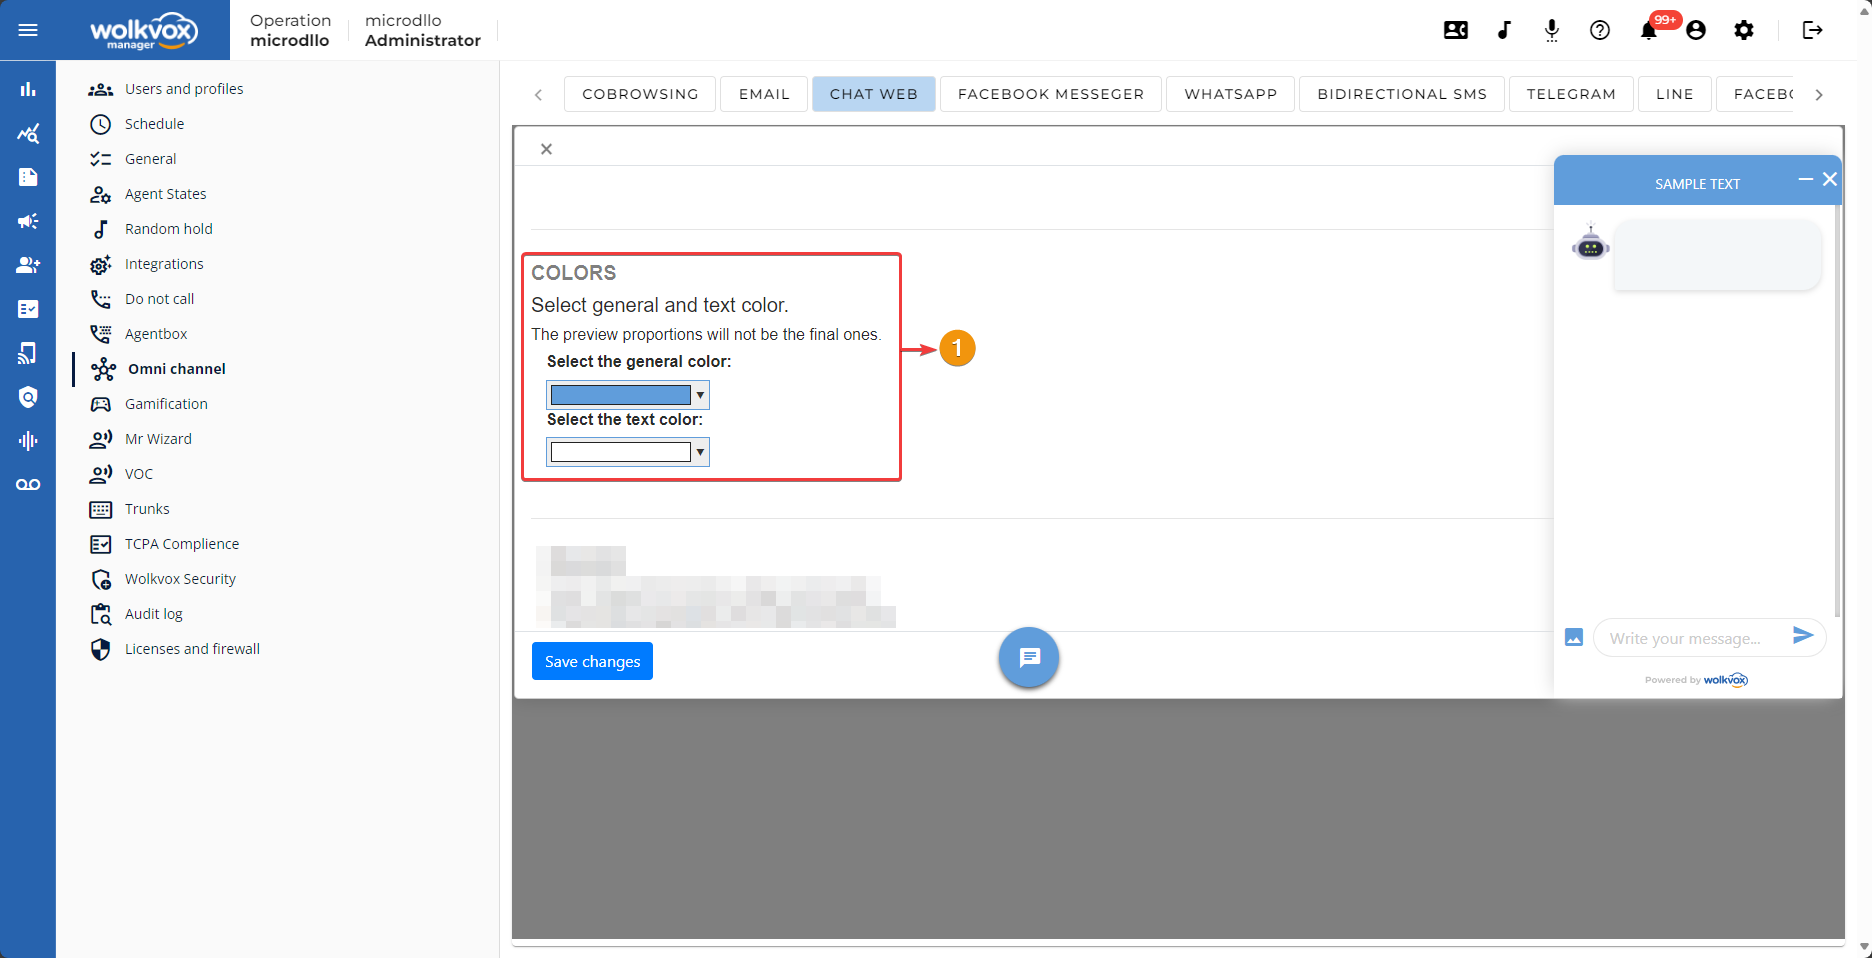
Continuing with the configuration, in the “Colors” section, you can change the general color of the elements and the text color.
Note: Make sure to generate good contrast for correct visualization.
In the “Images” section, you can first change the icon of the button that allows the customer to open the web chat.
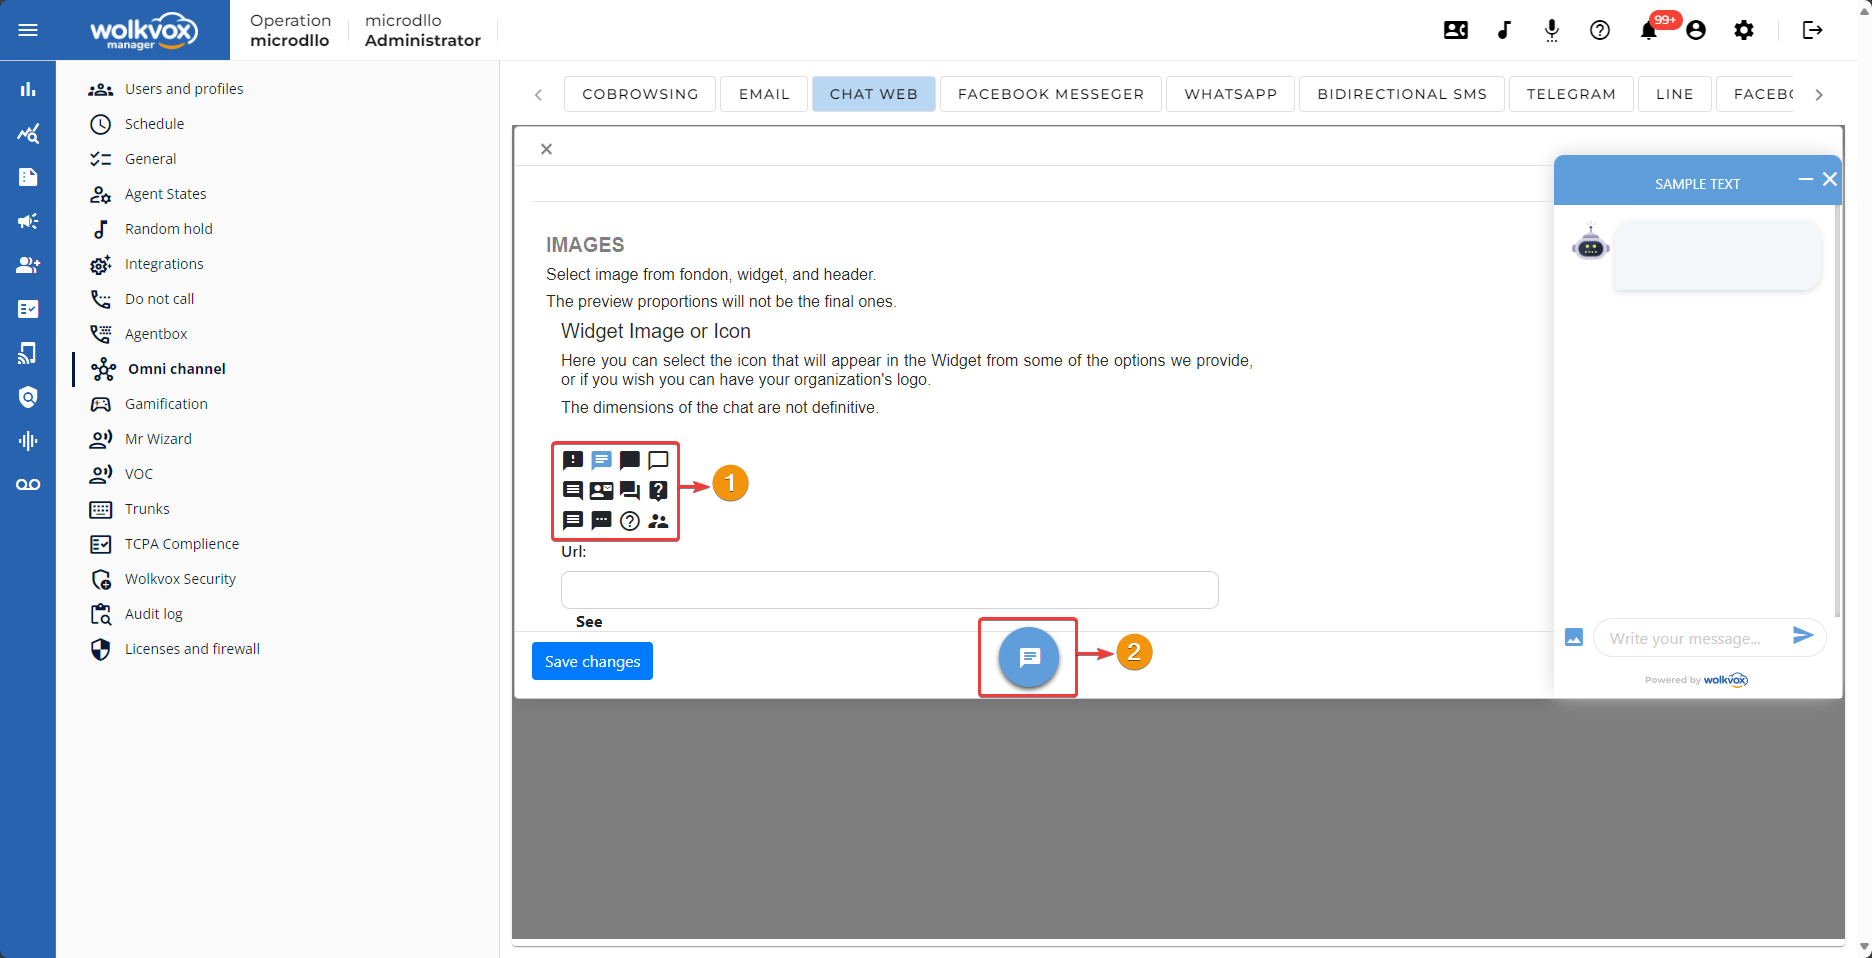
- You can further customize the image of the button that allows the customer to open the web chat. Simply enter the URL of the PNG image you want to use.
- Click the “Preview” button to view the applied image.
- You can see how the button would look.
- The “Transparent Background” option can be activated to remove the button’s background so that only the image you added via URL remains.
- The “Predefined Size” option allows you to switch between that option and “Image Size”.
- You can also add an image for the header of the web chat. Provide the URL of the image you want to use. Remember to attach an image that contrasts with the selected background color.
- Click “Preview” to view the applied image.
- You can see how the image would appear in the header.

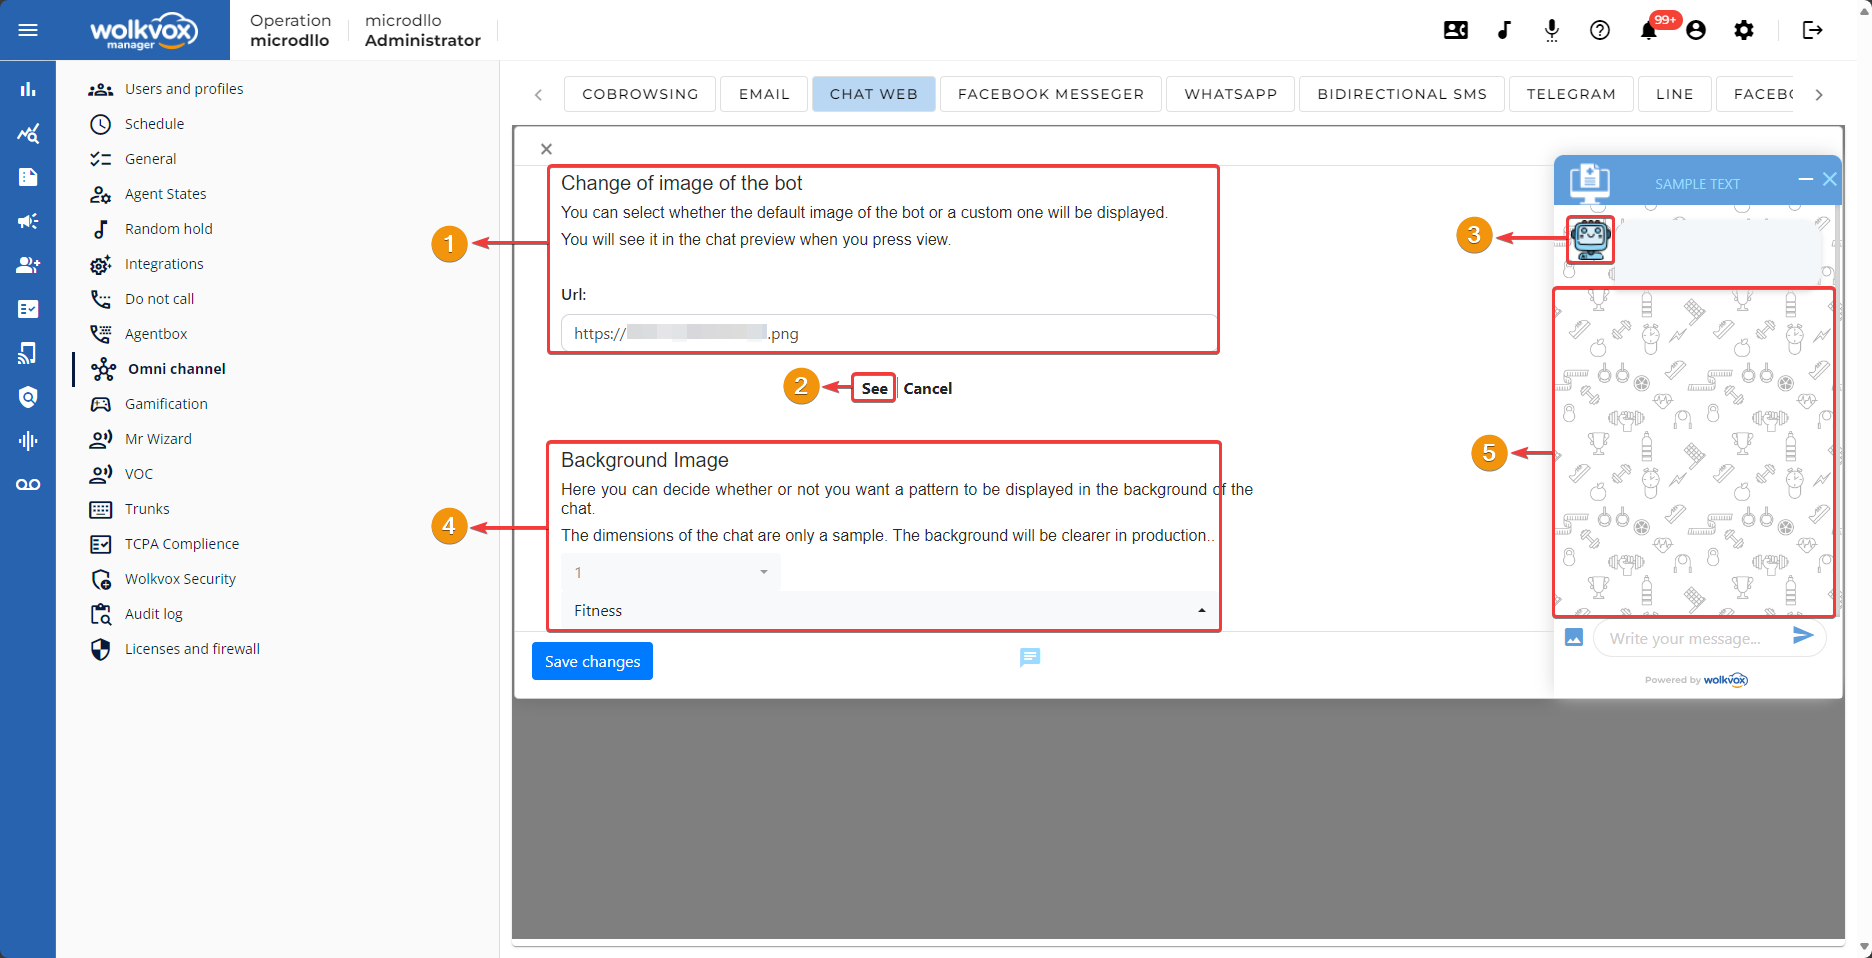
- You can change the bot’s image: To do this, enter the URL where the PNG image you want to use is located.
- Click “Preview” to view the image in the web chat preview.
- You can see the image applied in the web chat.
- You can also change the background image of the web chat: There is a dropdown menu that allows you to select various backgrounds or choose the “No Background” option.
- Here you can see an example of the selected background image applied.
- You can change the header text.
- The chat header allows up to 24 characters.
- You can also change the text in the field where the client responds to the chat.
- This text can be replaced with up to 21 characters.

- To preview how the web chat form is looking, click on “Show Form”. This button is located right here where it says “Hide Form” when it’s hidden.
- It will display the entire form that the client needs to fill out before accessing the web chat functionalities.
- You can change the title of each form field.
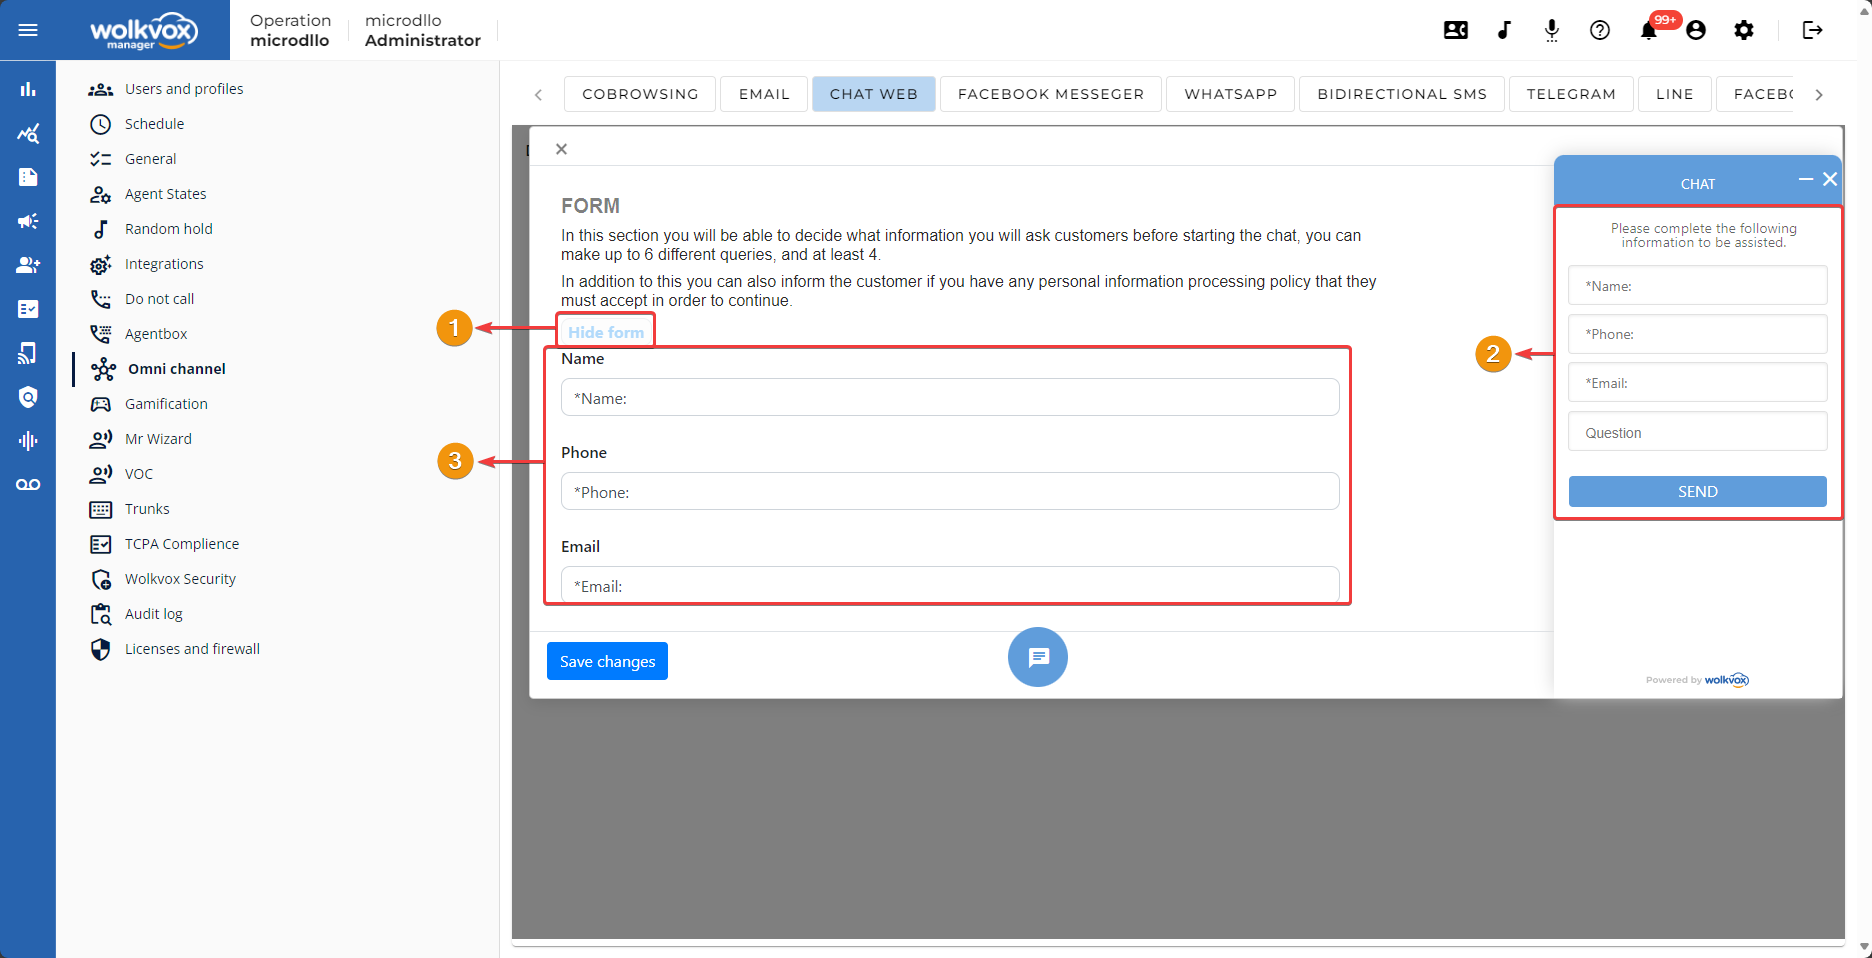
- You can enable or disable the field requesting the customer’s identification number.
- You can activate or deactivate an additional field requesting other relevant information from the customer.
- This additional field can be turned into a list field. This list field will contain the options you provide to the customer. Each value or option in the list should be separated by a comma.
- You can change the title of the “Comment” field.

- The toggle button “Data Treatment” allows adding a data treatment policy acceptance section.
- In “Text,” enter the text inviting to read the data treatment policy.
- In “Link,” you should input a link directing to a page where the company’s data treatment policy can be read.
- In “Link Text,” input the title of the button that will allow the client to navigate to the link containing the data treatment policy to read.

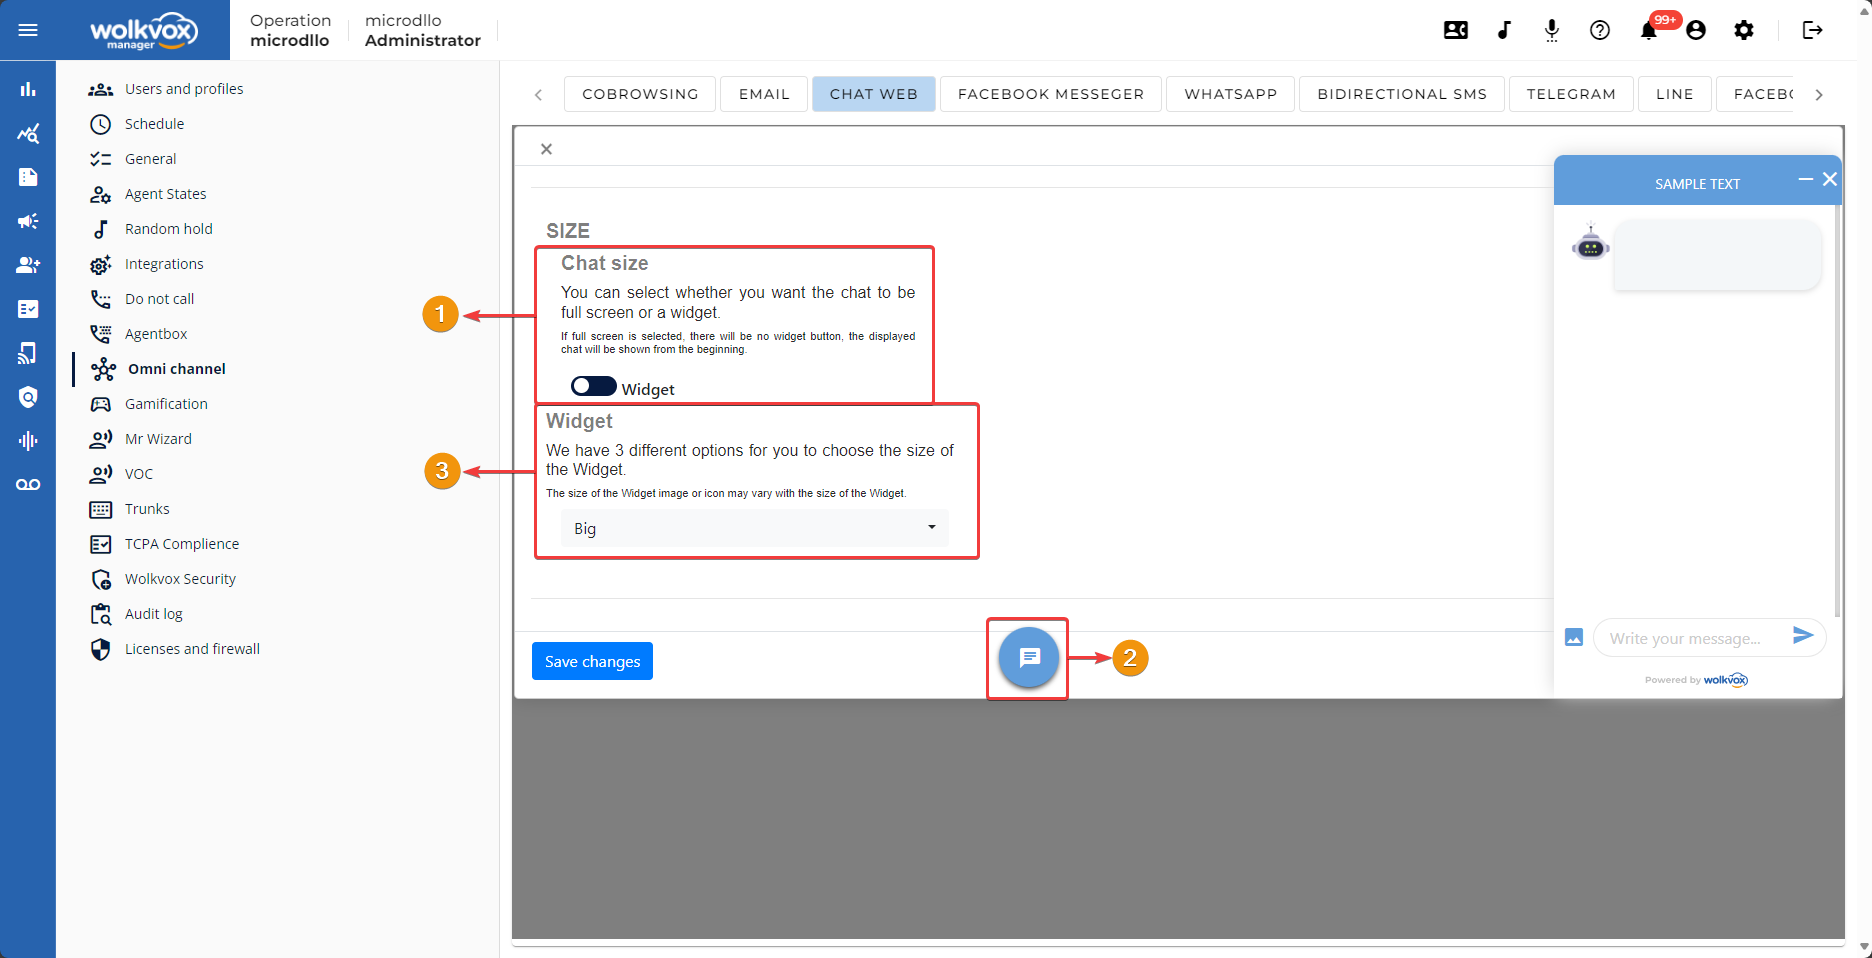
- In “Chat Size,” you can change the size of the icon that allows the client to open the web chat. When set to “Widget,” it means the web chat will be accessible from a floating button. But when set to “Full Screen,” the web chat will occupy the entire screen size without the button being present.
- The “Widget” refers to the icon of the web chat button.
- While set to “Widget,” you can change the button size among three options: large, medium, and small.
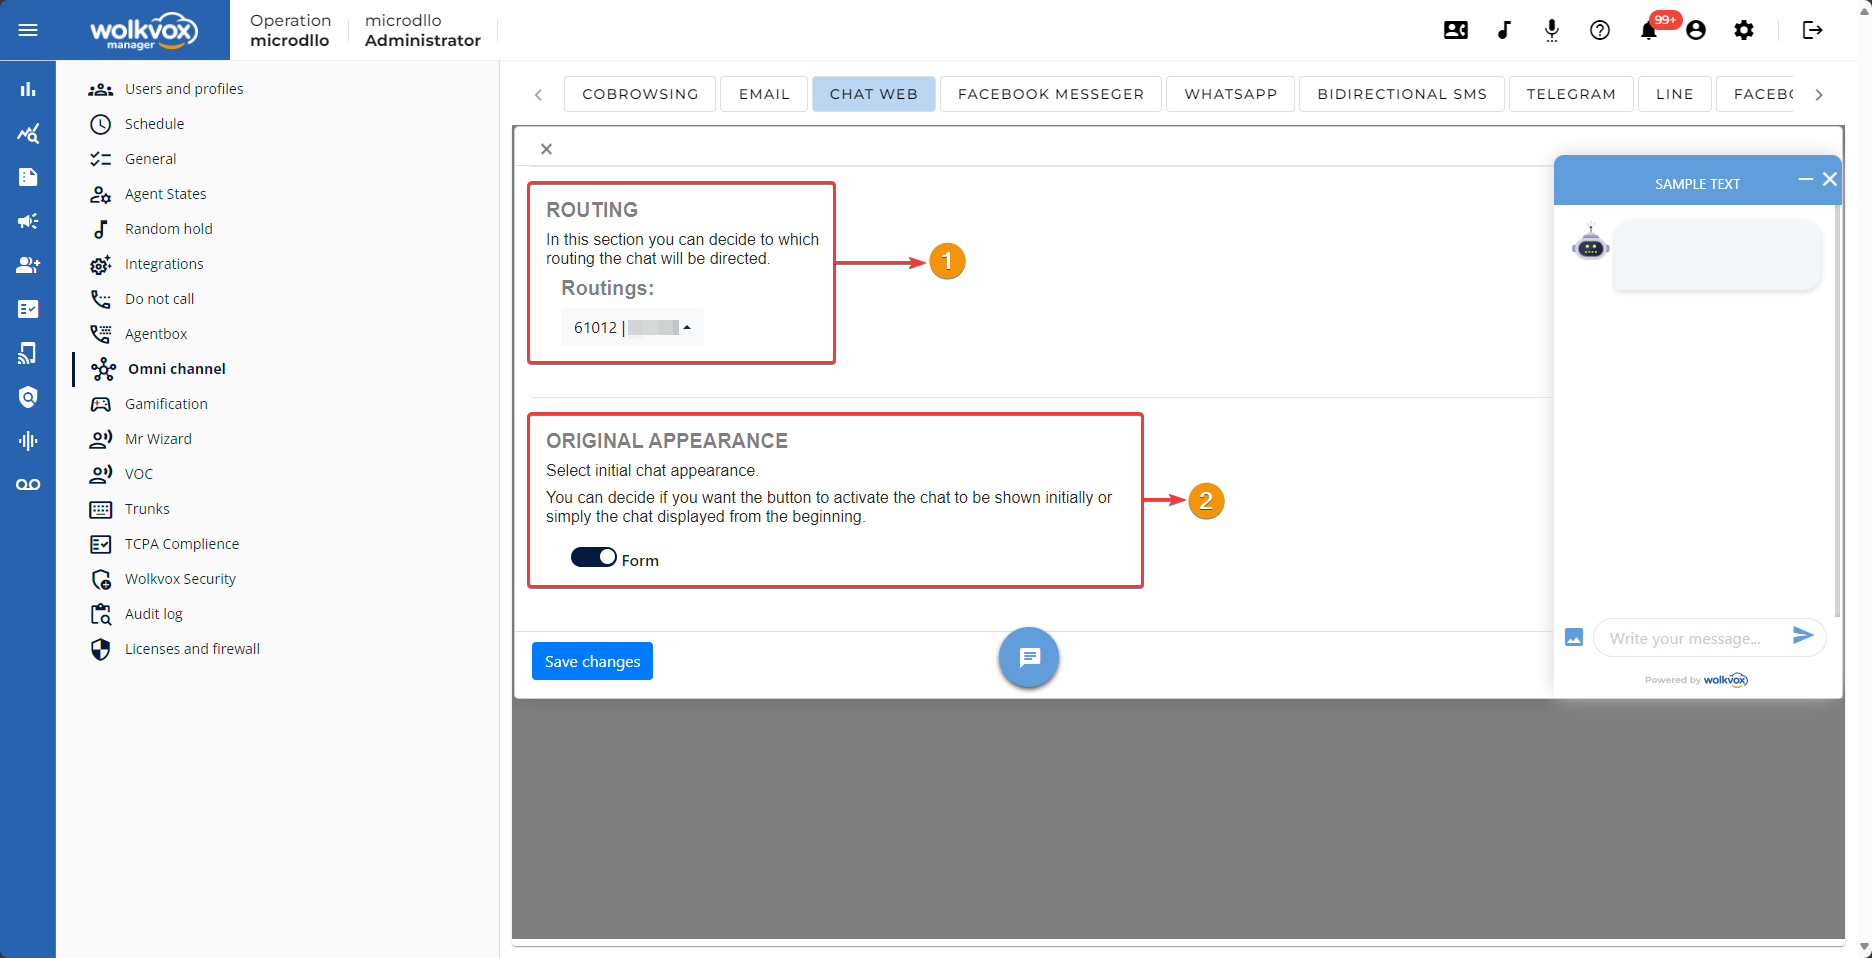
- In the “Routing” section, you should select the routing point you want to link with the web chat. The web chat will function according to the configuration of the selected routing point and the flow designed in its “ChatBot (web, facebook, telegram, line, whatsapp, sms, instagram)” section.
- In the “Initial Appearance” section, you can change how the web chat is activated.
- If set to “Form,” the web chat will prompt the client to fill out the form fields before starting.
- If set to “Button,” the chat will open automatically depending on the time set in the “Widget Timer” field.
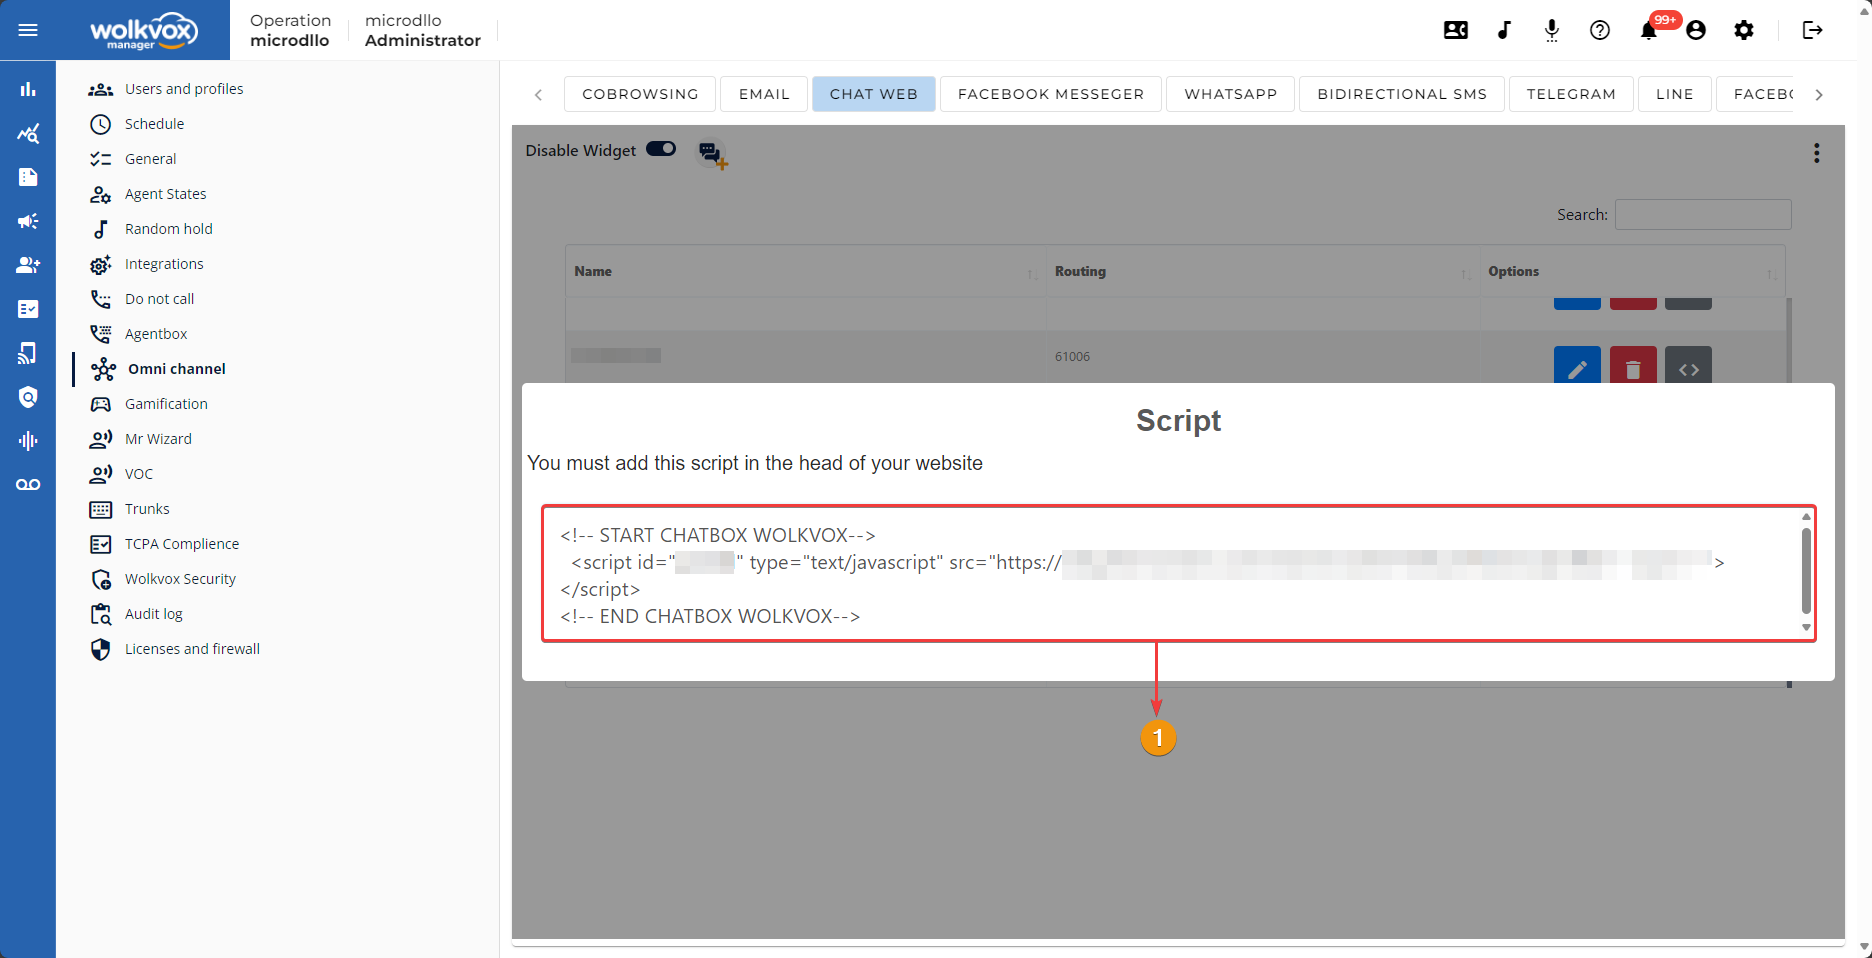
To embed the web chat on your website, you need to copy the insertion code. You can access this by clicking the highlighted button in the following image, corresponding to the web chat you wish to embed.

A window opens where you can copy the code. This should go in the <head> or <body> section of your website.
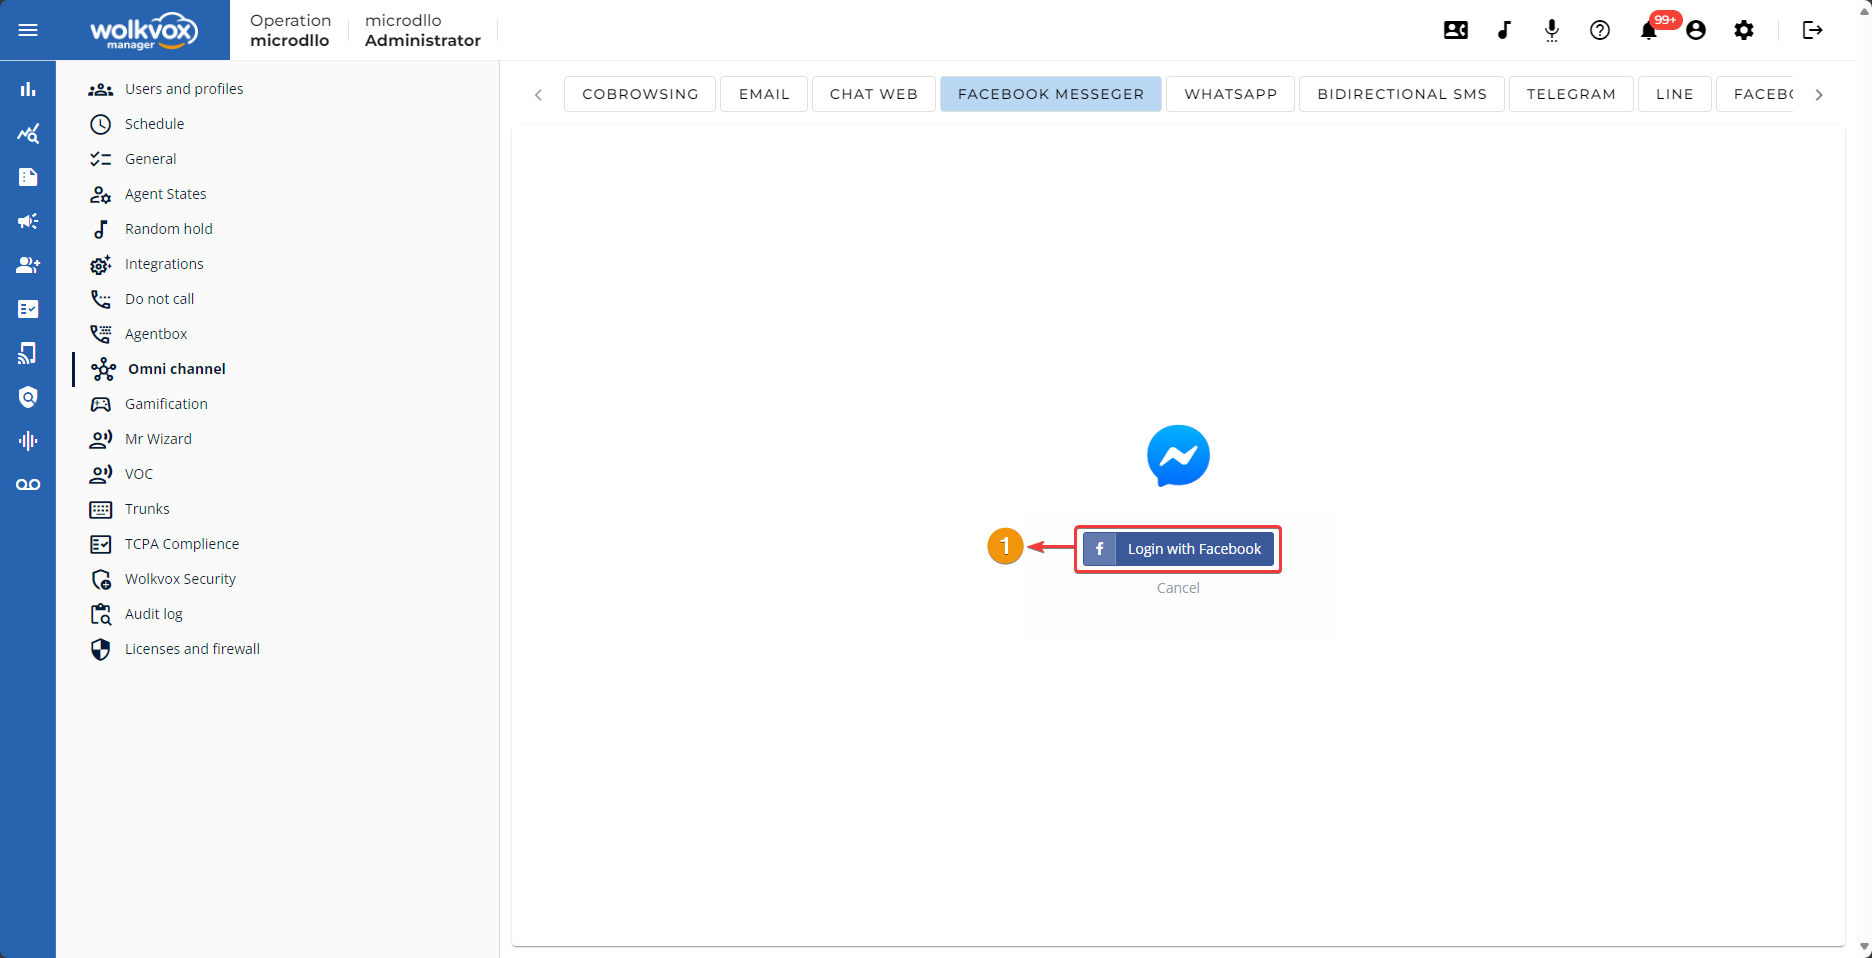
Facebook Messenger Configuration #
The next channel you can integrate into your Wolkvox Manager is Facebook Messenger, which allows you to manage messages bidirectionally. This means you can receive or send messages from your Facebook Messenger here.

The system will ask you to log in with the Facebook account that contains the page to be linked.
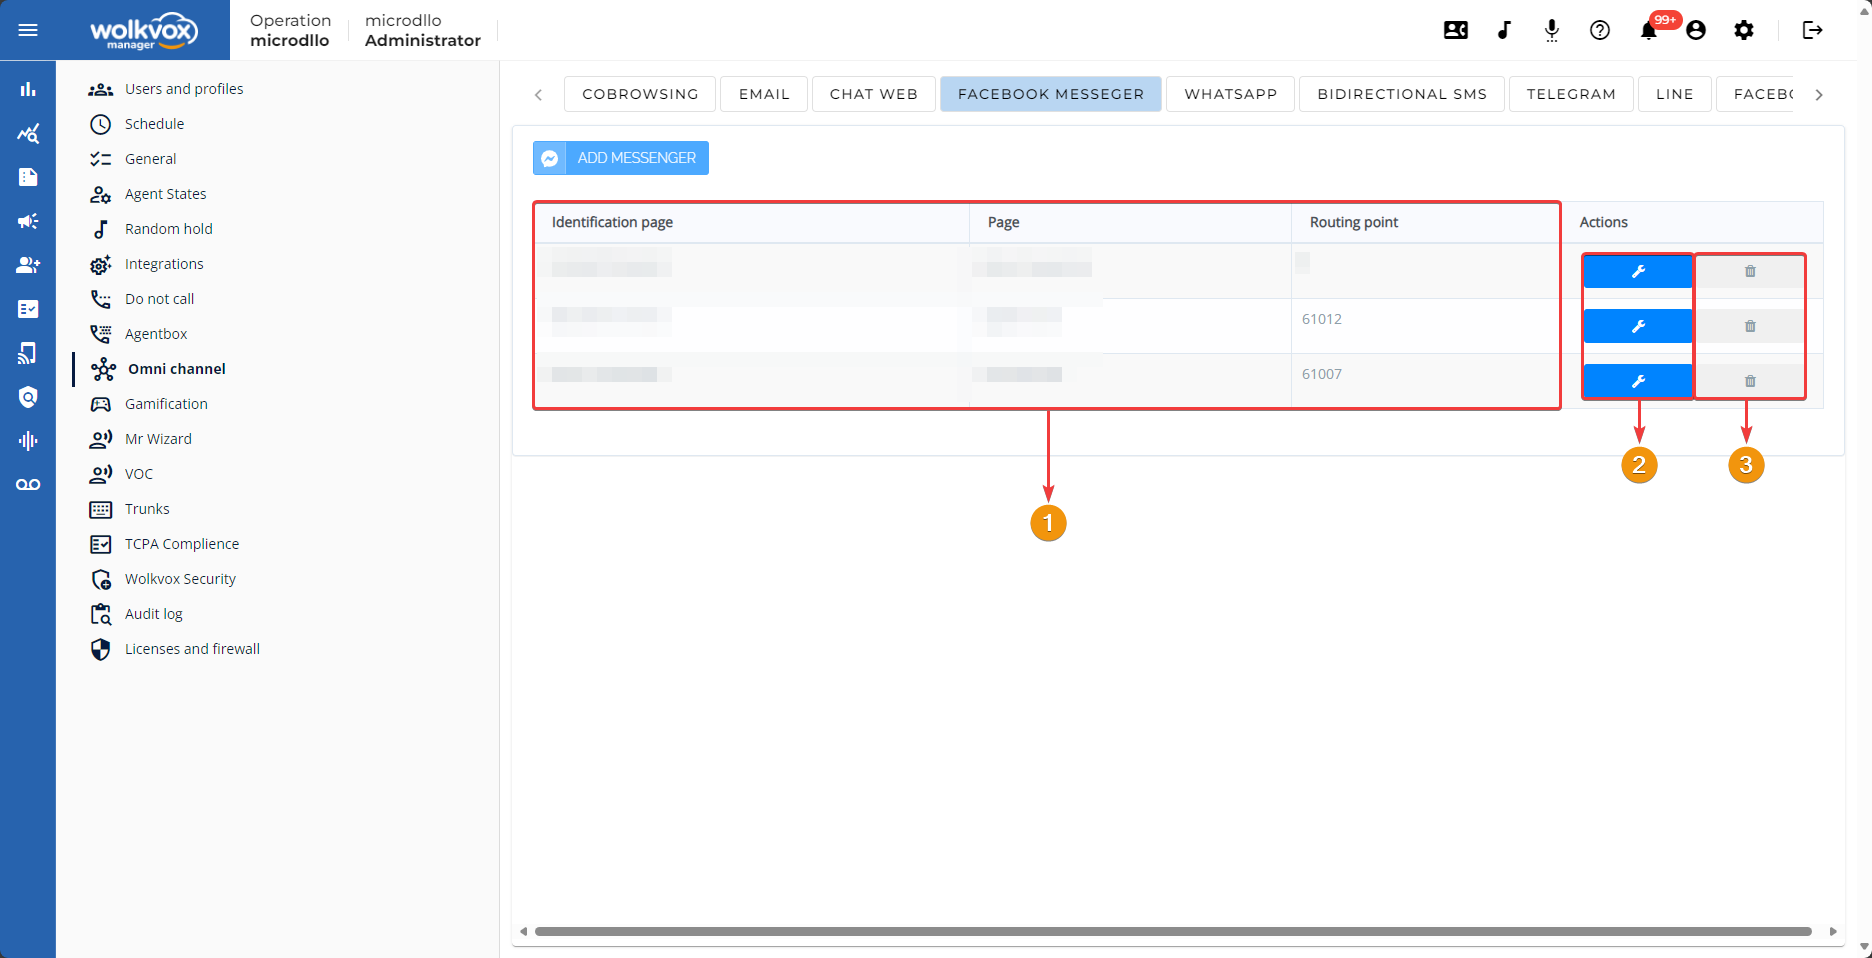
- You’ll need to select the Facebook page you want to link.
- The “Id Page” and “Tab Page” fields will be listed automatically upon selecting the Facebook page. Choose the routing point where you want to use the linked Facebook page.
- Click “Save.”

- All linked pages will be listed in the highlighted section.
- For each linkage, you can change its configuration.
- You can delete each page linkage.
WhatsApp Configuration #
The next channel you can integrate into your wolkvox Manager is WhatsApp, a messaging platform with over 2 billion active users worldwide. It’s an effective tool for communication and customer support, enabling businesses to interact with their customers quickly and easily.
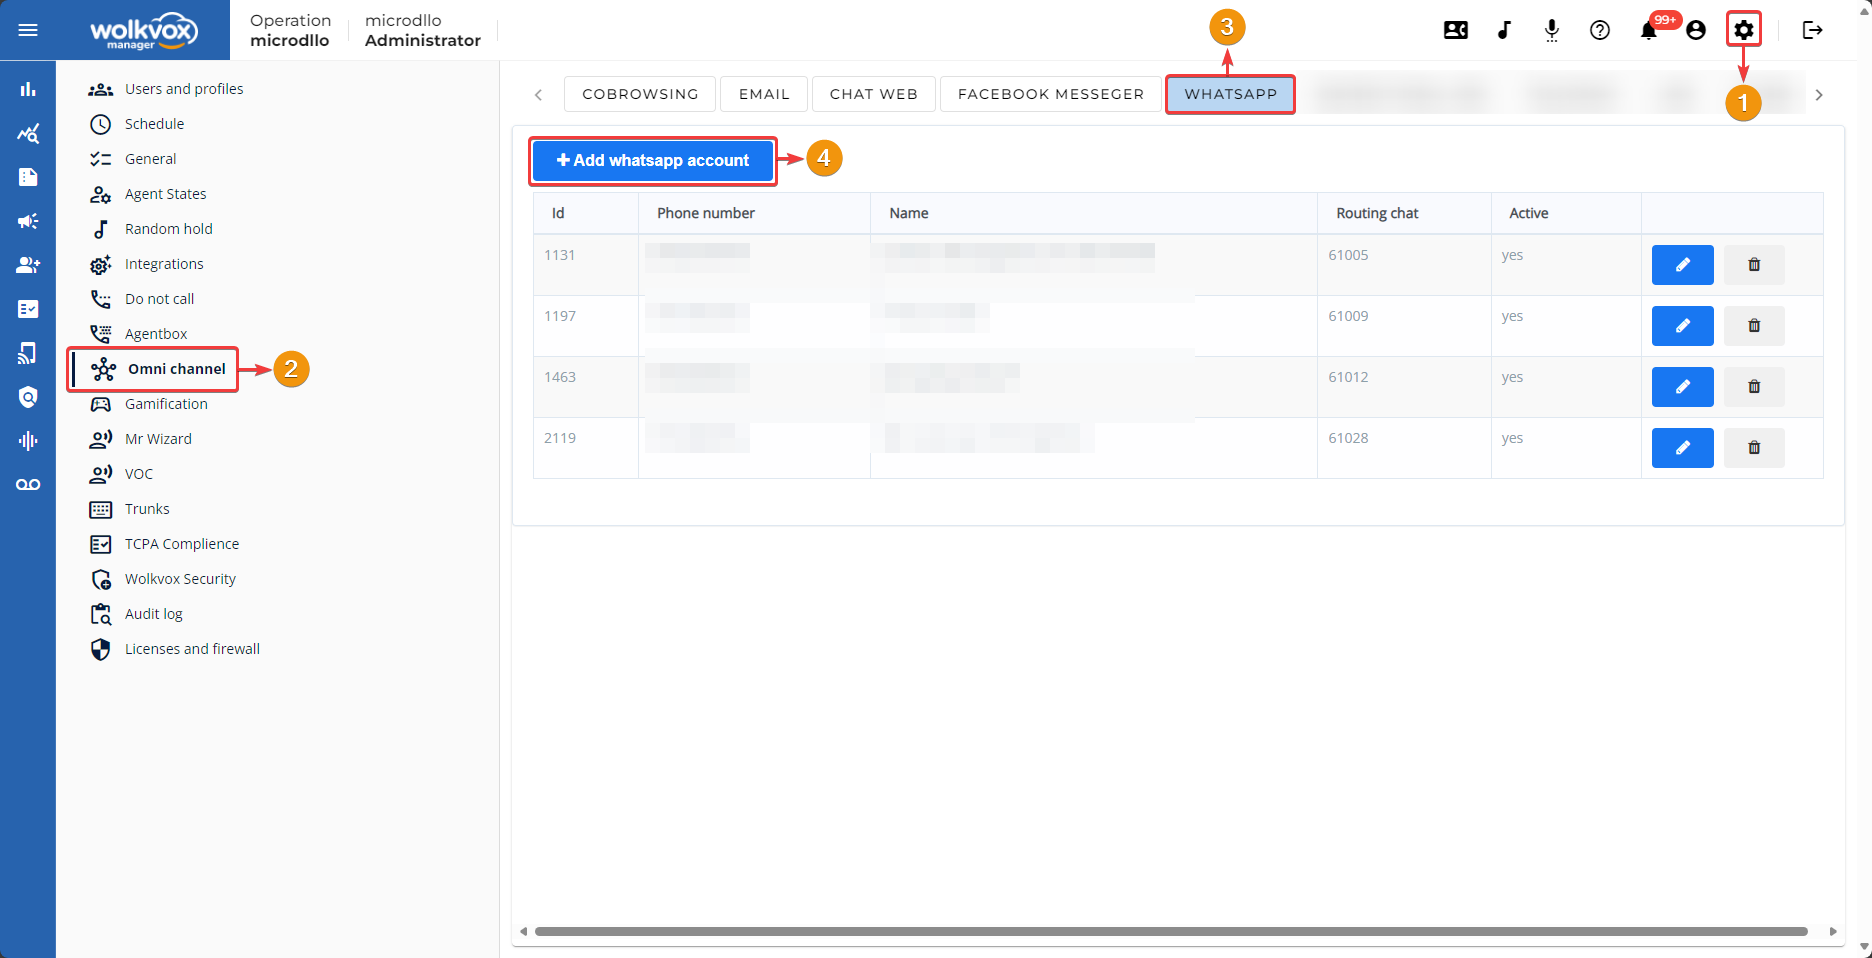
To integrate WhatsApp into wolkvox Manager, a WhatsApp connector is required. A WhatsApp connector is a software that enables businesses to connect wolkvox Manager with the WhatsApp platform.
There are several WhatsApp connectors available in the market. The choice of connector will depend on the specific needs of the company.
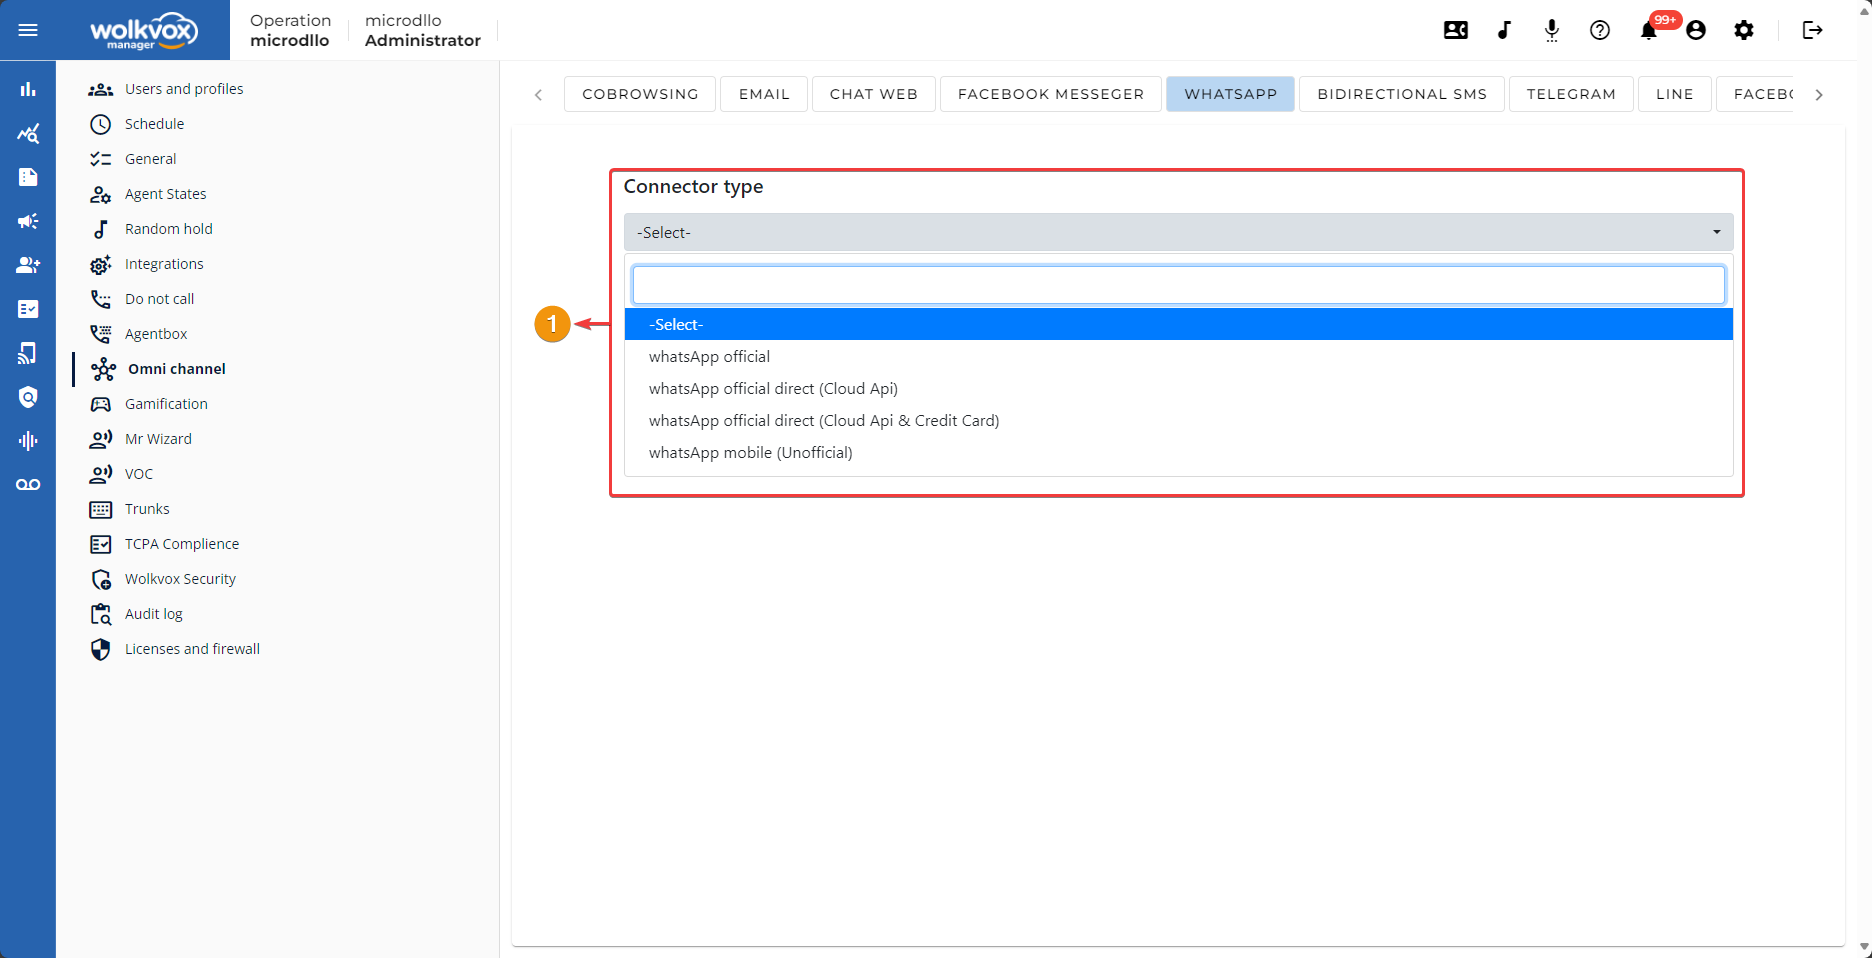
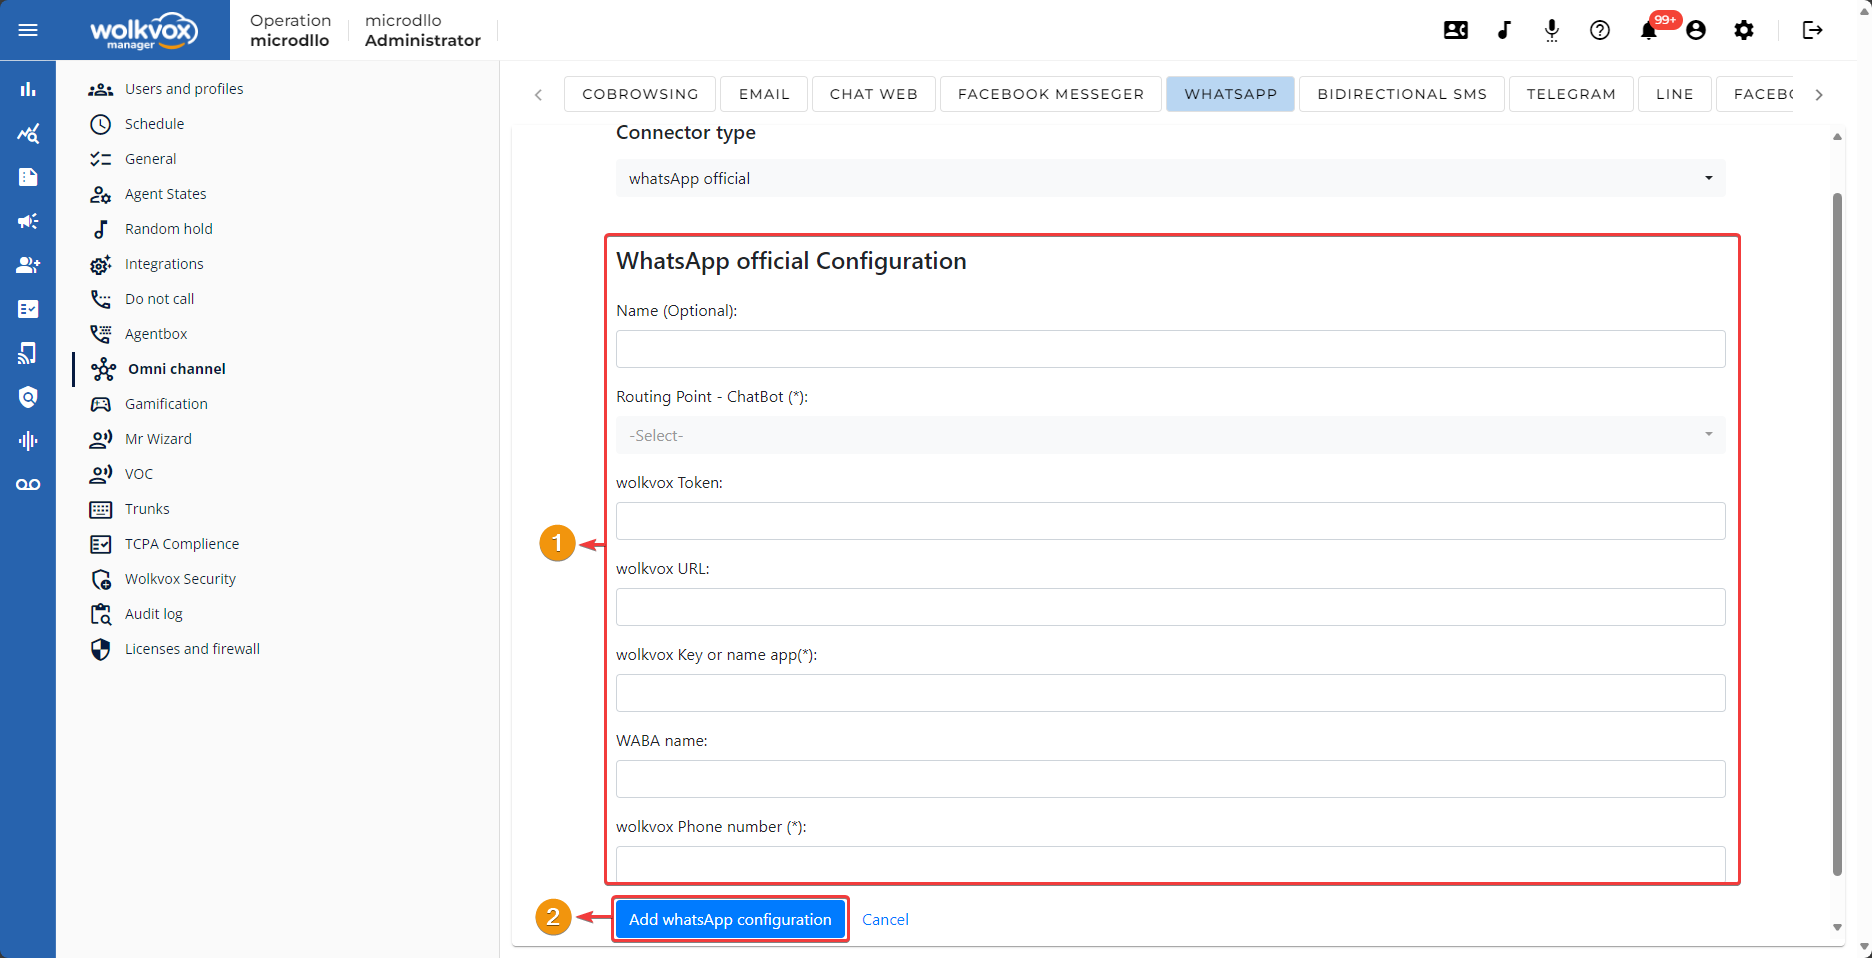
WhatsApp Official
A WhatsApp Official connector operates by establishing a communication channel between wolkvox Manager and the official WhatsApp platform. The connector utilizes an API (Application Programming Interface) provided by WhatsApp to send and receive WhatsApp messages.
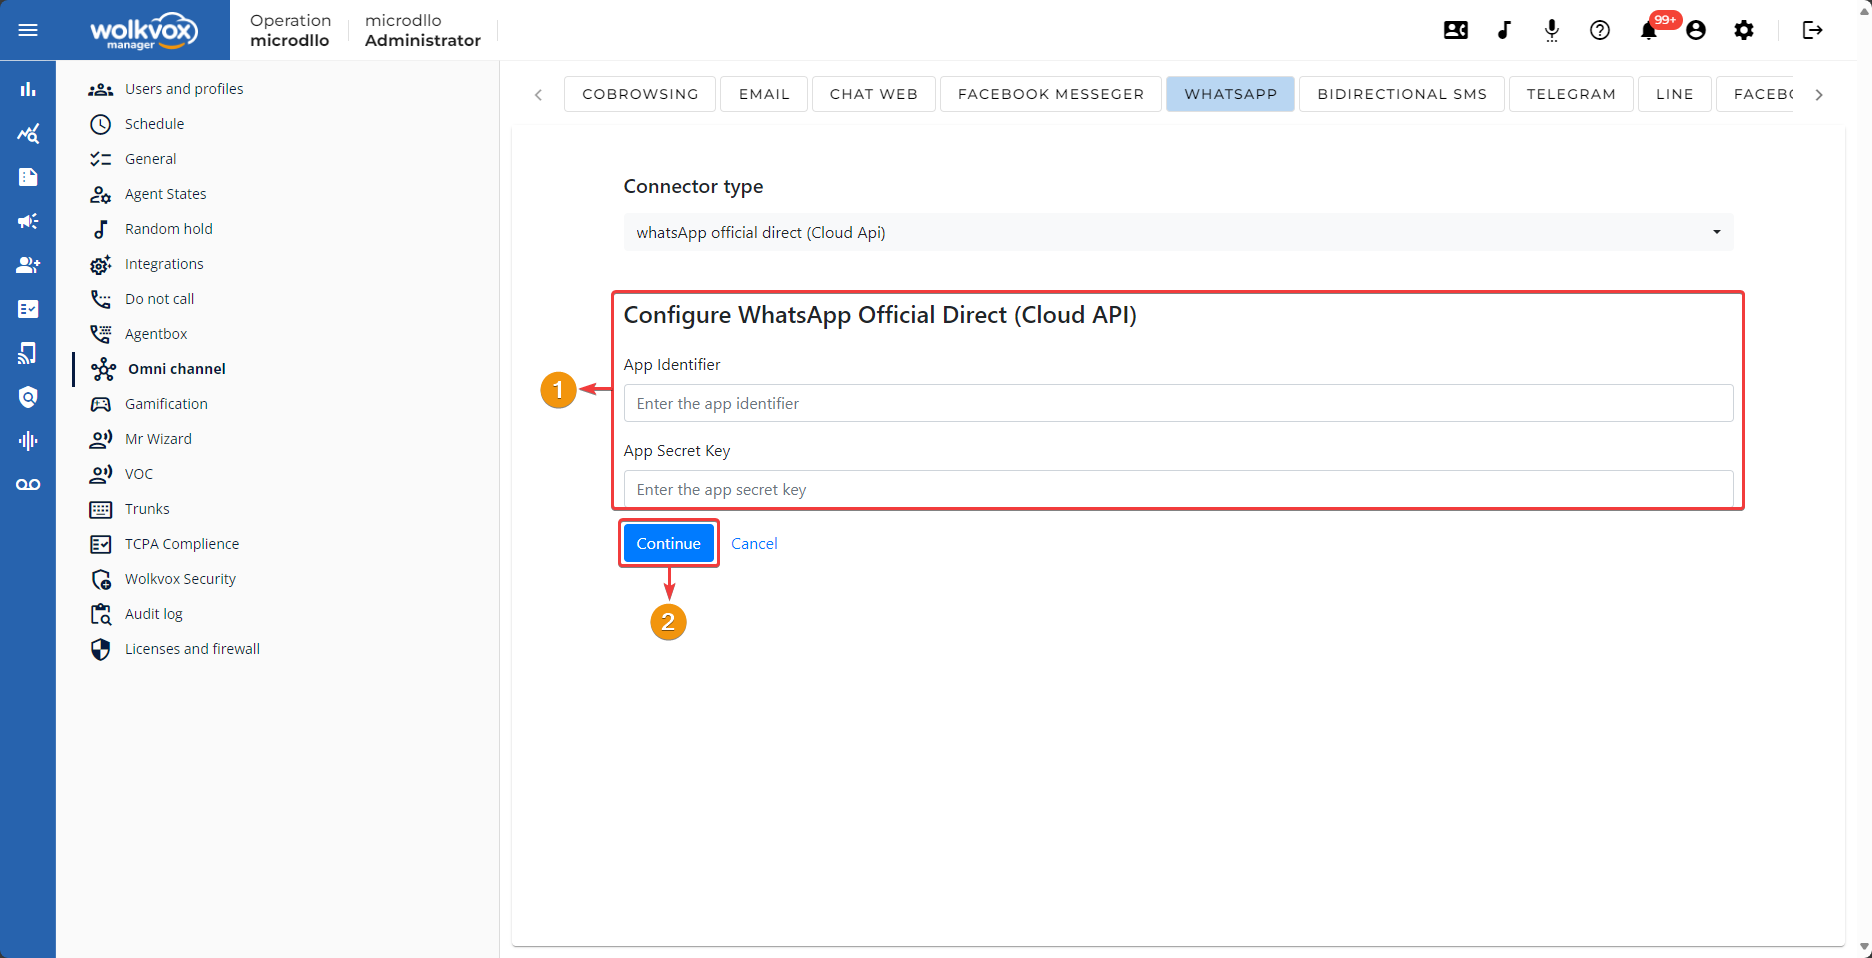
WhatsApp Official (Cloud API)
A WhatsApp Official (Cloud API) connector is a software that enables businesses to integrate wolkvox Manager with the official WhatsApp platform. This integration allows businesses to receive and respond to WhatsApp messages from the wolkvox system.
The WhatsApp Official (Cloud API) connector utilizes the WhatsApp Cloud API to send and receive WhatsApp messages. The WhatsApp Cloud API is a RESTful API that provides a set of functions for interacting with the WhatsApp platform.
WhatsApp mobile (UnOfficial)
An Unofficial WhatsApp connector is software that enables businesses to integrate Wolkvox Manager with the WhatsApp platform through a third-party API. This integration allows businesses to receive and respond to WhatsApp messages from the Wolkvox system.
Note: Unofficial WhatsApp connectors may have limitations regarding the features they offer. These include:
- The API is not part of Meta’s official API portfolio.
- Although stable, the service could become unavailable at any time.
- There is a moderate probability of service blocking.
- The operational cost is low.
- You can send up to 6,000 messages per day.
- The API is compatible with various devices.
- You can share files up to 2MB in size.
- The response speed is acceptable.
- Email support is available.
- There is no API for bulk messaging.
- Free conversations are not included.
- The connector does not have Service Level Agreements (SLAs).
- To use the connector, you need a mobile device and SIM card.
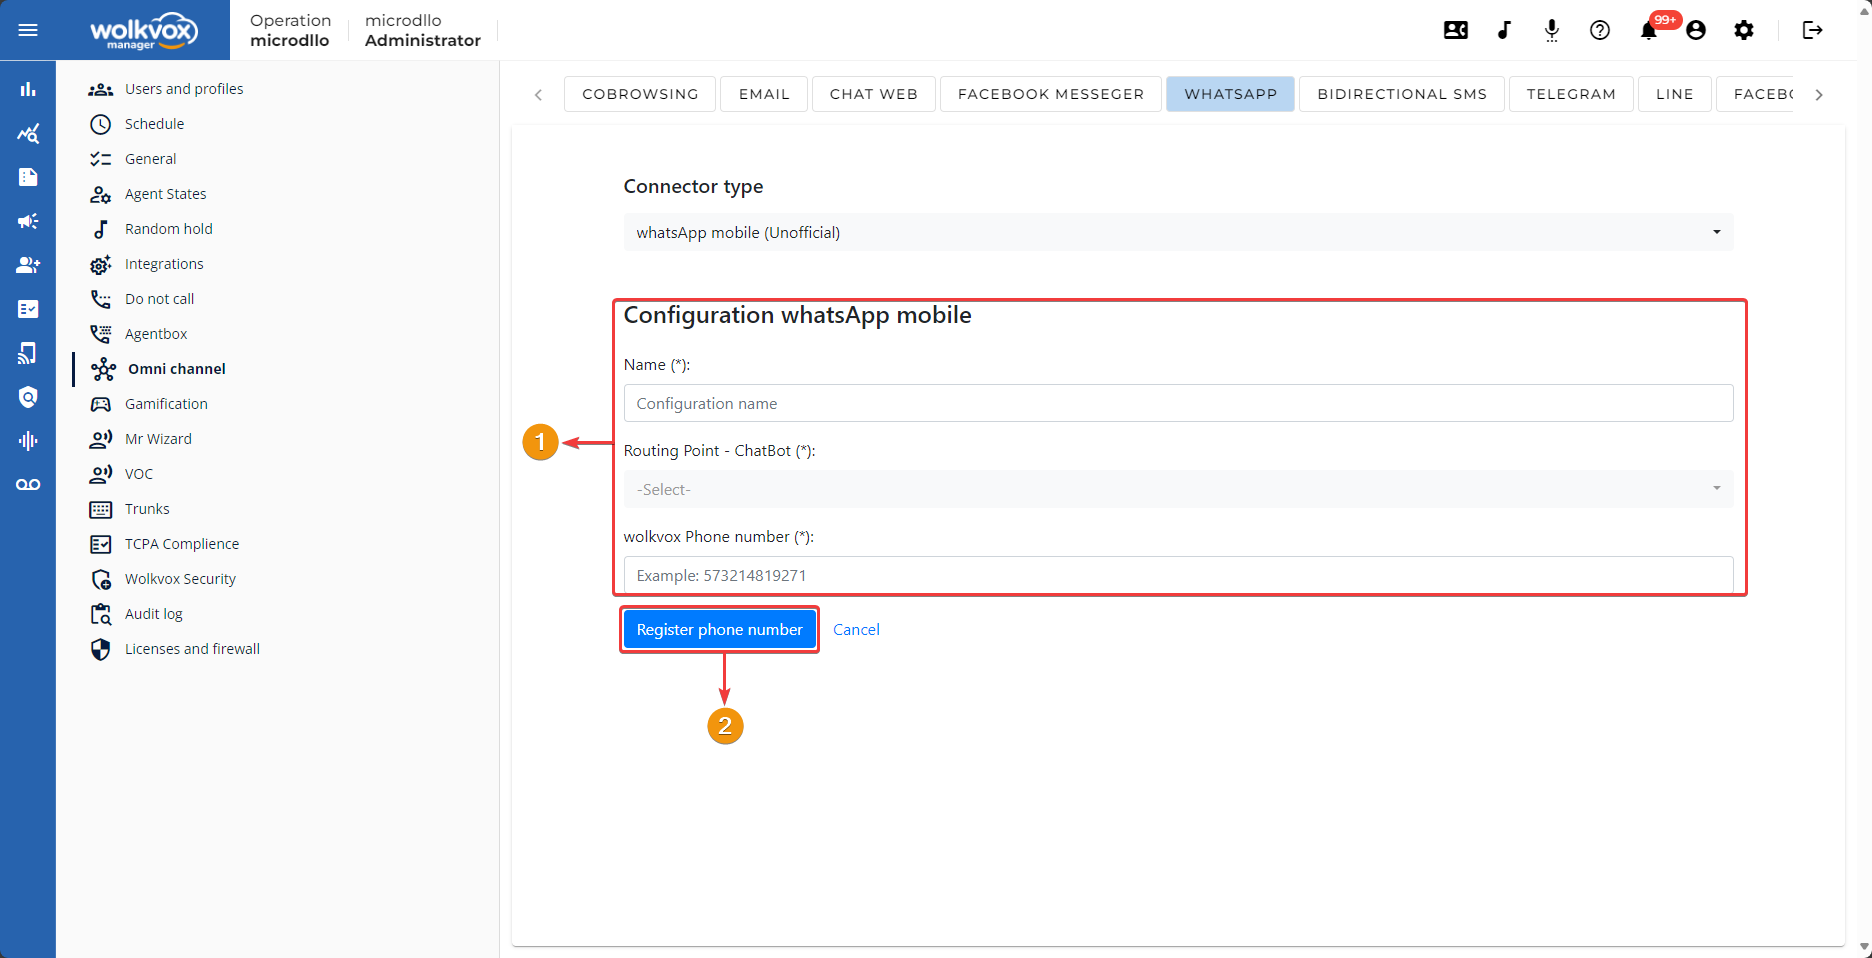
- Click on “Get QR Code” to generate the QR image to associate the account on the mobile device.
- Scan the QR code using the “WhatsApp” app on your device to associate the account.

Restart account linking (in case of error) with WhatsApp mobile connector (UnOfficial) #
Go to the list of WhatsApp accounts added to your operation and click on the edit icon of the account you want to edit. In this case, an account using the “WhatsApp mobile (UnOfficial)” connector type.

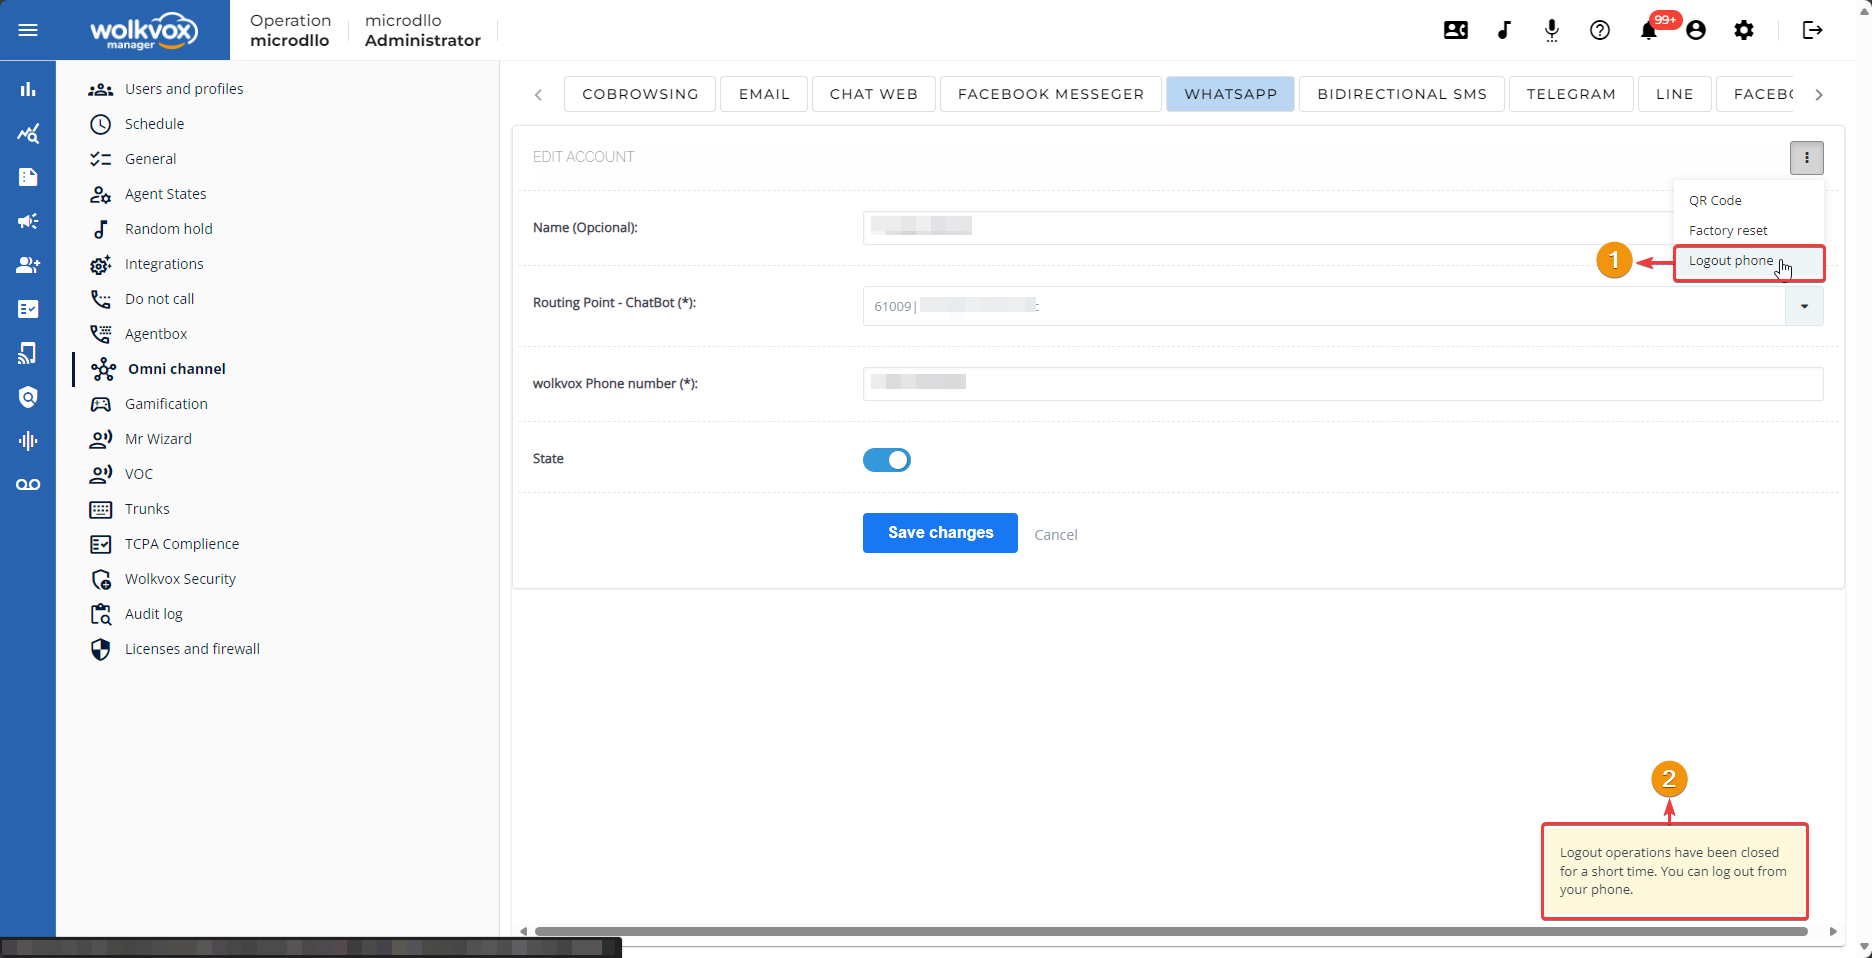
Click on the icon shaped like three vertically aligned dots and select the “Factory reset” option. This option will reset the account’s settings.
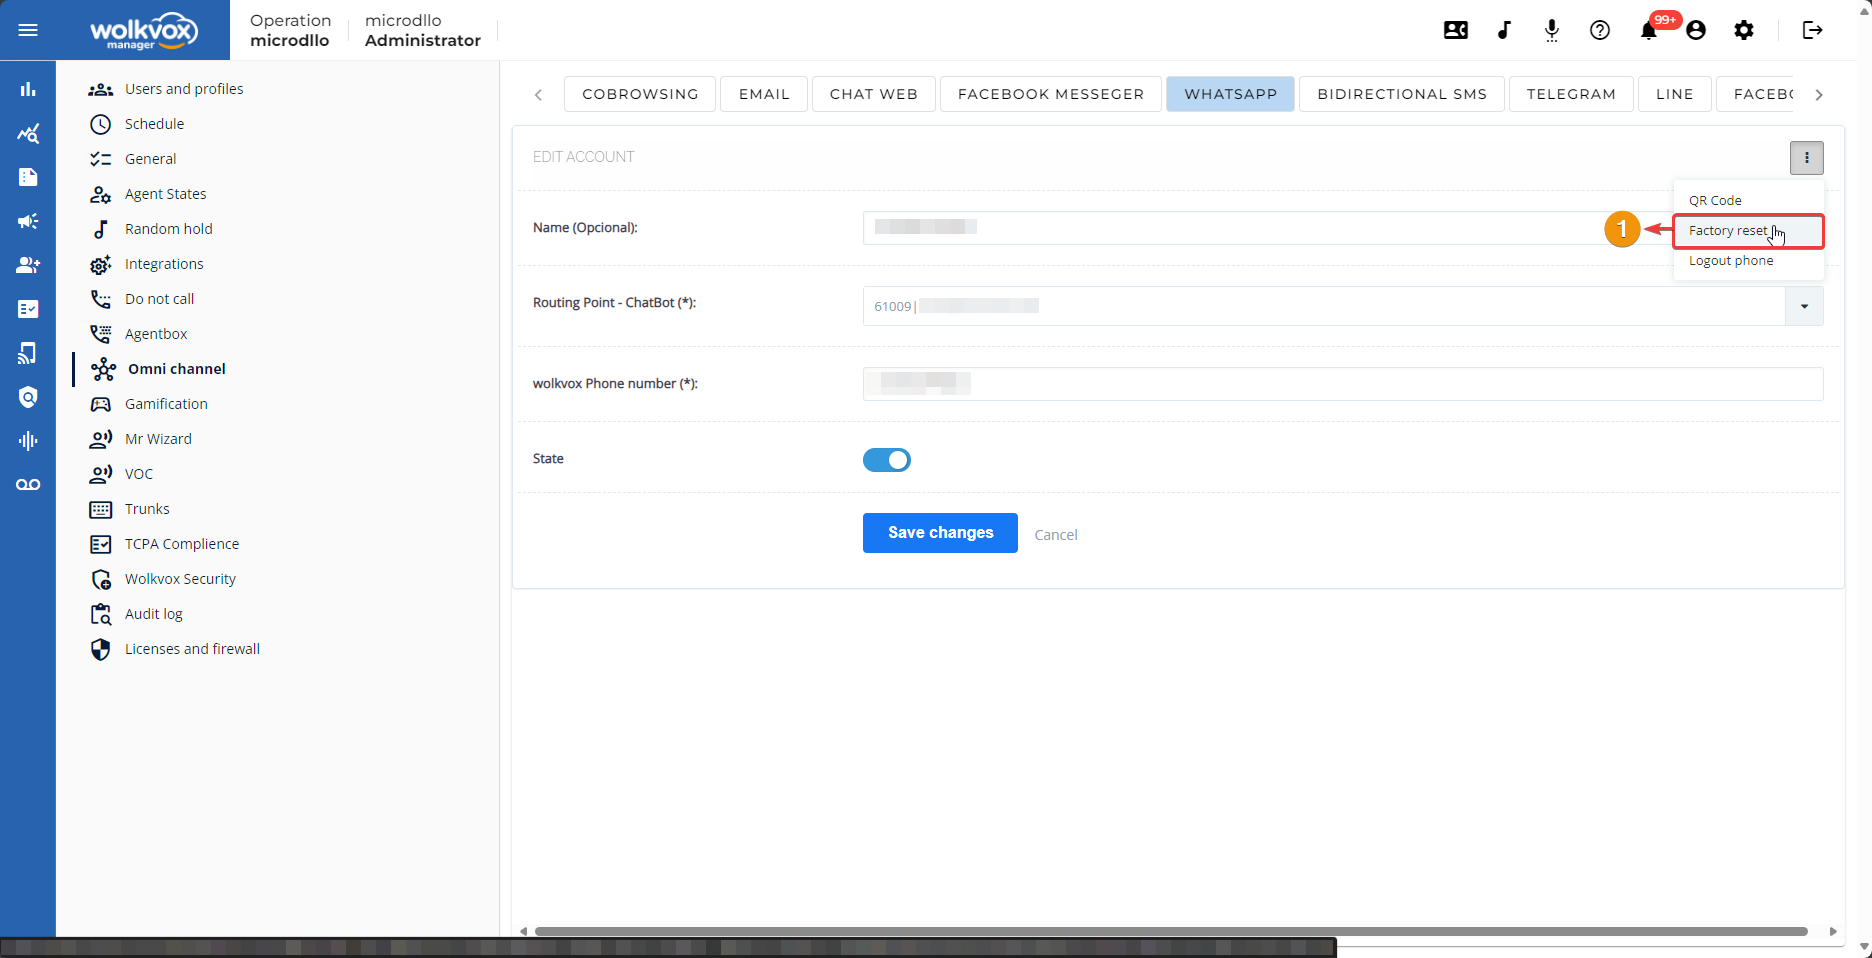
You should see a message stating that the reset was successful.

Click again on the icon with three vertically aligned dots and select the option “Logout phone”. This option will unlink the device associated with the account.
You should see a message stating that the session has been successfully terminated.
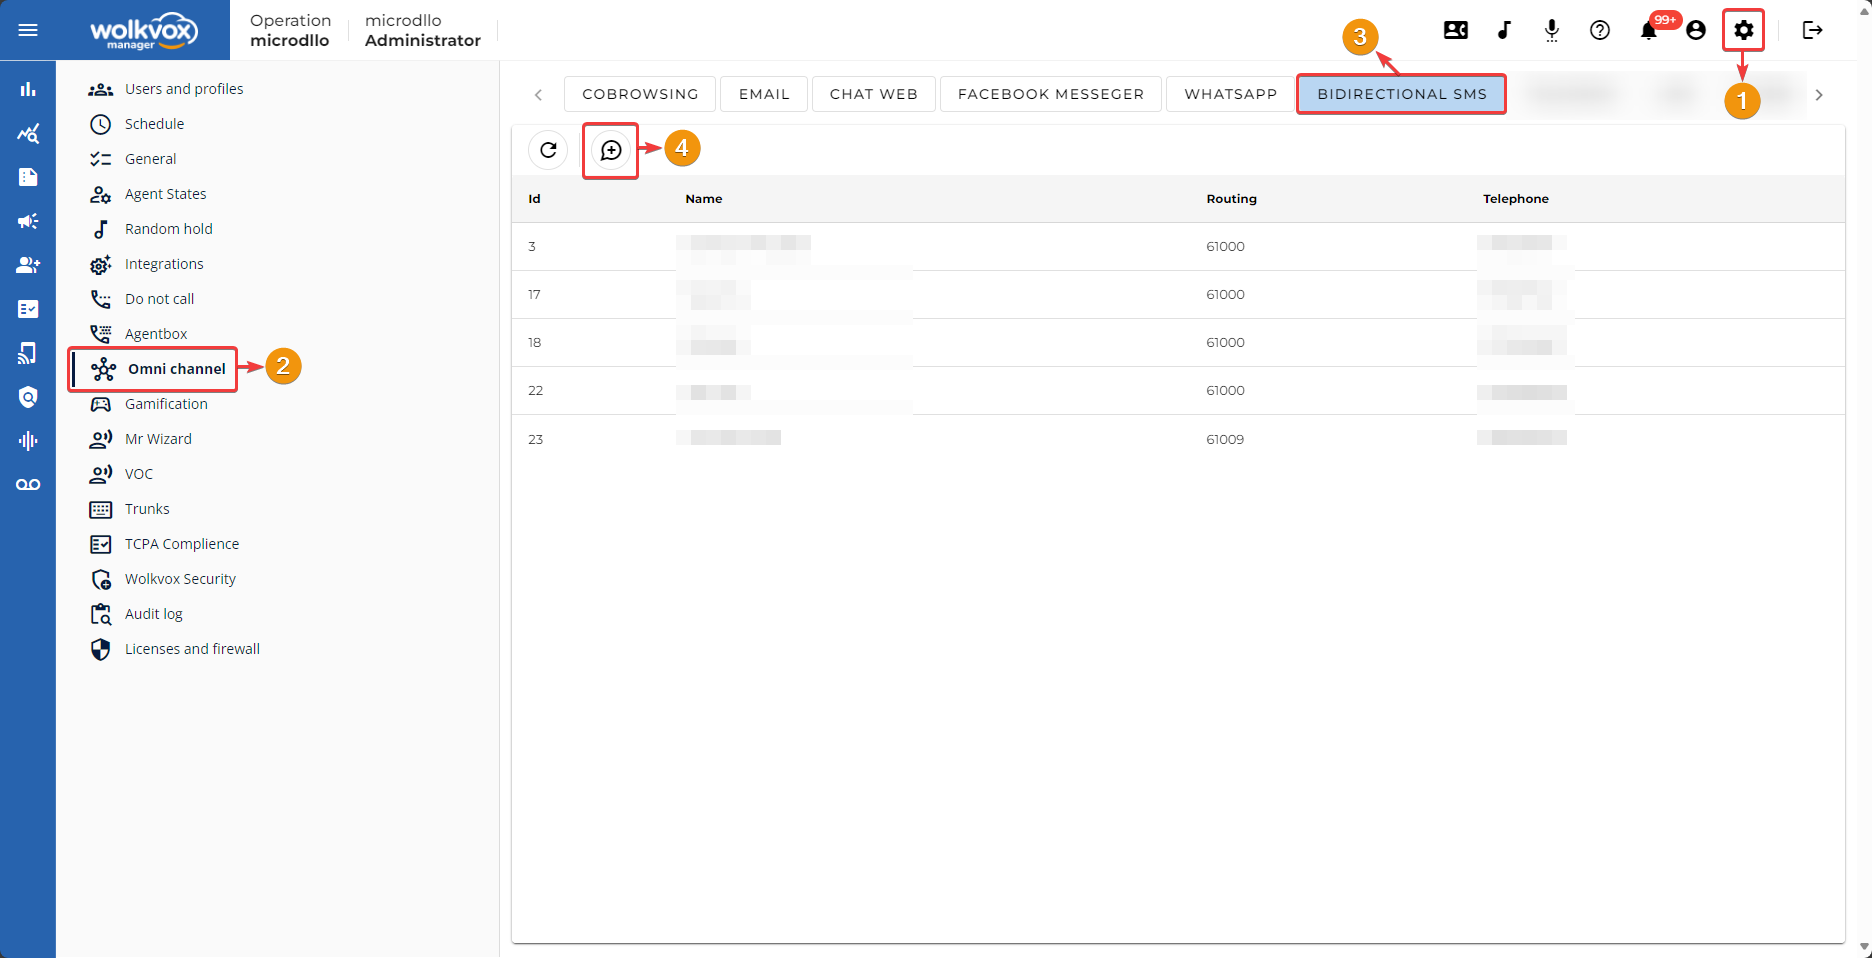
Bidirectional SMS Configuration #
The bidirectional SMS service allows for sending and receiving text messages between two parties, enabling communication in both directions.
Note: This service is only available for the United States. Therefore, you should contact the support team to activate the service if you operate in this country.
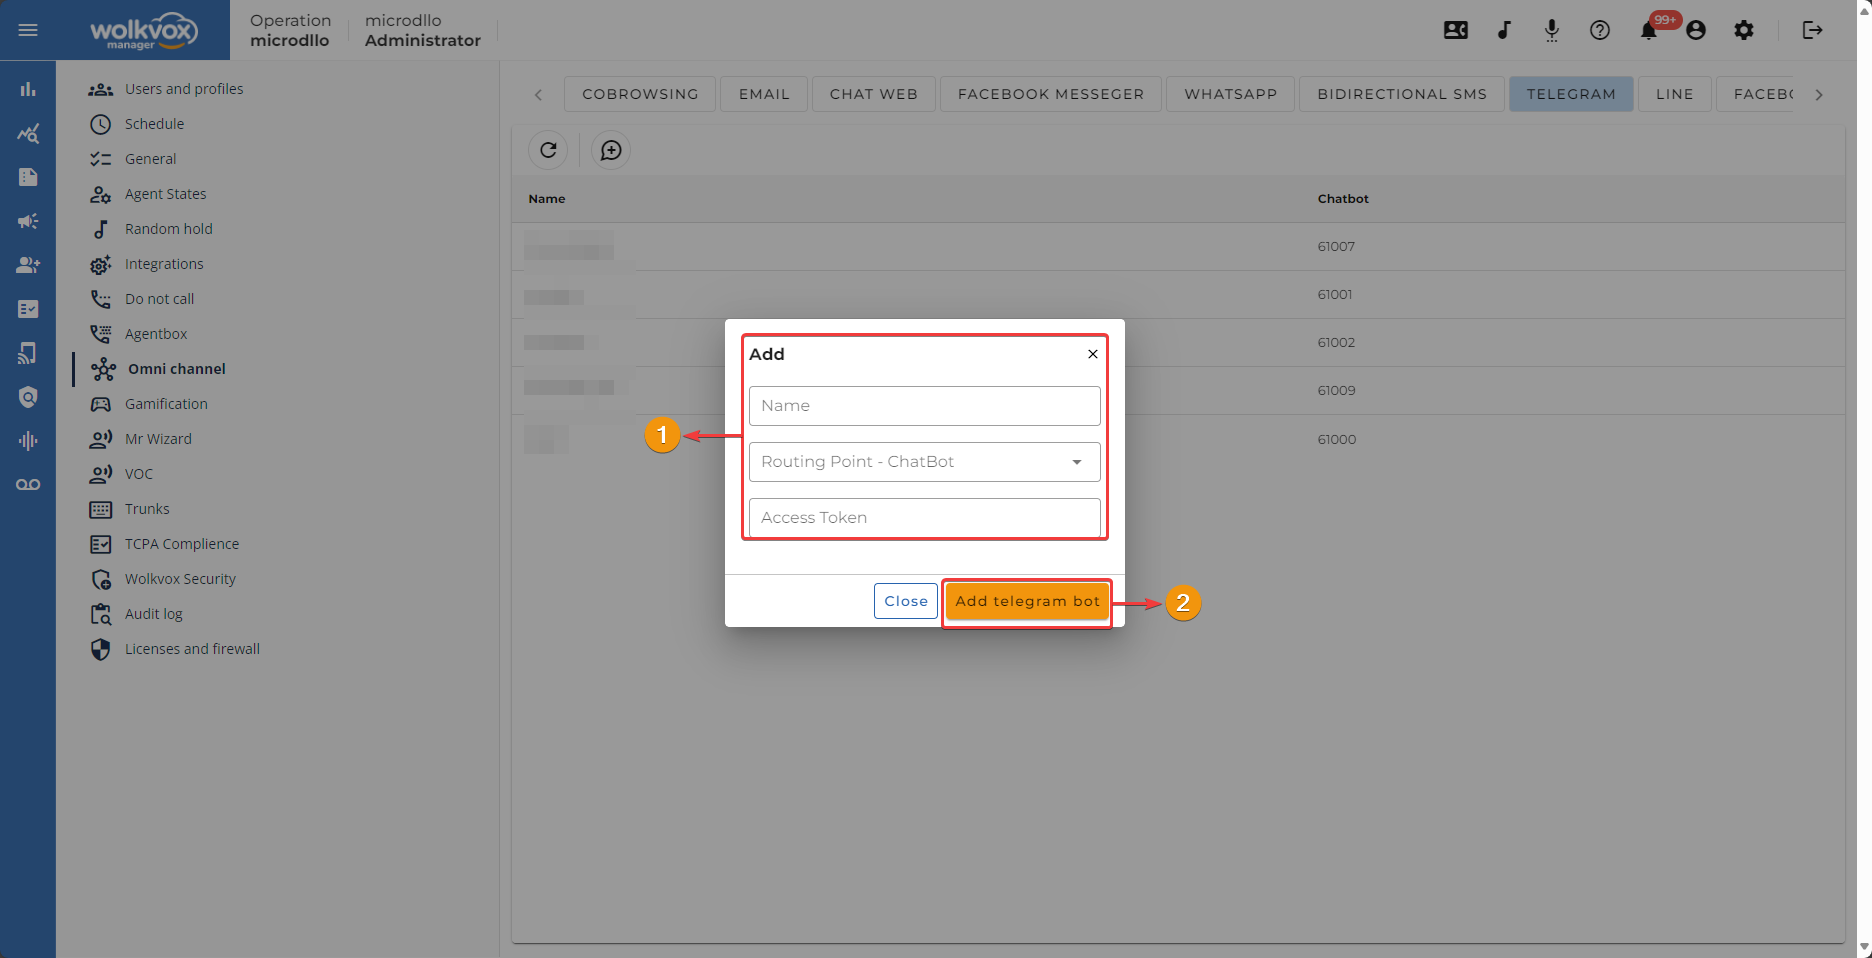
Telegram Setup #
The next channel you can integrate into your Wolkvox Manager is Telegram. This is a popular messaging platform with over 700 million active users. This means that businesses can reach a larger number of customers through Telegram.

Setting up Telegram is very straightforward. Simply obtain the access token from the app, then in Wolkvox Manager, assign a name to the Telegram ChatBot, assign it a routing point, and enter the access token obtained from the Telegram app.
Facebook Configuration #
The next channel you can integrate into your Wolkvox Manager is a Facebook page. This channel involves interactions rather than chat. Interactions are counted as comments within the posts on your Facebook page.
Facebook is a popular social platform with over 2.9 billion active users. This means that businesses can reach a larger number of customers through Facebook.
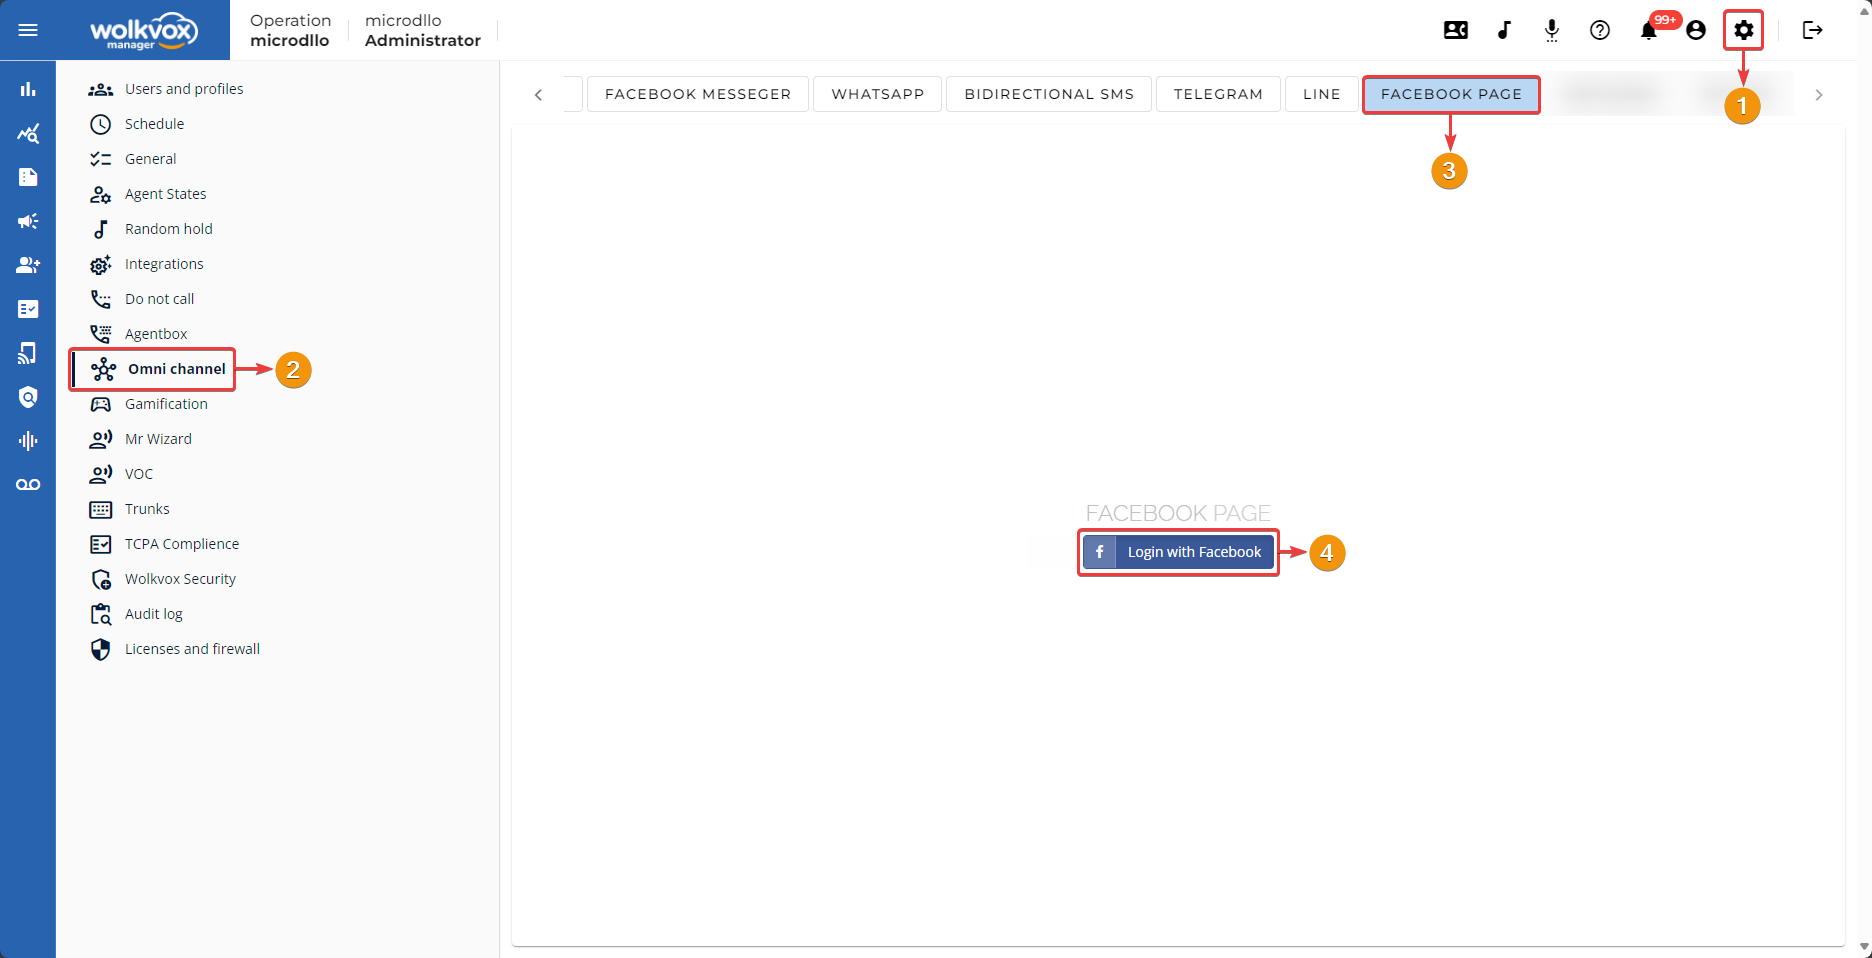
The system will prompt you to log in to where you have the Facebook page you want to link.
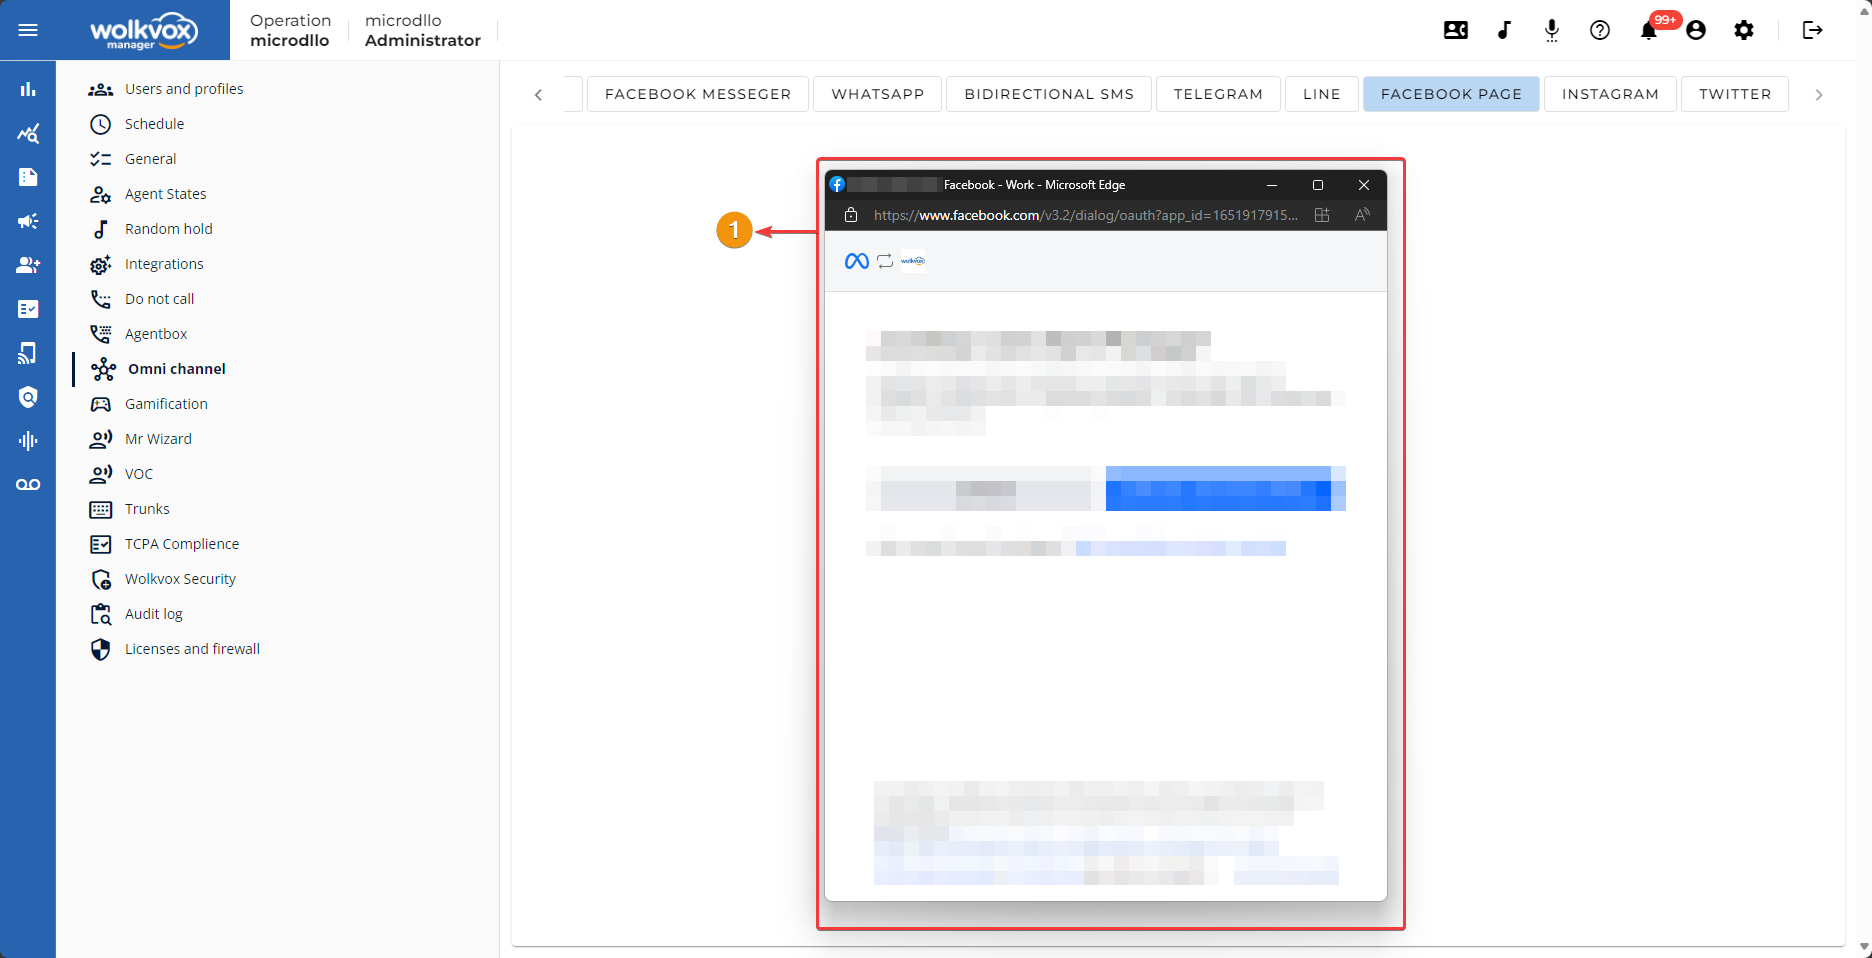
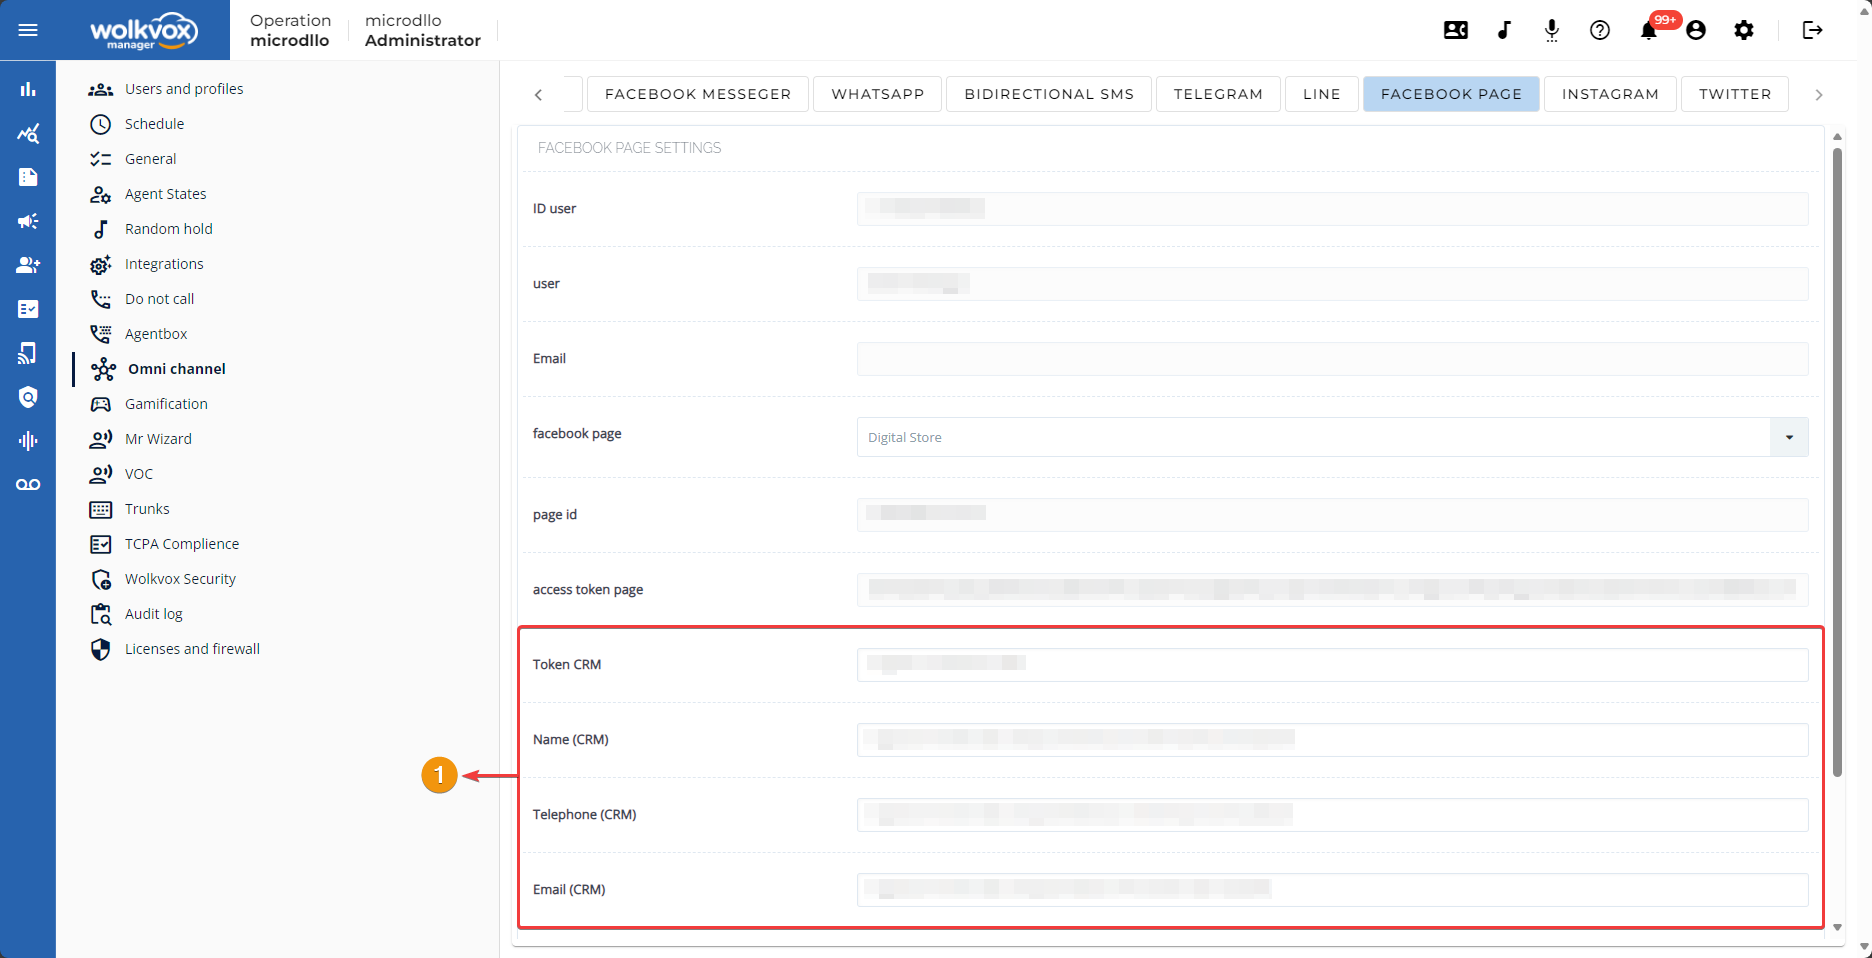
Select the Facebook page you want to link in the “Facebook Page” field. Once you select it, the other fields will be loaded, and the only one you need to complete is “Routing Point,” which contains the interaction flow you want the customer to go through.

If you need to integrate the forms created on Facebook so that the captured information is saved in your wolkvox CRM database, you must fill in the fields associated with your wolkvox CRM. The CRM token is generated from there and not from wolkvox Manager. They are two different token generators.
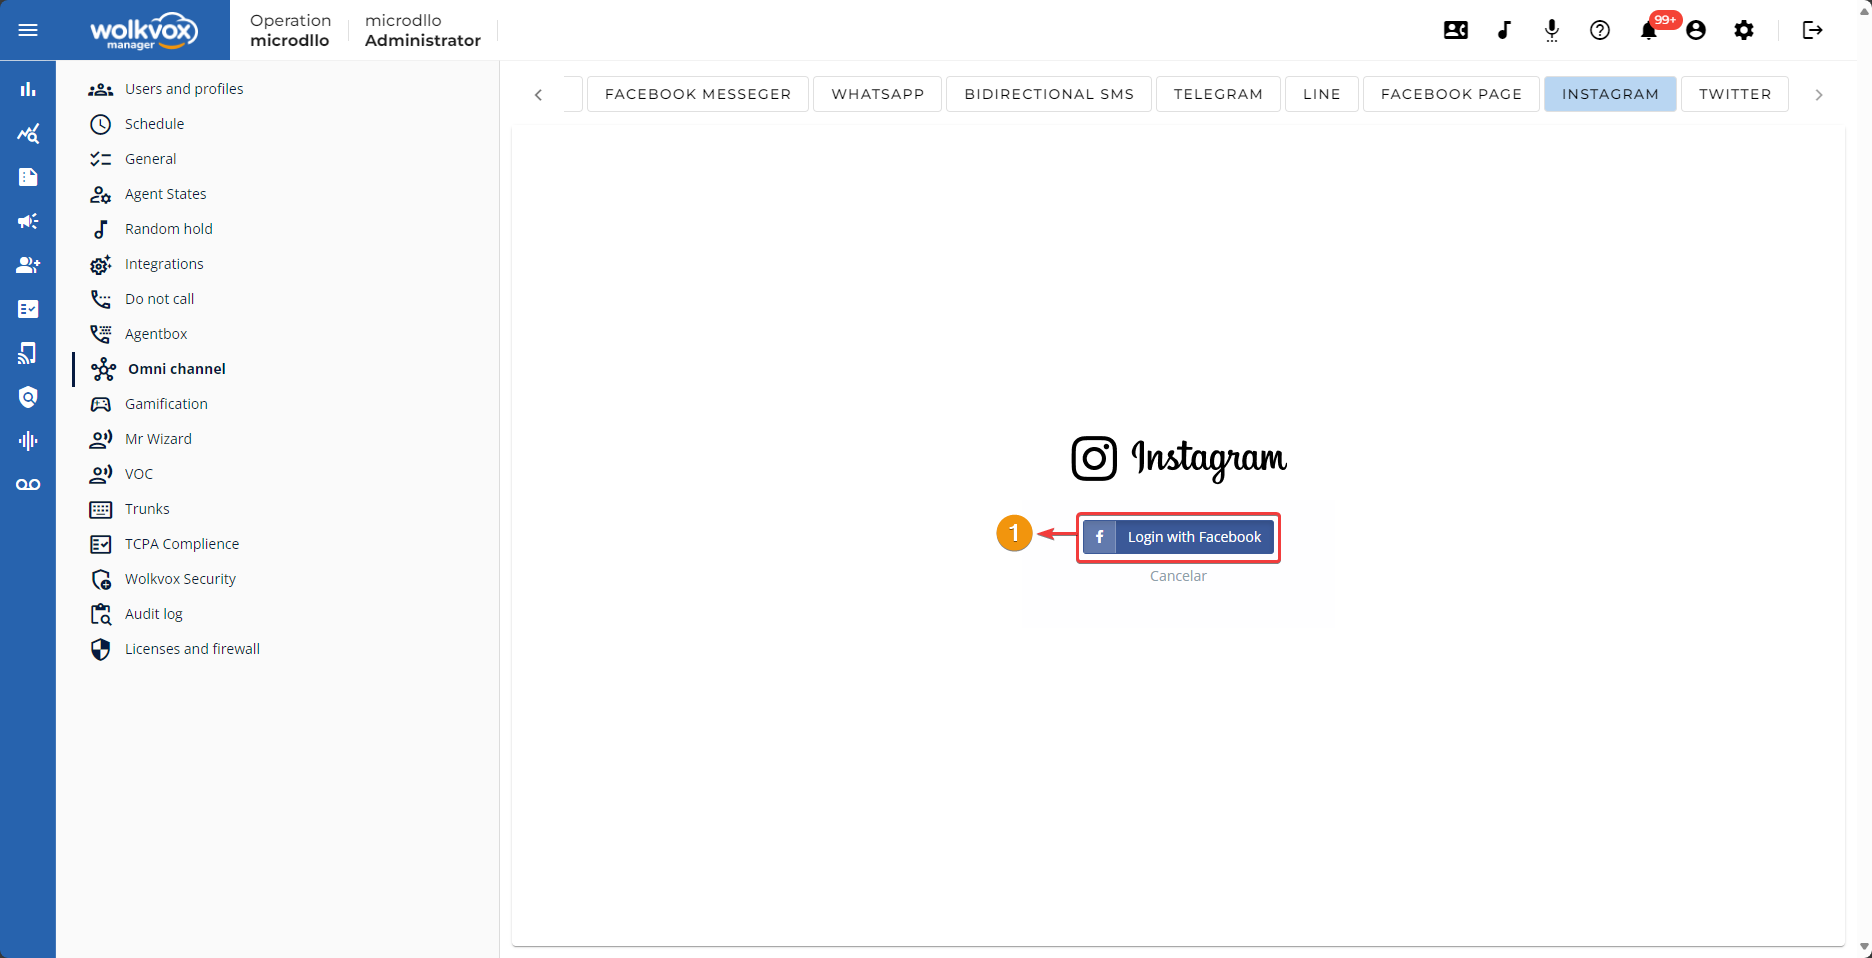
Configuration of Instagram #
The next channel you can integrate into your wolkvox Manager is an Instagram page. This channel involves interactions rather than chat. Interactions are counted as comments within the posts on your Instagram page.
Instagram is a popular social platform with over 1 billion active users. This means that businesses can reach a larger number of customers through Instagram.

The system will prompt you to log in to the Instagram account where you have the page you want to link.
First, select the desired Facebook Page from the dropdown menu labeled “Facebook Page”. Then, the remaining fields will be listed.
Choose the routing point where the flow you want to use for interactions is located.
Click “Save” to apply the configuration.

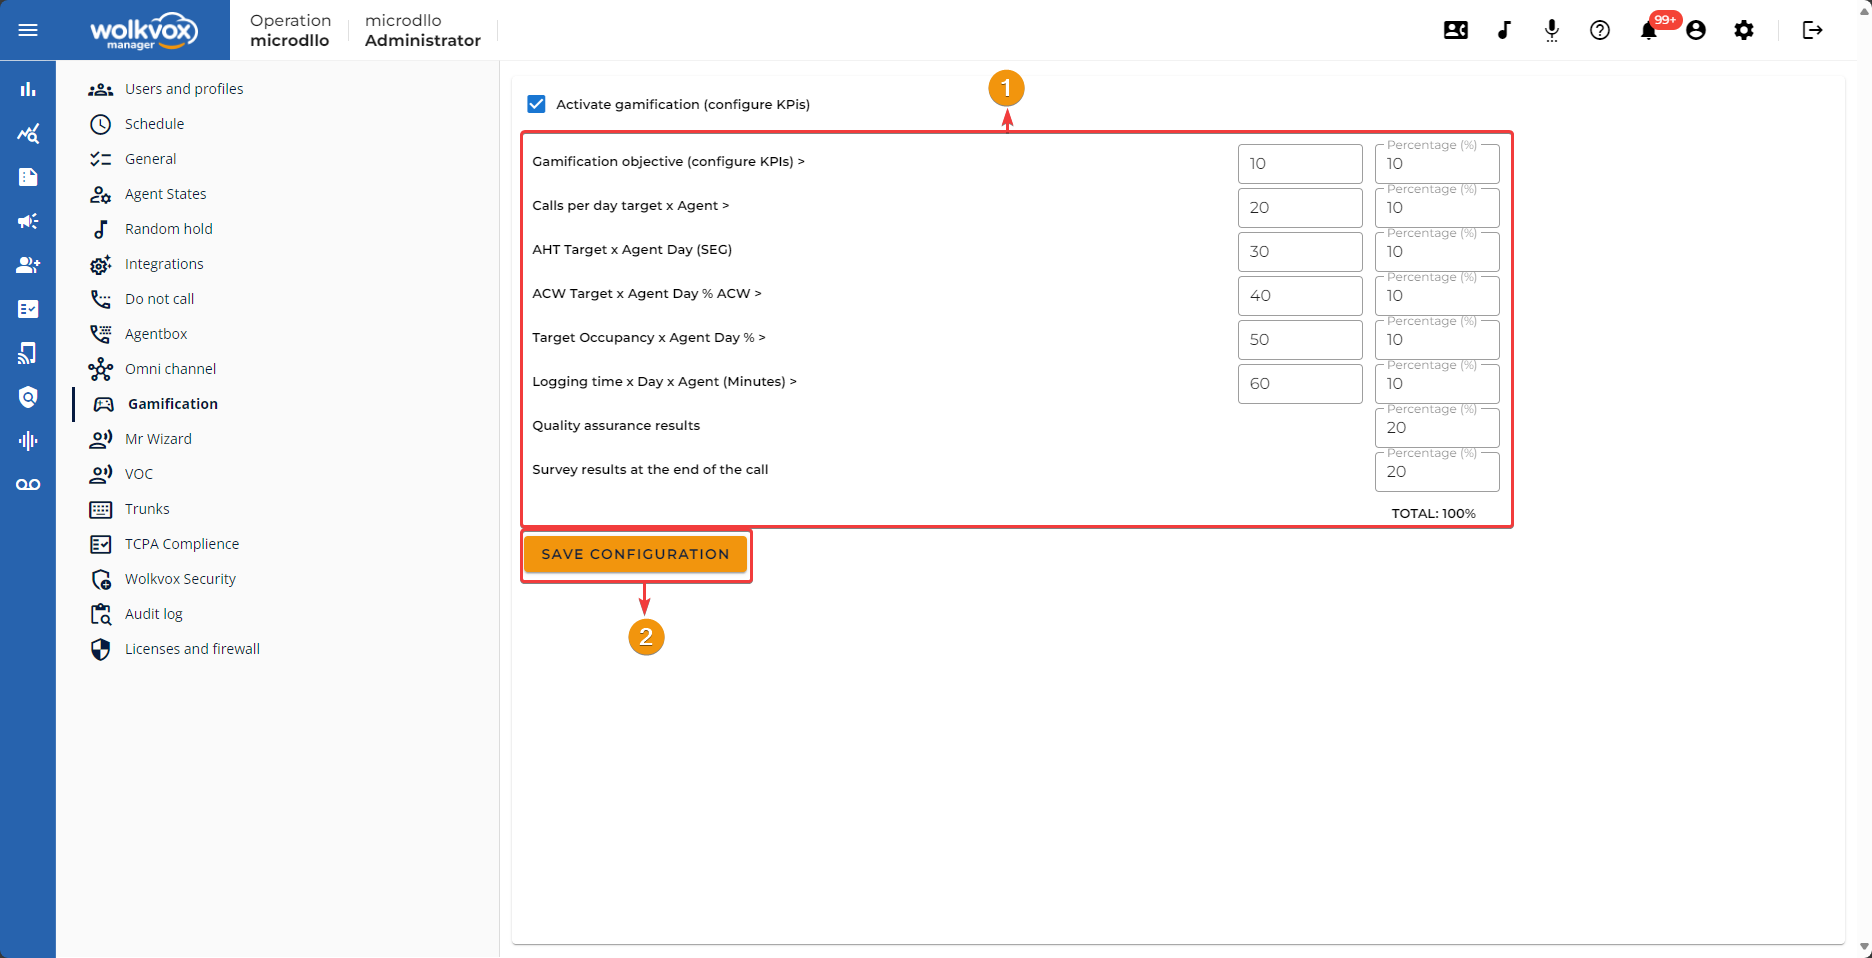
Gamification: Optimize didactic techniques to motivate and compete #
In this tab, everything related to the gamification of the operation is configured. You must remember that gamification involves all those didactic techniques used to achieve the proposed goals and foster healthy competition in your operation. Agents will feel more fulfilled seeing the fulfillment of their goals through scores.
The first thing you need to do is click on the checkbox “Activate gamification (configure KPIs).
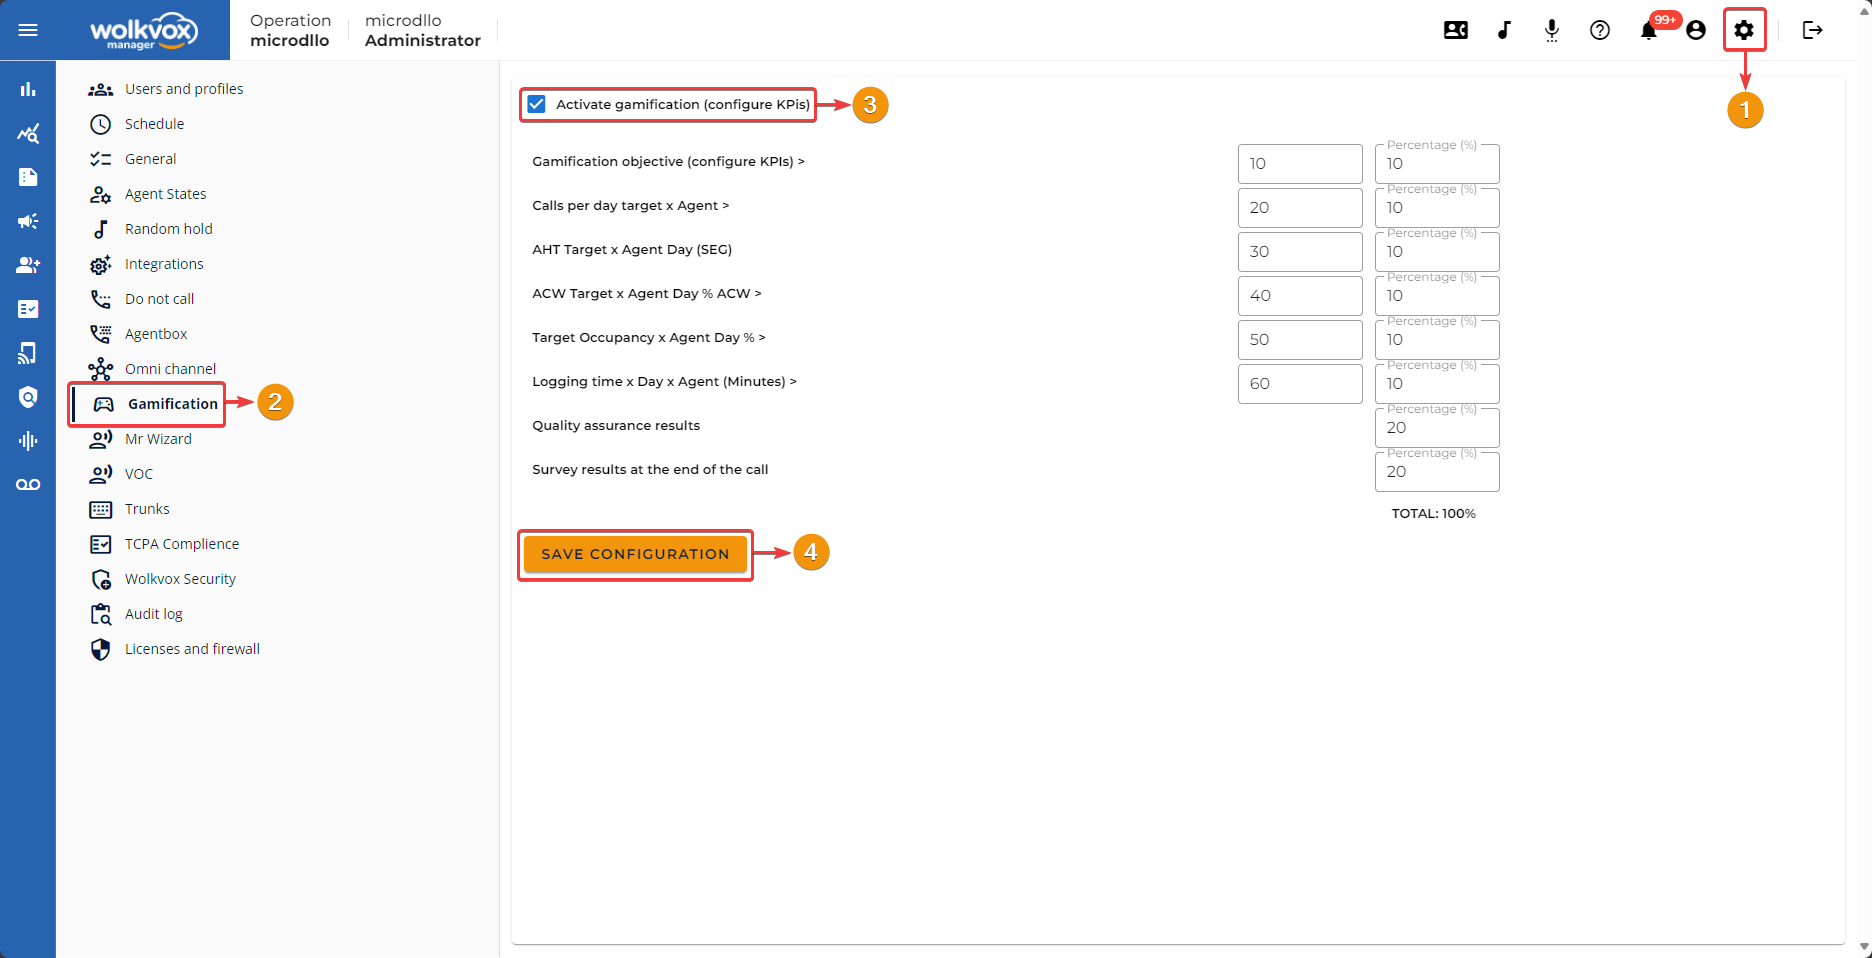
After activating the service, you must establish the goal for each indicator and the percentage weight it will have on the total.
The total sum of the percentage weights must not exceed 100%.
Each indicator has its reference value to specify the goal:
- Daily HITS Target per Agent: Set the minimum number of daily successful hits (calls) an agent must achieve to surpass the indicator.
- Calls per day target per Agent: How many minimum daily calls do you want the agent to make to surpass the indicator.
- AHT Target per Agent Day (SEC): How many seconds in daily AHT should the agent not exceed to meet the indicator.
- ACW Target per Agent Day (SEC): How many seconds in daily ACW should the agent not exceed to meet the indicator.
- Occupation Target per Agent Day: What percentage of daily occupancy do you want the agent to have to meet the indicator.
- Login Time per Day per Agent (Minutes): How many minutes of daily login time should the agent achieve to surpass the indicator.
- Quality Assurance Results: Set the percentage weight for compliance with quality standards.
- Post-call Survey Results: Set the percentage weight for results in surveys conducted at the end of the customer interaction.
Note: For each option, you must assign the percentage weight the indicator will have on the total.
Mr. Wizard for real-time voice analysis and response chat #
In this section, you have access to real-time voice tools, Mr. Wizard in voice, Mr. Wizard in chats, Mr. Wizard in interactions, and Mr. Wolkvox – Wolkvox Studio – Business Logic.
- Mr. Wizard in voice allows you to activate a section in Wolkvox Agent where the agent can type a question, and the system responds based on the training it receives.
- Thanks to Mr. Wizard, you’ll optimize the productivity of your operation and the quality of customer service provided by your agents.
- Go to the “Settings” tab.
- In “Language,” select the language for text and voice analysis.
- In “Real-time Voice Analysis,” you can enable or disable the sentiment analysis and call transcription service in real-time.
- In “Mr. Wizard in Voice,” you can activate or deactivate the new tool that allows the agent to type a question and receive a response from the system, the response depends on the information provided in the “Training” tab. The Mr. Wizard in Voice tool also allows the agent to have an informative field to check the overall sentiment of the call and its transcription for conversation history in text format.
- In “Mr. Wizard in Chat,” you can activate or deactivate the new Mr. Wizard tool that gives the agent the ability to ask questions to the artificial intelligence (the response depends on the training given).
- In “Enable Automatic Chat Checker,” you have a new functionality for Mr. Wizard with artificial intelligence that automatically corrects the texts sent by the agent to the client.
- In “Mr. Wizard in Interactions,” you can activate or deactivate the new tool that allows the agent to bring the body text of the received email into a window to get help from artificial intelligence in drafting the response message. Also, the agent will have a button available to check the spelling and grammar of the text to be sent.
- Don’t forget to click the “Save” button to apply the changes.
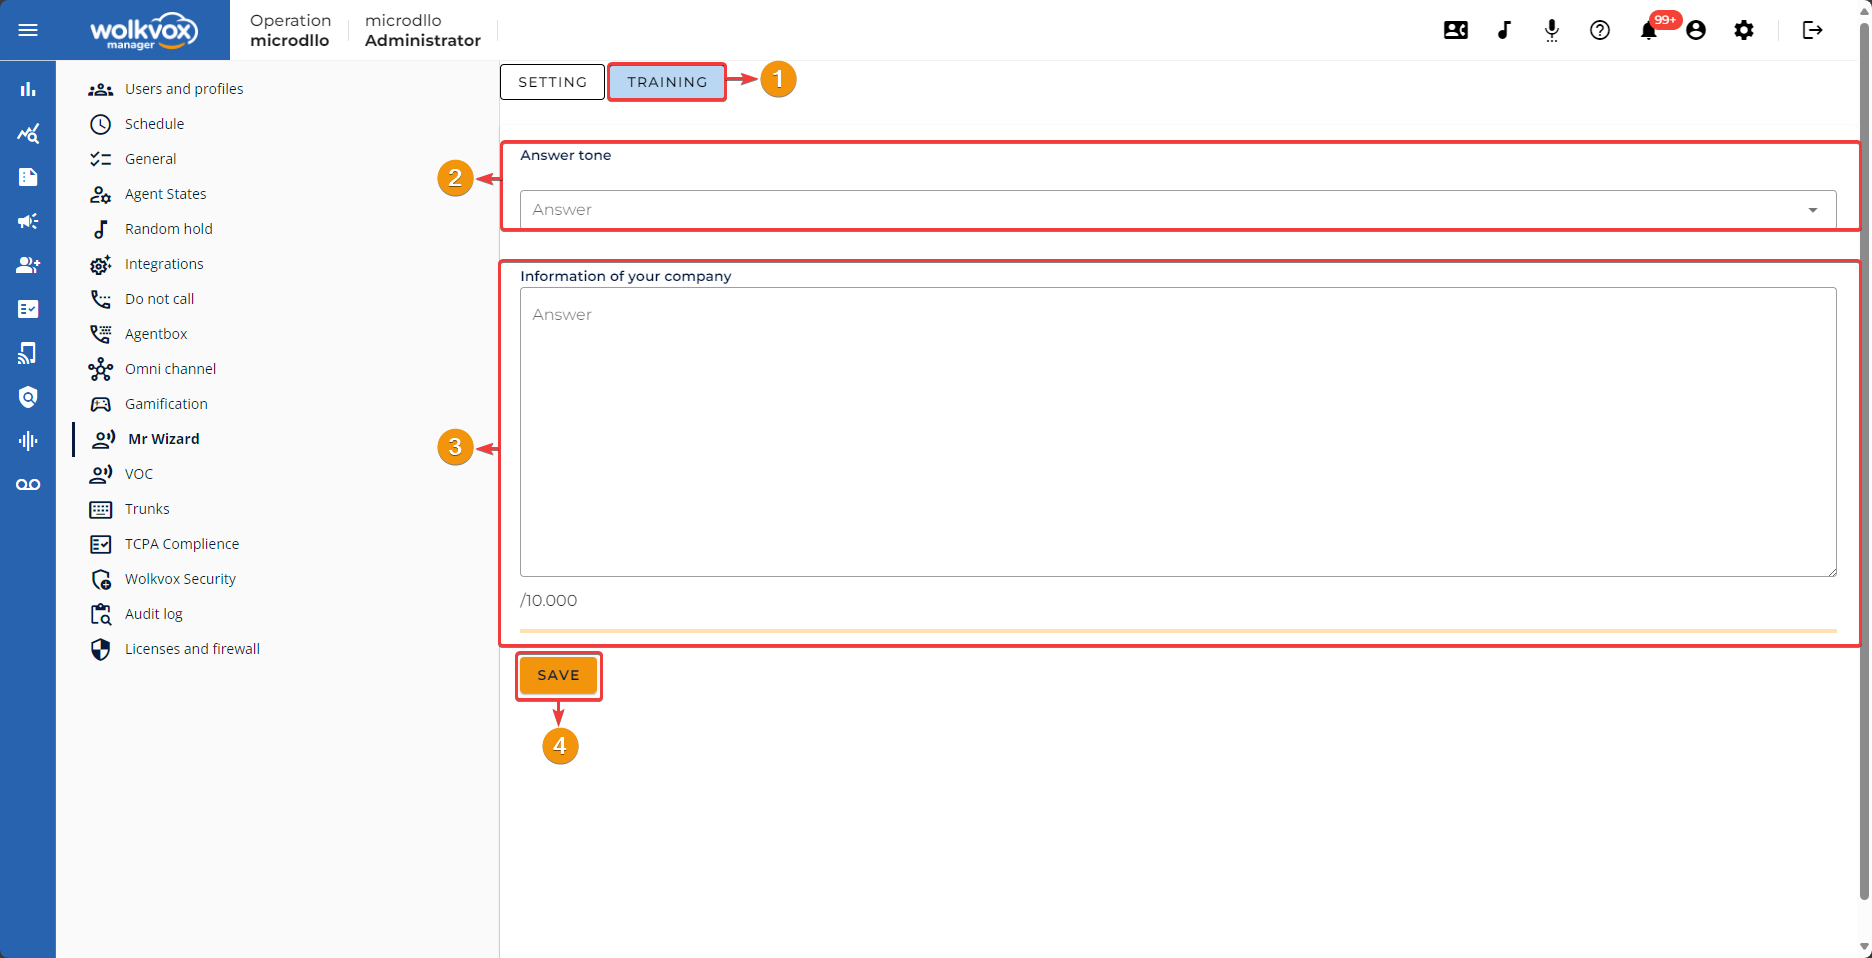
Training Mr. Wizard #
- To train Mr. Wizard, go to the tab called “Training.”
- Select the tone of the response, which can be professional, neutral, funny, or poetic. Choose the response tone that best fits what you want Mr. Wizard to respond with.
- In “Company Information,” you should write all the knowledge you want to train Mr. Wizard with. Mr. Wizard’s artificial intelligence will answer the agent’s questions based on the knowledge acquired in this field.
- Note: Training cannot exceed 10,000 characters.
- Click “Save” to apply the changes.
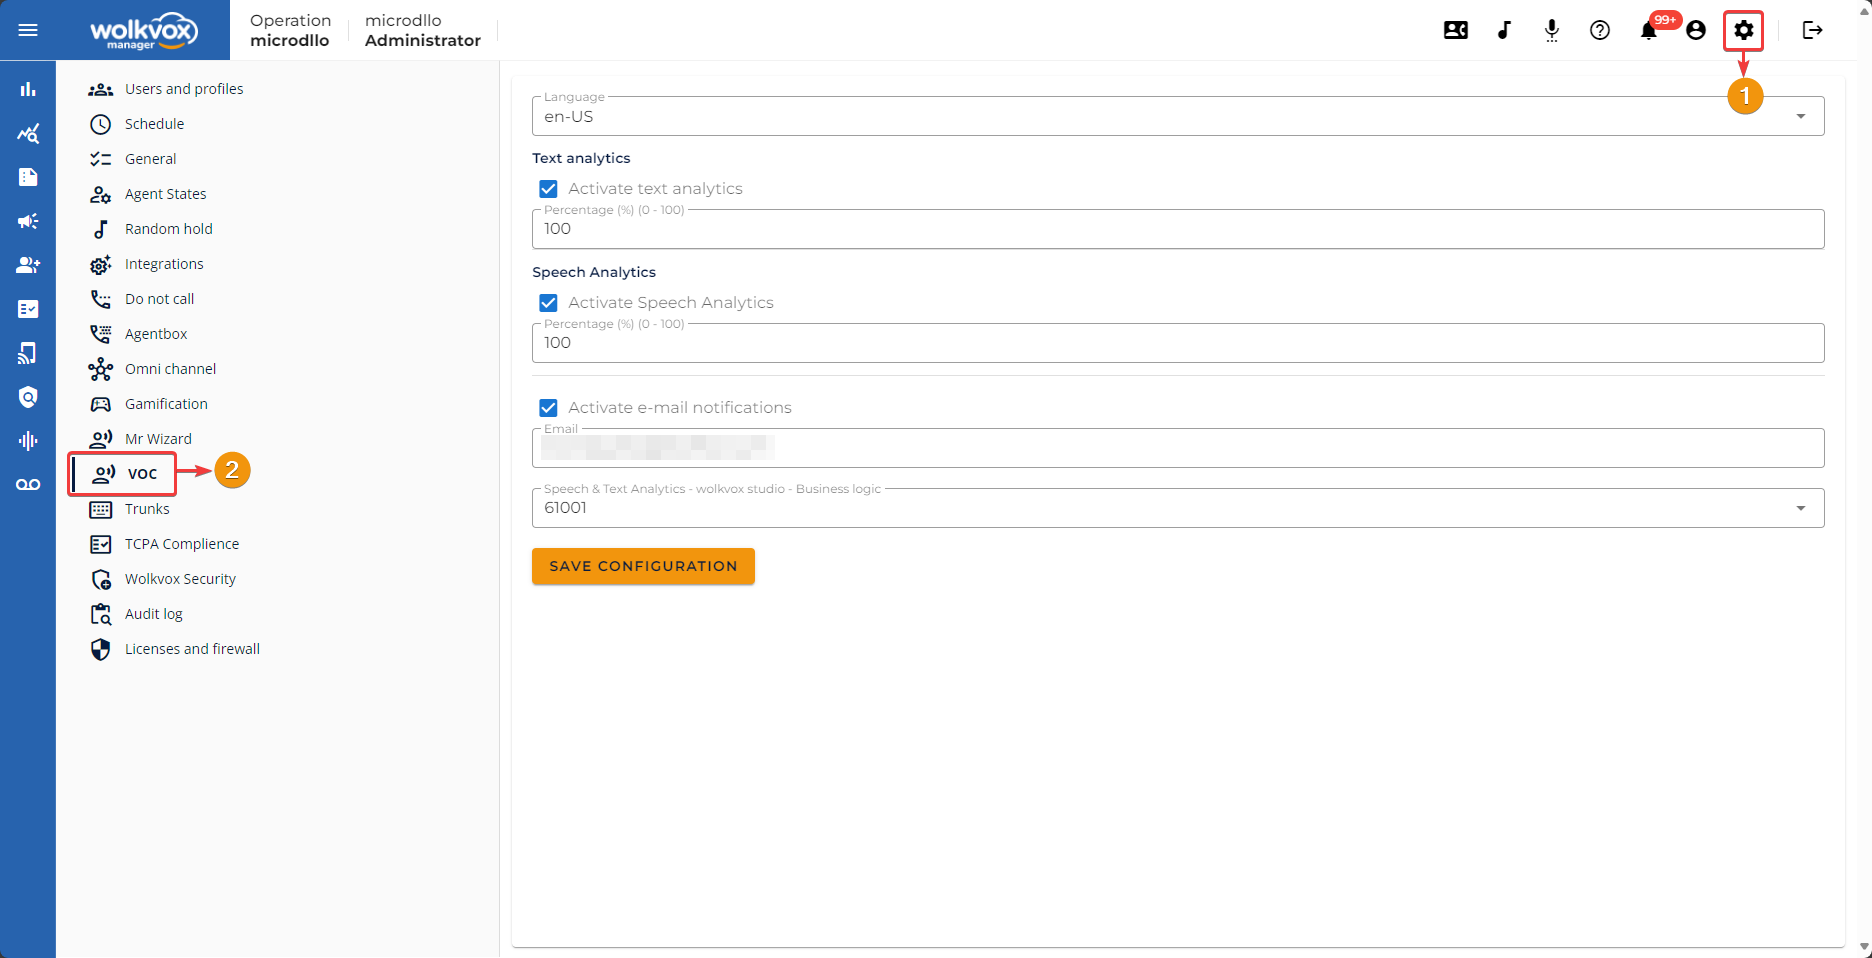
VOC #
In this section, you can activate and configure the voice and text analysis service. Thanks to this tool, you can obtain a comprehensive and detailed analysis of the conversations that occur in your operation. For example, you can get a summary of the conversation, understand its sentiment, obtain a text transcription of the call, know if the agents made the protocol greeting, the speed of the greeting, find out if the agent used certain keywords, etc.
- Select the language for conducting the conversation analysis.
- Text Analytics: Allows you to obtain a comprehensive analysis of all conversations in your operation that occur through text channels.
- Speech Analytics: Allows you to obtain a comprehensive analysis of all conversations in your operation that occur through voice channels.
- You can enable email notifications to receive emails each time text and/or audio analyses are performed, and also when there is any incorrect procedure within the VOC flow.
- Select the wolkvox Studio routing point you want to associate with text and audio analysis.
- Click on “Save configuration” to apply the changes.
Trunks #
- Here you can configure all the SIP trunks that will be used for making outgoing calls.
- To add a new trunk, click on the button.
- Enter the DNIS or incoming call identification number of the trunk.
- Select the wolkvox Studio routing point to which you want to assign the DNIS.
- Write a brief description to identify the DNIS.
- Click “Save” to add the DNIS.
In the table of the added trunk list, you will get the following data for each:
- ID: Trunk identification number.
- DNIS: Incoming call identification number (DNIS) of the trunk.
- DN: Domain name of the trunk. This is linked to the selected routing point for the trunk.
- Date: Creation date of the trunk.
- Description: Description of the trunk.
You can right-click on an already created trunk if you wish to edit its data, thus being able to change the DNIS, routing point, and the trunk’s description.
TCPA Compliance #
Through this section, you can regulate interactions with your customers to comply with the laws of telephone consumer protection that apply in your operating country.
- To activate TCPA Compliance, simply check the corresponding box.
- Then, click “Save Settings” to apply the changes.
- The first type of communication channel you can regulate is “Voice”.
- This setting limits the frequency with which the system will allow a phone communication to be established with a particular user during a 30-day period. In other words, it limits the number of times a call can be made to that user within that specific period.
- In this case, the setting focuses on the number of times dialing (i.e., attempting to make a call) to a user is allowed in the last 30 days. This can include not only successful calls but also call attempts, regardless of whether a telephone connection is established.
- Don’t forget to save the changes made.
- The second type of communication channel you can regulate is SMS or text messaging.
- Set a limit on the number of interactions via text messages that the system can have with a particular user within a month.
- Don’t forget to click “Save settings.”
- The third type of communication channel you can regulate is email.
- Set a limit on the number of interactions via email that the system can have with a particular user within a month.
- Don’t forget to click “Save settings.”
- The fourth type of communication channel you can regulate is WhatsApp.
- Set a limit on the number of times WhatsApp can be used to communicate with each user in a month.
- Don’t forget to click “Save Settings.”
wolkvox Security #
This tool allows you to apply specific security measures to certain aspects of user and agent passwords in order to control and enhance their security.
First, check the box to enable the use of optional parameters.
- Note 1: On free, shared, and dedicated servers, this tool will be optional, and activation of the service will depend on the administrator of your operation.
- Note 2: On PCI servers, this tool will always remain active, does not require initial activation, cannot be deactivated, and the various options provided by the tool cannot be disabled.
- Note 3: These activities recorded by the tool will be logged in the “Audit Log” section.
- Password reuse control: The last 4 passwords cannot be reused when changing a password.
- Mandatory password change every 90 days: After 90 days from the last password change, users will be prompted to change their password.
- Password change on first use: When logging in for the first time, users will be prompted to change their password. Similarly, when resetting a password for a wolkvox Manager user, they will be asked to change their password.
- Password change for agents: Agents can change their password on their own without relying on the operation administrator.
- The minimum password length is 10 characters and the maximum length is 20 characters. At least one uppercase letter, one lowercase letter, one digit, and one special character (! # % & * @ %) must be included.
- Click “Save” to apply the changes.
Note: These options apply to both wolkvox Manager and wolkvox Agent users.
Audit Log #
This tool allows you to view all actions recorded in the application. You can see each change listed by user, date, and the user who performed the action. Additionally, you can view the name of the workstation and the public IP address from which the action was performed.
- Select the date range to consider for generating the audit log.
- Click on the “Generate” button.
In the central table, all actions performed in your operation will be listed.
- Date: Indicates the date and time when the action was performed.
- IP: Shows the public IP address from which the action was performed.
- User: Displays the wolkvox Manager user who performed the action.
- Action: Specifies the specific action carried out by the wolkvox Manager user.
- Workstation: Indicates the name of the workstation from which the action was performed.
In this tool, you have a field available to search for specific actions. You can search by IP, user, action, or workstation name.
If you right-click on the table, you can export the generated report to HTML format for download.
Licenses and Firewall #
In this section, you can manage the licenses for the Call Center, PBX, and the operation’s firewall rules.
To configure the Call Center licenses to use, follow these steps:
- Set up the Call Center licenses.
- Click on the “Modify” button.
To configure the PBX licenses to use, follow these steps:
- Set the number of PBX licenses.
- Click on “Modify”.
To add an IP to the Firewall, follow these steps:
- Enter the IP number you want to add.
- Select whether the IP will be permanent or not.
- Add a description to clearly identify why the IP was added.
- Click on “Add IP”.
If you right-click on an item in the list, you can:
- Delete the selected IP.
- Refresh the table to get an updated list of IPs added to the Firewall.
