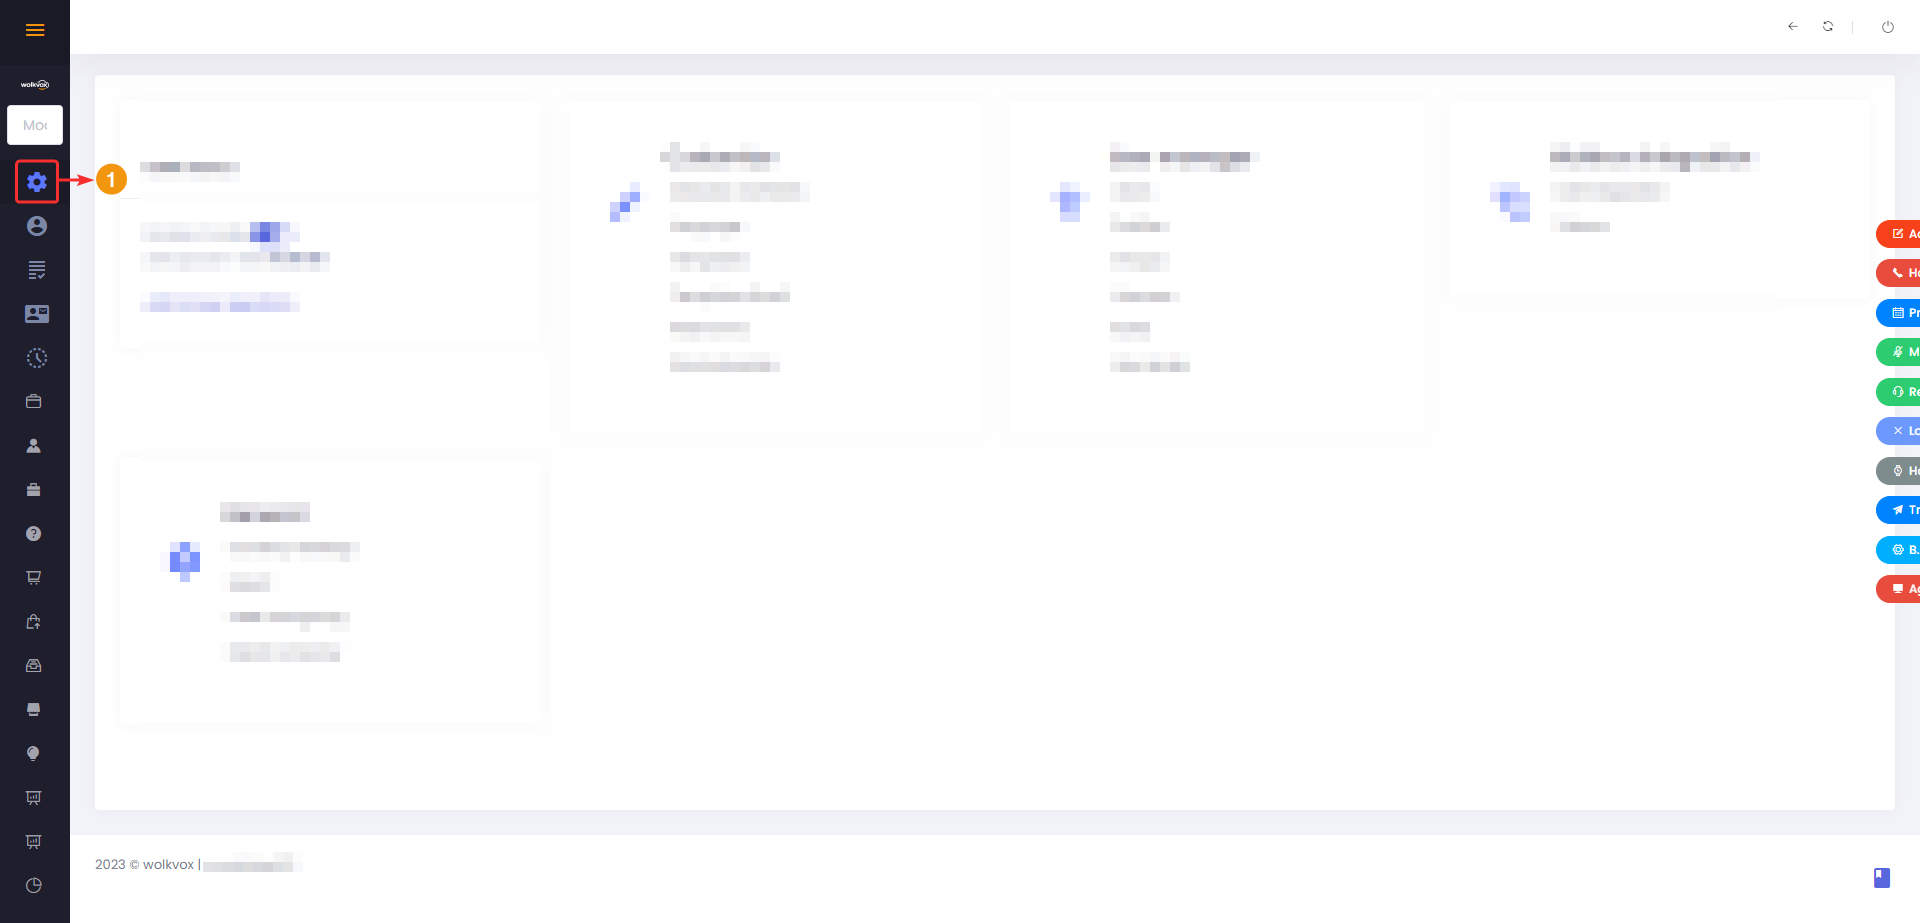
CRM configuration section #
In this section, you can access basic CRM information, configure the local currency, secondary currencies, access to report exporting, access to change logs, creation and configuration of modules, user creation and management, and call integration configuration.
To access the CRM configuration, use the left-hand side menu.
The first important piece of information you need to identify is the “Used space in GB” field. This field informs you about the total weight of the database your CRM is utilizing.

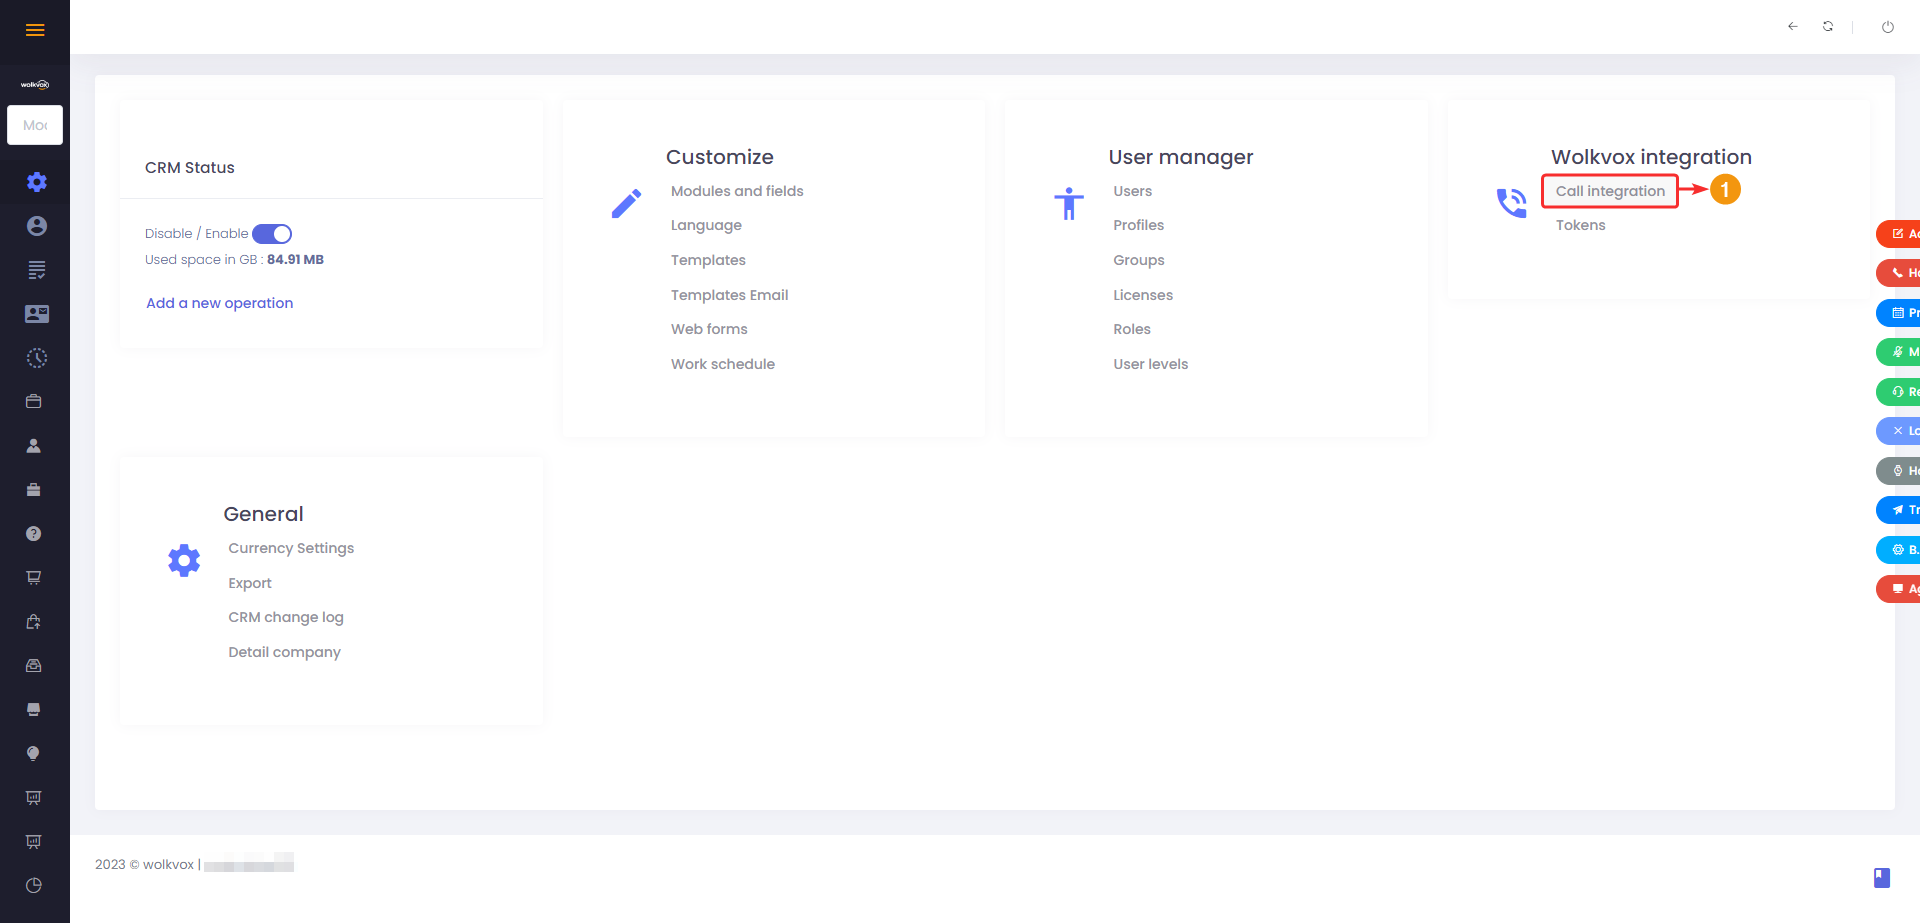
wolkvox Integration: Call integration #
This section allows you to establish a seamless and efficient connection with the Wolkvox Manager software. This integration enables a seamless experience by combining the CRM’s capabilities with the communication and tracking tools provided by Wolkvox Manager.
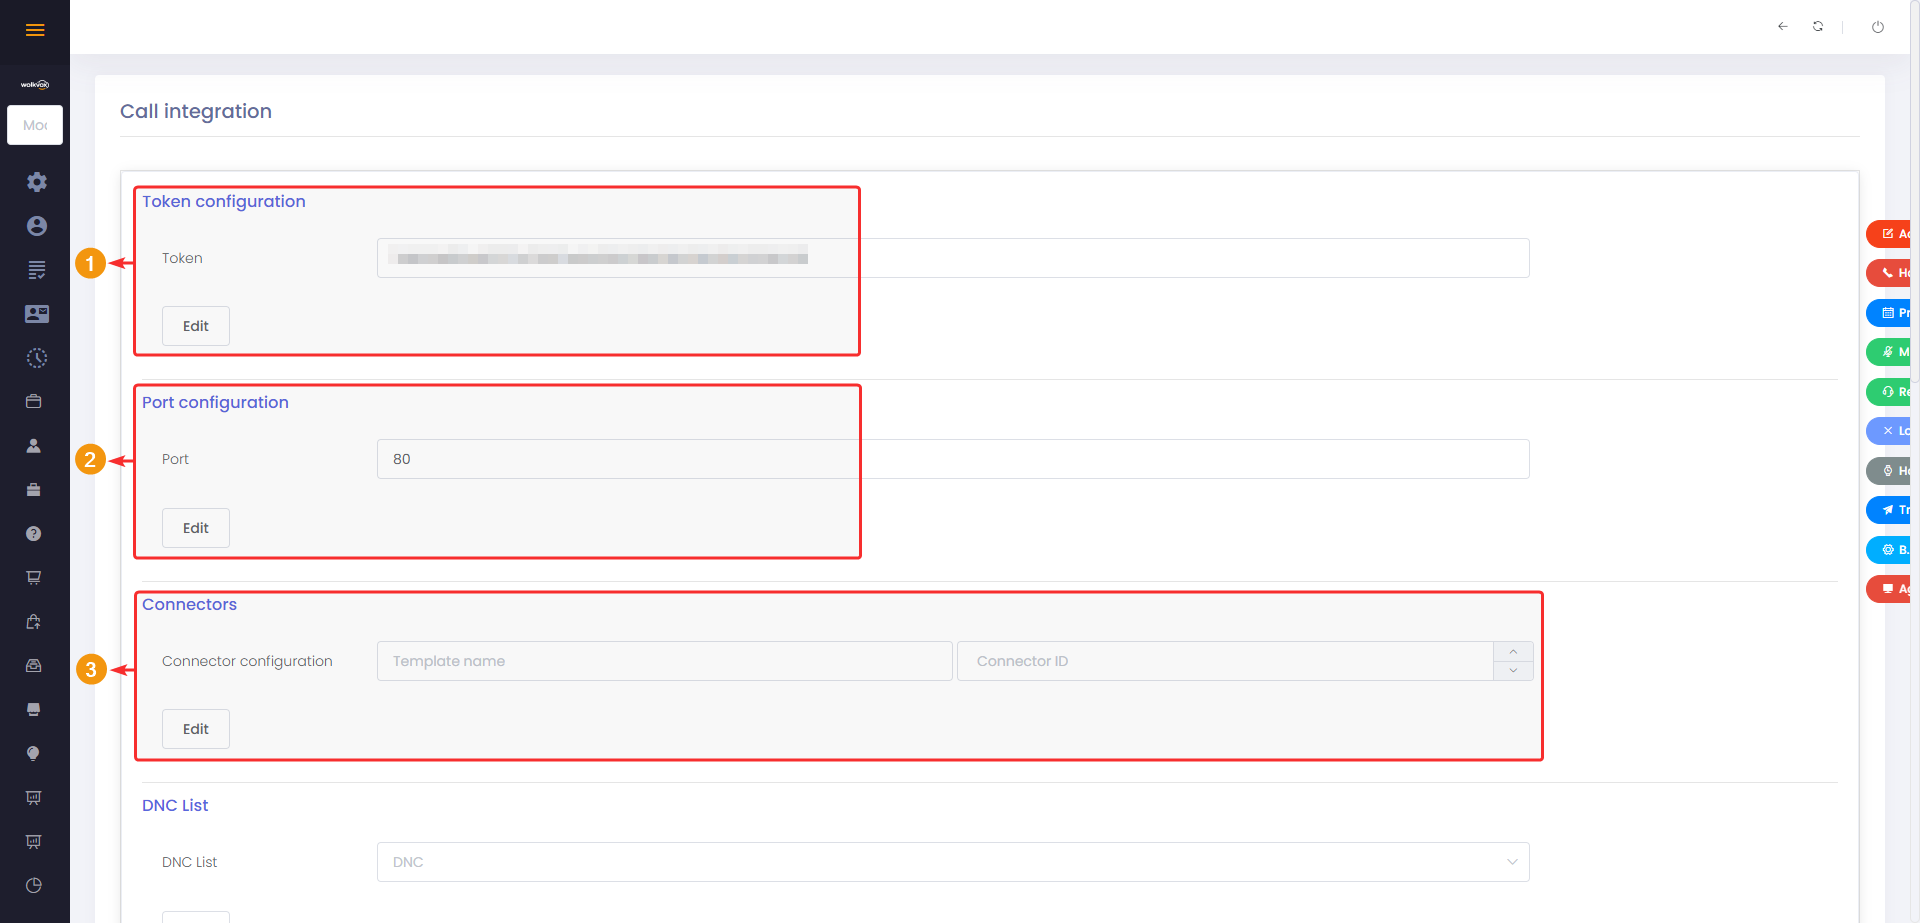
- Token Configuration: This is where the authentication setup through tokens is established to ensure secure communication between the CRM and Wolkvox Manager. Tokens are unique keys that grant authorization and access to services.
- Port Configuration: This field pertains to port configuration, which are specific communication channels used to transmit data between the CRM and Wolkvox Manager. This configuration ensures a smooth and reliable connection between the two systems.
- Connectors: Connectors are predefined links that facilitate integration between different applications. In this case, connectors are used to establish a robust connection between the CRM and Wolkvox Manager, enabling the transfer of data and synchronization of relevant information.
- DNC List: “DNC” stands for “Do Not Call,” which means that this is where the list of phone numbers that should not be contacted is configured. This setting assists in complying with regulations and restrictions related to customer privacy and consent.
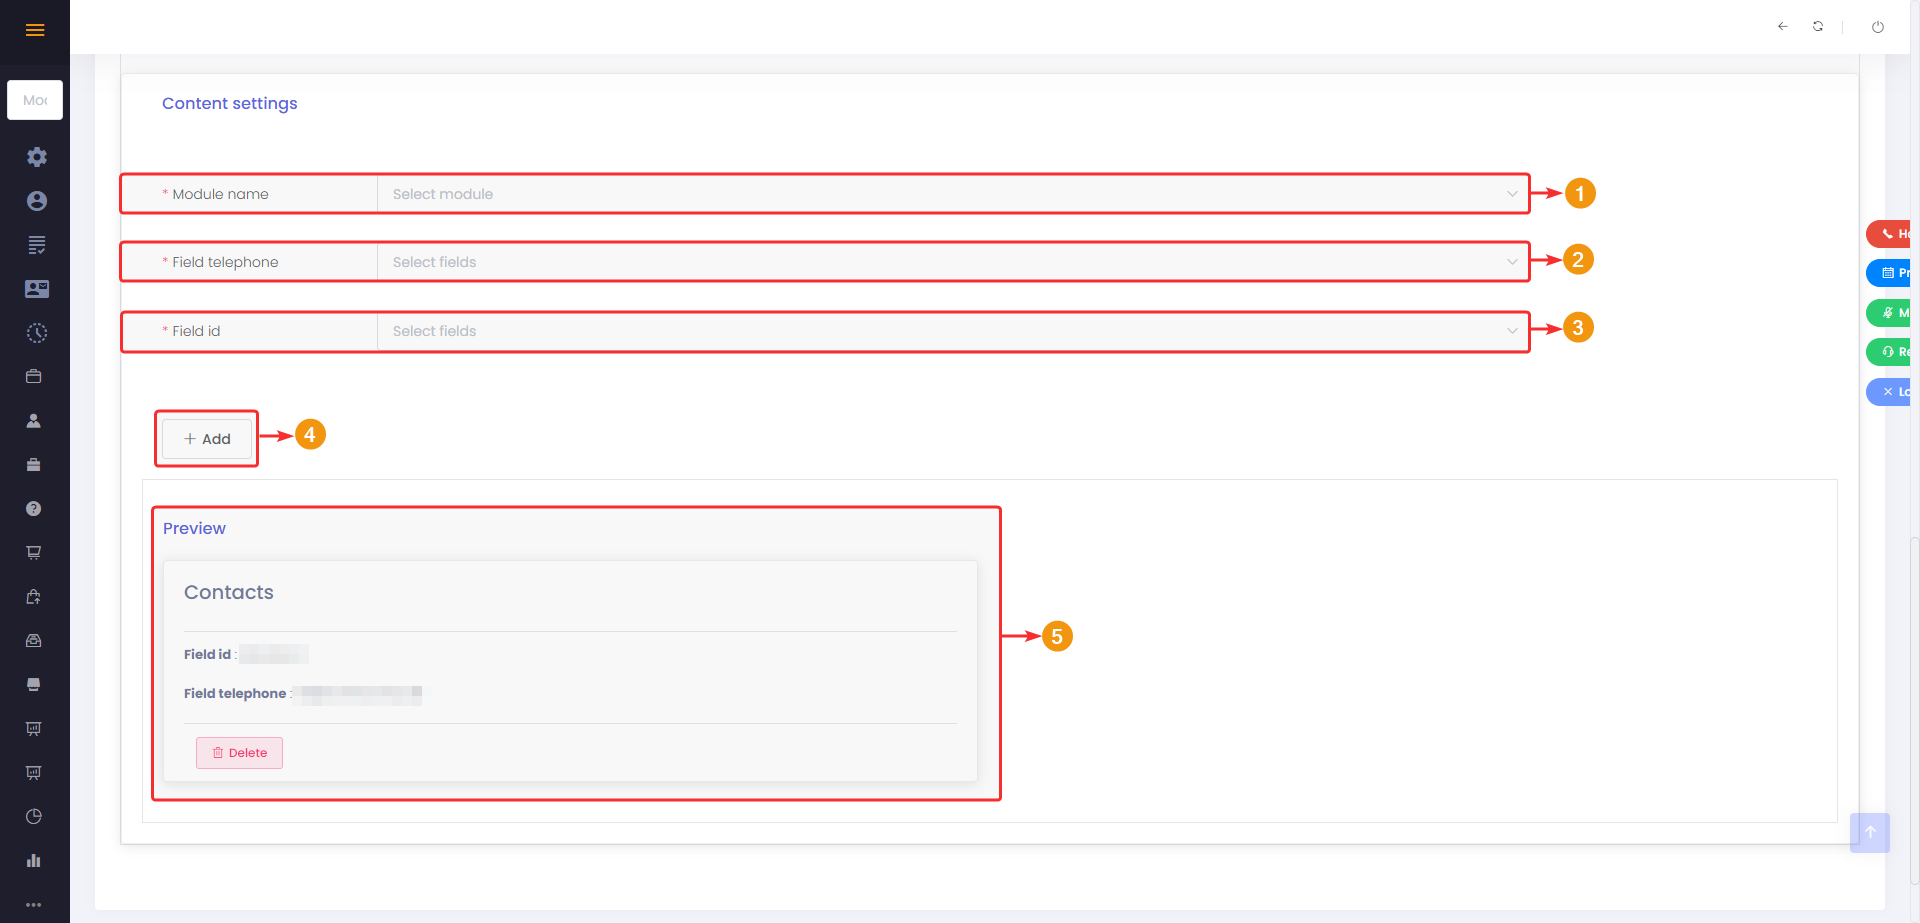
- Module Name: This refers to the module in the CRM where call details will be recorded or associated. For example, if the call is related to a specific customer, you could choose the “Customers” module. This helps organize call data within the CRM.
- Phone Field: This is the field in the selected module that stores the phone number associated with the call. For instance, if each customer has a phone number field, you would select that field here. This is essential for the system to identify the caller’s phone number and link it to CRM records.
- ID Field: This field stores the unique identifier of the record in the selected module. It can be an ID or reference number. This is crucial for the system to properly link the call with the corresponding record in the CRM.

- Module Name: Select the CRM module where you want to associate or link call details. For example, if you wish to link call information with customer records, you could choose the “Customers” module.
- Phone Field: Choose the field within the selected module where the telephone number associated with the call is stored. This field should be capable of storing phone numbers.
- ID Field: Select the field in the chosen module that contains the unique identifier of the record. This identifier could be an ID or a reference number, allowing the CRM to properly associate the call with the corresponding record.
- Click the “Add” button to add the configuration.
- In “Preview” you can view each field association.
wolkvox Integration: Call integration #
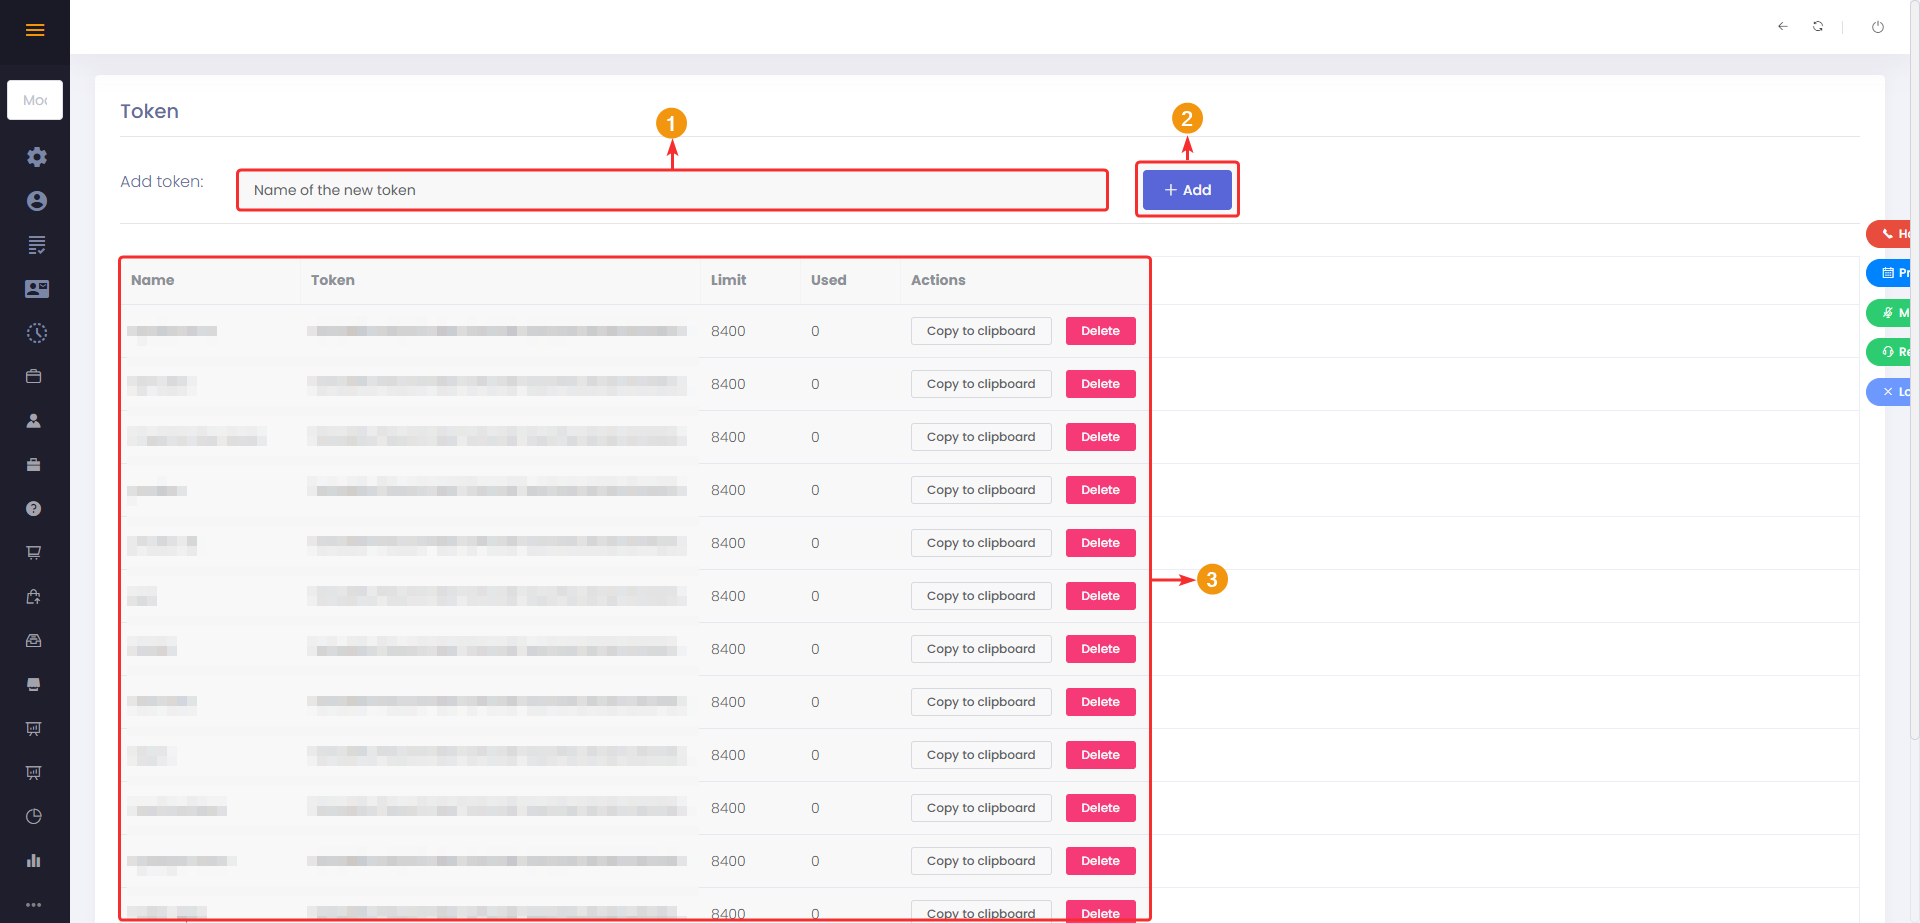
In this section, you create and manage all the tokens you need for the CRM. These tokens act as authentication keys, allowing authorized access to specific services, APIs, or data without exposing sensitive credentials. This enhances security and simplifies the integration process between the CRM and external applications, ensuring a smooth data exchange and efficient interoperability.

- Enter a name for the token.
- Click on “Add” to create the new token.
- In the central table, all the tokens you have created are listed. This table provides basic information about the token, such as the usage limit, the number of uses so far, and each token has a button to copy the token to the clipboard and delete the token.
Currency Configuration #
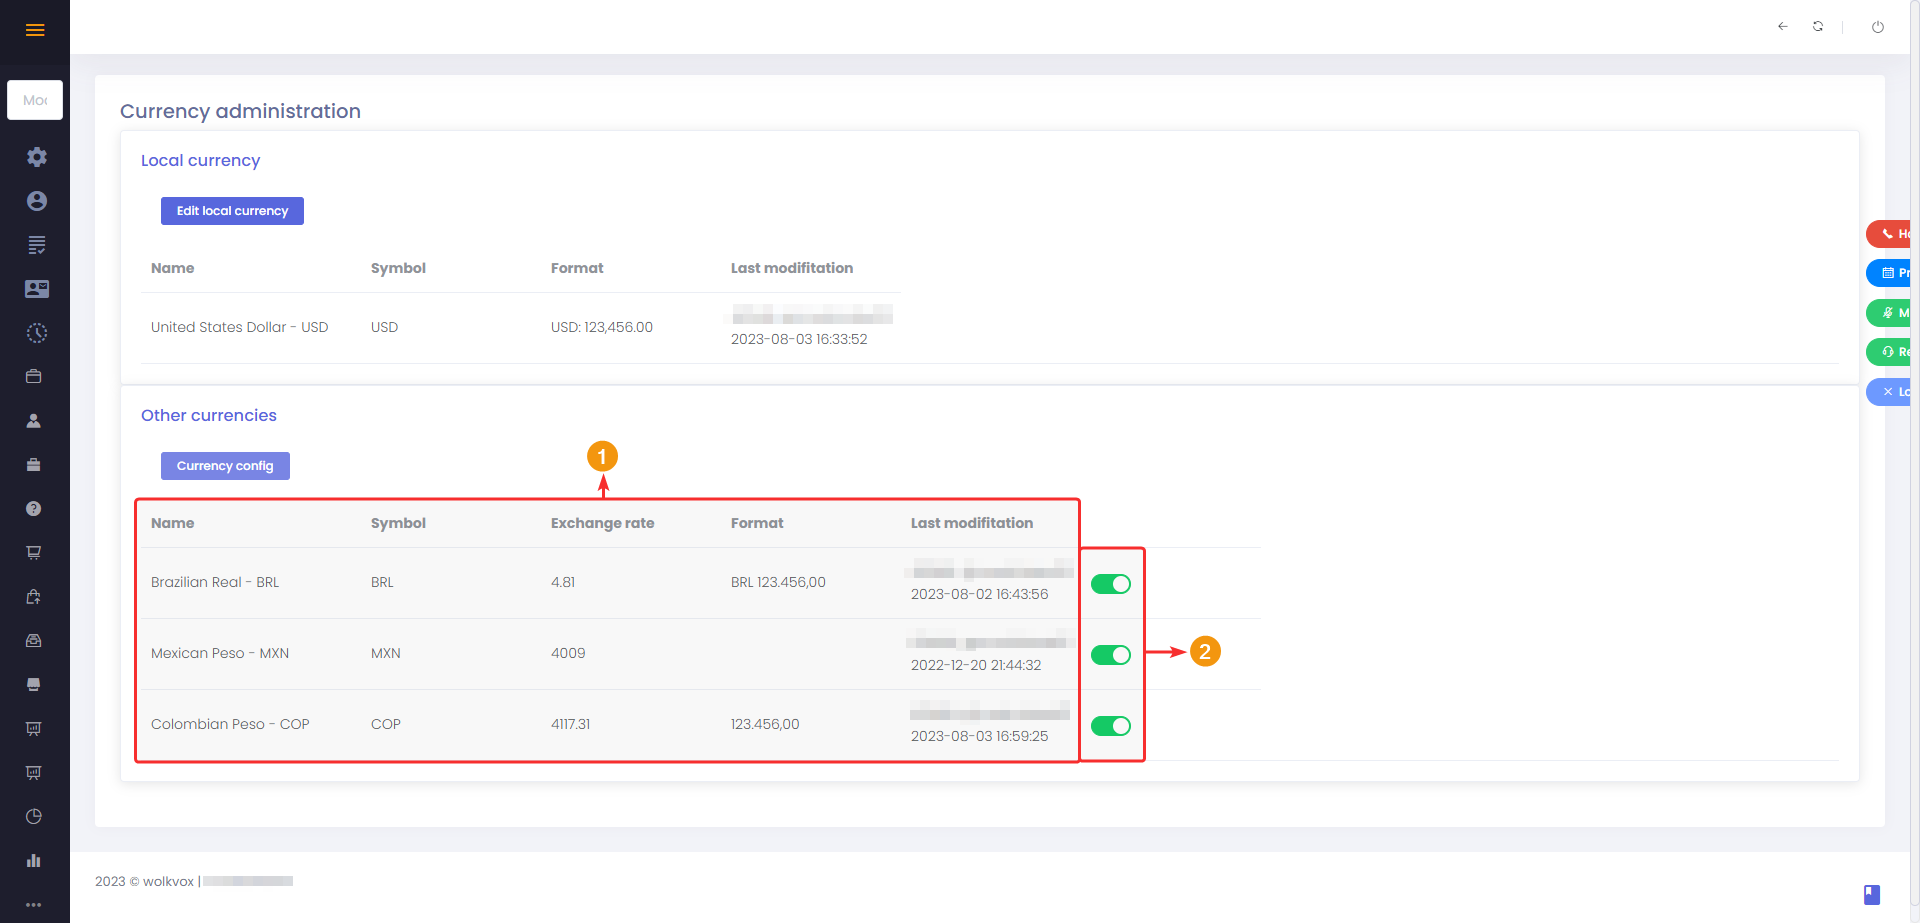
In the currency section, you can configure all the currencies that will be used in your wolkvox CRM. The currencies defined here will be reflected in the currency-type fields.

In the currency section, you will find two sections. The first one is called “Local Currency,” where you configure the main currency that will operate in your CRM. The second section is where you configure other currencies that your operation may use, serving as alternatives to the main (local) currency.
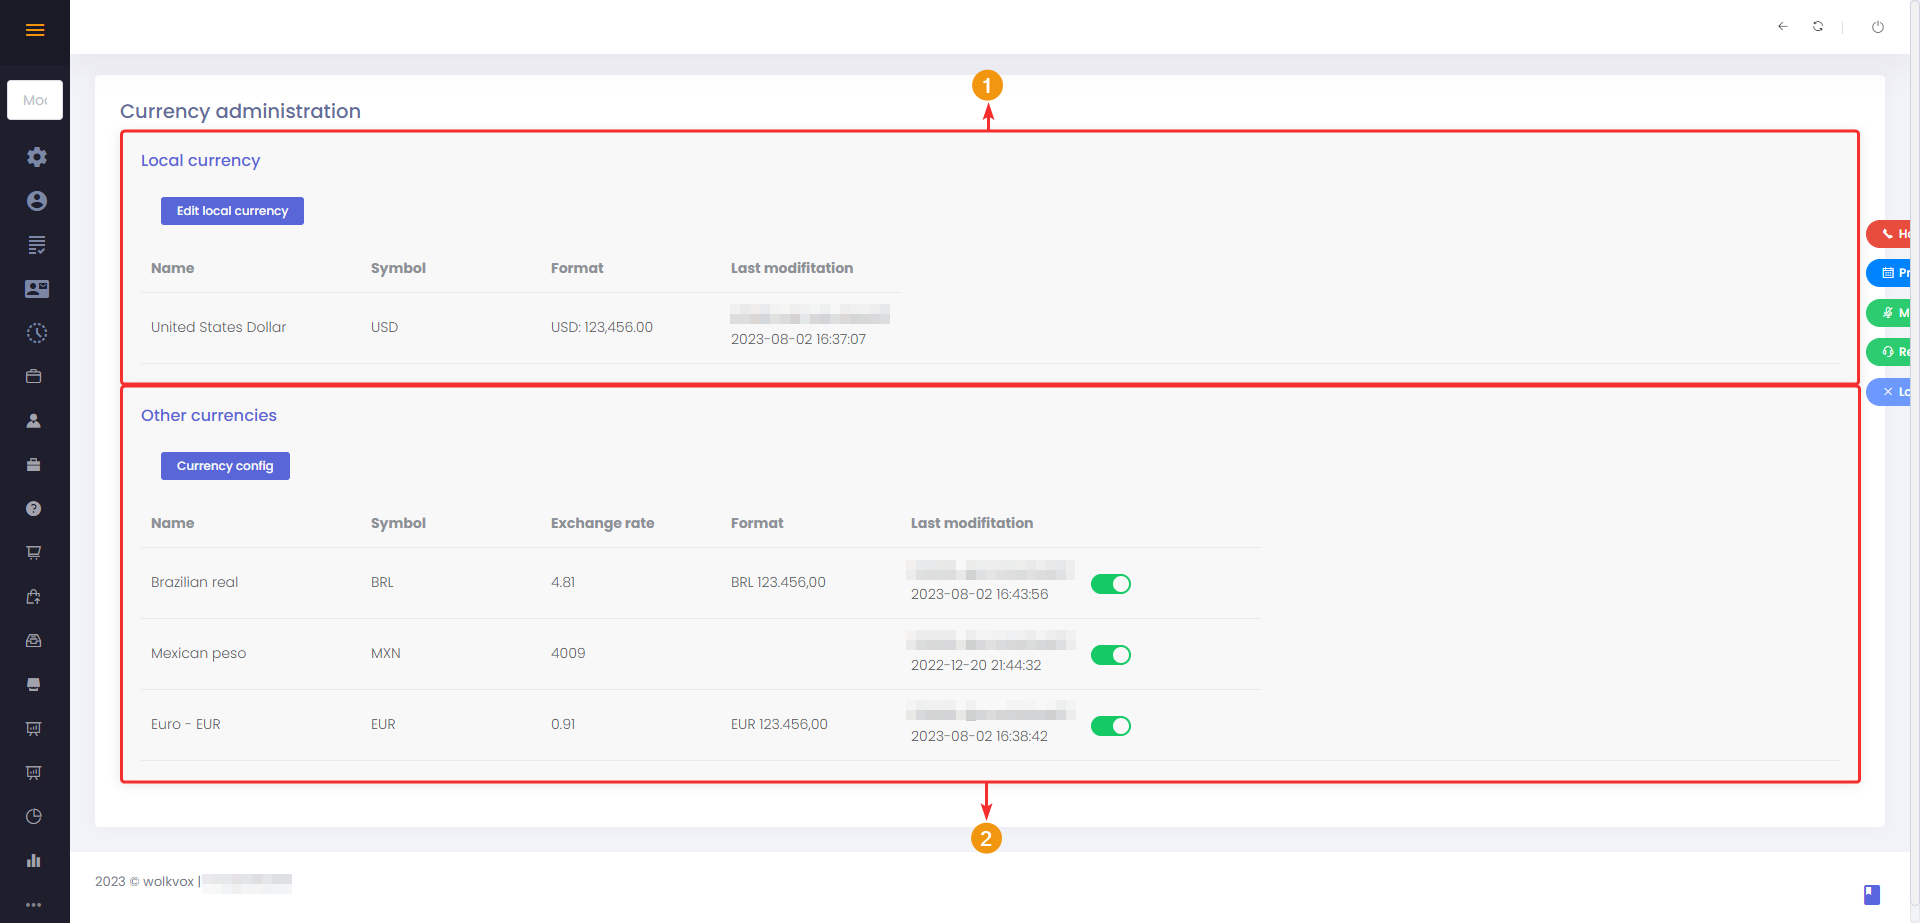
Local Currency #
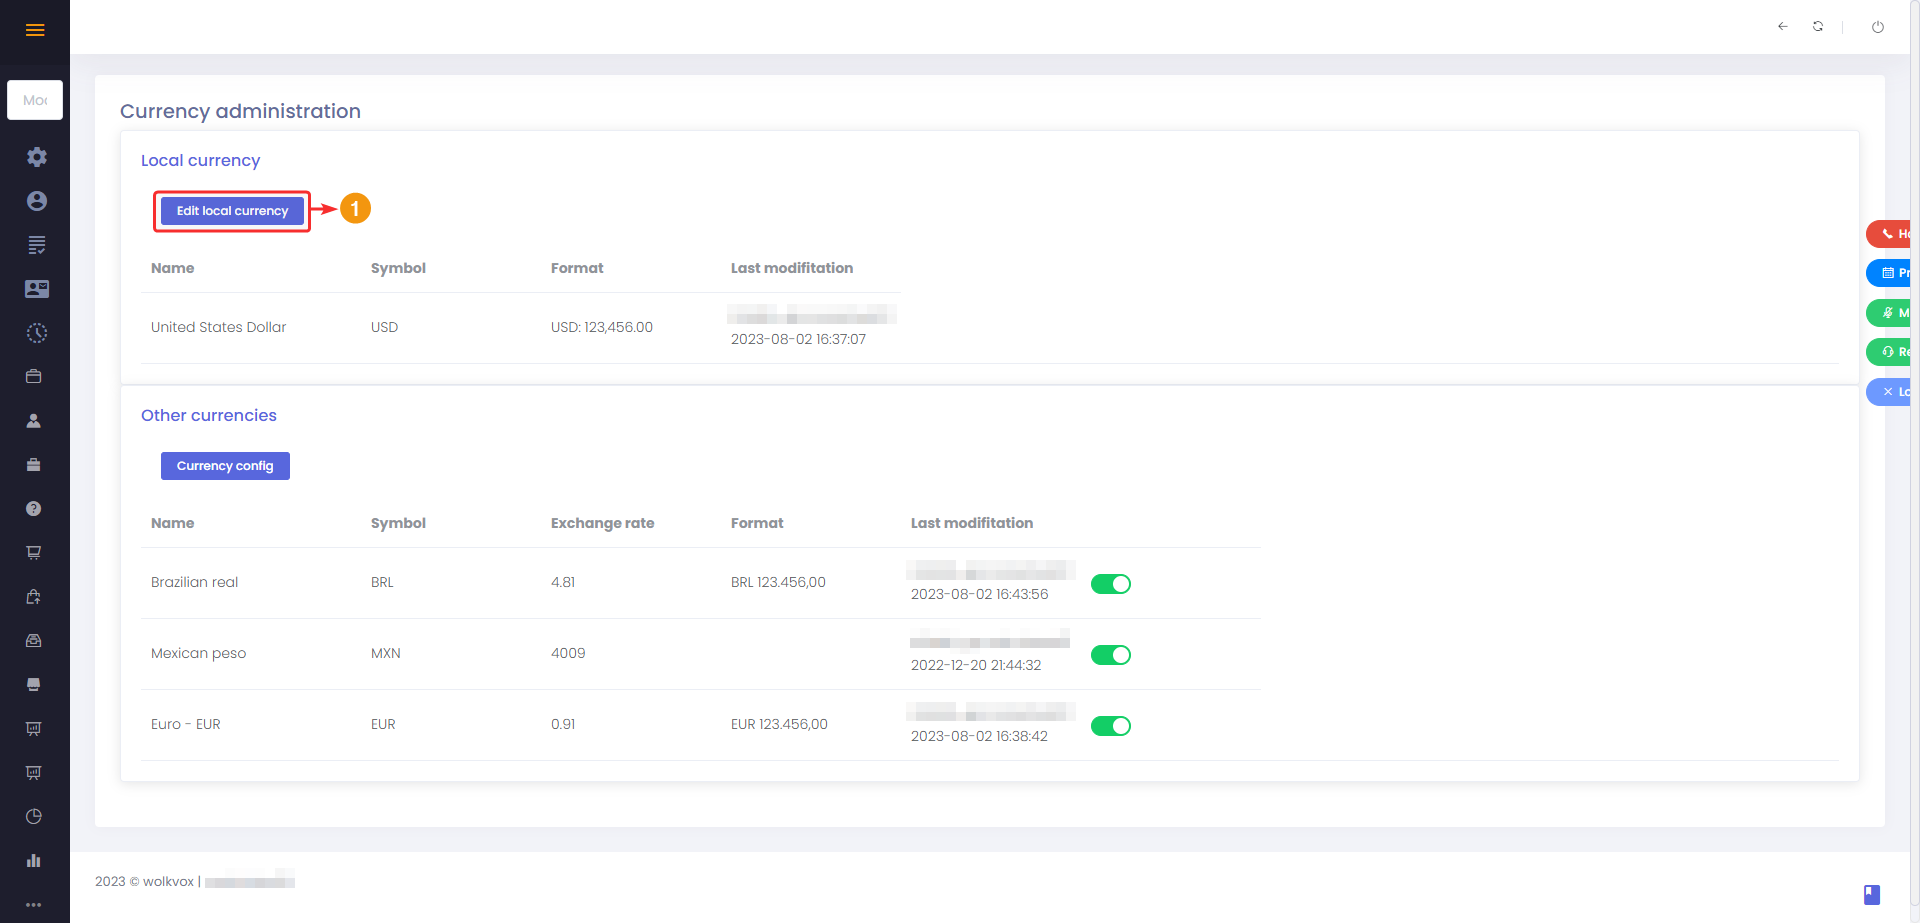
This is the main currency of the CRM. Once you have configured this currency, it cannot be changed for security reasons in the database management. In this section, there can only be one currency.
If you are setting up a new CRM, instead of “Edit Local Currency,” you should see “New Local Currency” in this button.
Whether you want to create a new local currency or edit an existing one, you must follow these steps:
- When you click on “Edit local currency,” a section opens on the right side of the screen.
- Select the currency.
- Click on the button with the icon of a pencil.
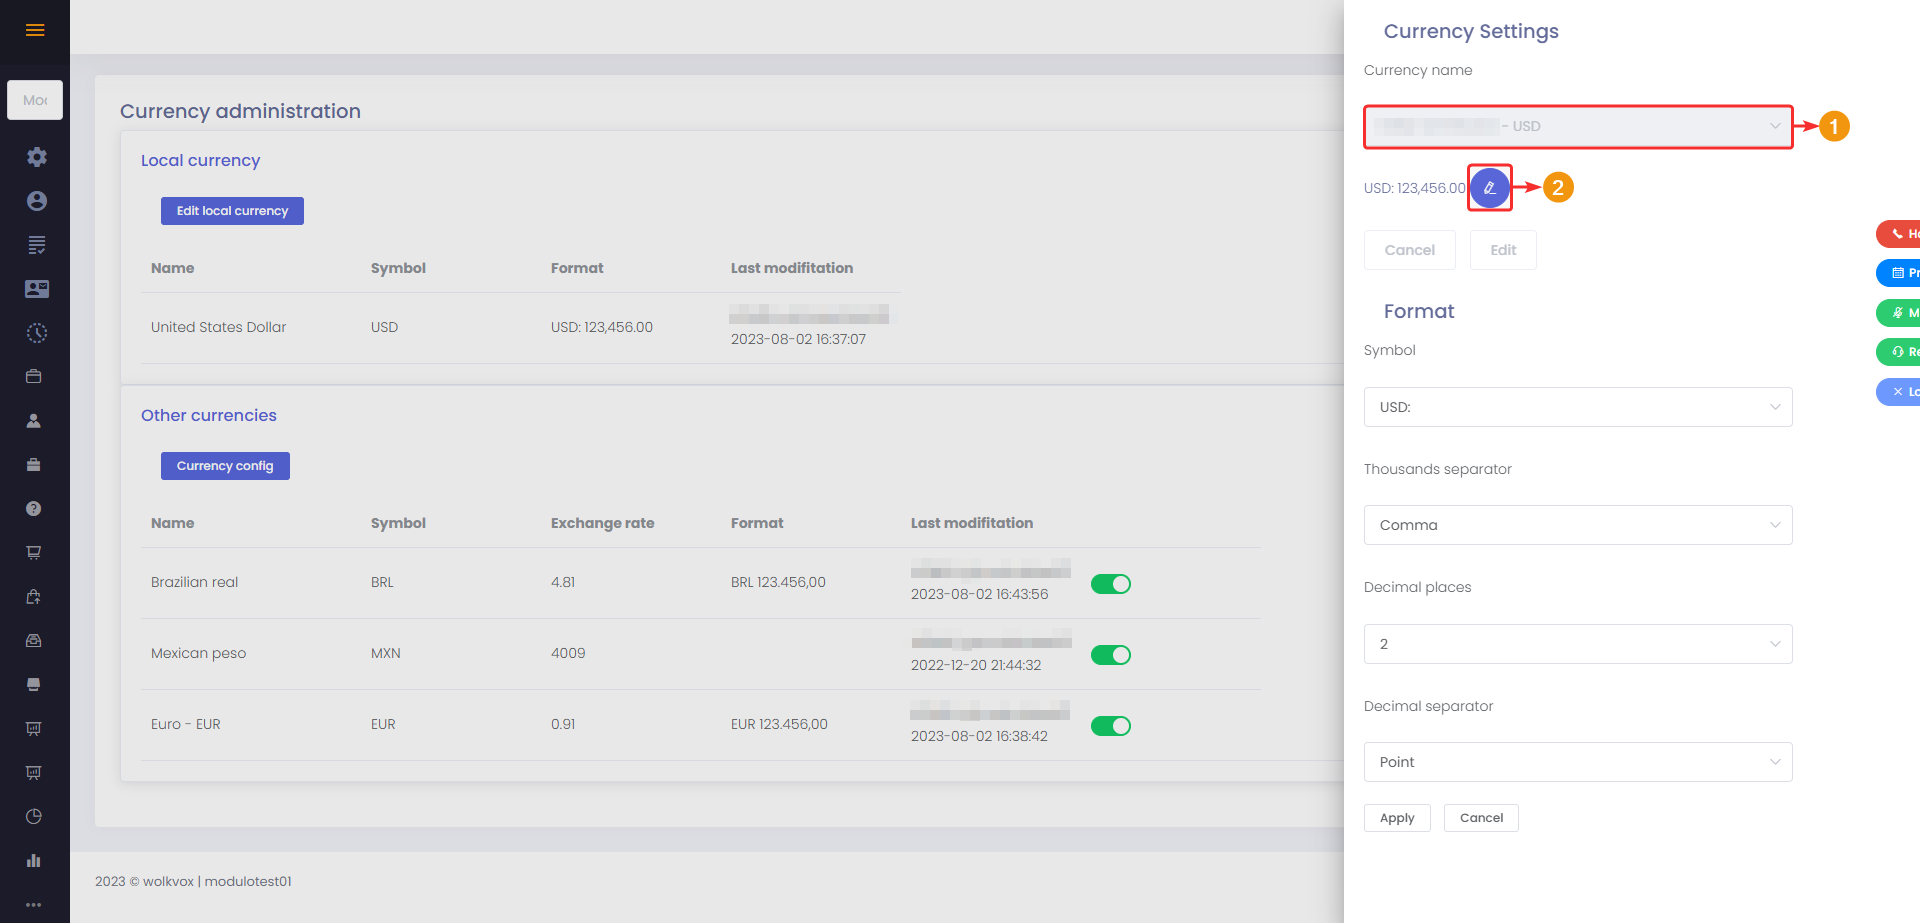
The following fields appear:
- Select the symbol to identify the currency.
- Choose the thousands separator for currency-related values. It can be a comma, period, or space. For example, selecting a period will display values with thousands as follows: 123,000.
- In “Decimal Positions,” choose where you want to place the decimal separator. “0” for no decimals, “1” for one decimal place, “2” for two decimal places, and “3” for three decimal places; this last option is the maximum number of decimals that currency-related fields can have. For example, selecting a comma will display values with decimals like this: 550.23.
- In “Decimal Separator,” choose the sign you want to use to separate decimals. It can be a period or a comma.
- Click the “Apply” button to save the changes.

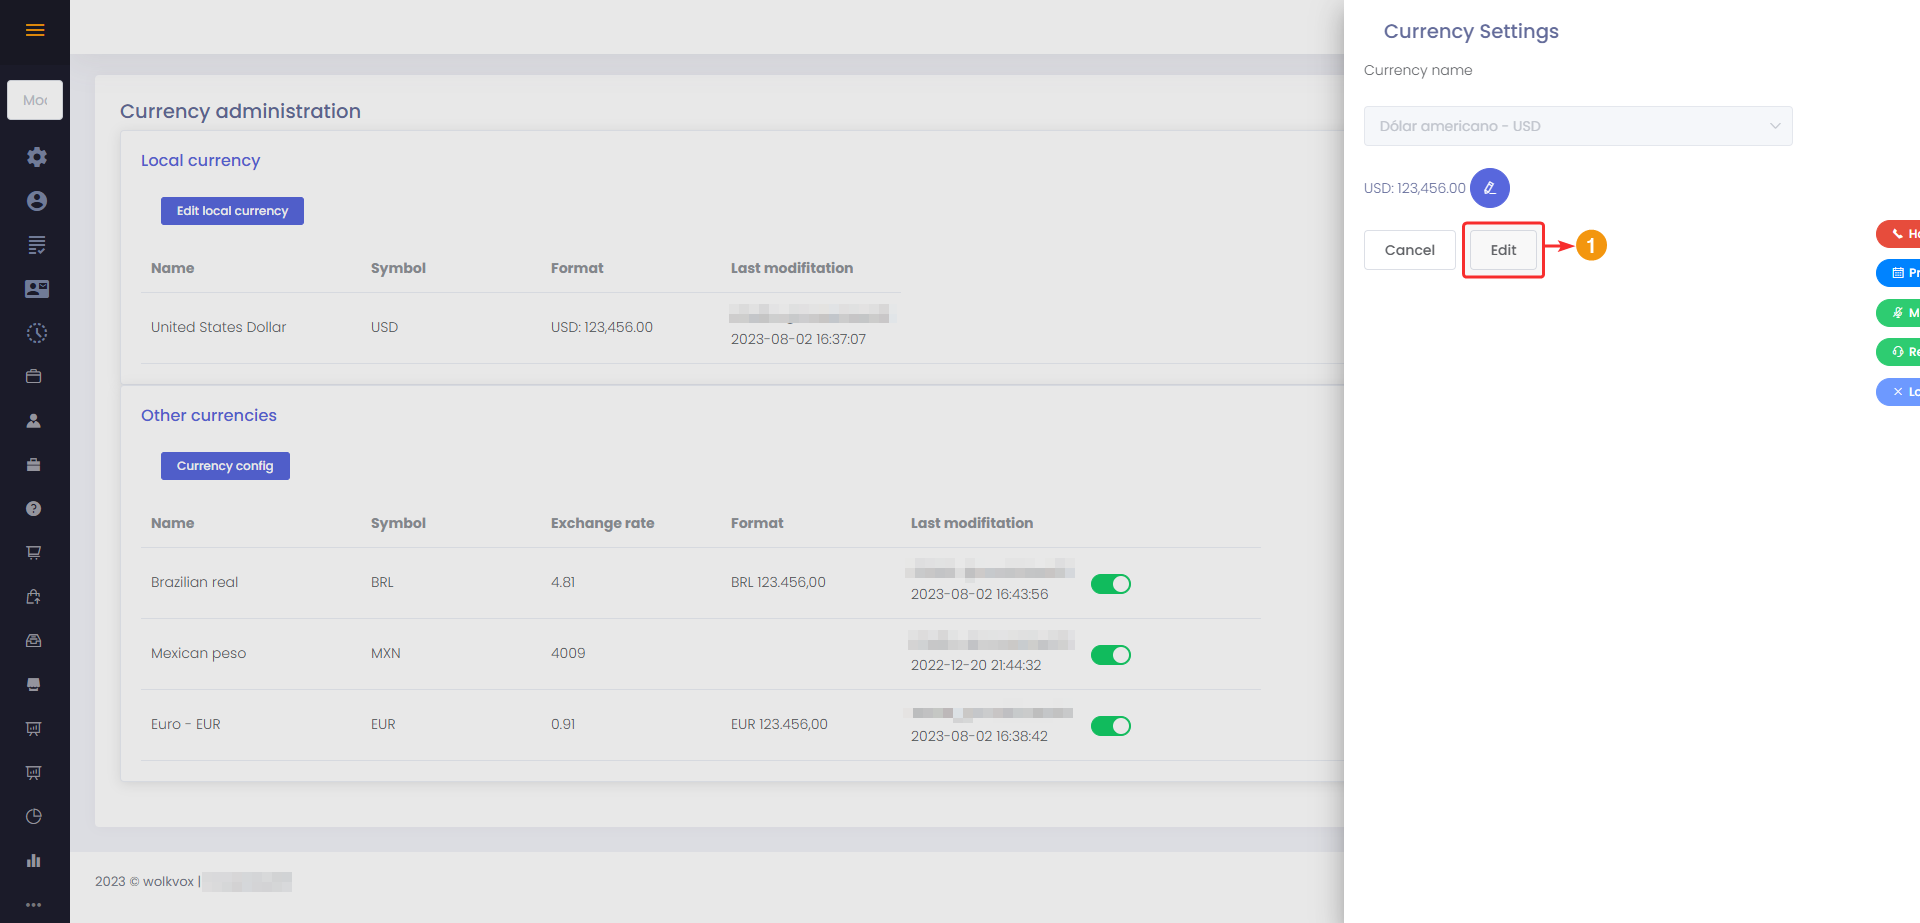
Click on “Edit” to apply the changes. A success message will appear.
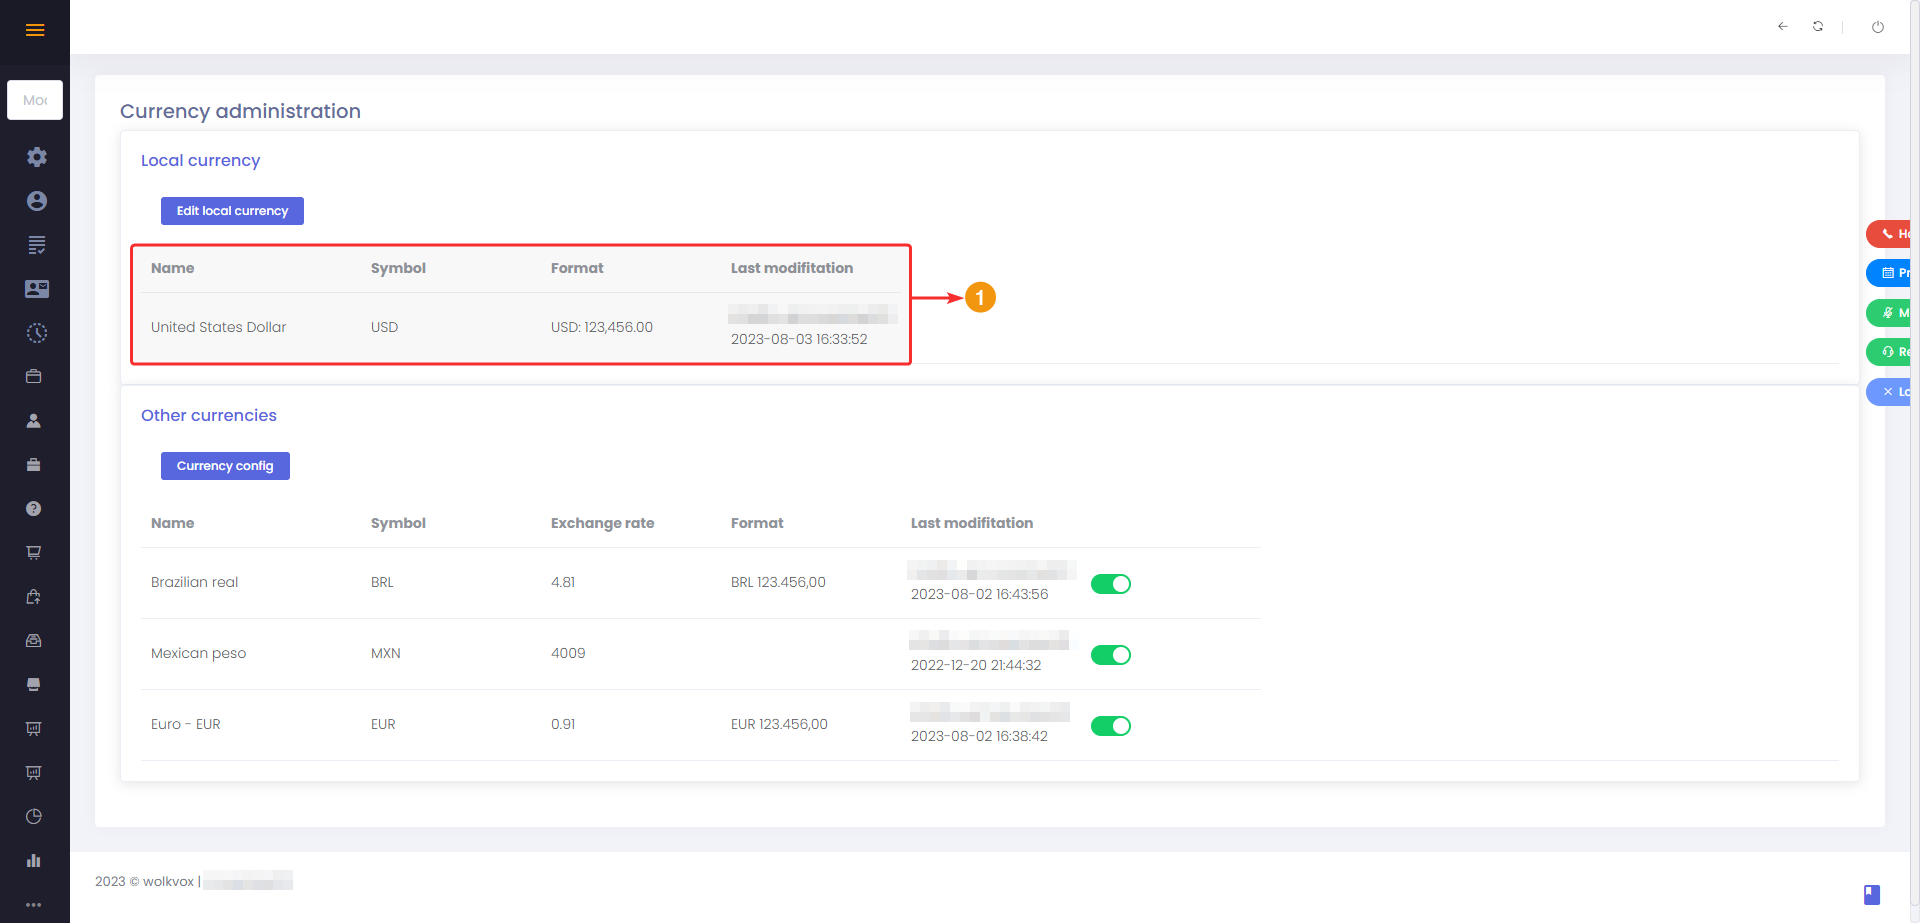
In the table of the local currency, the information with which the main currency is configured is displayed. Make sure the symbol and format are shown exactly as needed. It also shows information about the last user who modified this section along with the date and time of modification.
Other currencies #
In this section, you can add alternative currencies to the main currency. Here, there can be one or more currencies listed.
Click on “Configure currency” to create a new alternative currency or edit an existing one.

Whether you are creating a new local currency or editing an existing one, follow these steps:
- Select the currency.
- Click on the button with the icon of a pencil.
- Choose the symbol to identify the currency.
- Select the thousands separator for currency-related values. This can be a comma, a period, or a space. For example, selecting a period will display values with thousands like this: 123,000.
- In “Decimal Places,” choose where you want the decimal separator to be placed. “0” for no decimals, “1” to display one decimal place, “2” to display two decimal places, and “3” to show three decimal places; the latter is the maximum number of decimals that values in currency-related fields can have. For example, selecting a comma will display values with decimals like this: 550.23.
- In “Decimal Separator,” select the symbol you want to use to separate decimals. This can be a period or a comma.
- Click the “Apply” button to save the changes.
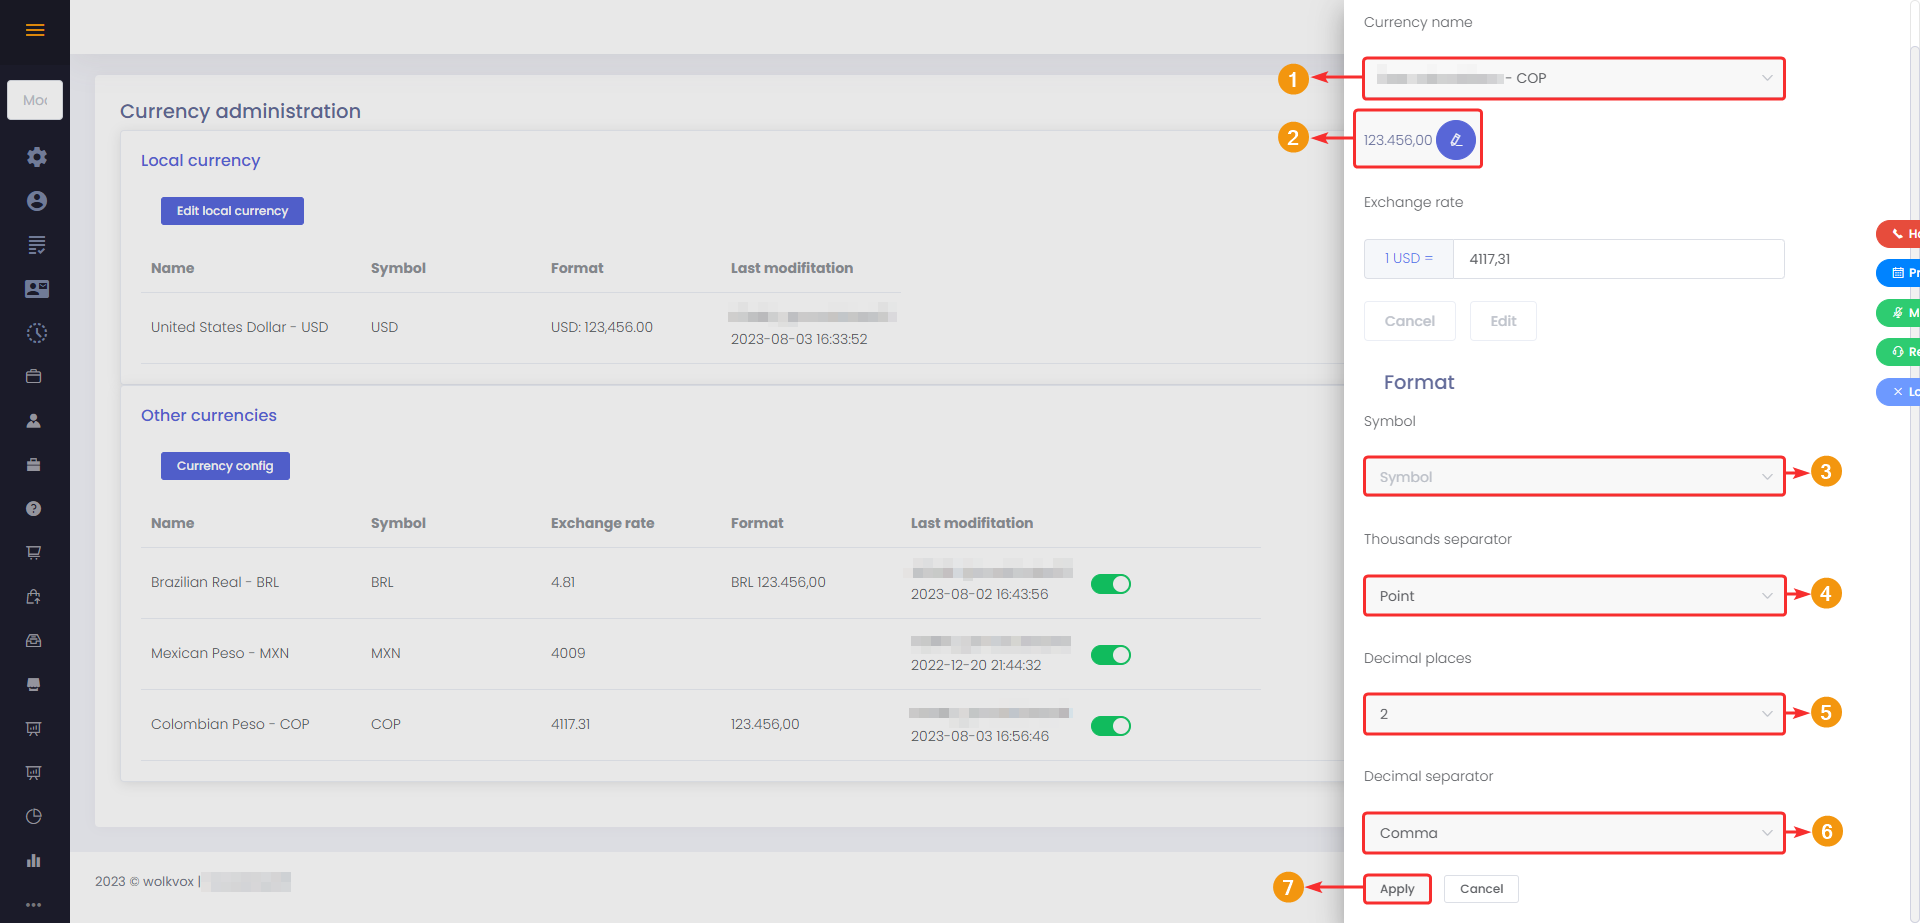
- Configure the exchange rate according to the local currency. That is, here you define how much 1 unit of the local currency is equivalent to in the alternative currency you are editing.
- Click on the “Edit” button to apply the changes. A message of successful change will appear.

- In the table of “Other currencies,” the information with which the alternative currencies are configured is displayed. Make sure the symbol and format are shown exactly as needed. It also shows information about the last user who modified this section along with the date and time of modification.
- The switch buttons allow you to activate or deactivate the listed currencies.
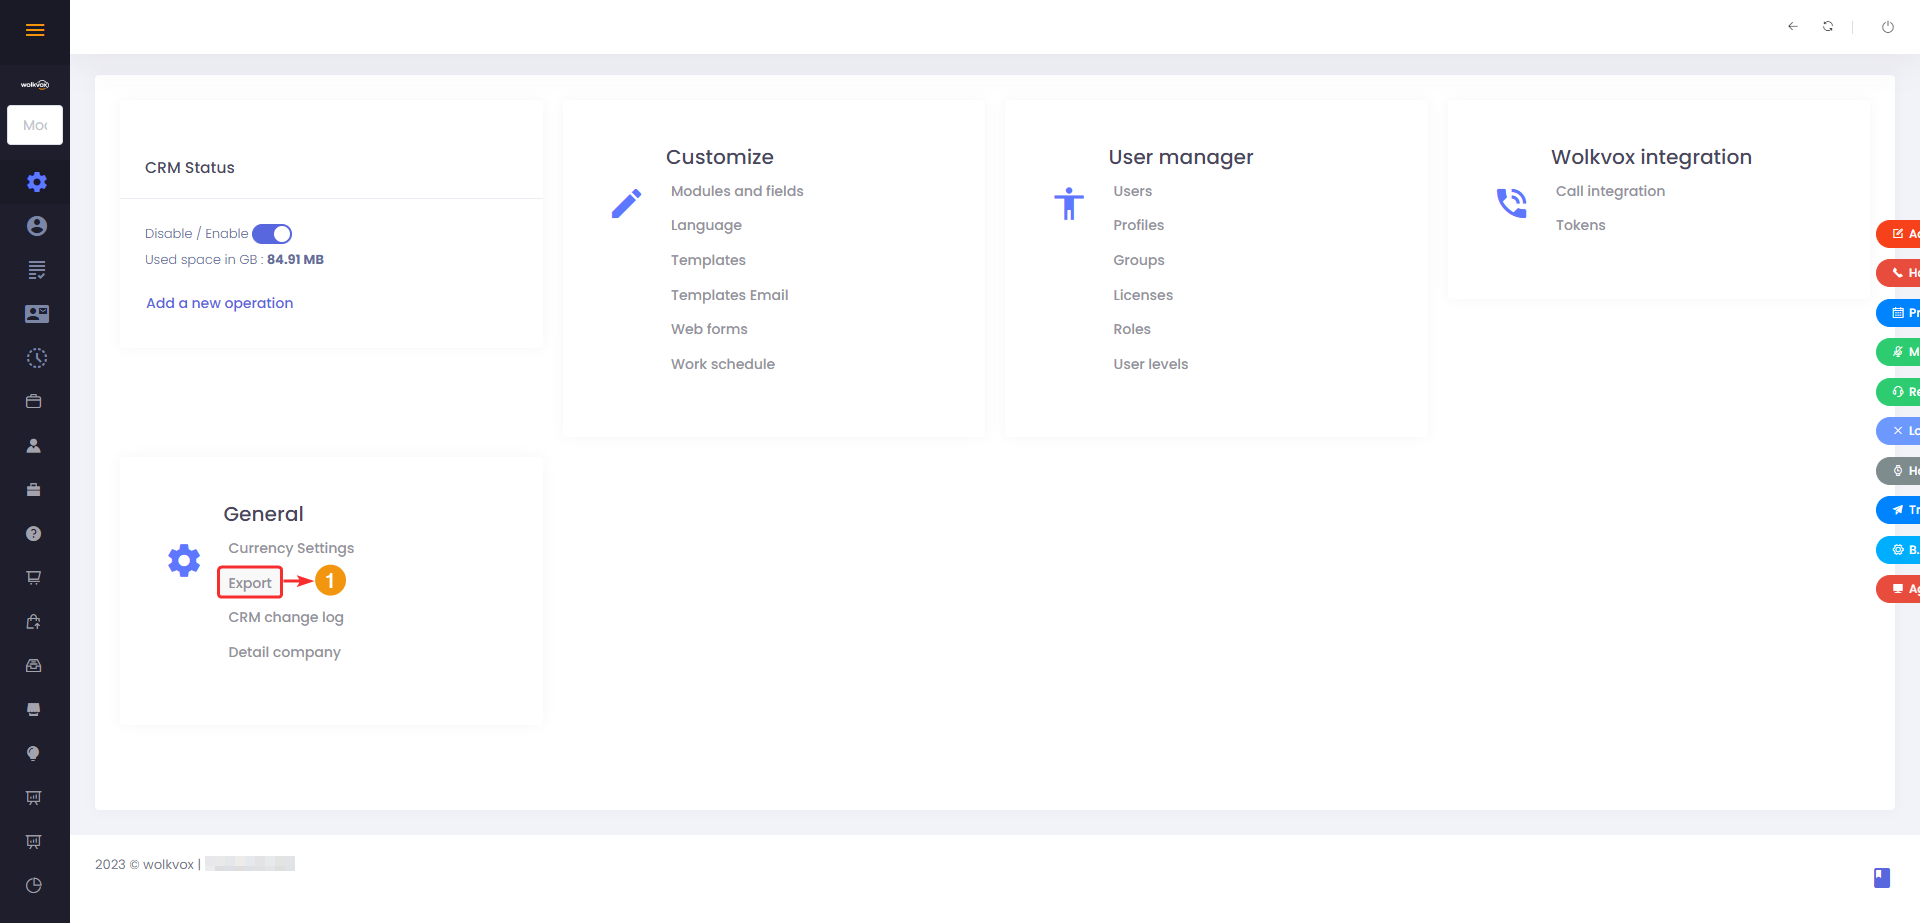
Export the data #
In this section, you can export the data stored in the CRM.
- Enter the email address where you want to receive the link to access the exported data.
- Select the date range for the data you wish to receive.
- Click on “Export” to initiate the process of generating and exporting the data.
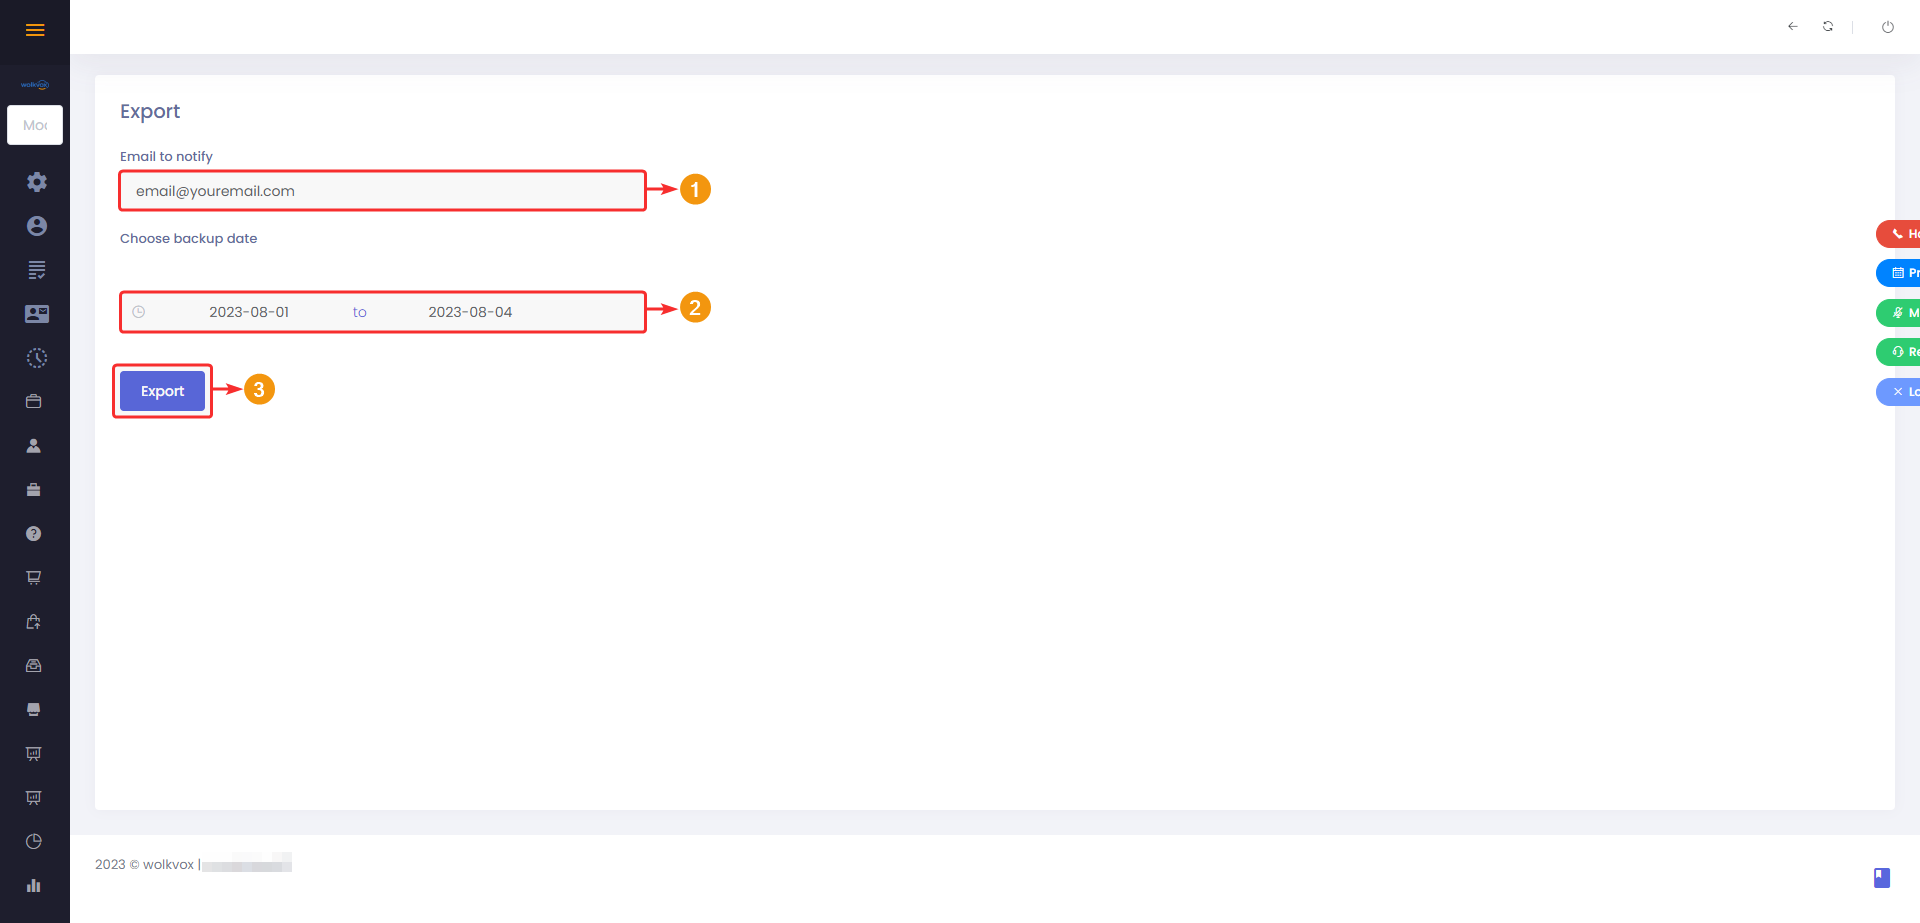
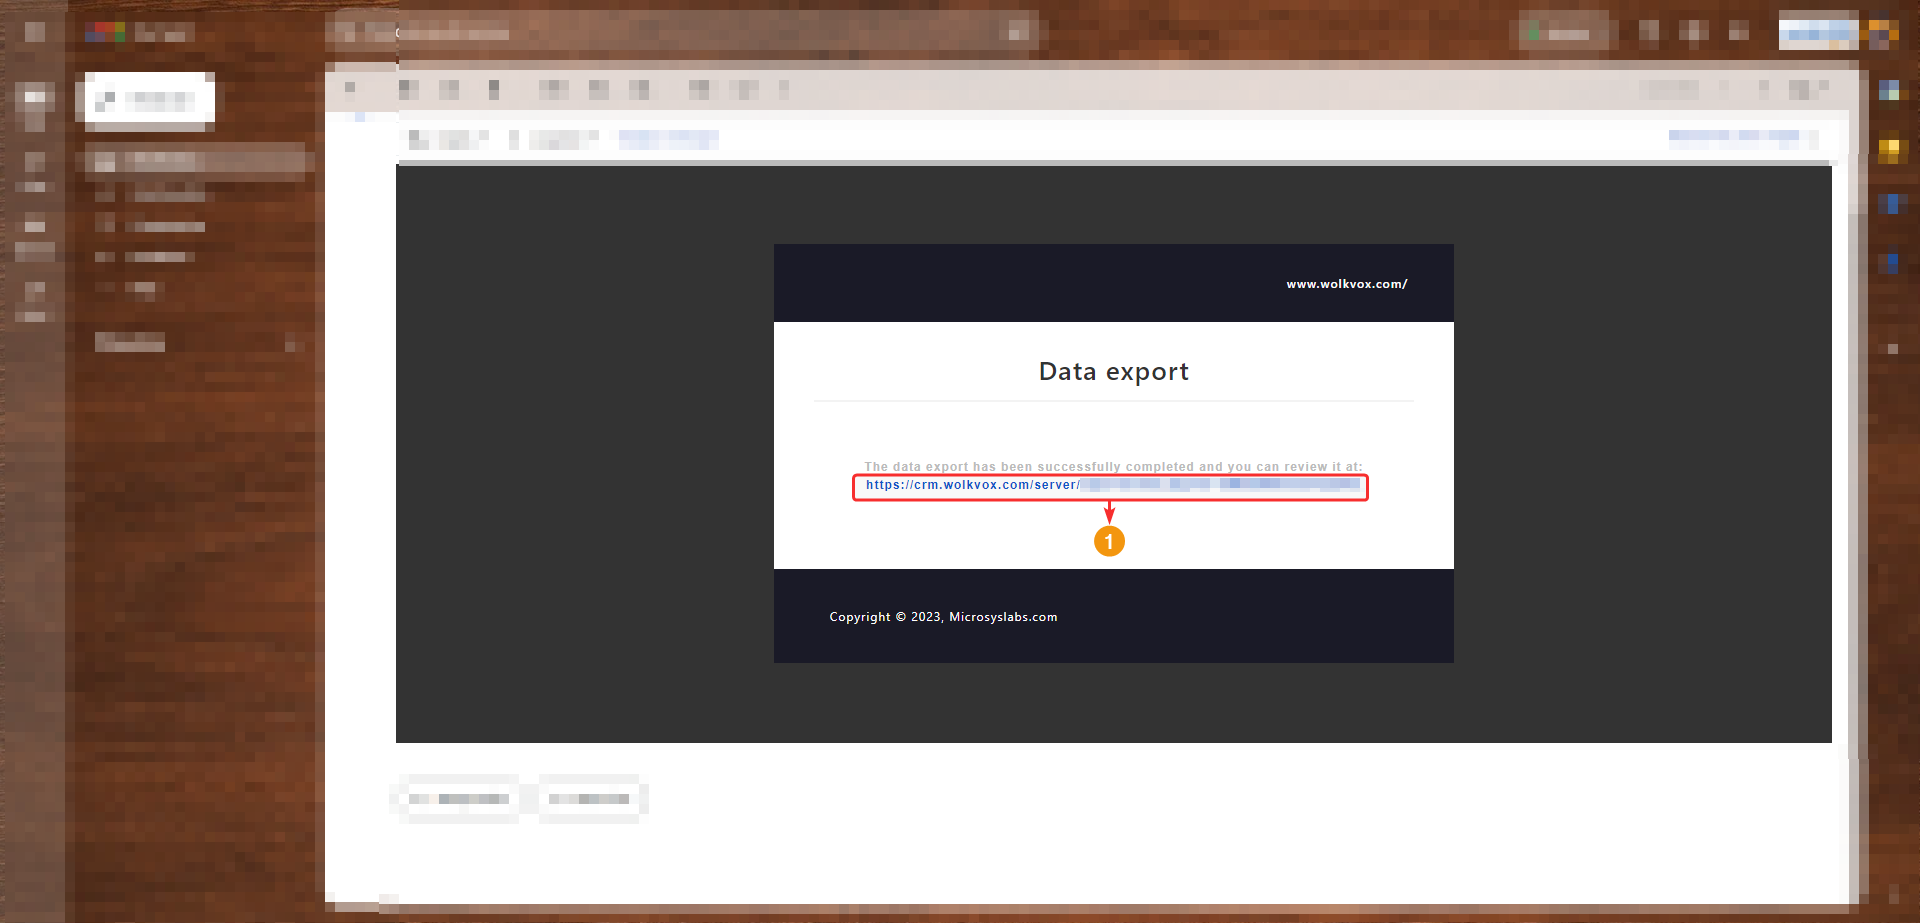
An email will be sent to the email address you provided in the form, containing the access link to the exported data based on the selected date range.
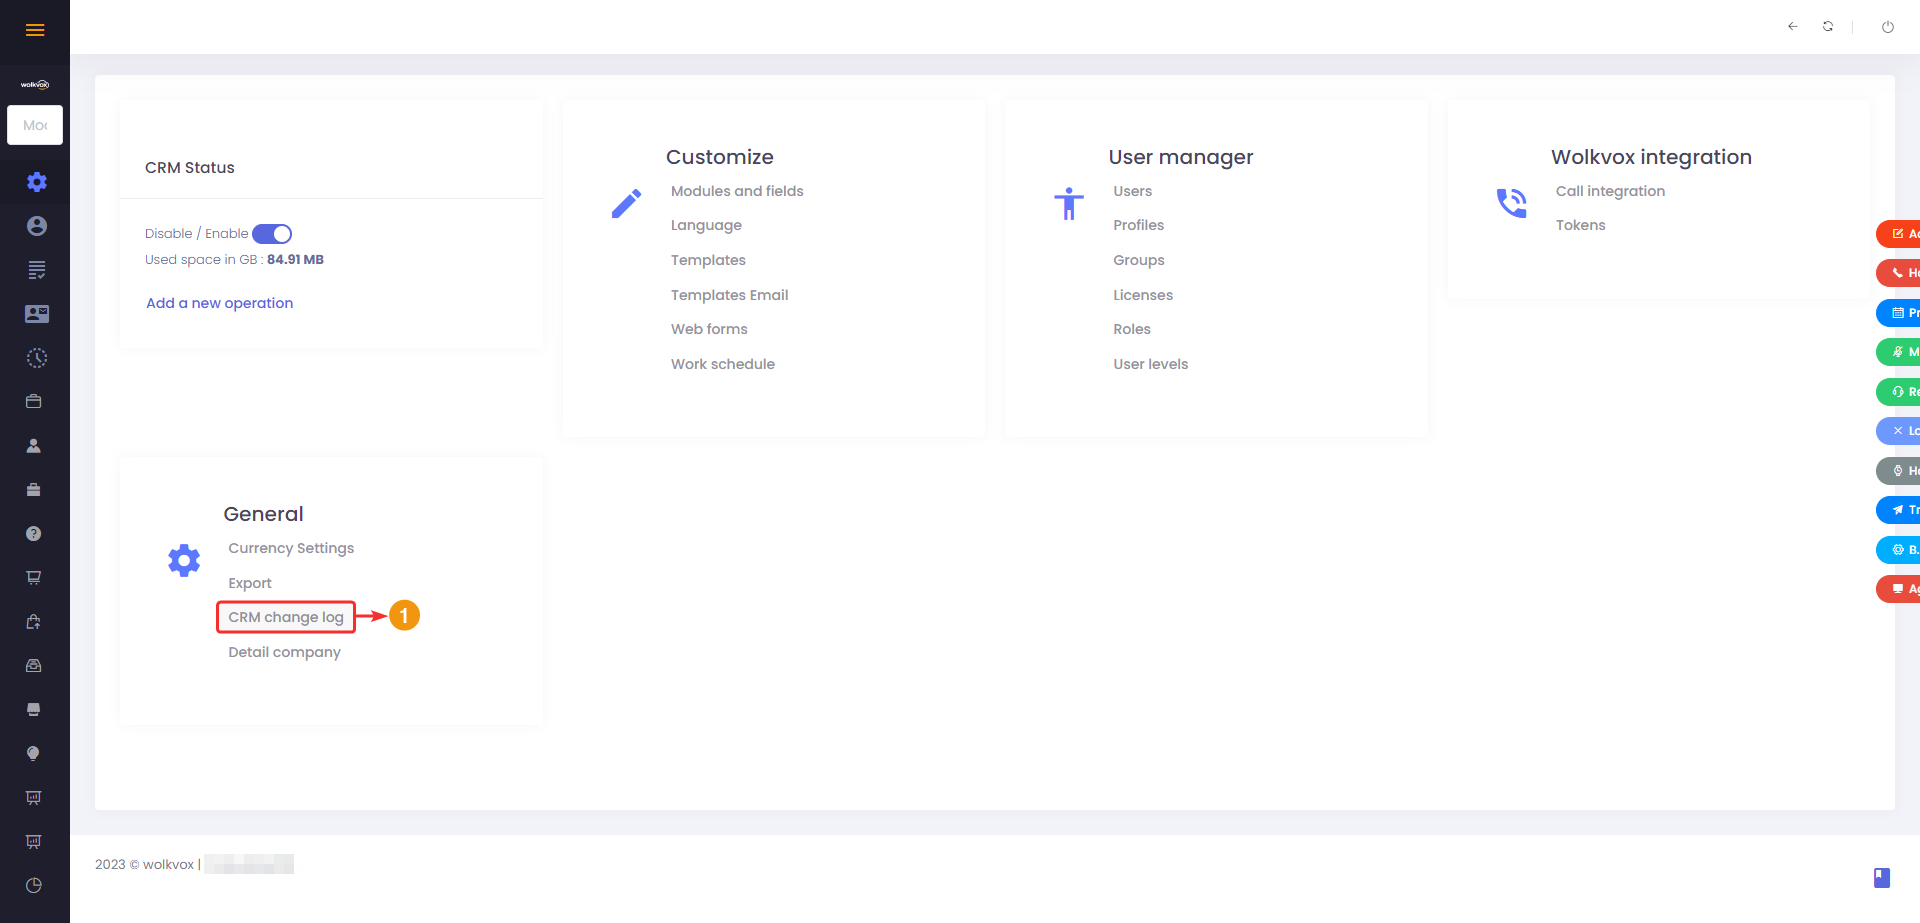
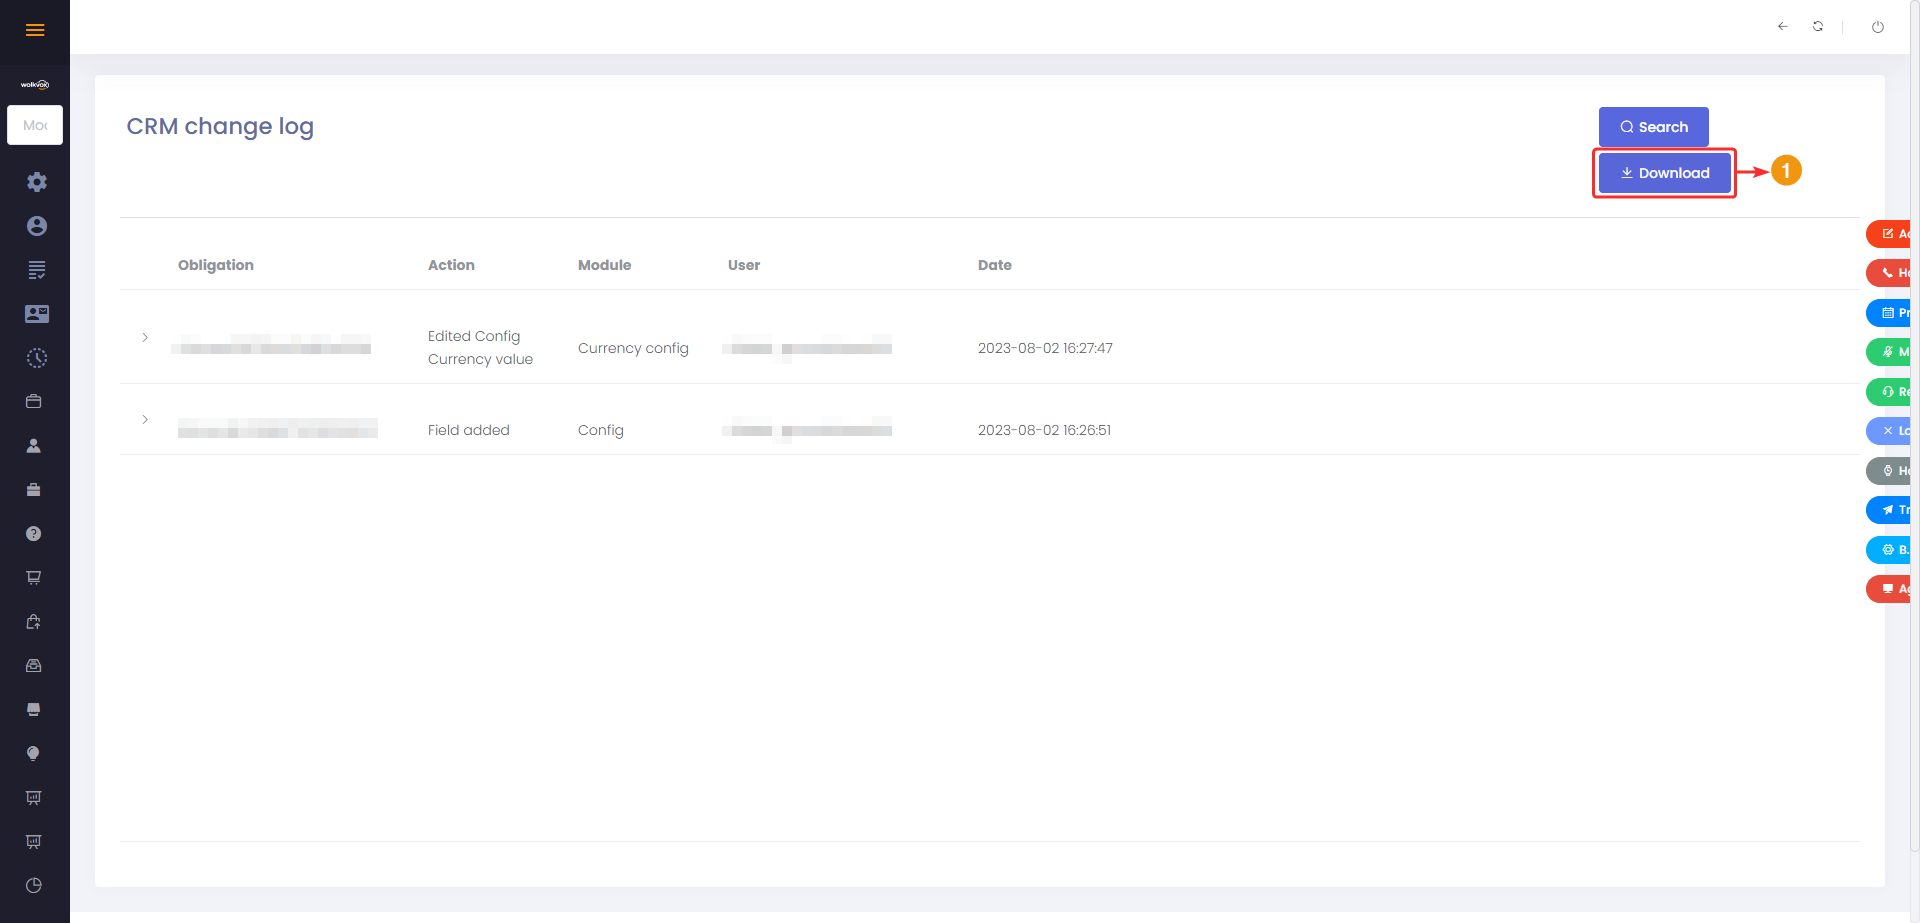
Change Log #
In this section, you can see in detail the latest changes made in your wolkvox CRM.
Once inside, the table of changes will appear with its respective columns:
- Wolkvox ID: Identification code of the change.
- Action: Shows the type of change performed.
- Module: Shows the module where the change occurred. Also, if it was in some section of the CRM configuration or a login.
- User: Shows the user who made the change or logged in if that was the action.
- Date: Indicates the date and time when the change or login occurred.

Clicking on the arrow located on the left side of each exchange record expands the selected exchange in detail.

- Through the “Search” button, you can filter the information by keywords.
- Enter the word you want to use for filtering the search.
- Select a date range, including the time.
- Click the “Confirm” button to apply the filter.

A “Download” button will appear that allows you to obtain the entire log of changes in an Excel file format where you will have the information filtered according to the search criteria you provided.
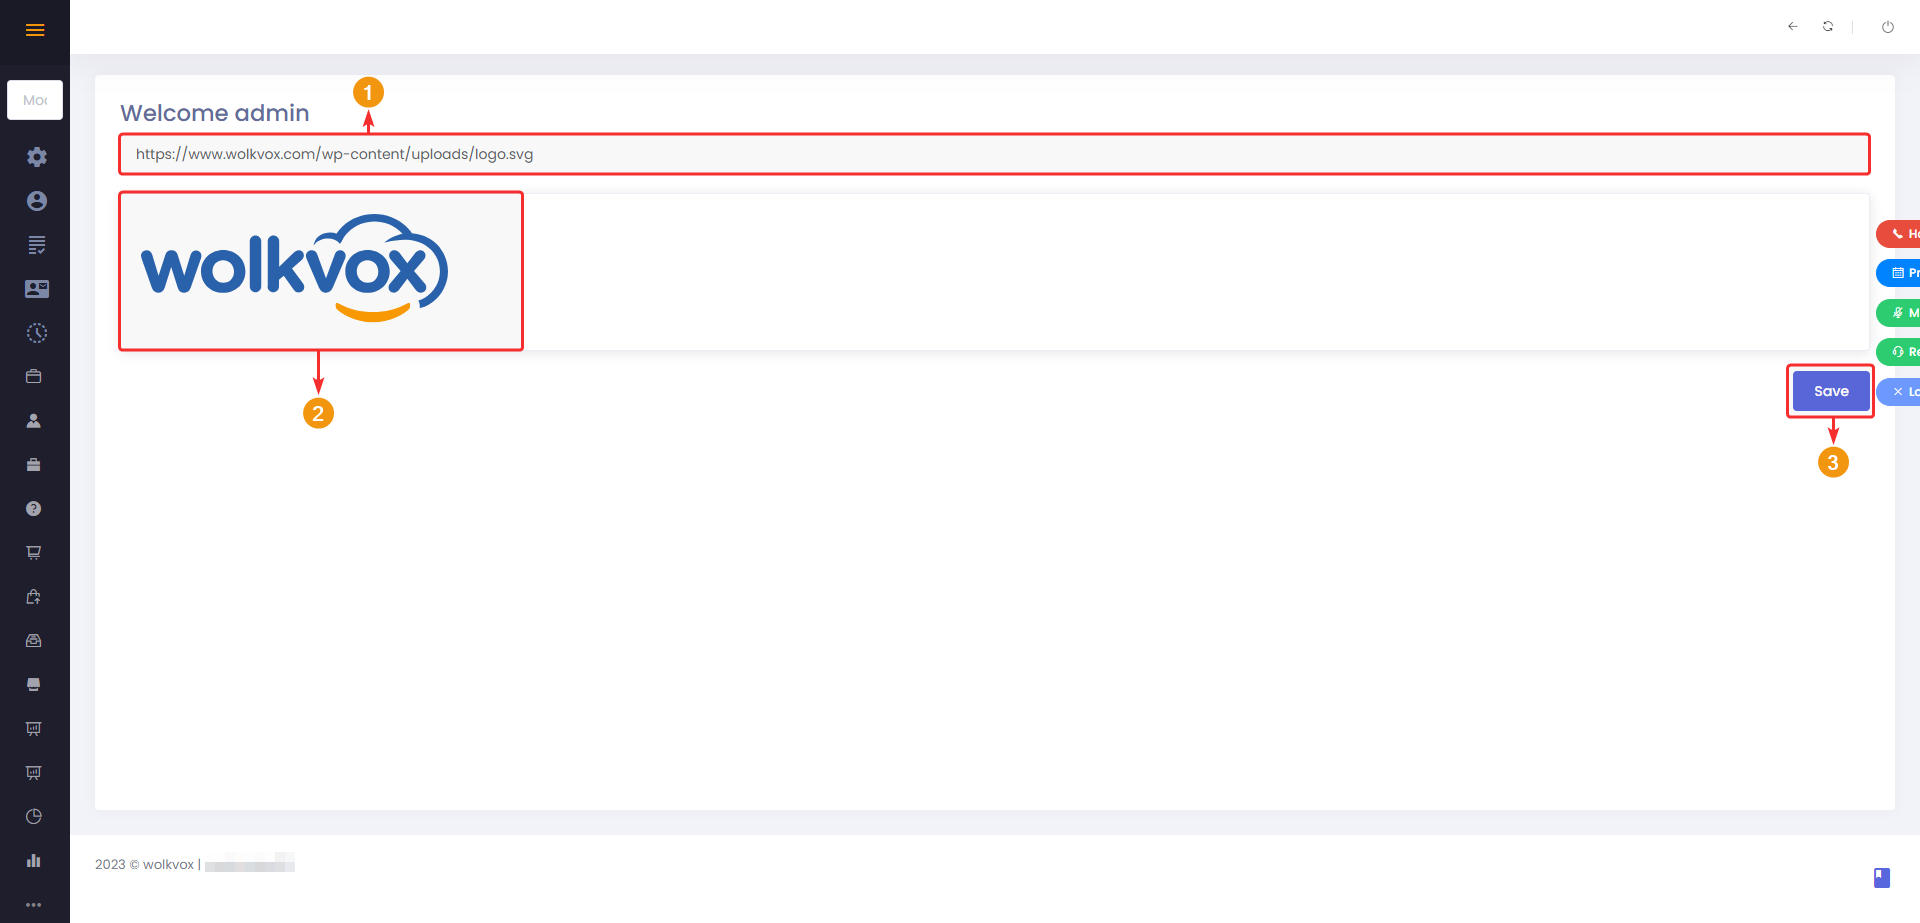
Detail company #
In this section, you can add a logo as a branding detail for your operation and place it in the left-hand side menu.
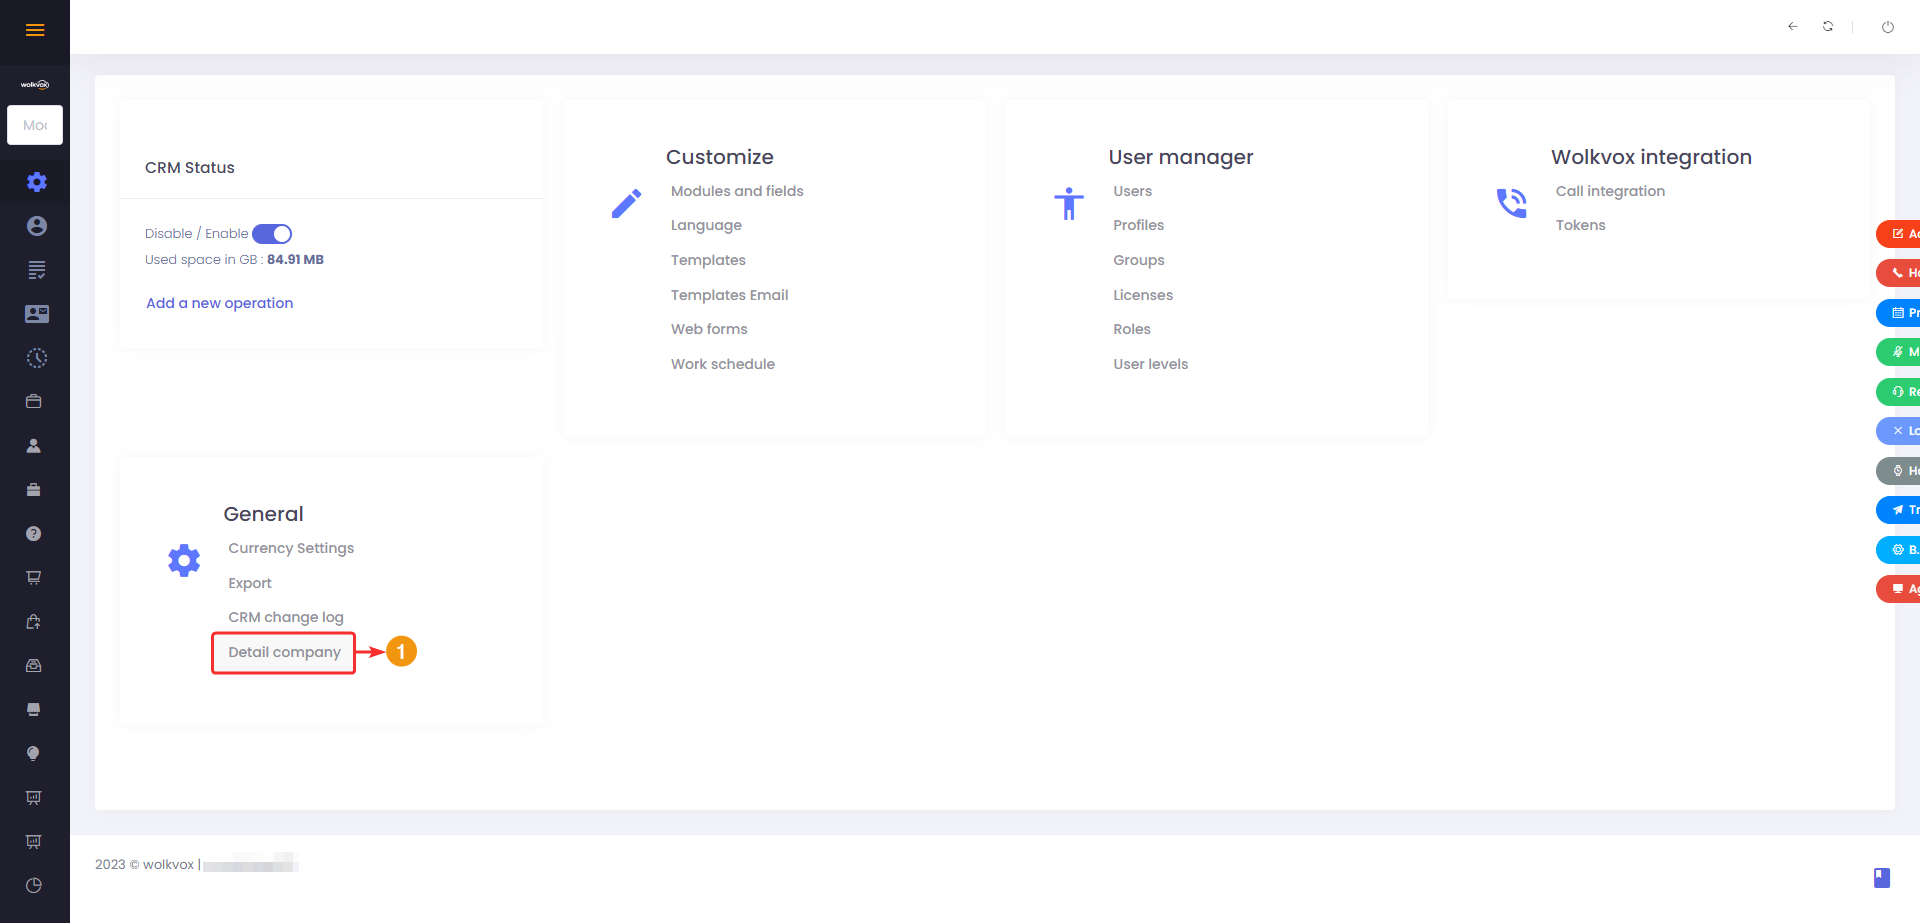
- Enter the public URL where your logo is stored.
- You can preview how your logo is being loaded.
- Click on “Save” to apply the changes. Once the changes are saved successfully, you will be able to see your logo in the left-hand side menu.
Note: It is recommended to refresh the website to view the logo.