

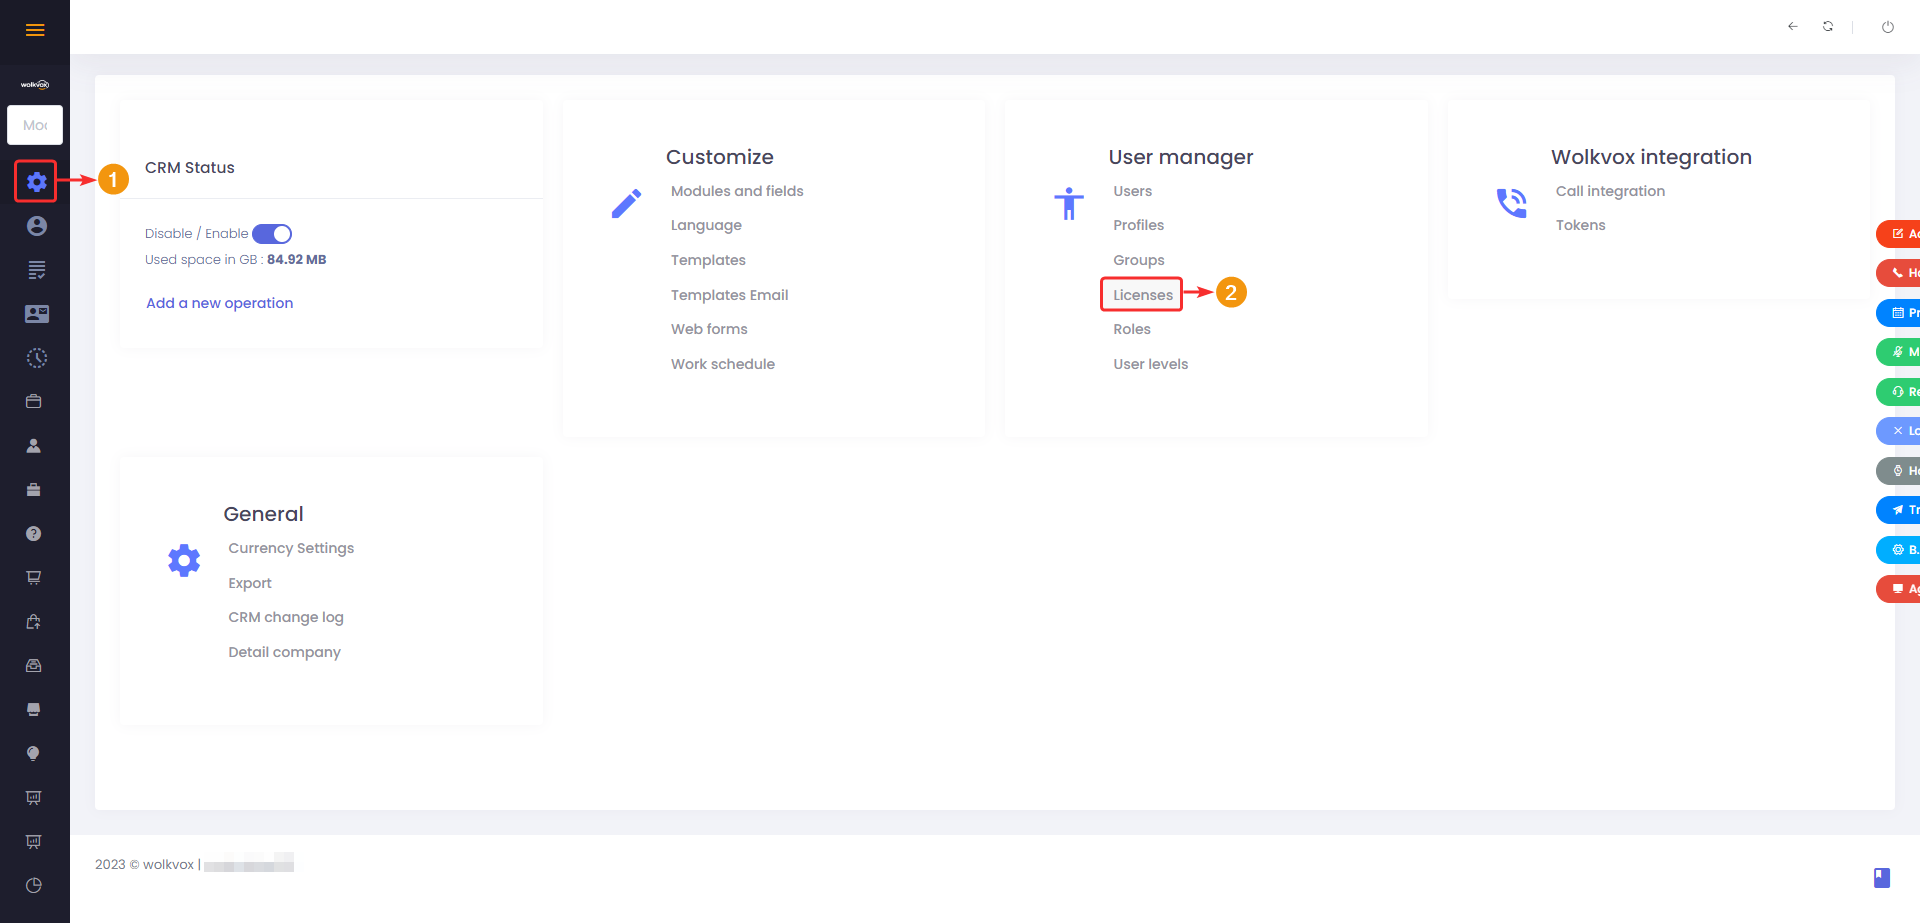
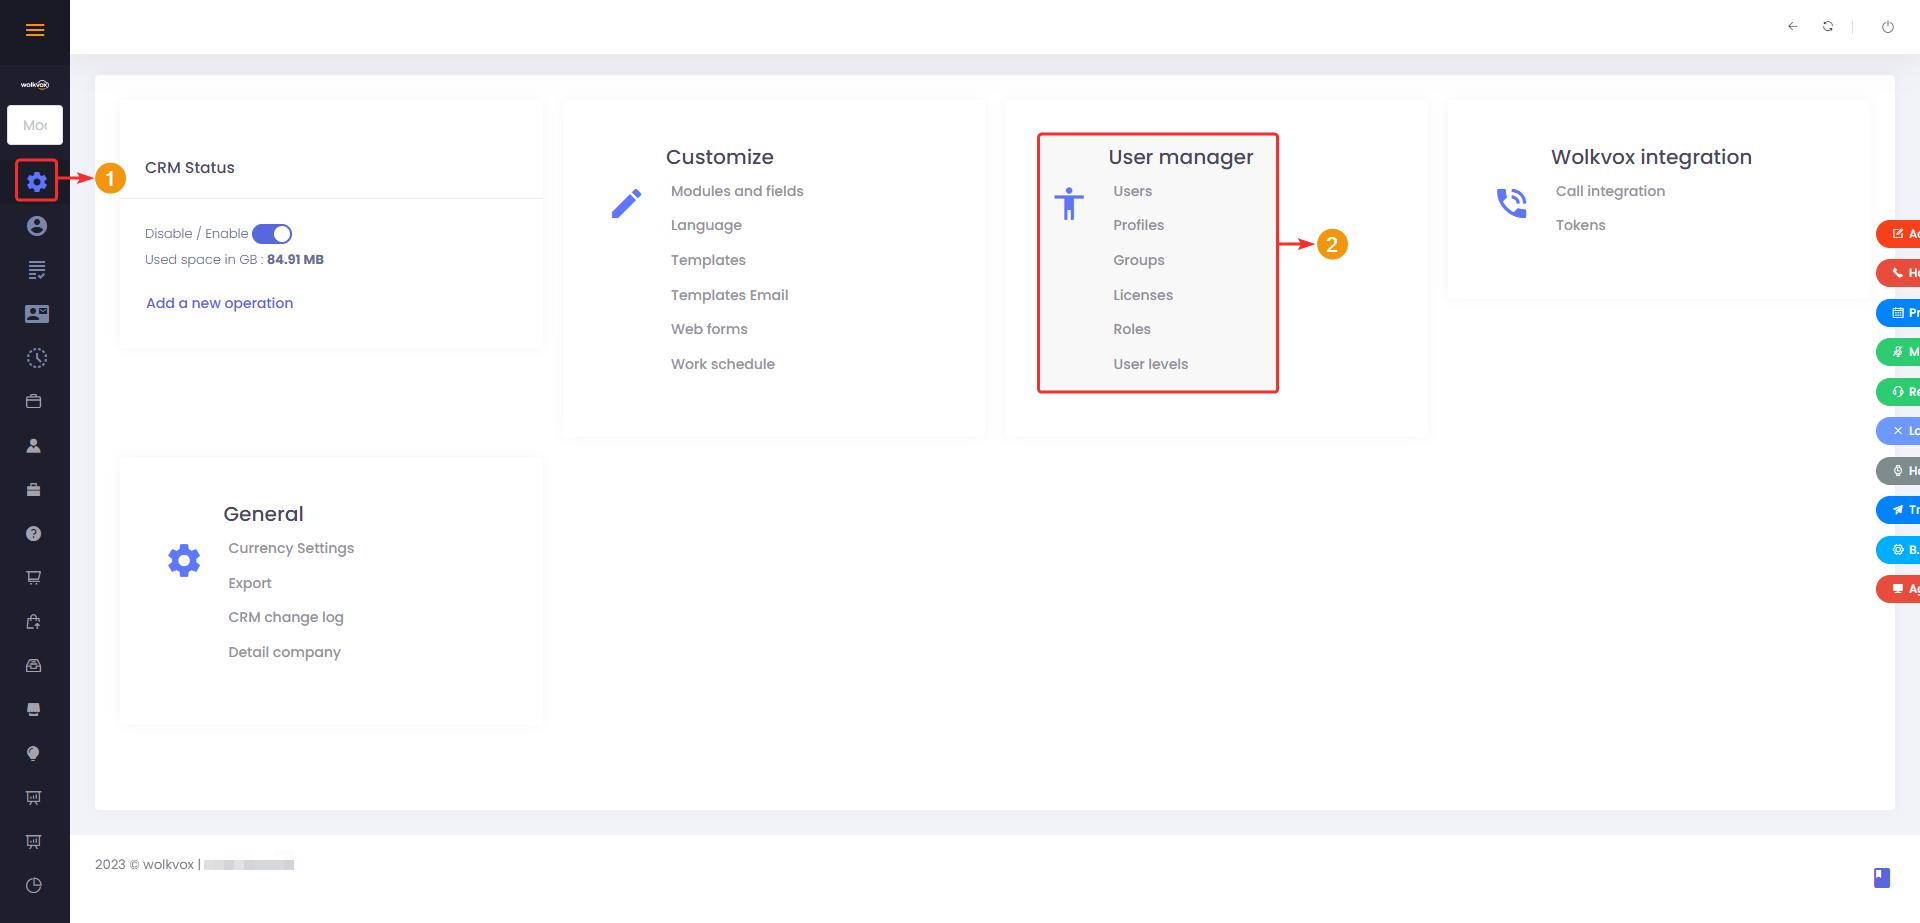
- Access the “Settings” section from the left-hand side menu.
- Click on the “Profiles” button located in the “User Administration” group.

Click on the “Add Profile” button.

- Assign a name for the profile.
- Create a description for the profile. This field is optional.
- Click on “Confirm” to create the profile.

Manage Profiles #
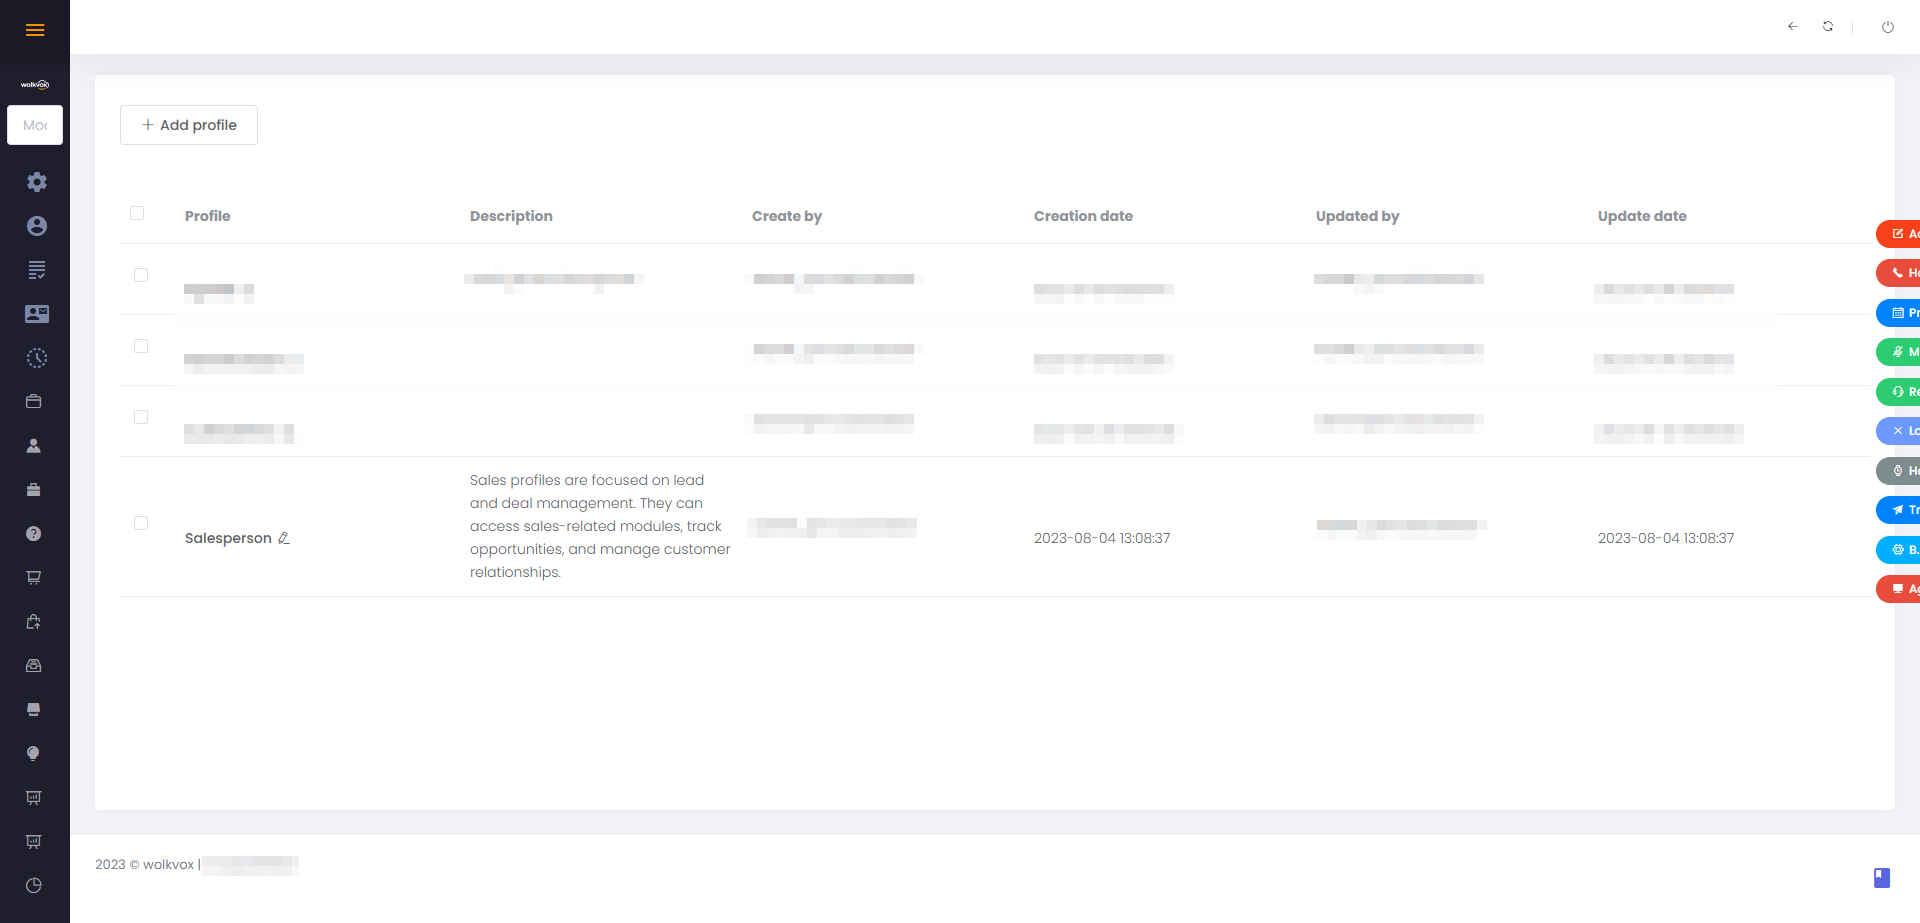
In the table shown in the following image, the profiles you create are listed. This table contains the following columns:
- Profile: Profile name. Next to the name, there is an edit icon, which allows you to edit the permissions the profile has for modules, configurations, and enabling or disabling buttons in the right-side menu on their screen.
- Description: Displays the profile description. Since this field is optional when creating a profile, it might appear empty.
- Created by: User who created the profile.
- Creation Date: Shows the date the profile was created, including the exact year, month, day, hour, minutes, and seconds.
- Updated by: Last user who modified or updated the profile information.
- Update Date: Date of the last update made to the profile, including the exact year, month, day, hour, minutes, and seconds.
Delete Profiles #
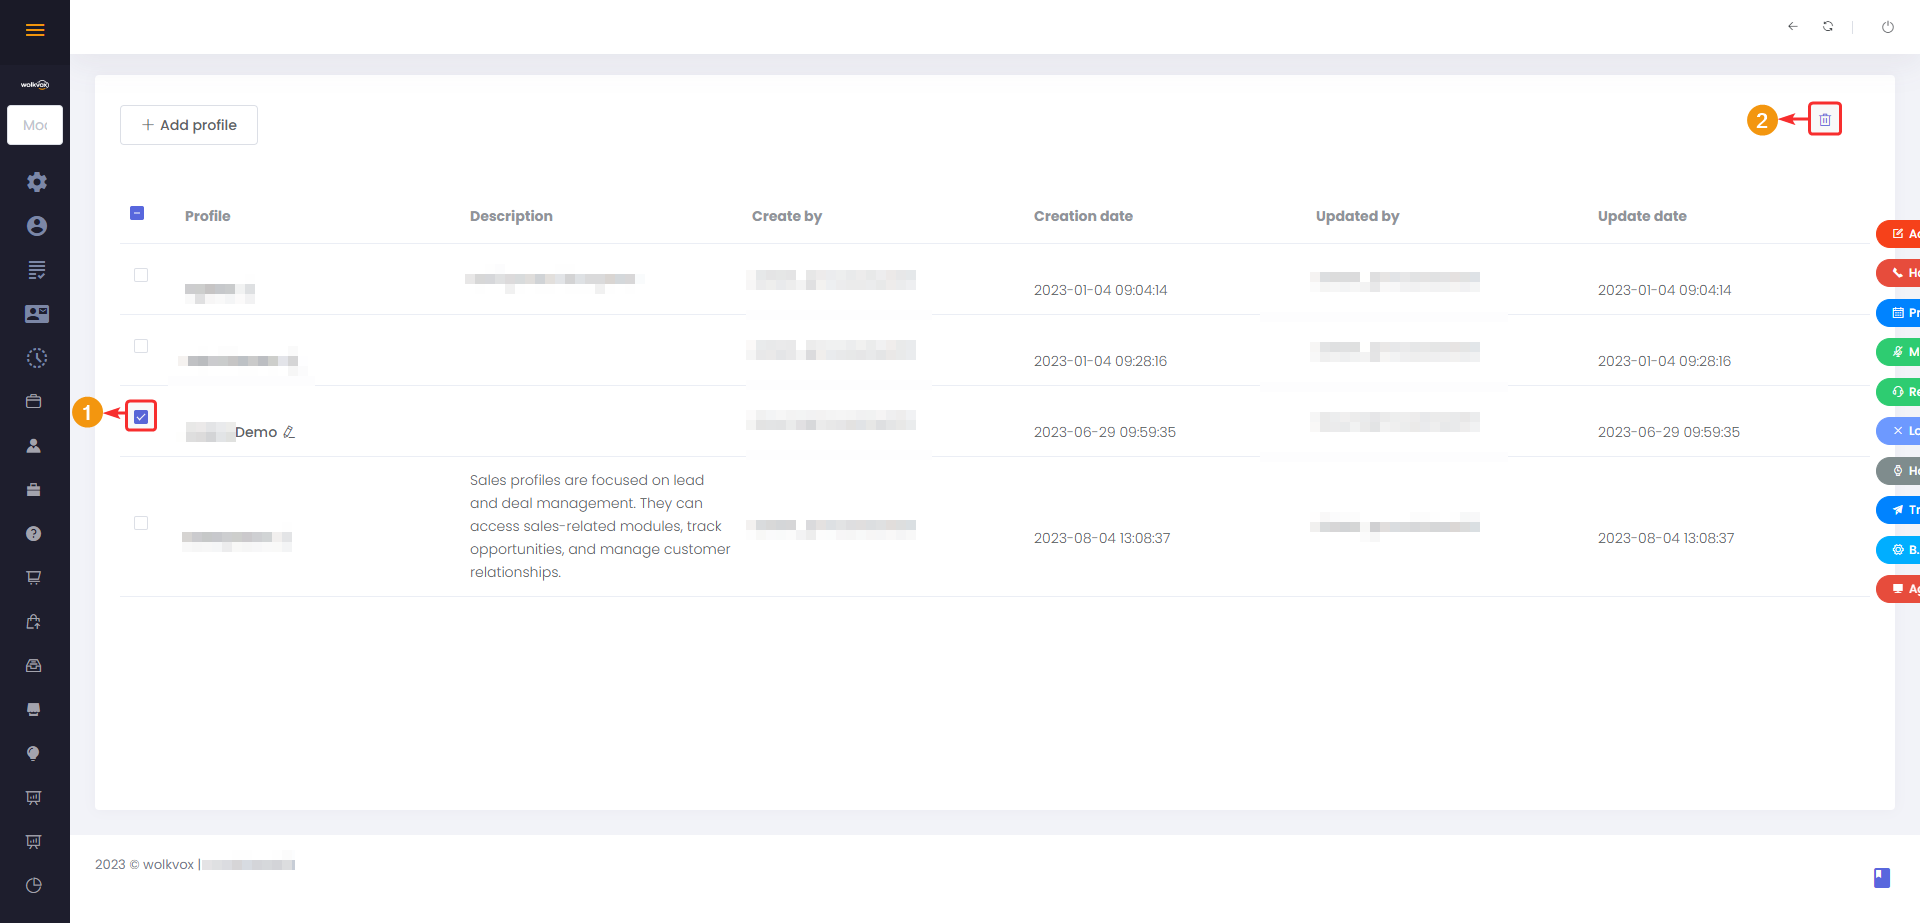
To delete a profile, select the checkbox in the first column corresponding to the profile you want to delete, then click on the trash can icon located in the top right corner of the section.
A confirmation window will appear asking if you really want to delete the selected profile. Click on “Delete” to confirm.
Manage the permissions that each profile possesses #
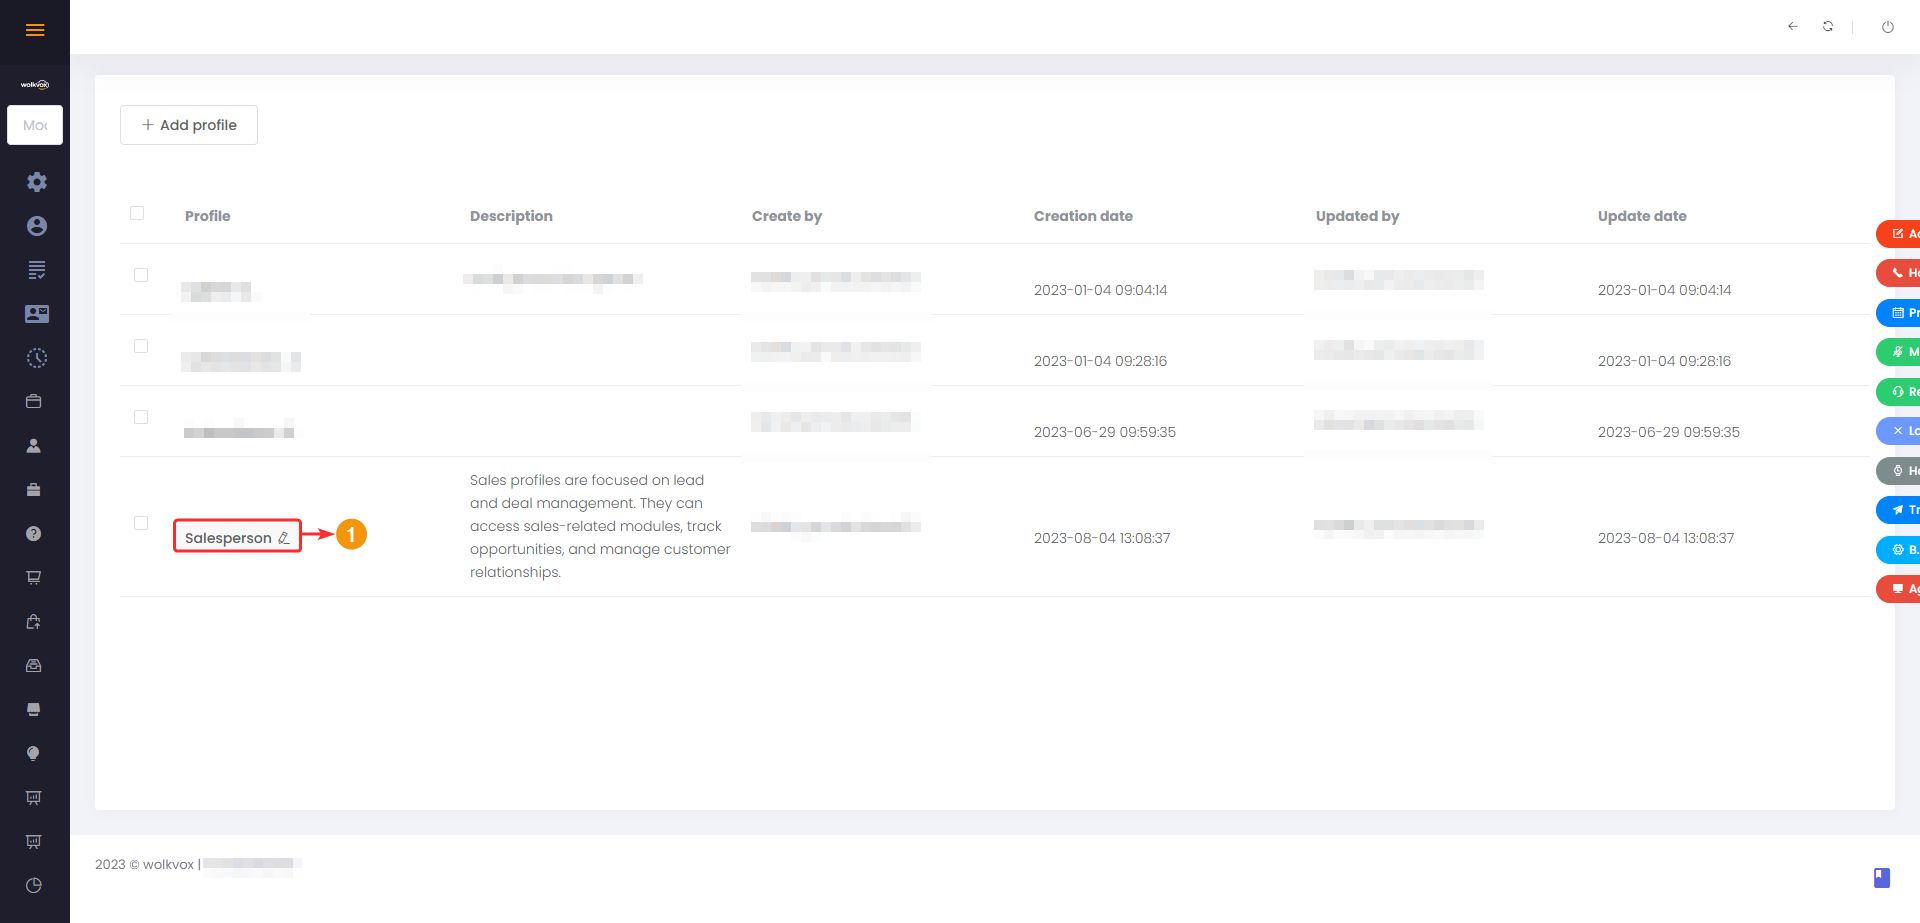
Each profile has a pencil-shaped icon on its right side; click on it, and it will take you to the management of permissions for the selected profile
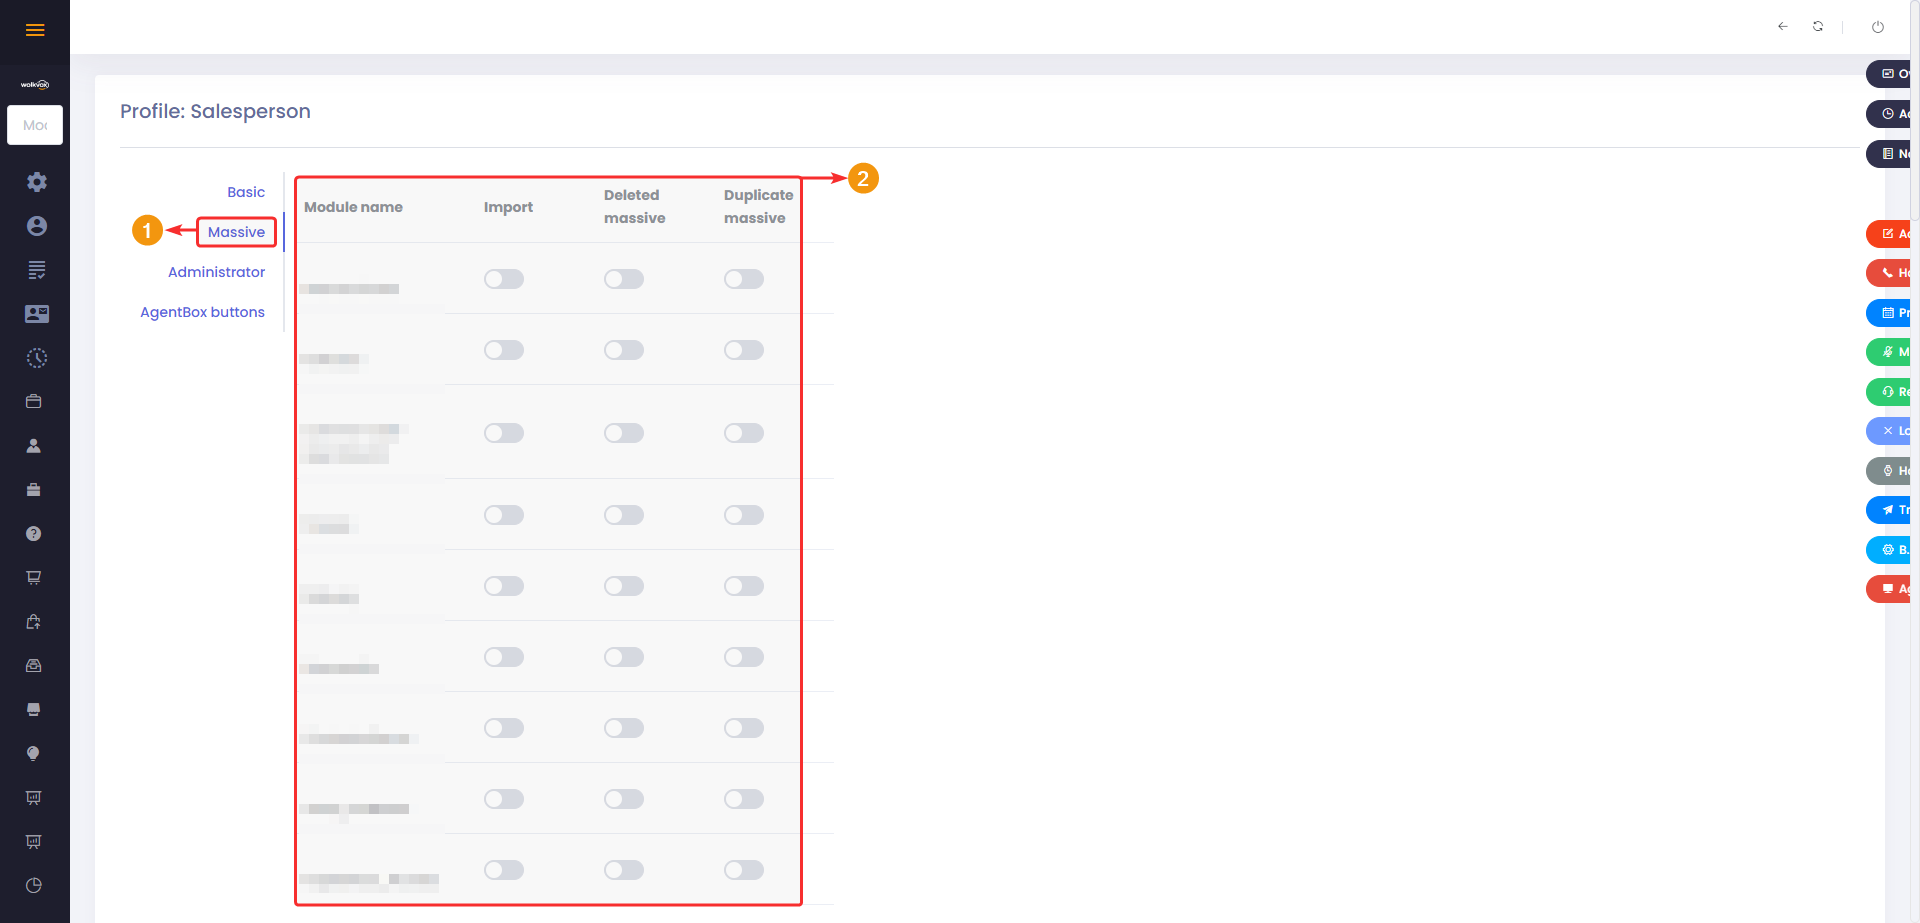
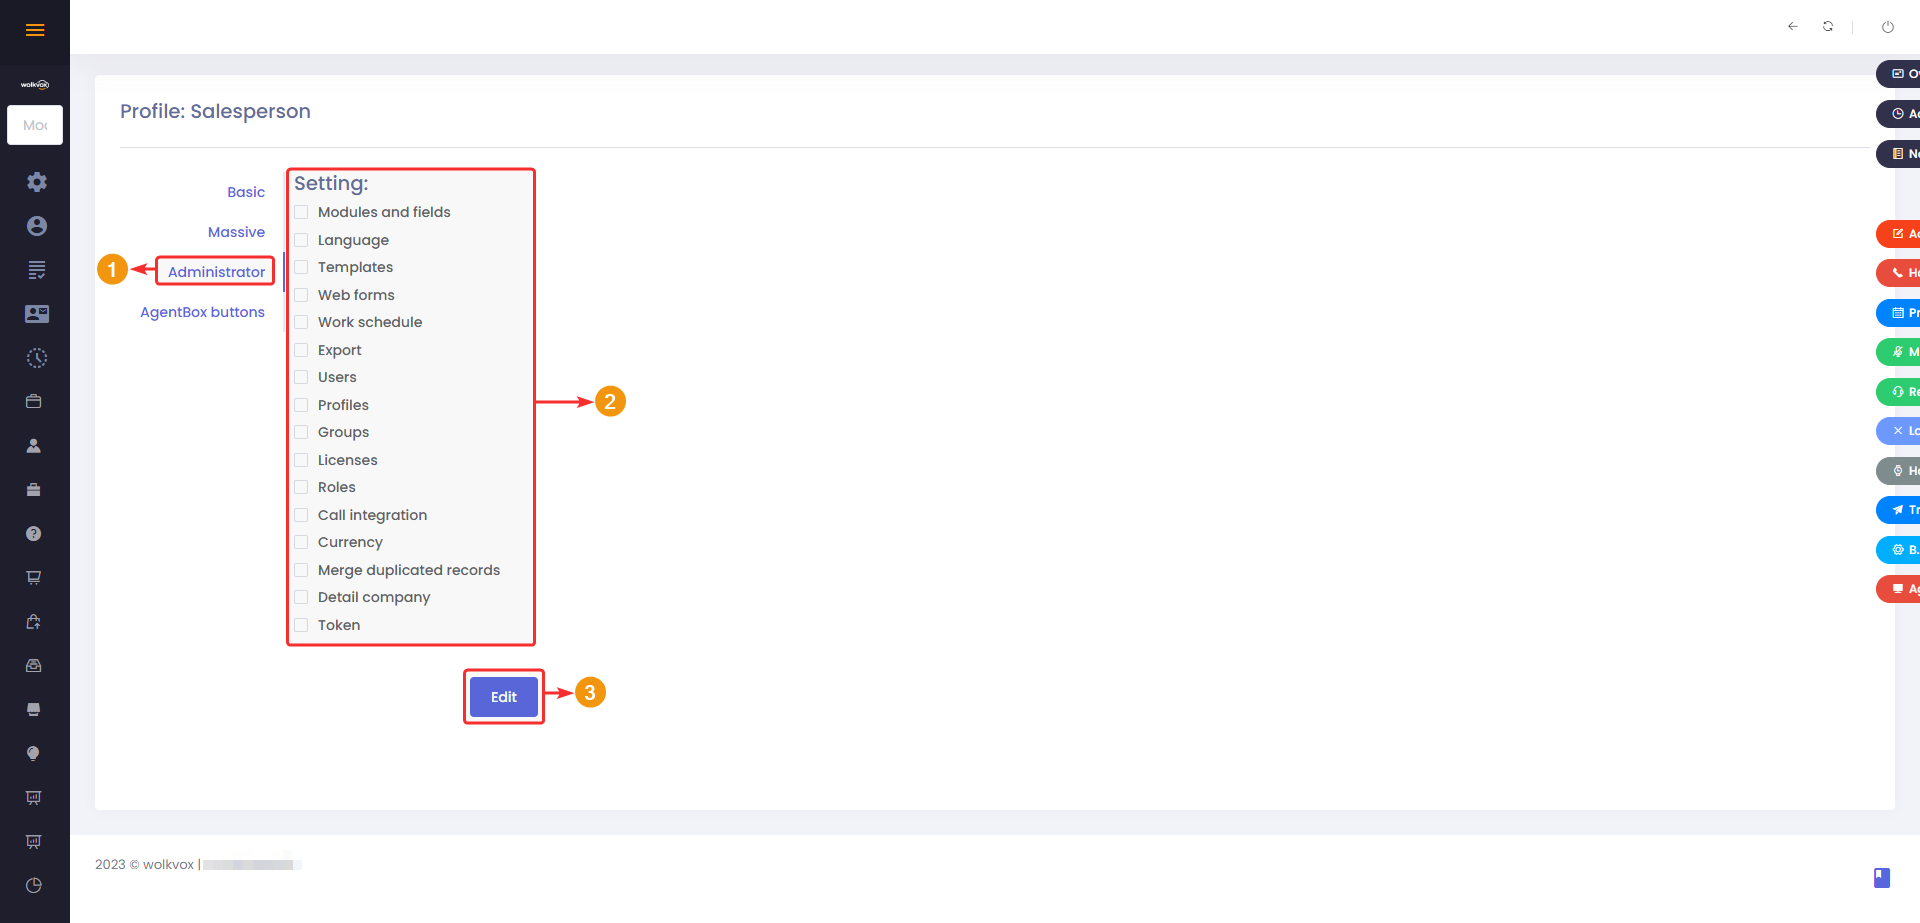
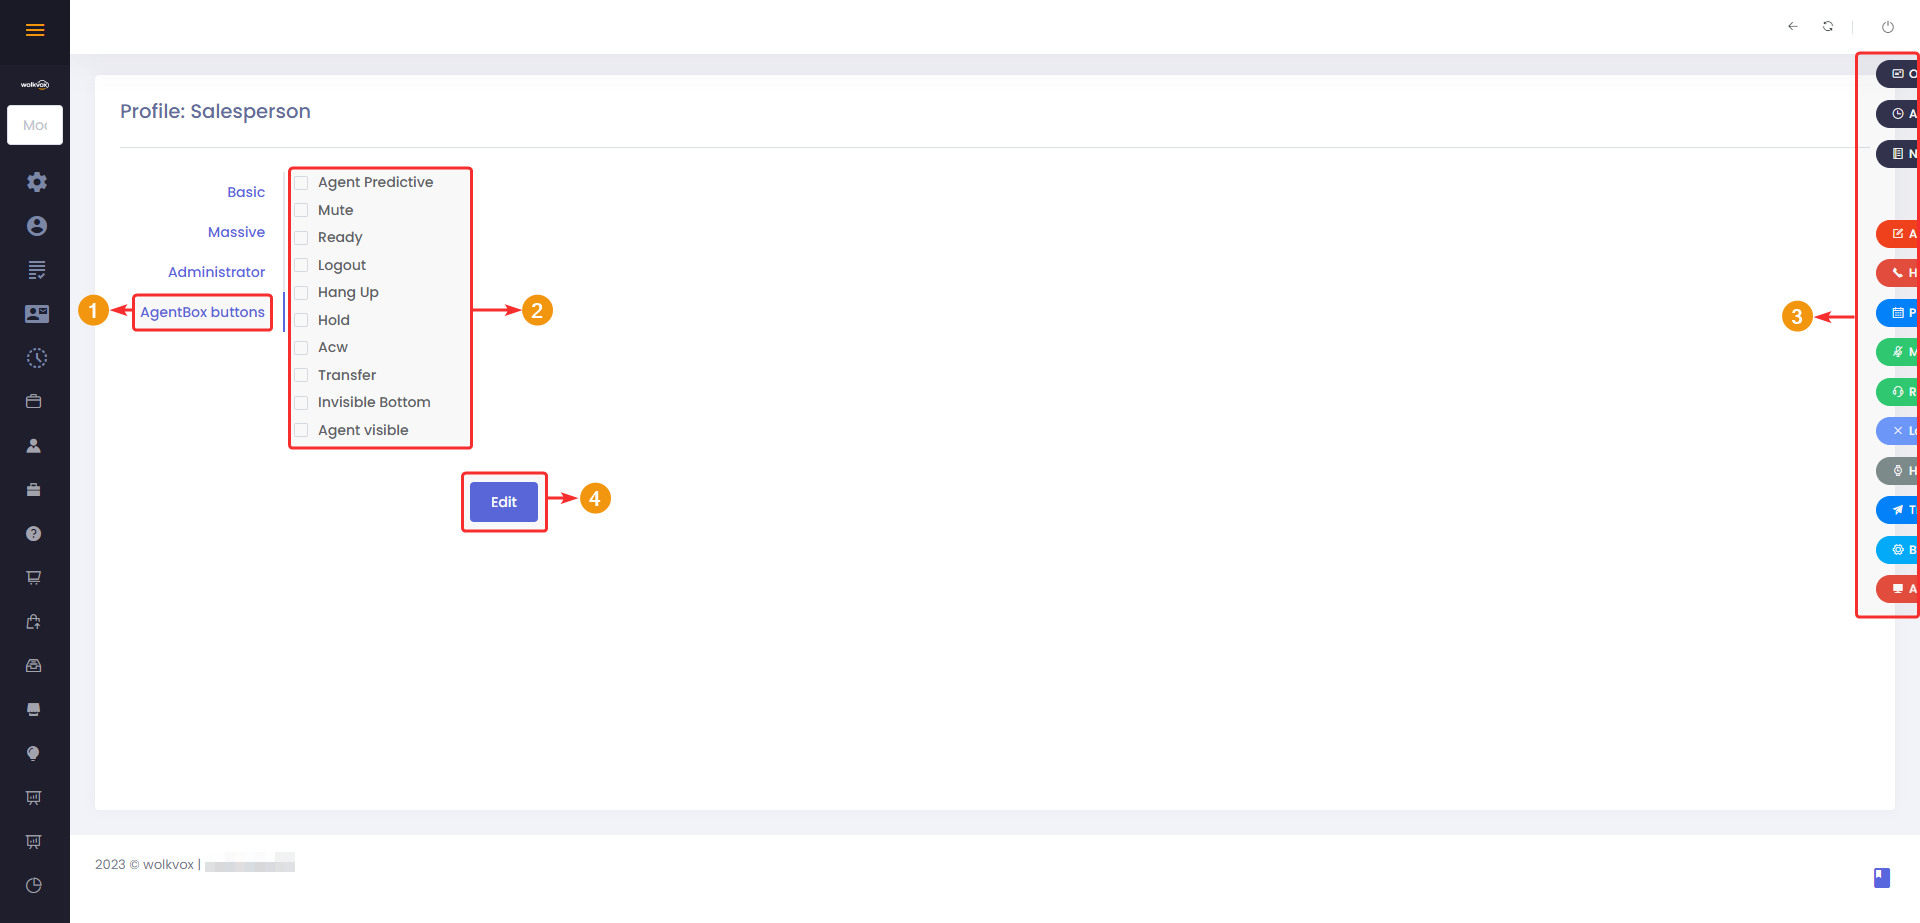
Once you enter the profile’s permissions, a section like the following will appear, where you have several tabs:
- Basic: Here, the basic permissions of the profile are listed.
- Massive: These are permissions related to bulk actions.
- Administrator: Permissions related to CRM administration are found here.
- AgentBox Buttons: This is where you configure the buttons that the agent linked with Wolkvox AgentBox will have access to.
On the right side of the menu, the permissions to grant will appear according to the tab you are in.
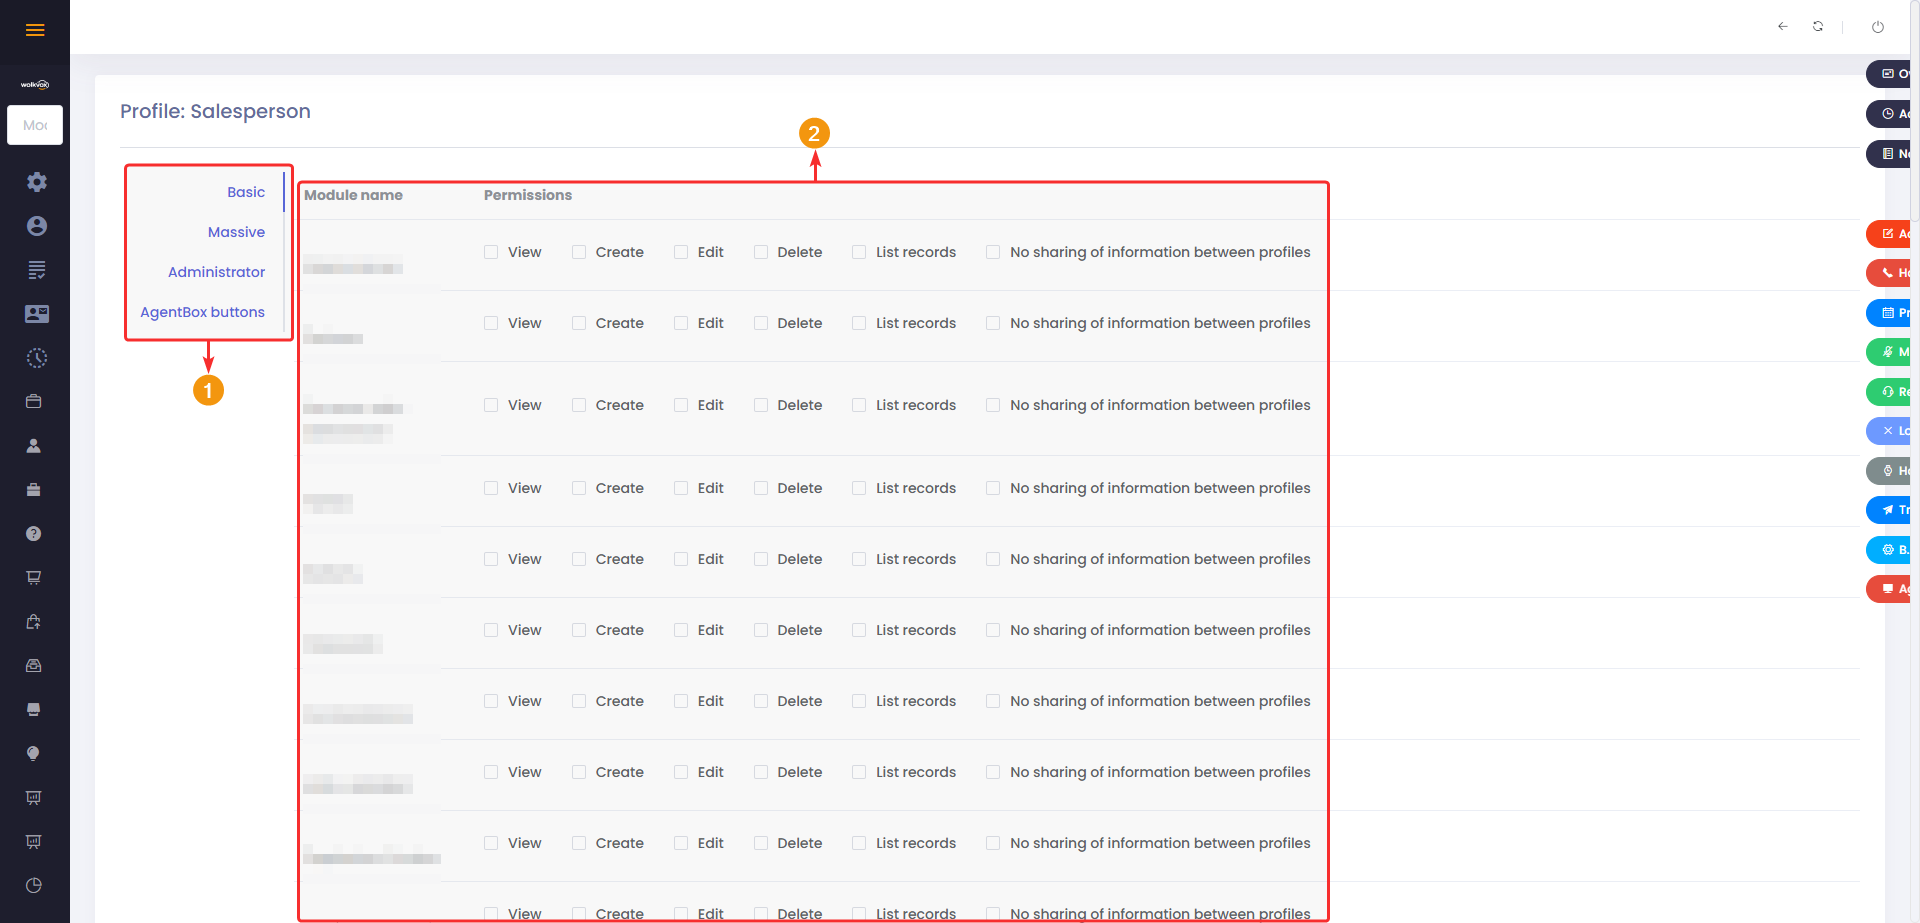
To apply the changes, you should go to the bottom of the section and click on “Edit”. A temporary window will appear, notifying you that the changes were successfully applied.
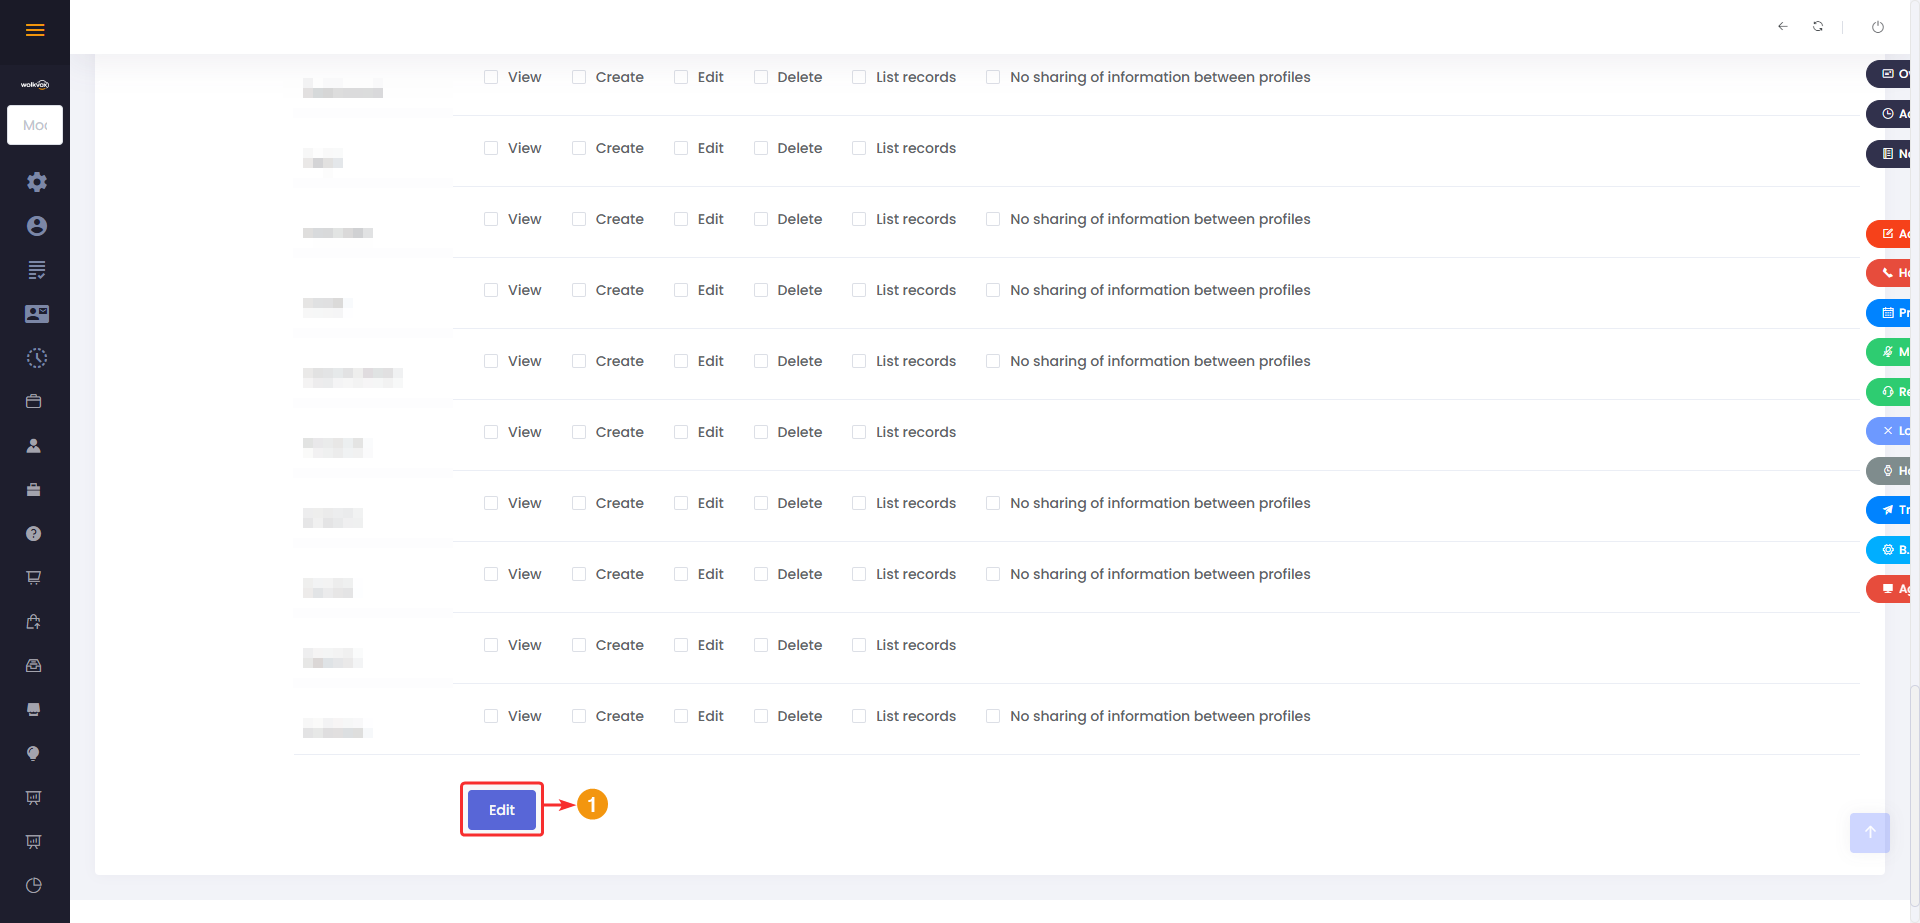
Basic Permissions #
The permissions you can configure in this tab are related to each module created in the CRM. In other words, here you will be telling the system that the profile in question can perform the following actions on a module:
- View: The profile can or cannot view the content of the module.
- Create: The profile can create items within the module in question.
- Edit: It may or may not edit the information within the module.
- List Records: Whether or not they can see the records within the module.
- Do not share information between profiles: If this box is checked, users with this profile type won’t be able to see the information entered by other users in different modules, nor can they share the information they add.
Remember to scroll down and click the “Edit” button at the bottom to apply the changes made.

Massive Permissions #
In the “Massive” tab, you can add or remove permissions related to bulk actions for users within modules.
The permissions are:
- Import: Enables or disables the ability to import records in bulk.
- Mass Delete: Enables or disables the ability to delete records in bulk.
- Mass Duplicate: Enables or disables the ability to duplicate records in bulk.
Remember to scroll down and click the “Edit” button at the bottom to apply the changes made.
Administration Permissions #
These permissions allow you to determine which sections of the wolkvox CRM configuration the profile can access.
Remember to scroll down and click the “Edit” button at the bottom to apply the changes you’ve made.
AgentBox Permissions #
- The permissions you can grant in the “AgentBox Buttons” tab are related to the wolkvox Agent application.
- The checkboxes that you can enable or disable correspond to the buttons located on the right side of the screen.
- Choose which buttons will appear for the user assigned to the specific profile.
Note: Remember to click on the “Edit” button at the bottom to apply the changes you’ve made.
Role Creation and Management #
The purpose of roles is to organize different users in a hierarchy, simulate a company’s organizational structure, and allow each user (based on their position in the hierarchy) to view certain records of specific CRM modules. It’s used, for example, to restrict access to information so that users belonging to a specific role cannot see the records of users in other roles.

Building the Hierarchical Role Structure #
Firstly, you should know that the highest or parent role is called the “CEO”. In other words, it’s not possible to create a role higher than the “CEO” role. And you can build child roles with their respective parent roles based on this, without exceeding the “CEO” role.
Higher-level roles will always have the ability to view the information of roles below them.
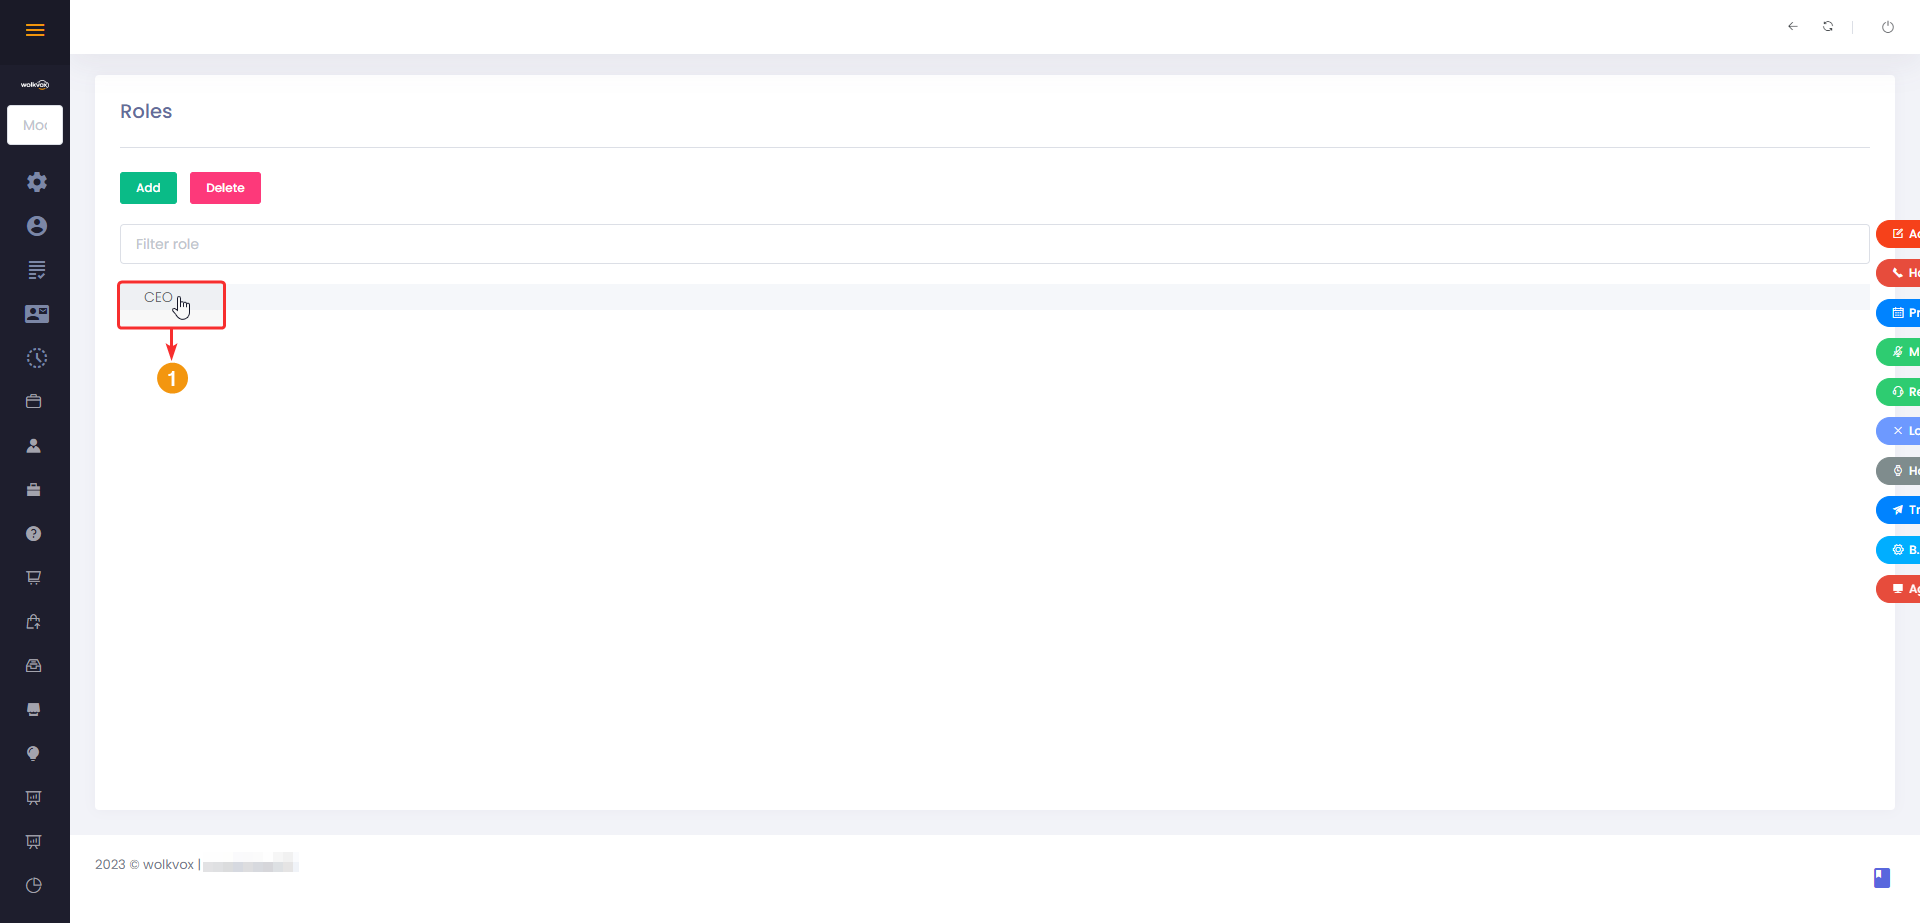
To create a role, you must have its parent role selected and then click on “Add”.

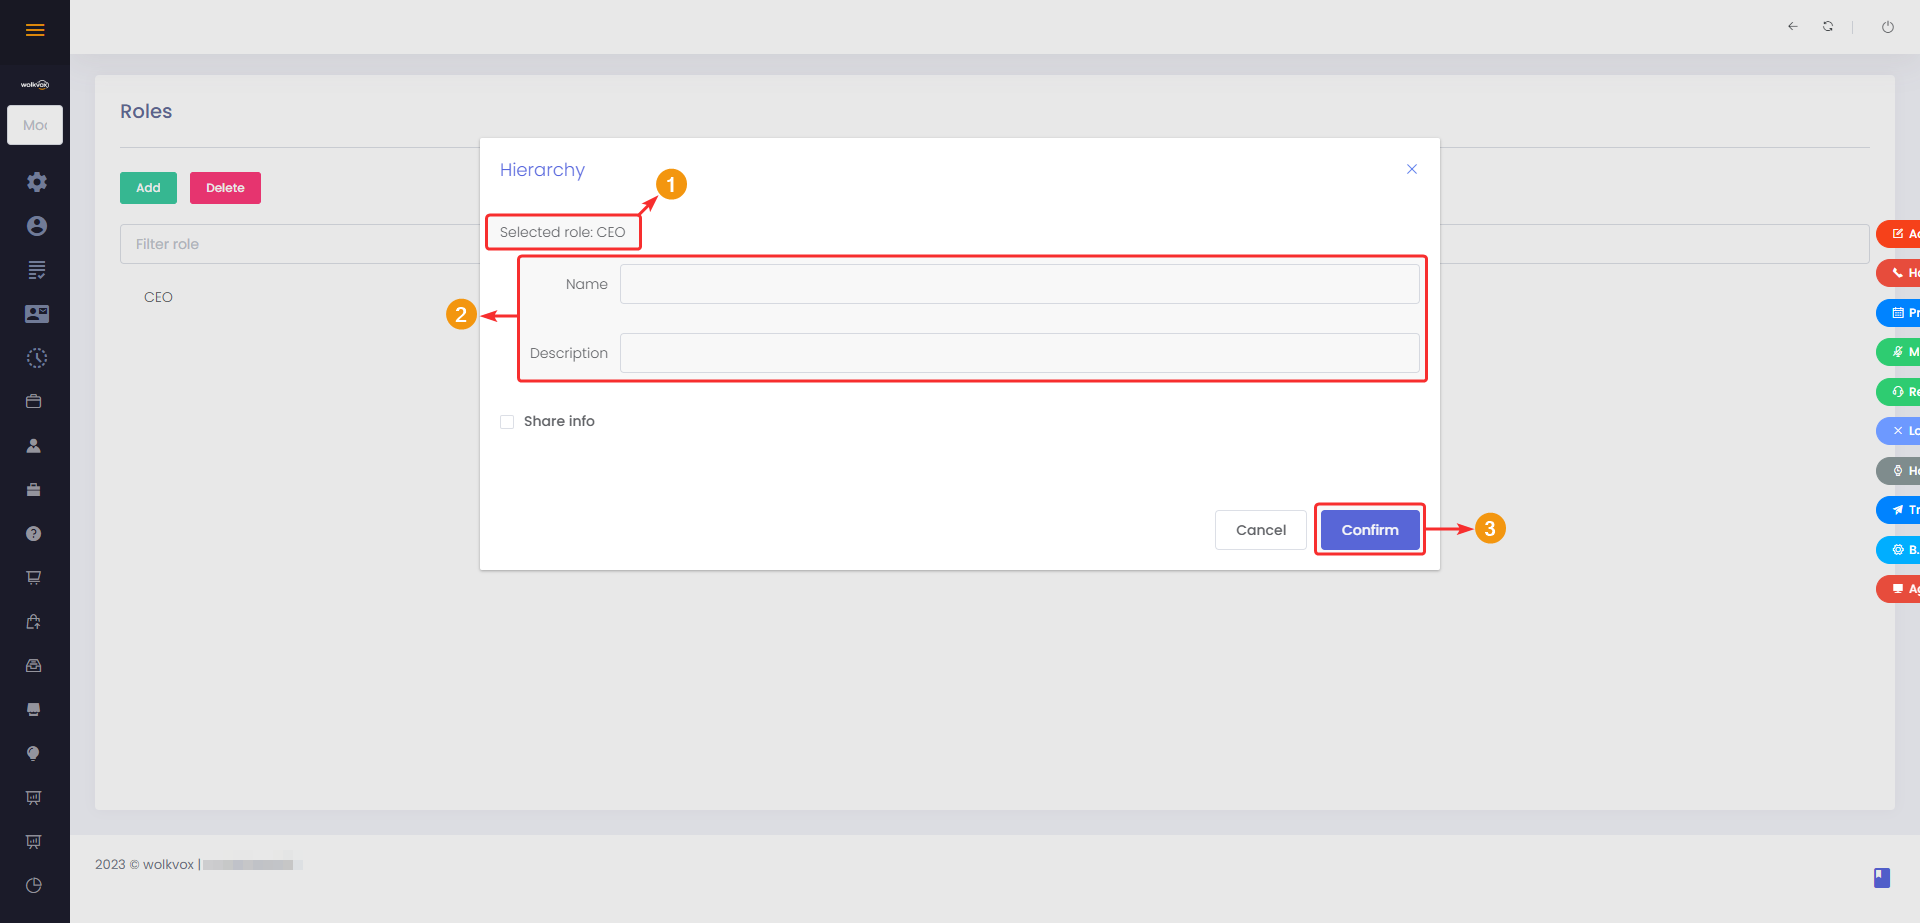
A new window opens where:
- The selected role is displayed as the parent of the role you are about to create.
- Assign a name and description to the new role.
- Click “Confirm” to create the role.
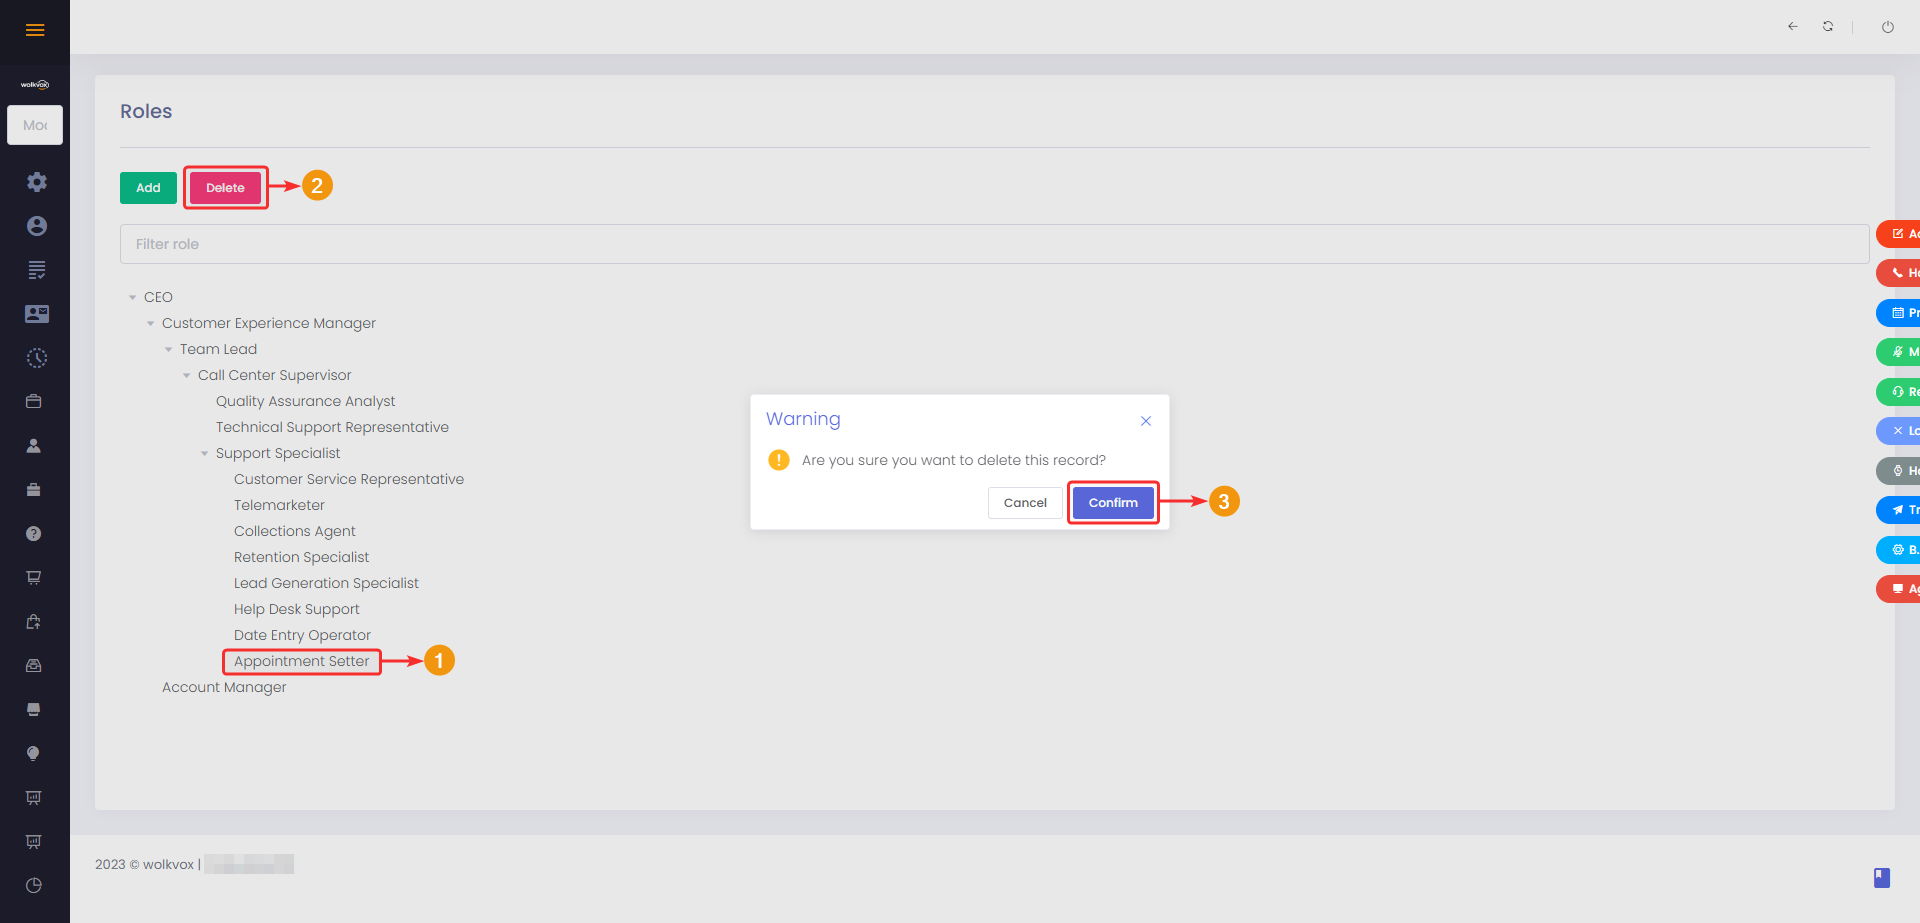
To delete a role, simply select one and click on “Delete”. Be careful, when deleting a role that has subordinate roles, all roles in cascade will be deleted.
Creation and Management of User Levels #
User levels are used to hierarchically organize case escalation. In other words, they establish an order for case management. Each user in the CRM will be assigned a user level according to their expertise.
Creation and Management of User Levels #
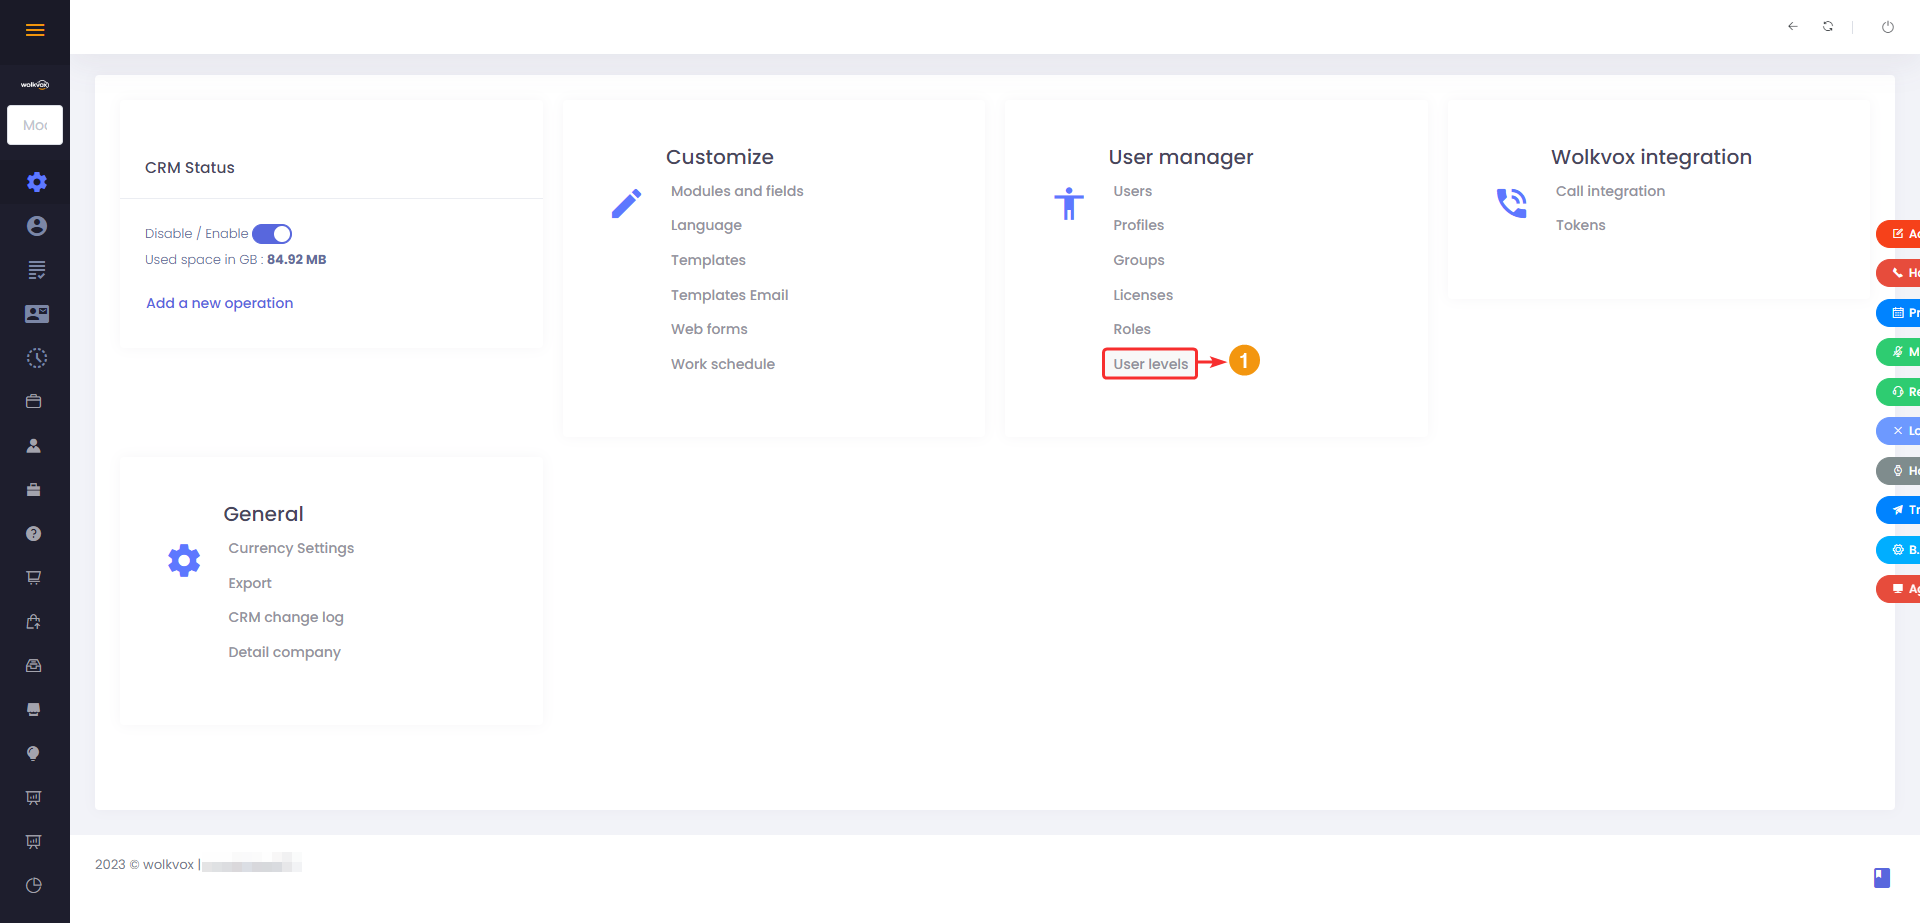
Access the CRM configuration and then click on the “User Levels” button, located within the “User Administrator” group.
- Click on the “Add Level” button.
- Assign a name and description to the level.
- Click “Confirm” to create the user level.

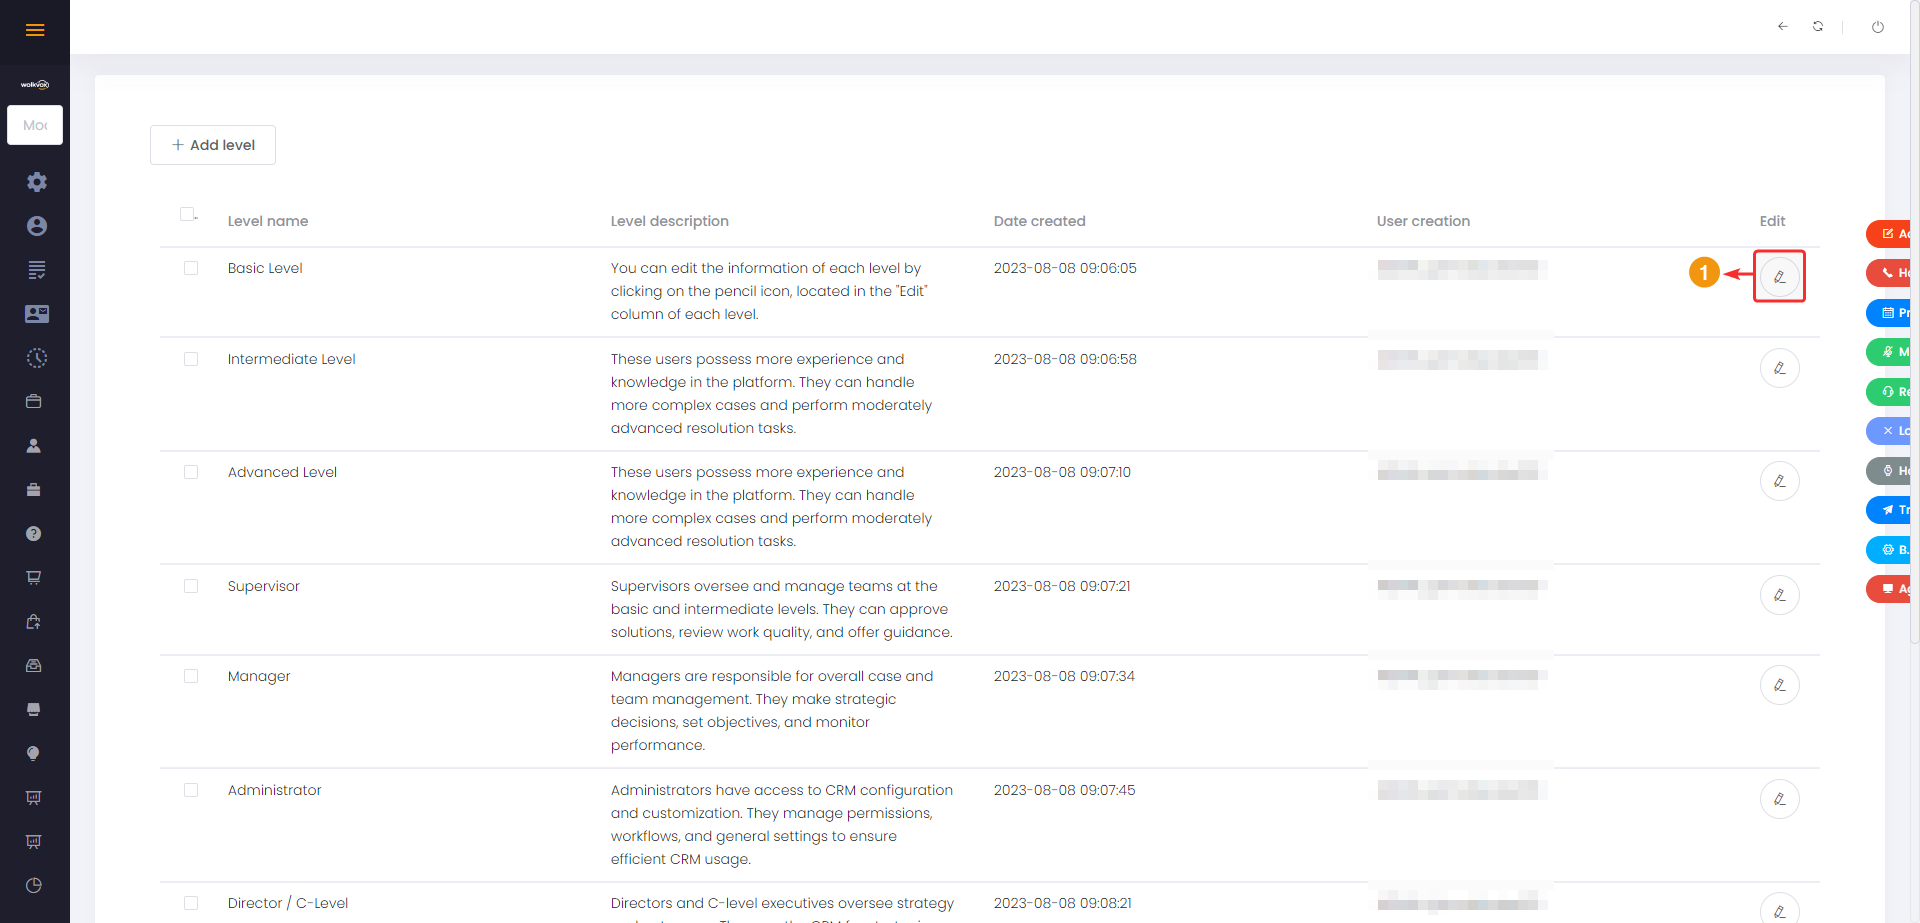
You can edit the information of each level by clicking on the pencil icon, located in the “Edit” column of each level.
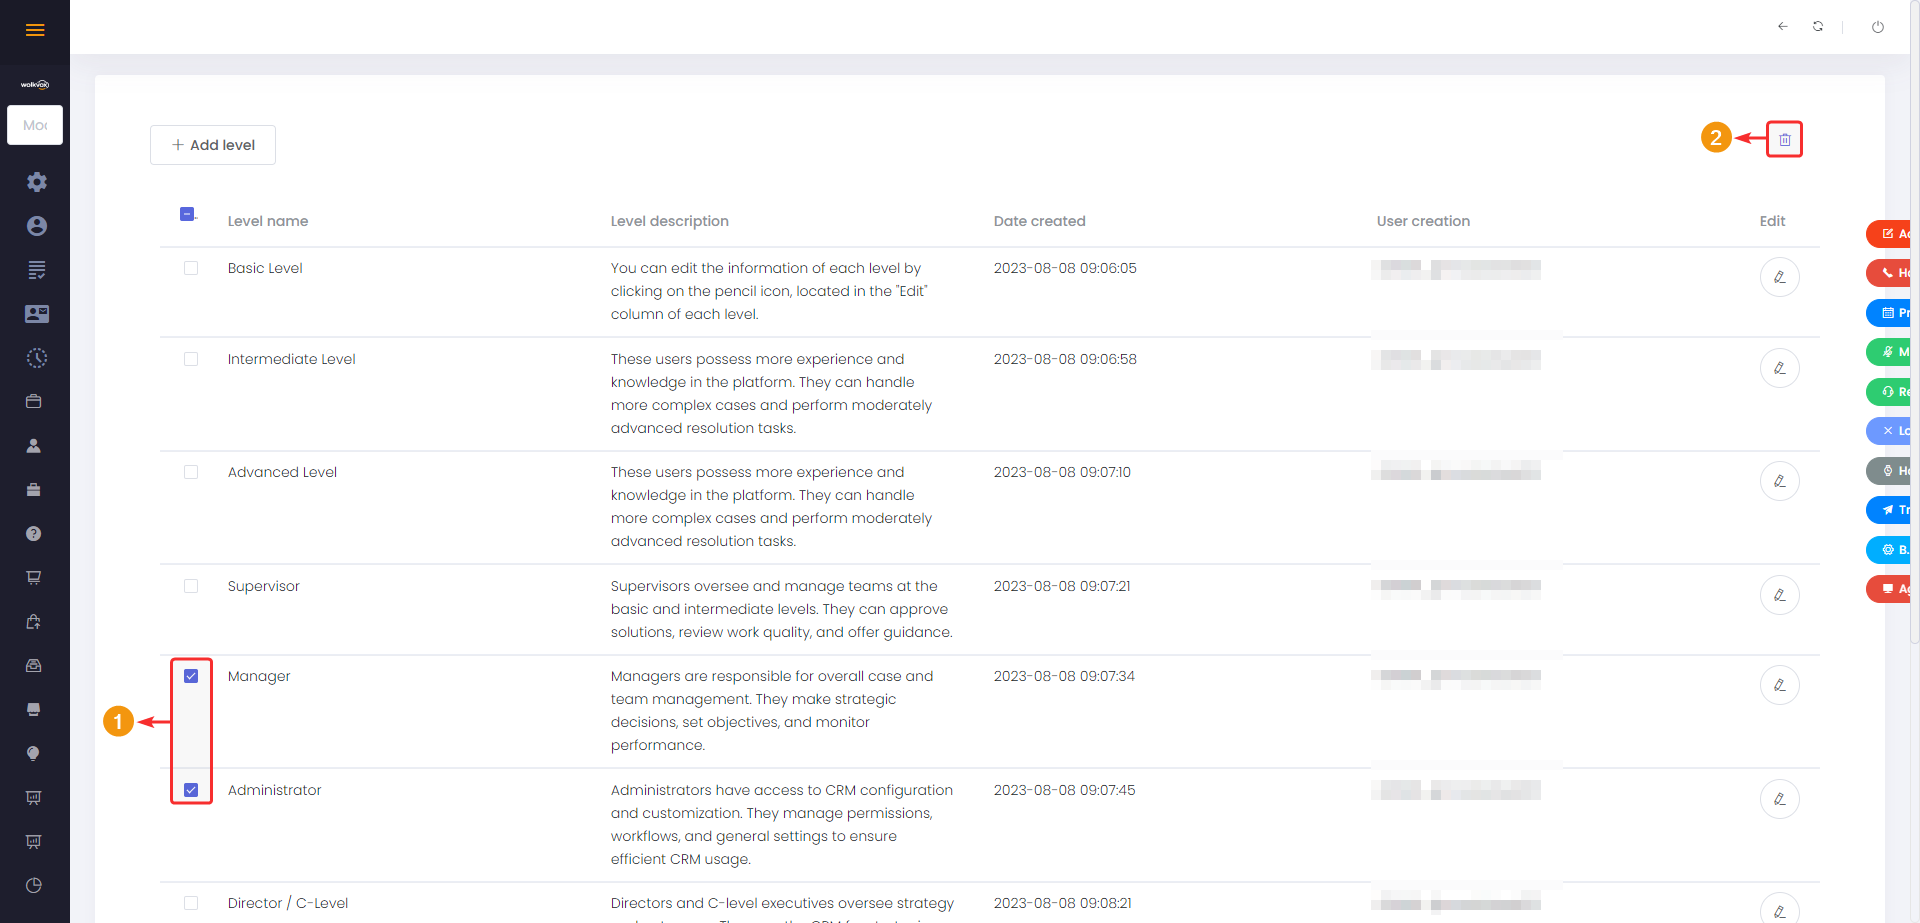
To delete one or multiple levels, activate the checkbox of the ones you want to delete in the leftmost column and then click on the trash can icon located in the upper right corner of the section.
User Creation and Management #
A user is the account used to access wolkvox CRM, providing their corresponding username and password.
Create a User #
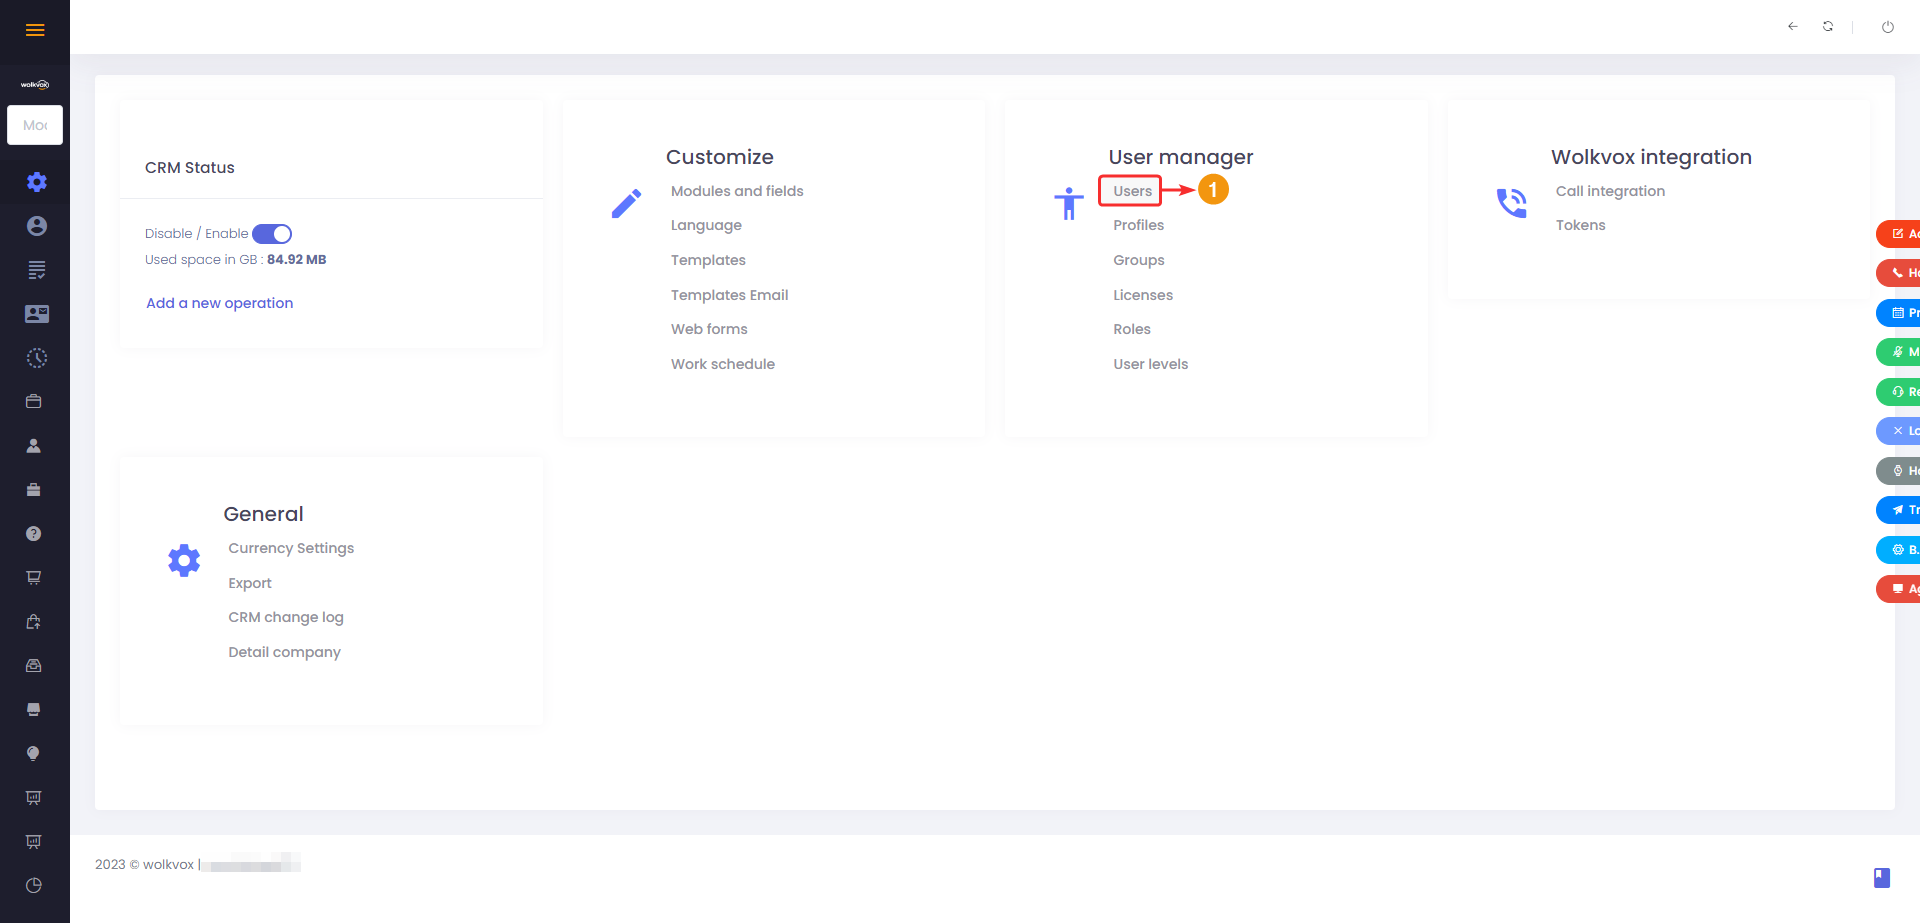
To create a user, first enter the “Configuration” section from the left-hand side menu. Then click on the “Users” button in the “User Administrator” group.
![]() Please note that users cannot be deleted, but you can edit the information for each one.
Please note that users cannot be deleted, but you can edit the information for each one.
Once inside, click on the “Add User” button.

The form to add a new user in wolkvox CRM requires the following information:
- User’s identification document.
- Username (not the one used for login).
- Email address.
- CRM Username: This field is crucial as it’s used to log into wolkvox CRM. The username you enter here should have the “@” symbol followed by the operation’s name. In other words, the username would look like this: “username@myoperation”.
- This is the only mandatory field you need to fill to create a user.
- User’s phone number.
- City of residence.
- Residential address.

Scroll down and continue with the following fields:
- Profile: Assign a profile to the user. Remember that through the profile, the user will have certain permissions or not.
- Role: Assign a role to the user. Keep in mind that roles allow you to assign special access restrictions to records, depending on where the role is in the hierarchical structure.
- User Levels: Assign a user level based on the types of cases they will handle. Consider the case escalation structure in your operation.
- The “Active License” option can be activated or deactivated. By default, users are created with the license deactivated. Activate this option to enable the account for immediate use after creation.

Edit User #
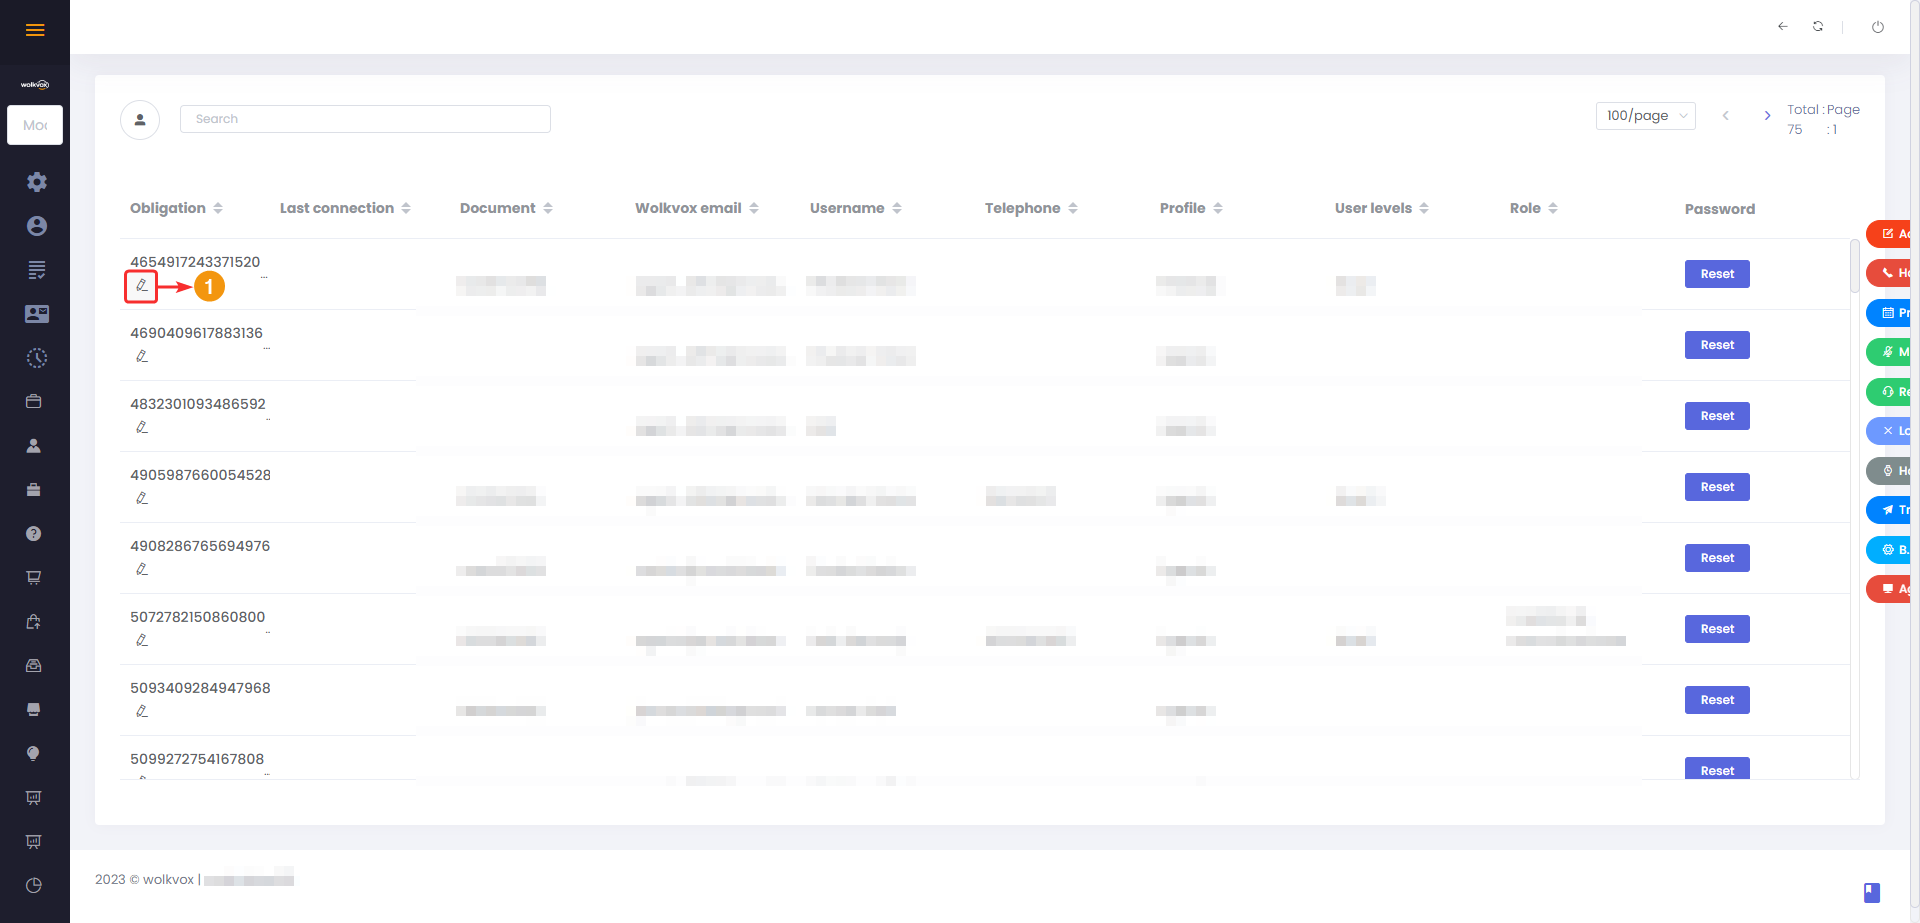
Each created user has a button represented by a pencil icon located below their name. This button allows you to edit the user to modify their information, profile, user level, and role.
The only thing you cannot change is the username used to log in to wolkvox CRM.

User Filtering #
User filtering can be done using:
- Search field: Here you can enter a username for the system to perform a search.
- Each column in the table of created users has an icon with opposite arrows that allows you to sort the data in ascending or descending order based on the selected column.
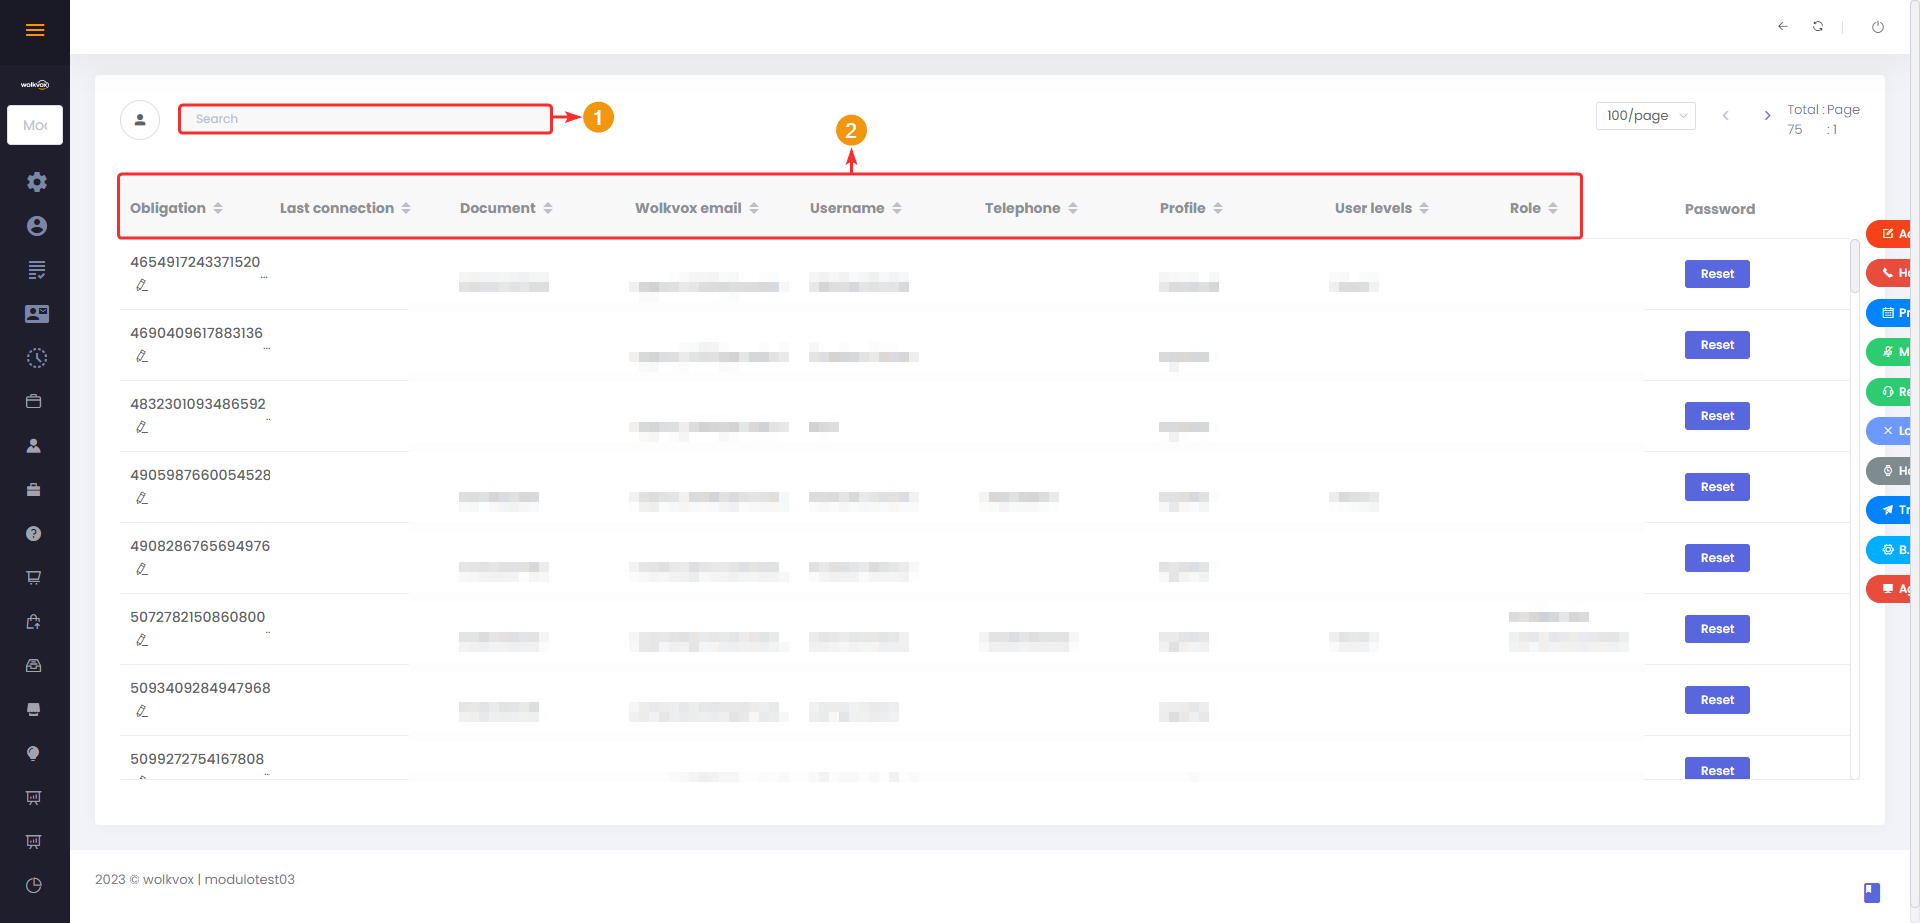
User Licenses Management #
In this section, user licenses are managed to activate or deactivate them as needed.
To access the license management, go to “Settings” and then click on the “Licenses” button in the “User Administrator” group.
Upon entering the section, the total number of active licenses in your operation is displayed at the top left.

In the column located on the far right of the list, you will find the button to activate or deactivate user licenses. You can easily identify which user’s license you are managing as their document number, username, email, and profile are provided. If the button is dimmed and has the circle on the left side, it means the license is deactivated. Conversely, if the button is illuminated in dark blue and has the circle on the right side, it means the license is active.
Finally, to confirm the changes made, click on the “Edit” button.

Creation and Management of Groups #
Groups are primarily used for assigning clients and/or cases in the sales and cases module.
A user can be part of multiple groups.
To manage groups, you should access “Settings” and then click on the “Groups” button located in the “User Administration” button group.

Create Group #
- Click on “Add Group.”
- Define a name for the group.
- Select the group’s administrator user. Note that you won’t be able to change the group administrator after it’s been created.
- As an optional feature, you can add a description about the group.
- Finally, click on “Confirm.”

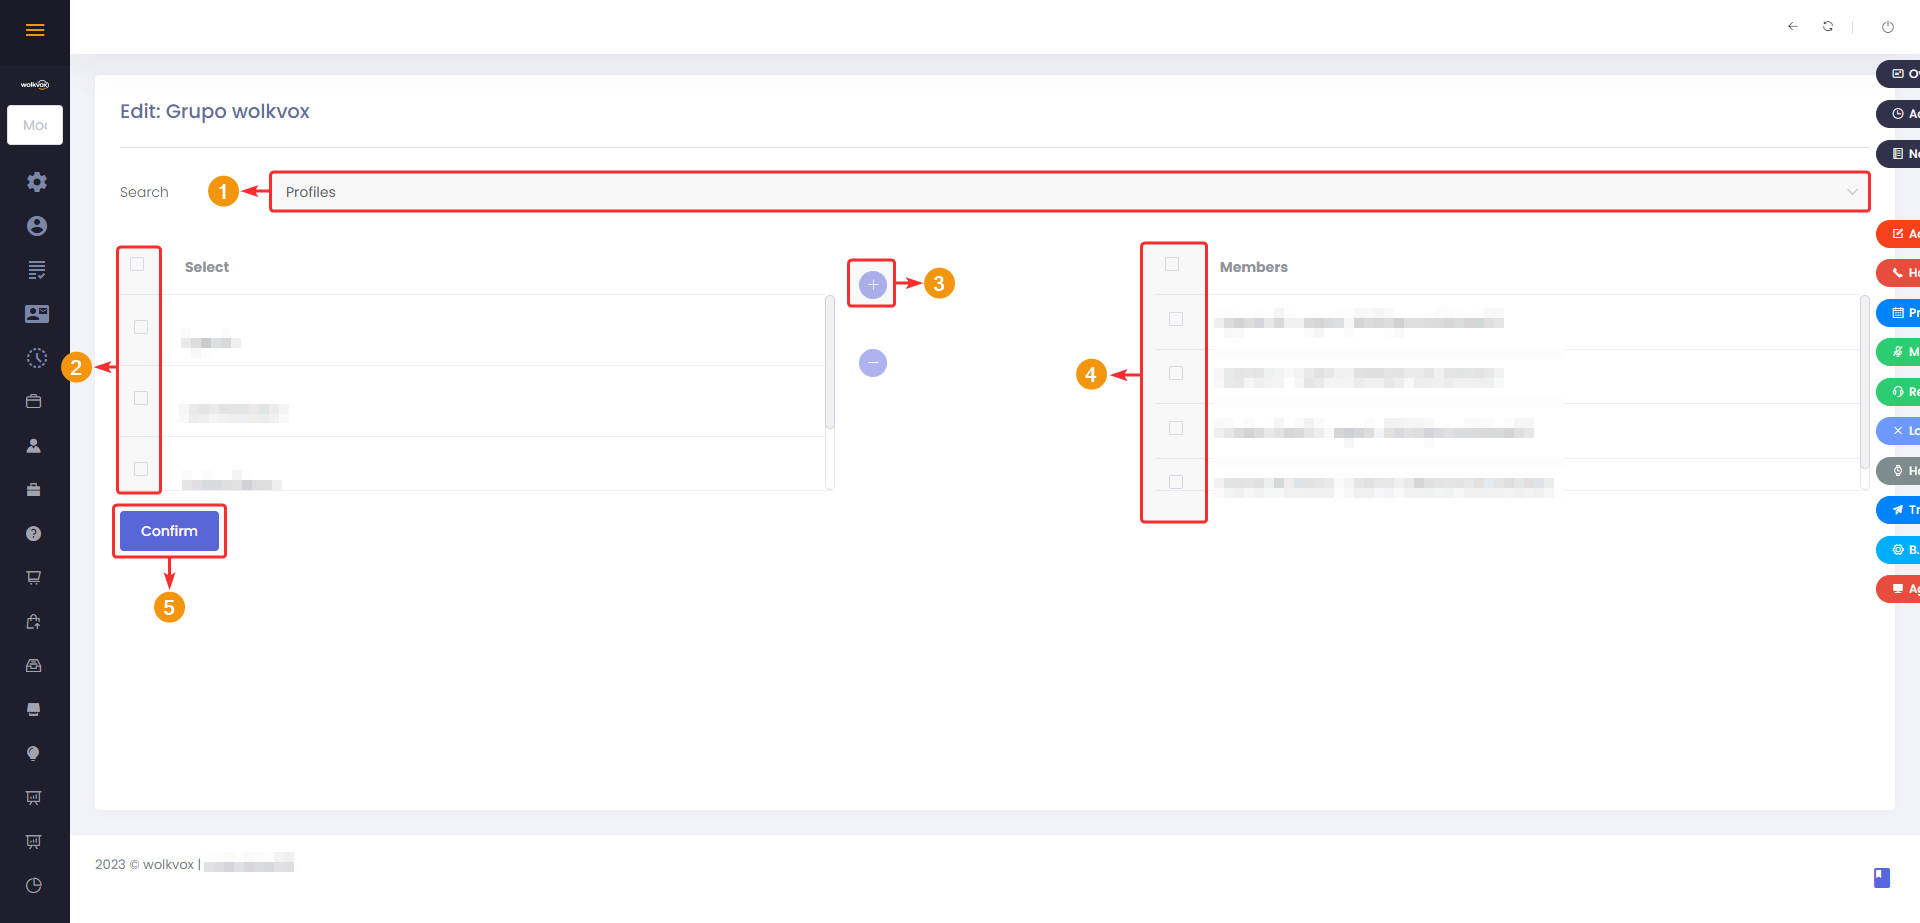
Edit Group #
Each created group has a pencil icon on its right side. Click on it to access group editing.

First, select whether you want to add a user, profile, or group within the group you are editing.
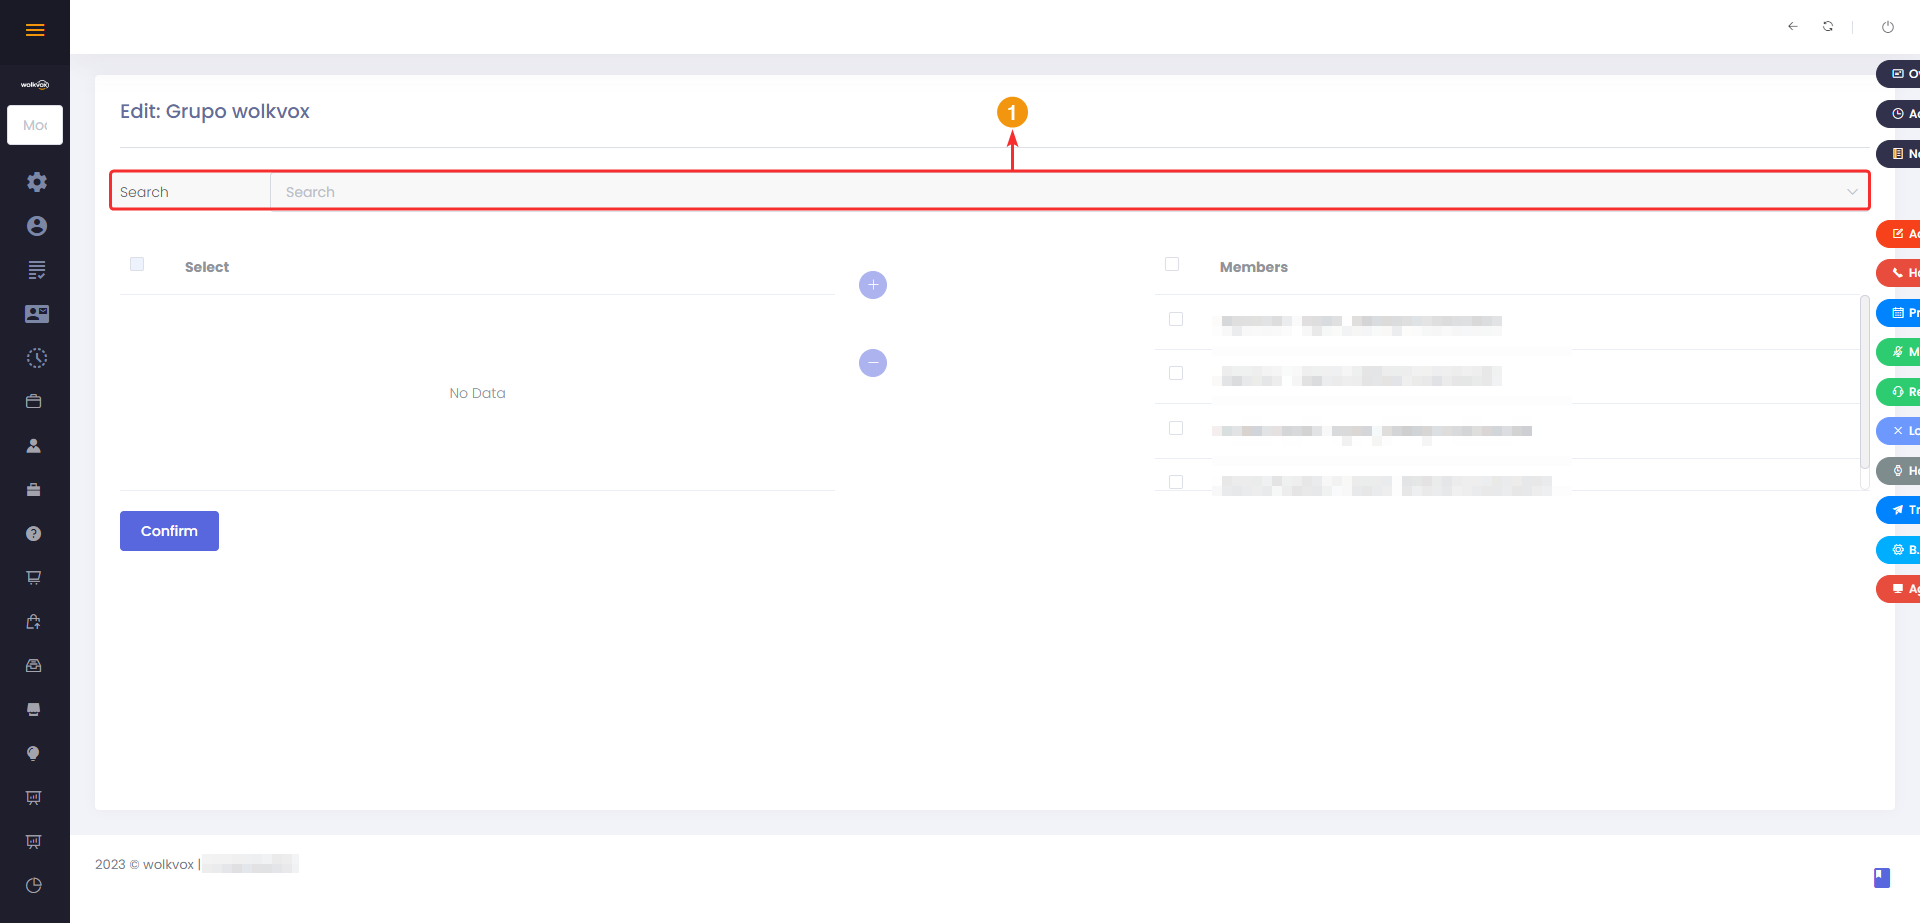
- Depending on the selected option, the elements will appear in the following section.
- Select the checkboxes of the users, profiles, or groups you want to add to the group.
- Click the “Add” button located between the two sections.
- The right-hand table displays the users, profiles, or groups that have been added.
- Click the “Confirm” button to apply the changes.
If you want to remove members from the group, follow these steps:
- Select the checkboxes of the members you want to remove from the group.
- Click the “Remove” button.
- Click “Confirm” to apply the changes.

Creation and Management of Profiles #
A profile is a set of characteristics that identify a user. Therefore, it is important to create profiles based on the properties that a user possesses and to whom a profile needs to be assigned. For instance, a profile could be named “Agent”, “Administrator”, “Quality Analyst”, among others.
Create a Profile #
Follow these steps:
- Access the “Settings” section from the left-hand side menu.
- Click on the “Profiles” button located in the “User Administration” group.
Click on the “Add Profile” button.
- Assign a name for the profile.
- Create a description for the profile. This field is optional.
- Click on “Confirm” to create the profile.
Manage Profiles #
In the table shown in the following image, the profiles you create are listed. This table contains the following columns:
- Profile: Profile name. Next to the name, there is an edit icon, which allows you to edit the permissions the profile has for modules, configurations, and enabling or disabling buttons in the right-side menu on their screen.
- Description: Displays the profile description. Since this field is optional when creating a profile, it might appear empty.
- Created by: User who created the profile.
- Creation Date: Shows the date the profile was created, including the exact year, month, day, hour, minutes, and seconds.
- Updated by: Last user who modified or updated the profile information.
- Update Date: Date of the last update made to the profile, including the exact year, month, day, hour, minutes, and seconds.
Delete Profiles #
To delete a profile, select the checkbox in the first column corresponding to the profile you want to delete, then click on the trash can icon located in the top right corner of the section.
A confirmation window will appear asking if you really want to delete the selected profile. Click on “Delete” to confirm.
Manage the permissions that each profile possesses #
Each profile has a pencil-shaped icon on its right side; click on it, and it will take you to the management of permissions for the selected profile
Once you enter the profile’s permissions, a section like the following will appear, where you have several tabs:
- Basic: Here, the basic permissions of the profile are listed.
- Massive: These are permissions related to bulk actions.
- Administrator: Permissions related to CRM administration are found here.
- AgentBox Buttons: This is where you configure the buttons that the agent linked with Wolkvox AgentBox will have access to.
On the right side of the menu, the permissions to grant will appear according to the tab you are in.
To apply the changes, you should go to the bottom of the section and click on “Edit”. A temporary window will appear, notifying you that the changes were successfully applied.
Basic Permissions #
The permissions you can configure in this tab are related to each module created in the CRM. In other words, here you will be telling the system that the profile in question can perform the following actions on a module:
- View: The profile can or cannot view the content of the module.
- Create: The profile can create items within the module in question.
- Edit: It may or may not edit the information within the module.
- List Records: Whether or not they can see the records within the module.
- Do not share information between profiles: If this box is checked, users with this profile type won’t be able to see the information entered by other users in different modules, nor can they share the information they add.
Remember to scroll down and click the “Edit” button at the bottom to apply the changes made.
Massive Permissions #
In the “Massive” tab, you can add or remove permissions related to bulk actions for users within modules.
The permissions are:
- Import: Enables or disables the ability to import records in bulk.
- Mass Delete: Enables or disables the ability to delete records in bulk.
- Mass Duplicate: Enables or disables the ability to duplicate records in bulk.
Remember to scroll down and click the “Edit” button at the bottom to apply the changes made.
Administration Permissions #
These permissions allow you to determine which sections of the wolkvox CRM configuration the profile can access.
Remember to scroll down and click the “Edit” button at the bottom to apply the changes you’ve made.
AgentBox Permissions #
- The permissions you can grant in the “AgentBox Buttons” tab are related to the wolkvox Agent application.
- The checkboxes that you can enable or disable correspond to the buttons located on the right side of the screen.
- Choose which buttons will appear for the user assigned to the specific profile.
Note: Remember to click on the “Edit” button at the bottom to apply the changes you’ve made.
Role Creation and Management #
The purpose of roles is to organize different users in a hierarchy, simulate a company’s organizational structure, and allow each user (based on their position in the hierarchy) to view certain records of specific CRM modules. It’s used, for example, to restrict access to information so that users belonging to a specific role cannot see the records of users in other roles.
Building the Hierarchical Role Structure #
Firstly, you should know that the highest or parent role is called the “CEO”. In other words, it’s not possible to create a role higher than the “CEO” role. And you can build child roles with their respective parent roles based on this, without exceeding the “CEO” role.
Higher-level roles will always have the ability to view the information of roles below them.
To create a role, you must have its parent role selected and then click on “Add”.
A new window opens where:
- The selected role is displayed as the parent of the role you are about to create.
- Assign a name and description to the new role.
- Click “Confirm” to create the role.
To delete a role, simply select one and click on “Delete”. Be careful, when deleting a role that has subordinate roles, all roles in cascade will be deleted.
Creation and Management of User Levels #
User levels are used to hierarchically organize case escalation. In other words, they establish an order for case management. Each user in the CRM will be assigned a user level according to their expertise.
Creation and Management of User Levels #
Access the CRM configuration and then click on the “User Levels” button, located within the “User Administrator” group.
- Click on the “Add Level” button.
- Assign a name and description to the level.
- Click “Confirm” to create the user level.
You can edit the information of each level by clicking on the pencil icon, located in the “Edit” column of each level.
To delete one or multiple levels, activate the checkbox of the ones you want to delete in the leftmost column and then click on the trash can icon located in the upper right corner of the section.
User Creation and Management #
A user is the account used to access wolkvox CRM, providing their corresponding username and password.
Create a User #
To create a user, first enter the “Configuration” section from the left-hand side menu. Then click on the “Users” button in the “User Administrator” group.
![]() Please note that users cannot be deleted, but you can edit the information for each one.
Please note that users cannot be deleted, but you can edit the information for each one.
Once inside, click on the “Add User” button.
The form to add a new user in wolkvox CRM requires the following information:
- User’s identification document.
- Username (not the one used for login).
- Email address.
- CRM Username: This field is crucial as it’s used to log into wolkvox CRM. The username you enter here should have the “@” symbol followed by the operation’s name. In other words, the username would look like this: “username@myoperation”.
- This is the only mandatory field you need to fill to create a user.
- User’s phone number.
- City of residence.
- Residential address.
Scroll down and continue with the following fields:
- Profile: Assign a profile to the user. Remember that through the profile, the user will have certain permissions or not.
- Role: Assign a role to the user. Keep in mind that roles allow you to assign special access restrictions to records, depending on where the role is in the hierarchical structure.
- User Levels: Assign a user level based on the types of cases they will handle. Consider the case escalation structure in your operation.
- The “Active License” option can be activated or deactivated. By default, users are created with the license deactivated. Activate this option to enable the account for immediate use after creation.
Edit User #
Each created user has a button represented by a pencil icon located below their name. This button allows you to edit the user to modify their information, profile, user level, and role.
The only thing you cannot change is the username used to log in to wolkvox CRM.
User Filtering #
User filtering can be done using:
- Search field: Here you can enter a username for the system to perform a search.
- Each column in the table of created users has an icon with opposite arrows that allows you to sort the data in ascending or descending order based on the selected column.
User Licenses Management #
In this section, user licenses are managed to activate or deactivate them as needed.
To access the license management, go to “Settings” and then click on the “Licenses” button in the “User Administrator” group.
Upon entering the section, the total number of active licenses in your operation is displayed at the top left.
In the column located on the far right of the list, you will find the button to activate or deactivate user licenses. You can easily identify which user’s license you are managing as their document number, username, email, and profile are provided. If the button is dimmed and has the circle on the left side, it means the license is deactivated. Conversely, if the button is illuminated in dark blue and has the circle on the right side, it means the license is active.
Finally, to confirm the changes made, click on the “Edit” button.
Creation and Management of Groups #
Groups are primarily used for assigning clients and/or cases in the sales and cases module.
A user can be part of multiple groups.
To manage groups, you should access “Settings” and then click on the “Groups” button located in the “User Administration” button group.
Create Group #
- Click on “Add Group.”
- Define a name for the group.
- Select the group’s administrator user. Note that you won’t be able to change the group administrator after it’s been created.
- As an optional feature, you can add a description about the group.
- Finally, click on “Confirm.”
Edit Group #
Each created group has a pencil icon on its right side. Click on it to access group editing.
First, select whether you want to add a user, profile, or group within the group you are editing.
- Depending on the selected option, the elements will appear in the following section.
- Select the checkboxes of the users, profiles, or groups you want to add to the group.
- Click the “Add” button located between the two sections.
- The right-hand table displays the users, profiles, or groups that have been added.
- Click the “Confirm” button to apply the changes.
If you want to remove members from the group, follow these steps:
- Select the checkboxes of the members you want to remove from the group.
- Click the “Remove” button.
- Click “Confirm” to apply the changes.
