

 Agent creation #
In the “Agents” tab of the “Agents and Skills” section, you create the extensions that will be used in your operation.
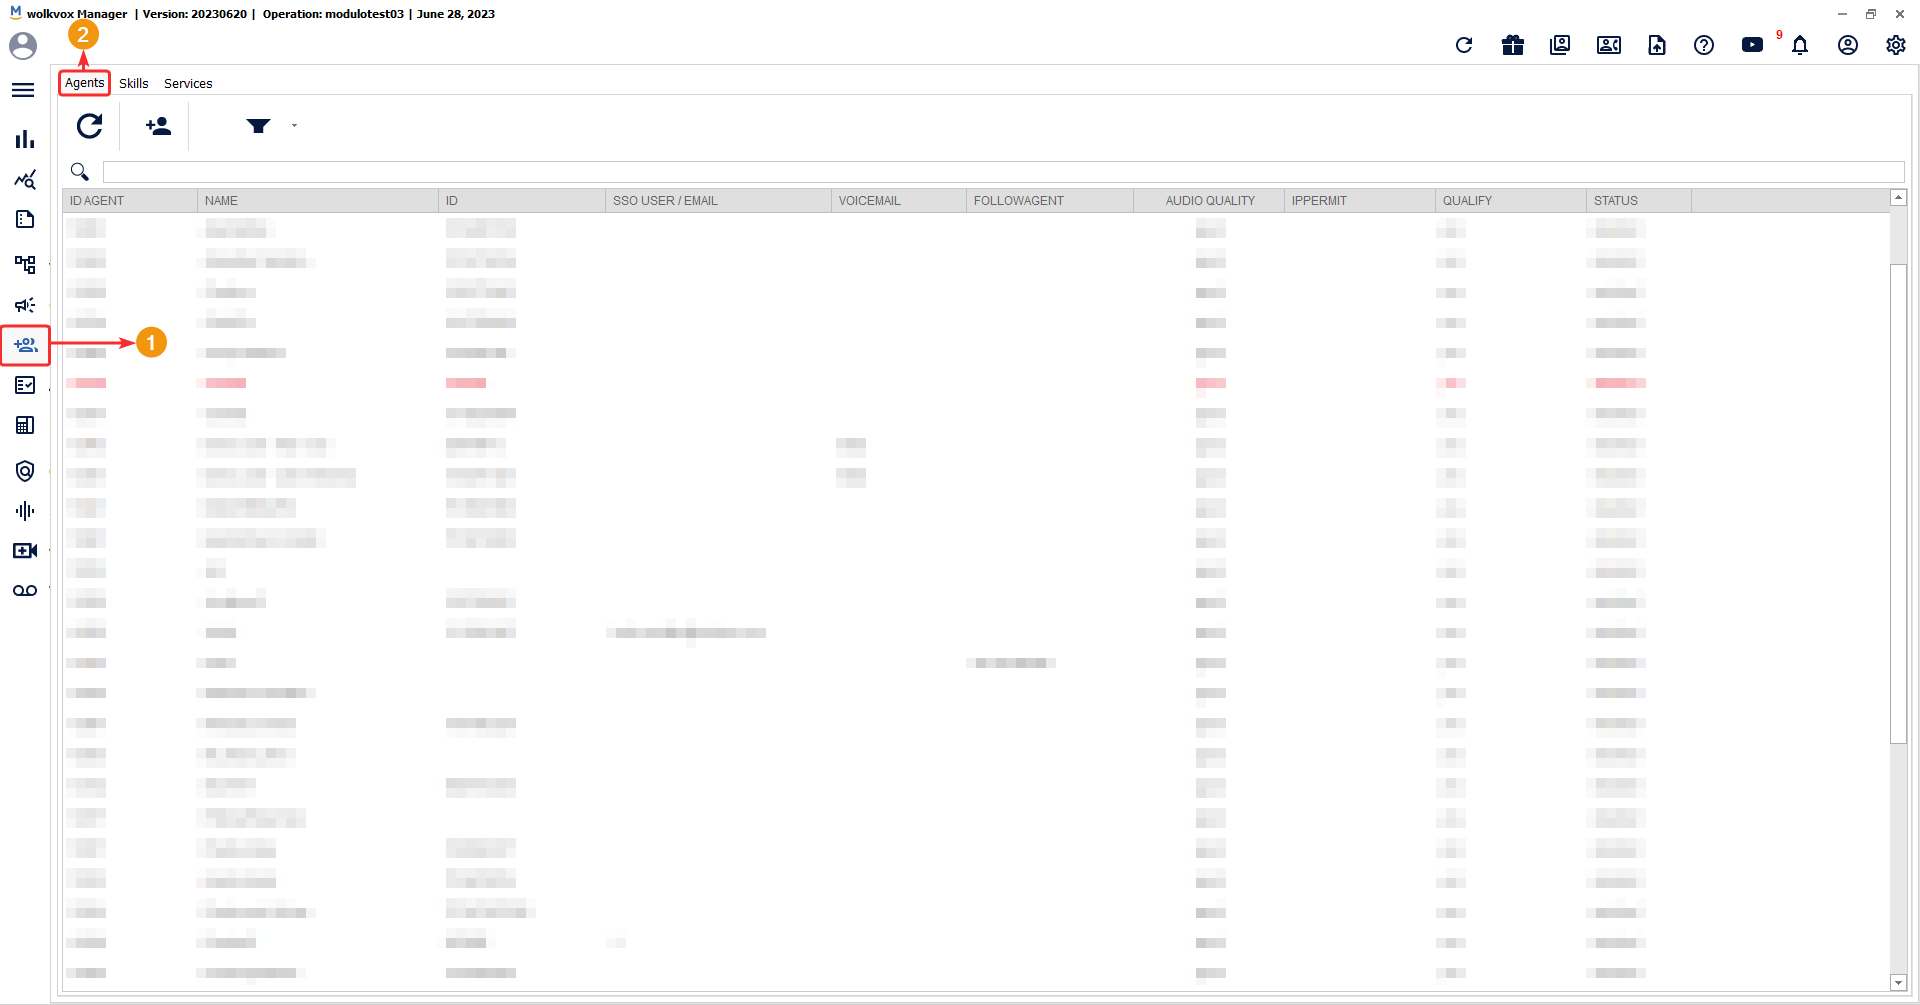
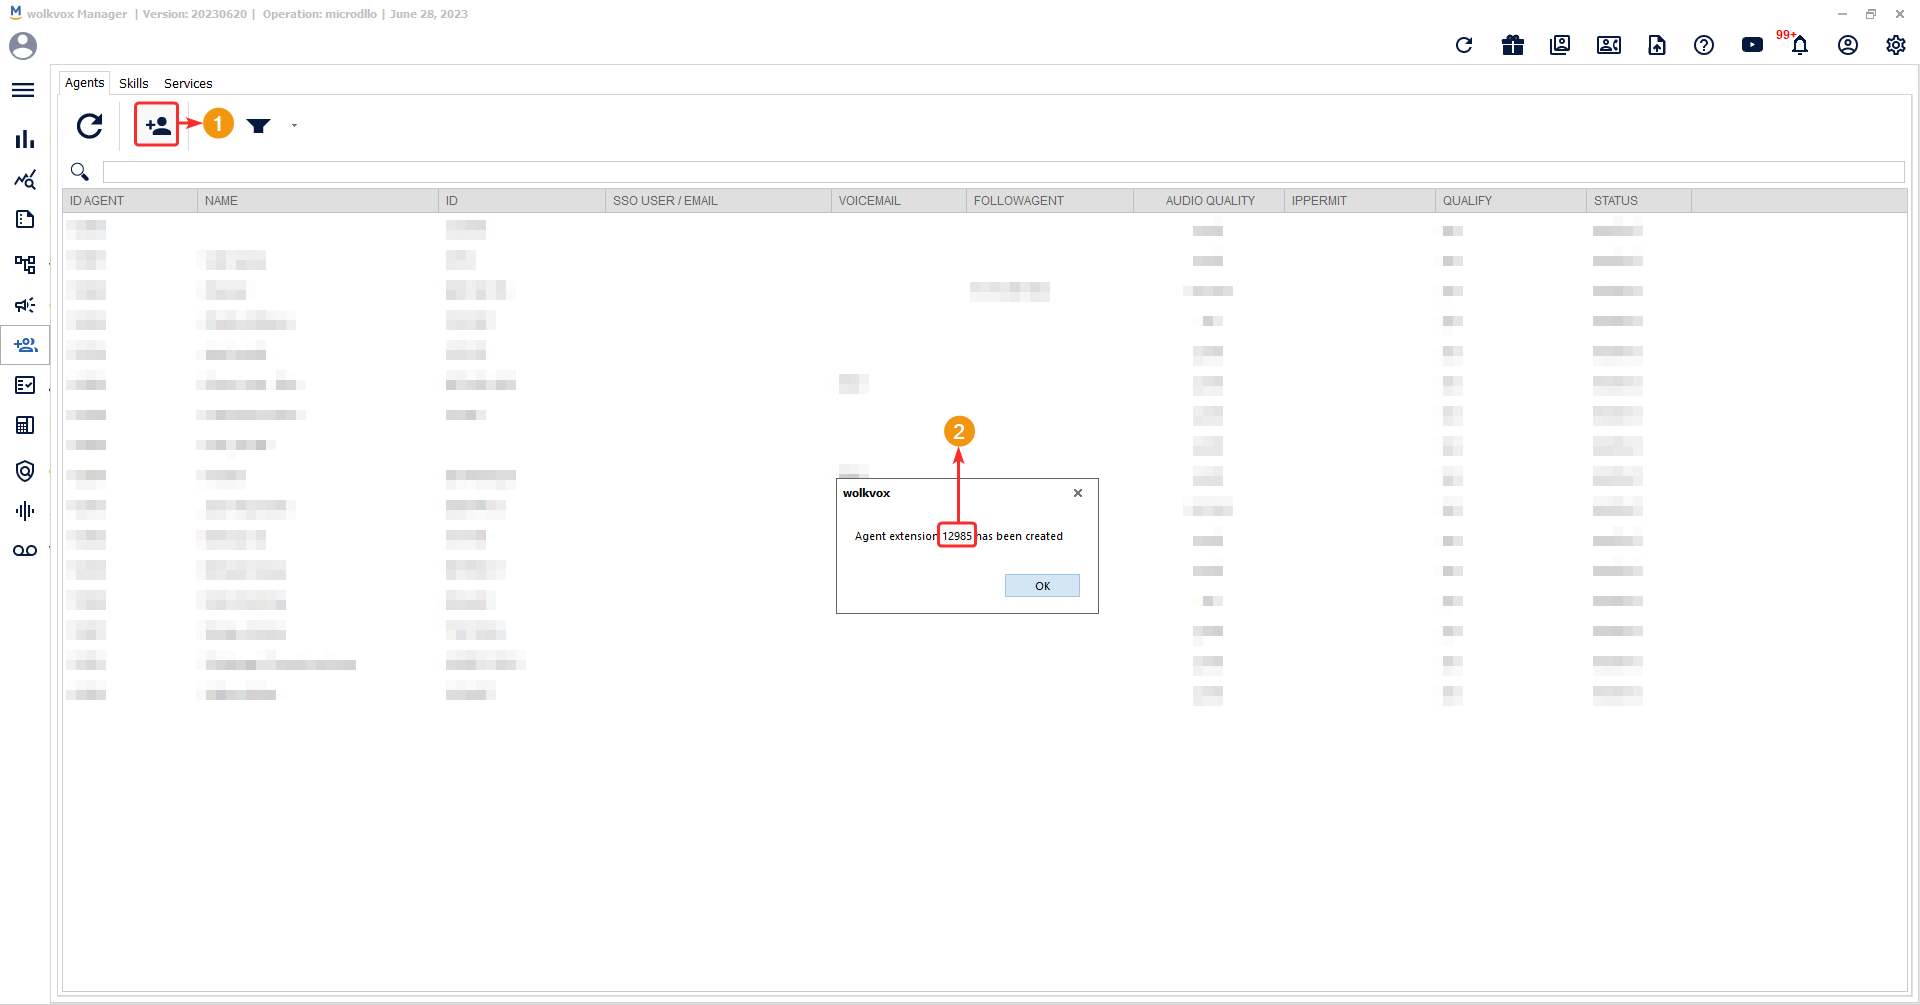
To create a new agent, click on “Create New User,” and a message will appear on the screen indicating the newly created extension number for the agent.
![]() If your service is on a shared server, you can create up to 10 agents per license.
If your service is on a shared server, you can create up to 10 agents per license.
![]() If your service is on a dedicated server, you can create up to 50 agents per license.
If your service is on a dedicated server, you can create up to 50 agents per license.
![]() It is important to remember the extension number to edit the agent’s information.
It is important to remember the extension number to edit the agent’s information.
![]() Agents cannot be deleted; they are automatically purged every 6 months due to inactivity.
Agents cannot be deleted; they are automatically purged every 6 months due to inactivity.
![]() Agents that have been inactive, meaning they have not been used within a 6-month timeframe, will be removed from your operation.
Agents that have been inactive, meaning they have not been used within a 6-month timeframe, will be removed from your operation.
![]() The system will not allow the creation of more agents if you have two agent extensions without editing their information.
The system will not allow the creation of more agents if you have two agent extensions without editing their information.
Agent Configuration #
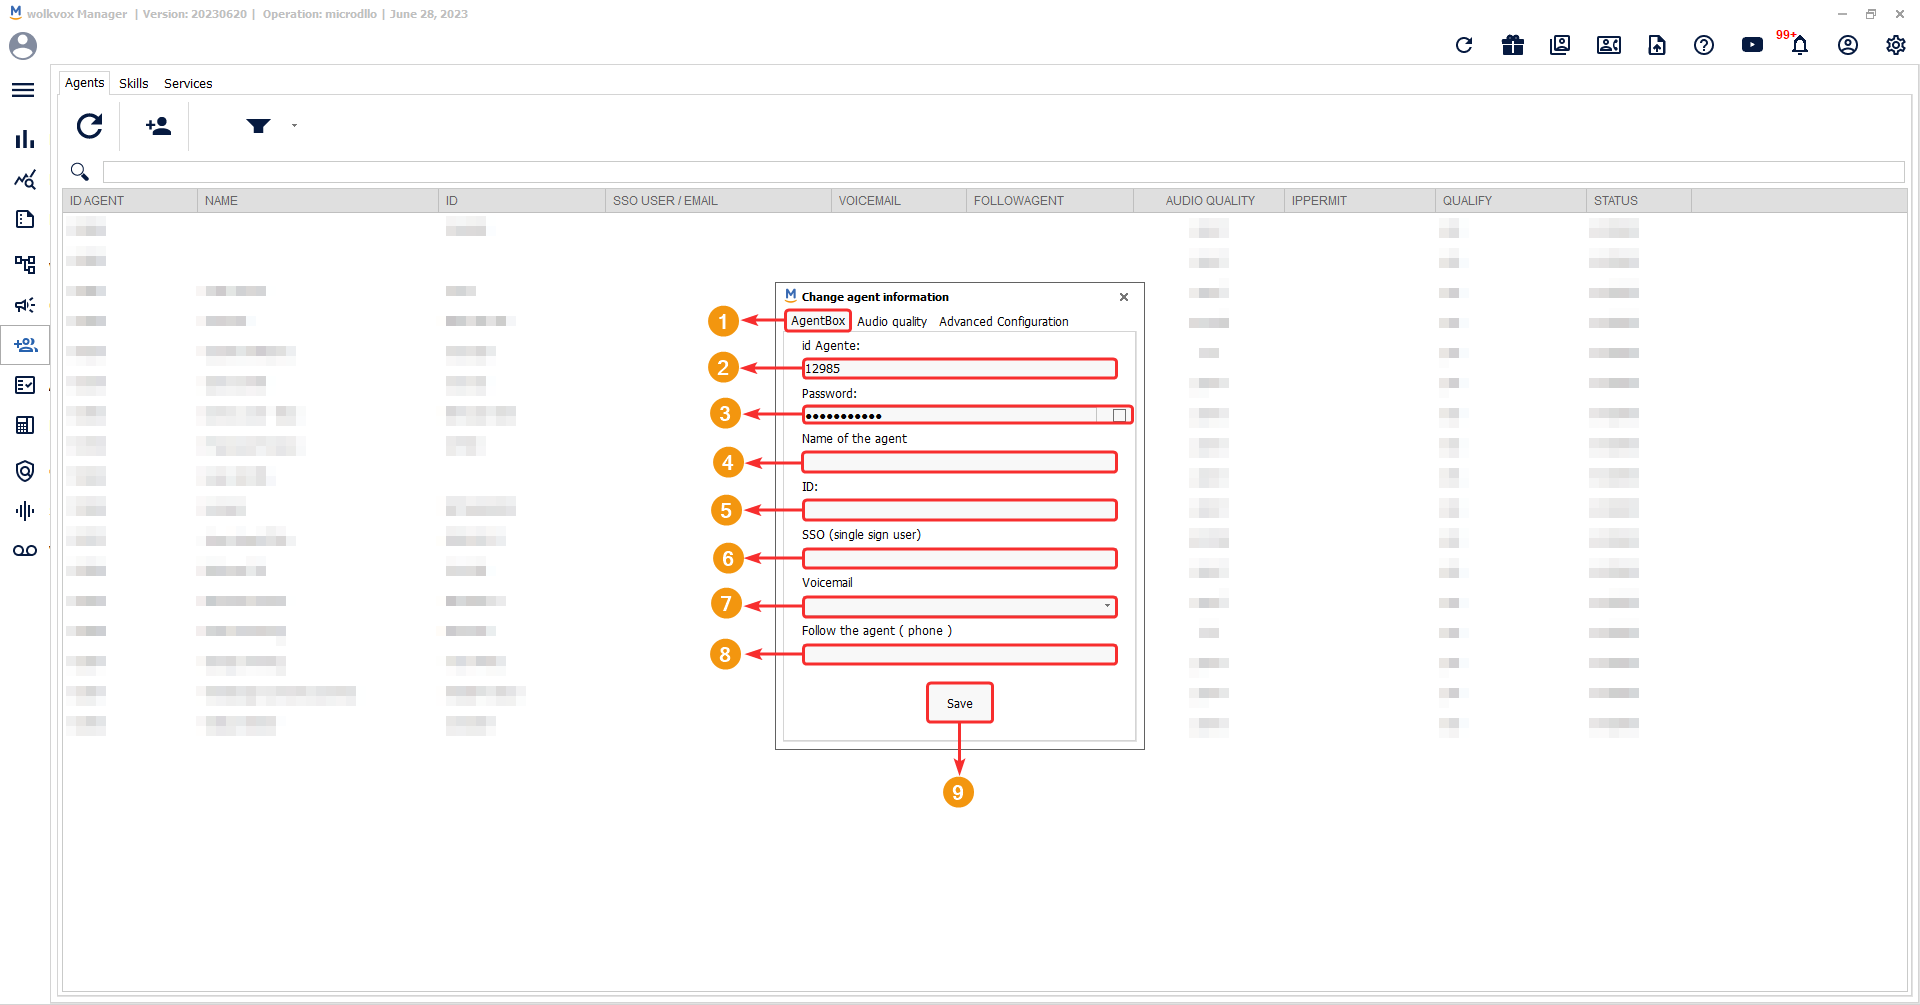
To edit the agent information, right-click on the newly created agent extension and select the option “Edit Agent Information.”

Edit AgentBox Information #
To edit the agent information, right-click on the newly created agent extension and select the option “Edit Agent Information.”
- Make sure you are on the “AgentBox” tab.
- Agent extension number. This number cannot be changed.
- Password for agent access to AgentBox. You can enable the checkbox to view the entered password.
- Agent’s name.
- Agent identification number.
- You can create an account with single sign-on.
- Assign a voicemail box to the agent.
- You can assign a phone number in the box to redirect a call that is being made to an agent who is not connected to that specified number.
Configure audio quality #
In the “Audio quality” tab, you can change the established audio quality for the agent according to your operation’s requirements. Choose between “HD,” “Good,” or “Normal” quality. By default, the “Good” option is selected.

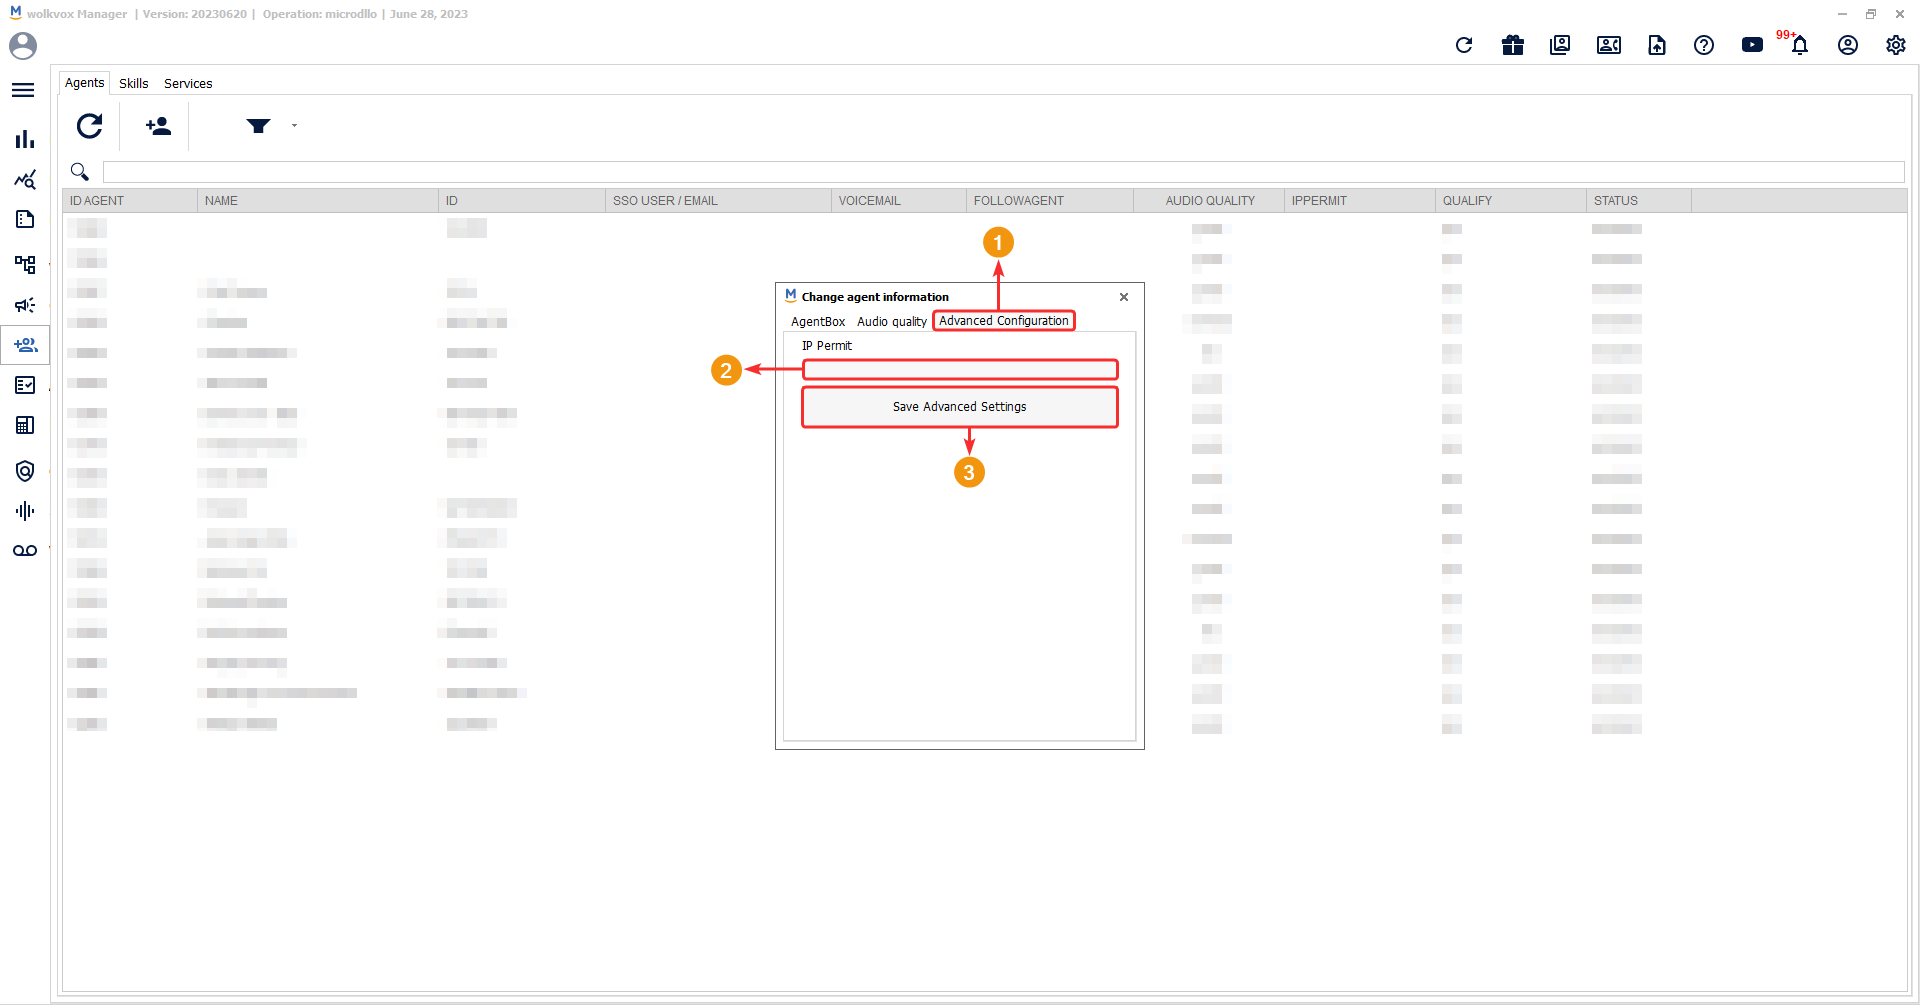
Advanced Configuration – IP Connection Permission #
In this section, you a add a URL and allow the agent to connect from a specific IP address.
Enable/Disable the agent #
To disable an agent, right-click on it and select the “Enable/Disable” option.
Note: Disabled agents will appear in red color. To re-enable them, perform the same action again.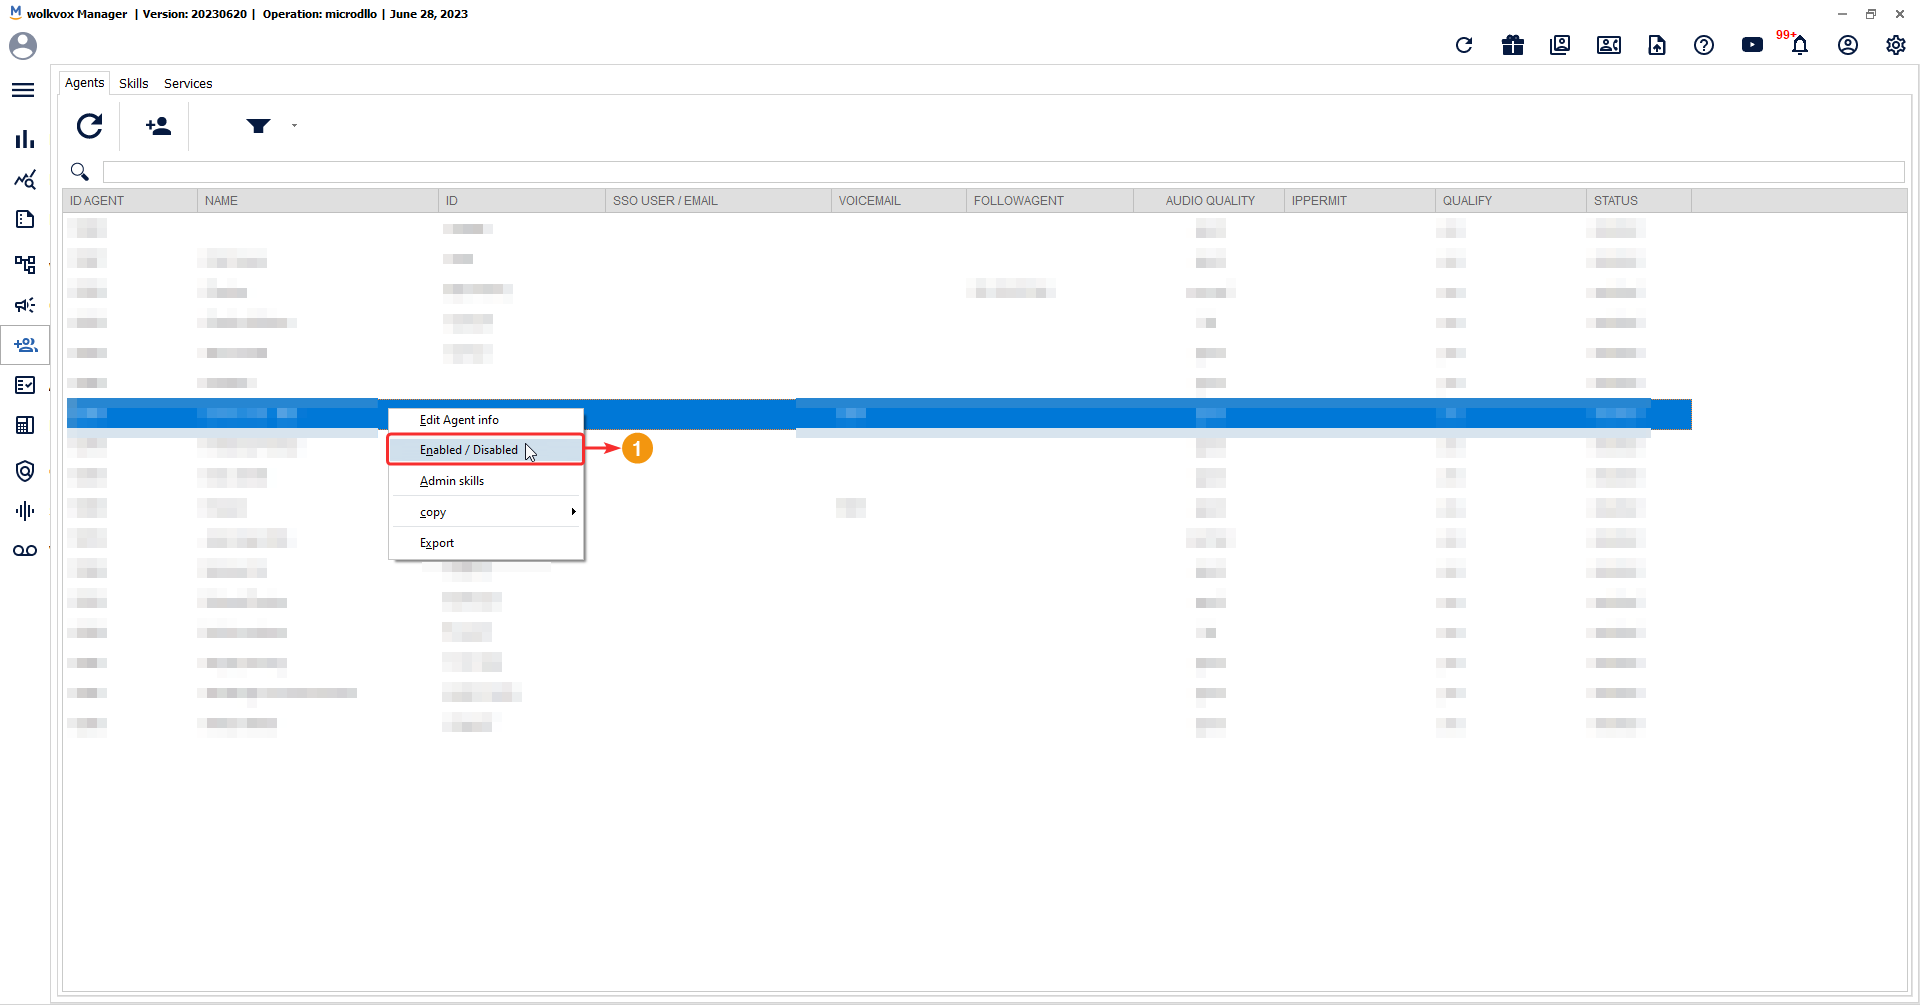
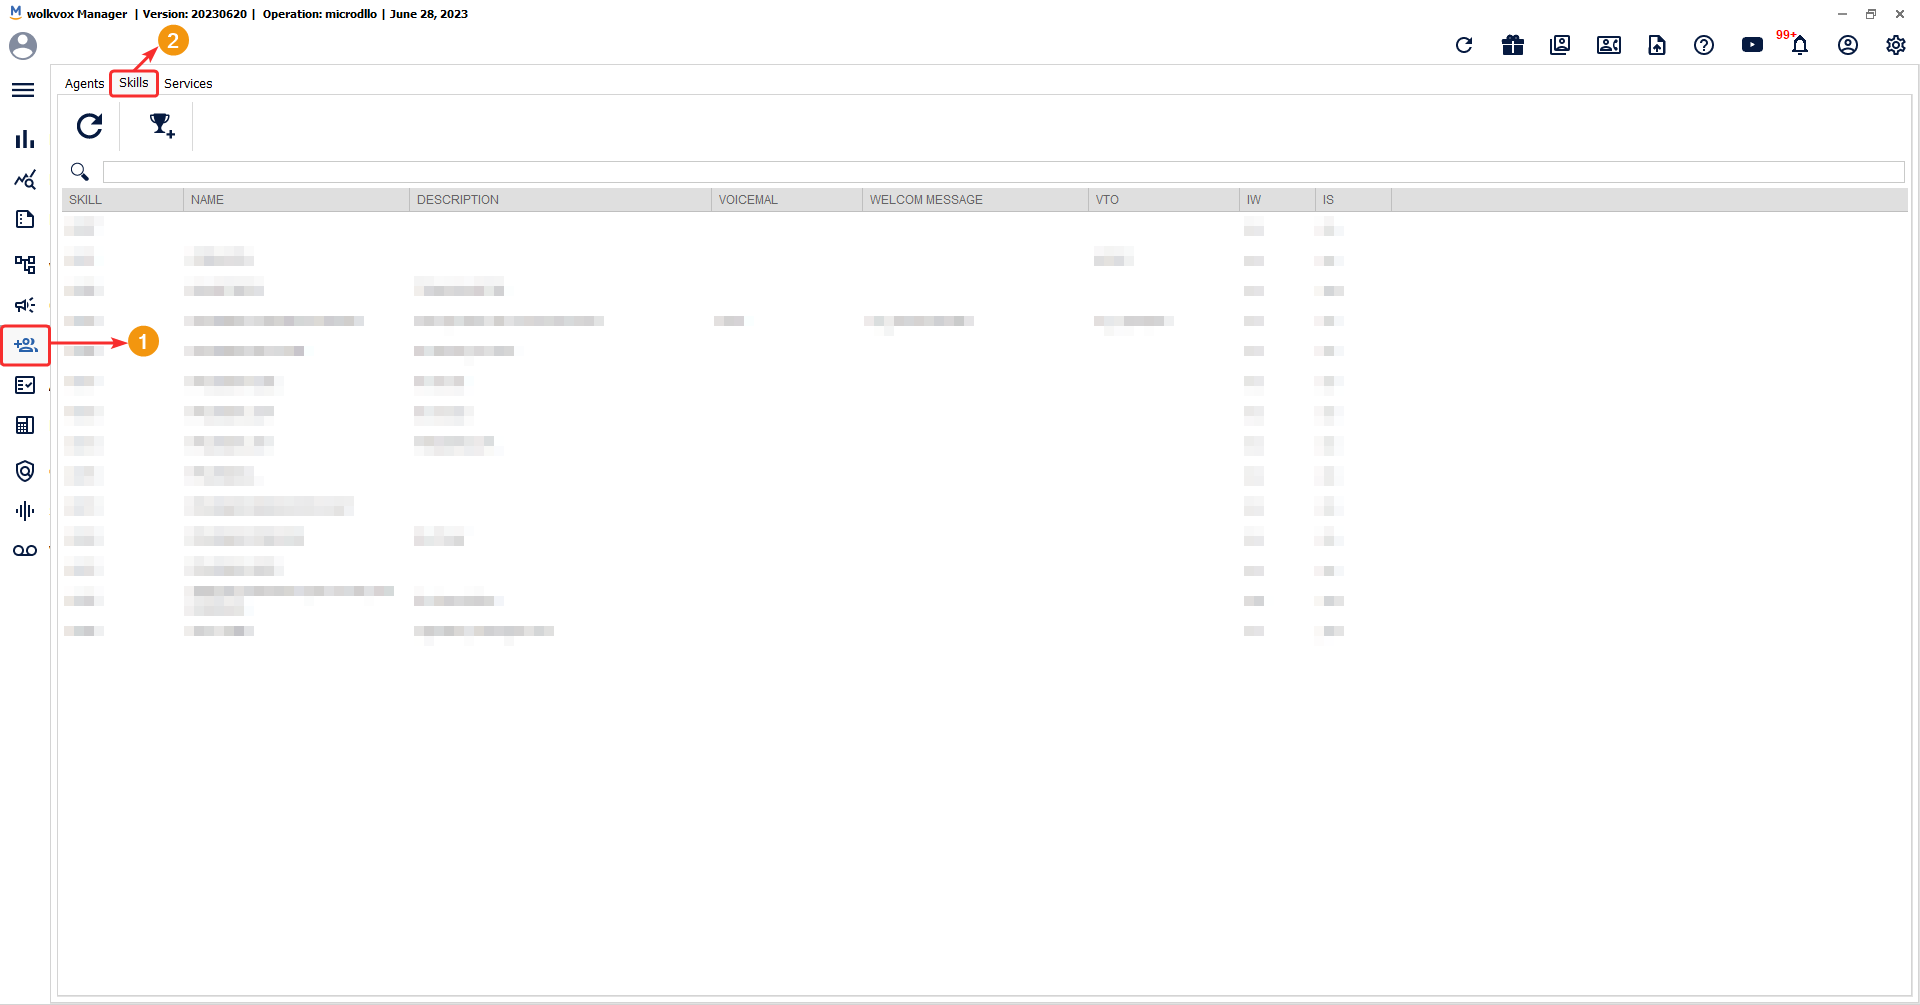
Manage agent skills #
Remember that “skills” are groups of agents. They serve to group agents according to their different functions, characteristics, or objectives in the operation center.
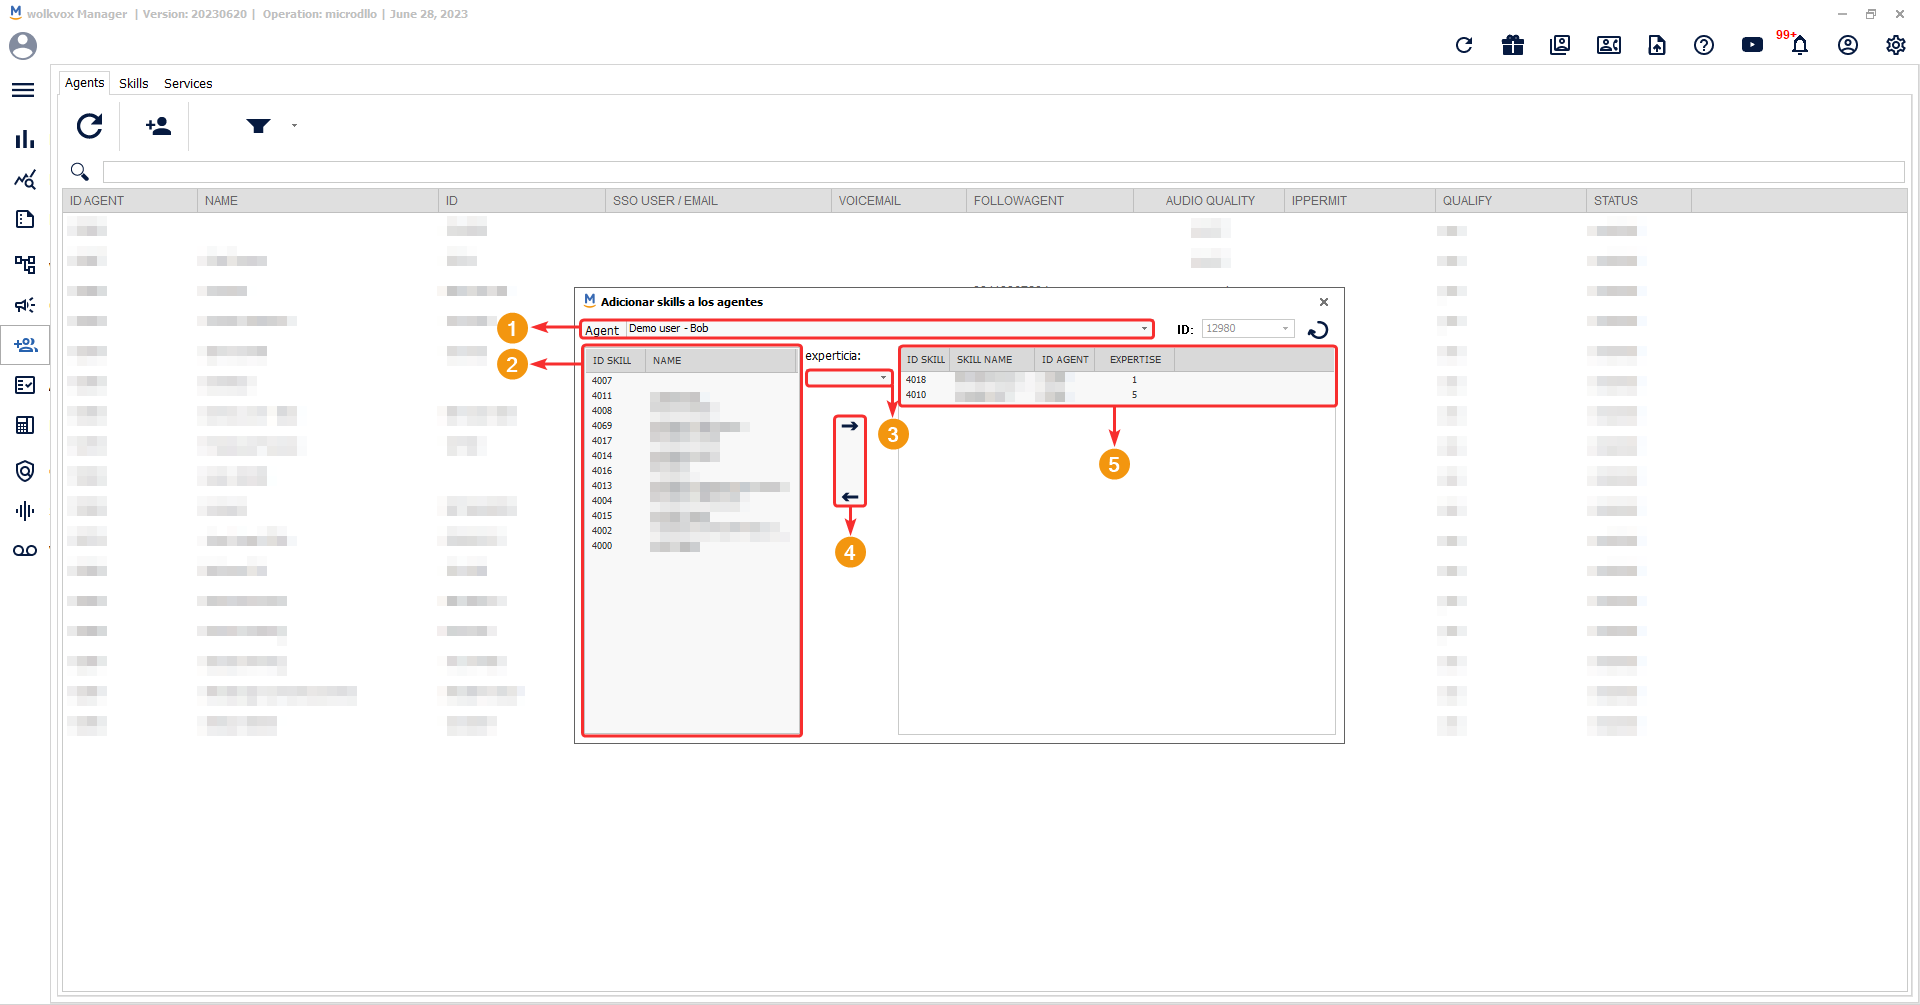
If you right-click on an agent and then select the “Manage Skills” option, you can assign skills to the agent.

Follow the steps below:
- You can change the agent to whom you will assign skills by using the dropdown menu in the “Agent” field.
- On the left panel, you will find the skills created in your operation that you can assign to the agent. Select one or multiple skills by holding down the CTRL key.
- It is mandatory to assign an expertise level to the agent. Consider the agent’s ability to handle calls. Note that an expertise level of “0” does not mean the agent will not receive calls but rather represents the lowest level of skill for handling calls.
- Use the right-pointing arrow to assign the selected skill(s). Use the left-pointing arrow to unassign one or multiple selected skills from the list on the right, which displays the skills already assigned to the agent.
- The table or list on the right side of the window represents the skills that have already been assigned to the agent.
Copying and Pasting Agent Login Information #
If you right-click on an agent, you will have the option to copy the agent’s extension number, which is used to log in to AgentBox. You can also copy the agent’s password.

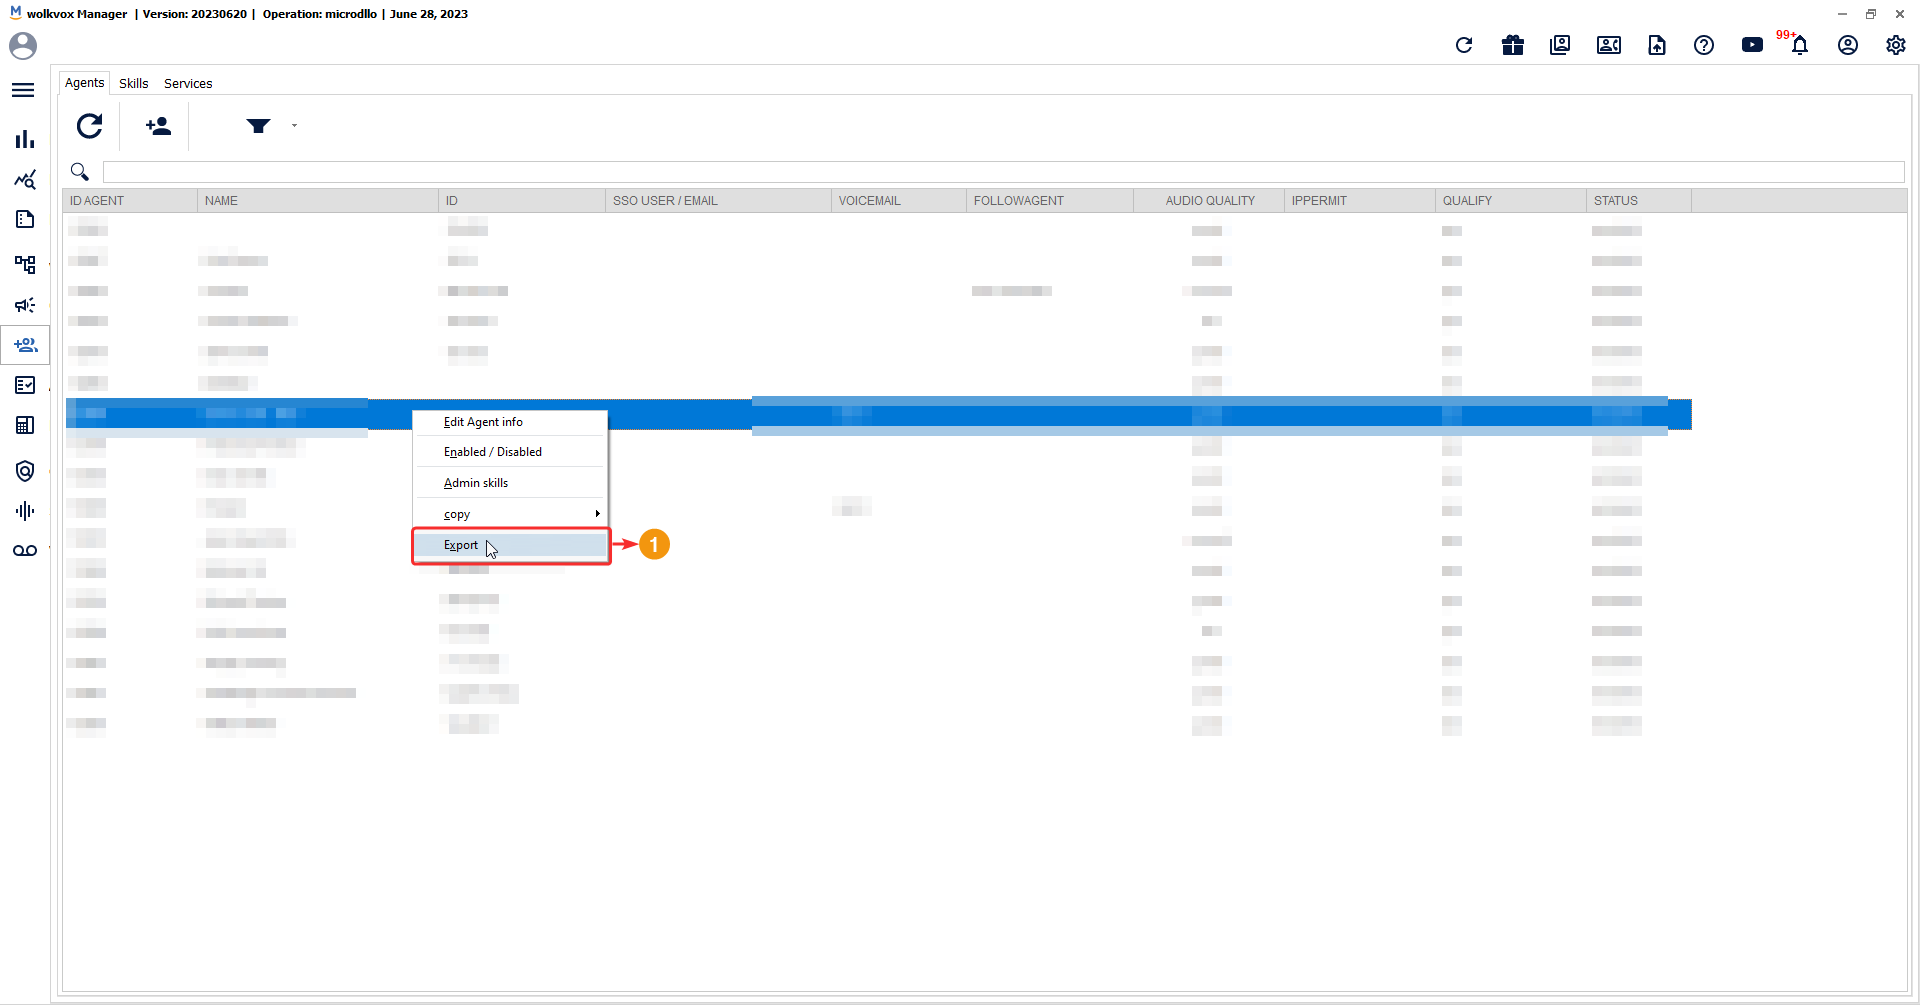
Exporting Agent List in HTML Format #
You can export all the data visible in the table by right-clicking and selecting the option to export in HTML format.
A new window will open in your browser with a table that includes the following columns:
- Agent ID: The agent’s extension number.
- SIP/Password: The agent’s assigned password.
- Name: Indicates the agent’s name.
- ID: The agent’s identification number.
- SSO User/Email: Indicates the SSO username.
- Voicemail: The assigned voicemail for the agent.
- Followagent: Configured call forwarding phone number for the agent.
- Audio Quality: Indicates the selected audio quality for the agent.
- IP Permit: Displays the added IP number for the agent.
- Status: Indicates whether the agent is enabled or disabled.
Filtering Agent List #
You can filter the agent list using three options:
- All: Displays all agents.
- Enabled: Displays only enabled agents.
- Disabled: Displays only disabled agents.

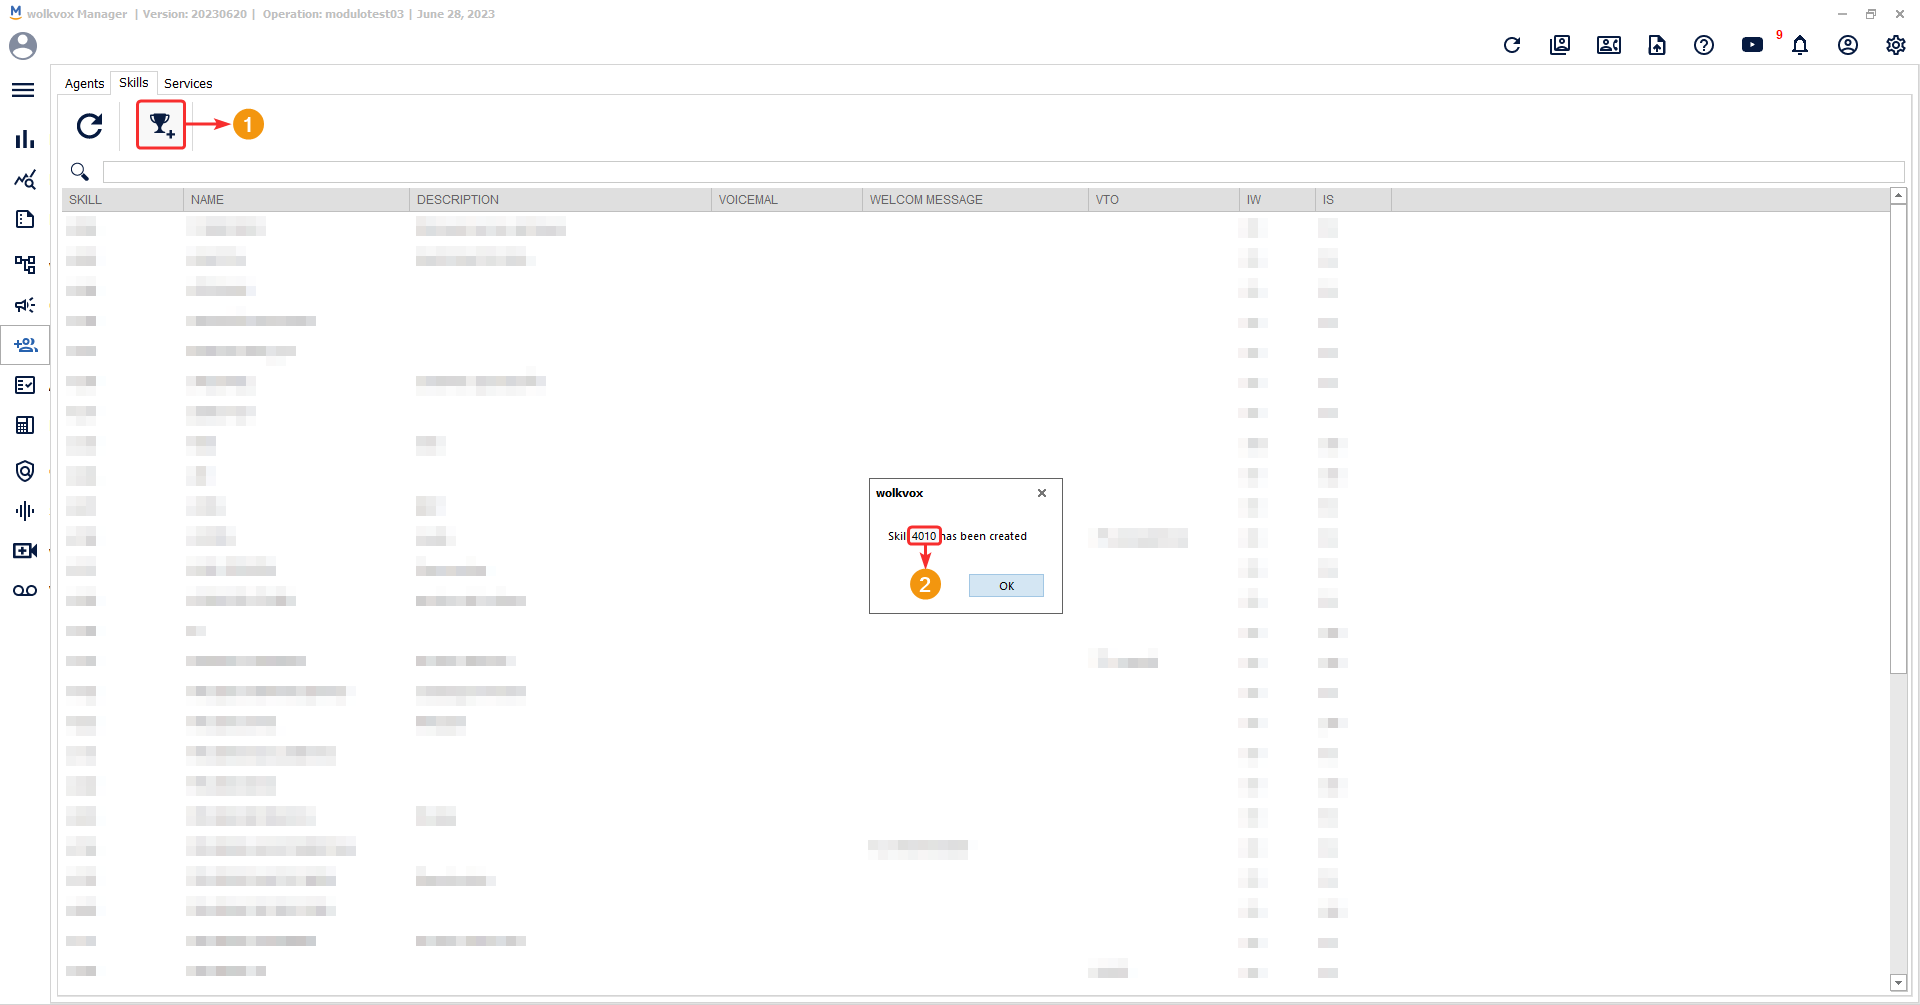
Creation of Skills (Agent Groups) #
In the “Skills” tab, you can create agent groups or queues.
To create a new skill, click on the “Create Skill” button. A window will appear displaying the skill’s identification number, which you can then edit to provide the necessary information.
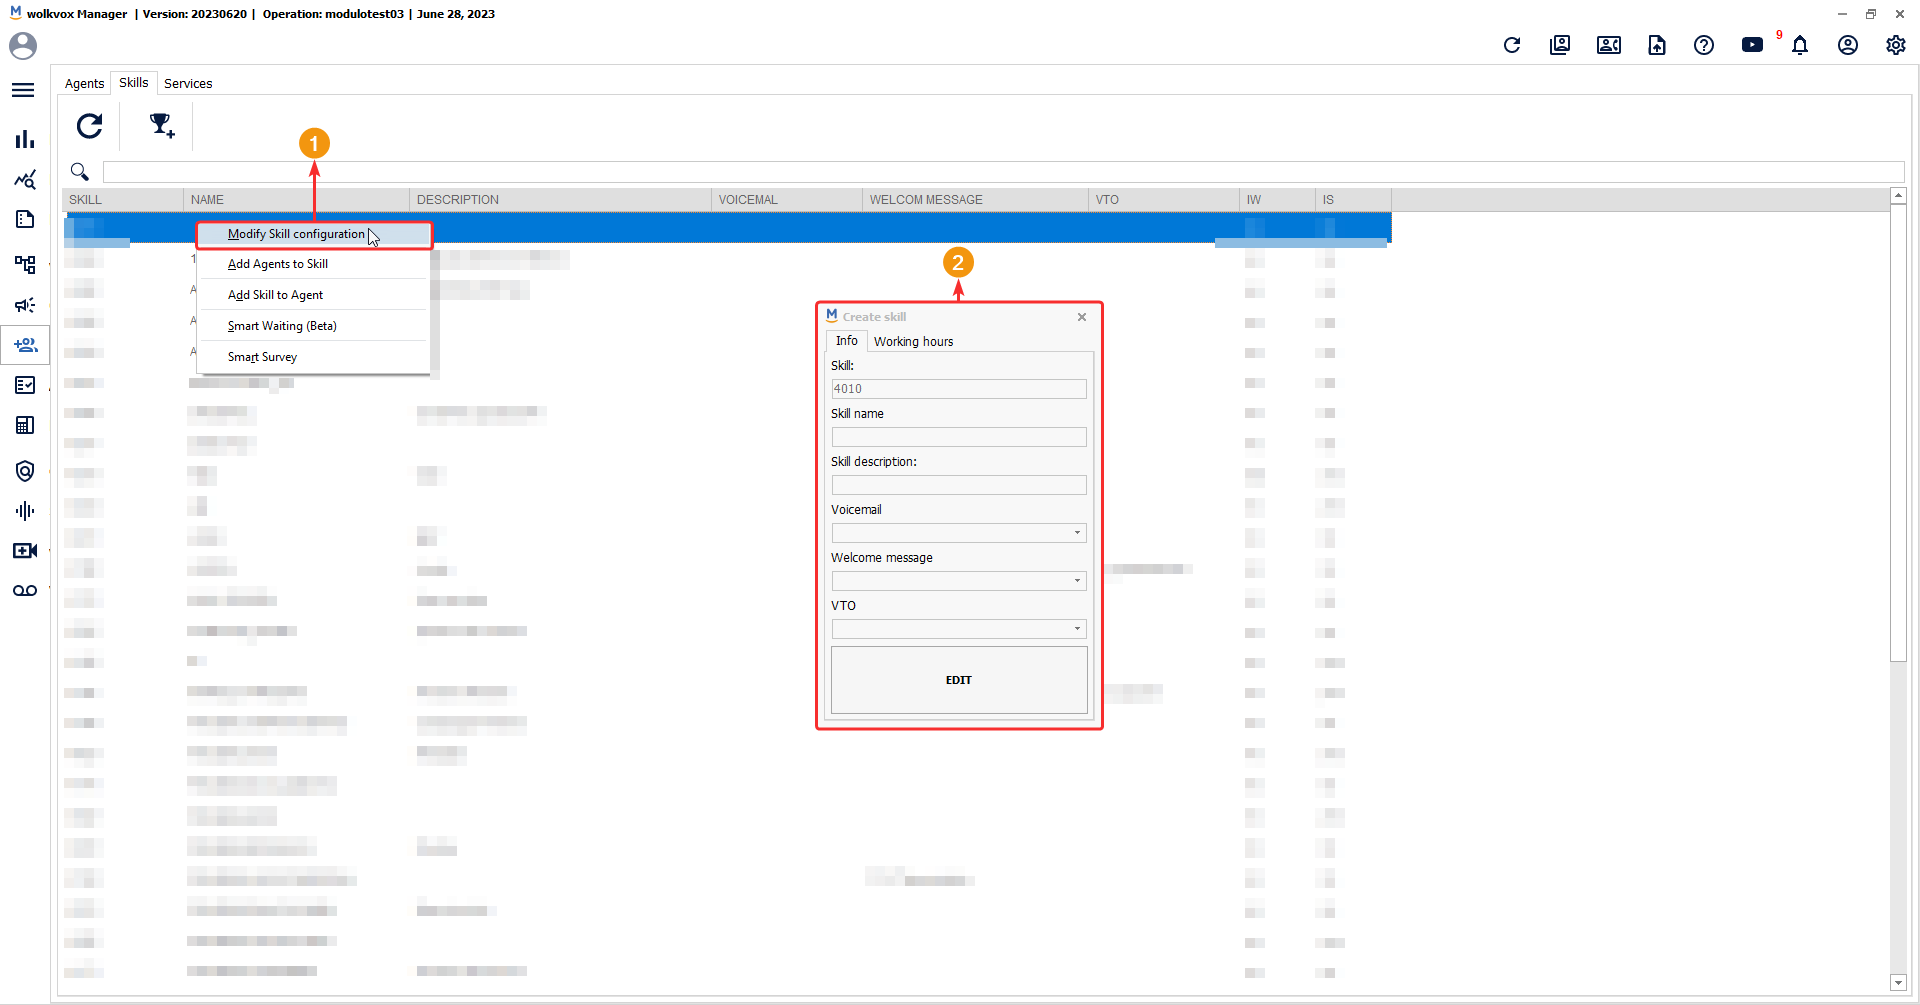
Edit Skill Information #
To edit the skill information, right-click on the newly created skill and select the “Modify Skill Configuration” option.
In the “Info” tab, you can configure the general options for the skill. These options include:
- Skill: Skill identification number. This number cannot be changed.
- Skill name: Assign a name to differentiate the skill from others.
- Skill description: Add a description of the skill.
- Voicemail: Select a voicemail for the skill.
- Welcome message: Choose a welcome message for the skill. The audio will play before the call is routed to the agent.
- VTO: Select a Voice Treatment Option (VTO), which is an option for voice treatment. This is a message played to the caller when there is an automated outbound dialing and the call is waiting in the queue before being routed to agents.
- Click the “Edit” button to save the configuration.
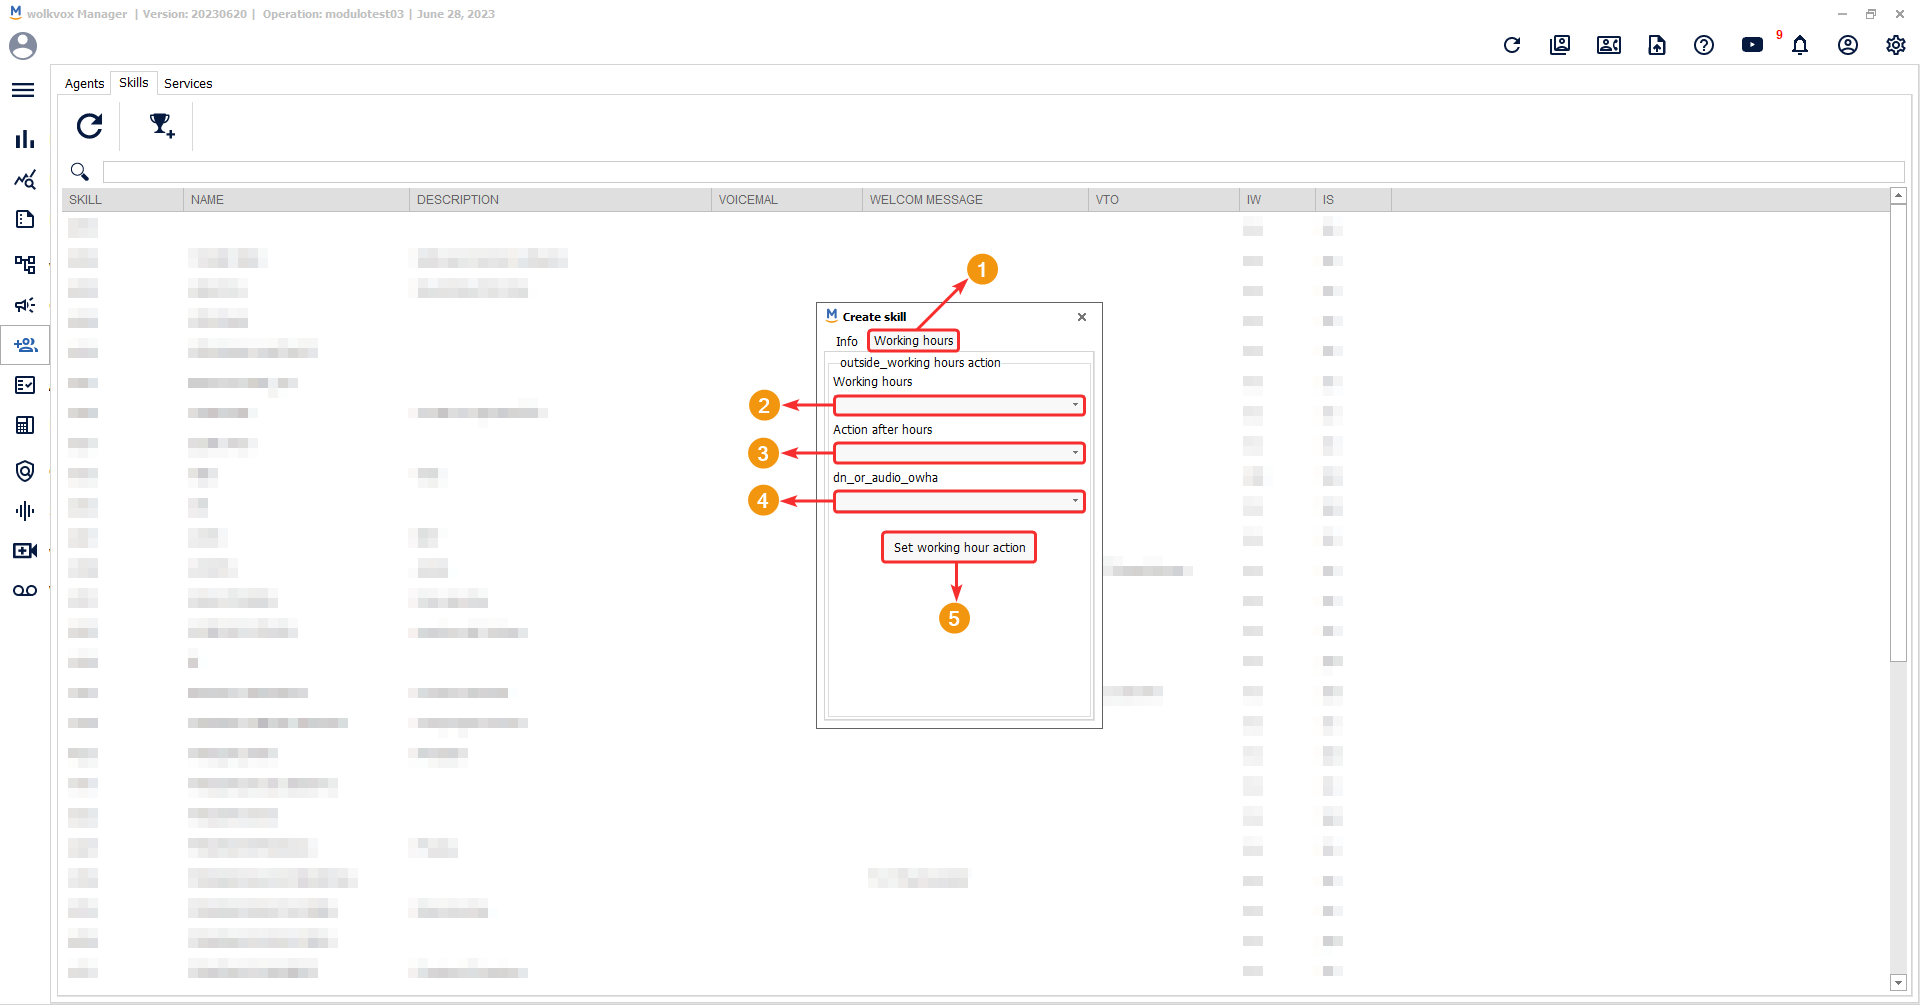
Skill Work Schedule Configuration #
In this section, you configure the action to be taken if a customer call enters your operations center outside of the working hours of the agents assigned to the current skill.
You can modify the following options:
- Go to the “Working hours” tab.
- Select the work schedule for the skill you are editing. Remember that work schedules are created in the wolkvox Manager configuration.
- Choose the action you want to occur when a call attempts to enter the skill.
- Select the audio or where to transfer the call according to the action selected in the previous field.
- Click on “Set working hour action” to apply the configuration.
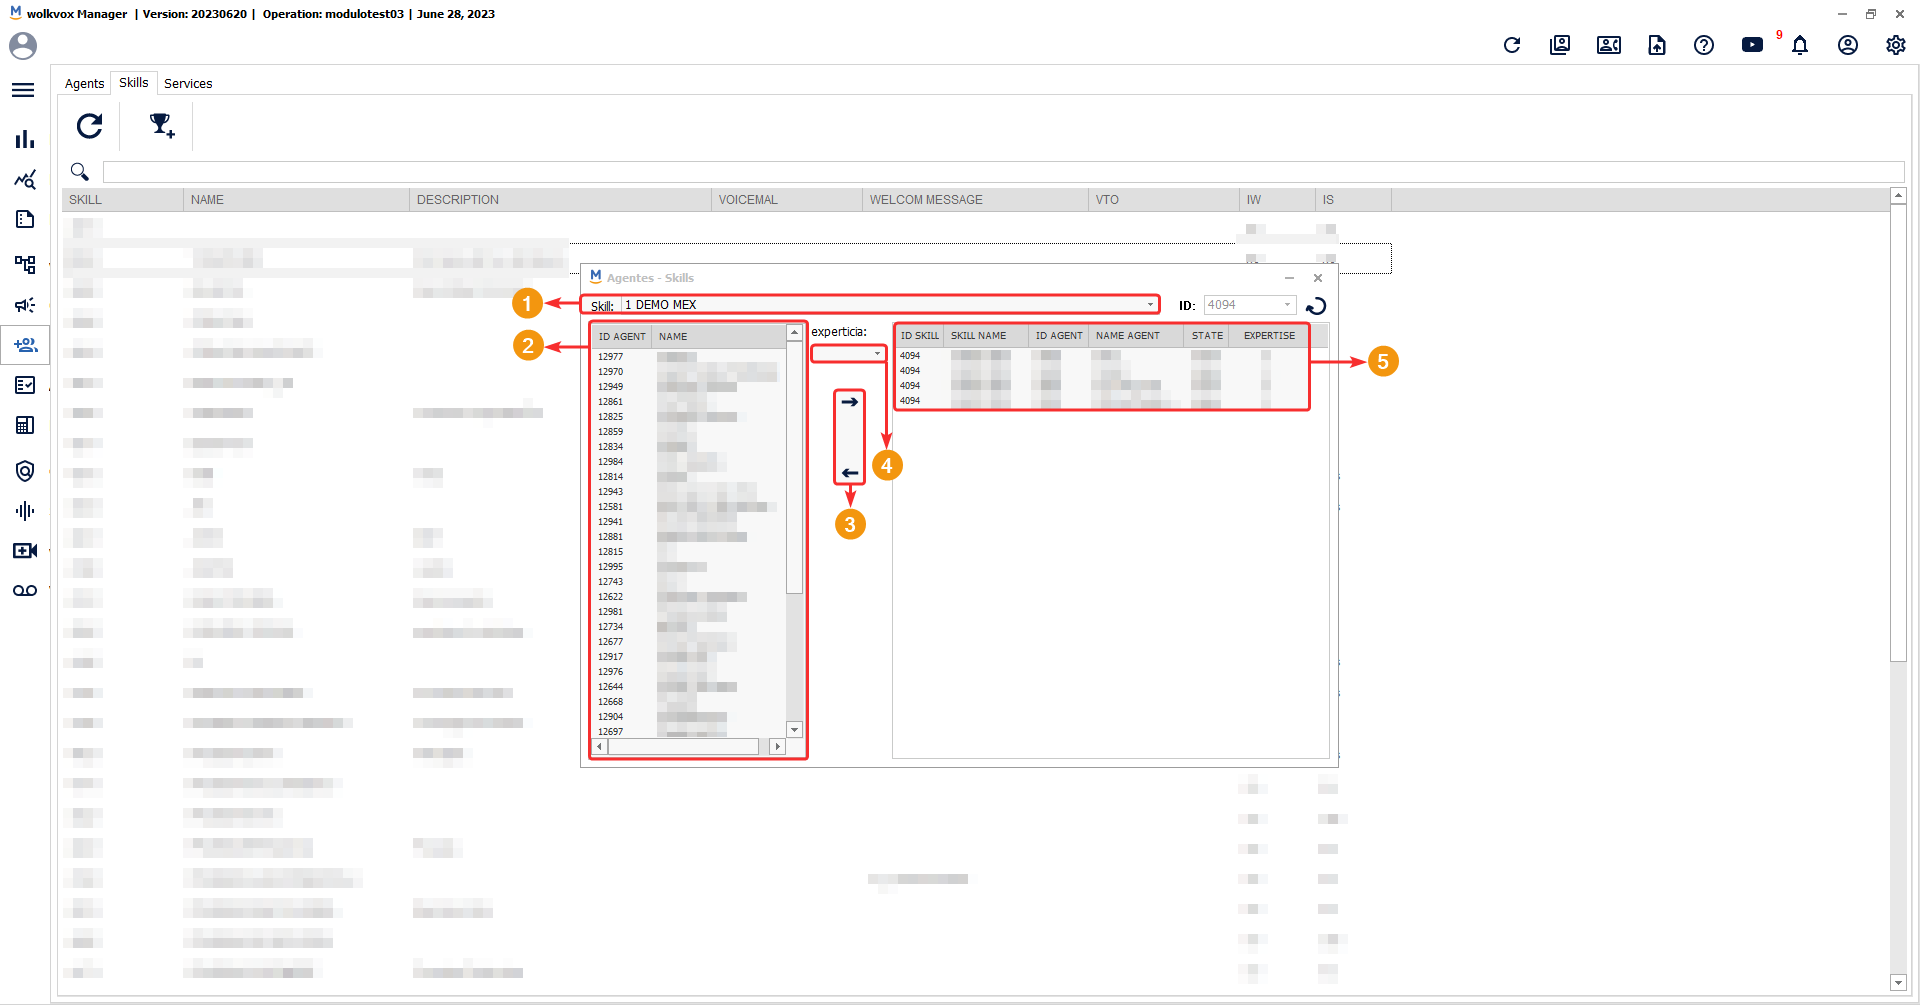
Add Agents to Skill #
If you right-click on a skill, you will have the option “Add Agents to Skill” to assign agents to a skill.

In the list of skills, you can right-click on any skill and select the option “Add Agents to Skill.” Here are the step-by-step instructions:
- You can change the skill to which you will assign agents using the dropdown menu in the “Skill” field.
- On the left panel, you will see the agents created in your operation that you can assign to the skill. You can select one or multiple agents by holding down the CTRL key.
- It is mandatory to assign an expertise level to the agent. Consider the agent’s ability to handle calls. Note that an expertise level of “0” does not mean the agent will not receive calls but indicates the lowest level of skill for call handling.
- Use the right-pointing arrow to assign the selected agent(s). Use the left-pointing arrow to unassign one or multiple agents from the list on the right, which displays the agents already assigned to the skill.
- The table or list on the right side of the window corresponds to the agents that have already been assigned to the skill.
Add Skill to Agent #
To assign skills to an agent, right-click on a skill and select the option “Add Skill to Agent.”
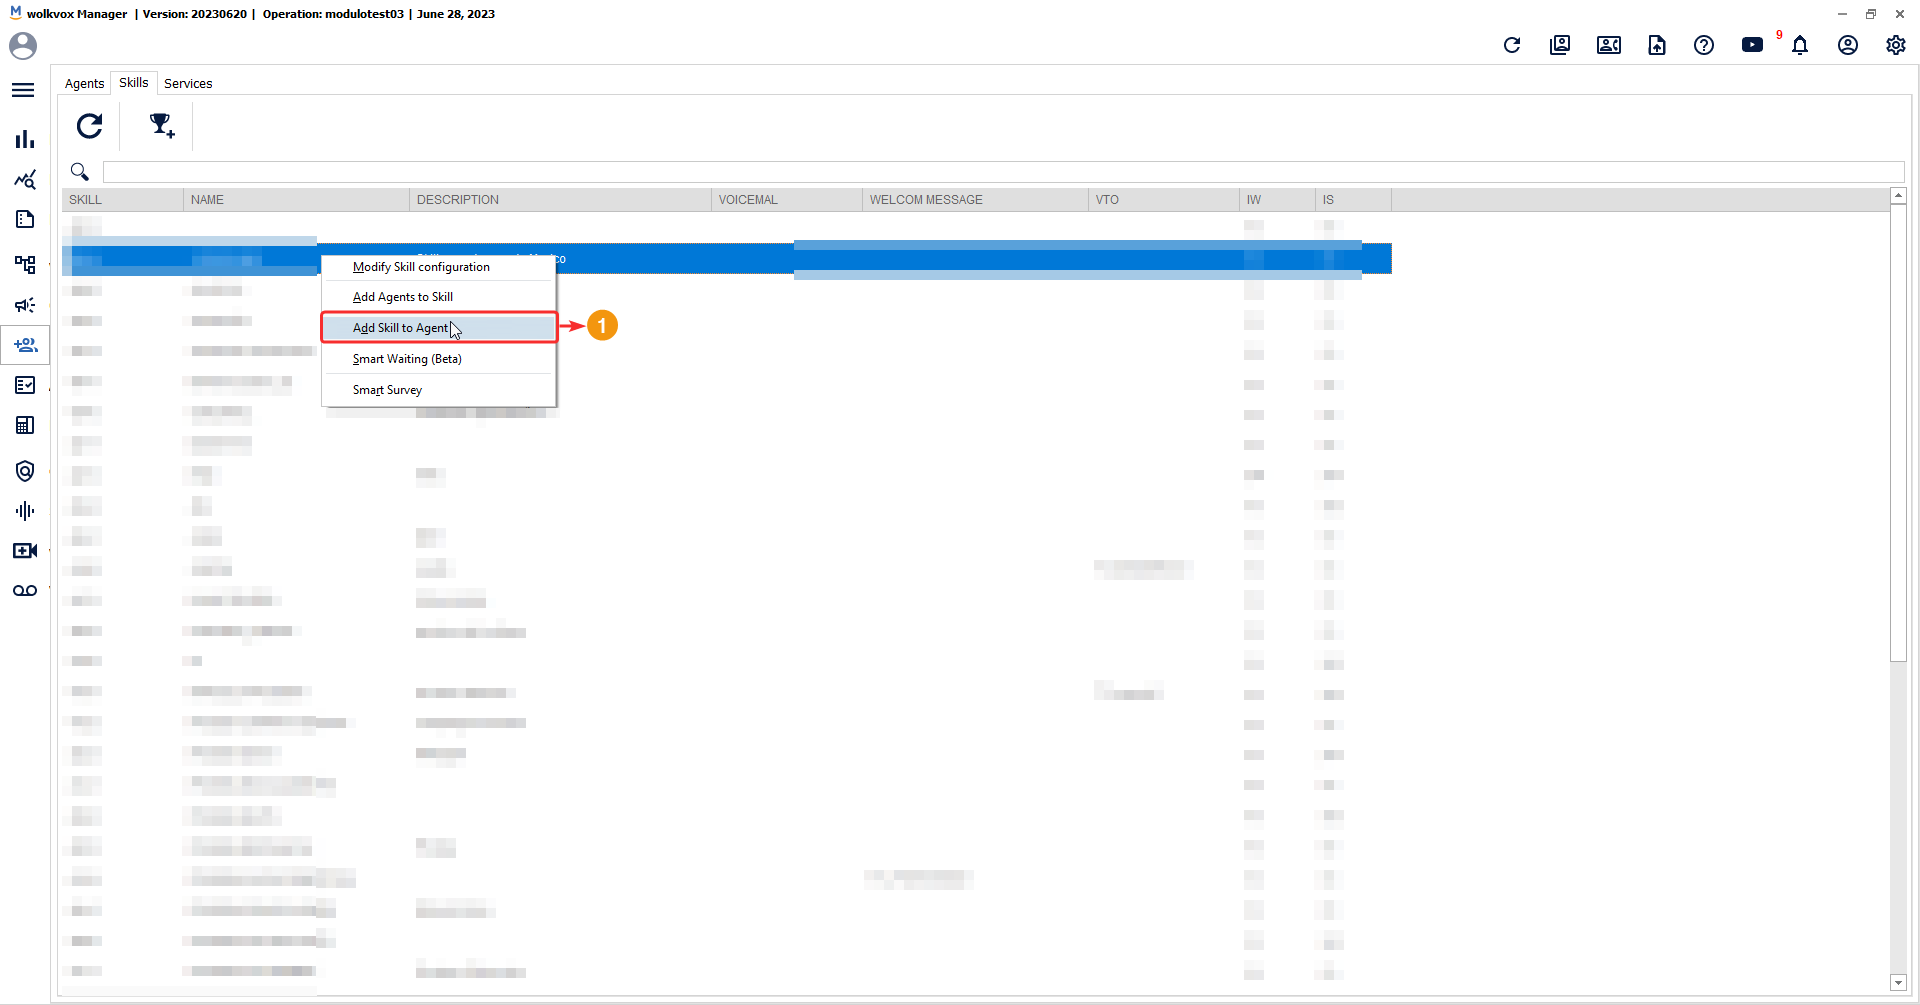
In the list of skills, right-click on a skill and select the option “Add Skills to Agent.” Here are the step-by-step instructions:
- You can change the agent to whom you want to assign skills by using the dropdown menu in the “Agent” field.
- On the left panel, you will find the skills created in your operation that you can assign to the agent. You can select one or multiple skills by holding down the CTRL key.
- It is mandatory to assign an expertise level to the agent. Consider the agent’s ability to handle calls. Note that an expertise level of “0” does not mean the agent won’t receive calls, but rather indicates the lowest level of skill to handle calls.
- Use the right-pointing arrow to assign the selected skills. Use the left-pointing arrow to remove one or multiple skills that you have selected in the right list, which displays the skills already assigned to the agent.
- The table or list on the right side of the window corresponds to the skills that have already been assigned to the agent.

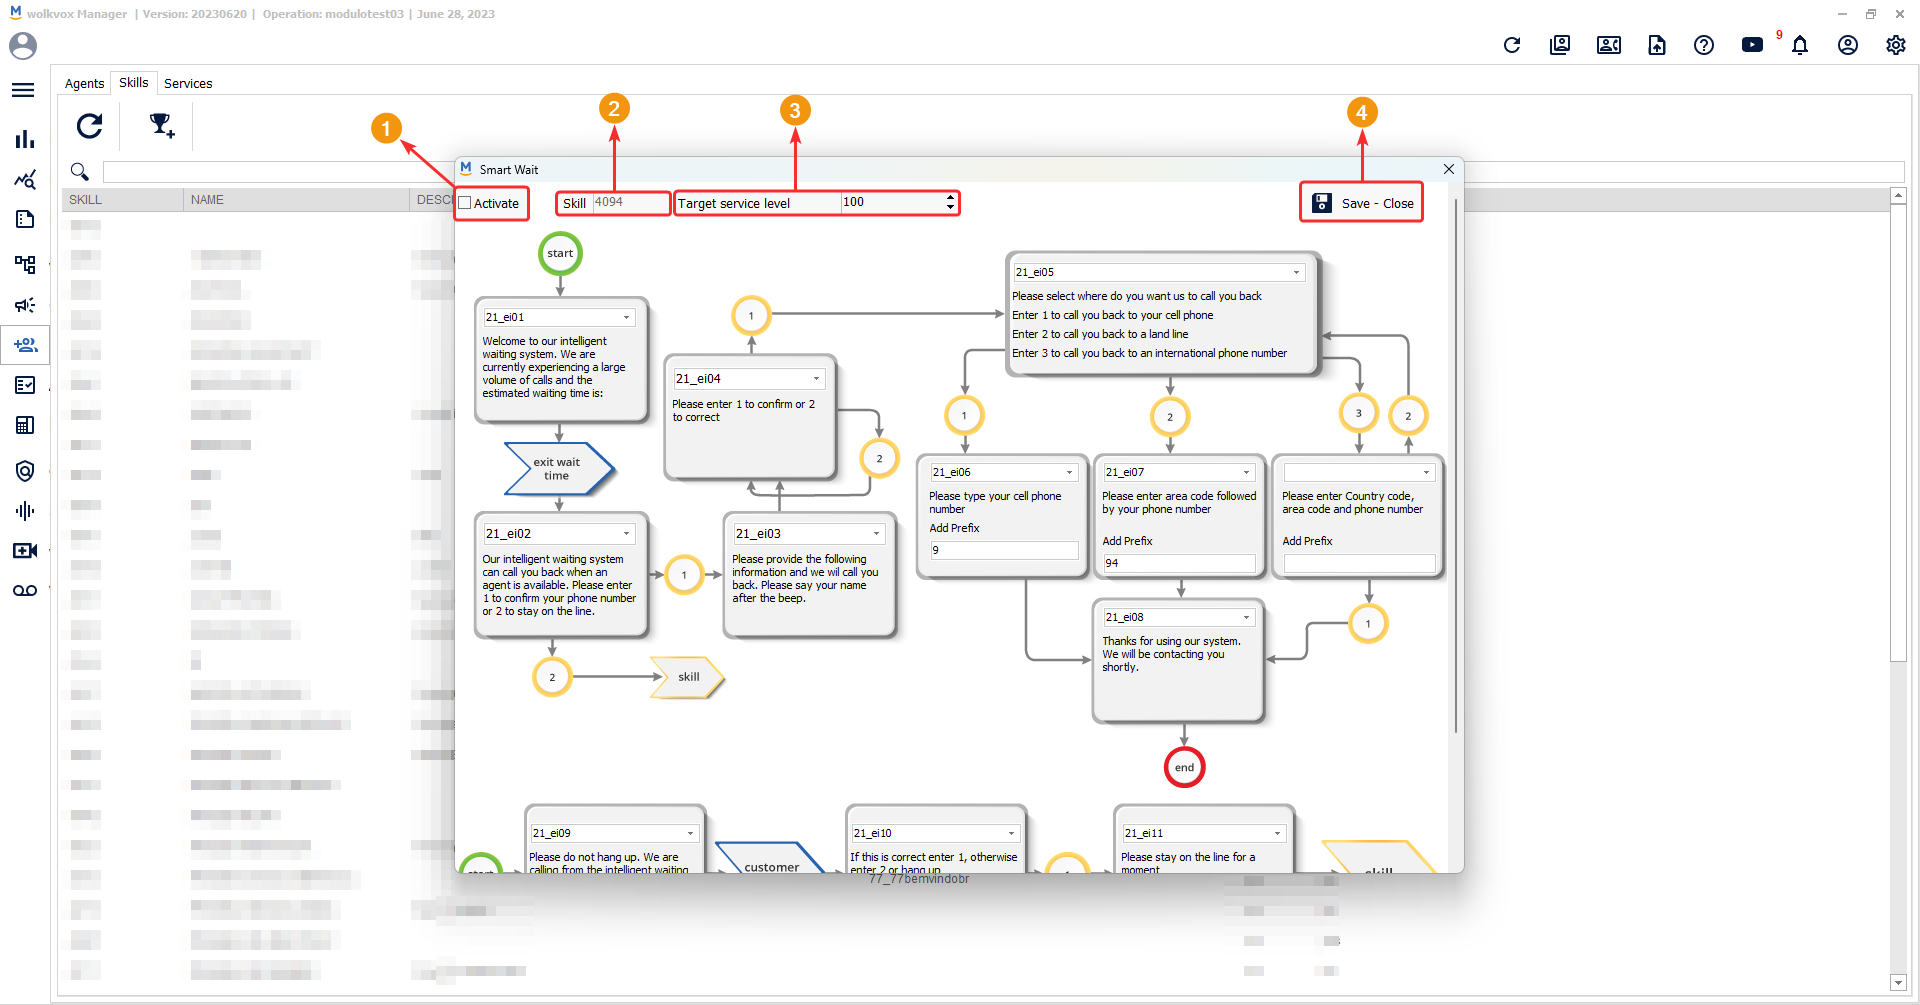
Smart Waiting service in the Skill #
Smart Waiting service is a feature that provides the customer with the option to choose between waiting on the line to be assisted or leaving their information for the system to automatically return their call.
To configure the Intelligent Wait for a skill, right-click on it and then select the “Smart Waiting” option.

A window will appear with configuration options at the top and two paths with a start and an end point.
Next, the functionality of each option presented in the top menu is explained.
- Enable or disable the Intelligent Wait service using the checkbox.
- Make sure to correctly identify the skill number for which you are editing the Intelligent Wait.
- The Intelligent Wait will be activated when the service level exceeds the value you set in the “Target Service Level”.
- Save the changes to avoid losing your edits.
The purpose of these two paths is to add a voice message for each step of the path. If you see an arrow in the right corner of the blank field, it means it is a dropdown menu where you should select an option.
The audio files should be recorded or uploaded through the “Upload Audio” section in the top right menu of wolkvox Manager.

Each step has an example or a script of what you should record to add the audio there.
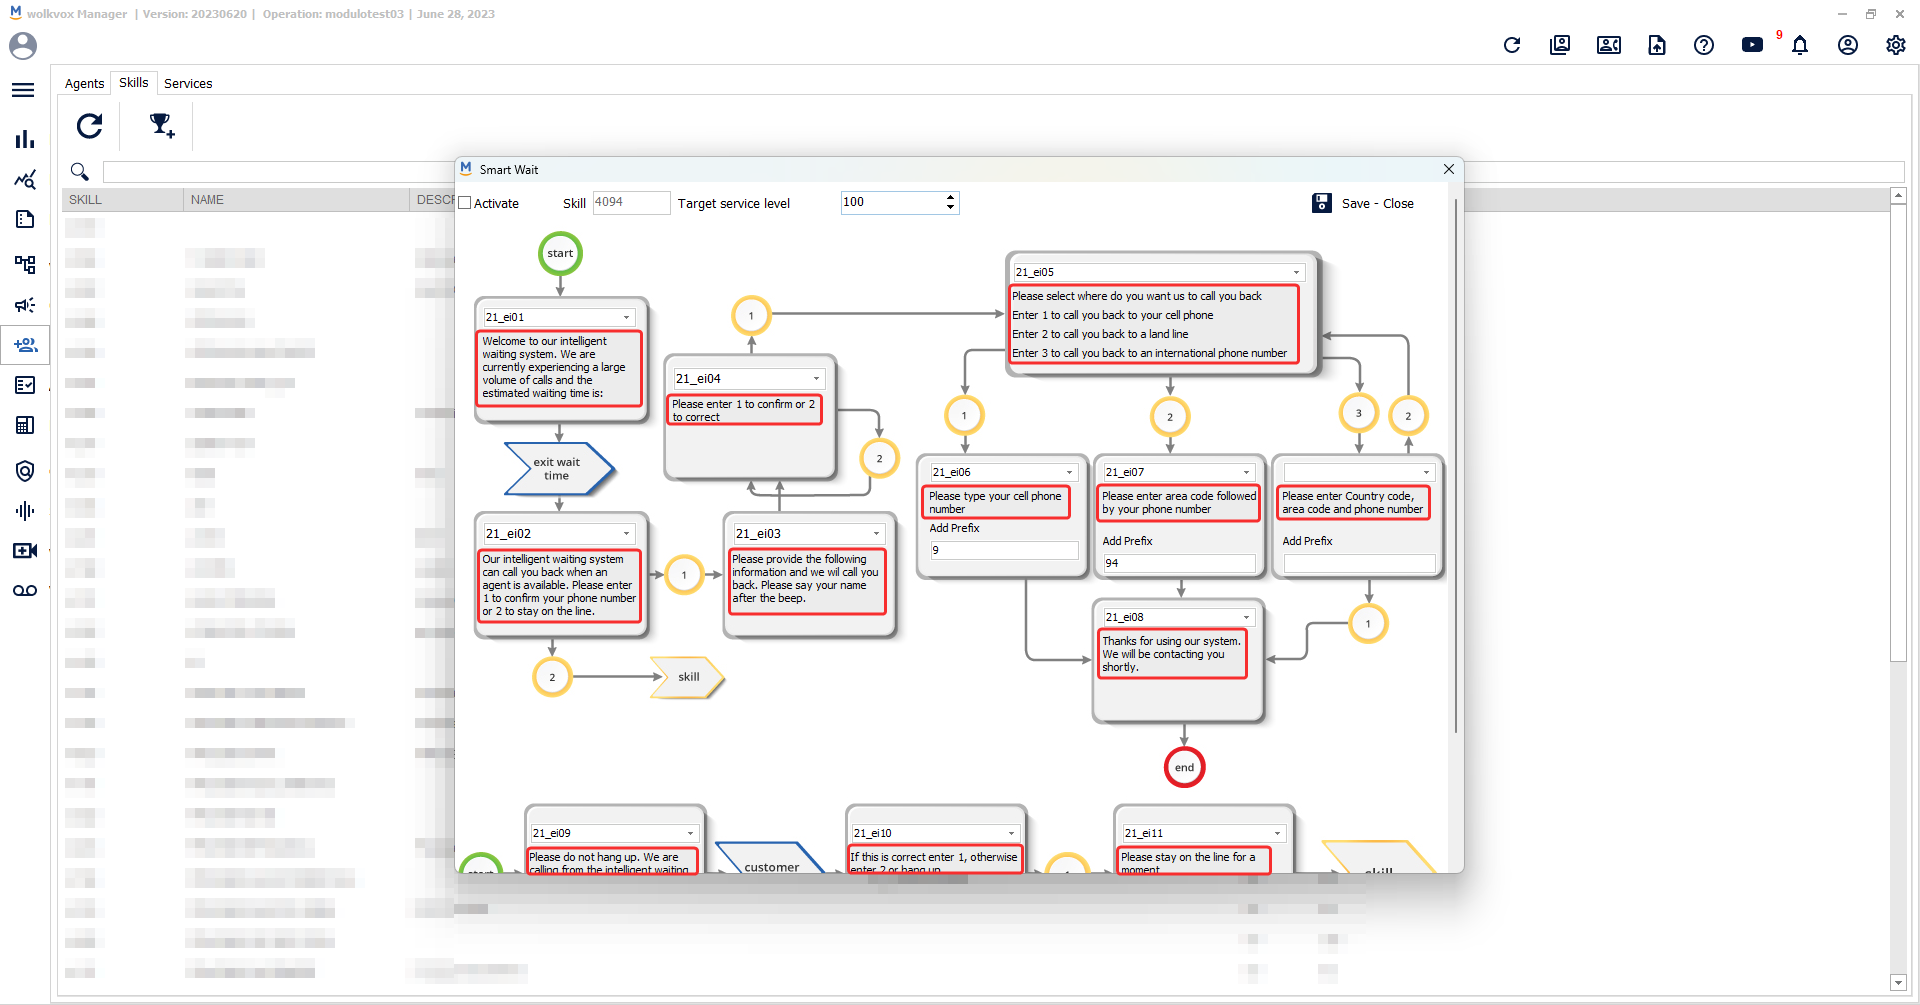
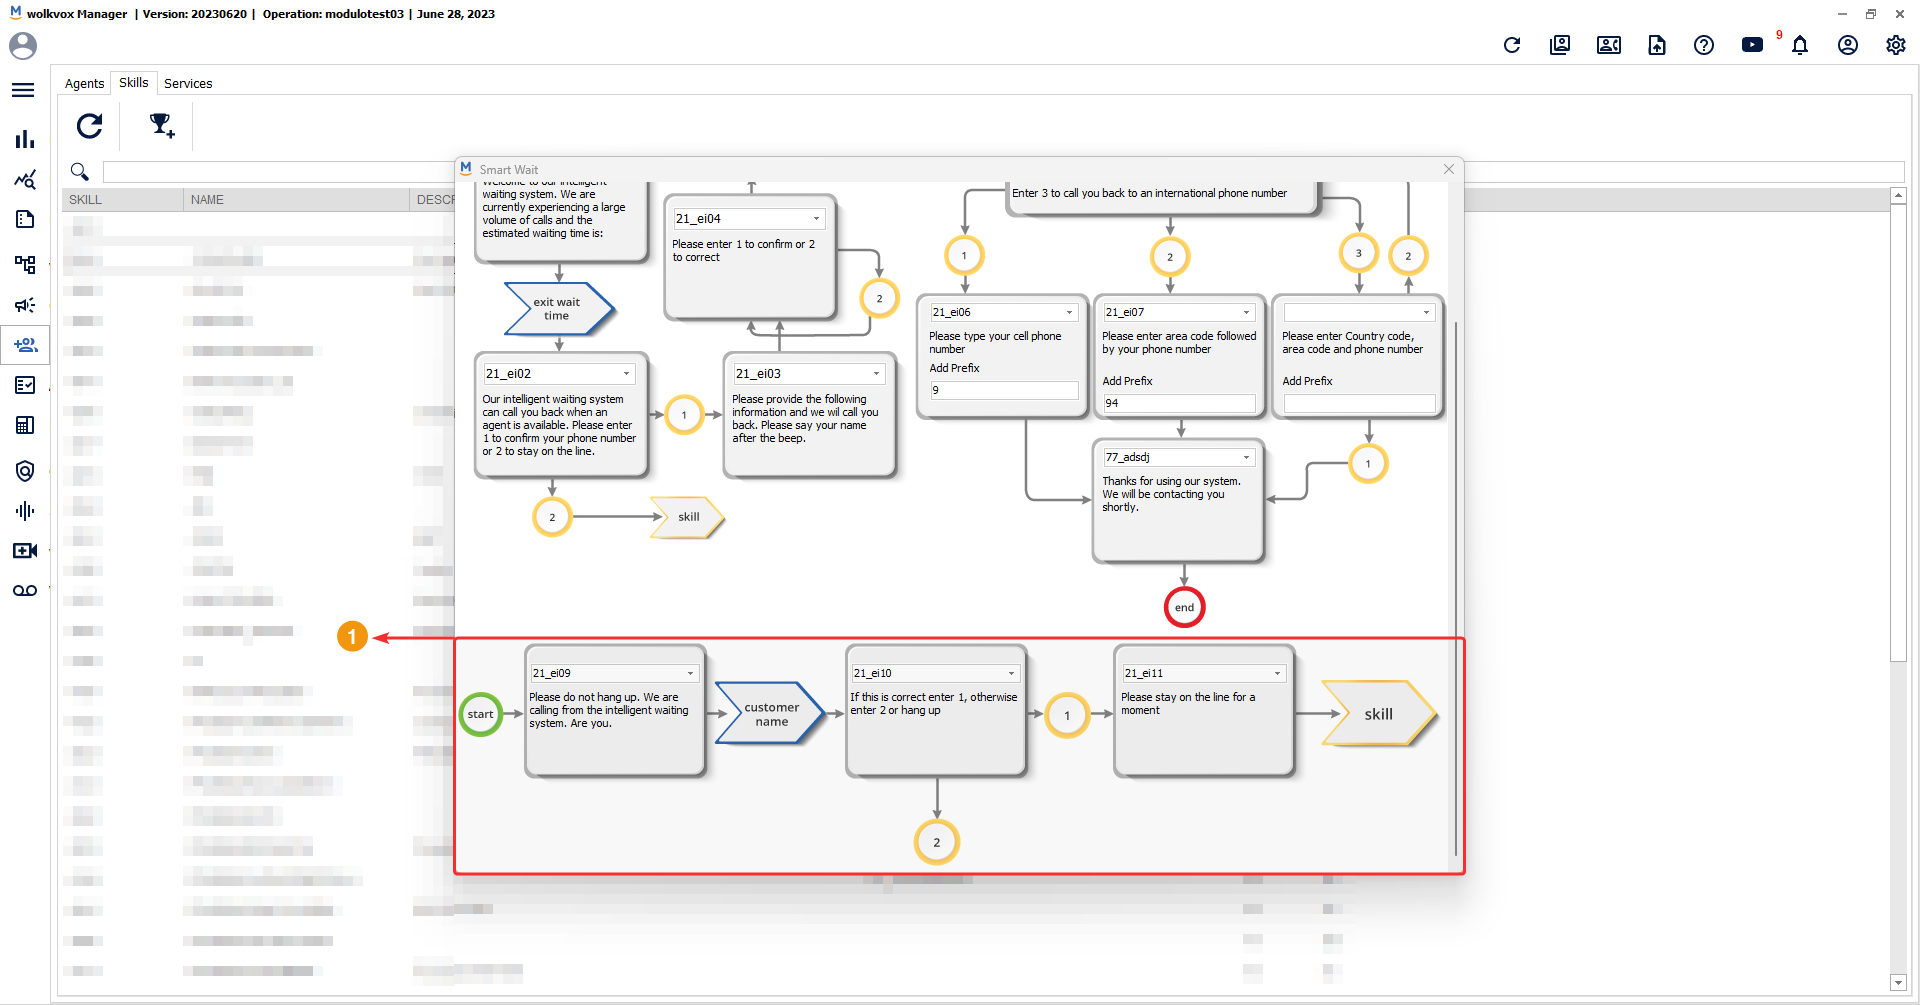
Read each route carefully and note that they have a number enclosed in a yellow circle. These are the options that the customer can dial. For example, in the following case, if the customer dials the number “1”, it means that the customer wants to be called back later, so in the subsequent steps of the route, certain requirements will be asked to fulfill their request. If the customer dials the number “2”, it means that the customer has chosen to remain on the line and will be placed on hold in the skill.

In the following cases, the fields do not have a dropdown menu to select an option; instead, you need to enter a value. In this case, you need to enter a prefix in each field (country area code):

The second route corresponds to the case where the system calls the customer. This happens when the customer has chosen to be called back automatically by the system instead of waiting on the line. You need to add the audio files that will accompany the system for each step.
Smart Survey #
This service enables customers to participate in a survey to evaluate the call quality.
Right-click on the skill where you want to configure the smart survey and select the “Smart Survey” option.

- Enable or disable the smart survey.
- Verify the number of the skill you are editing the smart survey for.
- Select the percentage of calls to which you want to apply the smart survey.
- Click on “Save and close” when you finish configuring the service to save and apply the changes.

The smart survey is structured with a specific route. Follow each step, adding the audio requirement in each field.
Keep in mind that each step provides an example or script of how you should record the audio.
Audios can be recorded (or uploaded) in the “Upload audio” section of the top right menu in wolkvox Manager.
In the step indicated below, you must at least add the audio for question 1. In the “Min” field, the minimum score that the question can receive is defined, and in the “Max” field, the maximum score that the question can receive is defined. For all questions, the lowest possible score is zero (0), and the highest possible score is ten (10).
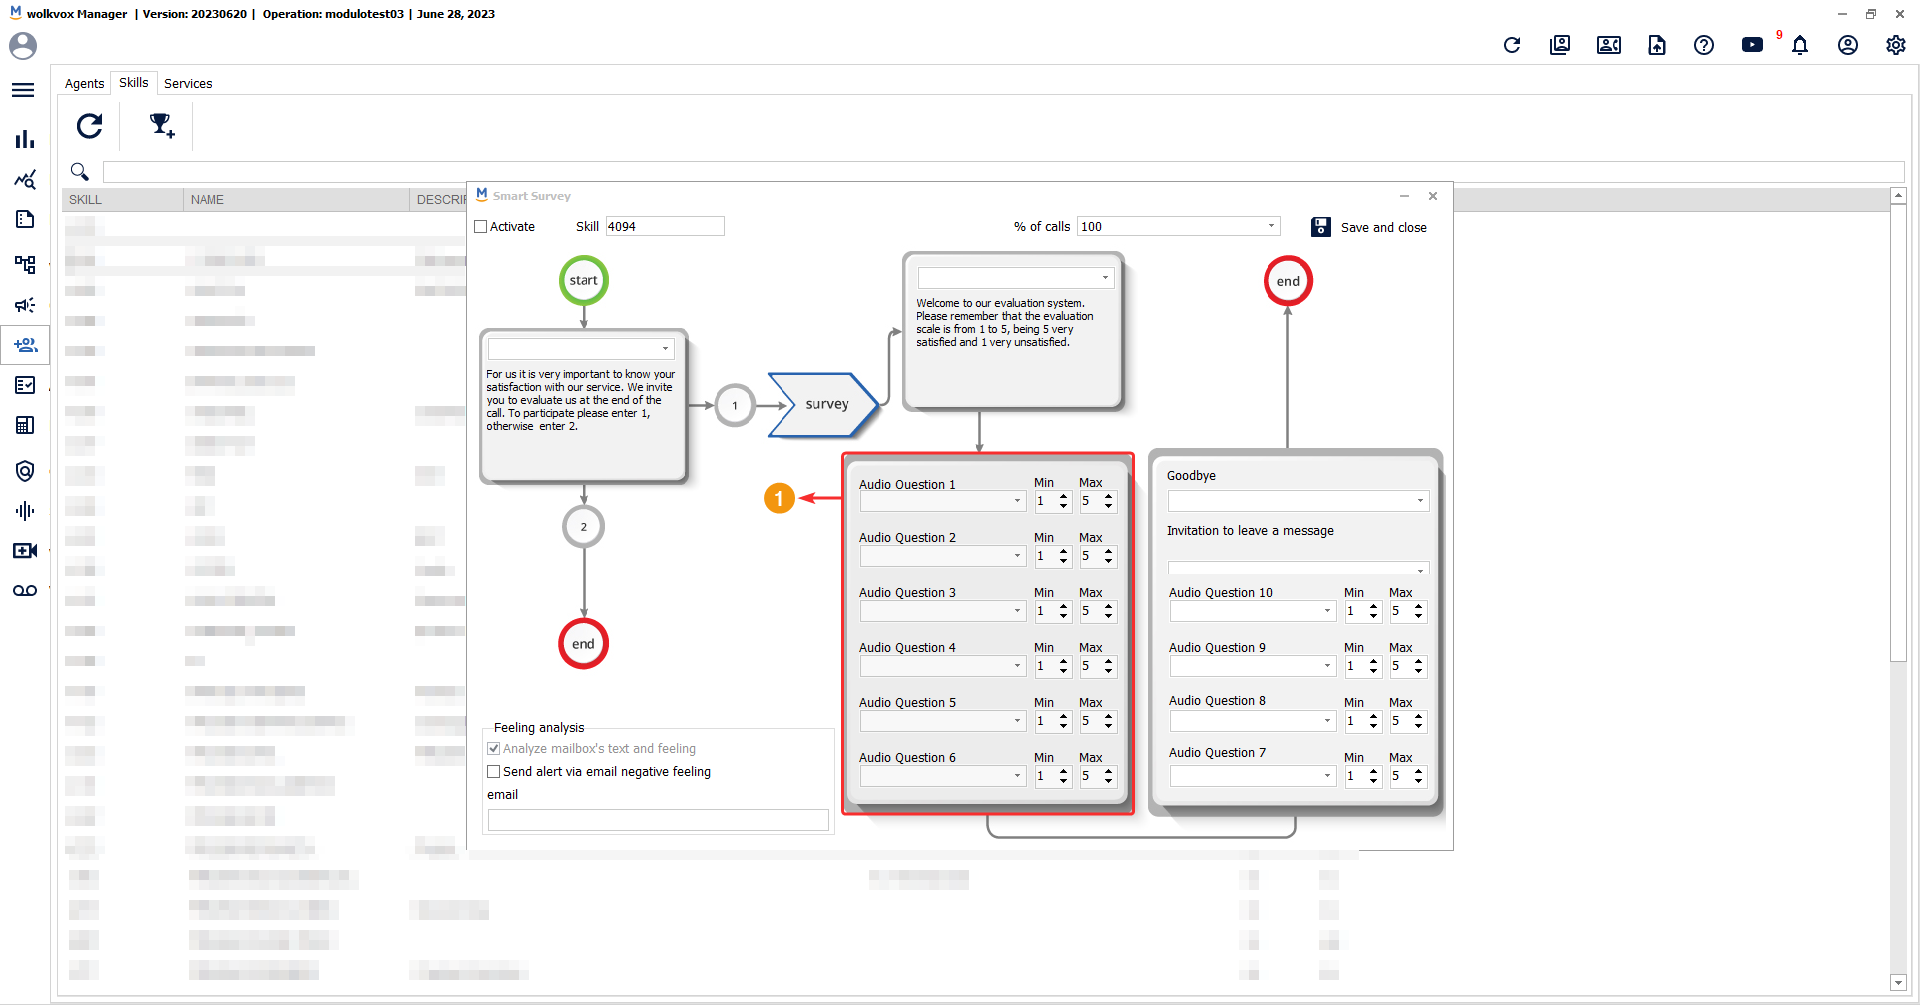
You can add up to 10 questions in the survey.
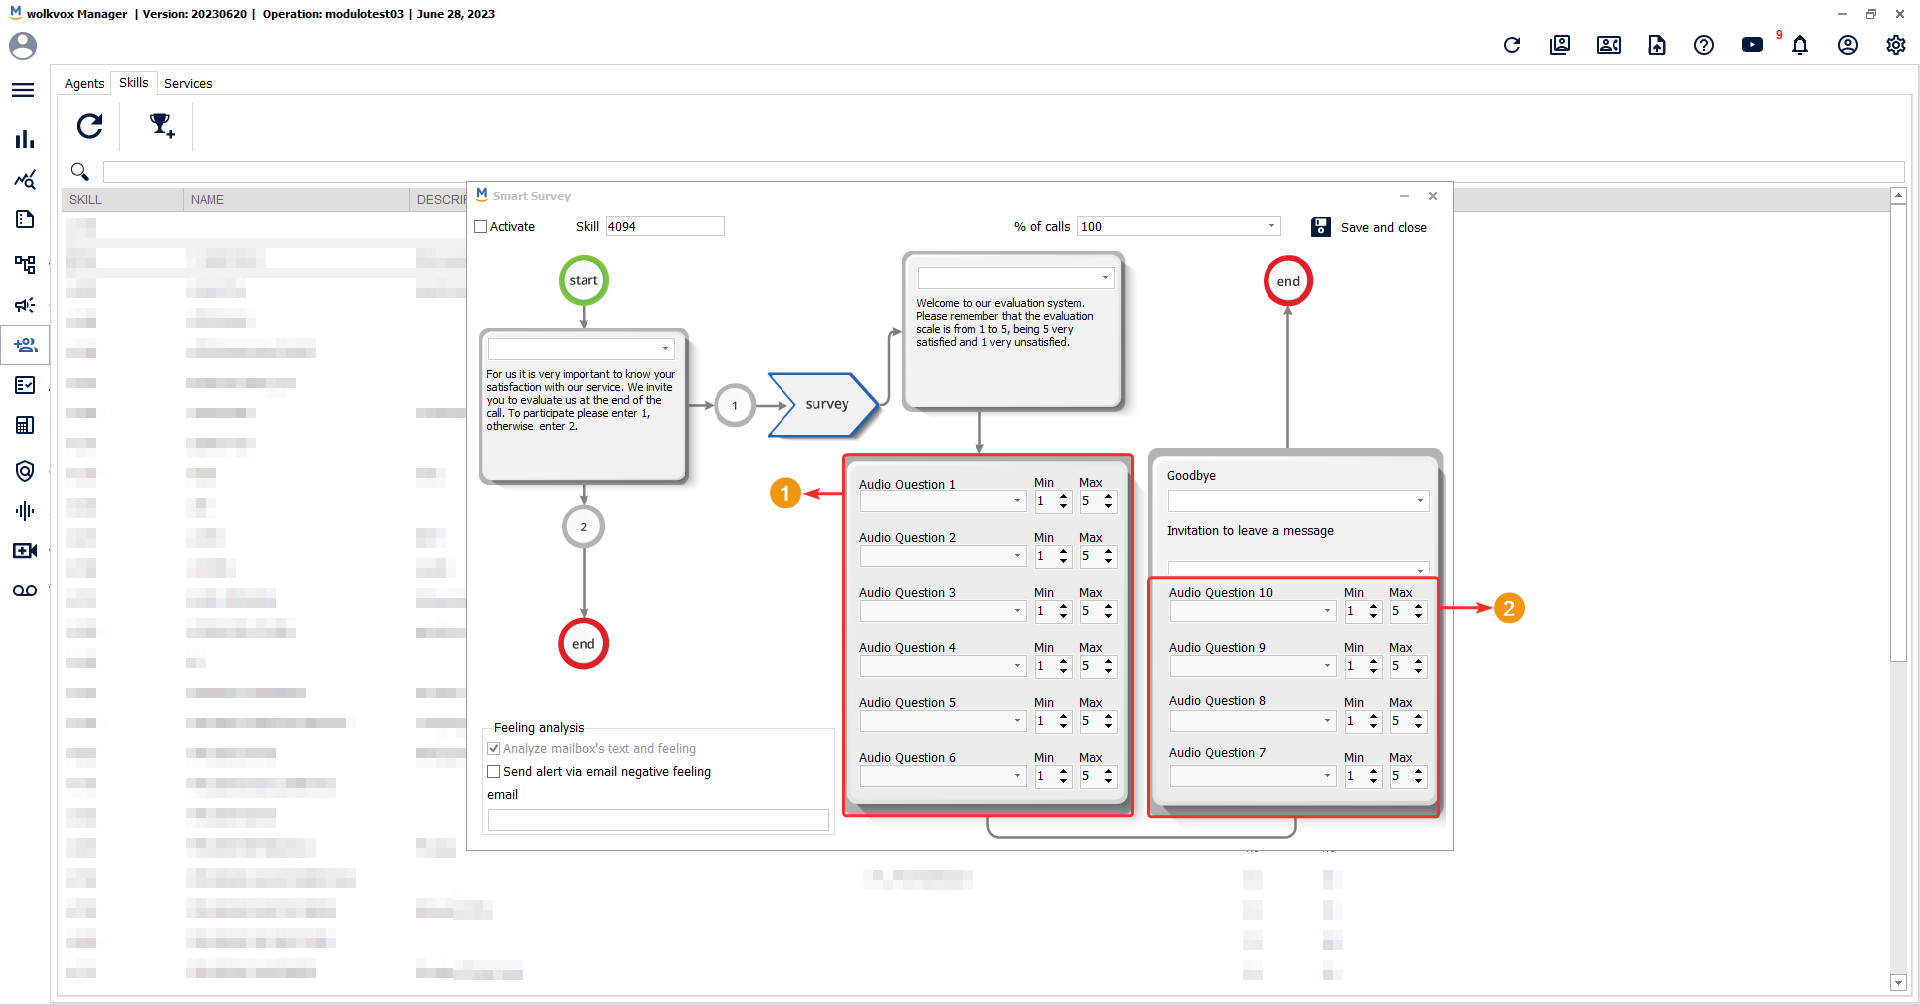
Add a farewell message and an invitation for the customer to leave a voicemail as an additional comment.

In the bottom-left corner of the window, there is an option called “Send alert via email negative feeling.” If this option is enabled, it will send an alert message (if the system detects negative sentiment from the customer) to the email address you enter in the following field:

Create a service #
Services are tags that can be used to differentiate the services provided by advisors in the same queue. They are used to prioritize customers in IVRs.

