 Basic Recommendations for the Workstation #
 Basic Recommendations for the Workstation
 AgentBox is the web application alternative for clients who prefer not to use the desktop application. Here are some recommendations for its use:
- Use the web browsers Google Chrome or Mozilla Firefox in their latest versions.
- Enable permissions for the devices the agent will use, such as the microphone and webcam.
- The workstation should be connected via Ethernet cable. Wireless connections are not recommended.
- For optimal quality in call playback and recording, as well as interaction with the client, it’s recommended to have professional USB-connected headsets suitable for call centers.
- The optimal screen size required to ensure proper functionality visibility is 1366×768 or higher. Our application adapts to various screen types (equal to or larger than the aforementioned resolution), so if certain sections don’t fit within the container, a vertical scroll bar will appear on the right side of the screen for navigation.
- Similar to desktop applications, AgentBox Web has login restrictions. Only users with their IP address enabled can access modules or operations. Therefore, it’s important to verify access with the support team.
Glossary of Terms #
Before proceeding with the reading of the following documentation, it’s recommended to review the glossary of terms to gain a better context of the presented situations. To view the glossary of terms, click here.
Access AgentBox #
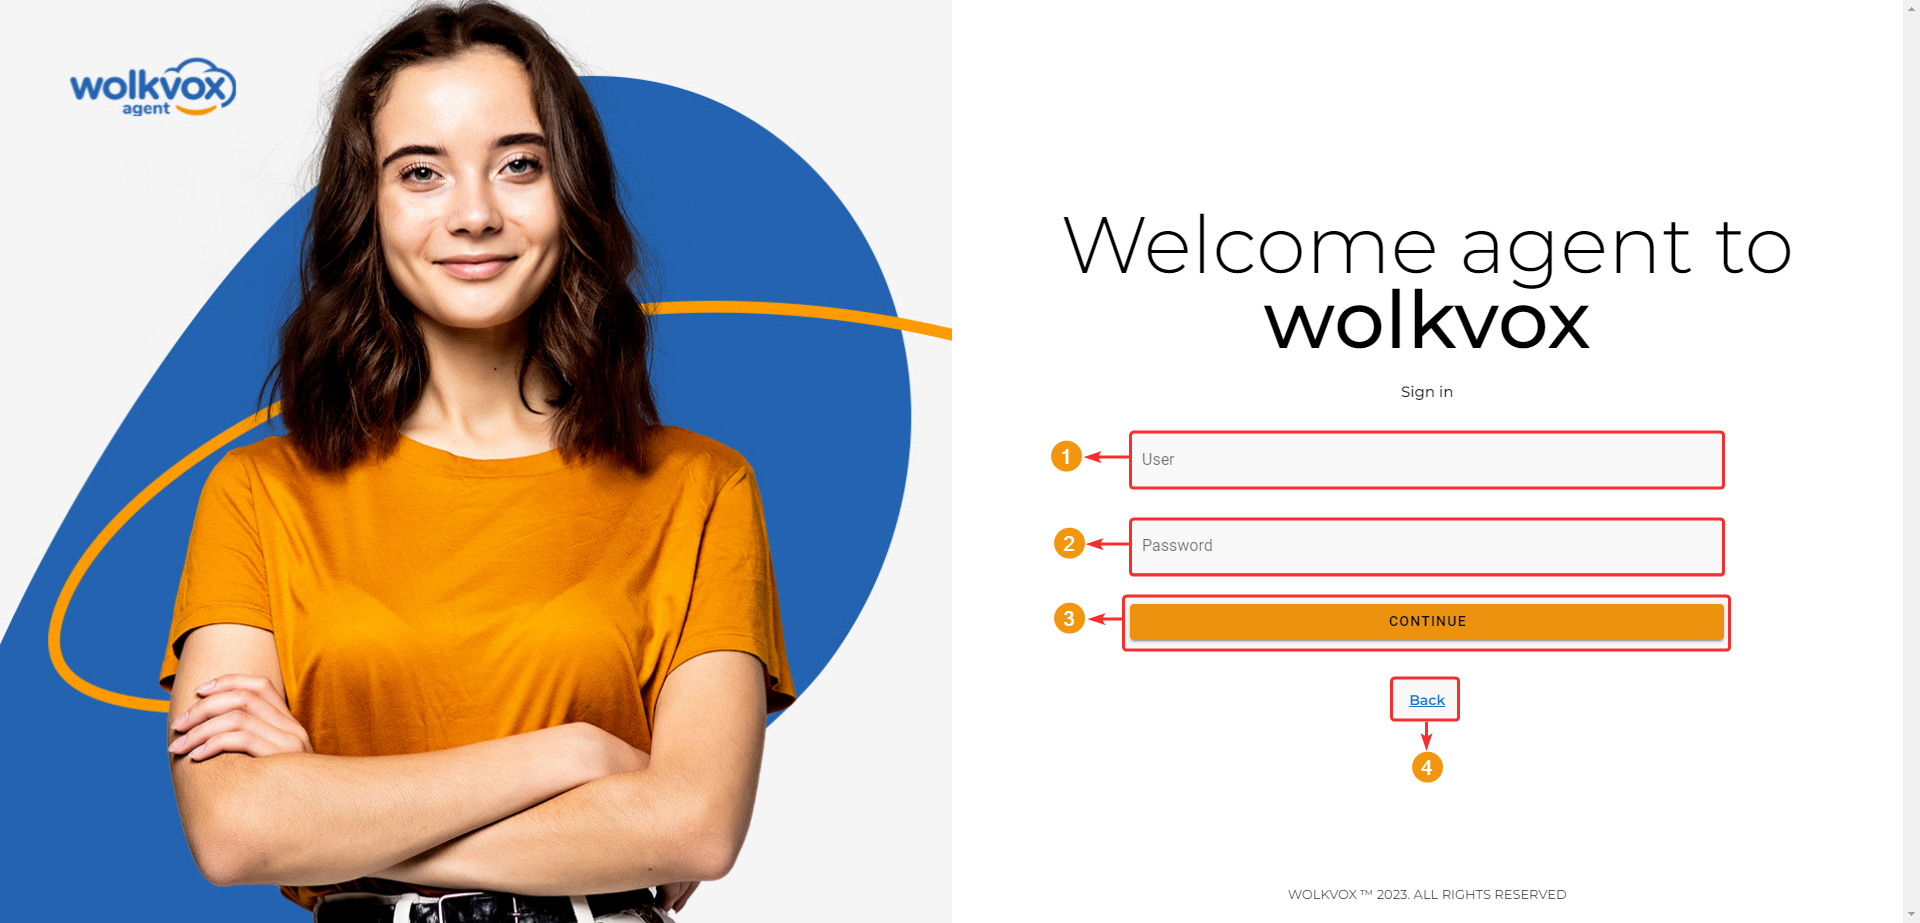
In the web address bar of your preferred browser, enter the following URL: https://agentbox.wolkvox.com/
Once you access the above web address, the AgentBox login section will appear, as shown in the following image.
Firstly, you need to enter the name of your operation or module. If you are unsure about the operation or module name, you should consult with the responsible parties in your process.
Note #1: If the operation name is misspelled, the application will display a message indicating that the operation does not exist.
Note #2: If upon entering the page, it doesn’t load or shows an error, it could be due to your connecting IP address not being allowed for access. In this case, you should contact the support team.

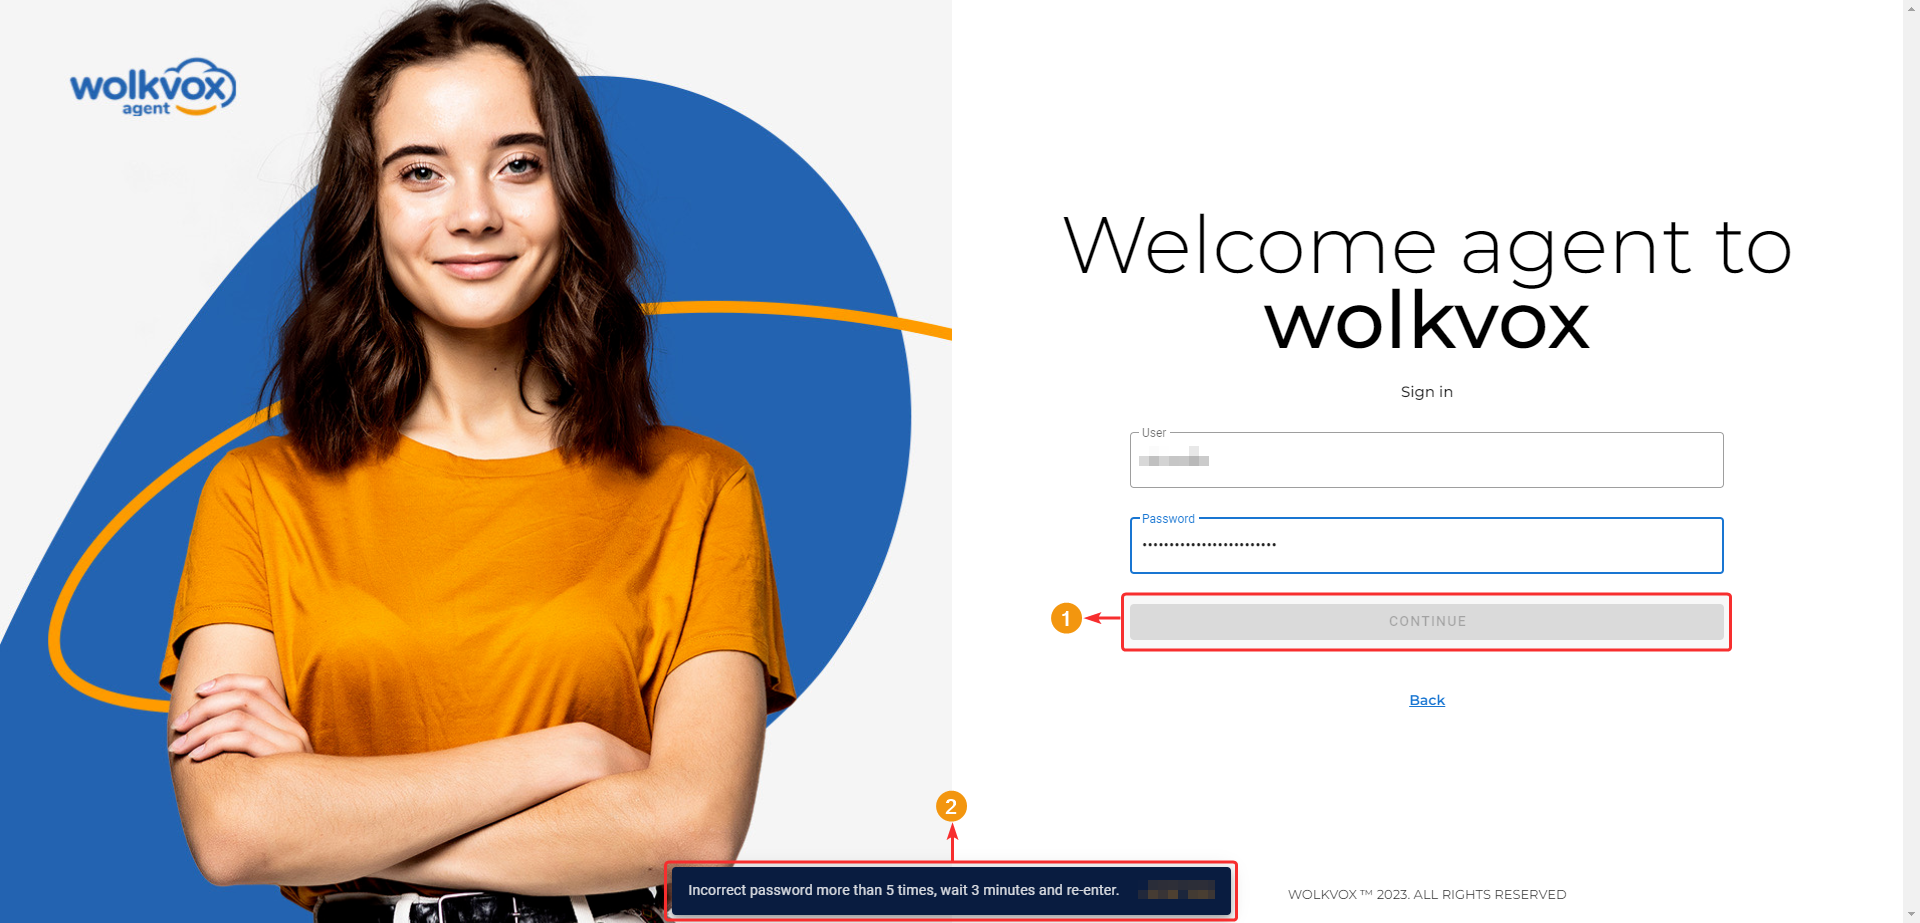
After entering the operation name correctly, the following section appears where you should enter the username and password assigned by the responsible party in your process.
Once you enter the username and password, click on “Continue.”
If for any reason you need to change the operation name you’re entering, you can do so by clicking the “Back” button, which takes you back to the section where you enter the operation or module name.
If you’re trying to access your account and enter the password incorrectly five (5) times in a row, your access will be blocked for three (3) minutes. Once that lockout period is over, you can attempt to log in again. This lockout is based on the machine and not considering your IP address.
Explore the AgentBox (Web) Interface #
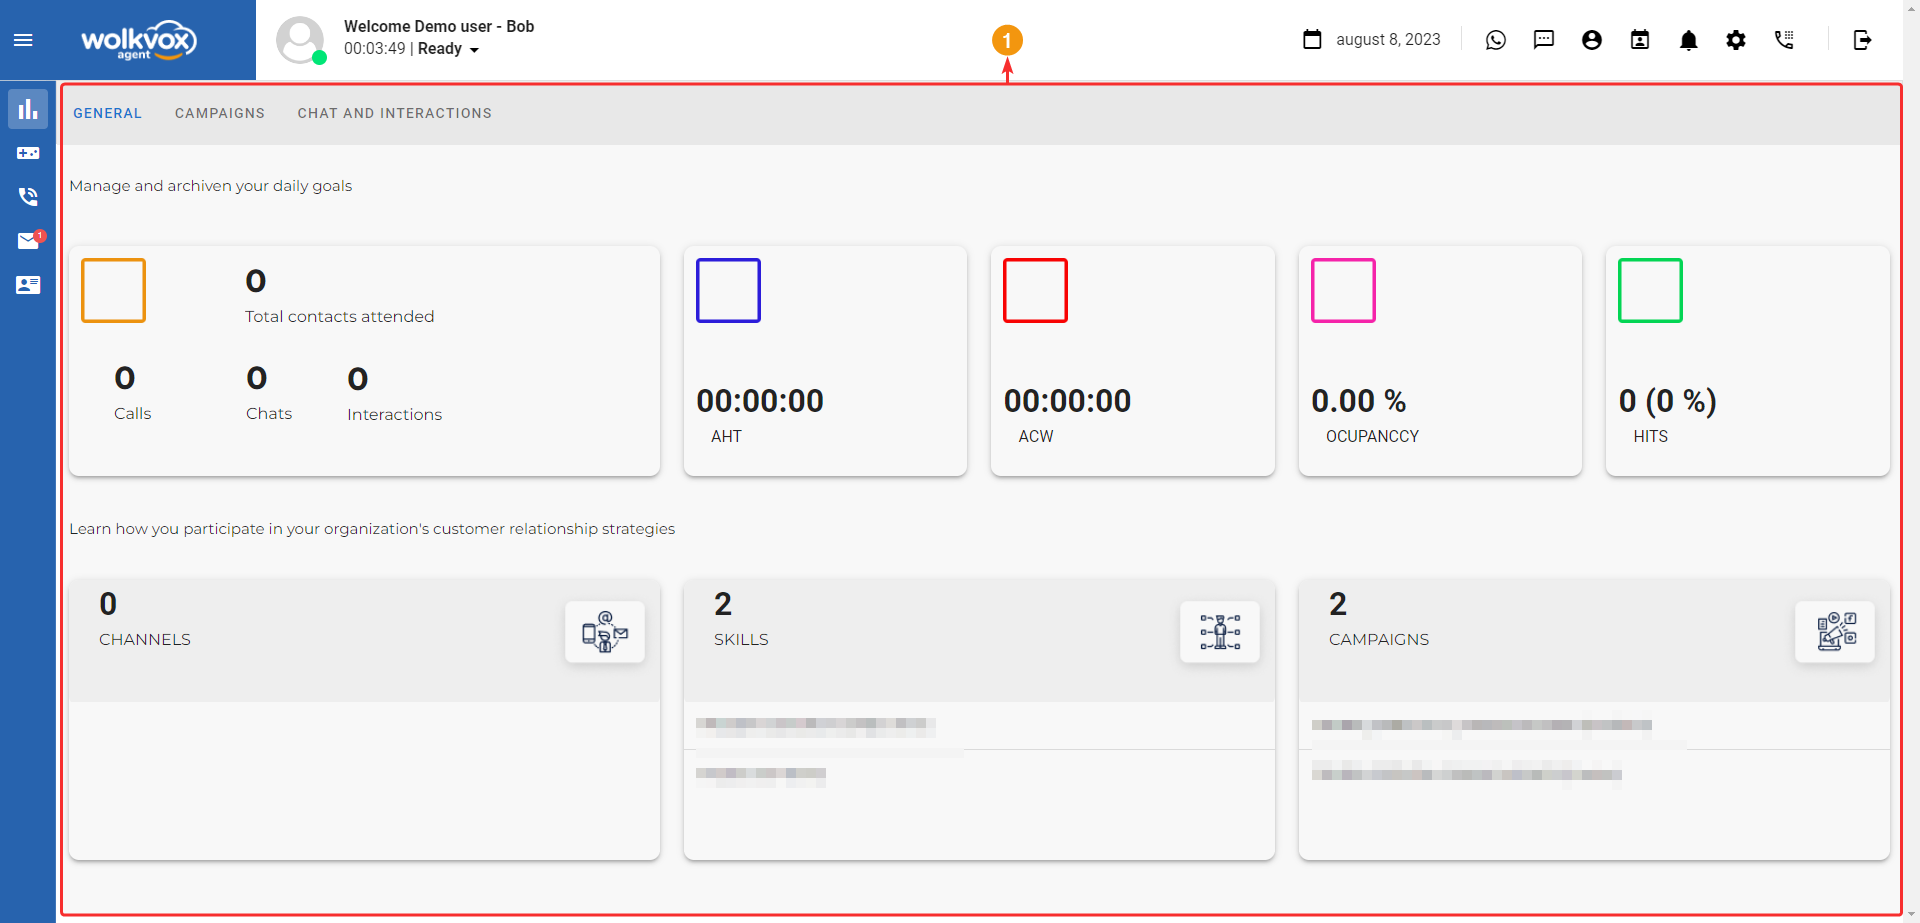
Upon entering the login details correctly, the following screen will be displayed.
- Left Side Menu: From here, you can access the dashboard, gamification section, call dialing tool, interaction and email inbox, chat inbox, and CRM integration section.
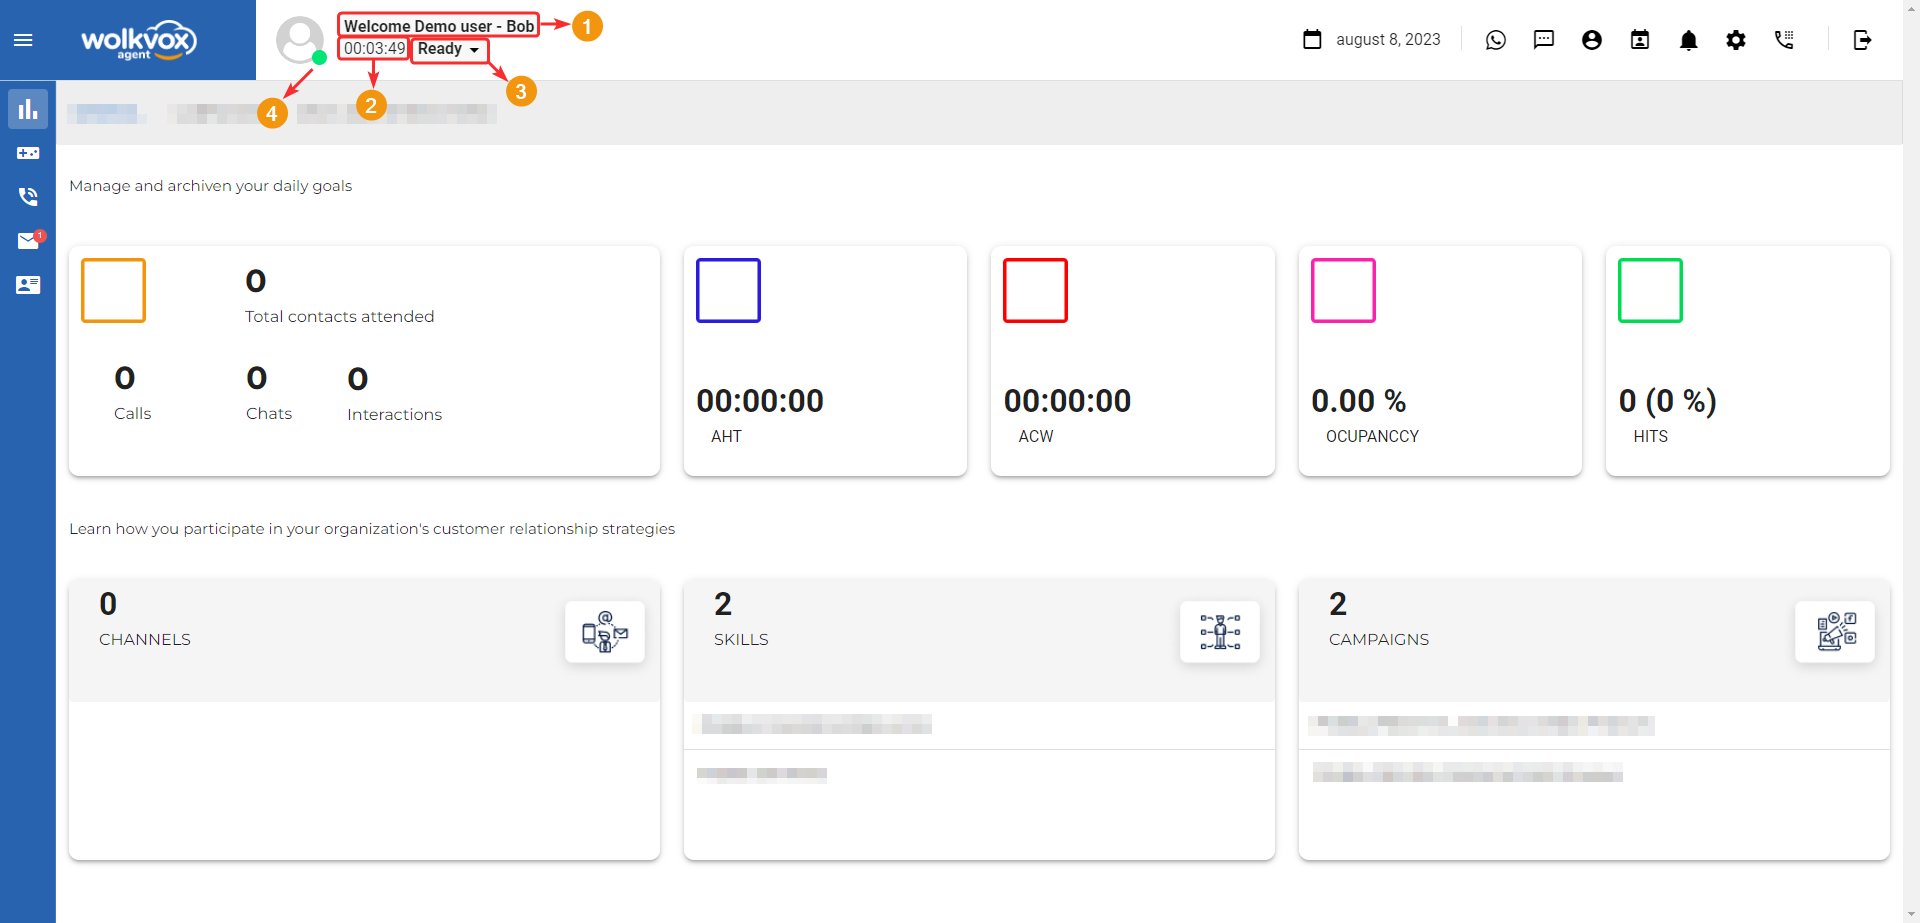
- Agent Name and Status Banner.
- Current Date.
- Top Right Menu: From here, you can access the WhatsApp tool, text messages, change password, view chat contacts, notifications, AgentBox Web settings, smart dial, and log out.

In the center of the application, the information for each button in the left side menu is displayed. The highlighted area in the following image represents the entire section. Additionally, there is a vertical scrolling bar on the right side to navigate through the section.
The hamburger-type button allows you to expand the buttons in the left side menu to view their respective labels.

General information about the agent #
In the following image, you can see the section for general agent information. Here, you can view the agent’s name, the color to identify their current state, the time elapsed since the start of the current state, and the button to view and modify the agent’s current state.
- Agent’s name assigned to the user logged in.
- Time elapsed since the start of the current state.
- Button to view and modify the agent’s current state.
- Color used to identify the agent’s current state. Green signifies “Ready,” red signifies “ACW” (After Call Work), gray signifies “Logout,” violet signifies “Auxiliary State,” and blue signifies “Talk”.
Types of agent states #
Each state has its own color and meaning, below we explain each type of state:
 |
Ready State: The “Ready” state signifies that the agent is available and ready to receive or make a call. This state is identified by the color green. |
 |
ACW State (After Call Work): The “ACW” state indicates that the agent is in the process of categorizing a call, i.e., after speaking with a customer, the agent needs to document the most important details of the interaction. After a call, the “ACW” state is automatically activated and doesn’t switch to “Ready” until the agent has coded the call. This state is identified by the color red. |
 |
Logout State: The “Logout” state means that the agent has disconnected from the platform. This state is identified by the color gray. |
 |
Auxiliary States: The “Auxiliary States” state implies that the agent is engaged in a specific process separate from productive processes. The agent’s manager is responsible for creating each auxiliary state. For instance, within “Auxiliary States,” there can be various elements such as breaks, training, breakfast, lunch, dinner, restroom breaks, active breaks, and others. |
 |
Talk State: The “Talk” state denotes that the agent is engaged in a call. After finishing the conversation with a customer, this state automatically changes to “ACW” to allow the agent to categorize the call. This state is identified by the color violet. |
Basic Settings #
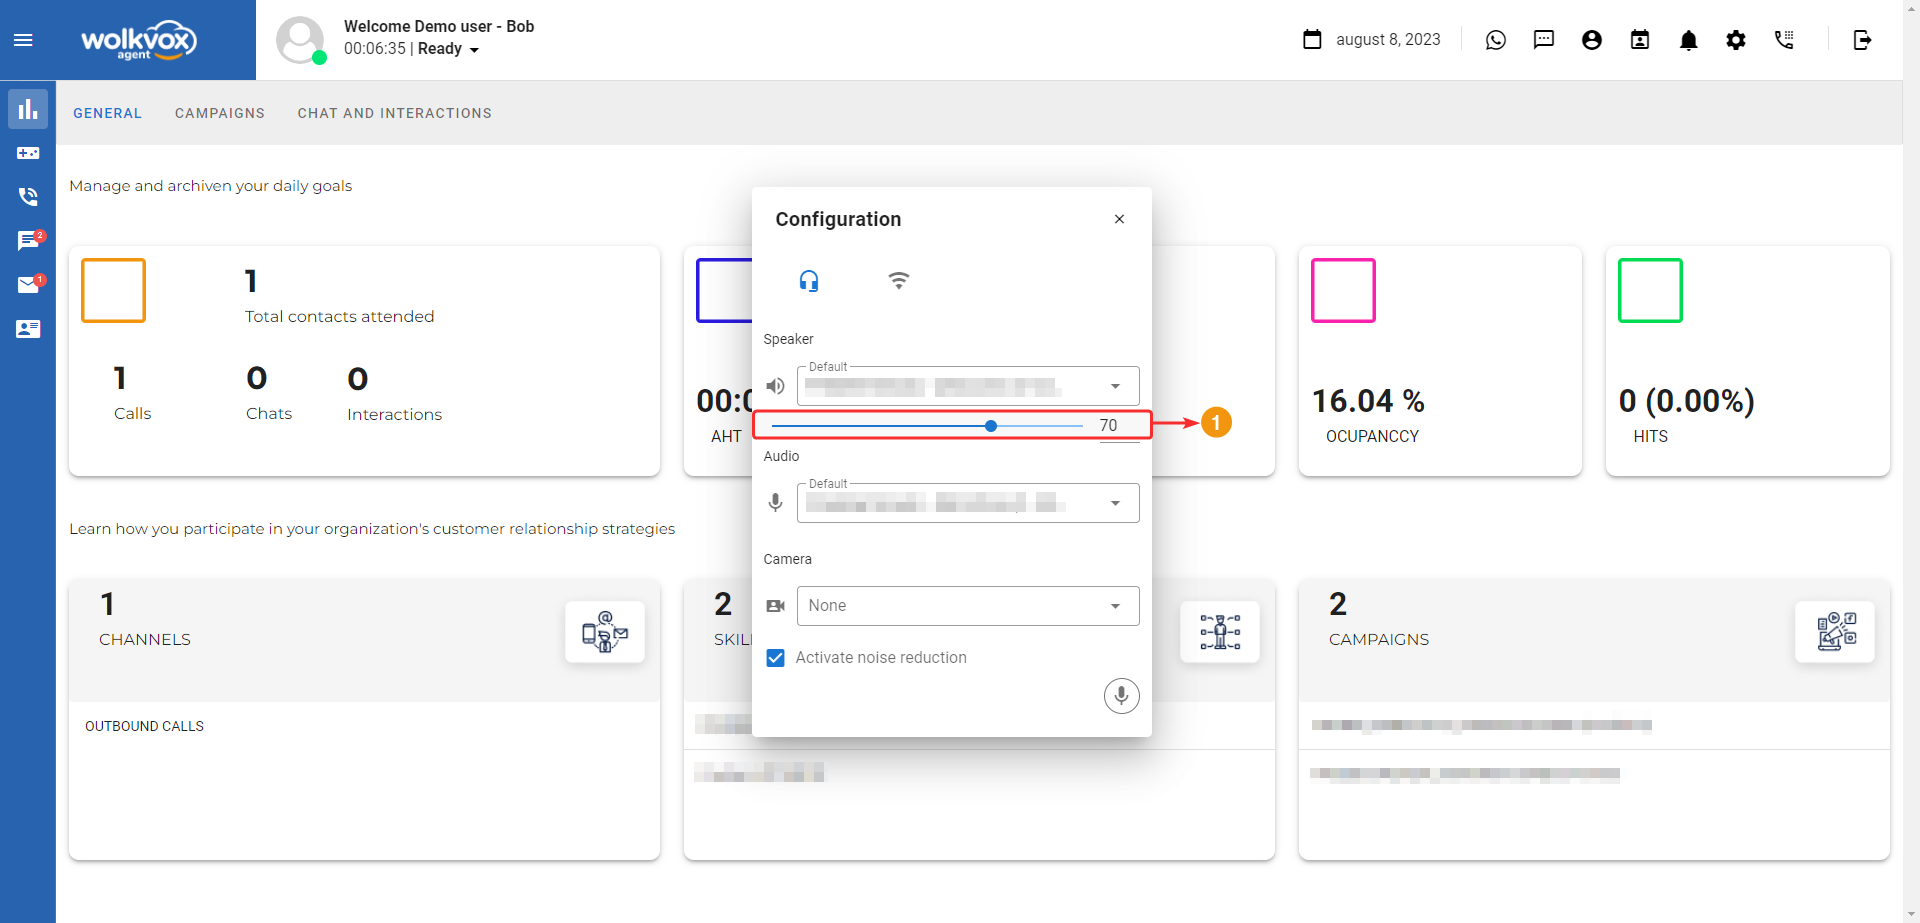
The settings button is used to configure audio devices, microphone, camera, and network connection.

Below you can see the two tabs you can access: the first one is “Device Settings” and the second one is “Network Settings”.

Device Settings #
The first option you can configure is the speakers (the device through which the agent will listen to the customer). If you click on the speaker selection arrow, a dropdown menu will open where you can choose the preferred device for sound playback.

In this same “Speaker” option, you have the possibility to increase or decrease the volume or sound level. You can use both the slider and also type the desired level from 0 to 100.
The second option in this devices tab is “Audio.” Here, just like in the previous device, you’ll find a dropdown menu where you can select the preferred microphone that has been detected by your computer.

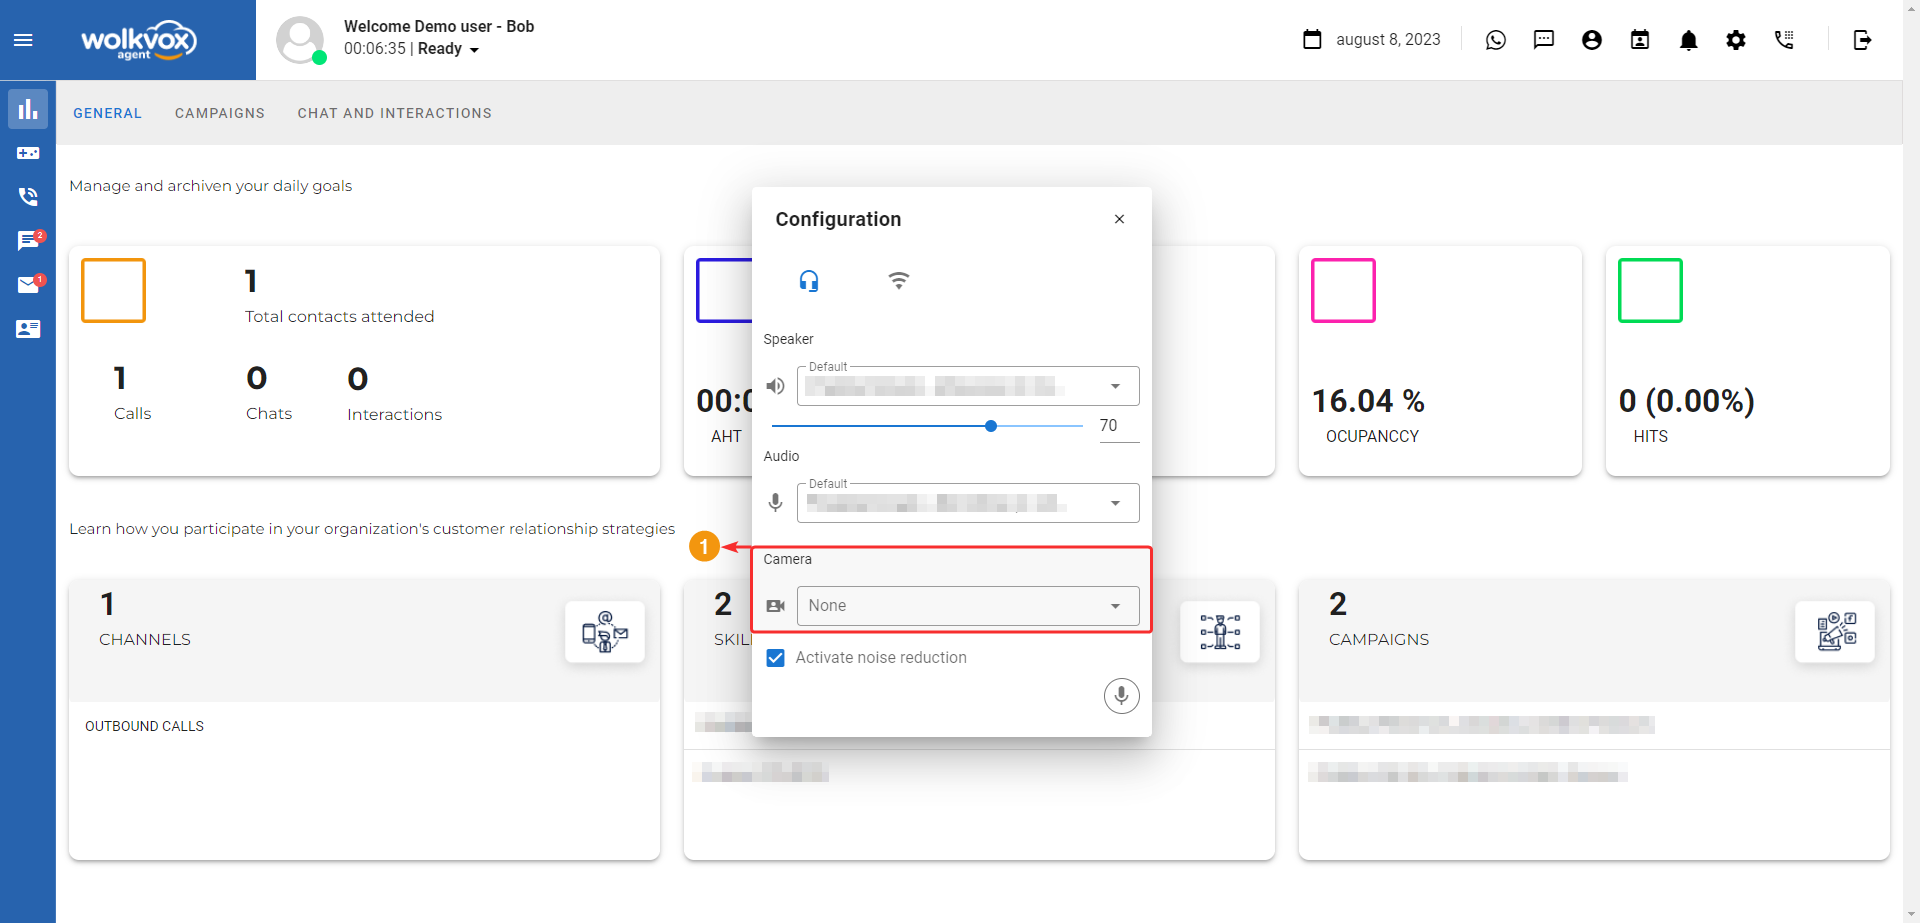
The third option is “Camera,” where you can select the webcam device through the dropdown menu. This option is only enabled if you have a configured video license.
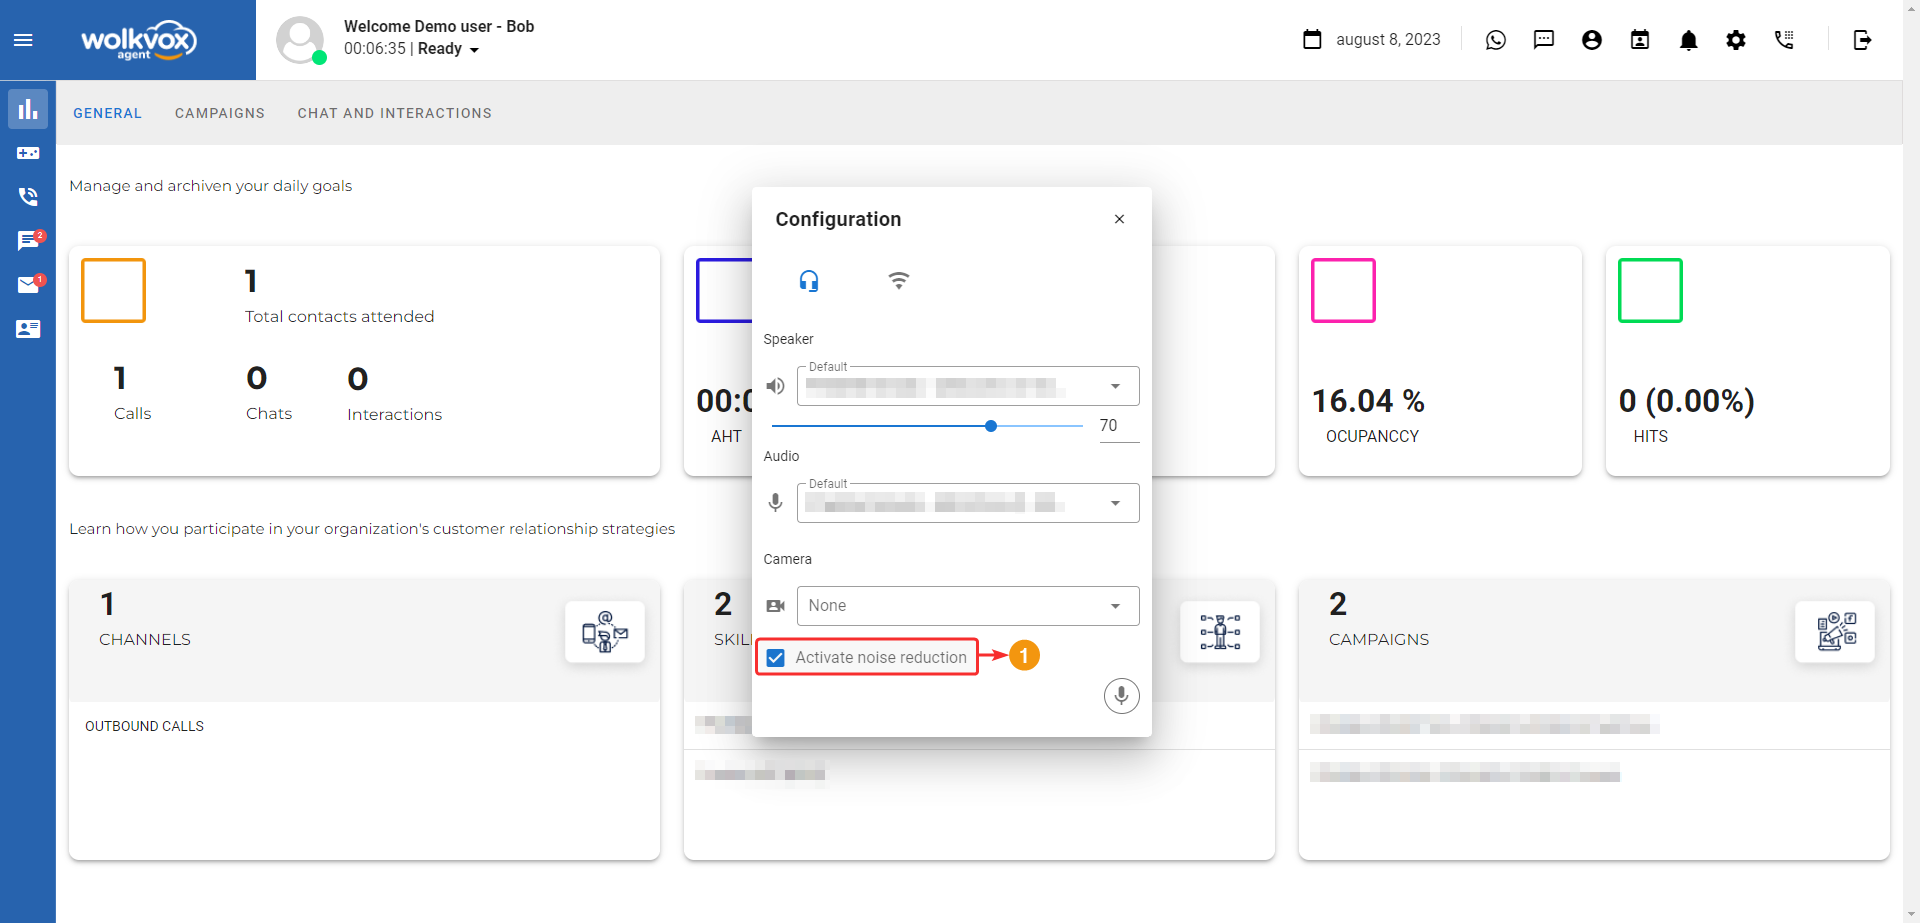
Activate noise reduction: This feature enhances call quality, so we recommend enabling it (If the square is blue with a white checkmark, it means the noise reduction feature is activated).
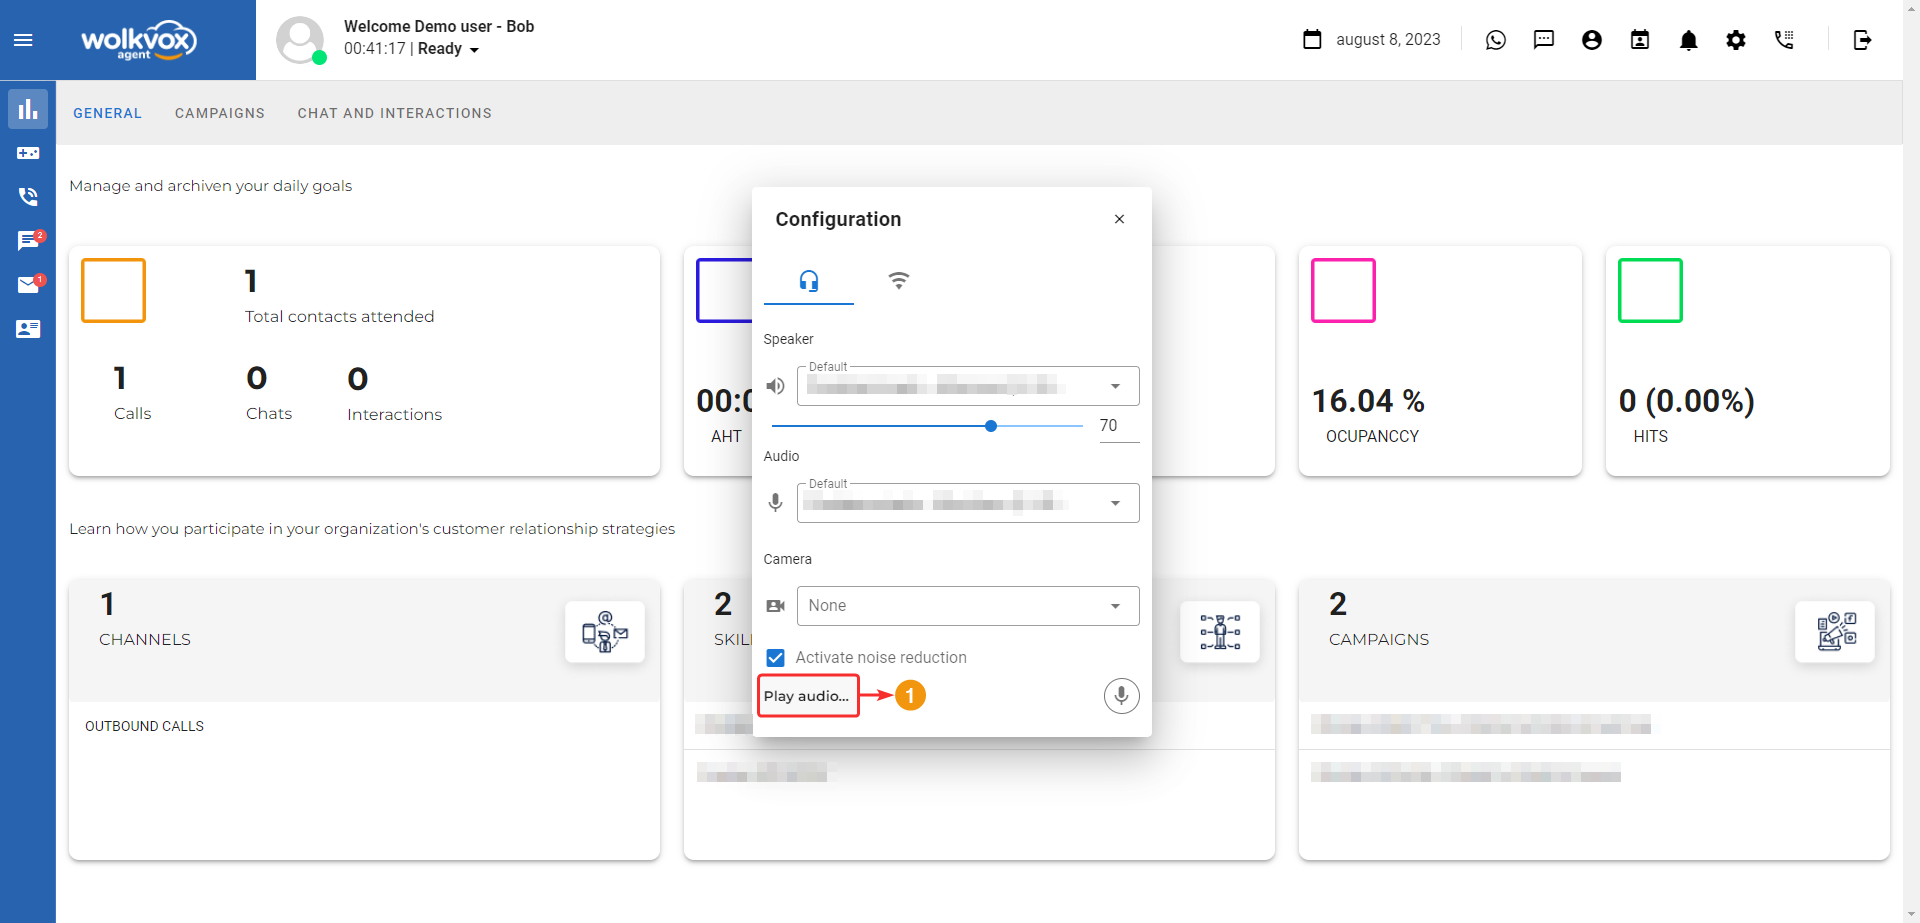
Echo test #
Echo Test allows you to verify the proper functioning and quality of your microphone and audio output, ensuring that you are ready to provide quality service to your customers.

Immediately, an audio recording will start, and a timer will be displayed. Before it finishes, you should speak a few short words so they are recorded, and then you can check the recorded audio.
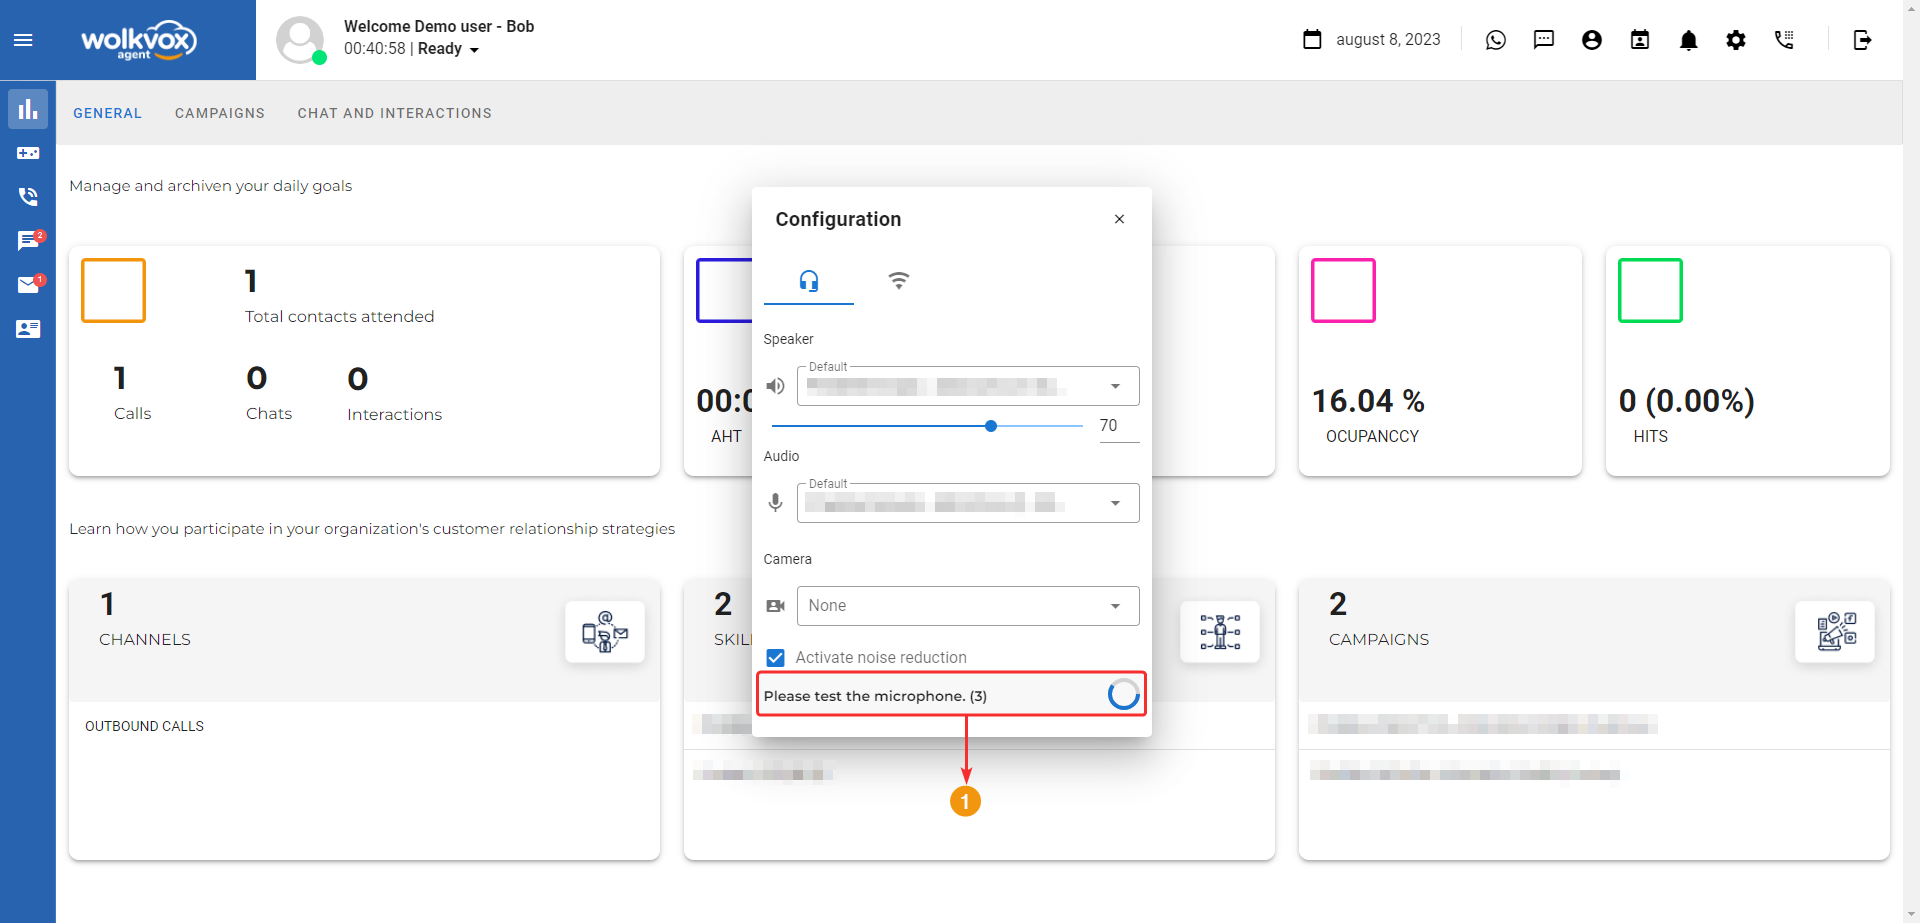
After the timer ends, the recorded audio will be played back. Here, you will verify that everything is working correctly. You can click the “Echo test” button again to conduct any additional tests you need.
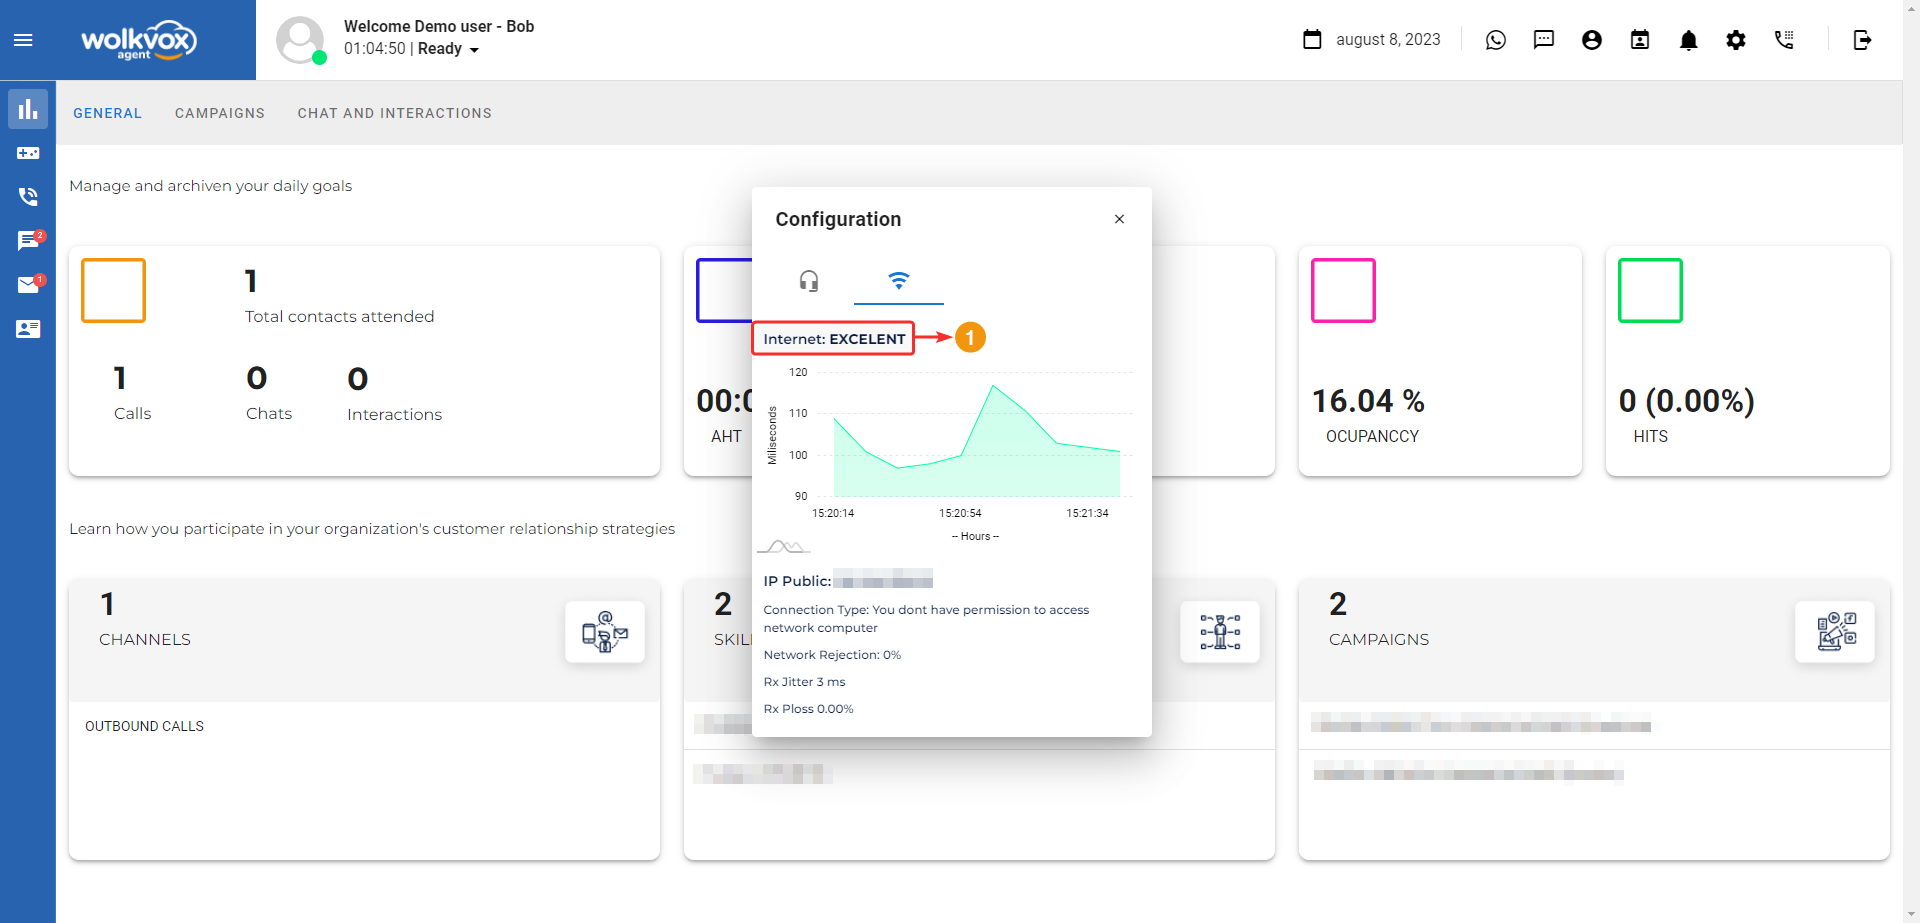
Network Configuration #
This tab allows you to observe the behavior of the network you are connected to. This provides important data for network inspection and analysis.
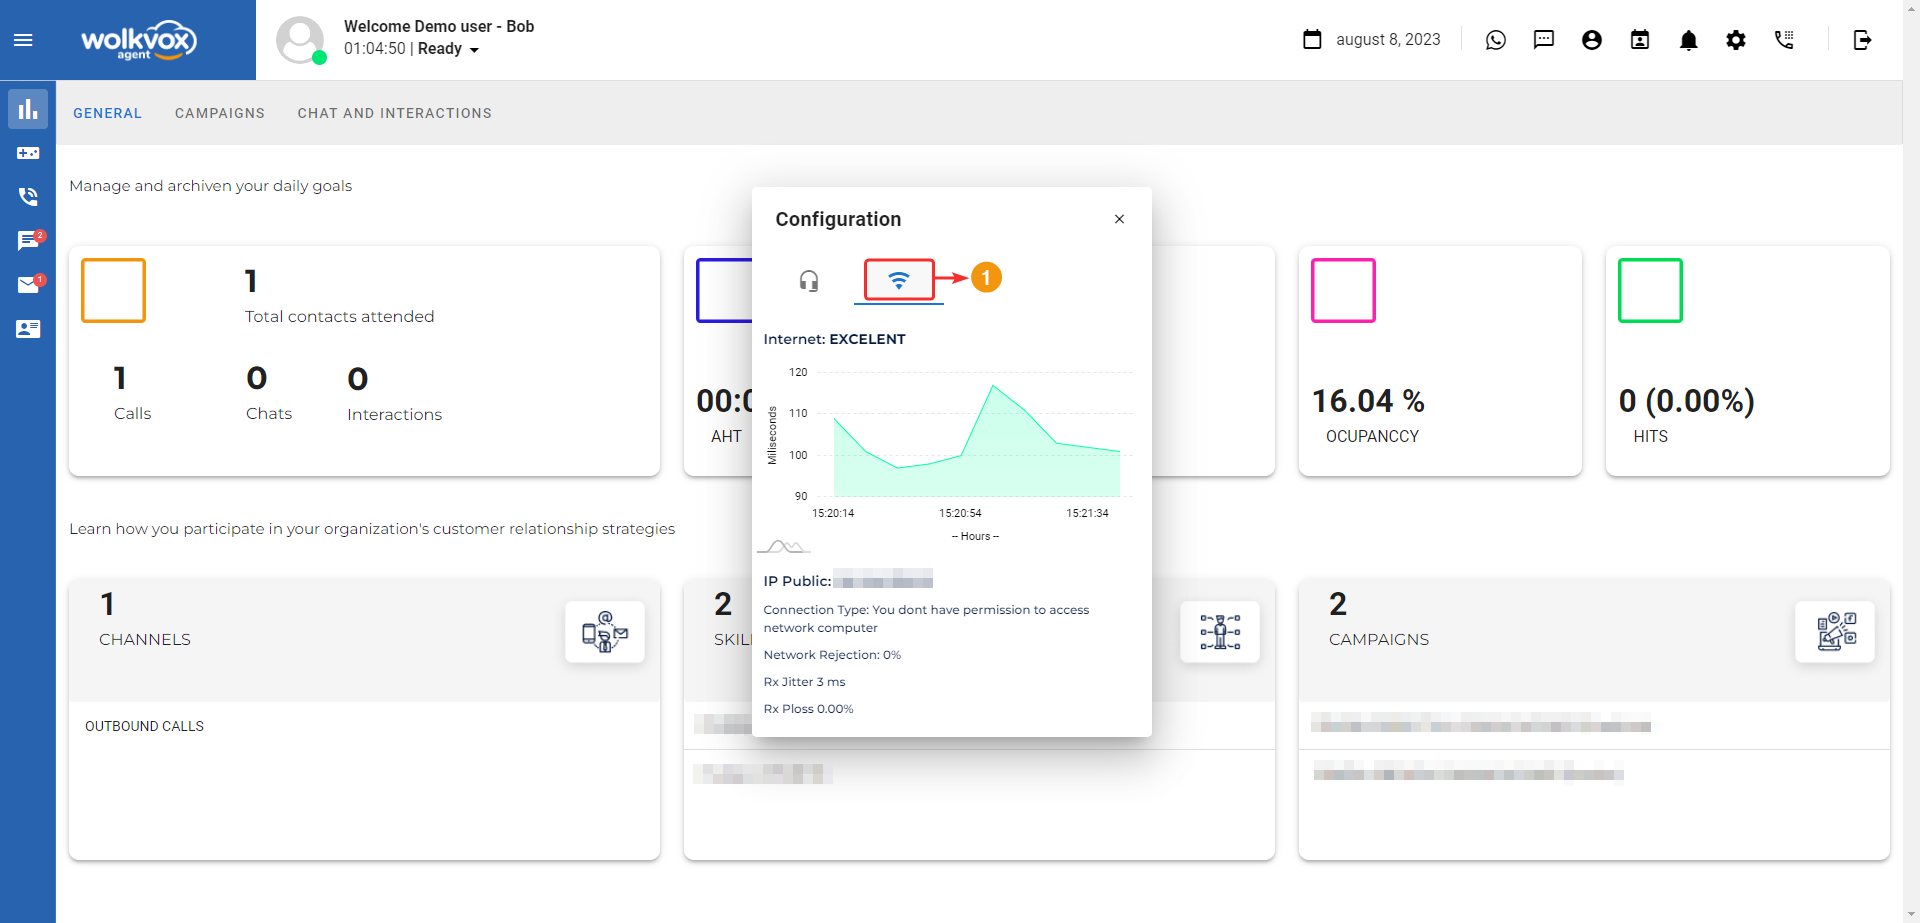
The first piece of information provided by this tab is the quality of your internet connection.
The next graph measures latency over time. The values on the left side correspond to milliseconds, and the values on the bottom row correspond to hours. This graph is very important as it displays the ups, downs, and latency spikes you have experienced.
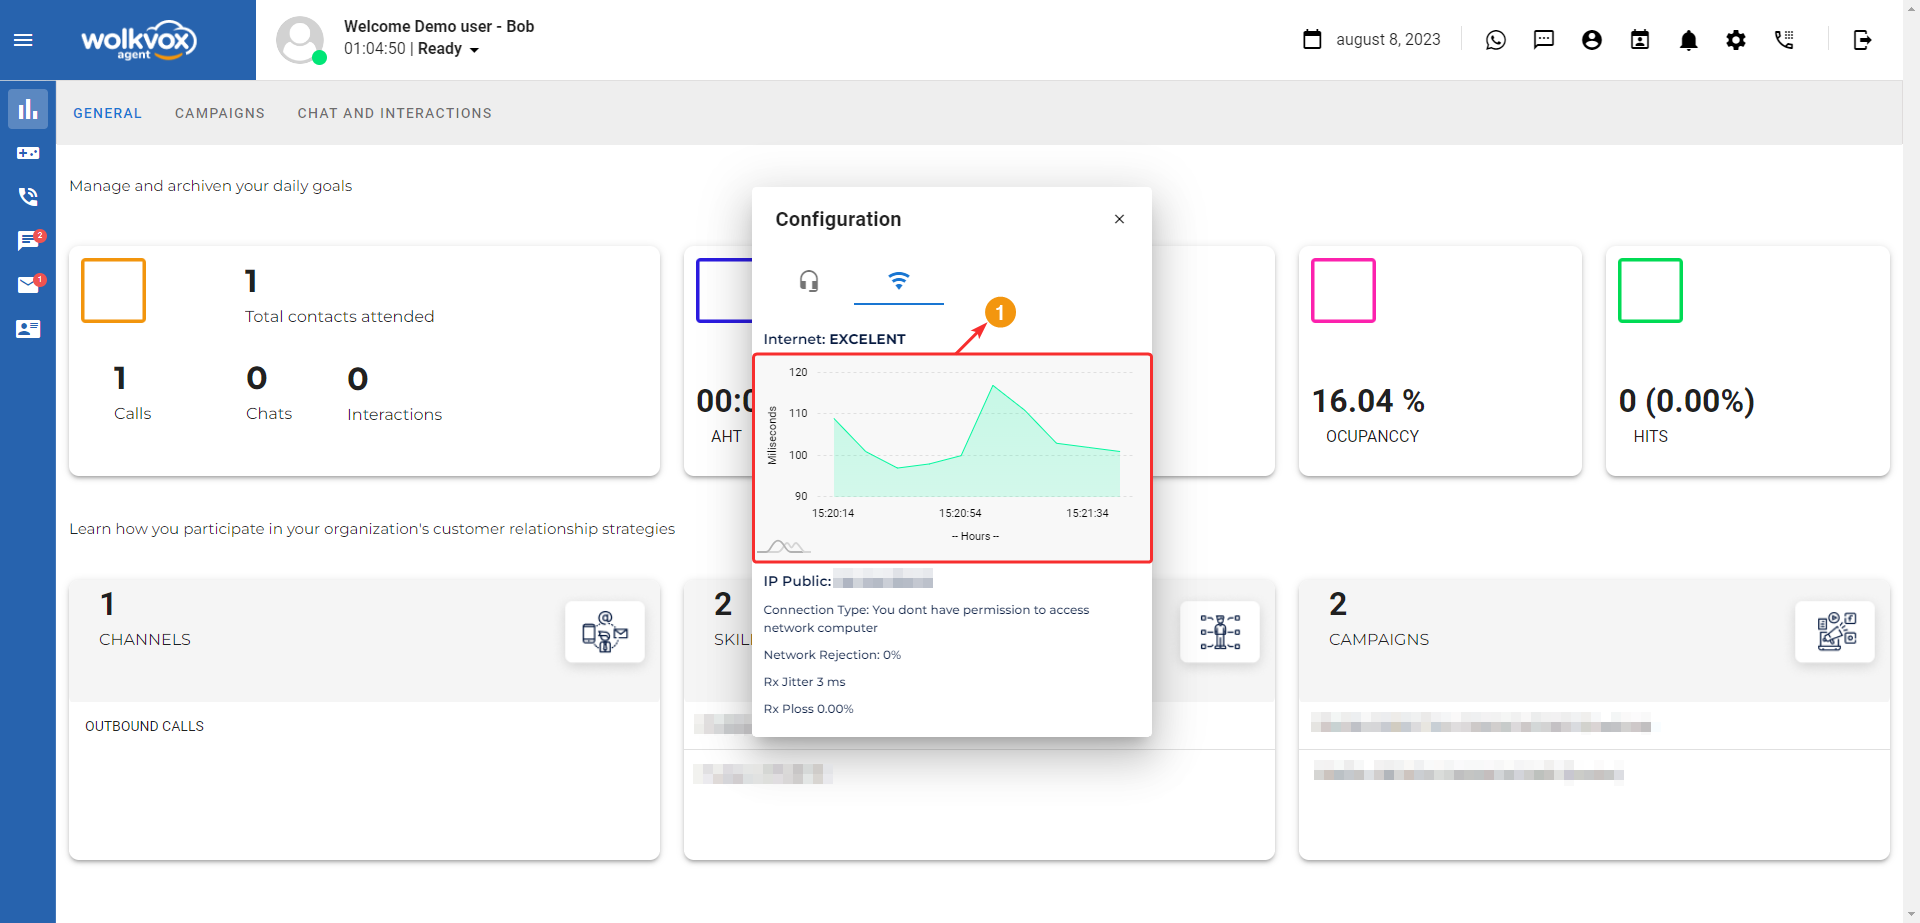
If you move the mouse pointer within the graph, you can navigate through time, and the latency value that occurred at the indicated time is displayed in a green label.

At the bottom, the following data is provided:
- Connection Type: Here, the type of connection from your computer to the Internet is displayed.
- Network Rejection: This metric shows the percentage of data packets that were rejected or didn’t reach their destination correctly in the network. A low value indicates a good connection and smooth data transmission.
- Rx Jitter: Jitter refers to the variation in the arrival time of data packets. A low Jitter means that packets arrive with consistent latency, which is crucial for seamless communication.
- Rx Packet Loss: This metric indicates the percentage of data packets that were lost during transmission. A low packet loss rate is desirable to ensure that all data reaches its destination correctly.

Dashboard #
The Dashboard is a real-time daily report board that provides agents with insights into the progress of their objectives. The data accumulates throughout the day and resets to zero the next day. It is divided into three tabs: General, Campaigns, and Chat & Interactions.
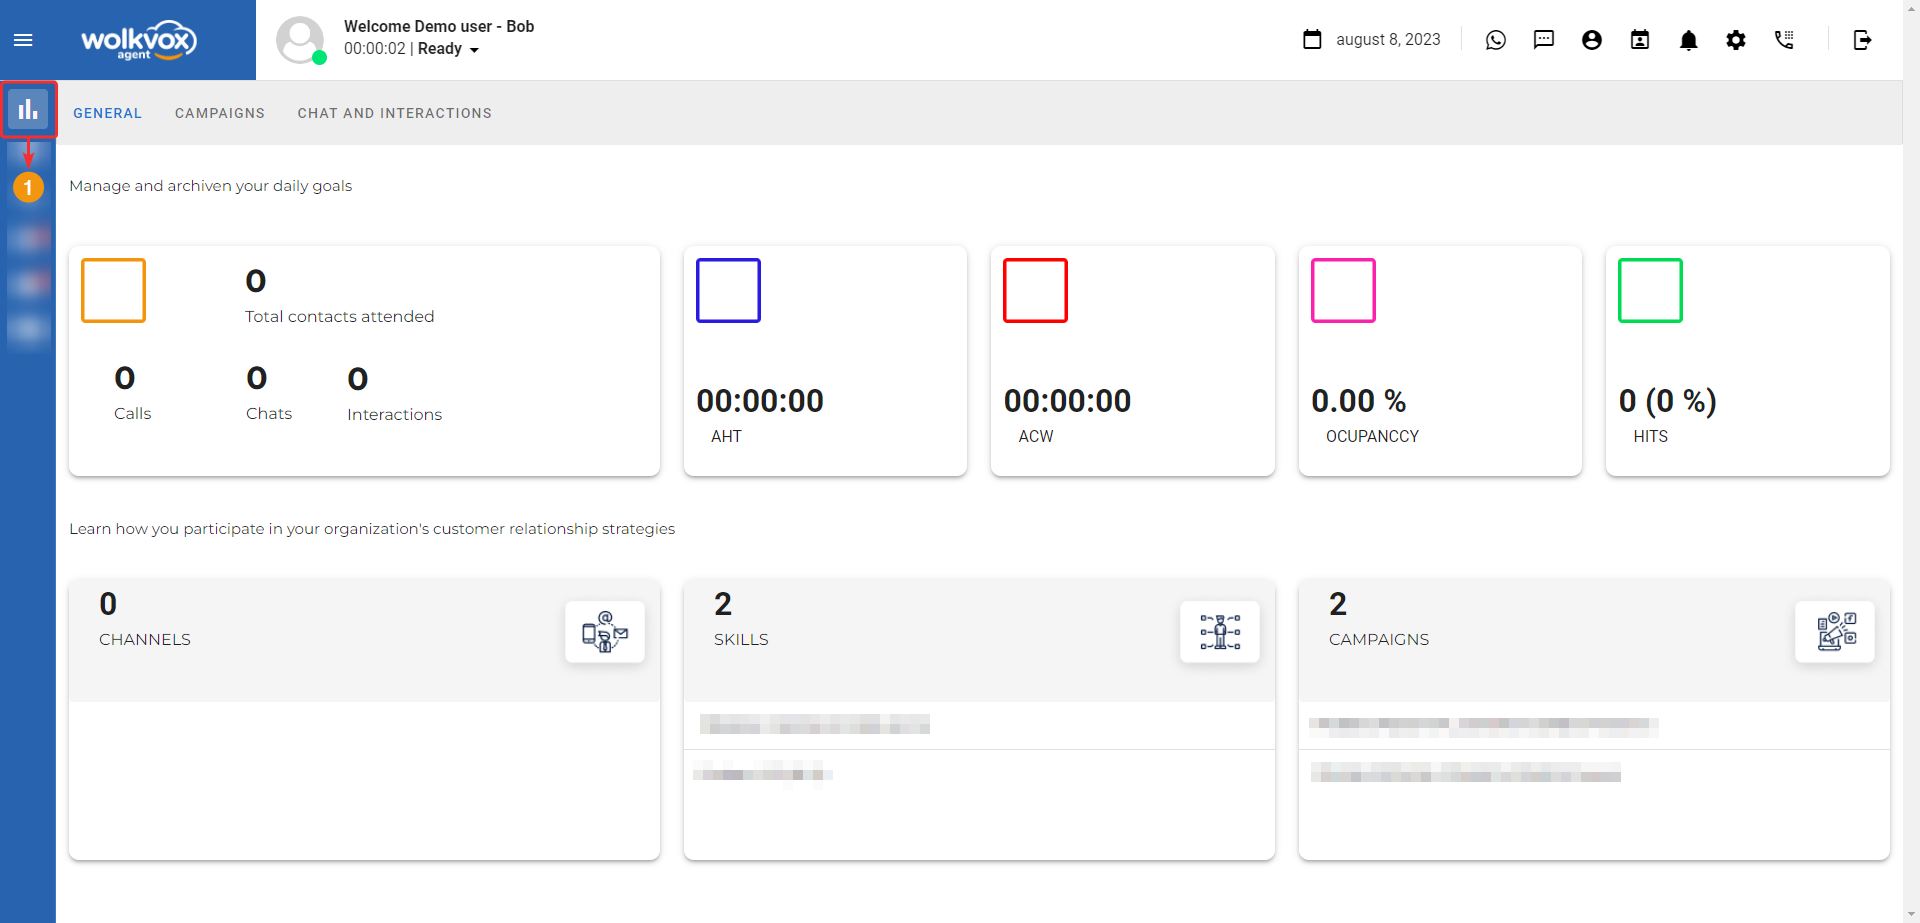
General #
In the “General” tab of the Dashboard, you will find the agent’s overall statistics. It contains two sections with various blocks that we explain below.
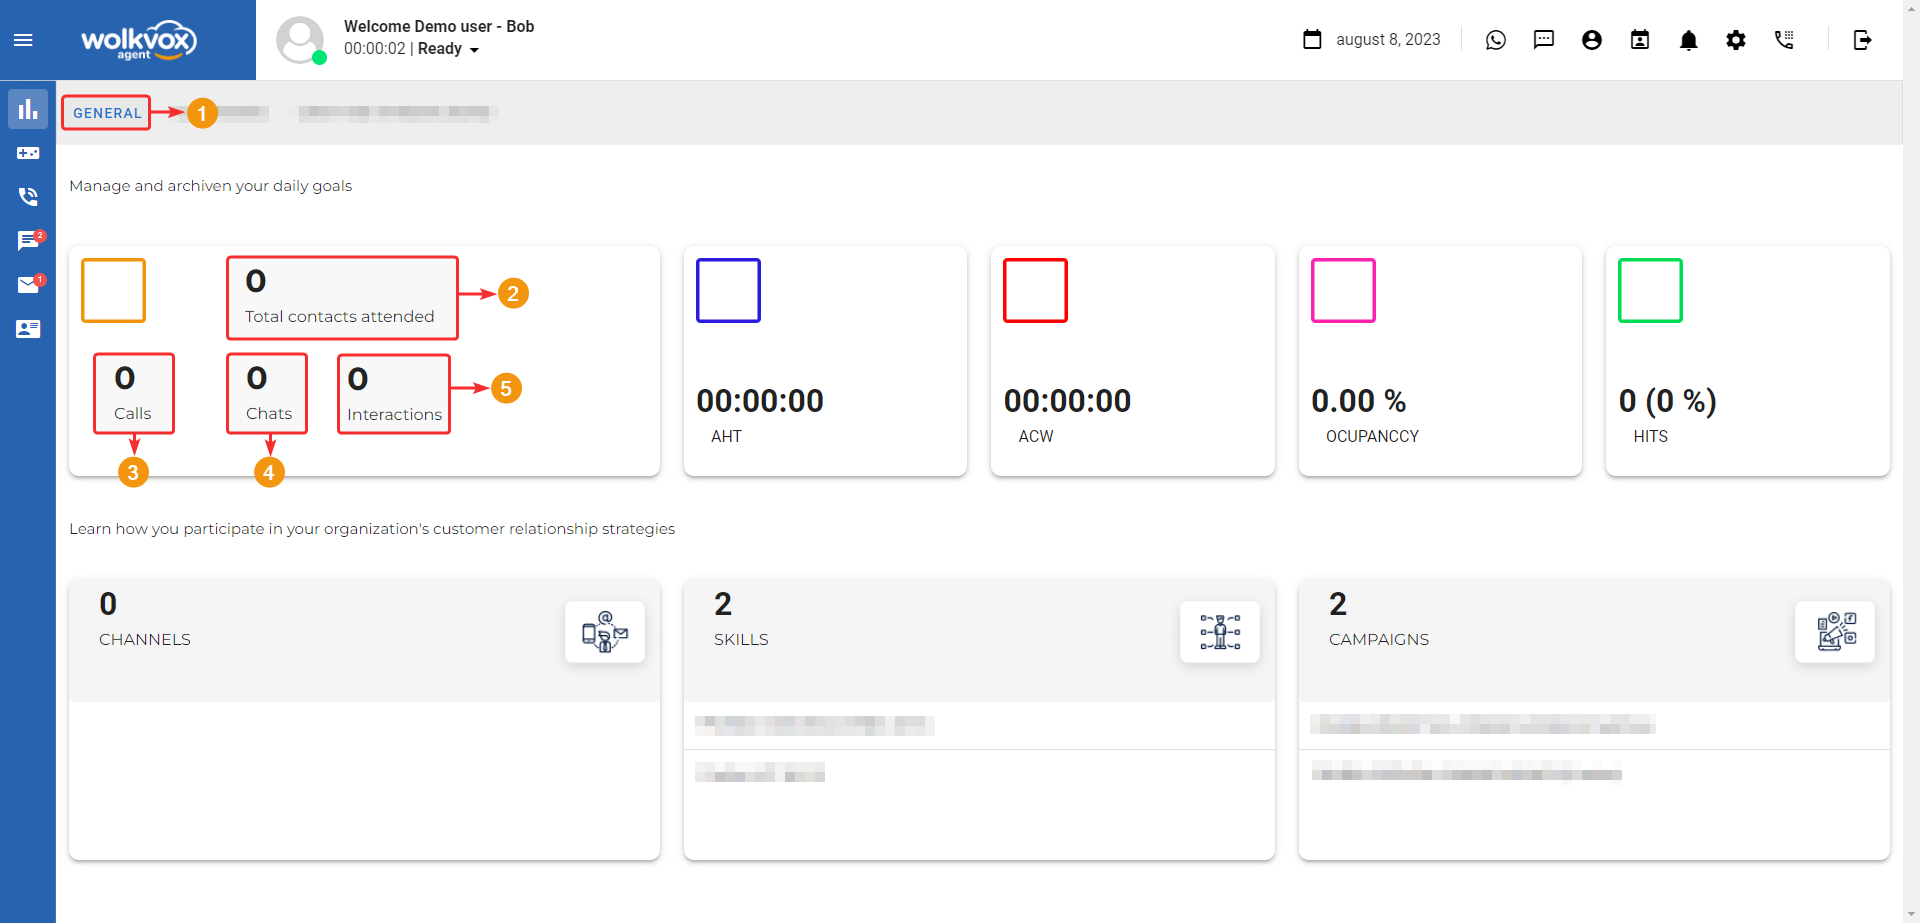
The first section provides assistance for the agent to analyze their indicators.
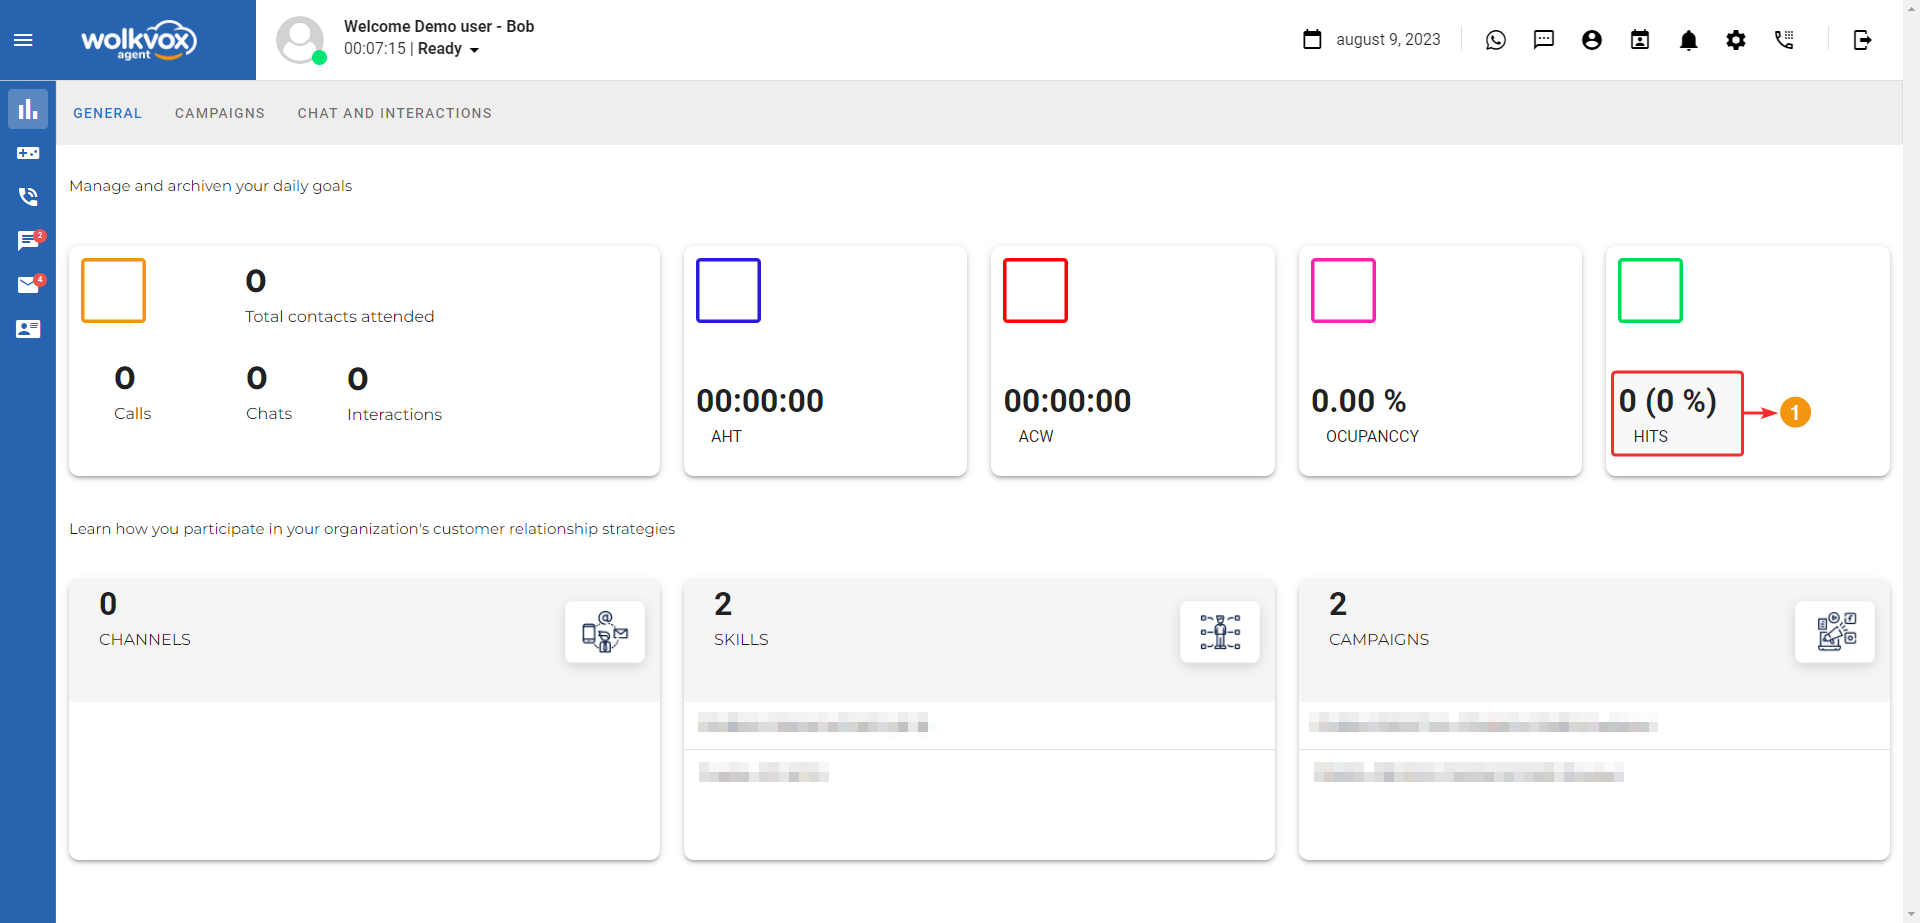
In the first block (identified with an orange square), we have the following information:
- Total contacts attended: It displays the total number of contacts that have been handled.
- Calls: The number of calls made so far.
- Initiated chats.
- Number of interactions attended.
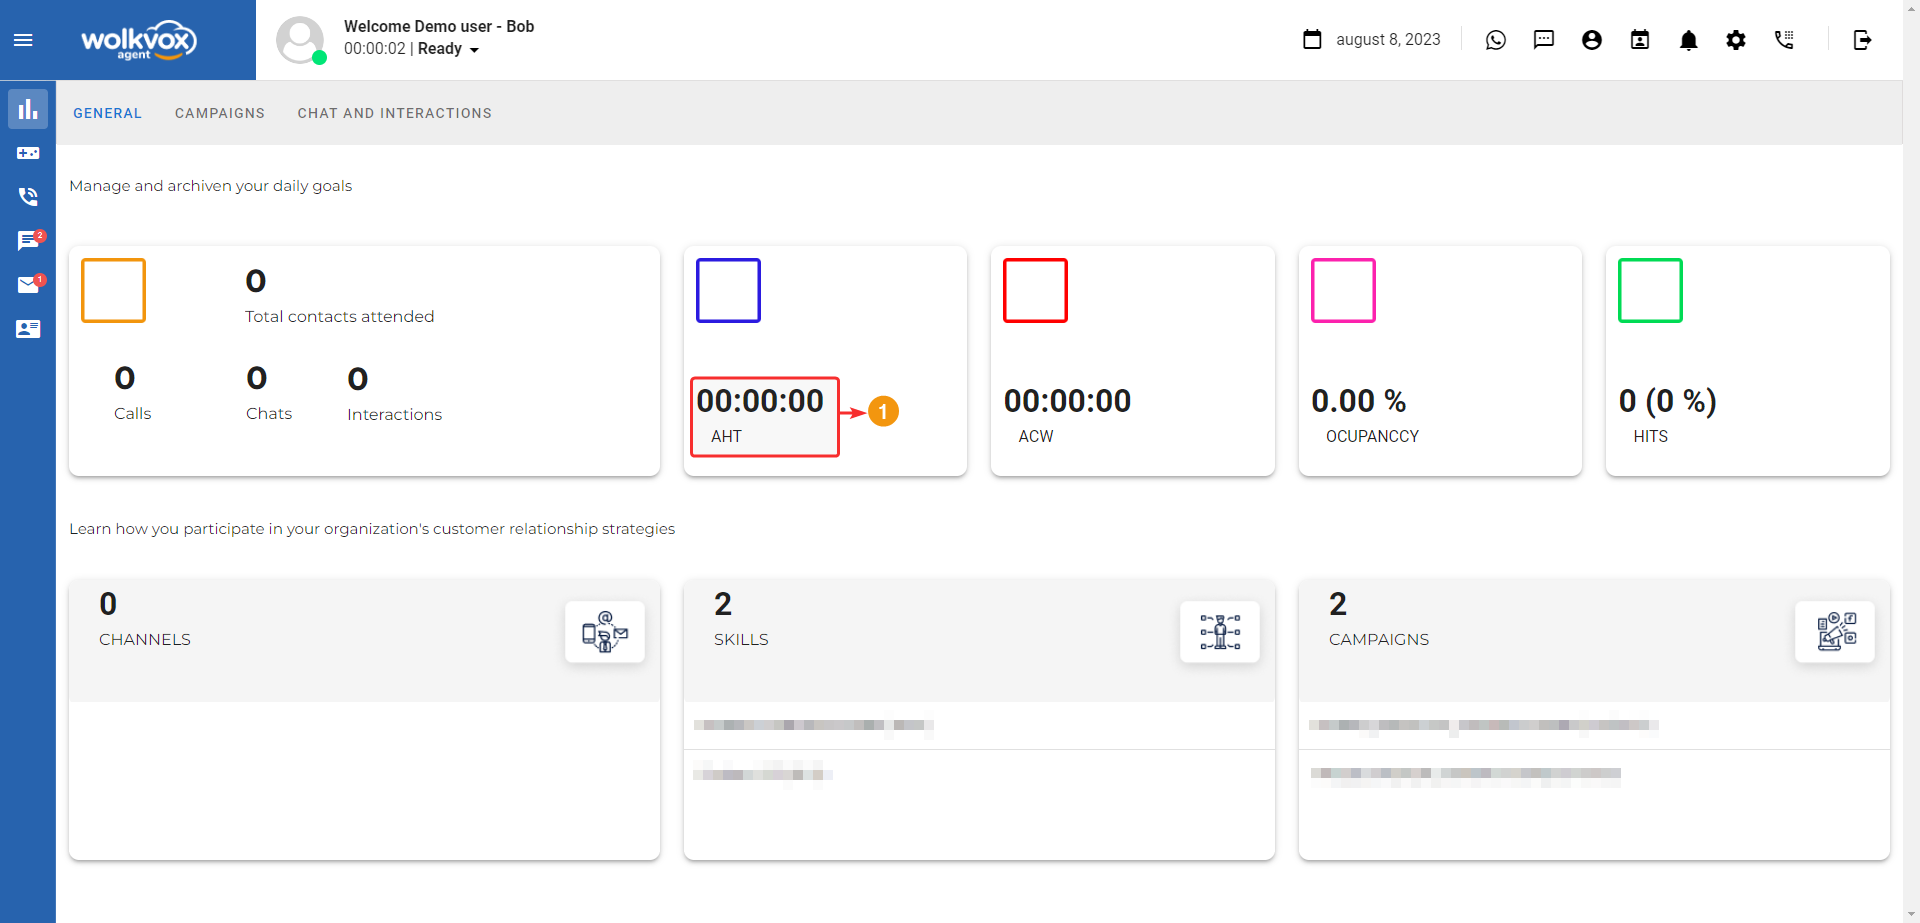
In the second block (identified with a blue square), you will find the AHT (Average Handle Time) statistic, which is also known as TMO (Average Operation Time). This metric measures the average time it takes for the agent to complete a service procedure. In other words, it counts from the beginning of the contact until the end of call disposition.
In the third block (identified with a red square), we have the ACW (After Call Working) metric, also known as Post-Call Work. This metric measures the time it takes for the agent to complete tasks that follow after concluding a contact with a customer, such as call disposition.
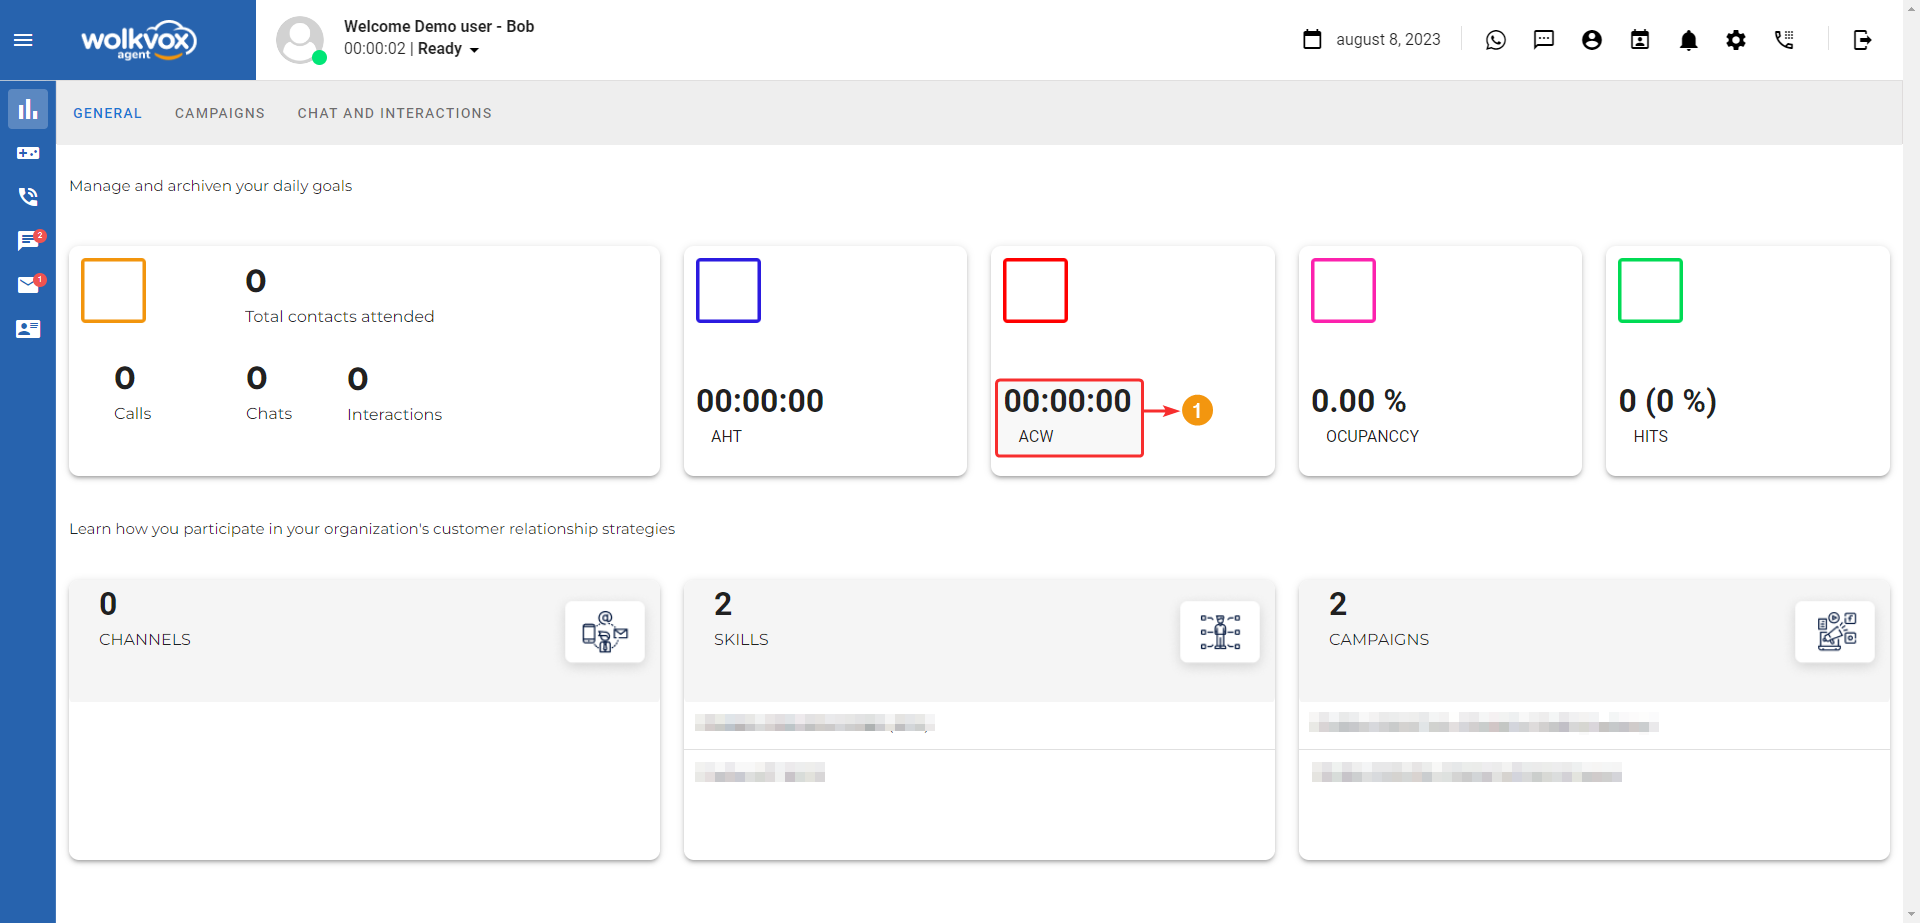
In the fourth block (identified with a magenta color), you will find the occupancy percentage, which measures the actual agent occupancy within productive time. In other words, it encompasses the entire customer contact process, the time in “Ready” state, and includes ACW, but excludes the time the agent has spent in auxiliary states.
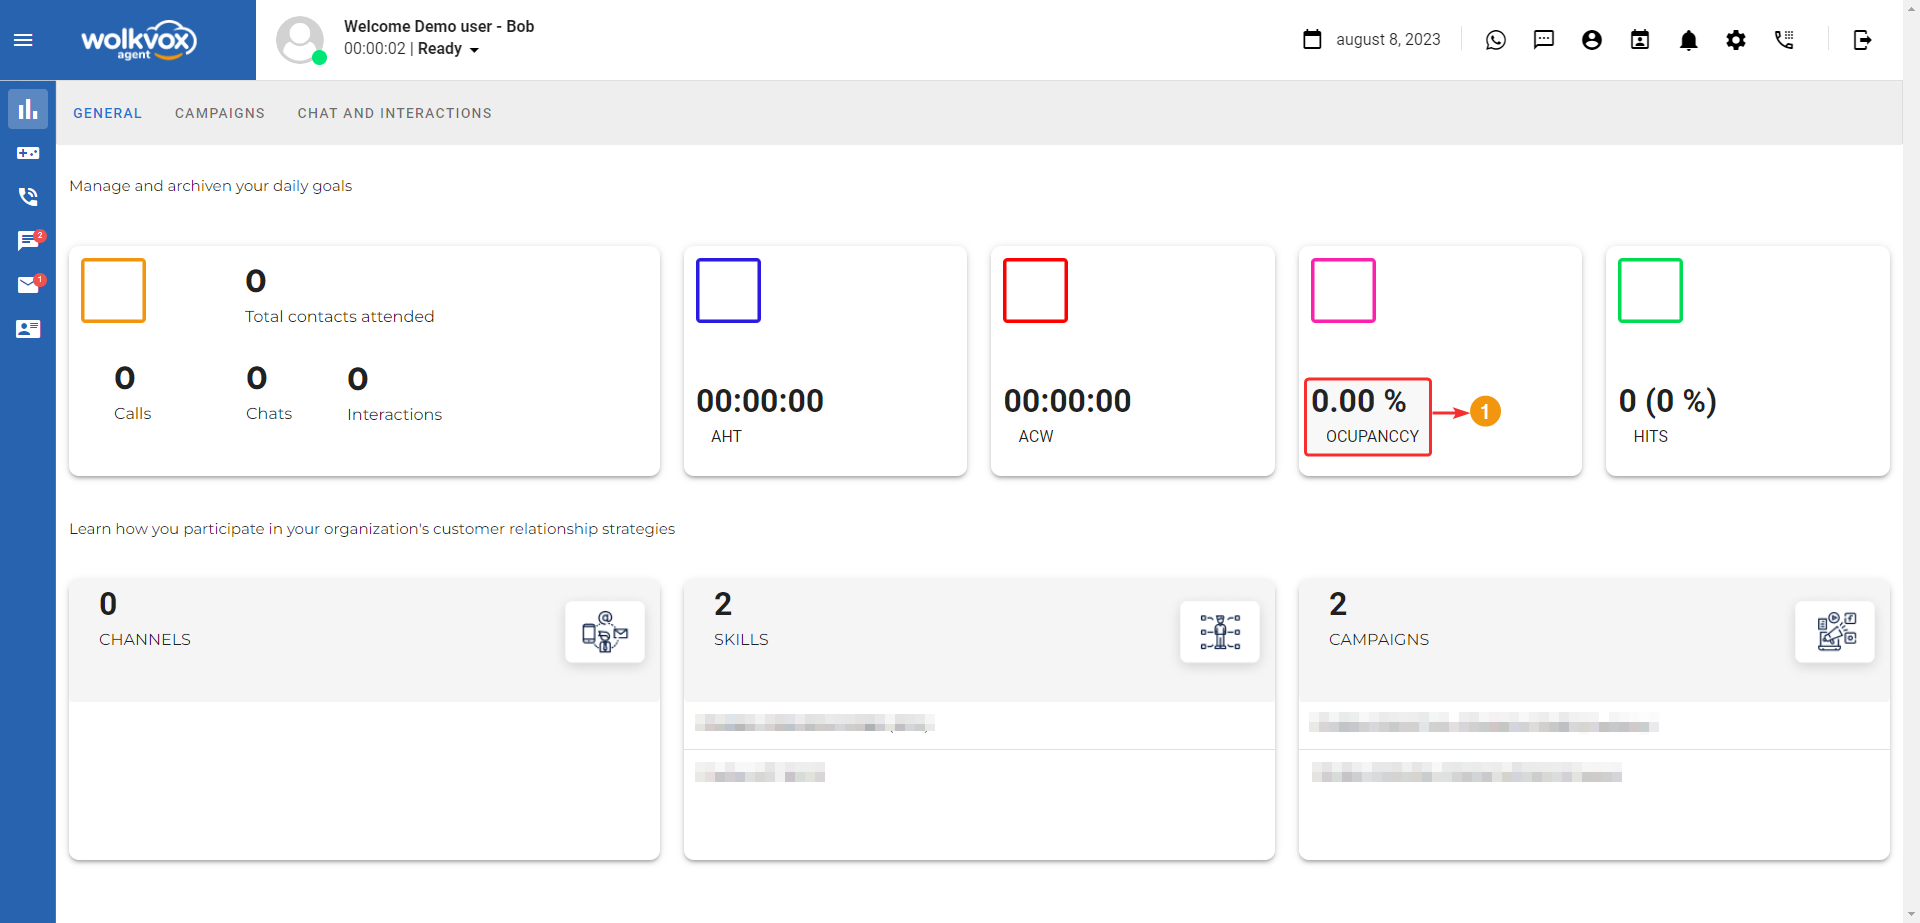
In the fifth and final block (identified with a green square), you’ll find the count of calls qualified as HIT. These are defined as calls that have been successful, such as successful sales, customer retention, payment agreements, appointment scheduling, among others. The call qualification as HIT will depend on the configuration set by your operation’s administrator.
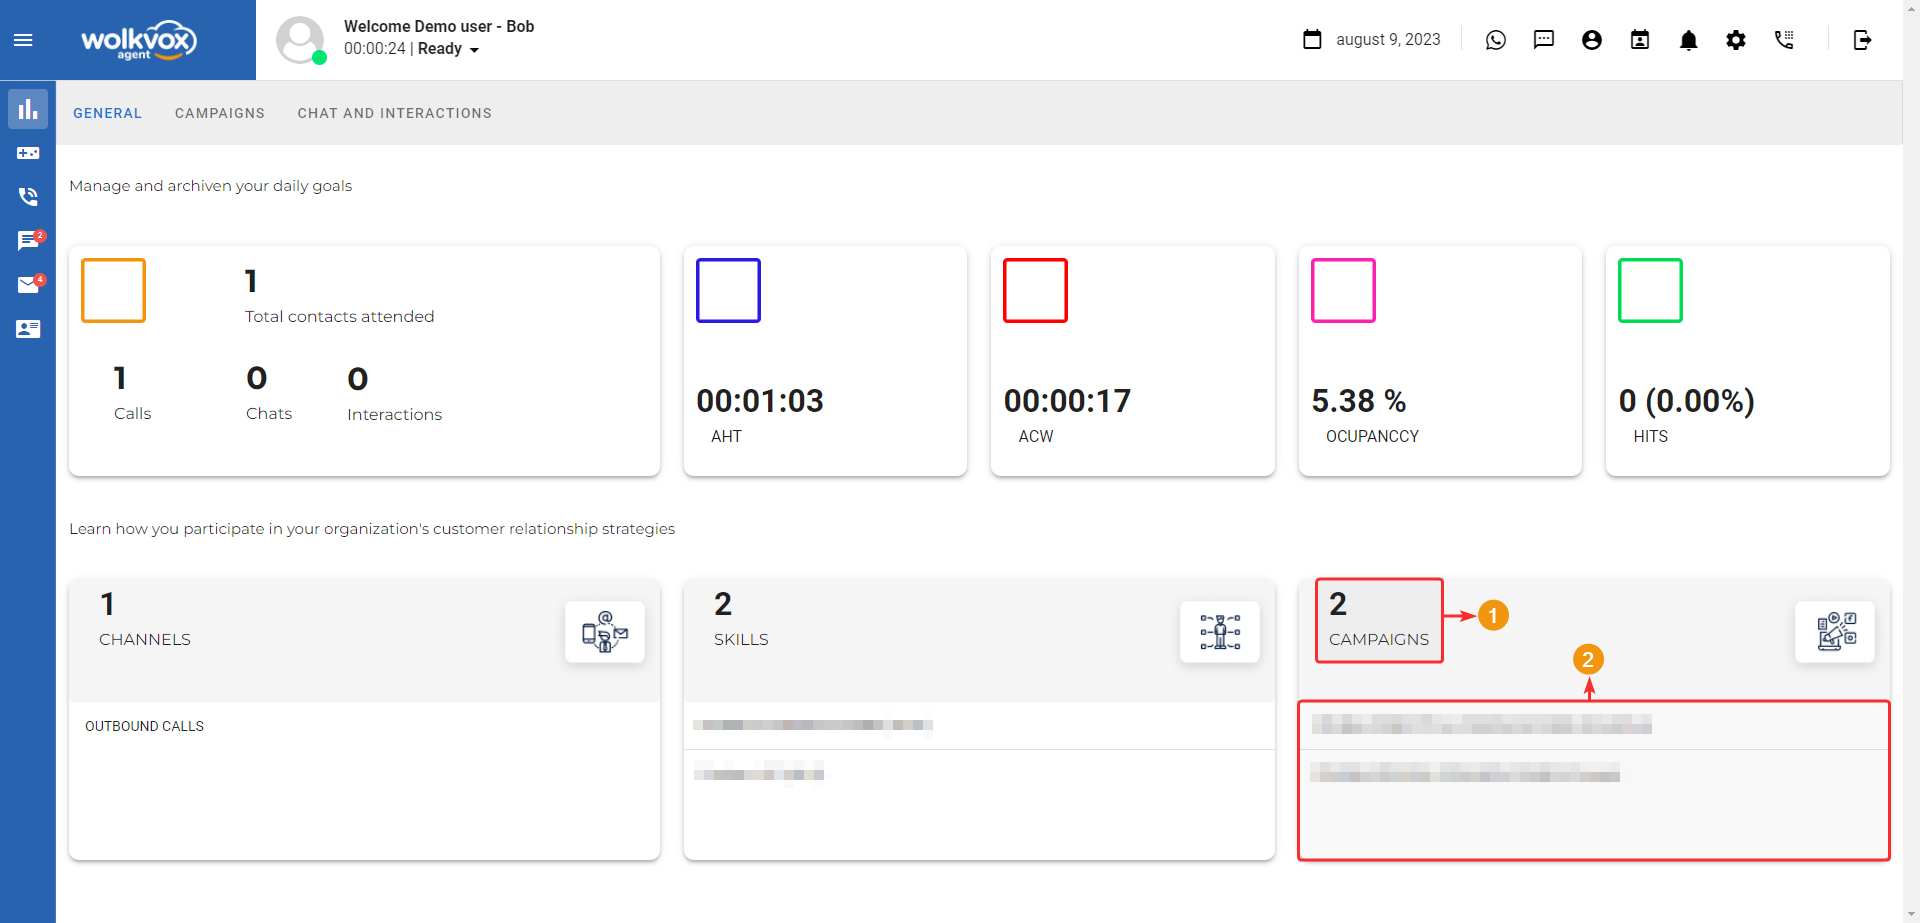
The following section displays information on how the agent is engaging with the customers. Within these blocks, if necessary, the application adds a scroll bar to view the entire list of items assigned to the agent.
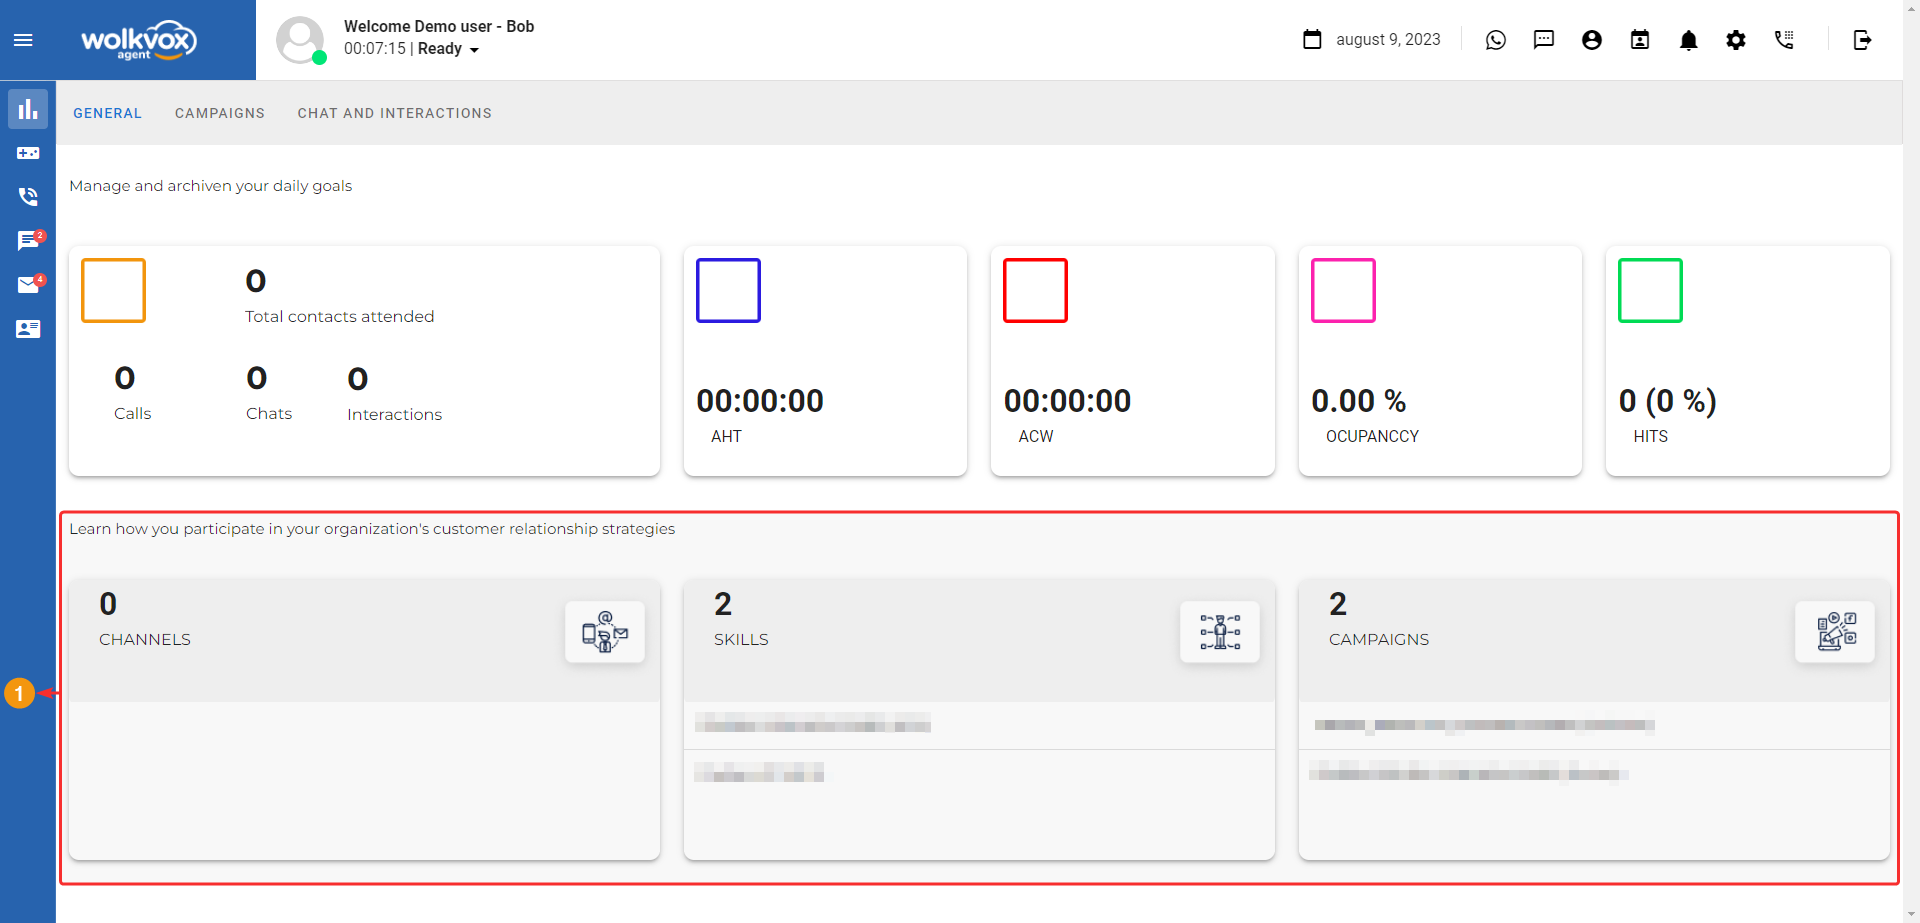
The first block provides information about the channels managed by the agent, mentioning details about the number of channels used by the agent and the list of which channels those are.
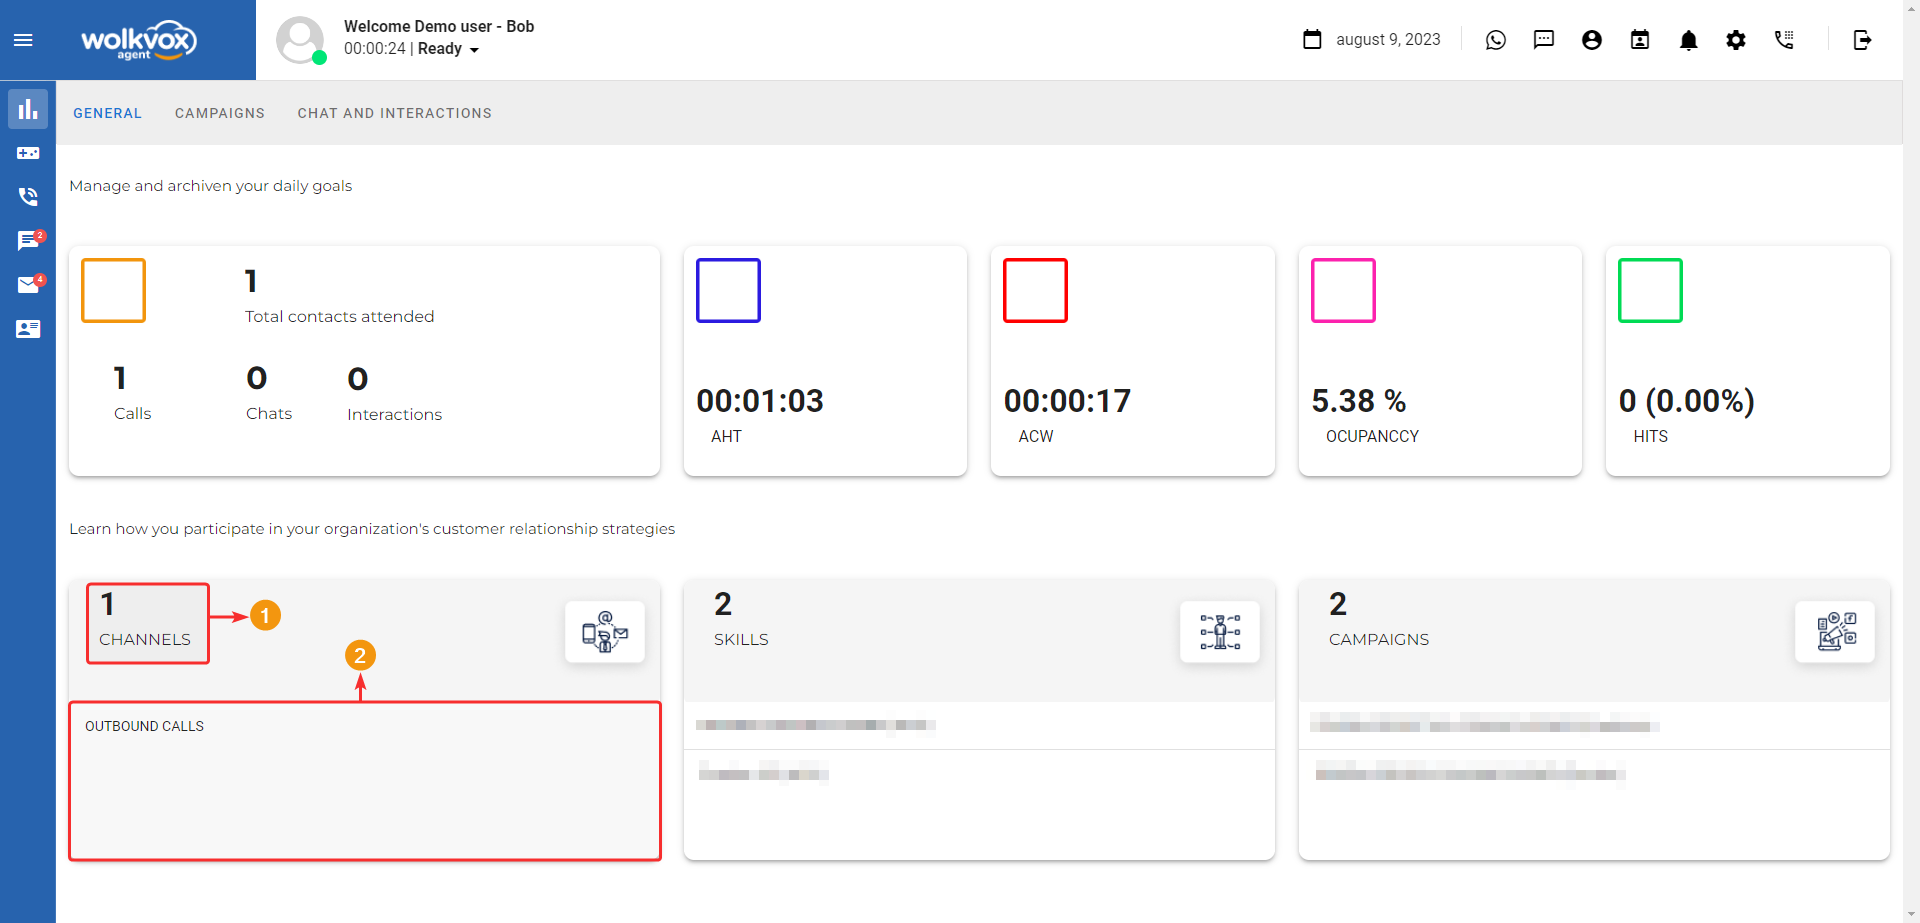
In the second block, you’ll find information about the skills to which the agent belongs. It states how many skills the agent has assigned and provides a list of which skills they are.
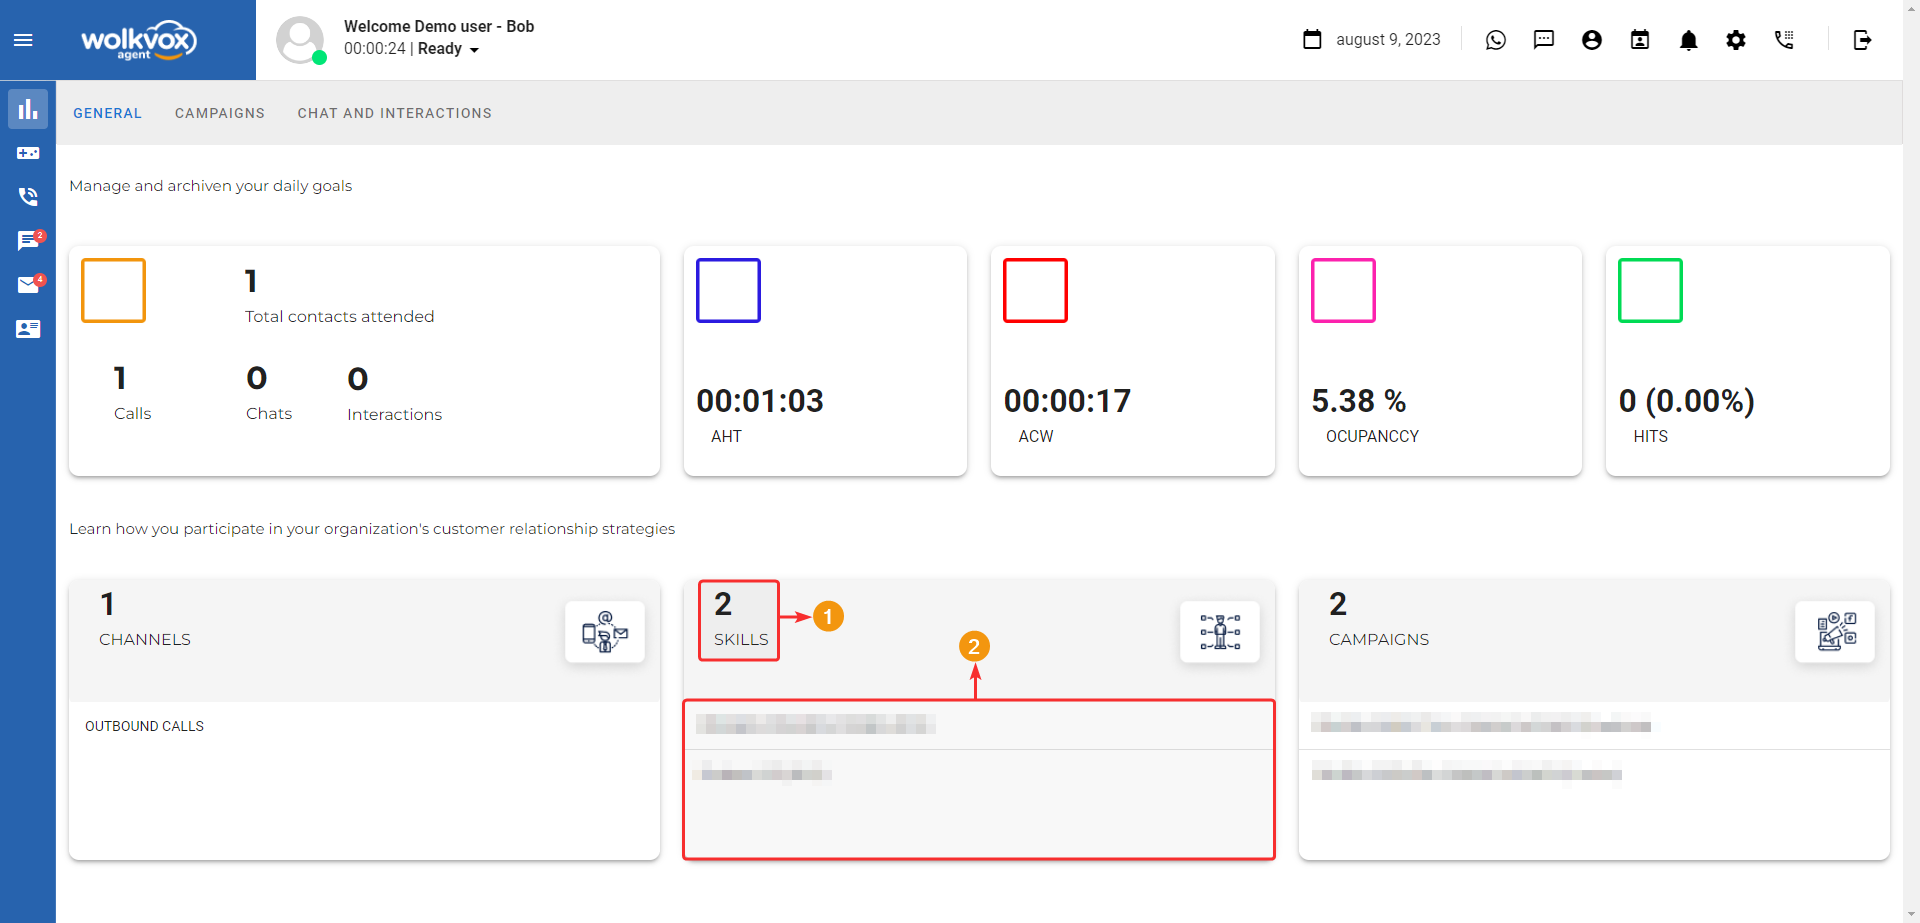
The last block provides information about the campaigns in which the agent is enrolled. It offers details about how many campaigns the agent is participating in and provides a list of which campaigns are assigned to the agent.
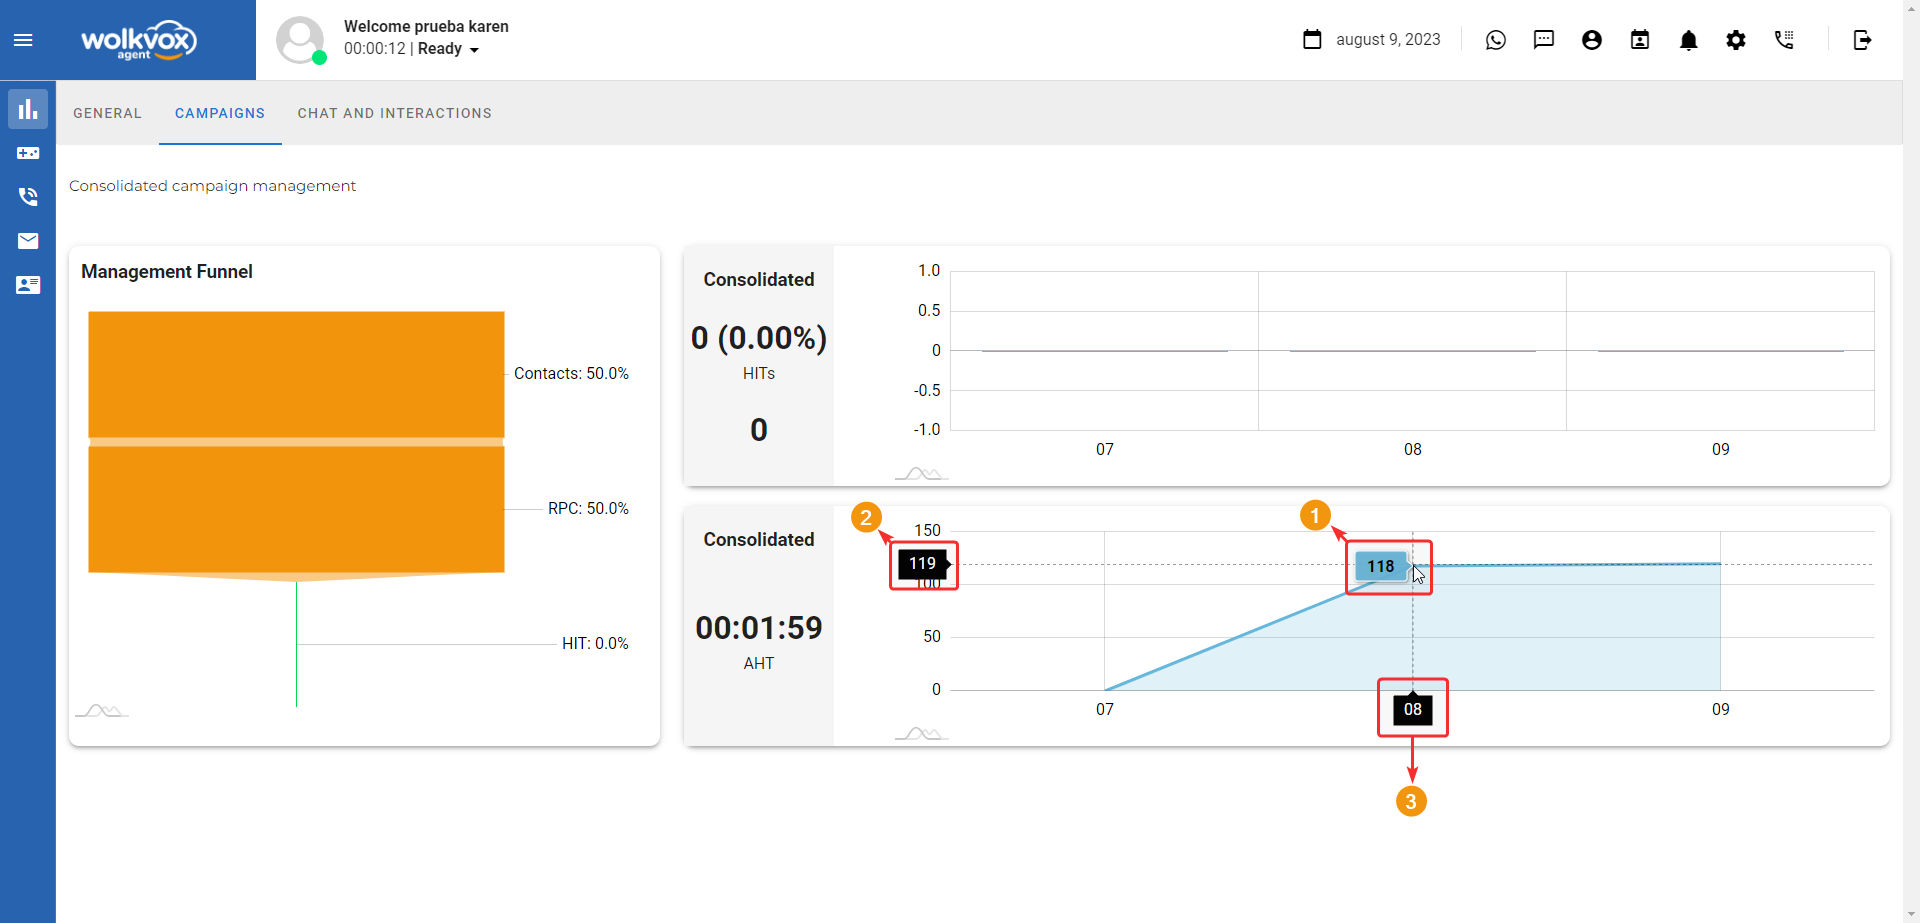
Campaigns #
In this tab, you can see statistics that are more focused on the agent’s achievement of campaign goals. Here, we find three blocks to observe the statistics.
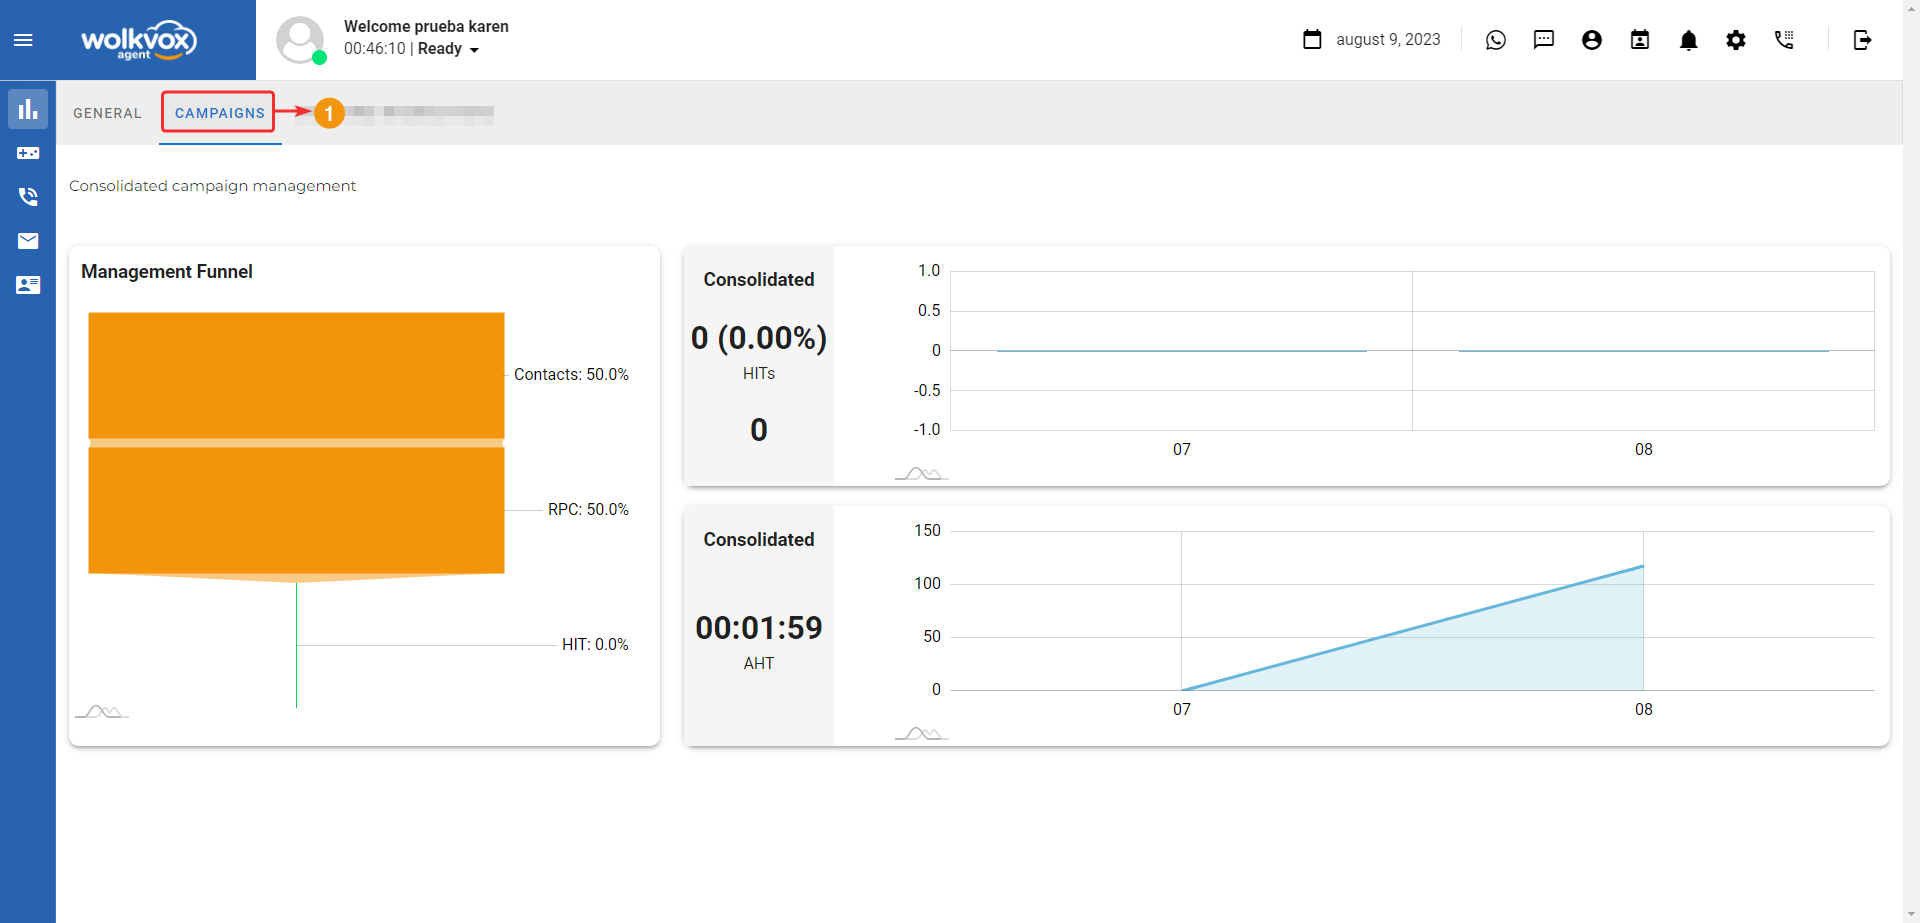
The first block is called the “Management Funnel,” and it displays the following data:
- Contacts: Displays the percentage of contacts called in the day.
- RPC (Right Party Contact): Right Party Contact refers to the metric that indicates when an agent successfully reaches the “right party” during a call. In the context of a call center, the “right party” refers to the individual with whom the agent needs to speak to achieve a specific goal, such as a sale or an information update. Reaching the “right party” is crucial for process effectiveness, as it ensures that the conversation is relevant and useful for both parties.
- HIT (Hit Rate): The Hit Rate refers to the proportion or percentage of successful calls compared to the total number of calls made. In a sales context, a call is considered successful if it achieves the desired goal, such as making a sale, scheduling an appointment, or achieving some other specific outcome. The Hit Rate is an important metric for measuring the effectiveness of customer interactions and the agent’s ability to reach established objectives. A high Hit Rate indicates that the agent is succeeding in their interactions with customers.
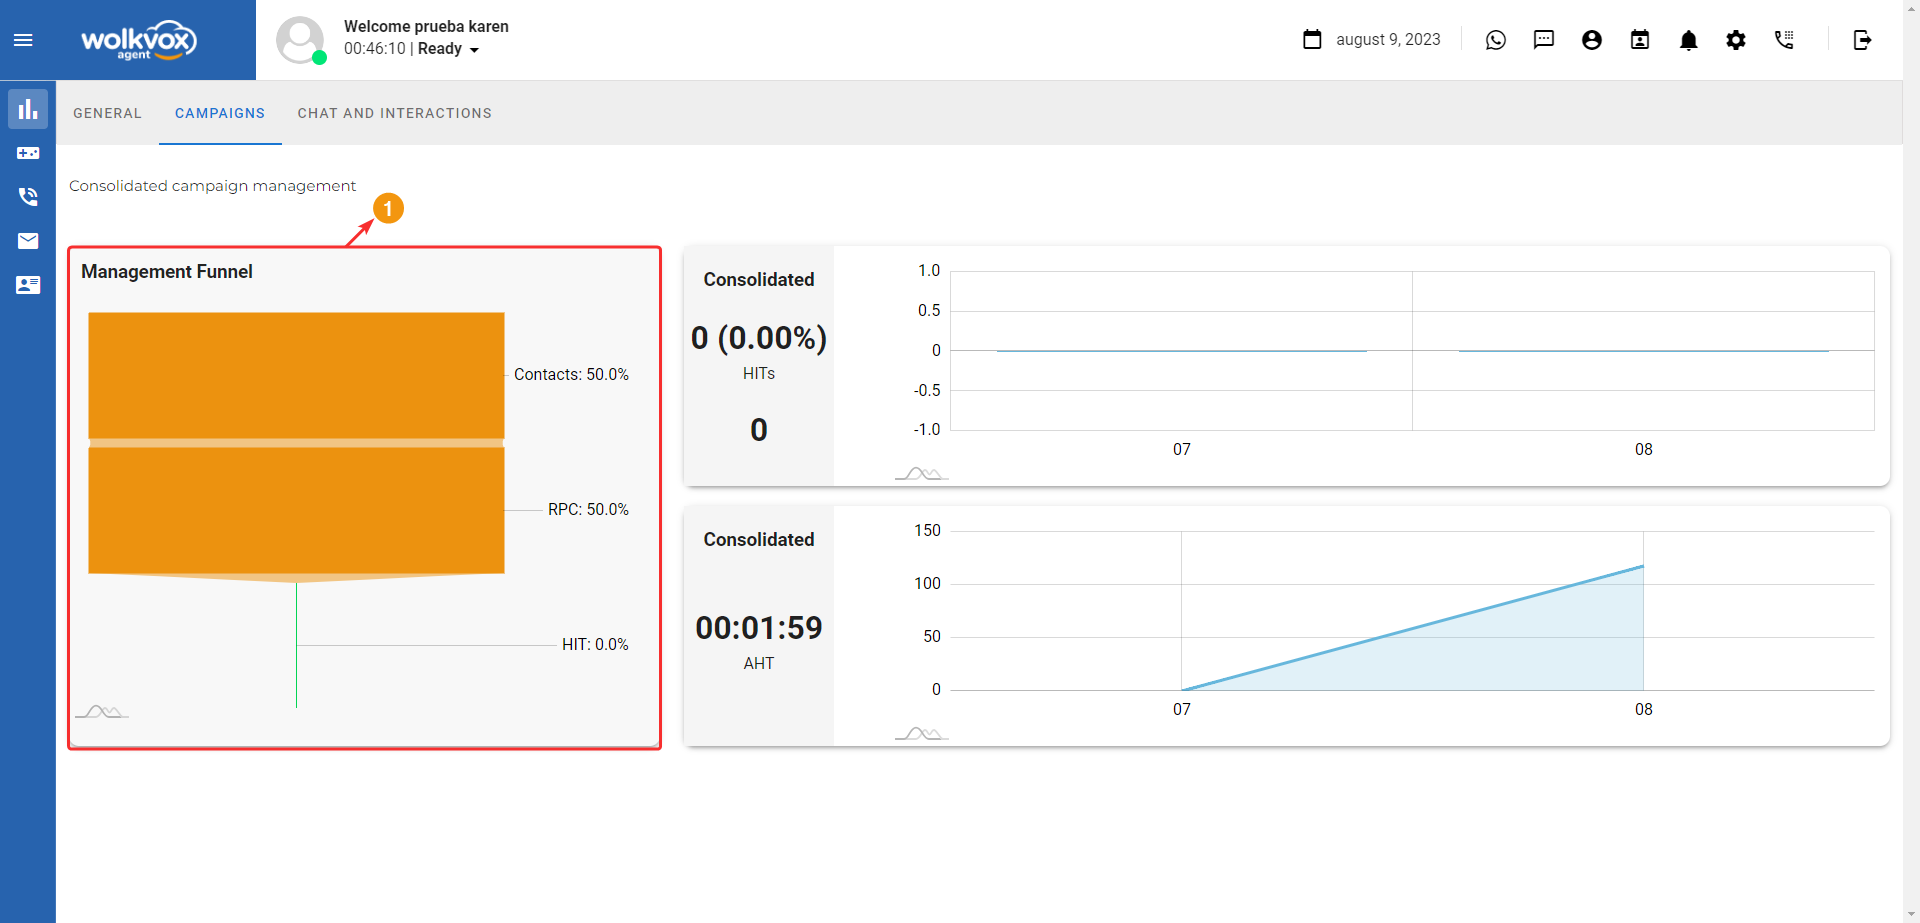
The next block corresponds to the HITs summary, which displays the following data:
- Total number of consolidated HITs up to the current hour.
- HITs per hour: It’s the average number of HITs the agent performs each hour during their work schedule.
- The graph in this block consists of a column indicating the quantity of HITs and a row indicating the hour. The bars displayed in the graph correspond to the number of HITs consolidated by the agent in the specified hour.

Next, you’ll find the AHT (Average Handle Time) consolidation block. This displays the following data:
When you hover over the graph, three labels appear: one in blue and the other two in black. The blue label shows the AHT achieved by the agent in the hour highlighted by the black label at the bottom of the graph. The black label on the left side shows the AHT value that the mouse pointer is pointing to but is not related to the AHT achieved by the agent.
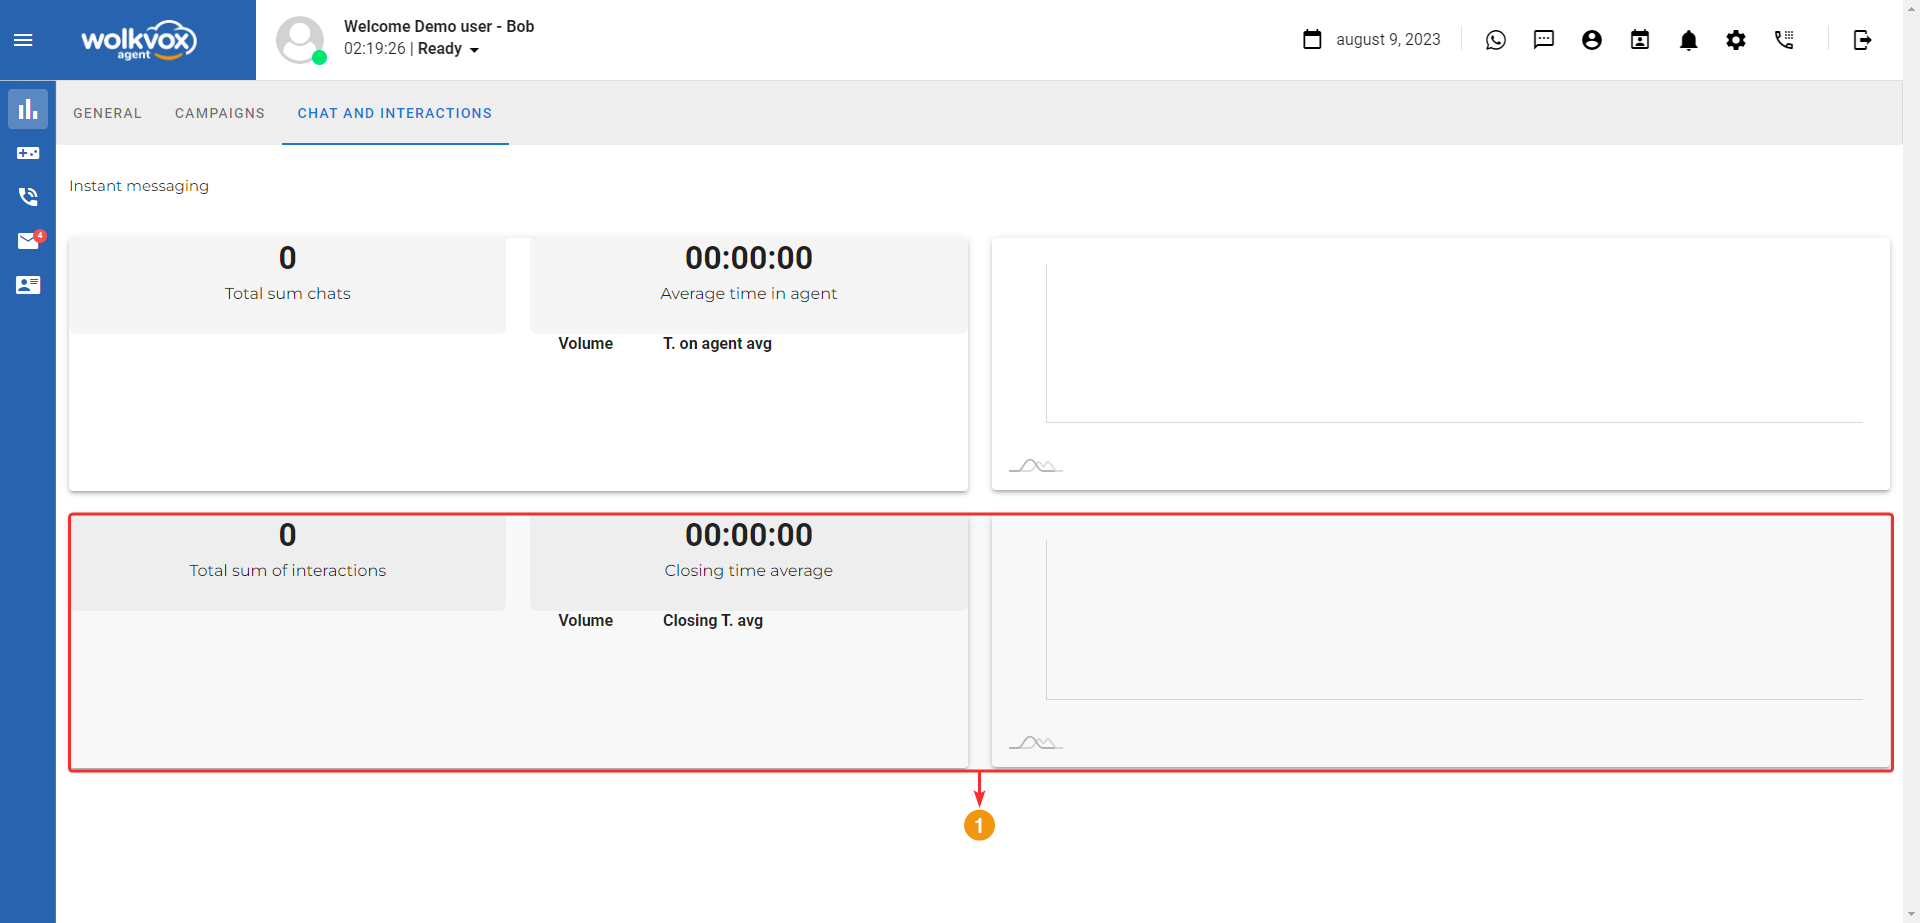
Chat and interactions #
In this tab, you will be able to view statistics related to chats and interactions.
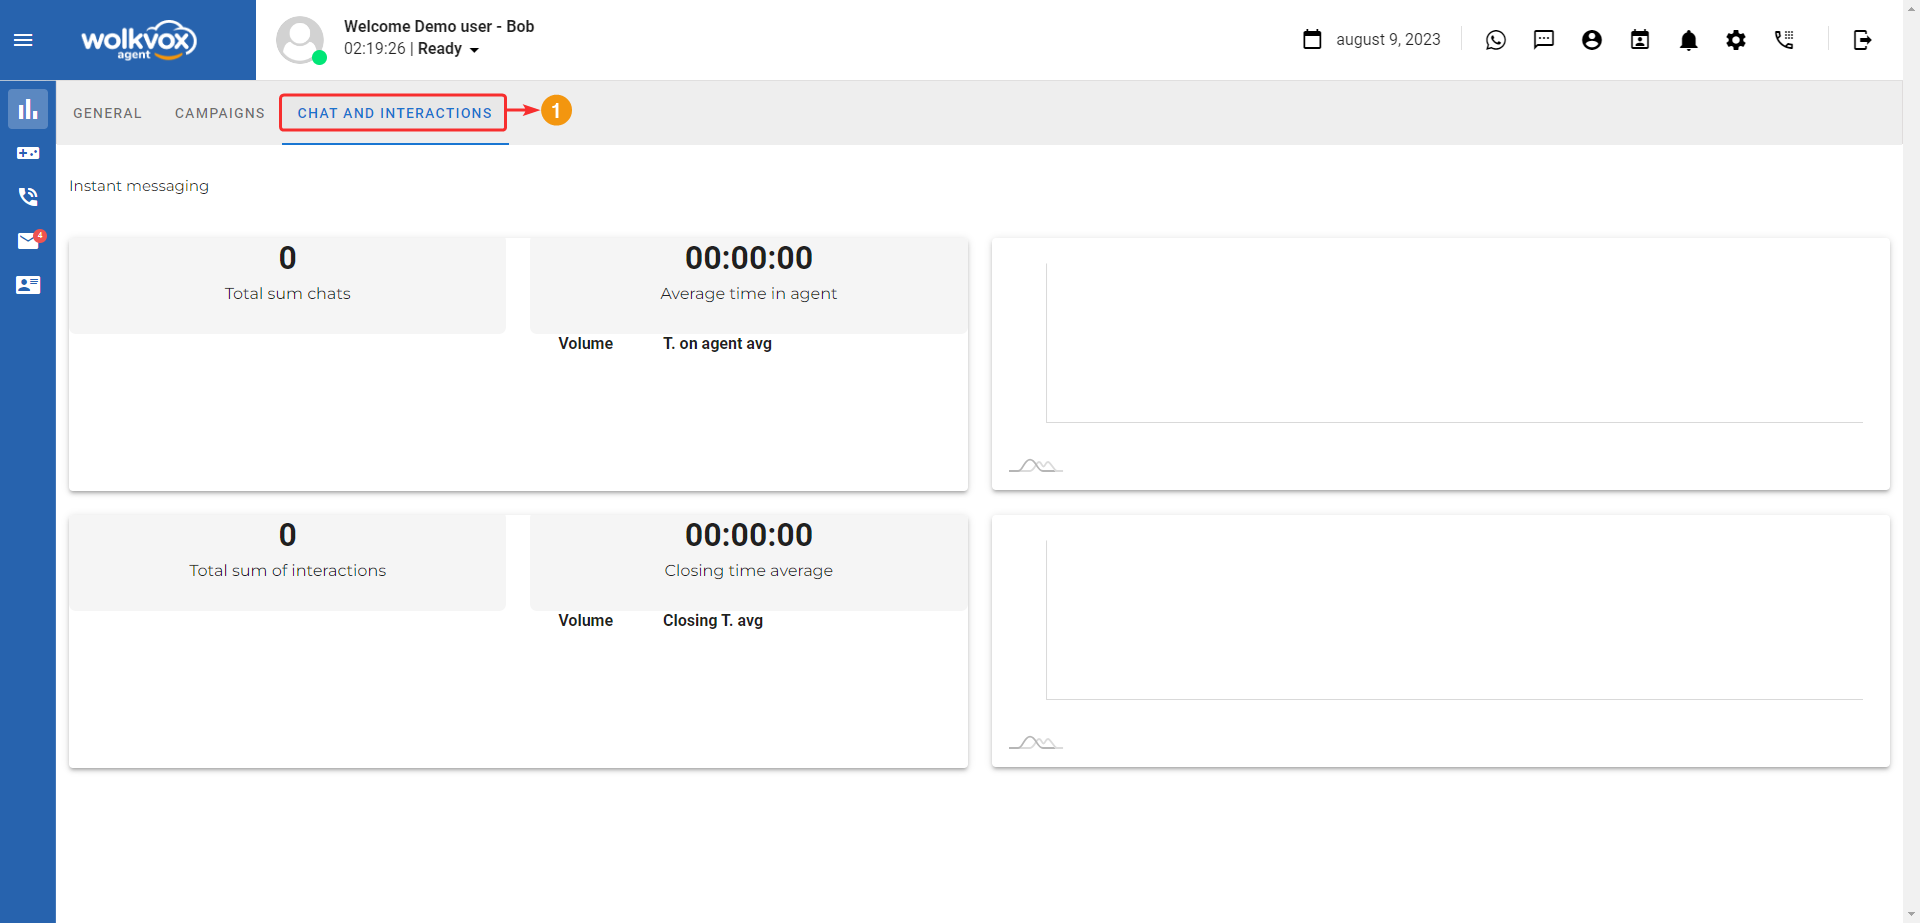
The first part displays statistics related to chats:
- Average Time in Agent: This metric measures the average time a chat spends being handled by an agent. It indicates how much time, on average, an agent dedicates to managing a chat before completing it. This metric is useful for assessing the efficiency of agents in handling chats and understanding how much time is needed to address customer inquiries.
- Volume: This metric refers to the total number of chats that have been managed within a specific period. It indicates the quantity of chat interactions that agents have handled. This metric can help understand the overall workload of the customer support team and provide insights into the chat demand at different times.
- T. on Agent Avg (Time on Agent Average): This metric is related to the total time a chat spends with the agent, including the time when the agent is actively engaged and the time the chat might be waiting for an agent’s response. It indicates how much time, on average, a chat remains with the agent before being concluded. This metric helps understand the complete duration of the chat interaction from when it arrives with the agent until it is closed.
Next, statistics related to interactions are displayed:
- Closing Time Average: This metric measures the average time required to close or resolve an interaction across different channels (email, social media comments, etc.). It indicates how much time, on average, it takes for an agent or the system to address and conclude each interaction. A lower closing time average generally suggests quicker response and resolution of customer inquiries or comments.
- Volume: The “volume” metric represents the total number of interactions across all channels during a specific day. It provides an overview of the quantity of interactions that agents managed within a 24-hour period, allowing an understanding of workload and demand for responses throughout the day.
Gamification #
This tab allows you to view management indicators within a gaming or competitive dynamic to achieve the best results. In this section, you can find out your position compared to your coworkers.
The gamification section features a menu with five buttons:
- Menu: Expand the menu to view the titles of each button.
- Position: Displays your position in relation to your colleagues and also the overall score indicators.
- Indicators: Presents important metrics such as the history of hits (successful calls), call count, AHT (average handling time of interactions between the customer and the agent), ACW (agent time spent on post-call activities like coding or logging interaction details with the customer), occupancy (average time an agent takes for post-call coding or customer information logging), and login time.
- Avatar: Enables you to create the character’s image.
- Chat: This chat is intended for maintaining conversation with your team leader.

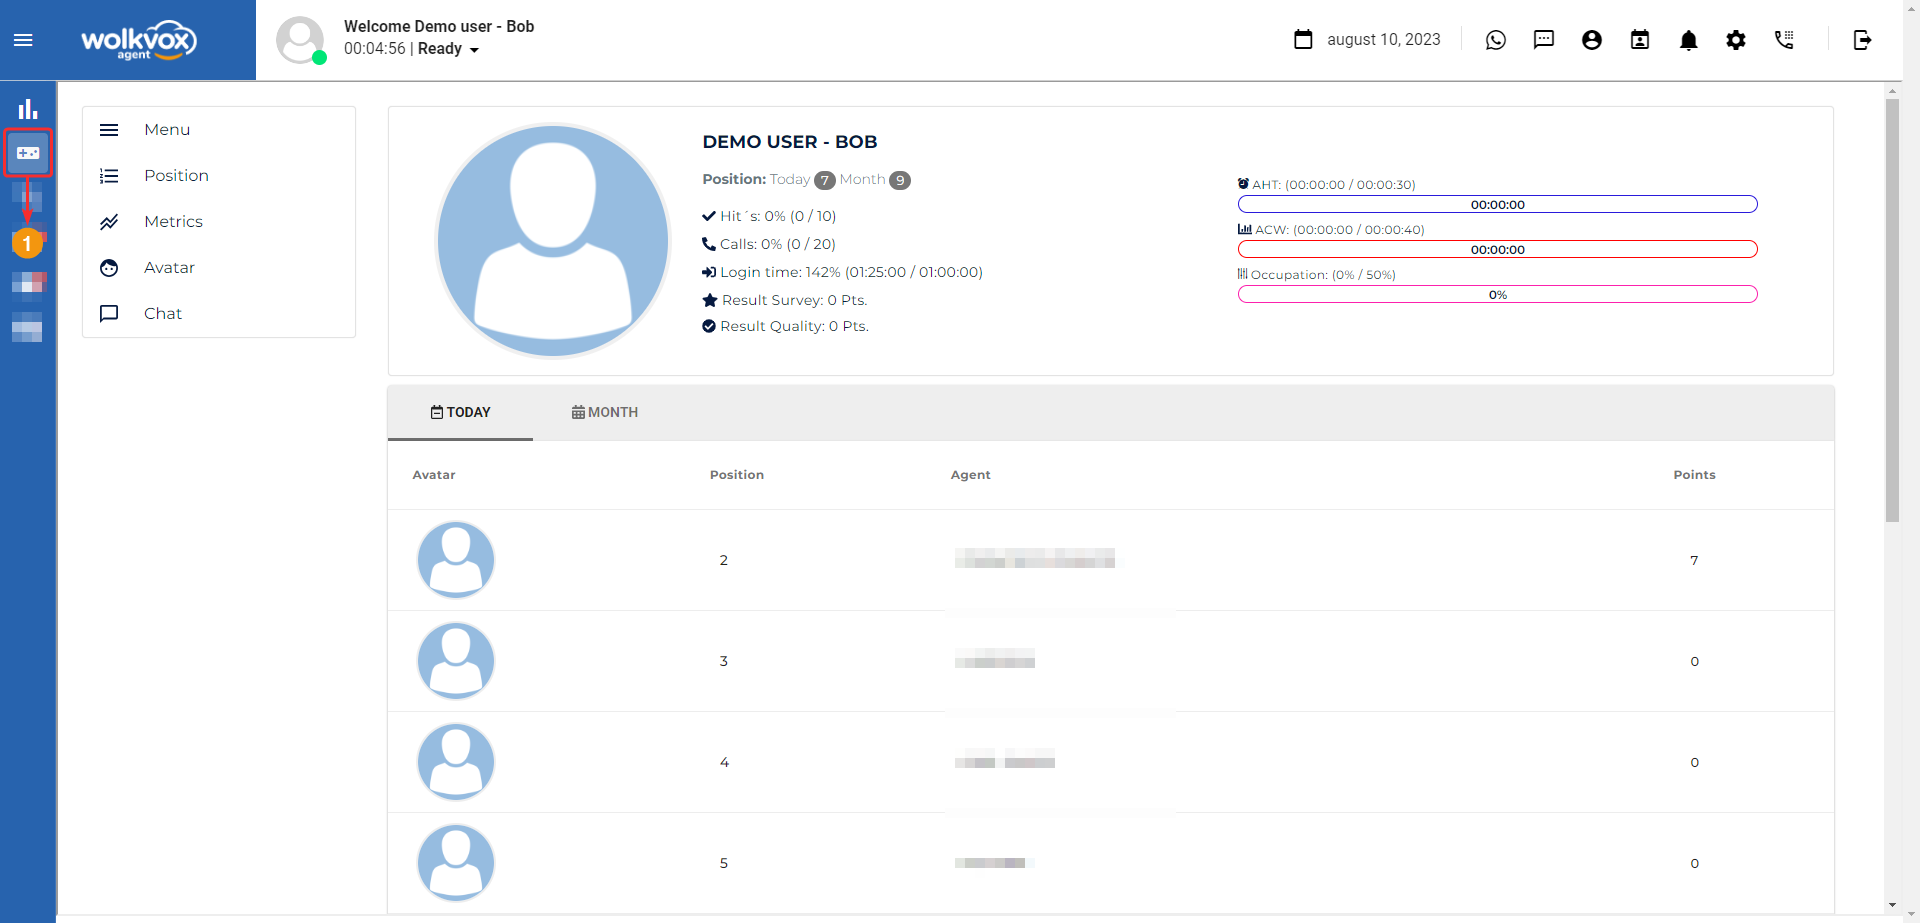
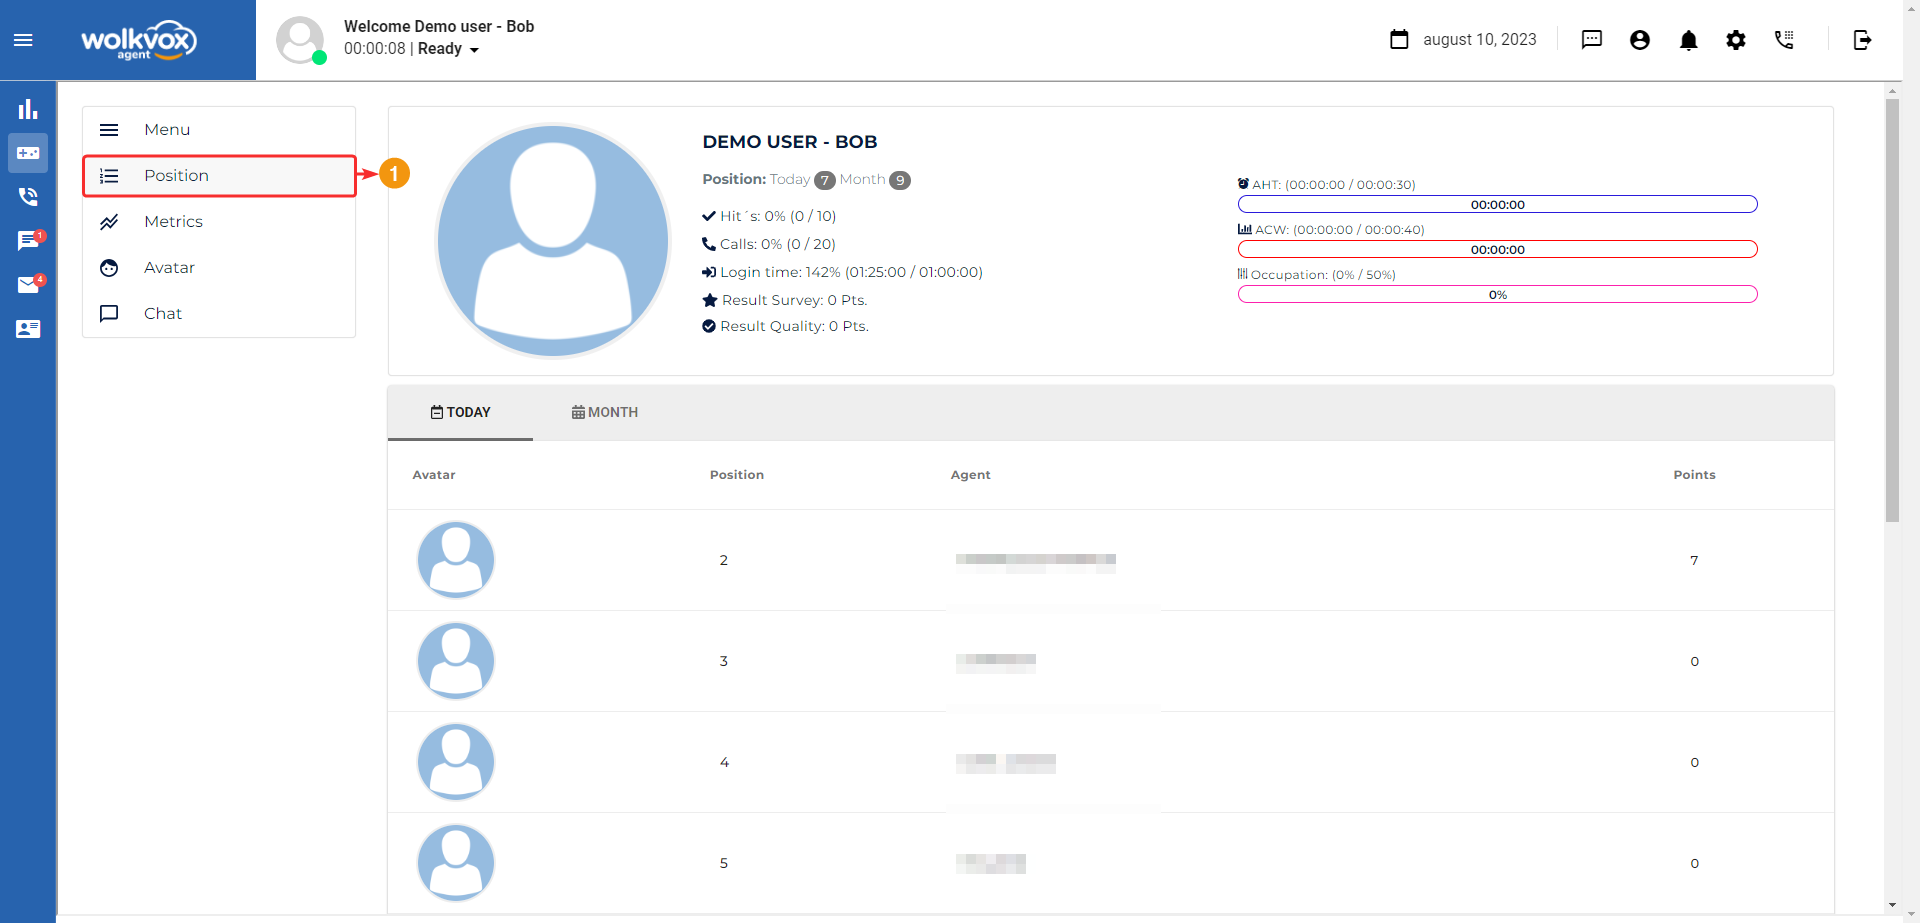
Position #
In this “Position” section, you can view significant statistics in relation to the measurement of your goals. You can also observe the agent leaderboard, ranked by achieved points.
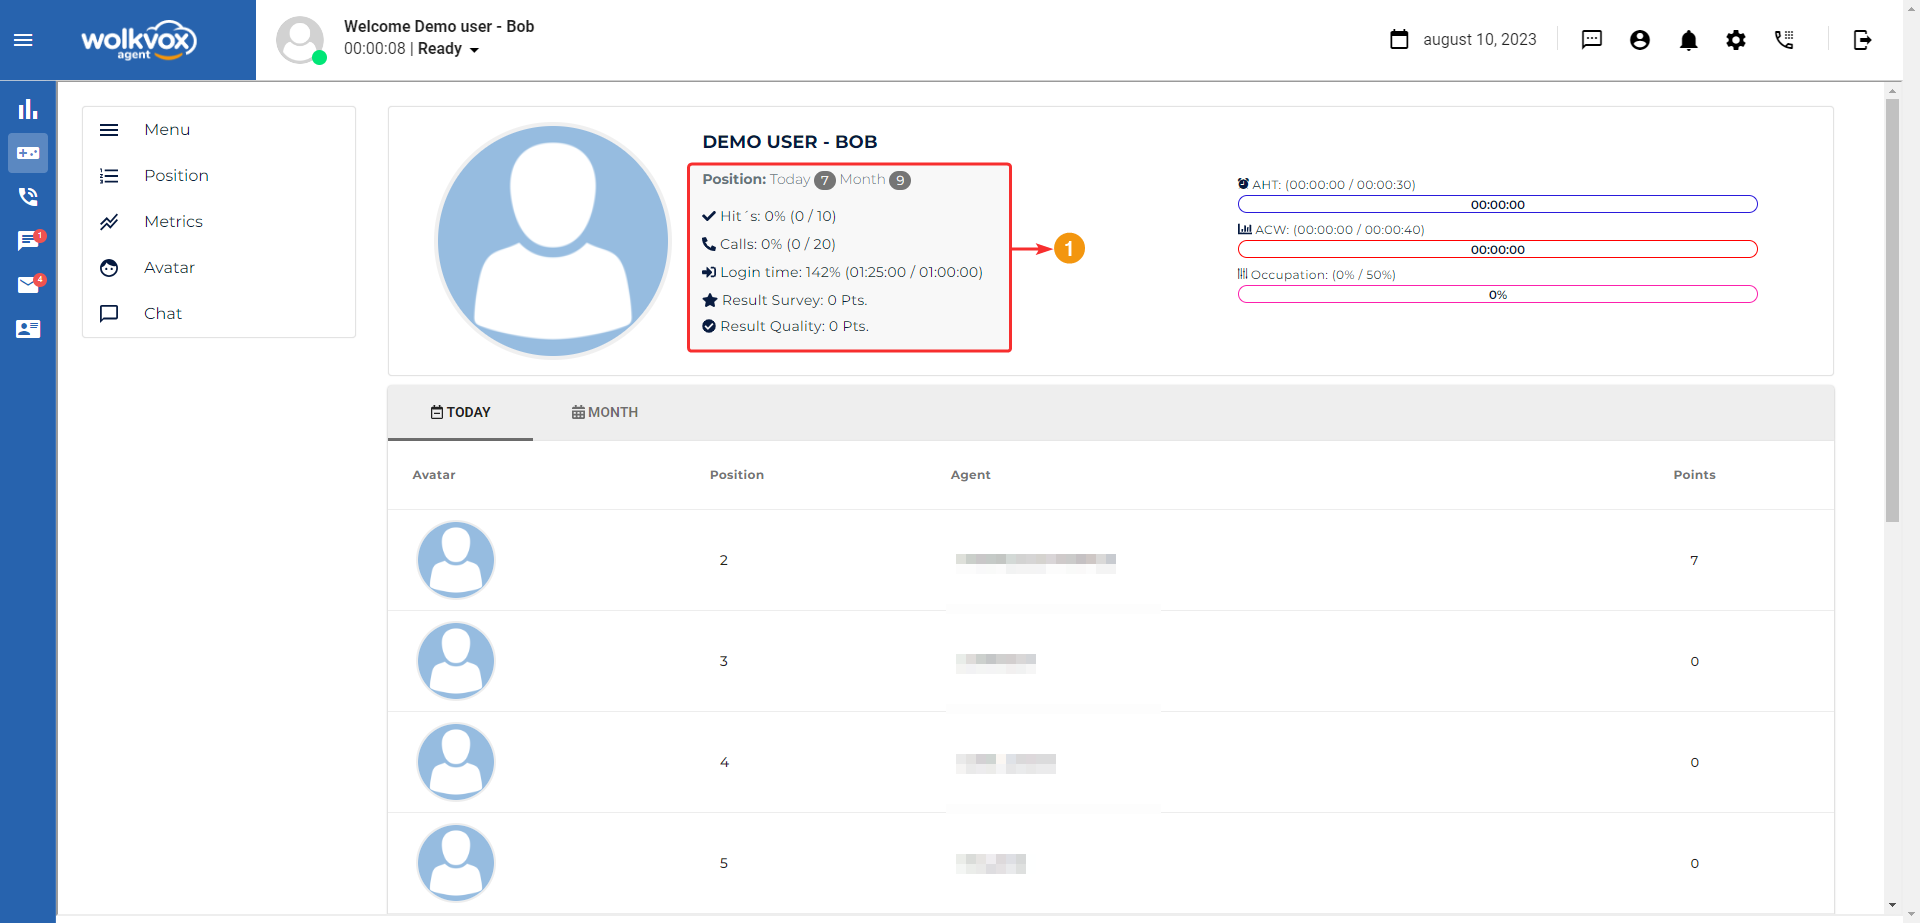
In the following section, you’ll find the following indicators:
- Hit’s: Indicates the percentage of successful or effective calls, and within parentheses, a comparison is made between the achieved hit’s count and the daily hit’s goal.
- Calls: Indicates the percentage of calls made, and within parentheses, a comparison is made between the number of calls made and the daily call’s goal.
- Login time: Indicates the percentage of time the agent has been logged in. Within parentheses, a comparison is shown between the time the agent has been logged in and the total time they should be logged in.
- Result Survey: Displays the agent’s evaluation score.
- Result Quality: Displays the agent’s quality score.
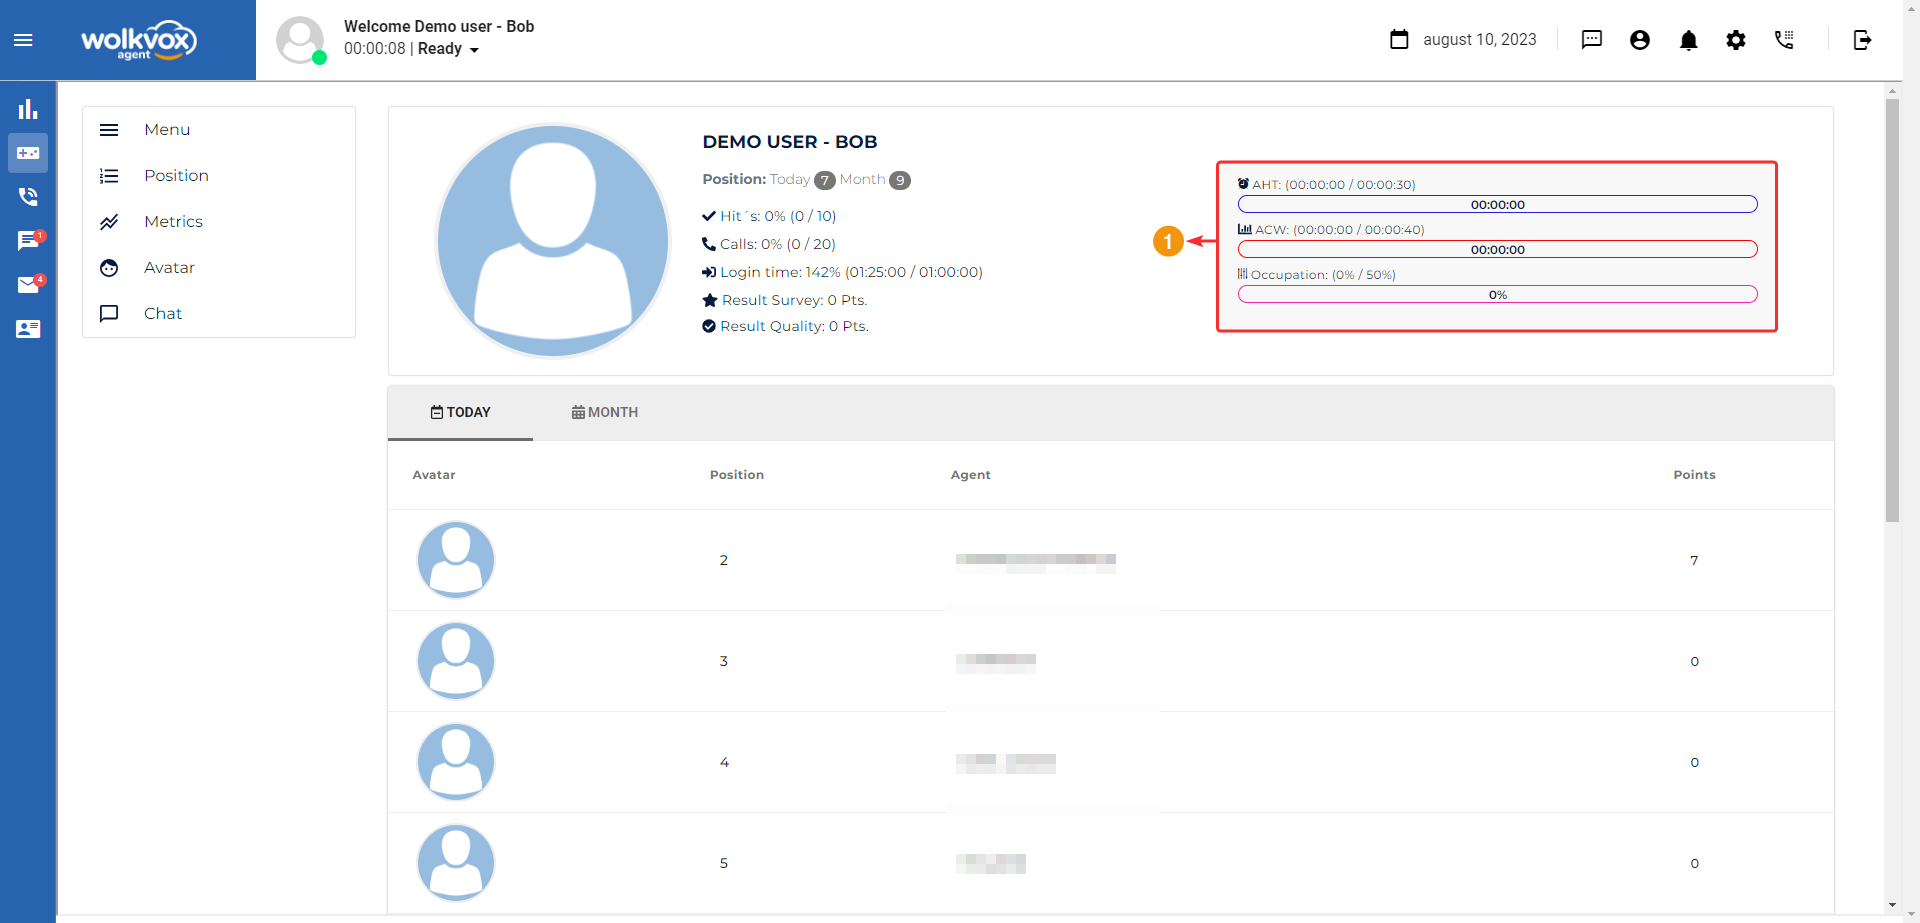
In the upper-right section, there are three important indicators:
- AHT: Average Handle Time. This shows the agent’s average handle time compared to the desired average time.
- ACW: After Call Work. In this indicator, you can observe the average time the agent has spent in After Call Work compared to the desired maximum time.
- Occupation: This indicates the current percentage of time the agent has remained occupied and the target percentage.
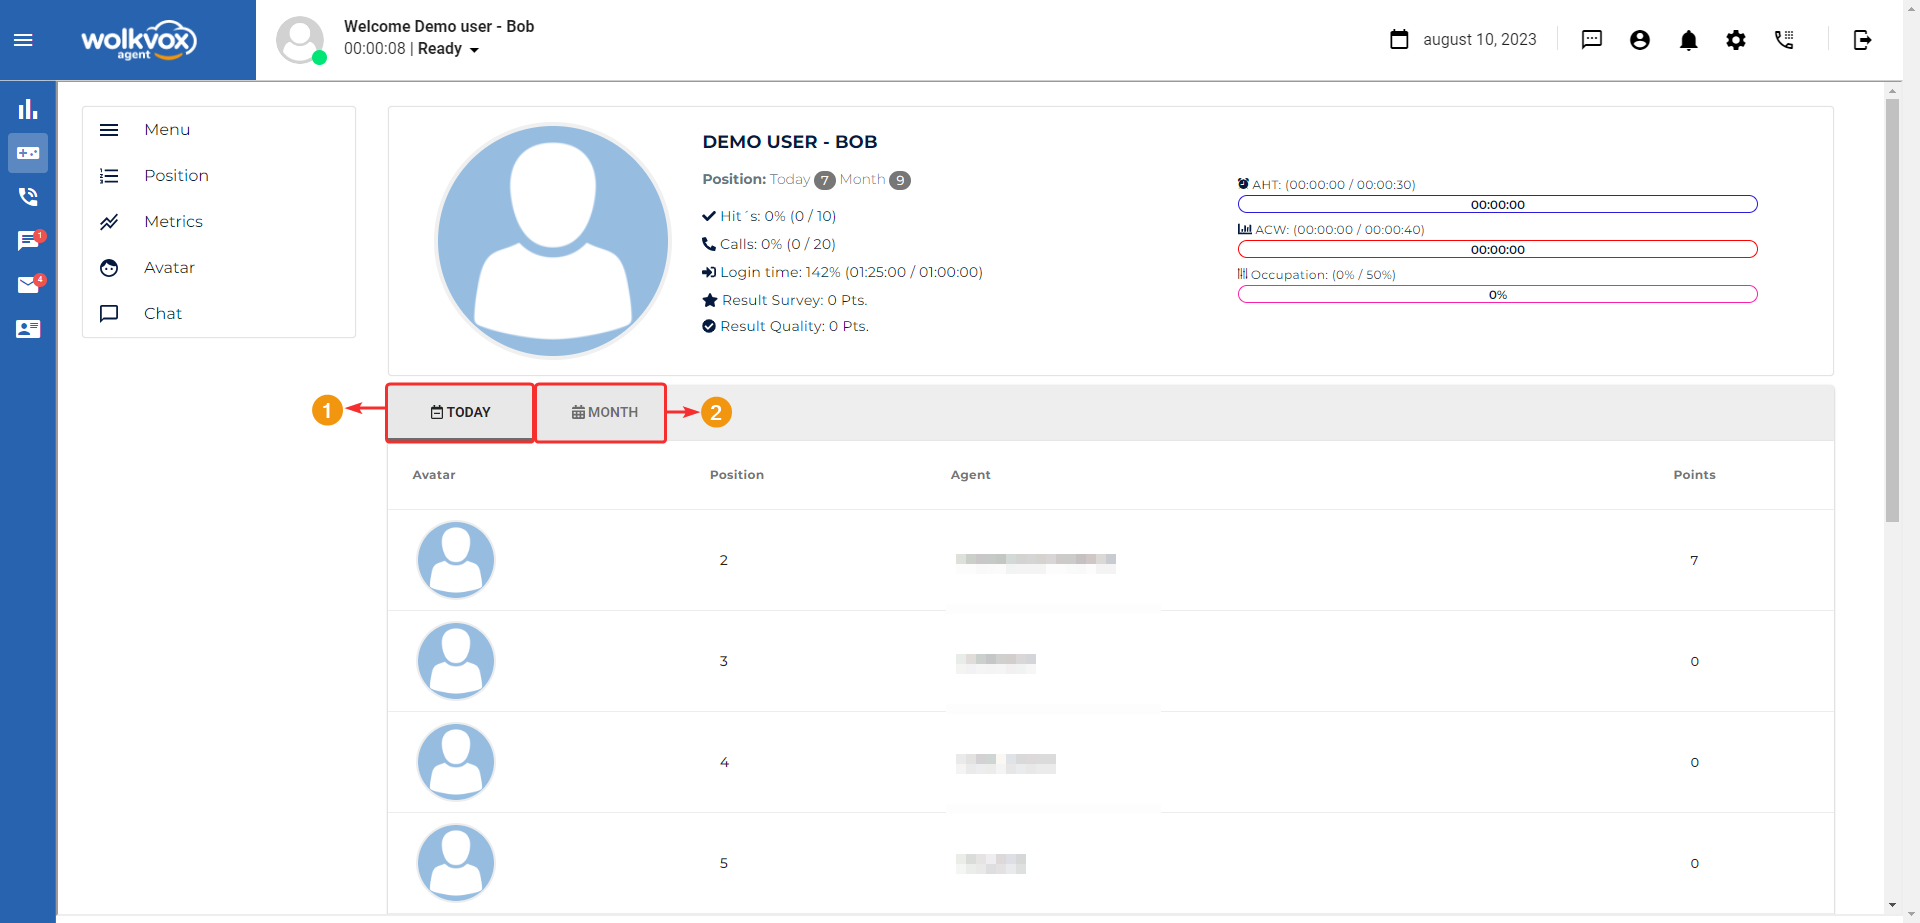
A leaderboard is also displayed, showing the position of each agent, and you can filter by day or month (for this purpose, there are the tabs “Today” and “Month”).
The table has a “Avatar” column displaying the character of each agent, a “Position” column indicating the agent’s current rank, an “Agent” column providing the name of each agent, and a “Points” column representing the total points acquired either for the day or the month (depending on the tab you’re on).
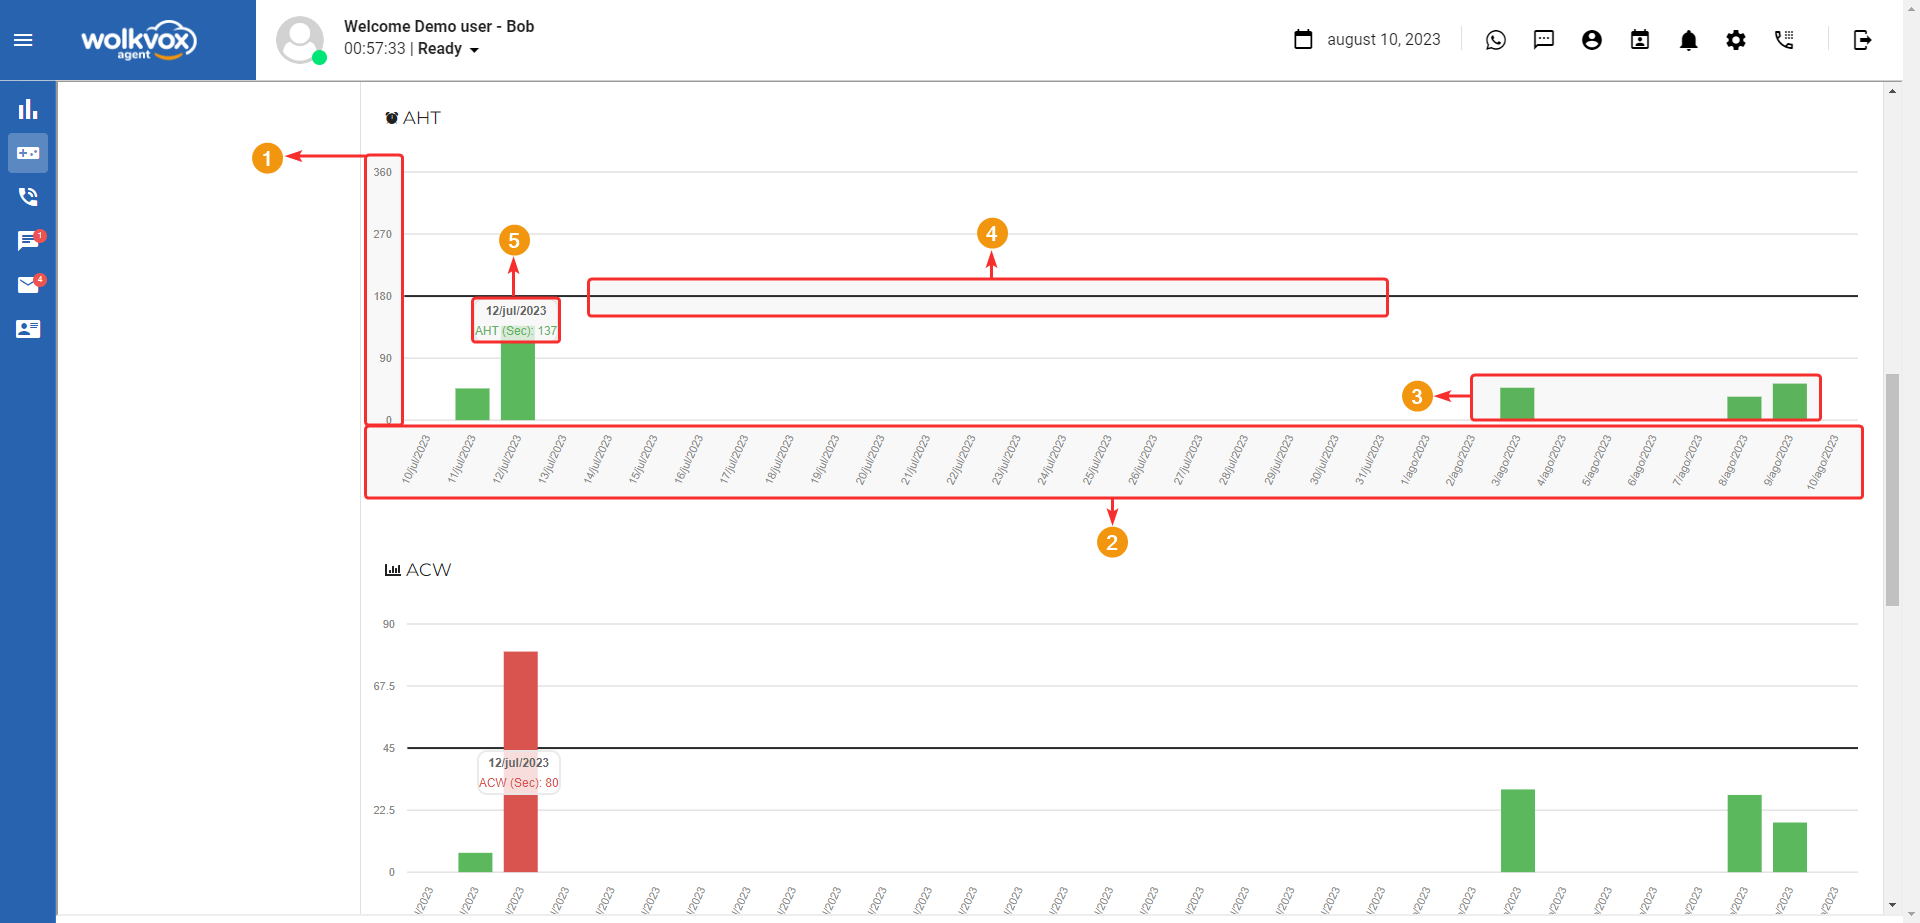
Metrics #
The “Metrics” button leads to a section where you can observe various bar graphs measuring what is indicated by their header. Each graph has the date value in its footer and on the left side, its respective data type according to the graph’s indicator. The black bar in the middle indicates the ideal goal, and if you hover the mouse over the graph, a label appears indicating the date selected by the mouse and the respective value of each indicator.
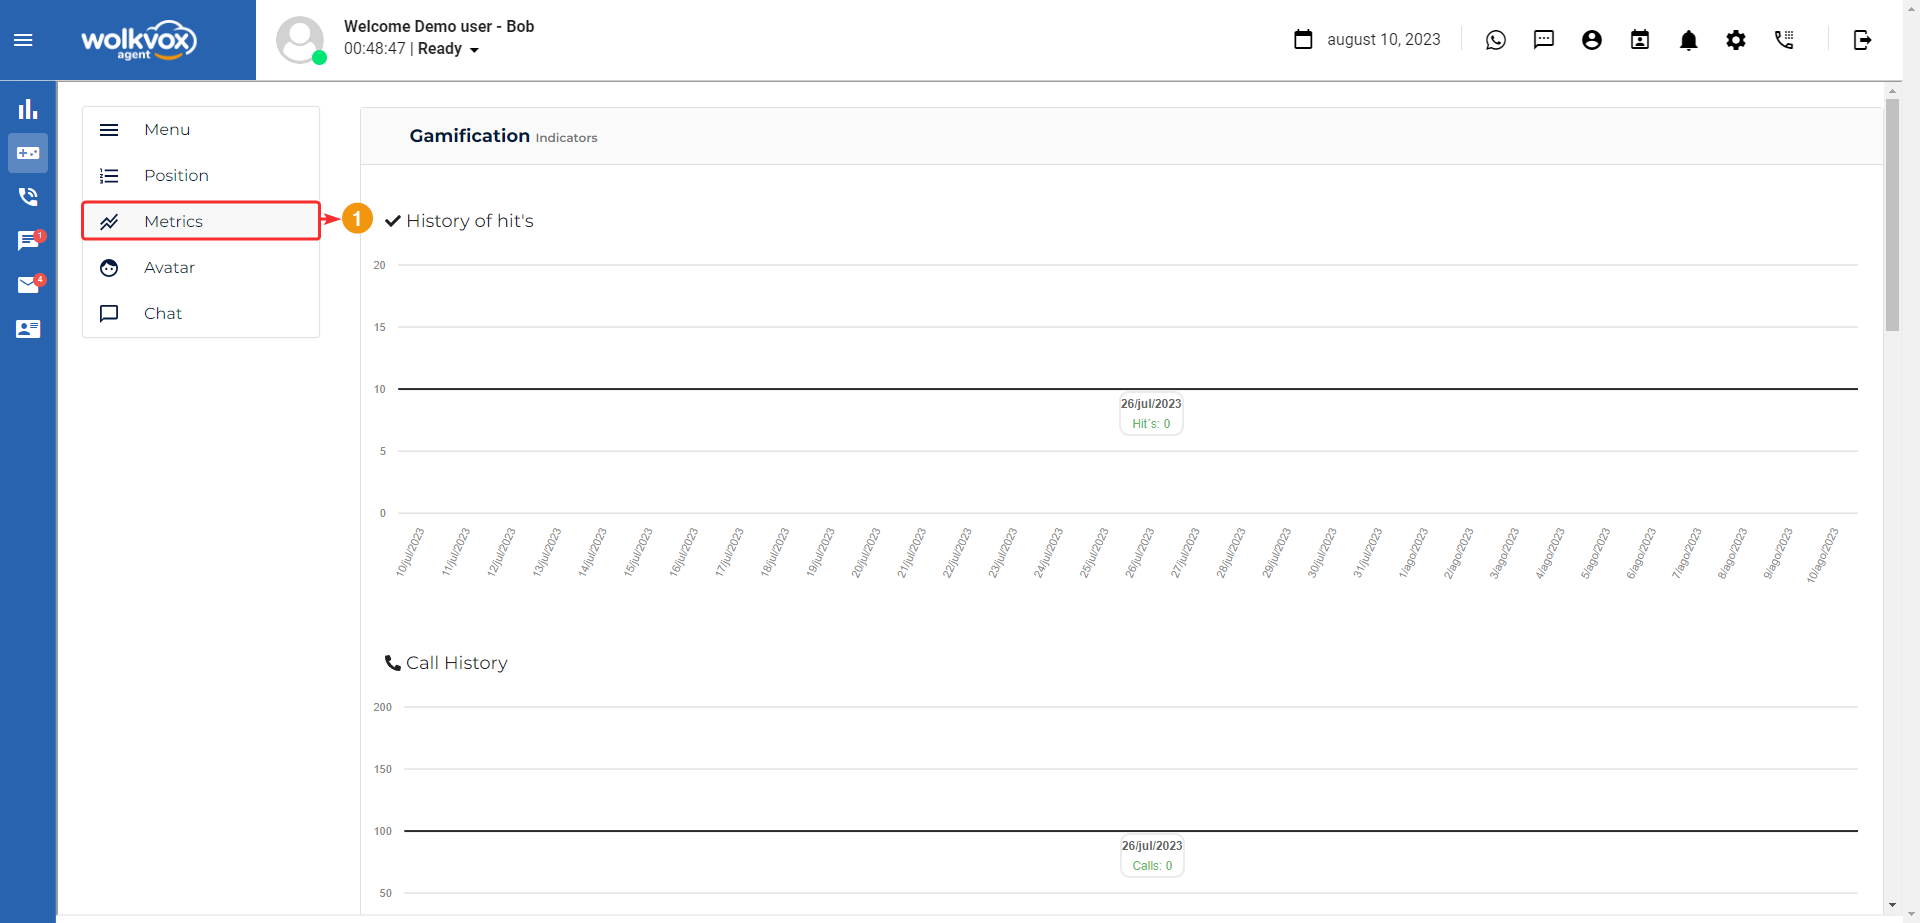
In the following image, you can see the “AHT” graph, which indicates the history of achieved hits.
- Value.
- Dates.
- Goal.
- Bar graph.
- Information label.
Avatar #
This section allows you to design an avatar, giving agents the opportunity to customize their profile image in a fun and unique way. This feature enables agents to express their individuality. By allowing them to adjust various aspects like facial features, eyes, hair, clothing, and backgrounds, a more personalized and friendly atmosphere is created. With all these options, you’ll be able to feel adequately represented in your avatar.
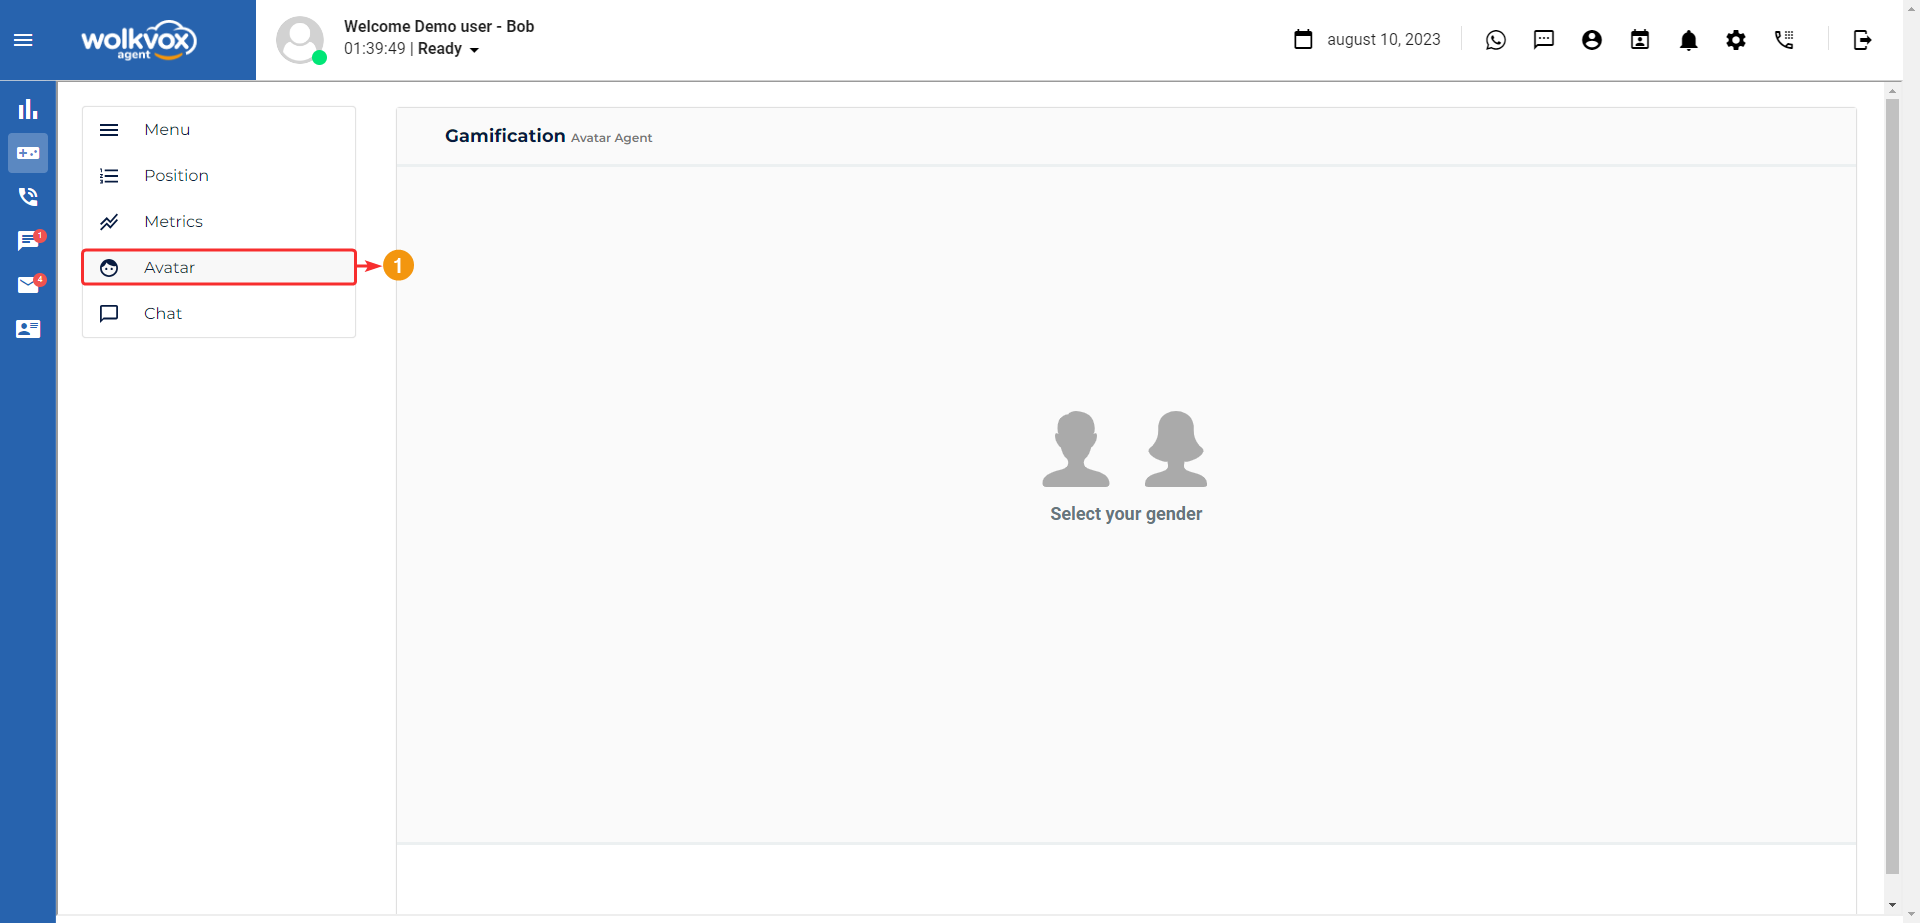
Take a look at all the options you have to change: Face, eyes, hair, clothing, background, etc.

When you’re done designing your character, click on “Save” to apply the changes.

See how impressive your profile will look when you design your own character. Motivate your character to achieve the goals!

Voice channel or calls #
The highlighted button in the following image corresponds to the voice channel. From there, incoming calls are managed and manual calls are made.

Here’s an explanation of the functionality of each button:
- Dial Phone: Opens a new window where we can manually dial a number.
- Hold: Allows placing a call on hold. The process manager might have assigned a sound or audio for the customer to hear while the agent is engaged in other activities.
- Mute: Silences the agent’s microphone.
- Hang Up: If the agent clicks this button, it ends the call.
- Conference: Allows adding the user on the line to a teleconference room or group call.
- Survey: Transfers the customer from the call to a survey for them to answer, depending on how it’s been constructed. This survey button appears only when the agent is in a call.

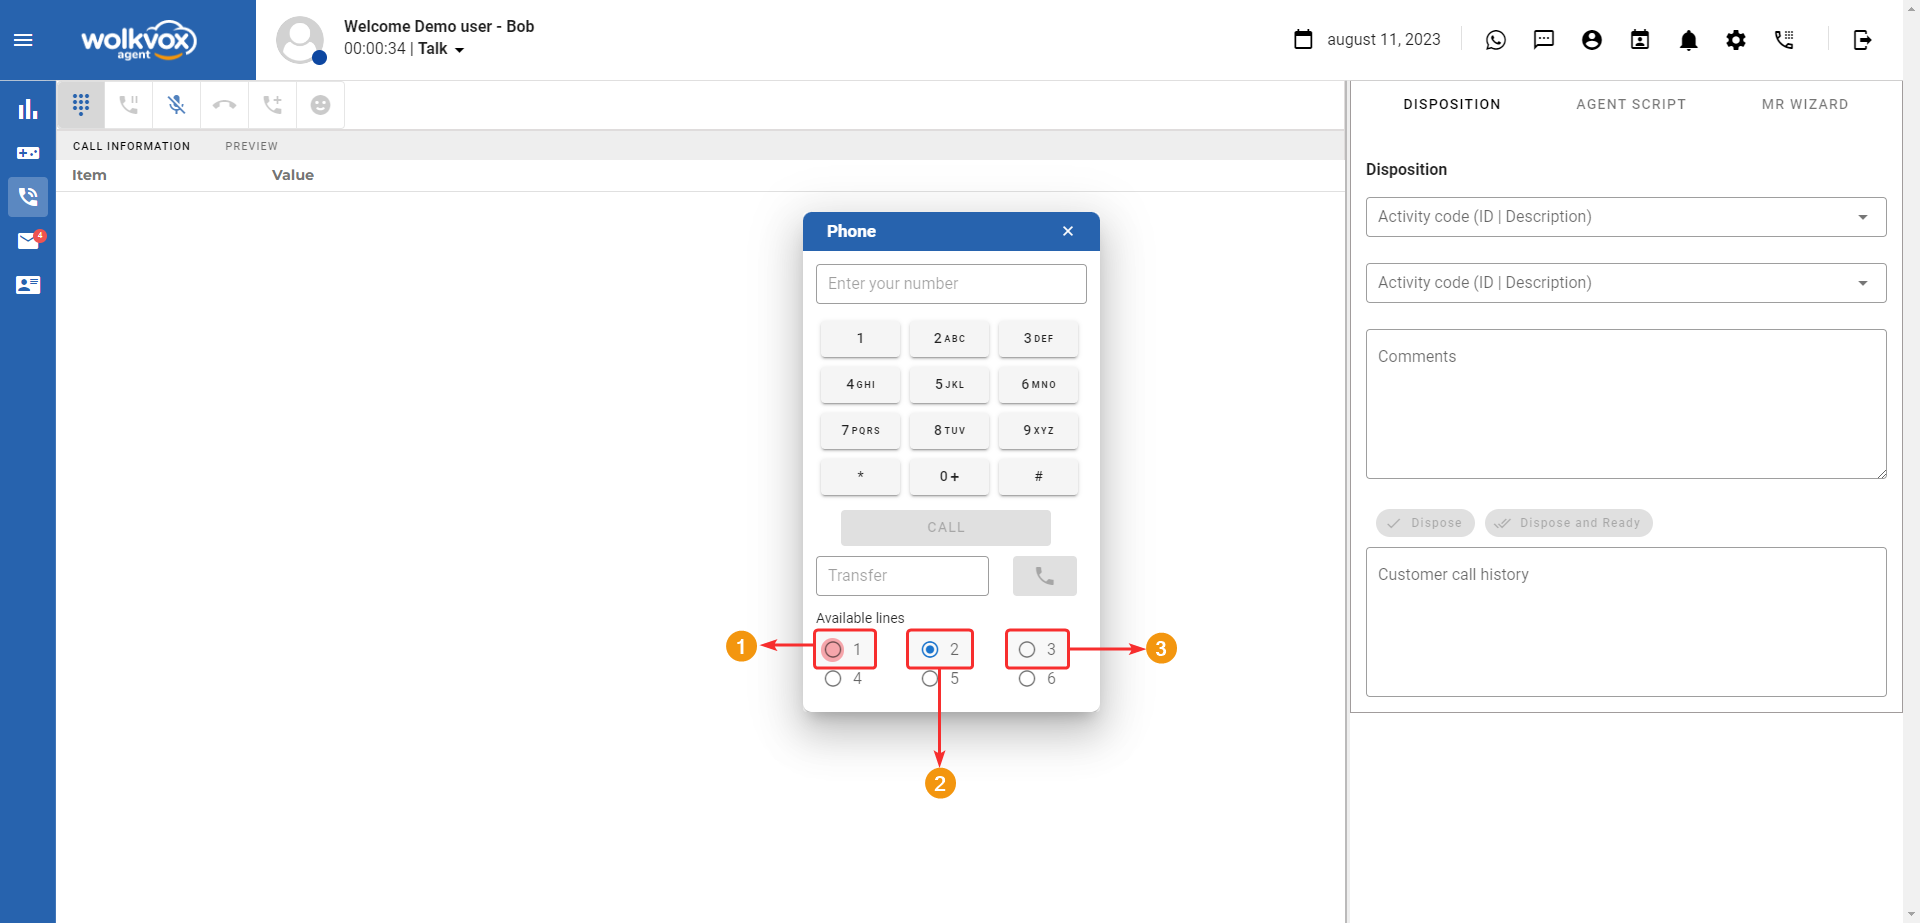
Manually Dialing a Phone Number #
Clicking on “Dial Phone” opens a new window where you can configure the details to call the desired customer. Below is an explanation of each field in the window:
- The first field allows you to input the number you wish to call.
- The second field corresponds to the numeric keypad, serving as an alternative to enter the desired number.
- Next is the “Call” button for the system to dial the entered number.
- Optional: If you wish to transfer a call. Here you can input the extension number of the agent you want to transfer the call to.
- Click the button to transfer the call.
- At the bottom, the available lines are listed. Each line can have an active call. Select the line where you want to initiate the call.

The lines that have a connected and waiting customer are identified with a flashing red highlight.
- Waiting Line.
- Selected Line.
- Unused Line.
Webcam and Agent Screen Sharing: These two tools are very useful in conferences or coaching sessions to facilitate demonstrative processes where visual explanation of something is needed.
- If the video call service is active in your operation, you can preview the webcam in the highlighted area.
- Instead of displaying the webcam, you can share your screen view.
Note: If you start screen sharing, your webcam display will be turned off.
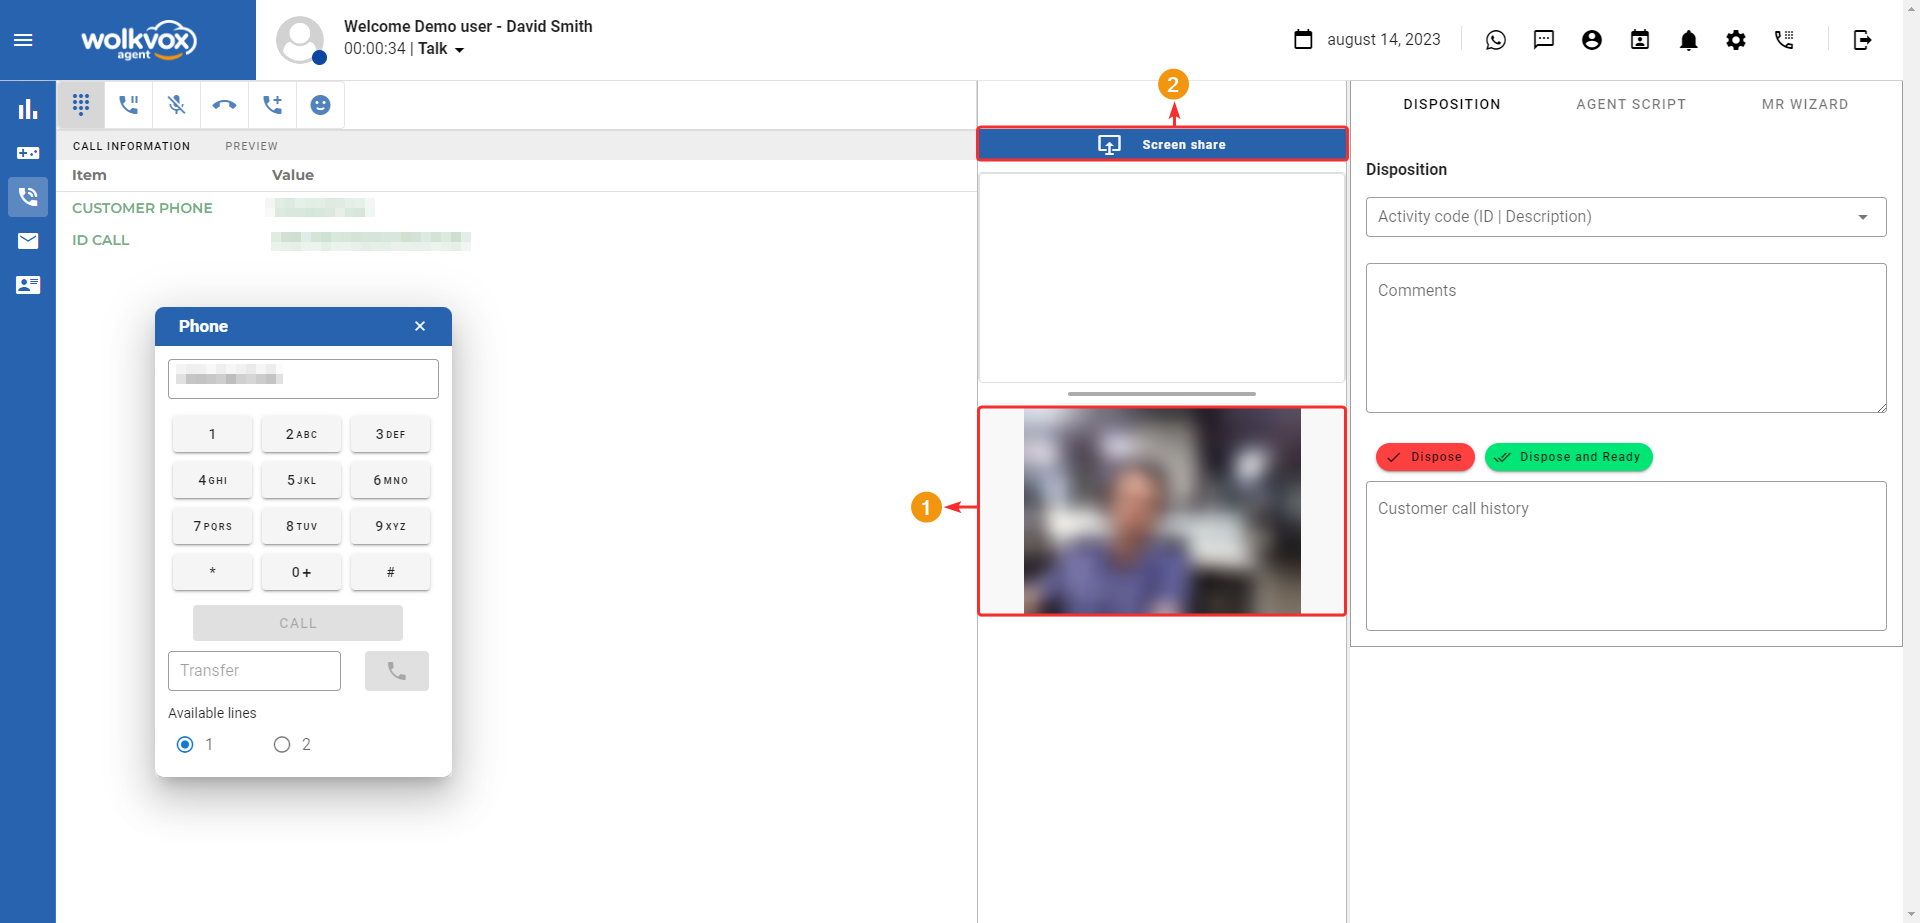
- Instead of the webcam, a preview of what you are seeing on your screen will appear.
- Click the button to stop sharing your screen and switch to displaying the webcam.

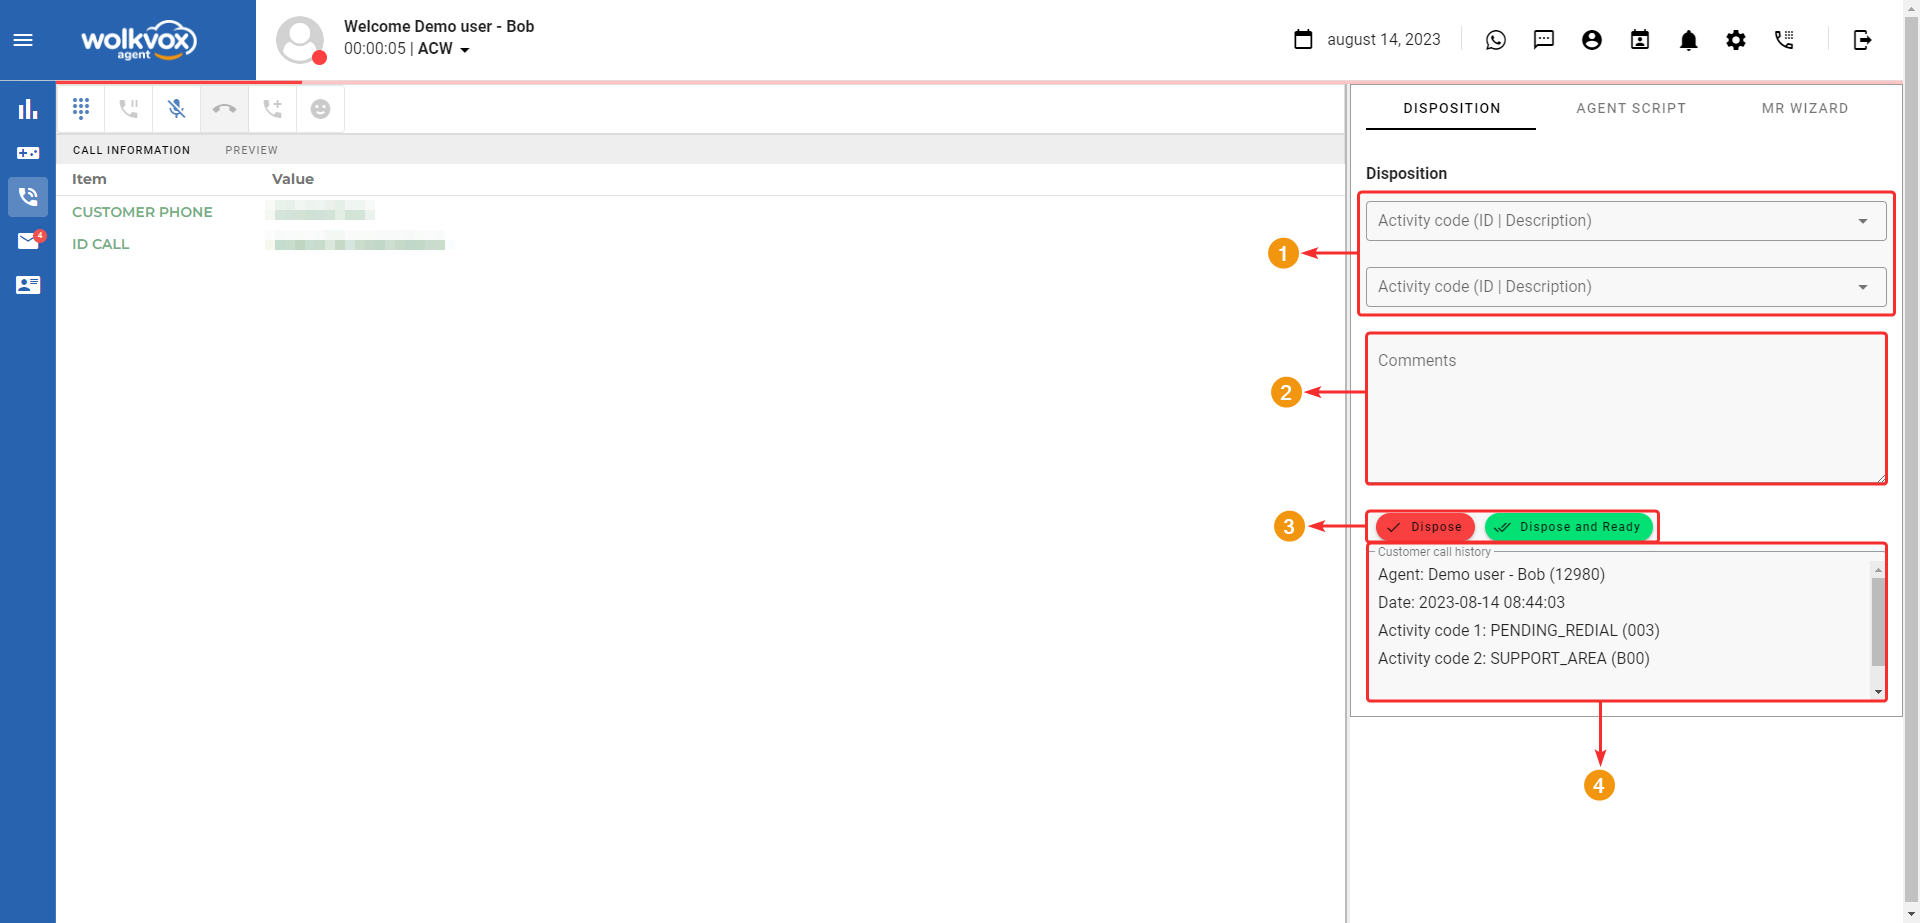
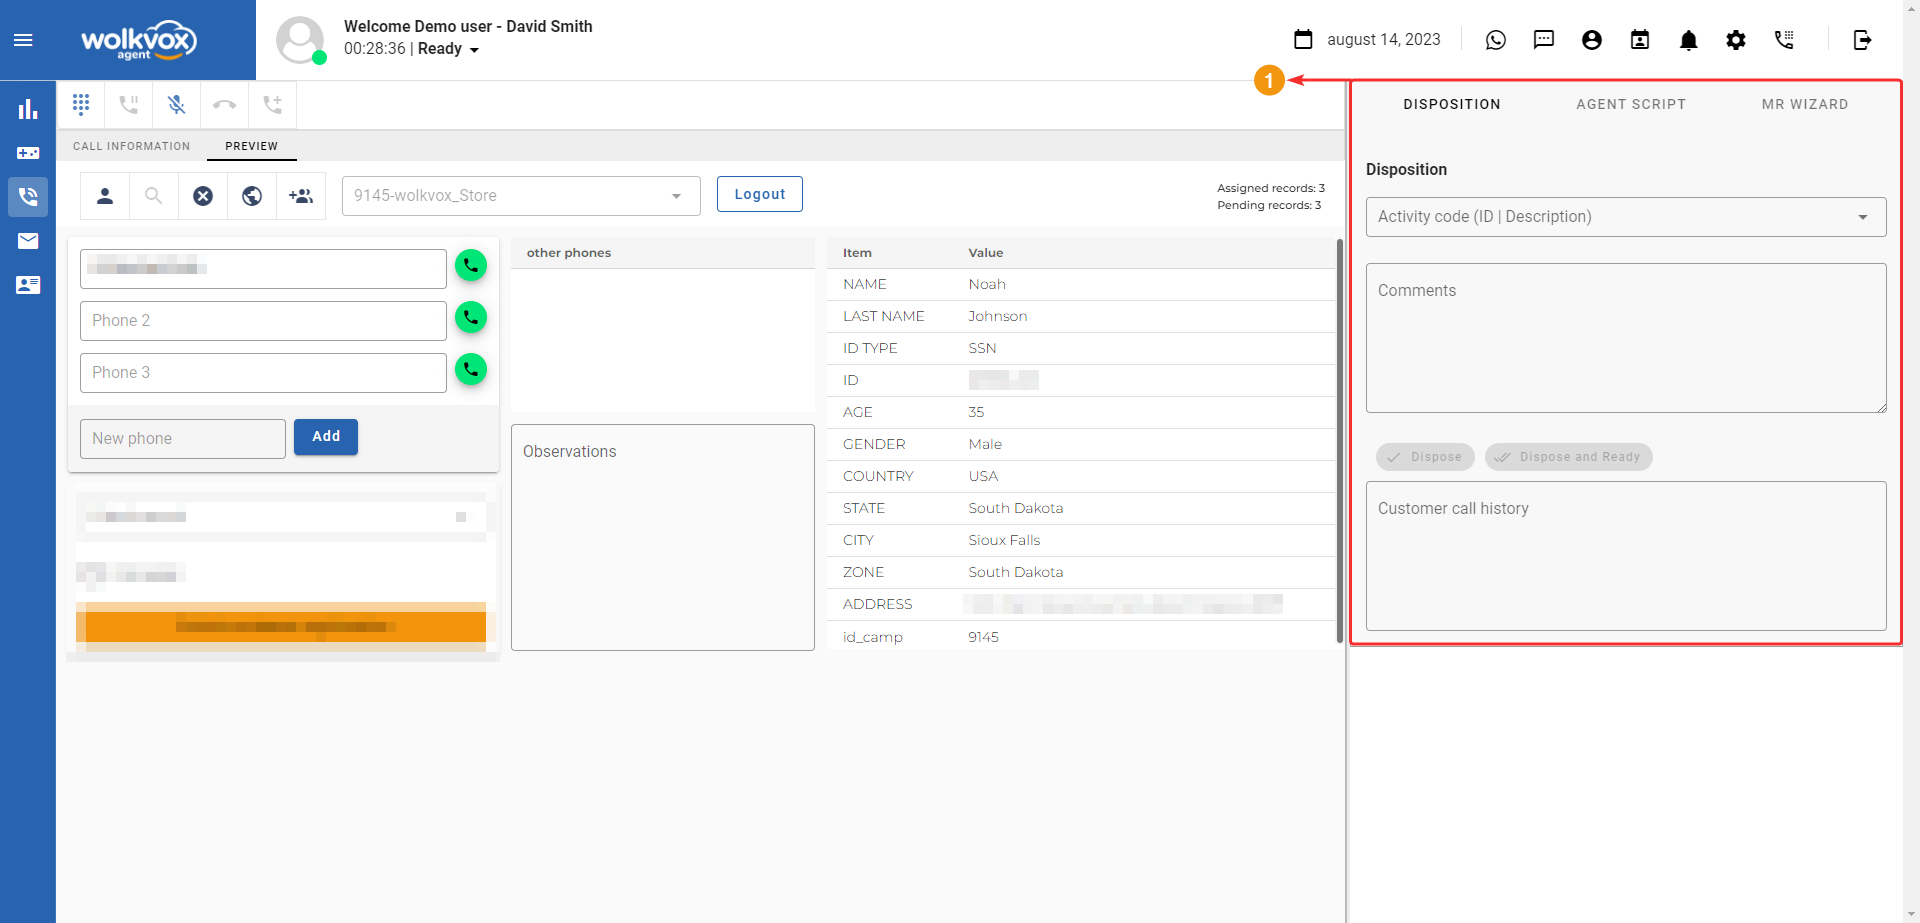
Call Coding or Disposition #
On the right side of the panel, you can see two tabs: “Disposition” and “Agent Script.” This section is what the agent should use after a call, when the status changes from “Talk” to “ACW” (After Call Work). The “Disposition” tab allows you to code or categorize calls to create a record of the call’s outcome. The behavior of the application for this section depends on the configuration set by the process leader or manager. For instance, the administrator might enable only the “Agent Script” tab for agents. This tab contains the script that guides the agent through the customer service process. Through the “Agent Script” tool, the agent can also code the call.

Disposition #
This tab allows you to encode or categorize the process with a customer (it’s worth noting that the administrator or leader can configure the application so that this tab is not available and the agent has to finish their process in the “Agent Script” tab).
- First, you can see one or two fields called “Activity Code.” The operation administrator can choose to display either one activity code for call categorization or two codes. The activity codes appear in the dropdown menu, and you must select an activity code based on the call’s outcome (completing the ACW state requires filling out the activity code fields).
- Next, there’s a comment field where the agent can leave some notes regarding the process they had with the customer.
- To submit the coding, there are two buttons: “Encode” and “Encode and Ready.” The first only encodes the call, while the second, in addition to encoding the call, changes the agent’s status to “Ready” so they can receive calls.
- At the bottom, there’s a field that provides the call history related to the current customer. The history will be available if it’s a customer with whom there has been a previous contact.
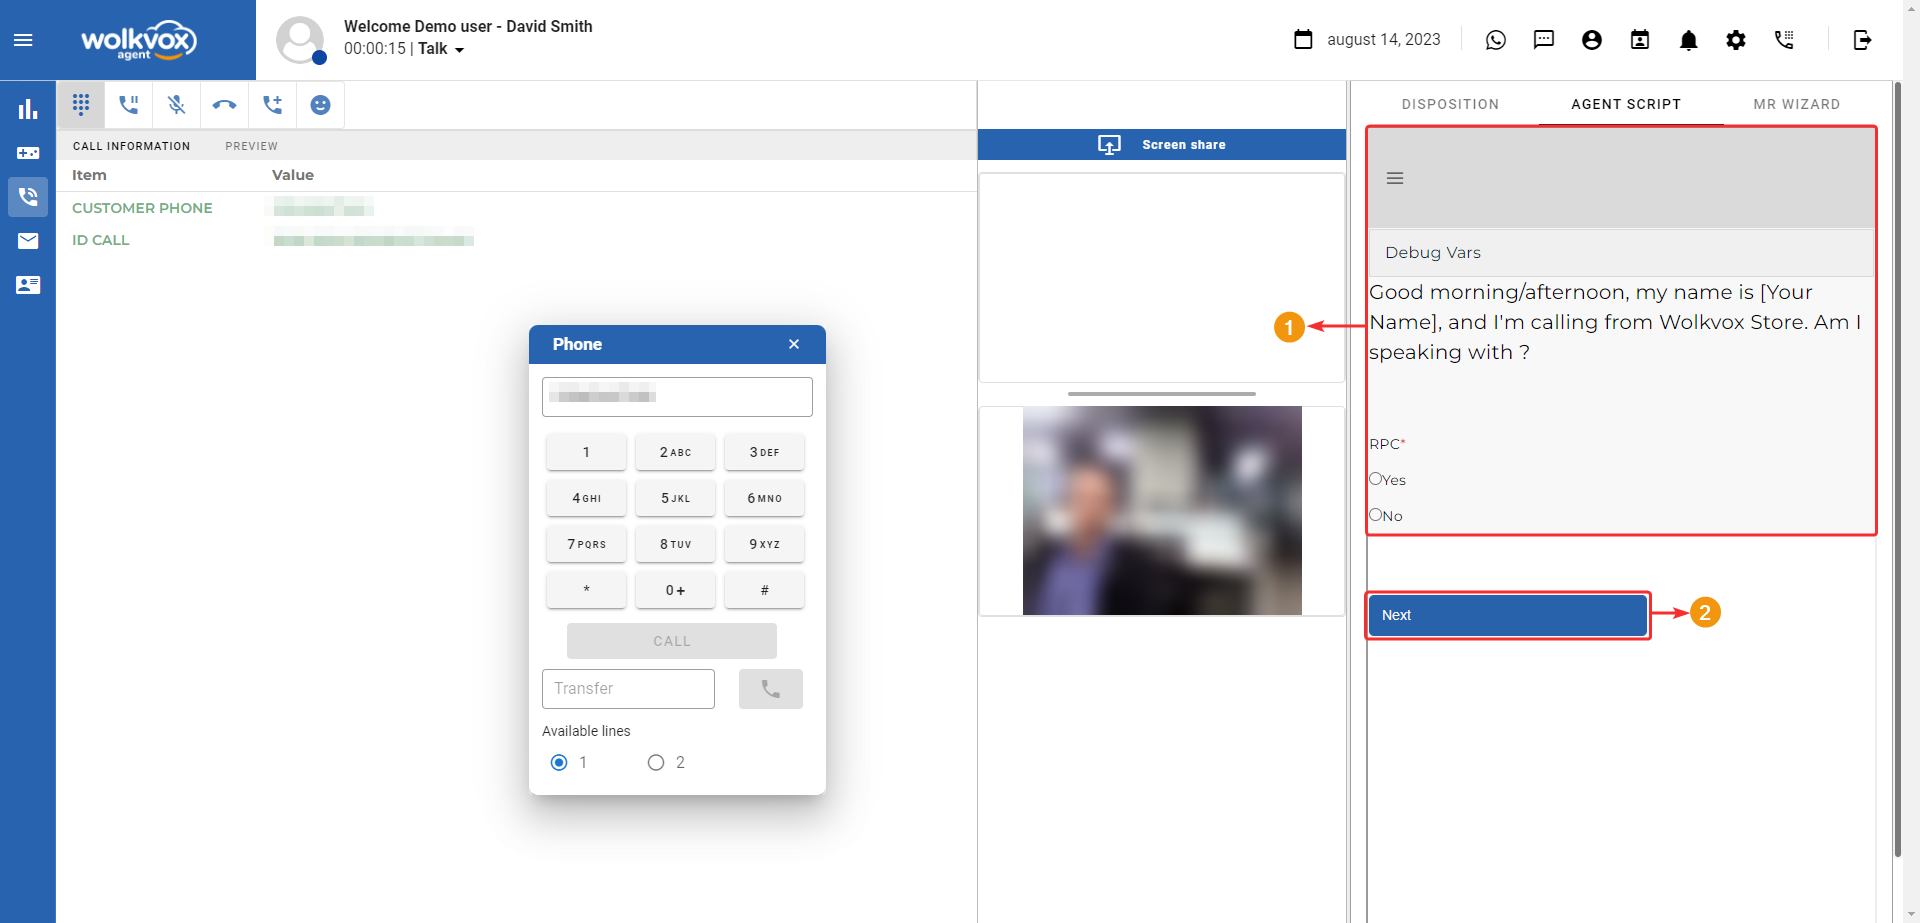
Agent Script #
This tab corresponds to a flow constructed from the Wolkvox Manager application by the leader or manager. As a result, not all modules or operations will have the same options in this tab. Each manager builds the “Agent Script” flow based on the needs of their operation.
This option serves as a guide for the agent to follow a specific series of steps during customer contact processes. After selecting the necessary option in each section that appears, you should click the “Next” button to proceed through each step of the flow until reaching the end.
Note: Even in this tool, it’s possible to incorporate customer interaction coding tools, so there’s no need to use the “Disposition” tab; instead, call coding can be done here within the “Agent Script.”
Campaigns and Preview Dialing Calls #
The type of dialing called “Preview” involves the agent deciding when to make a call and has the advantage that the agent has relevant information they can read before making the call. This type of campaign is recommended when pre-contact tasks are needed before the phone call.
If you see a tab named “Preview” next to the “Call Information” tab, it means the agent is assigned to a campaign of this type.
![]() In this type of campaign, the agent can read customer information before making the call.
In this type of campaign, the agent can read customer information before making the call.

- To log in to a preview-type campaign, click on the first field to display a dropdown list.
- Then, click on “Log In.”
Note: If the desired campaign doesn’t appear, you can click on the data refresh button (indicated in the following image). Also, keep in mind that only the campaigns to which the agent is assigned will appear.

The following image highlights the following elements:
- Active Campaign: This field displays the campaign in which you have logged in.
- Log Out: Allows you to exit the campaign.
- Assigned Records: Shows the total number of assigned customers the agent has in the active campaign.
- Pending Records: Displays the total number of customers that are yet to be contacted.
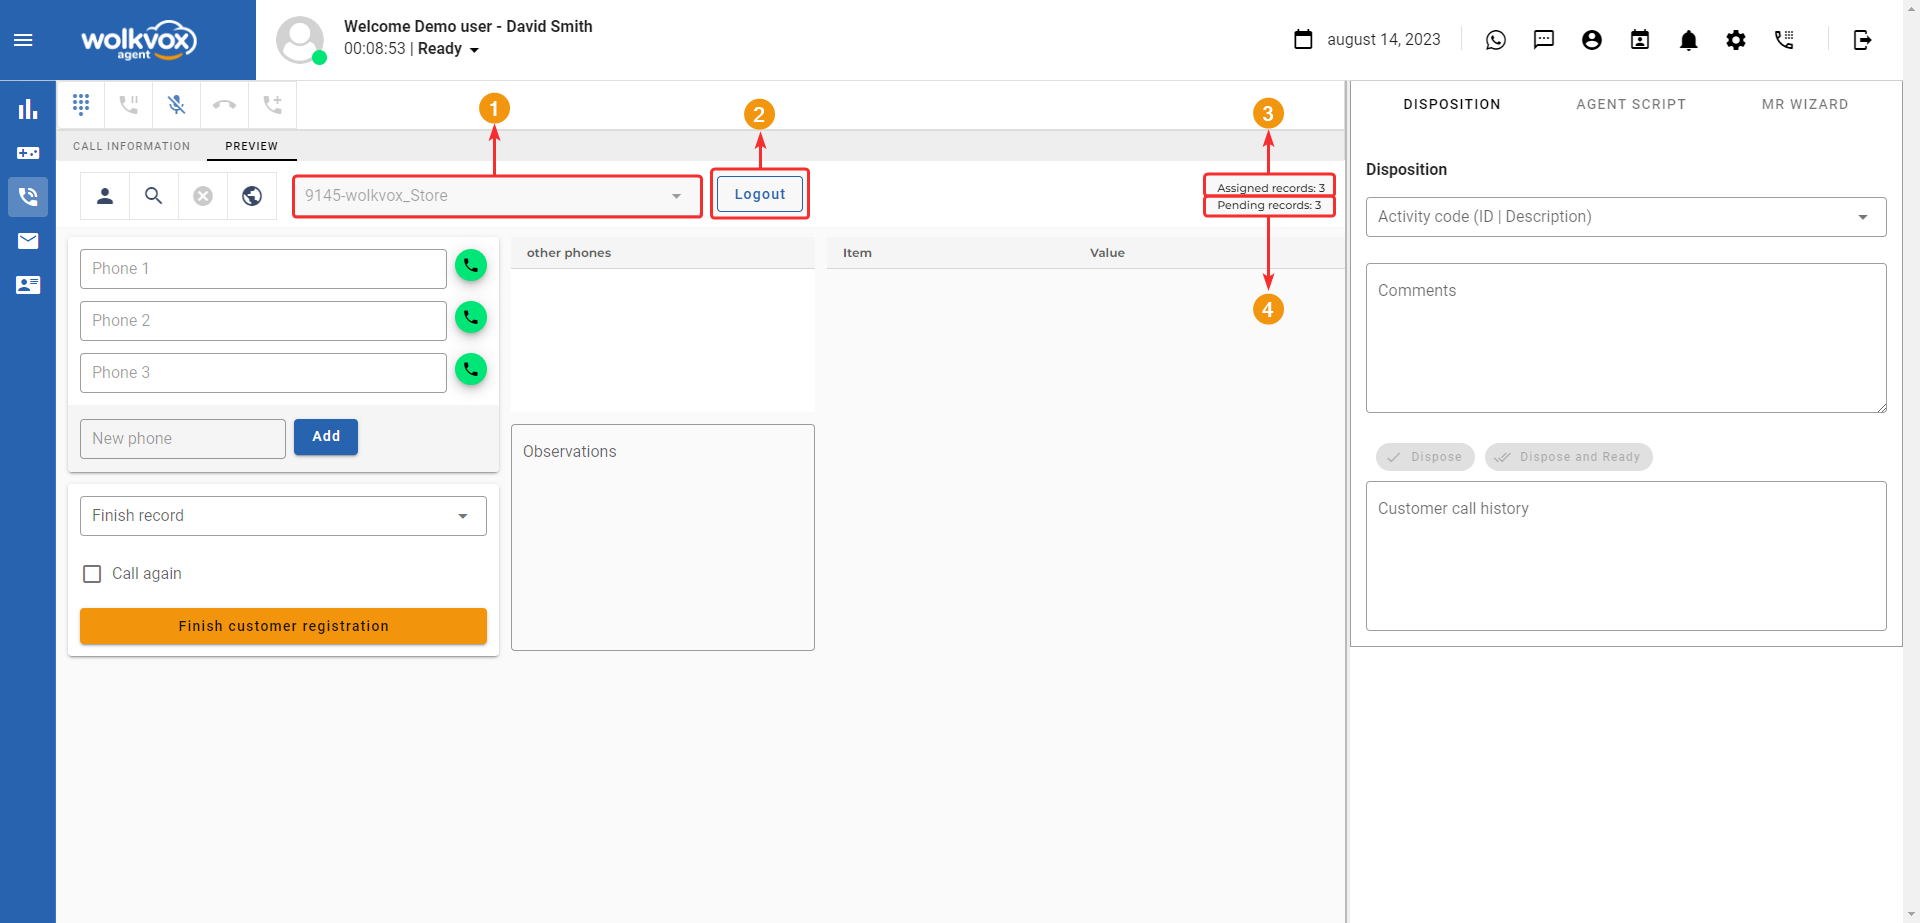
The main fields are as follows:
- Call and Record Area: This is where customer numbers are managed, and the call recording section is located. From here, customer numbers are dialed, and call records are completed.
- Information Area: This is where customer information uploaded by the campaign leader is displayed.
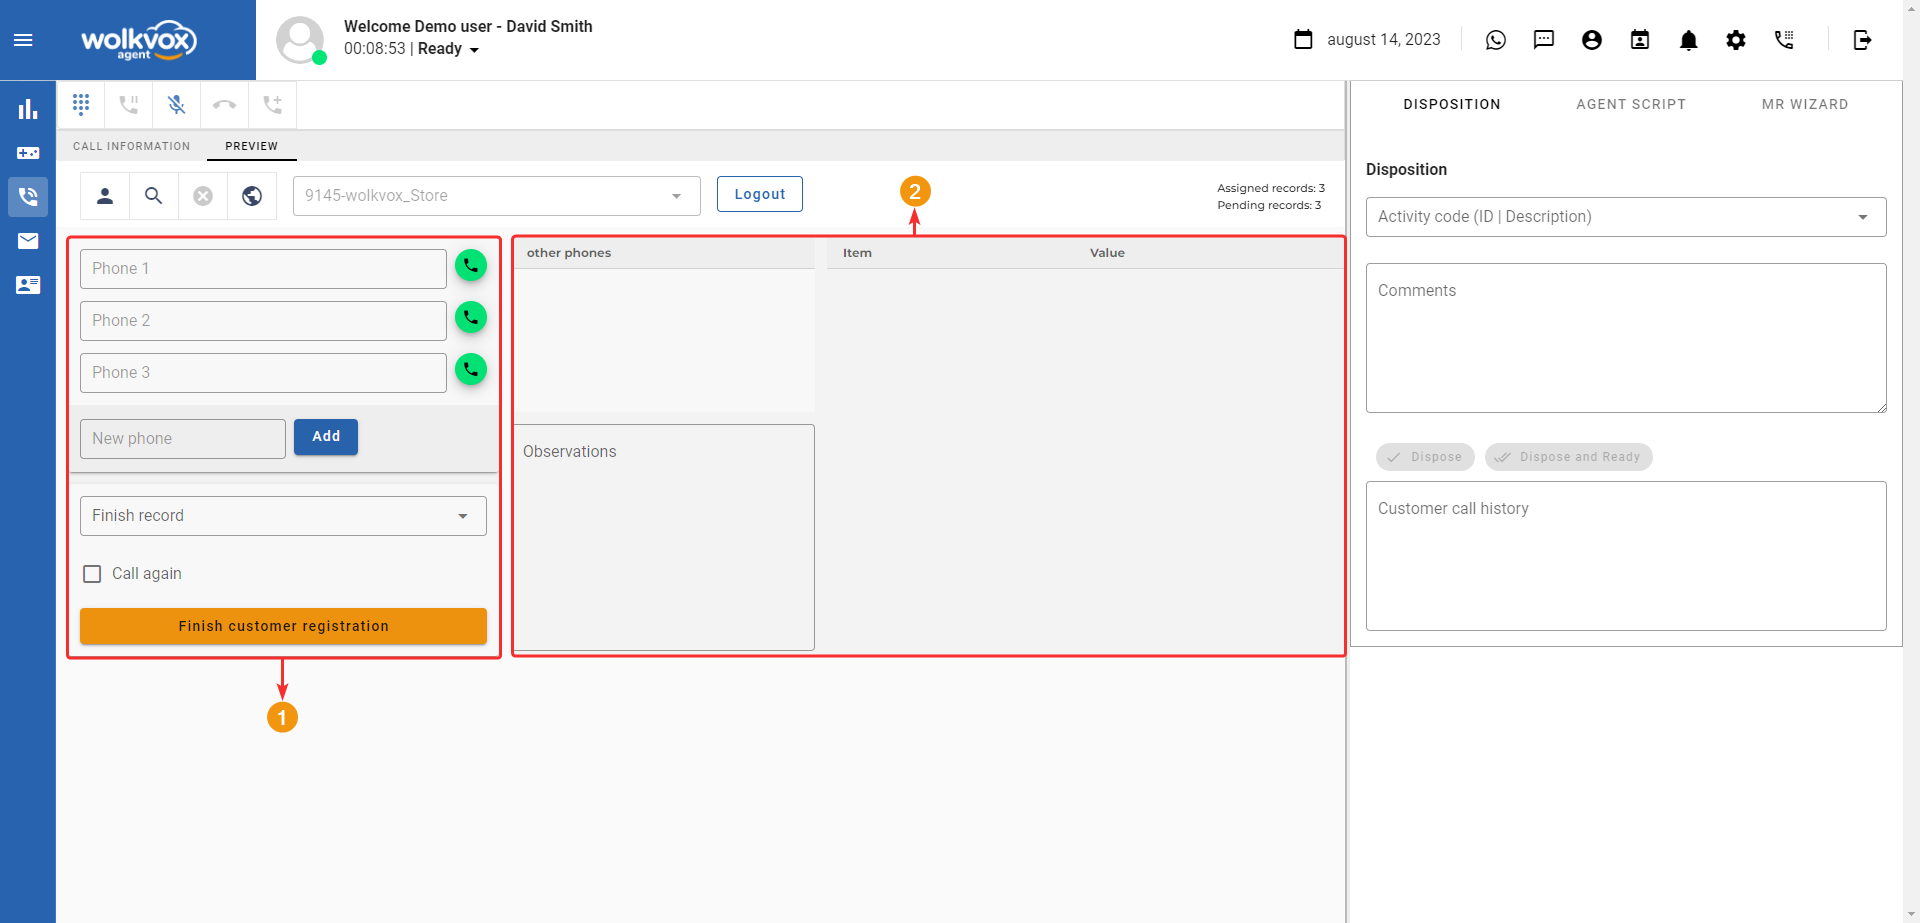
Next Customer #
This button allows you to request the data of the next customer or the first customer if the agent hasn’t completed the first record yet.

After clicking the “Next Customer” button, the Phone fields are filled with the customer’s numbers, and the agent can proceed to make a call using the green button located to the right of each phone field. However, before doing so, the agent can refer to relevant customer information in the table that includes “item” and “value.” This information helps the agent anticipate questions the customer may ask and also follow the script created by their administrator in the “Agent Script” tab.
Note: If you are unable to view the customer’s phone number, it’s because the administrator of your work area has chosen this setting. However, even if it doesn’t appear, you can click the button to initiate the call.
It is crucial to keep in mind that in preview dialing, it’s necessary to categorize the call and record customer information.
If you have completed the call process with the current customer, you should finalize the customer record. Once this field is submitted, the customer will not reappear since you have indicated that you’ve completed the process with the customer.
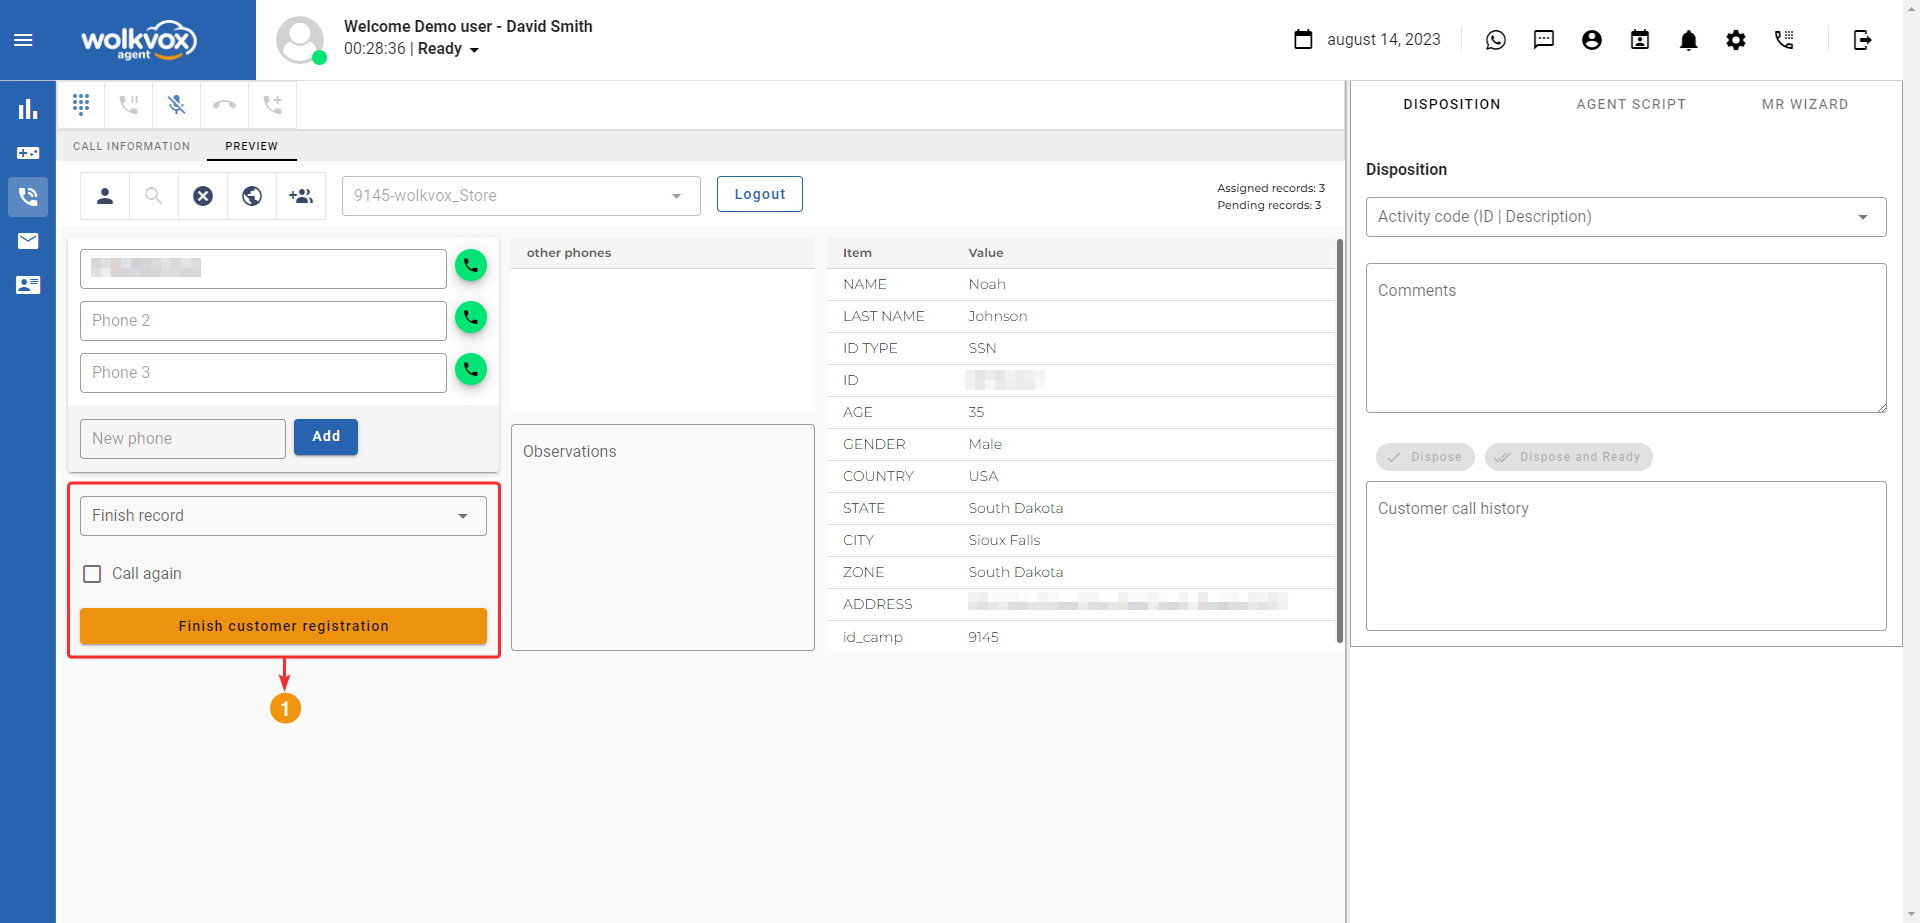
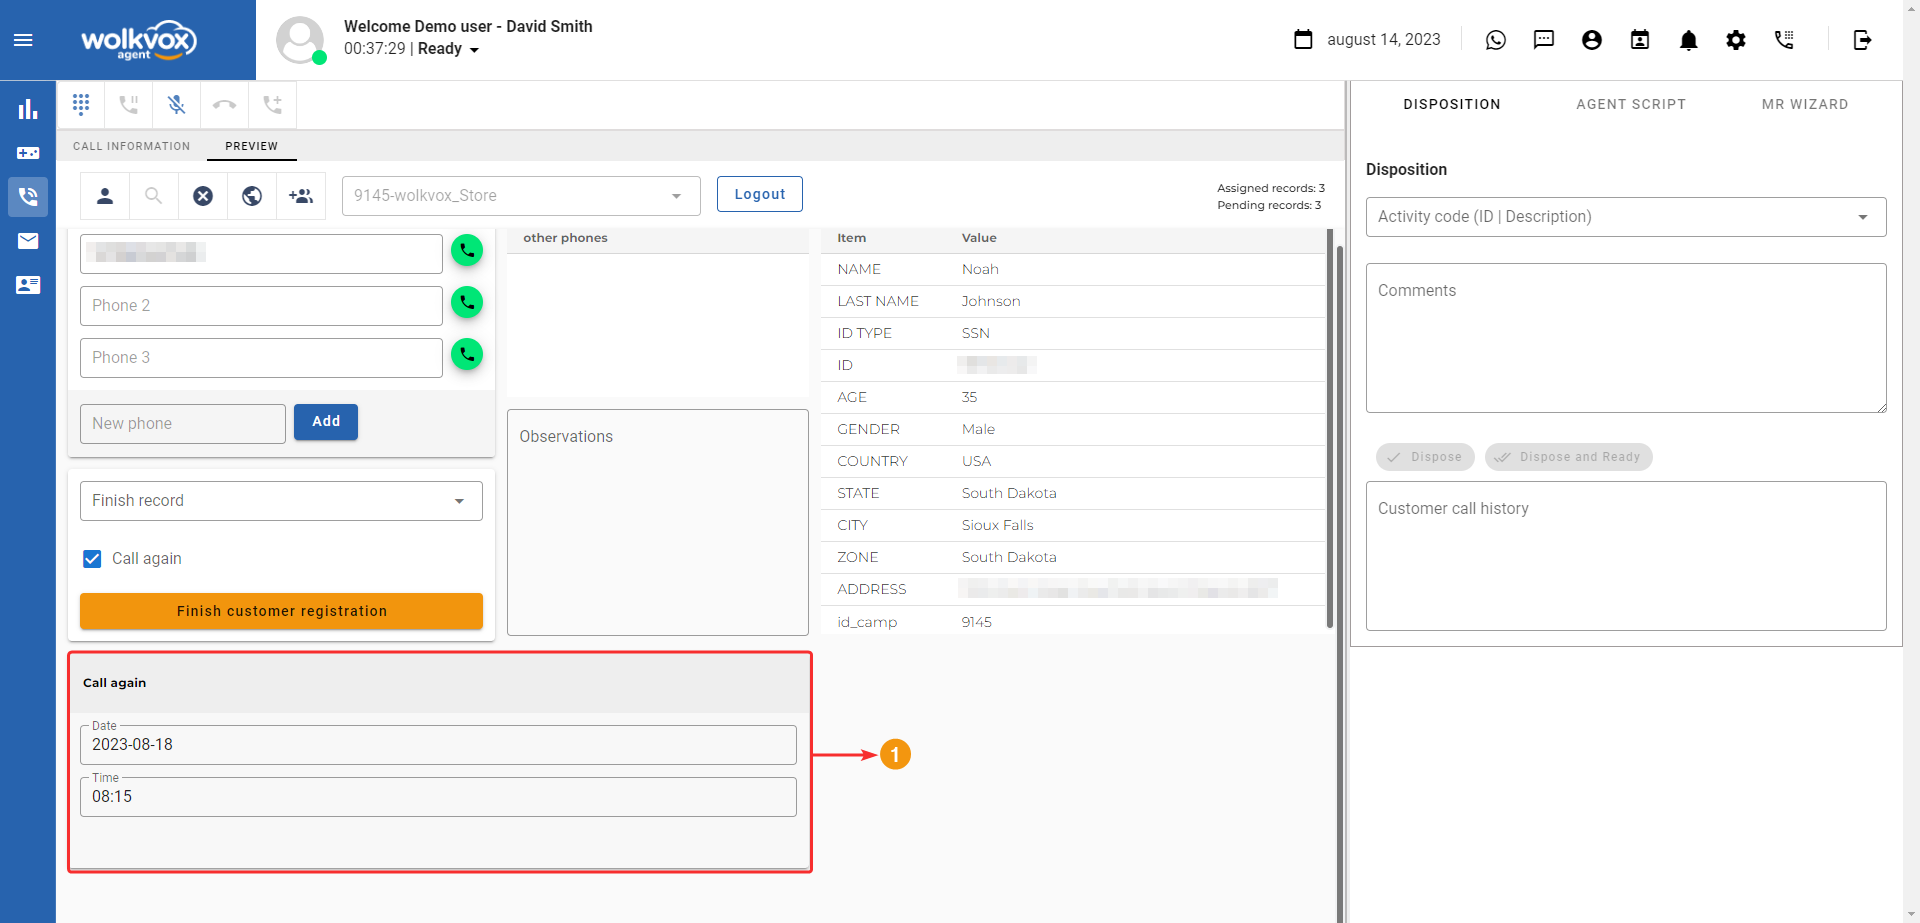
The customer record completion area also has an option called “Call again.” If you activate this option, a new section appears that allows you to select a date and time to schedule a future call. When the specified date arrives, the application will display an alert to remind the agent of the pending interaction with the customer.
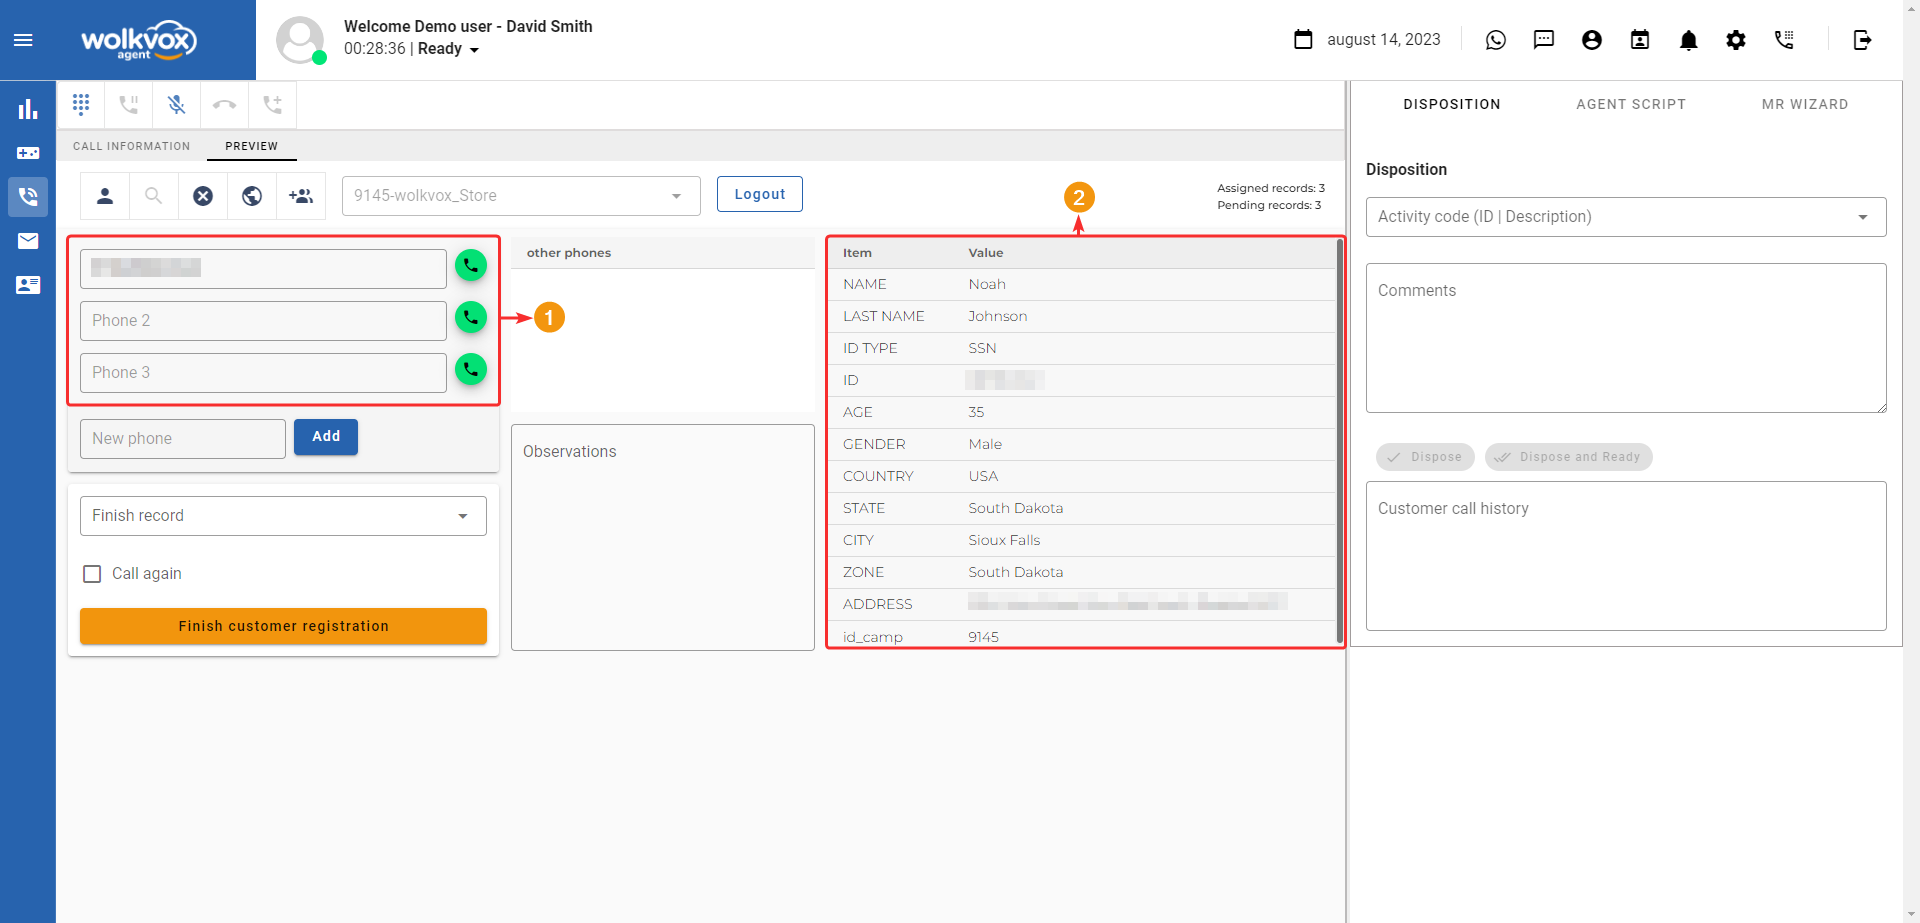
You can add phone numbers before or during a call. The numbers are stored in the fields in an organized manner. If there isn’t space for more in the first three fields, the next number you add will be placed under “Other phones.”

On the right-hand side area, you’ll find the coding or categorization of calls, a necessary process to conclude the ACW state for the agent.
In the case of making multiple calls to the same record or customer, you must code each of these, and the process will be recorded in the call history of the current customer.
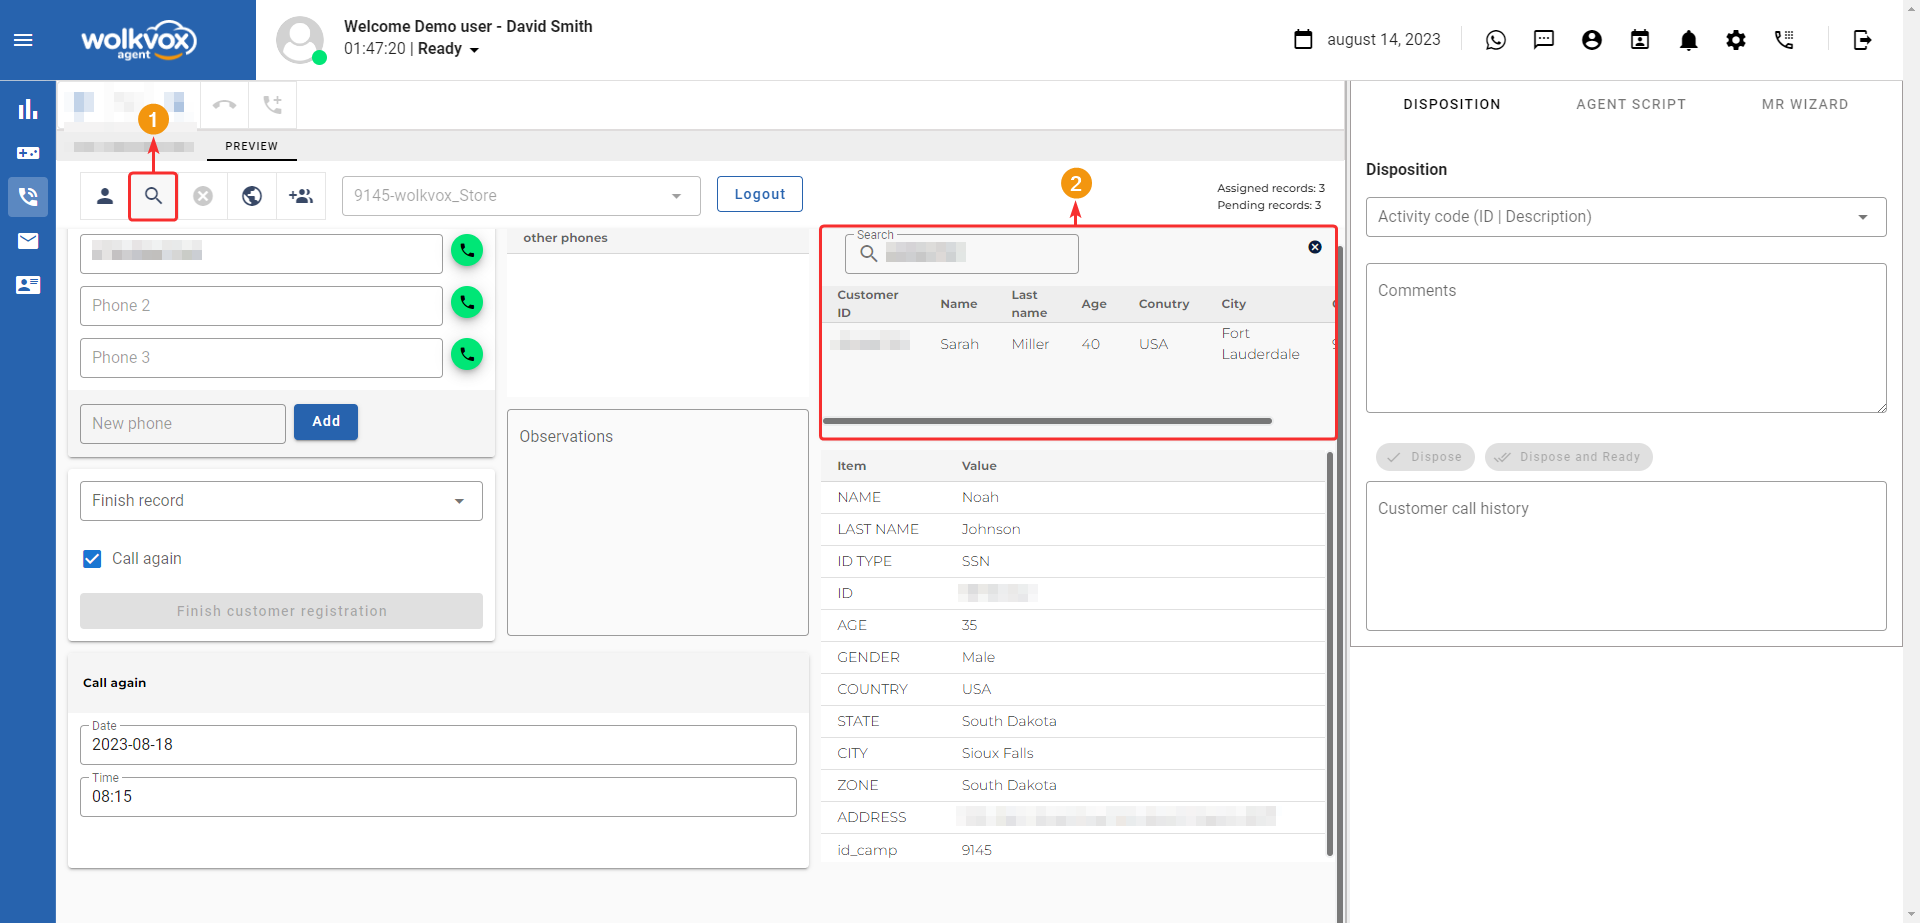
Search Customer #
This button allows you to search for a record or customer in the database. First, you need to enter the customer’s identification number in the new field.
Cancel Management for this Customer #
This button allows you to cancel the continuation of the current customer’s management; thus, the “Finish Customer Record” button will be disabled.

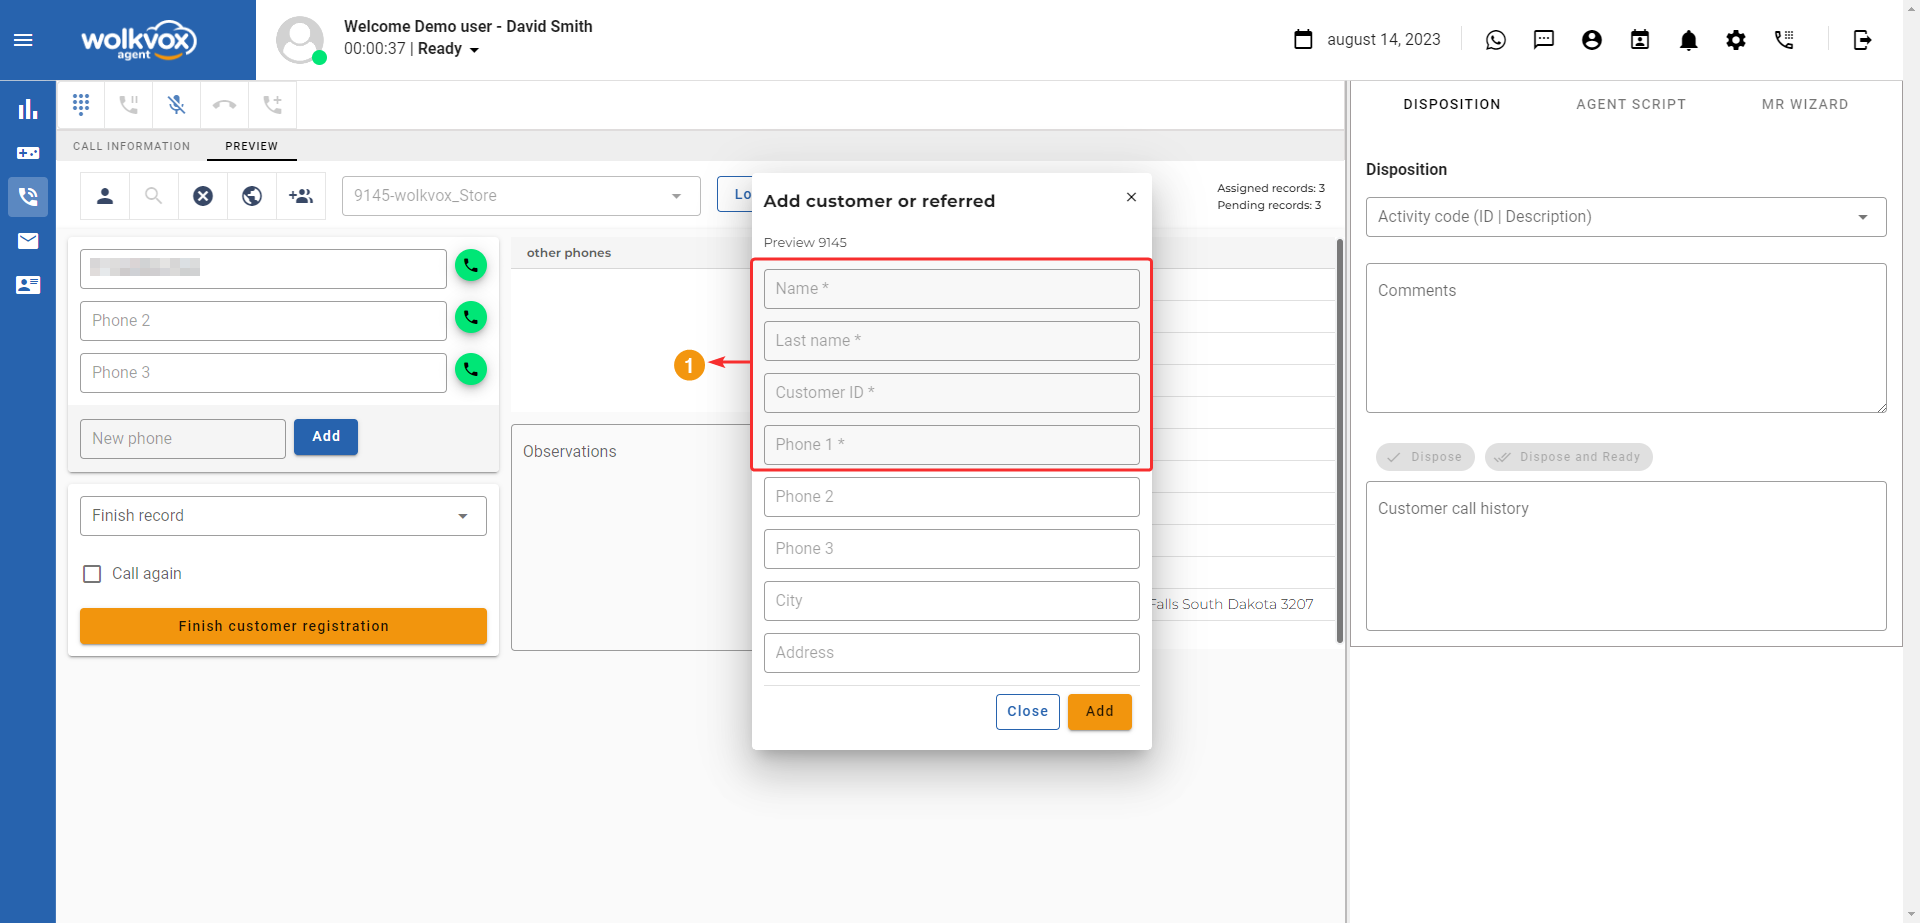
Add Customer or Referral #
The button highlighted in the following image allows you to add a customer or referral to the active campaign’s database.
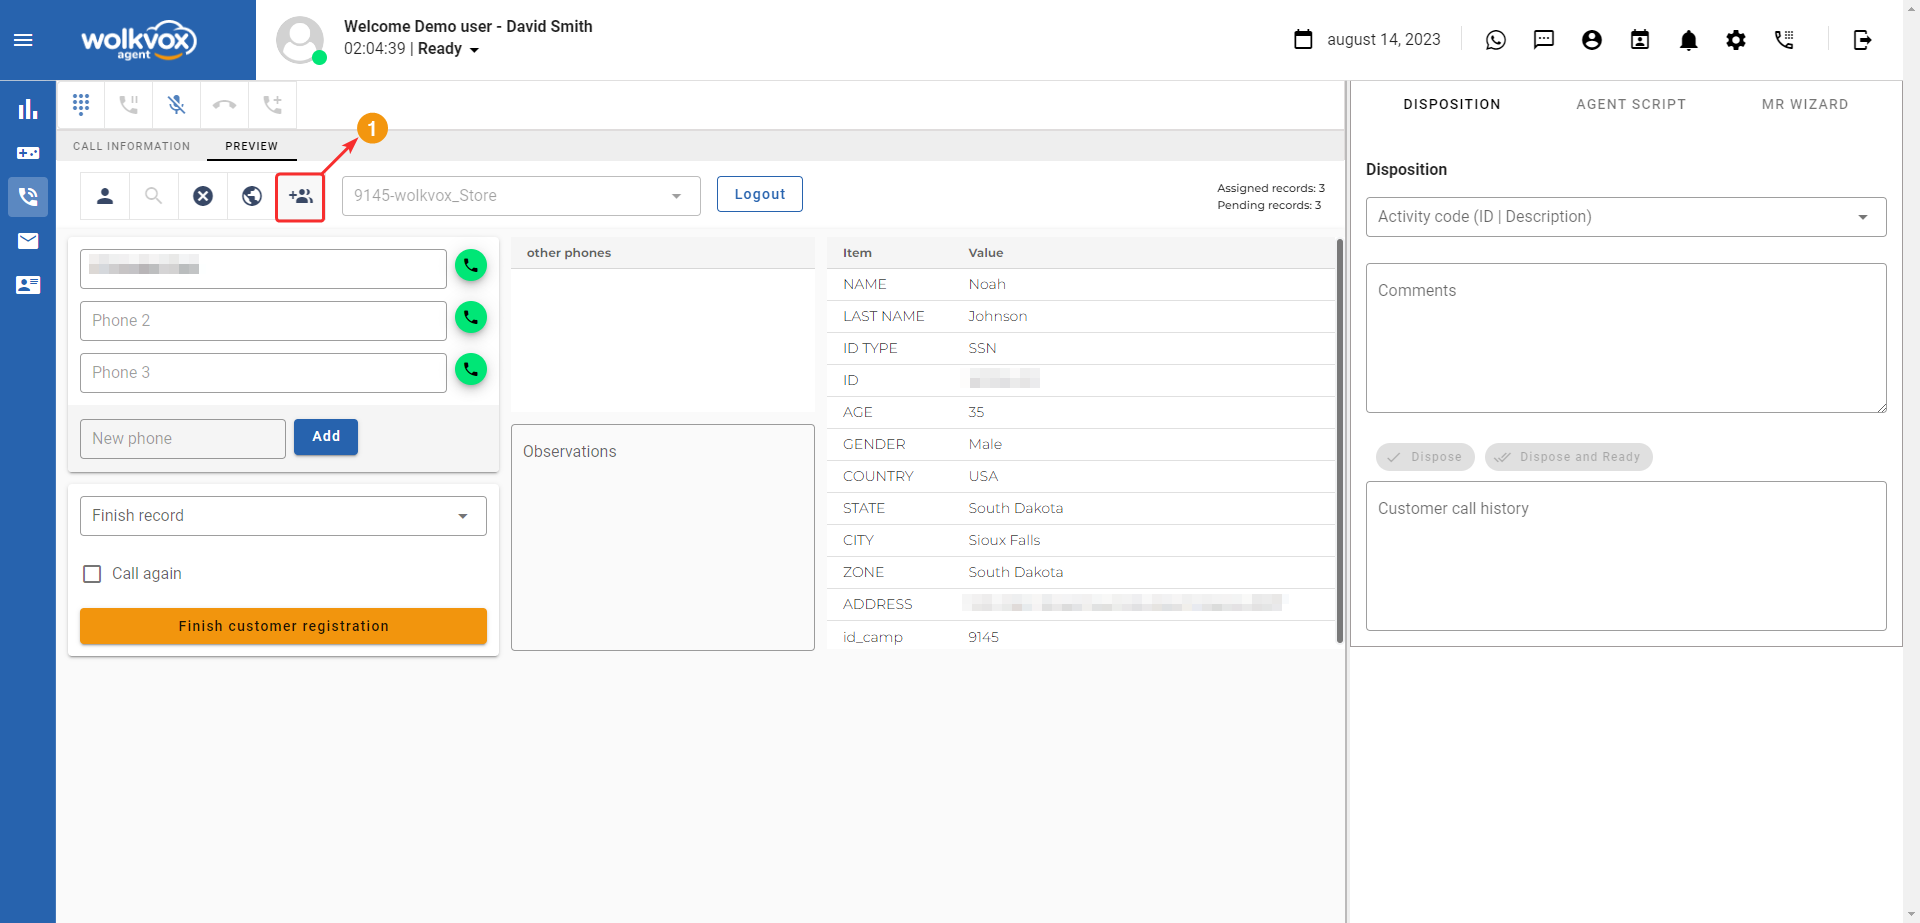
After clicking the button, a new window appears with several fields where you can input the customer or referral’s information. The mandatory data for this option includes: first name, last name, customer’s identification number, and phone number. As optional, there are two additional fields for phone numbers, city, and address.
Once you click the “Add” button, the customer will be added to the campaign’s database, and their information will be available for future reference.
Campaigns and Calls with Automatic Dialing #
These types of campaigns are divided into two: progressive and predictive.
- Predictive Type: This dialing type is conducted through an algorithm that aims to keep agents occupied for the majority of their work shift. This system initially calls the customer, and once the call is answered, it’s transferred to an available agent line.
- Progressive Type: Unlike predictive, this dialer only places calls when agents are available. This system offers greater reliability since we can be sure that an agent will be ready when a customer accepts the call.
![]() Campaigns must be initiated by the leaders of the process. Once the wolkvox Manager application administrator initiates a campaign, automatic dialing will commence.
Campaigns must be initiated by the leaders of the process. Once the wolkvox Manager application administrator initiates a campaign, automatic dialing will commence.
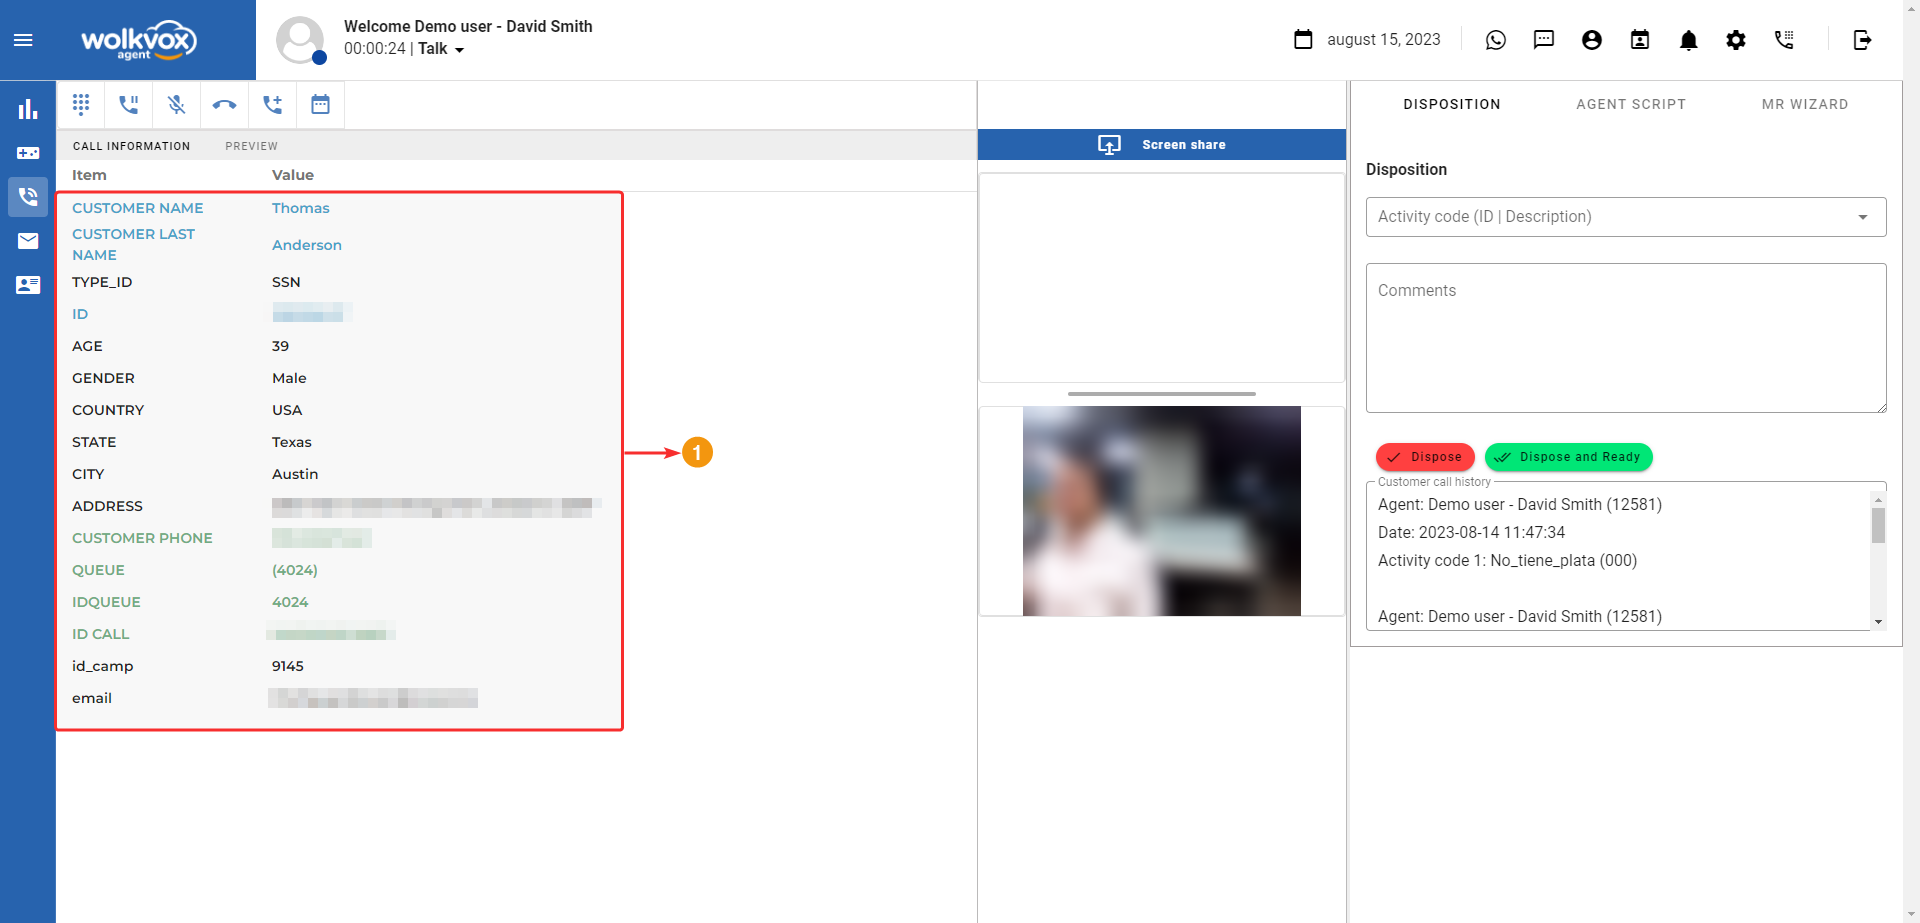
Once the system finds a call for the agent, in the highlighted section of the image, the customer information that has been included in the database will appear.

The information provided in this section is as follows:
- Customer’s First and Last Name.
- Type_ID: Refers to the customer’s identification type.
- ID: The customer’s identification number.
- General customer data such as age, gender, country, department, city, and the phone number the call was made to.
- Queue: Refers to the skill, queue, or agent group through which the call was made.
- ID Queue: Identification number of the skill, queue, or agent group.
- ID Call: A unique call identification number.
- Opt1, Opt2, Opt3, Opt4, among others: Additional data loaded into the database by the campaign leader to provide the agent with a broader context during the call.
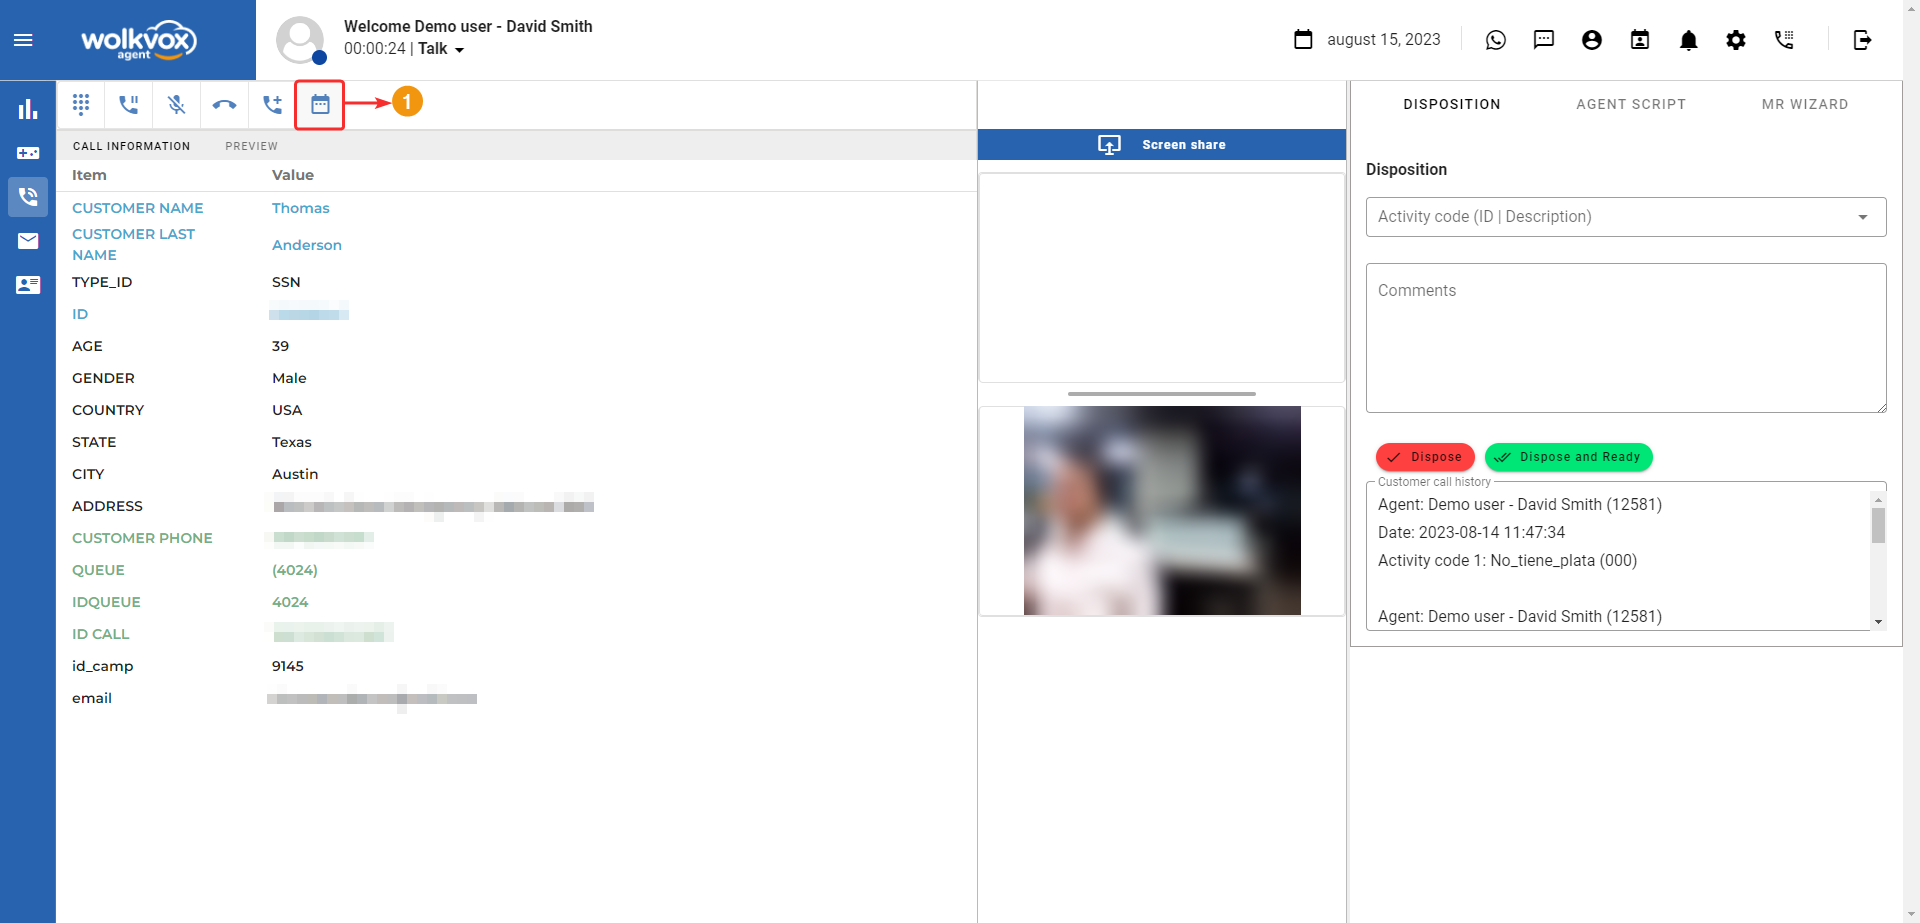
Recall #
If you need to make a call to a customer again, the “Recall” button allows you to schedule a call and view the list of pending callbacks.
After clicking the “Recall” button, a new window opens where you can identify two tabs, “Schedule Callbacks” and “Pending Callbacks.”
Schedule Callbacks Tab
The “Schedule Callbacks” tab is the section where you can schedule a call for future dialing.
- In the first field, you must select the date for the callback.
- In the second field, you select the call time.
- In the third field, you can modify the customer’s phone number if needed; otherwise, you can leave it as it is.
- After that, there are two selectable options: “Automatic – Any Agent” and “Manual – Callback”. By selecting the first option, automatic dialing will occur once the date and time set by the agent arrives. That is, when the specified date and time arrive, the system will search for an available agent and assign the call.
- On the other hand, with the second option, the call must be made manually. With this option, when the specified date and time arrive, the system will alert the agent that it’s time to make the previously scheduled call.
- Click on “Call again” to schedule the call according to the configuration made in the previous options.
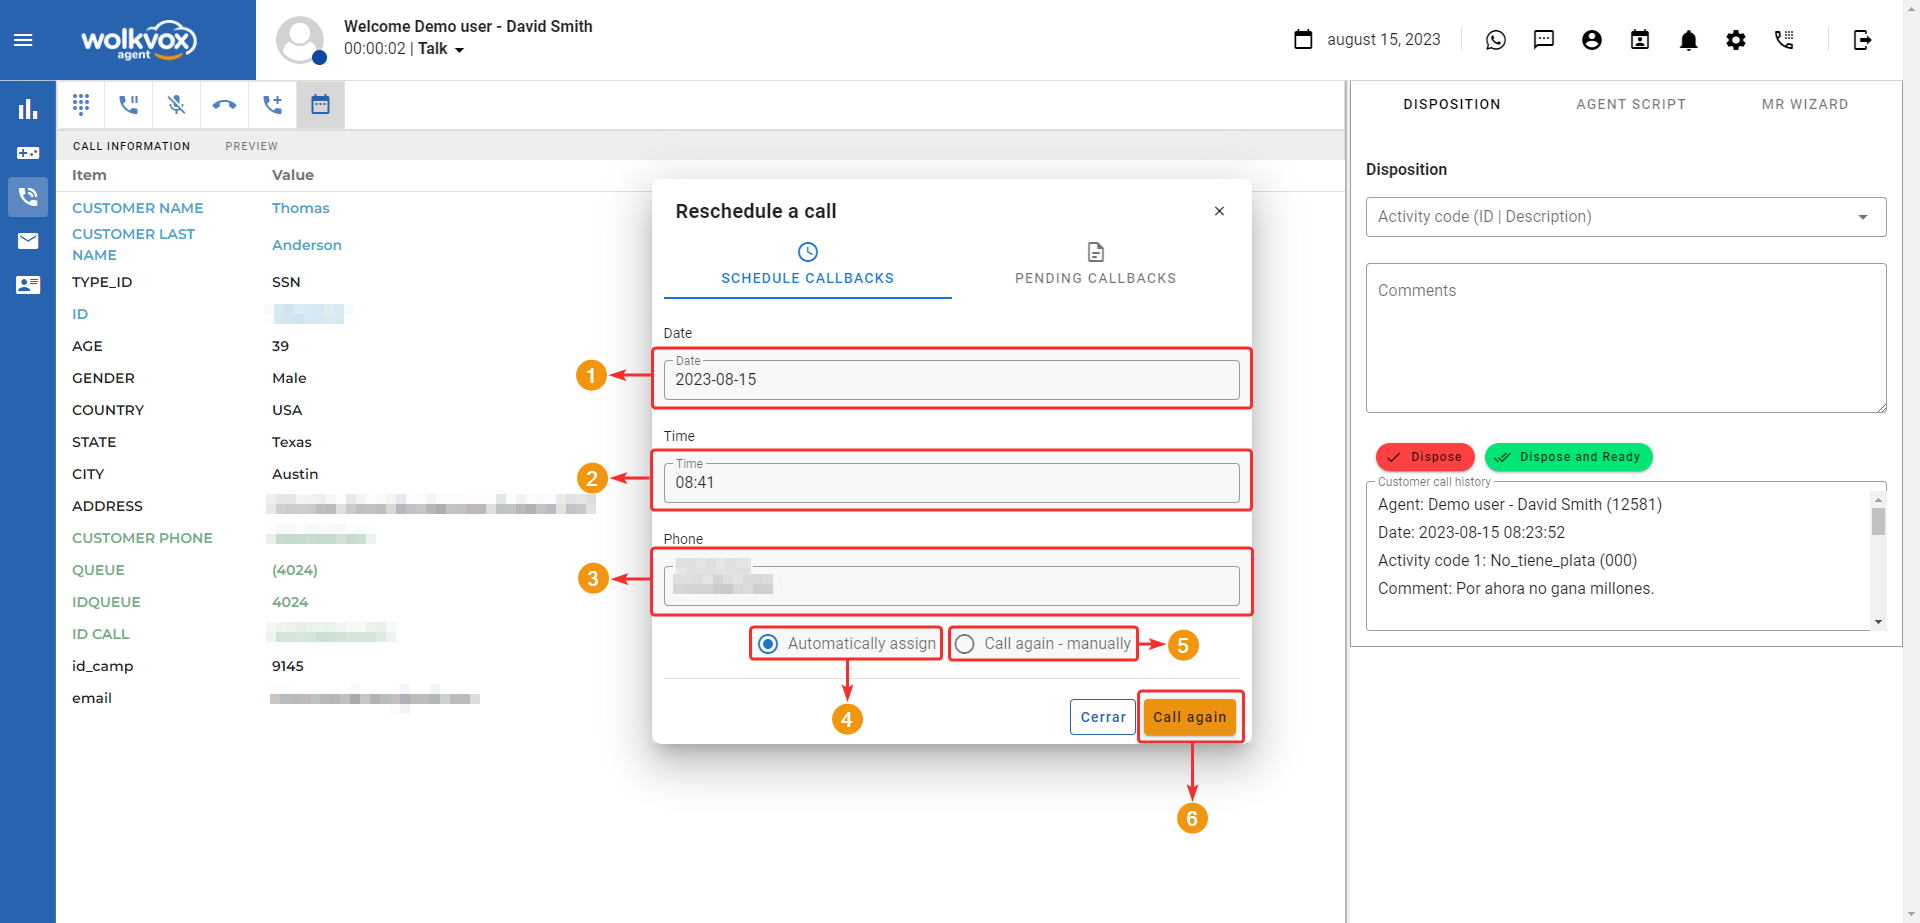
Pending Callbacks Tab
In this section, there is a table displaying the callbacks that the agent has scheduled as pending, along with a button to refresh the call list.

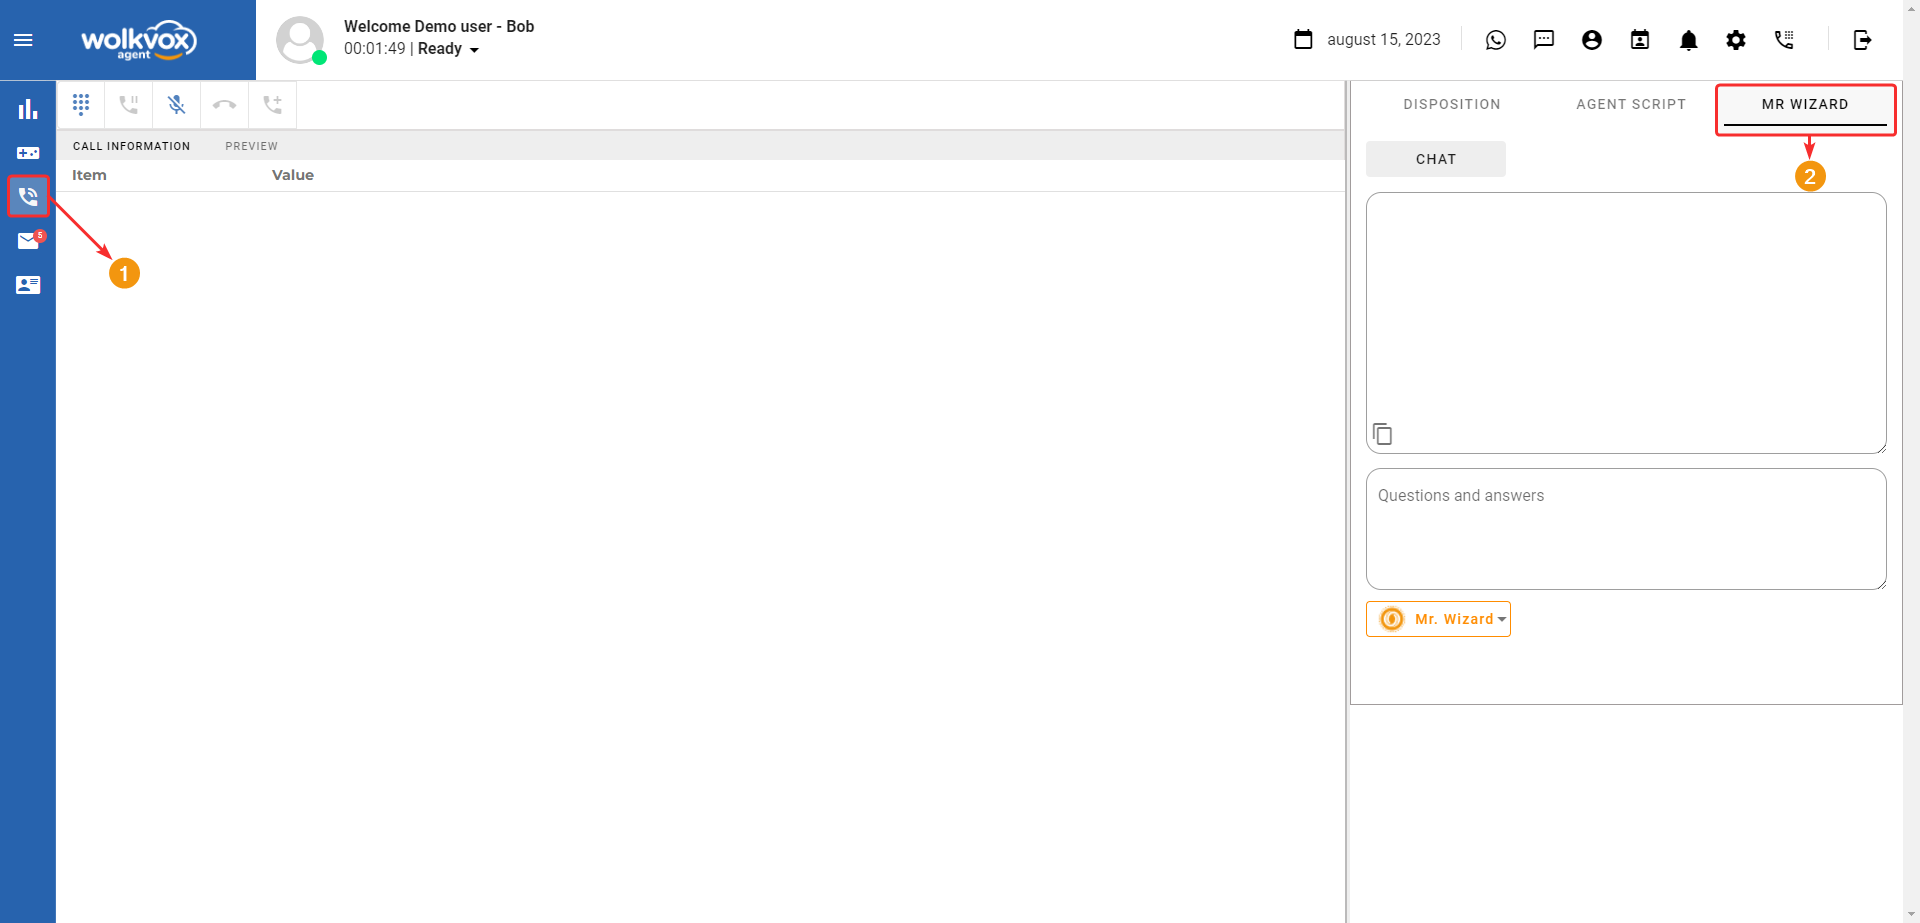
Mr. Wizard #
Mr. Wizard is an additional tool that provides several advantages: getting answers to questions that the agent asks the system’s bot, summarizing text, and checking the spelling of a text.
If your operation’s administrator decides to activate the tool, the “Mr. Wizard” tab will be enabled in the agent’s application.
Note: If you observe the “Mr. Wizard” button, you can see that it has a downward arrow. This means that if you right-click, a dropdown menu with three options will appear. Choose the option according to your needs, whether you want to get answers to any questions you have, obtain a summary, or have the bot perform a spelling check.
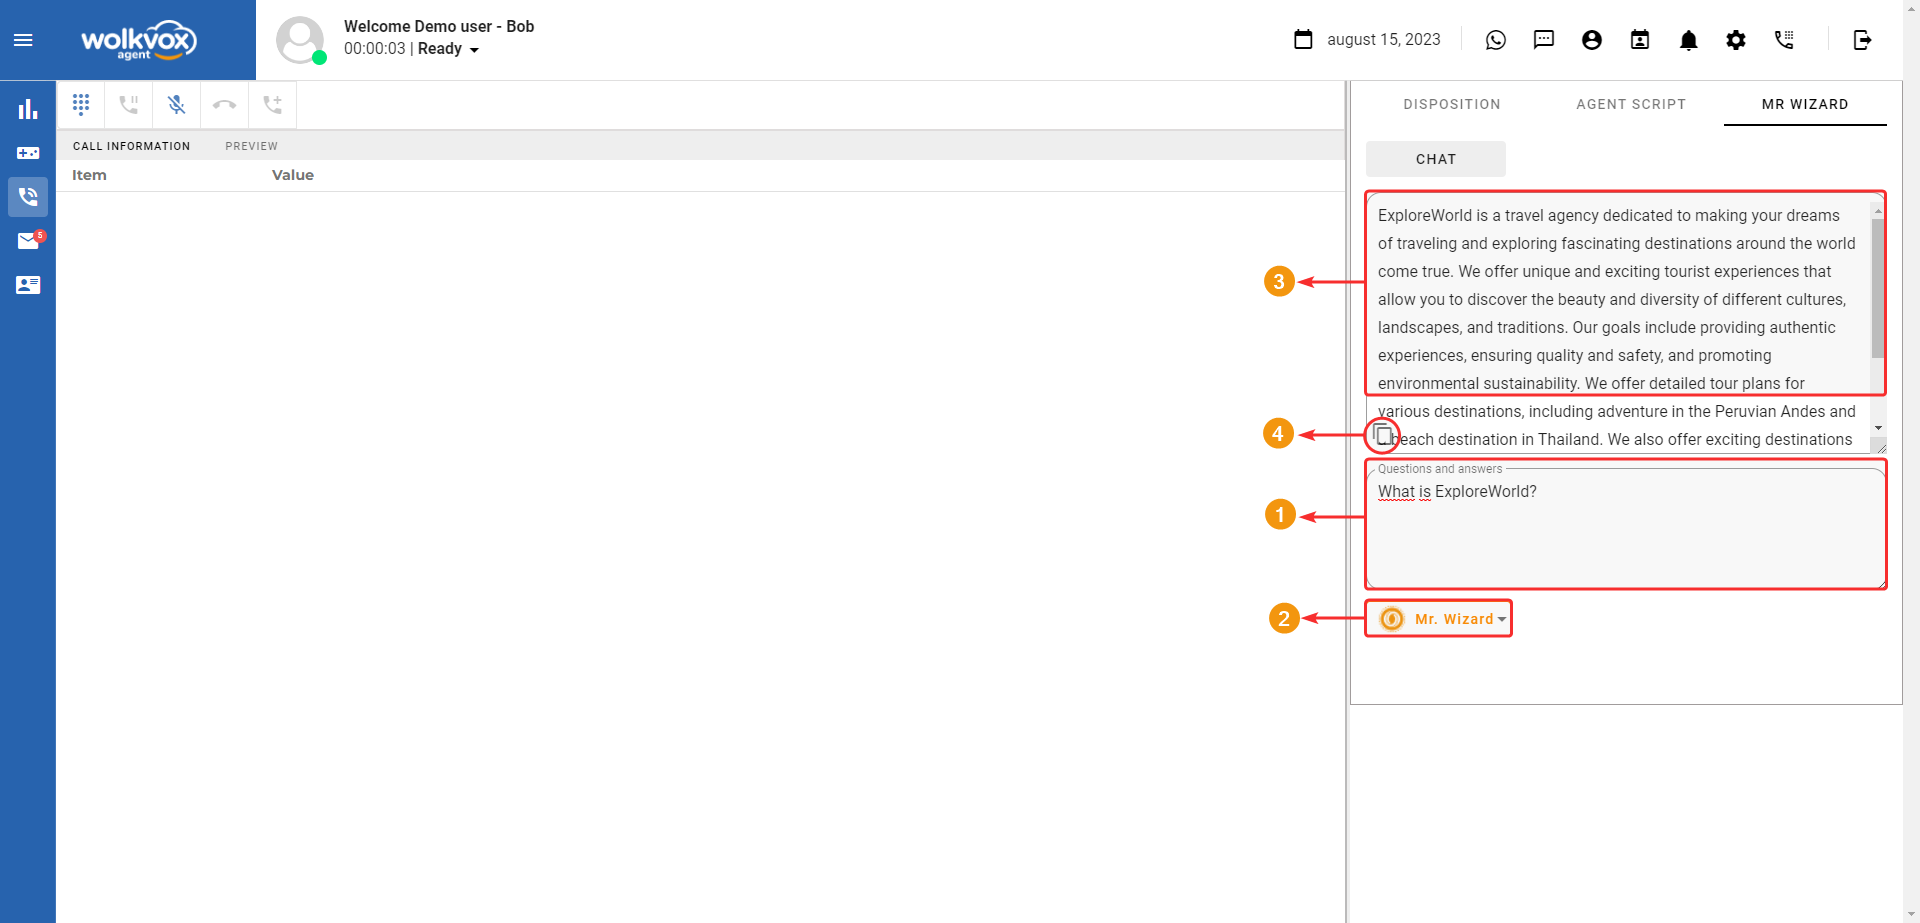
Questions and Answers
- In the designated field, the agent should write a question related to a task they need to resolve with the customer.
- Once the question is written, the agent clicks on the “Submit” button.
- The answer related to the question the agent wrote will appear at the top. The obtained response depends on the training provided by the operation’s administrator to the system’s bot. In other words, it’s the operation’s administrator who should train the bot’s knowledge regarding the necessary topics for various company processes.
- As an optional feature, there is a button to copy the response text.
Summary
- To obtain a summary, access the dropdown menu of the “Mr. Wizard” button and select the “Summary” option.
- Give the bot an instruction on how you want the summary, for example: “Provide me with a brief one-paragraph summary of the following text.”
- You will receive your summary in the highlighted area.
- You have the option to use the button to copy the summary provided by the bot.

Interactions #
![]() This section aims to serve as an omnichannel platform to simultaneously address your customers present on multiple social platforms.
This section aims to serve as an omnichannel platform to simultaneously address your customers present on multiple social platforms.
For example, you can view interactions from Email, Facebook, Twitter, and Instagram. It all depends on the integrated platforms in your operation, and this management is carried out by the administrator of Wolkvox Manager in your process.
- In this section, you’ll find the list of received interactions.
- At the bottom, you’ll identify the buttons to navigate through pages if you have a lot of interactions on the list.

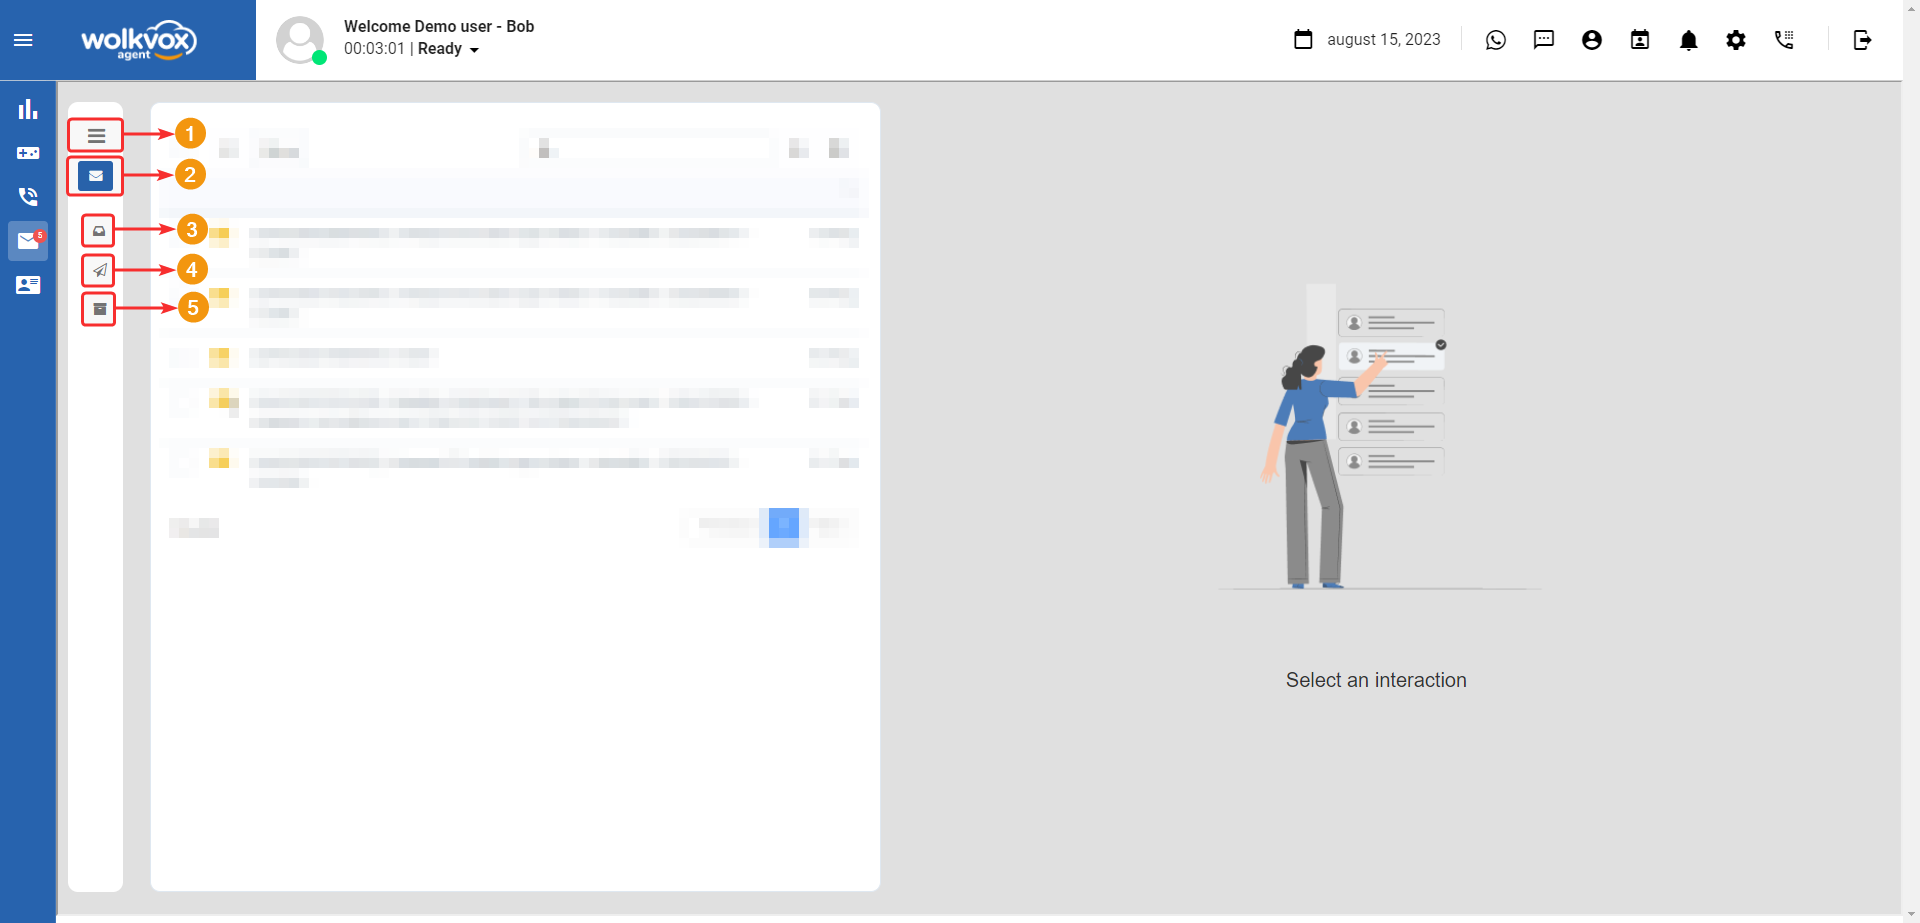
Within this section, we identify five buttons that correspond to:
- Expand Menu: This button displays the corresponding menu in an expanded way to view the titles of each button.
- New Email: Allows you to go to the section where a new message is created to be sent via email.
- Received Messages: Opens the email inbox for new messages received via Instagram, Facebook, or Twitter. However, this happens if the operation or module has configured the integration of any of these channels.
- Sent Messages: This button displays emails sent by the agent.
- Archived Messages: It’s the inbox for emails that have been saved by the agent.
Advanced Interaction Search #
![]() To expedite the search for an interaction when you have a large number in your inbox, the search field is available. In this field, you can type a keyword related to the search you want to find. Additionally, the advanced search tool is also available to further filter the list of interactions. This tool is explained below.
To expedite the search for an interaction when you have a large number in your inbox, the search field is available. In this field, you can type a keyword related to the search you want to find. Additionally, the advanced search tool is also available to further filter the list of interactions. This tool is explained below.

Filter by Interaction Source #
![]() To streamline omnichannel or multi-platform work, it’s also possible to filter interactions according to their source (email, Facebook, Instagram, or Twitter).
To streamline omnichannel or multi-platform work, it’s also possible to filter interactions according to their source (email, Facebook, Instagram, or Twitter).

Transfer or Archive an Interaction #
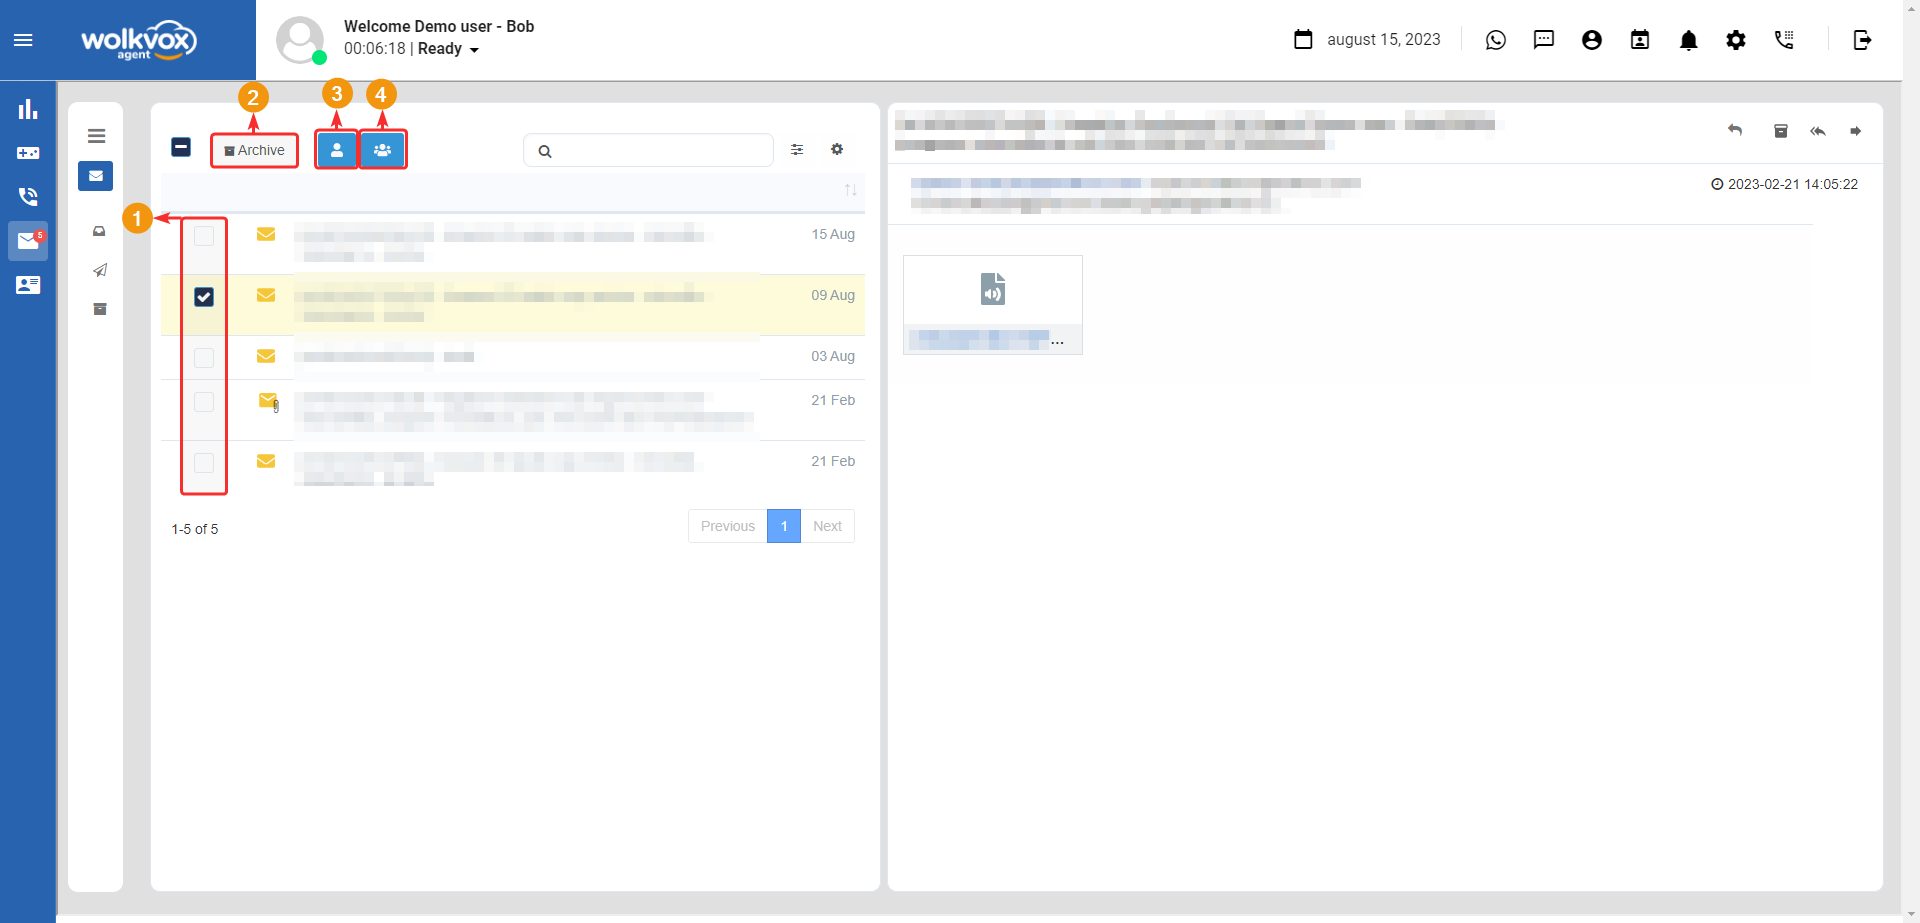
- In the interactions list, each interaction has a square on its left side that can be clicked to activate the selection of that interaction, in order to display the buttons. These buttons are used to:
- Archive the interaction.
- Transfer the interaction to another agent.
- Transfer the interaction to a skill.
Interaction in Facebook and Instagram Posts #
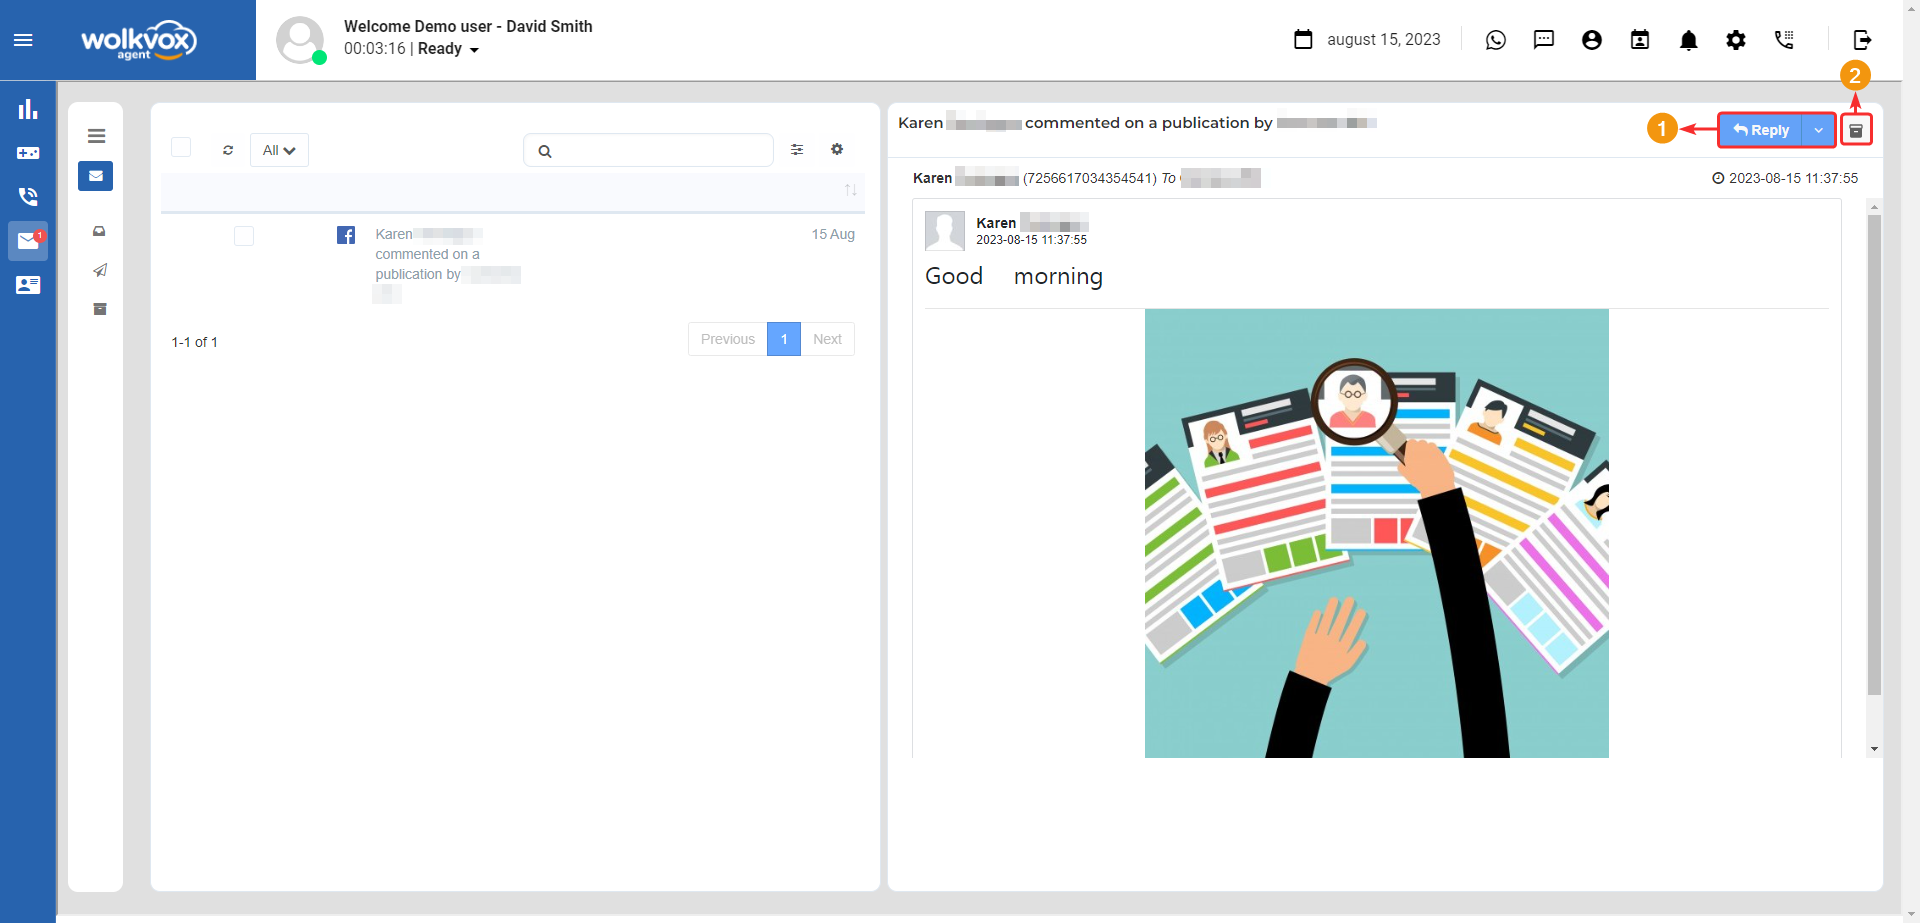
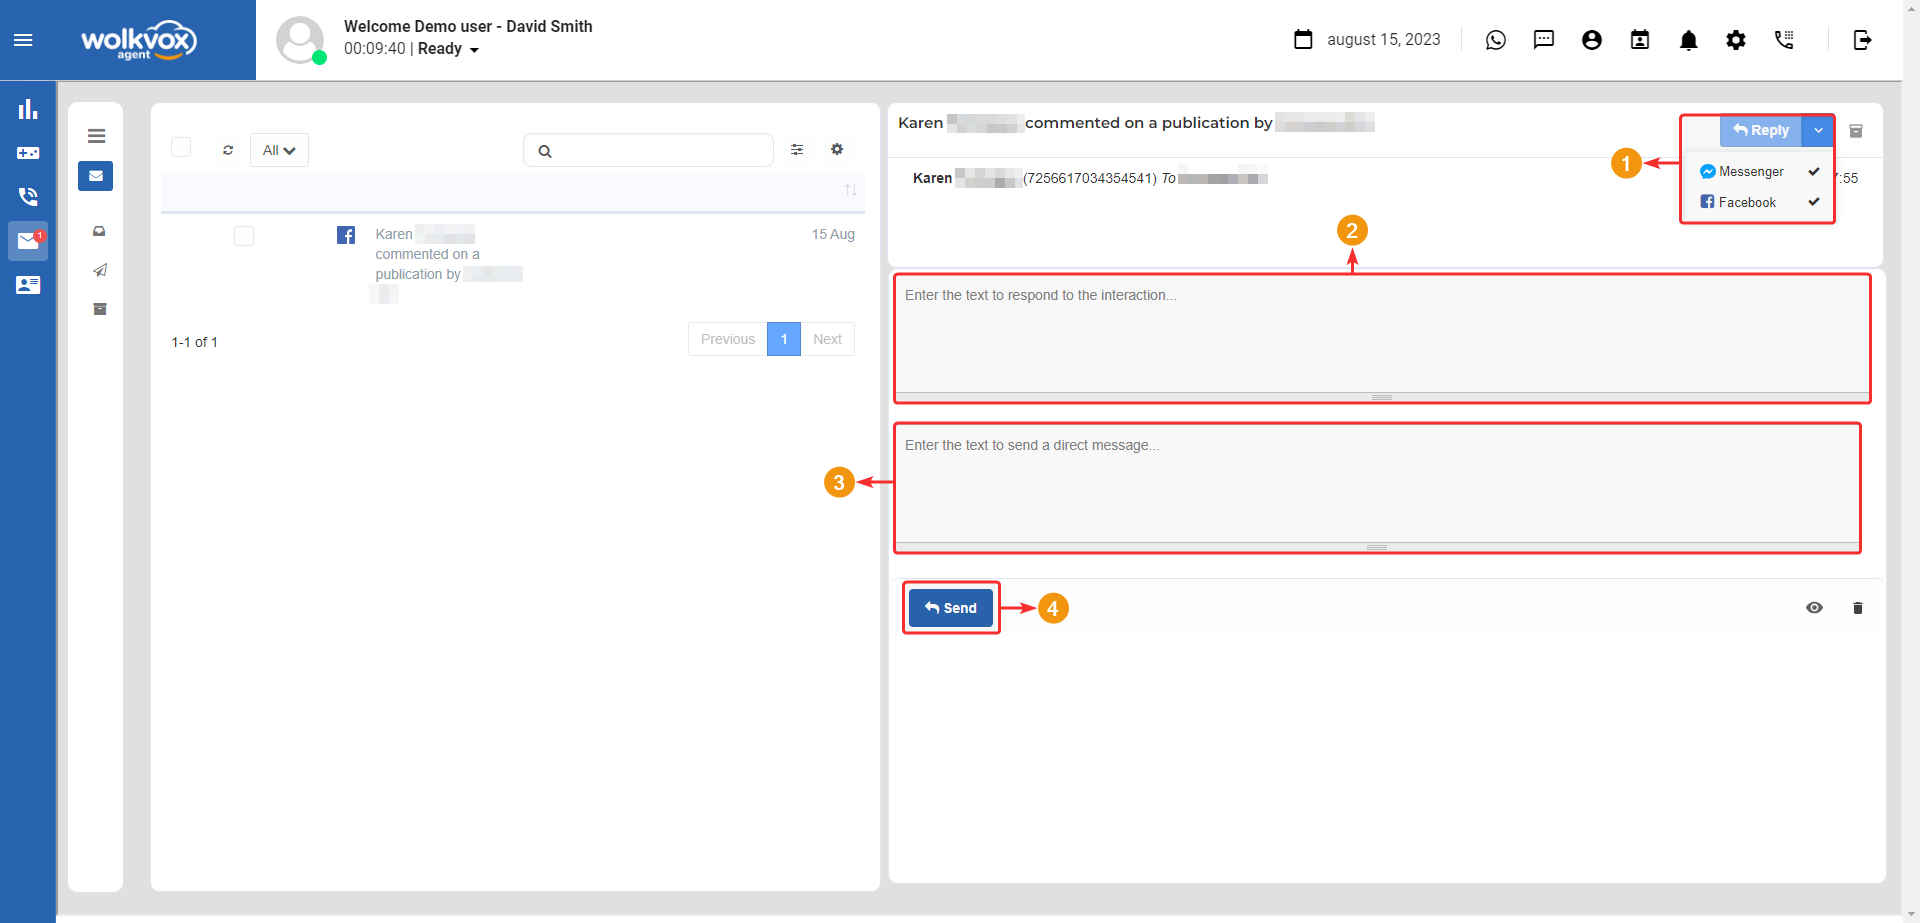
![]() When it comes to an interaction on Instagram or Facebook posts, the agent will be able to respond to the interaction using a message through Messenger chat or in the comment section of the post. The buttons available for interactions of this type are as follows:
When it comes to an interaction on Instagram or Facebook posts, the agent will be able to respond to the interaction using a message through Messenger chat or in the comment section of the post. The buttons available for interactions of this type are as follows:
- Respond to Interaction.
- Archive Interaction.
If you click on the arrow indicated in the following image, a dropdown menu opens where you can select whether you will respond to the interaction via Chat message through Messenger or in the comment section of the post.
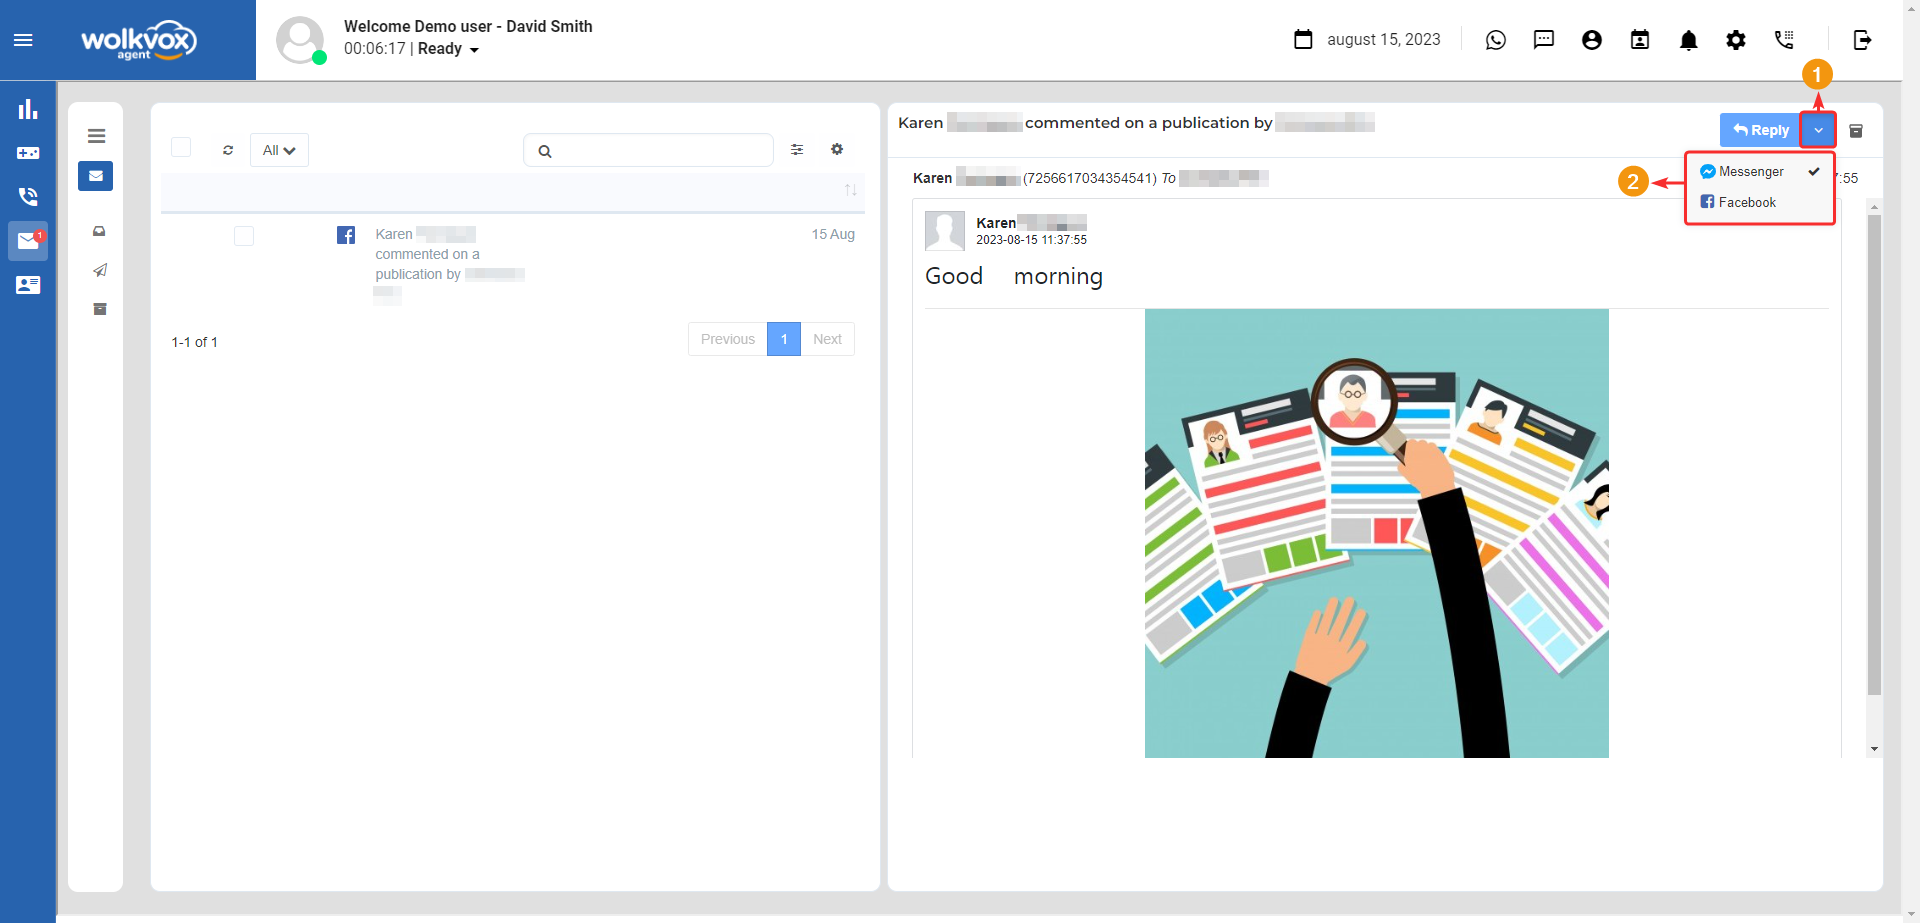
- Then, one or two fields are enabled for writing the message, depending on whether we have selected to respond through “Direct Message” and/or “Comment.”
- The field containing the text “Enter the text to reply to the interaction” is where you should write if you wish to reply via the post’s comments.
- The field containing the text “Enter the text to send a direct message” is used to reply via direct message on Messenger.
- After writing the message, you should click the “Send” button to send the response.
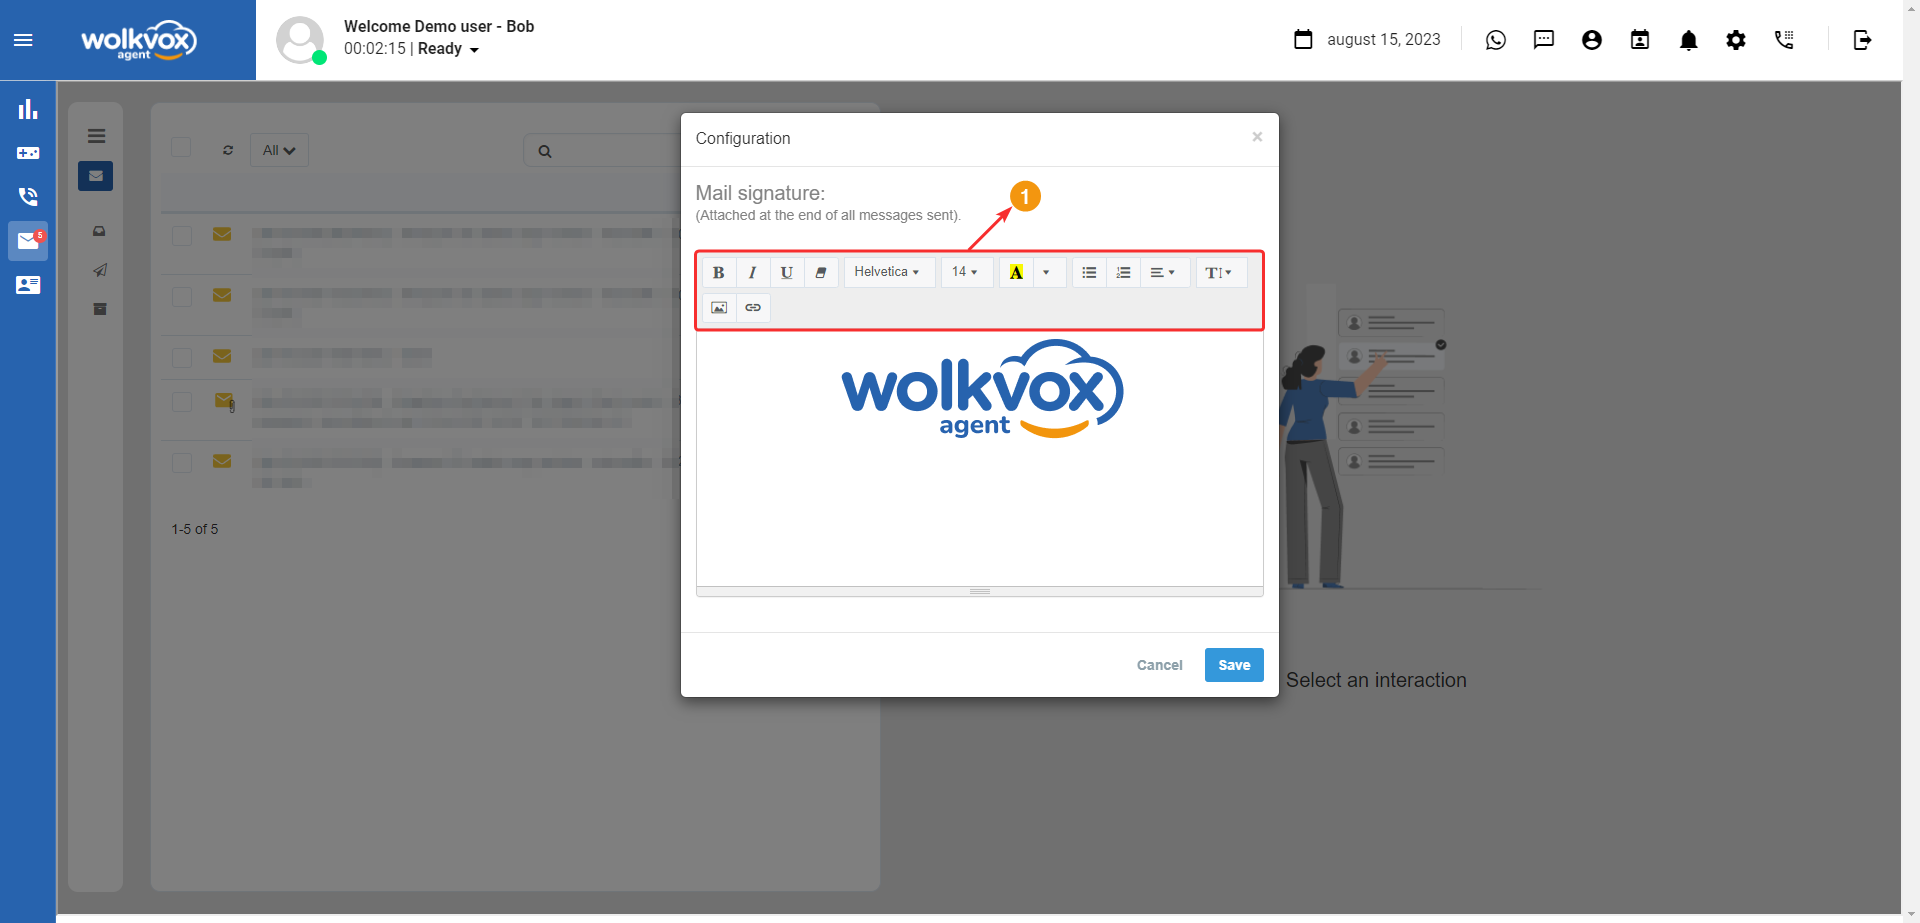
Set Up Signature #
![]() You can add a signature for email communications. This tool offers multiple editing options to add style to your signature.
You can add a signature for email communications. This tool offers multiple editing options to add style to your signature.
Configure a signature for emails using the highlighted button in the following image.

You can customize the email signature using the options in the tool menu. You have the ability to add styles to your text, include images, or insert links.
Email Interaction #
Regarding email interactions, in addition to being able to reply to and archive them, you can also forward them.
- Reply: Respond to the sender.
- Archive: Save the email in the “Archived” folder.
- Reply to all: Respond to all parties involved in the message thread.
- Forward to: Allows you to forward the email to desired recipients.

Whatsapp #
This “WhatsApp” button allows you to manually initiate a conversation with a customer. If the button doesn’t appear, it means it hasn’t been enabled for operation.
If you click on the icon, a new window opens where you need to follow these steps:
- In the dropdown menu of the first field, select the assigned WhatsApp connector. The options that appear next depend on the type of connector (official or mobile). In this example, the “Official” connector type is used.
- In the second field, enter the customer’s phone number in the following format: country code + phone number.
- The third field corresponds to the customer’s identification.
- In the fourth field named “Template Name,” select the message template you need.

After selecting a template in the “Template Name” field, the message structure appears in the “Template” field. The data you see enclosed in brackets, such as {1}, {2}, {3}, or any other number, are variables that can be modified in the field next to “Template.”
In that field, you write the data with which you want to replace the indicated variables. To modify the next variable, you should make a line break, meaning pressing “Enter” on the keyboard. Each “Enter” or line break will modify its respective variable. If you don’t write any data, the variable will remain empty, and therefore, that space will also be empty in the message. In the following image, you can see that the variable data has been entered, and the “Template” field now displays the replaced variable data.

In the following section, you have the possibility to insert an image, but this is only possible if the selected template has permission to insert images (this type of template is known as a multimedia template). File insertion through this tool is done using the public URL address where the file is hosted.
Lastly, you’ll find the option “Activate chat interaction.” This final option enables the agent to have a conversation with the customer in which they can receive messages from the customer. In other words, with this option enabled, if the customer responds to the messages, they will reach the agent.
After entering all the required data, you should click on “Send message”.

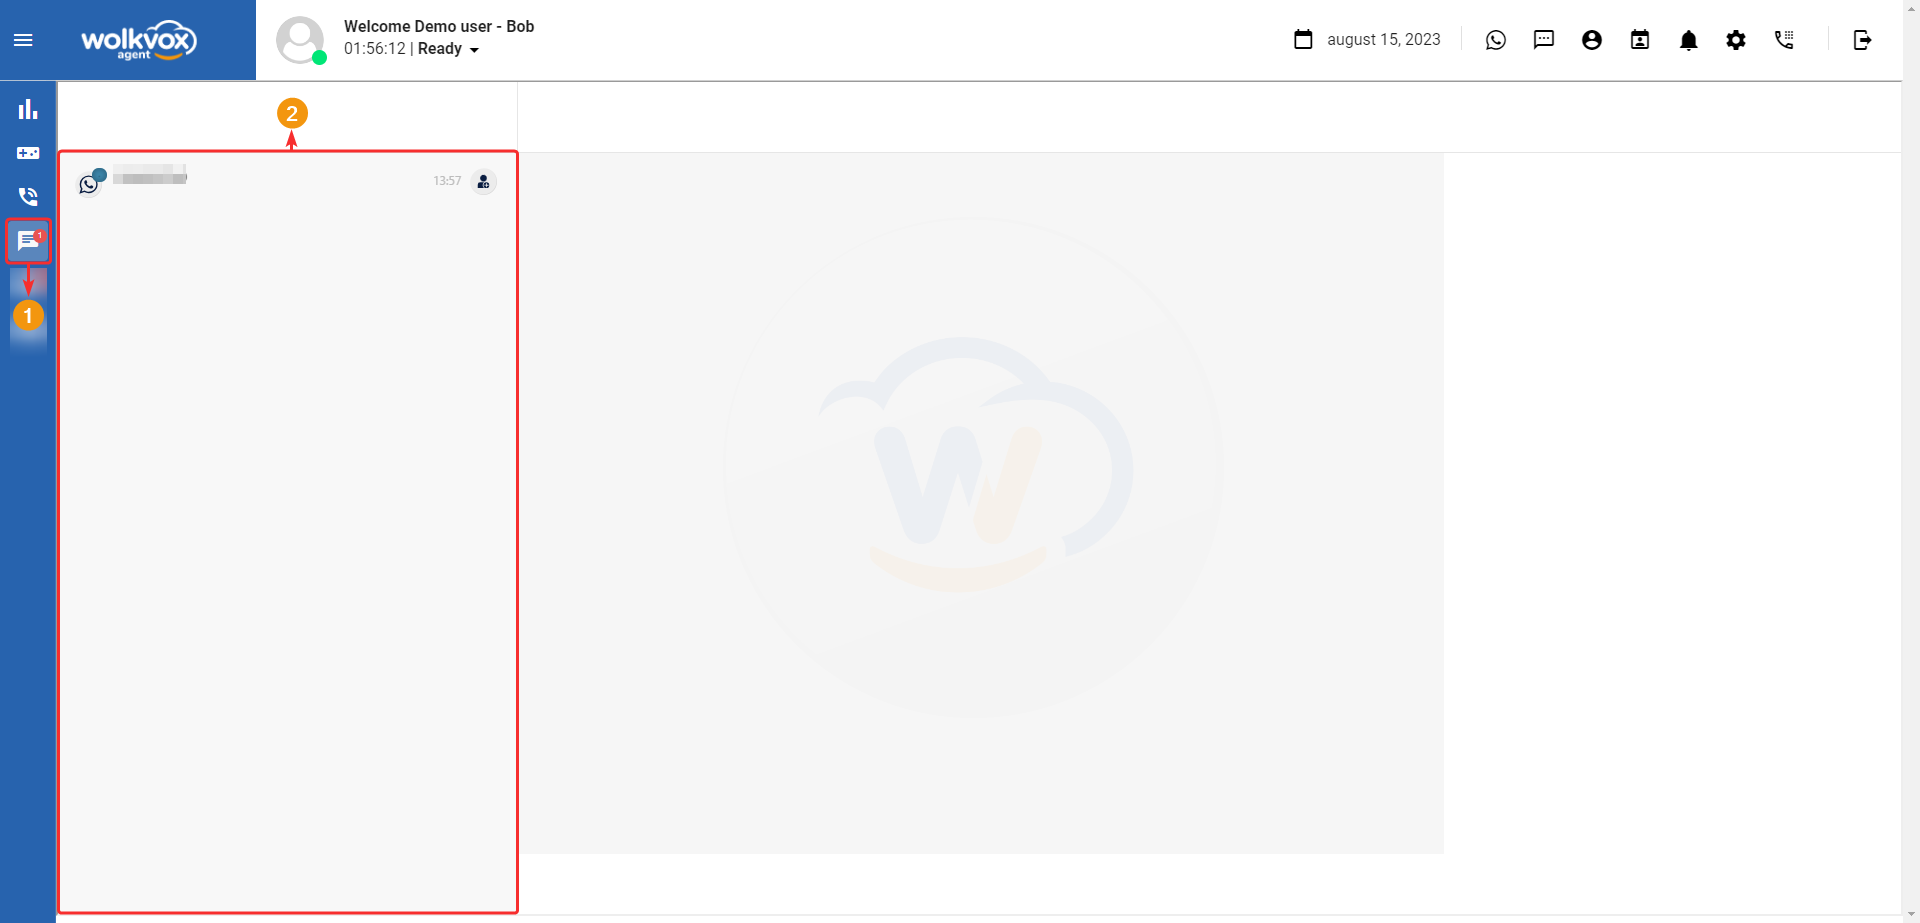
Chat and Conversations #
In this section, all the chats that come to you via WhatsApp, Facebook Messenger, and Telegram are managed.
After accessing the “Chat” button, you select the chat or conversation you wish to manage.
Once you select the chat to manage from the conversation list, you will see a section with all the information to assist the customer, as shown in the following image:
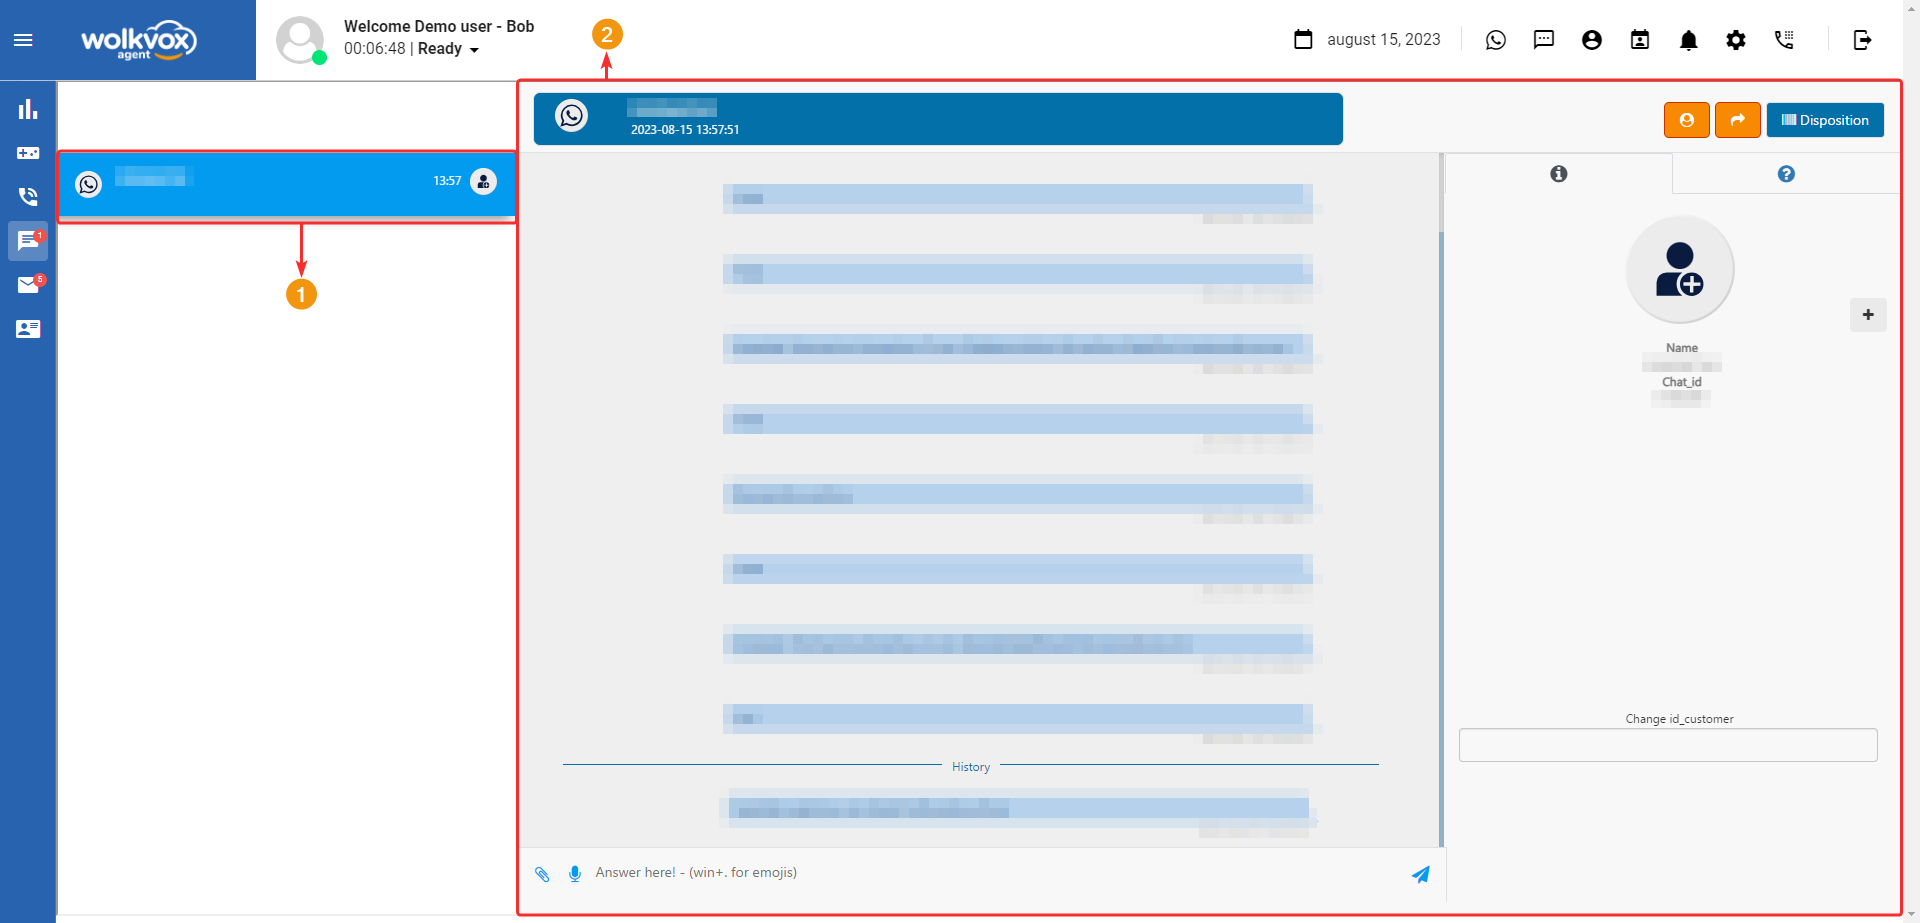
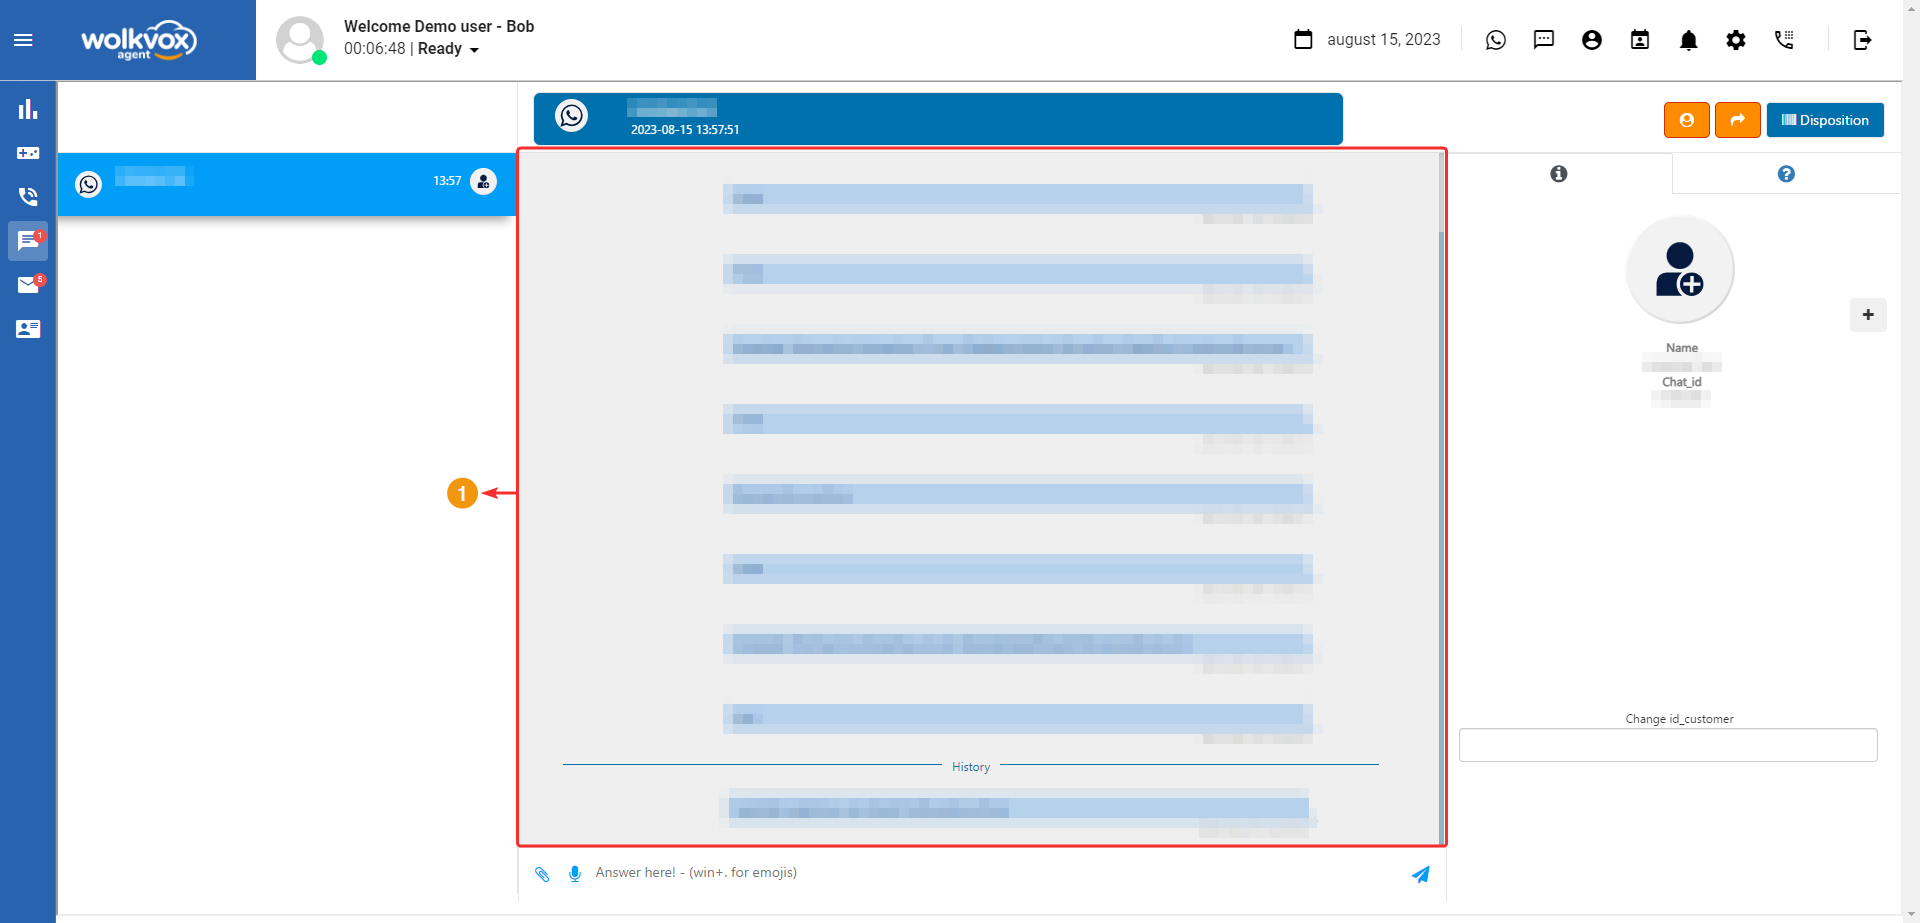
The first section you need to identify is the conversation history, which contains everything that has been discussed with the agent, including the record of dates when messages were sent.
Edit Contact #
To modify contact information, follow these steps:
- Enter the current customer’s identification number in the “Change id_customer” field.
- Click on the “+” button.
- Update customer details (Name, phone number, and email).
- Click “Save” to apply the changes.

- Transfer to Agent: You can transfer the selected chat to another agent in your operation.
- Transfer to Skill: You can transfer the selected chat to a specific group of agents.
- Disposition: Opens the coding window for the conversation, allowing you to record the outcome of the conversation.

This “Send SMS” button allows you to manually initiate a conversation with a customer. If the button doesn’t appear, it means it hasn’t been enabled for operation.
In the first field, you should enter the dialing plan number + the customer’s phone number.
In the second field, input the customer’s identification number.
The third field is where you can write the text message for the customer.
Finally, we have the “Close” button to close the window, and the “Send Message” button, which will send the message to the customer if the data entered in the “Phone” field is correct.
Note: If the destination country allows bidirectional messaging, you can continue the conversation in the chat section.

Bidirectional SMS
- Go to the “Bidirectional SMS” tab (If the destination country allows bidirectional SMS messaging, its respective tab will appear).
- Select the “Bidirectional SMS” connector. The listed options are implemented by the Wolkvox team.
- Enter the country code along with the destination phone number.
- Write the message body.
- You can add a public URL where a file you want to send is hosted.
- Having the “Activate chat interaction” option enabled allows you to continue the conversation if you need to further interact with the agent. The conversation will be saved in the “Chats” section.
- Click on “Send message.”

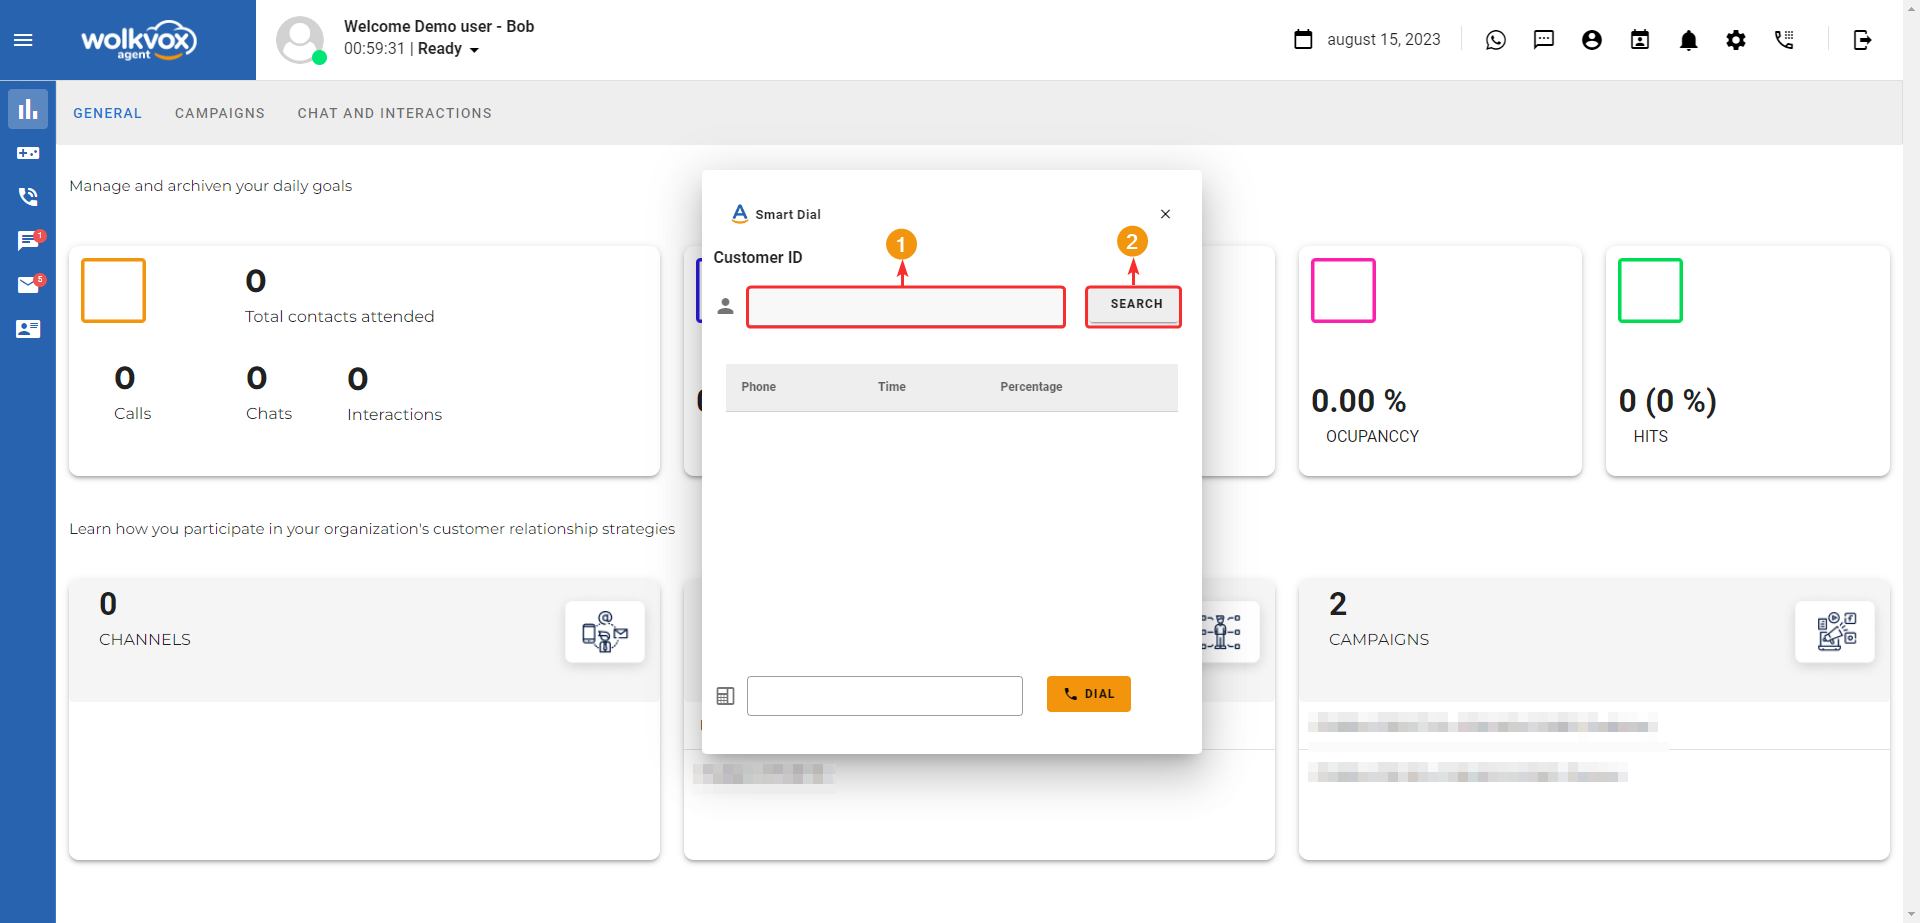
Smart Dial #
Also known as smart dialing or intelligent dialing. It’s a feature that allows obtaining basic call information.
Thanks to this functionality, the agent will be able to accurately know the telephone number and the time of contact with the customer.
Note: This button only appears if the service is contracted.

When you click on the “Smart Dial” button, the following window opens where you should first enter the customer’s identification number, and then proceed to click the “Search” button for the system to initiate the search for the entered customer.