What is CRM? #
CRM or Customer Relationship Management is a system that allows collecting and storing information about customers with the purpose of building stronger and lasting relationships with them and improving process efficiency.
The advantages of having a CRM include: Improved sales management, marketing, customer service, purchasing, and other areas.
CRM is divided into modules to organize information and functionalities more efficiently and tailored to the specific needs of the company.
What is a module in a CRM? #
A module in a CRM is a block of information within the entire ecosystem that performs a specific task. The goal of having modules in a CRM is to organize database information into different blocks and classify them based on their functionality.
These sets of functionalities and tools are designed to manage different areas of a company, such as contacts, customers, sales opportunities (prospects), campaigns, among others.
There are default modules and custom modules. Default modules come predefined in wolkvox CRM and already have a predefined structure of fields as they serve a specified function. Custom modules, on the other hand, come without predefined fields and allow you to build a module from scratch according to your needs.
What is a field in a CRM module? #
A field in a CRM module is an individual unit of information stored in relation to a specific record, and together, these fields comprise a complete set of data that helps in understanding and managing information related to records within the CRM system. For instance, in a CRM contacts module, fields could include the contact’s name, email, phone number, company, job position, etc.
Once inside, you will find the following options:
- Button to add a new module.
- List of created and enabled modules.

What general or default modules are available in wolkvox CRM? #
wolkvox CRM has the following standardized modules:
- Cases.
- Companies.
- Contacts.
- Reports.
- Dashboards.
- Frequently Asked Questions.
- Products.
- Quotes.
- Leads.
- Opportunities.
- Forecasts.
- Collections.
- Projects.
Creation of default modules #
wolkvox CRM has various modules with a predefined configuration and intended use.
- In the “Module Type” field, you must choose the “Default” module type.
- In the “Select Module” field, choose the desired module you want to add.
- Click the “Confirm” button to apply the changes.
![]() After creating the module, you’ll need to activate the necessary permissions in each profile to view and/or manage the module. The default modules are: “Cases”, “Companies”, “Contacts”, “Reports”, “Dashboards”, “Frequently Asked Questions”, “Products”, “Quotes”, “Leads”, “Opportunities”, “Forecasts”, “Collections”, and “Projects”.
After creating the module, you’ll need to activate the necessary permissions in each profile to view and/or manage the module. The default modules are: “Cases”, “Companies”, “Contacts”, “Reports”, “Dashboards”, “Frequently Asked Questions”, “Products”, “Quotes”, “Leads”, “Opportunities”, “Forecasts”, “Collections”, and “Projects”.

Module Relationships #
Some default modules are related to each other and require one another for the proper functioning of processes. These are:
Modules related to PQRS management #
- Contacts.
- Companies.
- Cases.
- Frequently Asked Questions.
Modules related to sales processes #
- Contacts.
- Companies.
- Leads.
- Opportunities.
- Forecasts.
- Products.
- Quotes.
Modules related to information management #
- Reports.
- Dashboards.
Default modules #
Module of Contacts (contacts) #
This module is designed to store and organize information about your clients. It is the first module that should be managed after creating a CRM since it is here where all the information related to clients and business contacts is centralized. In this module, detailed information about the client is recorded and consulted, such as their name, address, phone numbers, email address, among others.
Other modules depend on this module, such as the Cases module, where the agent must link a case to a client saved in the Contacts module.
Default fields of the Contacts module: #
The pre-defined fields in this module are:
- Contact Name.
- Contact Phone.
The information about your clients is very important, so we recommend adding the necessary fields according to the client information you need to collect.

Recommendations of fields for the Contacts module: #
It is recommended to consider the following fields in this module to have a more complete and common configuration according to global standards:
- Email address.
- Date of birth.
- Company.
- Position/Job title.
- Secondary phone number.
Cases Module (Cases) #
This module is designed to record support and customer service processes in your company. It is commonly known as PQRS, as it is where requests, complaints, claims, suggestions, compliments, and others are managed according to the company’s requirements.
For example, when a customer contacts an agent with a question or issue that the agent cannot resolve in the first interaction, they can use this module to create cases and respond to them later or transfer them to other areas of the company as needed.
This module can be oriented towards cases from customers, business partners, suppliers, internal collaborators, etc. It is a module that can be customized according to your specific needs and offers great versatility.
Cases can be of types such as: request, complaint, claim, suggestion, or other custom case types like compliments, among others.
Predefined fields in the Cases module: #
The predefined fields in this module that are present in all types of cases are:
- Responsible: The agent can select the person responsible for the case.
- Owner: This field is pre-filled and corresponds to the agent who created the case.
- Contact: The agent selects the contact who raised the case.
- Company: This is an optional field where the agent selects the company associated with the contact.
- Add case description: The agent can add a detailed description of the case.
- Dependency: Select whether the case is dependent on another case or is an independent case.
- Prefix: It is the code that indicates the type of case and case number.
- Status: The agent can select the status of the case. The available options will be set by the administrator in the configuration. The administrator can modify these statuses in the “Defaults” section.
- Priority: The agent selects the priority level for the case, which will determine the level of attention it receives.
- Estimated Time: In this field, the agent will see the estimated time to resolve the case. The administrator configures the parameters for this field and can modify the calculation of the estimated time in the “Defaults” section.
- Attachments: The agent can upload files with formats such as XLSX, CSV, PDF, JPG, PNG, DOCX, MP4, MP3, WMV, WMA, WAP, DOC, JPEG, AVI, BMP, BPM, and AVI.
Recommendations for fields in the Cases module #
The new fields you add will be listed in the “Fields” section and will be arranged starting from the top of this section, with the “Attachments” field listed last.
Default Setting #
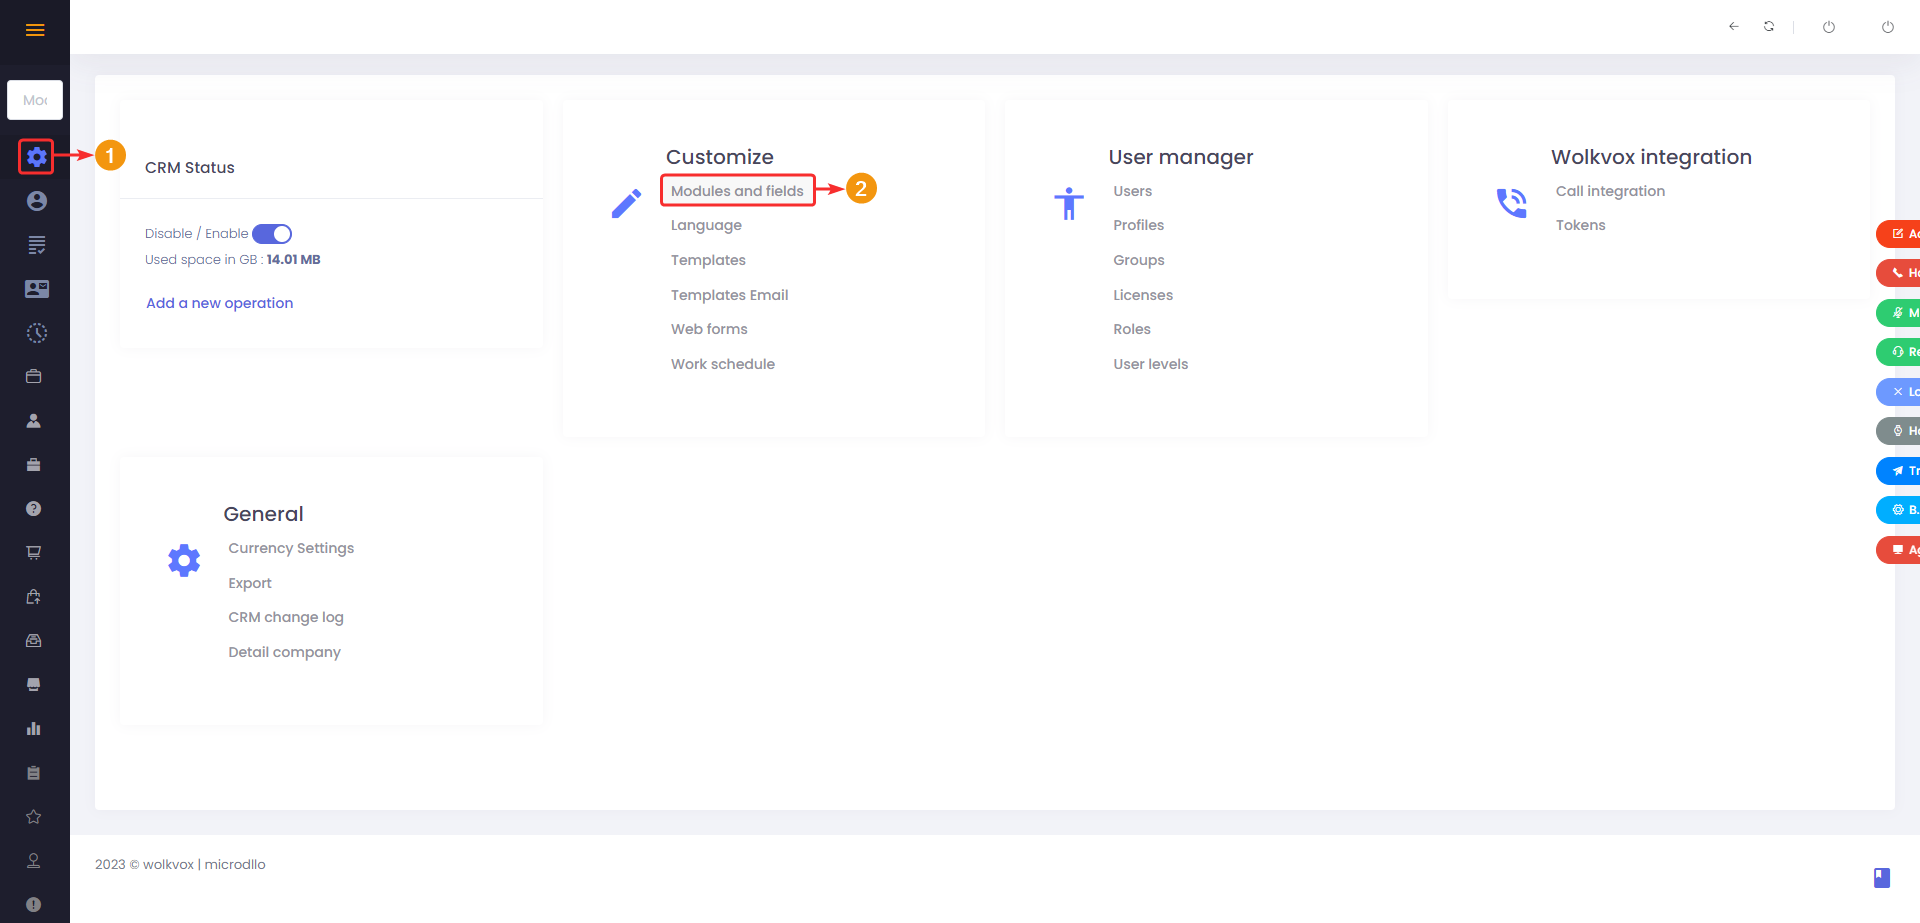
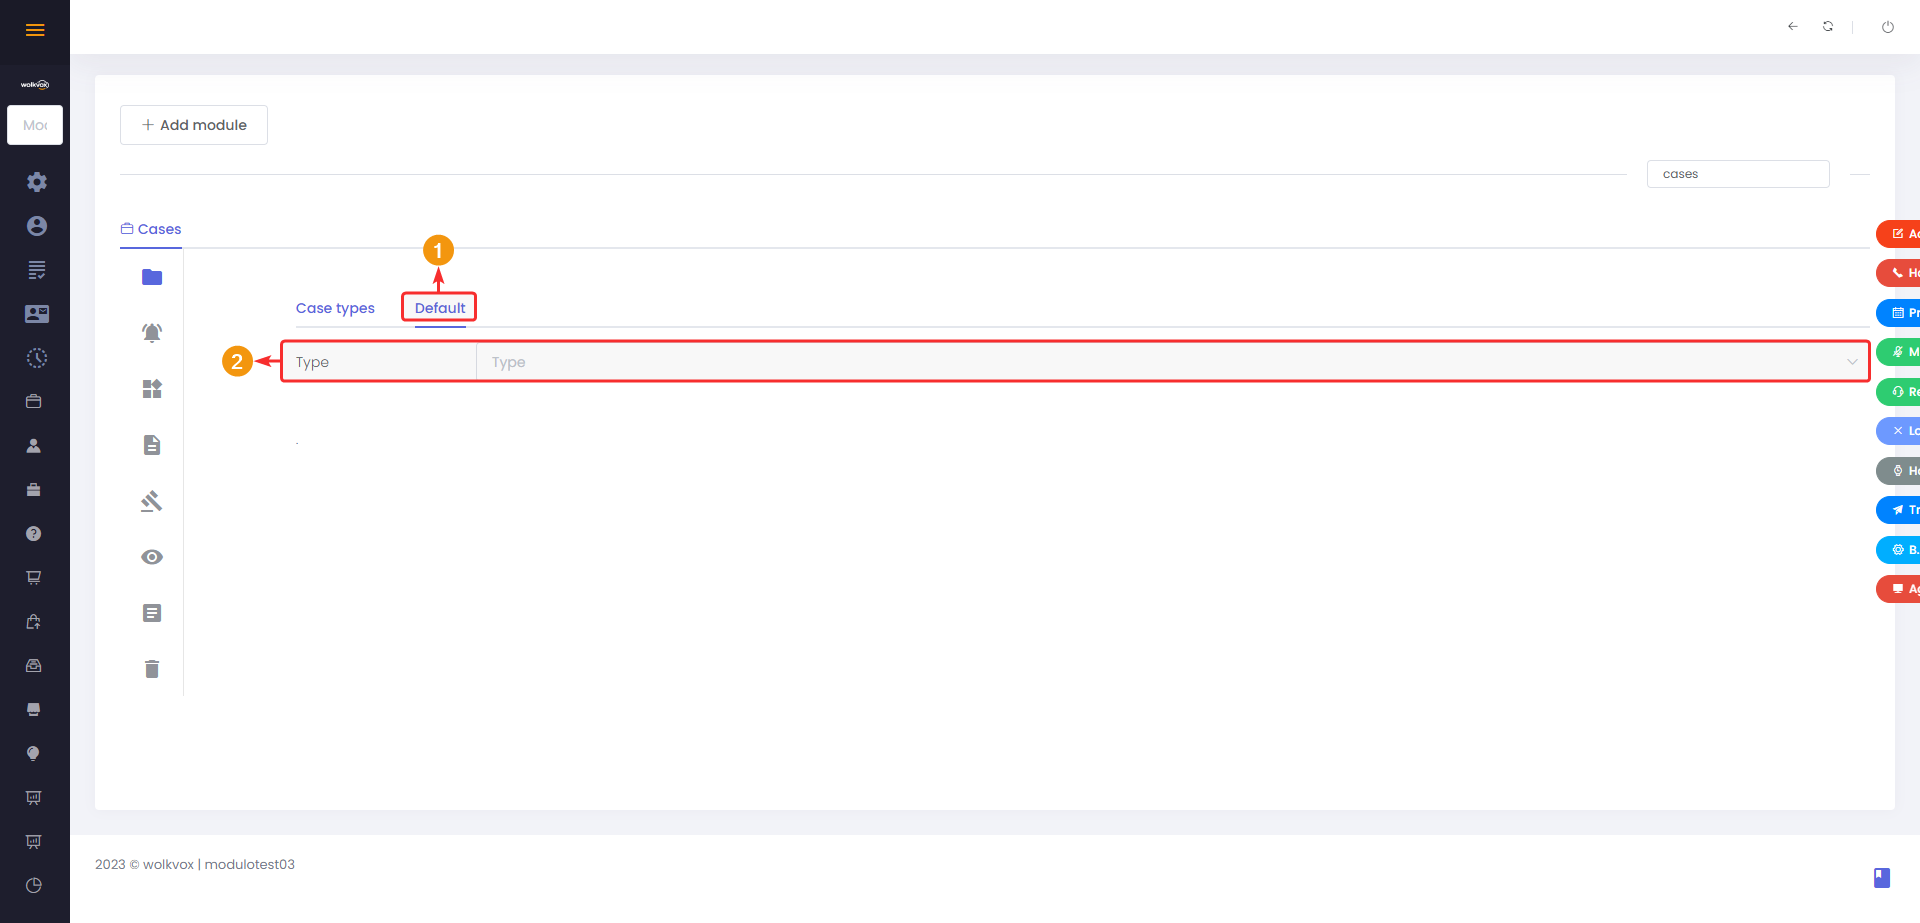
Access the default settings of the module by clicking on the highlighted button in the following image.
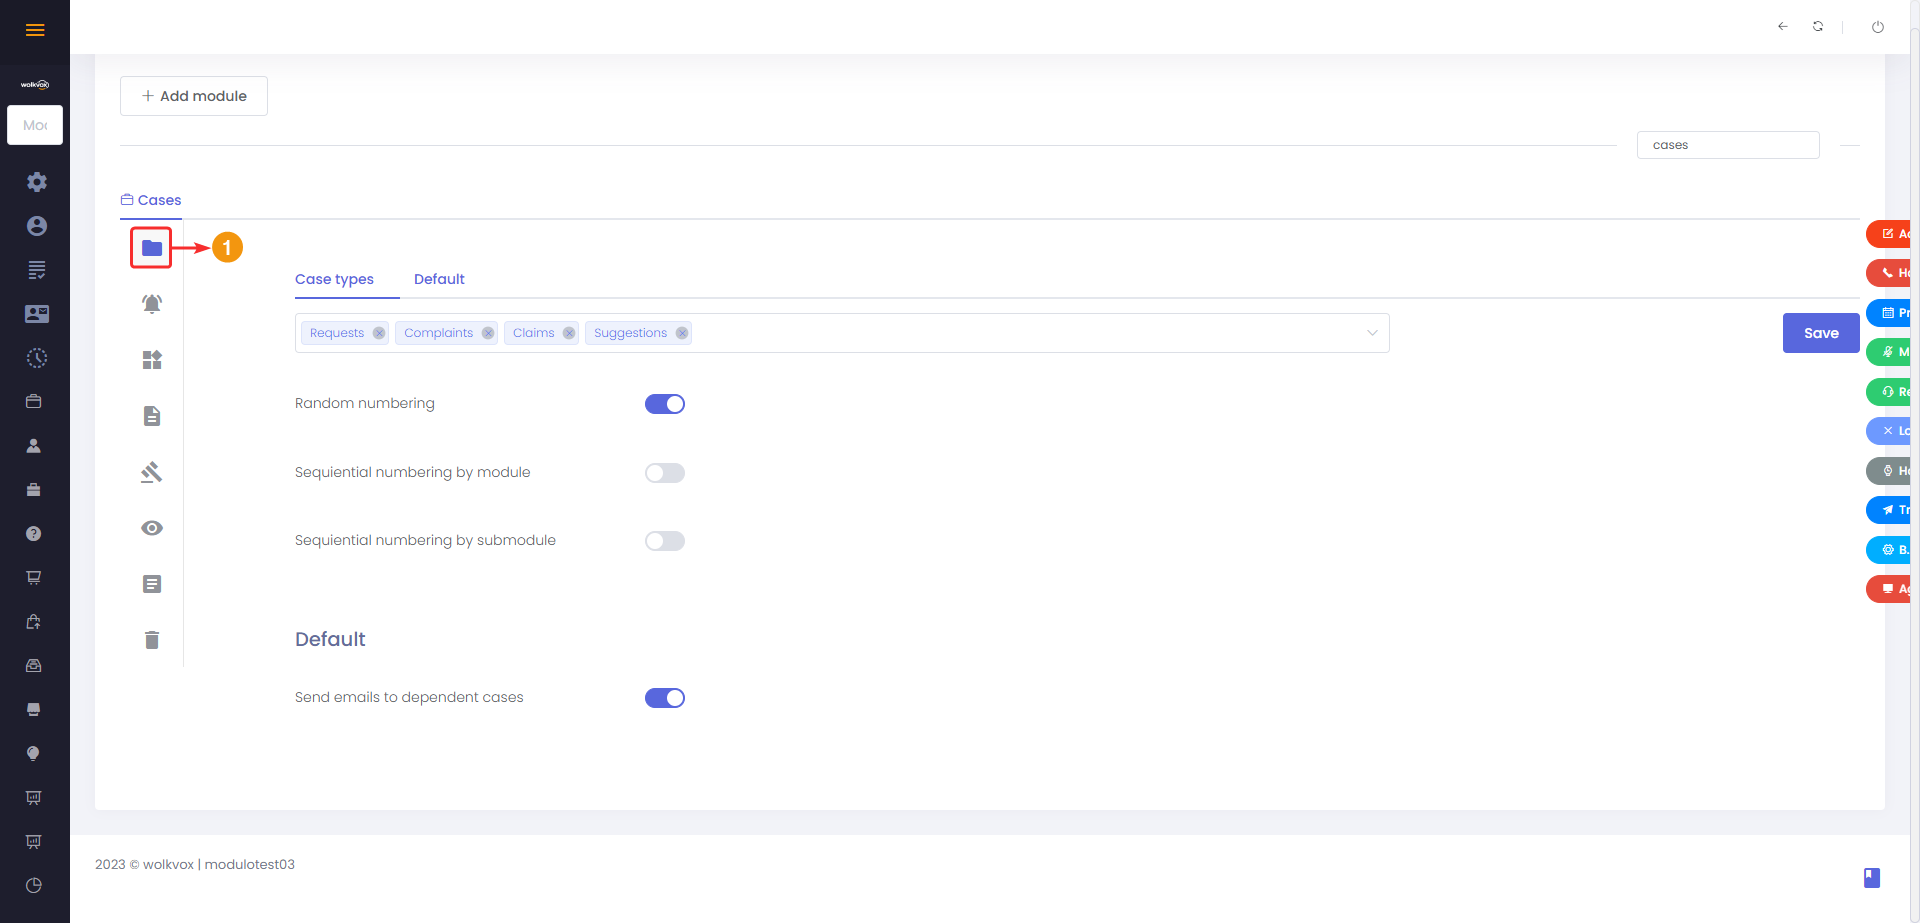
Default settings for case types #
Once you access the default settings of the cases module, you can configure the following:
- Go to the “Case Types” tab.
- In the highlighted field, you can add or remove case types as desired. Simply click on the field, type the name of the case type you want to create, and select its name from the dropdown menu to add the case type. If you want to delete a case type, just click on the “X” next to each case type.
- The numbering in this module is very important as it allows identifying each case with an identification number. Firstly, you find the random type of numbering, which adds a random number to identify the case. This is automatically added to the case description.
- The sequential numbering by module allows you to have an automatic numbering system and assign the case identification number in a unique and sequential manner.
- The sequential numbering by sub-module allows you to have an automatic numbering system and assign the case identification number in a unique and sequential manner.
- The “Send email to dependent cases” option, when activated, allows sending update emails of the case to the members of cases on which the current case depends.

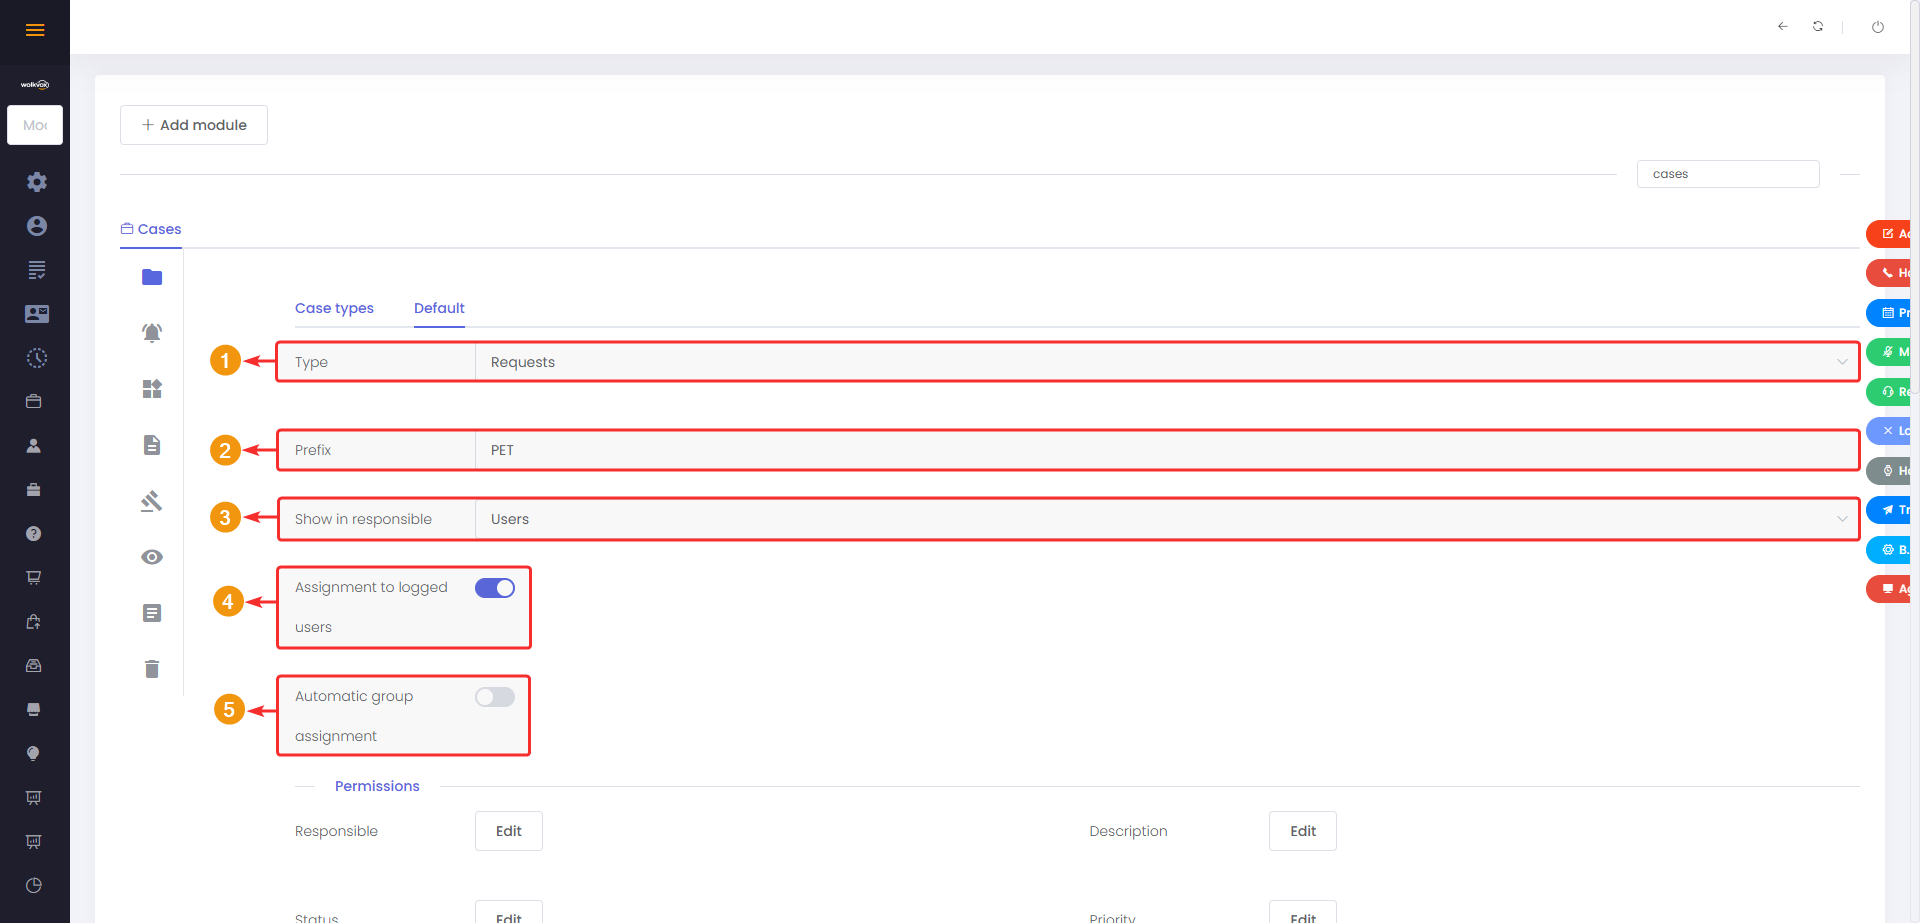
Default settings #
In this section, you can configure the general aspects of each case type.
- First, click on the “Default” tab.
- Select the case type for which you want to change the configuration.
Once you enter the “Default” tab, the first options to configure are the following:
- Type: Here, you can change the case type for which you are modifying the settings.
- Prefix: You can add a prefix text that will accompany the case ID. You should configure the prefix according to the case type.
- Show in responsible: You can make the case assignable to users only, groups only, or both groups and users.
- Assignment to connected users: If this option is enabled, new cases will be automatically assigned to all users connected in the CRM.
- Automatic group assignment: If this option is enabled, new cases will be automatically assigned to all groups.
Editing permissions for case parameters: #
The next part corresponds to the permission configuration:
- You can edit permissions related to: case owner, status, history, companies, contacts, description, priority, solution, and dependents.
- Each type of permission has its “Edit” button.

When you click “Edit” on a permission, the following configuration will appear:
- Select the user profile to which you want to grant permissions.
- Choose the type of permission you want to assign.
- Select whether you want to allow viewing, editing, or hiding.
- Click the “+” button to add the permission.
- The granted permissions will be listed at the bottom according to the user profile.
- Click the “Confirm” button to apply the changes.

Editing Case Statuses #
In this section, you can create and modify statuses to indicate the situation of each case.
- In the “Name” field, enter the title of the new status.
- In the “Condition” field, select whether the case should be open or closed to be set to this status.
- You can choose a default status for all new cases that will be created.
- The created statuses will be listed at the bottom. Each status has a checkbox on the left side that allows you to select it, and a trash can icon will appear to delete the status.
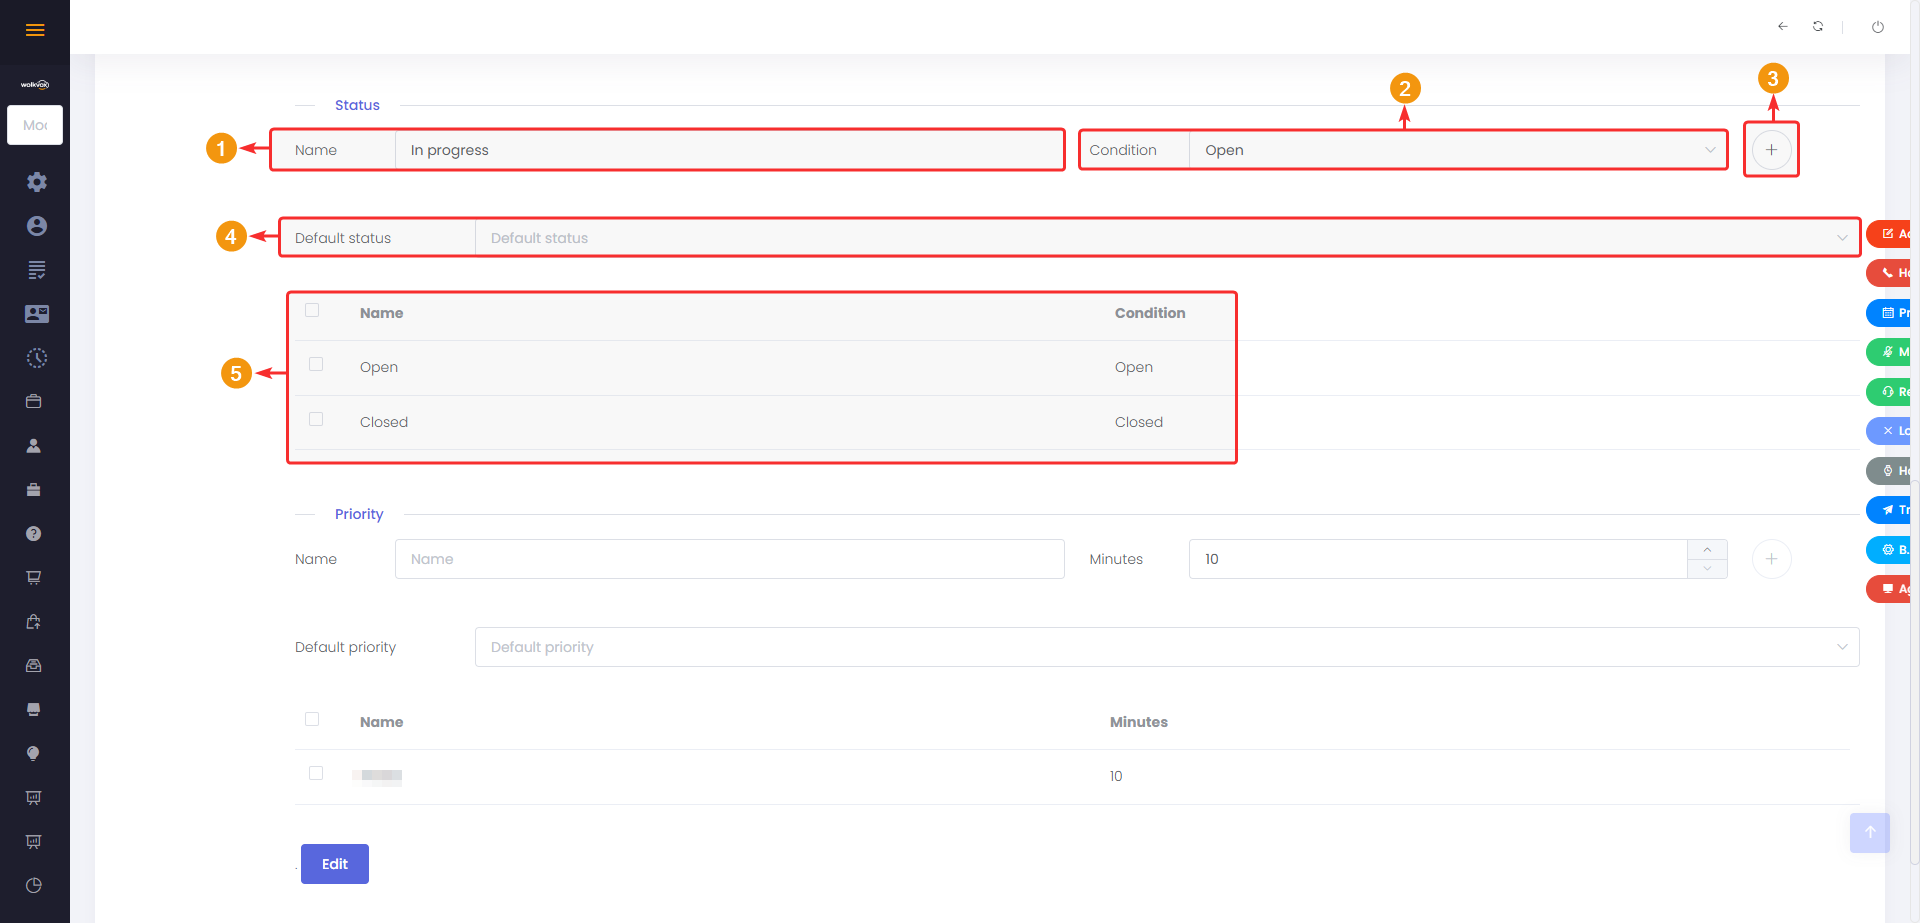
Editing Case Priorities #
In this section, you can create or modify the available priority options for each case.
- Enter a title for the priority.
- Set the maximum number of minutes an agent will have to resolve a case with this priority.
- Set a default priority for all new cases that will be created.
- The created priority options for the cases will be listed at the bottom.

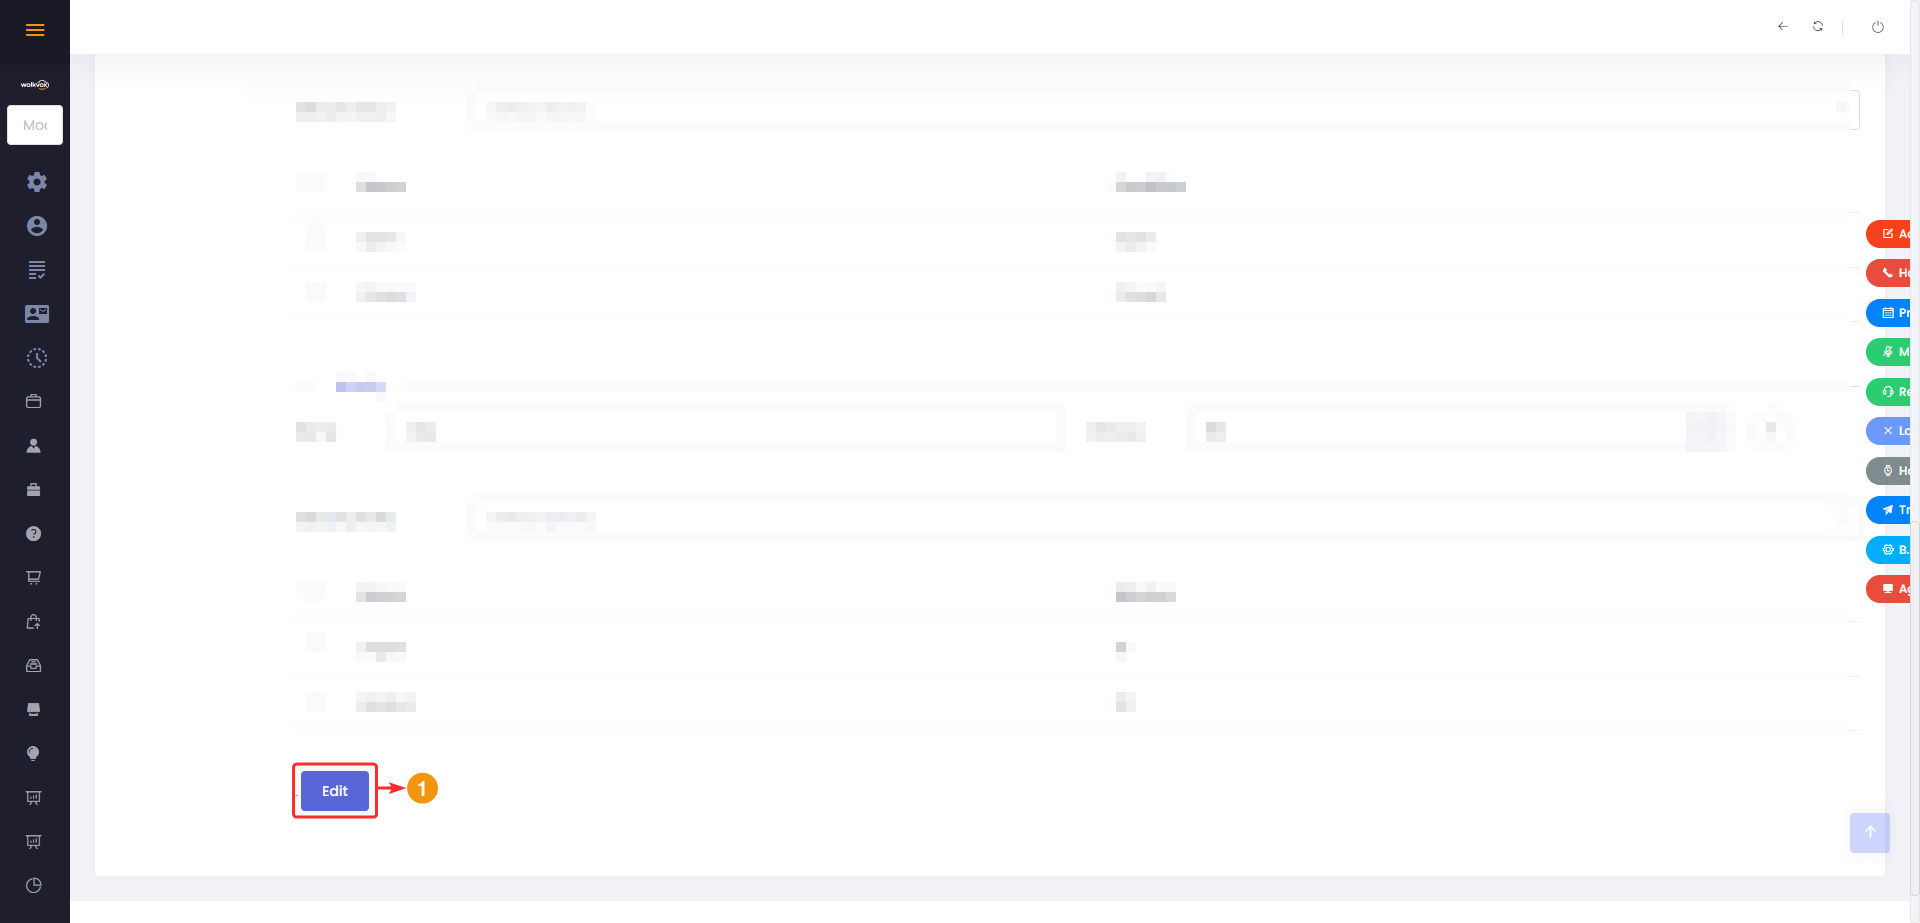
Save Changes #
To apply any changes made in this default section, click on the “Save” button.
Notification Settings #
In the “Notifications” section, you can configure everything related to case notifications. Depending on the settings, you can enable email and/or text message notifications for different user profiles whenever there is an event related to a case.
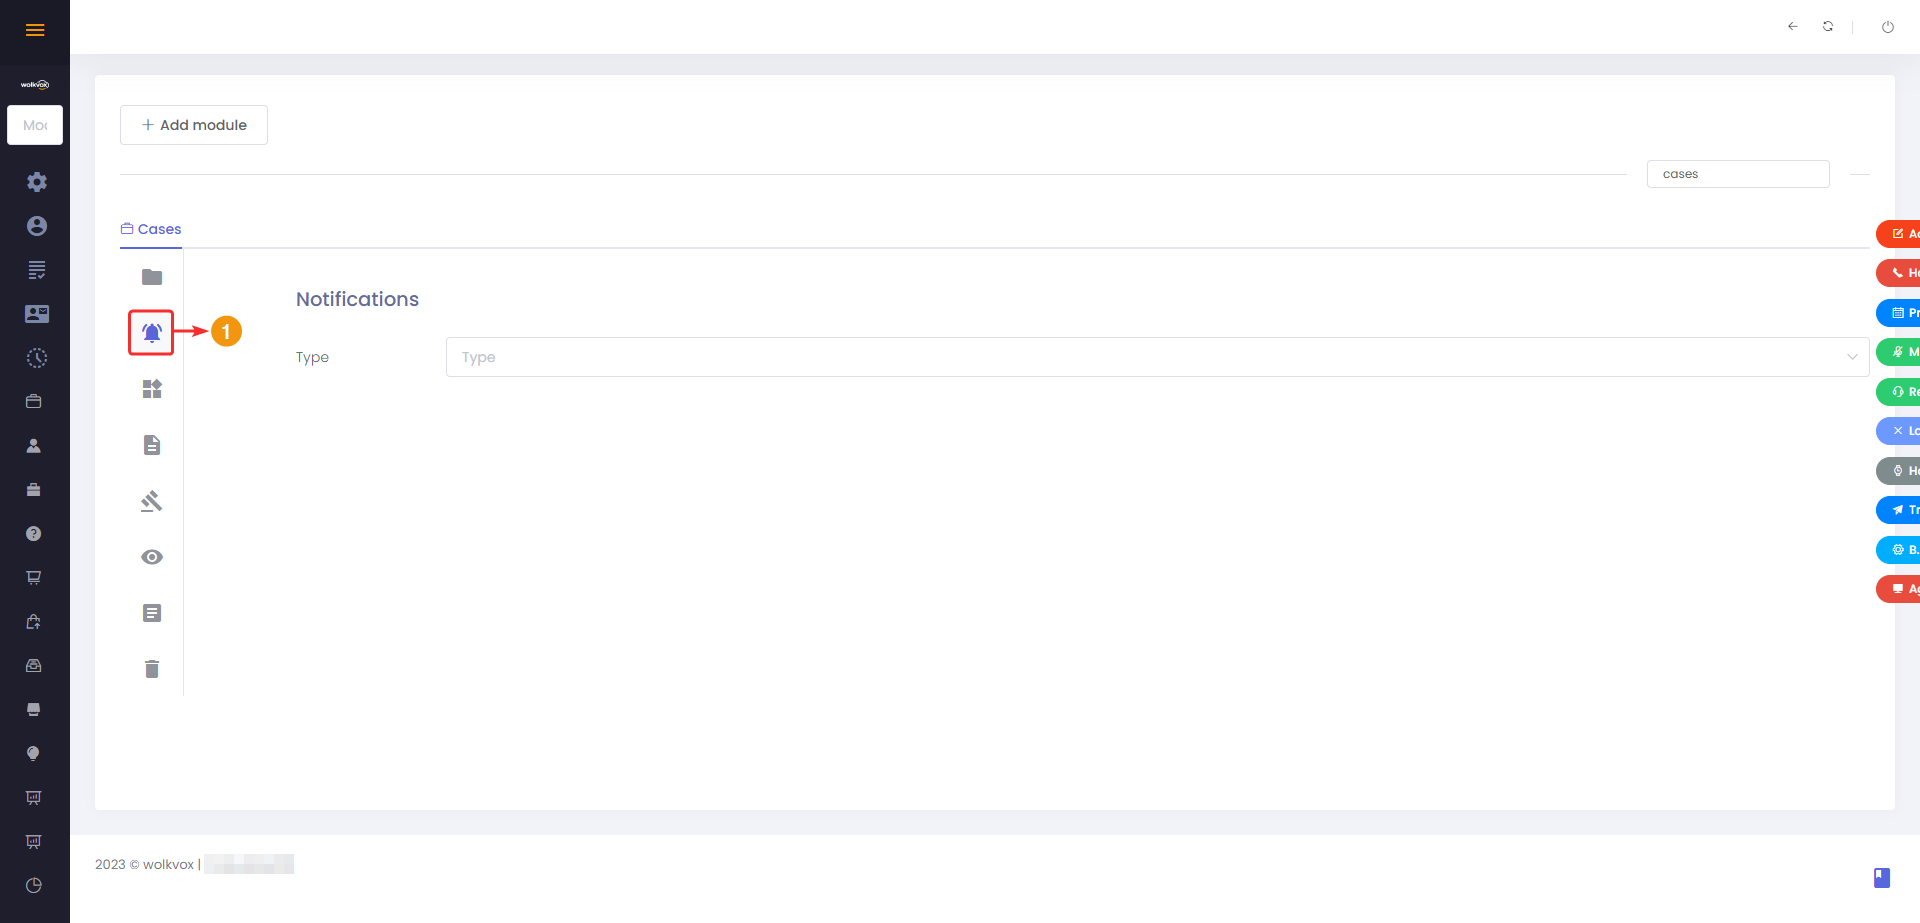
Select the type of case for which you wish to configure the notification options.

- In “Type,” you can change the type of case for which you are modifying the notification settings.
- In “Events,” you can change the event for which you are modifying the notification settings. An event in this module is a situation that must occur to trigger a notification, for example, when the case is opened, closed, overdue, about to be overdue, changes responsible, the customer reopens the case, or someone adds a comment.
- In “Templates,” select the email template you want to be sent as a notification for each case event.
- You can activate the option for the case responsible to receive a notification for a case event.
- You can activate the option for the case owner to receive a notification for a case event.
- You can activate the option for the case contact to receive a notification for a case event.
- You can activate the option for one or more groups to receive a notification for a case event.
- Activate the “SMS” option to send a notification via text message to the specified person or group. You must add a prefix and an access token in wolkvox Manager.
- Activate the “Email” option to send a notification via email to the specified person or group.
- Click on “Edit” to apply changes.
Frequently Asked Questions (FAQs) Module #
This module aims to provide quick answers to the most common questions. It allows you to save time and improve efficiency by offering comprehensive documentation to address repetitive inquiries.
Predefined Fields #
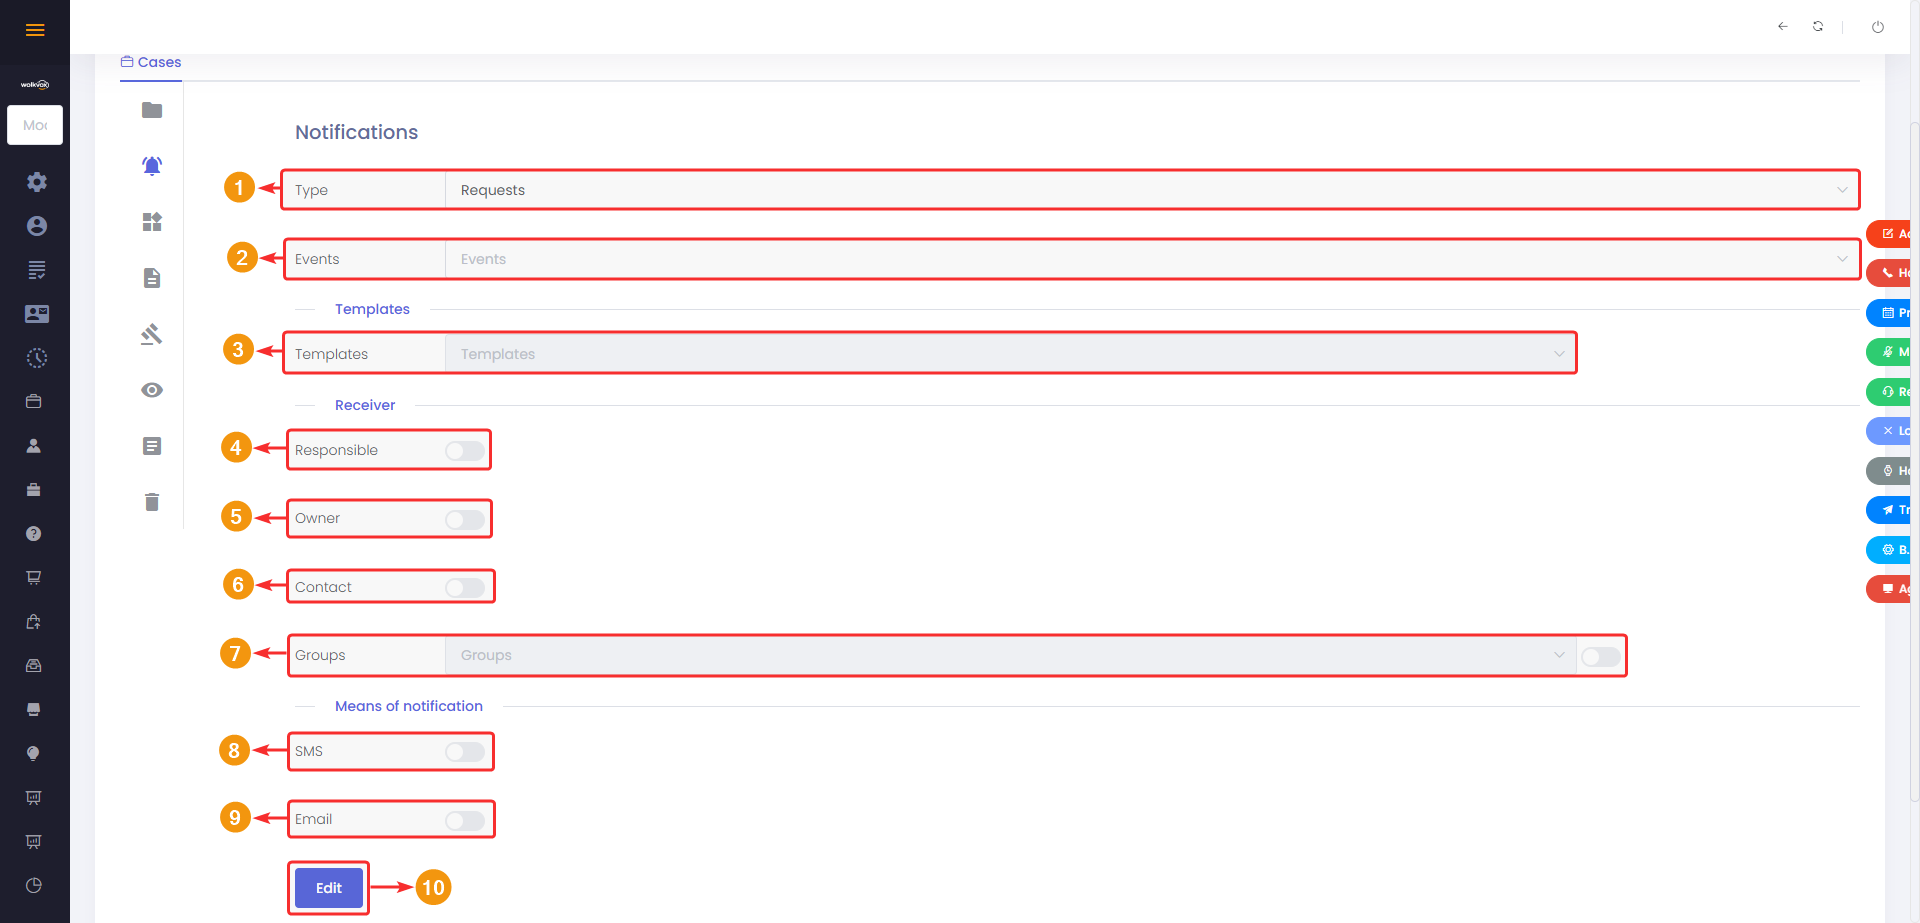
Within this module, you will find the following fields, which cannot be deleted:
- Question.
- Answer.
The frequently asked questions will be displayed as follows.
Collections Module #
This module allows you to manage records related to collections or accounts receivable. It enables profiles to efficiently handle pending payments and invoices from customers, providing proper tracking through wolkvox CRM.
Predefined Fields #
Within this module, you will find the following fields, which cannot be deleted:
- Name.
- Phone.
- Email.
- Total Debt.
- Overdue.
- Due Soon.
Leads Module #
This module allows you to manage potential customers, who are interested in your products or services. It helps businesses organize and track interactions with prospects.
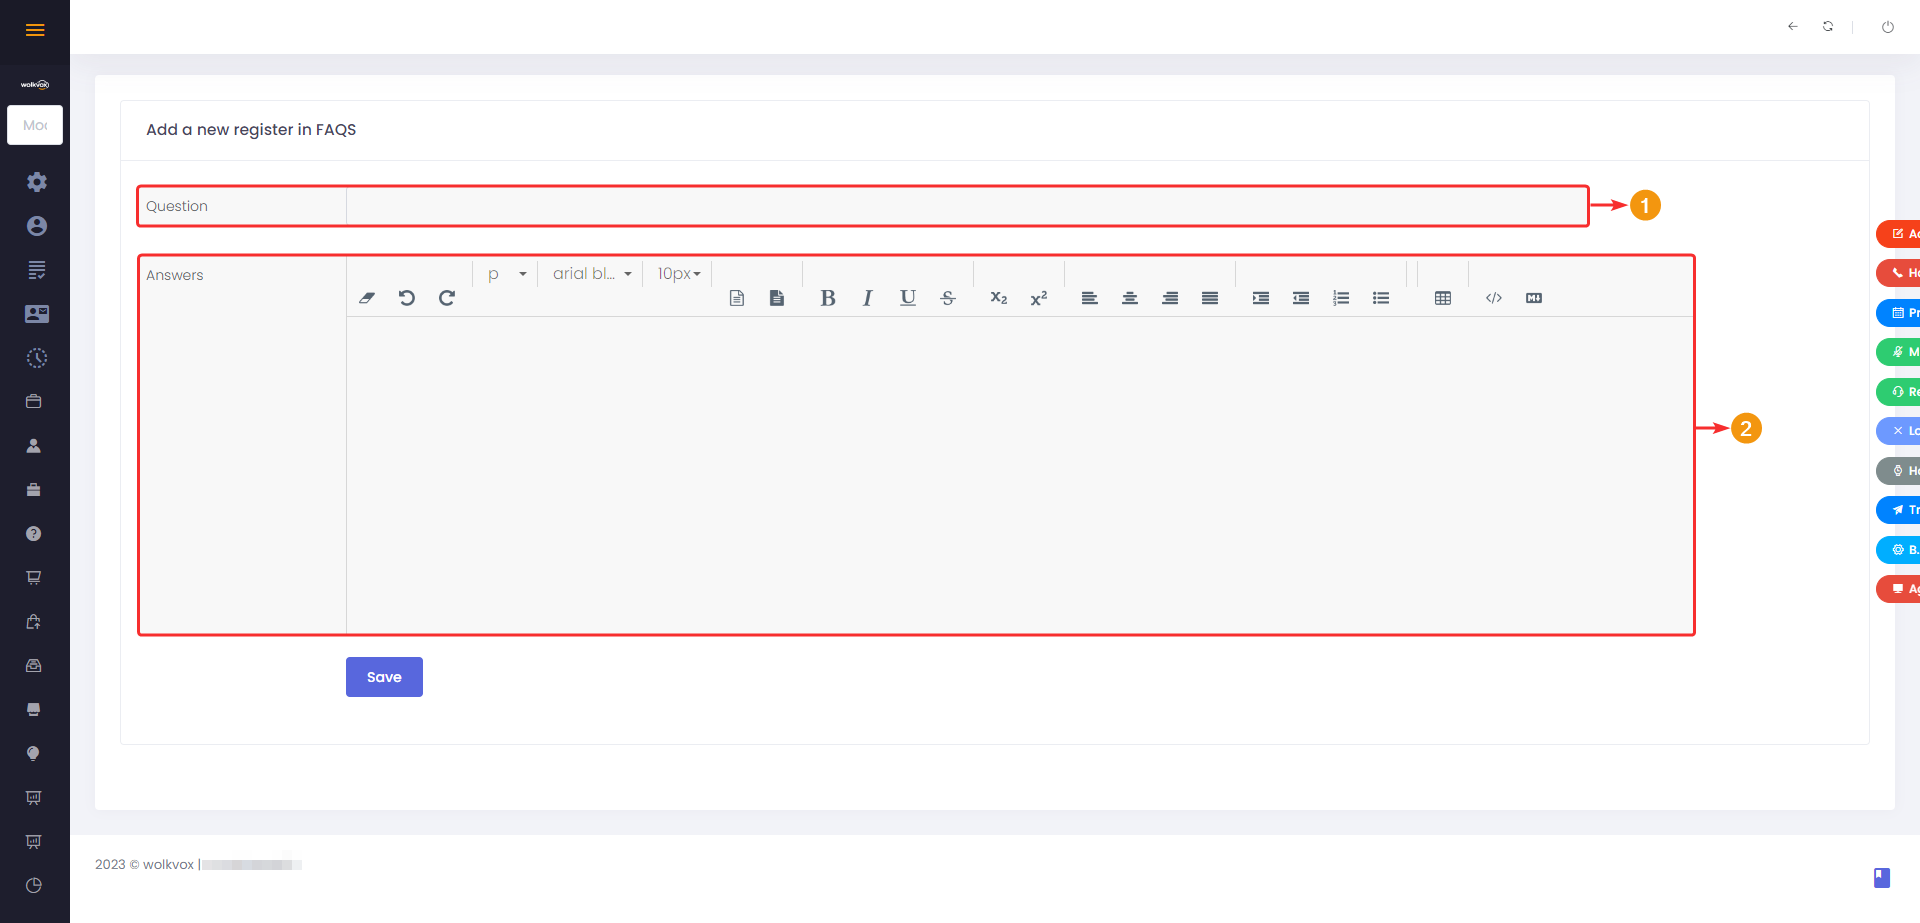
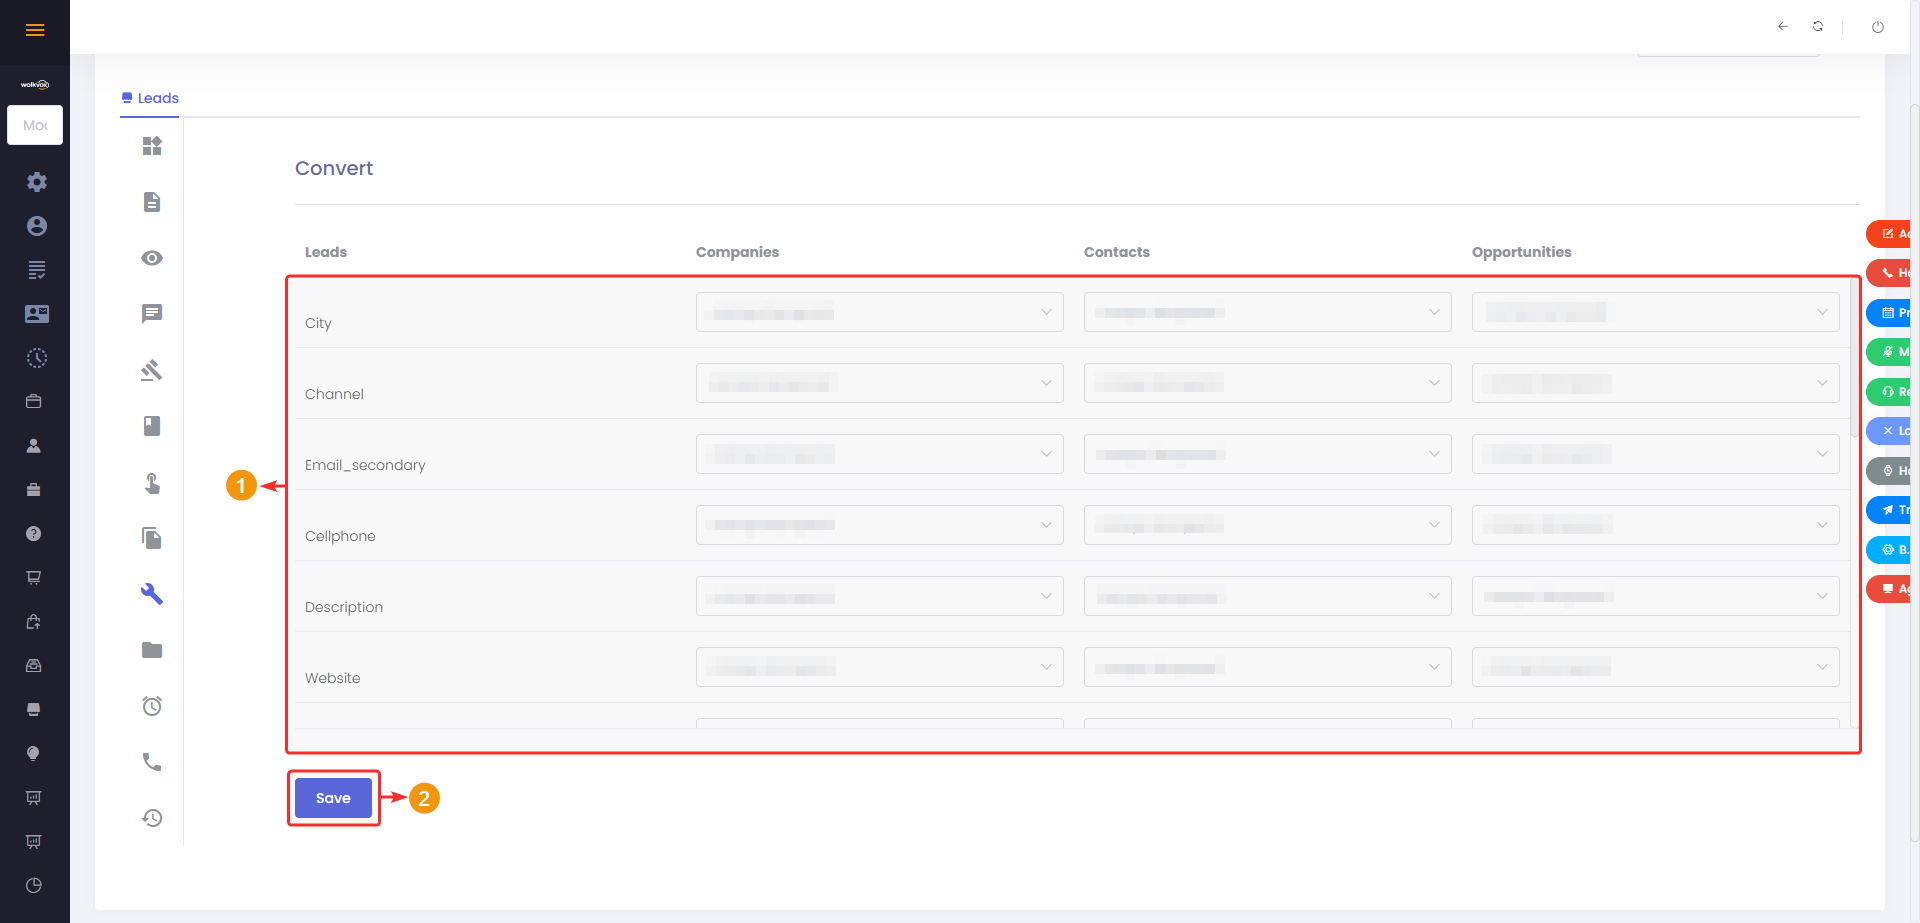
The “Convert” button takes you to the section where you must relate or link the specified fields from the Leads module with the modules “Companies,” “Contacts,” and “Opportunities.”
Before entering this section, make sure you have the same fields in the three modules mentioned above.
The purpose of this section is to link the fields between the modules to store information without having to enter it individually once the customers are no longer potential but have become fixed clients.
In the conversion table, the fields you have in the “Leads” module are listed, and each one has corresponding fields from the “Companies,” “Contacts,” and “Opportunities” modules. Select the module to link for each field using the dropdown menu.
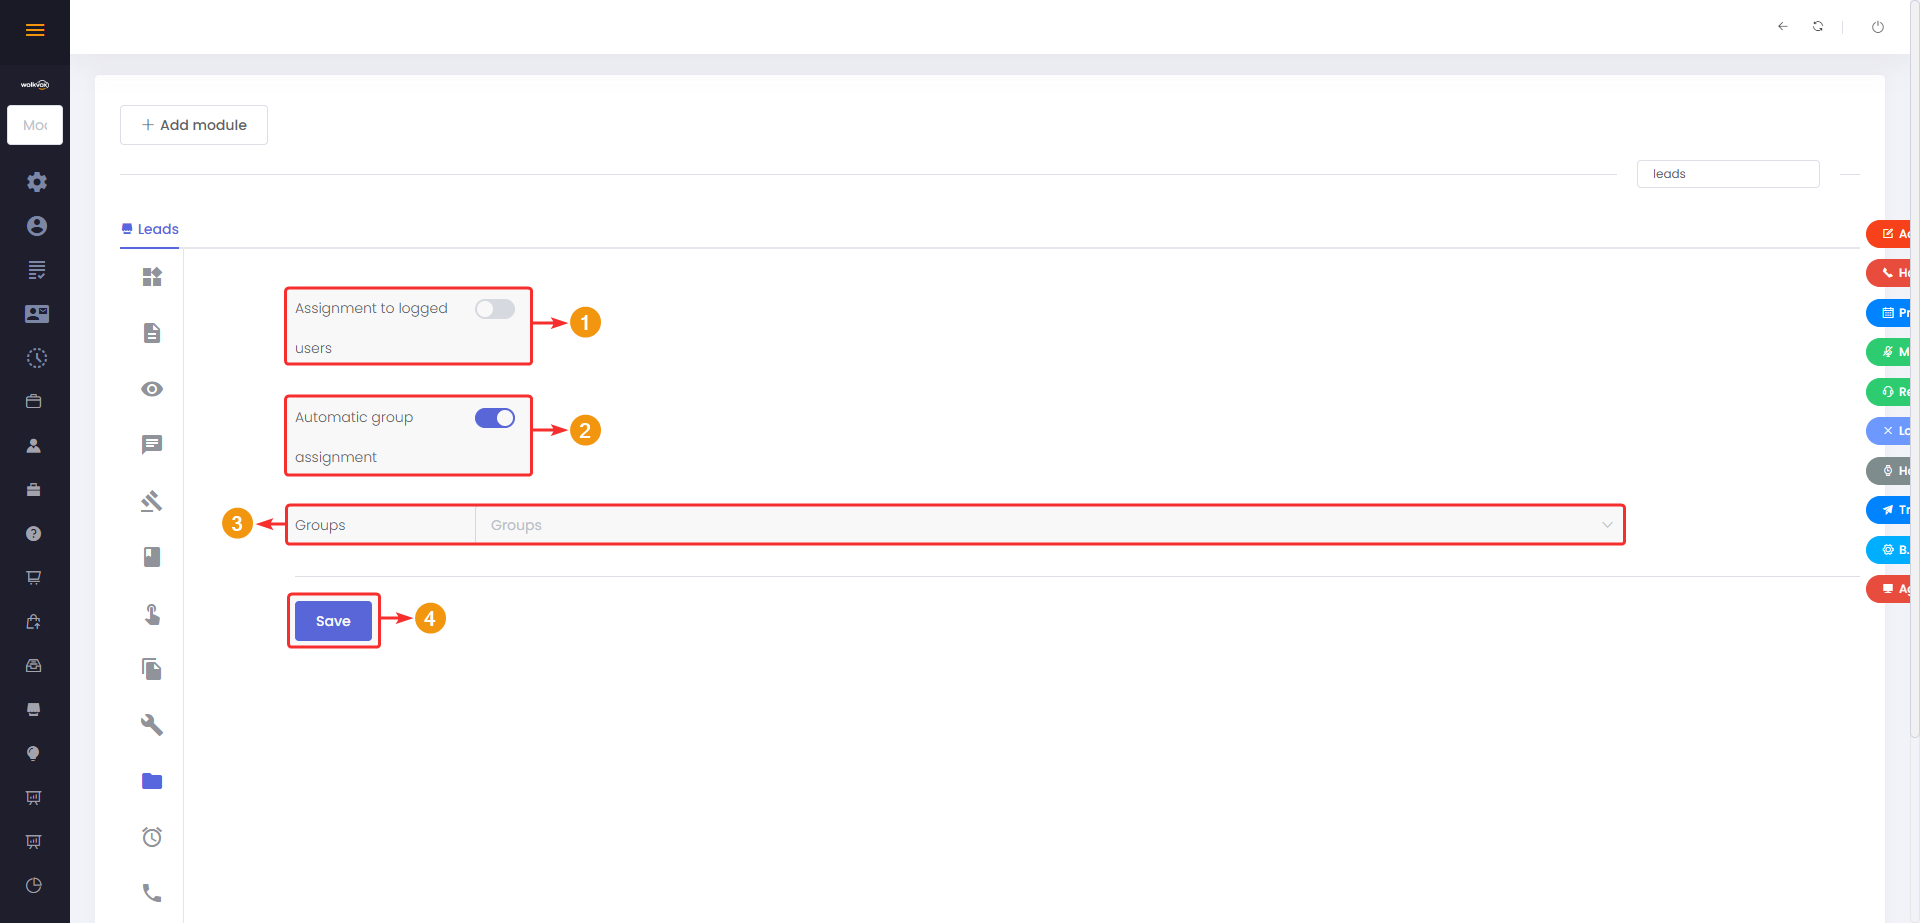
In the “Default” tab, there are two important configurations to consider:
- You can assign newly added leads to all users who are currently connected in the CRM.
- You can assign lead management to all users who are linked to a specific user group.
- If the previous option is active, you must select the group that you want to manage the leads.
- Click on “Save” to apply the changes.
Module: Opportunities #
The purpose of this module is to record the follow-up on potential sales opportunities. Register and monitor each sales opportunity, including its current status, involved contacts, products or services in question, and the deadline for closing the sale. Thanks to the general tools provided by wolkvox CRM, such as tasks, reminders, and other activities, you won’t miss any sales opportunity.
Predefined Fields #
In this module, you will find the following fields that cannot be deleted:
- Name
- Contact
- Companies (Businesses)
- Amount
- Expected Amount
- Closing Date
- Attachment
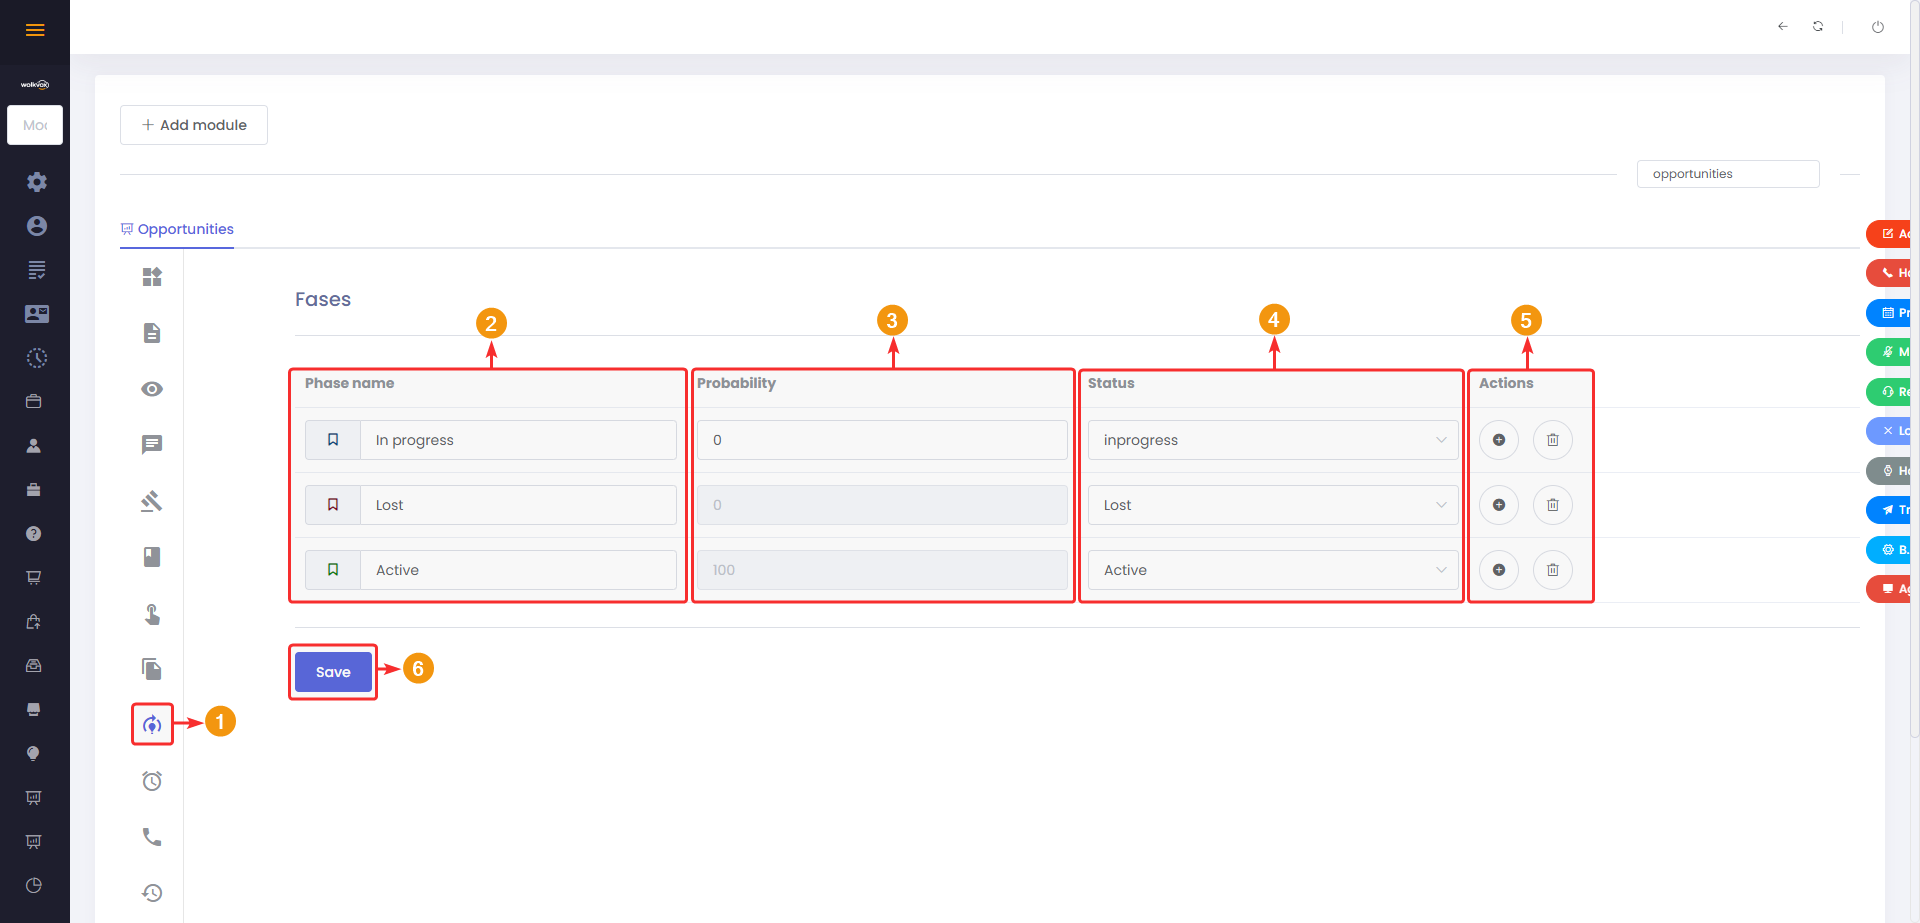
In the “Phases” button, you can configure the options for phases that will contain the records in this module. It allows you to specify the stage of each sales opportunity, such as the contact phase, product/service presentation phase, successful sale phase, and more. It all depends on the terminology used in your operation.
- Enter the phase configuration.
- Write the name of each phase.
- Probability calculates the expected amount of the deal. Assign the corresponding probability to each phase. Phases with an “Active” status will always have a 100% probability without the possibility of change.
- Assign the corresponding status to each phase.
- The “+” button allows you to add more phases.
- Click on “Save” to apply the changes.
Module: Products #
This module is designed to manage and track the products offered by the company to its customers. Here, you can maintain a detailed record of the products and services provided, which enhances sales management efficiency and improves customer satisfaction.
Predefined Fields #
In this module, you will find the following fields that cannot be deleted:
- Product Name.
- Product Code.
- Product Active (switch button).
- Product Category.
- Type of Payment.
- Commission Rate.
- Quantity in Stock.
- Tax.
Note: After the fields, there is a section to manage product prices classified according to specific needs. The purpose of this section is to separate prices based on the sales location and the accepted currency in that location. This tool is useful for companies offering a variety of personalized products/services or having a range of options that may affect the final purchase price.
Module: Quotes #
This module allows agents to generate and manage personalized, effective, and efficient quotes for their customers. Additionally, companies can offer personalized and efficient buying experiences for their clients.
Predefined Fields #
In this module, you will find the following fields that cannot be deleted:
- Contact.
- Companies.
- Opportunity.
- Email.
- Status.
- Subject.
- Observations.
- Valid Until.
- Description.
- Owner.
- Quote Price.
- Offer Details.
- Terms and Conditions.
Module: Forecasts #
This module is used to forecast future sales and plan strategies for a period based on expected results. The module takes into account objective values and historical data from business opportunities to predict expected sales in a future period, whether monthly, quarterly, or semi-annually. With this tool, sales teams can plan and organize activities to achieve established sales targets through data collection and analysis.
Common Attributes Among Modules #
Some sections of the configuration for each module are available across various types of modules.
Testing Validations #
All modules in the “Fields” section have a button called “Test Validations.” This allows for a quick test of fields that require specific input or have restrictions, such as character limits.
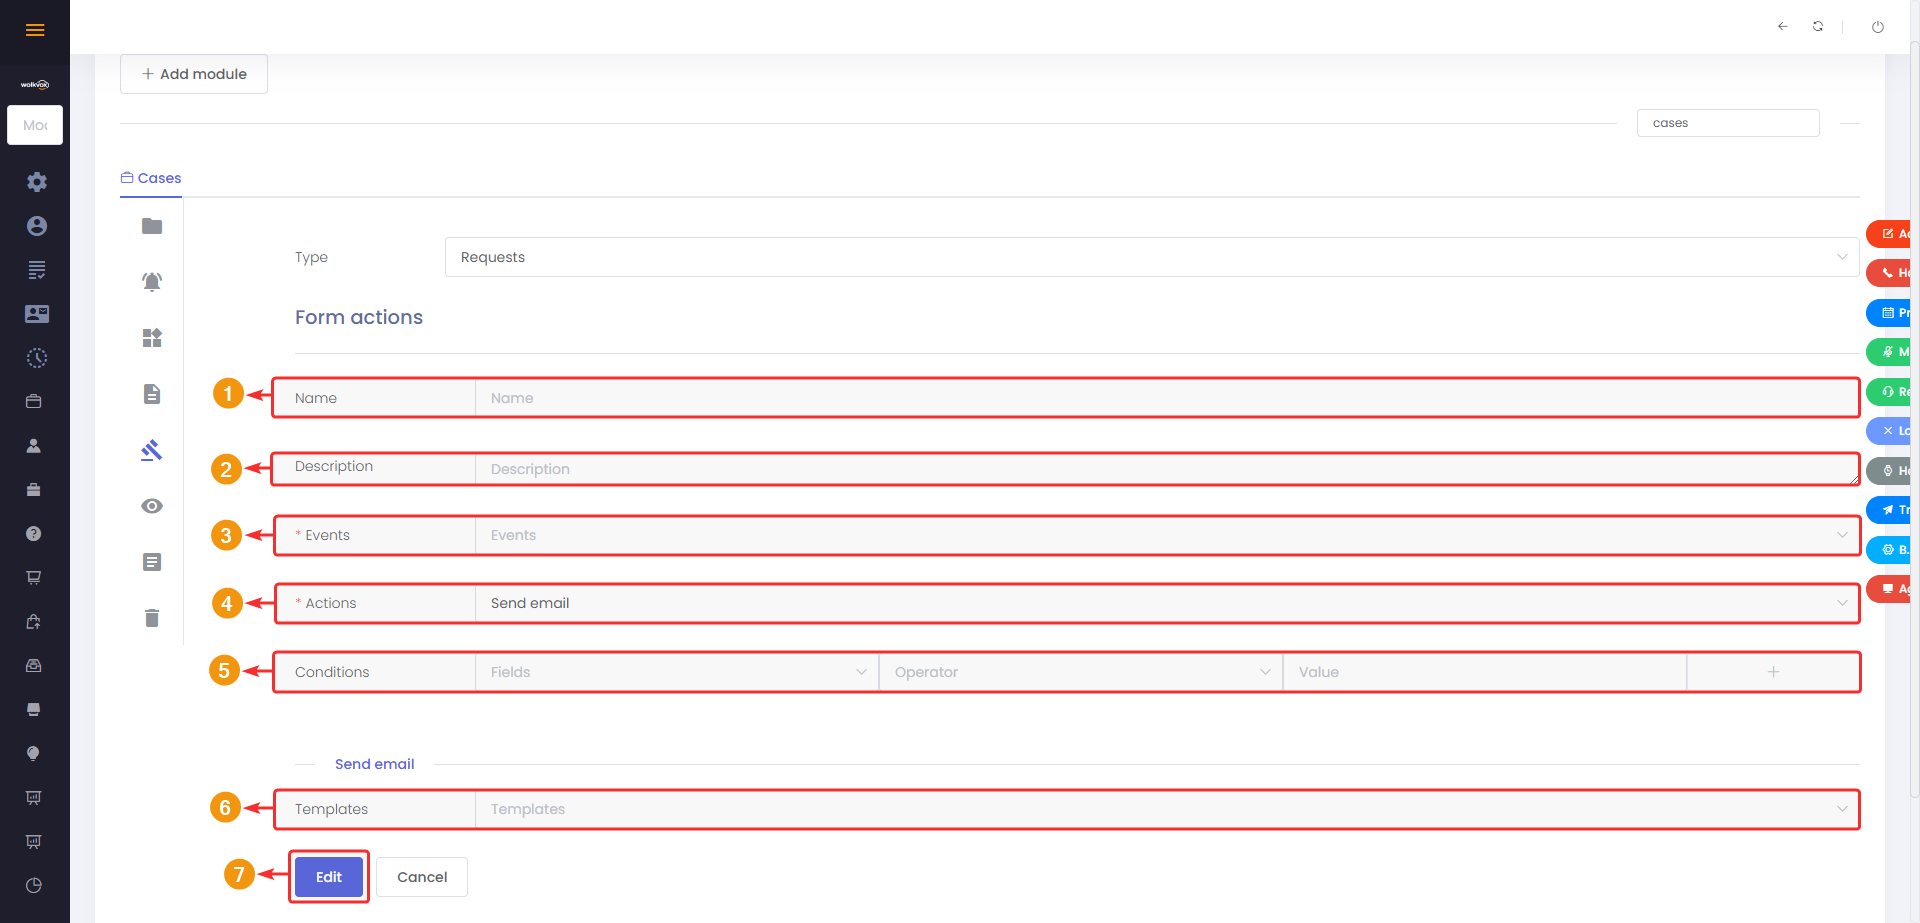
Configuration of Form Actions #
In the “Form Actions” section, possible events that may occur in the module and the corresponding actions to be taken are managed. For instance, here you can set up an email to be sent whenever a new record is created or consume an API each time a record is edited, and so on.
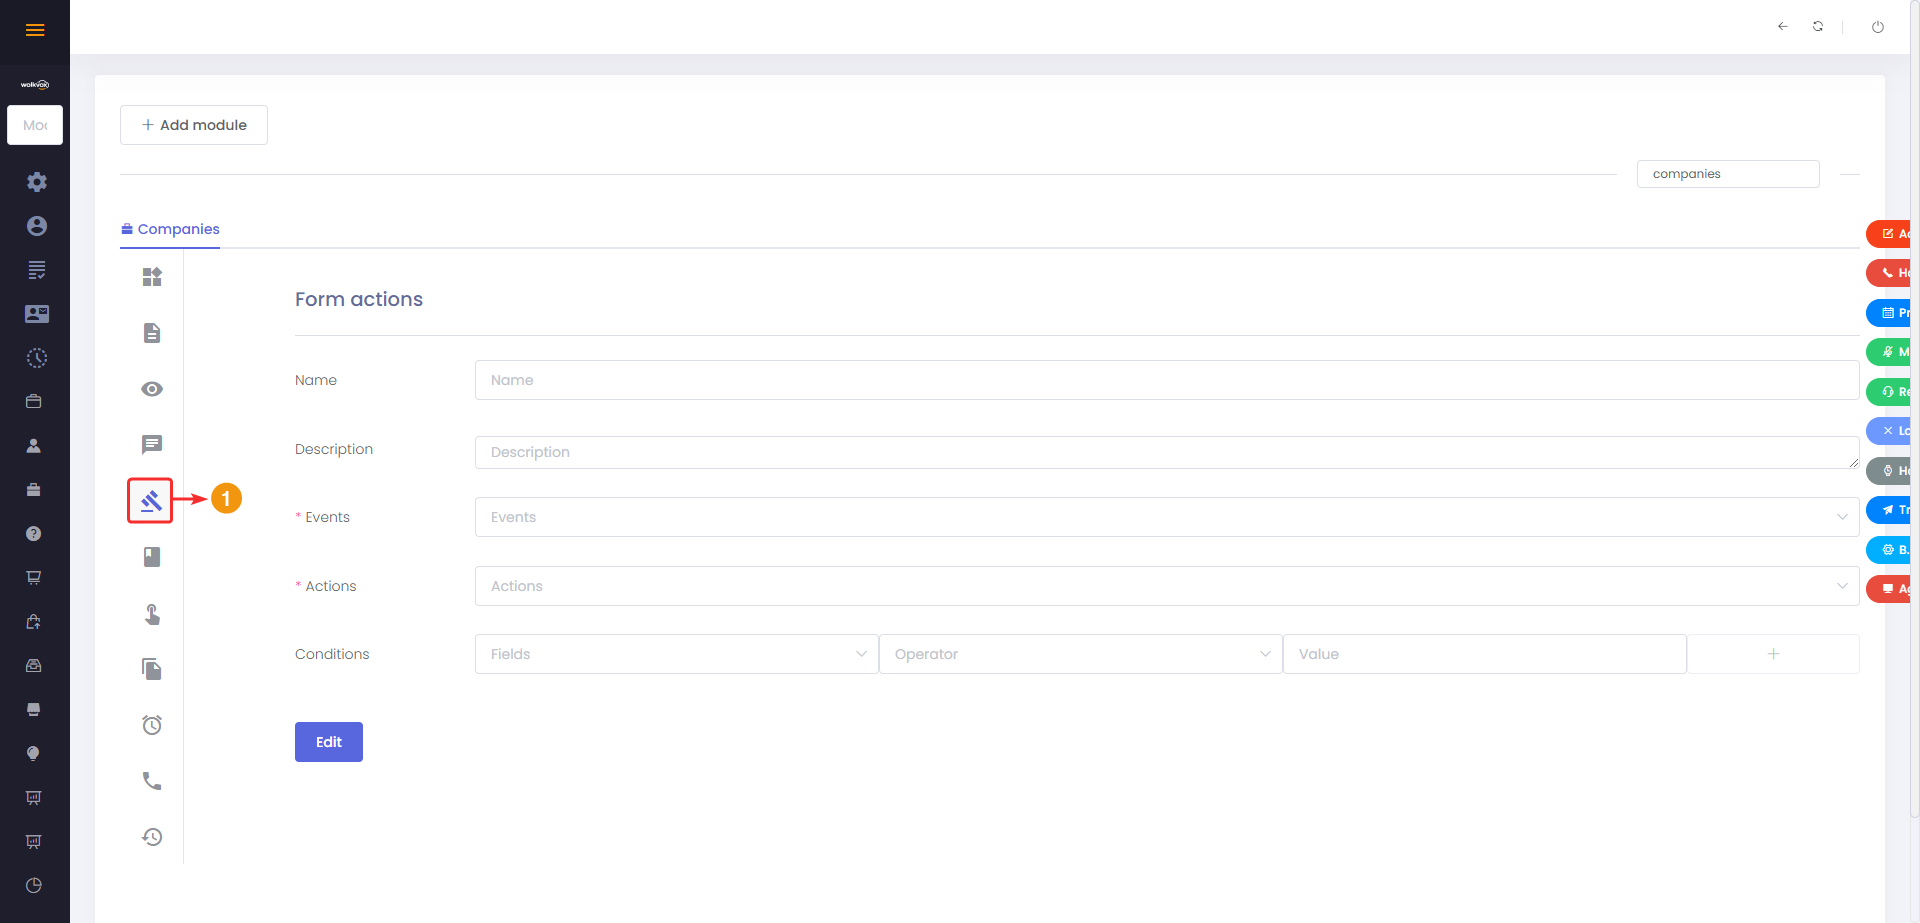
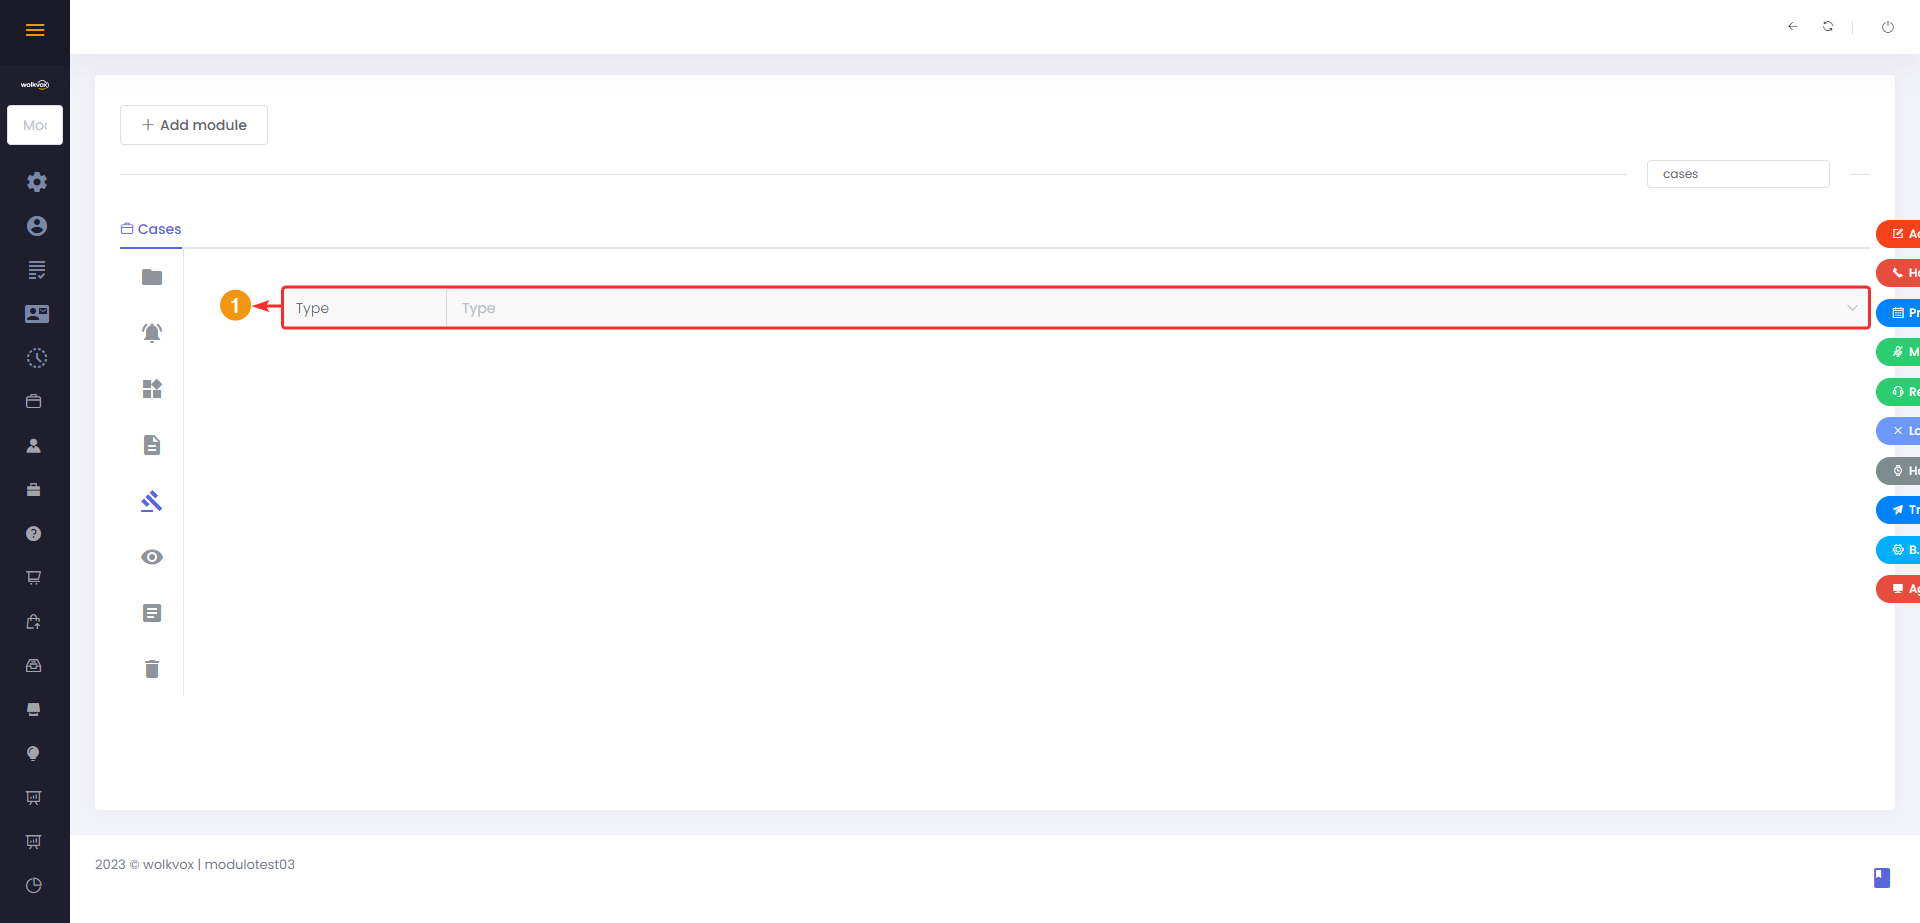
In the Cases module, you must select the type of case to which you want to add or modify form actions.
In the form actions configuration, you will find the following options.
- Enter a name to identify the action.
- Add a description detailing what the action does.
- In Event, select what must occur for the system to execute the following action. The event options are: create a new record, edit an existing record, and delete a record.
- In Actions, select what should be performed once the previously selected event occurs. The action options are: create a record in another module, send an email, connect to an API, and connect to a Routing Point.
- In Conditions, you can add conditionals and decide to execute the action under a requirement set here. For example, you could make the action only execute if the owner’s name has a certain value or if the case status name contains a specific value like “Resolved.”
- The configuration options are listed at the bottom according to the selected action.If you chose Create a record in another module, you should select the module in which you want to create a new record and fill in the fields that appear. If you chose Send an email, a field will appear to select the email template to send. These templates are created in Settings > Customize > Email Templates. If you chose Connect to an API, you can connect to an API using the Get and Post methods.
- Don’t forget to click Save to apply the changes.
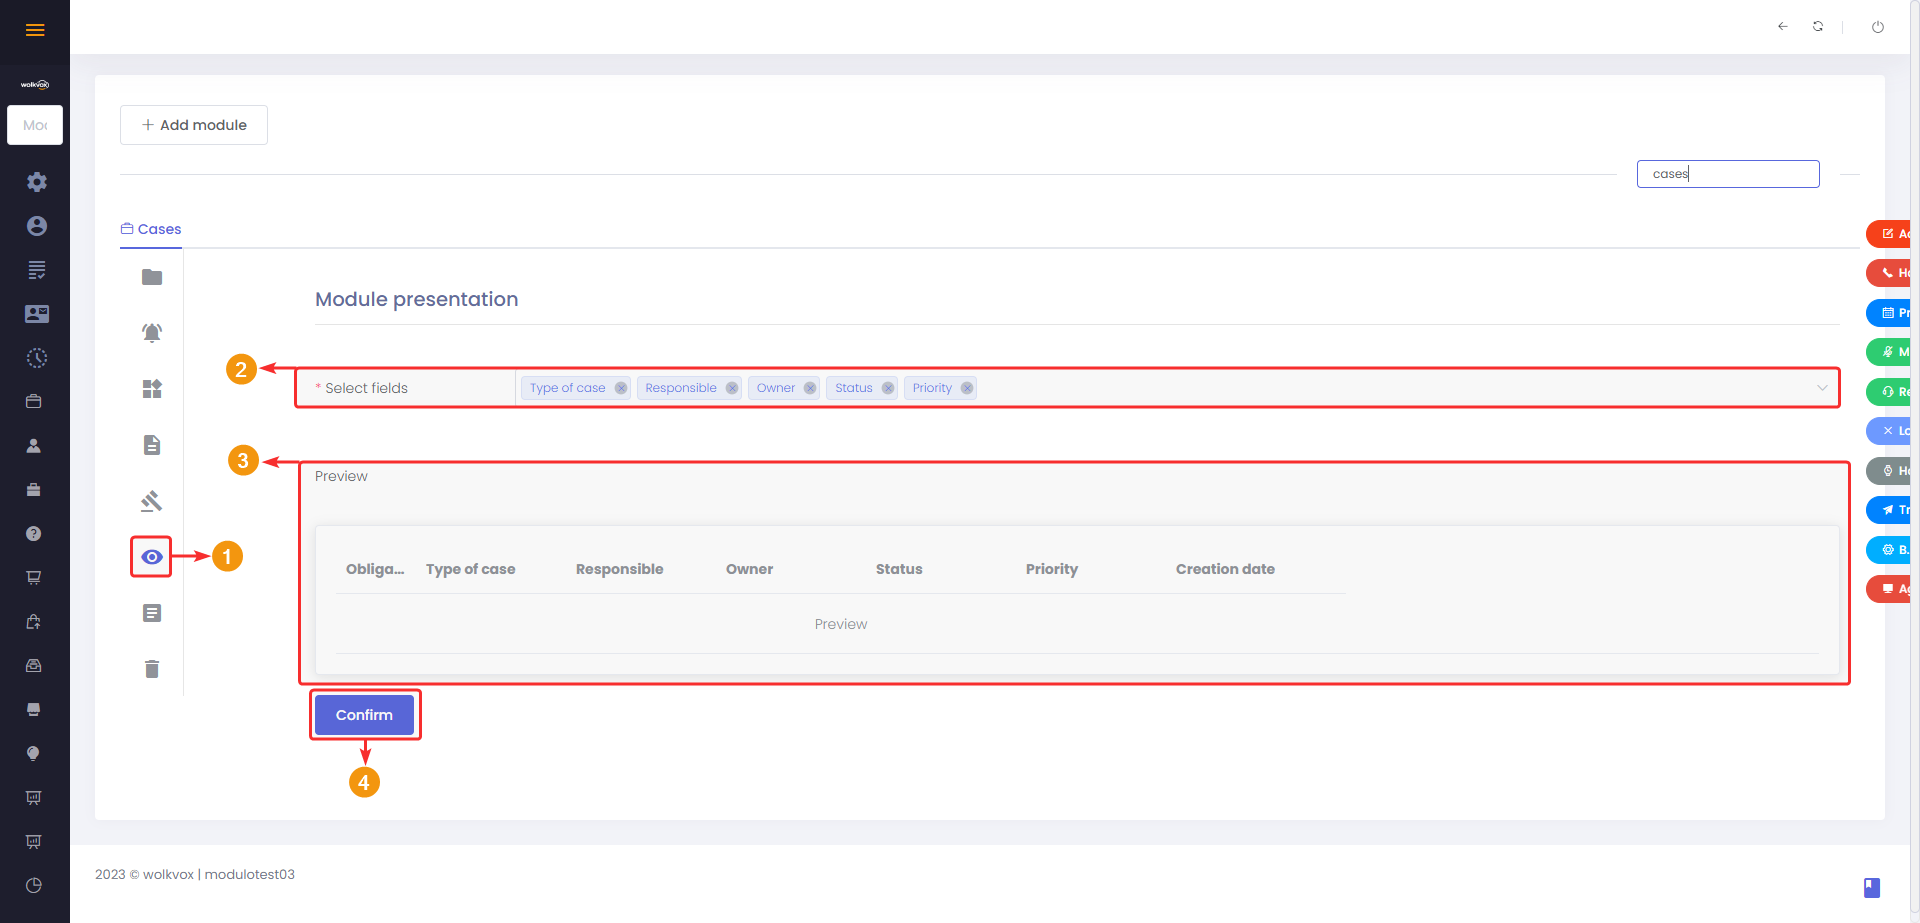
Module display configuration #
In the “Module Presentation” section, you can configure how the home section of each module will be displayed for every profile accessing them. Customize this option based on which information columns you want to be visible when viewing the module’s general information.
- Go to the “Module Presentation” section of the module.
- Select the desired fields from the dropdown menu that you want to display in the module’s presentation table.
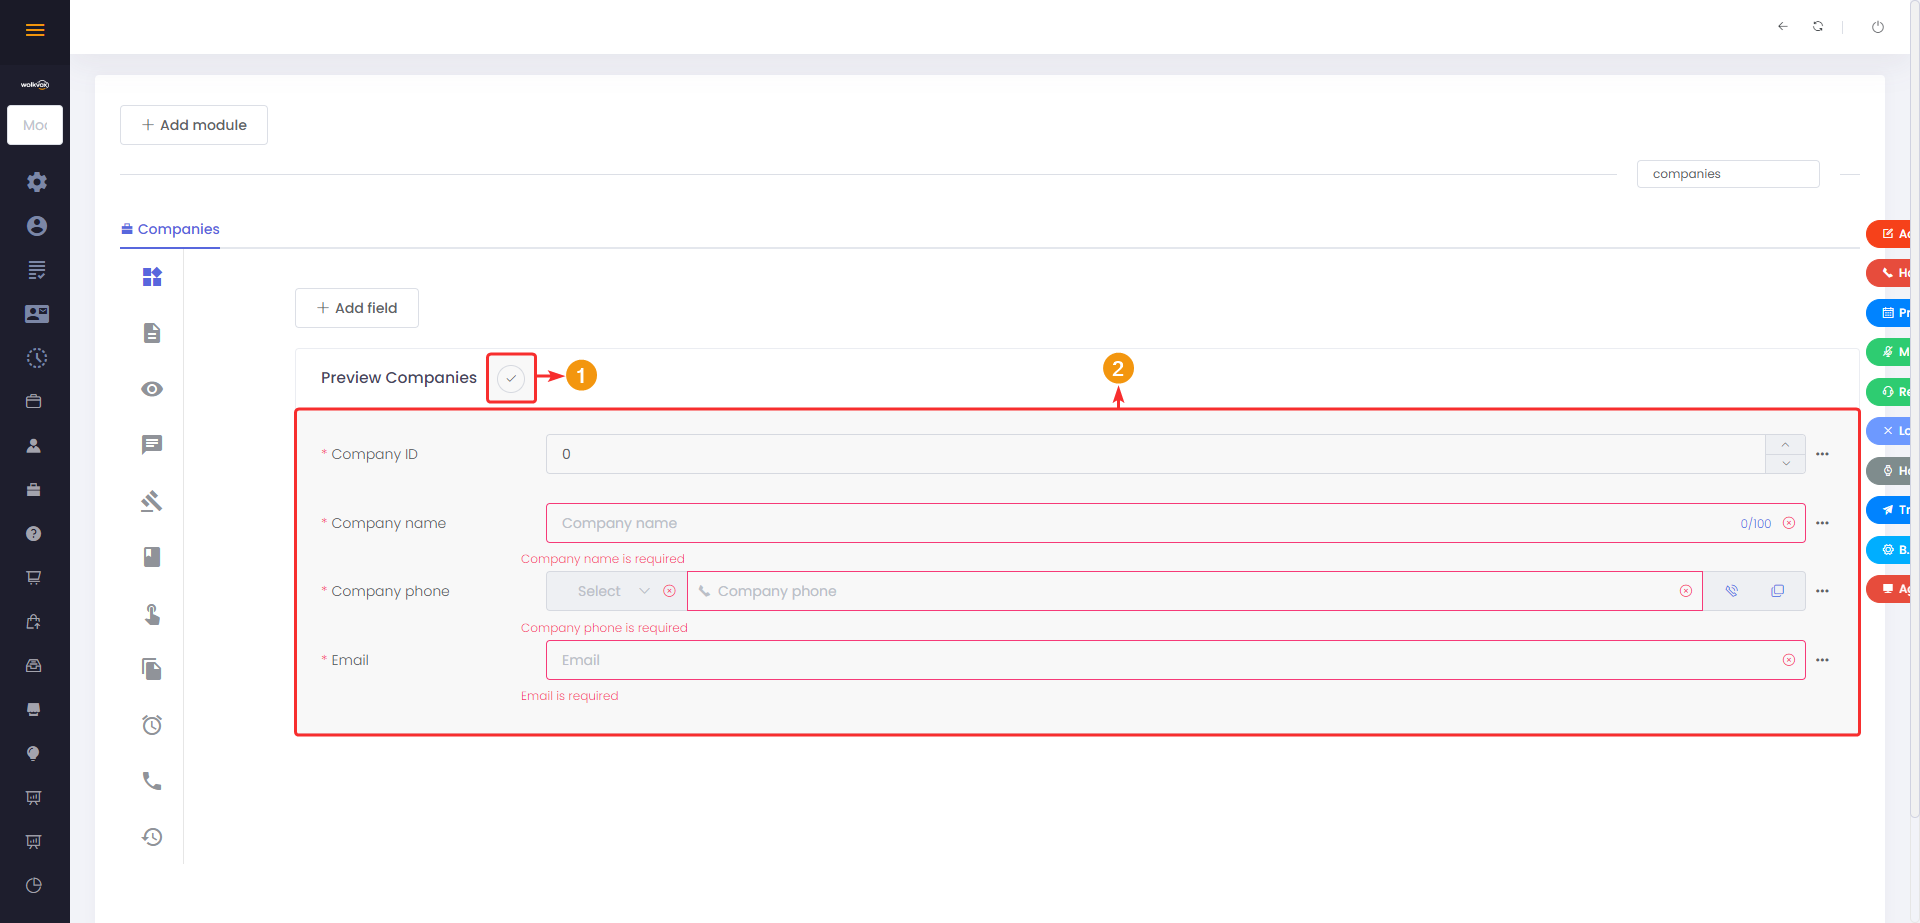
- Use the “Preview” to see how the table will be visualized.
- Click on “Confirm” to apply the changes.
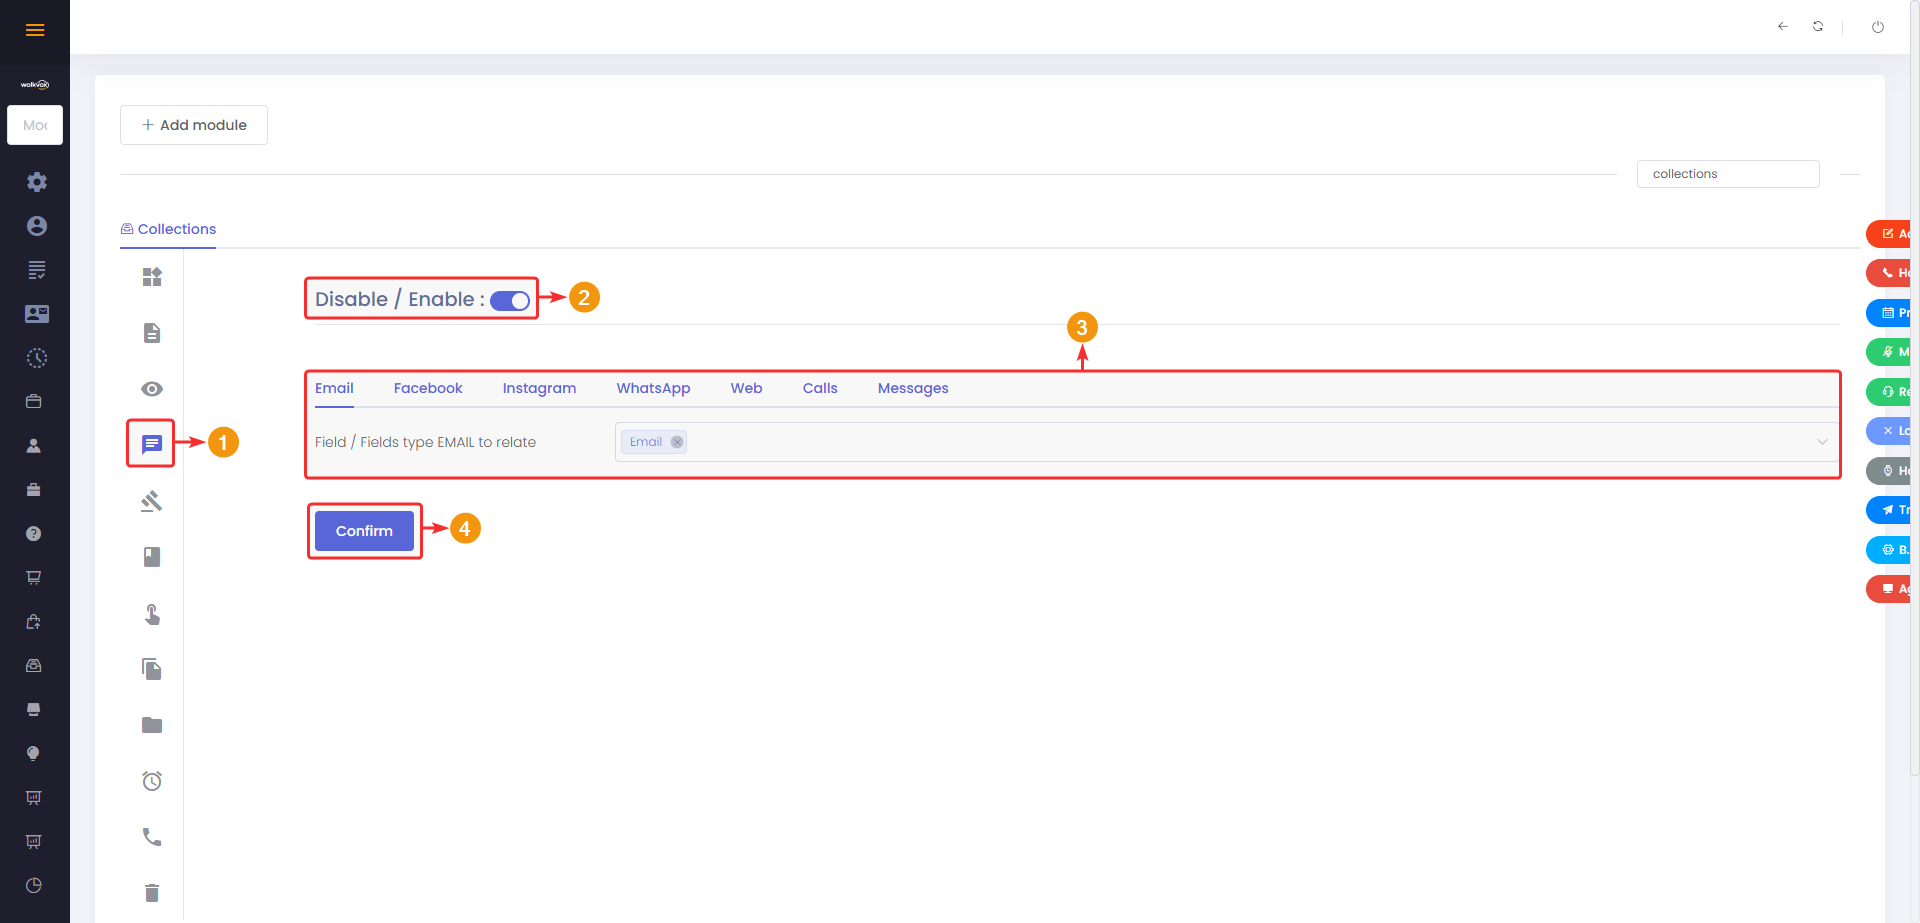
“Social” tab #
In this tab, you can configure the options related to interactions in email, Facebook, Instagram, WhatsApp, Web Chat, calls, and messages.
To activate this option, you must have at least one email or phone field in the module.
- You must activate the highlighted button in the following image to enable the “Social” section.
- For each service (Email, Facebook, Instagram, WhatsApp, Web, Calls, and Messages), you must link their respective created field.
- Click on the “Confirm” button to save the changes.
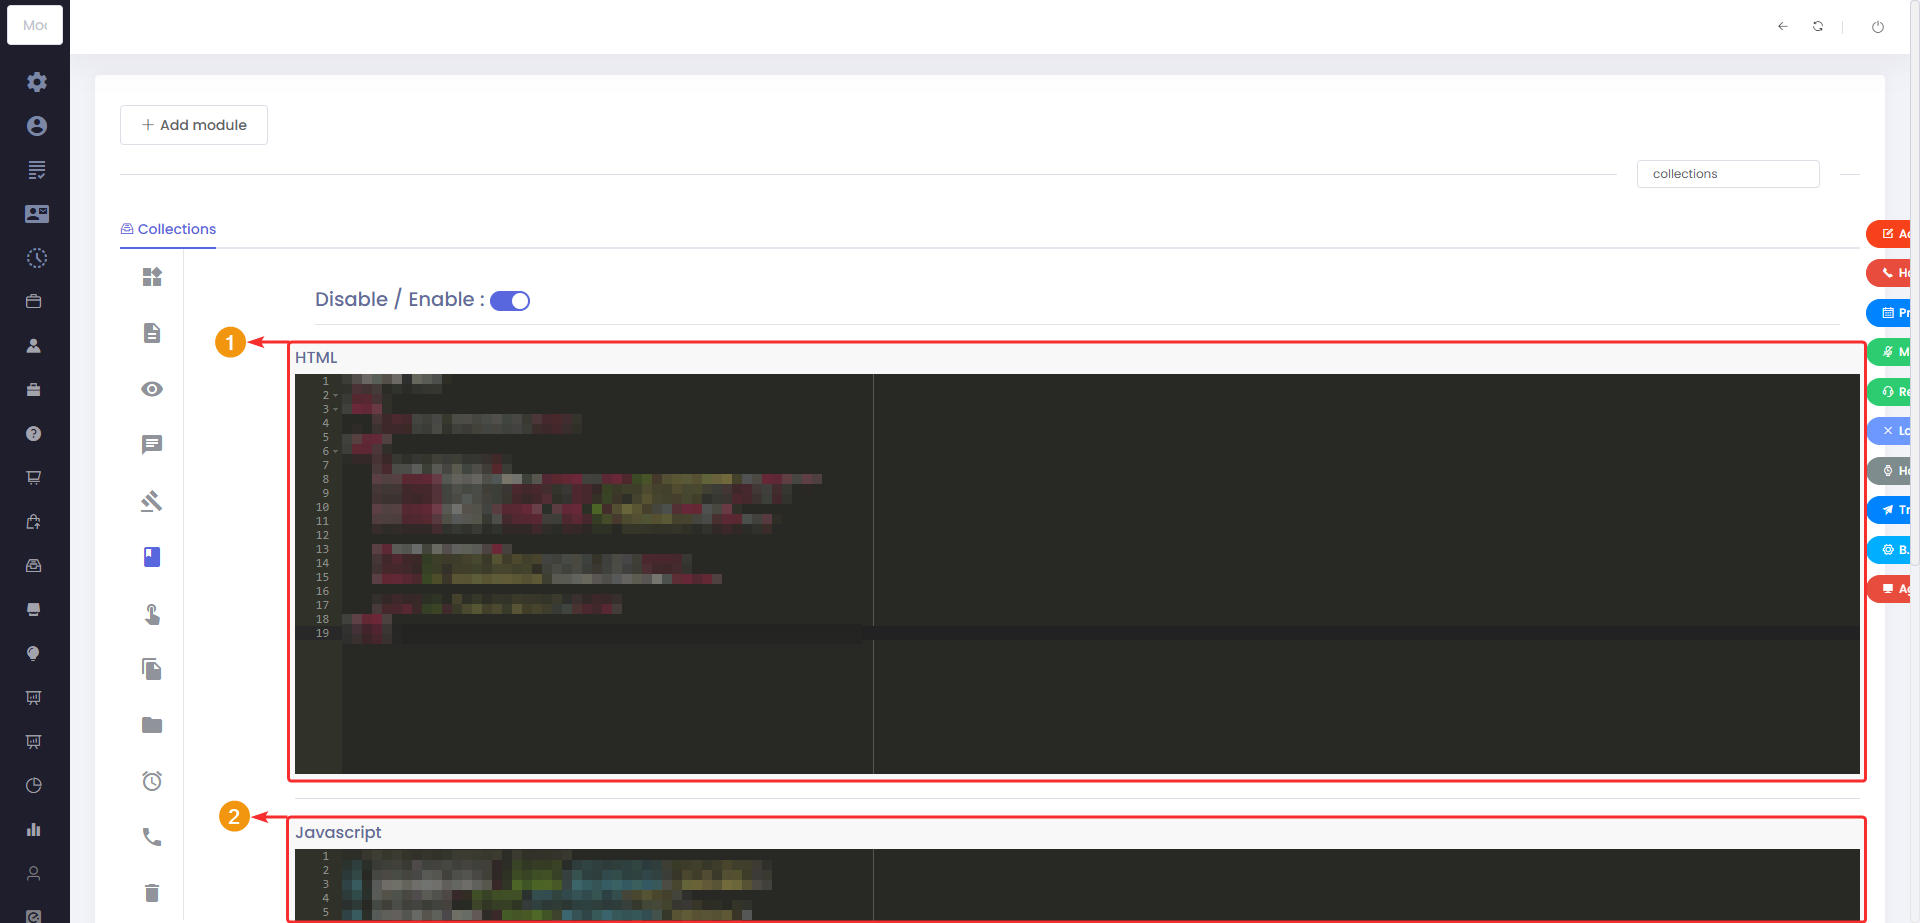
“Script” Preferences #
Allows adding a script to the module to guide the agent on how to follow up on customer management within the module. As the name suggests, it is a script for the agent to follow step-by-step and not miss any details during customer management.
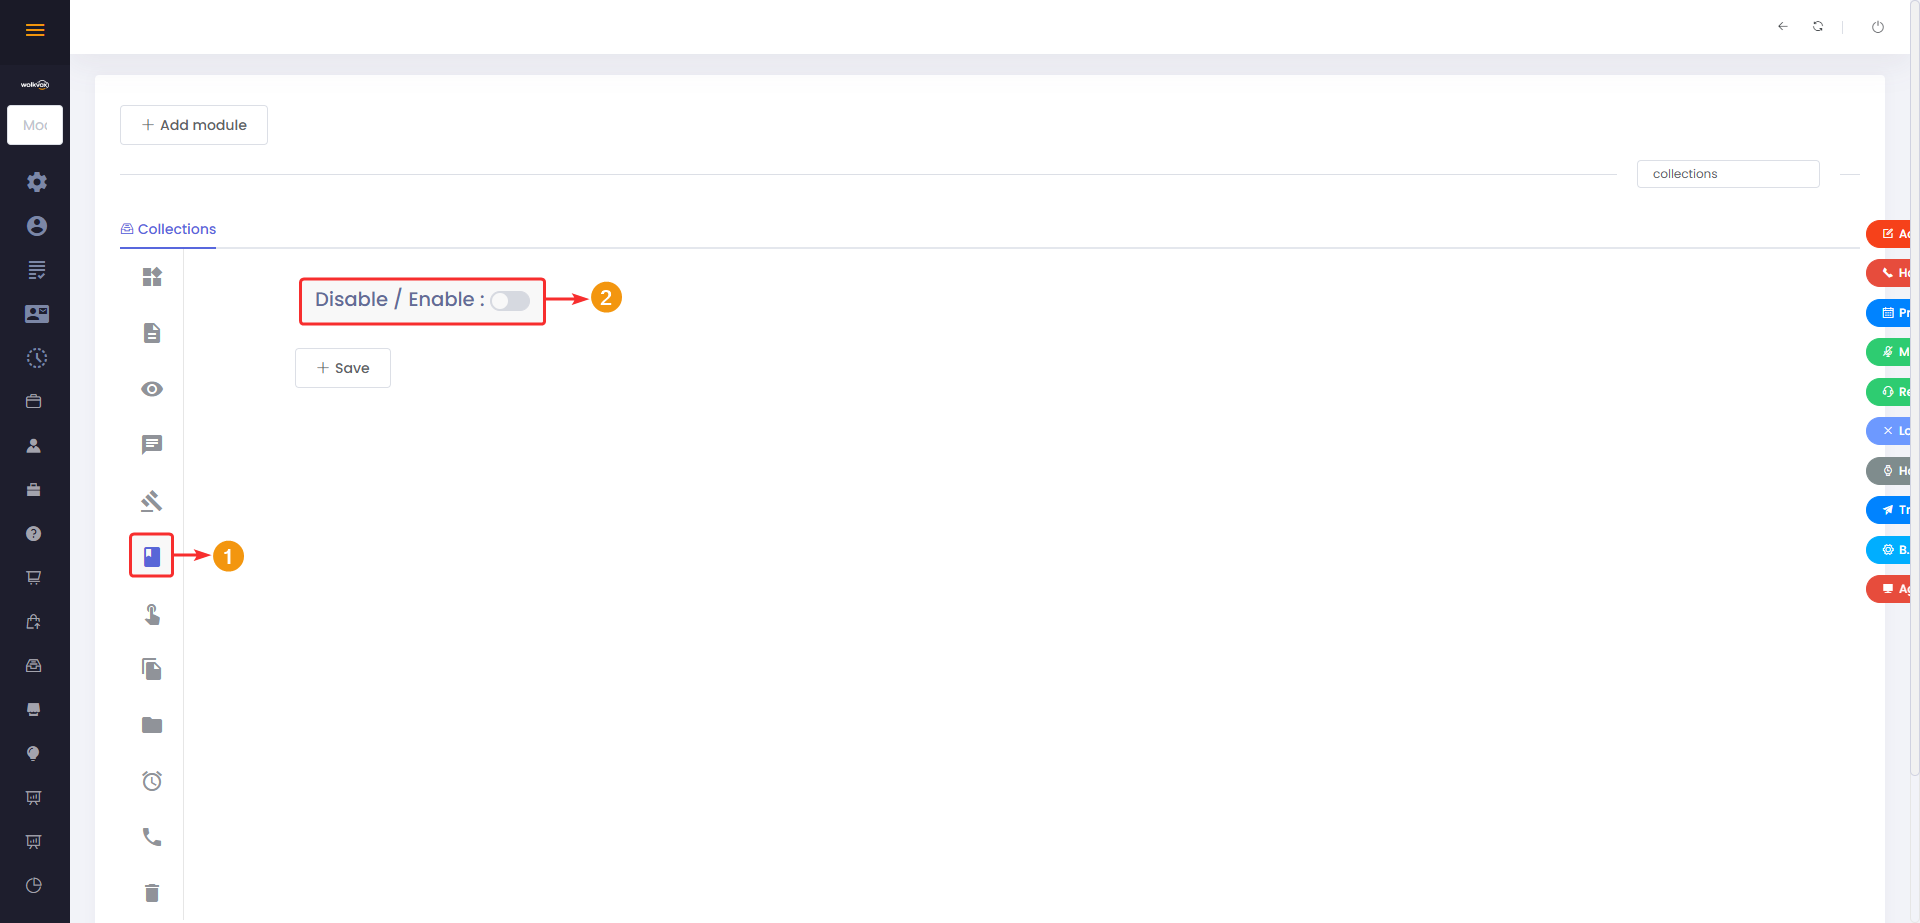
You must have basic knowledge of HTML and JavaScript to design a script for the agents.
Click on the “Save” button located at the bottom to apply the changes.
This is achieved by entering a module, then creating a new record, and navigating to the “Script” tab.
In the following image, an example of a script is shown:

Typifying records #
Typification allows classifying interactions, records, or events that occur in our CRM to inform the system about what happened or what was the conclusion of that interaction, record, or event.
Add and edit disposition options for profiles #
In the “Manage Buttons” section, you can manage the disposition options that will be available to the profiles handling customer relations. This is the button for the agent to define the outcome of the contact with the customer or any result related to the insertion of the new record or the editing of the record.
The modules with this option are: Collections, Contacts, Quotes, Companies, Tasks, Opportunities, Prospects, Frequently Asked Questions, Products, and Projects.
- Go to the “Manage Buttons” section of the desired module.
- Define the name of the disposition button that the agent will see.
- Choose the position of the button, either on the right or left side of the screen. It will be located at the top of the screen, before the record form.

- In the highlighted area, the created disposition options are listed. There must be at least one option.
- The fields “Value,” “Description,” and “Dispositionand and ready” are edited for each of the created disposition options.
- You can activate three options: “Hide telephone typing,” “Typify and ACW,” and “Typify in CRM only.”
- Click on “Save” to apply the changes.
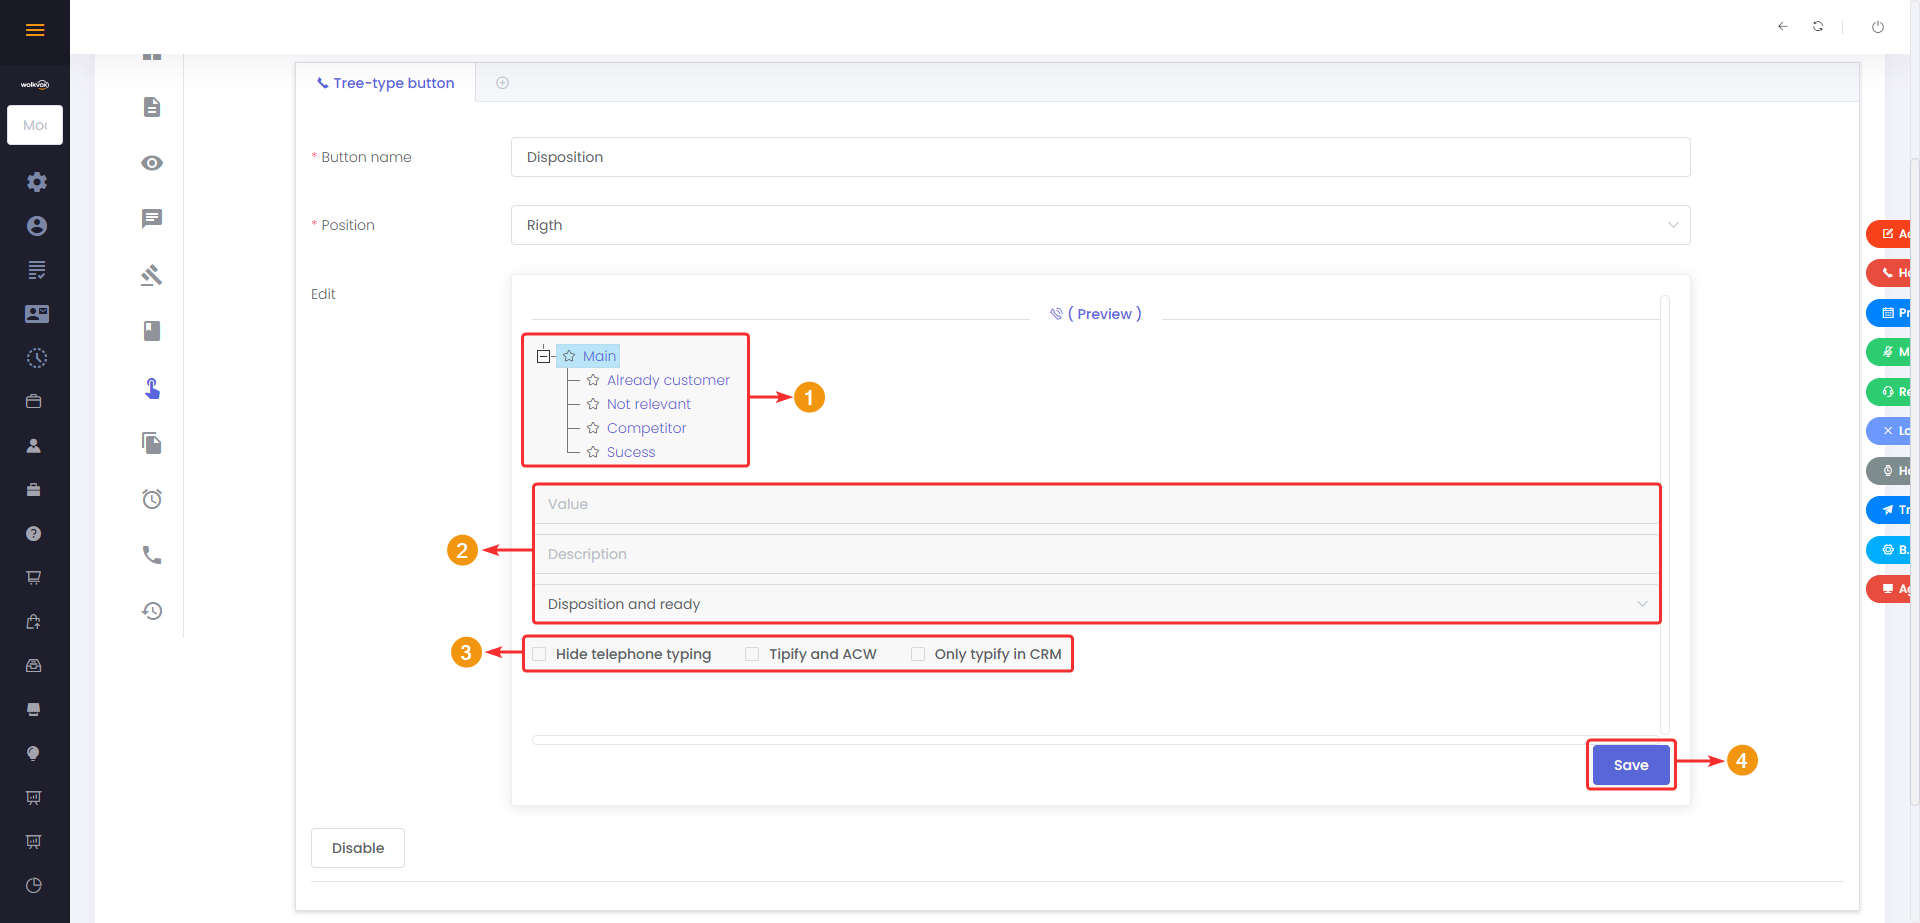
You can create hierarchical levels of dispositions. Simply right-click on the disposition code to which you want to add a child disposition code and click on “Create.” You also have the options to change the name or remove the disposition code.
- Create: Creates a new child typification option of the selected element.
- Rename: Changes the name of the option.
- Remove: Deletes the element. If there are child elements, they will also be deleted.

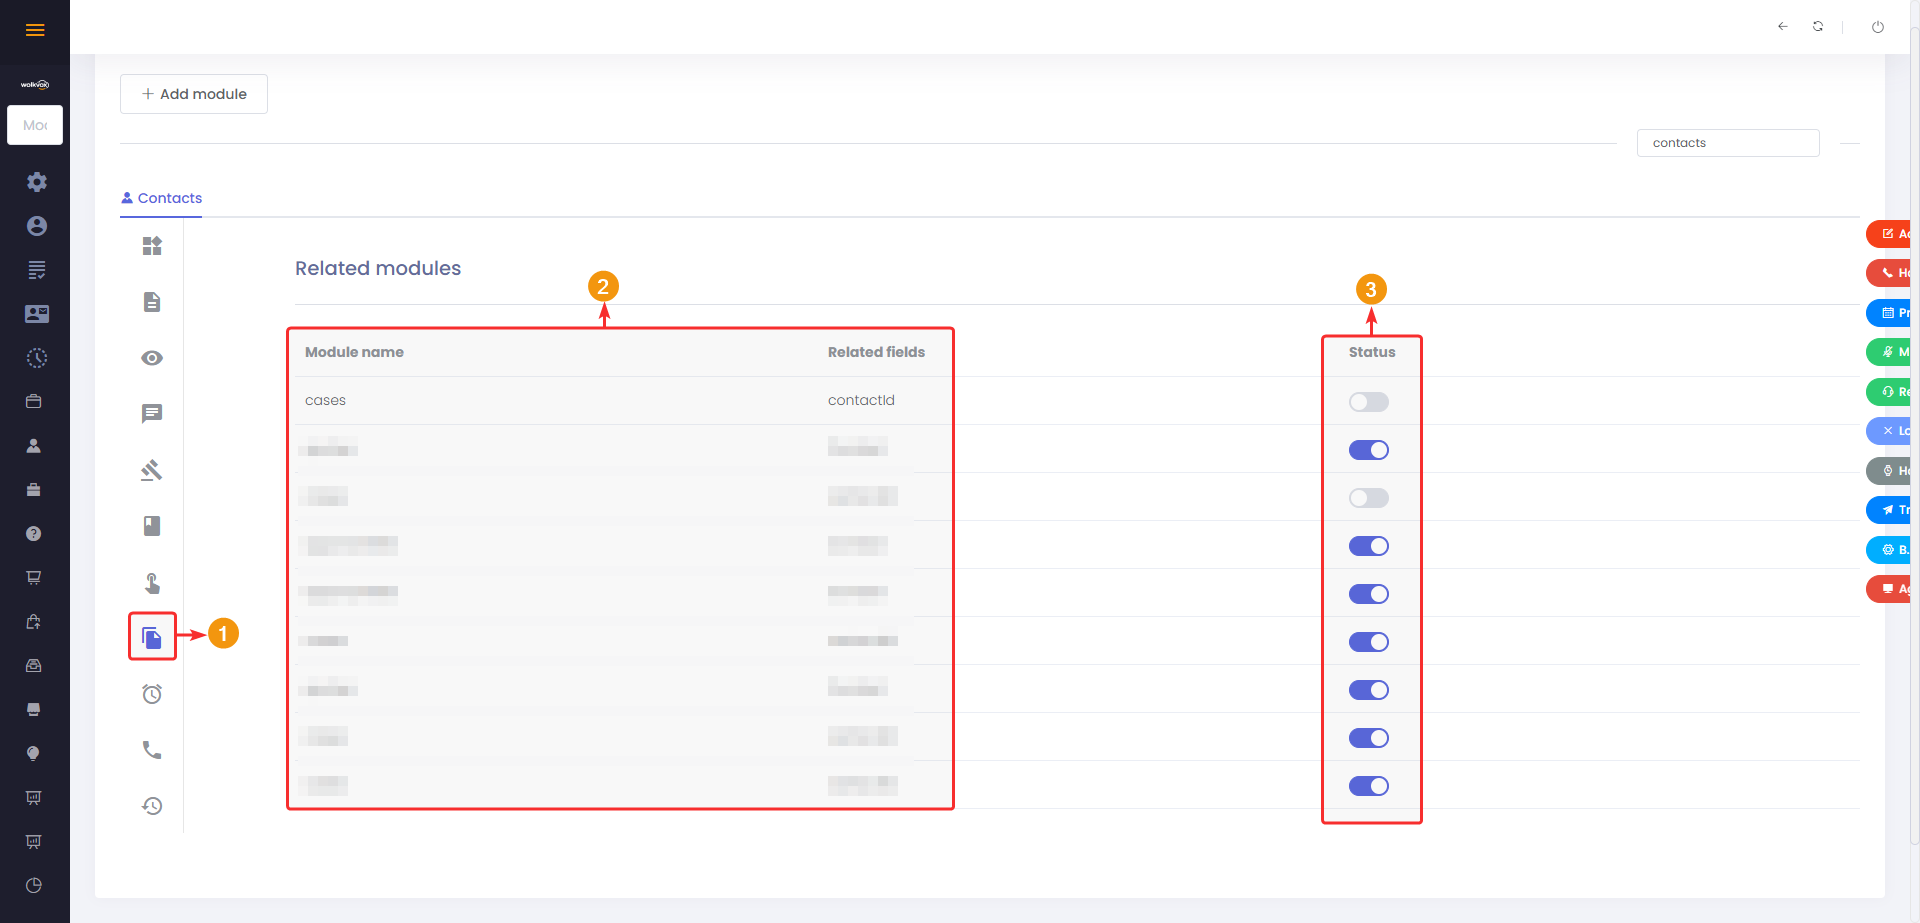
Modules Related #
This section allows you to view the modules that are linked to the selected module through related fields.
In the table, you can see which modules are referencing any field of the selected module.
You can also activate or deactivate this relationship of fields between modules using the toggle buttons in the “status” column.
Fields #
Fields are the different elements within the CRM module’s database used to capture and store customer data. The module administrator will create the necessary fields, and agents will enter customer information there.
Below, you can see each field that you can add and the options available in its configuration.
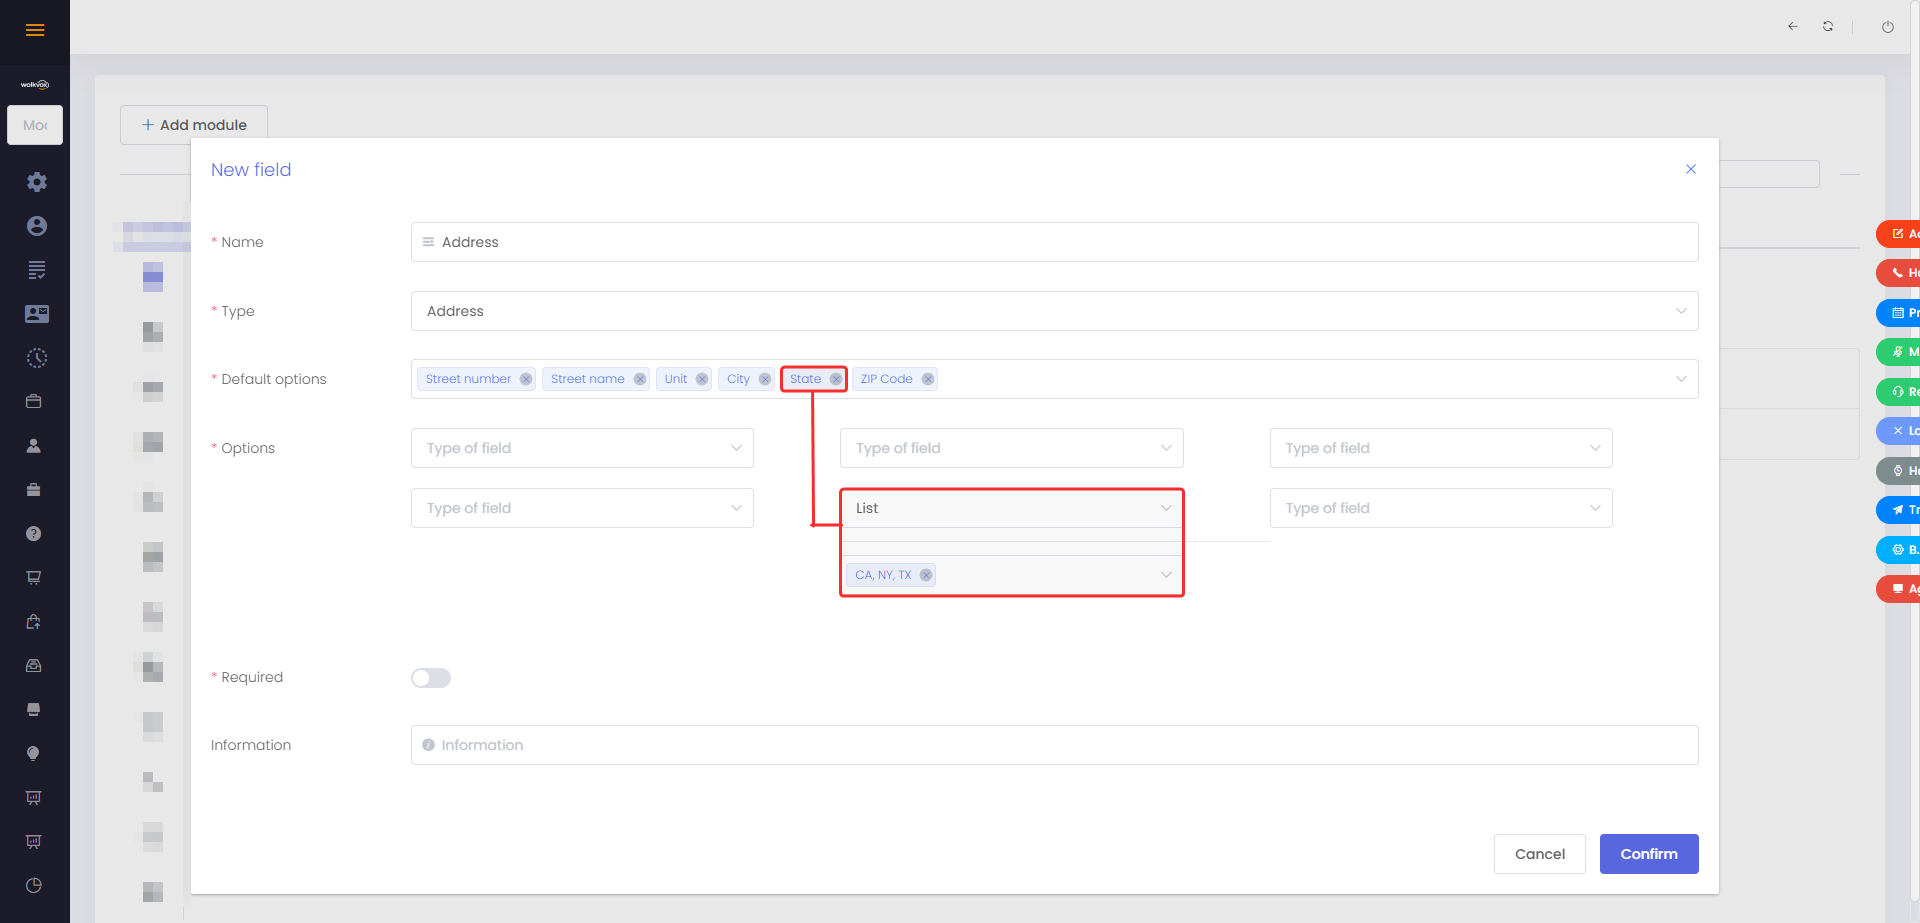
Address #
The purpose of this field is to create a space to store address information.
- In the “Default Options” label, you should structure the address format. This will be how the agent enters the client’s address. Each space you create will be added with the “Enter” key.
- In the “Options” label, you specify the format of the created spaces.

Each added option will be listed sequentially from left to right.
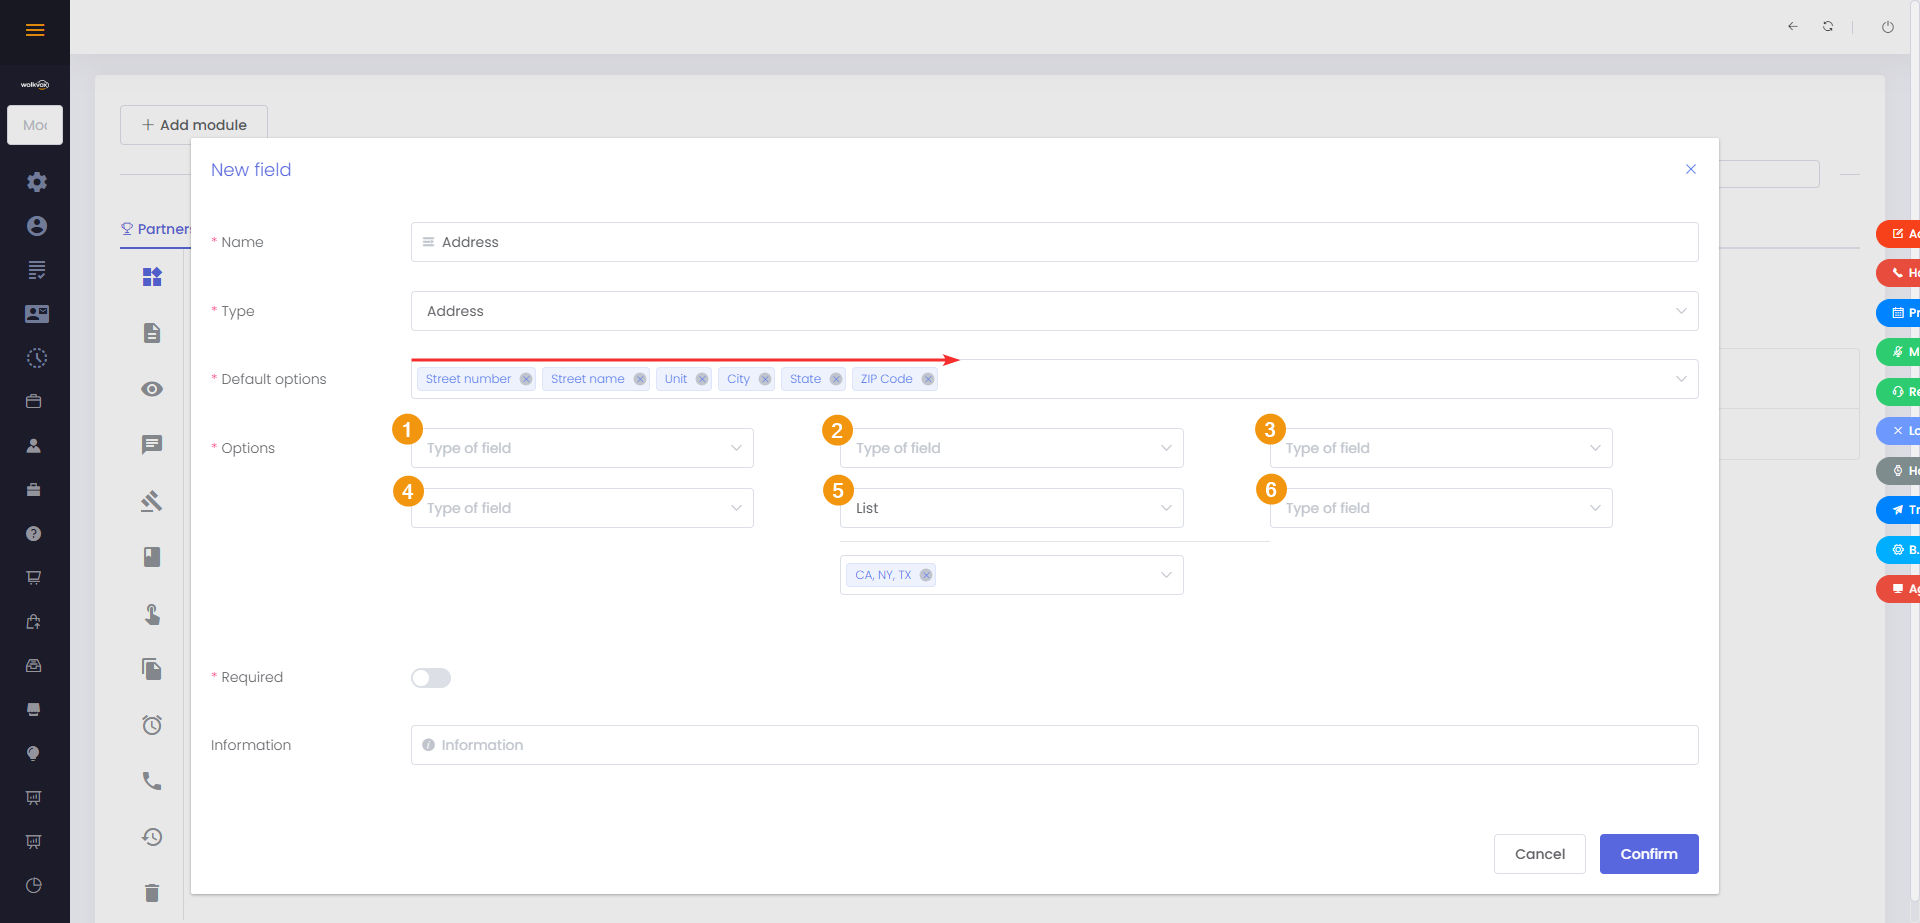
In the “List” type options, another box will appear where you must add each option for the list you want to create. This list will be a dropdown menu where the agent can select the required option. Add each option to the list by pressing the “Enter” key.
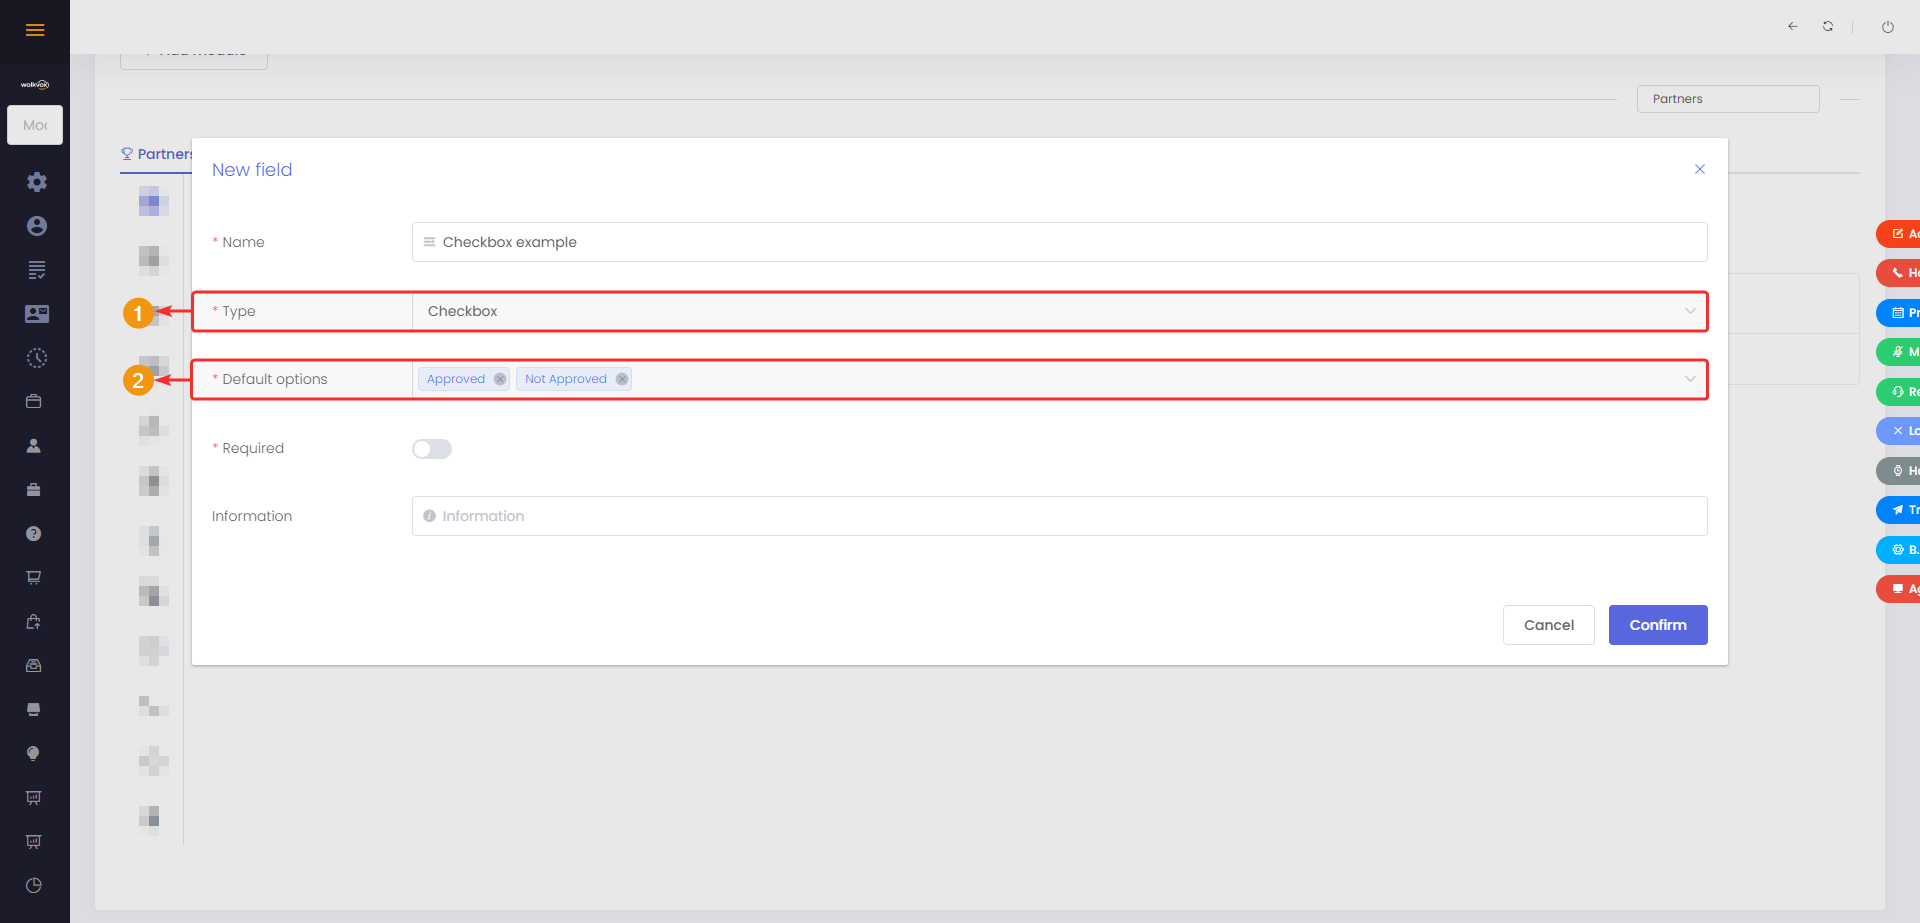
Checkbox #
With this field, you can create activatable and deactivatable options in the module. The CRM user can check or uncheck multiple checkboxes at once

In the field options, you must add each of the checkboxes it will have. Add each option by pressing the “Enter” key.
Current user #
This field displays information about the user who is currently logged in. In other words, this field is not related to customers but to the users accessing the CRM.
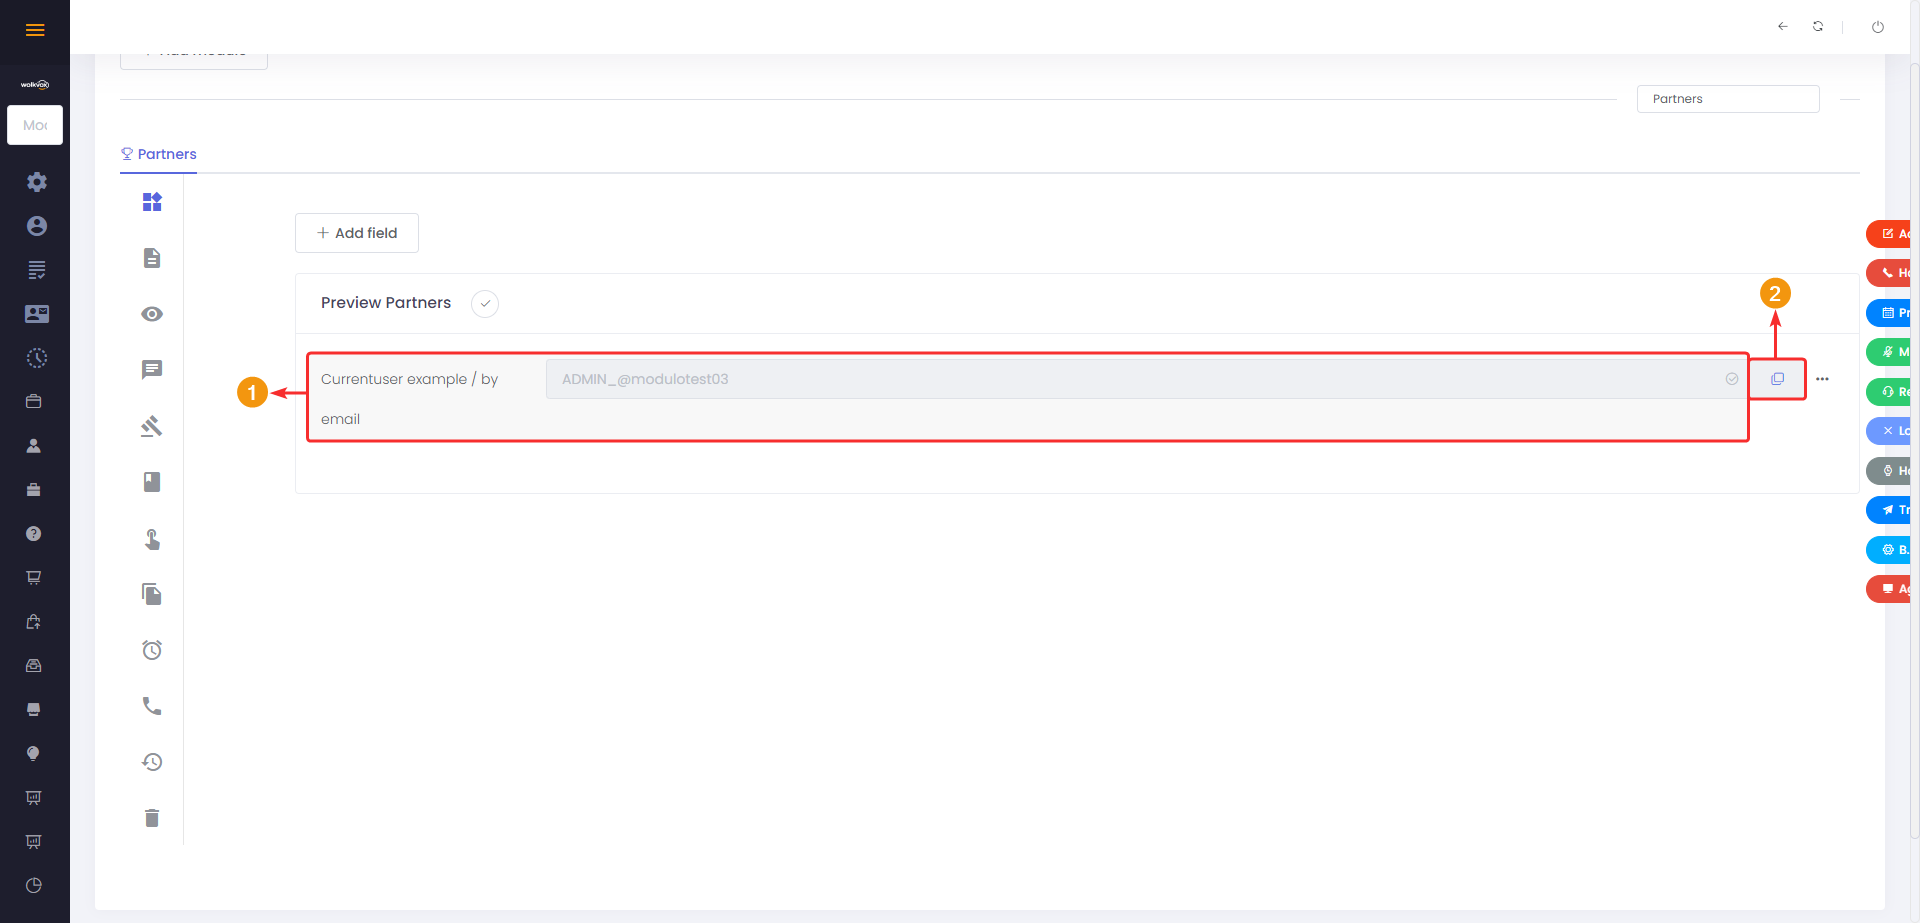
The only option for this field is “Display,” and in its dropdown menu, you must select the element you want to show. You can set it to display the user’s document, email, name, extension, or assigned profile type.

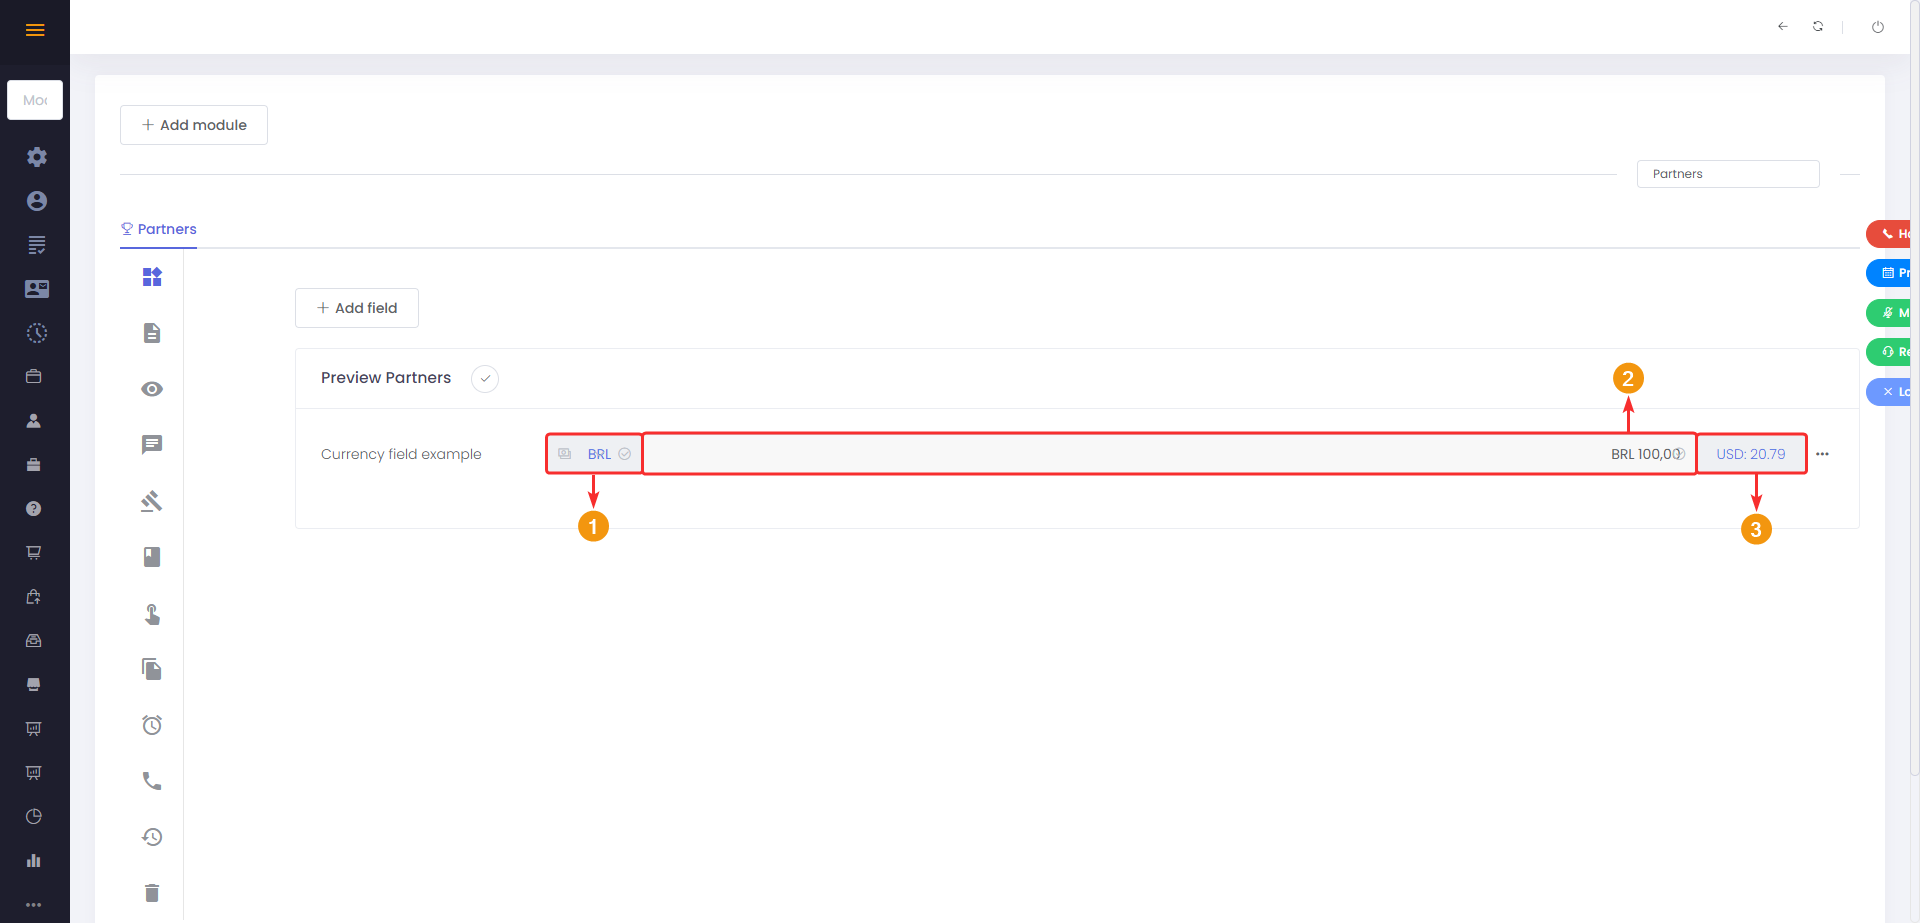
Currency #
This field allows you to add an amount of money in a selected currency. If you choose a currency other than the local one, it will be converted to the local currency based on the exchange rate set in the currency settings.
- On the left side of the field, you will find the option for selecting the currency (the available options will depend on the currencies added in the “Other Currencies” section in the currency configuration of your CRM).
- In the central field, the agent can enter the value to be converted from the previously selected currency to the local currency.
- On the right side, there is a field where the result of the currency conversion is displayed.
The following image shows an example of using the field to convert Brazilian reais to dollars.
Note: The conversion rate is configured in the currency configuration section of your CRM.
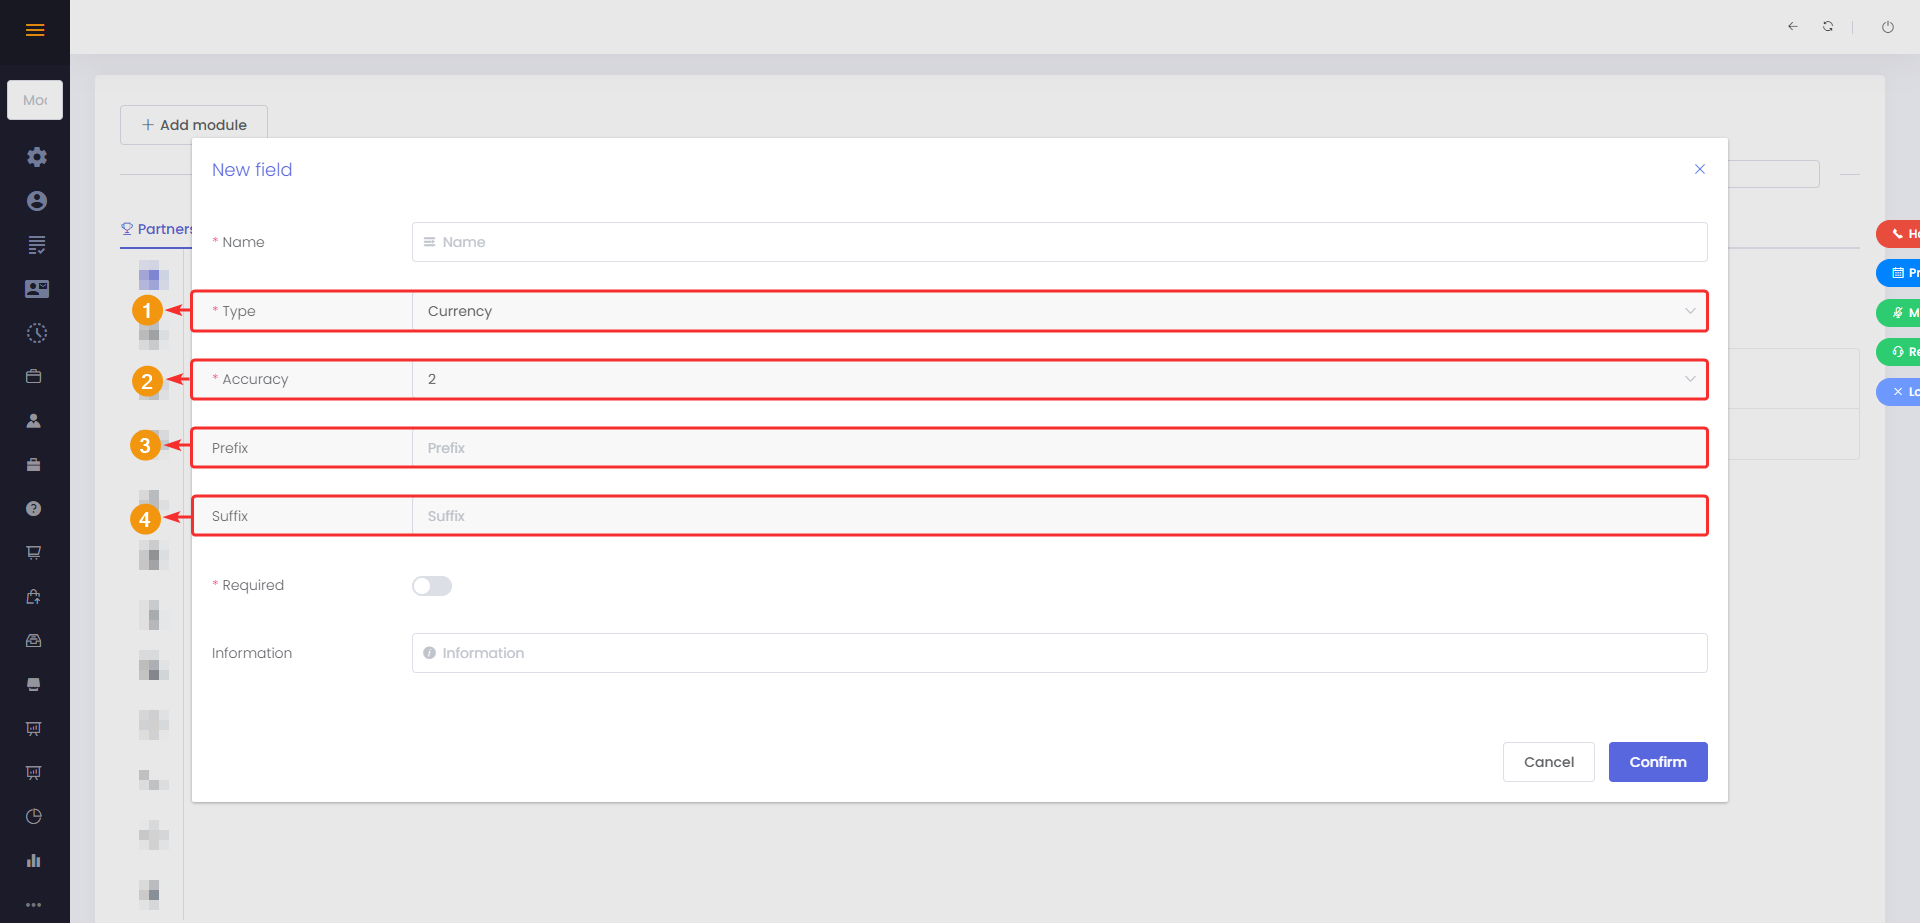
- Select the field type “Currency”.
- In “Accuracy,” you can choose the number of decimals to display in the “Currency” field.
- In “Prefix,” you can add a prefix that will accompany the value in the field.
- In “Suffix,” you can add a suffix that will accompany the value in the field.
Date #
This field allows you to add a date field in a specified format.
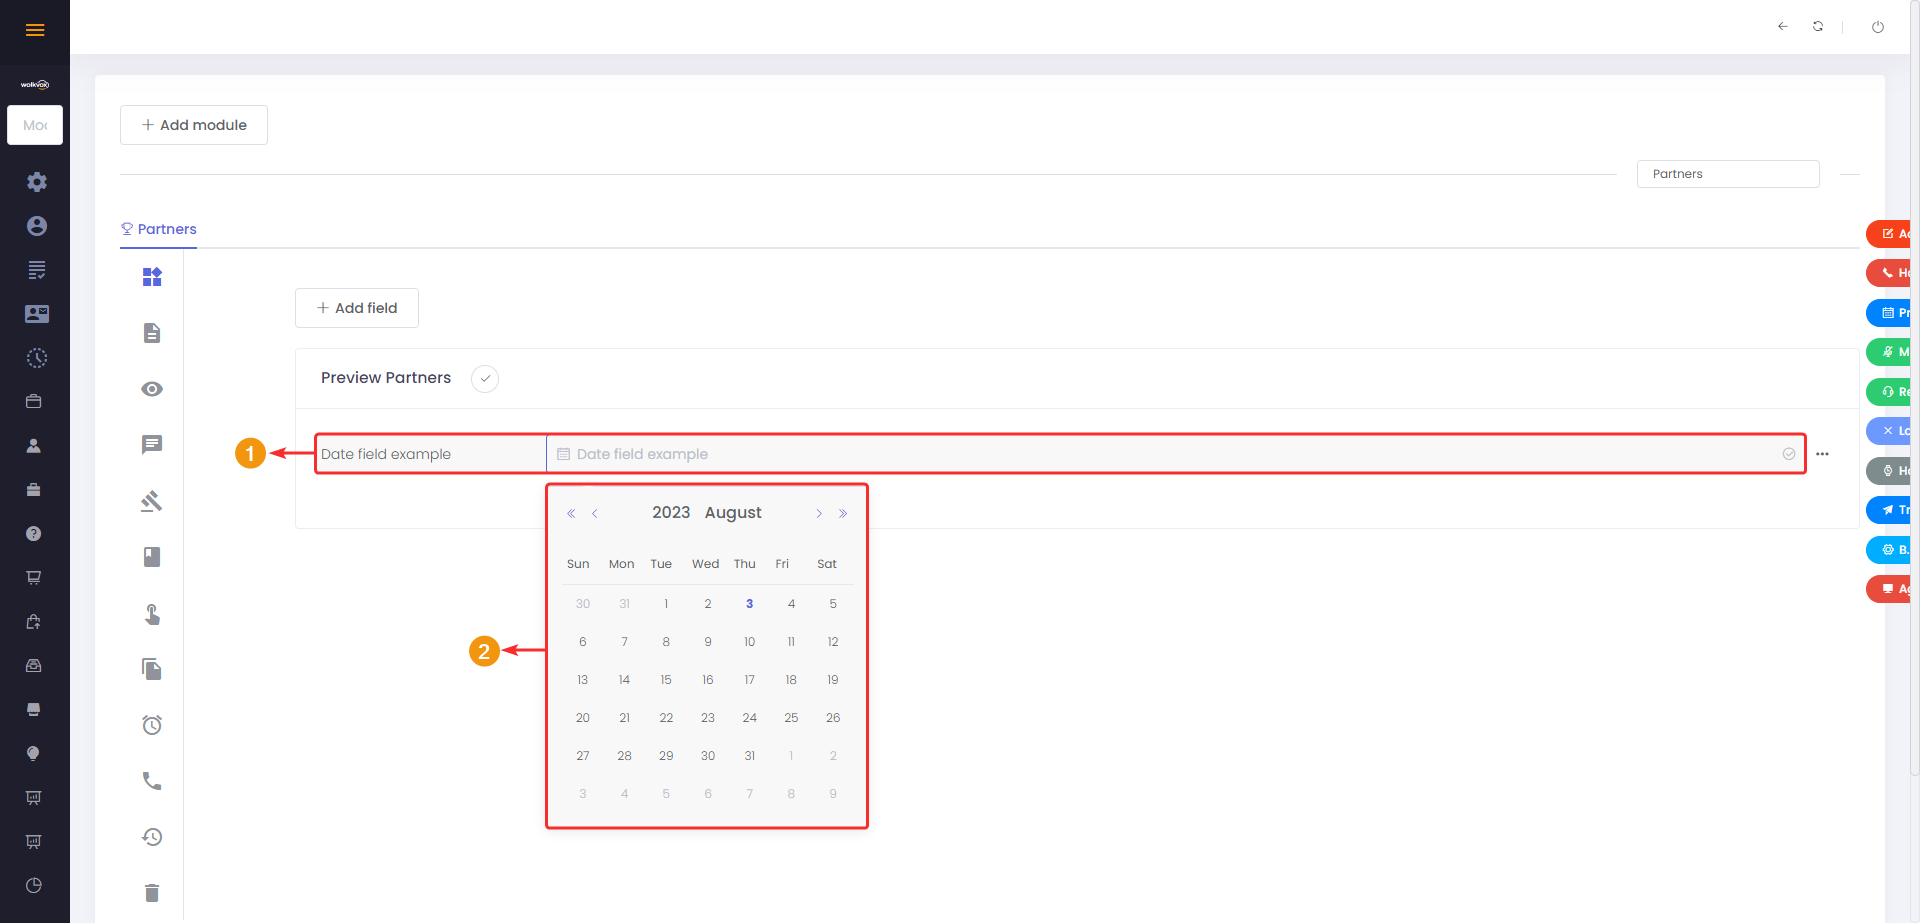
- Select in which date format it will be displayed. The following options are available:
- YYYY-MM-DD.
- YYYY-DD-MM.
- DD-MM-YYYY.
- MM-DD-YYYY.
- You can use the “Automatic date” toggle to have the date data calculated automatically.

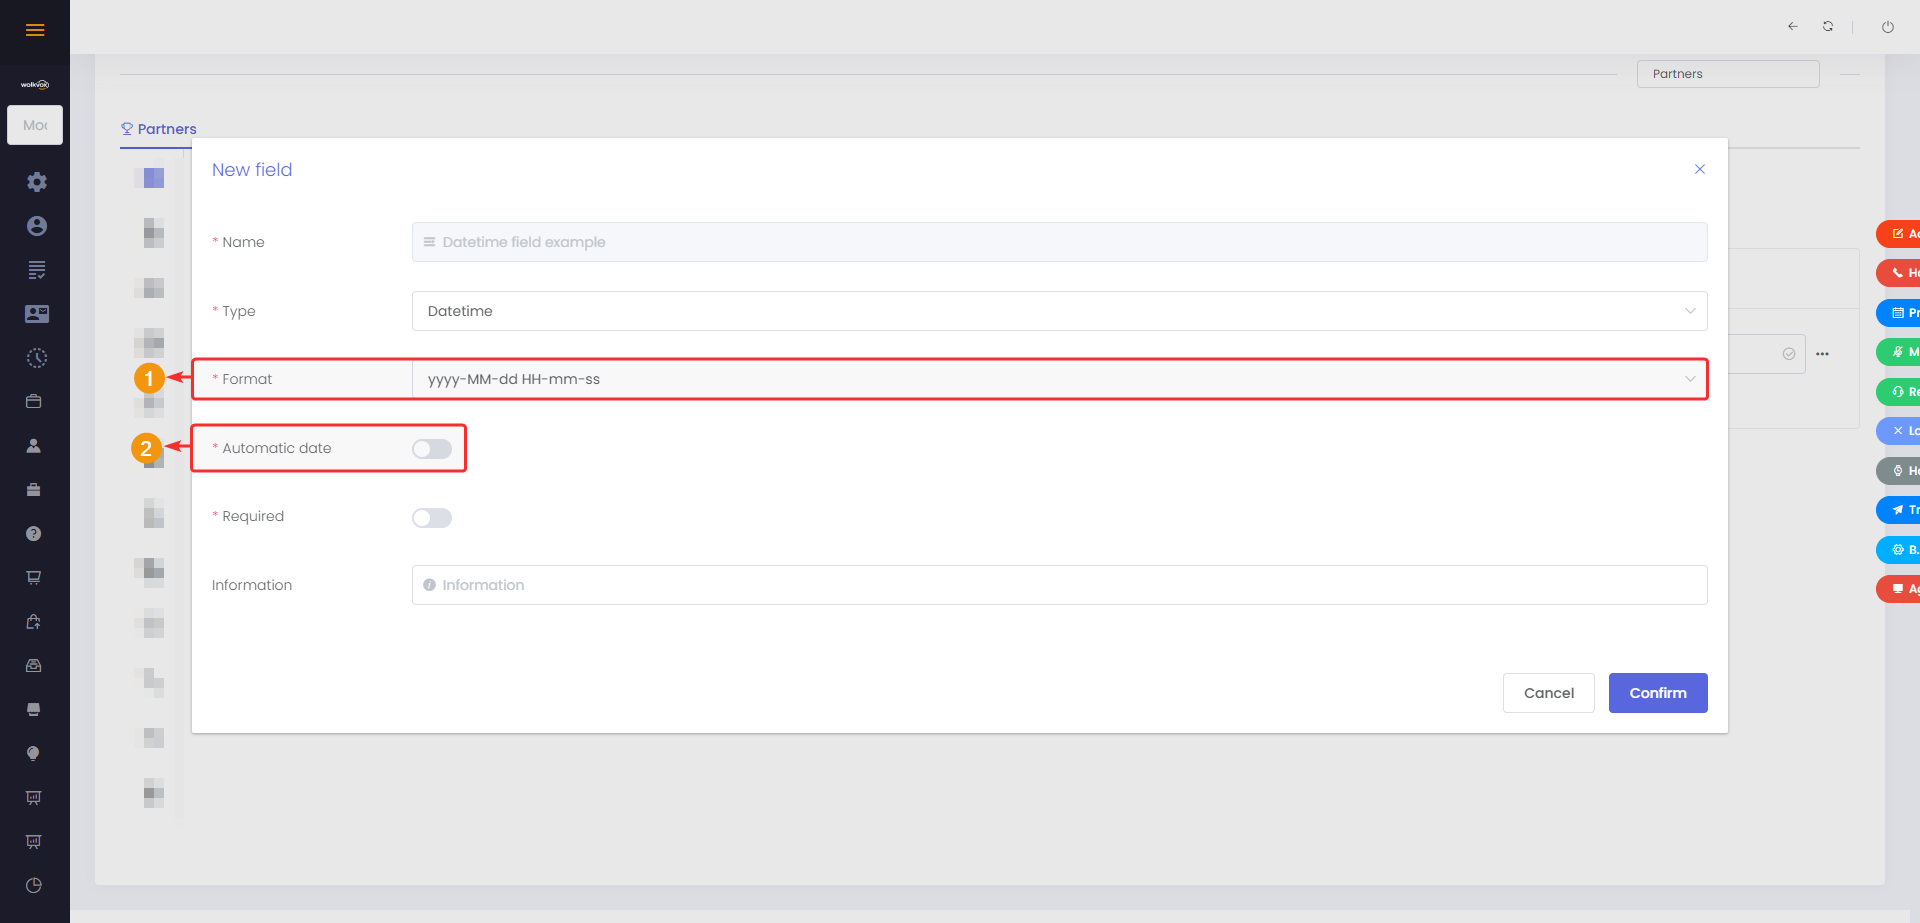
Date and Time #
- Allows adding a field of date and time type in a specified format.
- Unlike the previous field, this one also includes information for hours, minutes, and seconds.
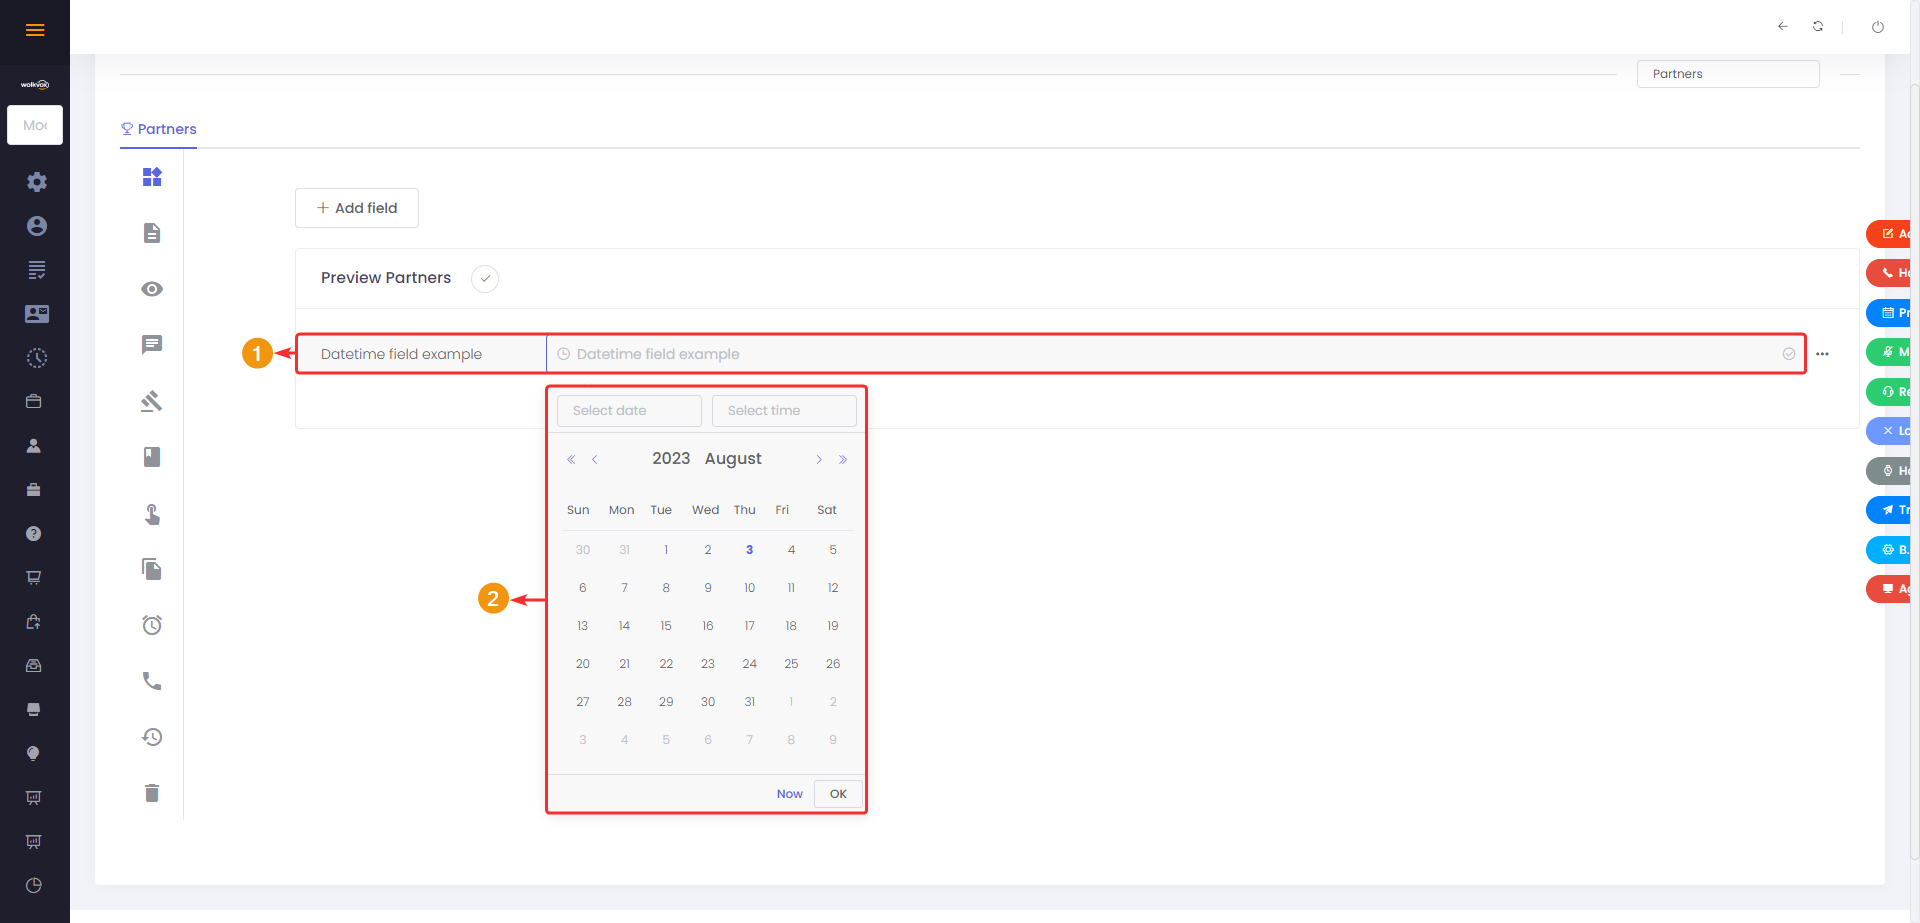
- Select the date and time format in which it will be displayed. Choose from the following options:
- YYYY-MM-DD HH:mm:ss
- YYYY-DD-MM HH:mm:ss
- DD-MM-YYYY HH:mm:ss
- MM-DD-YYYY HH:mm:ss
- HH:mm:ss YYYY-MM-DD
- HH:mm:ss YYYY-DD-MM
- HH:mm:ss DD-MM-YYYY
- HH:mm:ss MM-DD-YYYY
- “wolkvox”. The date and time format for the “wolkvox” option is as follows: YYYY-DD-MM HH:mm:ss. This should be used for API consumption.
- You can use the “Automatic date” toggle to have the date data calculated automatically.
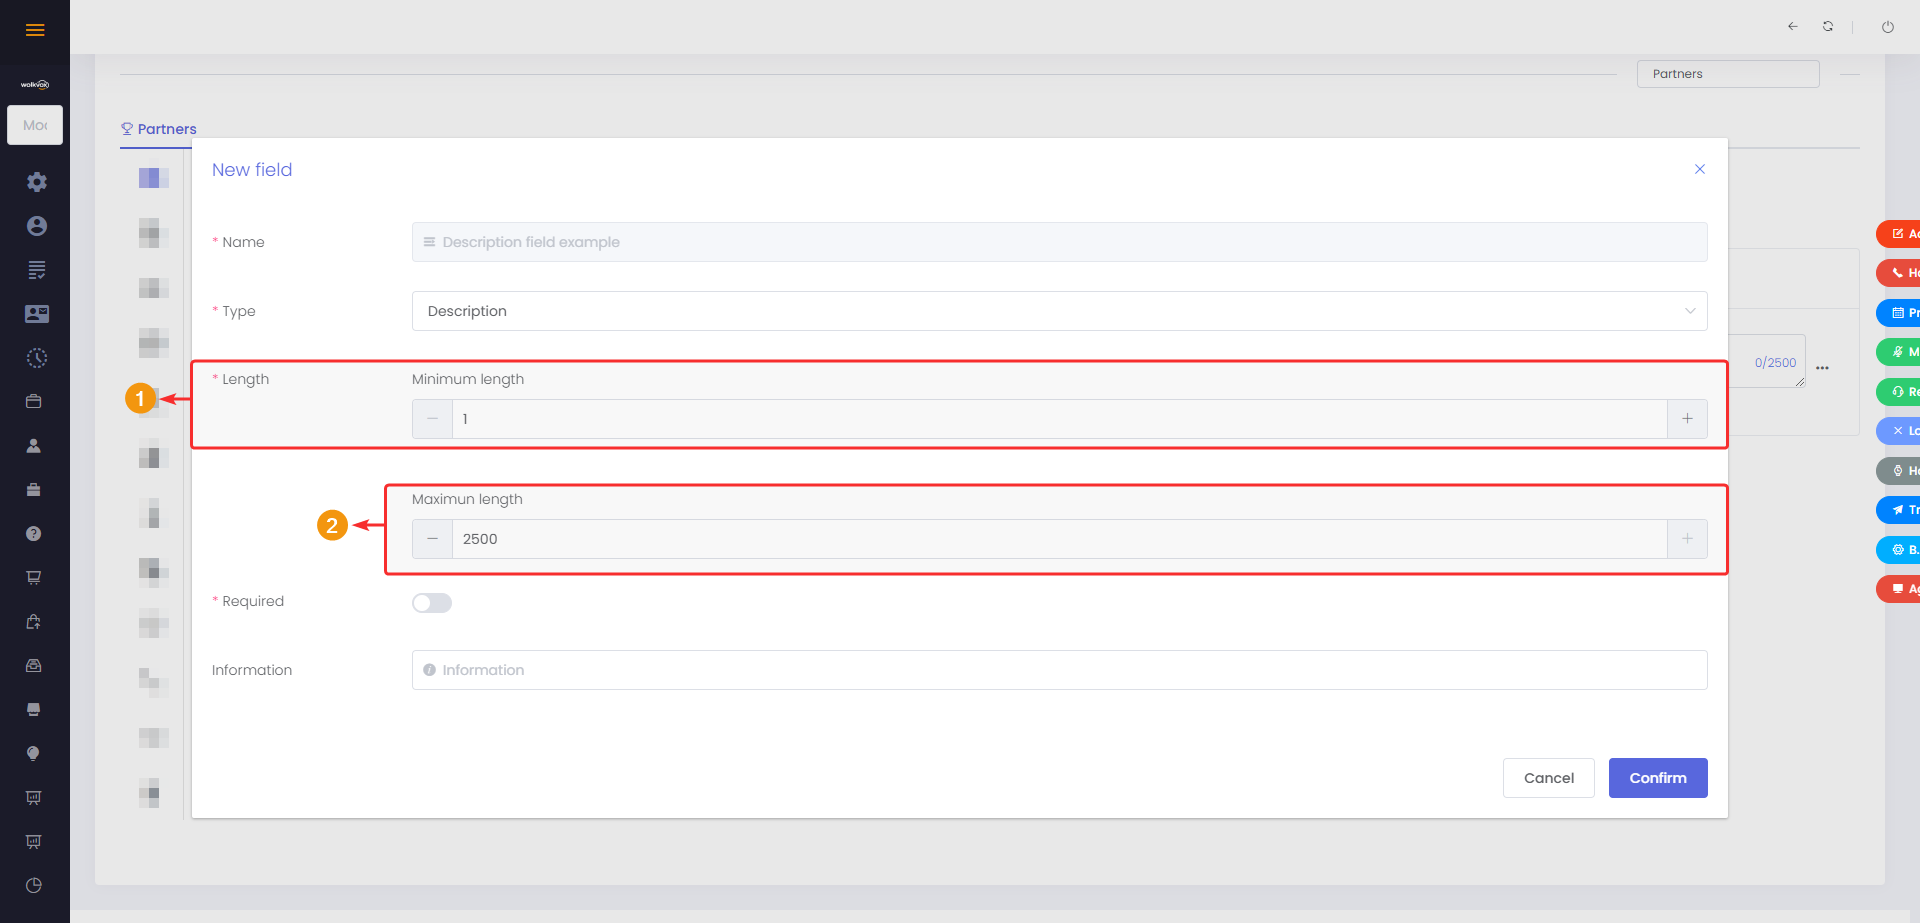
Description #
Allows writing text in an empty space. In the settings of this field, it is possible to set a minimum and maximum number of characters.

- In “Minimum Length,” you must set the minimum number of characters required to enter in this field.
- In “Maximum Length,” you must set the maximum number of characters required to enter in this field.
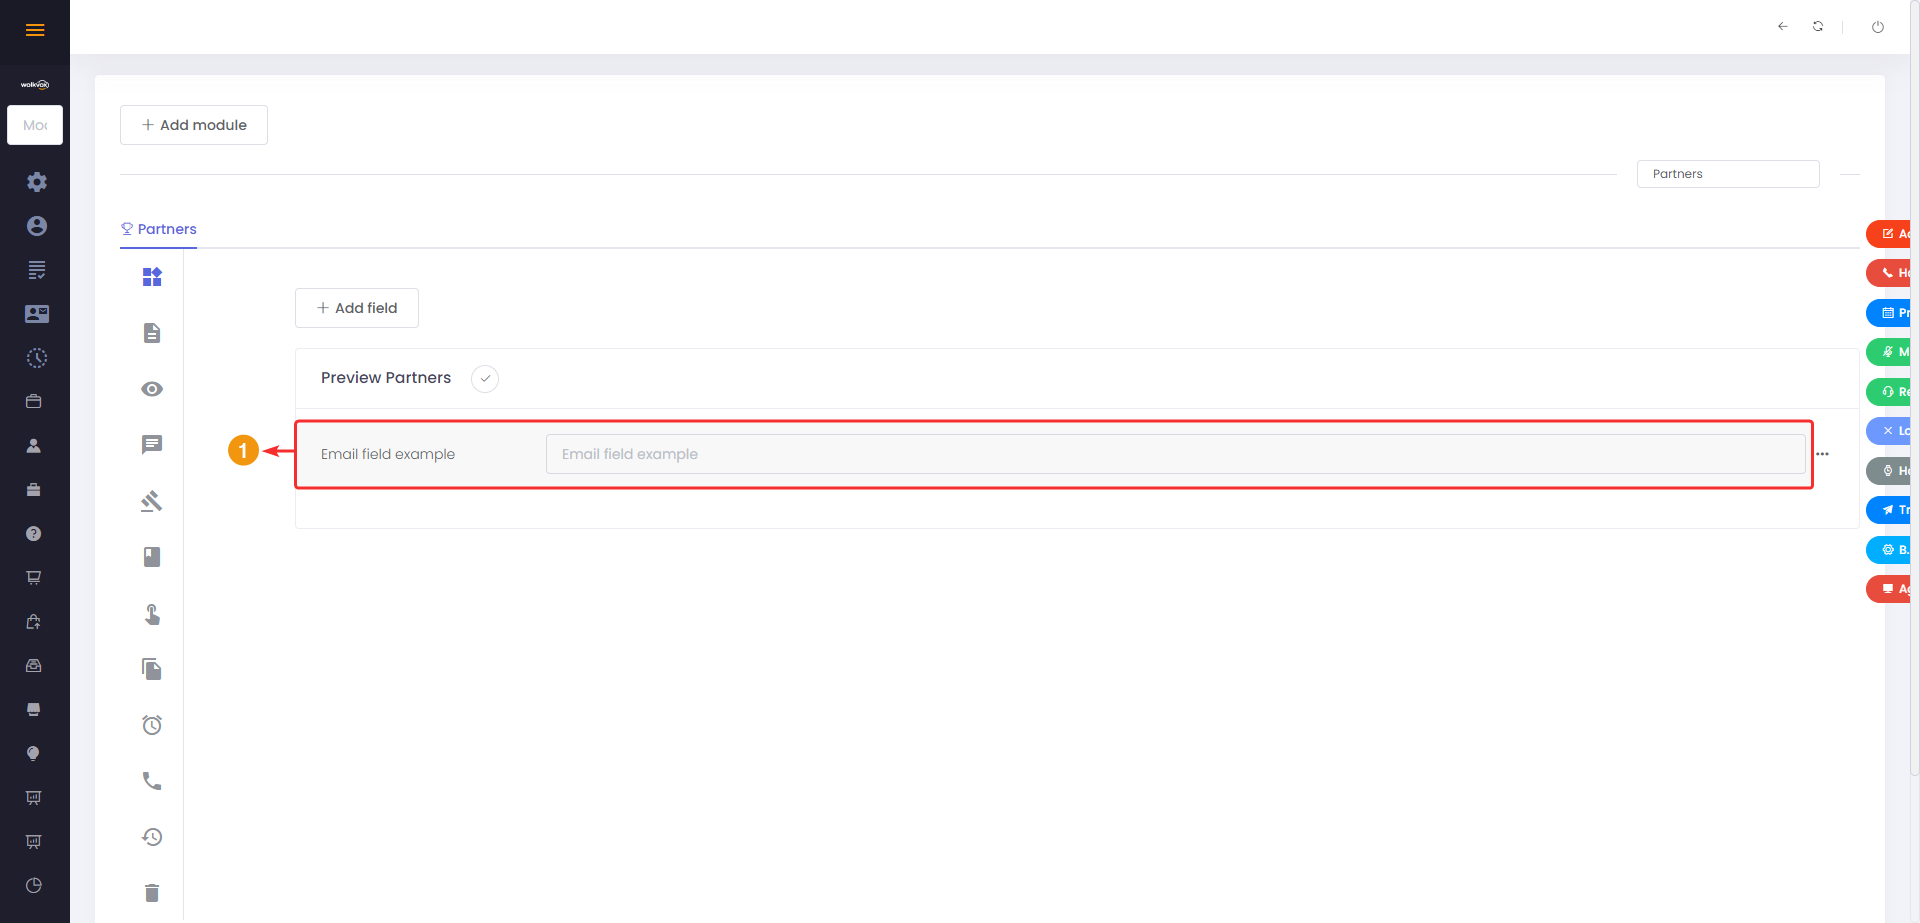
Email #
This field allows entering an email address. If the system detects that the entered value is not an email address, it will not allow applying changes.
Note: This field does not have additional configuration options.
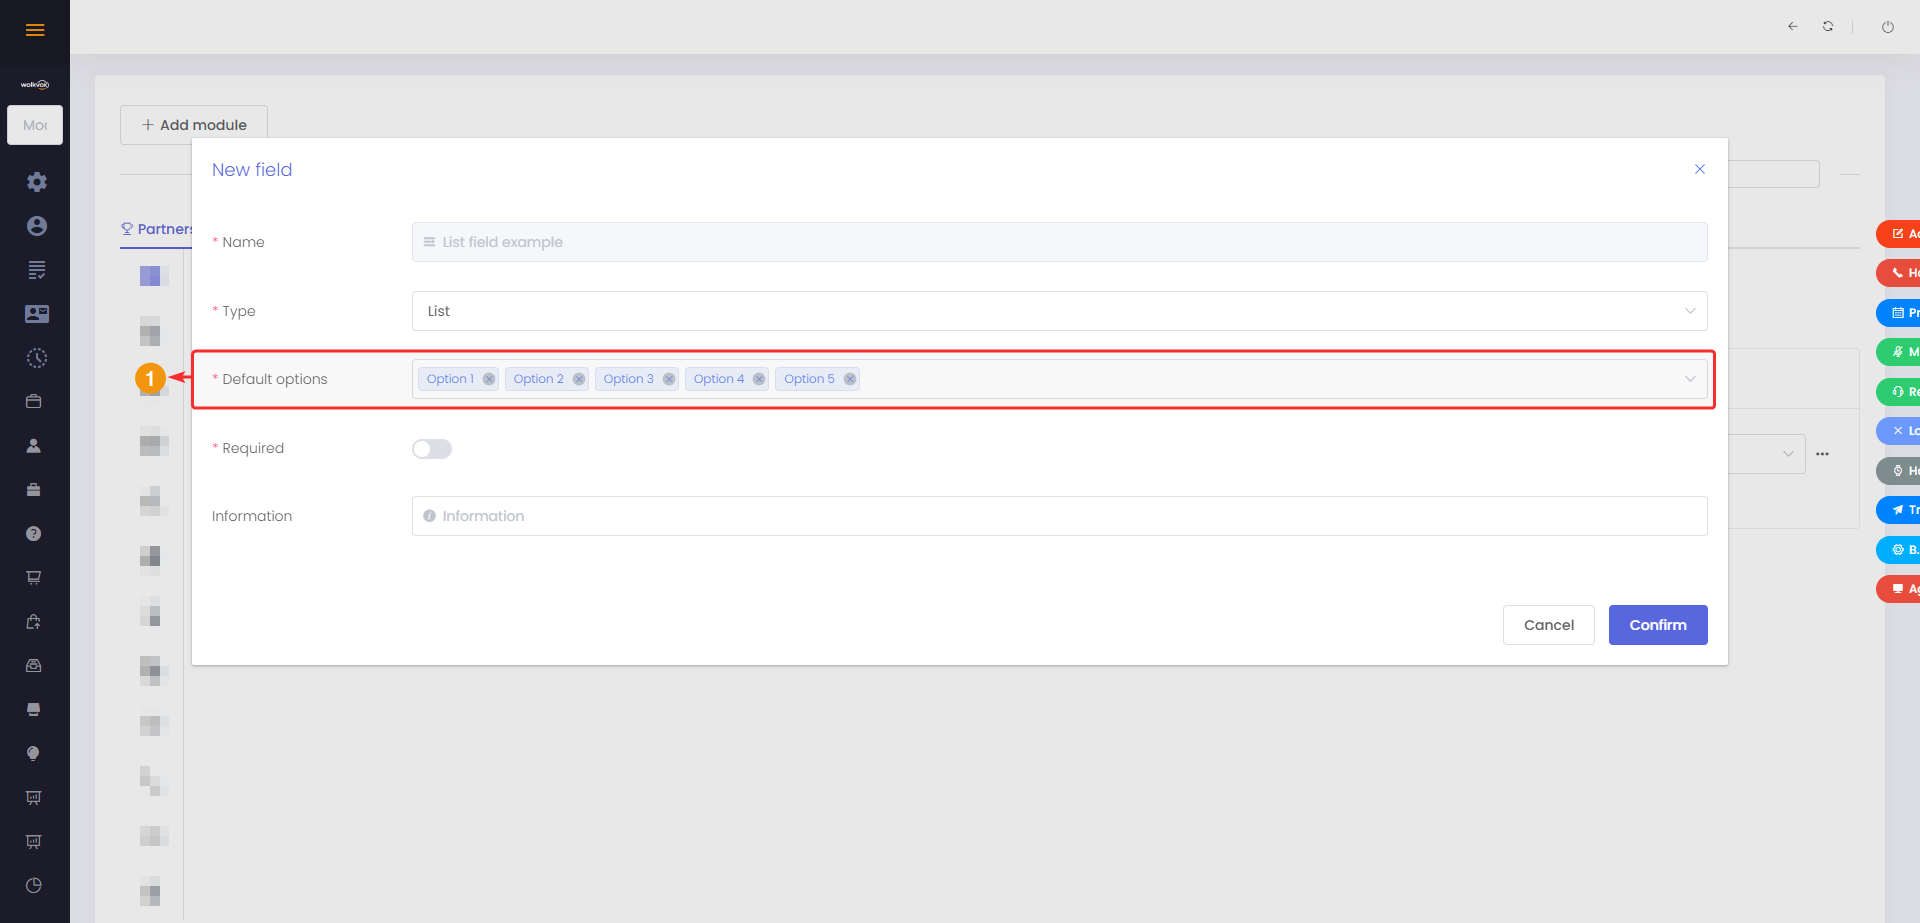
List #
This field allows you to add a list of items in a dropdown menu.
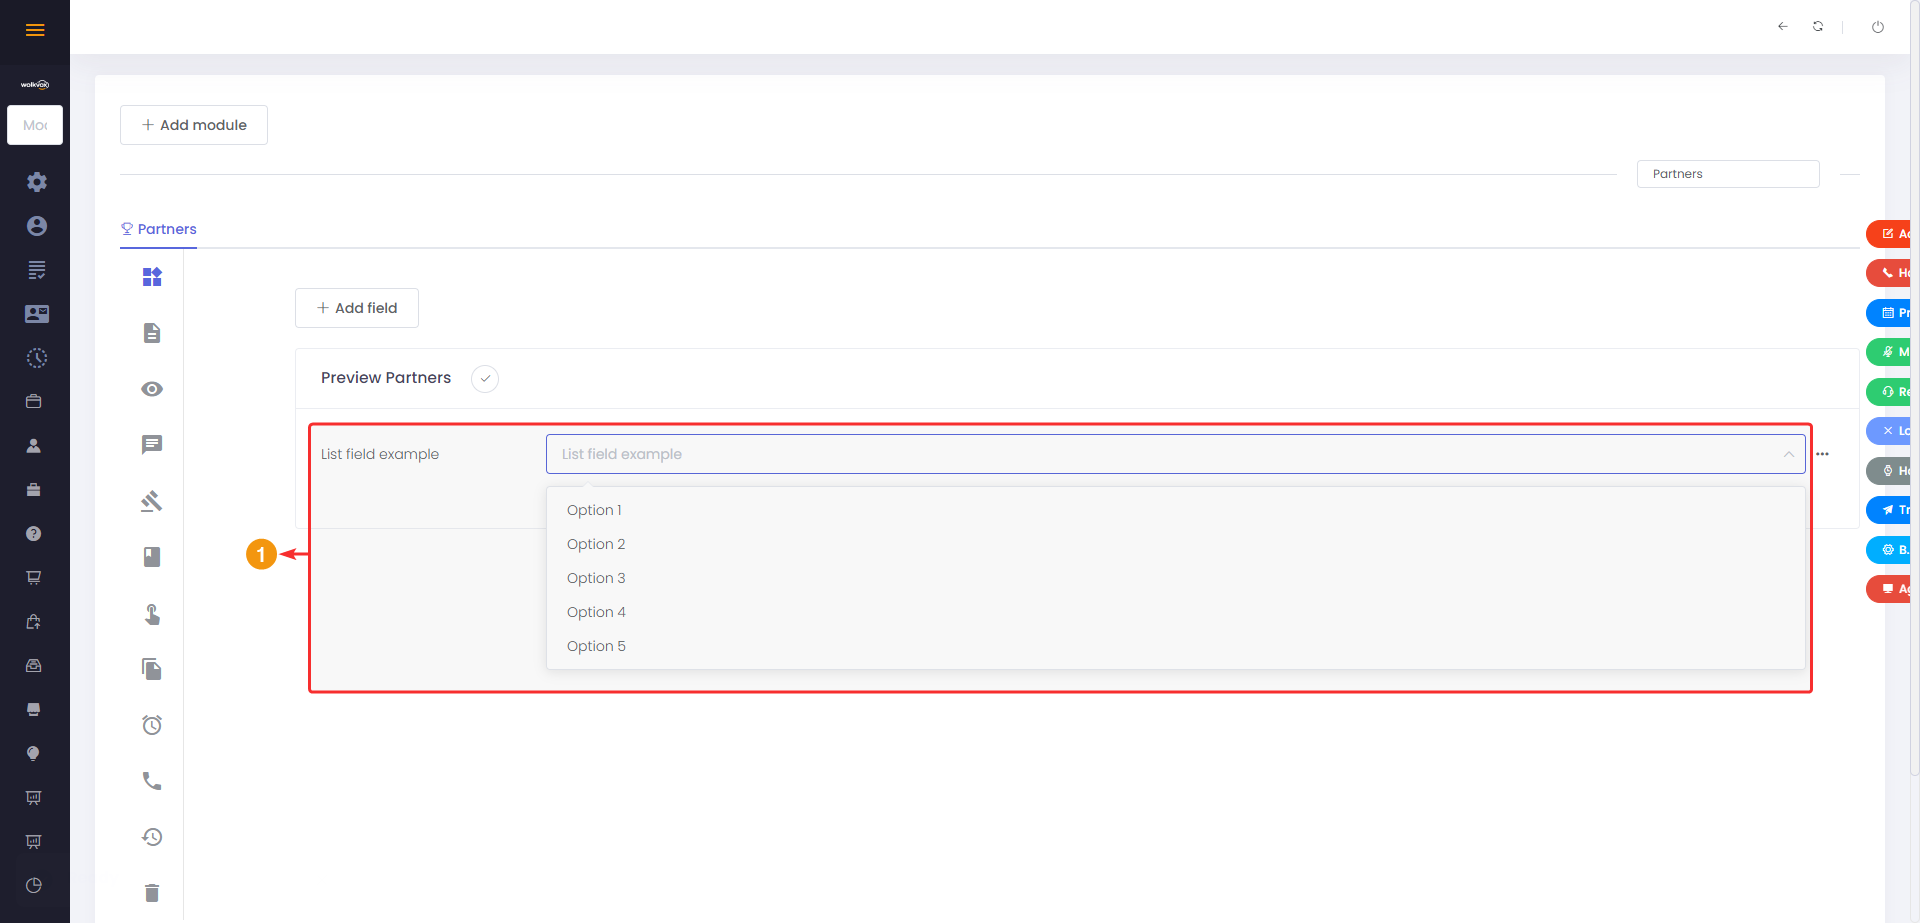
In the “Default Options” space, you should add the items for each list. To add each item, press the “Enter” key.
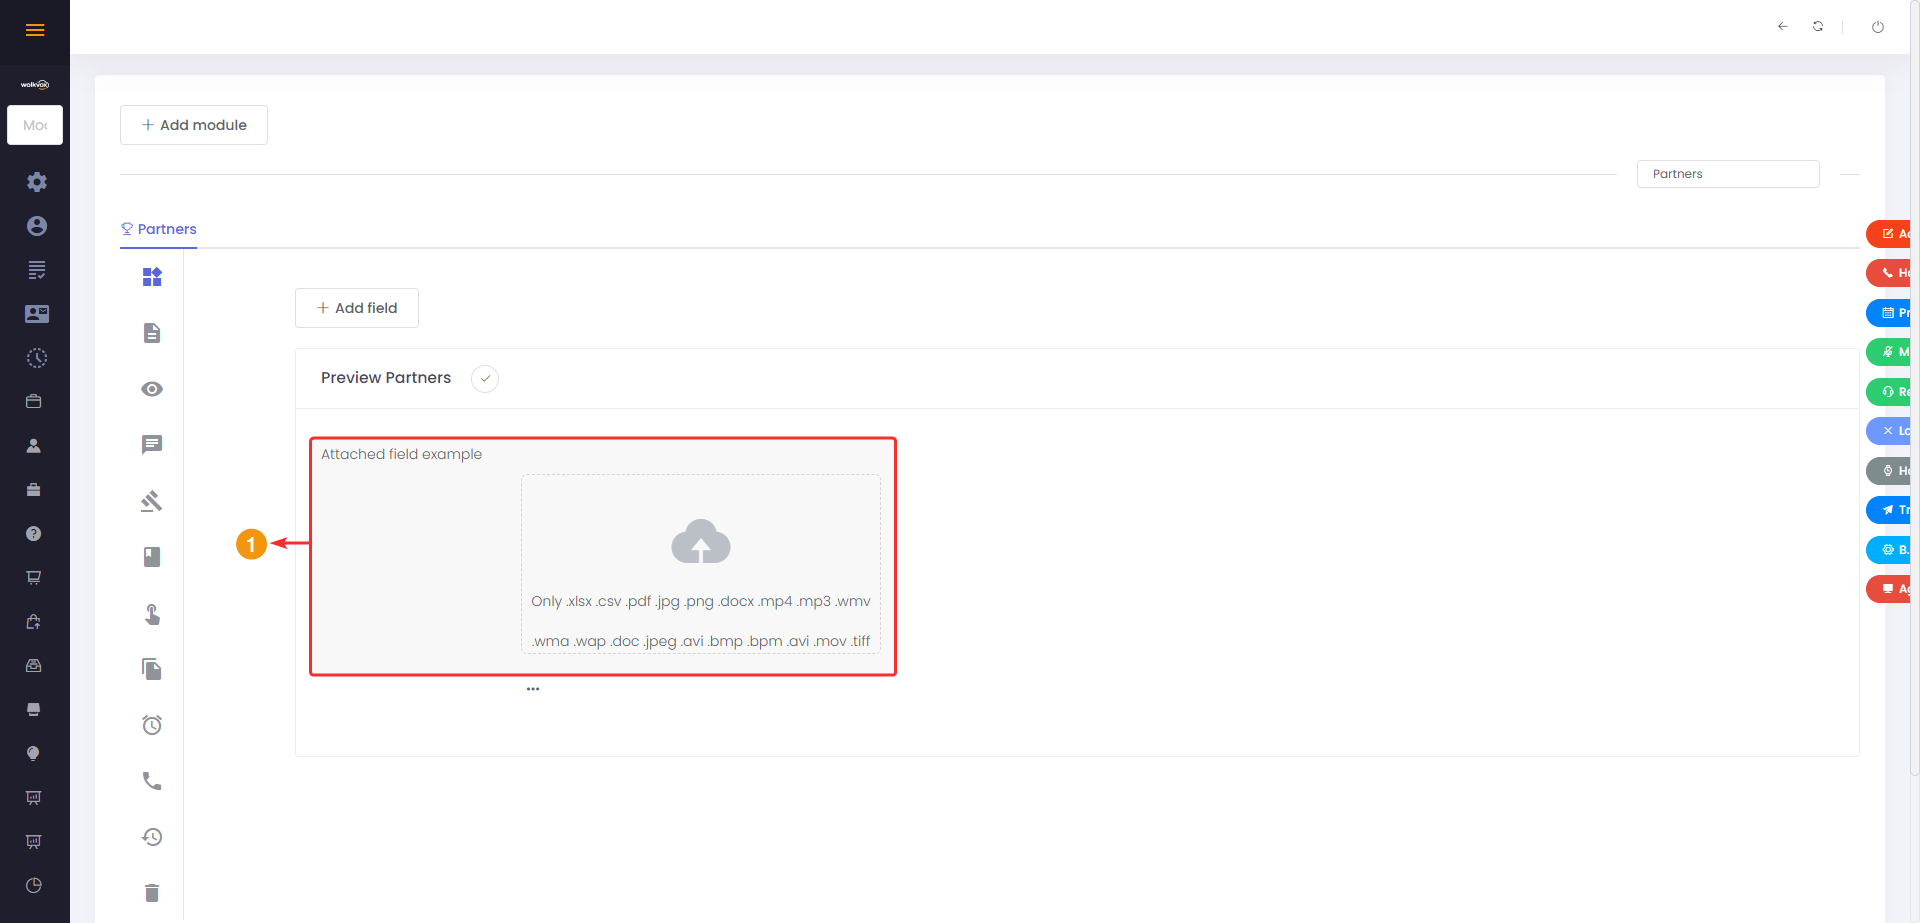
Attachments #
Allows you to attach a file saved in any of the following formats: XLSX, CSV, PDF, JPG, JPEG, PNG, BMP, DOCX, DOC, MP4, AVI, WMV, MP3, and WMA.
Note: This field has no additional configuration options.
List Users #
This field allows creating a dropdown menu where a user linked to the CRM module can be selected.
Note: This field does not have any additional configuration options.

Multiple Selection List #
Allows adding a dropdown menu where one or multiple items can be selected.
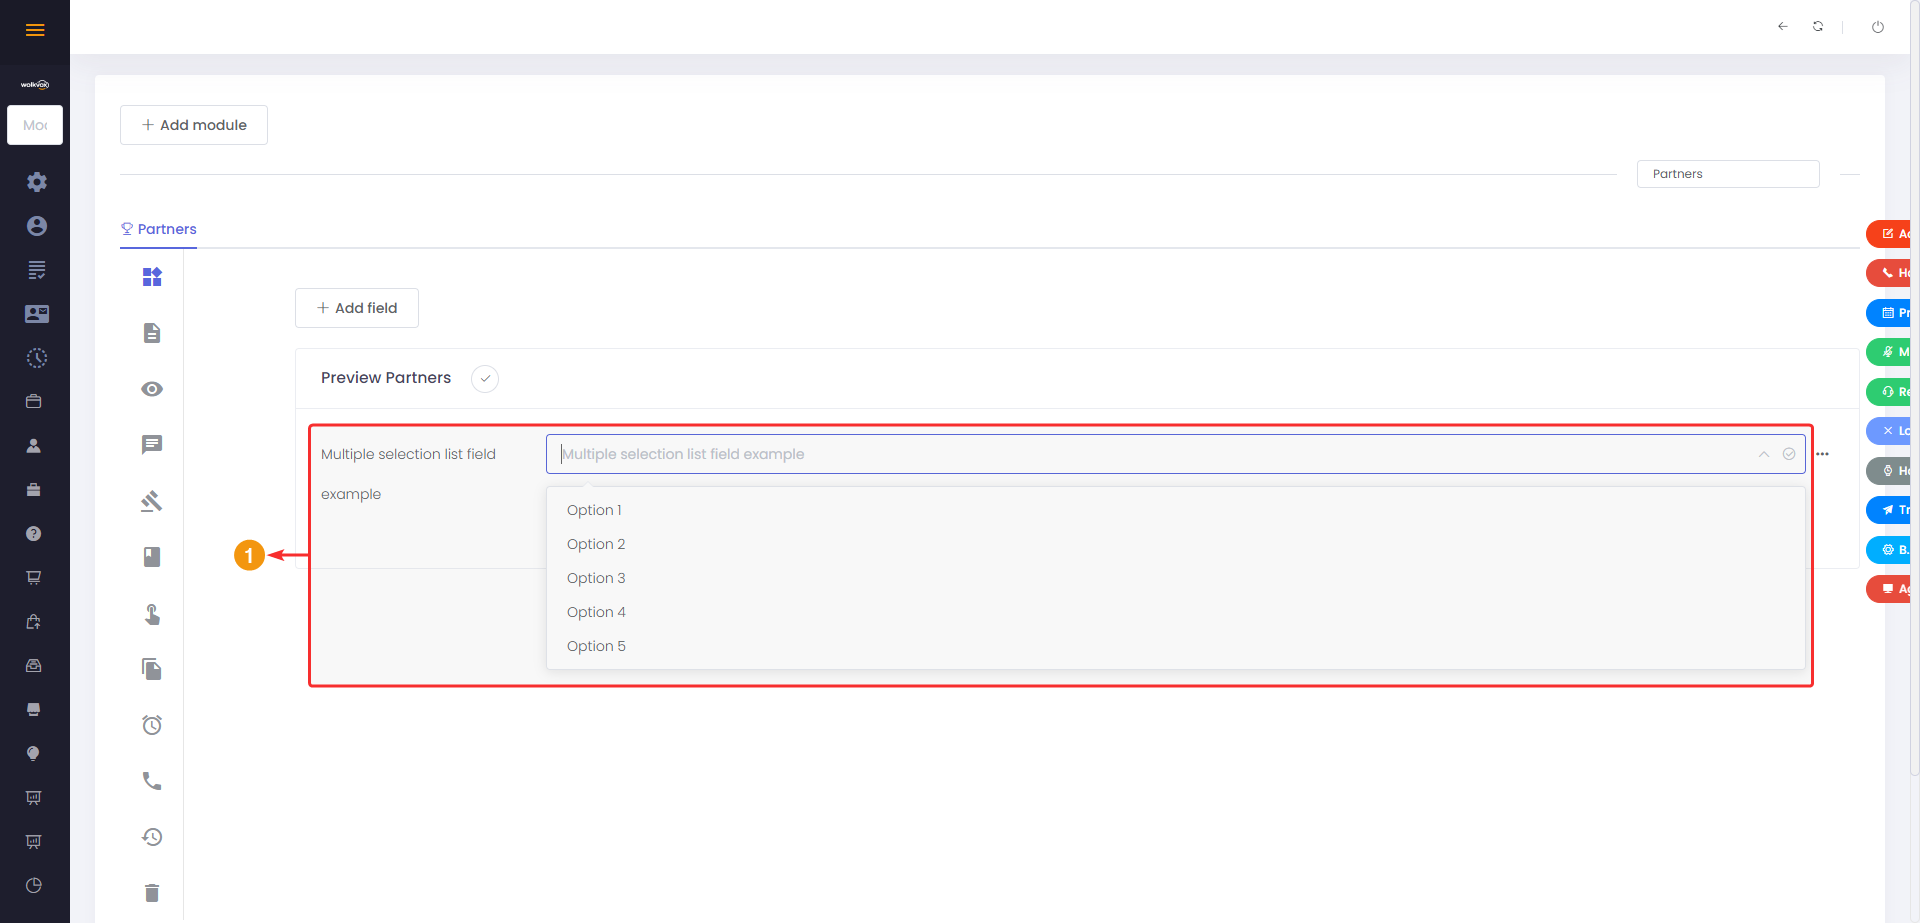
In the “Default Options” space, you should write each of the options you want to appear, each of these options is added with the “Enter” key.

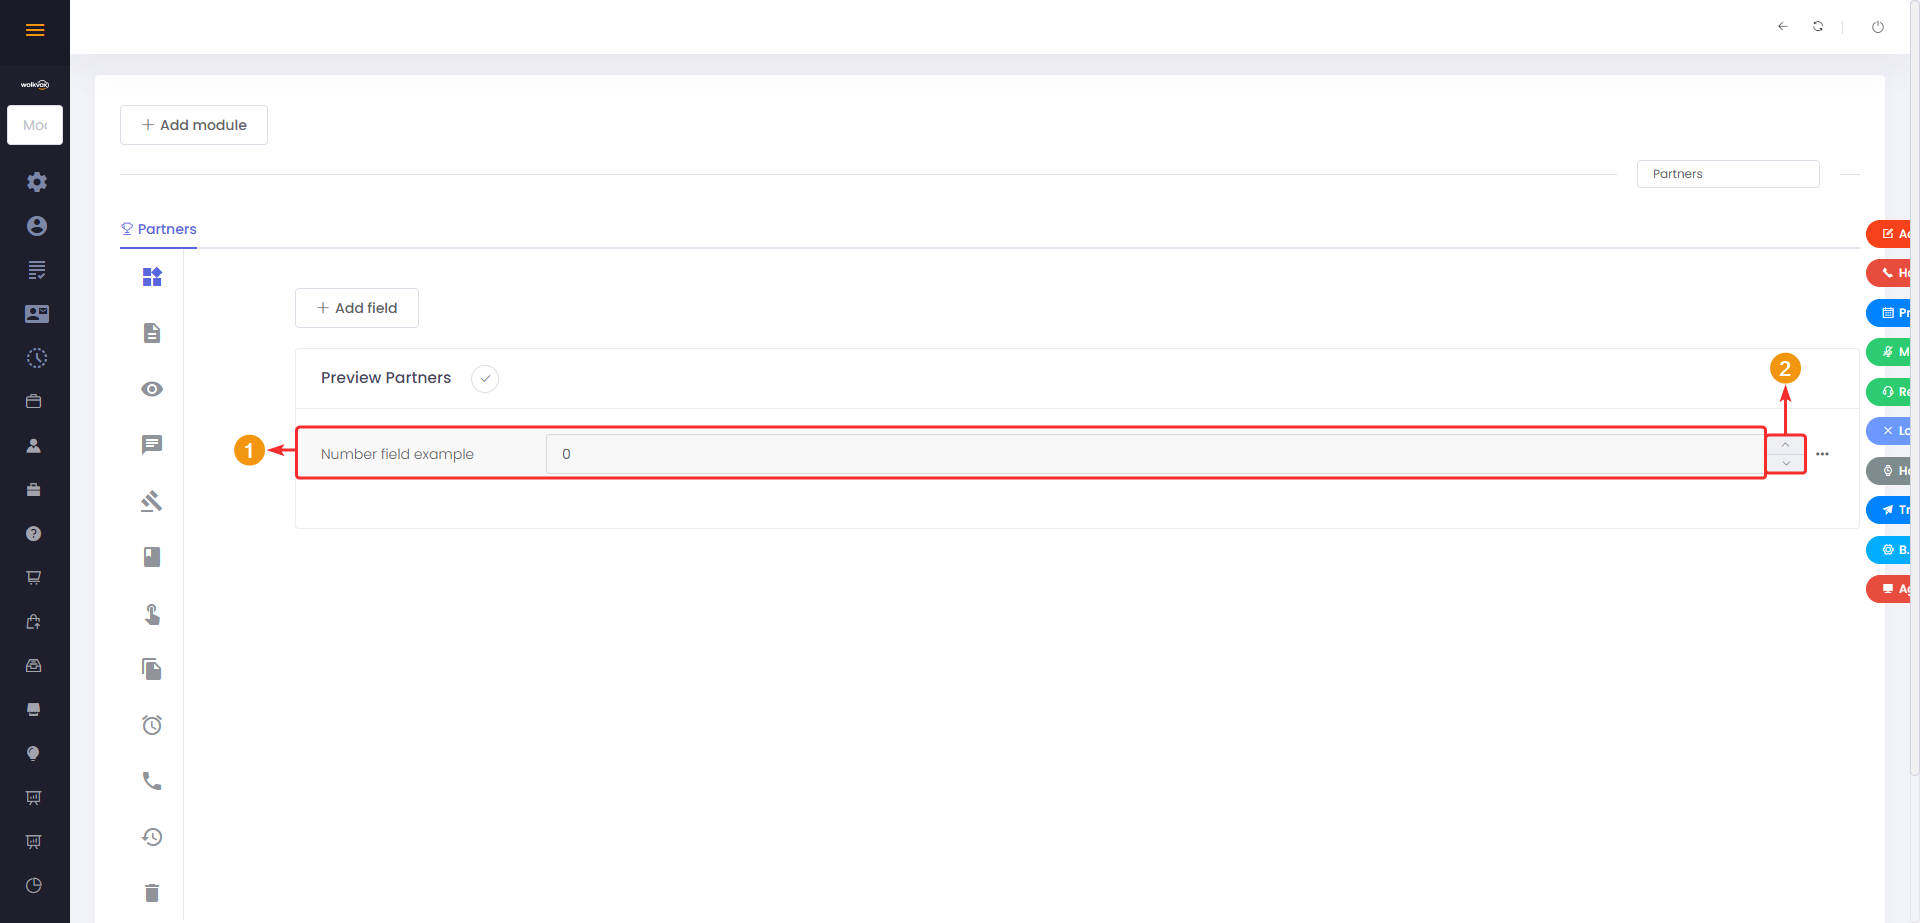
Number #
This field adds a space where you can enter a number. This field does not allow letters or special characters, only numbers are allowed.
Note: This field does not have additional configuration options.
Radio option #
Allows adding a list of options where only one can be selected.
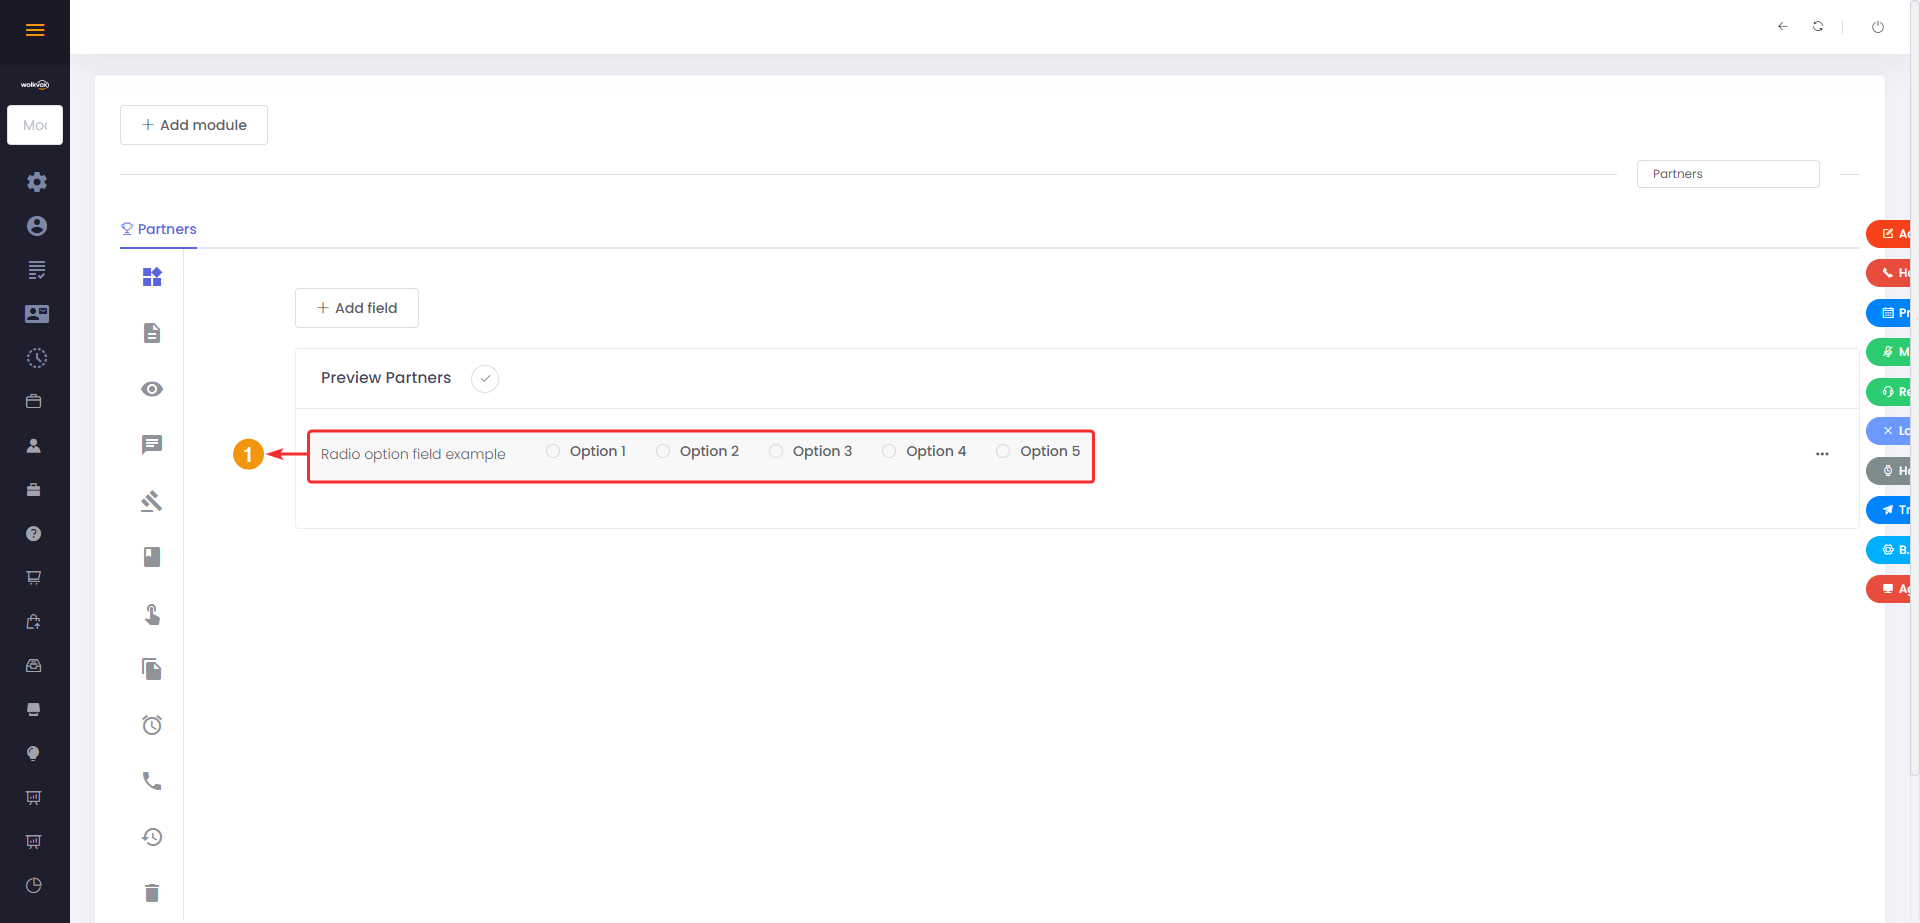
In the “Default options” space, you must write each of the options you want to appear. Each of these options is added with the “Enter” key.

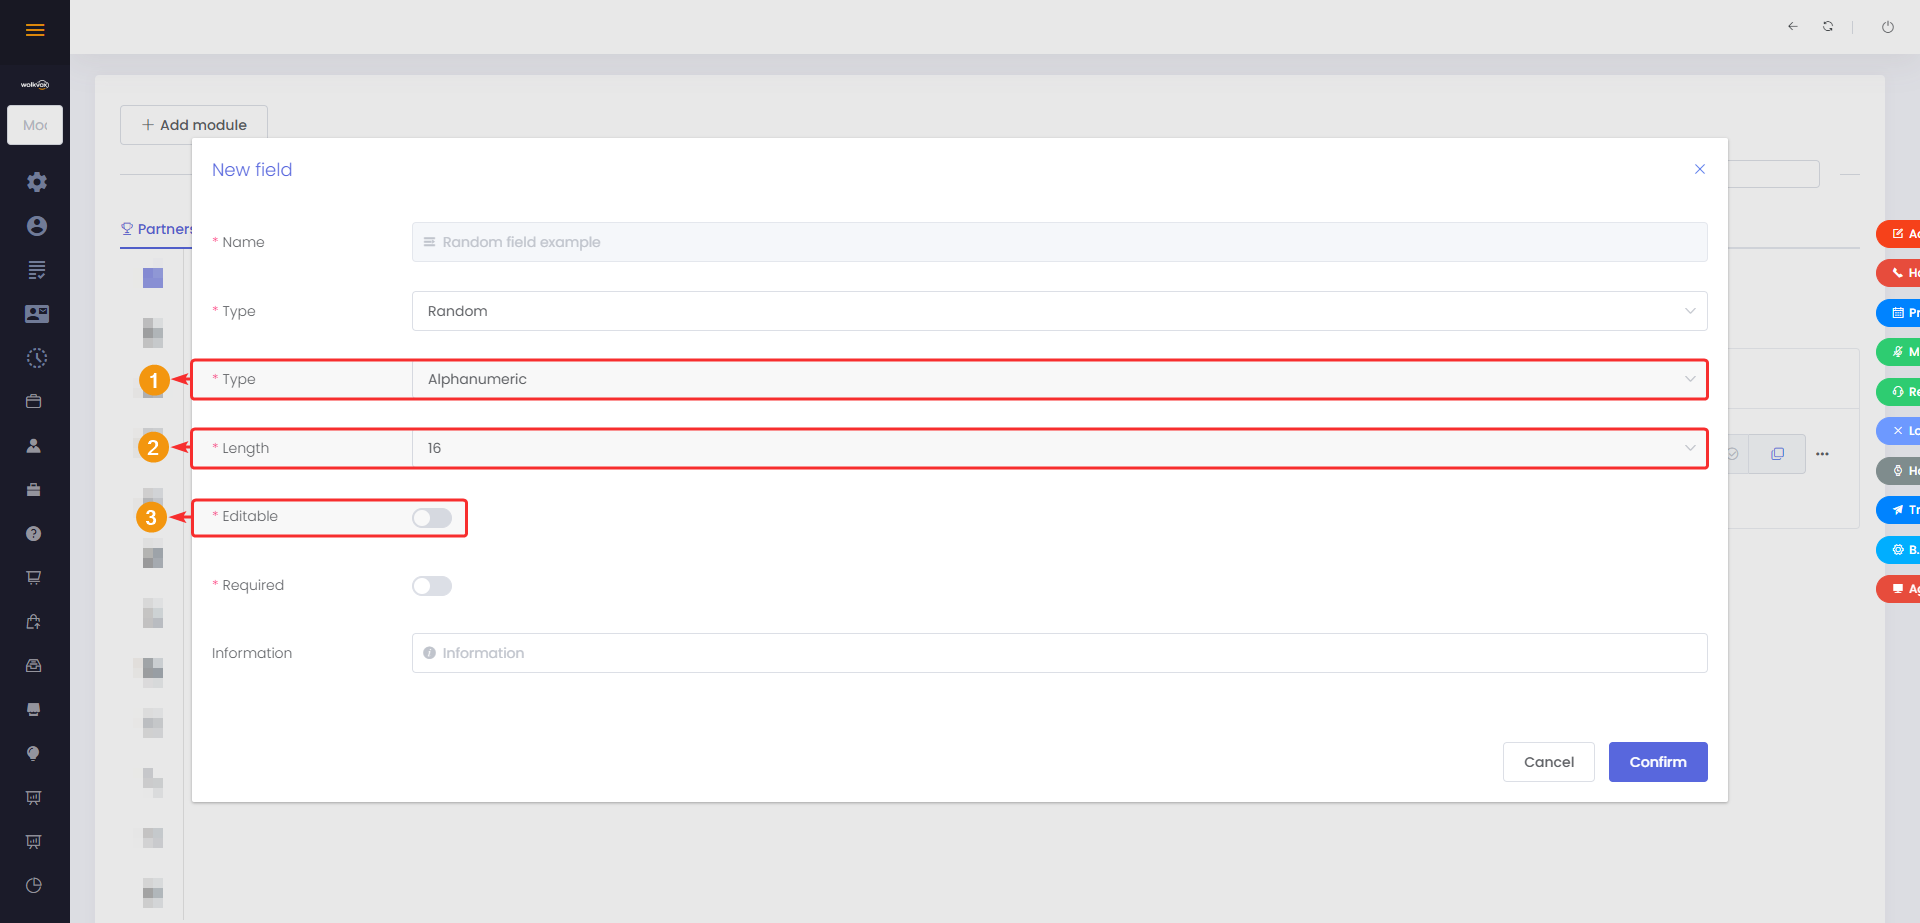
Random #
Allows generating a set of characters, either alphanumeric, numbers only, or letters only.
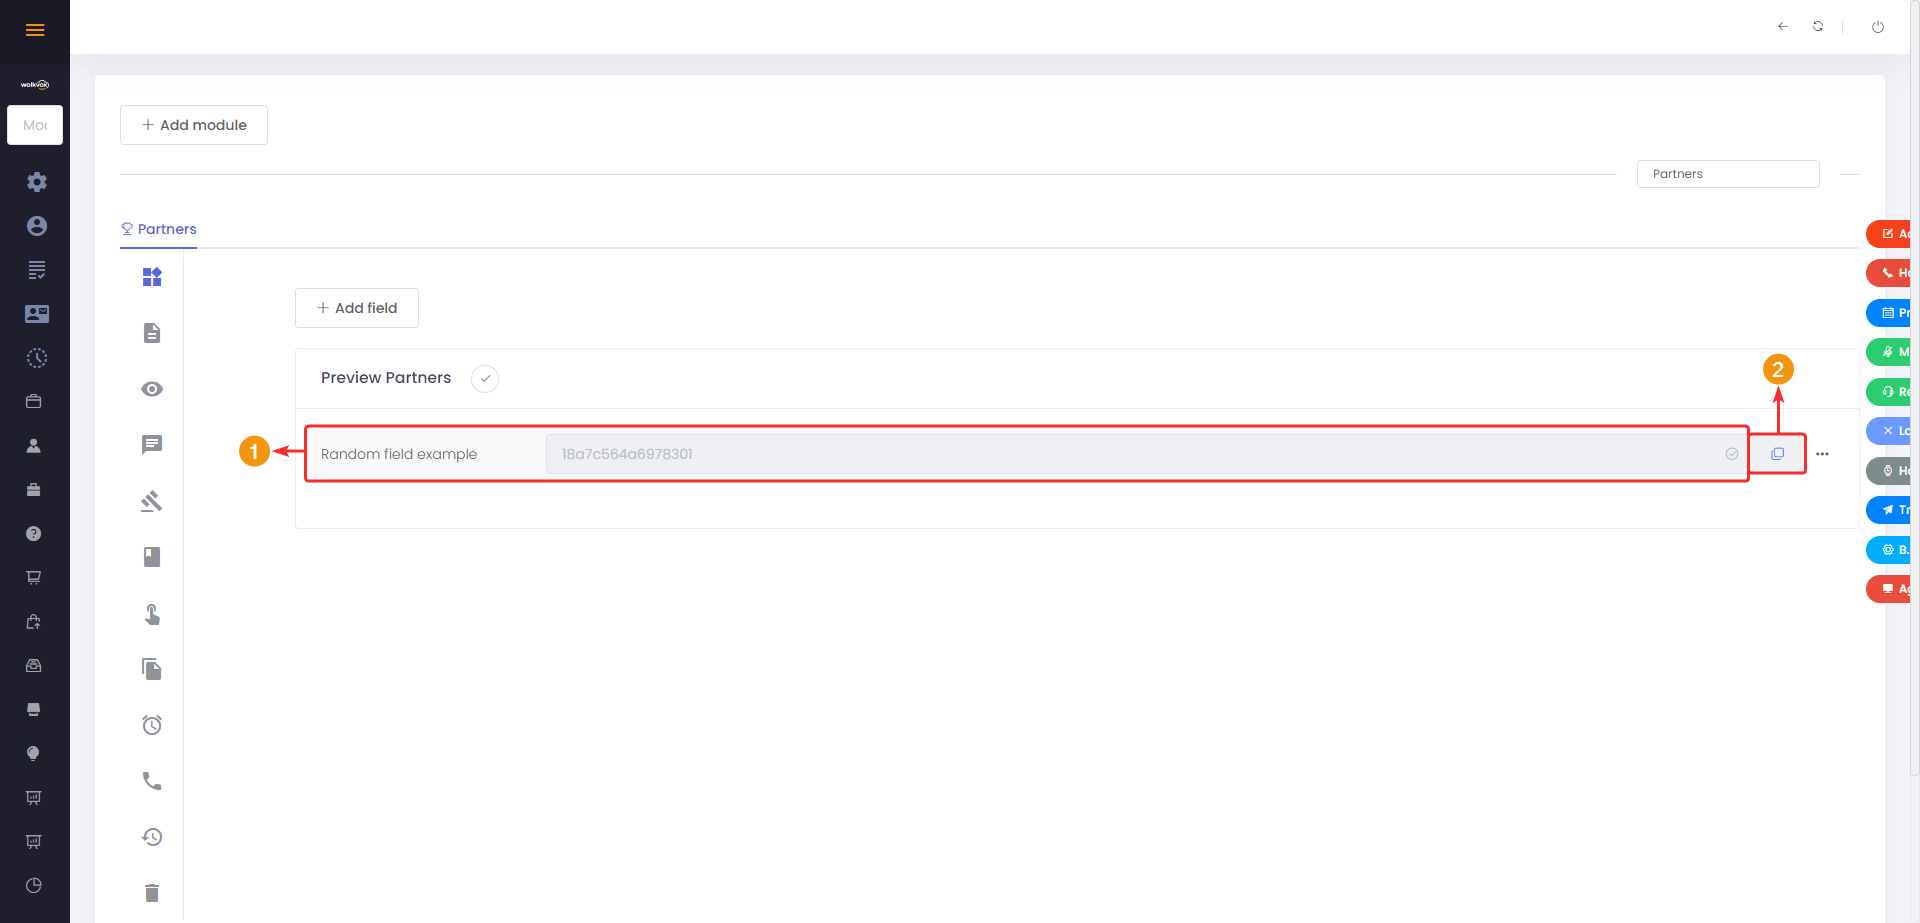
- Select the type of value the field will have. It can be alphanumeric, letters only, or numbers only.
- Set the length of the value that this field will provide. It can have a minimum length of 2 and a maximum of 16.
- The “Editable” option allows the field to be editable by the agent who needs to use this field when inserting a record.
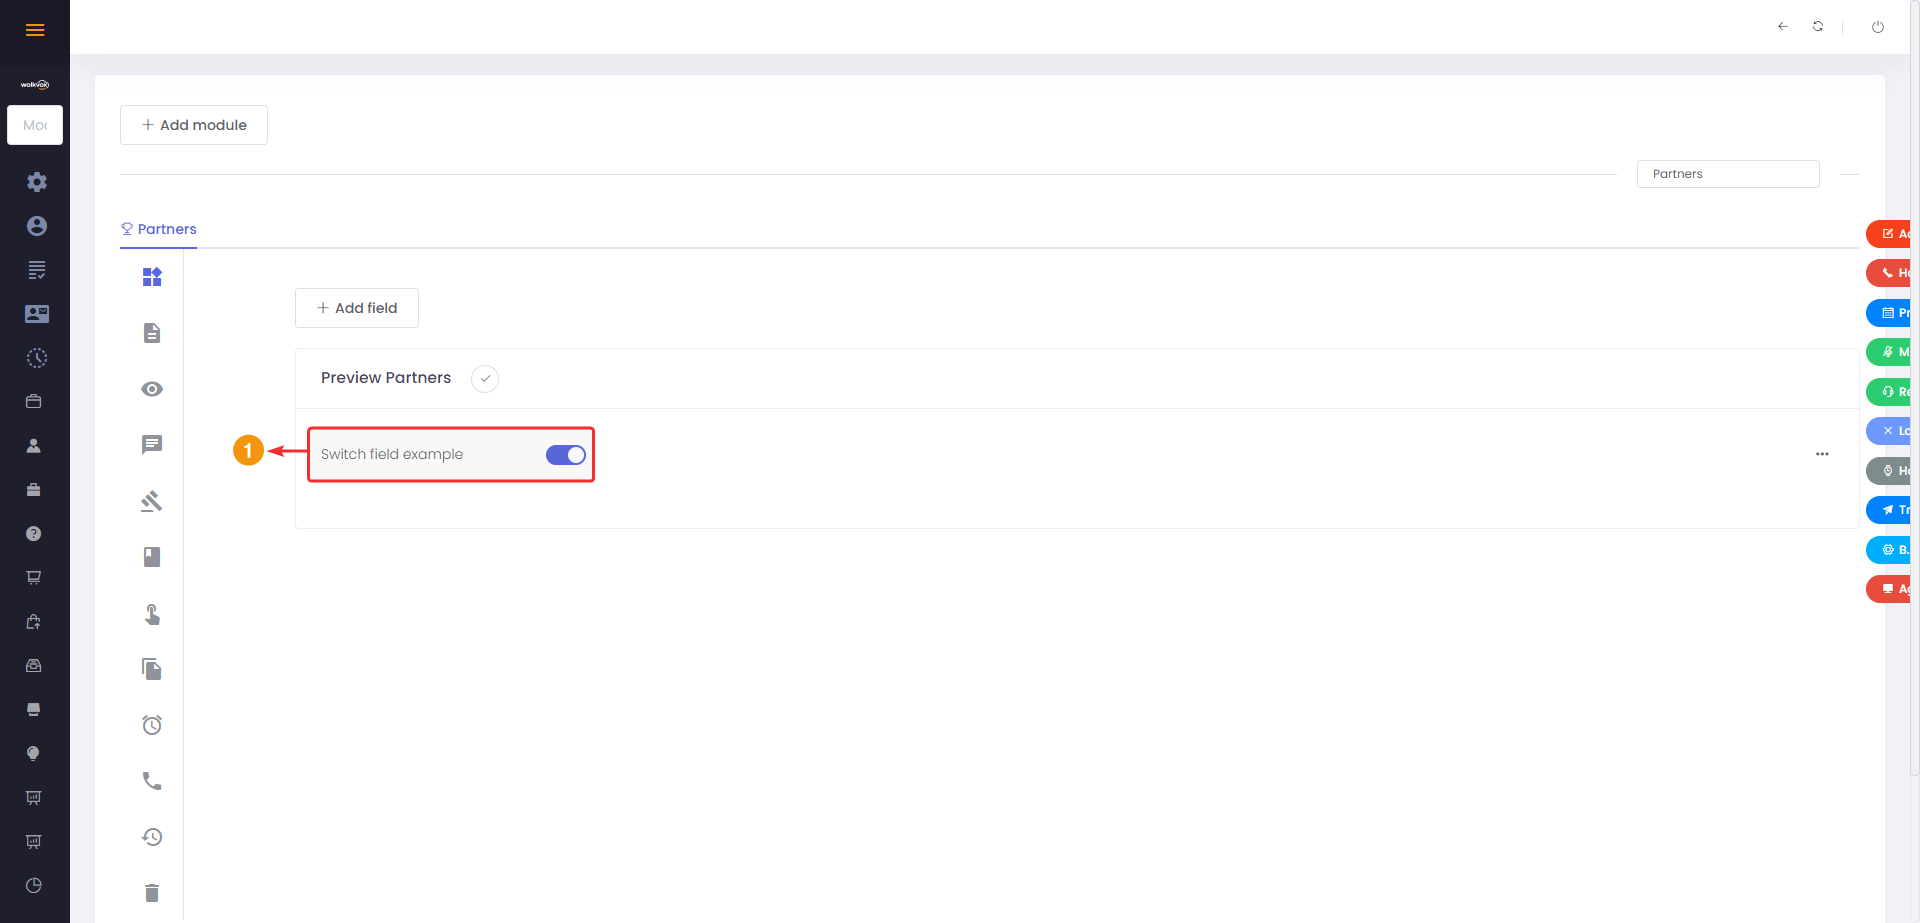
Switch #
Allows adding a switch button or toggle button that can be activated and deactivated.
Note: This field does not have additional configuration options.
Phone #
Allows adding a field where a telephone number must be entered, and a button is provided to make a call.
The agent will have the following options in this field.
- Select the country code to which the number belongs.
- Enter the phone number.
- This button allows making a call to the entered number.
- This button is used to copy the number to the clipboard of the operating system.
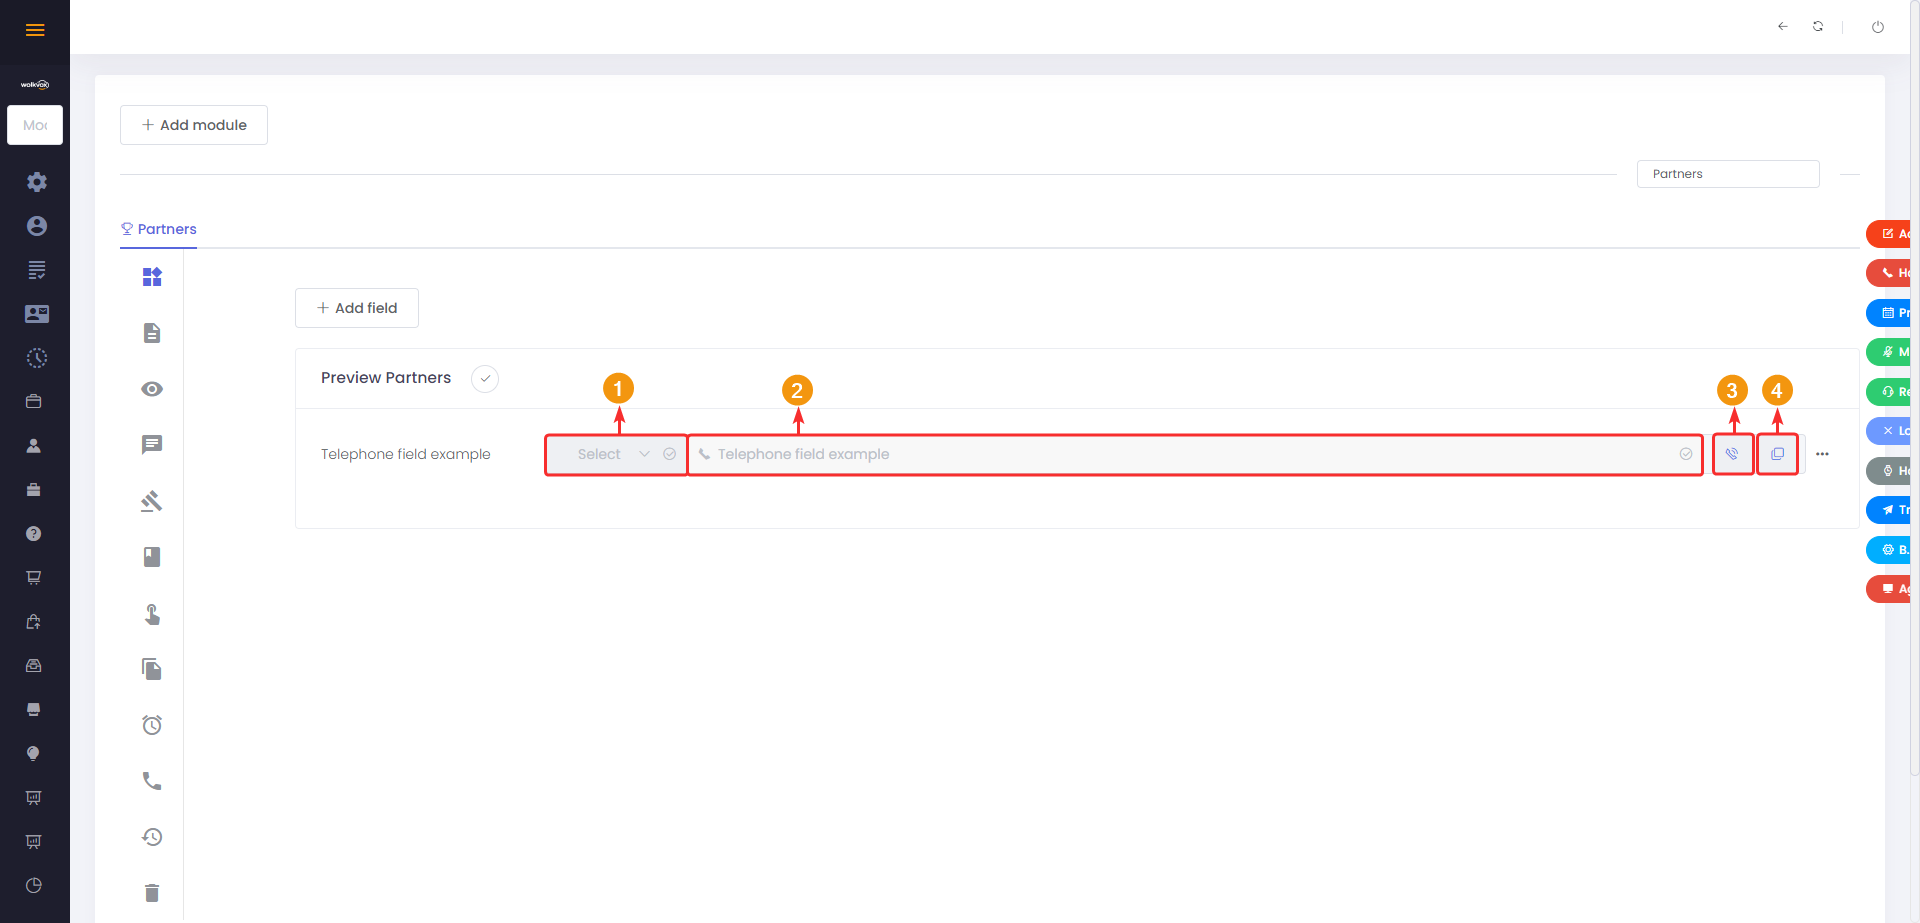
The field has the configuration of “Call prefix” where you can add a prefix that the system will use when dialing the number.

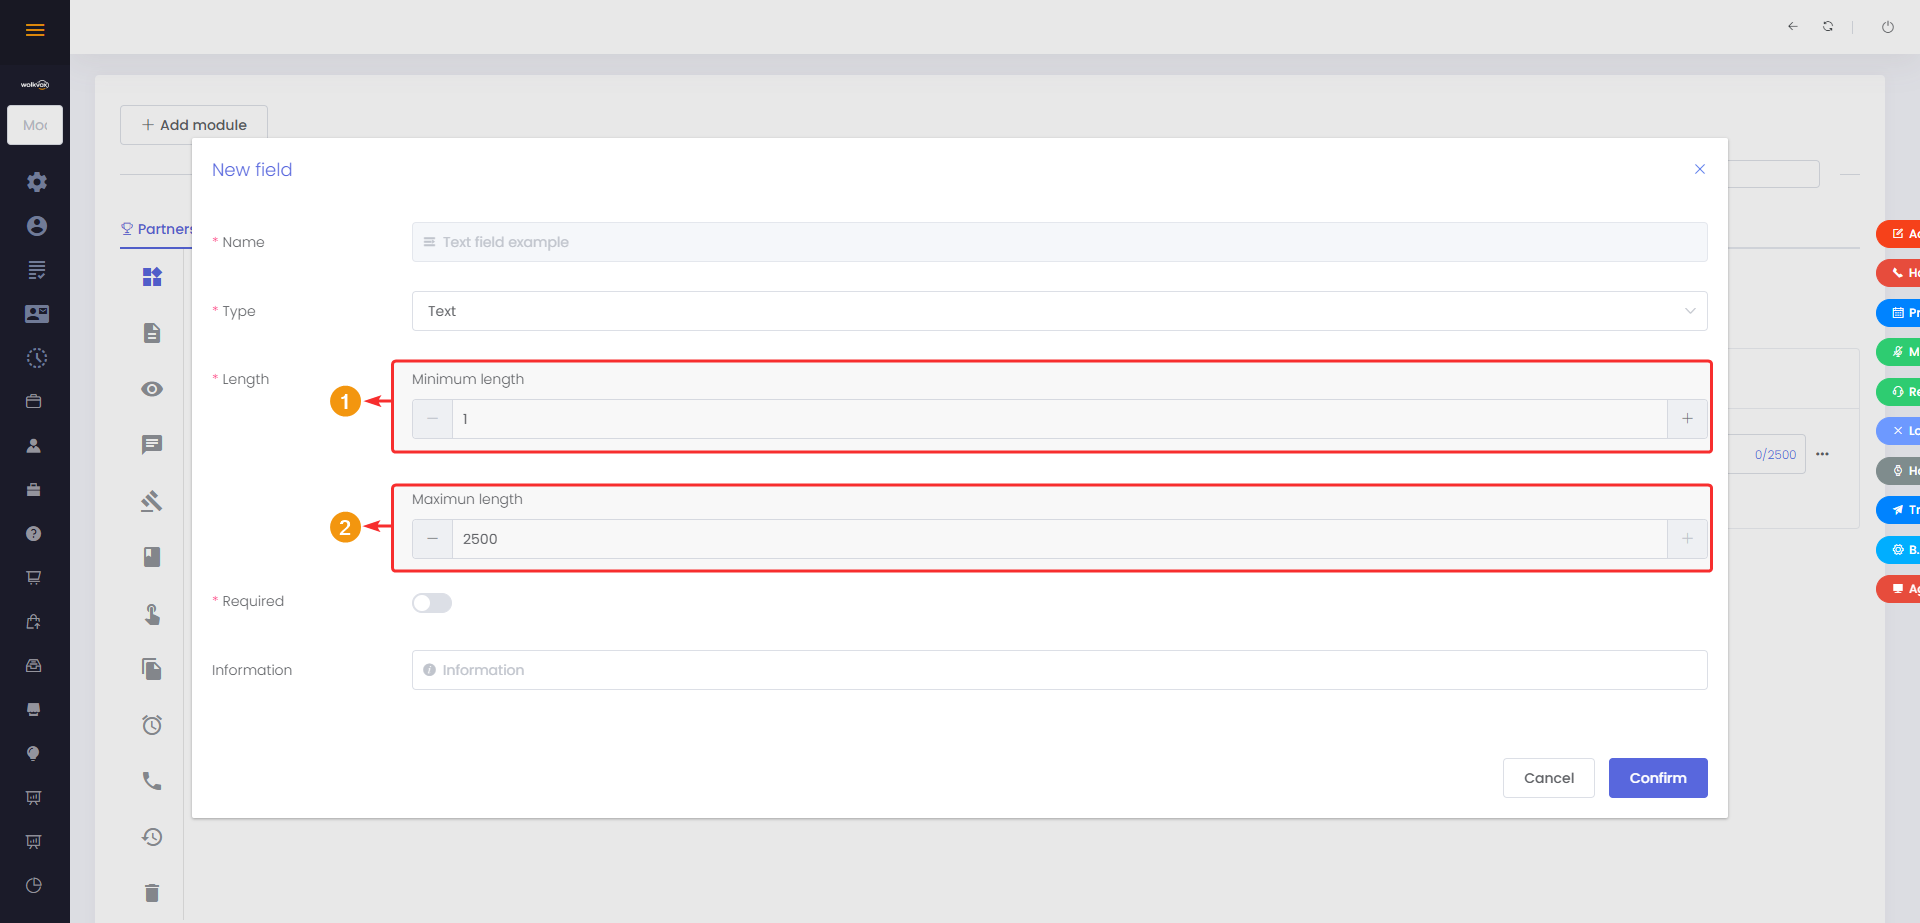
Text #
Allows adding a space to enter text.

- Set a minimum number of characters that must be entered in the field.
- Set a maximum number of characters that can be entered in the field.
Time #
This type of field allows adding hours, minutes, and seconds.
Note: This field does not have additional configuration options.

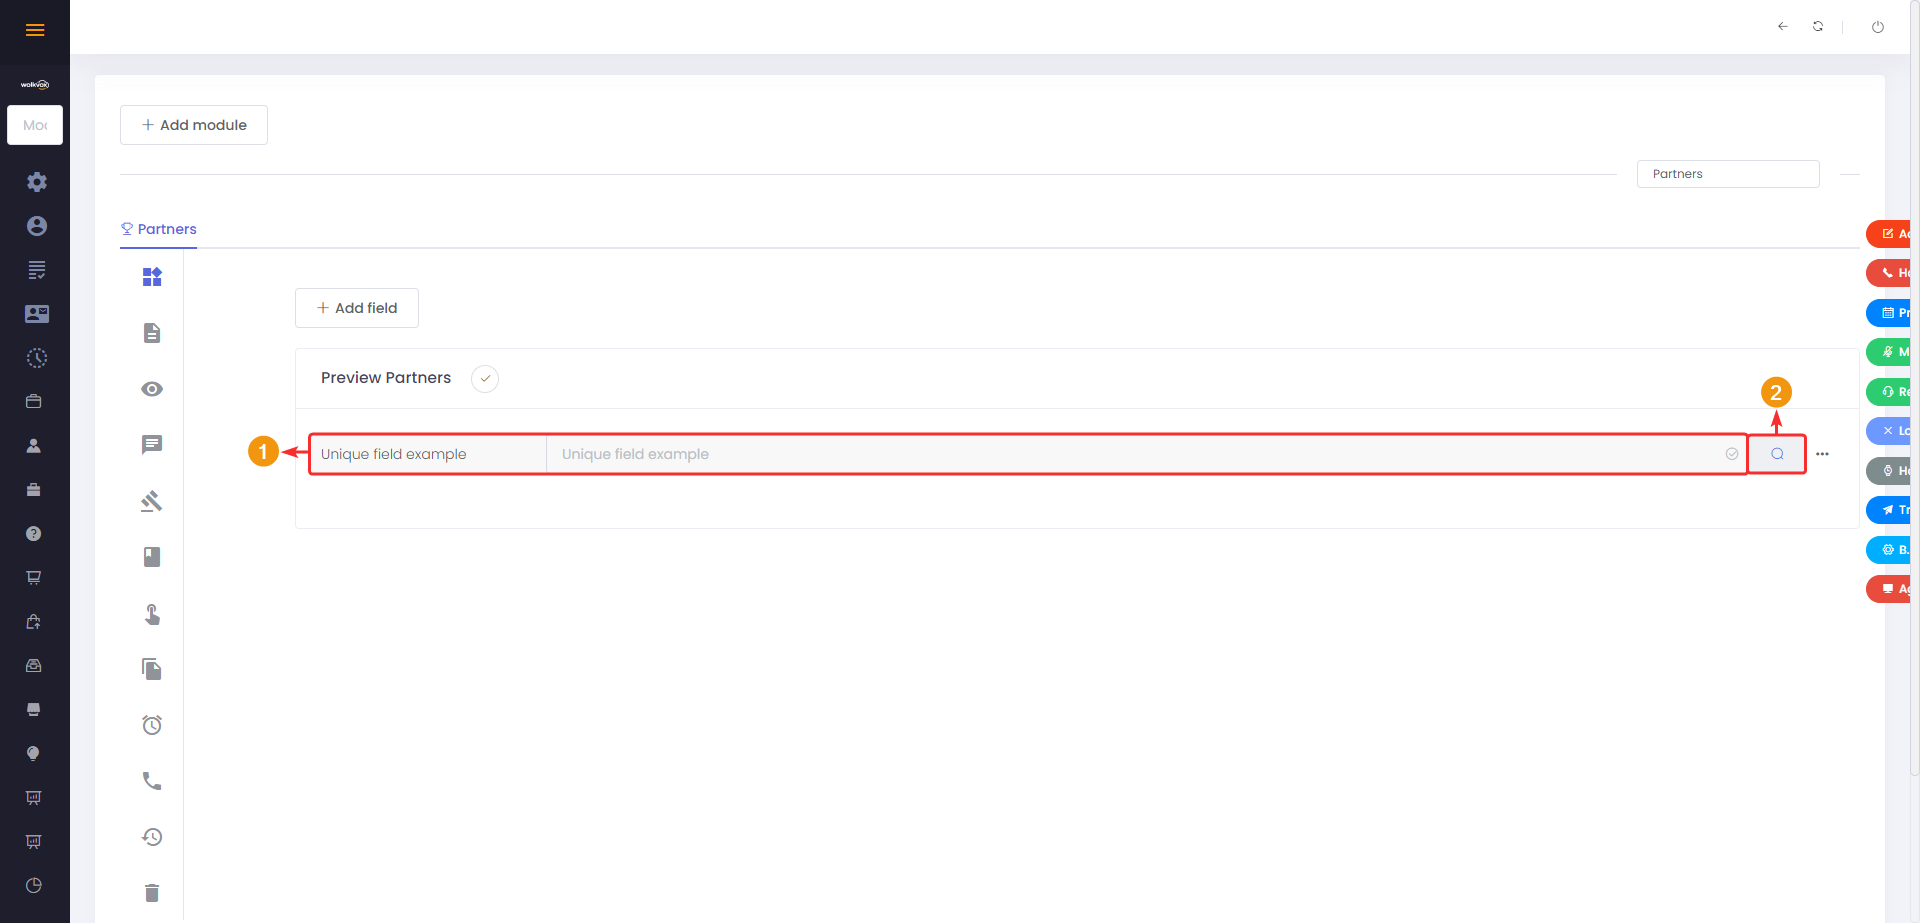
Unique #
Allows adding a field in which the value entered when inserting a new record cannot be changed, and its value will be unique across the module for each record. In other words, for each record in the module, the value in this field must be different.
On the right-hand side, there will always be a magnifying glass icon that allows the agent to verify that the value they are entering has not been used in another record.
Note: This field does not have additional configuration options.
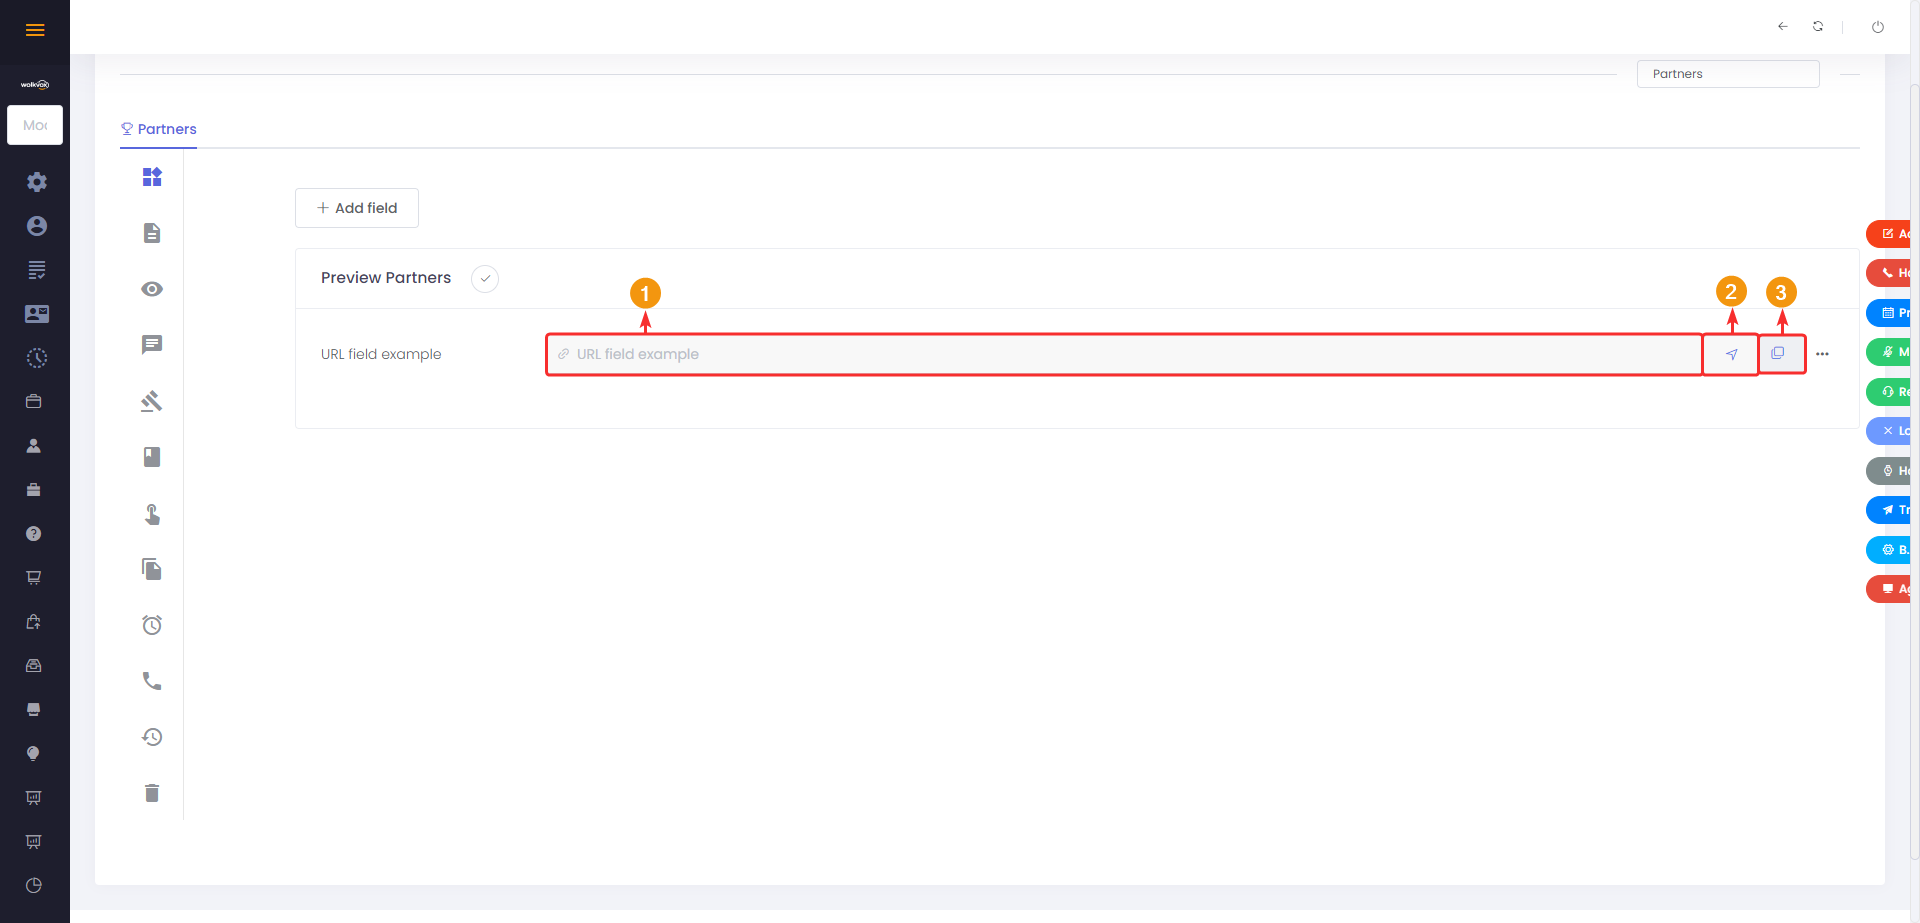
URL #
Allows adding a field to enter a web address.
- In the provided space, enter the URL.
- This button allows navigating to the entered URL using the same browser tab.
- This button is used to copy the entered URL.
Note: This field does not have additional configuration options.
Search #
This field allows you to search for and retrieve data from a record in another module of the CRM.
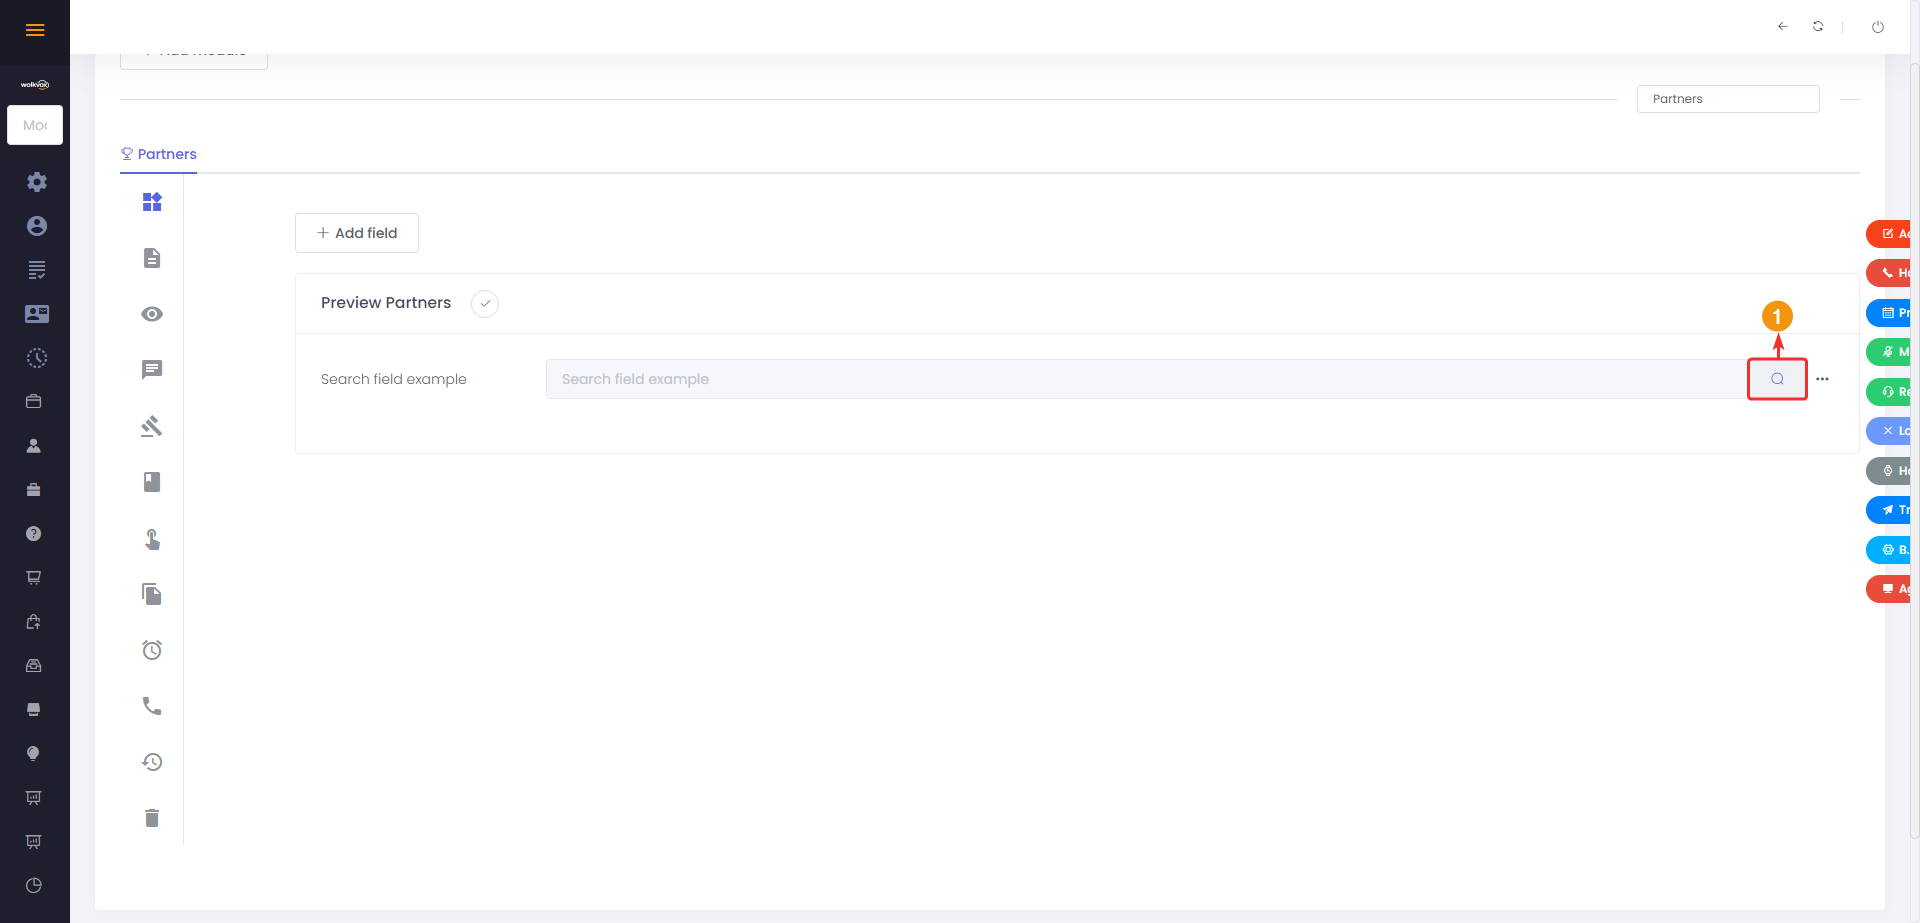
- Select the module from which you want to retrieve a data.
- Select the field from that module from which you want to retrieve the data.

Separator #
This allows you to add a separator that contains two lines on the sides and text in the middle. It is mainly used for aesthetic purposes.
Note: This field has no additional configuration options.
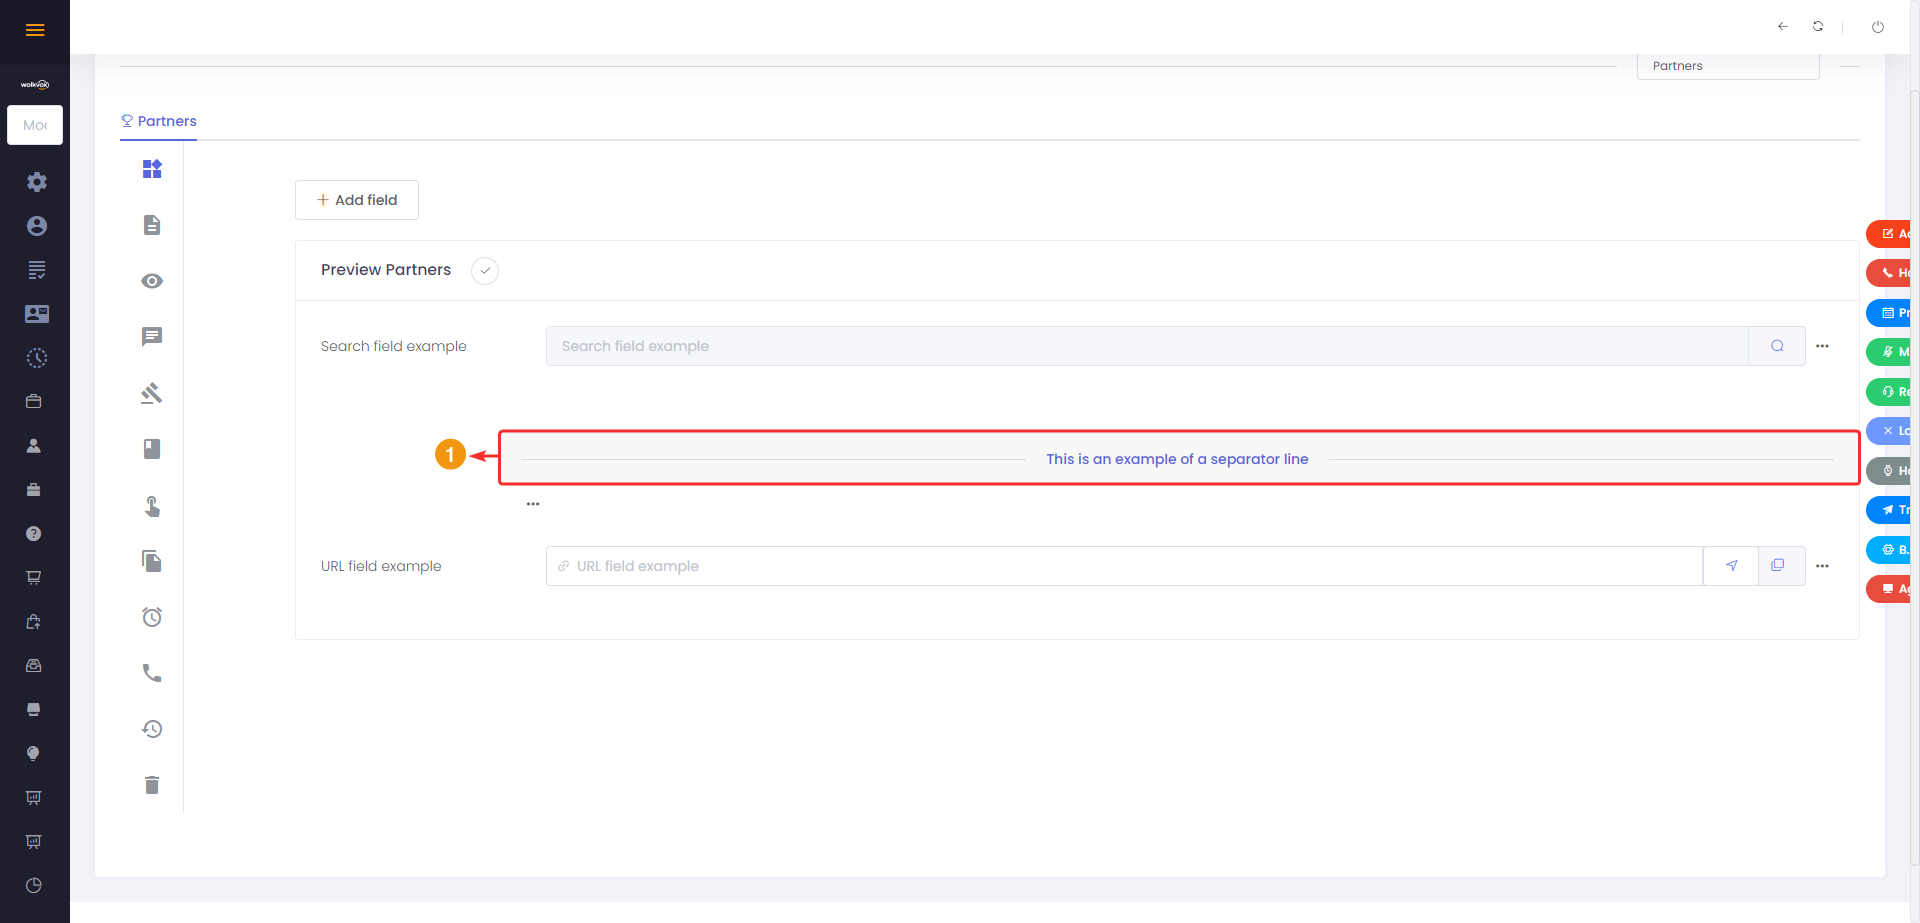
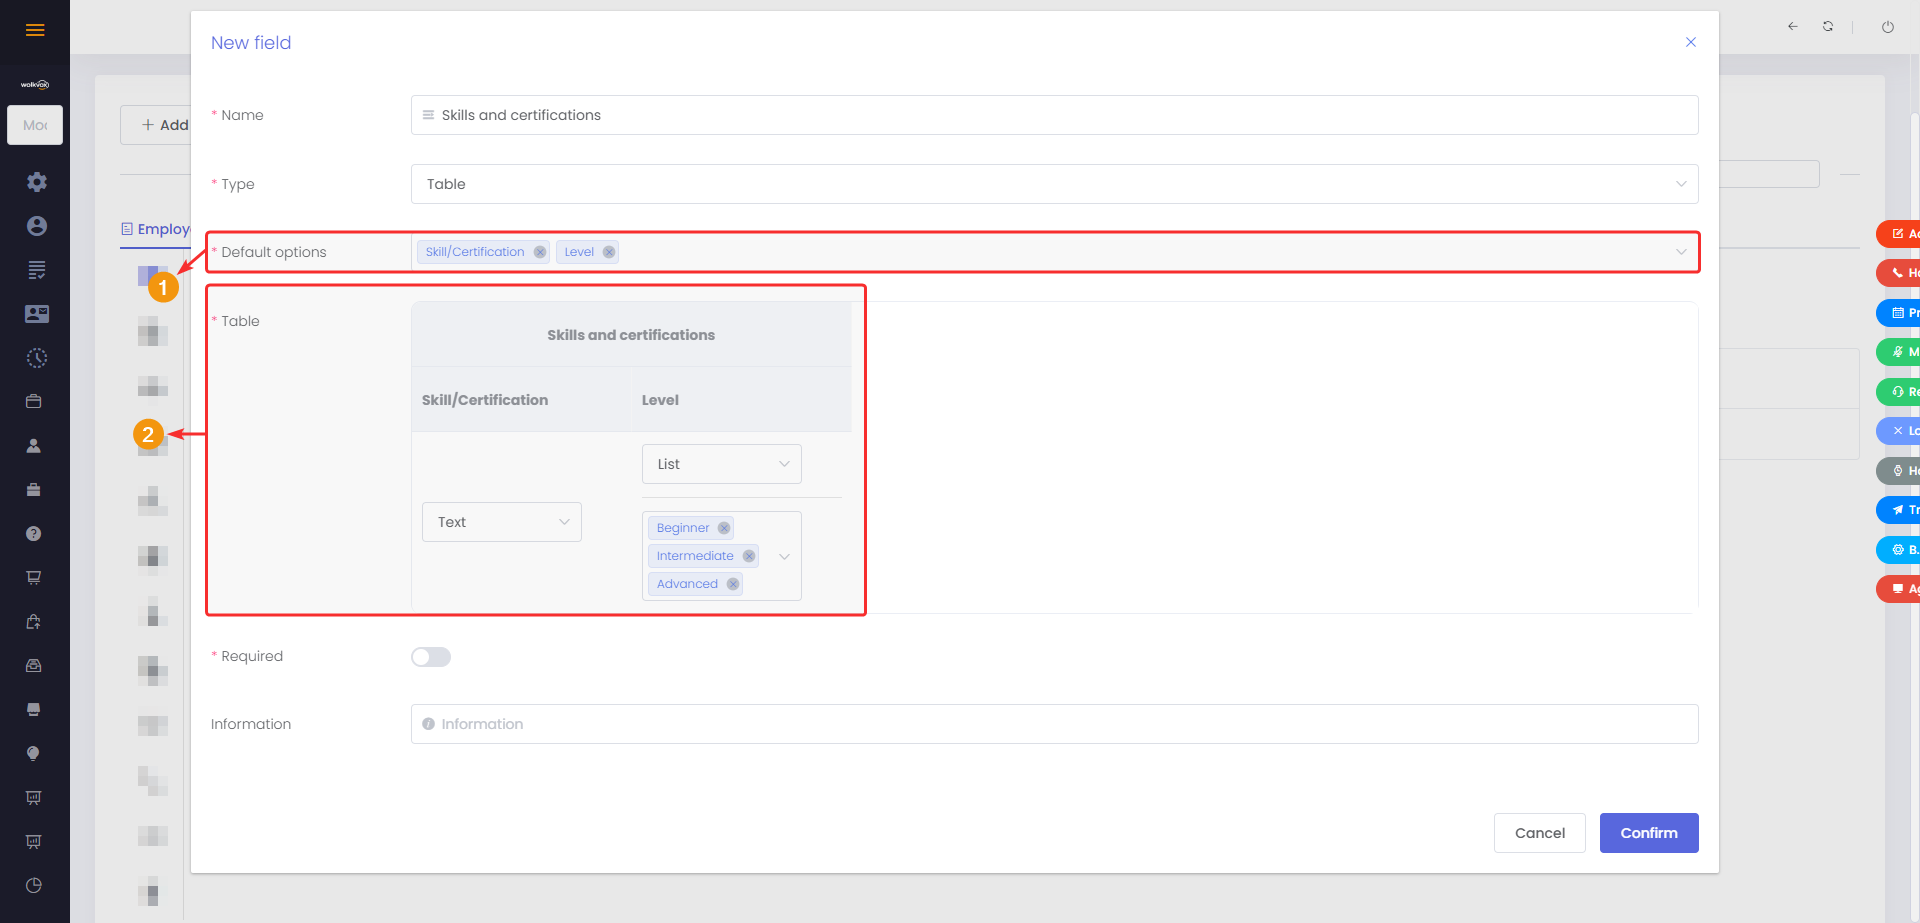
Table #
With this field, you can build a table to capture information. Within this table, there can be options for lists and text.
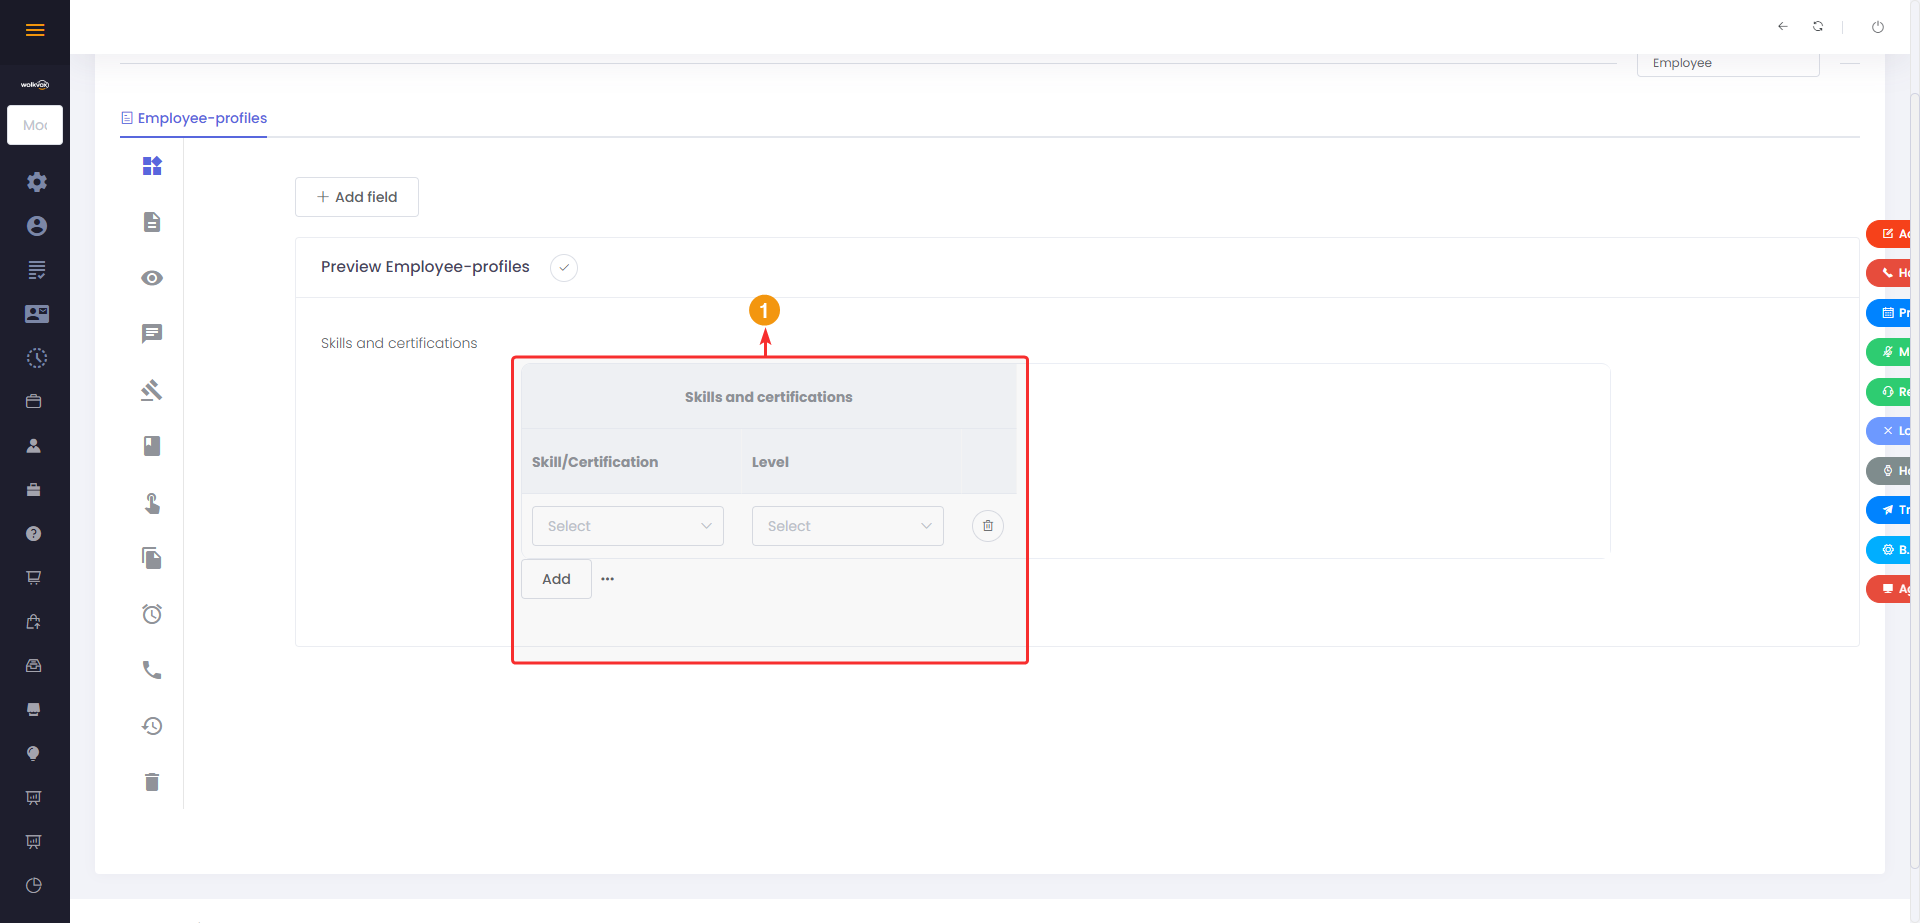
- The texts you enter in “Default options” will be the columns of the table. Add each one by pressing the “Enter” key.
- In the “Table” label, the table is previewed, and you specify what type of option each column will have. It can be of type “List” or “Text”. In the “List” type, you should add each available option by pressing the “Enter” key.
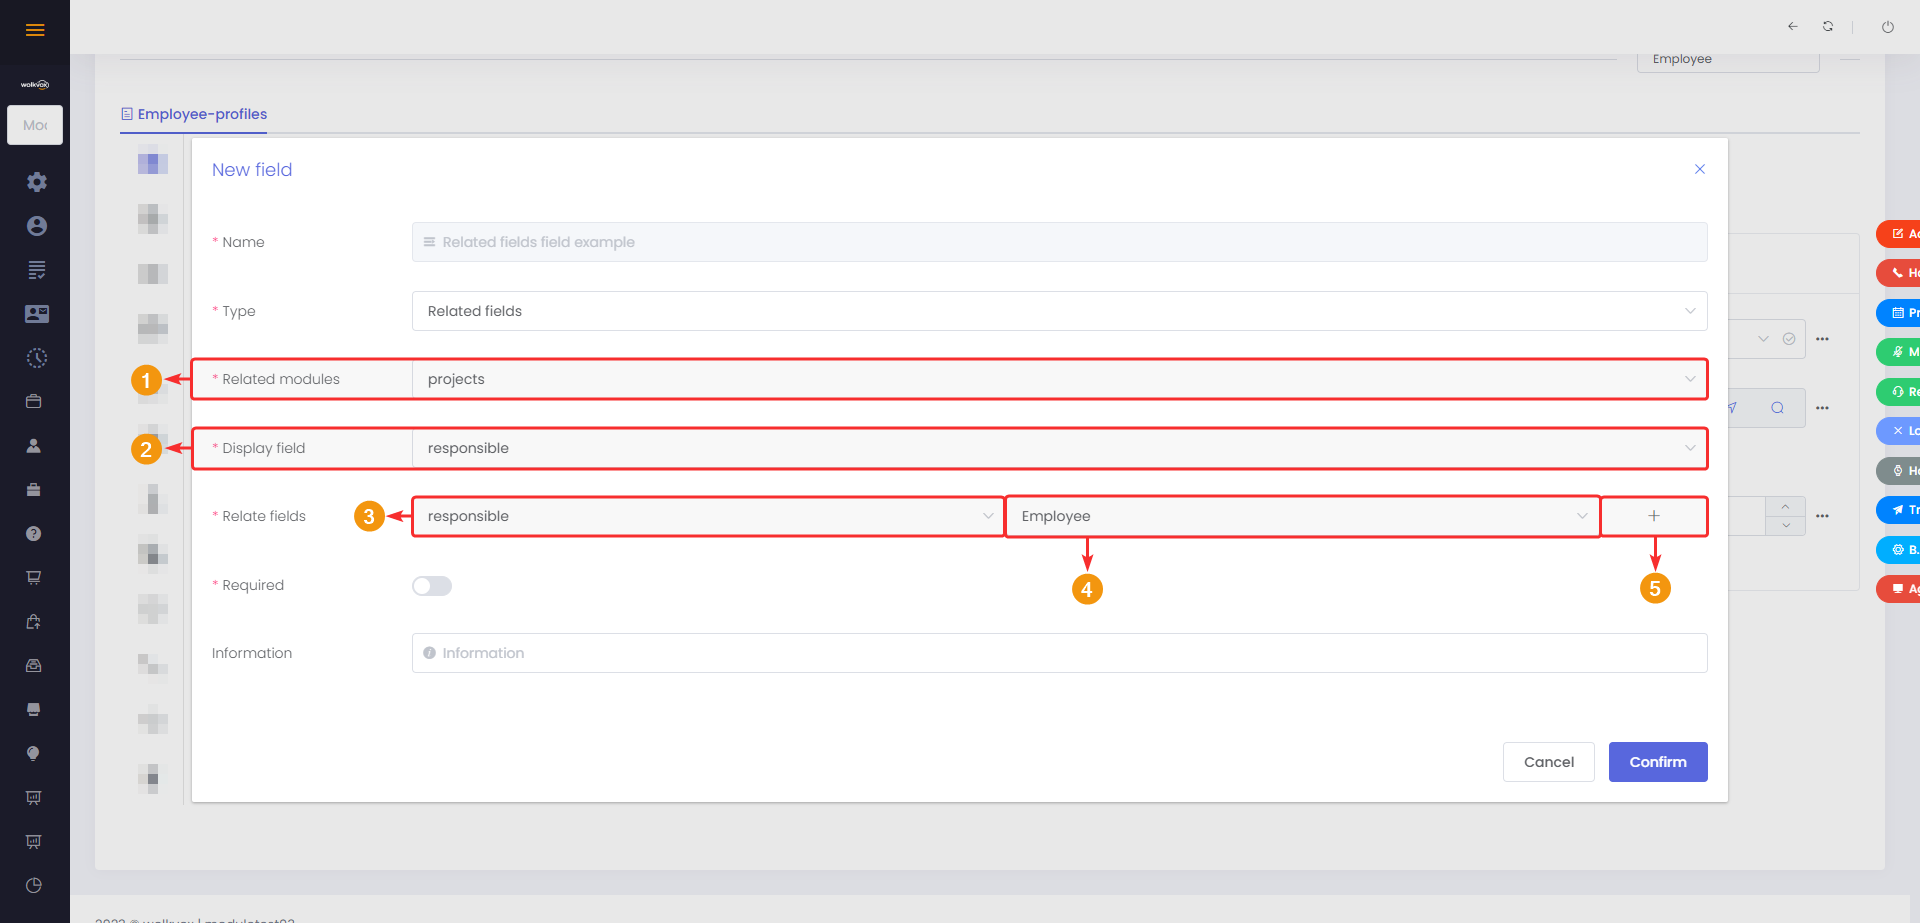
Related fields #
It allows establishing a relationship between fields from different modules. This is useful when there is information in one module that is related to information in another module, and you want to display or link those data in a coherent and efficient manner.
In the image below, you can observe:
- A “related fields” field has been created where a relationship has been configured between a field from another module and a field from the current module.
- The value of the field from that other module will be displayed in another field within the current module.
This illustrates how information from one module can be linked and displayed in a meaningful way within another module using the “related fields” configuration.

- Select the module from which you want to relate a field with a field in the current module.
- Select the field from that other module from which you want to bring its value.
- Select the field from that other module to relate.
- Select the field from the current module where you want to display the value from the other module’s field.
- Click the “+” button to add the field relation.
A table with the added field relations will be displayed.
In this table, each relation will have a button to delete that field relation.

List telephone #
This field allows adding a dropdown menu with a list of phones.
- First, you need to click the “+” button to add each phone.
- After successfully adding the phone, each of the added phones will appear in the dropdown menu.

You will also have the following options:
- Button to call the selected phone number in the dropdown menu.
- Button to copy the selected phone number to the clipboard.

Custom Modules #
Creating Custom Modules #
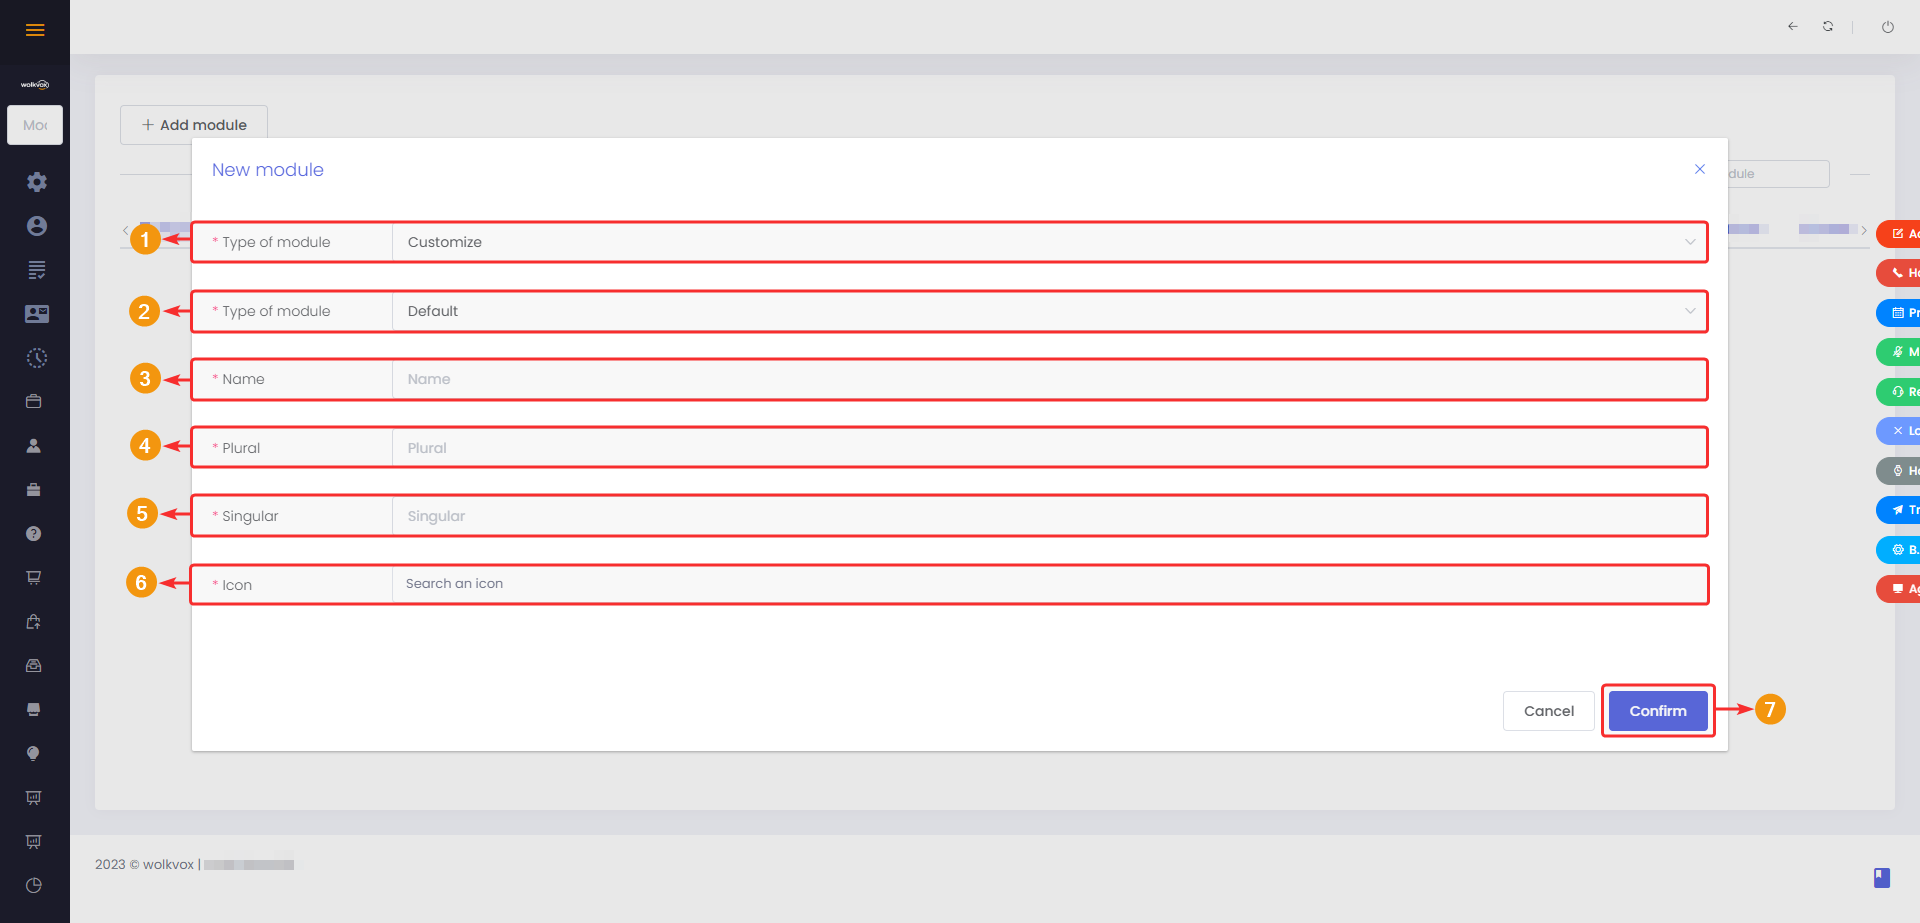
It is possible to create custom modules to build a space that meets the specific needs of a company and is not included in the CRM’s default modules. With this type of modules, you can customize the functionalities required for your operation.
- In the “Module Type” field, select the “Customize” option.
- In the “Module Type” field, select the “Default” option.
- Assign a name to the module. This field does not allow spaces or the letter “Ñ”. As an alternative to a space, you can use the underscore symbol (_).
- In the “Plural” field, write the name of the module in plural.
- In the “Singular” field, write the name of the module in singular.
- In the “Icon” field, you must select the icon that will accompany the module’s name.
- Click the “Confirm” button to apply the changes.
![]() After creating the module, you must activate the necessary permissions for each profile to view and/or manage the module.
After creating the module, you must activate the necessary permissions for each profile to view and/or manage the module.
Custom Module Management #
Custom modules have the following configurations:
- Fields.
- Manage Rules.
- Module Presentation.
- Social.
- Form Actions.
- Script.
- Manage Buttons.
- Related Modules.
- Alerts.
- Configure Call Field.
- List Managements.
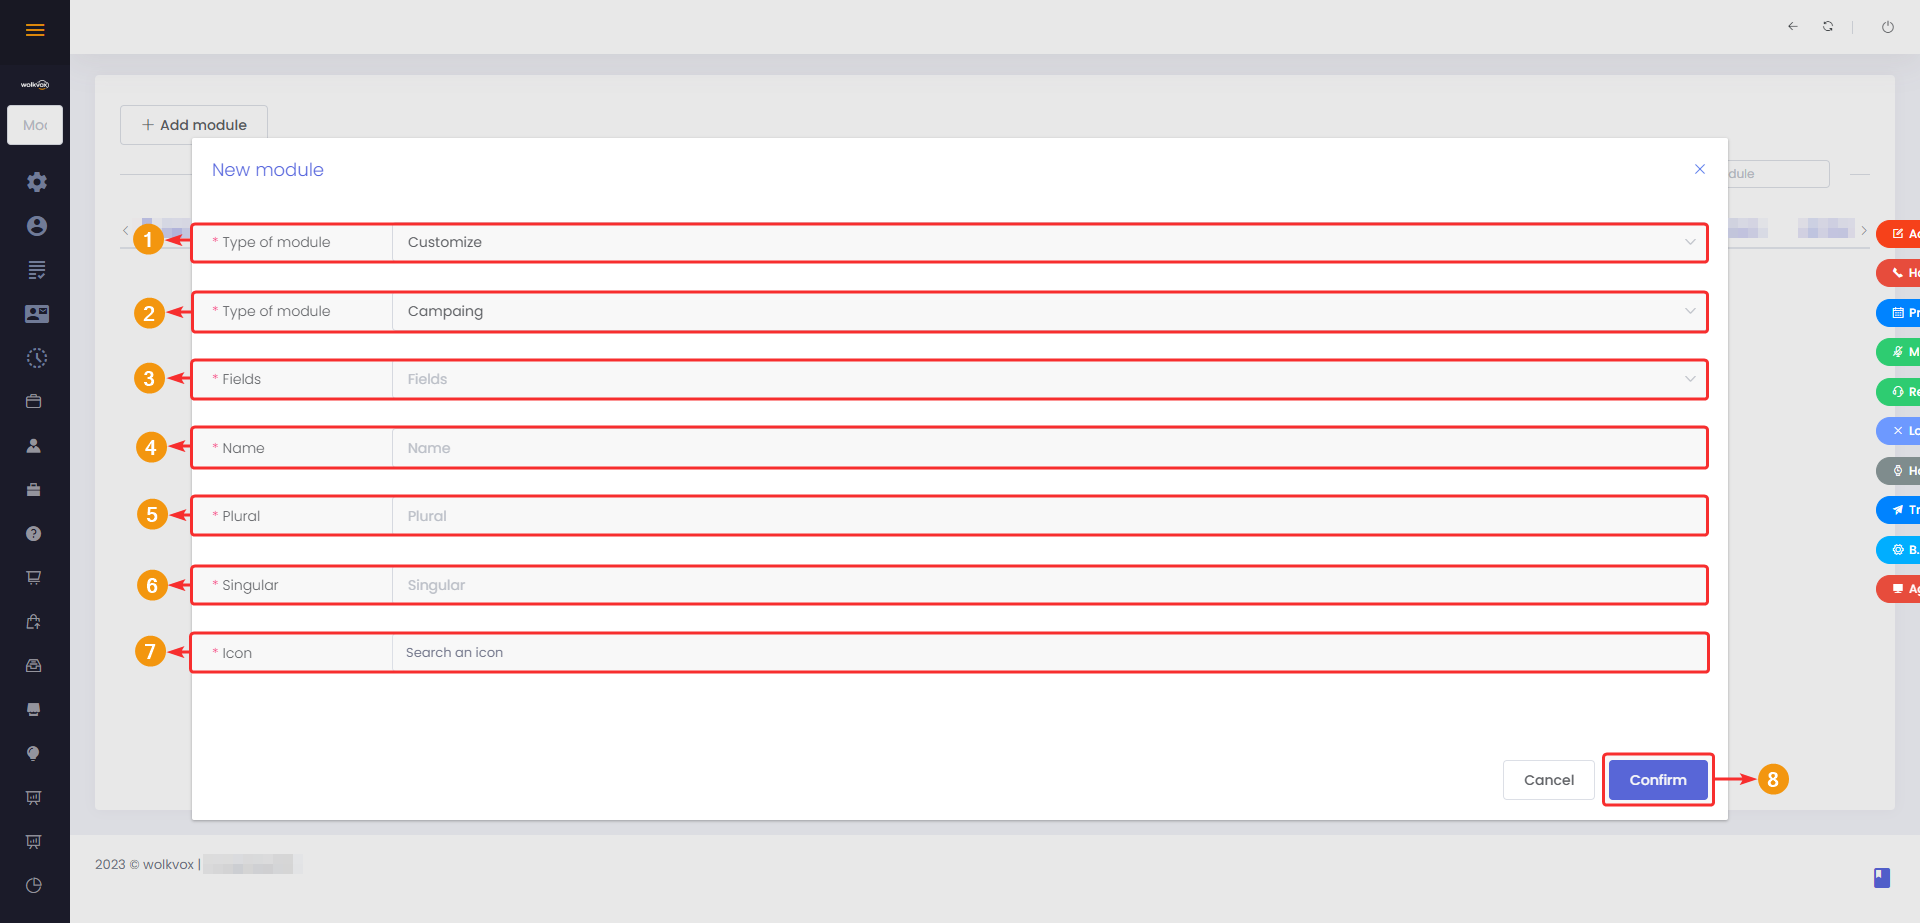
Creation of Campaign Type Modules #
Campaigns in wolkvox CRM are of the preview type, meaning there is no automatic dialing system, and each agent will be responsible for managing how to dial the customers within the campaign.
You can create custom modules that aim to manage a campaign as needed.
- In the “Module Type” field, select the “Customize” option.
- In “Module Type,” select the “Campaign” option.
- In “Fields,” click to expand the menu of fields you want to add. You can add the following fields: Last name, ID type, Age, Sex, Country, State, City, Zone, Address, Phone 2, Phone 3 and Other phone.
- Assign a name to the module. This field does not allow spaces or the letter “Ñ”. As an alternative to spaces, you can use an underscore (_).
- Assign a plural name to the module.
- Assign a singular name to the module.
- Select an icon to accompany the module’s name.
- Click “Confirm” to apply the changes.
![]() After creating the module, you will need to activate the necessary permissions in each profile to view and/or manage the module.
After creating the module, you will need to activate the necessary permissions in each profile to view and/or manage the module.
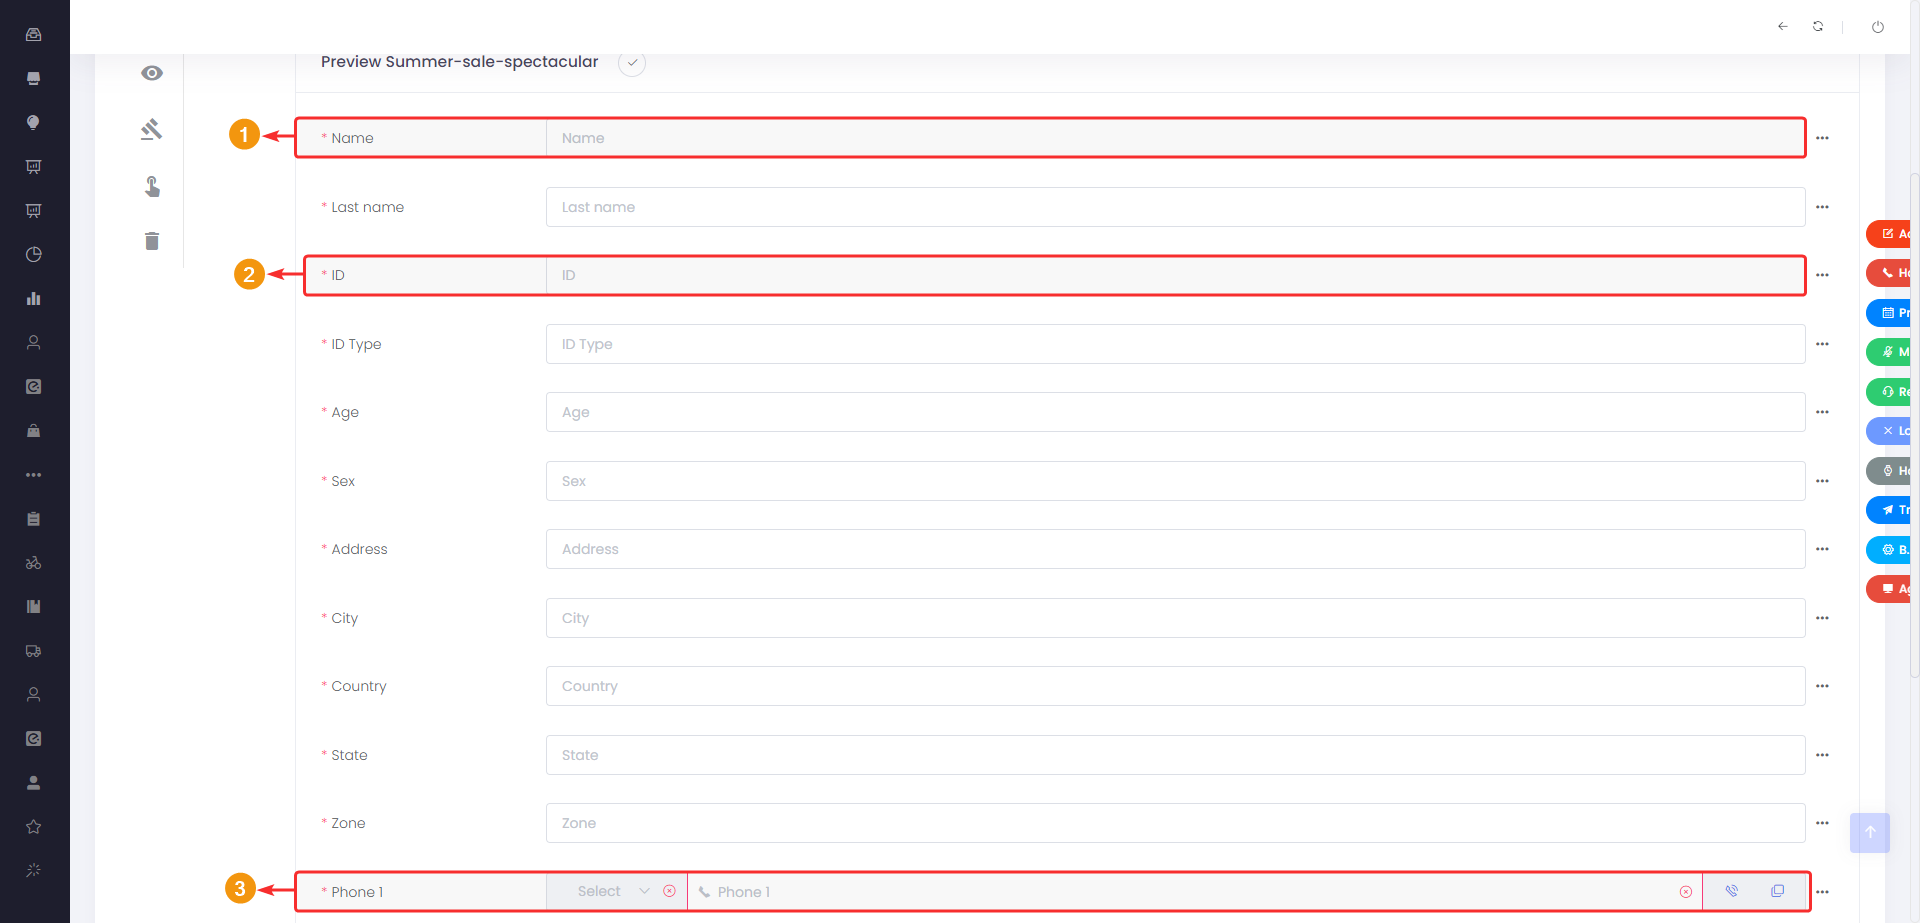
Note: In campaign-type modules, the “ID”, “Name”, and “Phone 1” fields will appear by default. So, you won’t have to worry about creating or adding these fields.
Campaign Type Module Management #
Campaign type modules have the following configurations:
- Fields: Allows adding or removing fields of information from records.
- Rule Management: Enables setting fields as dependent on other fields and creating field rules.
- Module Presentation: Defines the presentation layout of the module. This is where you configure which fields to display and which ones to hide when viewing the records table.
- Form Actions: Configures actions to be taken whenever certain events occur, such as an action triggered when a new record is created, edited, or deleted.
- Button Management: Sets up buttons for agents and campaign managers to classify interactions with customers or actions within the campaign.
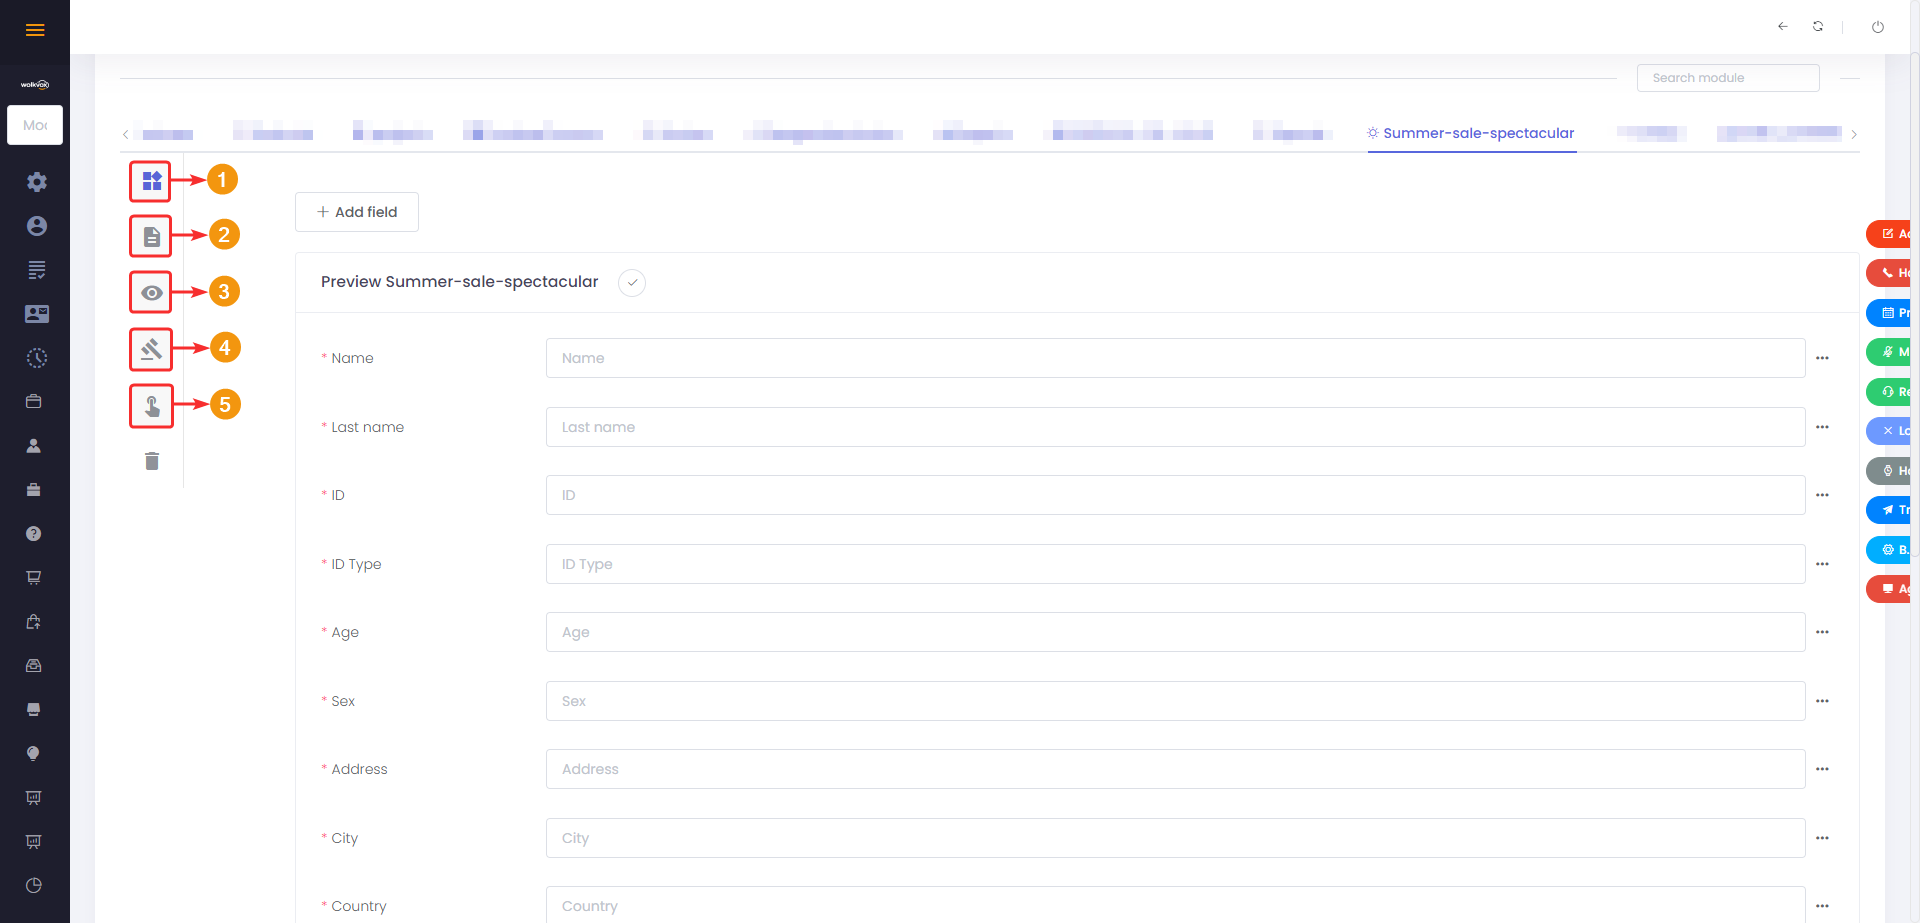
Module Fields #
In the field configuration, in addition to those assigned during module creation, the “ID,” “Name,” and “Phone 1” fields will appear.