

 About wolkvox Manager #
 About wolkvox Manager
Wolkvox Manager is the platform where you can configure everything related to agent operations and customer contact. This application offers a wide range of essential functionalities for your solution, such as:
- Designing IVRs: Design the required IVRs using a user-friendly and easy-to-use graphical interface.
- Ability to implement over 60 components: Customize and incorporate various components to enhance the functionality of your IVRs.
- Integration of artificial intelligence: Utilize artificial intelligence capabilities to enhance customer interactions and automate processes.
- Voice recognition: Implement voice recognition technology for improved customer interactions and call routing.
- Database queries: Perform database queries to retrieve and update customer information during calls.
- API connections: Connect and integrate with other systems and applications through APIs.
- Creation and management of predictive, progressive, and preview campaigns: Create and manage campaigns of different types to suit your specific needs.
- Intelligent routing: Implement intelligent call routing strategies to ensure calls are directed to the most suitable agents.
- Visualization and export of historical and real-time reports: Access and export detailed reports to analyze performance and make informed decisions.
Wolkvox Manager provides a comprehensive set of functionalities to optimize agent operations and enhance customer interactions.
Glossary of terms #
Before starting with the reading of the following documentation, it is recommended to read the glossary of terms to have a better understanding of the presented situations. To view the glossary of terms, click on the button below.
Initial Steps #
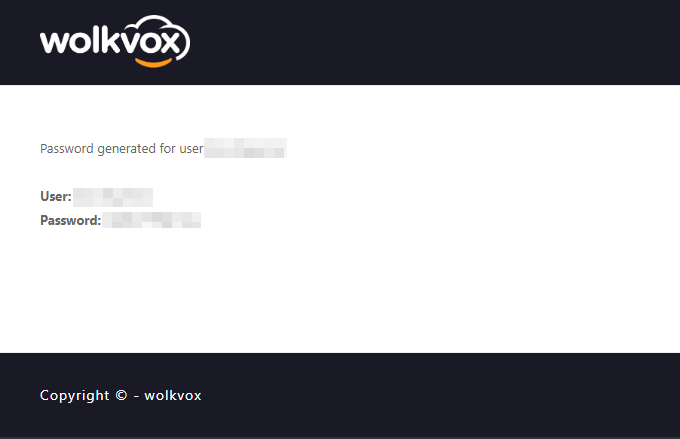
All the necessary information to log in to the wolkvox Manager application will be sent to your email.
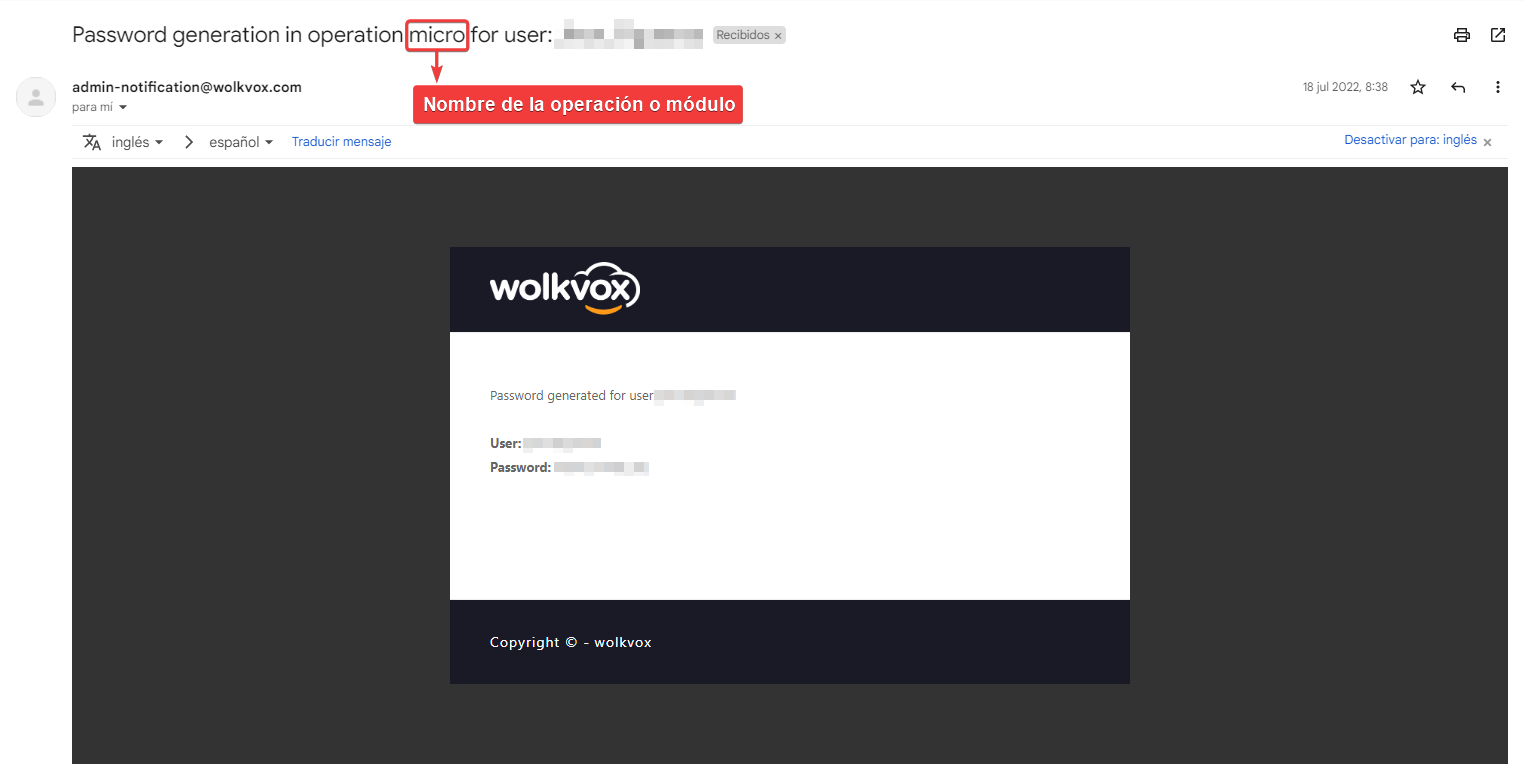
![]() In the email notifying the creation of the new user, you can identify the name of the operation in the subject line.
In the email notifying the creation of the new user, you can identify the name of the operation in the subject line.
Log in to wolkvox Manager #
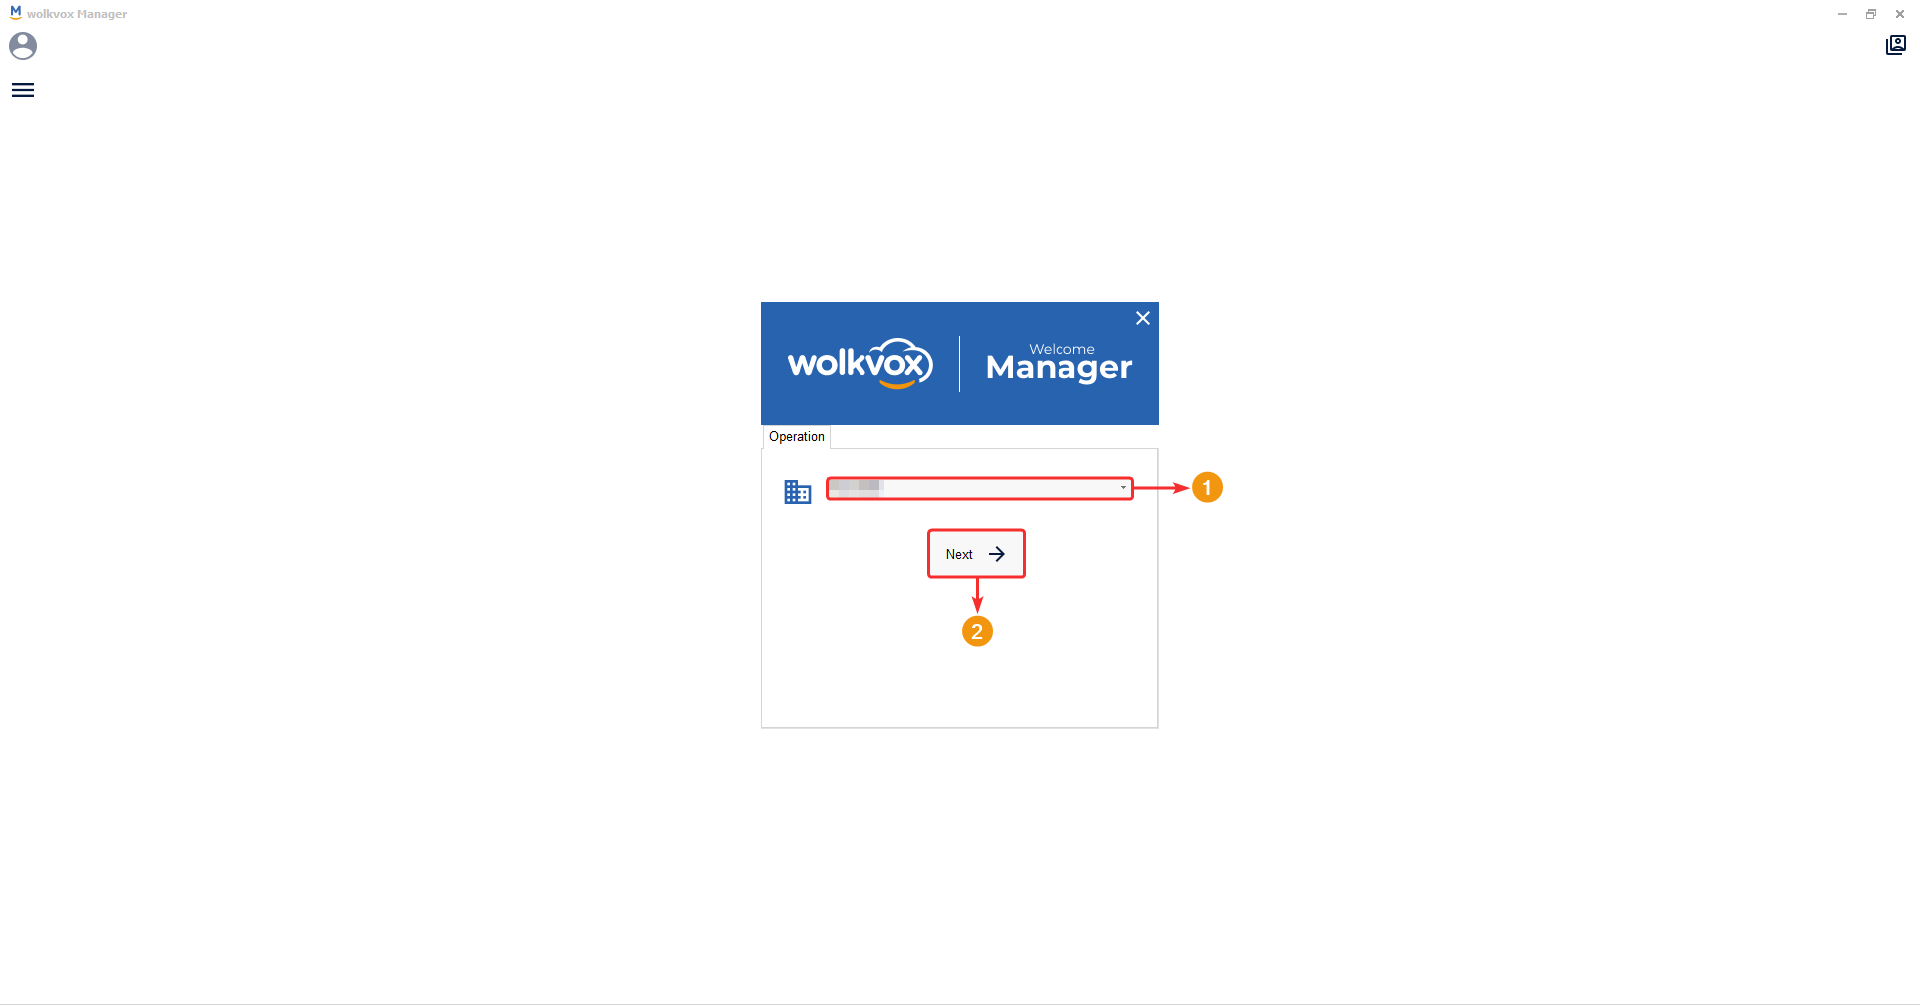
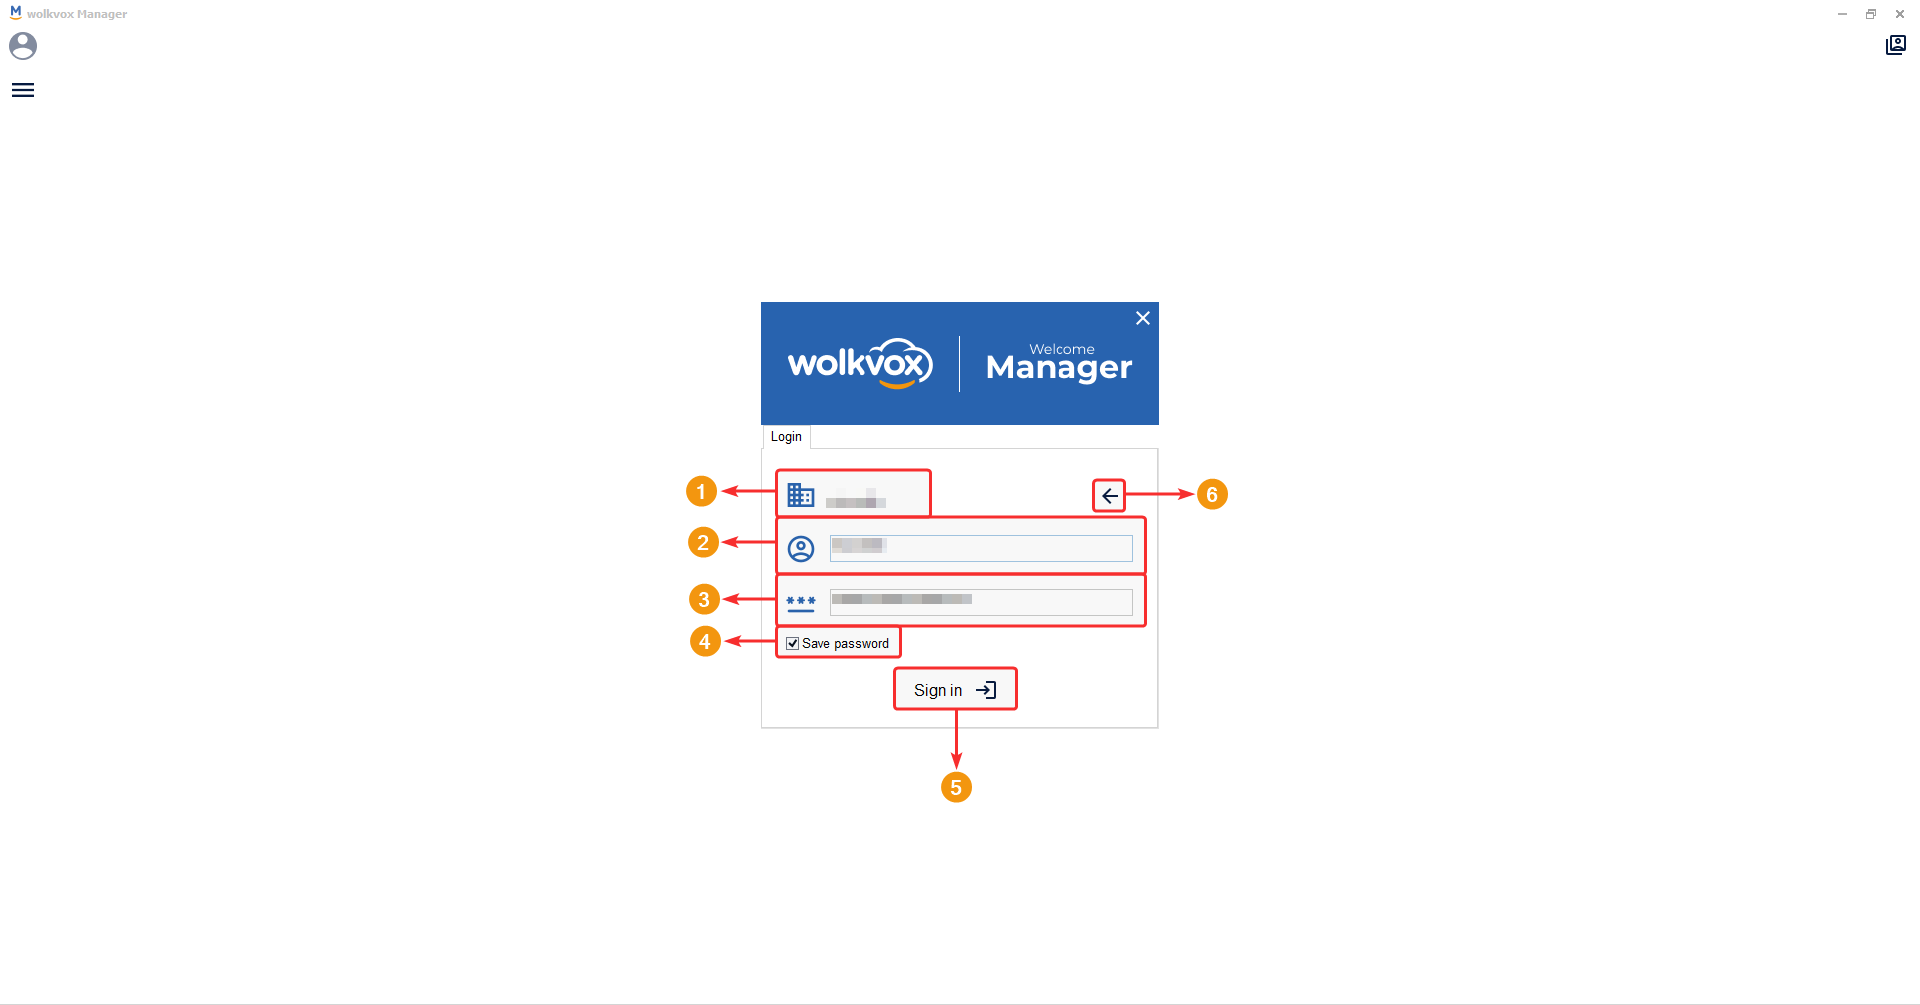
Below you can see what is displayed when the program loads. In the “Operation” field, you must enter the name of the operation to which you are registered.
After successfully entering the operation name, you can identify the following:
- Name of the operation you are trying to access.
- Assigned username.
- Provided password.
- If desired, you can check the “Save password” box to have the application automatically fill in the password when logging in again.
- Once you have entered all the data, click the “Login” button to start loading the program interface.
- The left-pointing arrow allows you to go back and re-enter the operation name.
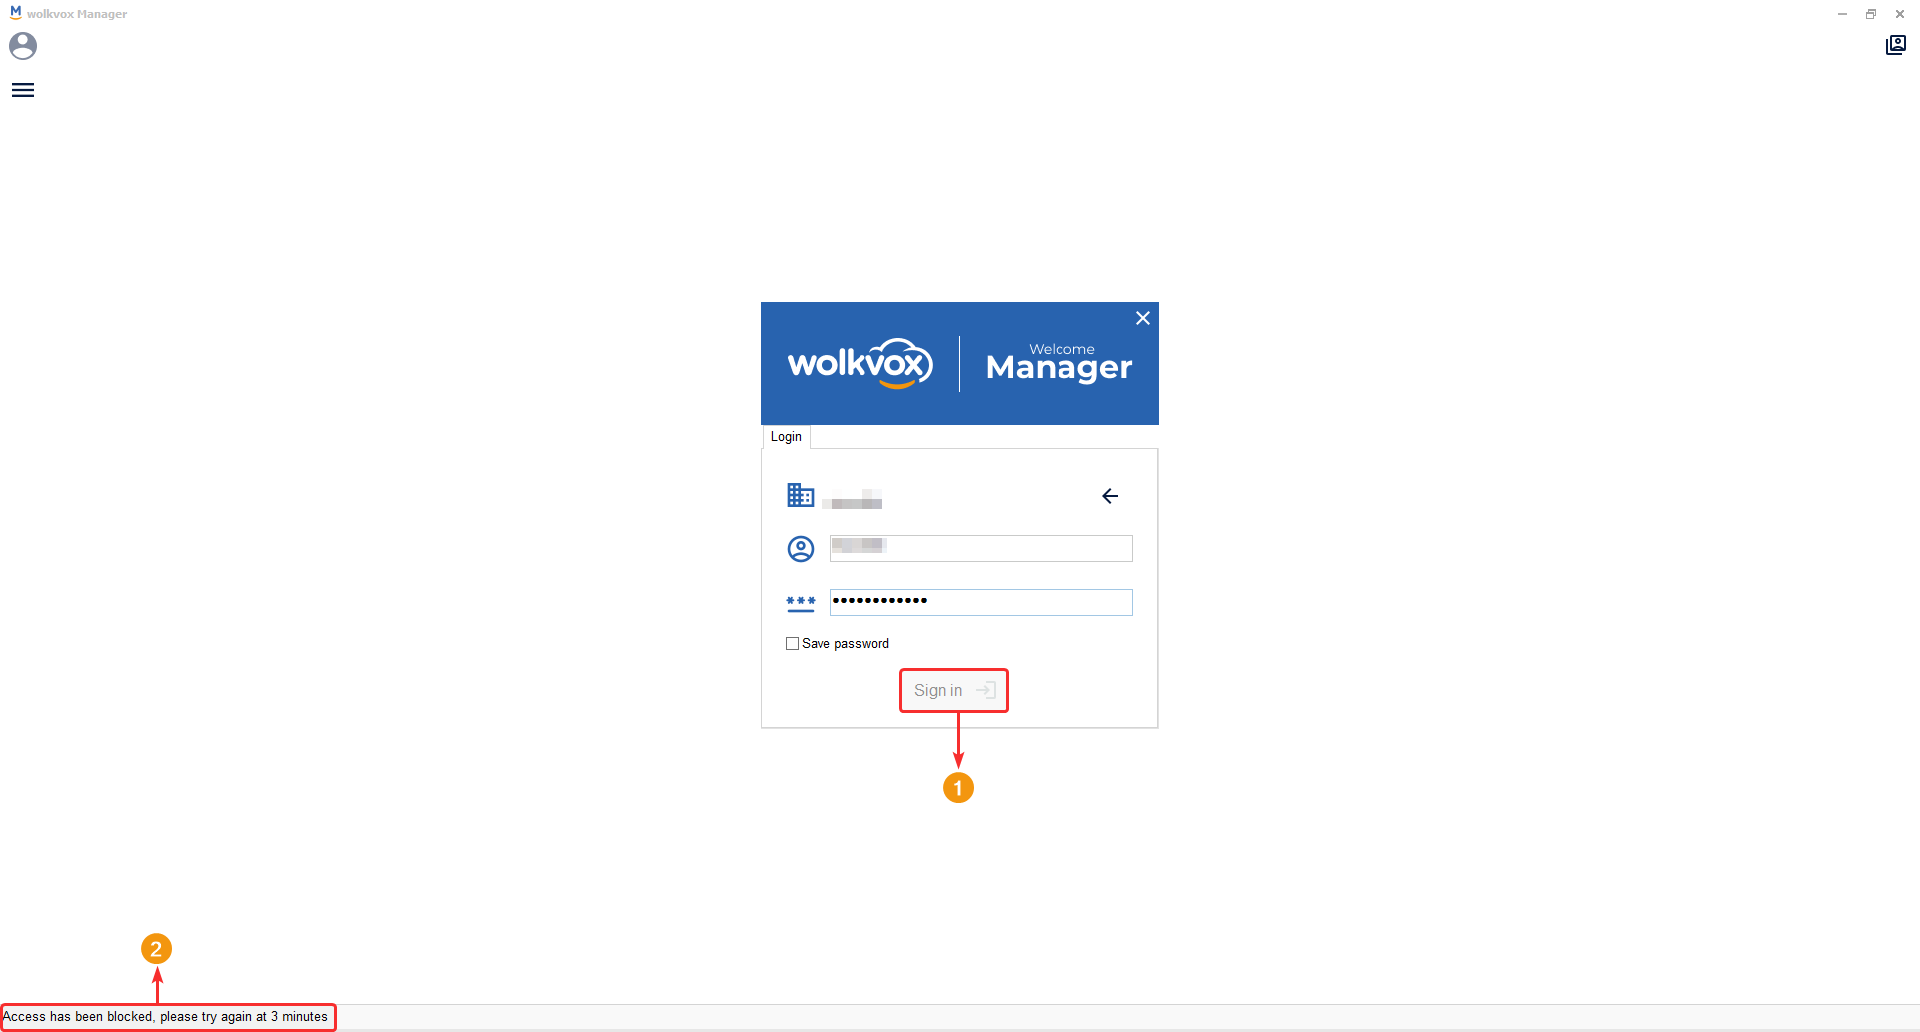
If you attempt to access your account and enter the password incorrectly five (5) times in a row, your access will be blocked for three (3) minutes. Once this lockout period has elapsed, you can attempt to log in again. This lockout is based on the machine and does not take into account your IP address.
Please note:
- Closing and reopening the application will not unlock the button. You must wait for the lockout time to pass with the application open.
- Switching operations will not remove the temporary lockout.
General options #
Reload application elements #
If for any reason you need to reload the program, you have the “Refresh” button available in the top menu of wolkvox Manager. This refreshes the program and reloads the elements.

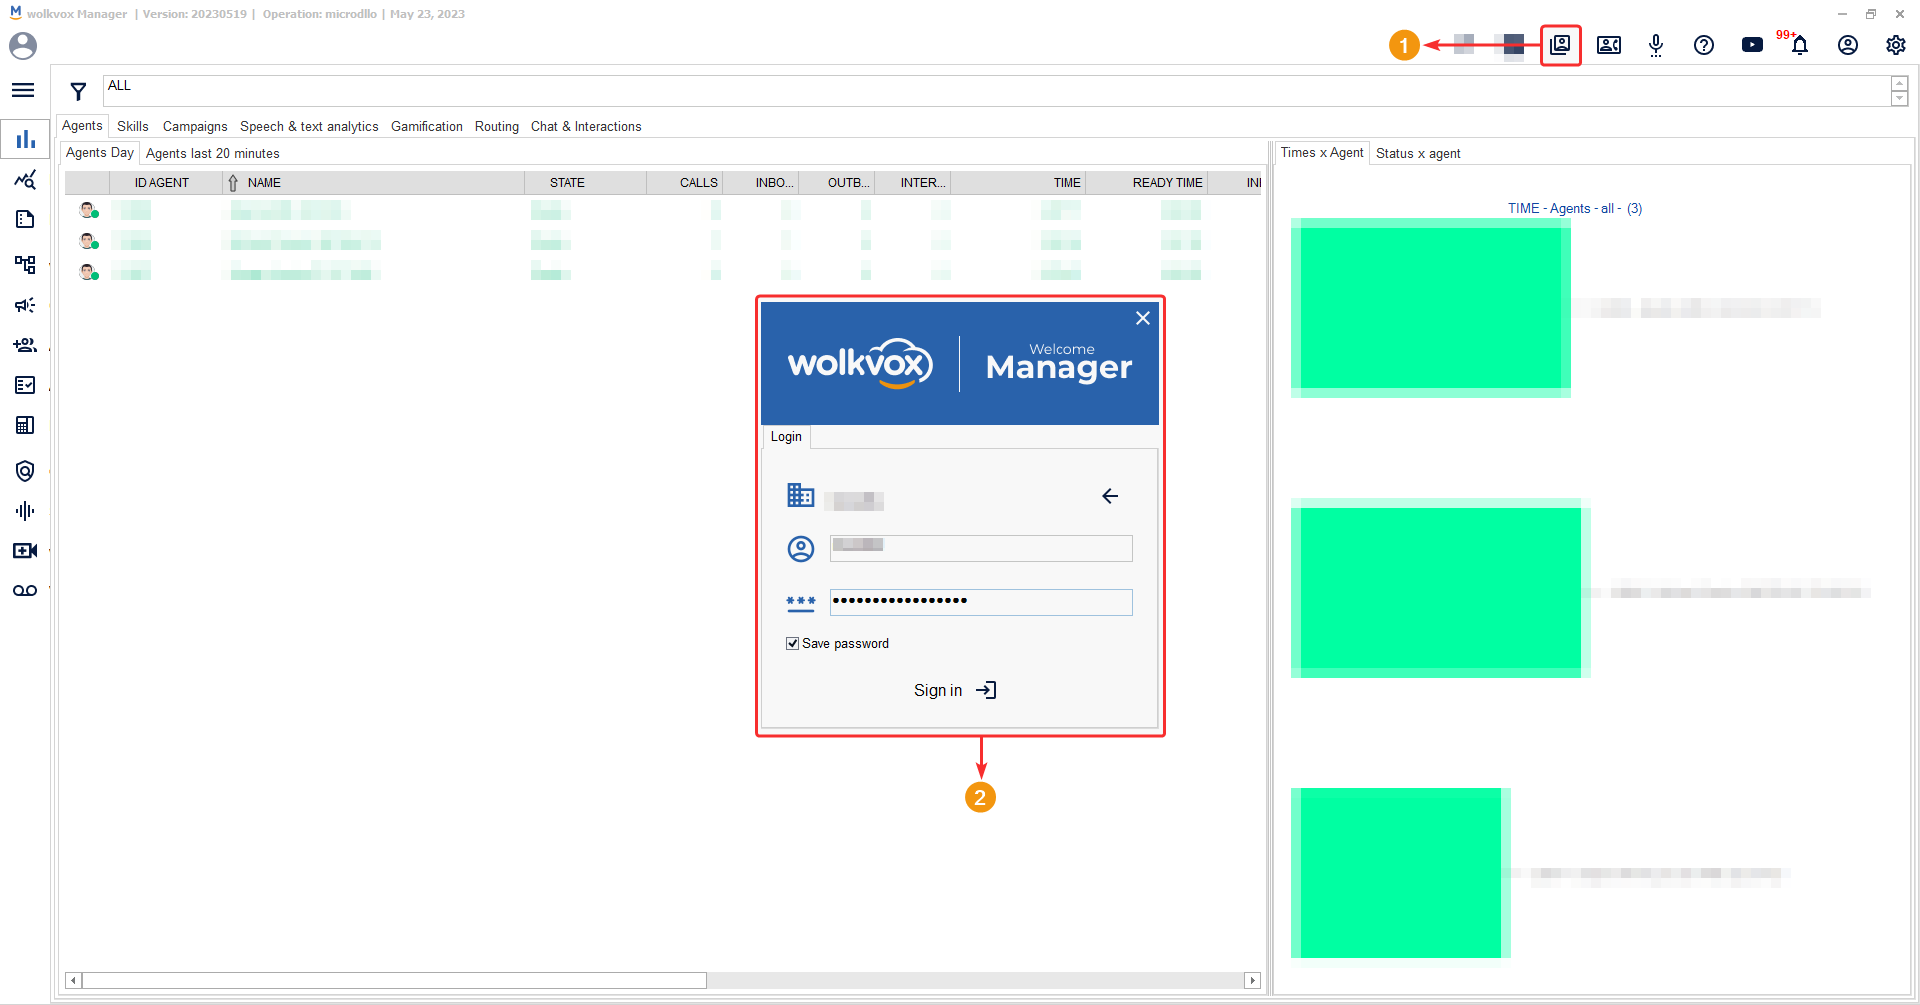
Switching accounts #
If you’re going to switch accounts, you don’t necessarily need to close the program and reopen it. For this purpose, you have the “Switch Account” button, which displays the login window again where you enter the operation name, username, and password.
Conference Rooms #
This tool allows for the incorporation of conference rooms for various purposes, such as:
- Internal meetings to discuss strategies, share information, and collaborate on projects.
- Training sessions or workshops for agents.
- Meetings with clients to discuss their needs or provide assistance.
Note: The maximum number of participants per conference room is 6 people.

By right-clicking on a conference room, you can edit the following options:
- Password: Only numeric values are allowed to set the password.
- Conference room name: You can assign a custom name for the conference room.
- Remember to click the “Save” button to apply the changes.

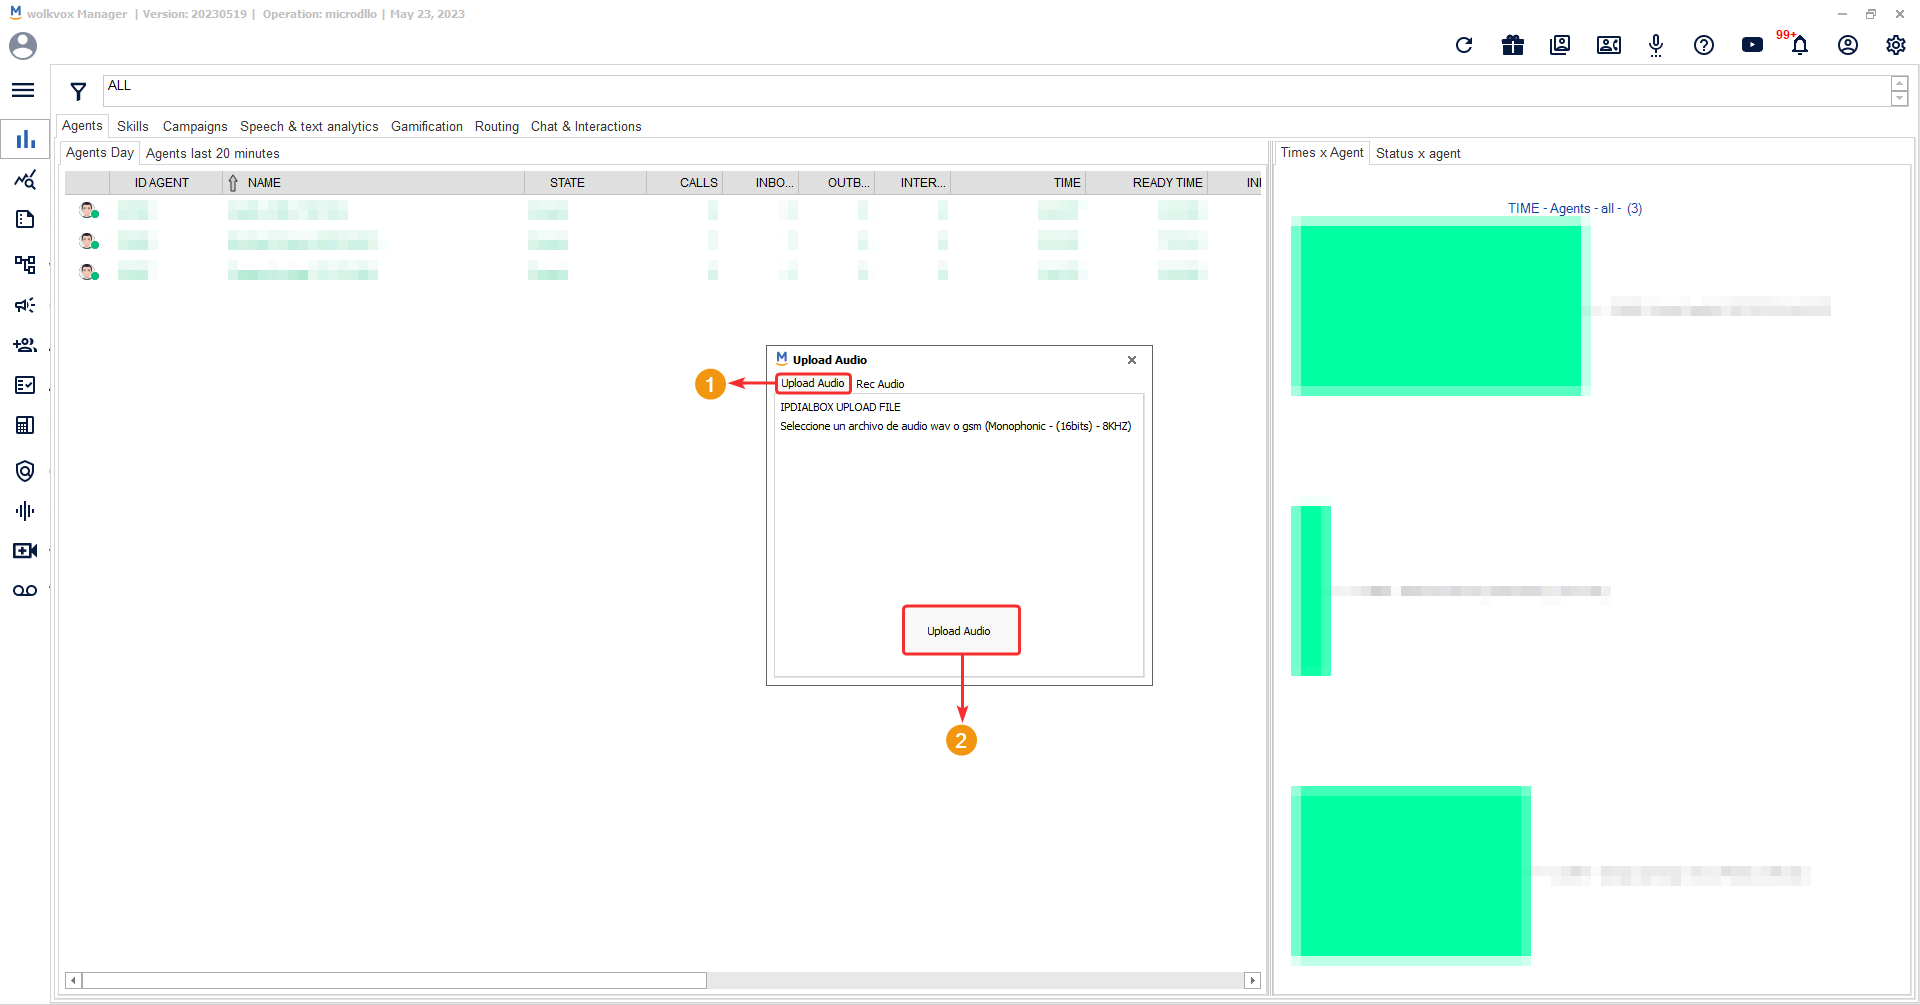
Upload or record an audio file to your operation’s audio repository #
This option allows you to upload or record an audio file that will be saved in the application’s storage and can be used in various tools of wolkvox Manager, such as wolkvox Studio, to build voice flows or IVR.

- The first tab called “Upload Audio” allows you to add an audio file that is already saved on your computer.
- You must meet the file requirements, which are as follows: the file should be in WAV or GSM format with a mono channel output, as stereo is not allowed. Additionally, it should have a sampling frequency of 8KHZ and a quality of 16 bits.
- By clicking on the “Upload Audio” button, the file explorer will open, allowing you to locate and select the audio file you want to upload.
In the second tab called “Rec Audio,” you can directly record your audio without worrying about file formats or export configurations.
All the audios you record in this tool can be used later for sections in wolkvox Manager where the selection of an audio file is required, such as voice components in wolkvox Studio.
- Go to the “Rec audio” tab.
- Assign a name to the audio you are going to record.
- The first icon, represented by a red circle, allows you to start capturing the sound from your microphone. The second button allows you to stop the audio recording. The third button enables you to play the recorded audio, and the fourth button allows you to upload the file to your audio repository if it meets your expectations.

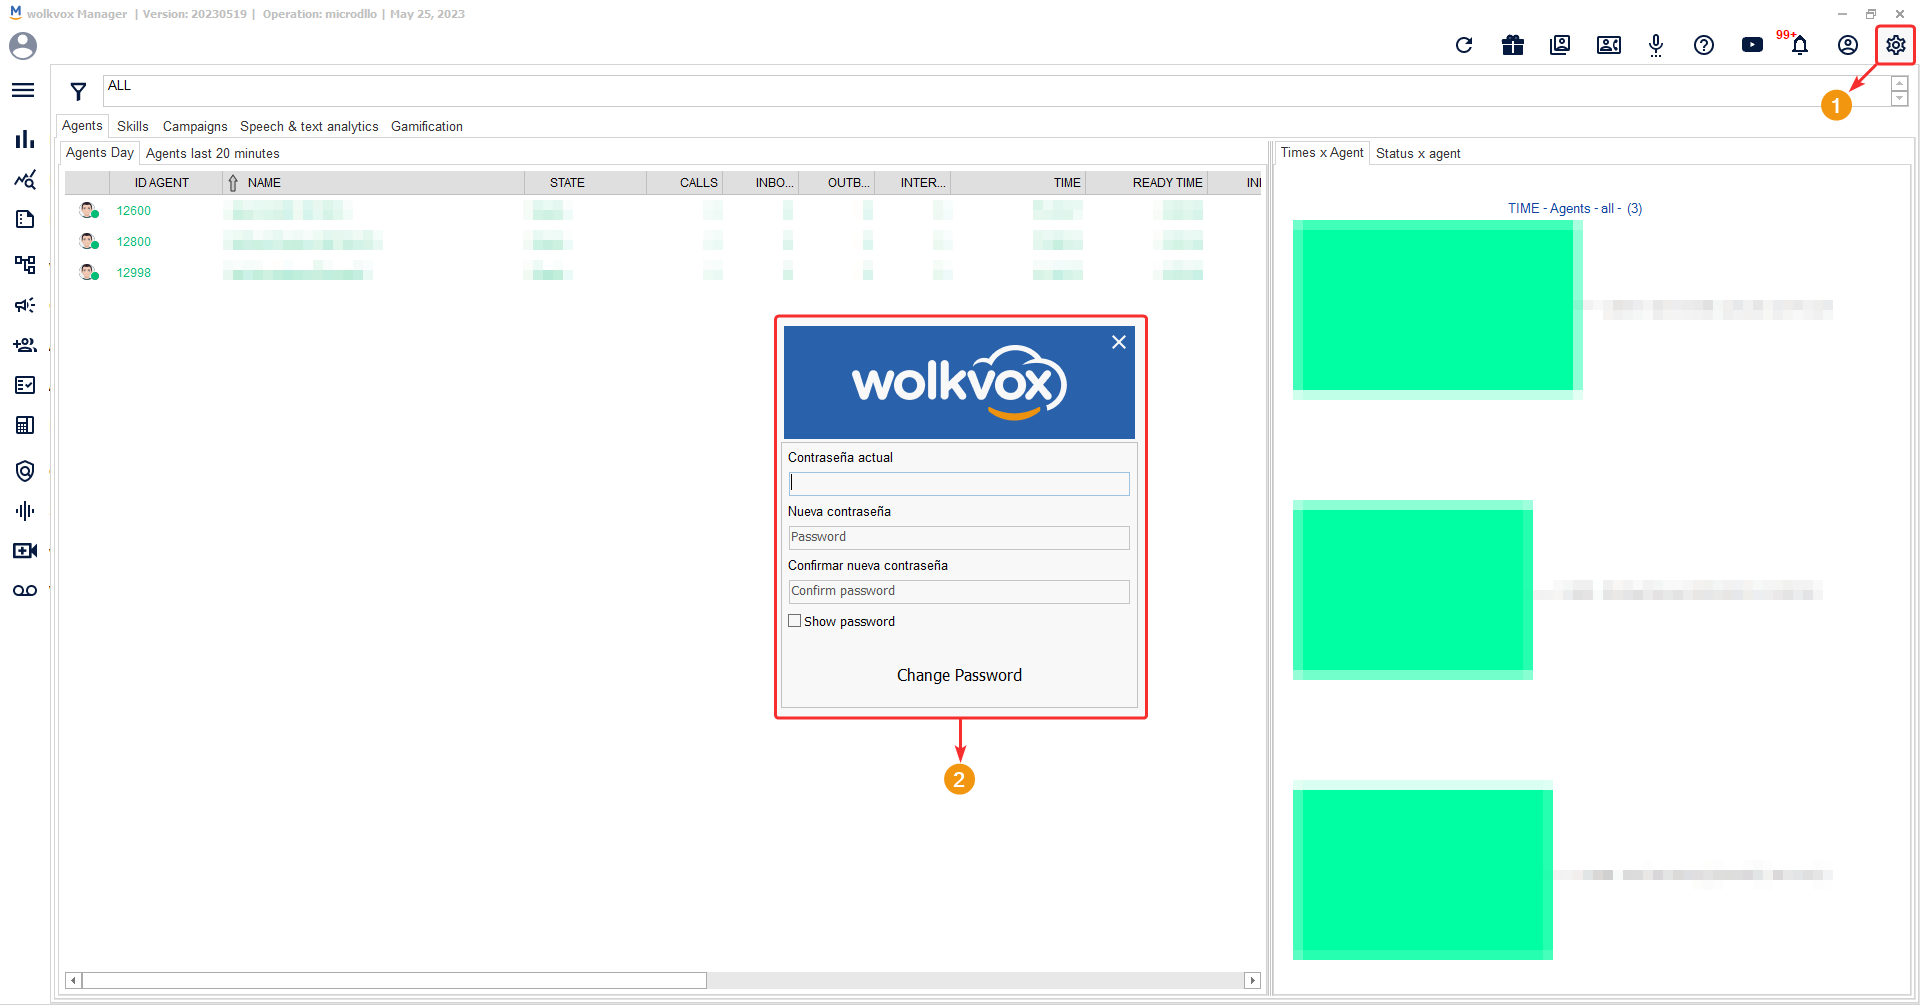
Change password for your user in wolkvox Manager #
If you want to change the password of your wolkvox Manager user, you can do so by clicking on the highlighted button in the following image.
In this window, you will be asked to enter the current password, the new password, and retype the new password to verify it.
![]() Remember to use a set of characters with a high level of security to avoid unwanted access. You can combine lowercase and uppercase letters, numbers, and special characters (these add an extra layer of security to the password).
Remember to use a set of characters with a high level of security to avoid unwanted access. You can combine lowercase and uppercase letters, numbers, and special characters (these add an extra layer of security to the password).
User and Profile Configuration #
Profile Creation #
User profiles are used to differentiate different user groups who will be using wolkvox Manager, with each group having specific permissions. In other words, you can create a profile called “Sales Leader,” “Supervisor,” “Trainer,” “Technical Support,” among others. These profiles are assigned to each user based on their role, and permissions are granted according to the function they will perform. These permissions can allow or restrict access to different sections, tools, and functionalities of wolkvox Manager.
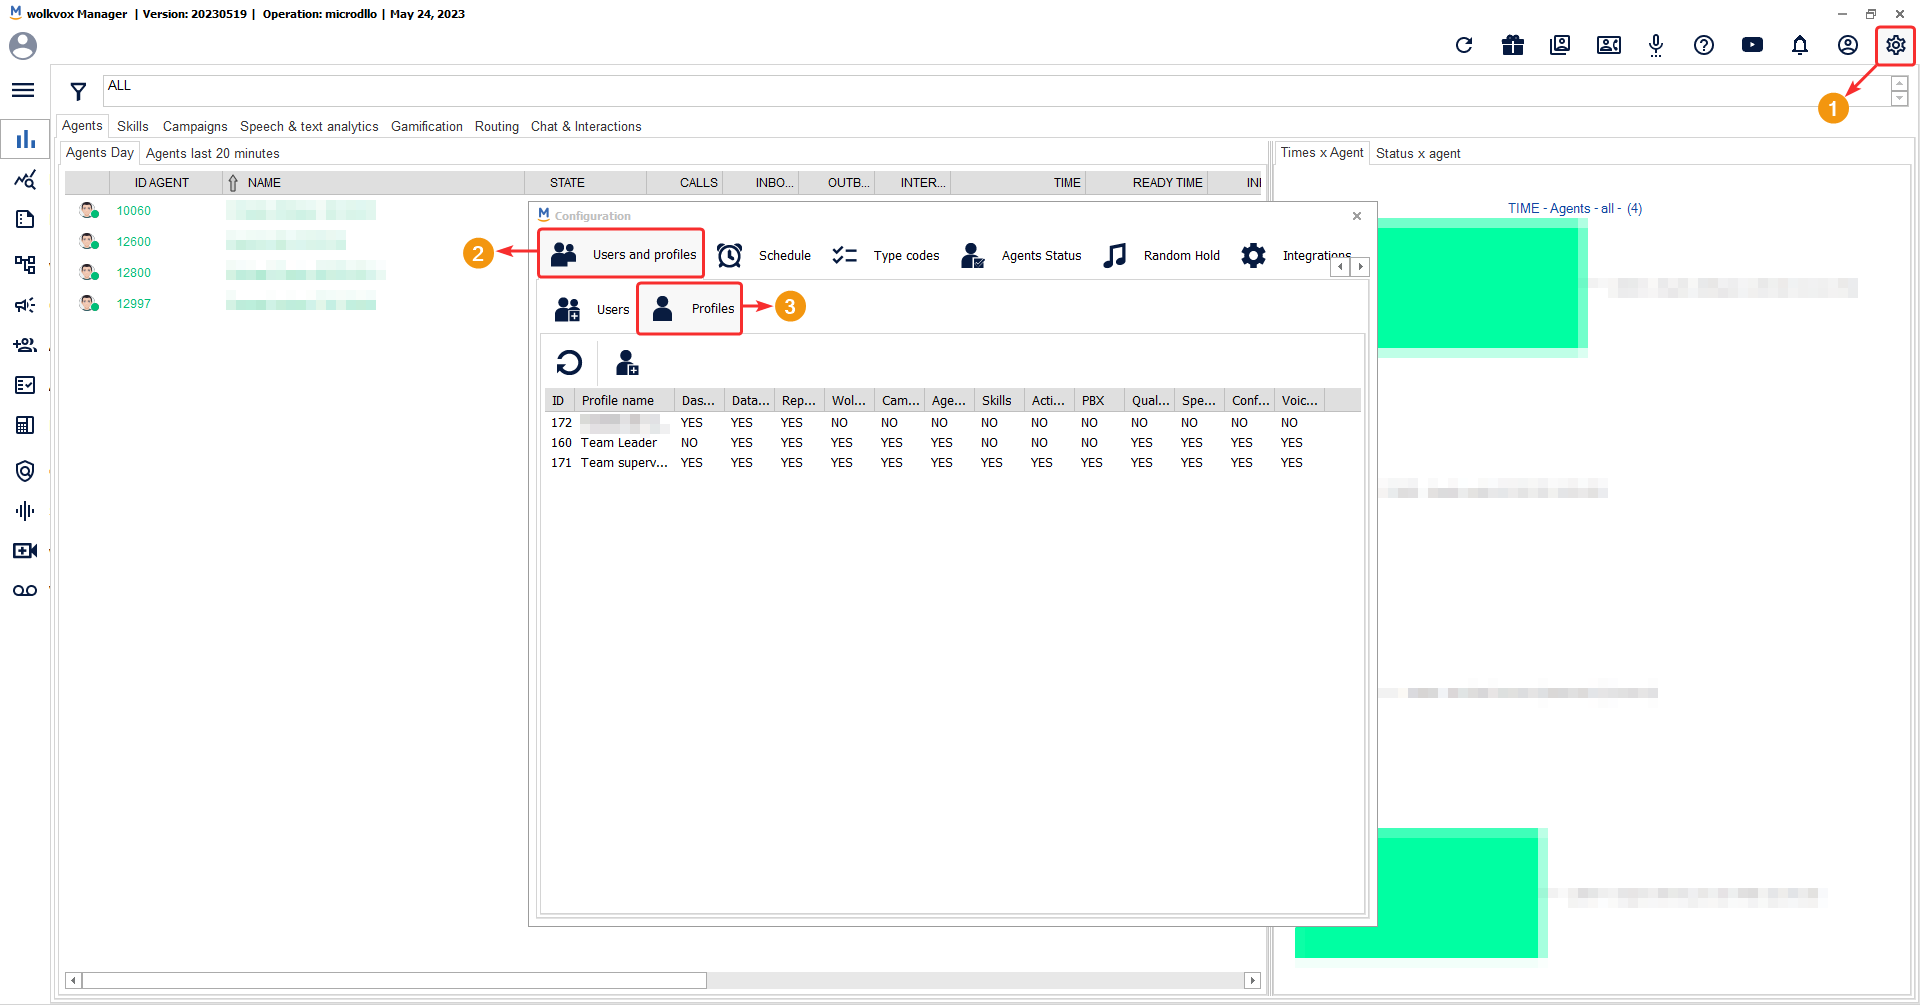
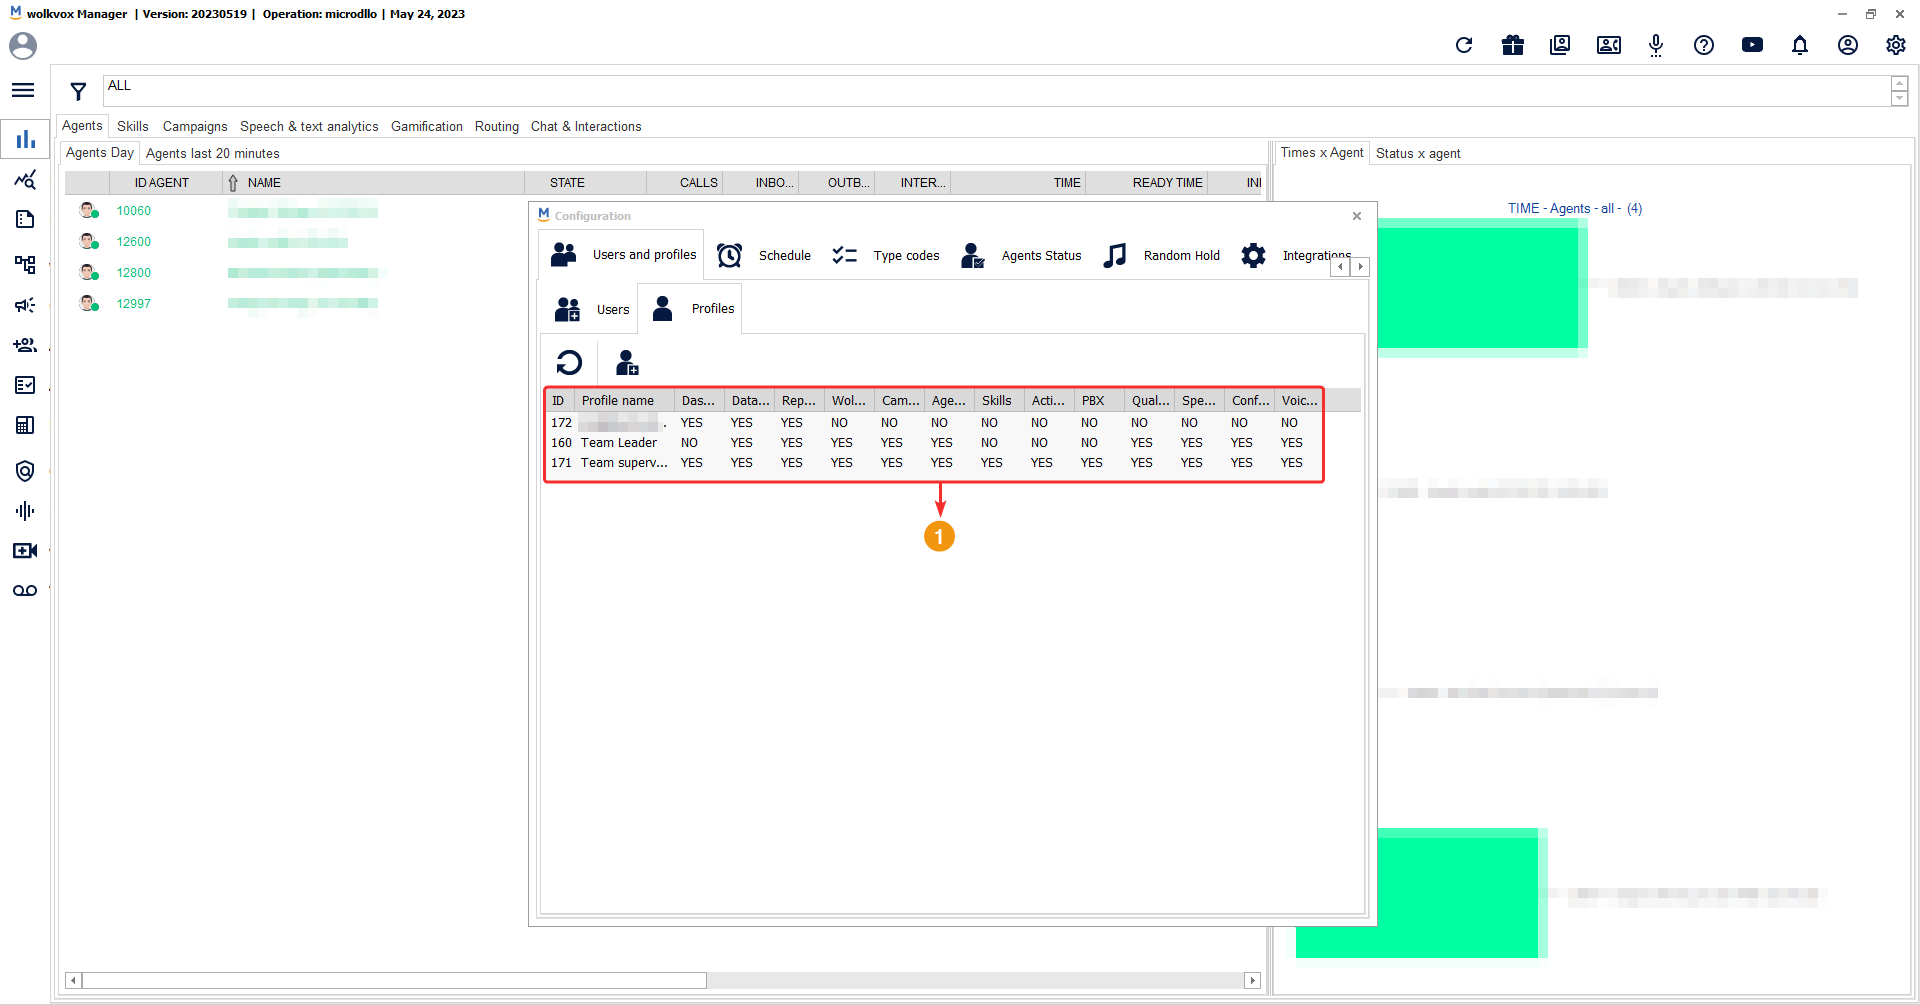
In the table, you can review the assigned ID number for each profile along with the name and the permissions that each profile has.
- The new window that appears contains the following fields for editing: “Profile Name” and the different permissions grouped under “Performance,” “Service Design,” and “Tools.”
- The permissions in the “Performance” group are mainly used to provide access to the performance monitoring sections for each agent.
- Under “Service Design,” you will find the permissions related to accessing the tools that allow the creation of different processes that agents will use.
- The “Tools” group includes permissions to grant access to voice analysis instruments, conference rooms, and voicemail.
Below you can see the available permissions to assign:
- Access to the Dashboard.
- Data Monitor visualization.
- Report download.
- Access to Wolkvox Studio.
- Campaign creation.
- Agent management.
- Skills management.
- Activity code creation.
- PBX.
- Quality Analyzer visualization.
- Access to Speech Analytics.
- Conference room creation.
- Voicemail management.
Once the profile creation options are configured, you should click on “New Profile” to have it listed in the profile table and make it available for assignment to any user.

If you right-click on any item in the profile table, you will be able to:
- Edit the profile to modify the name or permissions.
- Delete the selected profile.

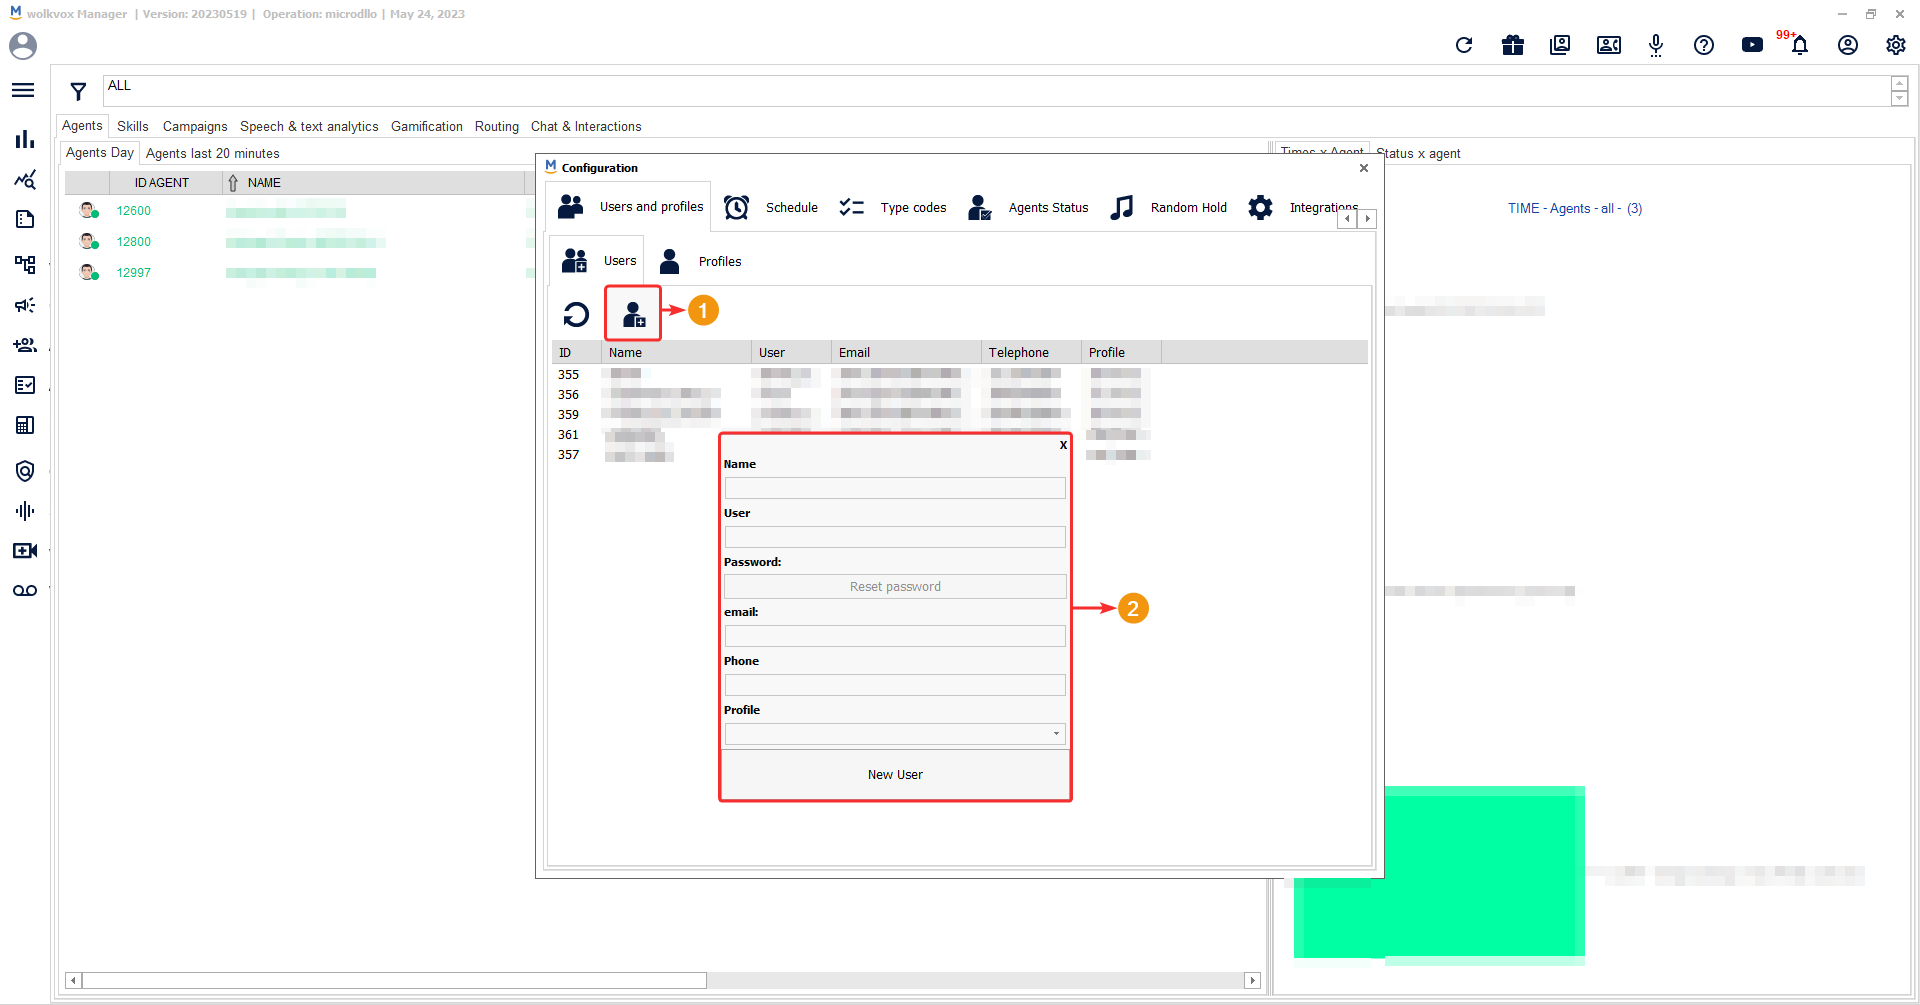
User creation #
Users are individuals who can access Wolkvox Manager and will be authorized to access certain sections and tools based on their assigned profile.

In the table, you can see each added user along with their contact information, identification number in the application, and the assigned profile.
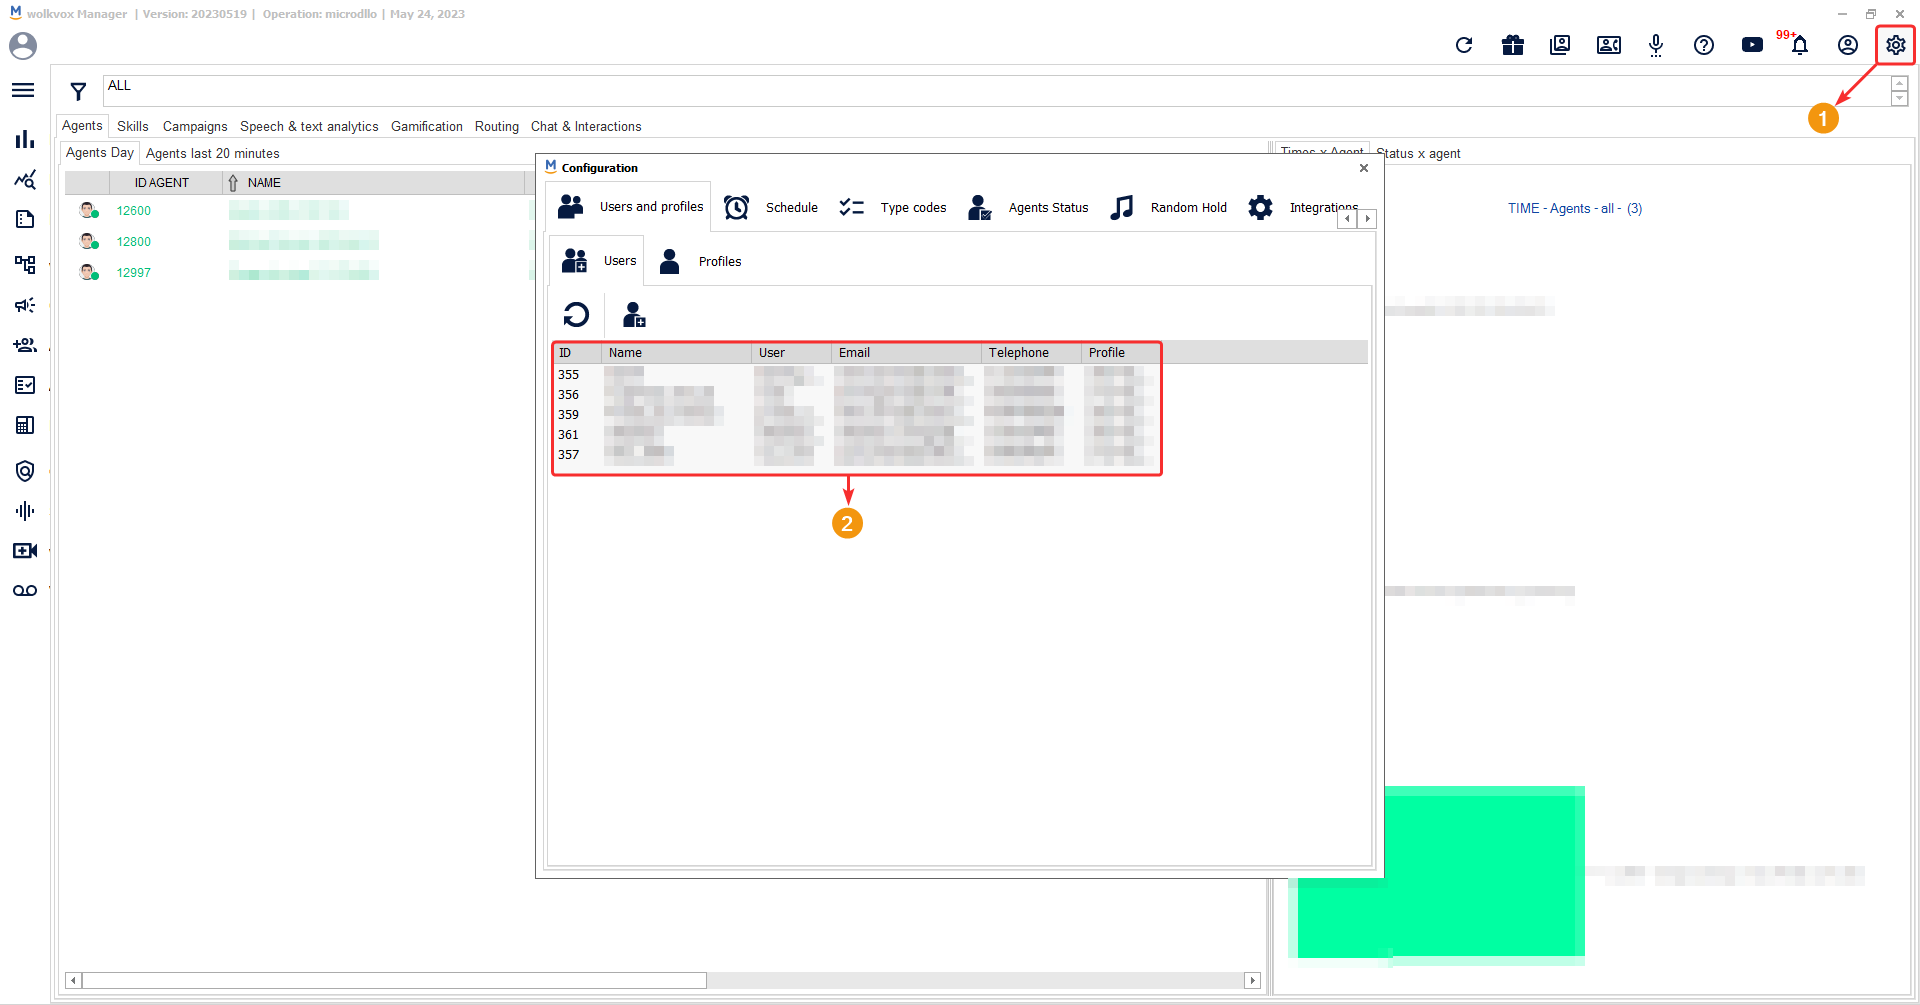
In the user creation window, you need to enter the following data:
- Person’s name who will use the user.
- Username (it should not contain spaces).
- The password is automatically generated and sent via email.
- Email address (the user’s password will be sent to this email inbox).
- Phone number.
- Profile you wish to assign to the user.
Once you have filled in the fields, click on “New User” to add the new user.
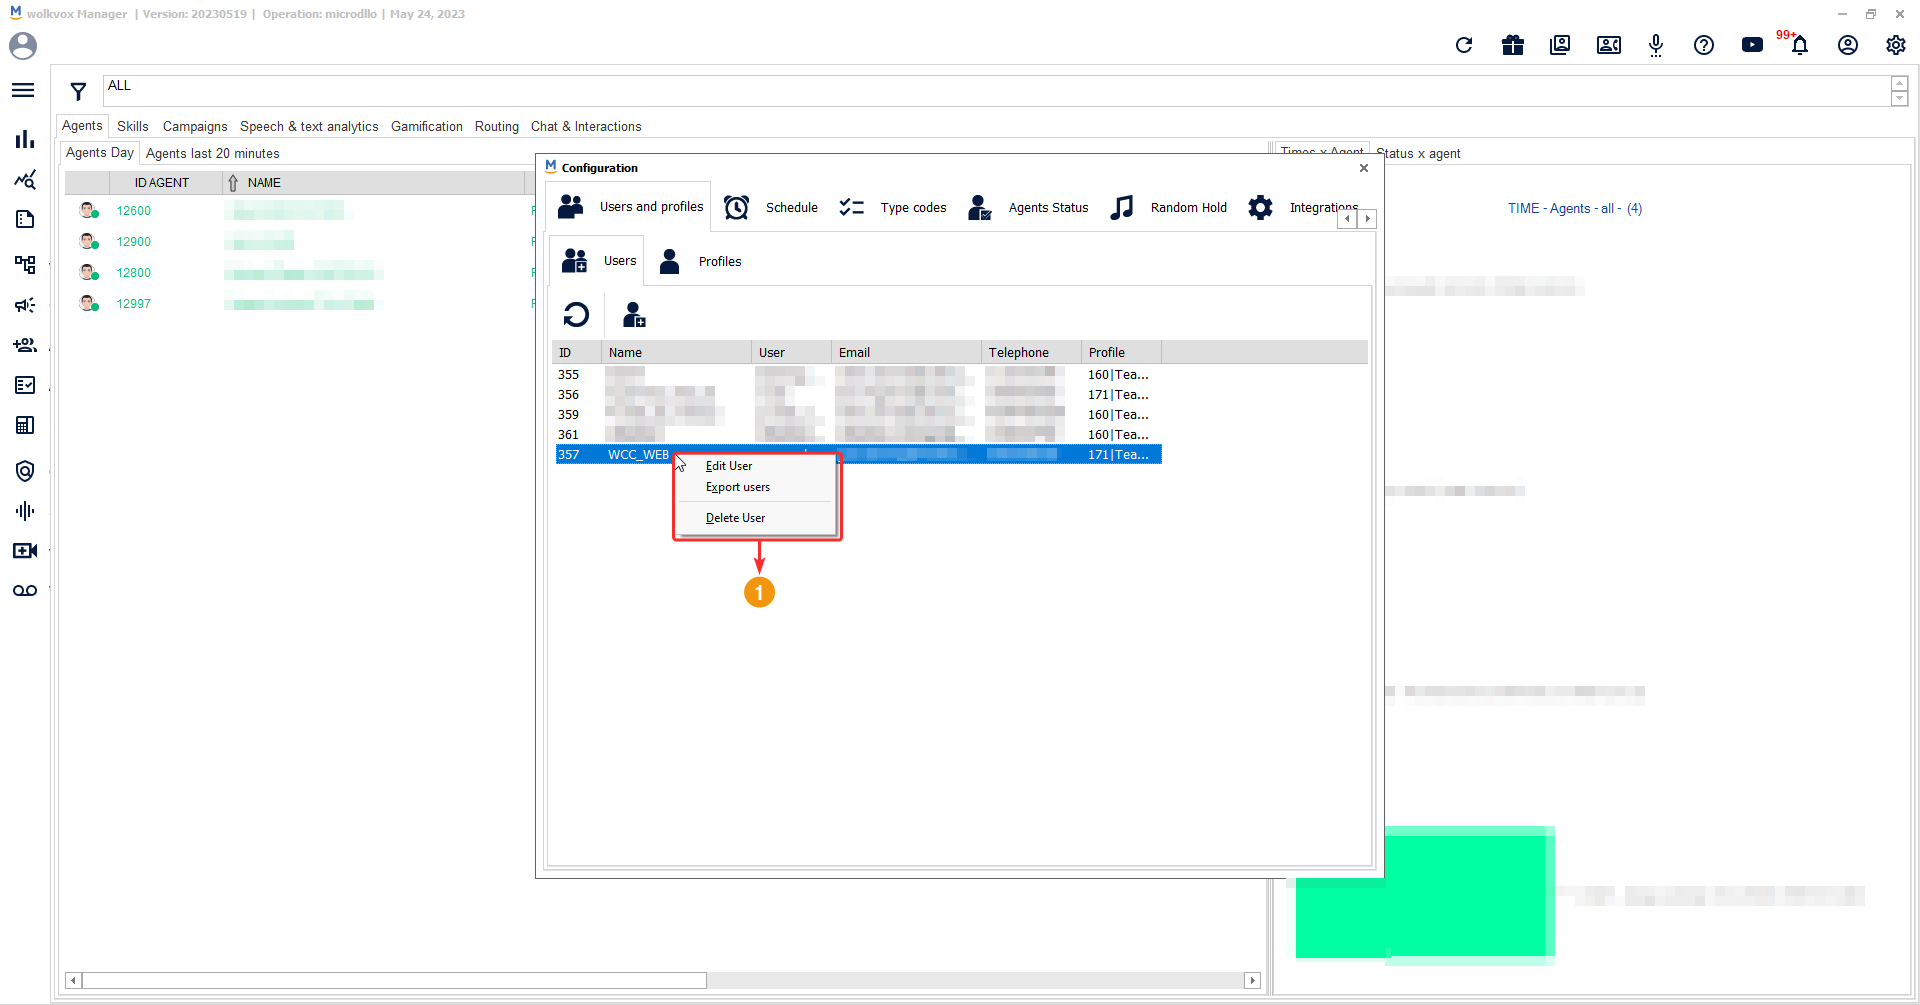
If you right-click on any item in the user table or the users’ table, you can:
- Edit all the data of the selected user, except for the username, which cannot be modified. Additionally, you can reset the user’s password, and the new password will be sent to the previously defined email address.
- Export the list of users in HTML format.
- Delete the user.
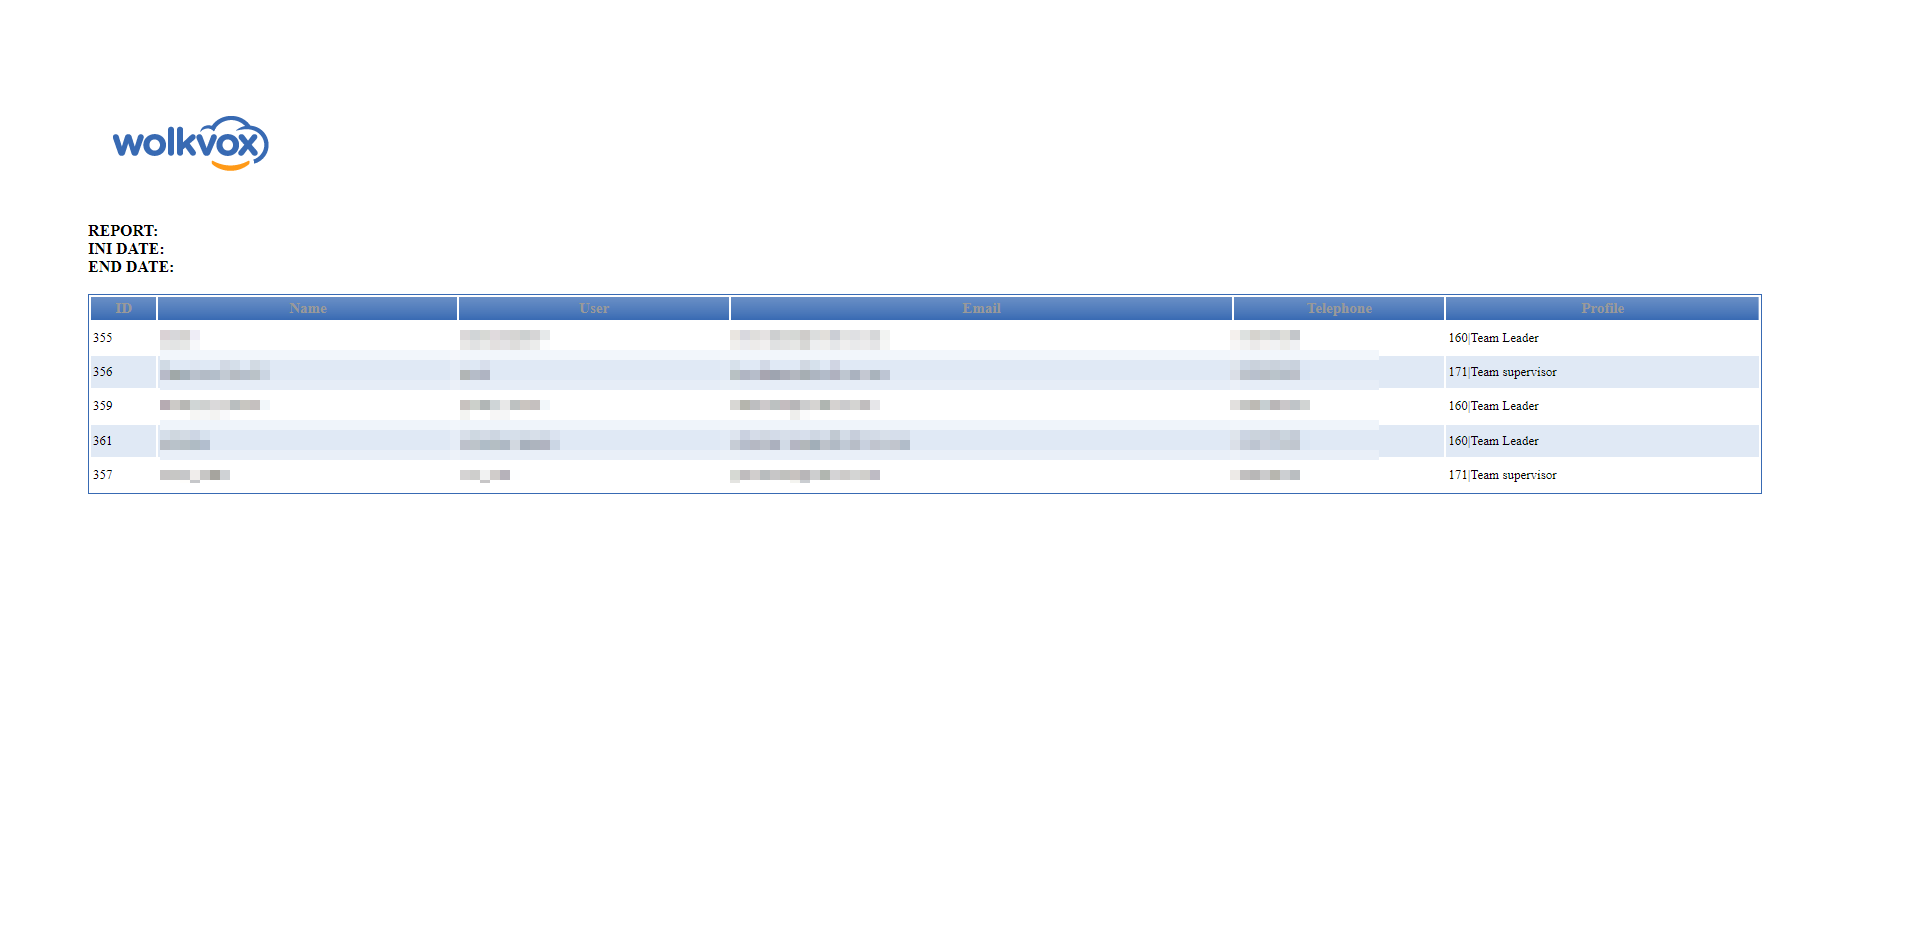
When you click on the “Export” option, the table will be exported in HTML format and displayed as the following image:
Schedule configuration #
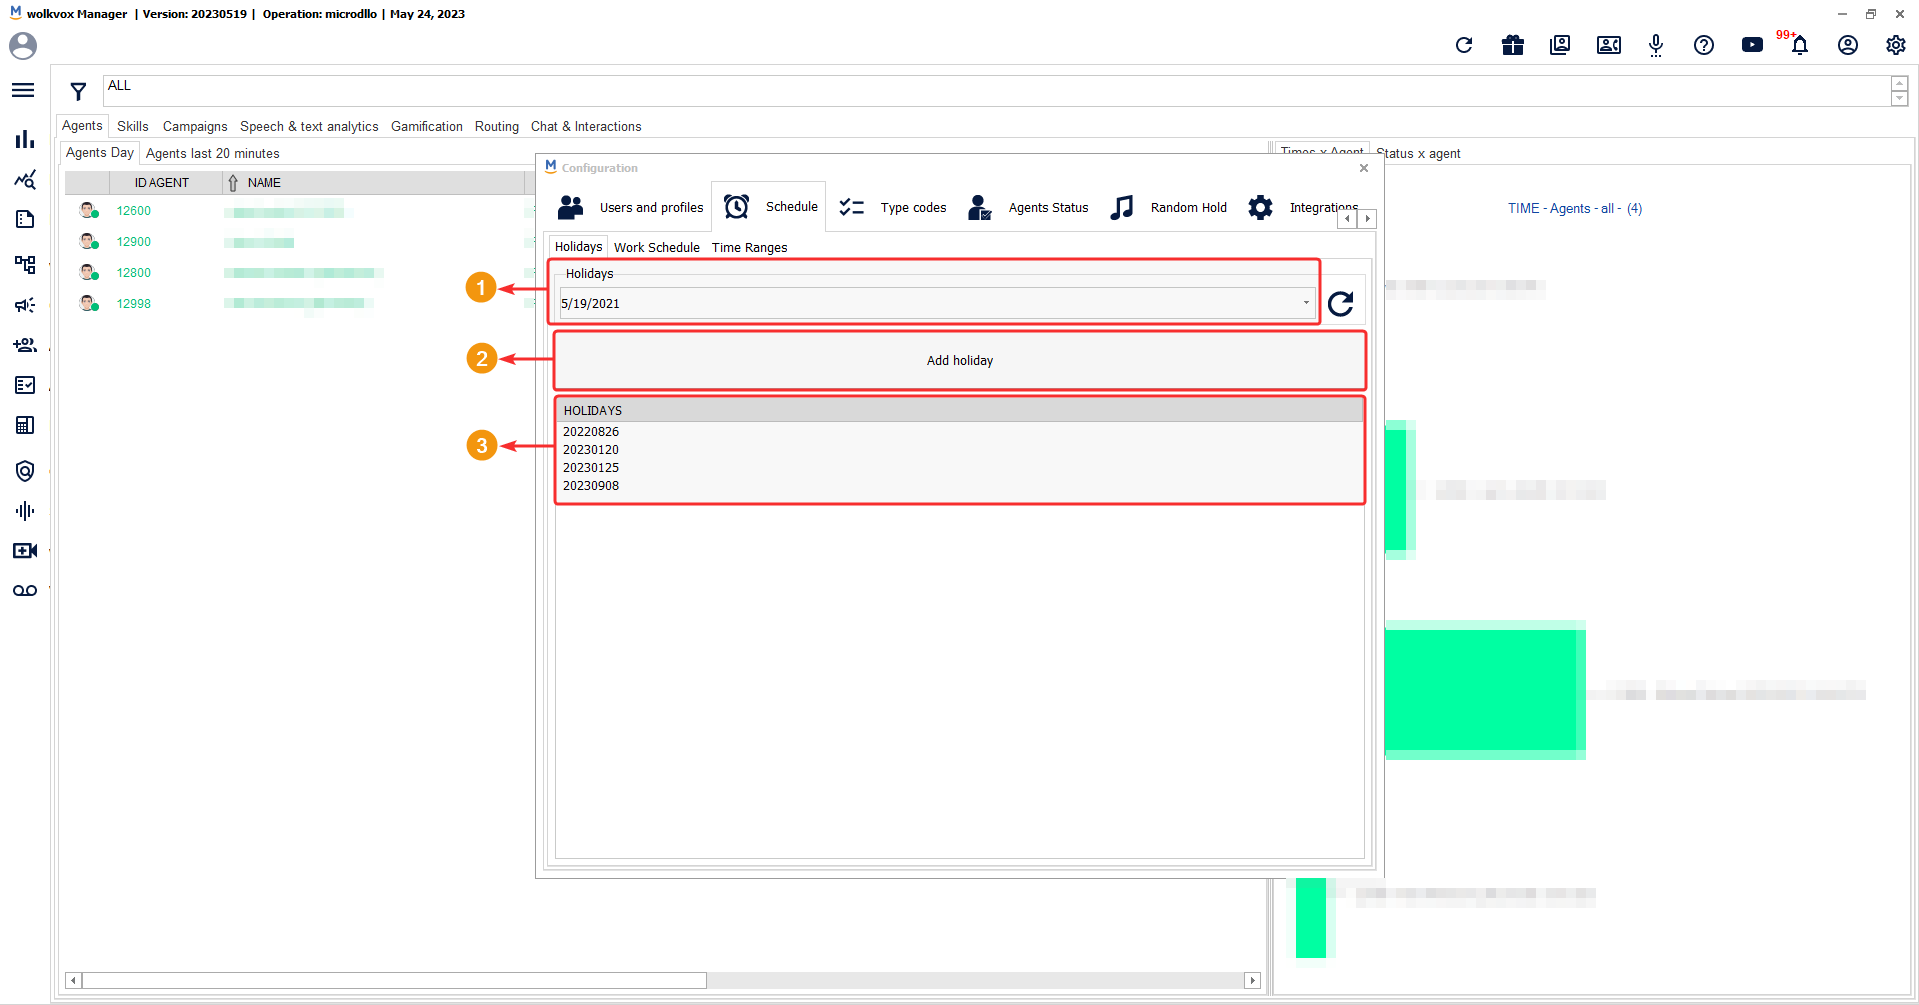
Set the holidays #
This option allows you to set the holidays or days when the operation will not provide its services.
Firstly, you need to follow the following path: Configuration > Schedule > Holidays.

In the first field, click on the downward arrow, which opens a calendar. Select a day and then click on “Add Holiday” to mark that date as a non-service day.
Each holiday must be manually added, and during these days, inbound calls will be blocked.
Once you click the “Add Holiday” button, the selected day will be added to the holiday table. If it doesn’t appear, click the “Refresh” button indicated in the following image.
If you right-click on a day in the table, you can delete it.
Work schedule creation #
There, you can create work schedules that will be assigned to each skill or group of agents. You need to specify the availability schedule for agents in the skill for each day of the week.
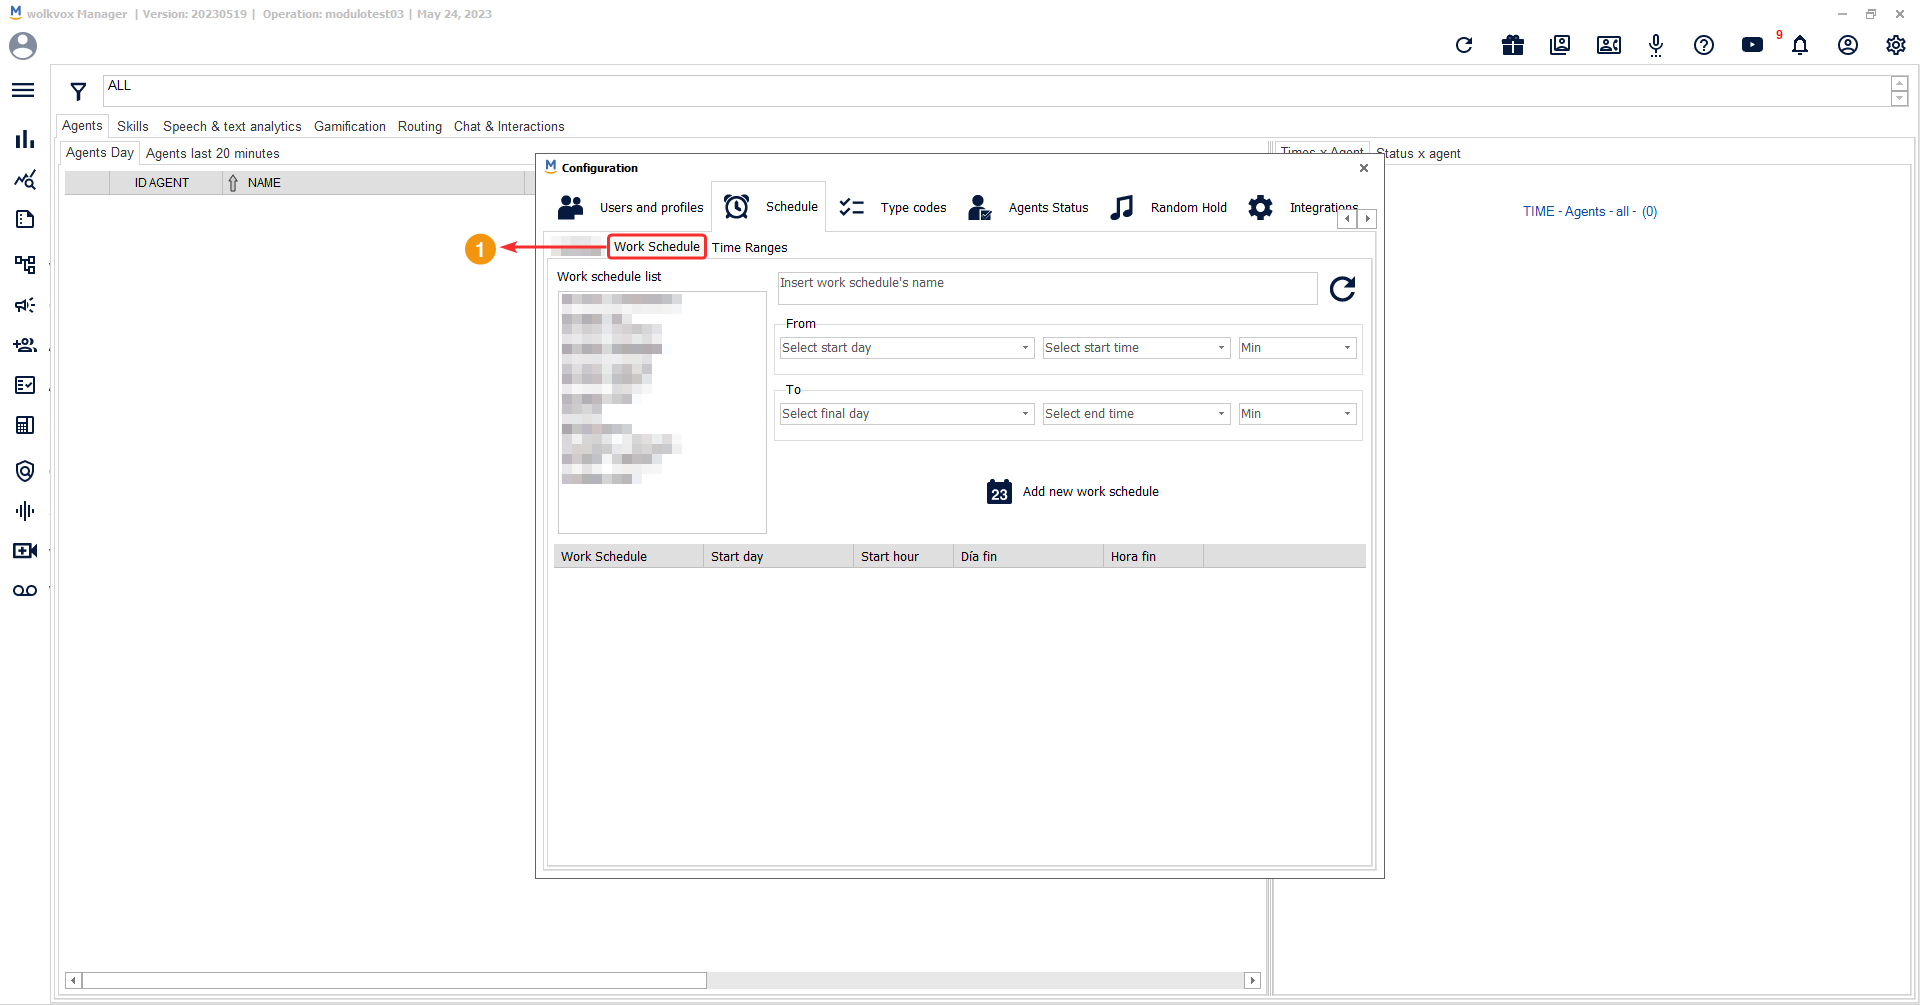
To add a new schedule, you need to specify:
- A name to distinguish the schedule.
- Start day and time.
- End day and time.
- Once you finish configuring the new schedule, click on “Add Work Schedule.” It will be added to the “List of Work Schedules.”
- In the lower table of the window, the added schedules are displayed under the current schedule name.
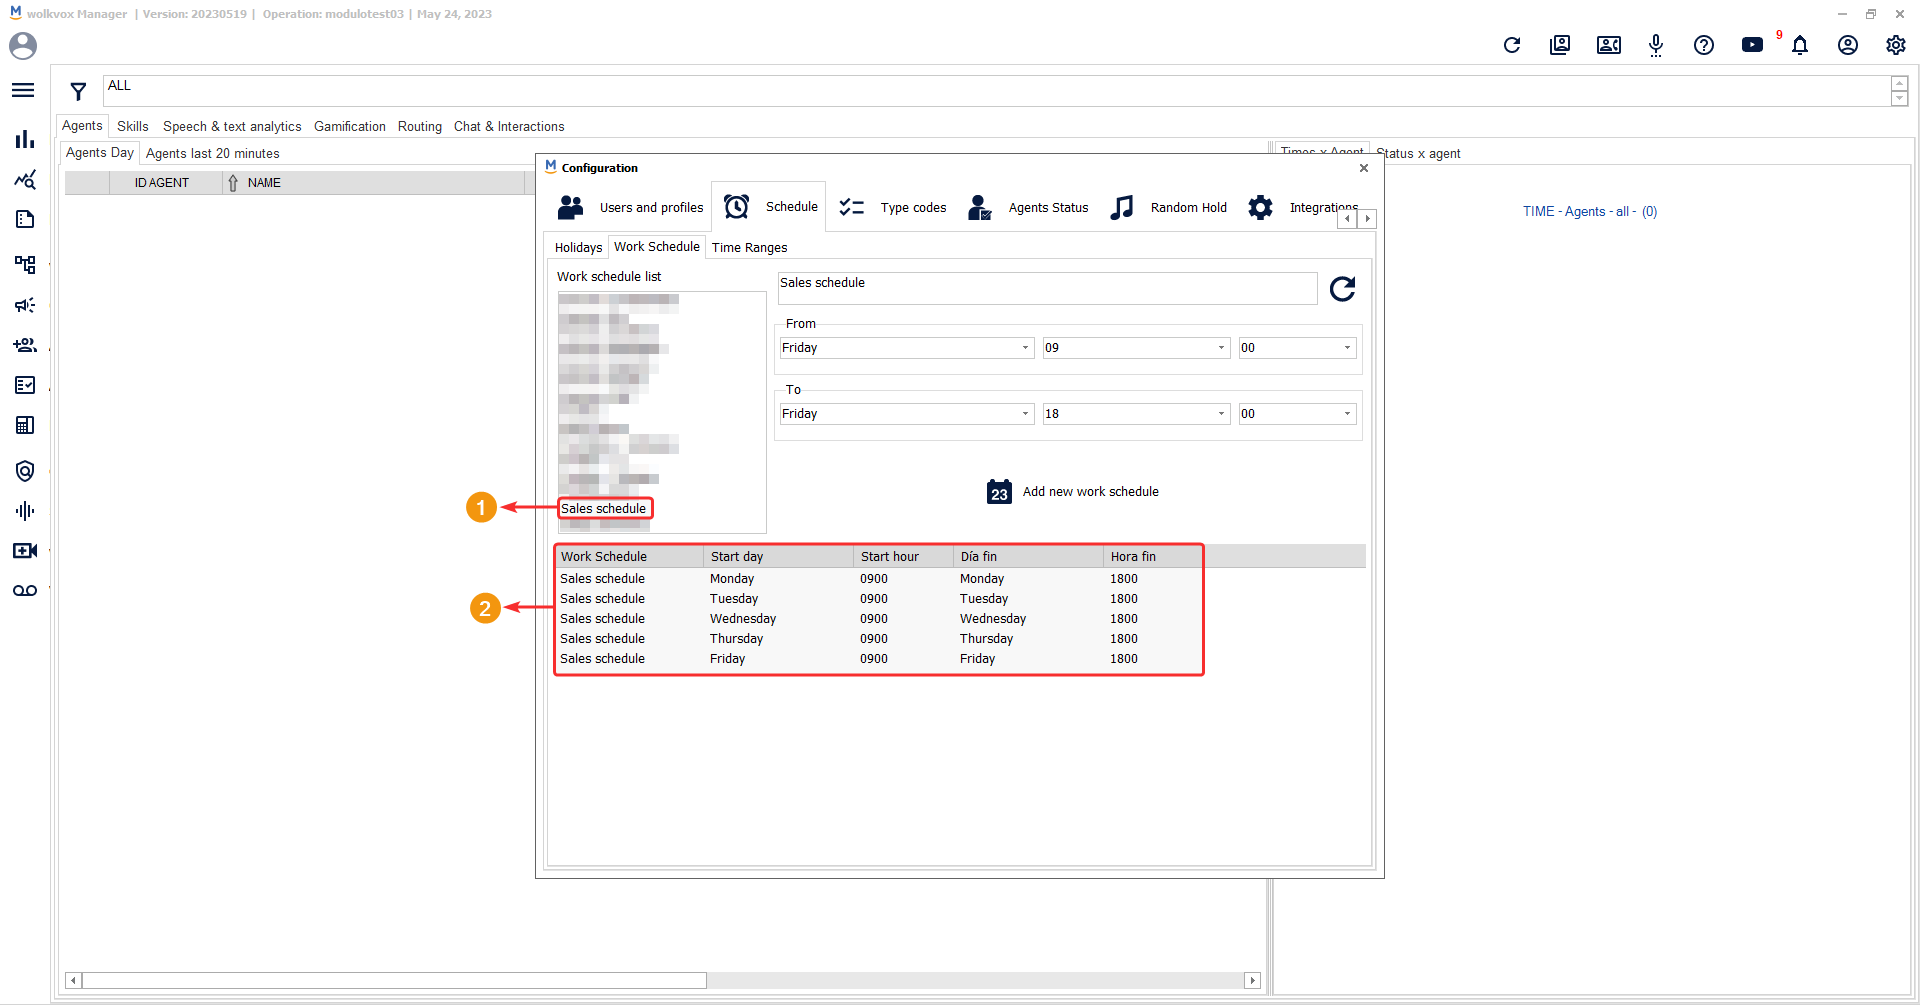
- In the “Work schedule list” field, all created schedules will be listed. Each schedule name can have multiple schedules at once so that you can specify the schedule for each day. For example, if you only specify a schedule from Monday to Friday, from 09:00 to 18:00, the system will assume that the schedule continues after 17:00 from Monday to Thursday. Therefore, you should add the schedule day by day. Remember, each item in the “work schedule list” can contain multiple schedules. The schedules will be listed in the field indicated by number (5).

![]() Therefore, it is recommended to specify each workday individually, that is, not to define the entire range of workdays in a week but to add each day separately.
Therefore, it is recommended to specify each workday individually, that is, not to define the entire range of workdays in a week but to add each day separately.
![]() Example: Below you can see that the schedule has been configured for each day from Monday to Friday, from 9 in the morning to 6 in the afternoon. With this configuration, calls that customers make after 6 pm from Monday to Friday will not be received by the operation (cutting off the incoming call or playing an audio for the customer), and no calls will be received on weekends either.
Example: Below you can see that the schedule has been configured for each day from Monday to Friday, from 9 in the morning to 6 in the afternoon. With this configuration, calls that customers make after 6 pm from Monday to Friday will not be received by the operation (cutting off the incoming call or playing an audio for the customer), and no calls will be received on weekends either.
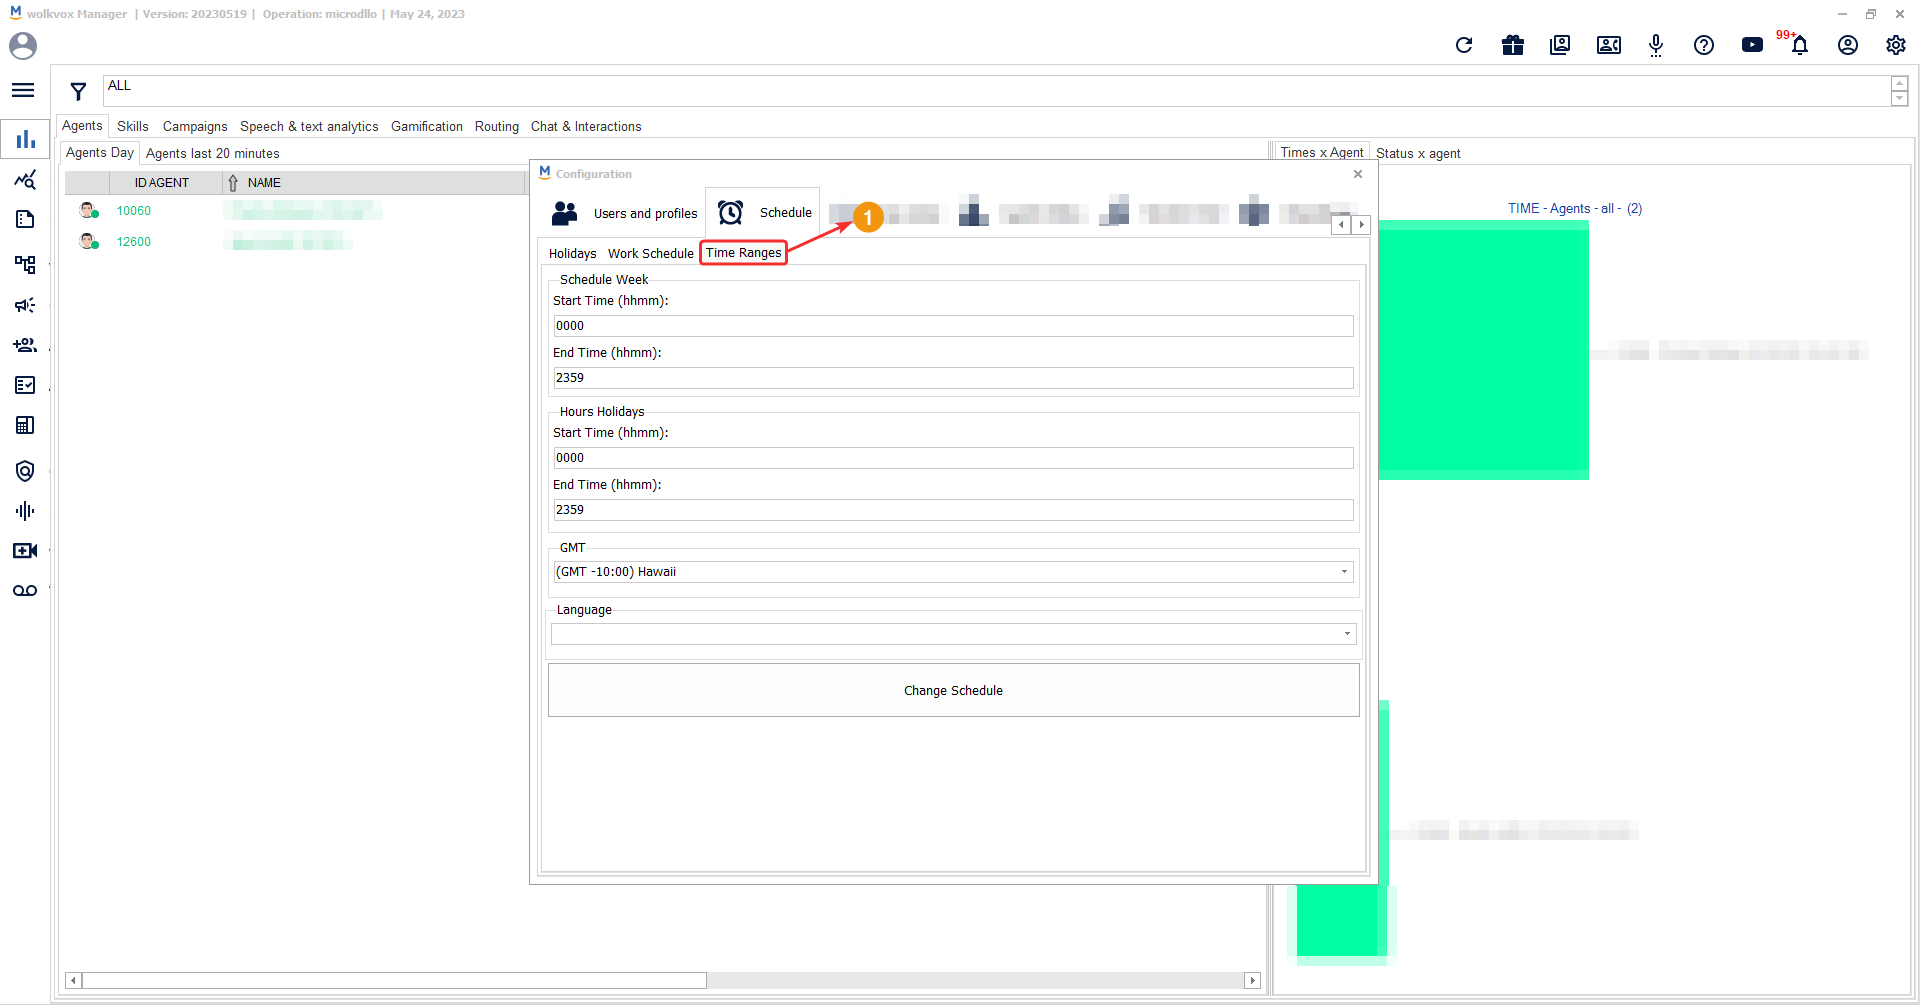
Time Ranges #
In this section you configure the weekly schedule, the schedule for non-working days, the GMT time zone of the operation, and the language in which you operate.
General settings #
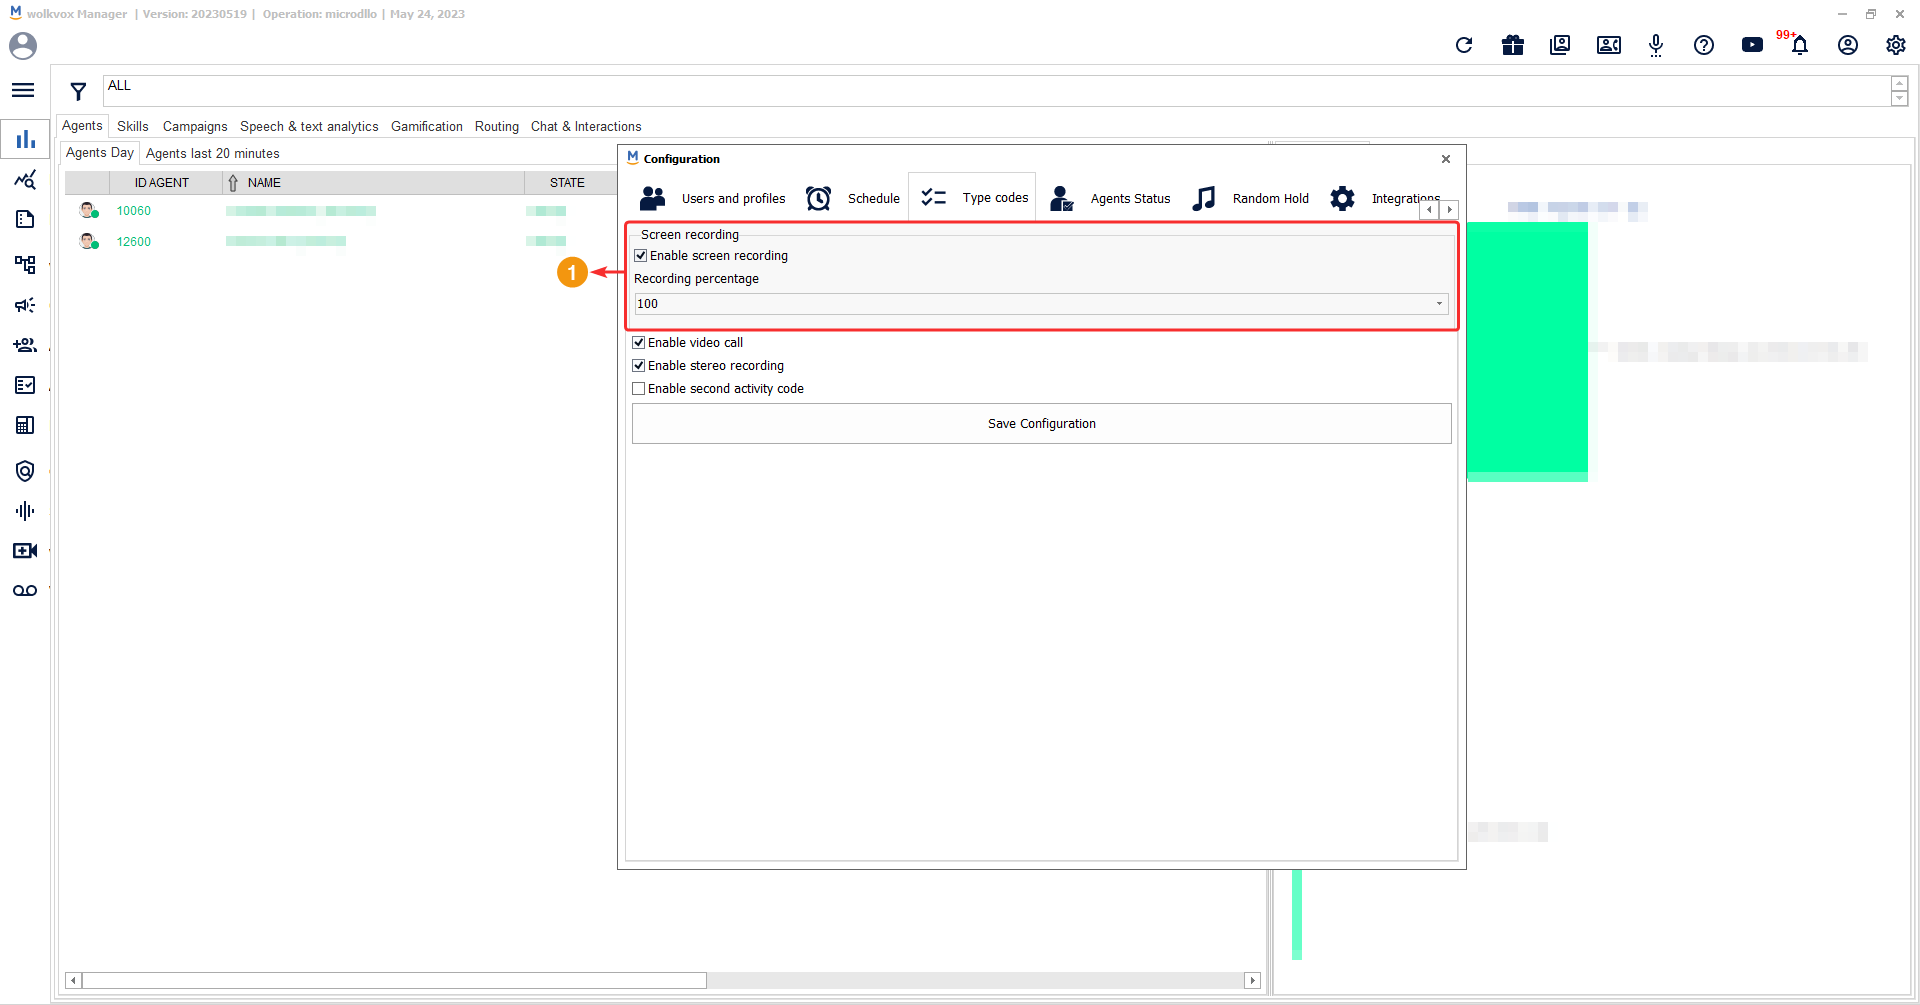
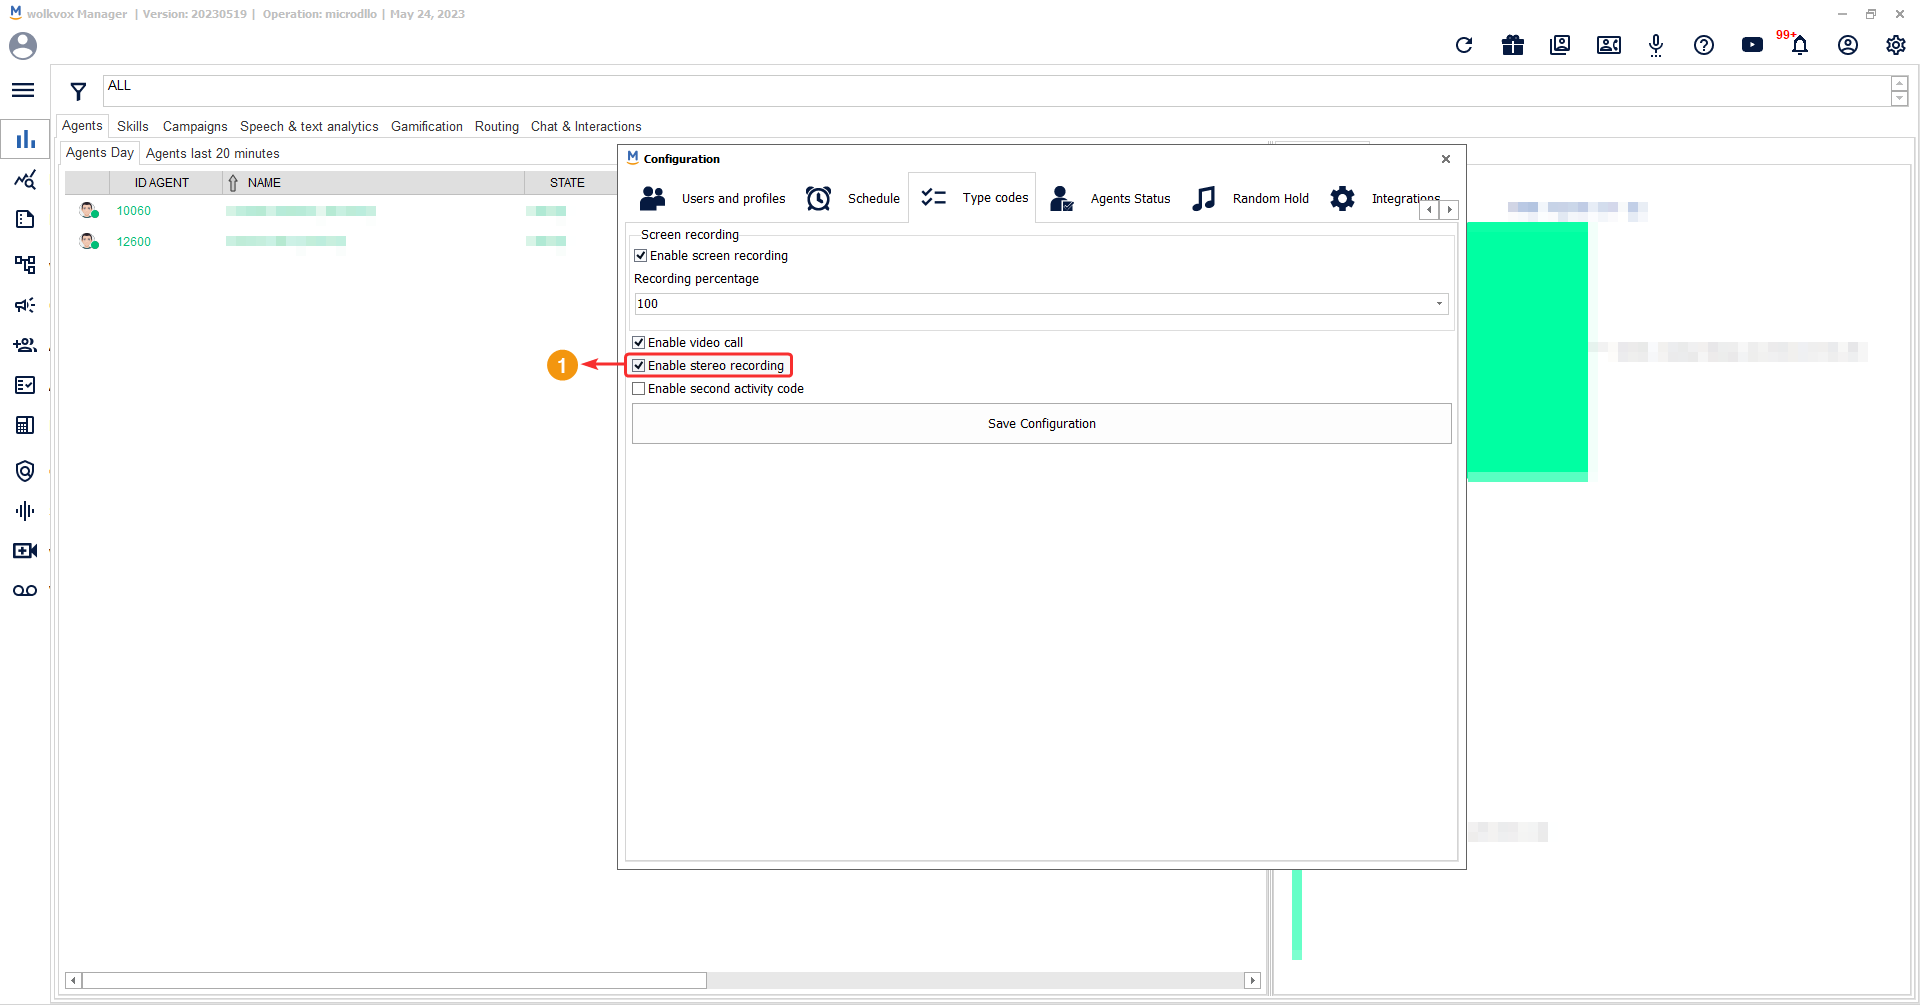
In this section, general aspects of the application are configured, such as the activation/deactivation of agent screen recording, video calls, stereo calls, and enabling a second encoding code for agents.
Note: Don’t forget to save the configuration after making any changes.

Screen recording #
This option allows for the recording of the agent’s screen for a specific duration.
The checkbox “Enable screen recording” enables automatic screen recording for the agent.
In the “Recording Percentage” field, you define the percentage of calls for which you want to record the screen. For example, if you set it to 50% and make a total of 10 calls, the screen recording will only be applied to 5 calls.
On the right side, there is a button that opens a dropdown menu to select the desired percentage, ranging from 10% to 100%.
Note: This option incurs an additional cost.
Enable video call #
By enabling this option, the agent will have the ability to initiate video calls using their webcam and share their computer screen.
Note: This option incurs an additional cost.

Here is an example of this feature active and working in the AgentBox application.

Enable stereo call recording #
By enabling this option, the audio channels are separated, and in the call recordings, you will be able to listen to the agent on one channel and the customer on the other, without mixing.
Note: This service incurs an additional cost.
Enable second activity code group #
By enabling the “Enable second activity code” option, the agent, when required to code a call, will have two dropdown menus to select two codes to categorize the call instead of just one.
Note: Remember that activity or coding codes are the codes that the agent can use at the end of the call to categorize it or define its outcome based on the codes created by the operation administrator.

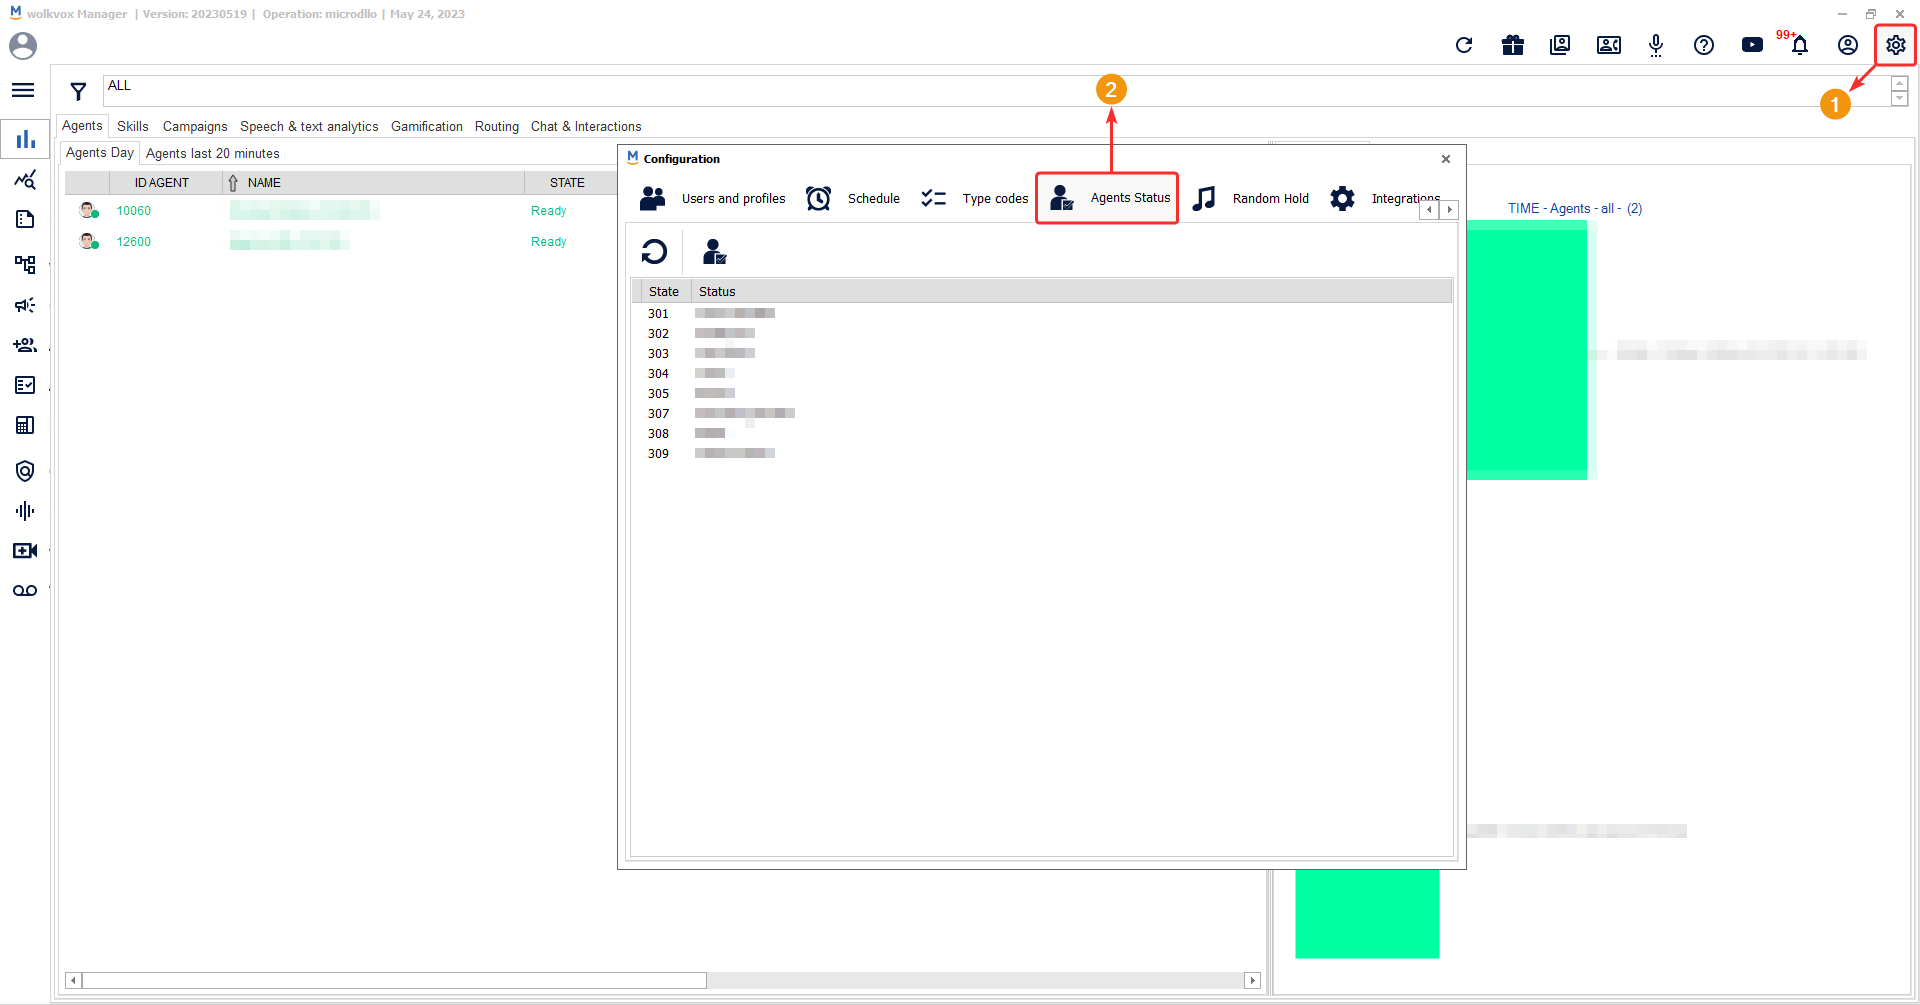
Agent status #
Agent statuses are the different situations in which agents can be. Agents have the ability to set each of these statuses to inform others in the operation about what they are currently doing. Auxiliary statuses can be created, which are custom statuses, as by default agents have the option to set themselves to three (3) statuses: Ready (to indicate that they are available and ready to assist customers), ACW (to indicate that they are in after-call work, coding a call), and Logout (to indicate that they are disconnected or logged out).
Create a status for agents #
![]() Up to 15 auxiliary statuses can be created.
Up to 15 auxiliary statuses can be created.
Follow the following path to create an auxiliary status: Configuration > Agent Status > Create New Status.
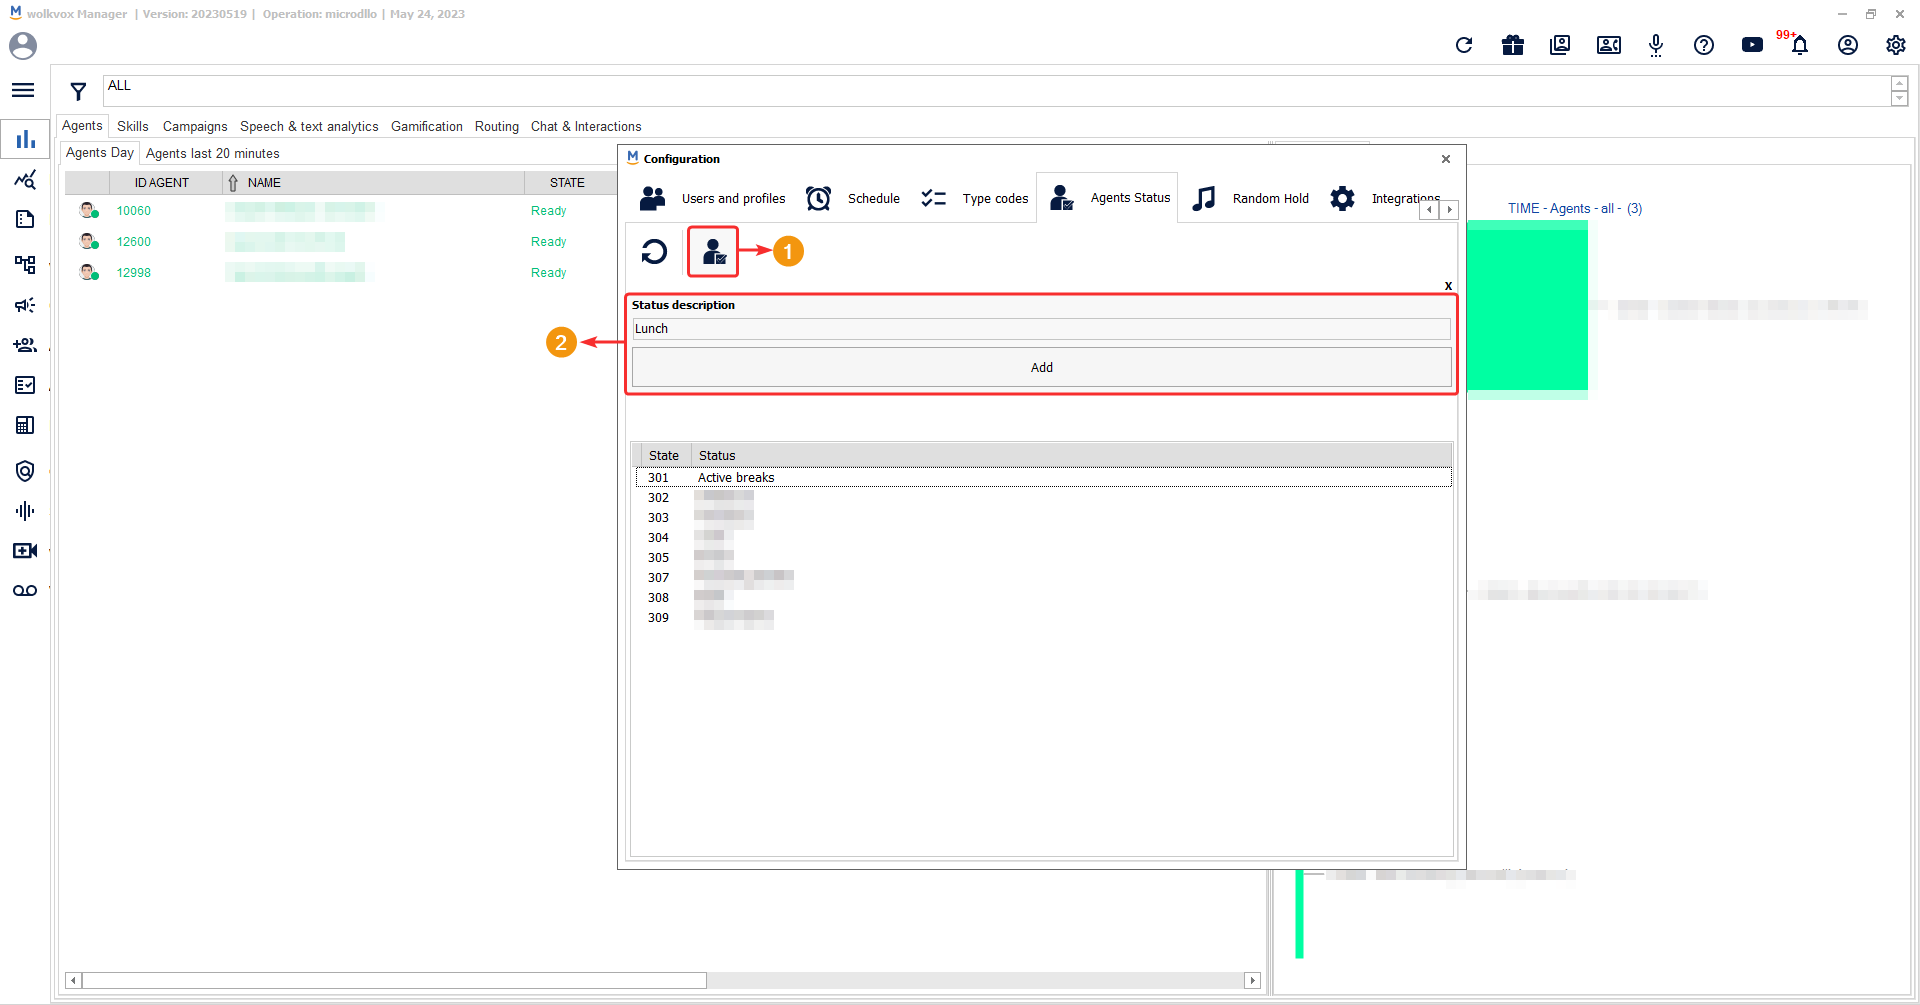
By right-clicking on a status in the table, you can edit or delete it.

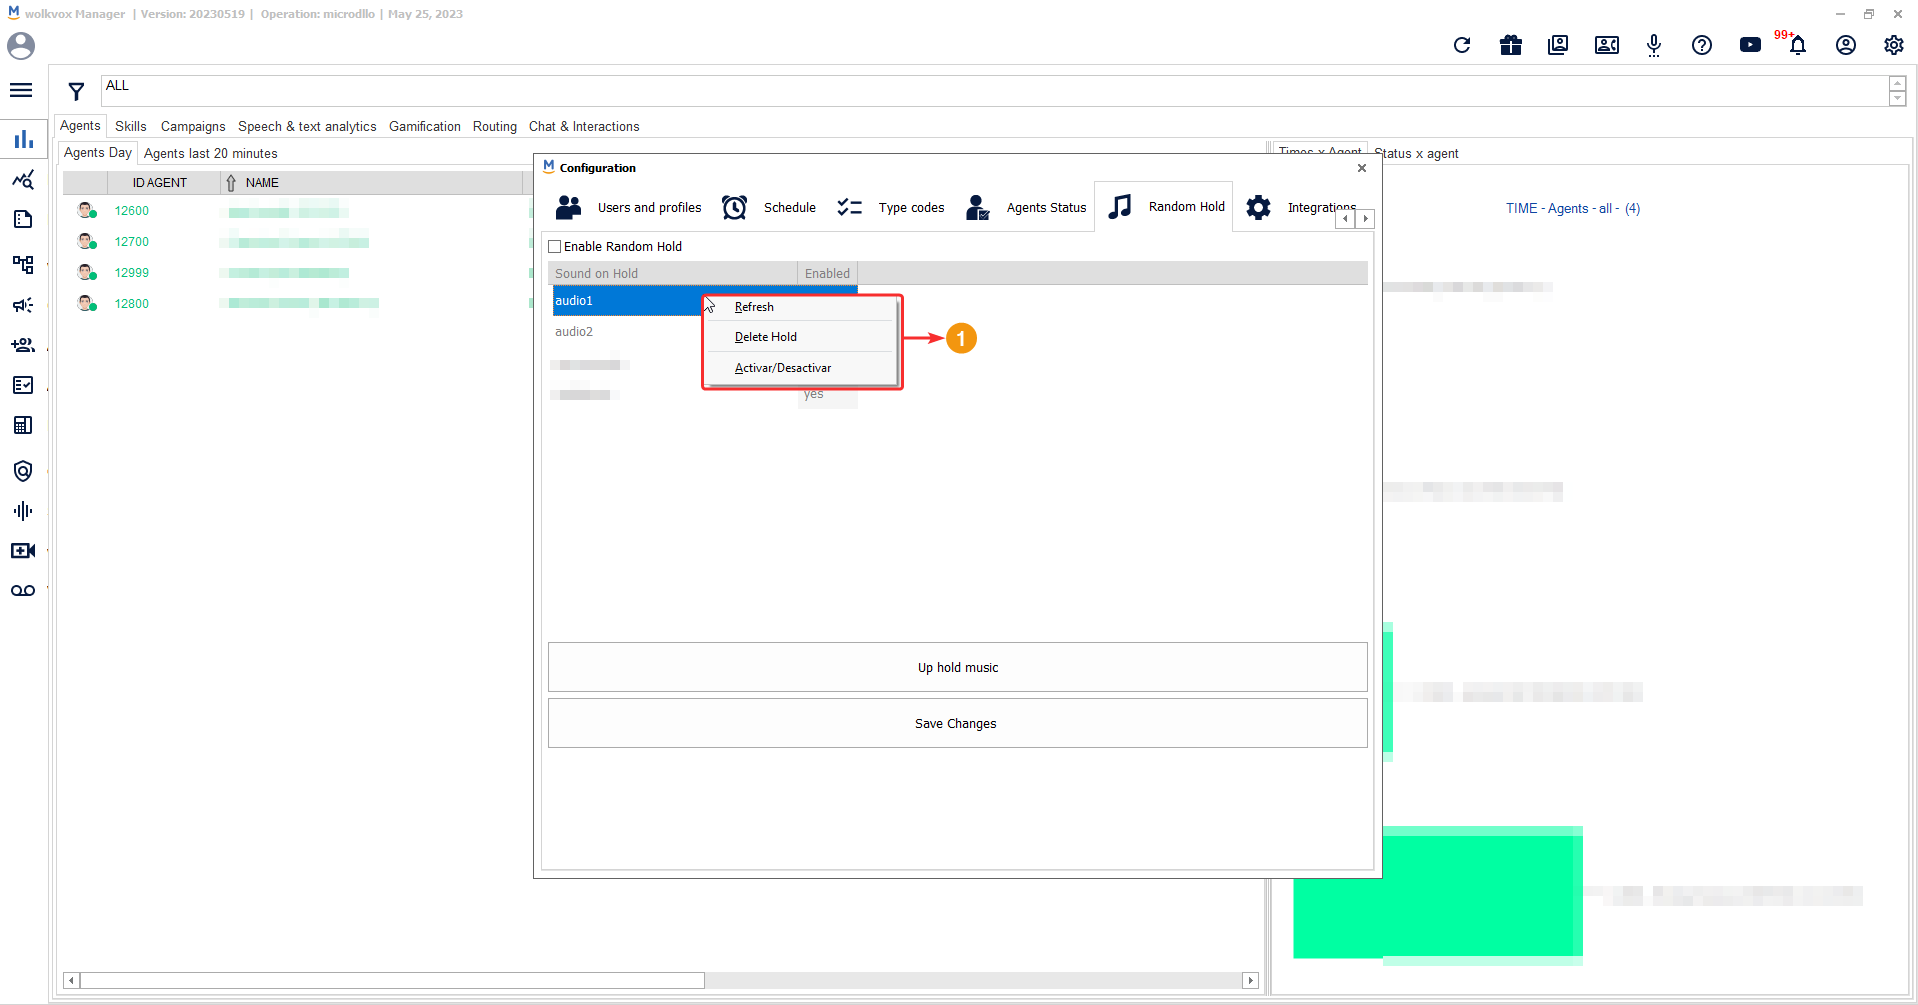
Random hold #
This tool allows you to add audio tracks to serve as hold music while the customer waits to be attended. The hold music is played when the agent puts a customer on hold while they perform some tasks or transfer the call.
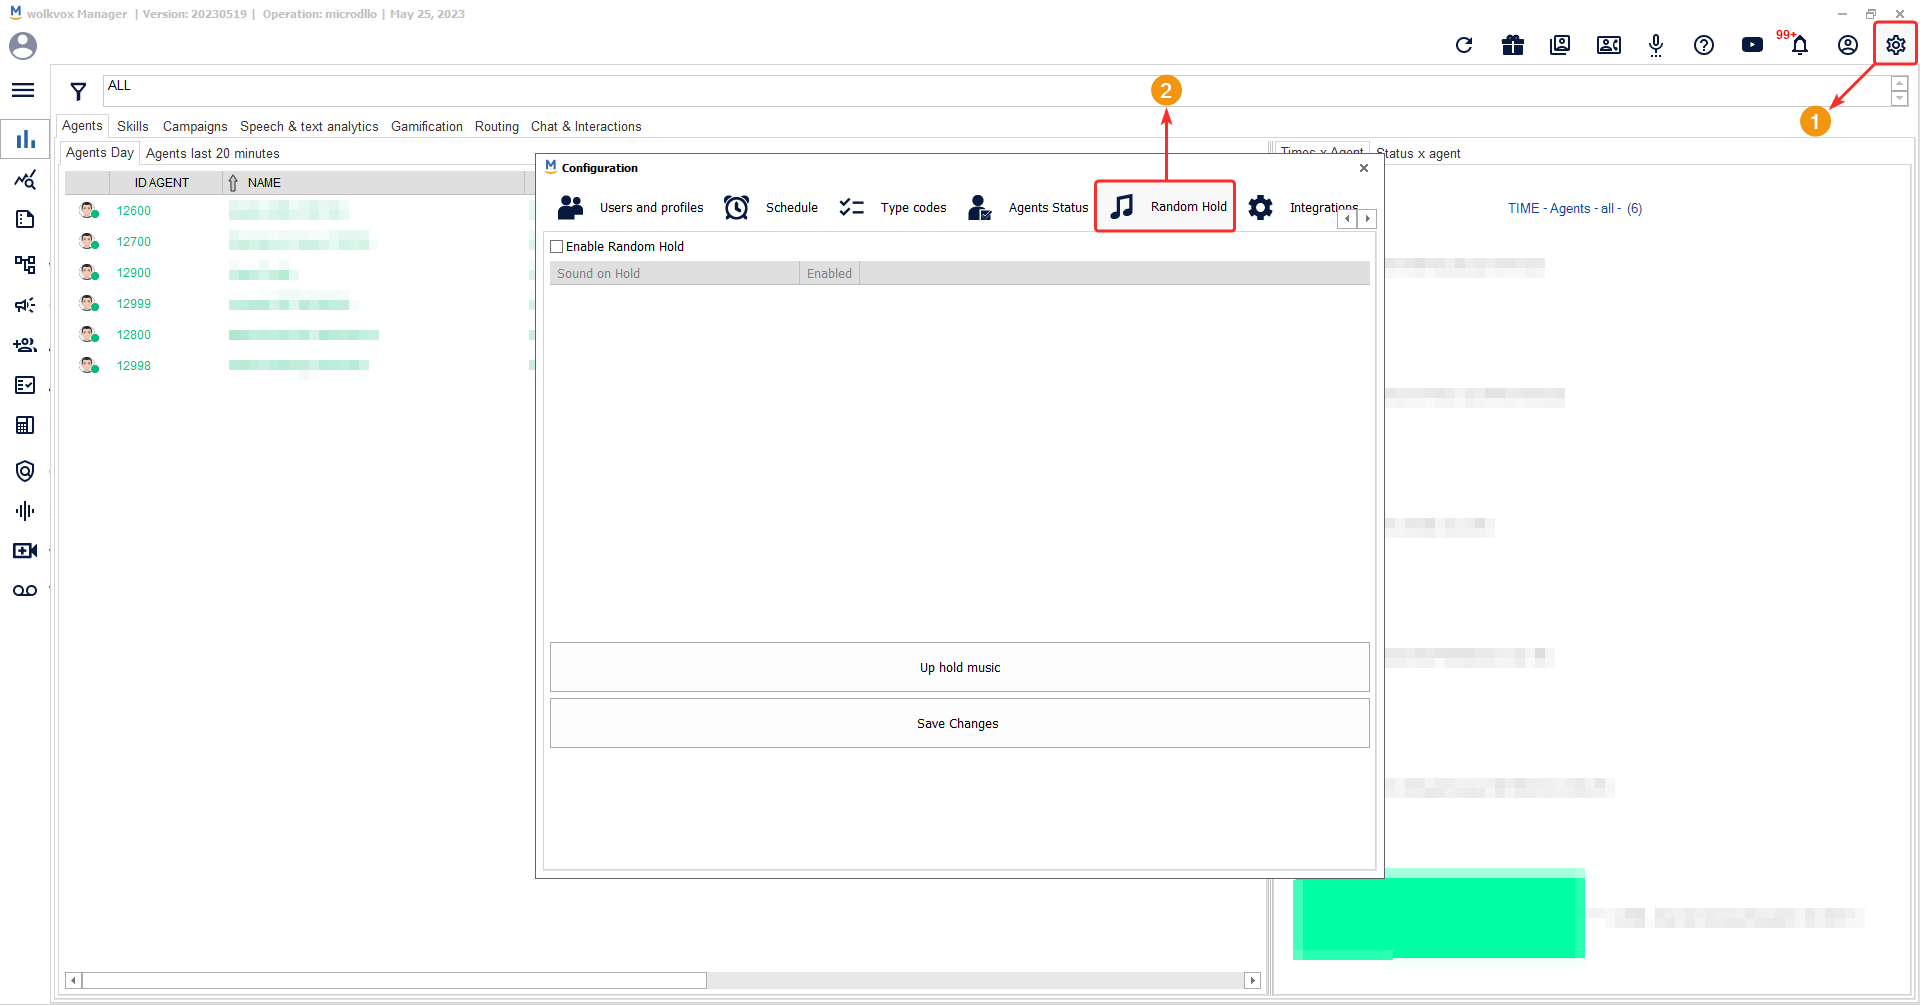
The “Enable Random Hold” checkbox allows all uploaded audios to be played randomly instead of in a specific order.

By clicking on “Up hold music,” a file explorer window will open for you to browse and select the audio file you want to upload.
![]() Remember that the supported audio formats are WAV or GSM (mono, with a sampling frequency of 8KHZ).
Remember that the supported audio formats are WAV or GSM (mono, with a sampling frequency of 8KHZ).

The table lists all the audio files you have uploaded. The “Enabled” column indicates whether the audio is enabled or not, as each audio can be disabled without the need to delete and re-upload it later.

If you right-click on an item in the table, you can delete the audio or enable/disable it. The “Refresh” option is important for updating the list of uploaded audios if not all of them have been loaded.
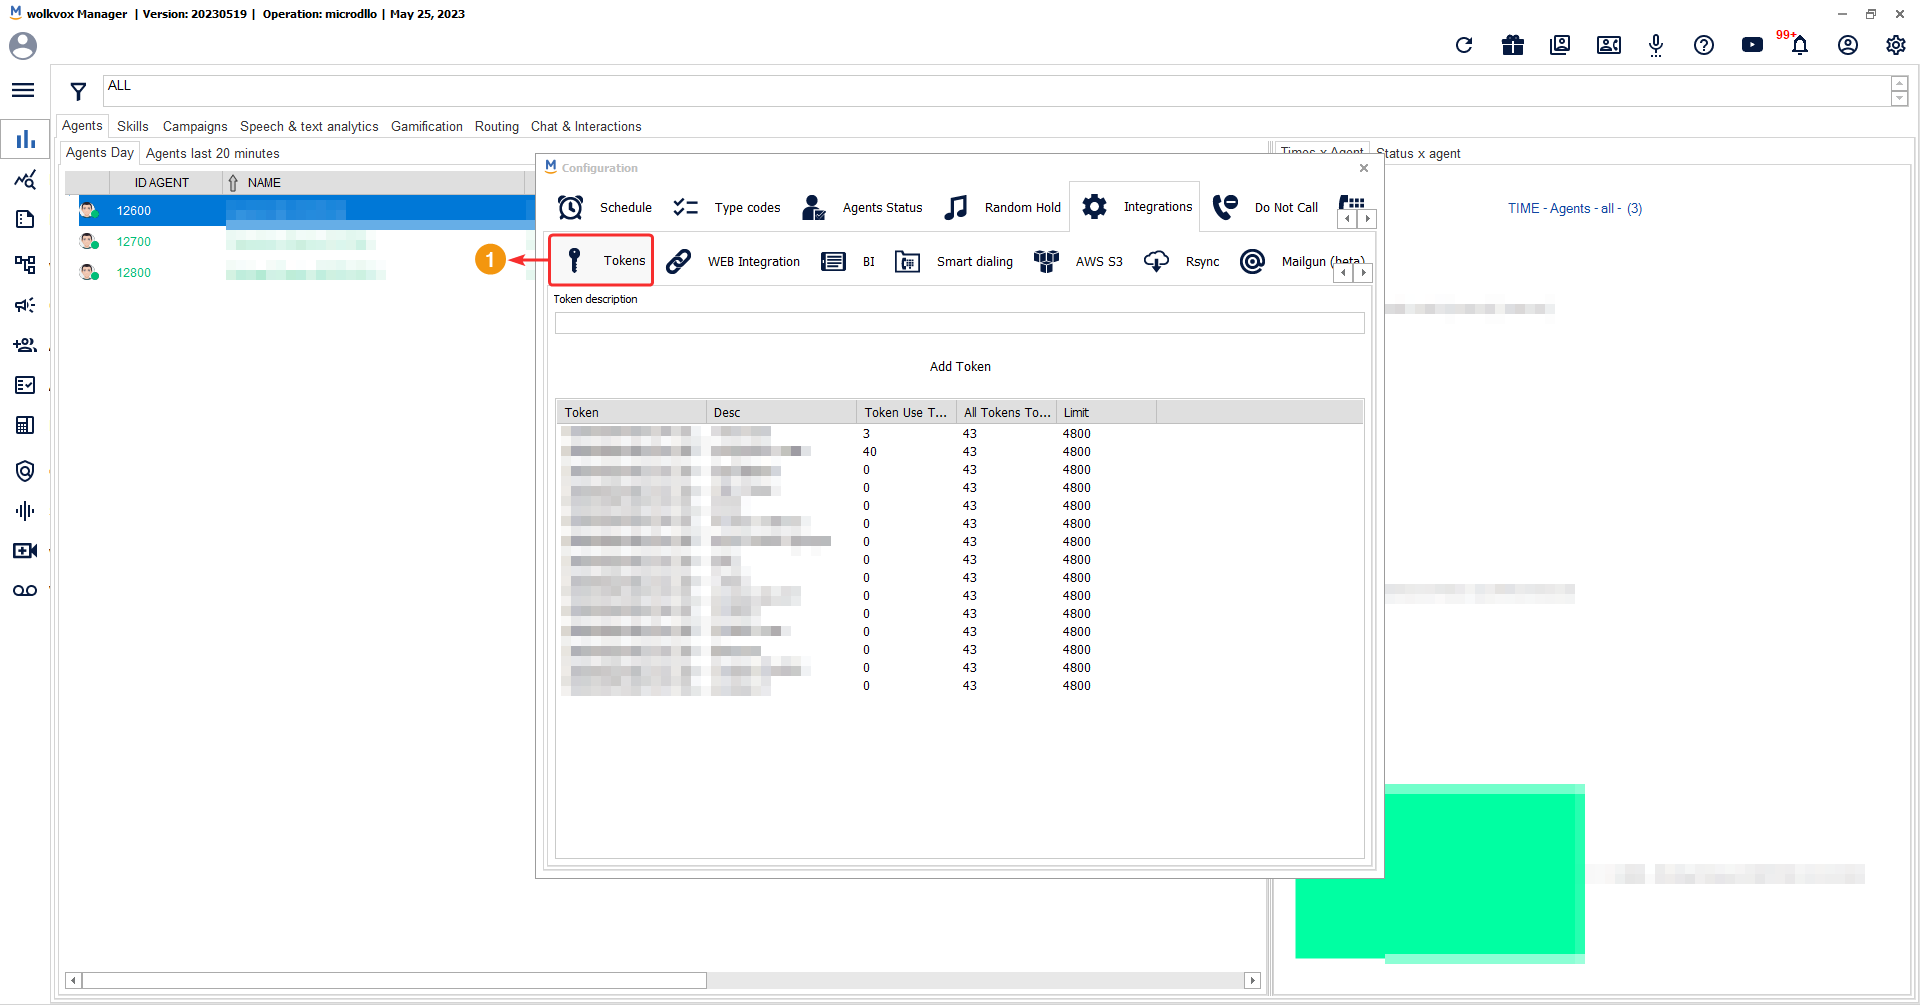
Integrate services #
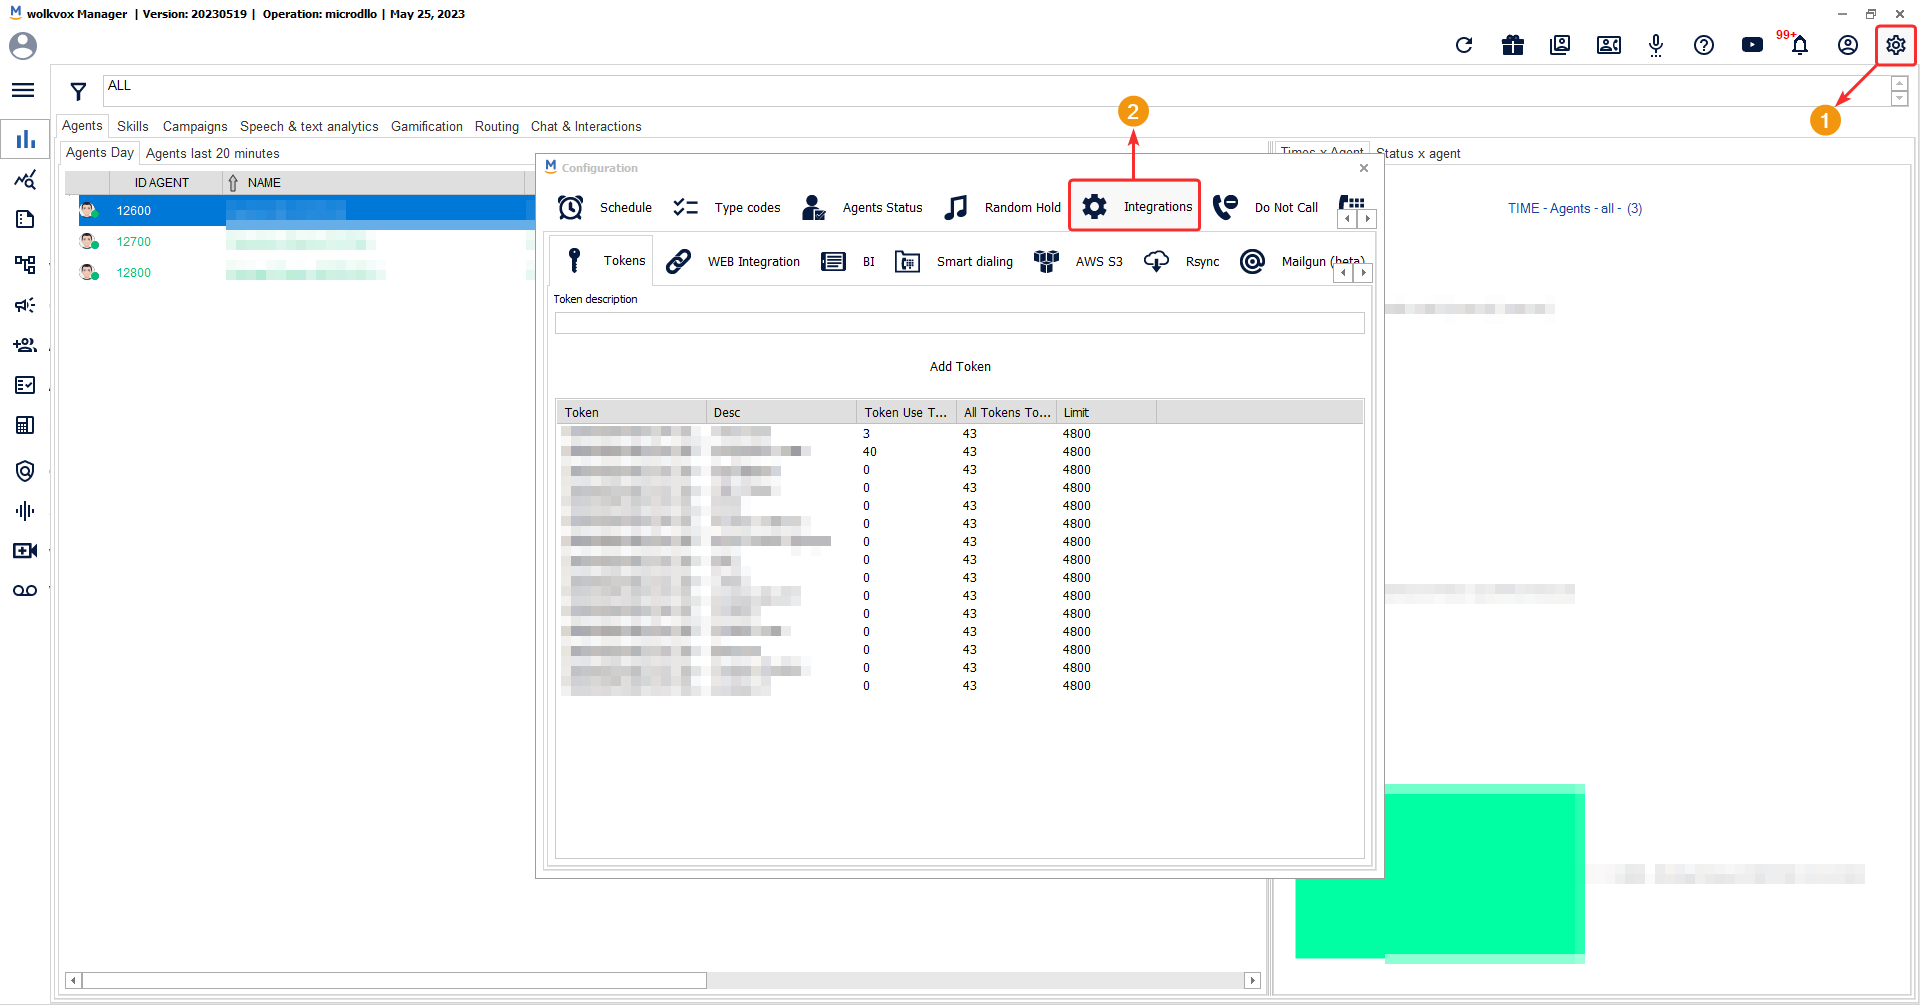
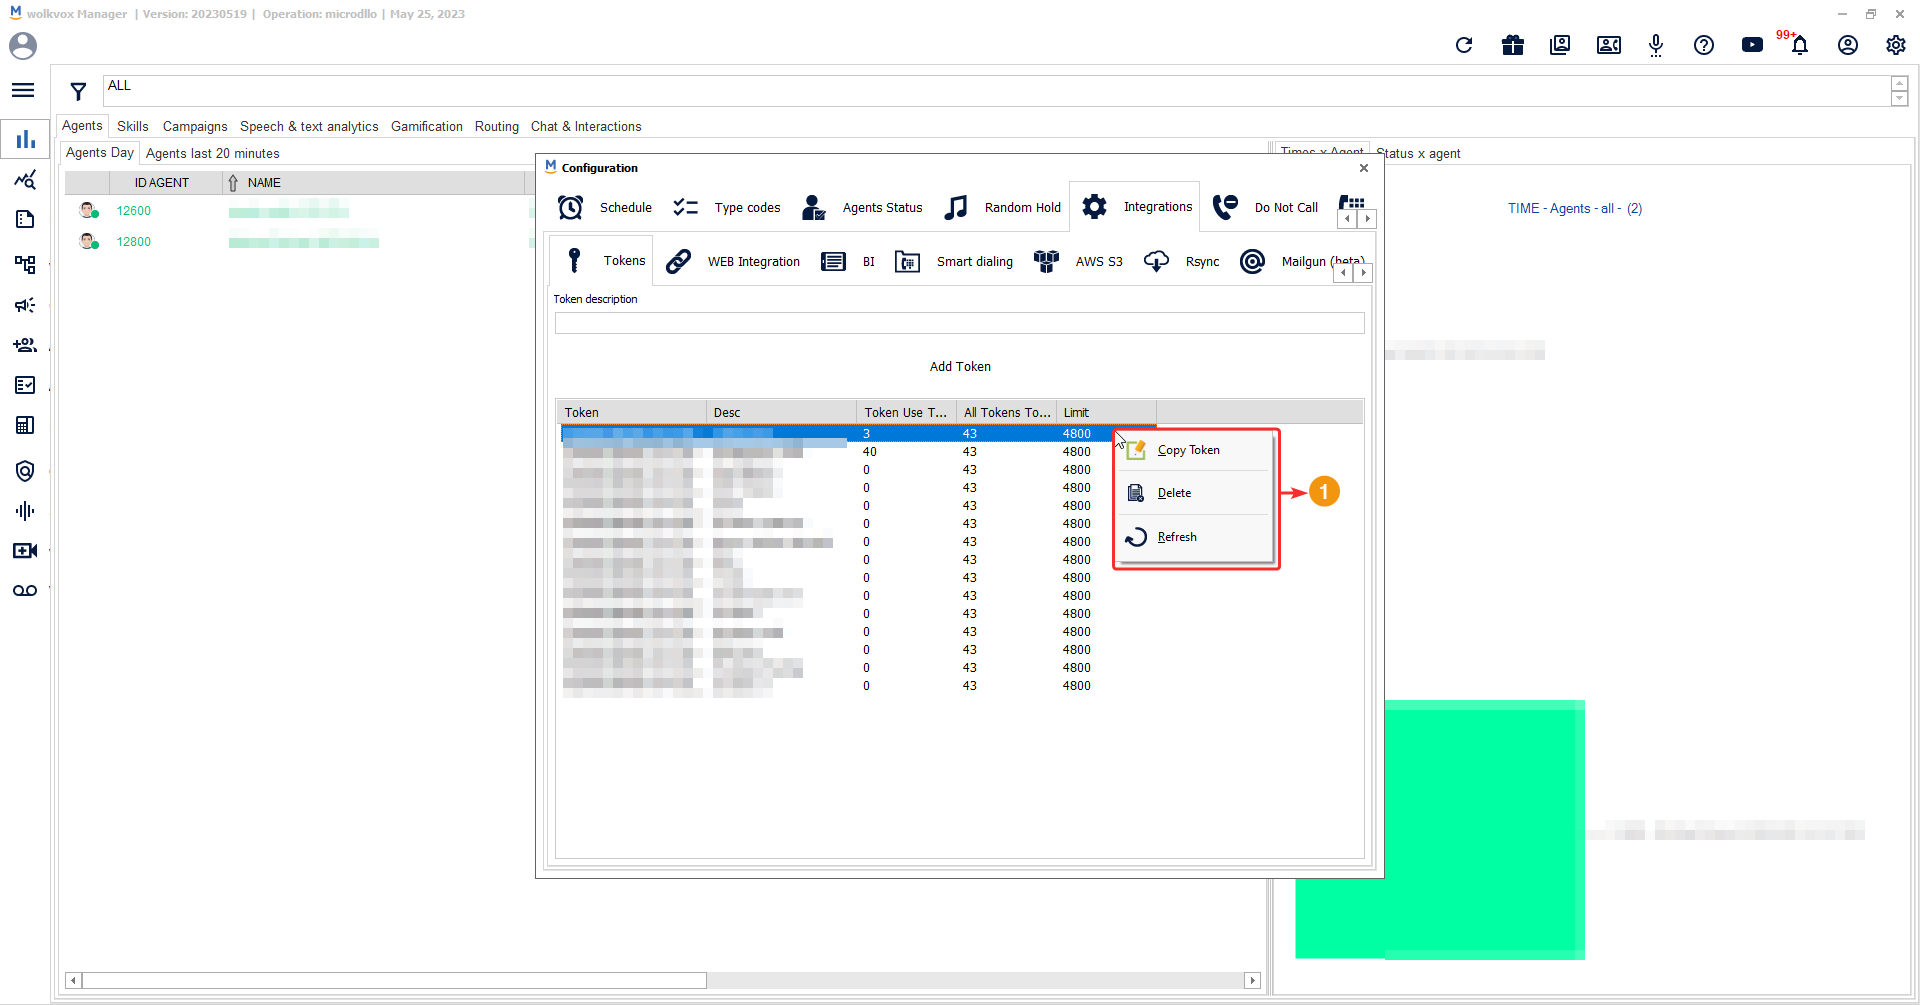
Crear Tokens #
This service allows you to integrate Wolkvox with your own services. It is a code that works to link external services with the Wolkvox application.
To add a token, follow these steps:
- In the “Token description” field, enter a name to distinguish the token being created.
- Click on “Add Token” to create the token.
- The created token will be listed in the table. Its code will be generated randomly.
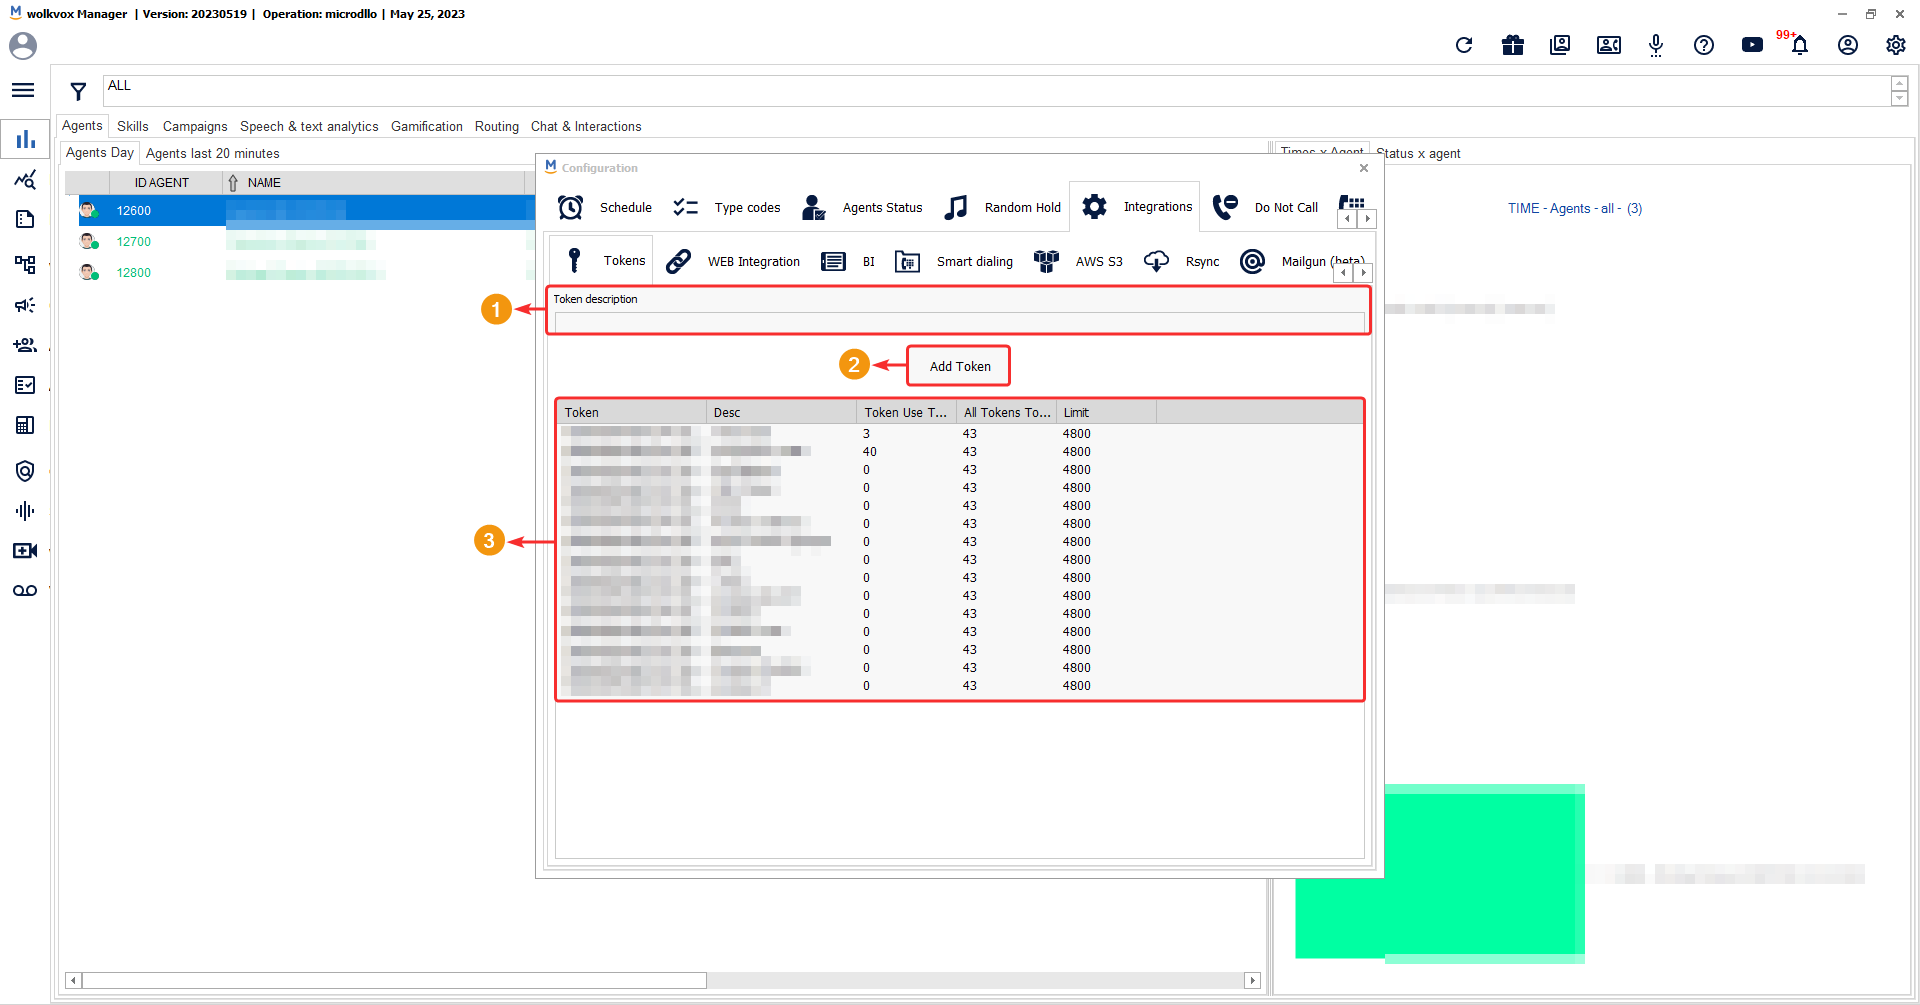
By right-clicking on a token, you can copy the token to the clipboard, delete the token, or refresh the token list.
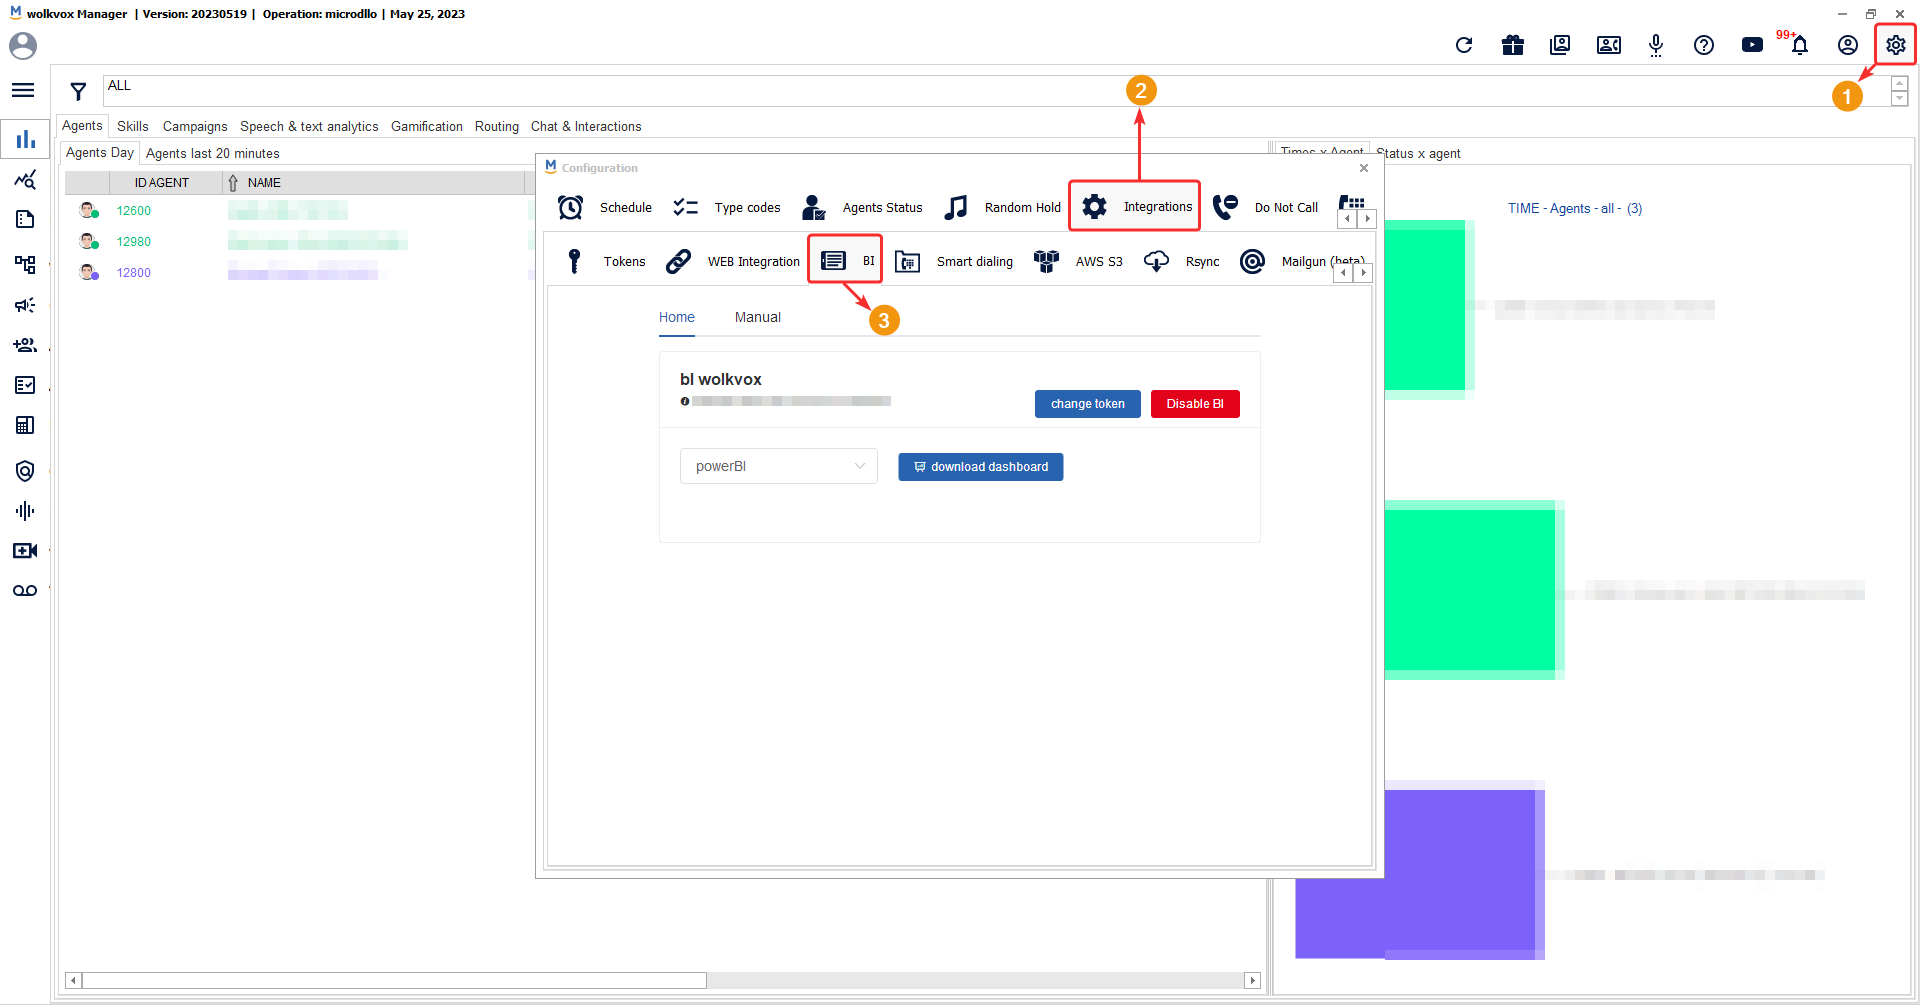
Activate wolkvox BI (Business Intelligence with Microsoft Power BI and Power Pivot from Office) #
This service allows you to integrate wolkvox Manager with Microsoft Power BI and Power Pivot from Office (if you already have a licensed subscription for those external services).
To access the manual regarding the integration of your Power BI or Power Pivot solution in wolkvox Manager, click here.
Enable the intelligent dialing system #
Smart dialing is a process in which the system consolidates data into a single database that is analyzed daily to gather basic information about calls and organizes it for future queries. The “Smart Dialing” service can also provide detailed information about the calls made, including call times, duration, call outcome, and other metrics. This allows for further analysis to identify patterns, improve efficiency, and adjust outbound call strategies.
This system learns from experience to become more accurate over time, incorporating insights from new customer contacts.
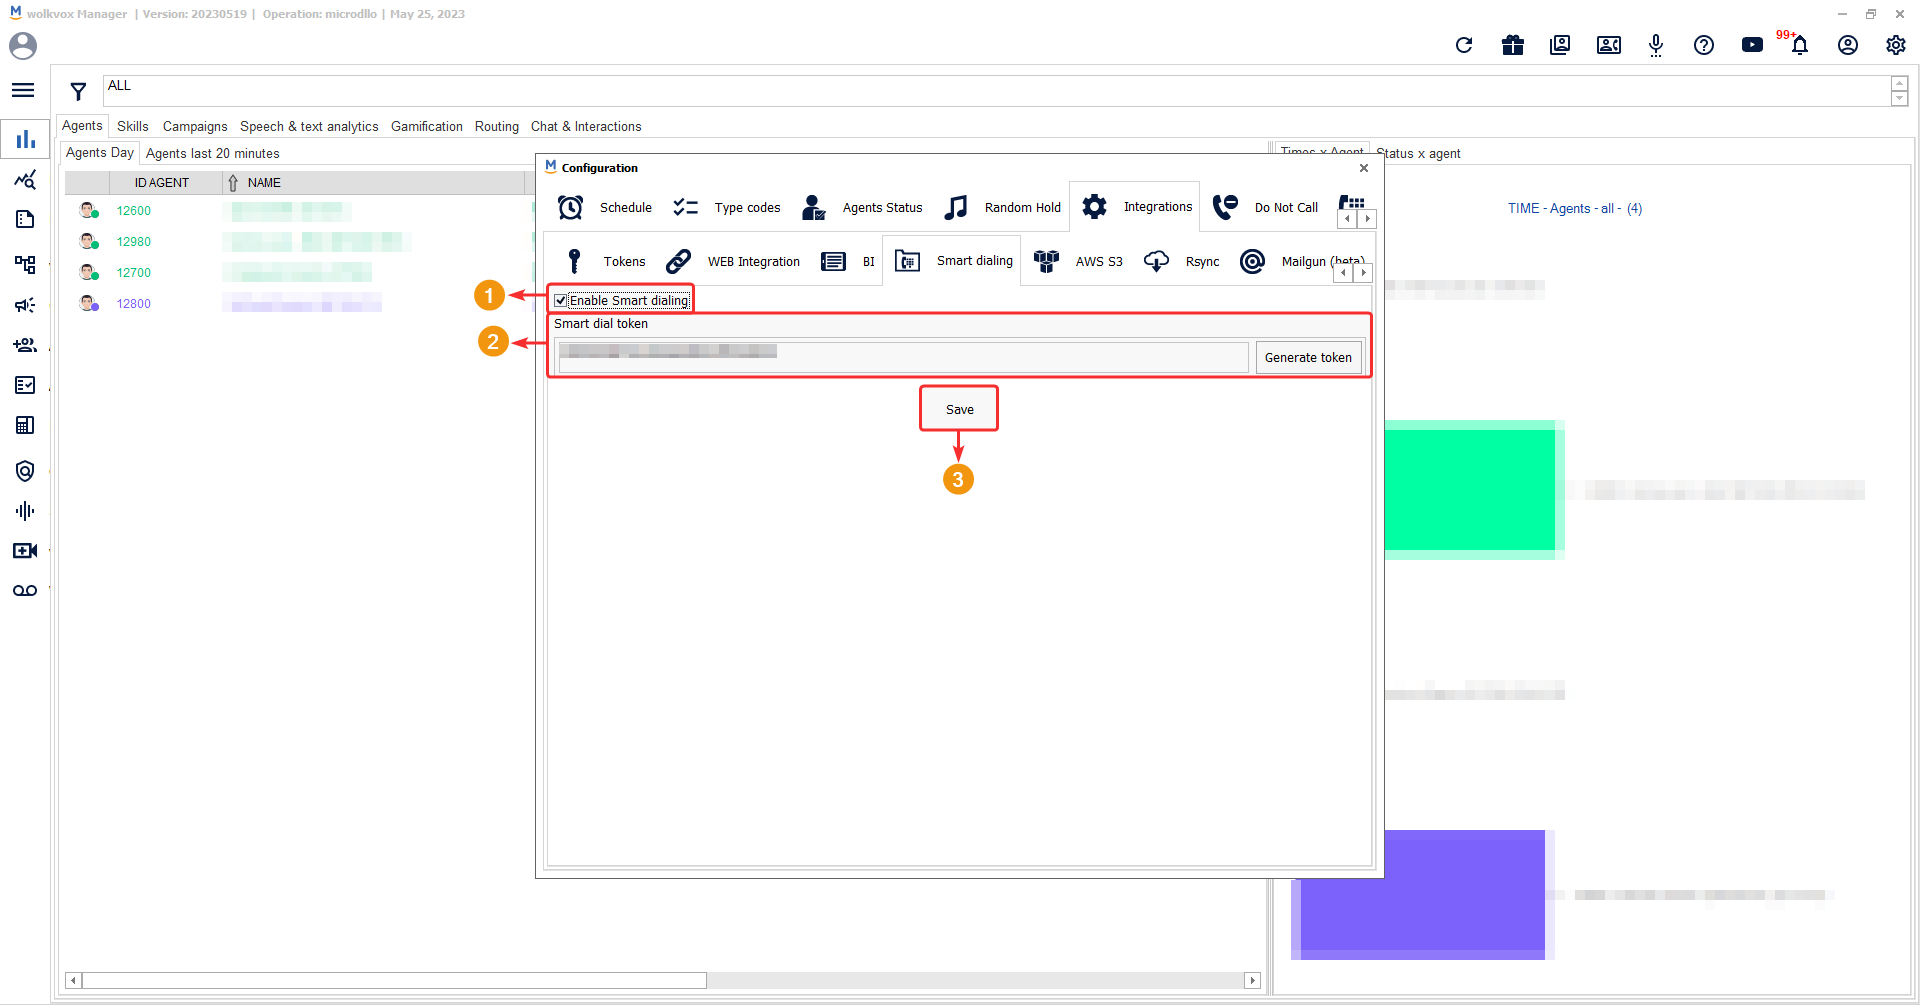
To activate the service, you must check the box and generate a token.
Note: This service has an additional cost.
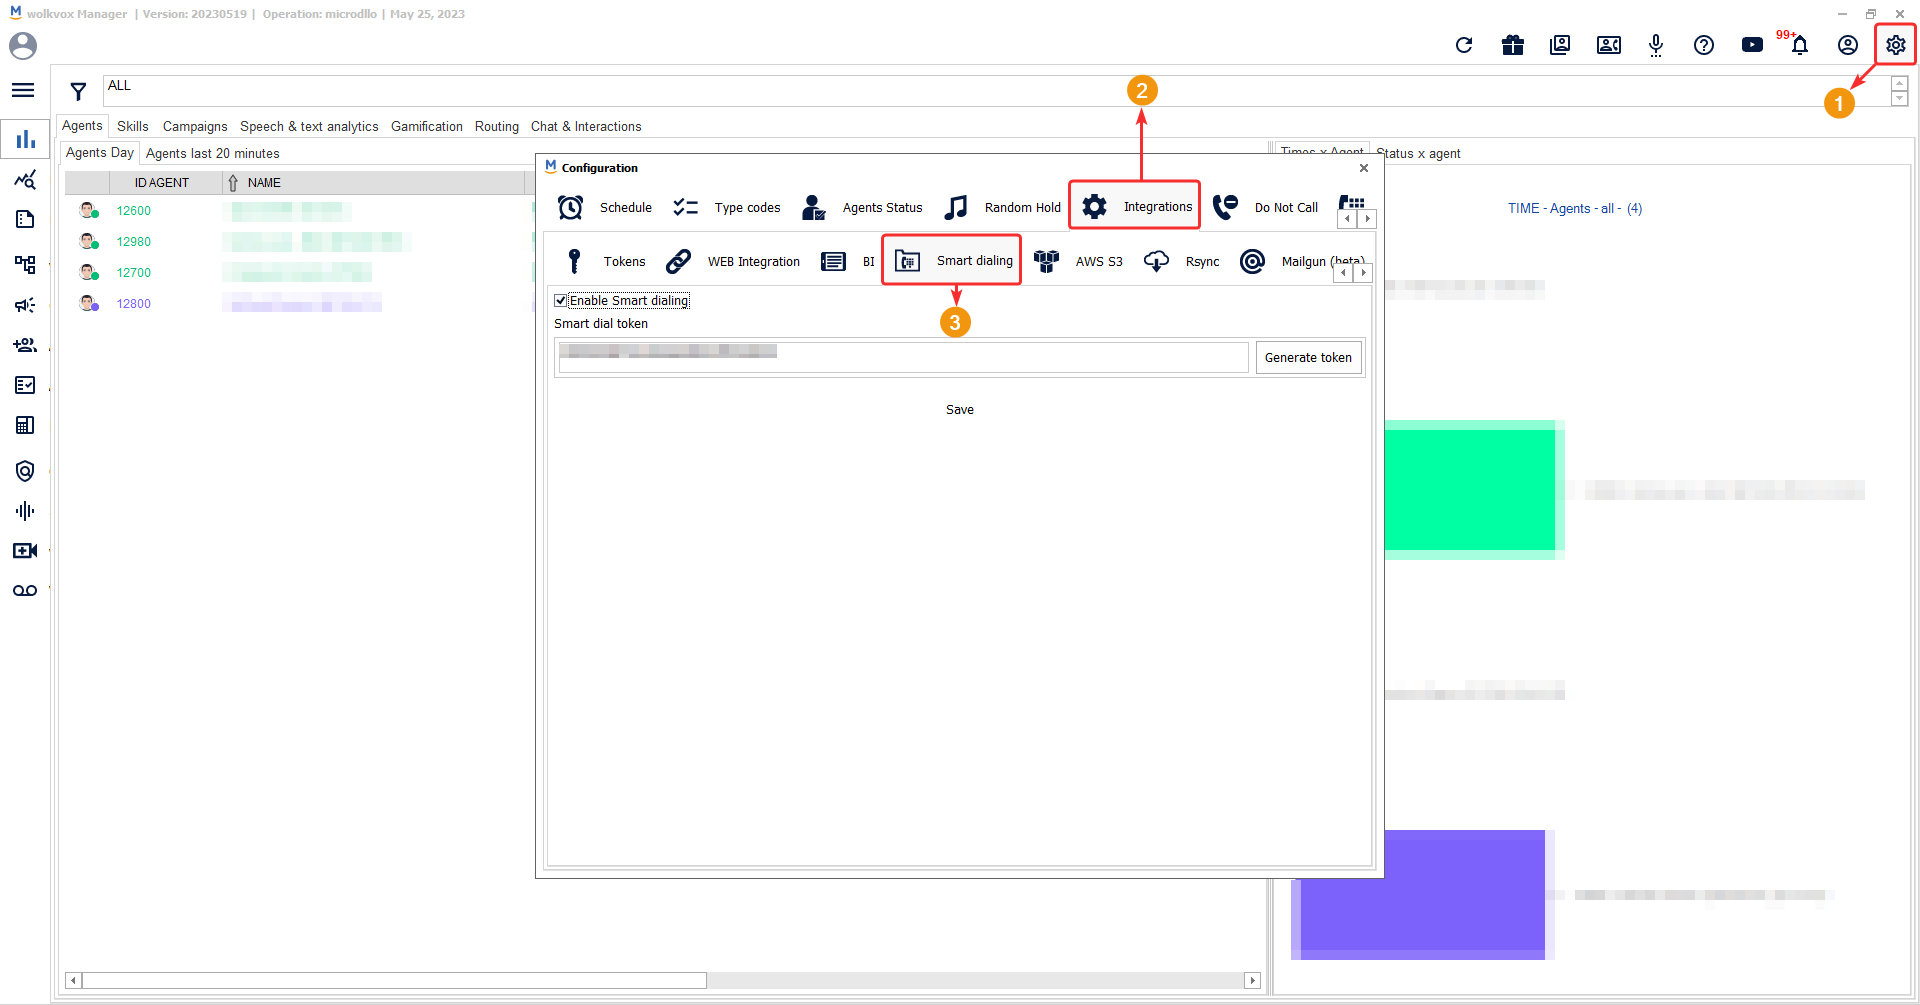
- Activate the Smart Dialing service.
- Click on the “Generate token” button to create a token and enable your service.
- Click on “Save” to apply the changes.
AWS S3: Creating a backup of your audio files with Amazon Web Services (S3) #
If you have a license for Amazon’s secure cloud data storage service (S3), you can integrate it with wolkvox Manager to create backups of your call recordings.
Note: The use of this service incurs an additional cost.

- Enable or disable the audio backup service.
- S3 Bucket: It refers to the name of the bucket in Amazon S3 where the call audio recordings will be stored. A bucket is a basic unit of storage in S3 and acts as a container for the files and data you want to store.
- S3 Access key: It is the access key of your Amazon Web Services (AWS) account that has permissions to access and perform operations in the S3 service. This key is used to authenticate and authorize the requests made by the wolkvox Manager software to save or retrieve files in the S3 bucket.
- S3 Secret key: It is the secret key corresponding to the access key mentioned above. The secret key is used together with the access key to authenticate and secure the requests made to the S3 service.
- Enable or disable file copying in MP3 format. Remember that the original format of the files generated by the wolkvox application is WAV.

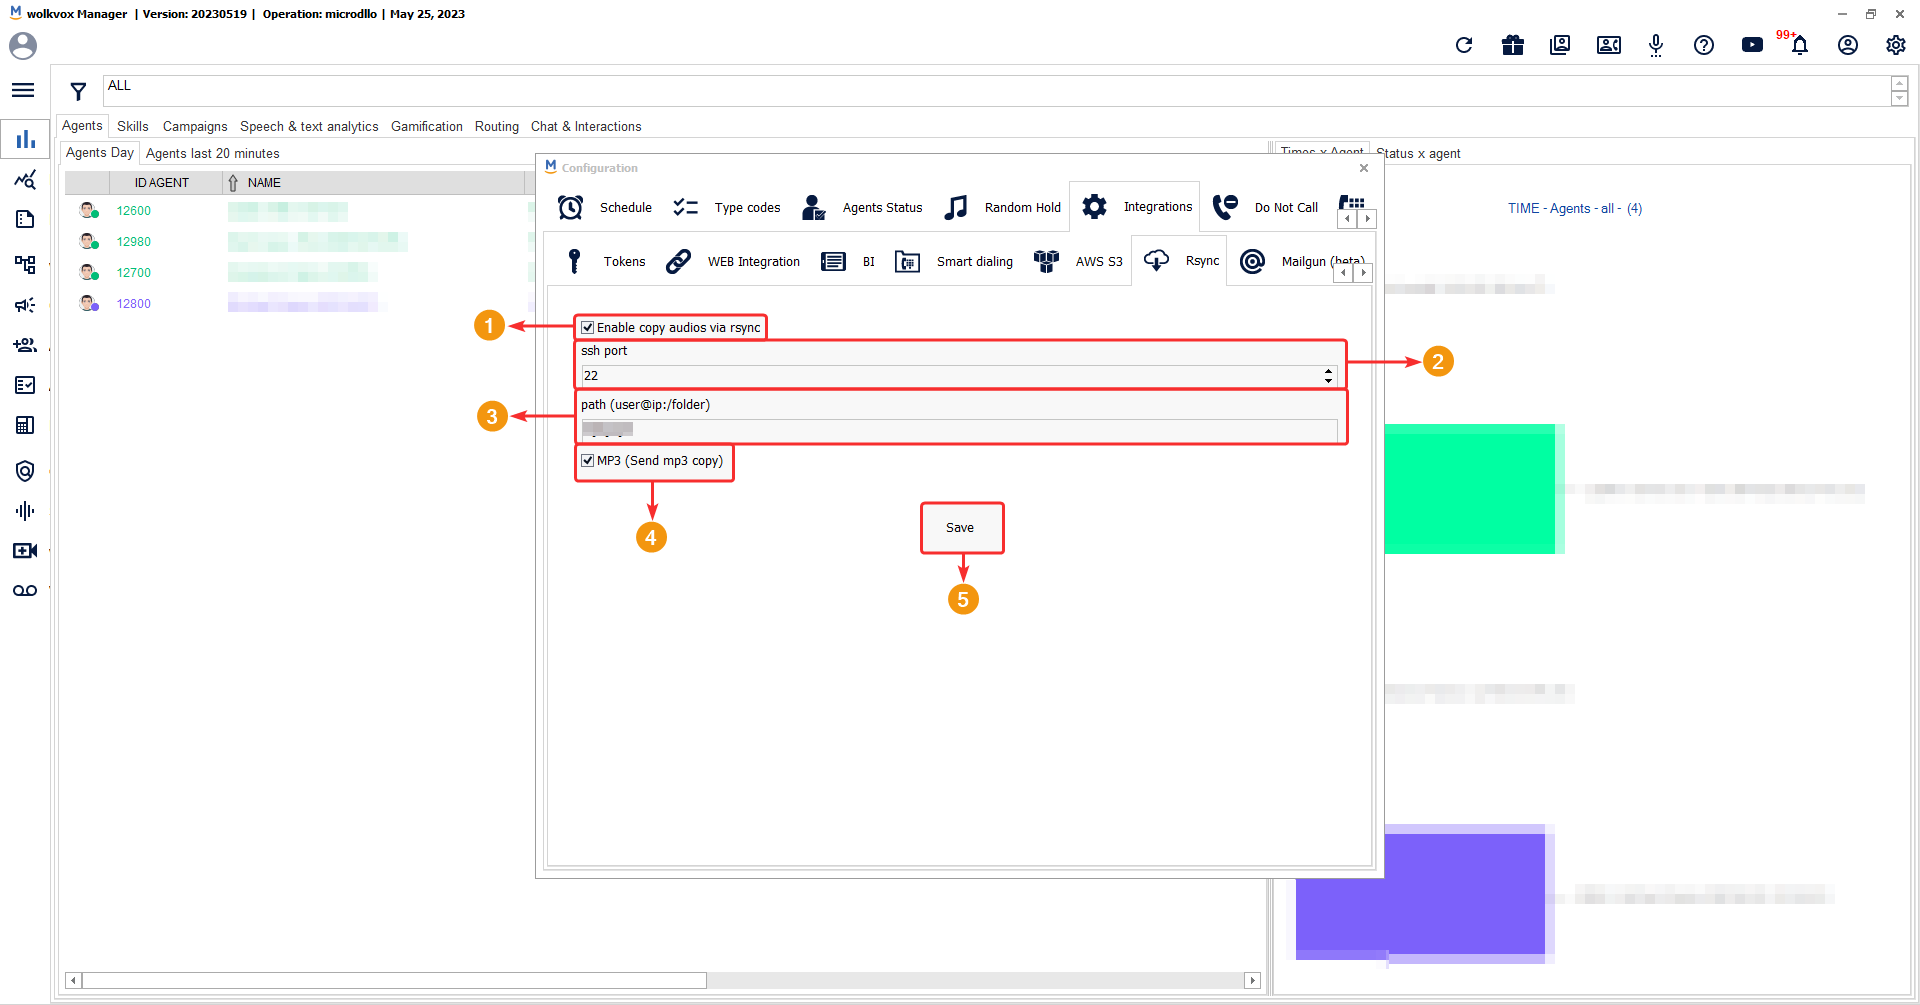
Create a backup of your audio files on your NAS or local storage server #
This service allows you to link wolkvox Manager with a NAS (Network Attached Storage) or local storage server. To start the process, you first need to publish the server where the recordings will be stored.
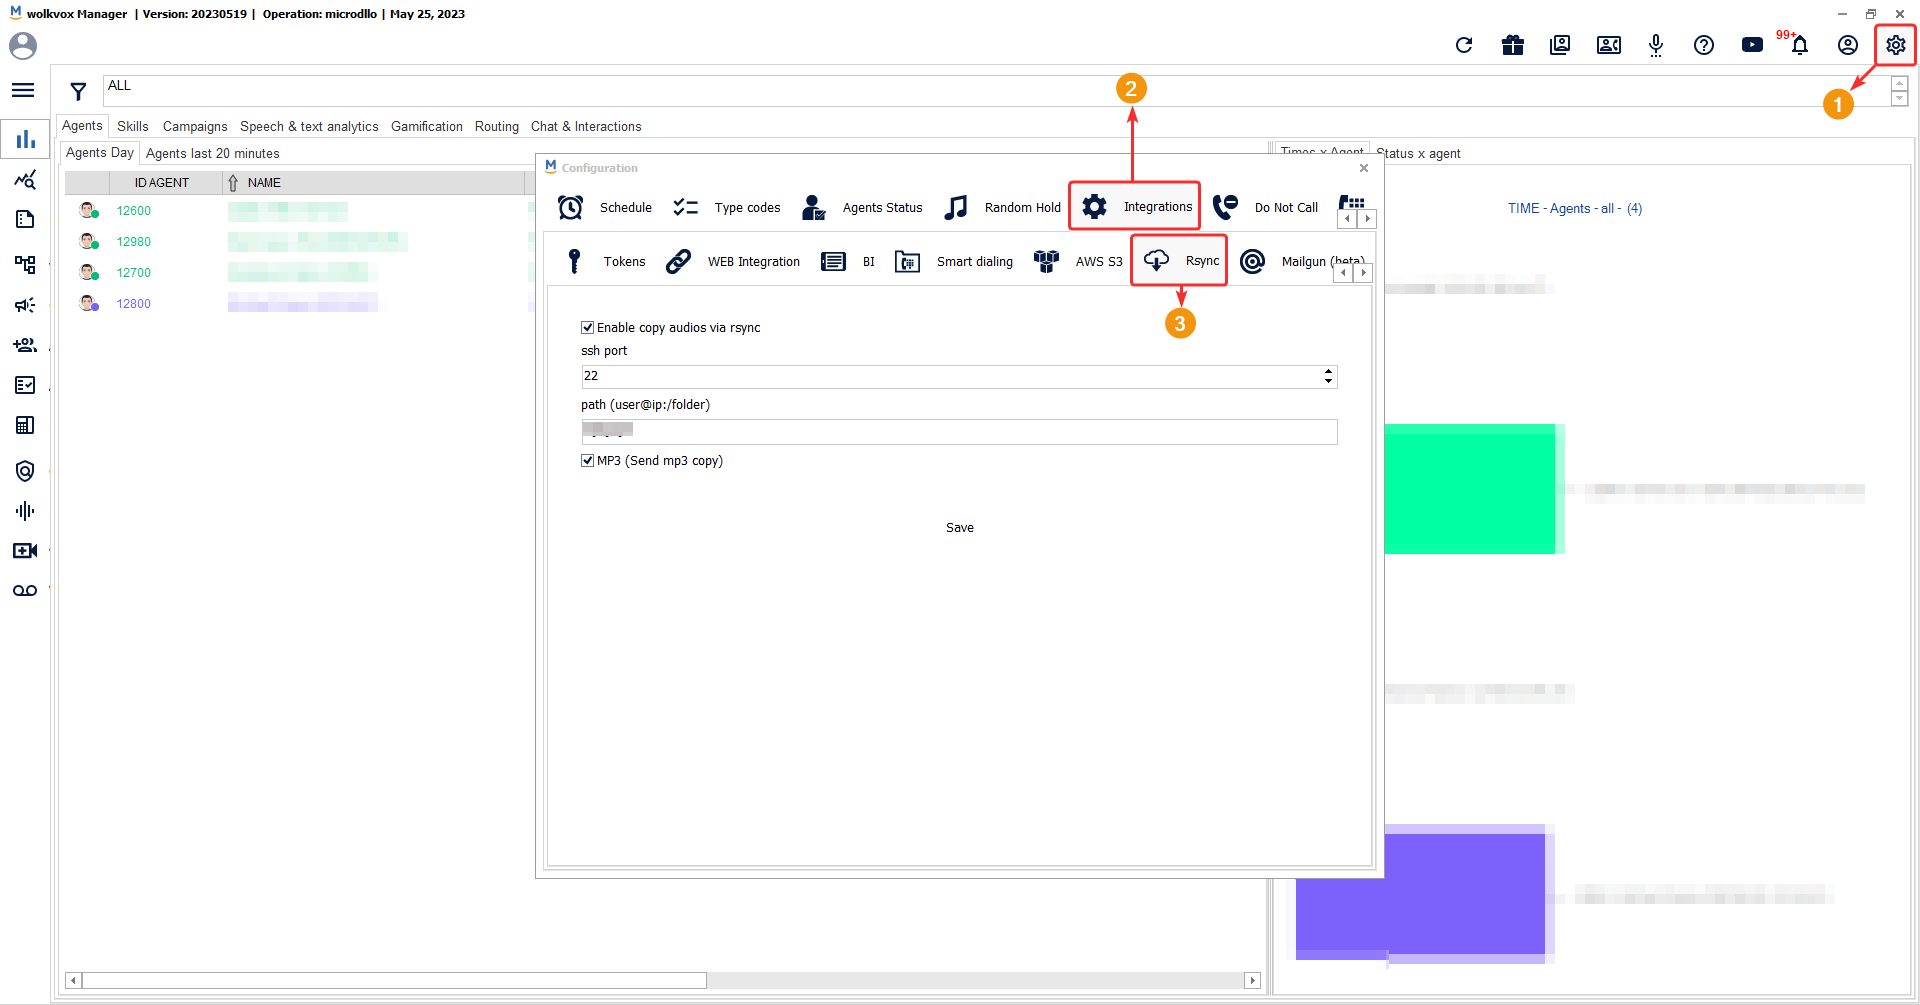
Then, enter the following information:
- Check the “Enable audio backup via RSYNC” box to activate the service.
- SSH PORT: It is the port number used to establish the SSH connection. SSH (Secure Shell) is a network protocol that allows secure communication and remote access through an encrypted connection. The wolkvox Manager software needs to know the SSH port that will be used to connect to the server where the rsync service will run.
- Path (user@ip:/folder): This field refers to the path and IP address of the destination server along with the authentication information.
“user” represents the username used to authenticate on the destination server.
“ip” is the IP address of the server where the rsync service is running.
“/folder” is the location of the directory on the server where the audio recordings will be stored. It can be a specific folder or a complete path in the server’s file system. - Optional: You can enable backup of files in MP3 format. Enable or disable file copying in MP3 format. Remember that the original format of the files generated by the wolkvox application is WAV.
- Click on “Save” to save the changes.
Note: This service incurs an additional cost.
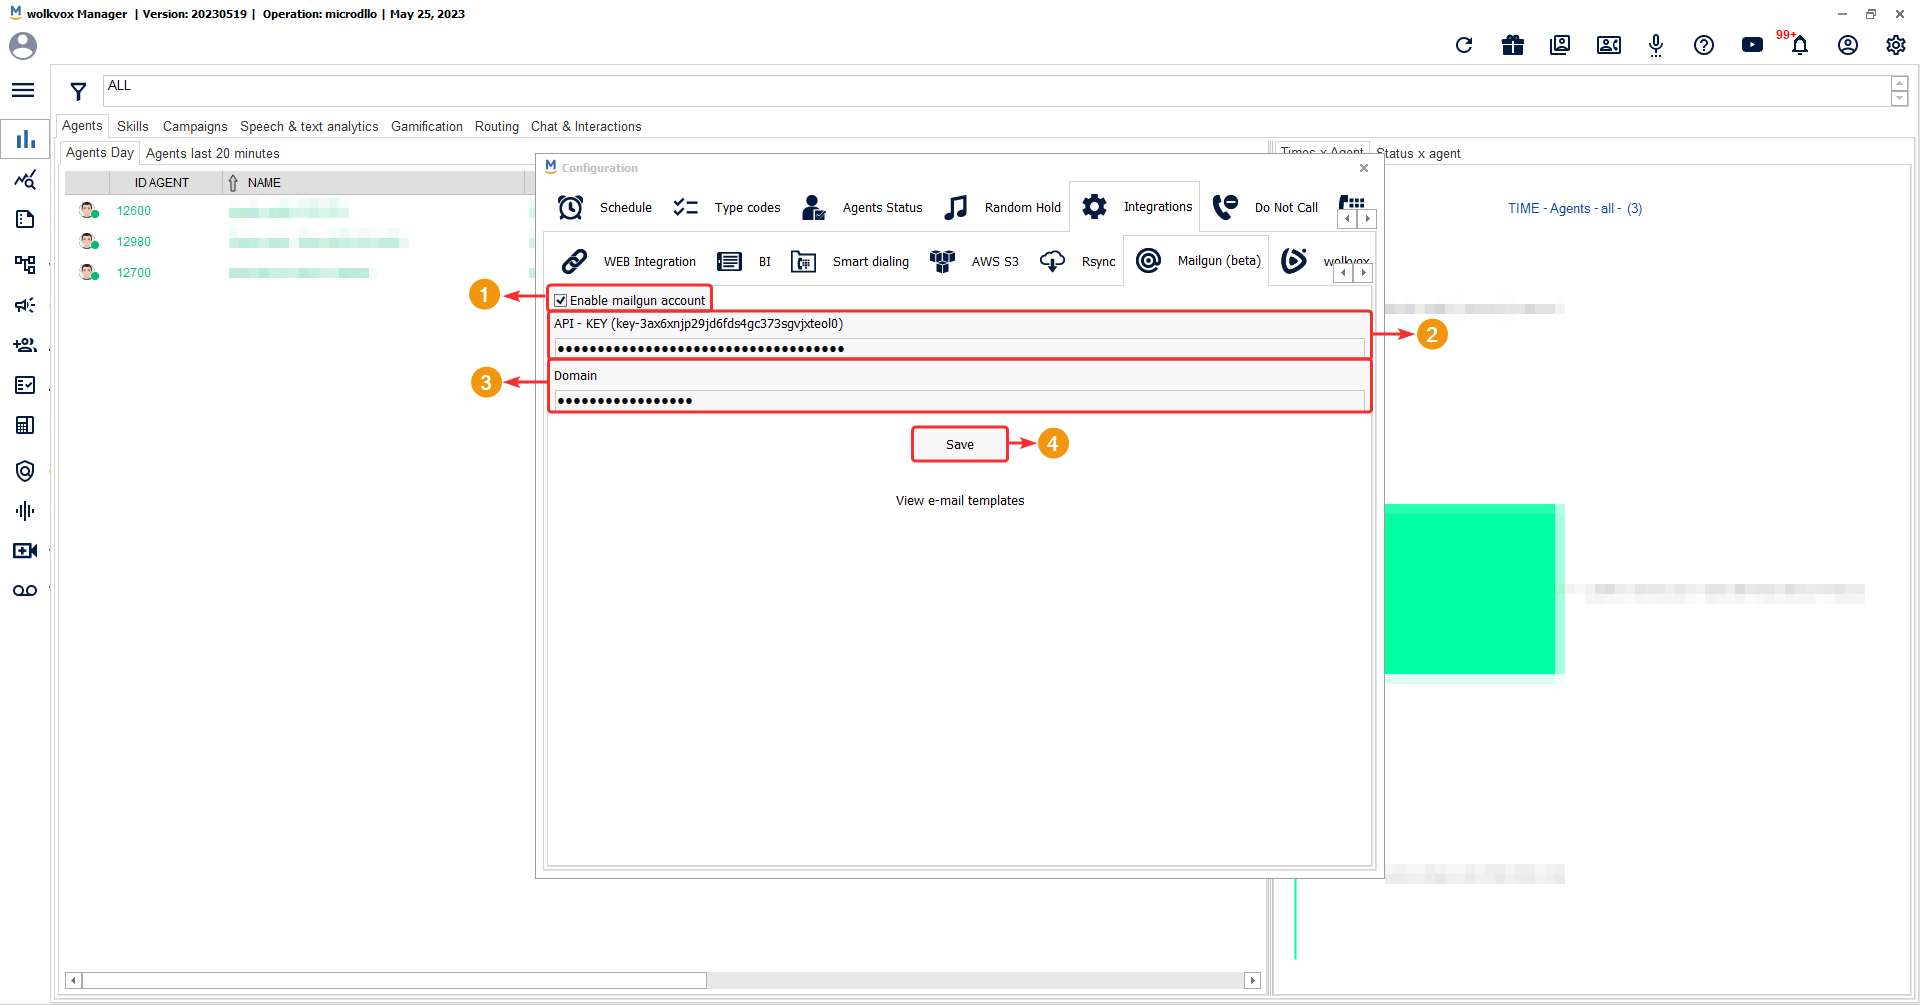
Send emails in bulk #
You can integrate your Mailgun license with wolkvox Manager for the purpose of sending emails in bulk, which helps prevent your emails from ending up in your clients’ SPAM folder.

You should follow the following steps:
- Enable the Mailgun account checkbox to begin configuring the service.
- Enter the API KEY that you obtain from your account page on Mailgun’s website. The API Key is a unique and secret authentication key that provides access to Mailgun’s functions and services through its Application Programming Interface (API). The API Key acts as a password to ensure that only authorized individuals can send emails through your Mailgun account. It is important to keep the API Key confidential and not share it with unauthorized individuals, as it grants full access to your Mailgun account.
- Domain: In the context of Mailgun, the “Domain” refers to the domain name that you use to send emails. It is the domain from which the emails will be sent, such as “yourdomain.com” or “company.com”. When setting up Mailgun, you need to authenticate and verify the domain you plan to use to ensure that you have control over it and permission to send emails from that address. This helps prevent unauthorized use of domains and increases the delivery rate of emails sent through Mailgun.
- Click on “Save” to apply the changes.
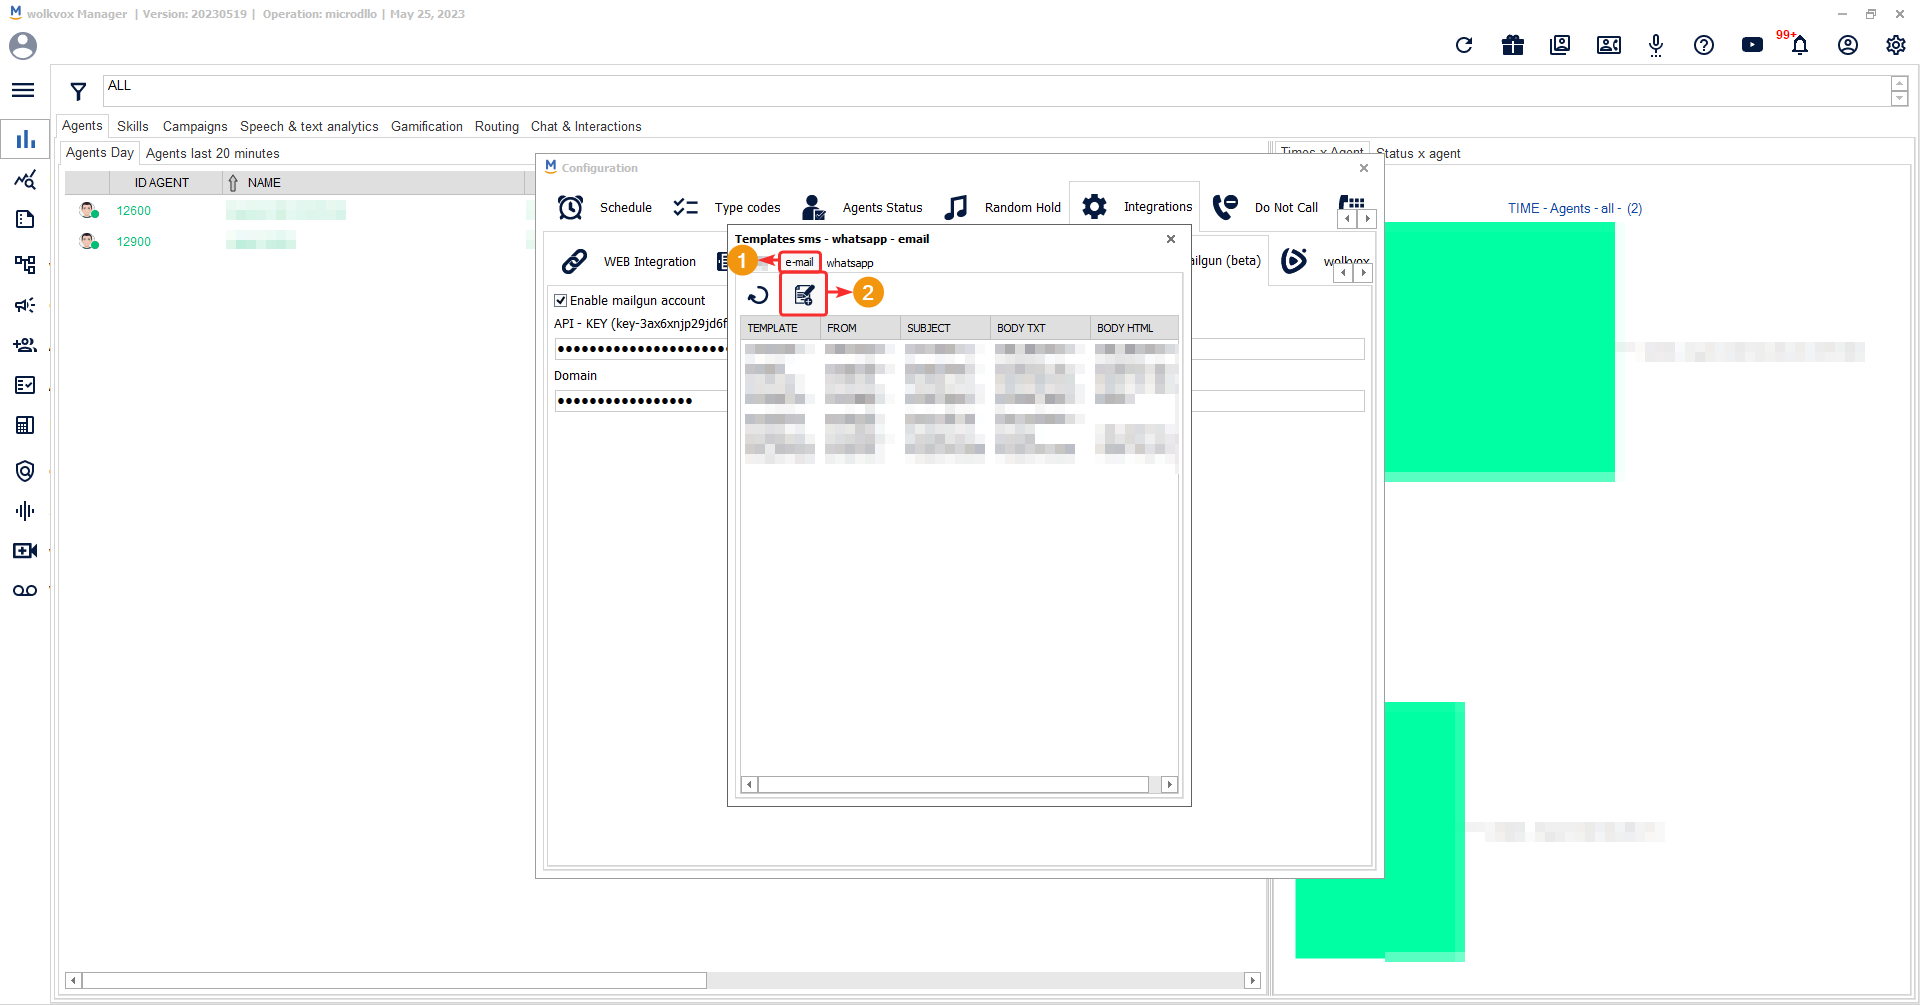
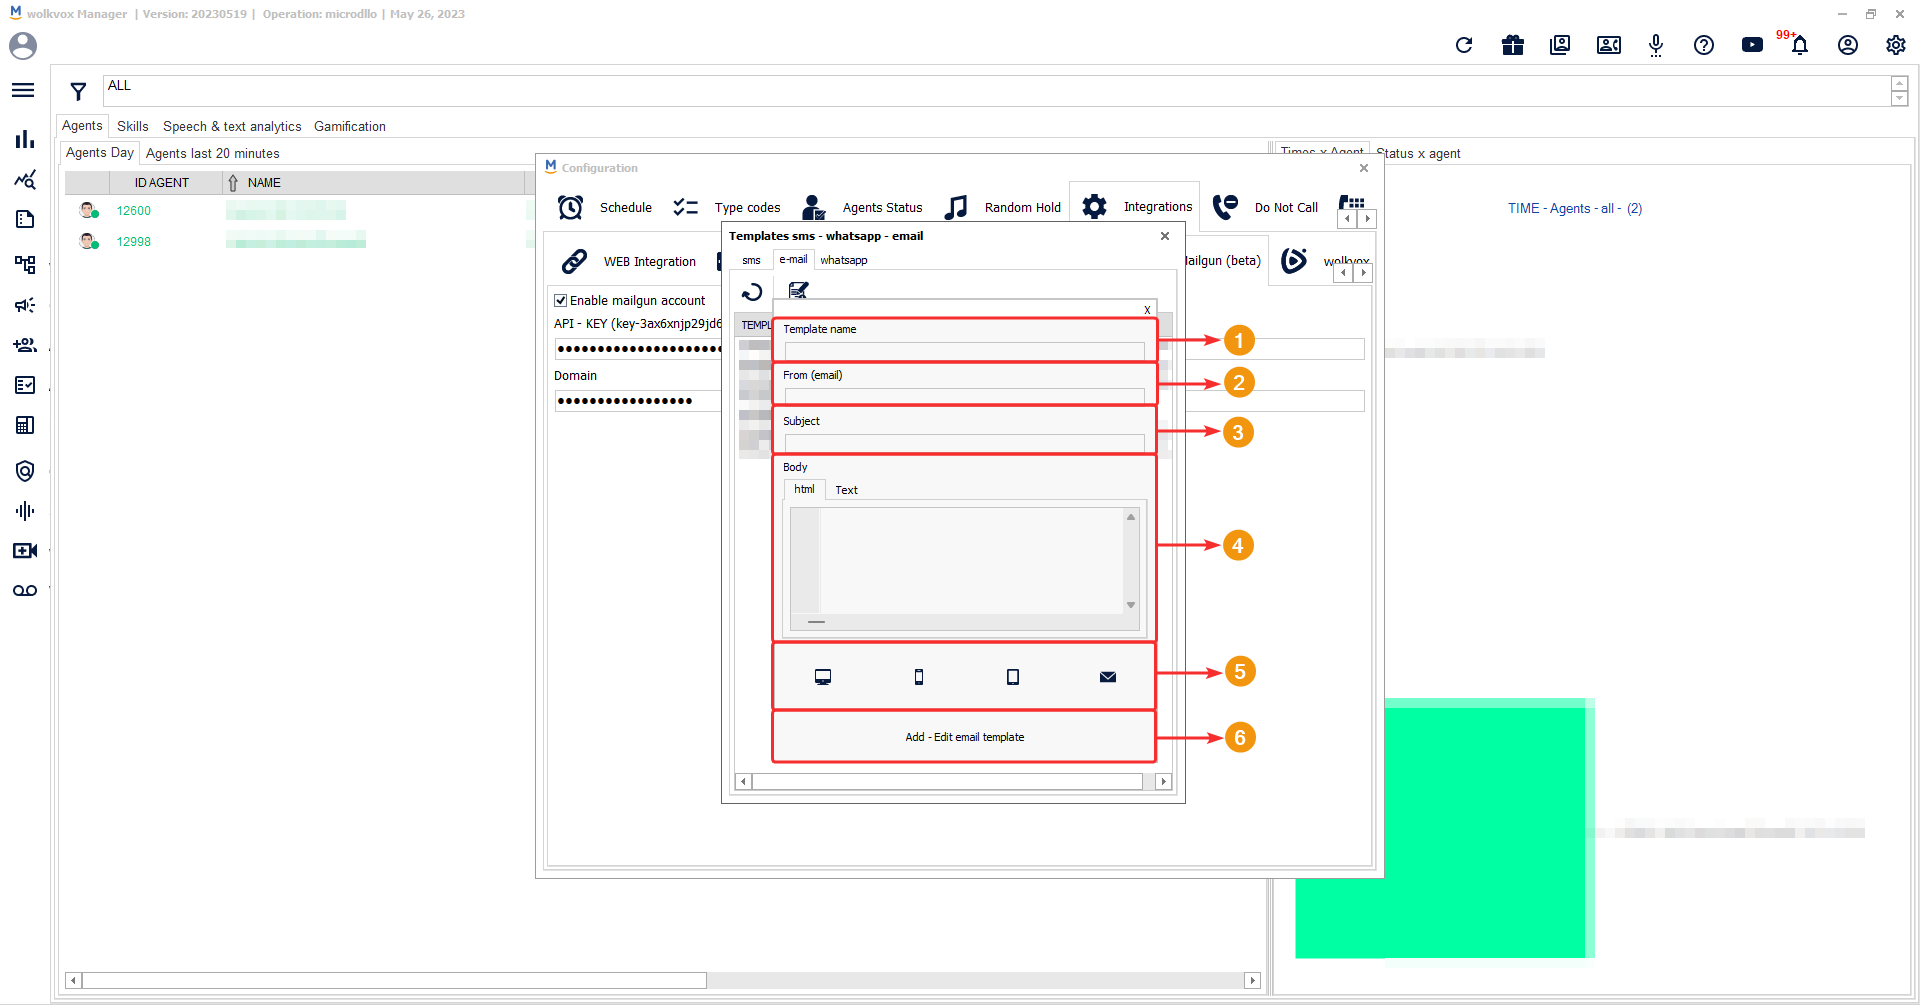
View and create email templates #
The following button allows you to go to the email template configuration window.

Once the window is open, go to the “Email” tab and click on the “Create new template” button.
After clicking on the “Create new template” button, a window will open with the following options to configure your email template:
- Template Name: Assign a name to the template.
- From (email): Enter the sender’s email address.
- Subject: Enter the subject that will be set for all emails sent with the template you are creating.
- Body: Here you should structure the body of the message that will be sent in the emails using this template. In the “HTML” tab, you can write HTML code, and in the “Text” tab, you can write plain text if you prefer this template to be text-only.
- In the highlighted area, you can click on each icon to preview your template on desktop computers, mobile phones, and tablets. The last icon allows you to send an email to the email address registered in your user account to verify how the template would appear.
- Click on “Add – Edit email template” to add the email template.
Below is an example of how HTML templates are previewed:

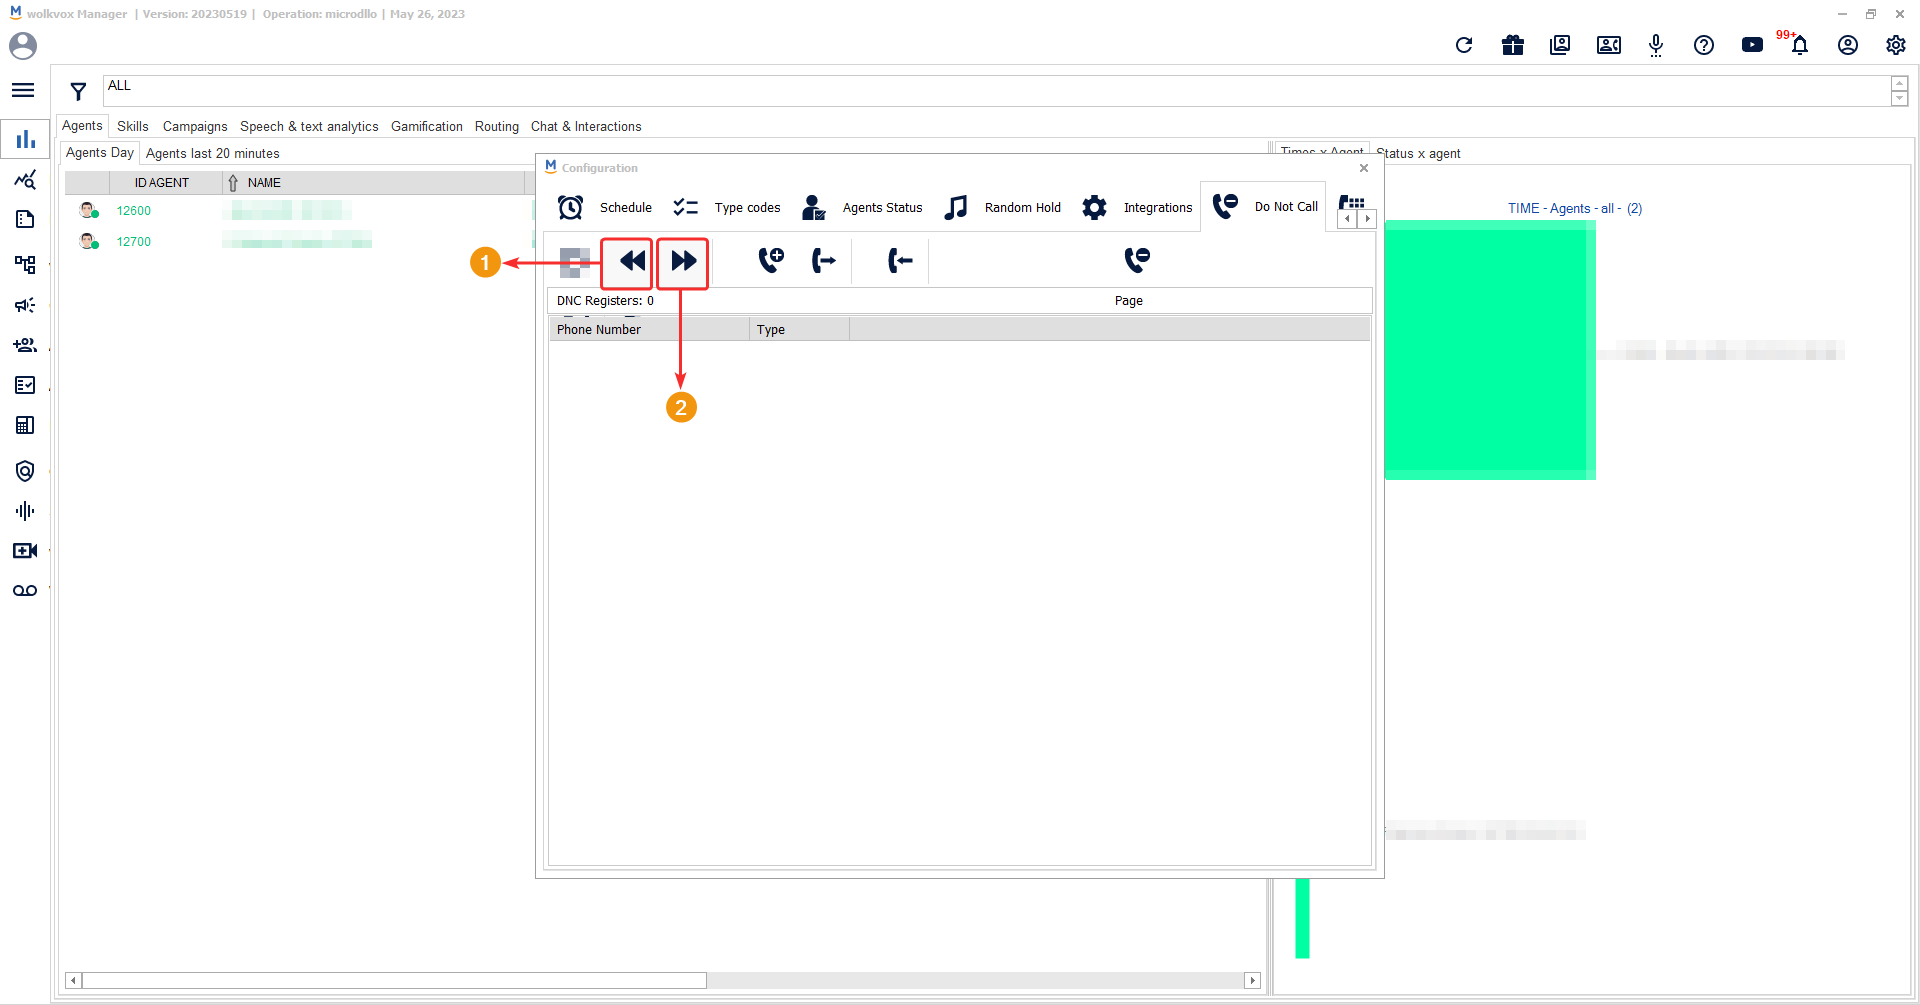
Do Not Call (DNC) List or Blocked Numbers #
In the “Do Not Call” service, blacklists of phone numbers are added so that agents can avoid calling the numbers included in that list. Additionally, numbers can be added to prevent agents from receiving calls from those specific numbers. In other words, all numbers added to this list will be blocked, and you can select whether the block applies to incoming or outgoing calls.
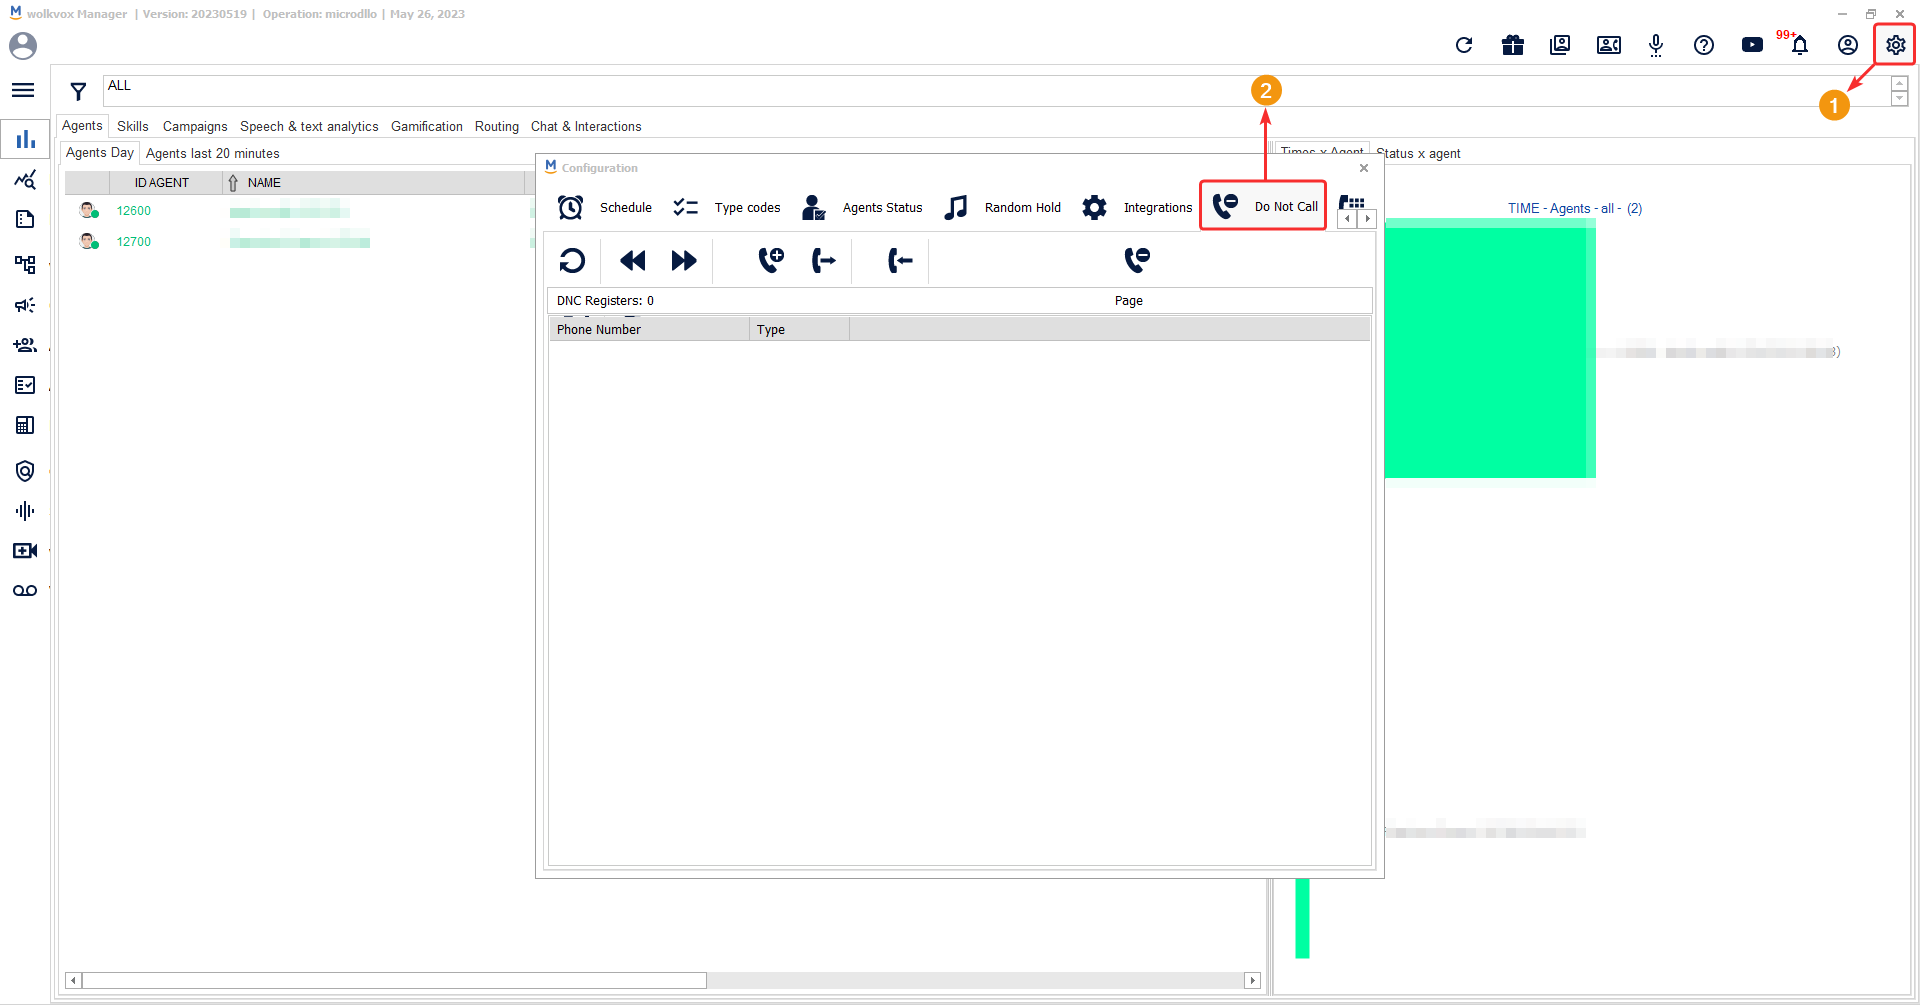
- The highlighted button in the following image allows you to manually add numbers to the blacklist.
- In the pop-up window, you should enter the phone number to add to the blacklist, select whether you want to block it for outgoing or incoming calls, and click the “Add Do Not Call” button to add it.
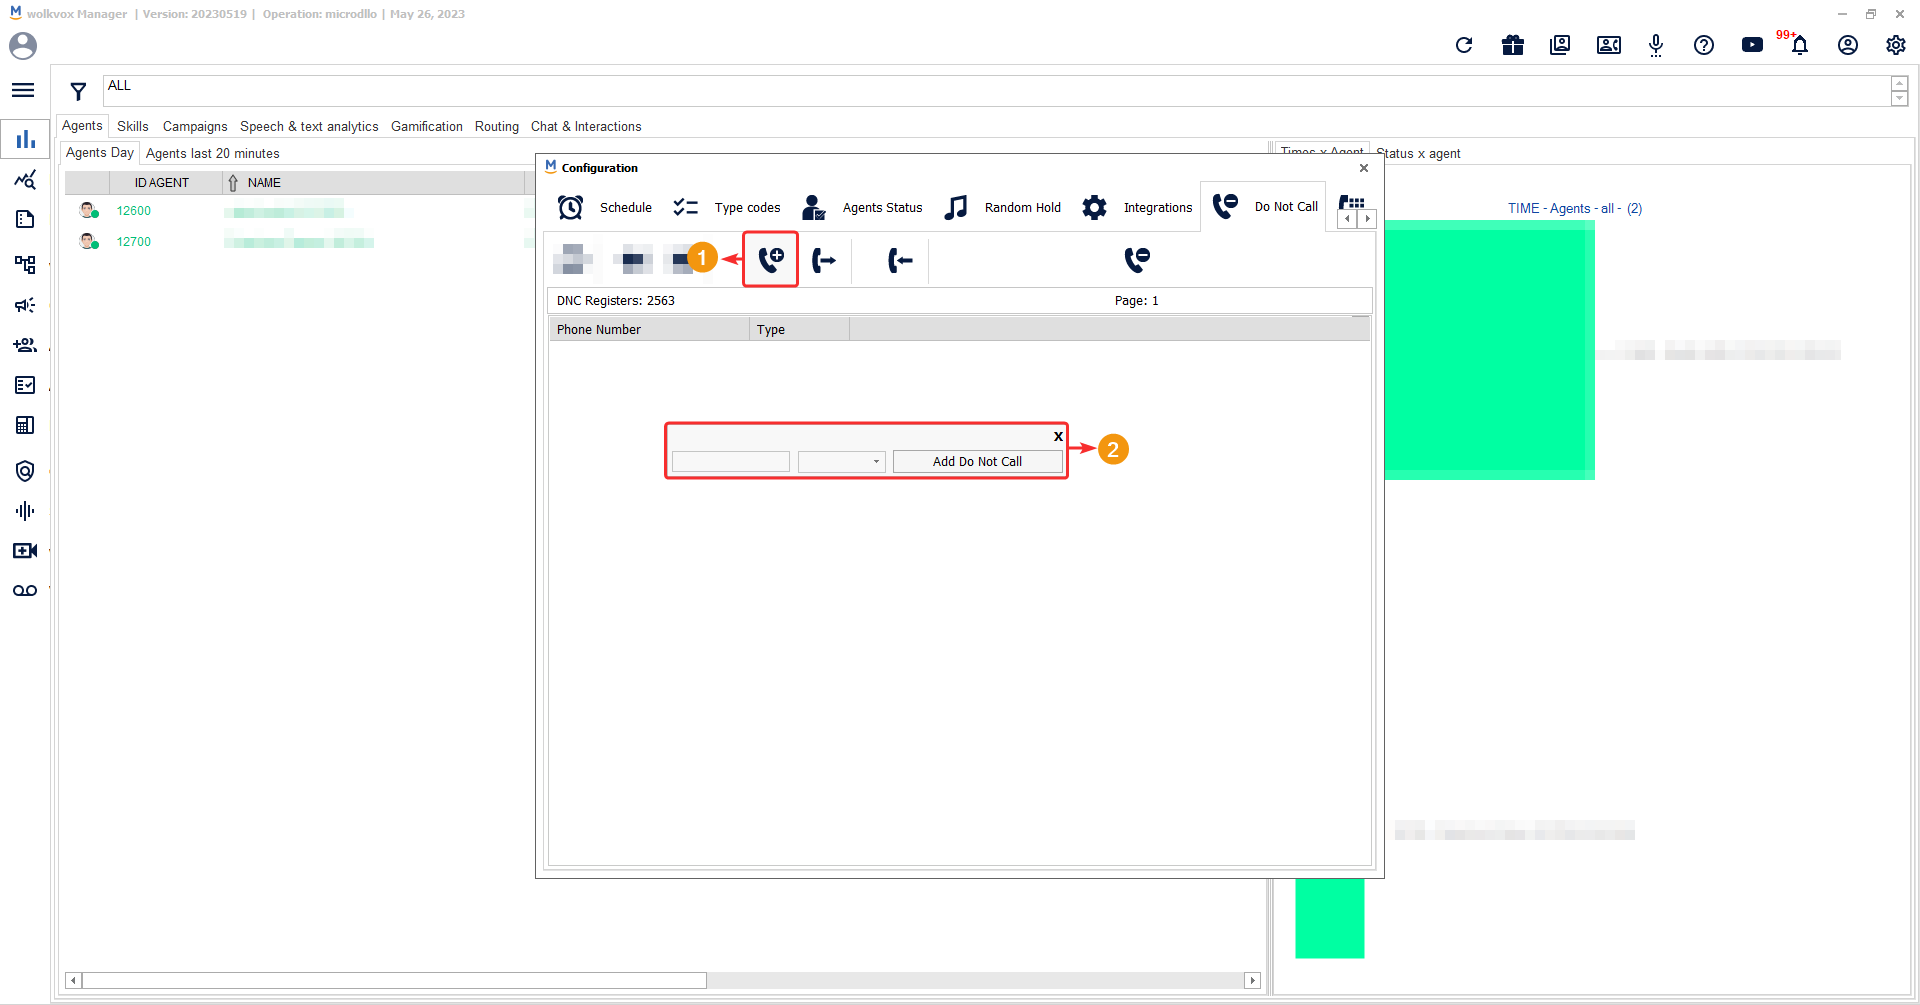
- This button allows you to add numbers in bulk to block for outbound calls. Upon clicking, a file explorer will open where you need to browse and select the desired file.
- This button allows you to add numbers in bulk to block for inbounbd calls. Upon clicking, a file explorer will open where you need to browse and select the desired file.
- Click this button to delete all the records added to the DNC list.
Note:
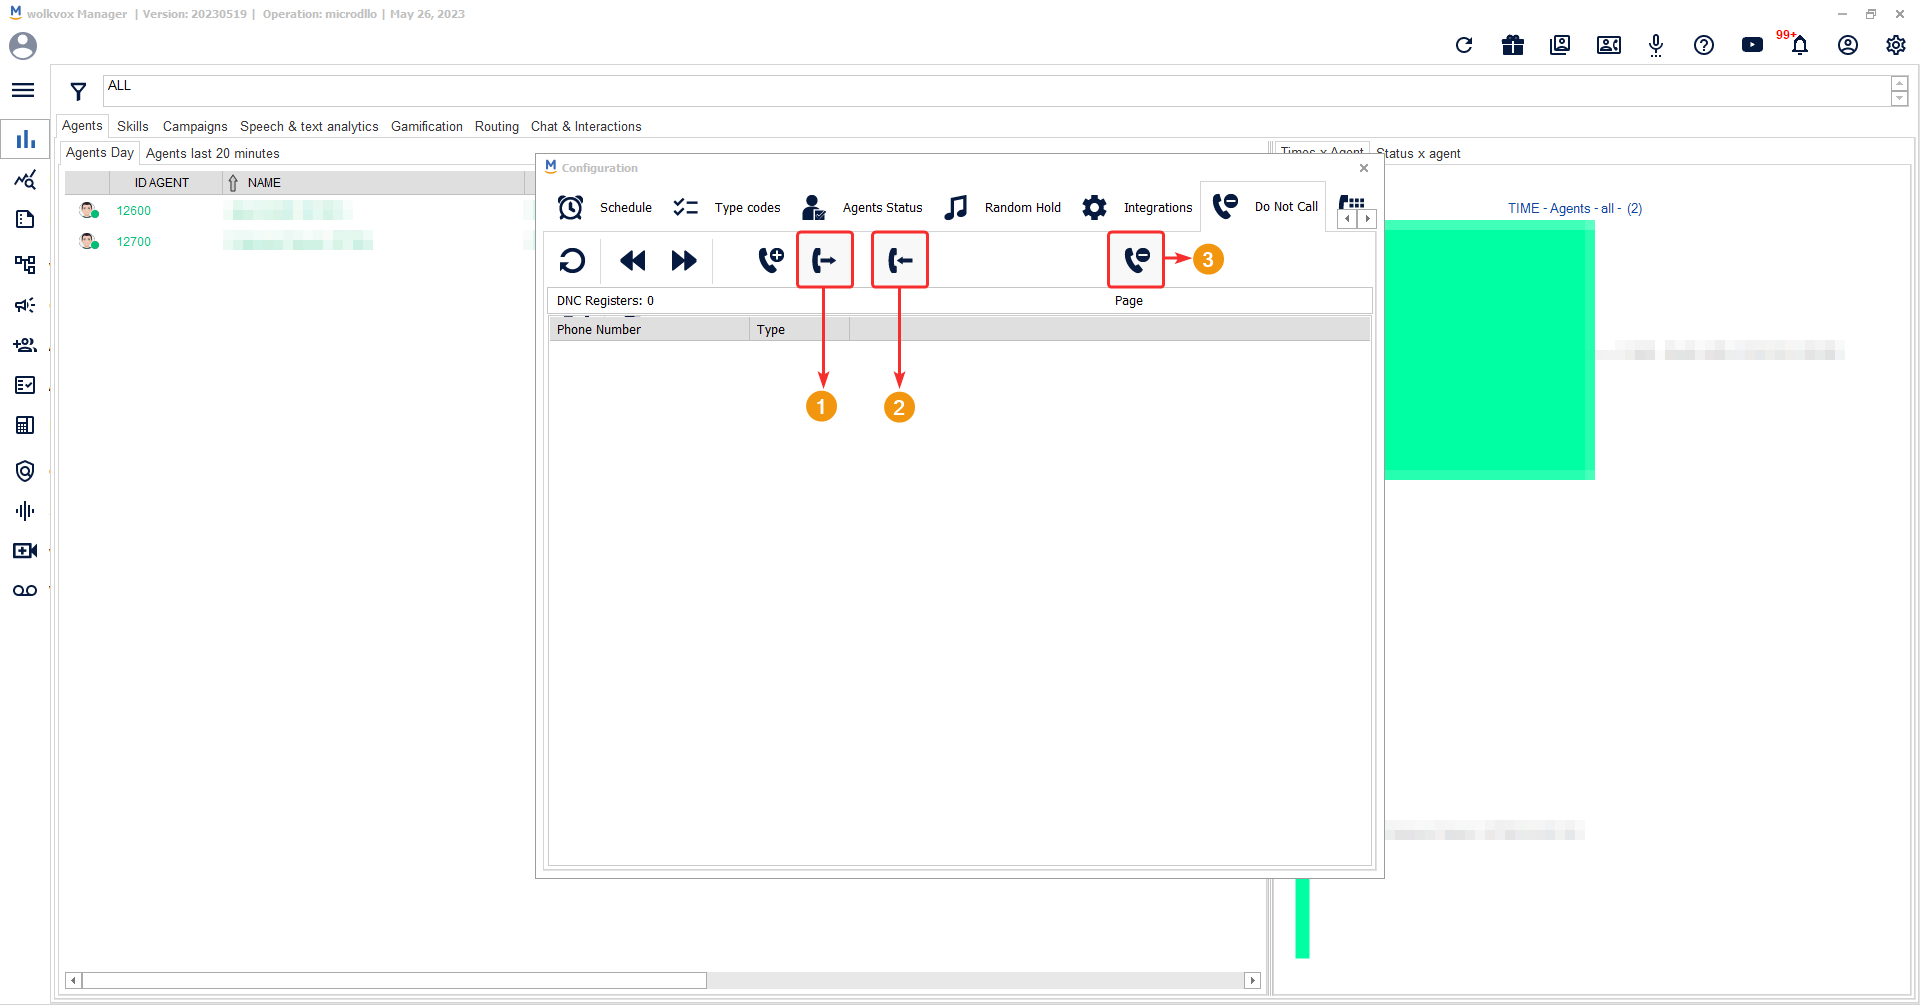
By clicking on an item in the list, you can delete the number or export the entire list to HTML format.

These buttons will allow you to navigate forward or backward through the pages when you have a large list of “Do not call” numbers.
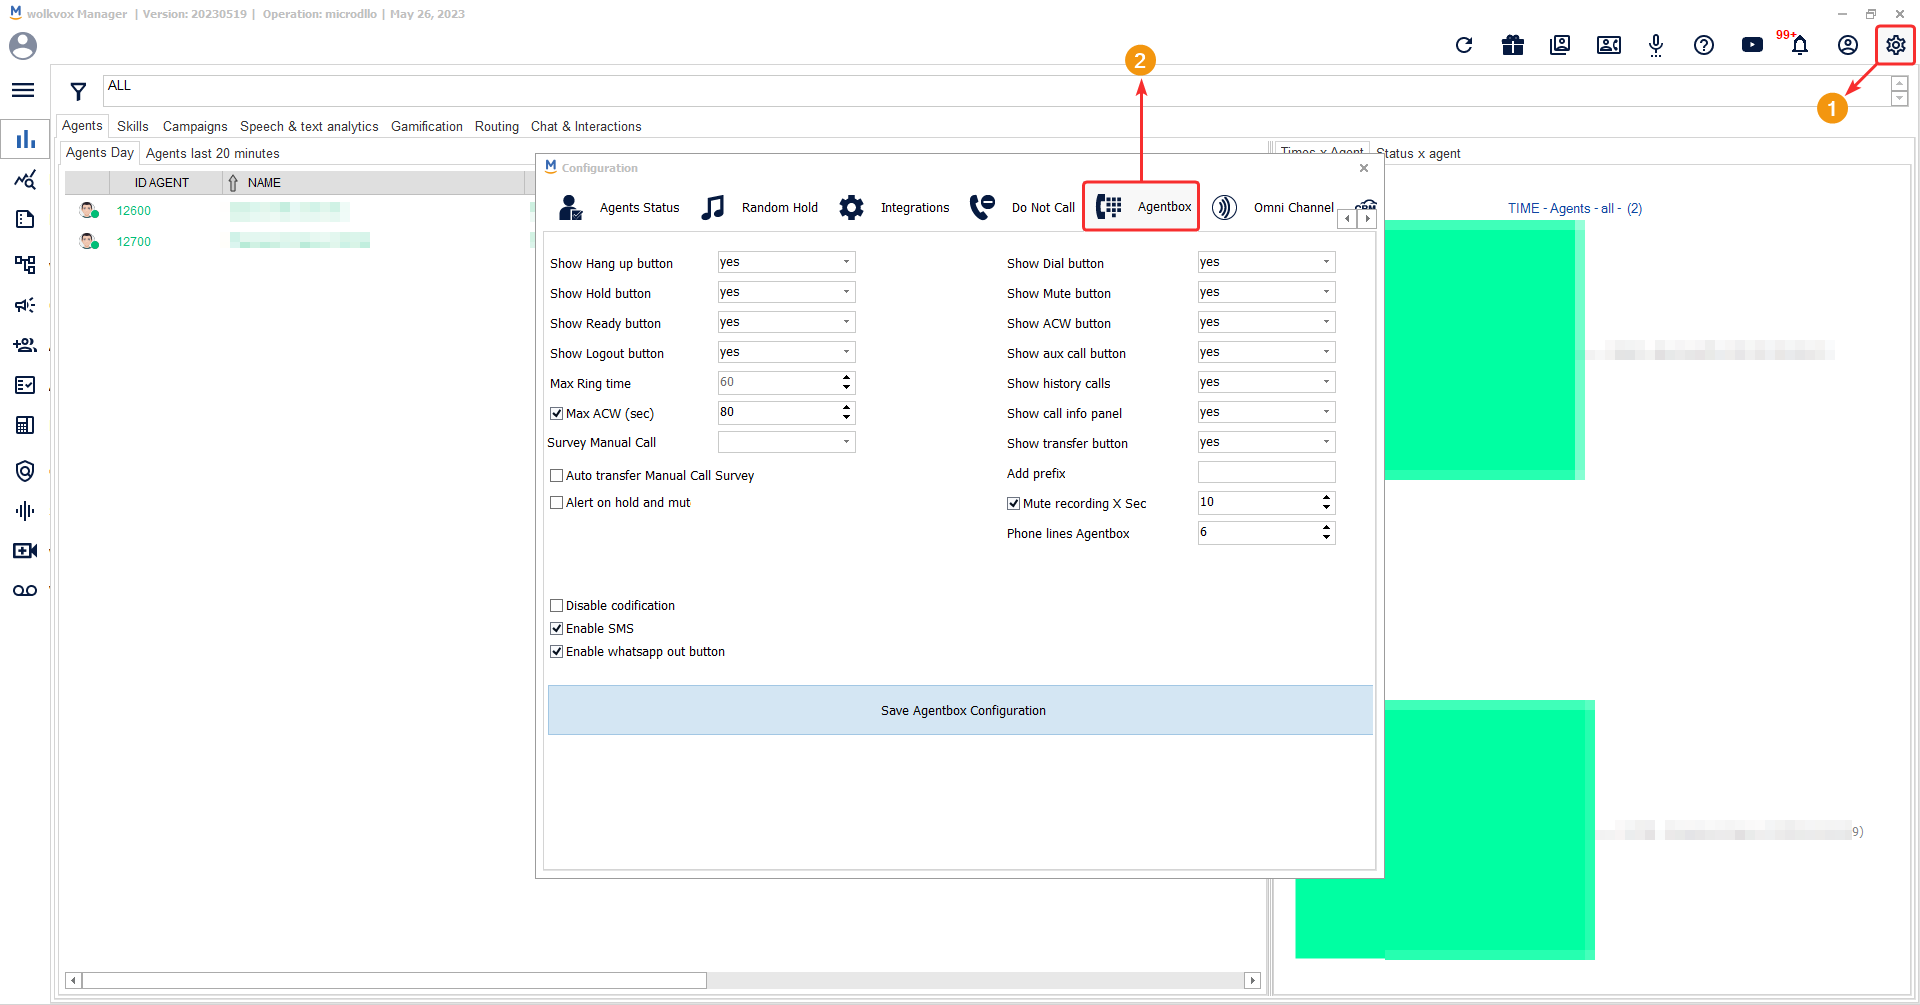
Configure general parameters for the AgentBox application for agents #
In the “AgentBox” section, you can configure all the parameters related to the agents’ platform. The following options are available for configuration:
- Show Hang up button: Display or hide the button that allows the agent to hang up the call.
- Show Hold button: Display or hide the button that allows the agent to place the client on hold.
- Show Ready button: Display or hide the button that allows the agent to set their status to “Ready”.
- Show Logout button: Display or hide the button that allows the agent to set their status to “Logout”.
- Max Ring Time: Set the maximum ring time, which is the maximum time to answer the call from the client.
- Max ACW (sec): Set the maximum After Call Work (ACW) time for agents to classify or encode the call. Once the agent exceeds the specified time, they will automatically be set to “Ready” status.
- Survey Manual Call: Select the skill that contains the desired survey.
- Auto transfer survey manual call.
- Alert on hold and mute: Activate alerts to notify the agent when they have been in mute mode or when the client has been on hold for a specified period of time. You can set the number of seconds before the alert appears to the agent. This feature is useful to ensure excellent customer service and avoid leaving the client on hold for an extended period without updates. It also helps prevent the agent from being in mute mode for too long.
- Show Dial button: Display or hide the button that allows the agent to manually make calls.
- Show Mute button: Display or hide the button that allows the agent to mute their microphone.
- Show ACW button: Display or hide the button that allows the agent to set their status to “ACW”.
- Show aux call button: Display or hide the button that allows the agent…
- Show history calls: Display or hide the button that allows the agent to view their call history.
- Show call info panel: Display or hide the call information panel for the agent.
- Show transfer button: Display or hide the button that allows the agent to transfer calls.
- Add prefix: Set a default prefix so that agents do not have to enter it manually each time they make a call.
- Mute recording x Sec: Set the time in seconds to pause call recordings.
- Phone lines Agentbox: Enter the number of telephone lines available to the agent for making calls in the softphone. You can set a maximum of 6 lines per agent. For example, if you enter 3 in this field, the agent can have up to 3 concurrent calls.
- Disable codification: Disable call classification or encoding by the agent.
- Enable SMS: Enable or disable the button that allows the agent to send a text message or initiate a conversation via text message (in a country where it is allowed).
- Enable WhatsApp out button: Enable or disable the button that allows the agent to initiate a conversation on WhatsApp.
Configuring the omnichannel functionality of the operation #
The Omni Channel section allows you to integrate various external services into wolkvox Manager to operate them within the platform, eliminating the need to work with them separately and avoiding productivity loss. The services that can be integrated are: Email, Web Chat, Facebook Messenger, WhatsApp, Bidirectional SMS (only available in countries that support this feature), Telegram, Line, Facebook Page, Instagram, and Twitter.
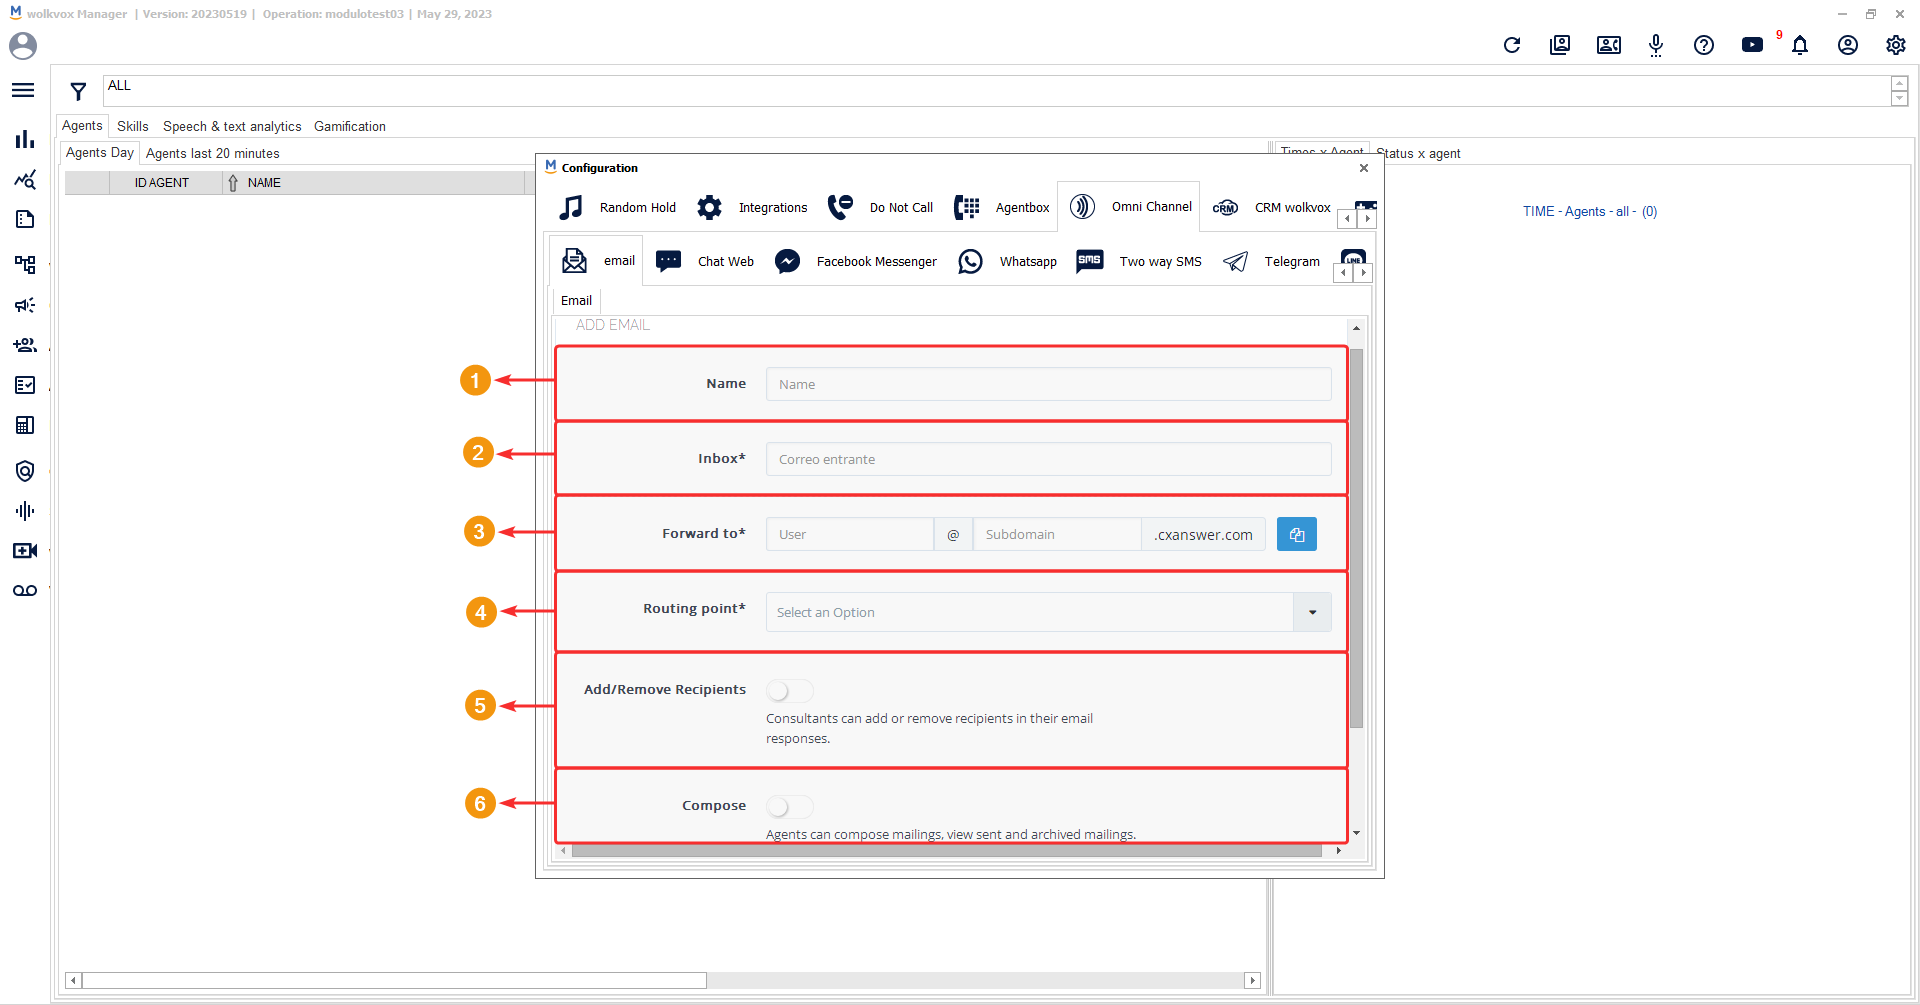
Add your email to the Omni Channel service #
The first channel you can integrate into your wolkvox Manager is email. With this channel, your agents will have an email inbox where they will receive all emails and manage the entire service from wolkvox Manager without having to access the channel through another application. It also allows for sending emails. In other words, they will be able to handle both calls and emails from Agentbox (applies to desktop and web versions).
![]() This service has an additional cost.
This service has an additional cost.

In the fields that appear, you need to configure the following:
- Name: The name you want to appear to the customer when interacting with them in the email service.
- Inbox: Specify the email address that you want CXAnswer to verify and download so that you can receive incoming emails in the CXAnswer platform.
- Forward to: Specify the email address that you want CXAnswer to verify and download so that you can receive incoming emails in the CXAnswer platform. This field is divided into “User” and “Subdomain”. This button allows you to copy the entire “Forward to” email address so that you can paste it in the configuration of the email you want to use.
- Routing point: Link a routing point to the email.
- Add/Remove Recipients: Activate this option if you want your agents to be able to add or remove recipients in their email responses
- Compose: Enable this option if you want your agents to be able to compose new email messages, view sent and archived email messages.
![]() Mandatory fields are marked with an asterisk (*).
Mandatory fields are marked with an asterisk (*).
Modify the design of your emails #
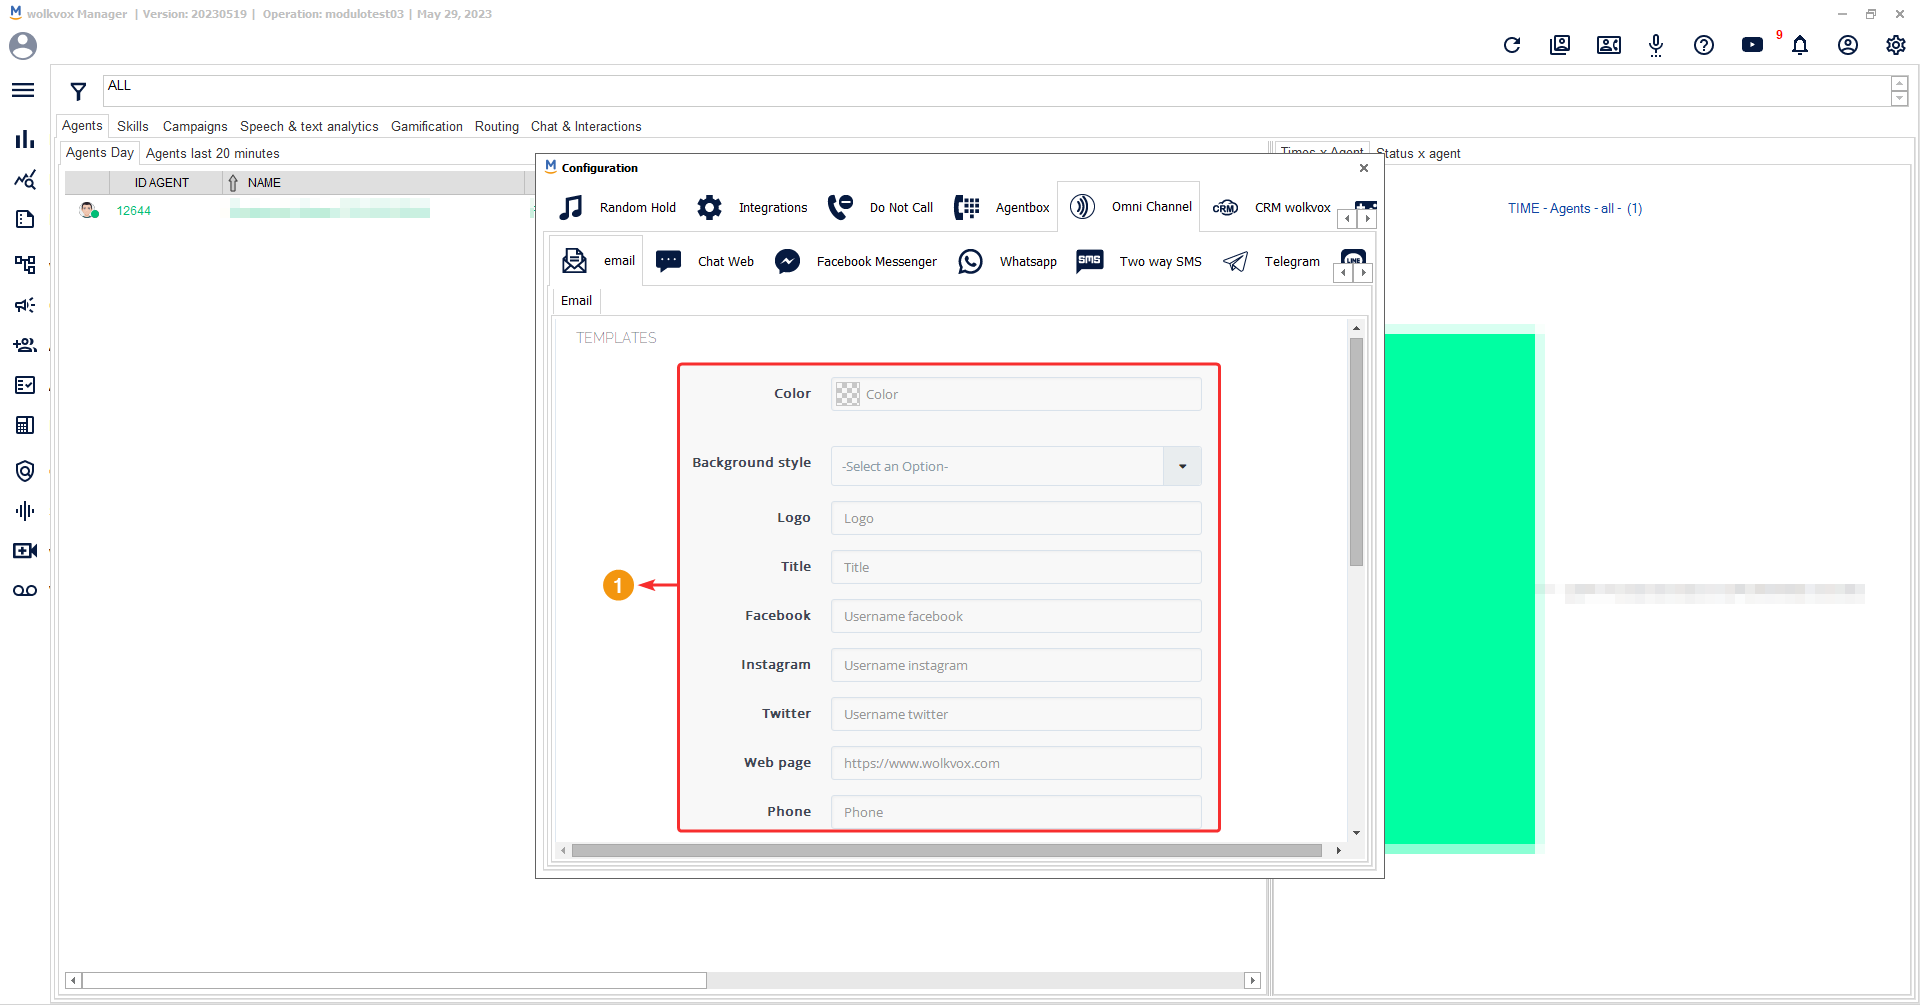
Using the ‘Templates’ button, you can modify the structure of your messages that will be sent via email.

You can modify the following options.
- Color: Background color of the message.
- Background style: Overall style of the message (dark or light).
- Logo: URL of your logo’s location.
- Title: Title of the message.
- Facebook, Instagram, and Twitter Page Name: Only the name, not in the form of a URL.
- Web Page: Link to the webpage you want to include.
- Phone: Phone number you want to display.
If you scroll down using the scroll bar, you will find more options.
- Link text survey: Assign text for the link that leads to the survey.
- Sign text: Text for the signature.
- Signature options: Type of signature (agent’s name, agent’s signature, or none).
- All rights reserved: Link to read the copyright policy.
- Social networks text: Write text to announce the social networks.
- Survey: Enable or disable the satisfaction survey within the message.
- Text rating: Write text to announce the satisfaction survey.
- Qualification options: Write 5 options that the customer will have to evaluate the service (values should be separated by commas).
- Click on “Preview” to see a preview of how the message would look like.

- Below, you can see an example of the email preview.
- Click on “Update” to apply the changes if you liked how your design looked in the preview.
- Click on “Edit” to modify the template settings if there was something you didn’t like about how your template looked in the preview.

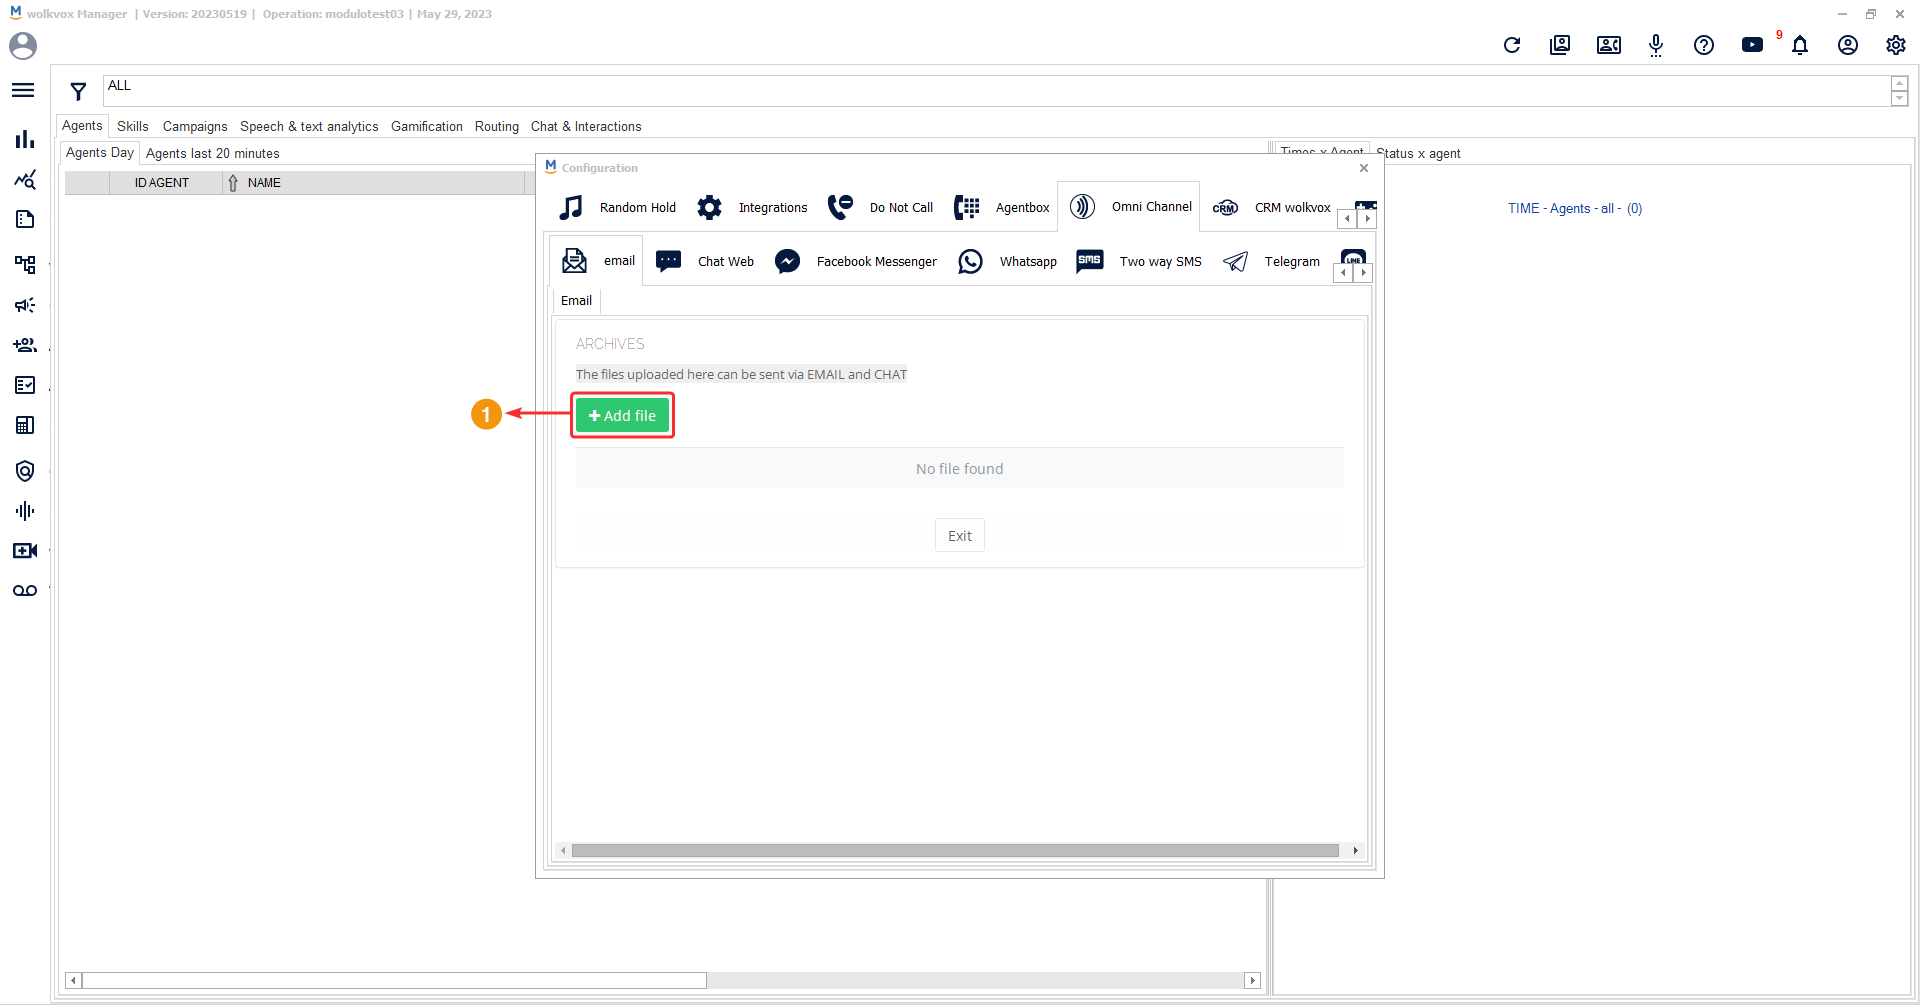
Add files, which can be attached by the agent when sending emails #
In this section, you can add files for agents to attach them to the necessary emails.
To access this section, click on the ‘Files’ button.”
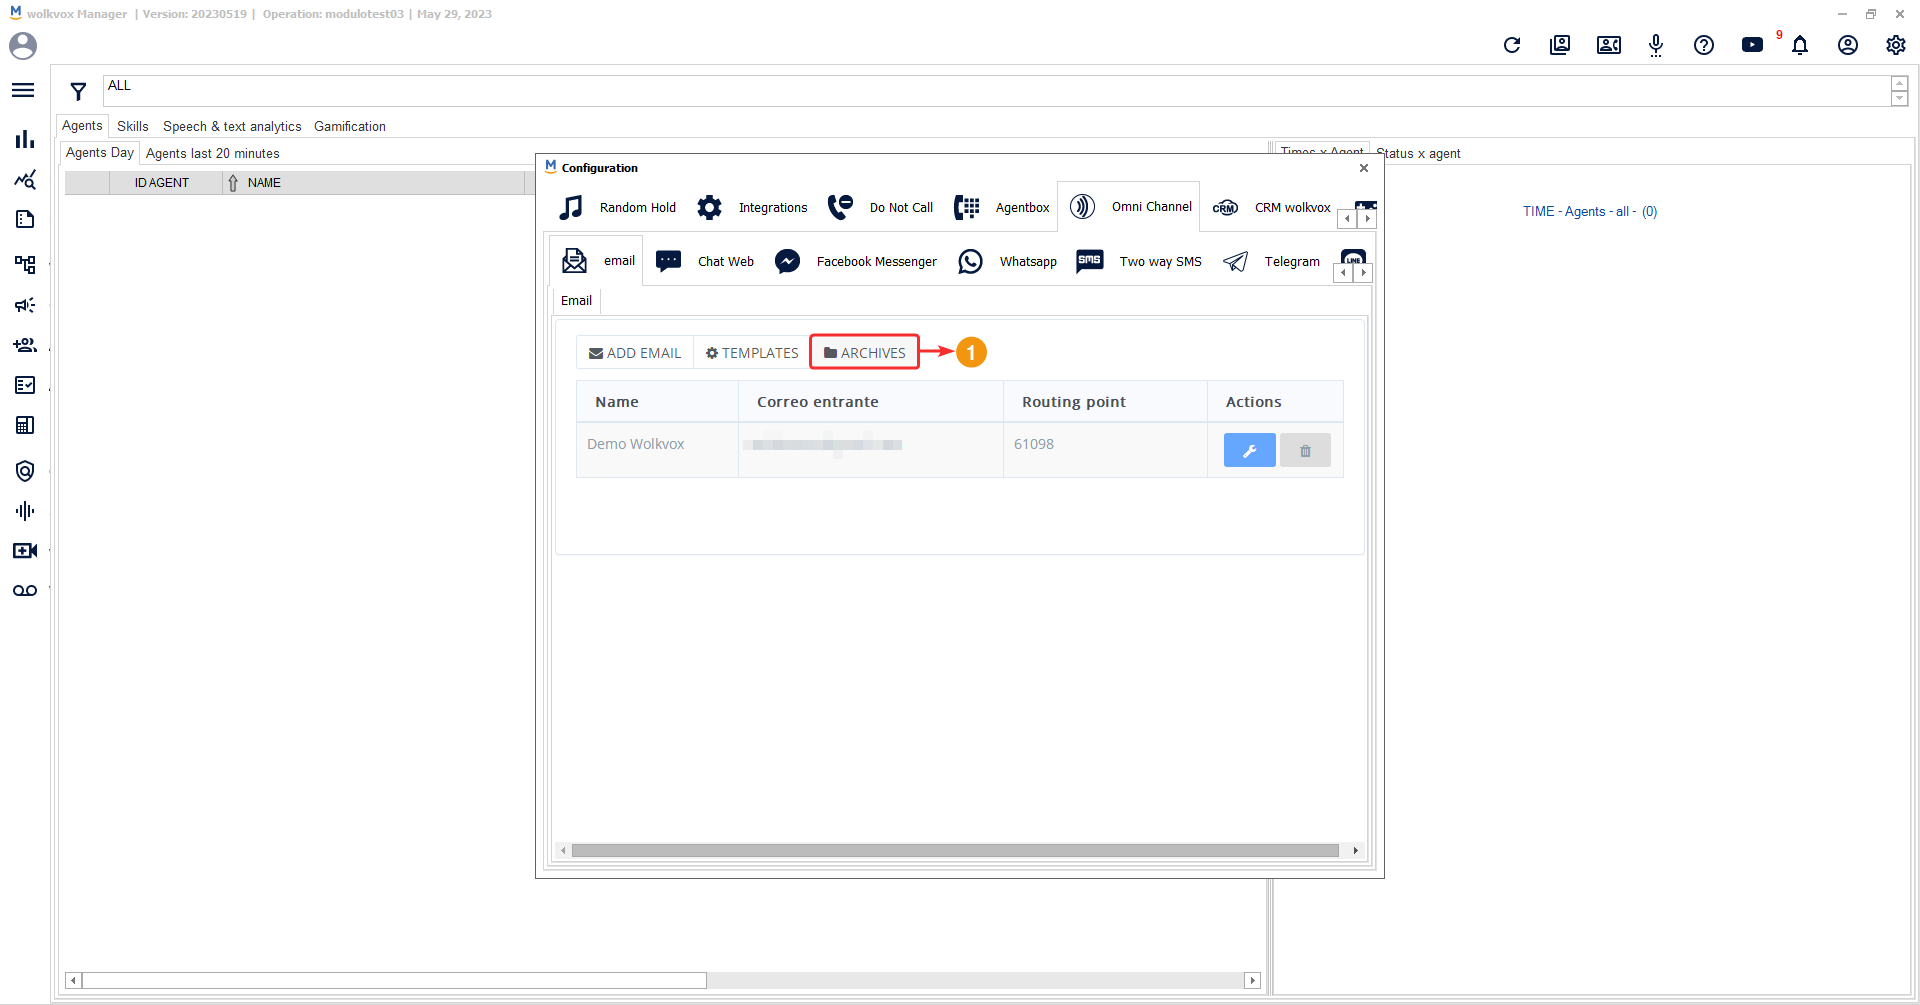
After entering, click on ‘Add file’.
In the new window, two fields will appear. In the first one, you write a name for the attached file, and in the second one, you enter the URL of the location where the file is hosted.
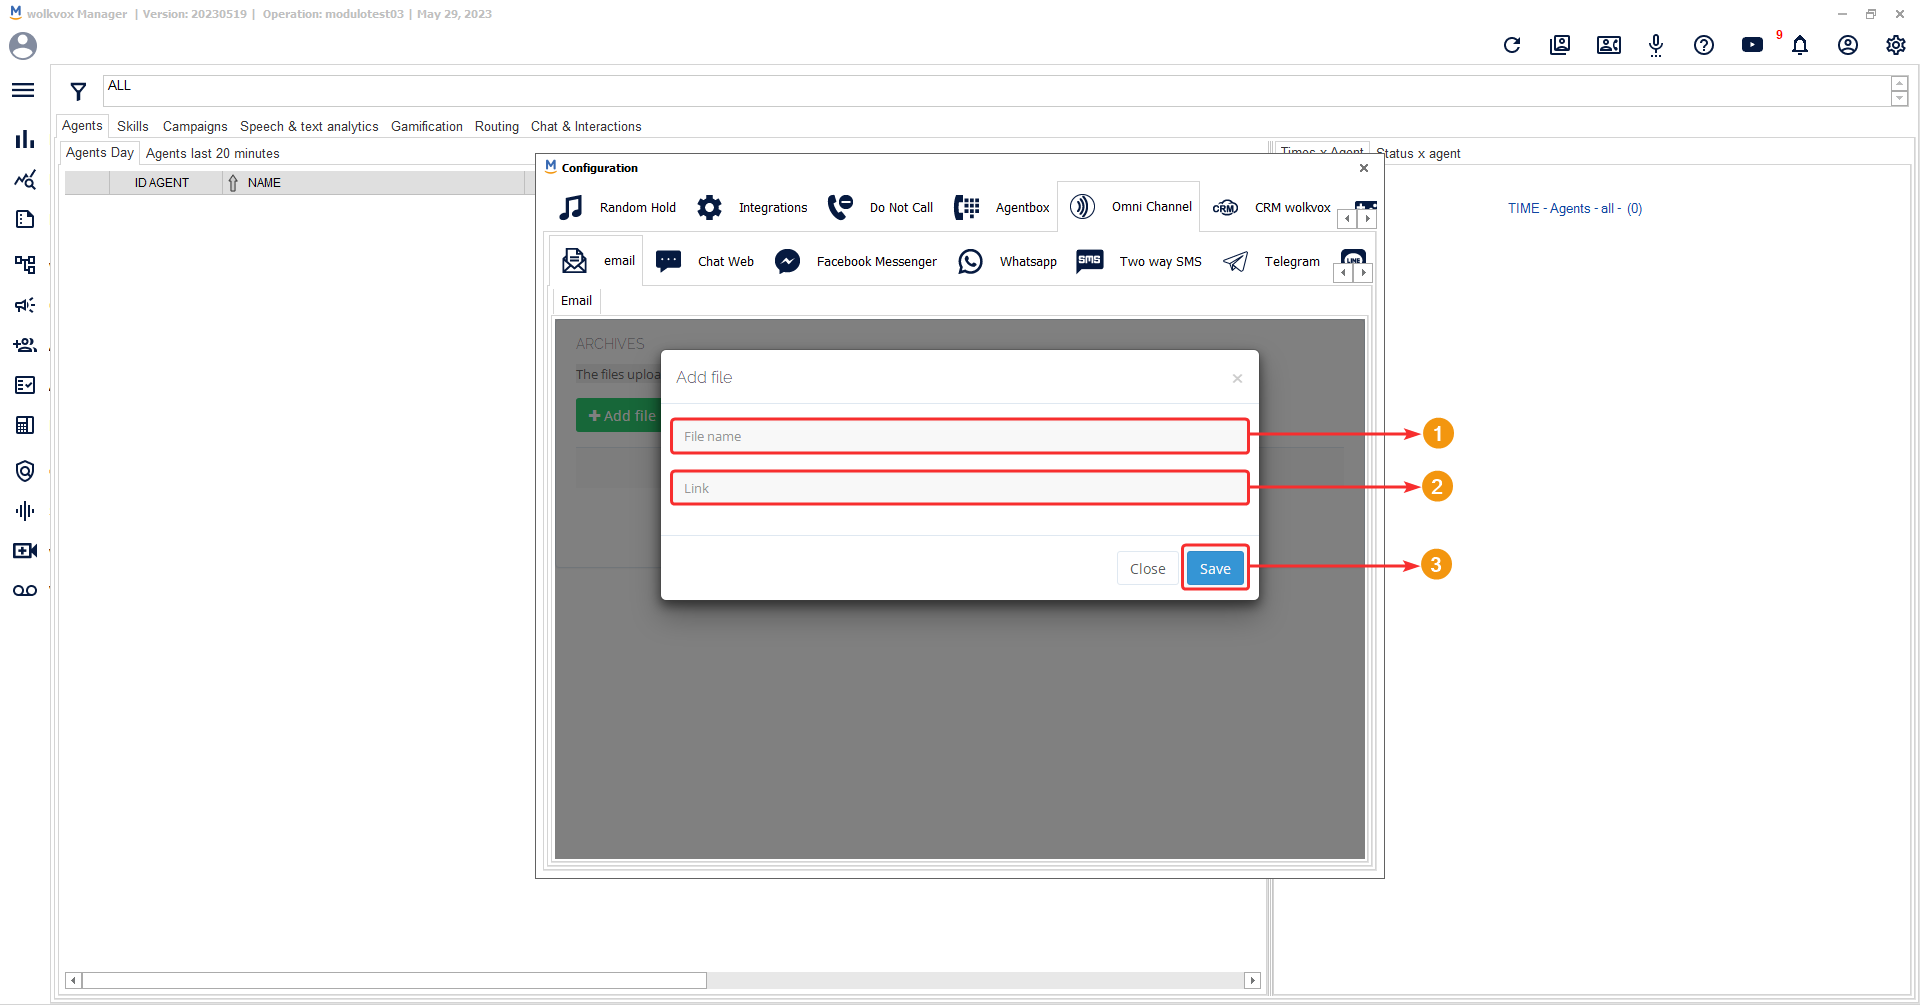
The items listed in the attachments list are ready to be used by agents in their email message submissions.

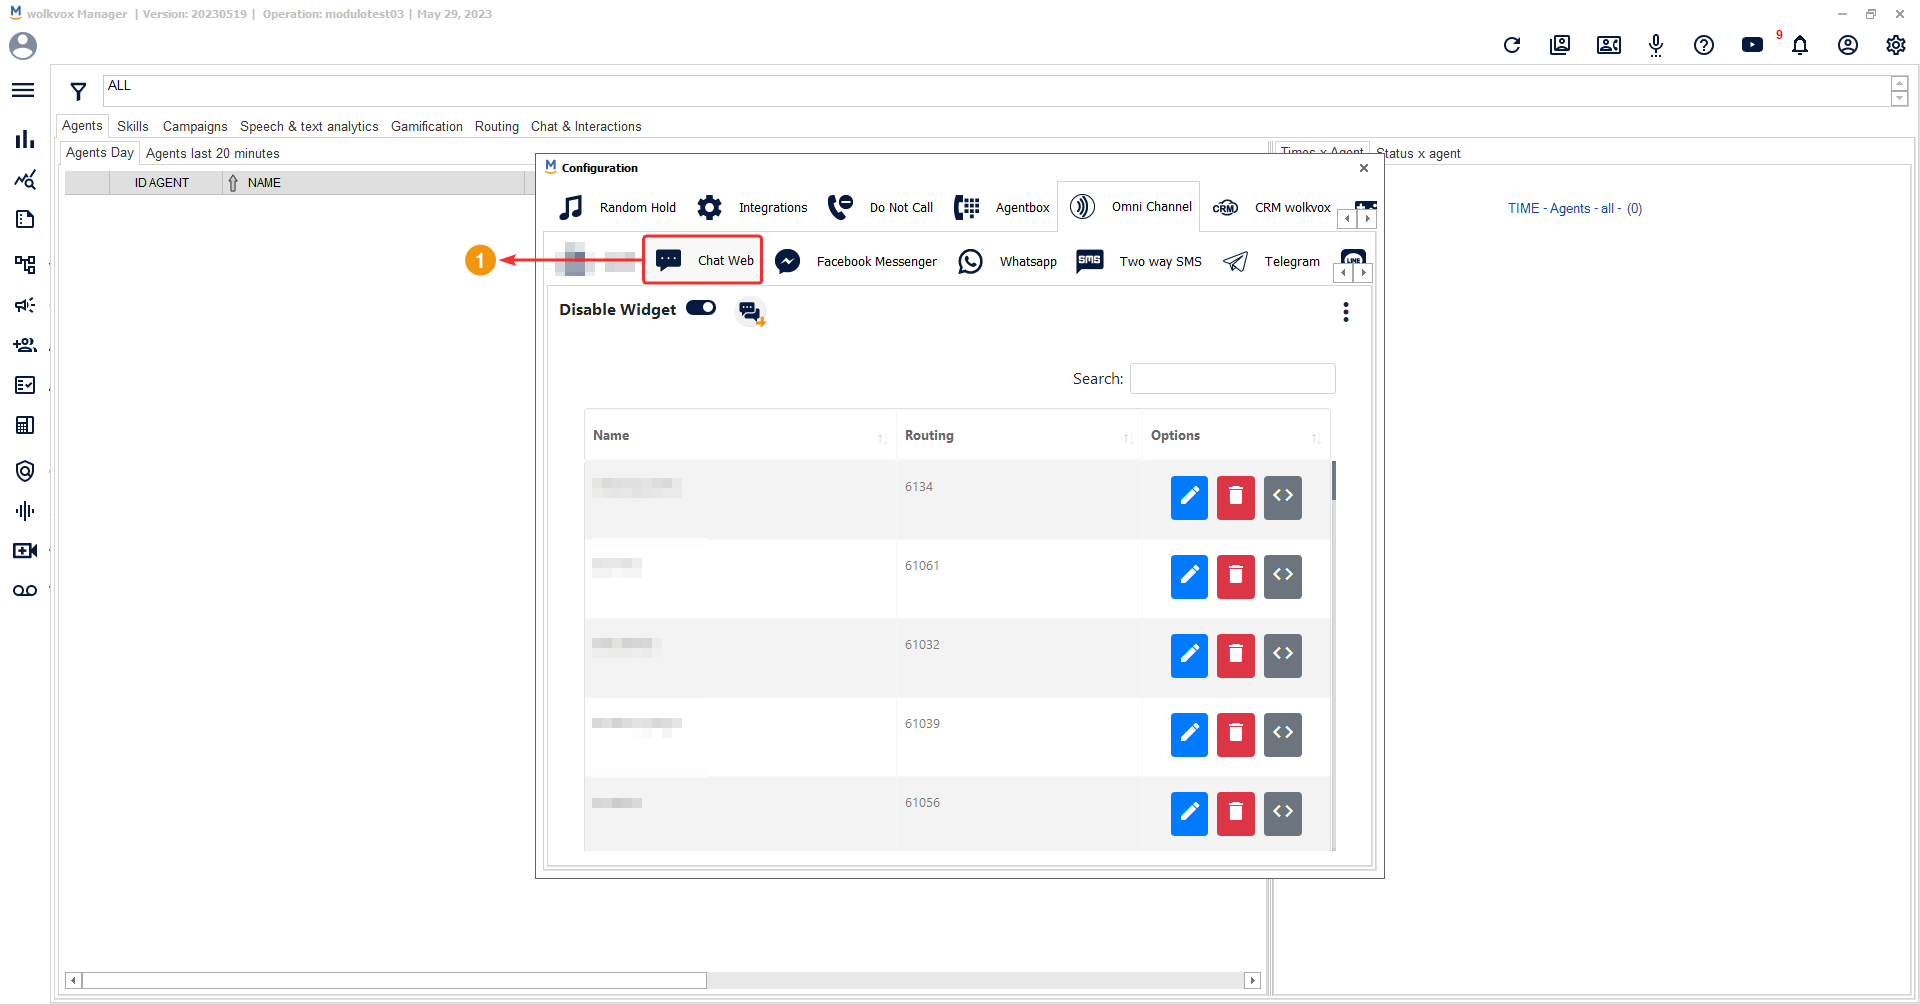
Create and configure a chat for your website #
The second channel you can integrate into your Wolkvox Manager is a chat for your website.
General configuration of the chat #
The highlighted button in the following image provides access to the general chat configuration. Additionally, it is here where the surveys sent in email messages are configured.

- Firstly, you can find the ‘Send email’ section, where you can enable the toggle button to send an email with the entire conversation between a customer and an agent to the operation administrator.
- In the ‘Messages’ section, you can configure the texts that are sent to the customer whenever an action occurs.

In the ‘FAQs’ section, you can create default answers for the frequently asked questions posed by your customers.

A new window appears where you can:
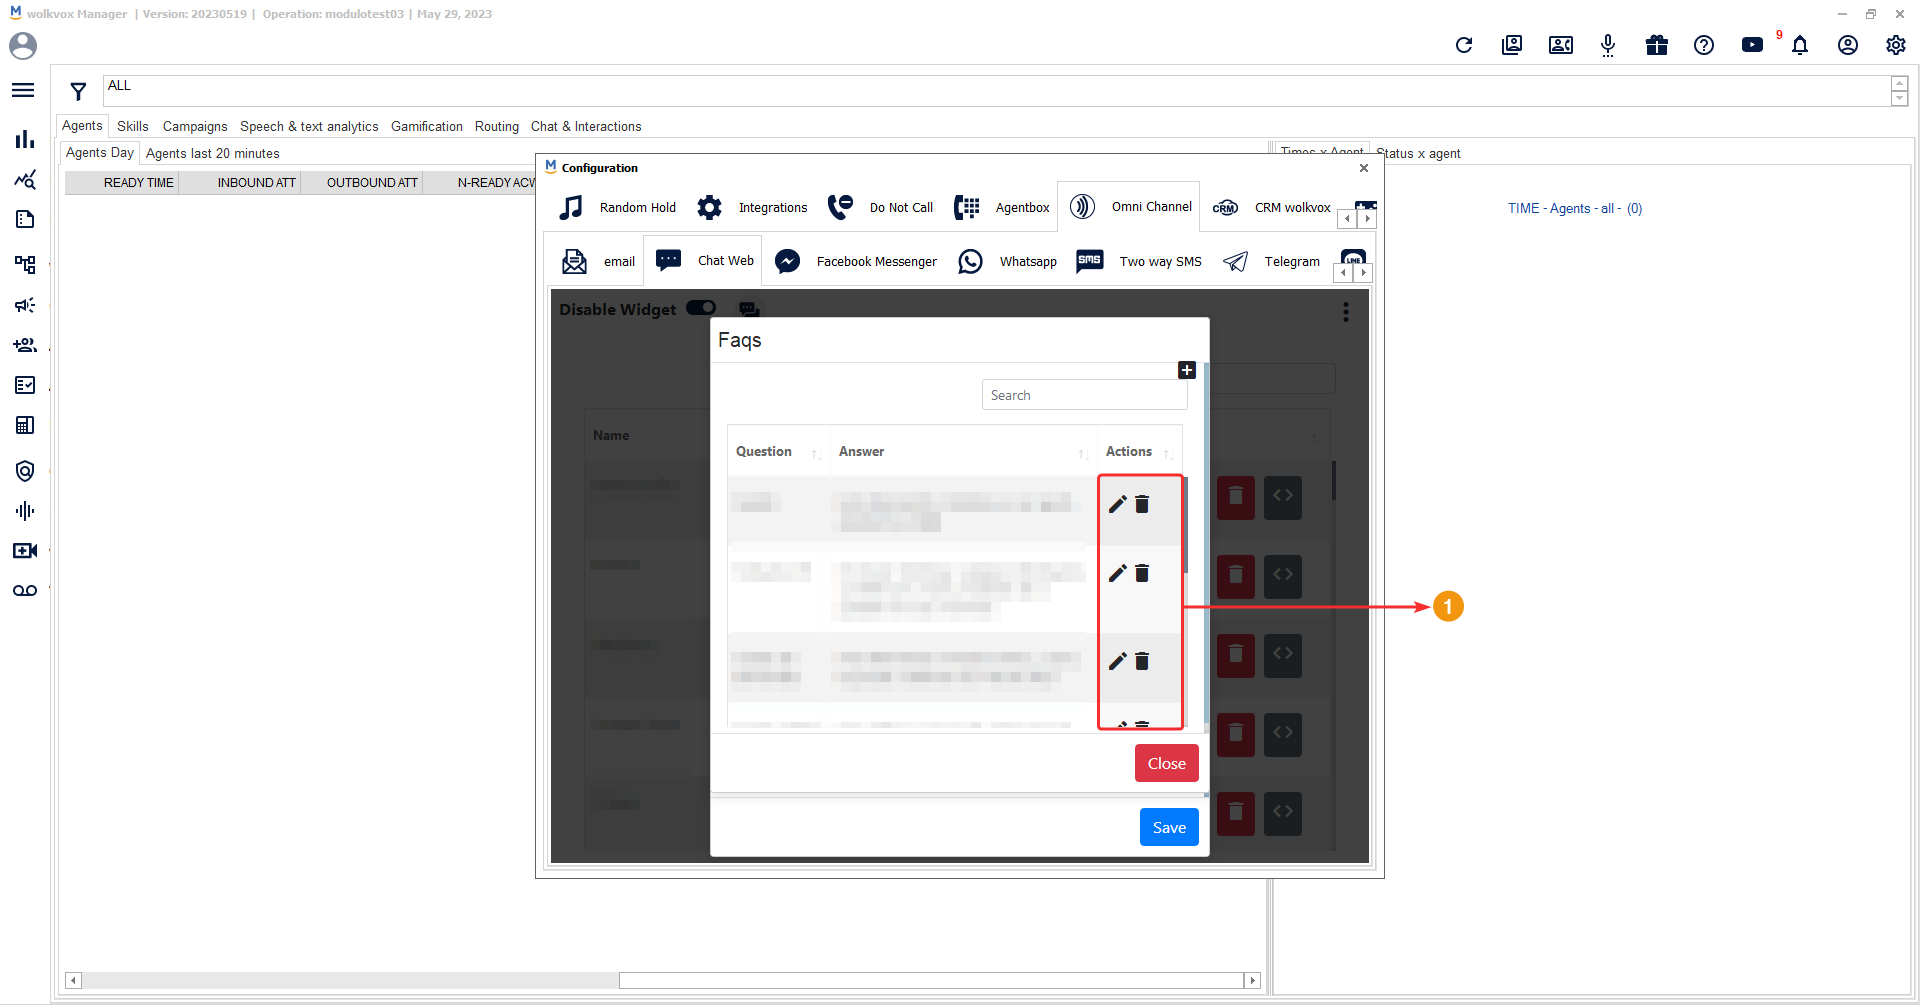
- View the list of added questions.
- Search by keywords.
- Add new questions with their respective answers.

By clicking on ‘Add question’, a new window opens where you must write the frequent question you want and its respective answer.
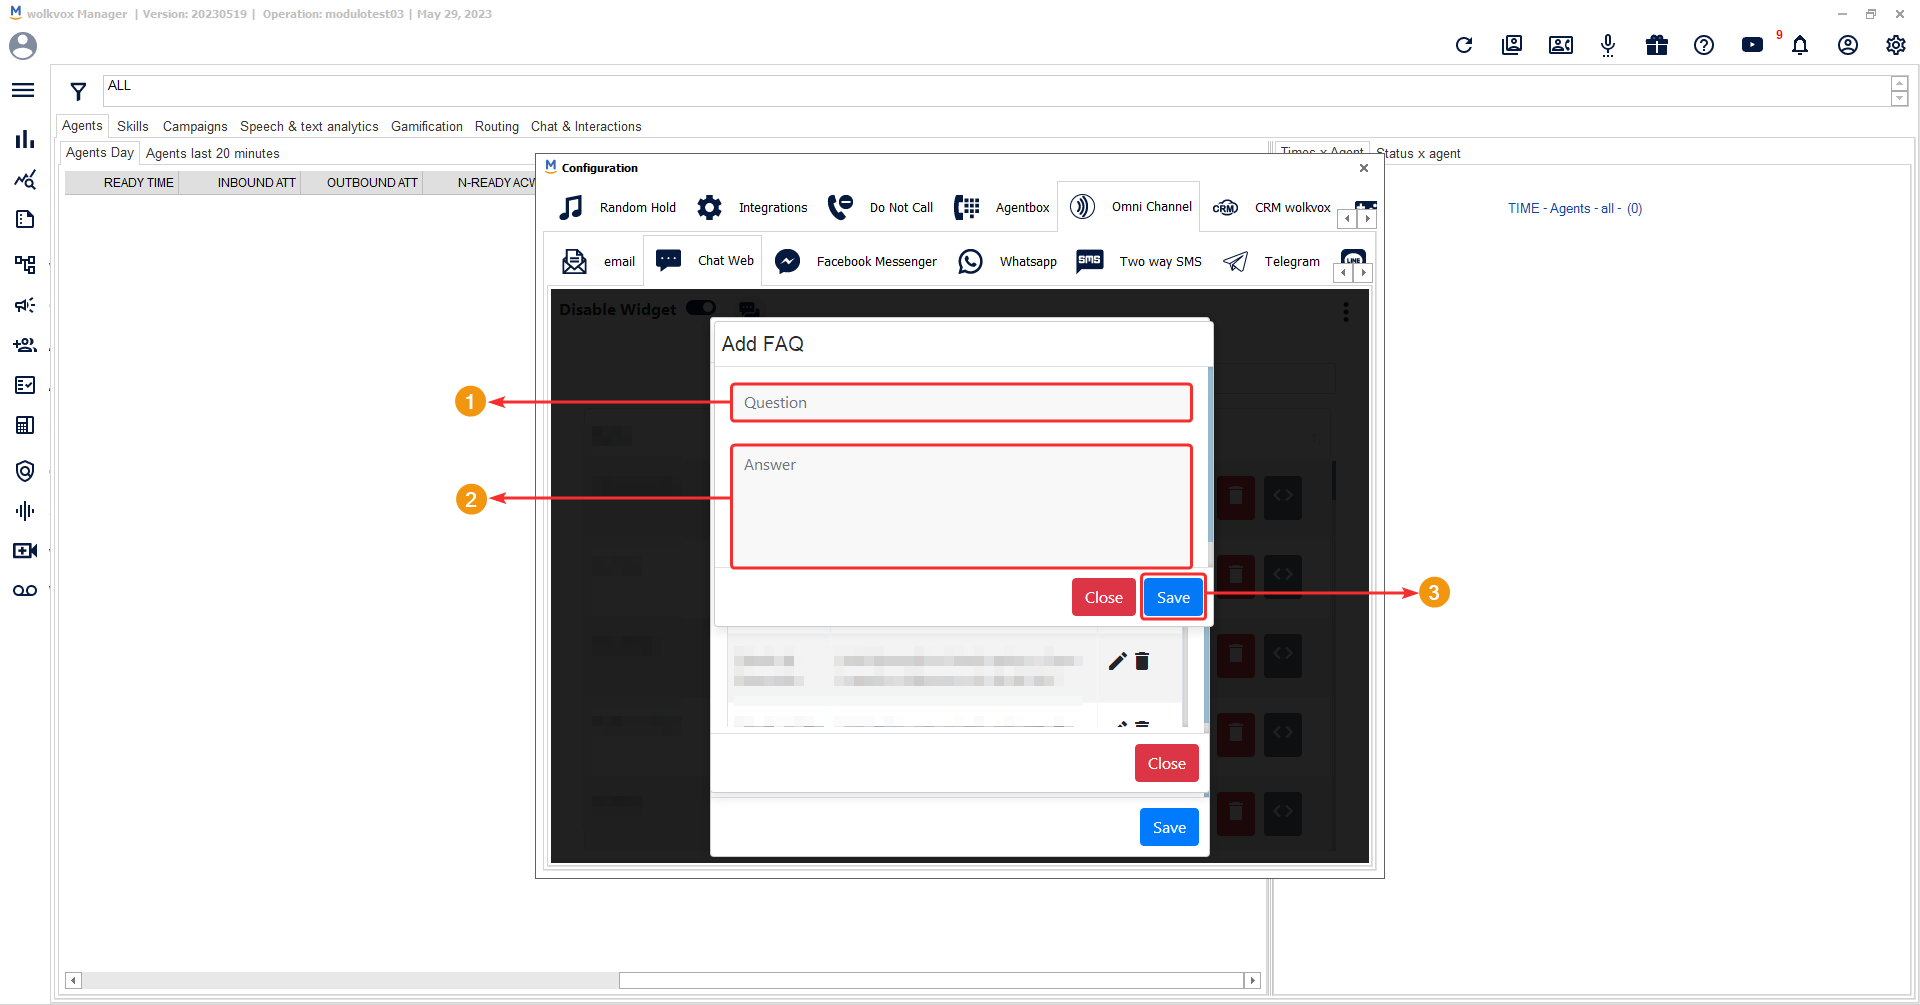
Once you save the question, it will appear in the FAQs list with the option to edit its content or delete it.
In the next section, you can create a survey. Surveys are sent to the customer through a link and can be of two types: internal survey and external survey.
The survey will be sent to the customer once the chat is finished.

The first options you can configure are:
- Enable or disable the survey
- Select the percentage of chats to which you want to send the survey.
- Select all (default | All) or a specific skill.
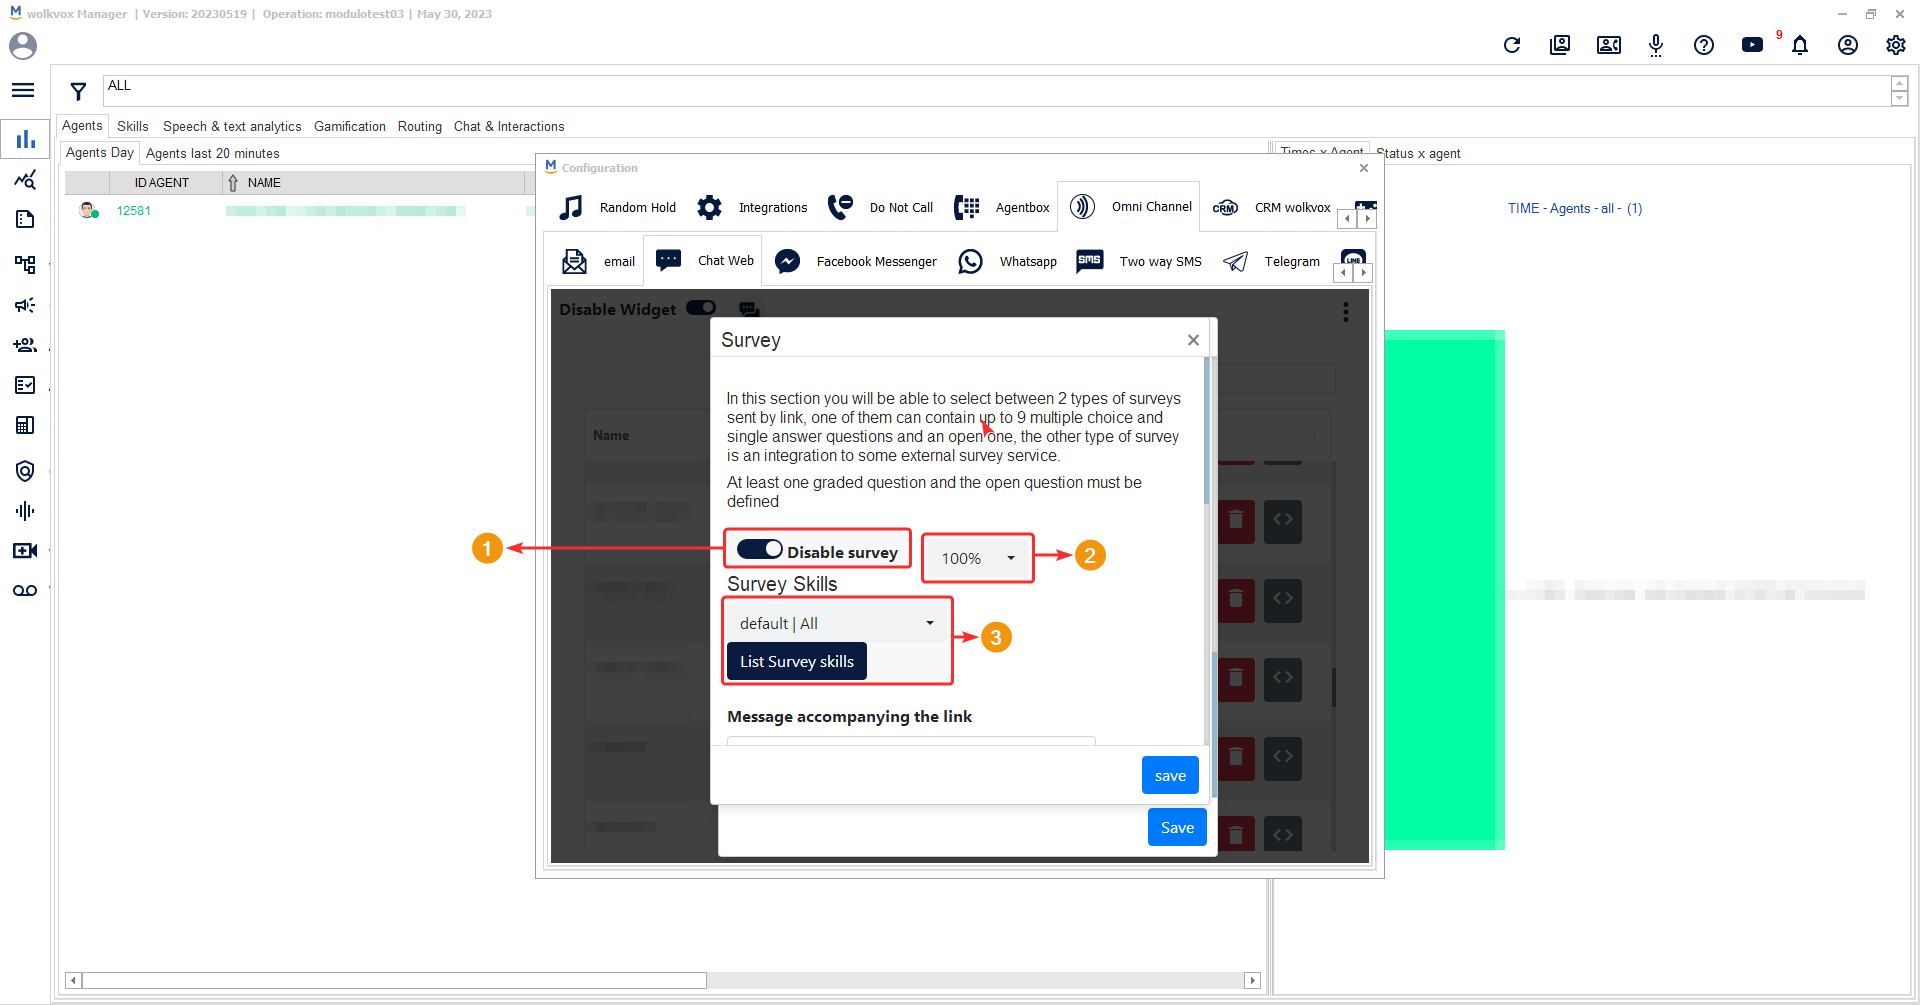
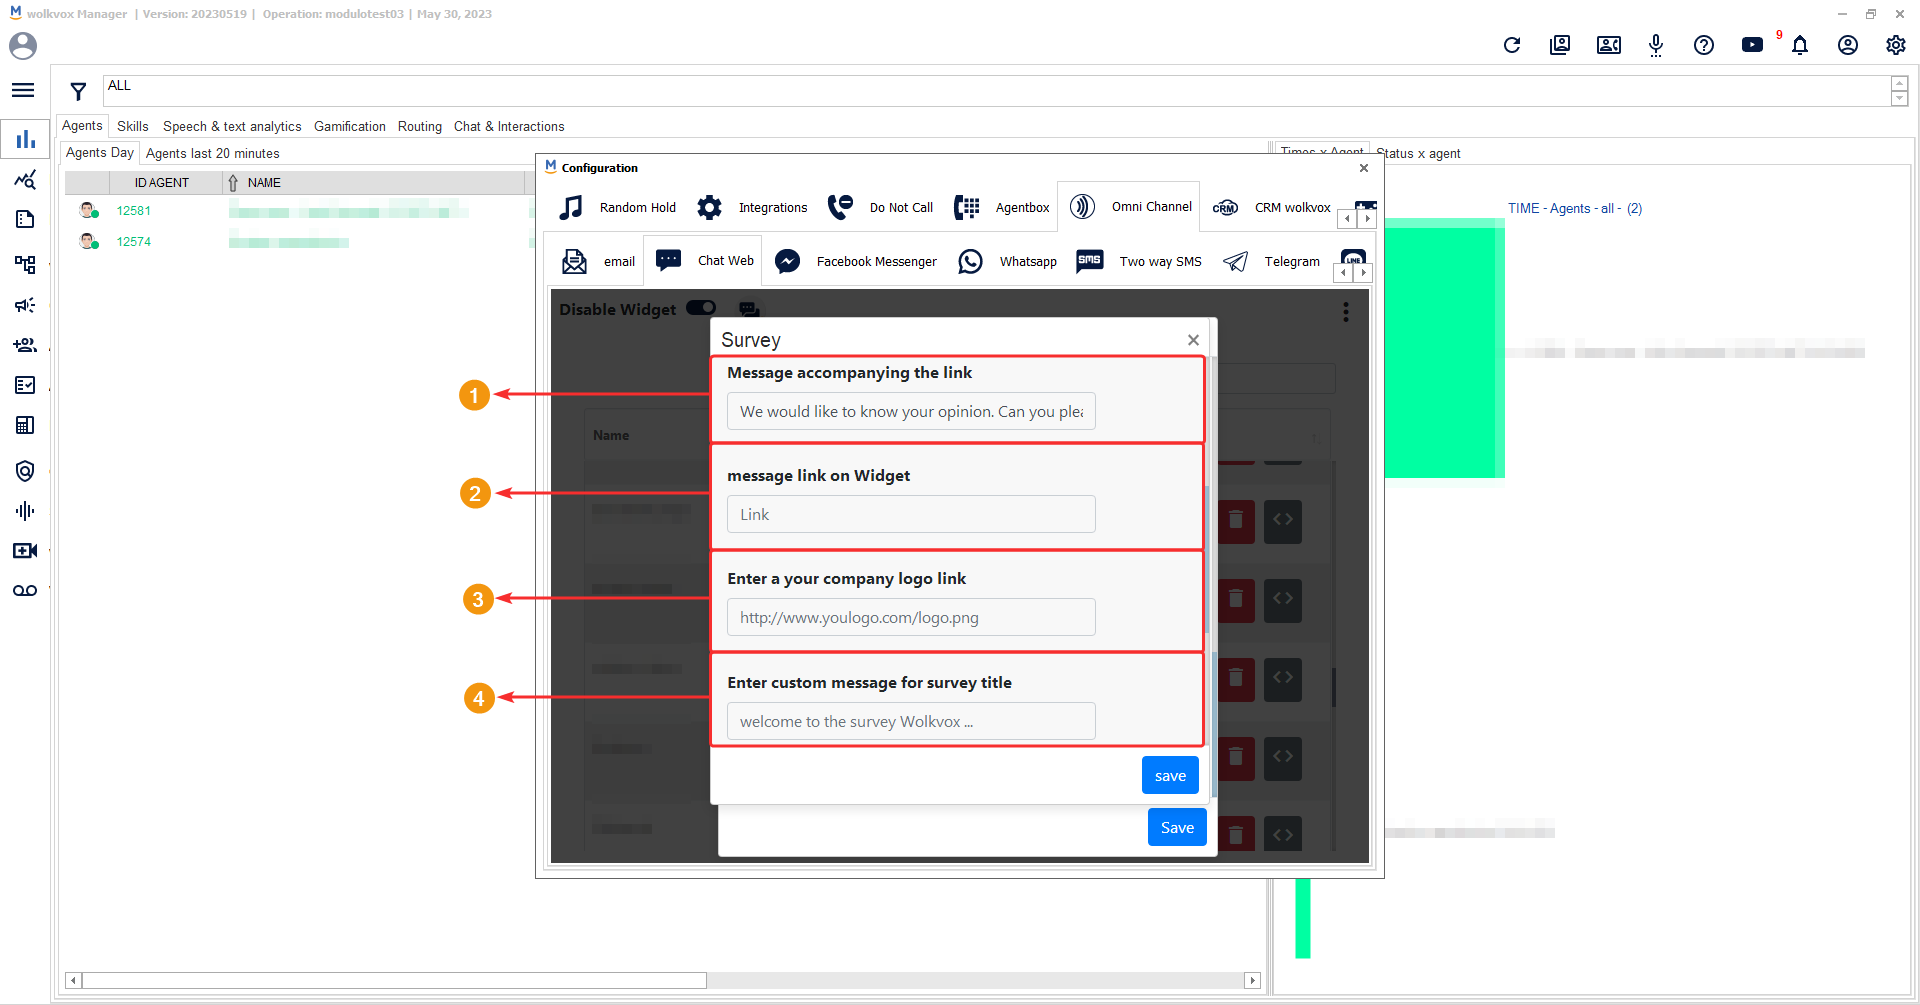
Then you can configure:
- The message accompanying the link.
- The link of the message.
- Logo using the image file URL.
- Welcome message to the survey.
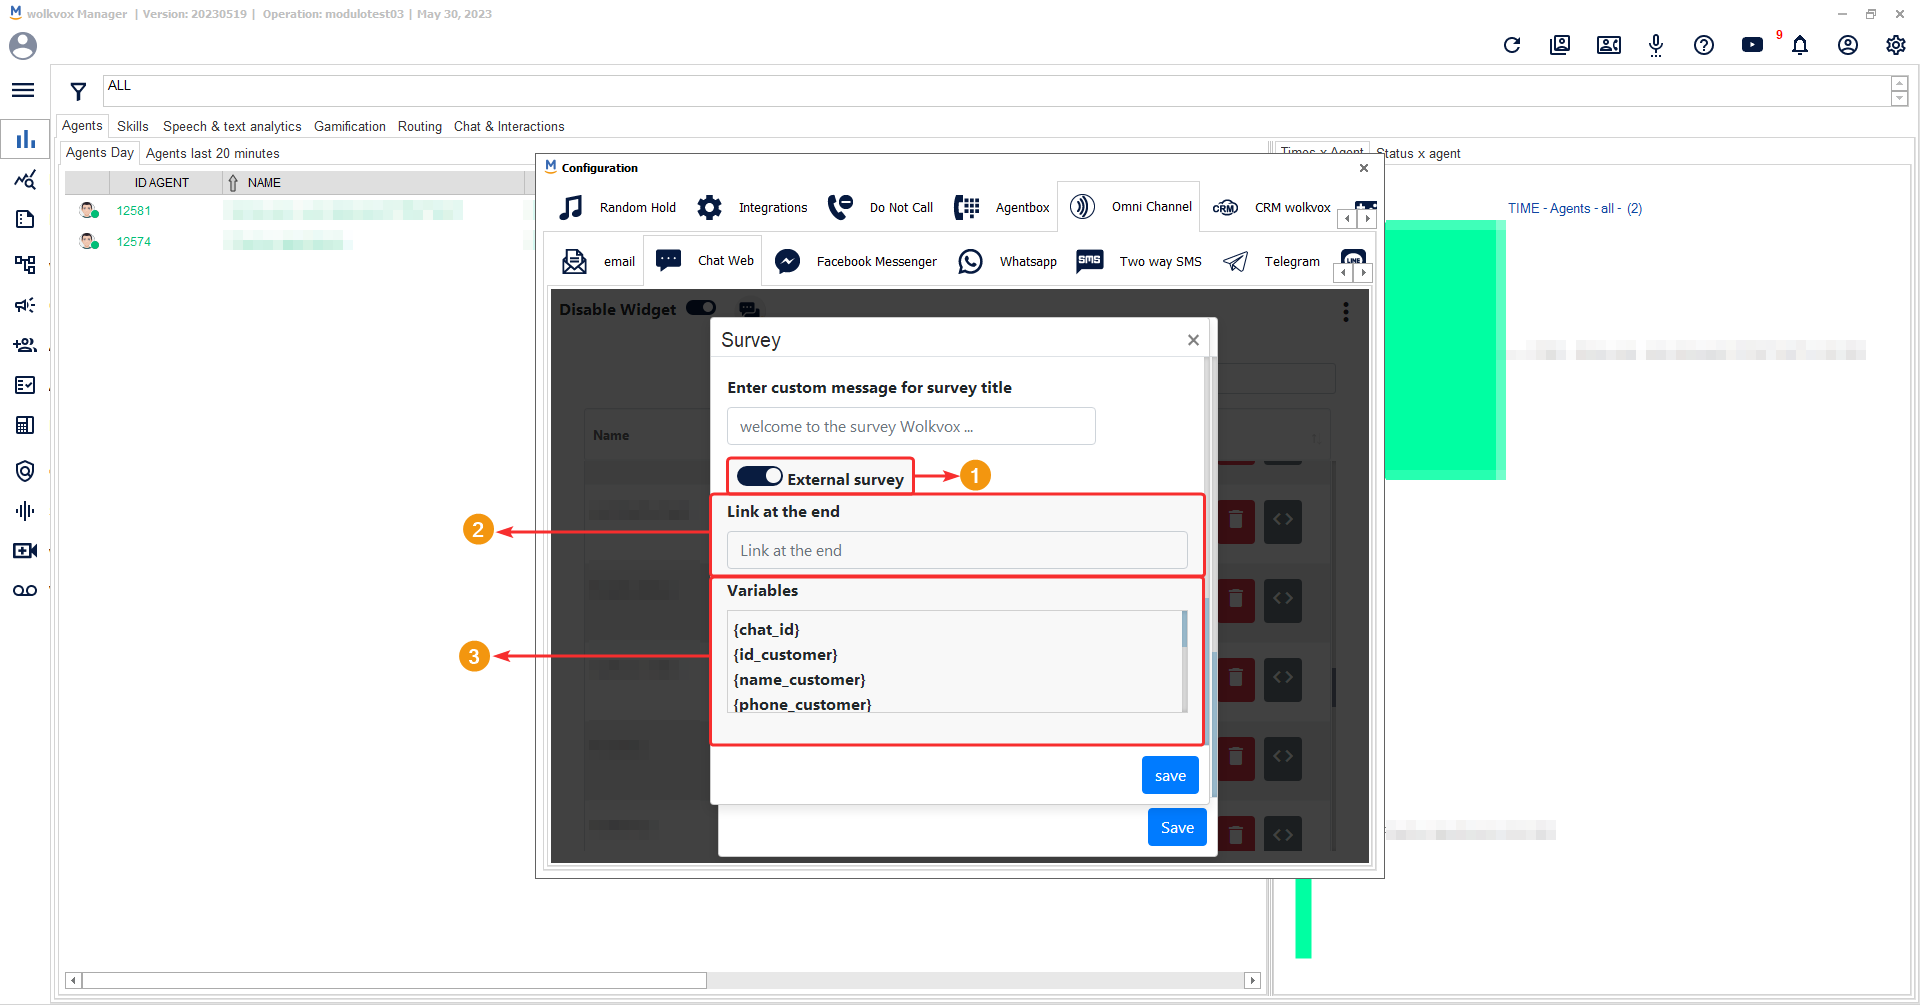
Next, there is the option to choose whether you want the survey to be integrated or external.
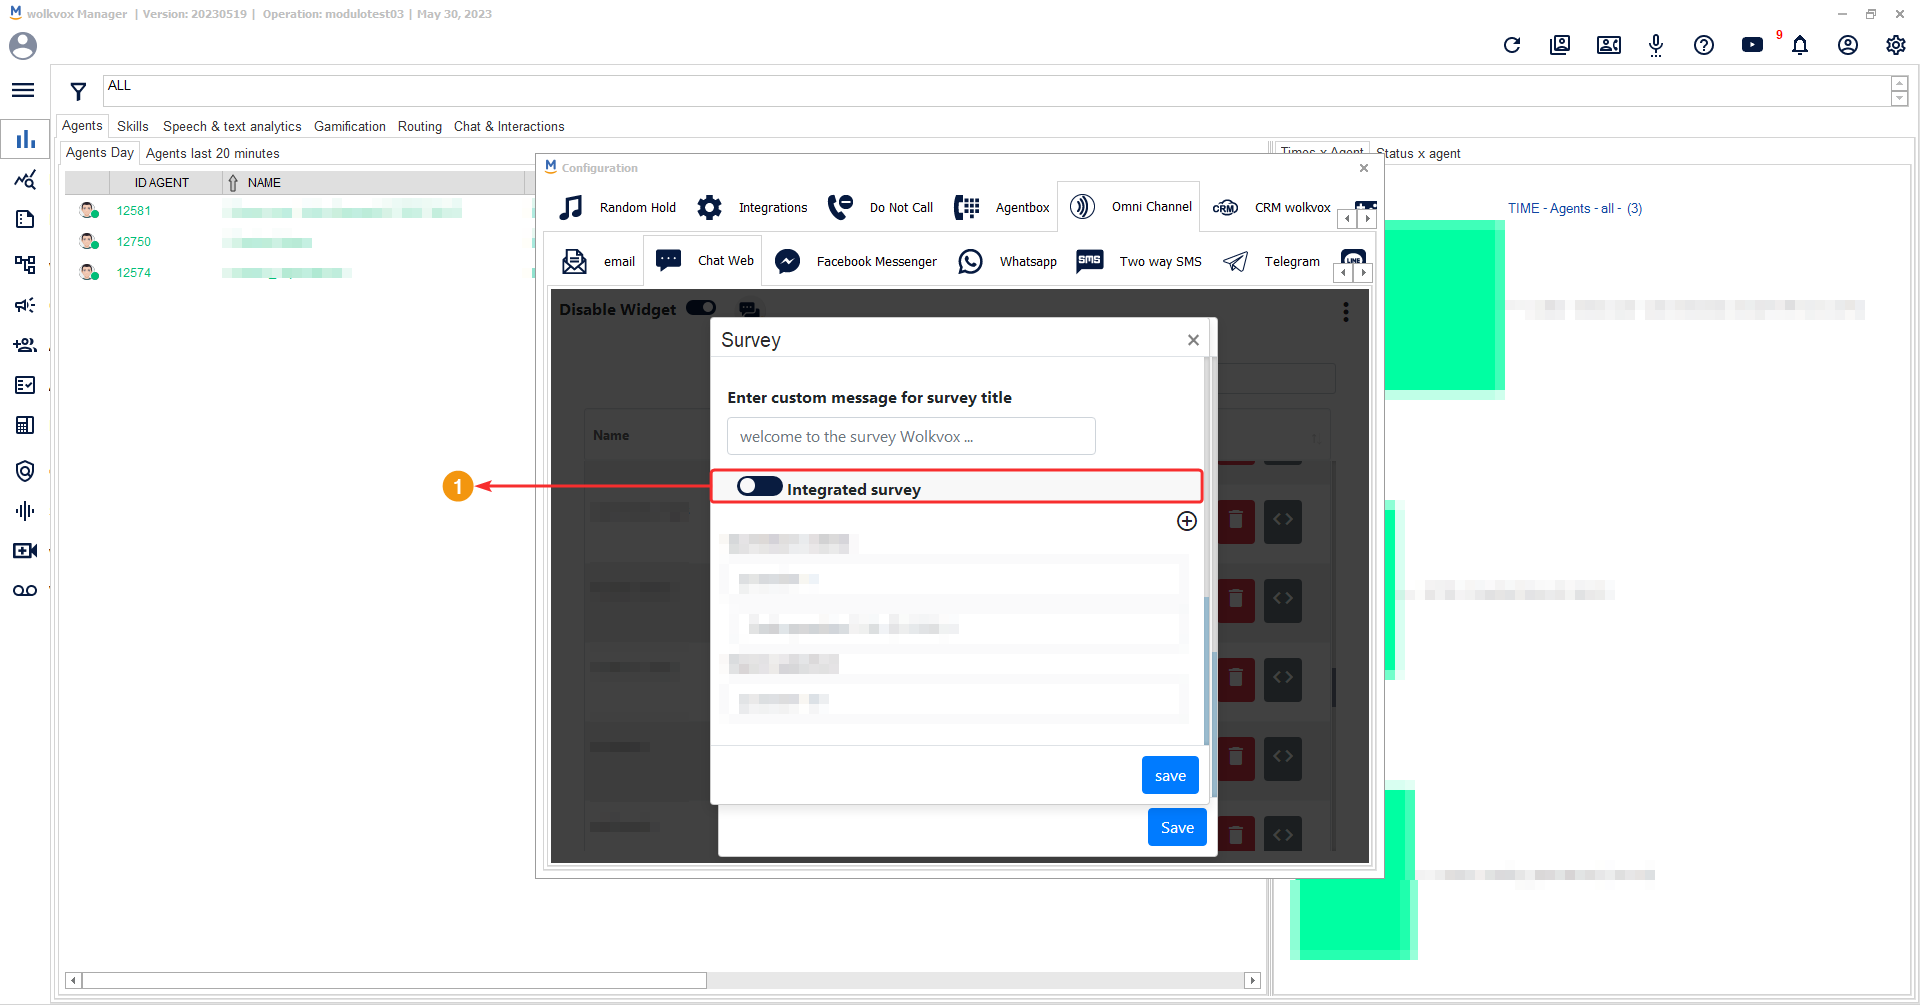
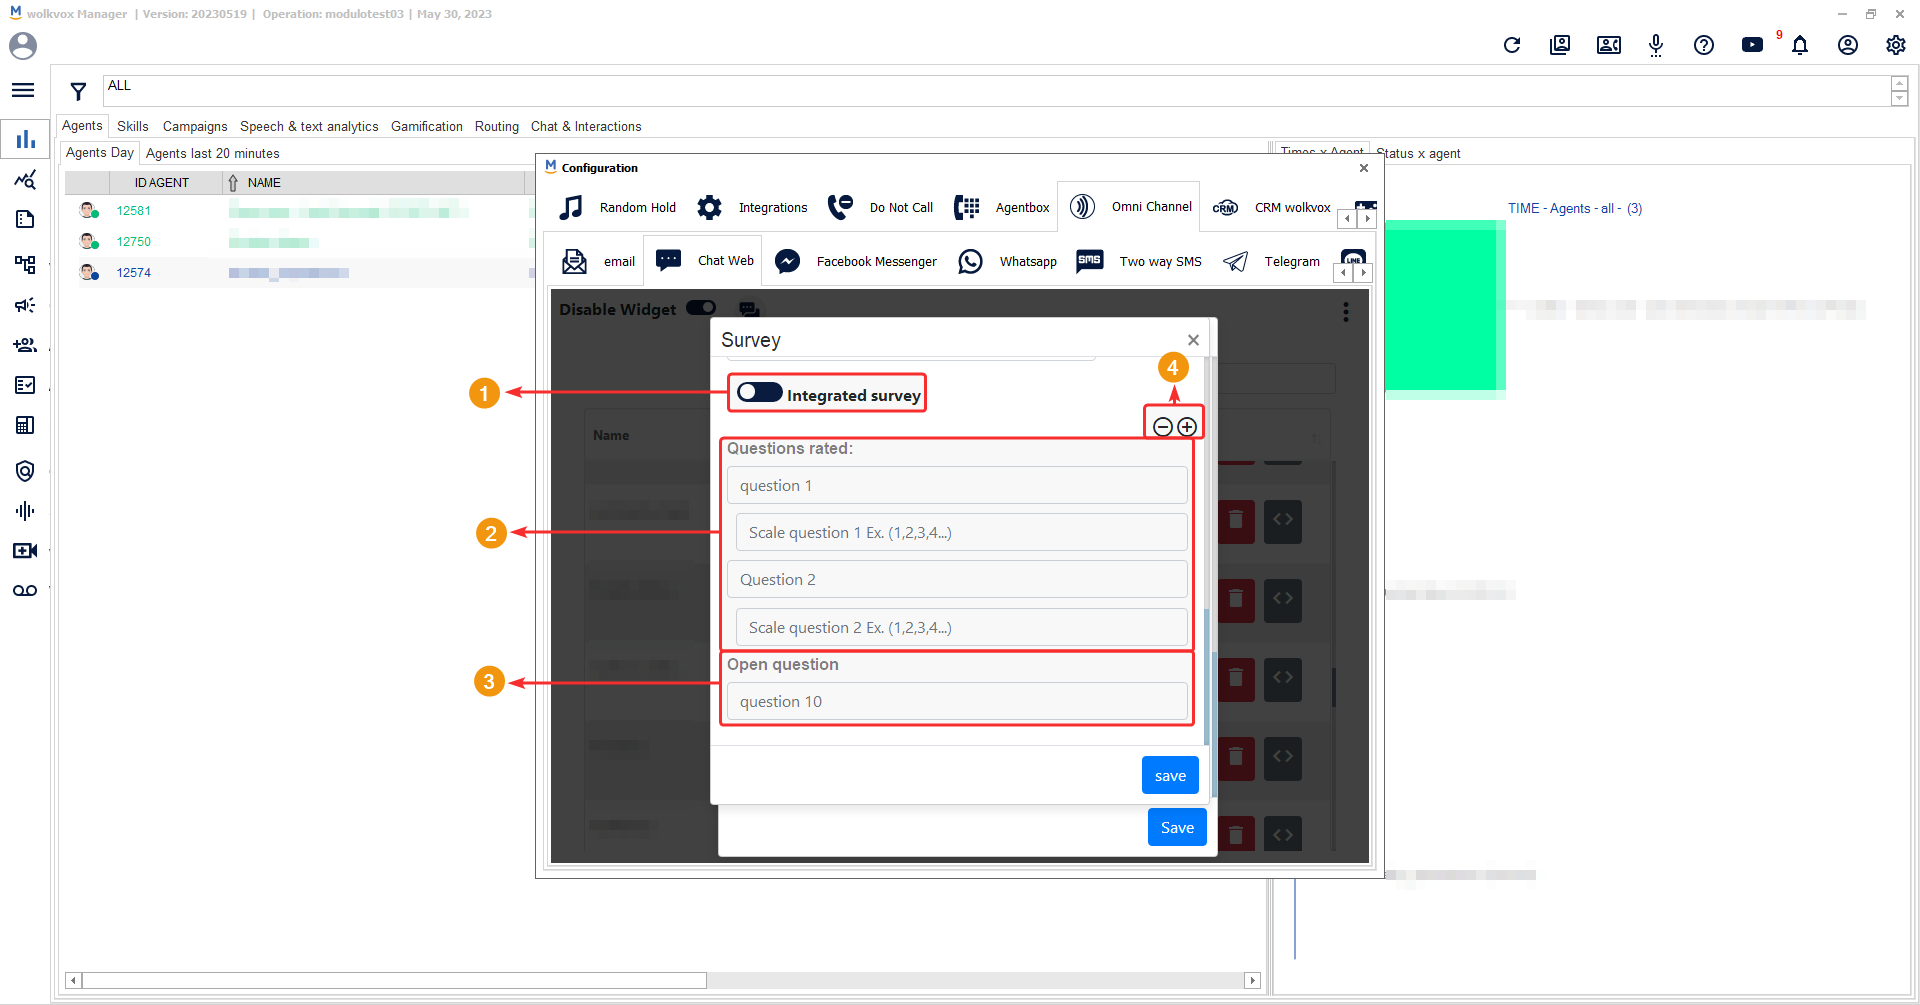
- If you have selected ‘Integrated survey,’ you will have the following options.
- Add rating questions: In this type of question, the customer needs to rate according to the parameters you have written. Each question has its field to parameterize according to your needs. The rating values should be separated by commas (,).
- There is a field to ask an open-ended question and let the customer respond without predetermined options but freely.
- On the right side, there are two buttons: one to delete the last question and another to add a multiple-choice rating question. You can add up to a maximum of 9 multiple-choice rating questions.
- If you have selected ‘Integrated survey,’ you will have the following options.
- You will need to enter the link that will take the customer to the survey.
- You can use the variables from the list in the external survey to integrate the data.
Create a new chat to integrate into your website #
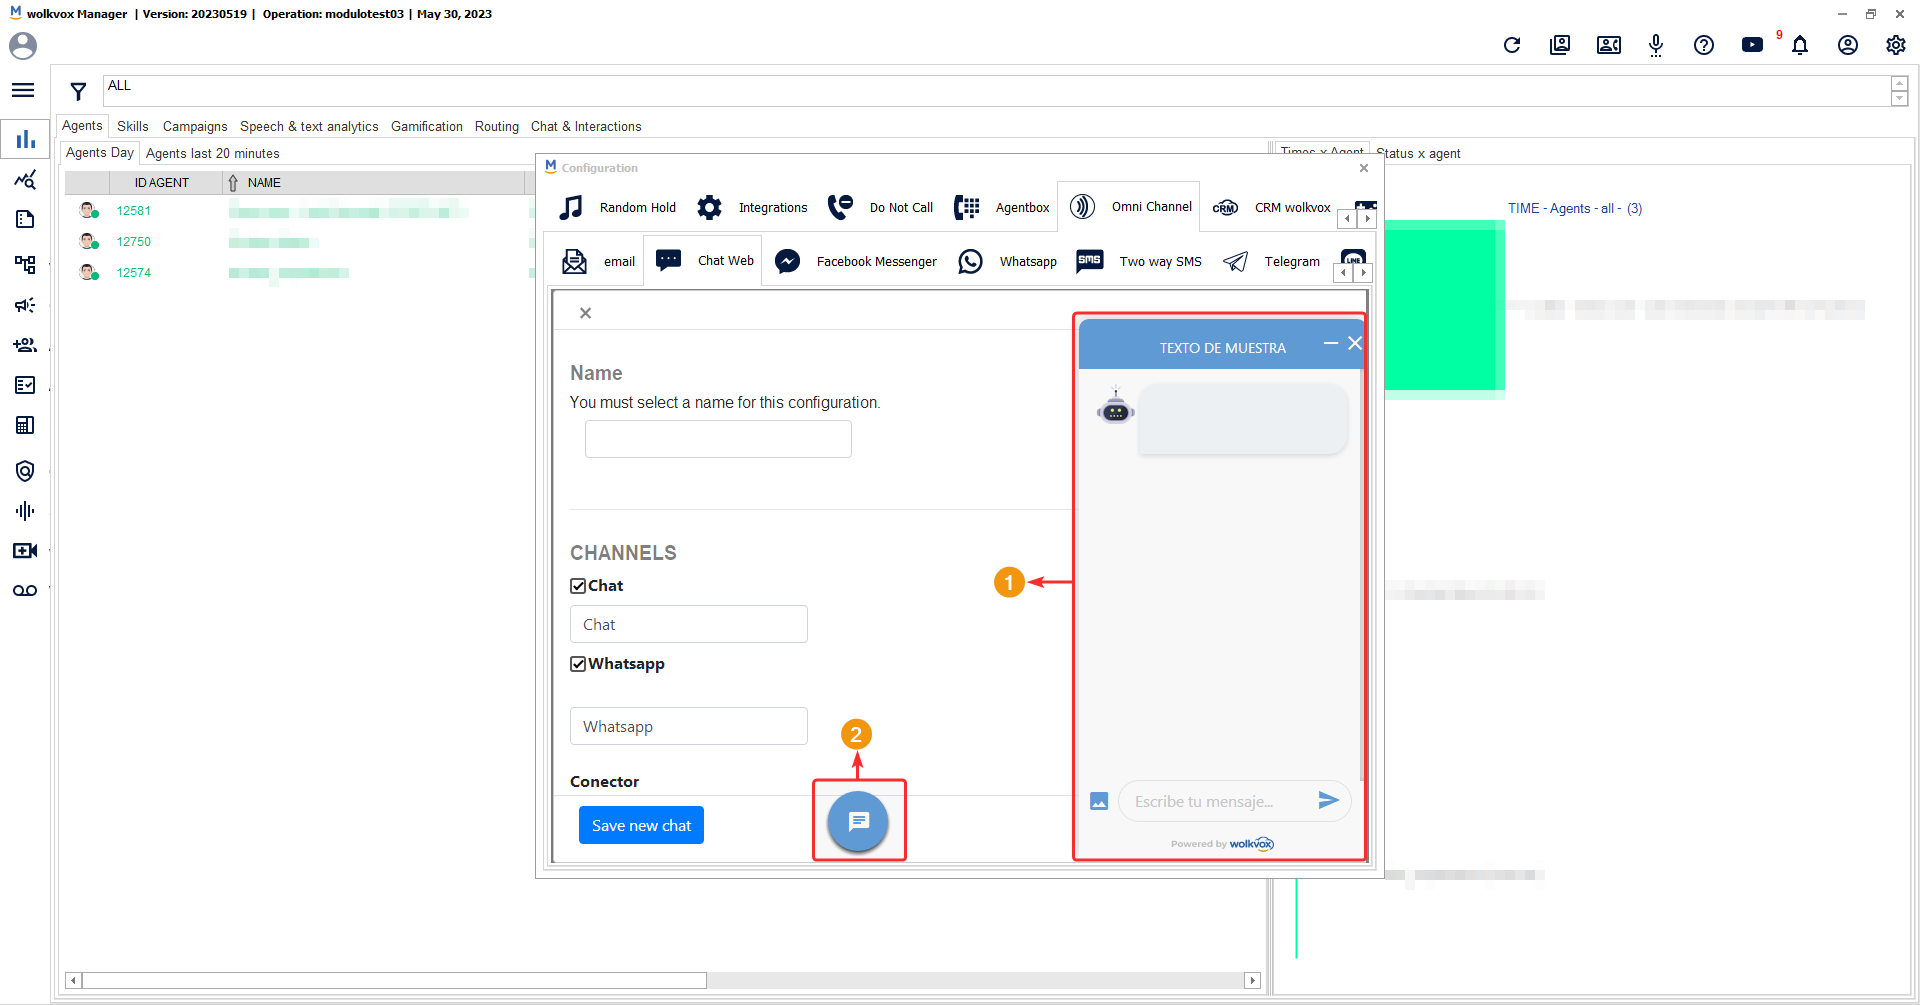
Click on the highlighted button in the following image to create a new web chat.

When you click on the button to create or configure a new chat, a new section will appear where you can change the chat options and an area to preview how the web chat is looking.
First, you need to identify:
- Area to preview the chat.
- Area to preview the ‘start chat’ button.
In this first image, the following options are shown for configuration:
- Name or title to identify the chat.
- Add or remove the following chat function:
- Chat: Enables communication through text.
- WhatsApp: Allows continuing the conversation through WhatsApp.
- Audio call: Enables communication through voice.
- Video call: Adds the possibility of making a video call.
- Callback: Adds a button for the customer to request a callback from an advisor. For this case, a token code must be added and the ID of a campaign must be entered to save the data in its database so that the advisor can call the customer later.

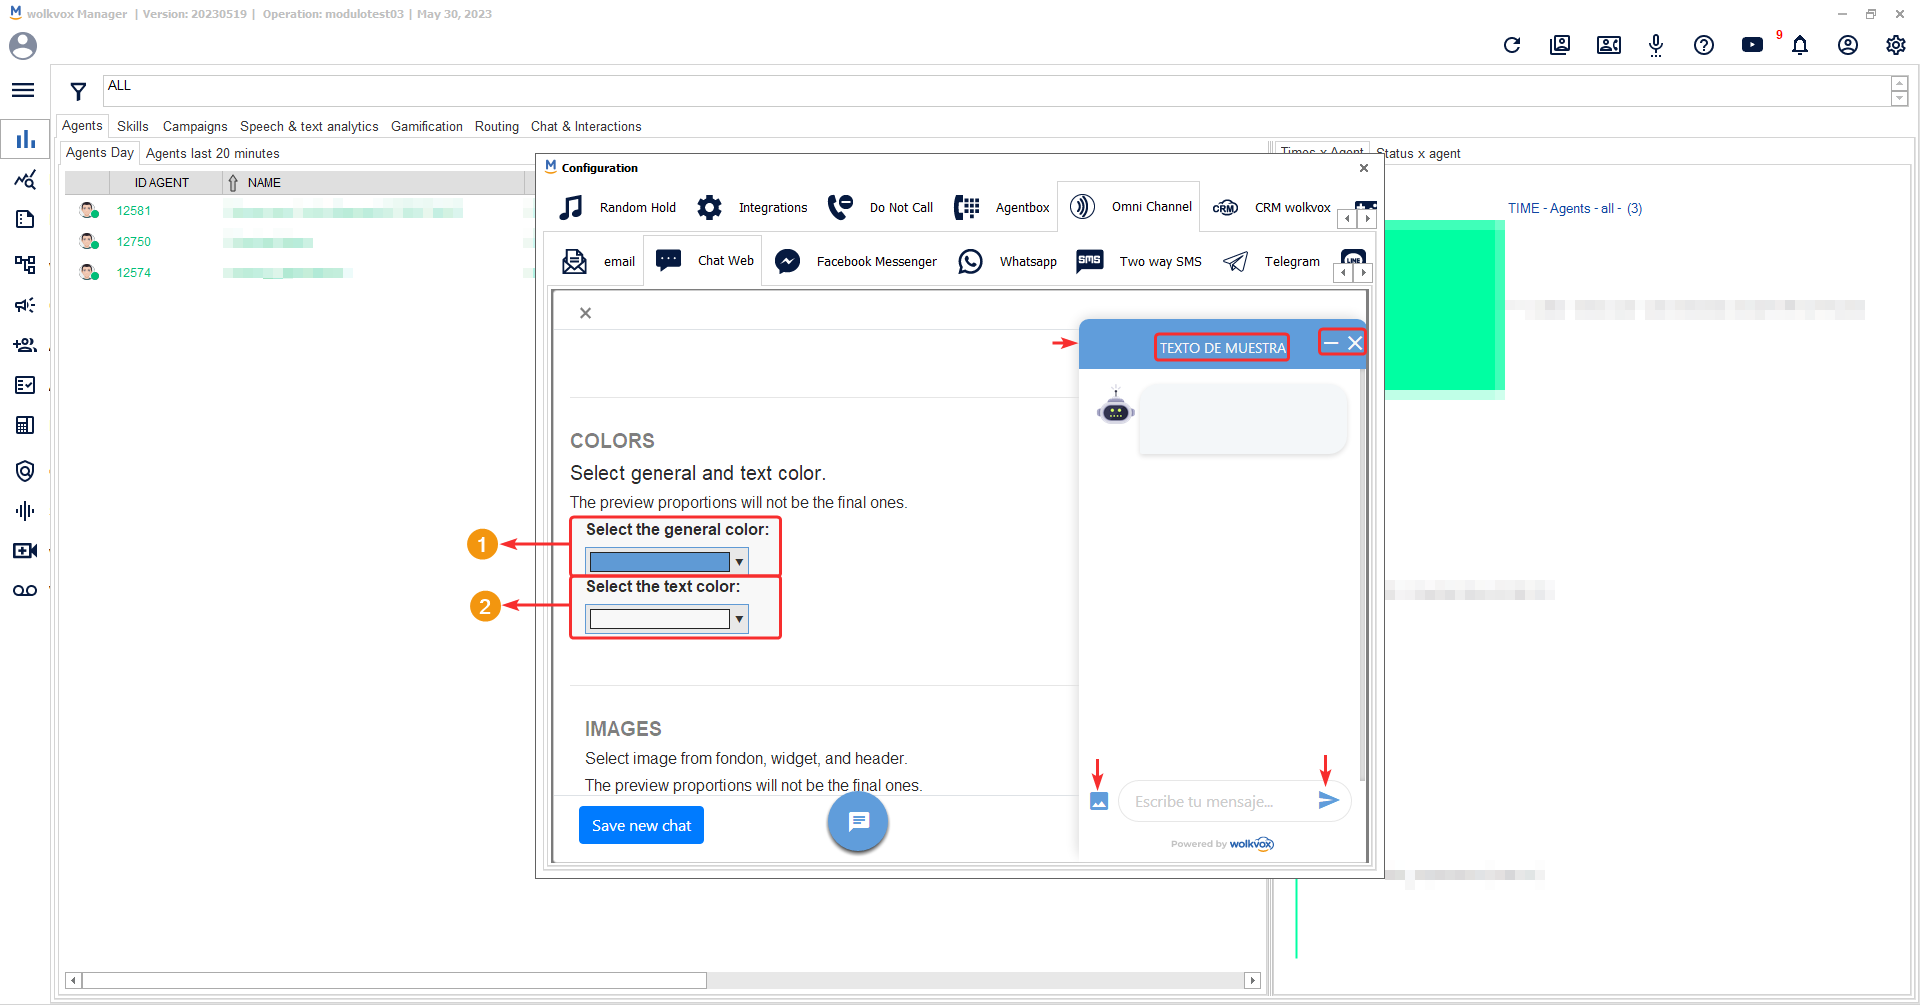
If you continue scrolling down, you will find the color options.
- The general color affects the top part of the chat (highlighted with an arrow) and the icons for attaching an image and sending a message.
- The text color affects the highlighted text in rectangles and the text that is sent in the chat.
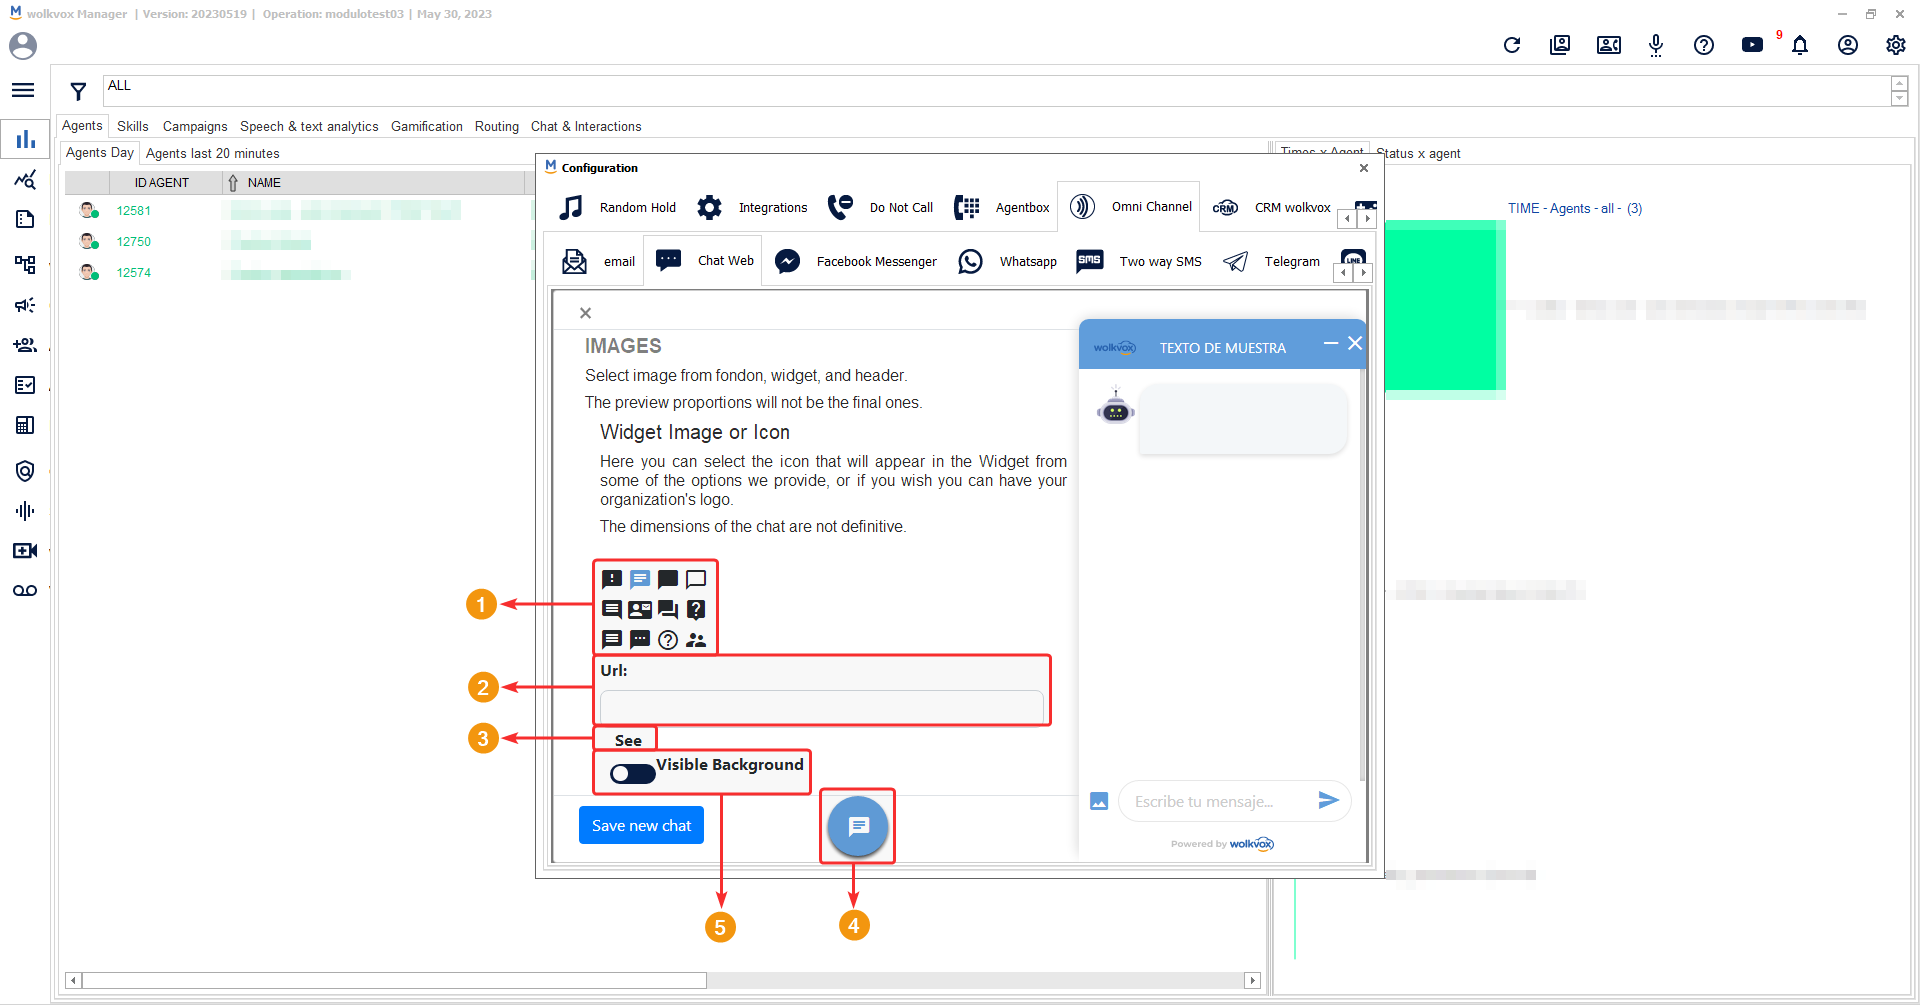
As you scroll down a bit further, you will find the option called ‘Images.’ Here you can change the icon of the button that allows starting the chat.
- You will have a list of default icons.
- If you have an icon uploaded on a public server, you can incorporate it using its URL. The icon format should be PNG.
- With the ‘See’ button, you can preview the button.
- The icon will be applied to the button that opens the chat window.
- After the previous option, there is a sliding button. If it is set to ‘Visible Background,’ the icon will be displayed with a circular background. If it is set to ‘Transparent Background,’ the circular background will be hidden
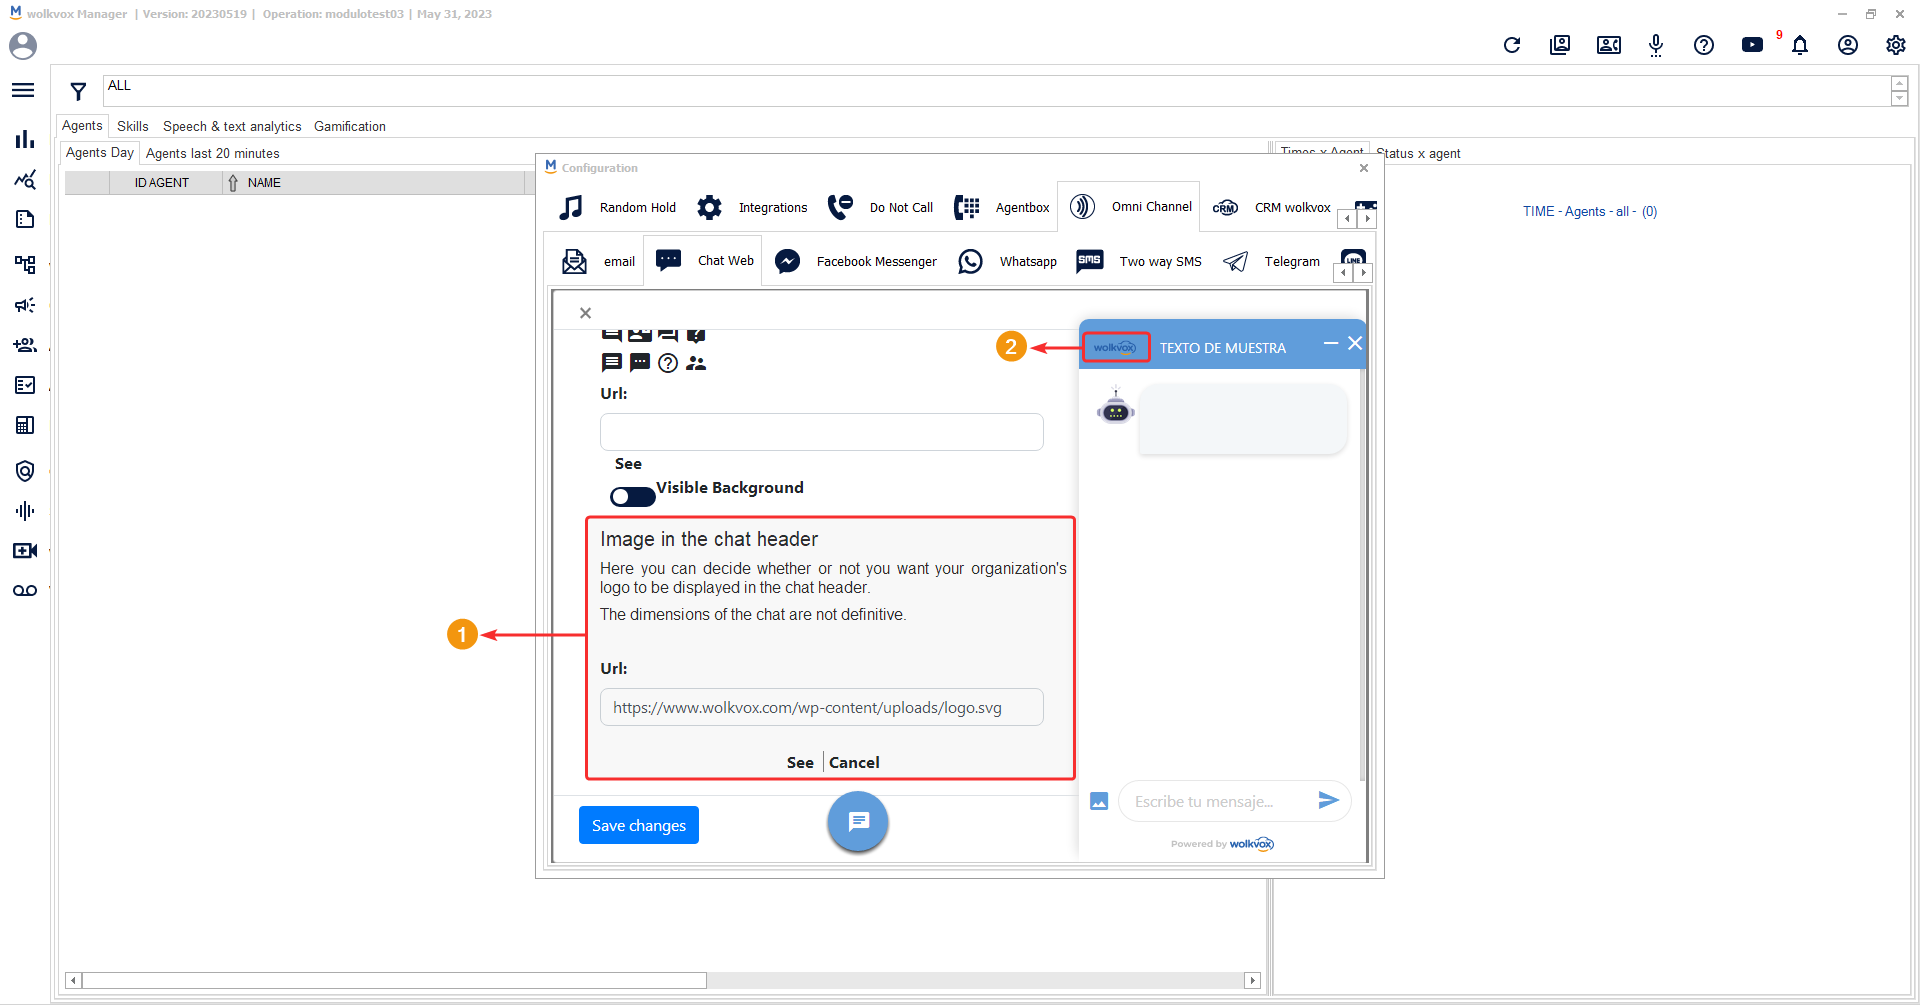
As you scroll down a bit further, you will find the option called ‘Image in the chat header.’ Here you can change the icon located in the header of the chat window. The image is associated via URL and should be in PNG or SVG format.
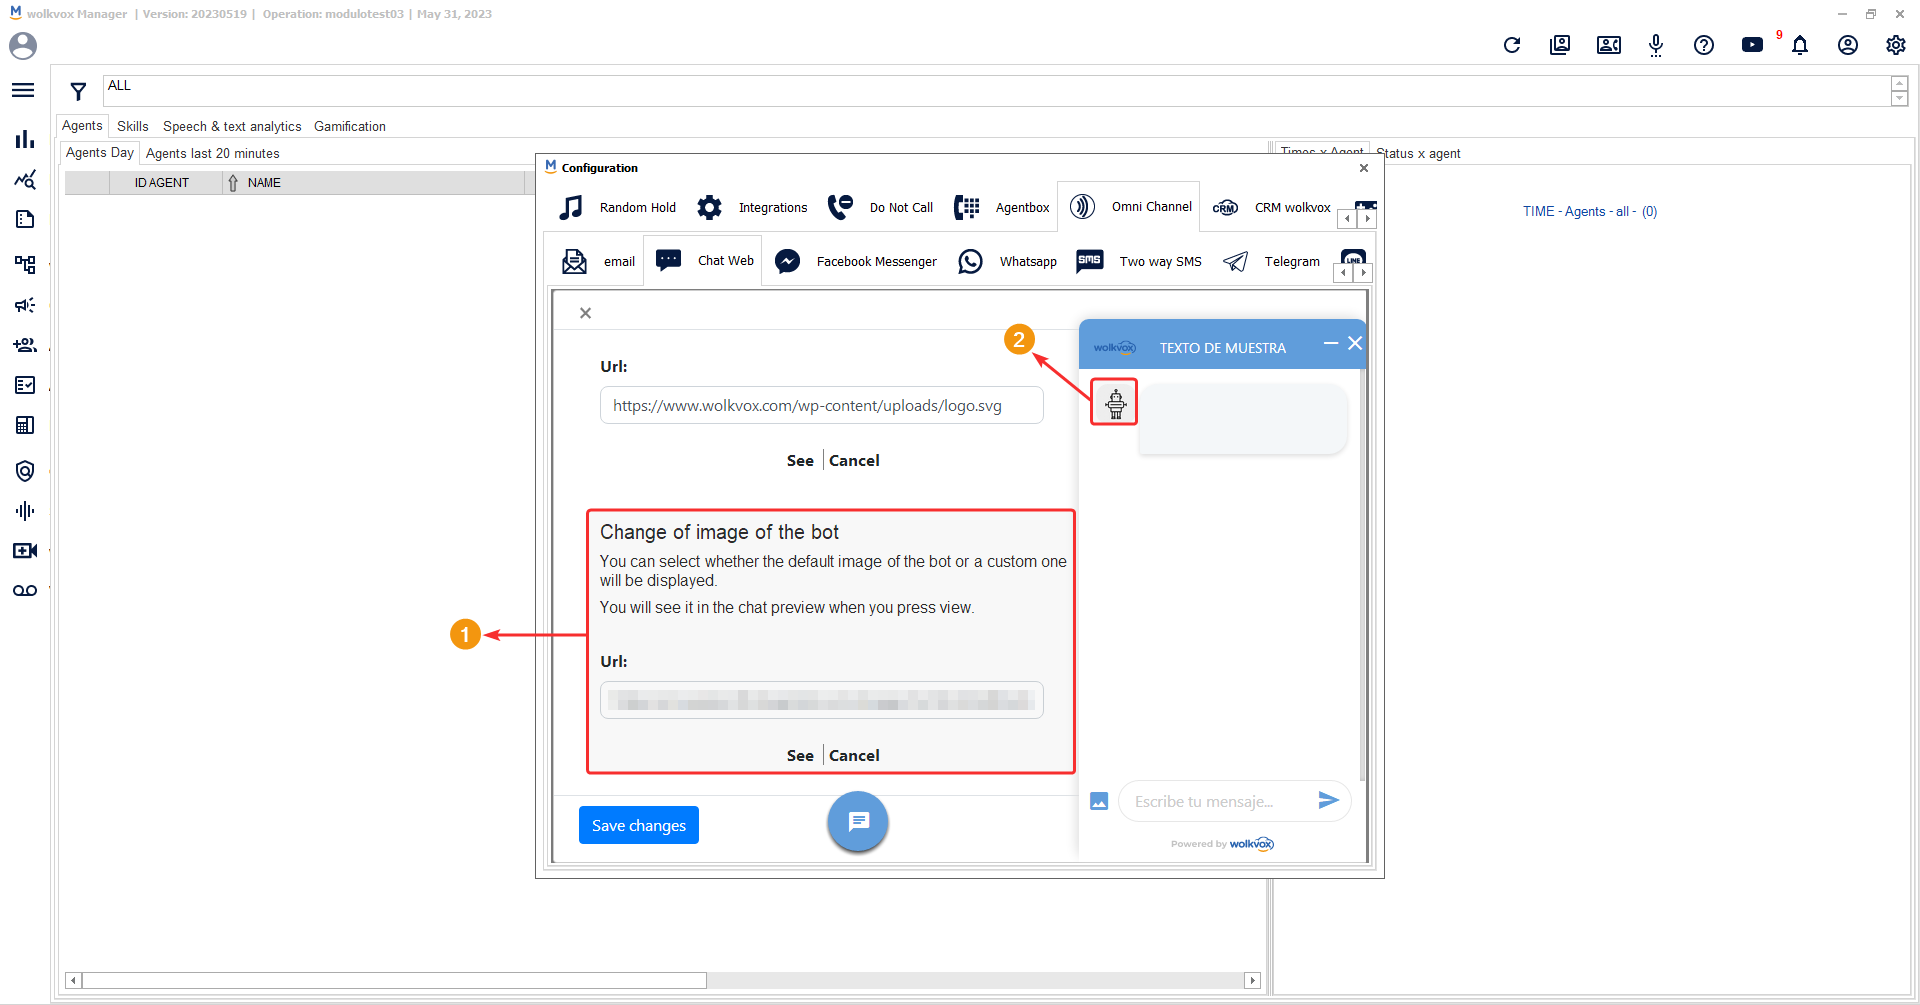
In the ‘Change of image of the bot’ option, you can change the icon or image corresponding to the bot’s profile. Just enter the URL where the image is hosted, and it is recommended that the image be in PNG format.
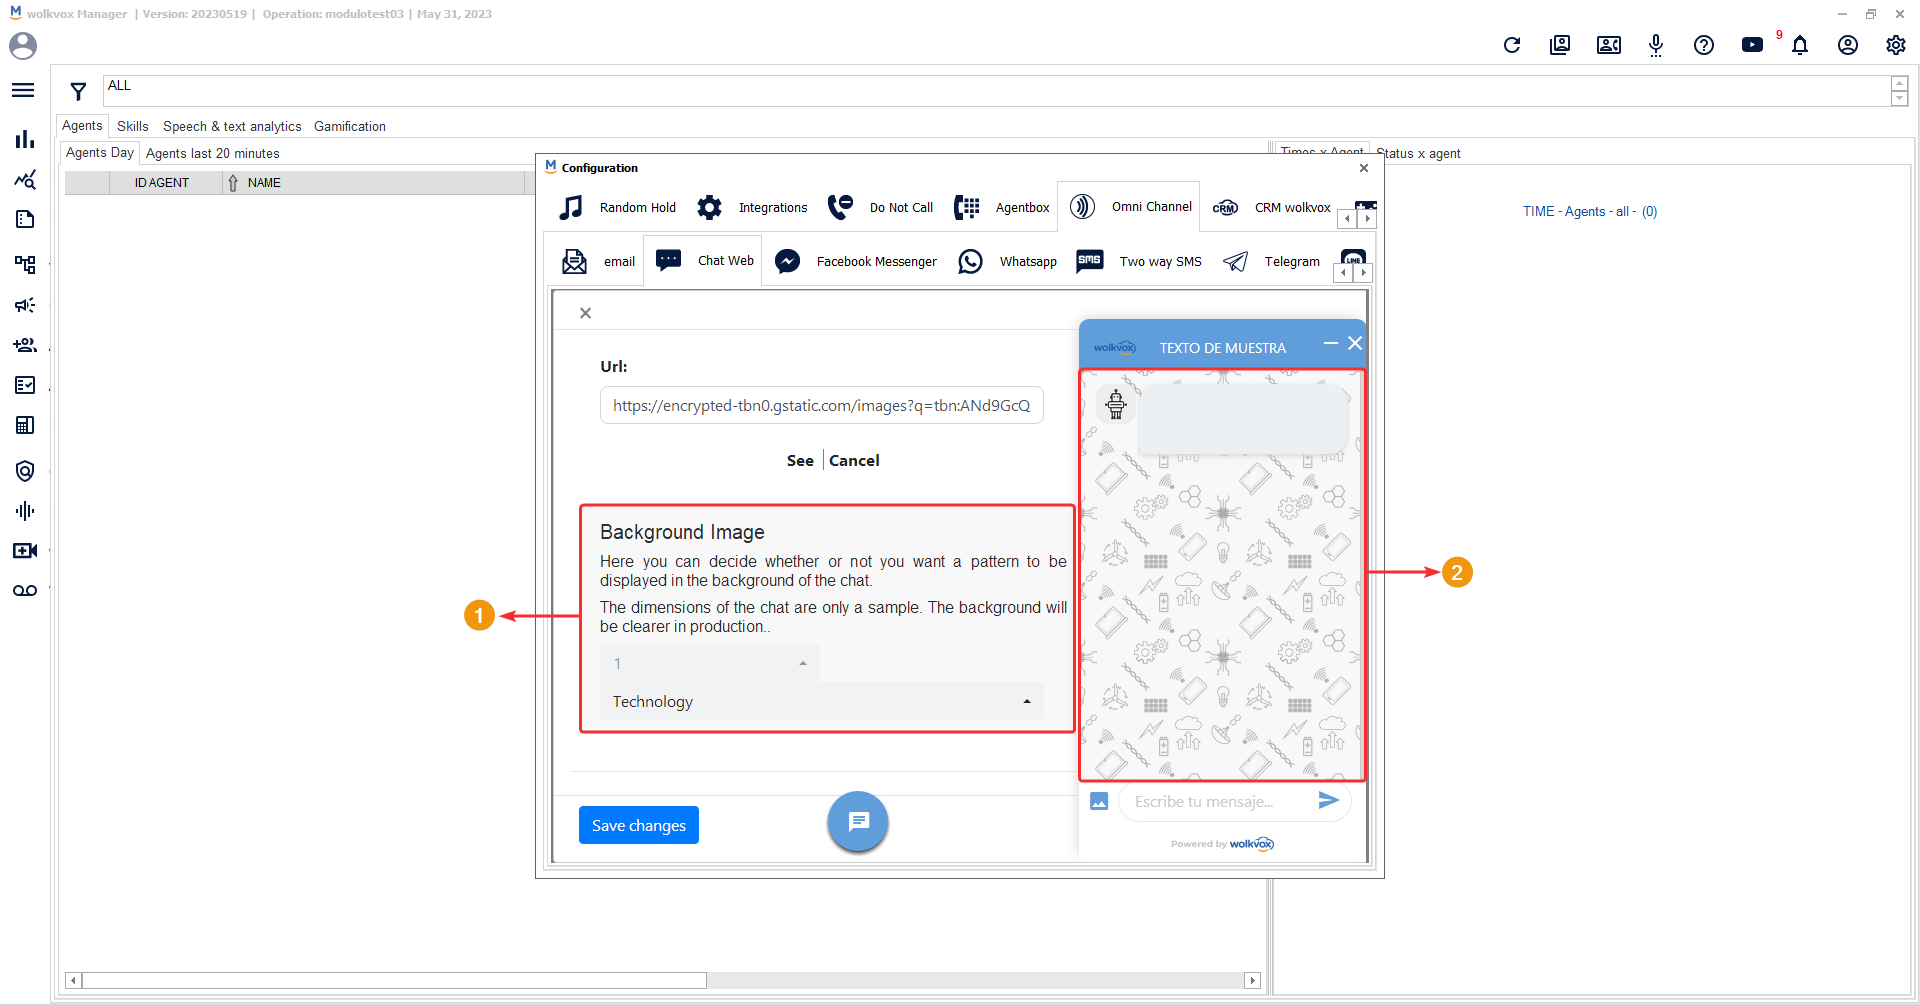
The last option called ‘Background Image’ in the image section allows you to change the background image of the chat window.
There is also an option for ‘No background’ to leave the background free of images.
In the “Texts” section, you can change two options:
- Header: Corresponds to the text you find at the top of the web chat window.
- Request message: Changes the text that corresponds to the message inviting to write a message.

Next is the “Form” section, where you can configure everything related to the form that the customer needs to fill out before starting the web chat.
The options are as follows:
- Show form / Hide form: Depending on the message being displayed, the chat form is shown or hidden. With the “Hide form” option, the customer does not have to fill out the form before starting the web chat. With the “Show form” option, the customer must fill out the form before starting the web chat.
- The following fields come with their respective default values by default, and it is mandatory for the customer to enter the requested information: Name, phone, and email. If desired, it is possible to change the default value of these fields if you want to collect different data.
- There will also be a field called “comment” where the customer can leave a message before starting the chat with the agent. This field, unlike the previous ones, is not mandatory for the customer to fill out. The main idea of this field is for the customer to provide a message prior to starting the chat about the reason for their communication.

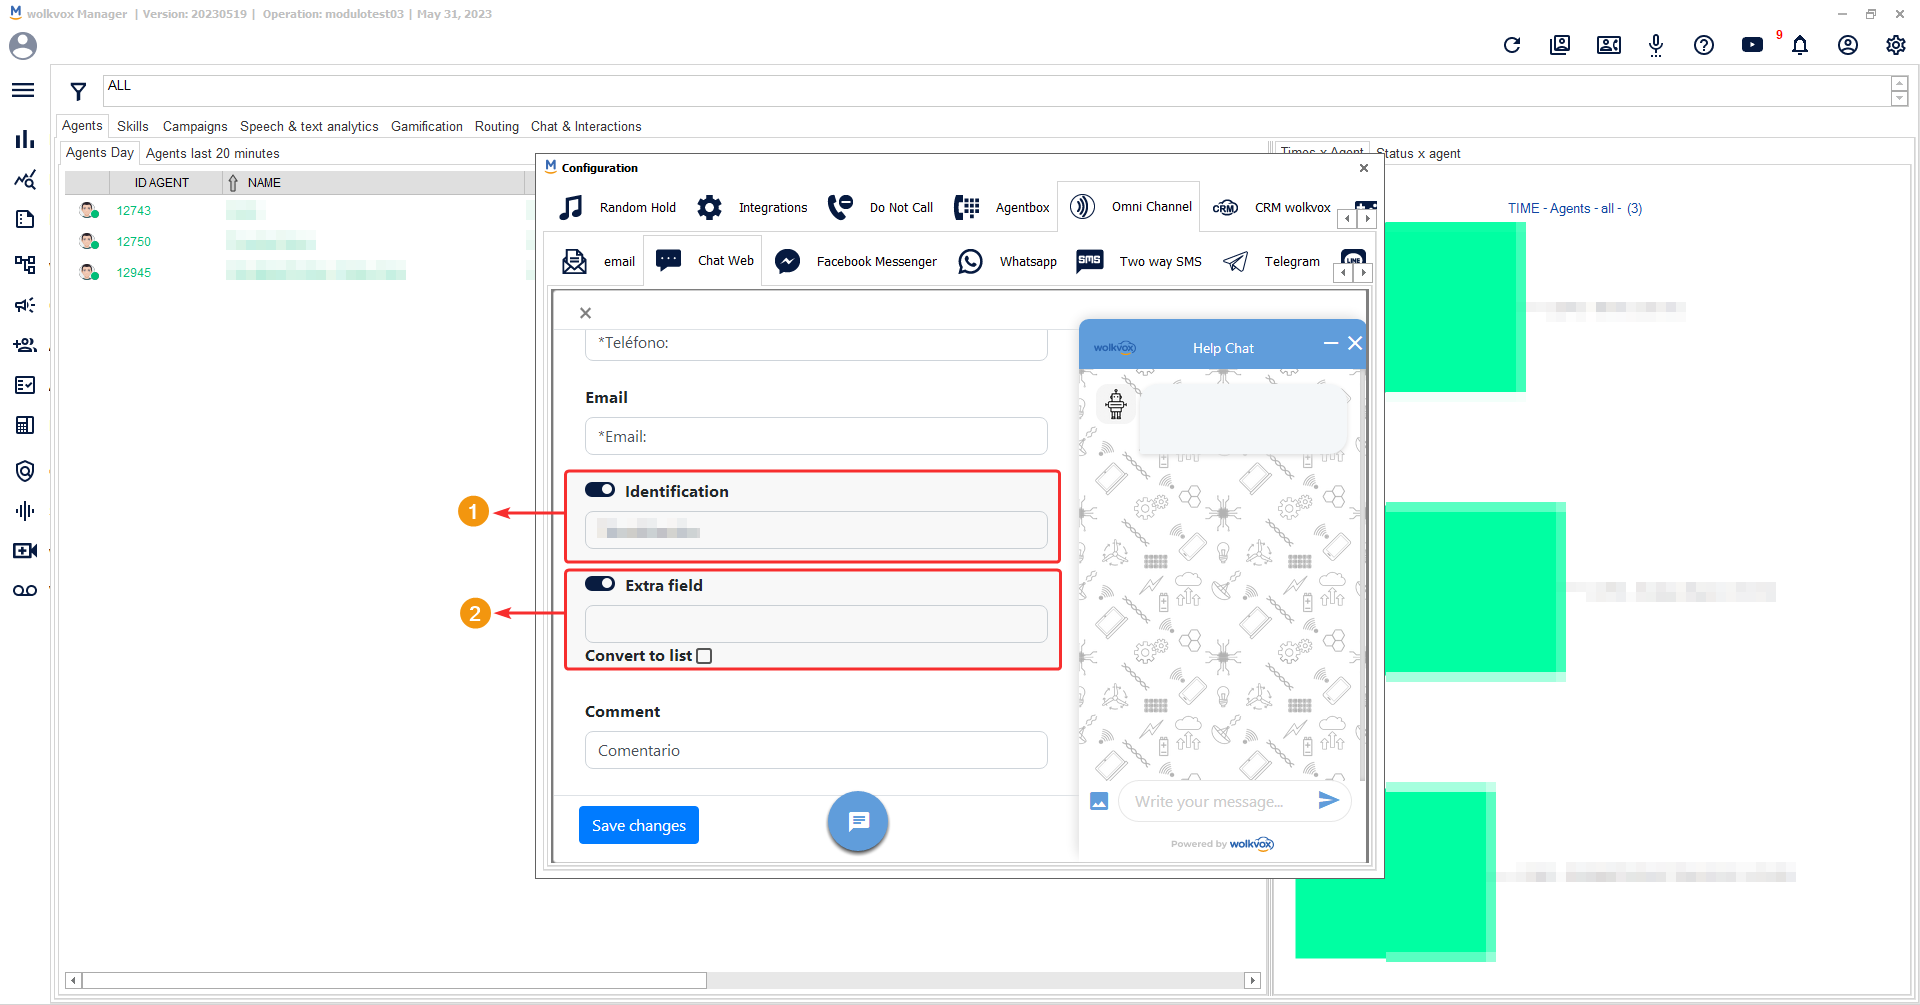
In the same “Form” section, you can configure the following options:
- Identification: Hide or show a field for the customer to enter their identification.
- Extra Field: Show or hide an additional field that can be either a free-text field or a dropdown list (using the checkbox) so that the customer can select multiple options instead of entering free-text in the field.
In the next section, you have “Data Processing.” This option can be enabled or disabled. It is used for the client to check a box to accept the data processing policy of your company. You should enter the text that accompanies the checkbox so that the client understands the meaning of that checkbox. Also, enter a link and a link title text that should lead to the page where you communicate your company’s complete data processing policy.

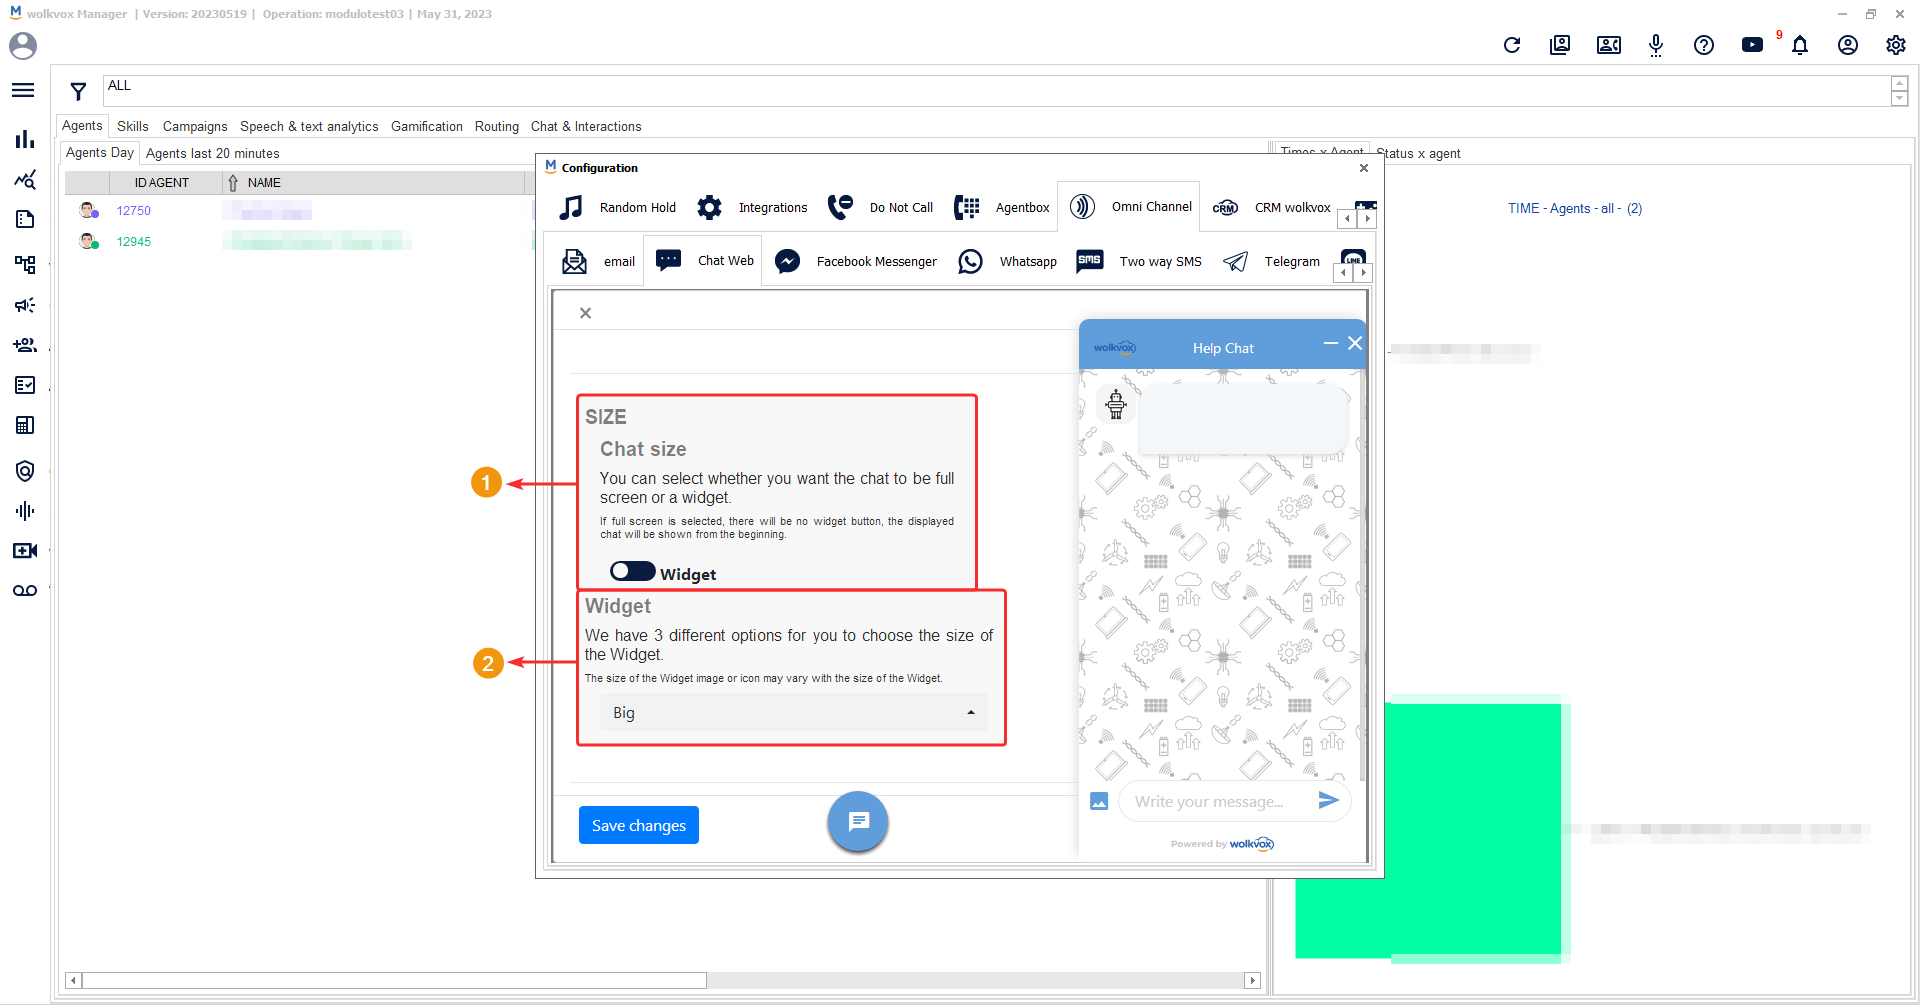
- Next, you will find the “Size” section, where you can use the slider button to select whether you want the chat to be displayed as a widget (a floating button that the user has to click to start the chat) or in full-screen mode, where the chat will occupy the entire browser window.
- If you choose “Widget,” you will need to select its size (small, medium, or large).
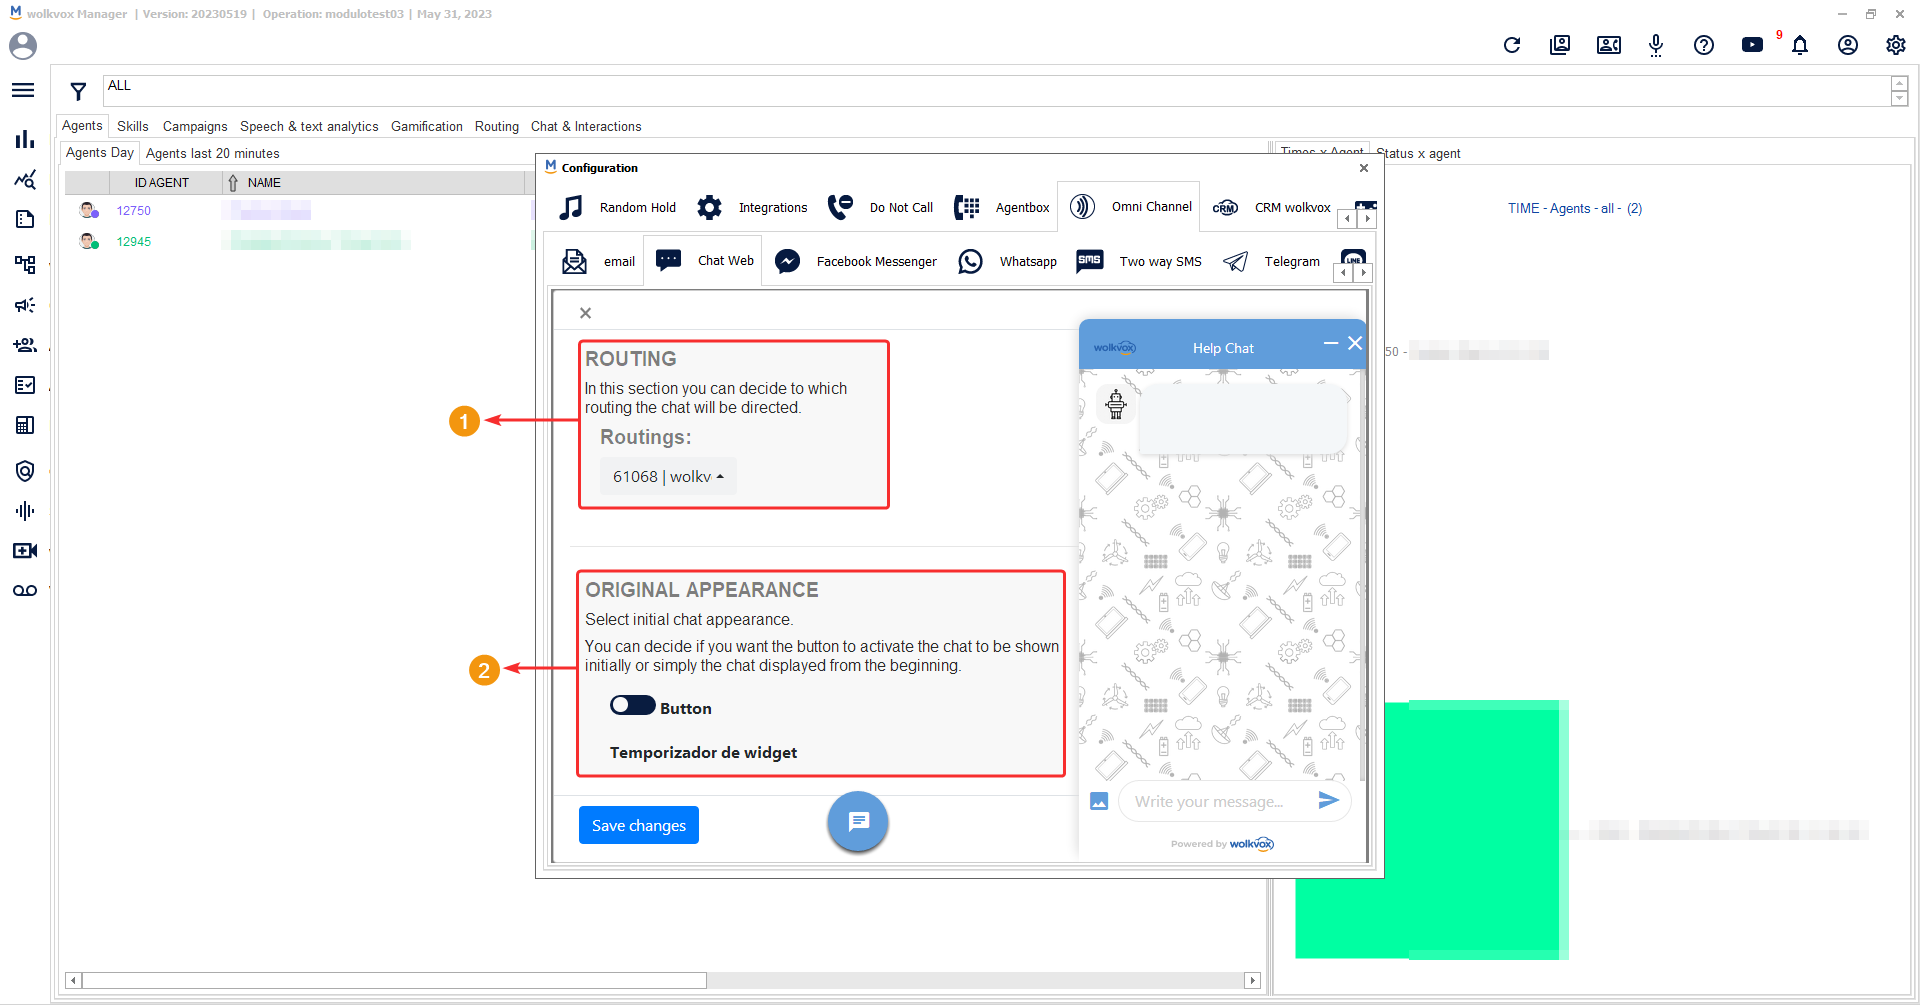
- In the “Routing” section, you must select the routing that will be linked to the chat you are creating. In this routing, you should build a flow that defines the skill or group of agents who will handle the chats initiated in the web chat.
- In the “Initial Appearance” option, you can select whether the chat will initially be displayed as a button that the customer needs to click on, or if it will be already expanded for the customer to enter the information.
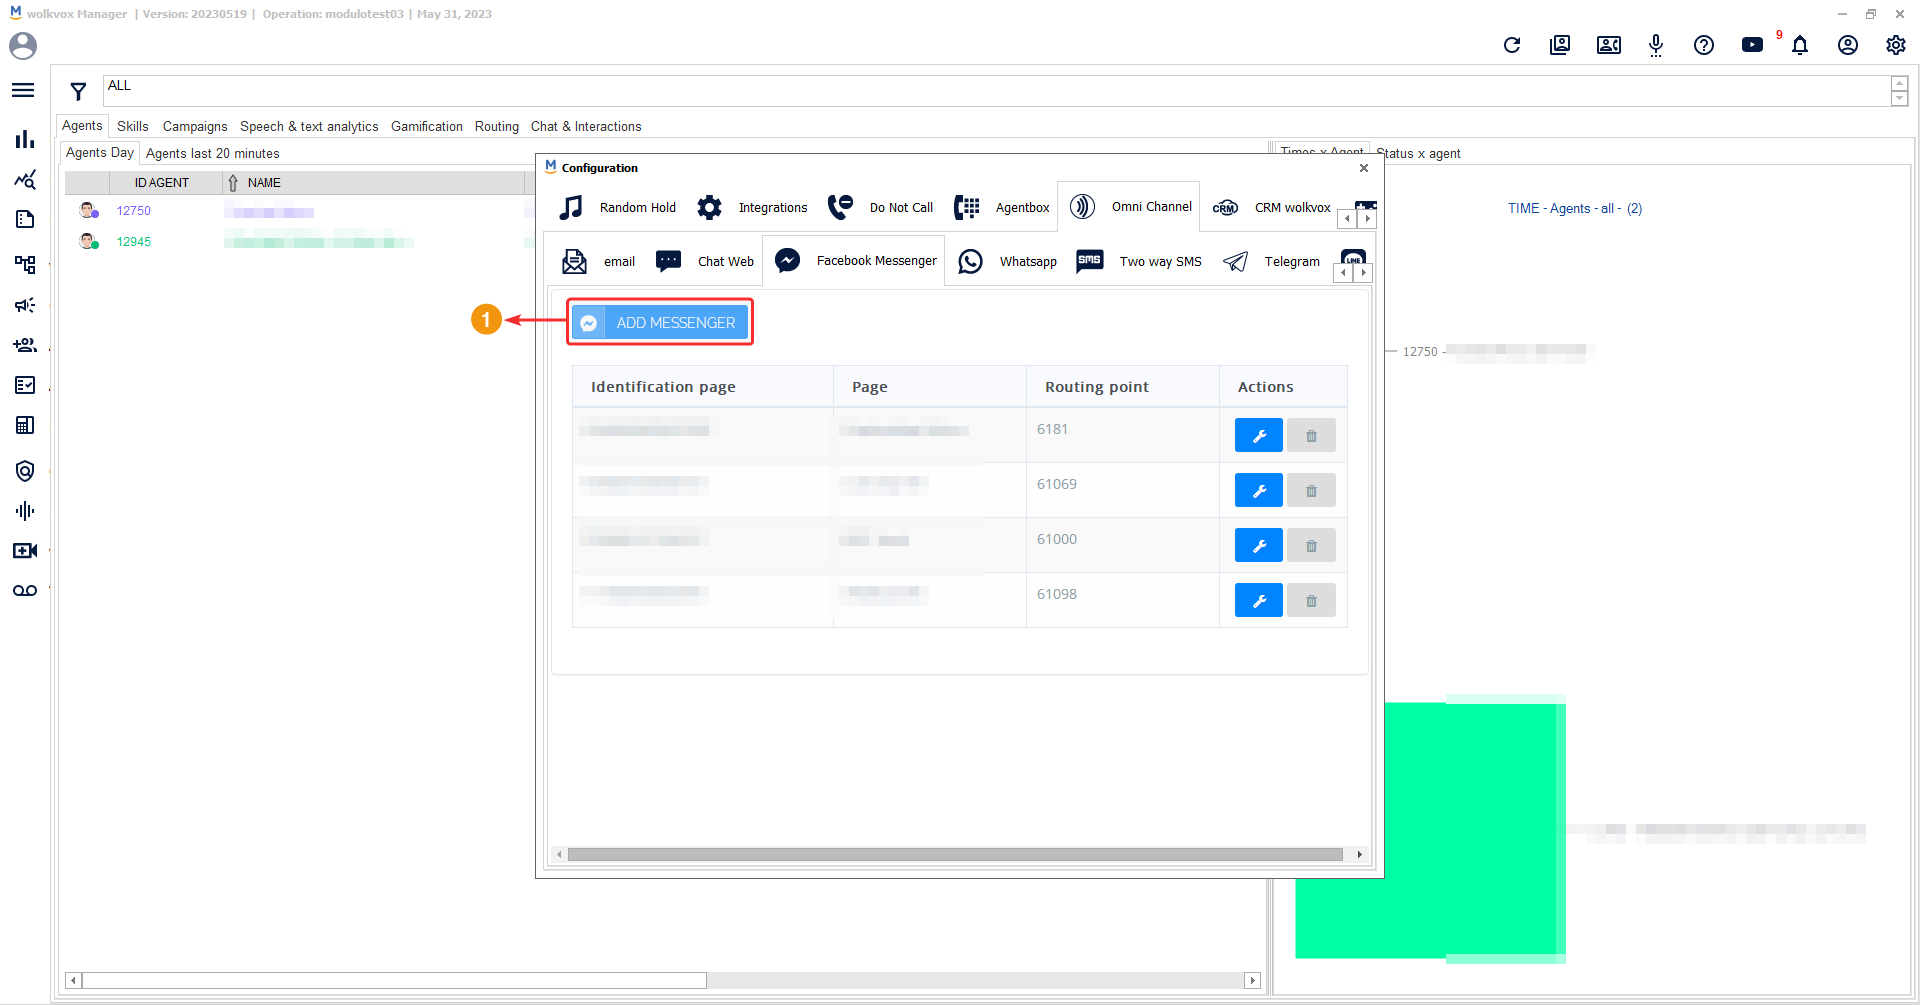
Integrate Facebook Messenger into your operation #
The next channel you can integrate into your wolkvox Manager is Facebook Messenger, which allows you to manage messages bidirectionally. This means you can receive and send messages from your Facebook page.
Note: This service has an additional cost.
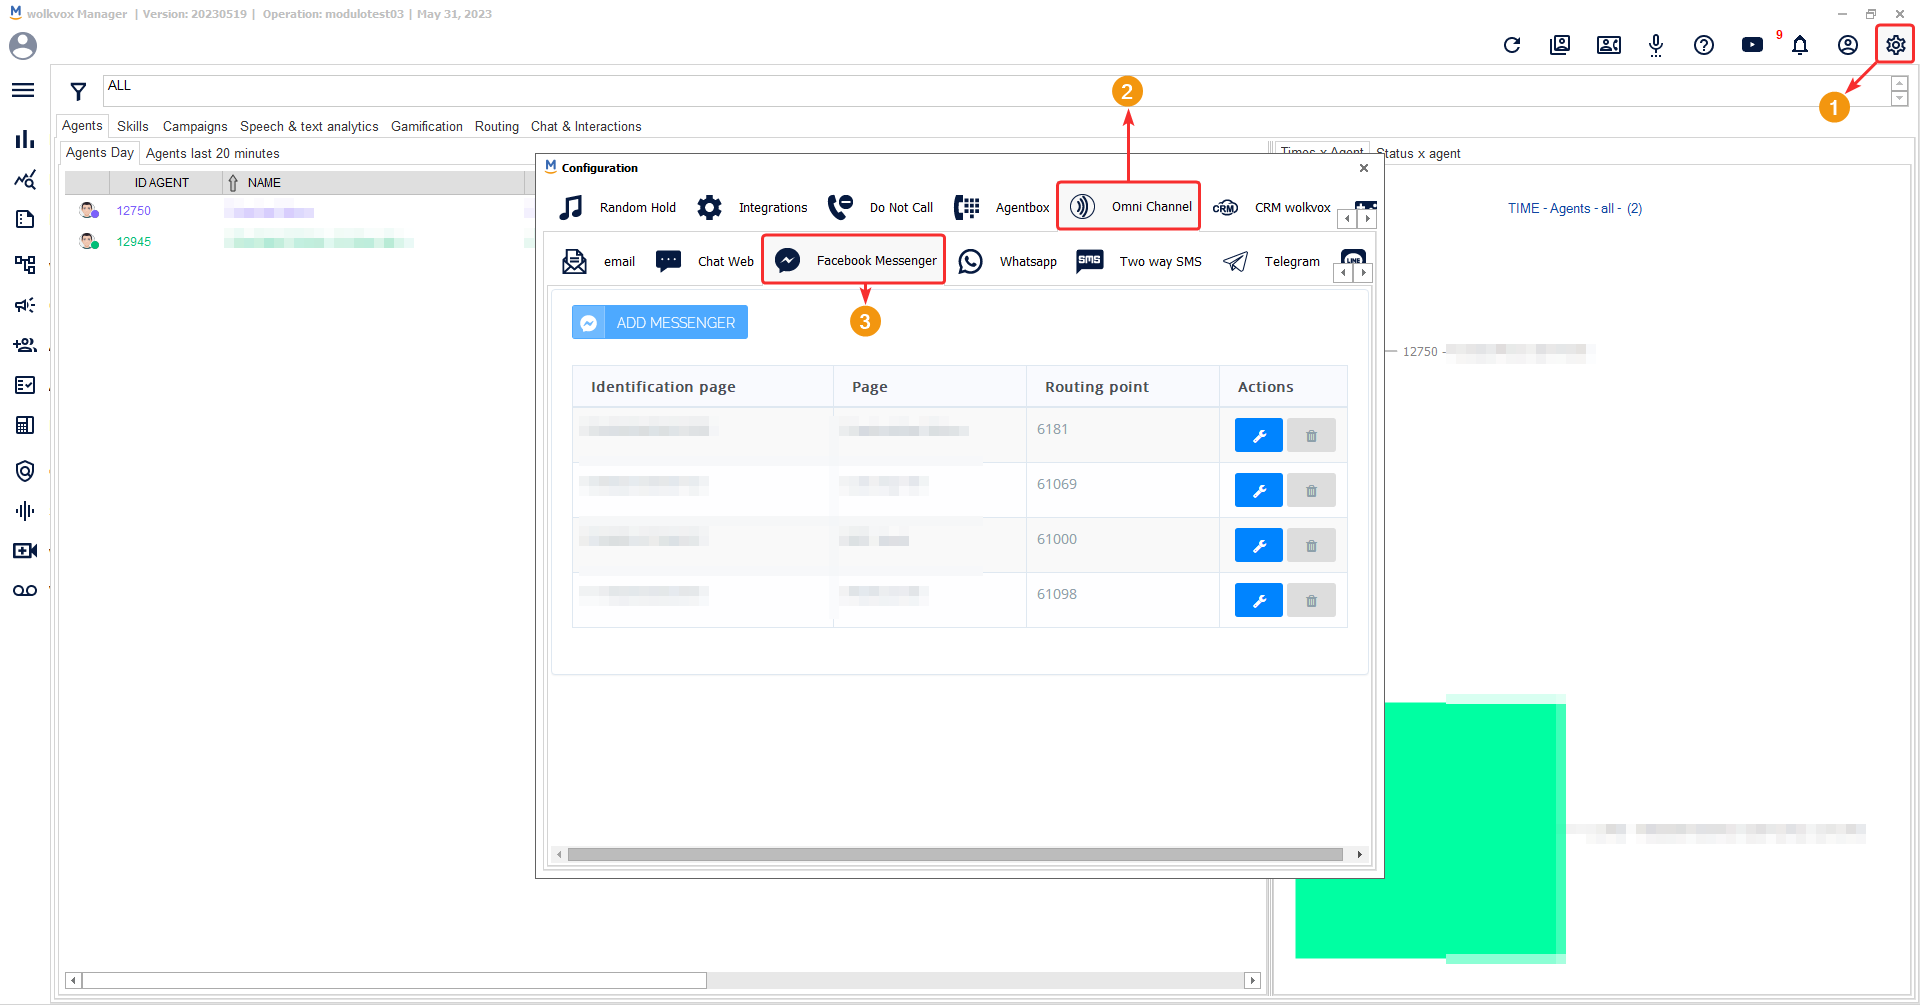
Click on the highlighted button in the image to link a Facebook Messenger account.
Once you click on the “Log in with Facebook” button, the following window will appear for you to enter your credentials and accept the permissions.

- Select the page from your Facebook account that you want to link. The “Page ID” and page token will be automatically listed.
- You need to select the Routing Point to link with the account. There, you must define which skill or group of agents will receive the chat transfers.
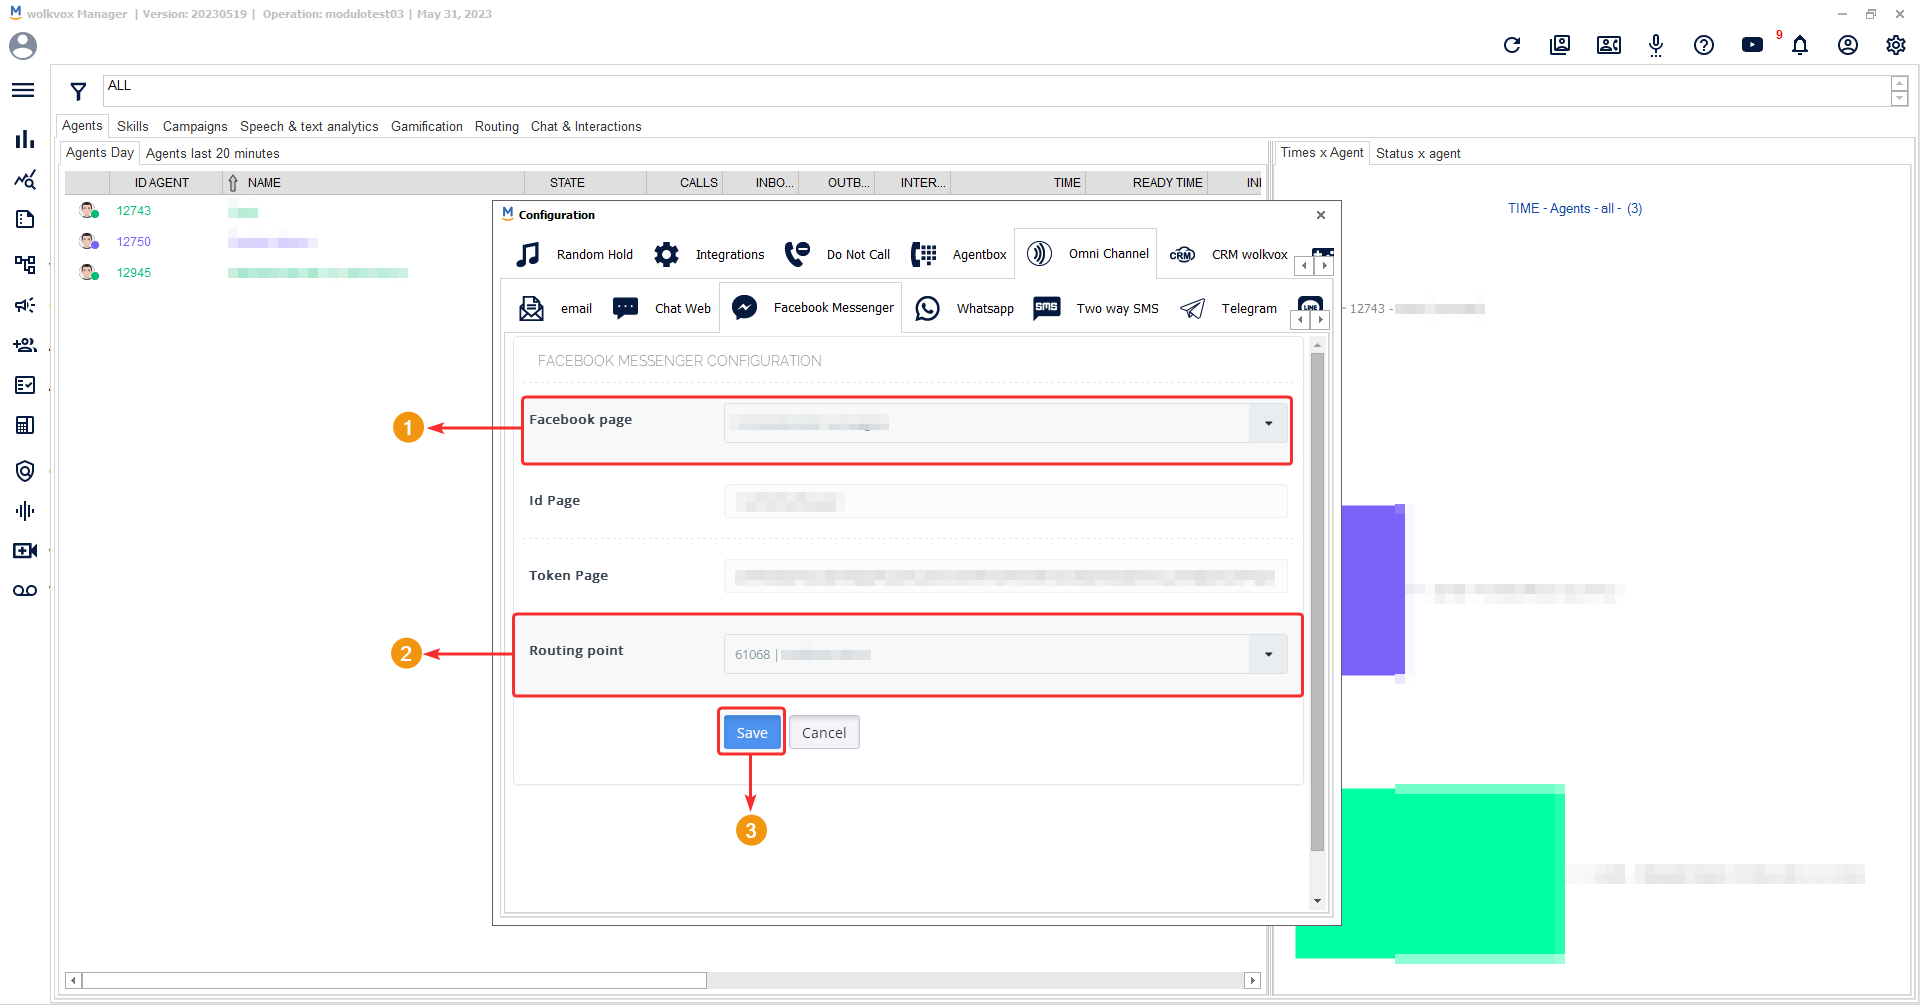
Now, your Facebook page is added to the list of integrations, and you can edit the settings or delete it.

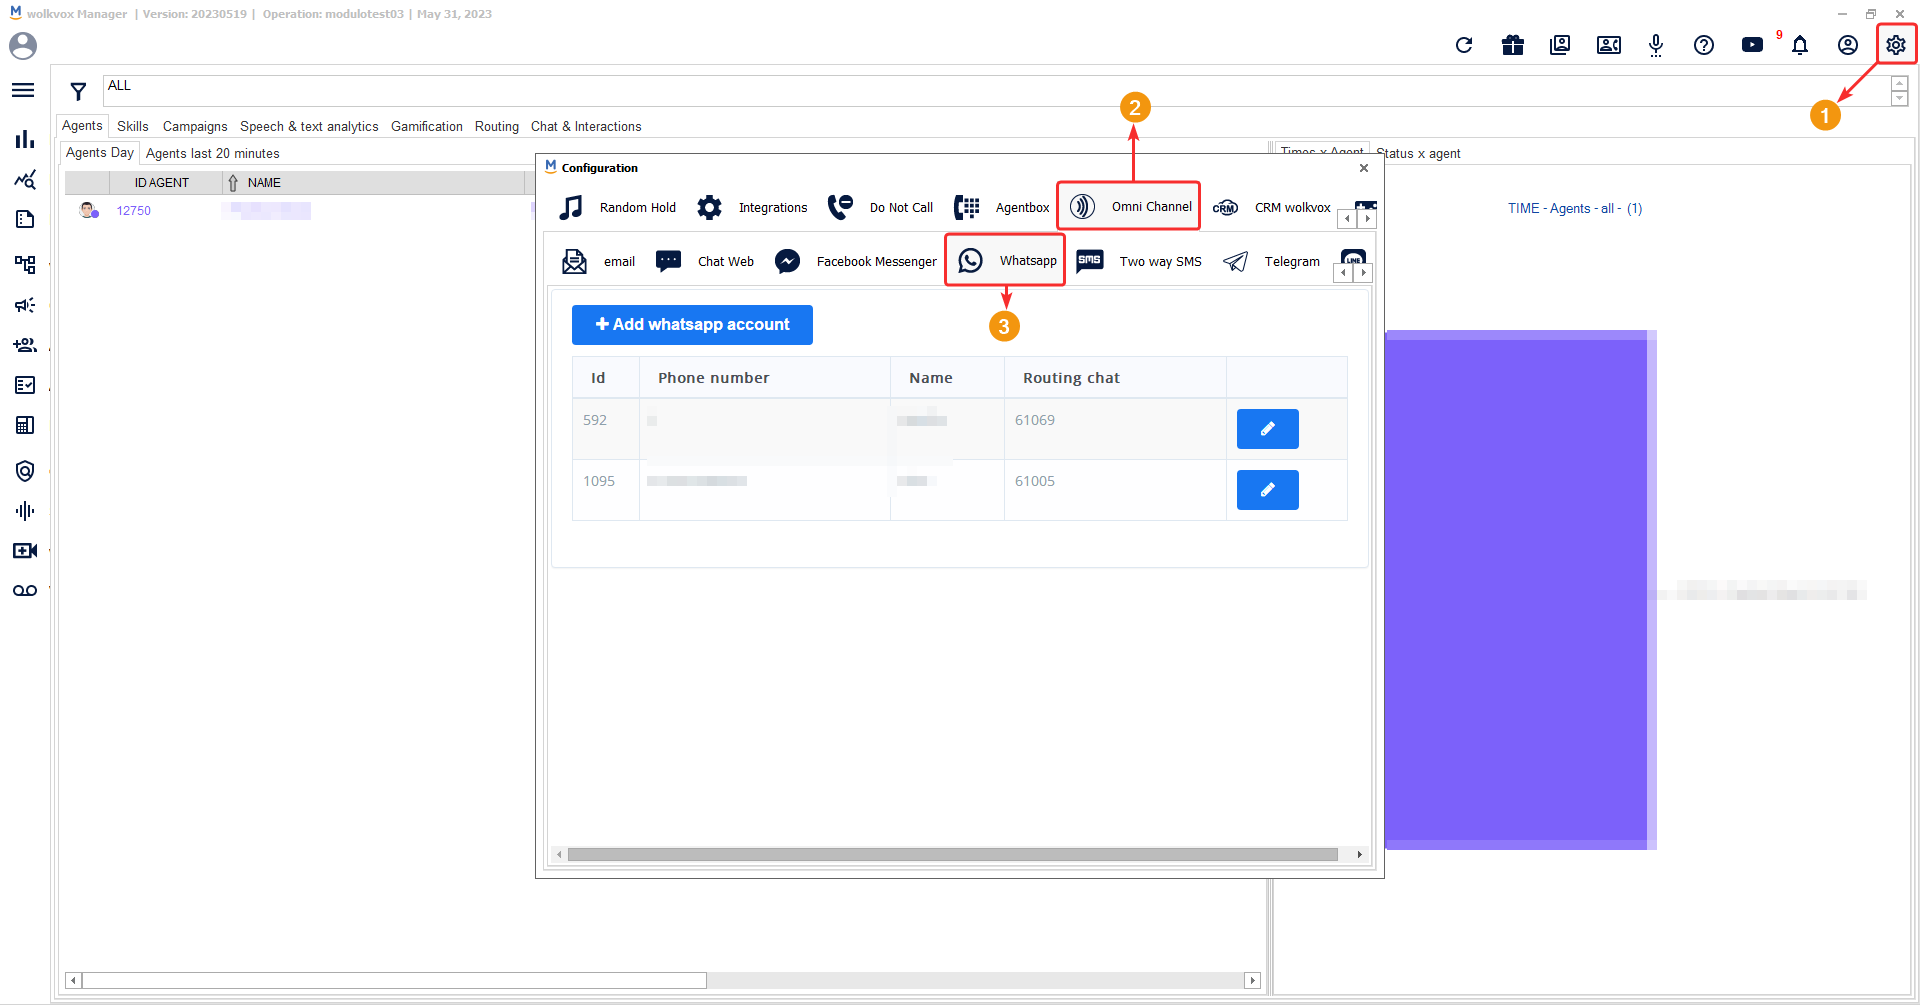
Integrate WhatsApp into wolkvox Manager #
To configure WhatsApp, you need to request the implementation from the help desk. Once the functionality is enabled for your operation, you need to create a session and then scan the QR code.
Please note the following:
- The account should not have any chat history.
- This service has an additional cost.
- Go to the “Configuration” section of wolkvox Manager.
- Click on the “Omni channel” tab.
- Click on the “WhatsApp” tab.
- Click on the “Add WhatsApp account” button.
WhatsApp Mobile #
At the bottom of the window, a message in a green box should appear, informing you that the phone number has been successfully registered.
Please note that before creating the Mobile (Unofficial) WhatsApp connector, you must accept the terms and conditions that describe the following features of this connector:
- The API does not belong to Meta’s official API portfolio.
- Although it is stable, the service could become unavailable at any time.
- The probability of service interruption is moderate.
- The cost of operation is low.
- You can send up to 6,000 messages per day.
- The API is compatible with multiple devices.
- It is possible to share files of up to 2MB.
- The response speed is acceptable.
- It has email support.
- It does not include an API for bulk messaging.
- There are no free conversations available.
- The connector does not have Service Level Agreements (SLAs).
- To use the connector, you need to have a mobile device and SIM Card.
Note: This is the only type of connector that you will be able to configure without assistance from the wolkvox team.
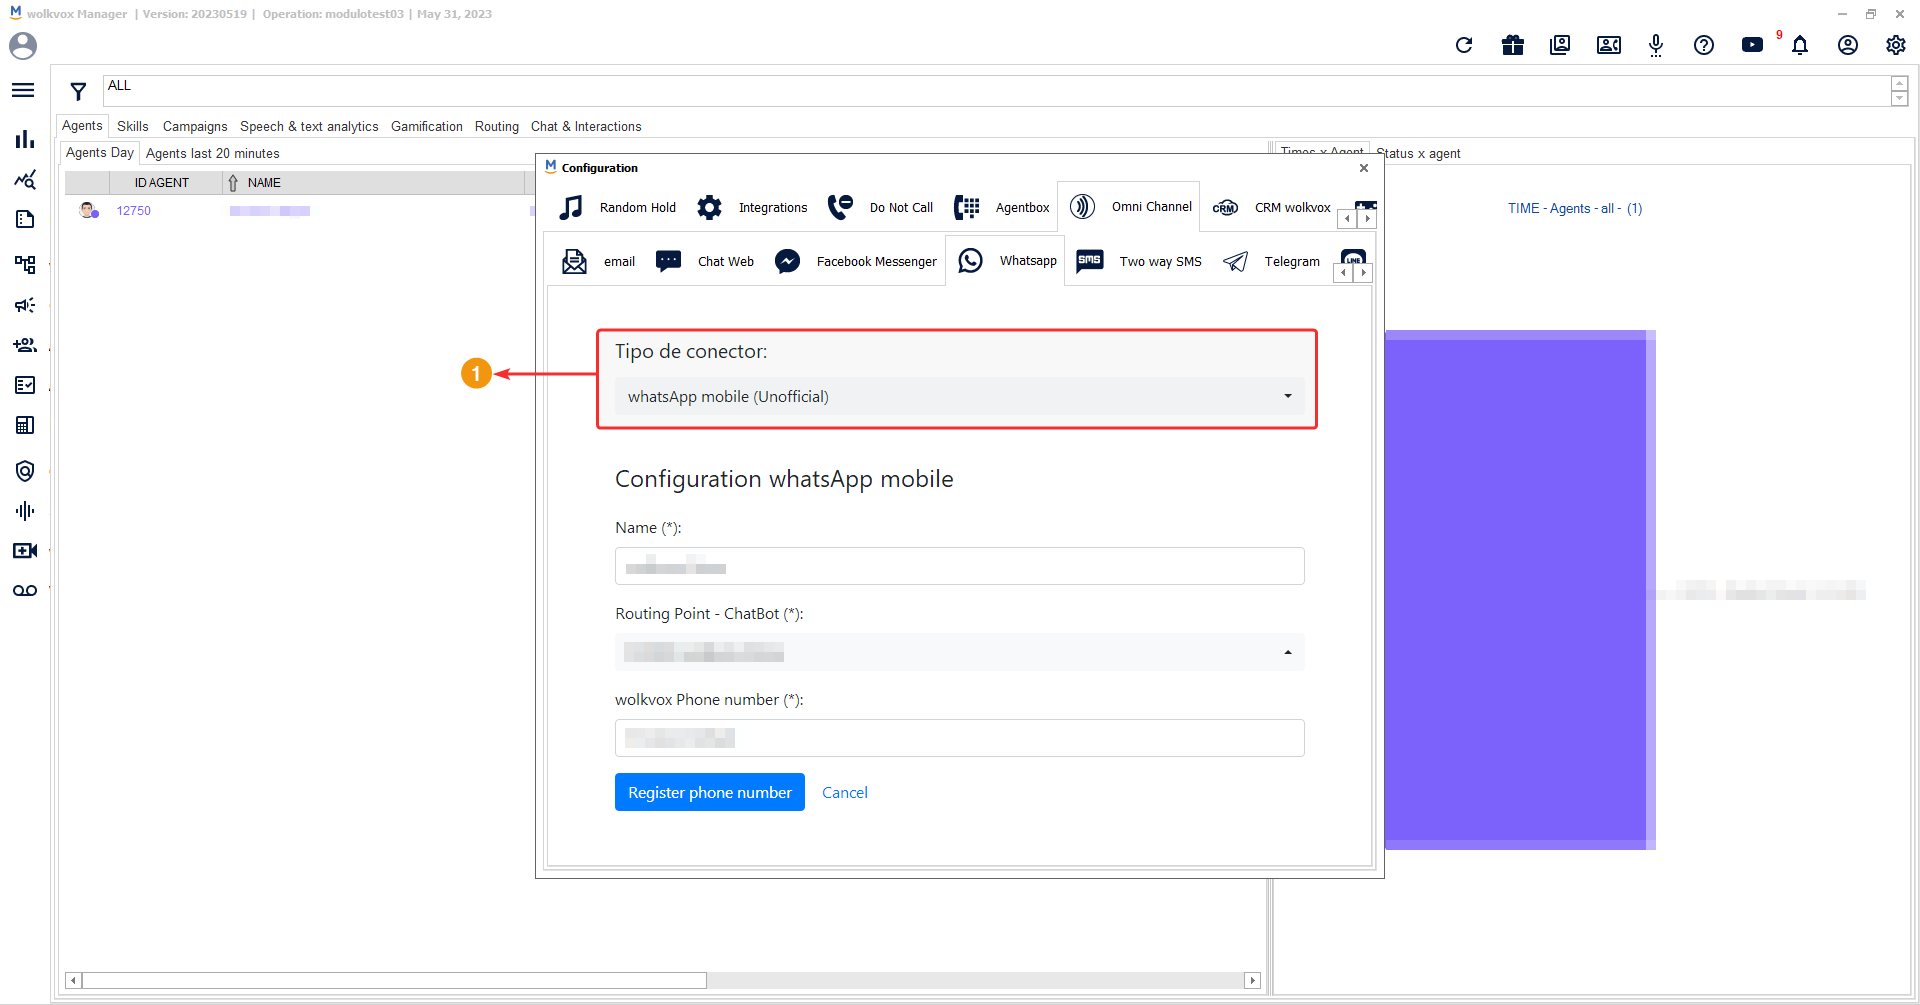
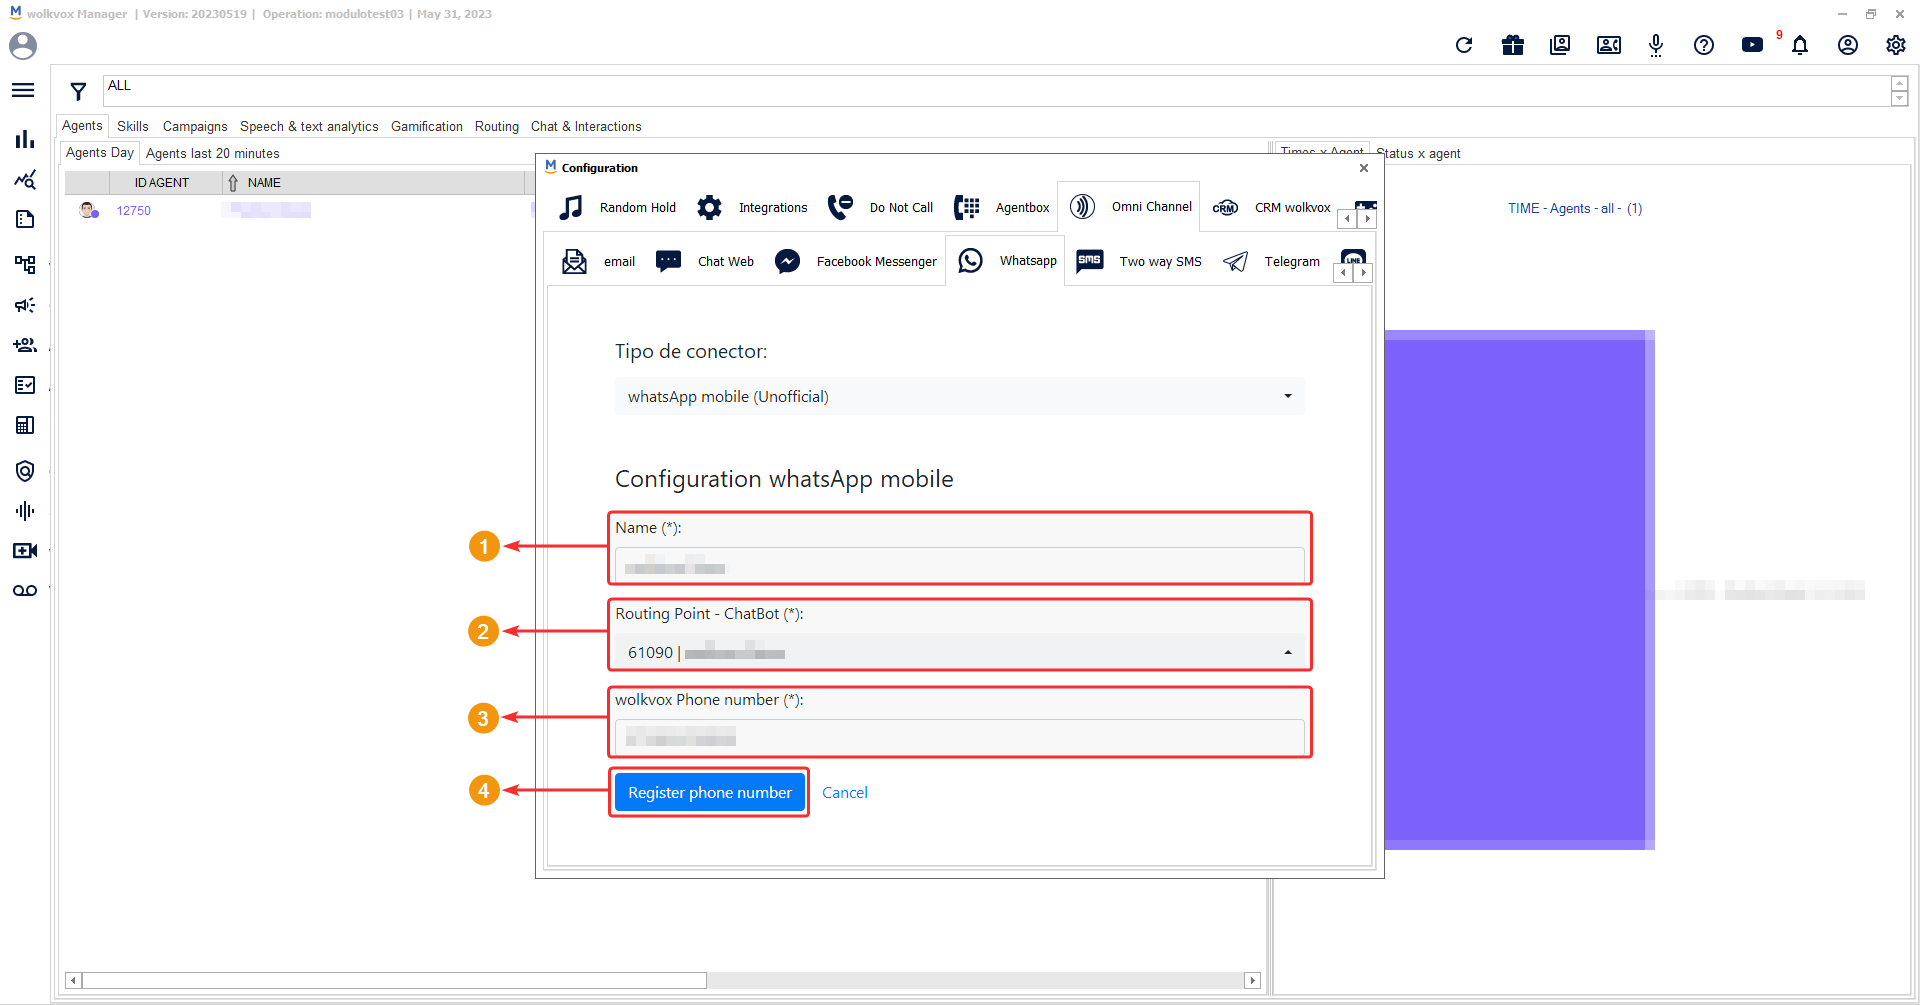
By accepting the terms and conditions of using this connector, you should:
- In the “Name” field, enter the name of the configuration you are creating.
- In the “Routing Point – ChatBot” section, associate the Routing Point to which you want customers to be directed.
- In the “wolkvox Phone number” field, enter the mobile phone number you want to associate.
- Click on “Register phone number”.
Note: Before performing this configuration, the phone number should already be associated with a WhatsApp account.
At the bottom of the window, a message in a green box should appear, informing you that the phone number has been successfully registered.

Click on the “Get QR code” button to generate the QR code image for associating the account on your mobile device.

Scan the QR code using the “WhatsApp” app on your device to associate the account.
The QR code will disappear if you don’t link your account within a few seconds.

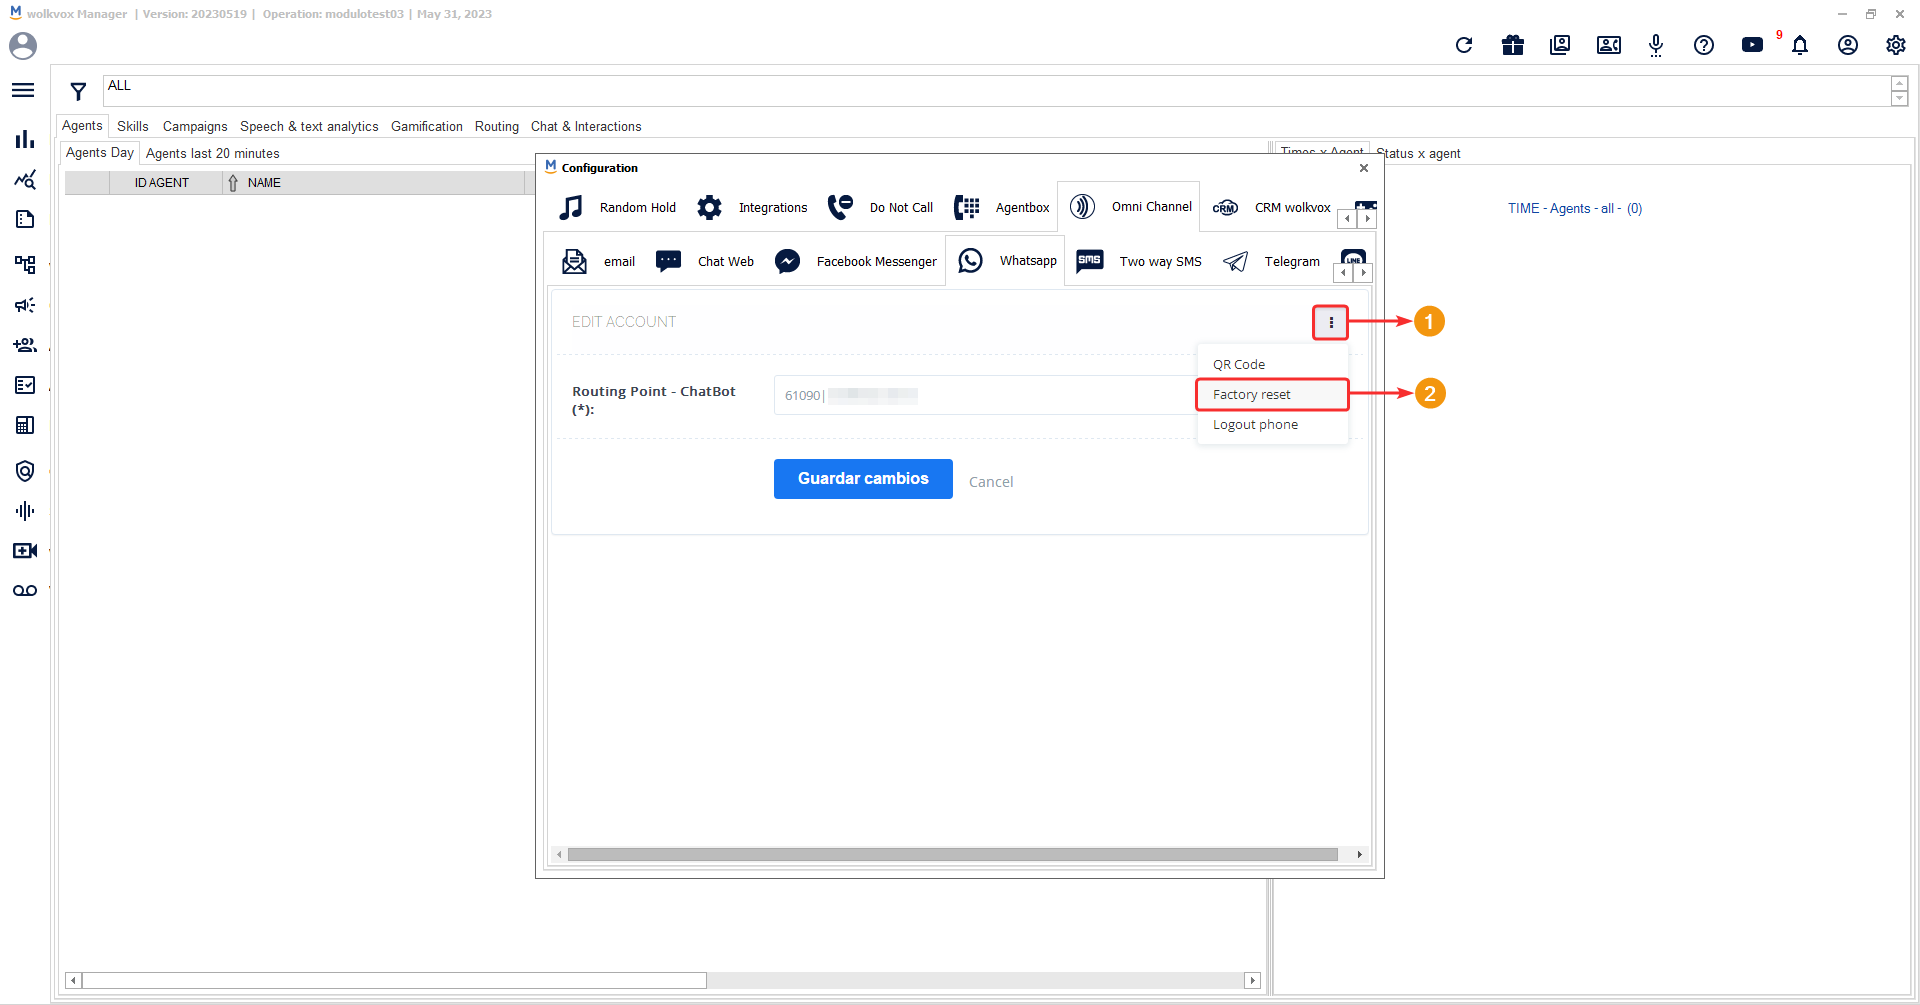
If the QR code window closes, go back to the list of added connectors and click on the account configuration icon.

Click on the three-dot icon vertically aligned and select the “QR Code” option. You will have the QR code image displayed to link the account. Try not to take too long as the QR code expires after a few seconds if you don’t attempt to link the account.

Restarting the account linking process (in case of an error) #
Go to the list of added WhatsApp accounts in your operation and click on the edit icon of the account you wish to edit. In this case, an account using the “WhatsApp mobile (unofficial)” connector type.
Click on the vertically aligned three-dot icon and select the “Factory reset” option to restore the initial configuration.
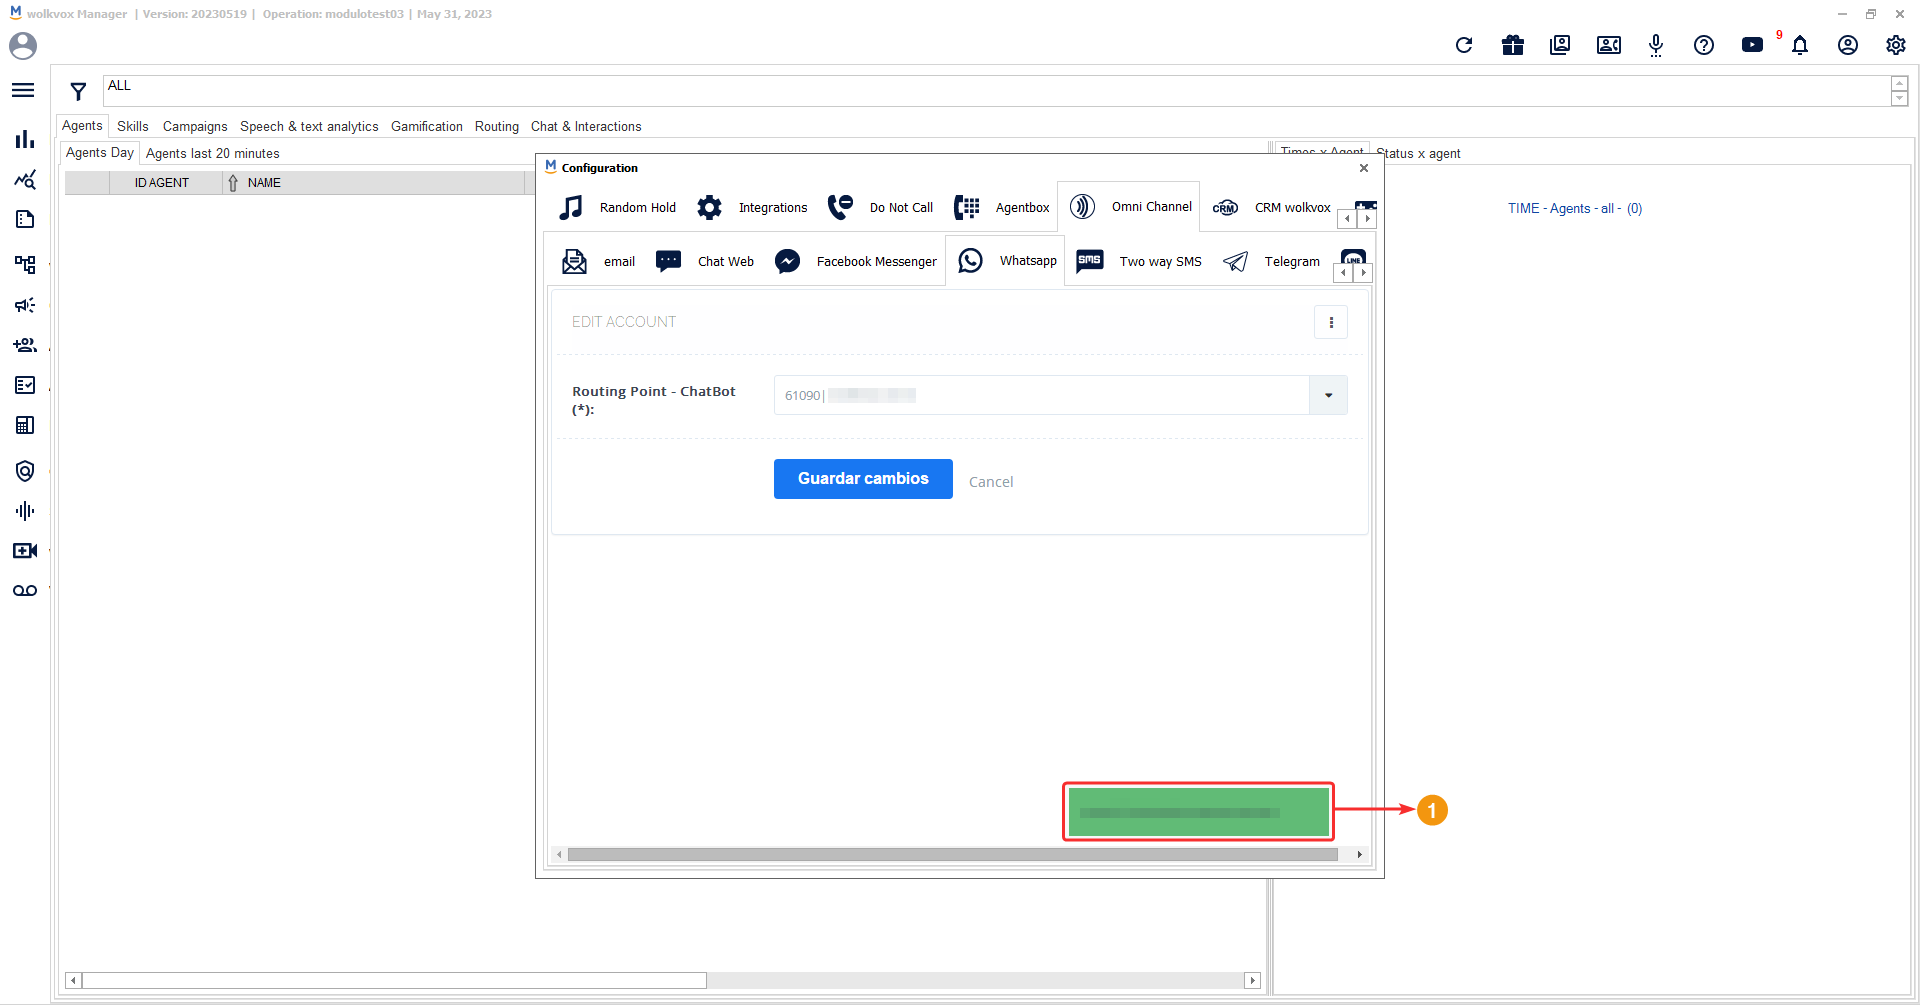
A message will appear notifying that the configuration has been successfully reset to its initial state.

Click again on the vertically aligned three-dot icon and select the “Logout phone” option. This will unlink the device associated with the account.

A message should appear stating that the session has been successfully terminated.
Click again on the button with three vertically aligned dots and select the option “QR Code”. This will generate the QR code to re-link the account.
Finally, scan the generated code (using the WhatsApp app on your device) to re-link the account.
Integrate the bidirectional text message sending service #
With this service, you can send bidirectional text messages, which means that the client can send text messages to the agent, and the agent can respond within the same conversation, keeping it fluid. The same applies in reverse.
Note: This service only works for the United States as it is the only country that allows bidirectional SMS.

Integrate Telegram chatbots into wolkvox Manager #
To configure Telegram, you must first create a Bot there. If you haven’t created one yet, you should request it from BotFather (the official service of the Telegram platform used to generate new bots). BotFather will provide you with the bot’s name and access token (have these details ready to enter them in wolkvox Manager).

In wolkvox Manager, you enter the name of the bot given by Telegram, associate it with a routing point, and enter the token (data provided by Telegram).

Integrate a Line channel into wolkvox Manager #
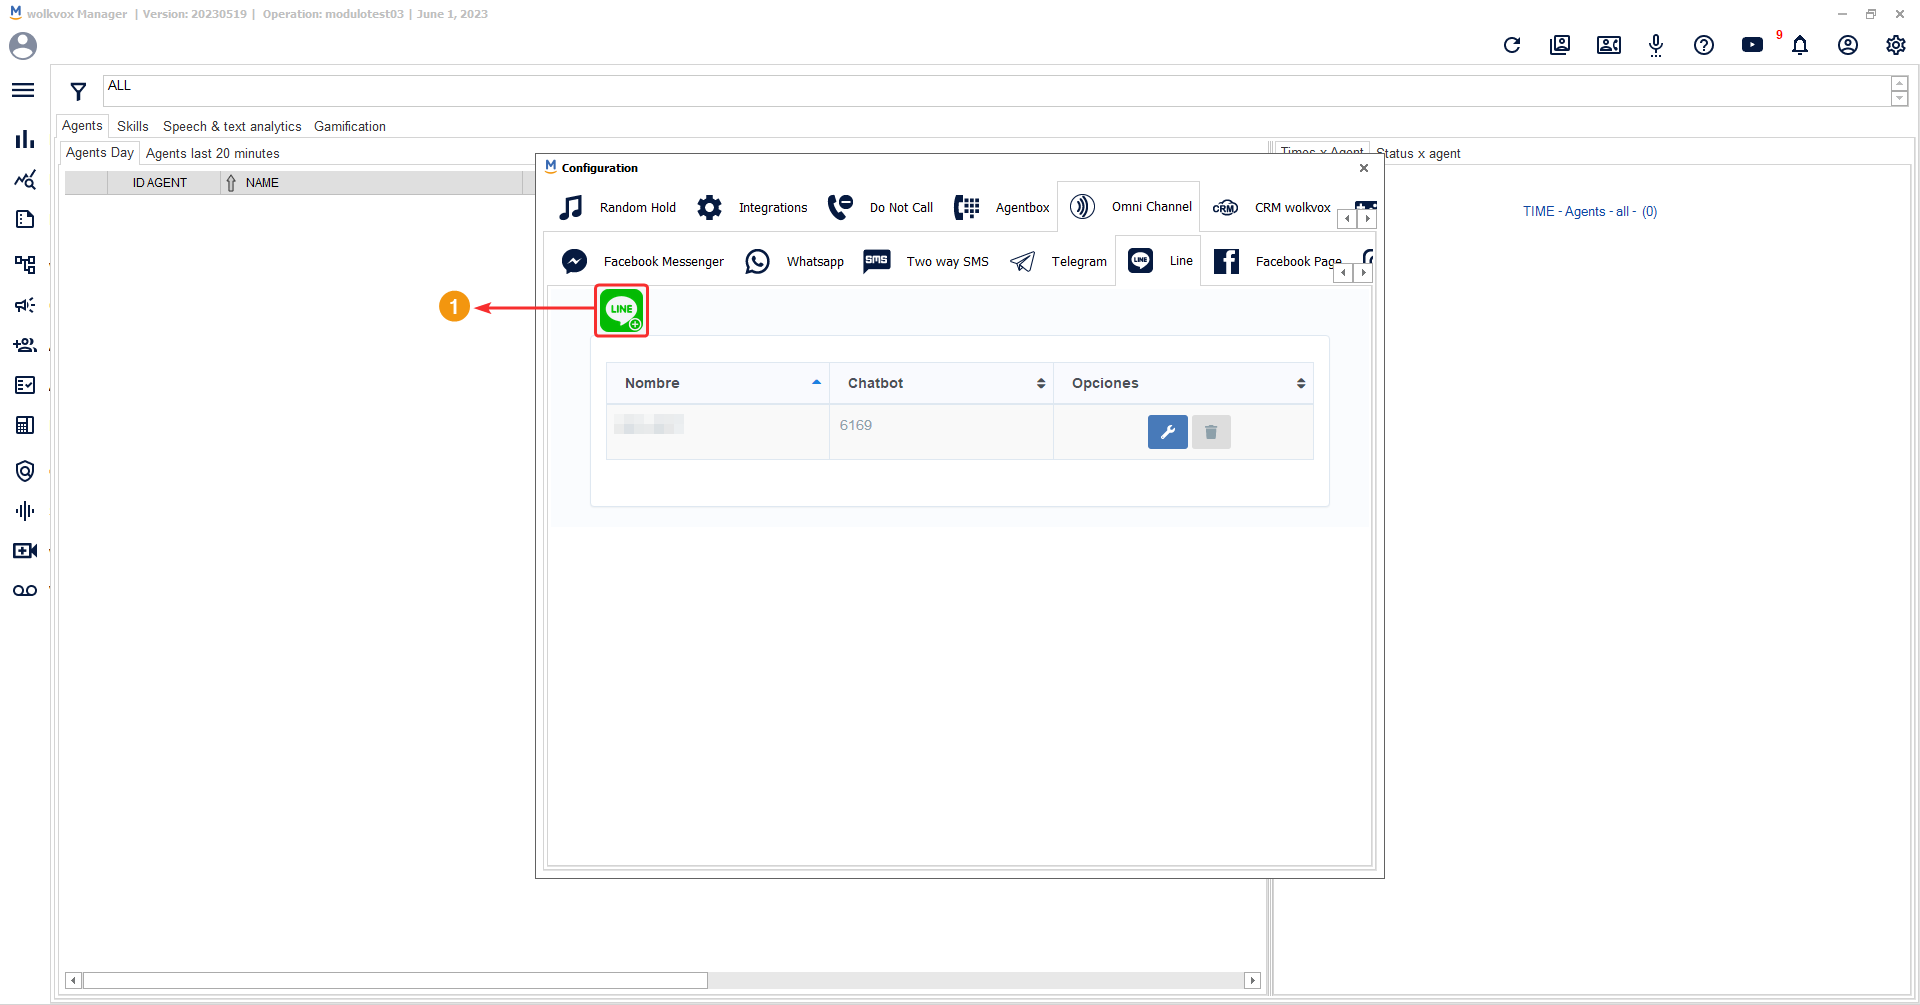
Another channel you can integrate into the Wolkvox application is Line.
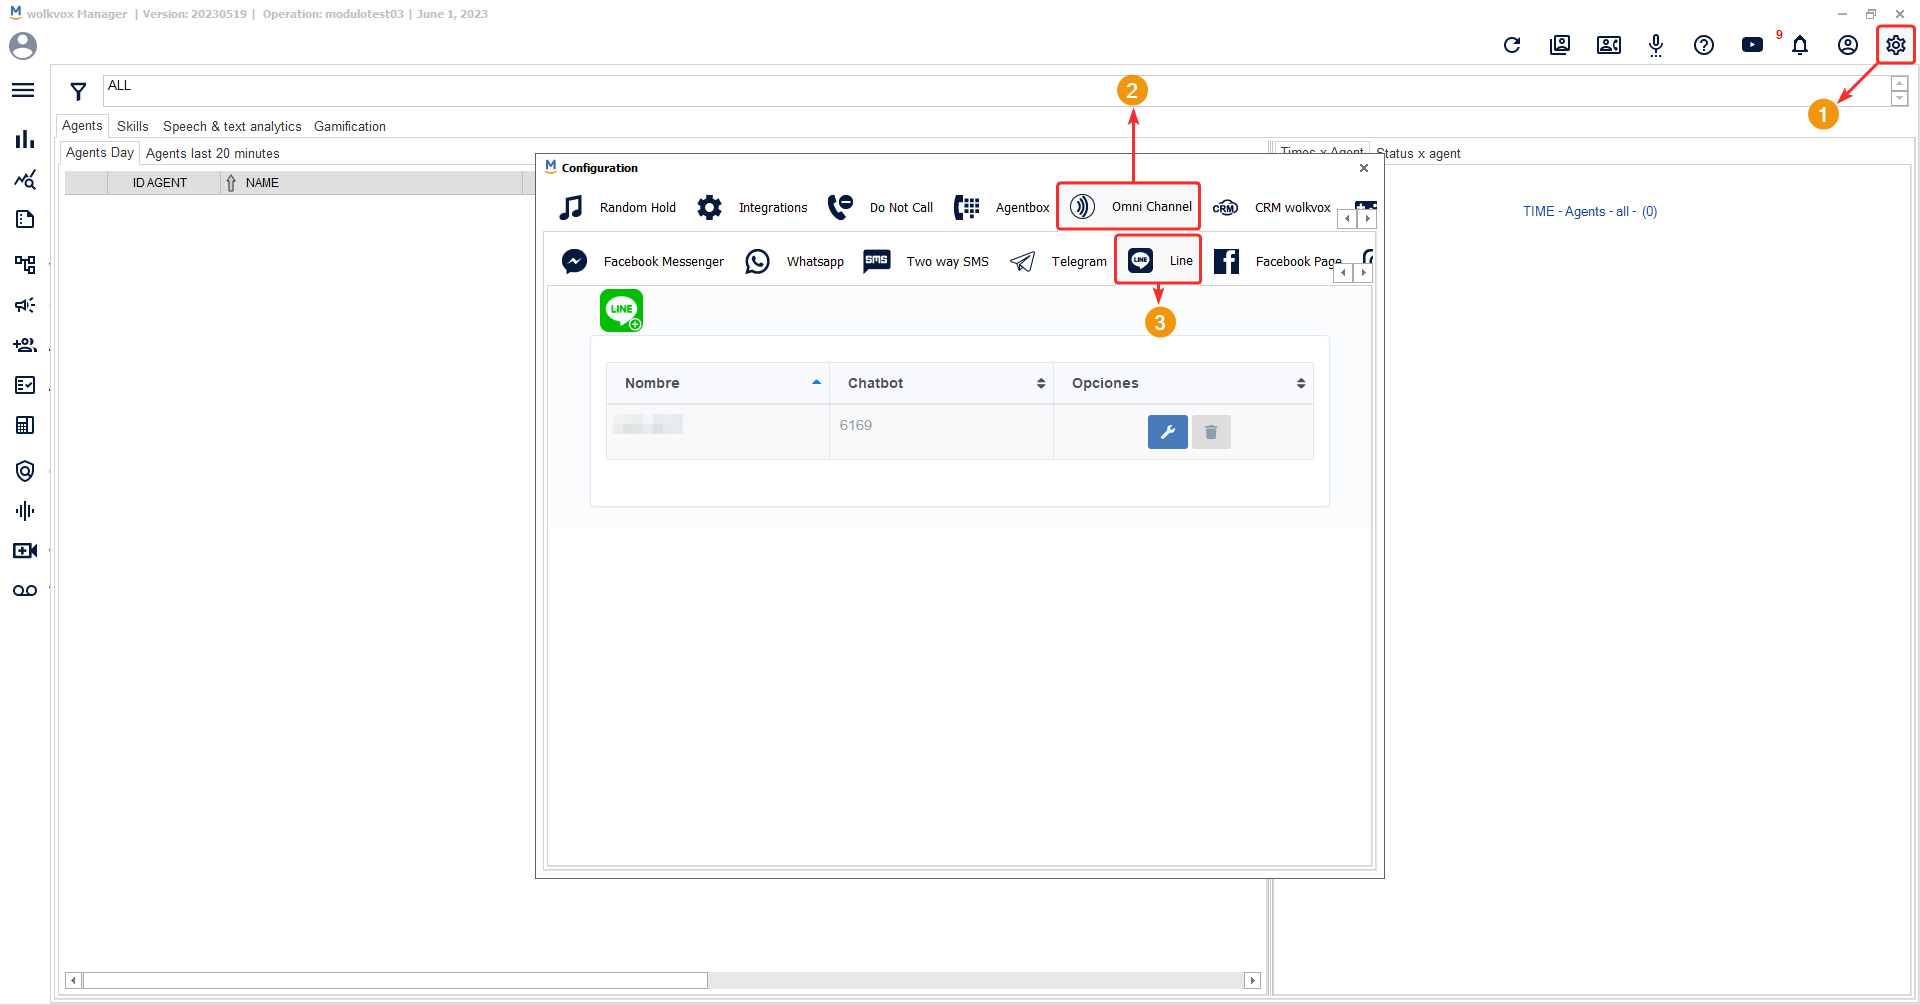
Click on the highlighted button in the following image to link a Line account with the Wolkvox application.
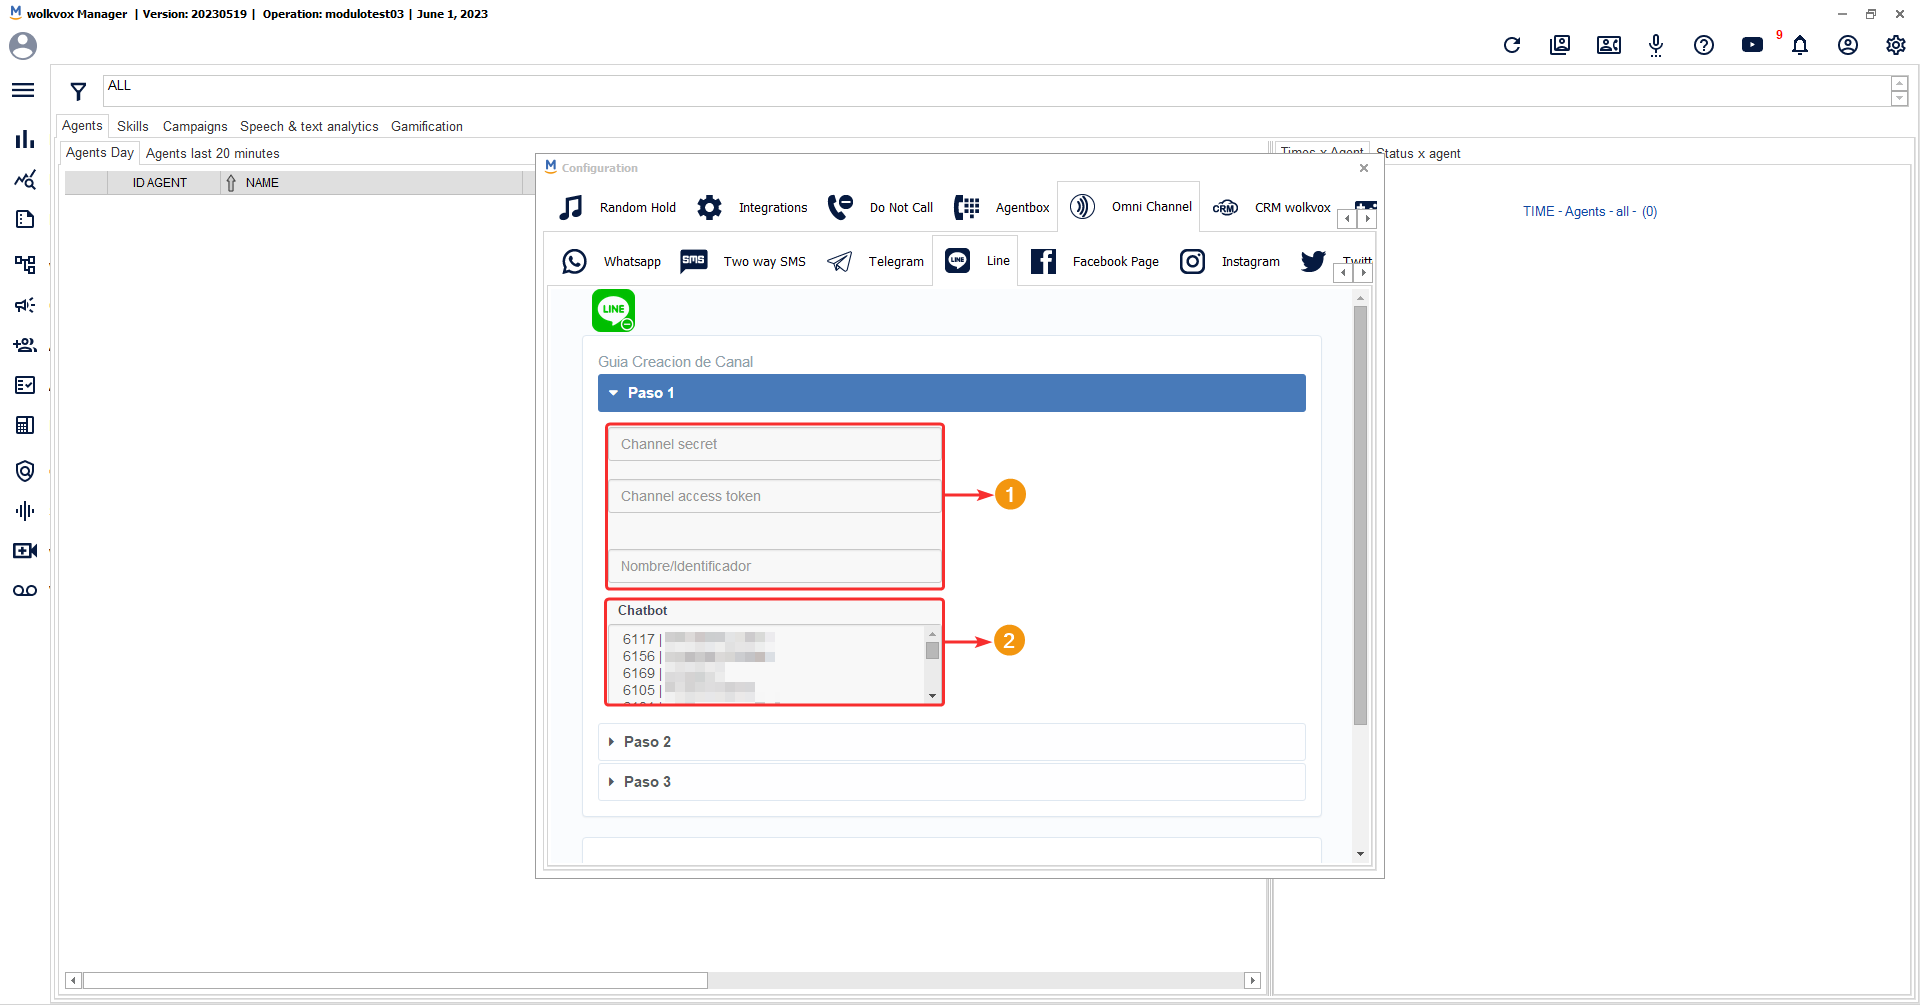
The first step requires you to enter the following data obtained from Line:
- Channel secret.
- Channel access token.
- Identification number.
Finally, in this step, you need to select the routing point you want to associate.
In the second step, you need to enter the webhook URL provided by Line.
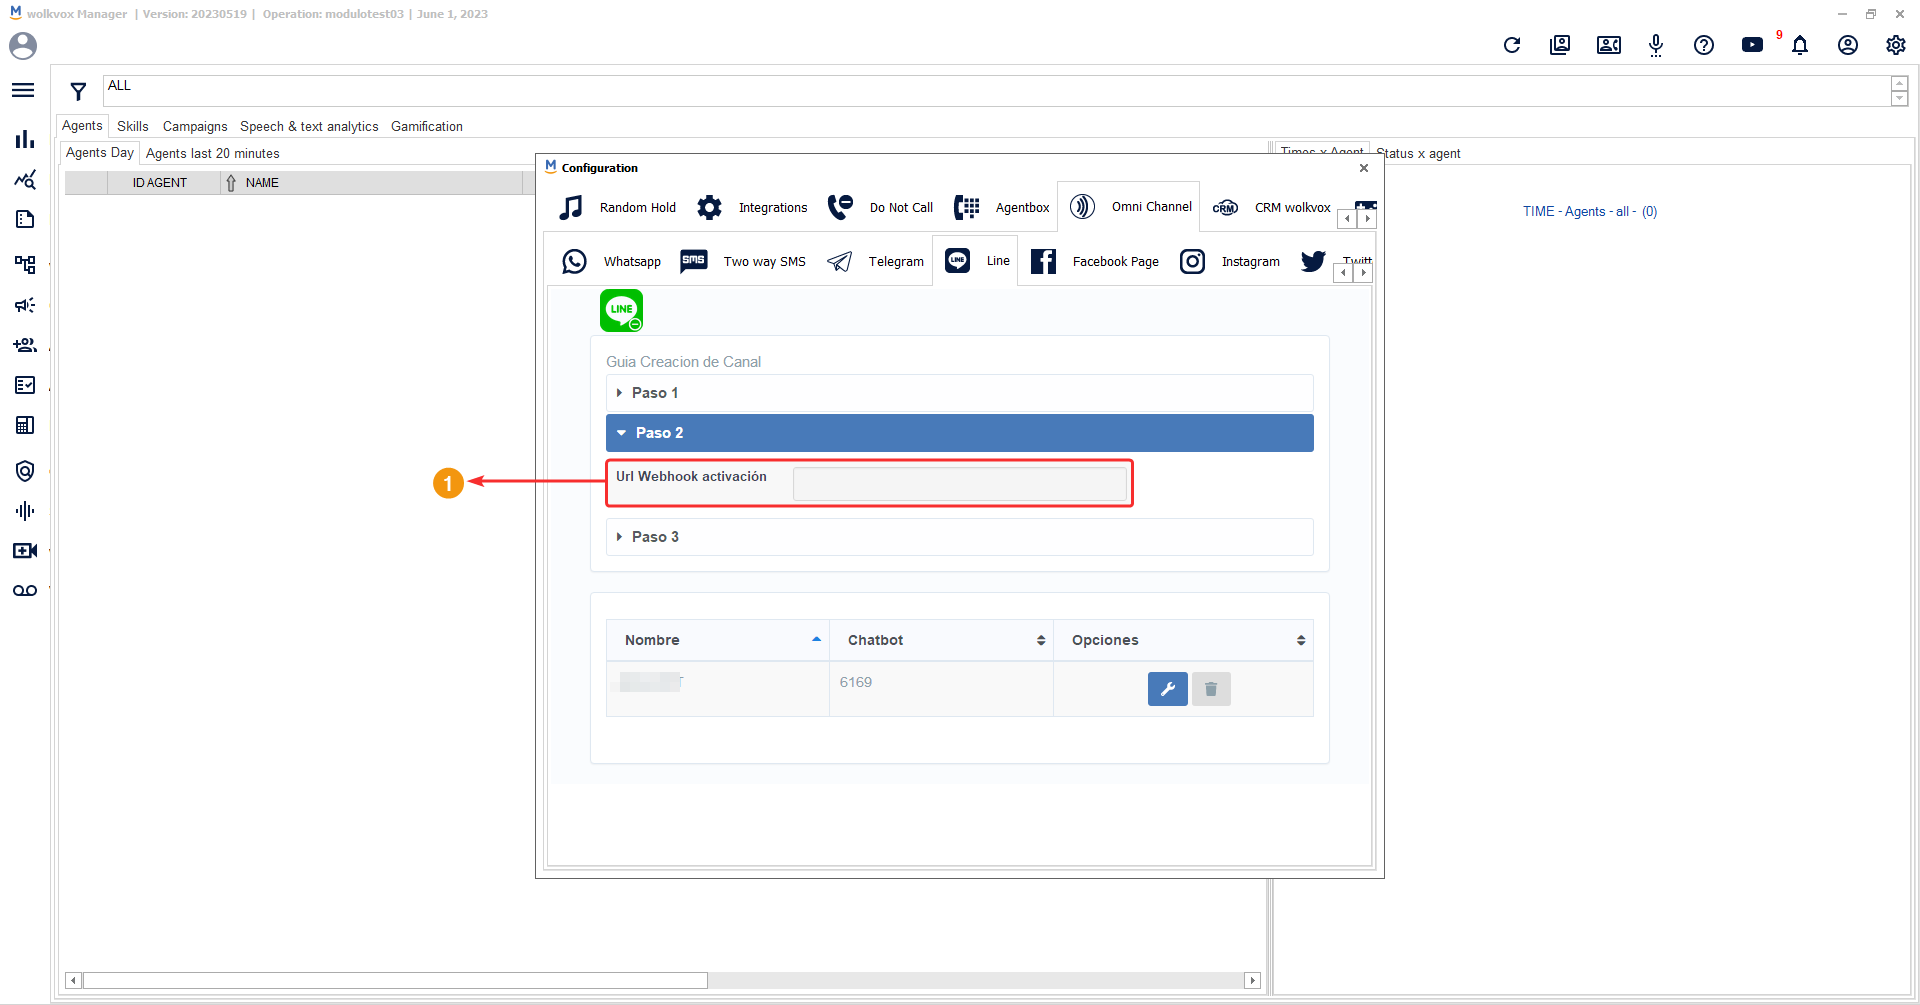
In the third step, you need to click on “Finish” to complete the configuration.

Integrate your Facebook pages into wolkvox Manager #
You can integrate your Facebook page so that the agents in your operation can manage interactions on your page, such as responding to comments left by customers on the posts you upload to your Facebook page.
Note: This service has an additional cost.

By clicking on “Add Page,” you need to log in to the new window that appears and accept the necessary permissions.

To integrate your Instagram account into wolkvox Manager, follow these steps #
By integrating your Instagram account, you will be able to have all the interactions that occur on your Instagram page within the wolkvox applications. You can manage these interactions by responding to comments left by your customers on the posts you upload to your Instagram page.
![]() Note: To have this option enabled, you must have a Facebook account linked to your Instagram.
Note: To have this option enabled, you must have a Facebook account linked to your Instagram.

After clicking on “Log in,” you must enter the login credentials for your Facebook account.

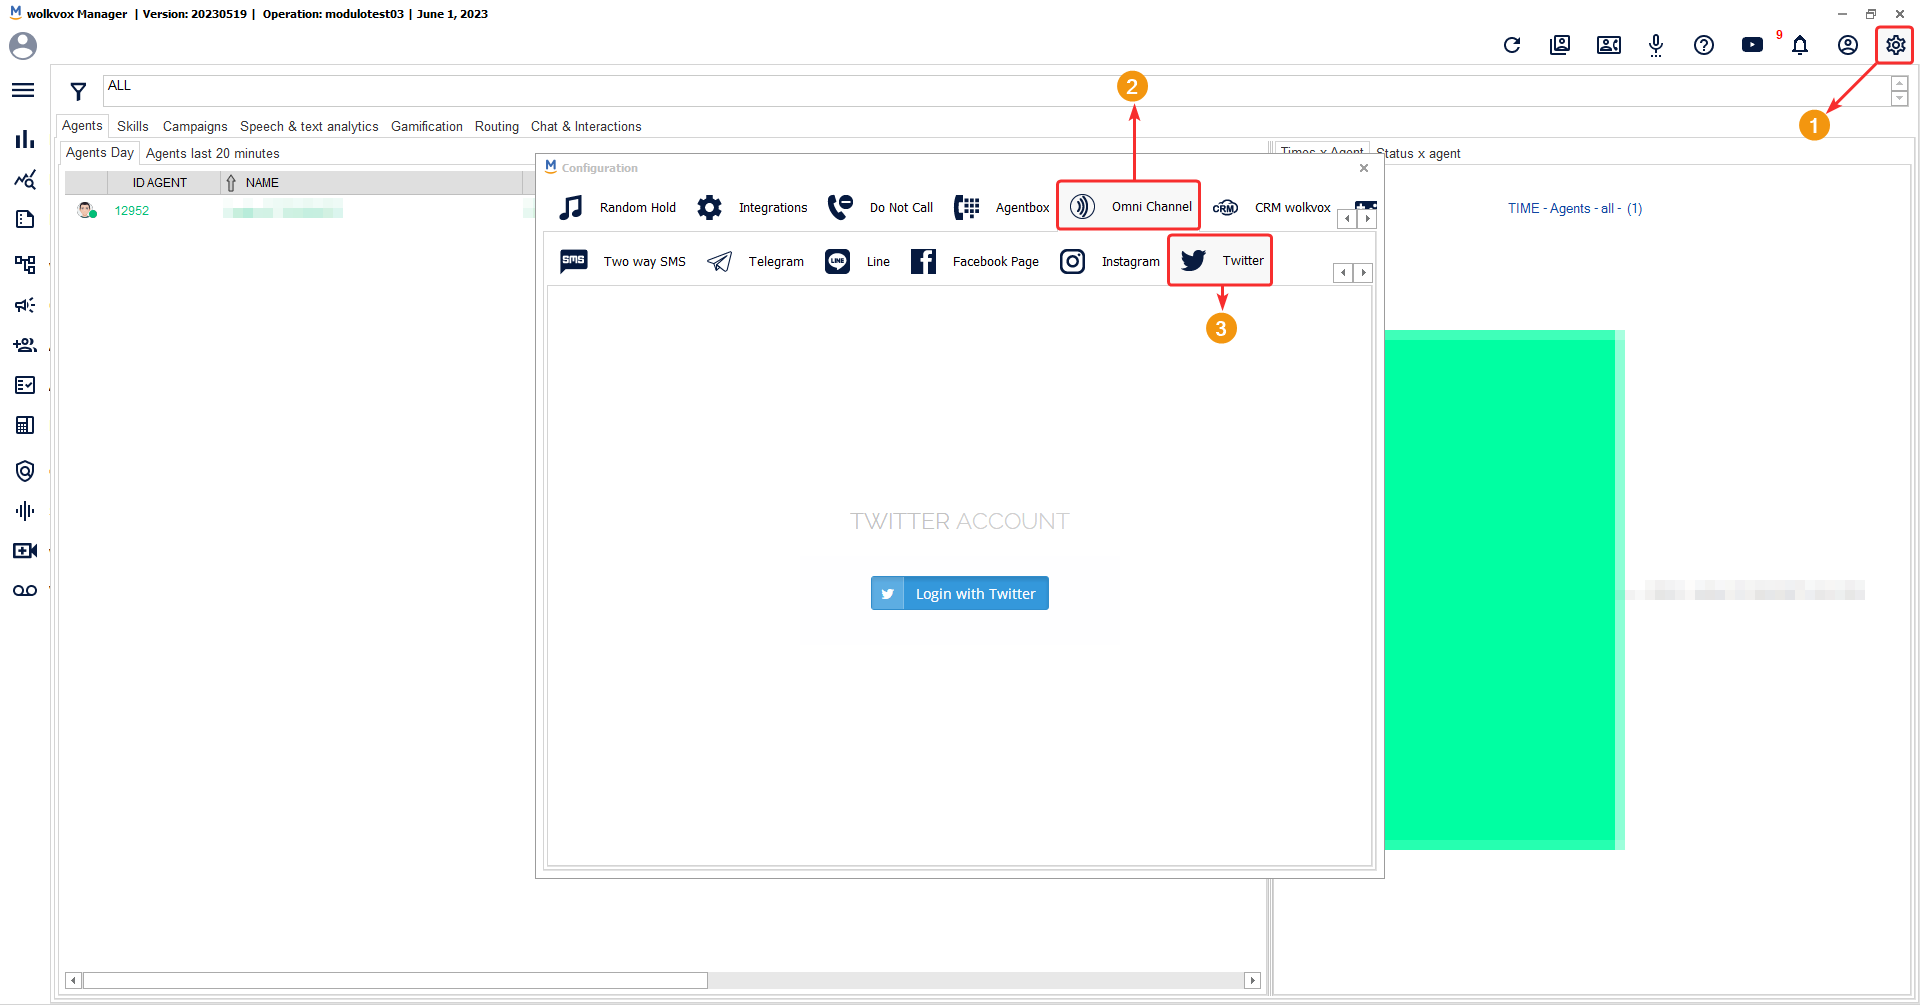
Integrate your Twitter account into wolkvox Manager #
You can integrate your Twitter account to manage the interactions that occur on your tweets.
Then, you need to enter the login credentials used in Twitter and authorize the application integration.
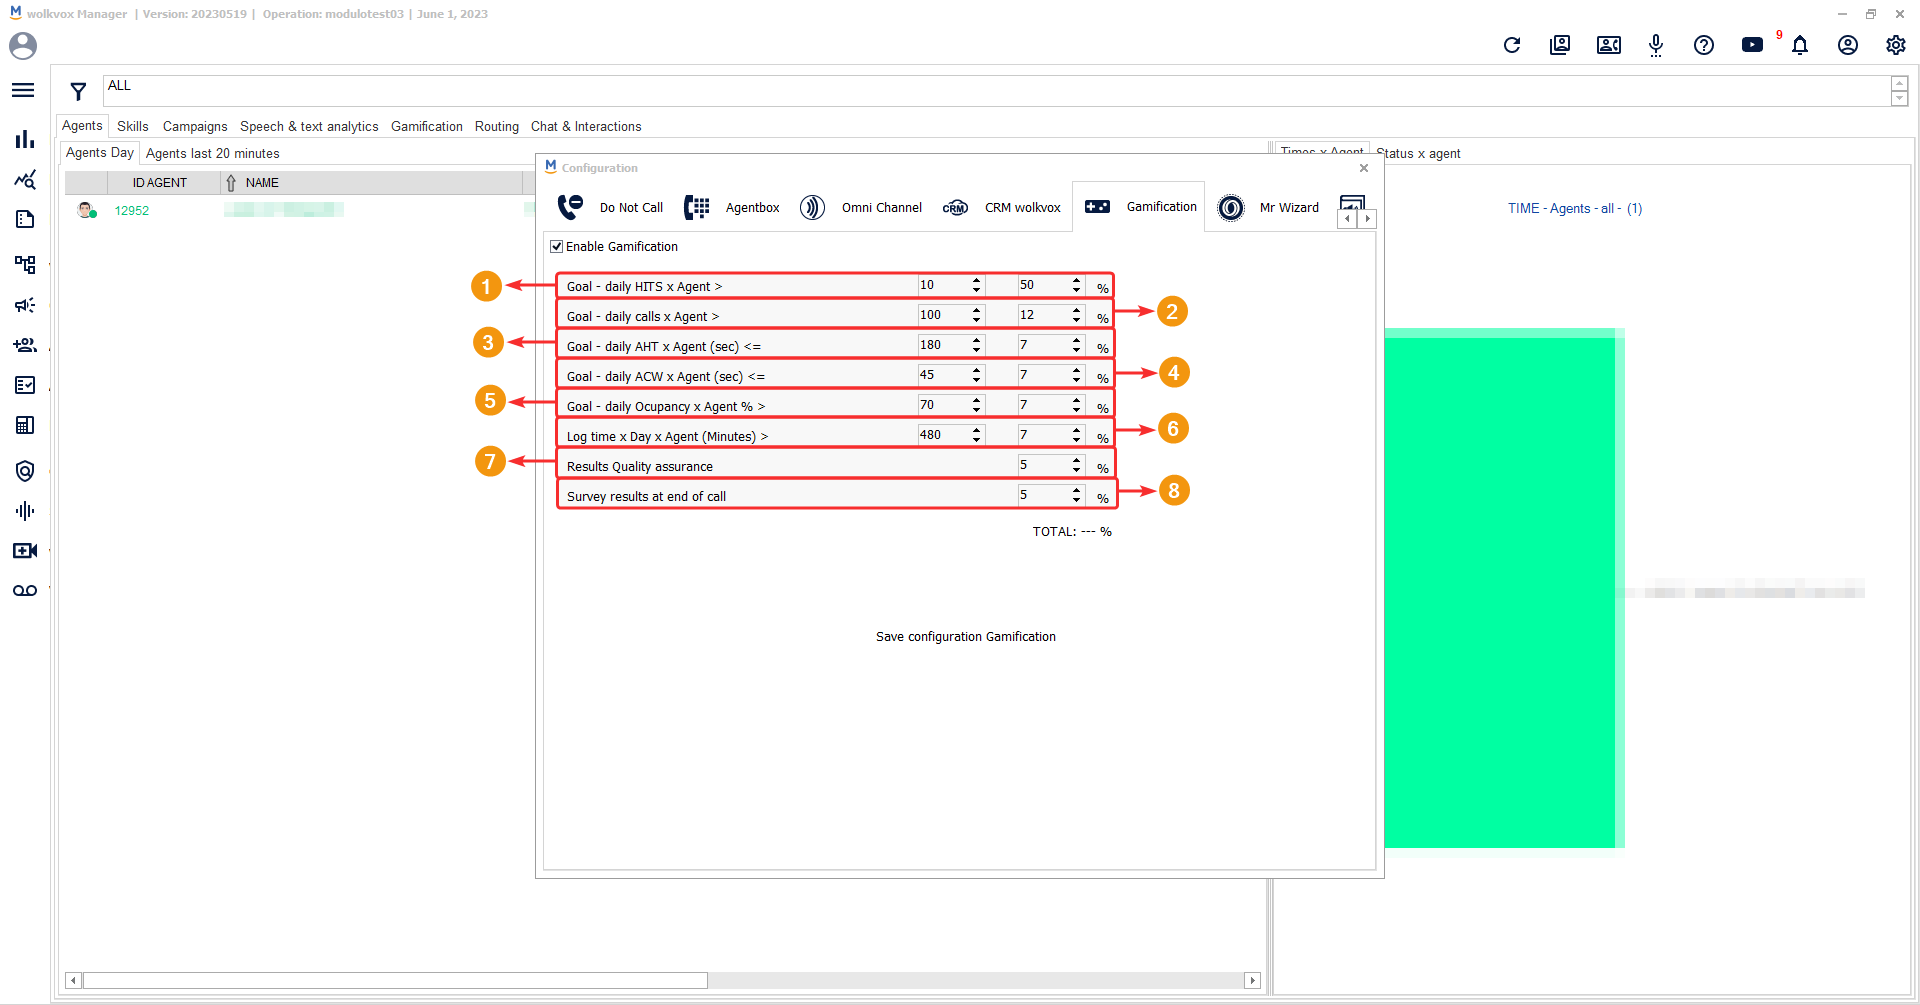
Configure the gamification service #
In this tab, you can enable or disable the gamification service in your operation. If it is enabled, you can configure the entire service. Remember that gamification refers to all the didactic techniques used to achieve set goals and foster healthy competition in your operation. Agents will feel more fulfilled as they see their goals being met through scores.
Note: This service comes with an additional cost.
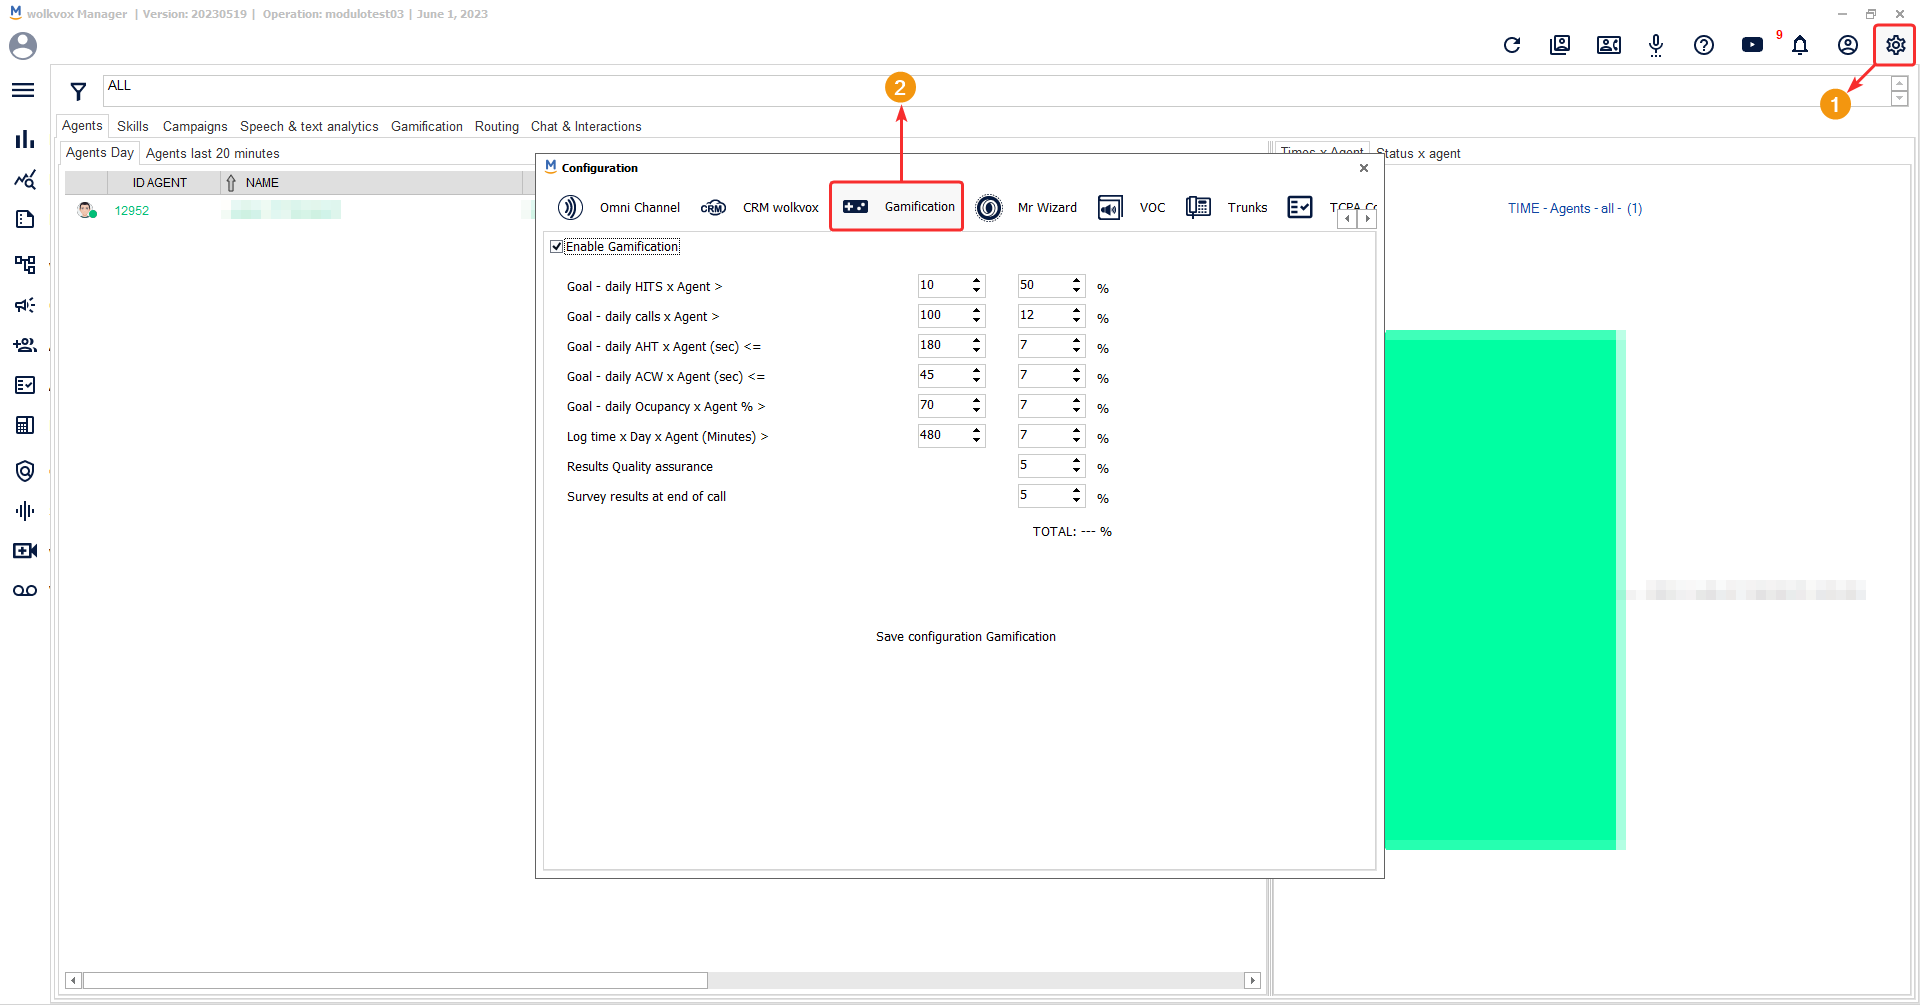
After enabling the service, you need to set the goal for each indicator and the percentage weight it will have on the total.
The total sum of the percentage weights should not exceed 100%.
Each indicator has its reference value to specify the goal:
- Daily HITS Target per Agent: Set the minimum number of daily hits the agent must achieve to surpass the indicator. Remember that HITS are the calls marked as successful (for example, a successful sale, resolution of an issue, etc.). This definition will depend on what the administrator of your operation has designed.
- Daily Calls Target per Agent: Define how many calls per day the agent should make to meet the target.
- AHT Objective per Agent per Day (SEC): Specifies the maximum number of seconds in daily AHT that the agent should not exceed to meet the goal. Remember that AHT is the average time indicator spent by the agent on each call, including the conversation time with the customer and additional time for call coding.
- ACW Objective per Agent per Day (SEC): Specifies the maximum number of seconds in daily ACW that the agent should not exceed to meet the indicator. Remember that ACW is the post-call process used by the agent to code the call, it is the stage where the agent defines the outcome of the call.
- Occupation Objective per Agent per Day: Sets the desired percentage of daily occupation that the agent should have to meet the goal. The occupation indicator includes all agent time except for the time spent in auxiliary states and logout.
- Login Time per Day per Agent (Minutes): Specifies how many minutes of daily login time the agent must meet to exceed the indicator.
- Results Quality Assurance: Set the percentage weight that this attribute has with the agent’s performance outcome.
- Survey results at end of call: Set the percentage weight of the score given by the customer to the agent in the satisfaction survey after the call ends.
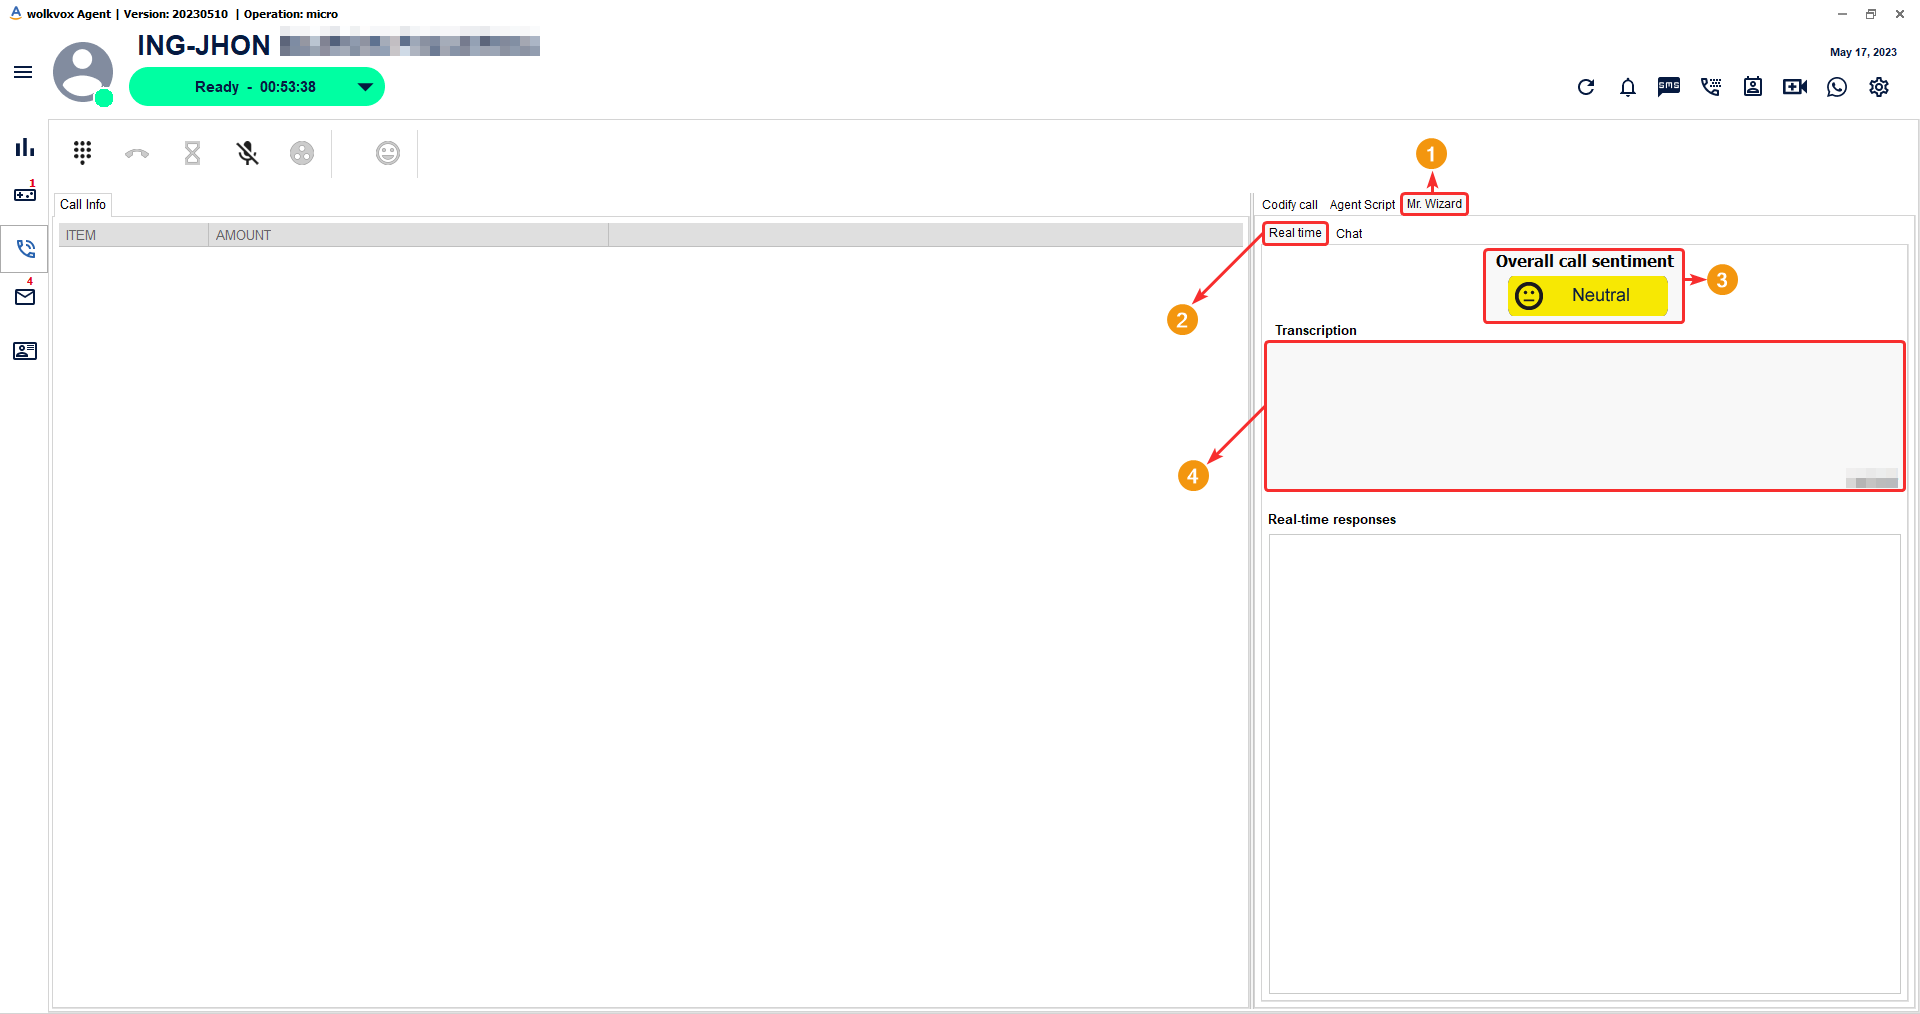
Mr. Wizard for real-time voice analysis and response chat #
- In this section, you have access to real-time voice tools, Mr. Wizard in voice, Mr. Wizard in chats, Mr. Wizard in interactions (coming soon), and Mr. wolkvox – wolkvox studio – Business Logic (coming soon).
- Mr. Wizard in voice allows you to activate a section in wolkvox Agent where the agent can type a question and the system will provide a response based on the training it has received.
- Thanks to Mr. Wizard, you will optimize the productivity of your operation and improve the quality of customer service provided by your agents.
- Note: This functionality is only available in the local applications and not in Manager Web or Agent Web.
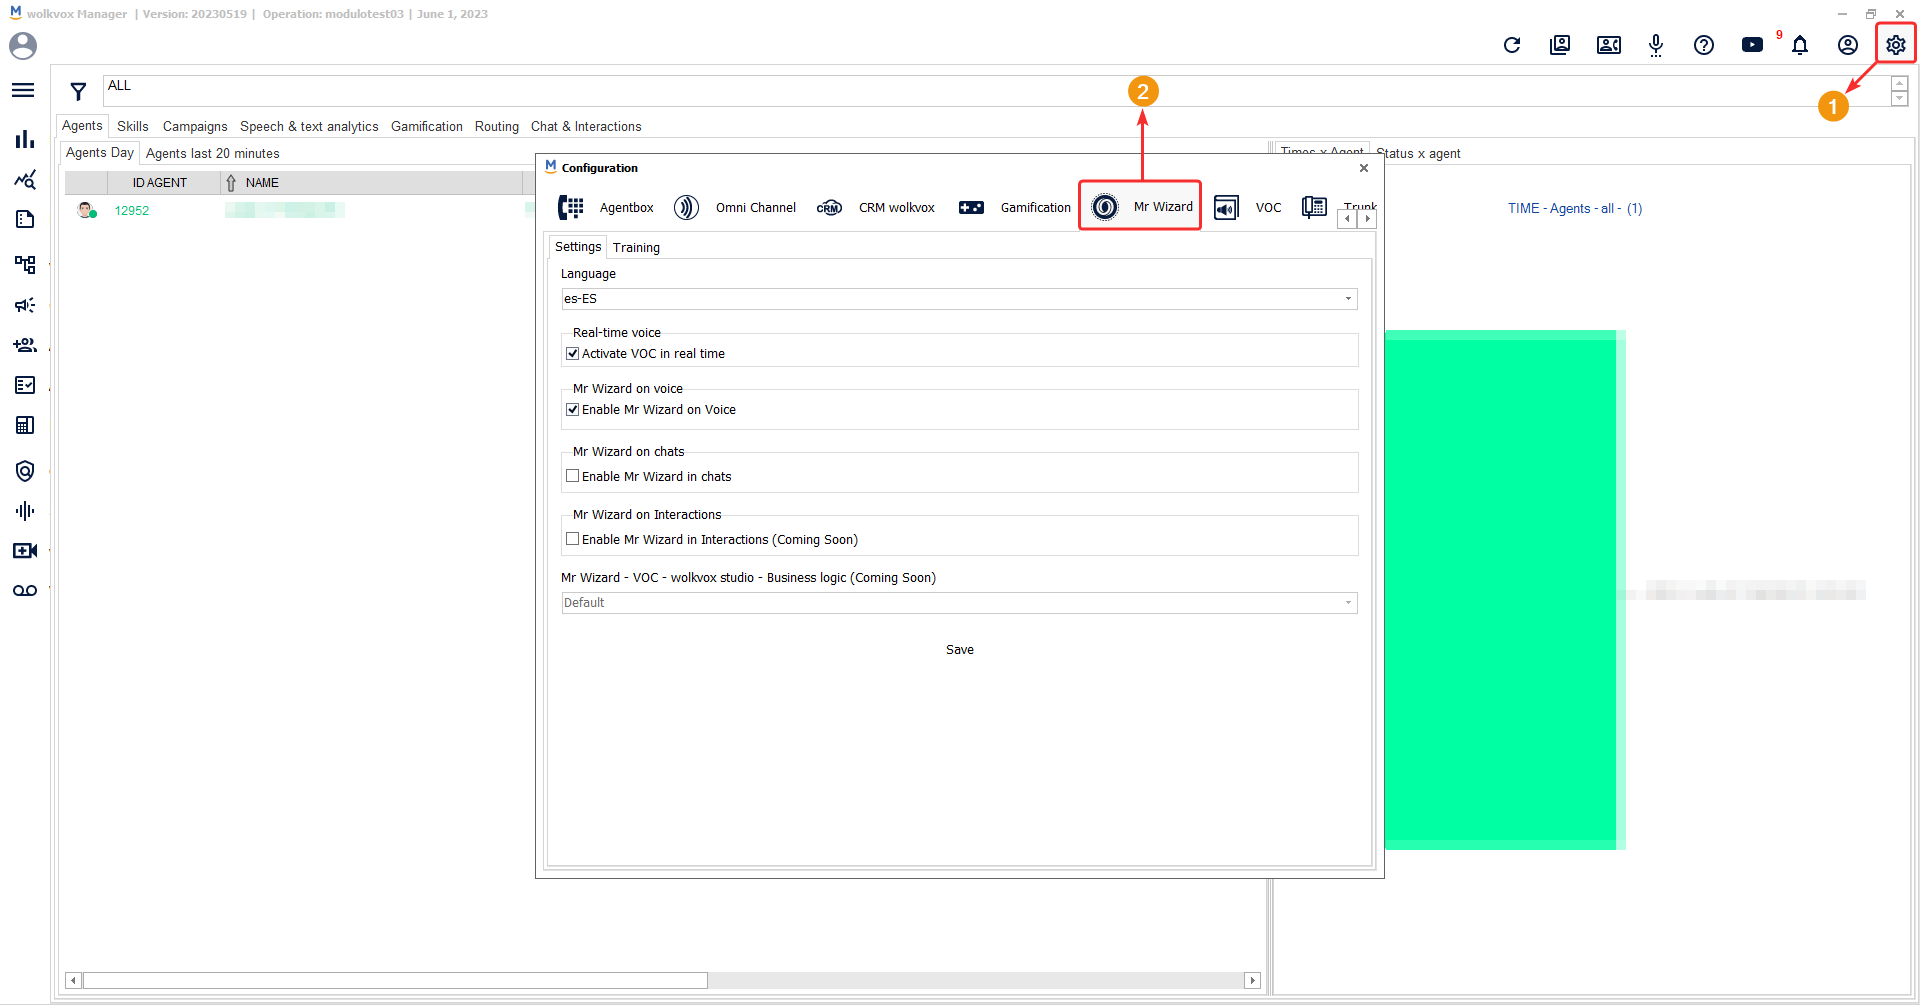
- In the “Language” section, you can select the language in which the system will perform text and voice analysis.
- In the “Real-time Voice” section, you can enable or disable the sentiment analysis and call transcription services in real time.
- In the “Mr. Wizard in Voice” section, you can activate or deactivate the new tool that allows the agent to type a question and receive a response from the system. The response depends on the information provided in the “Training” tab. This is an important feature to quickly resolve customer inquiries.
- In the “Mr. Wizard on Chats” section, you can activate or deactivate the new tool that allows the agent to type a question and receive a response based on the training provided. This tool also has the feature of correcting spelling and grammar before the agent sends a response to the customer.
- Please note that the mentioned services are currently under development.
- Don’t forget to click the “Save” button to apply the changes.

The agent, in the “Voice” section, will have the two main tools of Mr. Wizard: “Real-time” and “Chat”. The “Real-time” tool will allow the agent to have a “Transcription” field where the entire conversation of the call will be displayed in text in real time. Additionally, there is a section that shows the overall sentiment of the call analyzed in real time.
The “Chat” tool of Mr. Wizard for voice channels will serve as an AI-powered assistant trained to answer all questions asked by the agent, aiming to expedite the response to the customer. A good response will depend on the training we provide to the system. This tool also has the option to generate a summary of a text written by the agent to the system.
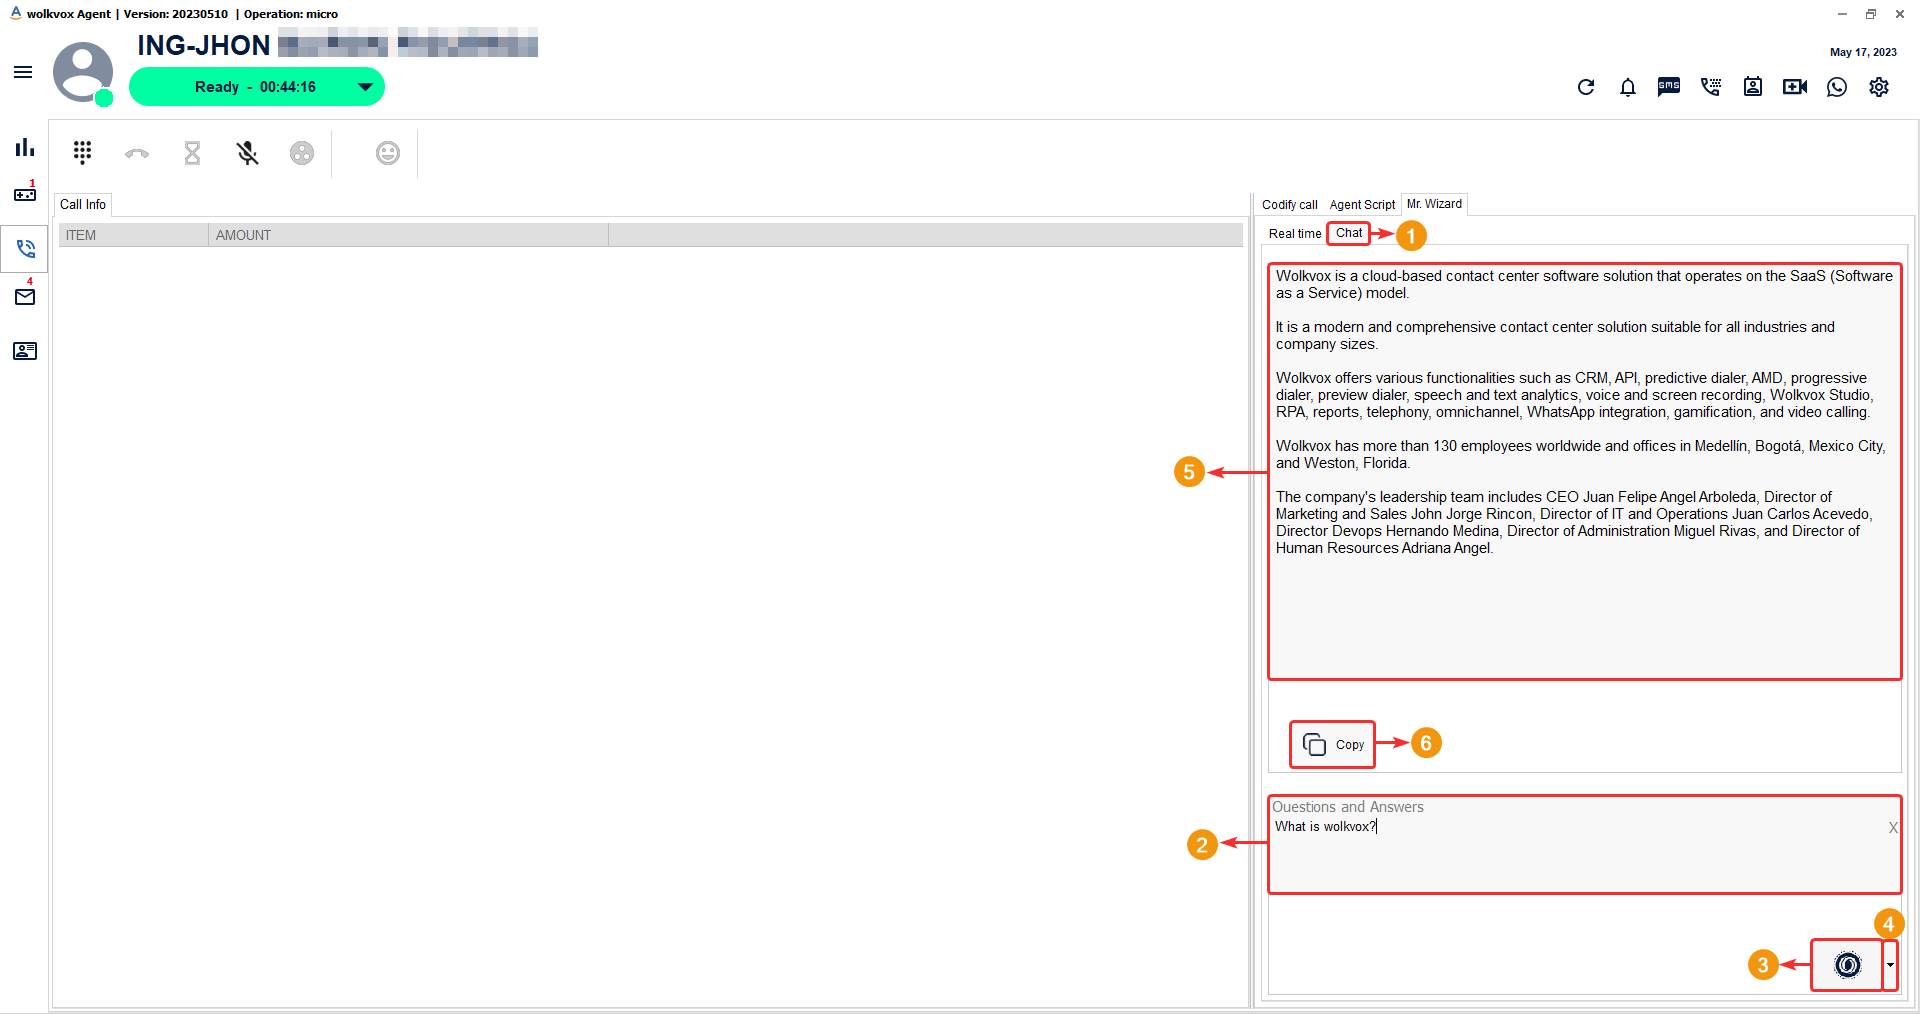
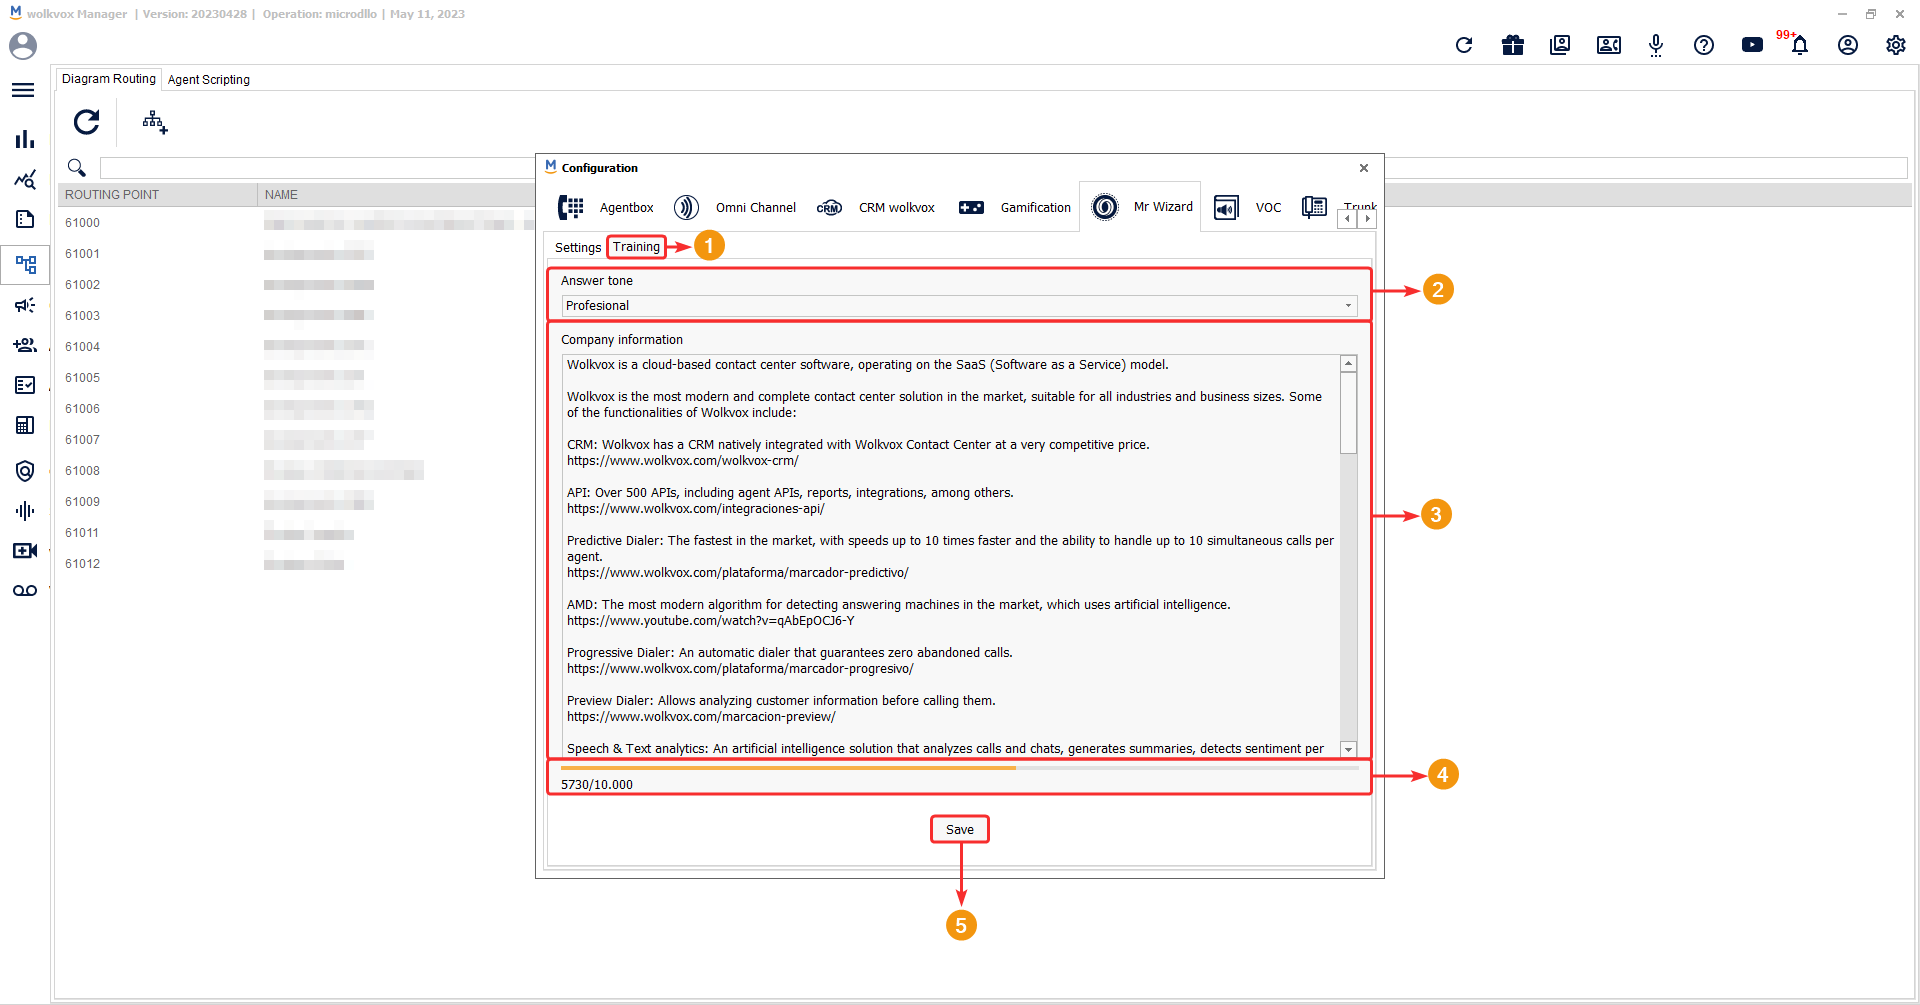
Training is crucial in this tool as a good response depends on the information collected in this tab.
There is a character limit set at 10,000, so make sure to provide the most important information without exceeding that character count and including the necessary keywords for a proper system response to the agent’s questions. However, this limit encompasses a significant number of words, enough to train the system effectively and provide all the required information to the agent.
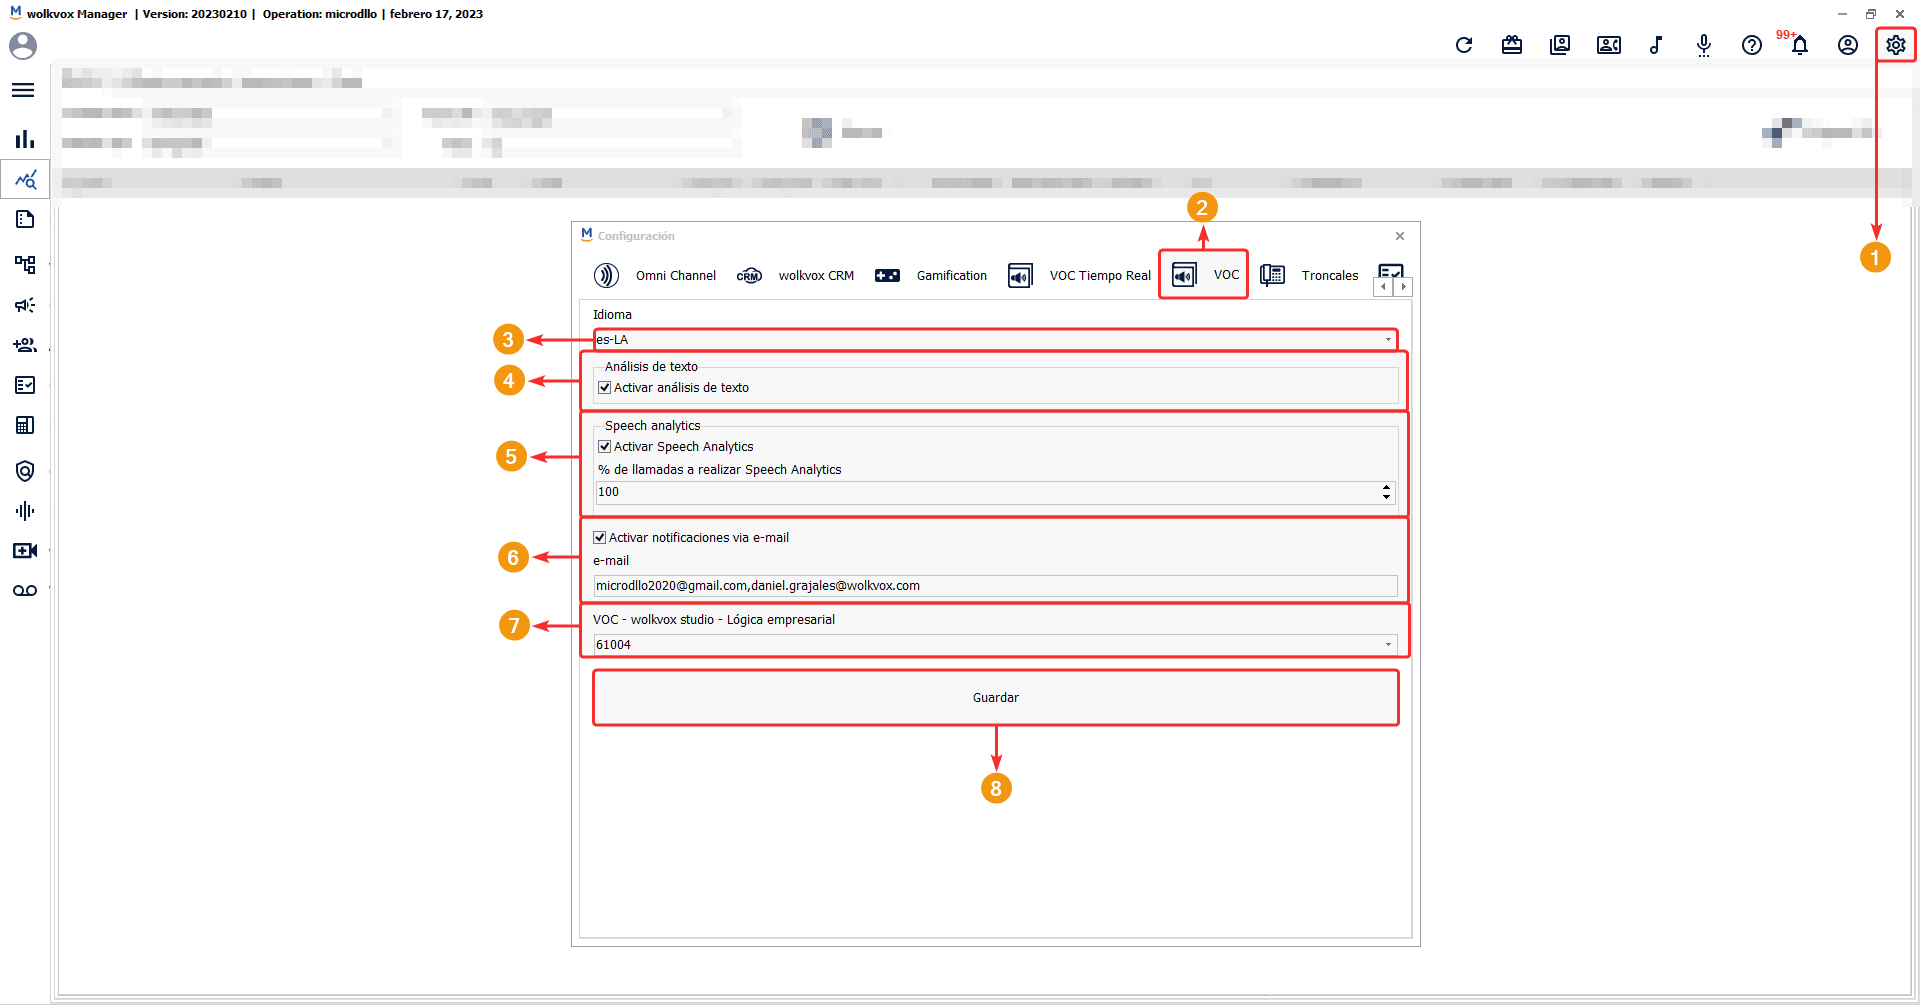
Activa el servicio de análisis de voz y texto para monitorear mejor las conversaciones #
Speech y Text Analytics es el servicio que analiza las conversaciones de sus agentes en las llamadas y también en los chats. Todo esto para monitorear más profundamente y mejorar la atención en su operación.
El servicio que analiza las llamadas o interacciones de tipo voz es conocido como Speech Analytics. Mientras que el servicio que analiza todo lo relacionado con texto como lo son los chats, es conocido como Text Analytics.
Configura el servicio de la siguiente manera:
- Entra en la configuración del wolkvox Manager.
- Entra en la pestaña “VOC”.
- En “Idioma” seleccionas el idioma que debería de tener en cuenta el sistema para realizar el análisis. Es decir, aquí seleccionas el idioma con el que se comunica el agente y el cliente.
- En “Análisis de texto” activas o desactivas el servicio de análisis de interacciones relacionadas con texto, como son los chats.
- En “Speech analytics” tienes la casilla para activar el servicio que analiza las interacciones de tipo voz, es decir, las llamadas. También tienes el campo “% de llamadas a realizar Speech Analytics” que te permite establecer el porcentaje de llamadas de tu operación a la que les deseas aplicar el análisis.
- En “Activar notificaciones vía e-mail” puedes activar el servicio que te permite recibir notificaciones de correo electrónico cada que el sistema realiza un análisis sea de texto o voz.
- En “VOC – wolkvox Studio – Lógica empresarial” debes seleccionar el Routing Point que contiene el flujo del análisis que deseas aplicar cada que un cliente termine su interacción con un asesor.
- Da clic en “Guardar” para aplicar los cambios.
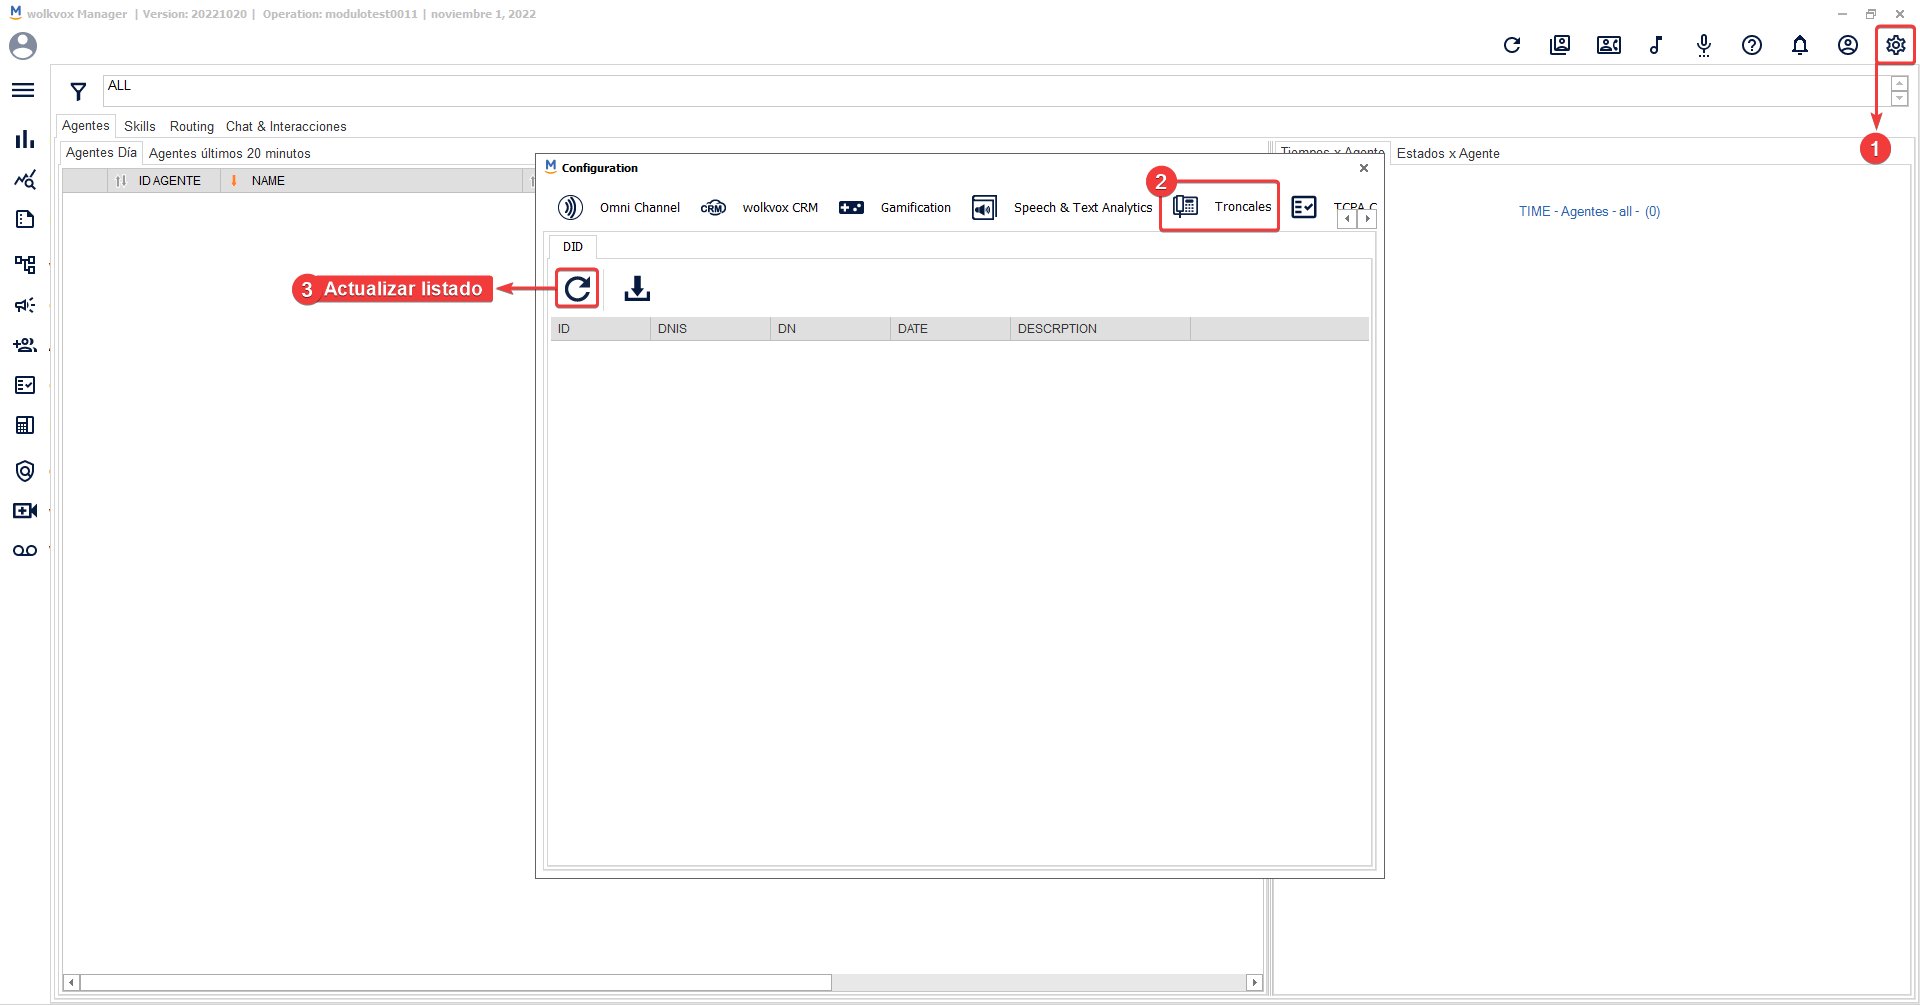
Configura los DID de las troncales #
Monitor the changes made in wolkvox Manager #
Thanks to the “Audit Log” service, you can view a record of the changes that have been made in all the options of wolkvox Manager.
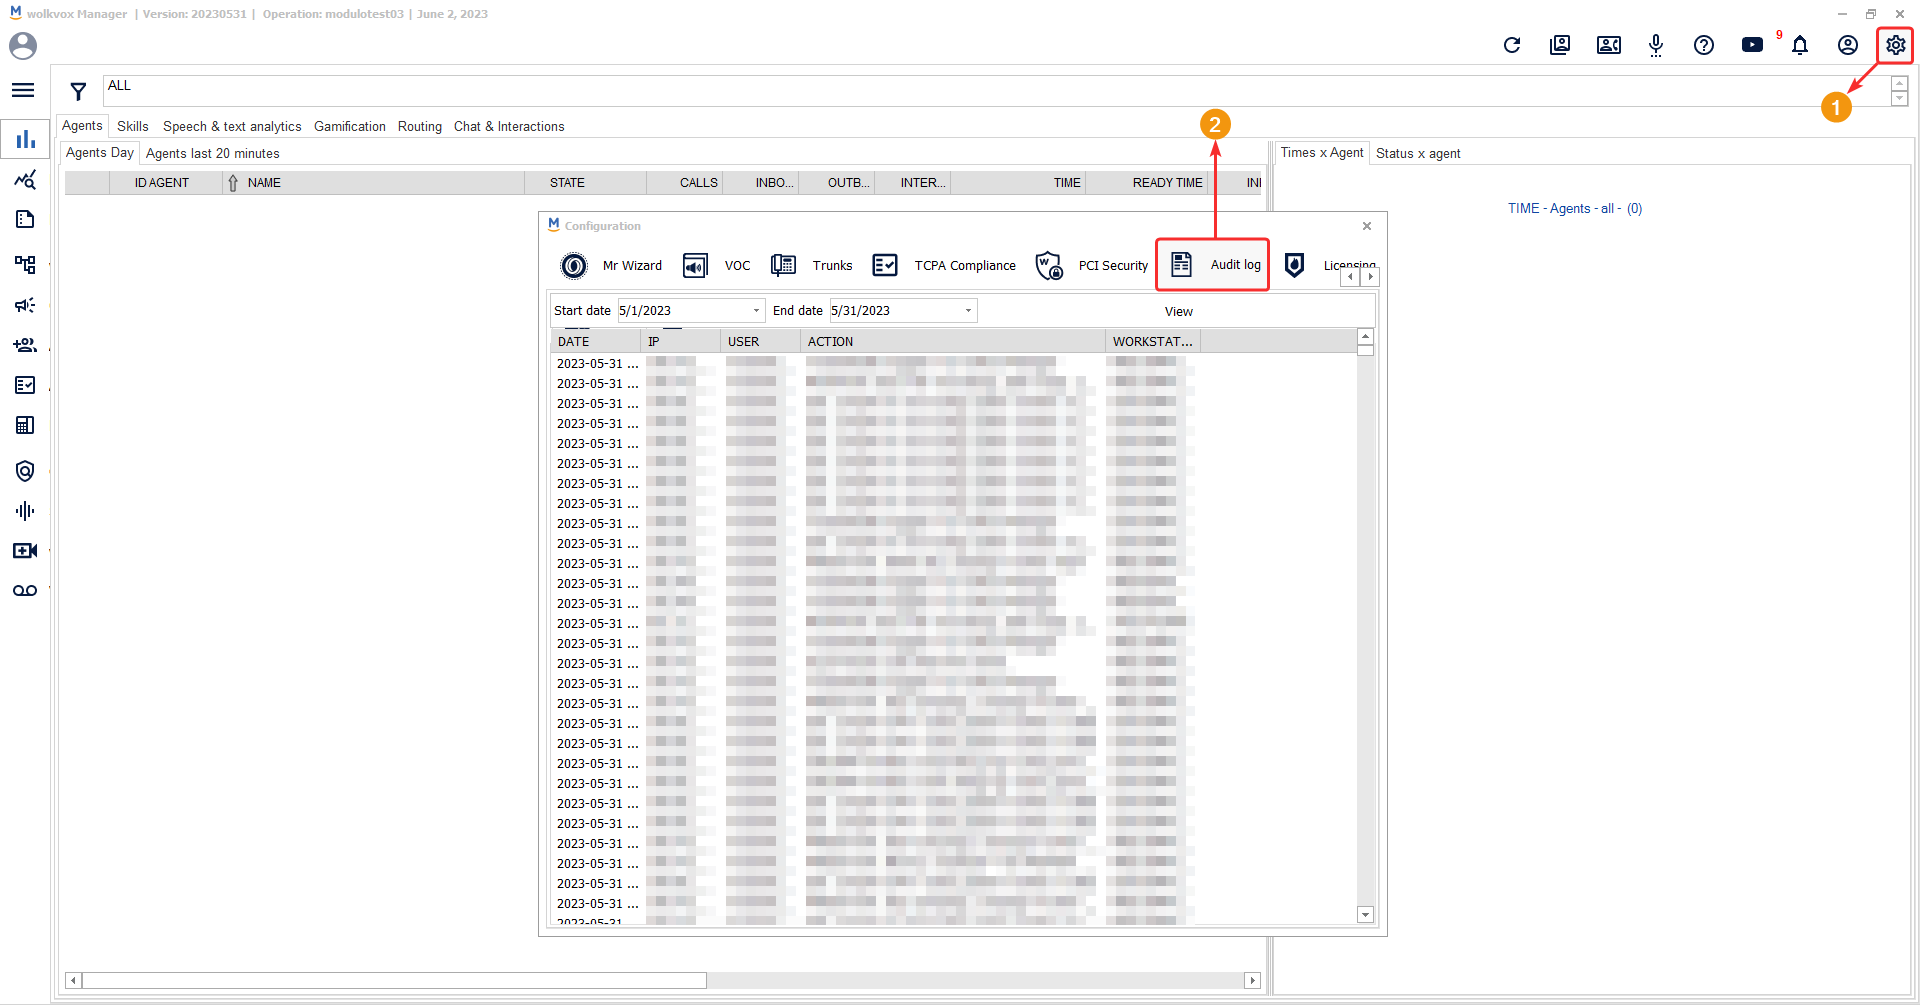
To view a report of changes made in your operation, you must first select a date range and then click on “View”.
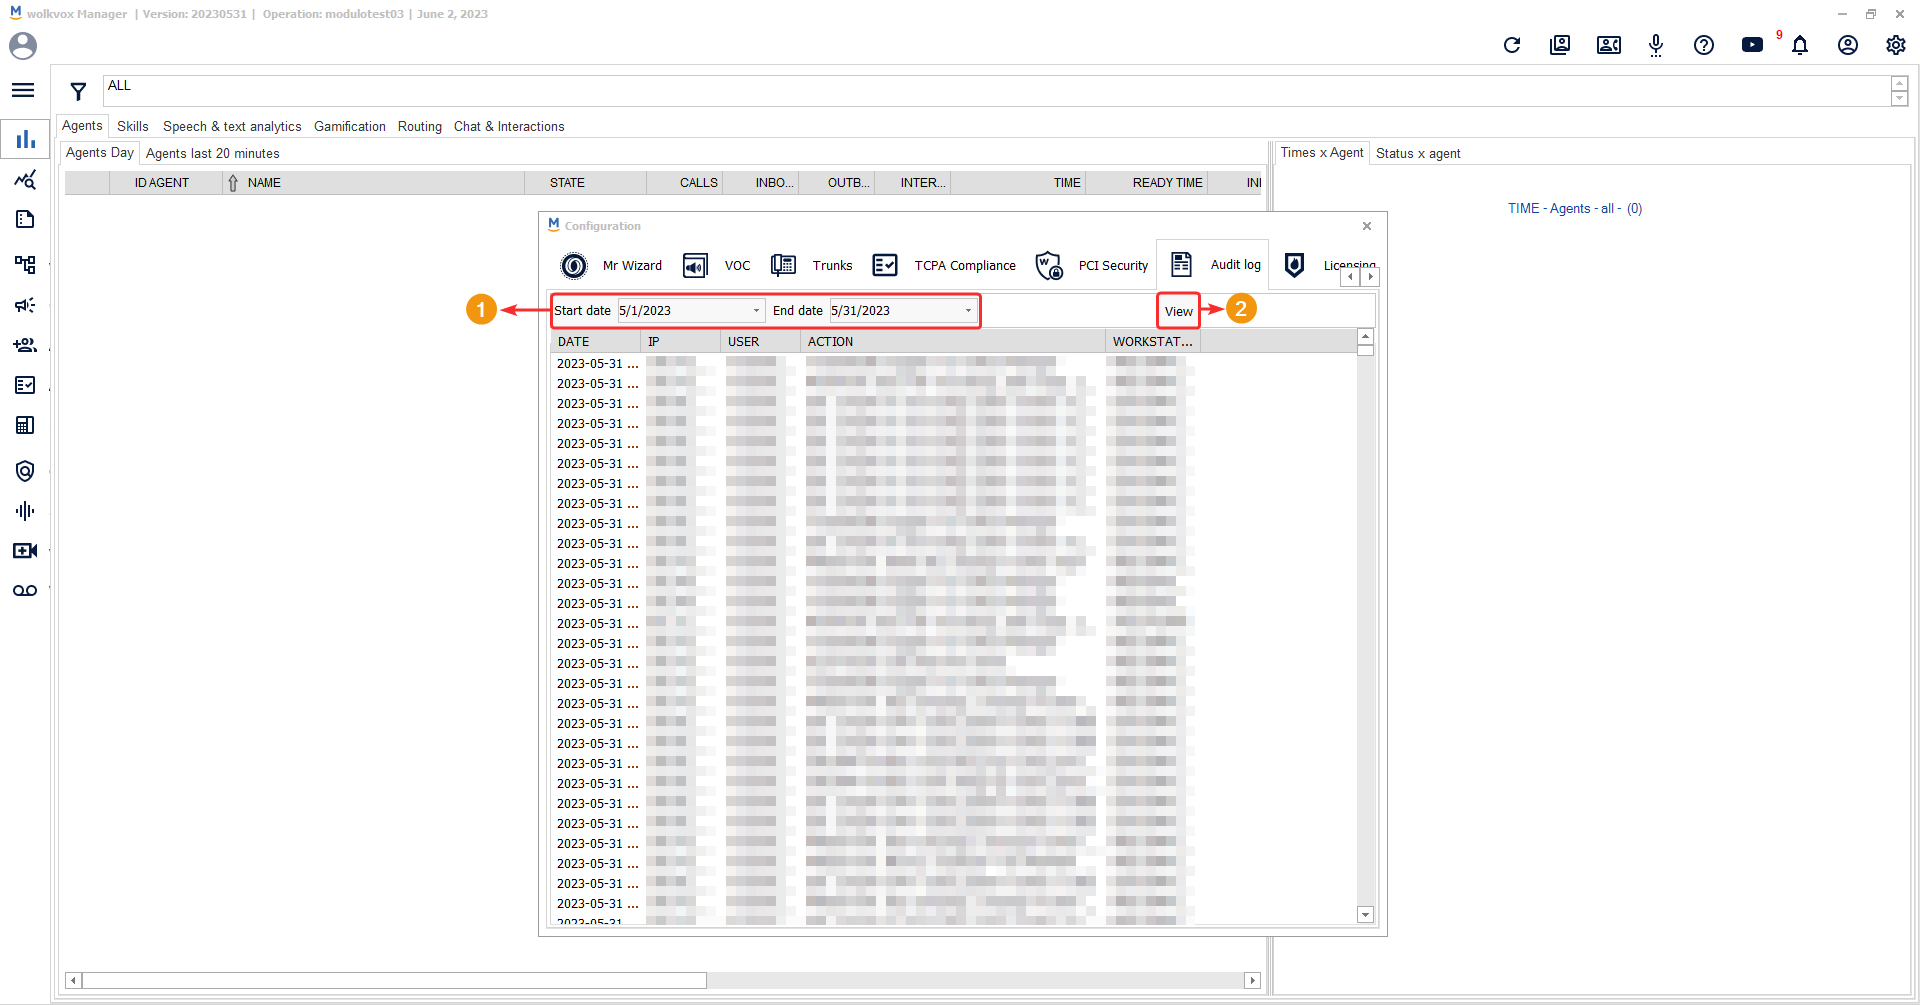
The generated report table displays the following data:
- Date of the movement or change.
- Public IP address from which it was performed.
- Username of the user who made the change.
- Specification of the action or movement performed.
- Name of the computer or workstation from which the movement originated.
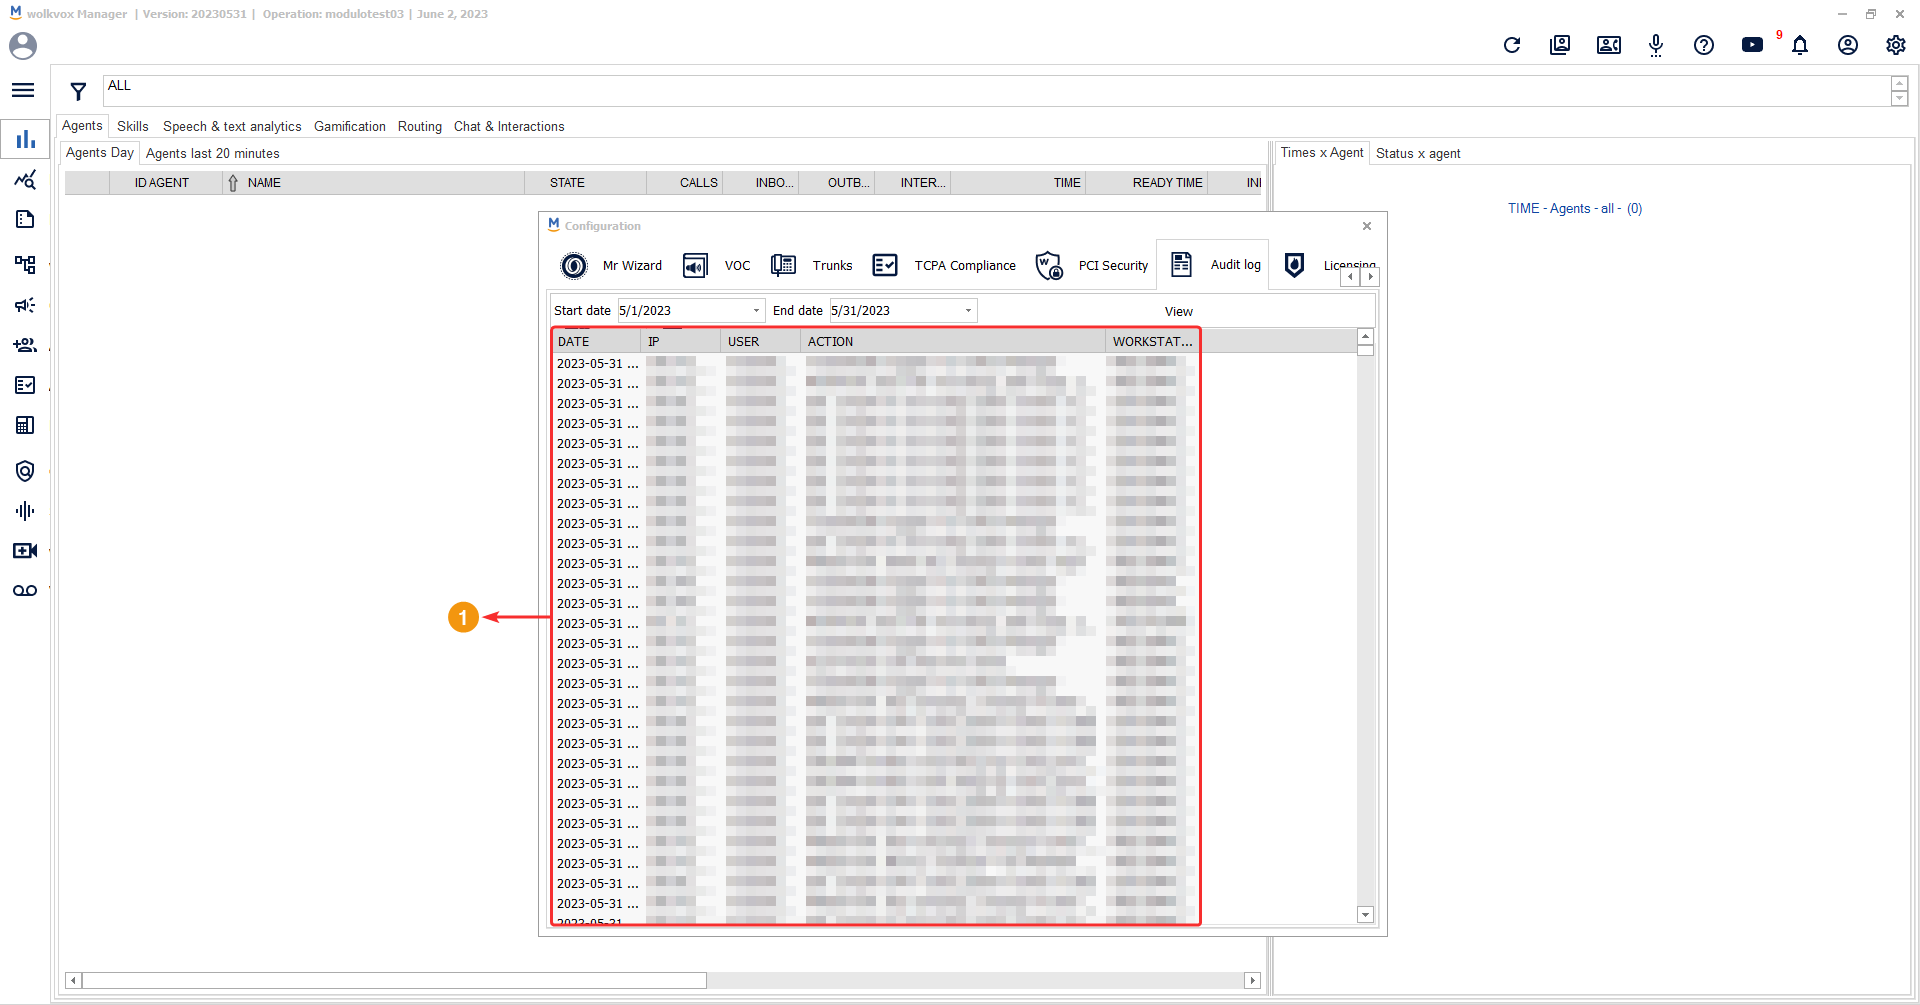
If you right-click on the record table, you can export the table to HTML format.

Manage PBX licenses and add IP addresses to the Firewall #
In this section, you can add call center and PBX licenses, as well as add IPs to the Firewall.
![]() The “Add IP” function is used to grant connection to the wolkvox applications from the specified IPs.
The “Add IP” function is used to grant connection to the wolkvox applications from the specified IPs.
![]() Every month, a cleanup is performed for IPs that have not been used continuously for 30 days.
Every month, a cleanup is performed for IPs that have not been used continuously for 30 days.
![]() You can add a maximum of 5 permanent IPs.
You can add a maximum of 5 permanent IPs.
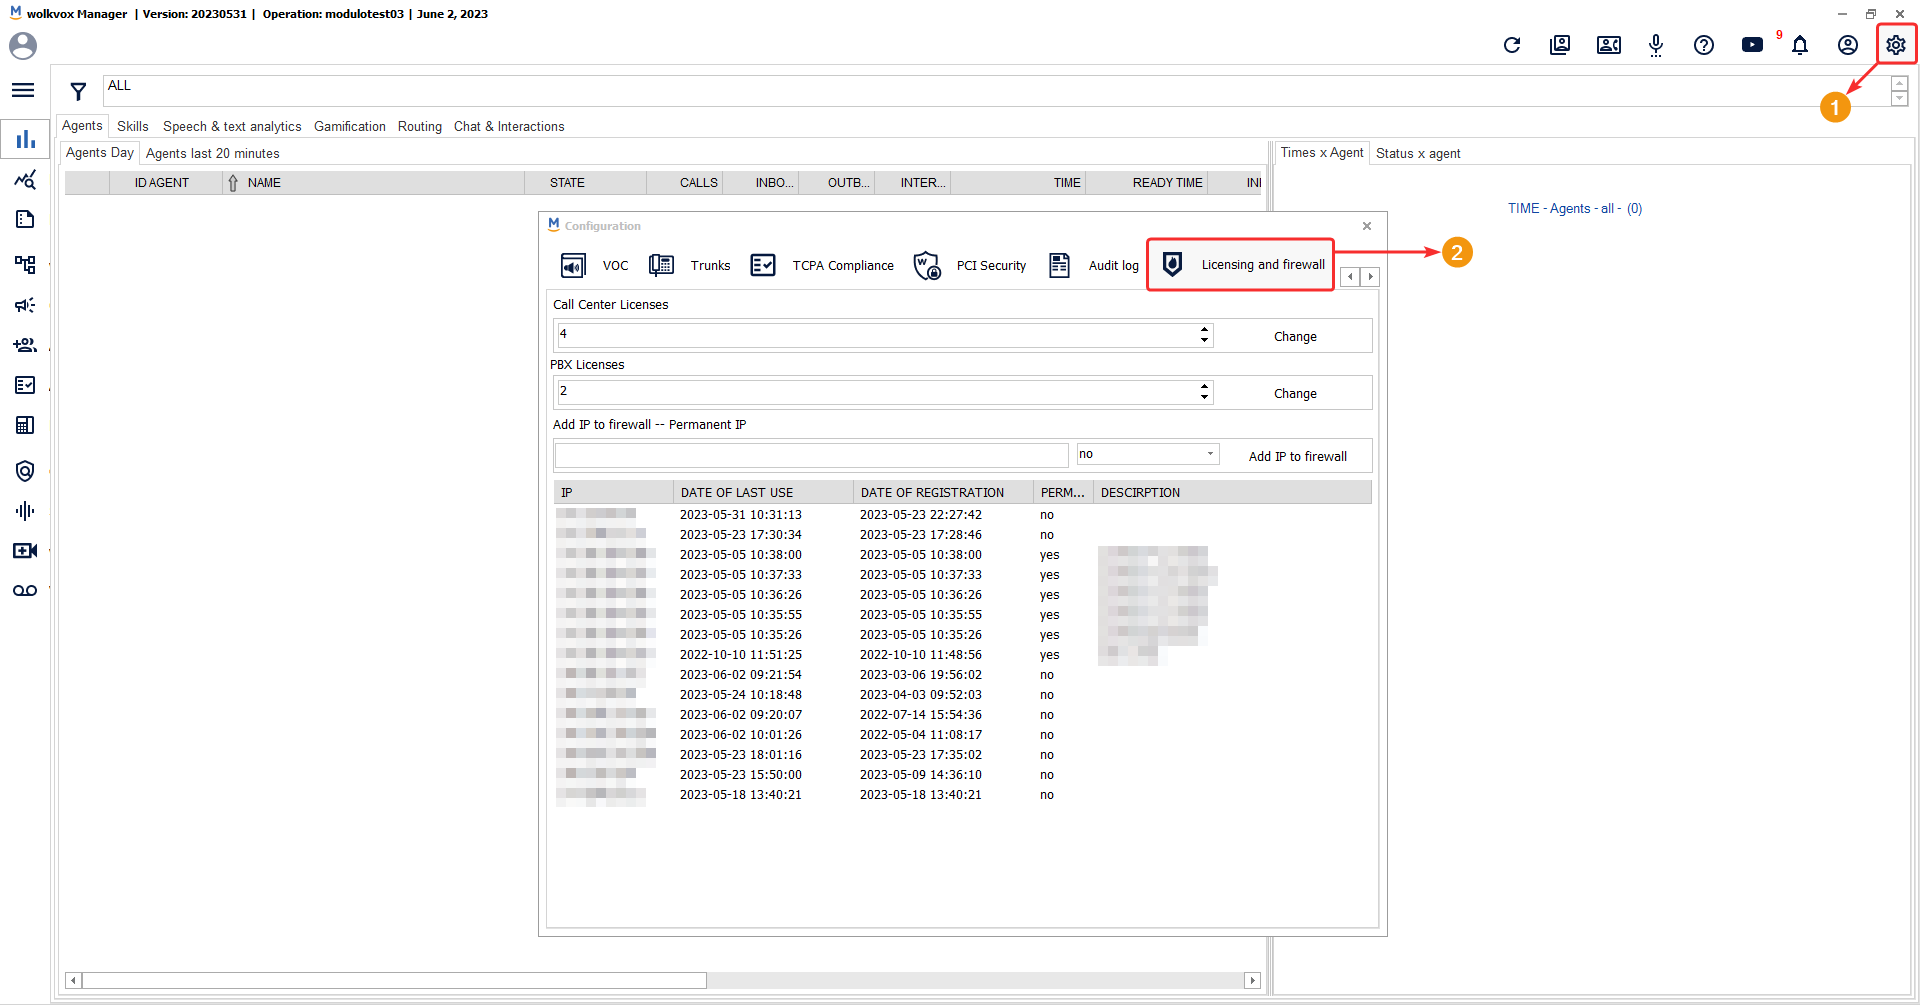
Permanent IP addresses #
Permanent IP addresses: This service allows you to add up to 5 IP addresses that will be permanent. They should be used on devices where the use of the wolkvox Manager application is always fixed. The IPs that you set as non-permanent should be used in situations where you will be using wolkvox Manager in a different location than where you usually use wolkvox Manager.
To add an IP, simply enter the address in the designated field, then select whether it will be a permanent IP or not. In the case of a permanent IP, you can also provide a description to specify why it will be permanent, or you can use the “description” field to differentiate the IP.

