

Wolkvox Studio #
This environment allows you to create omnichannel routing points by simply dragging graphical components, making it easy and enjoyable. Your customers will follow the routes designed by you in this tool.
Among the most important features of this environment are:
- Design routing points graphically.
- Integrate different channels of communication (omnichannel).
- Create and edit advanced bots and IVRs. Automatic voice components.
- Artificial intelligence components.
- Components that analyze conversations and perform quality analysis.

Routing Point #
It is a routing point used to direct and manage customer interactions within the system. Routing points are key components that allow for the configuration and control of how inbound and outbound communications are routed and handled across various modalities.
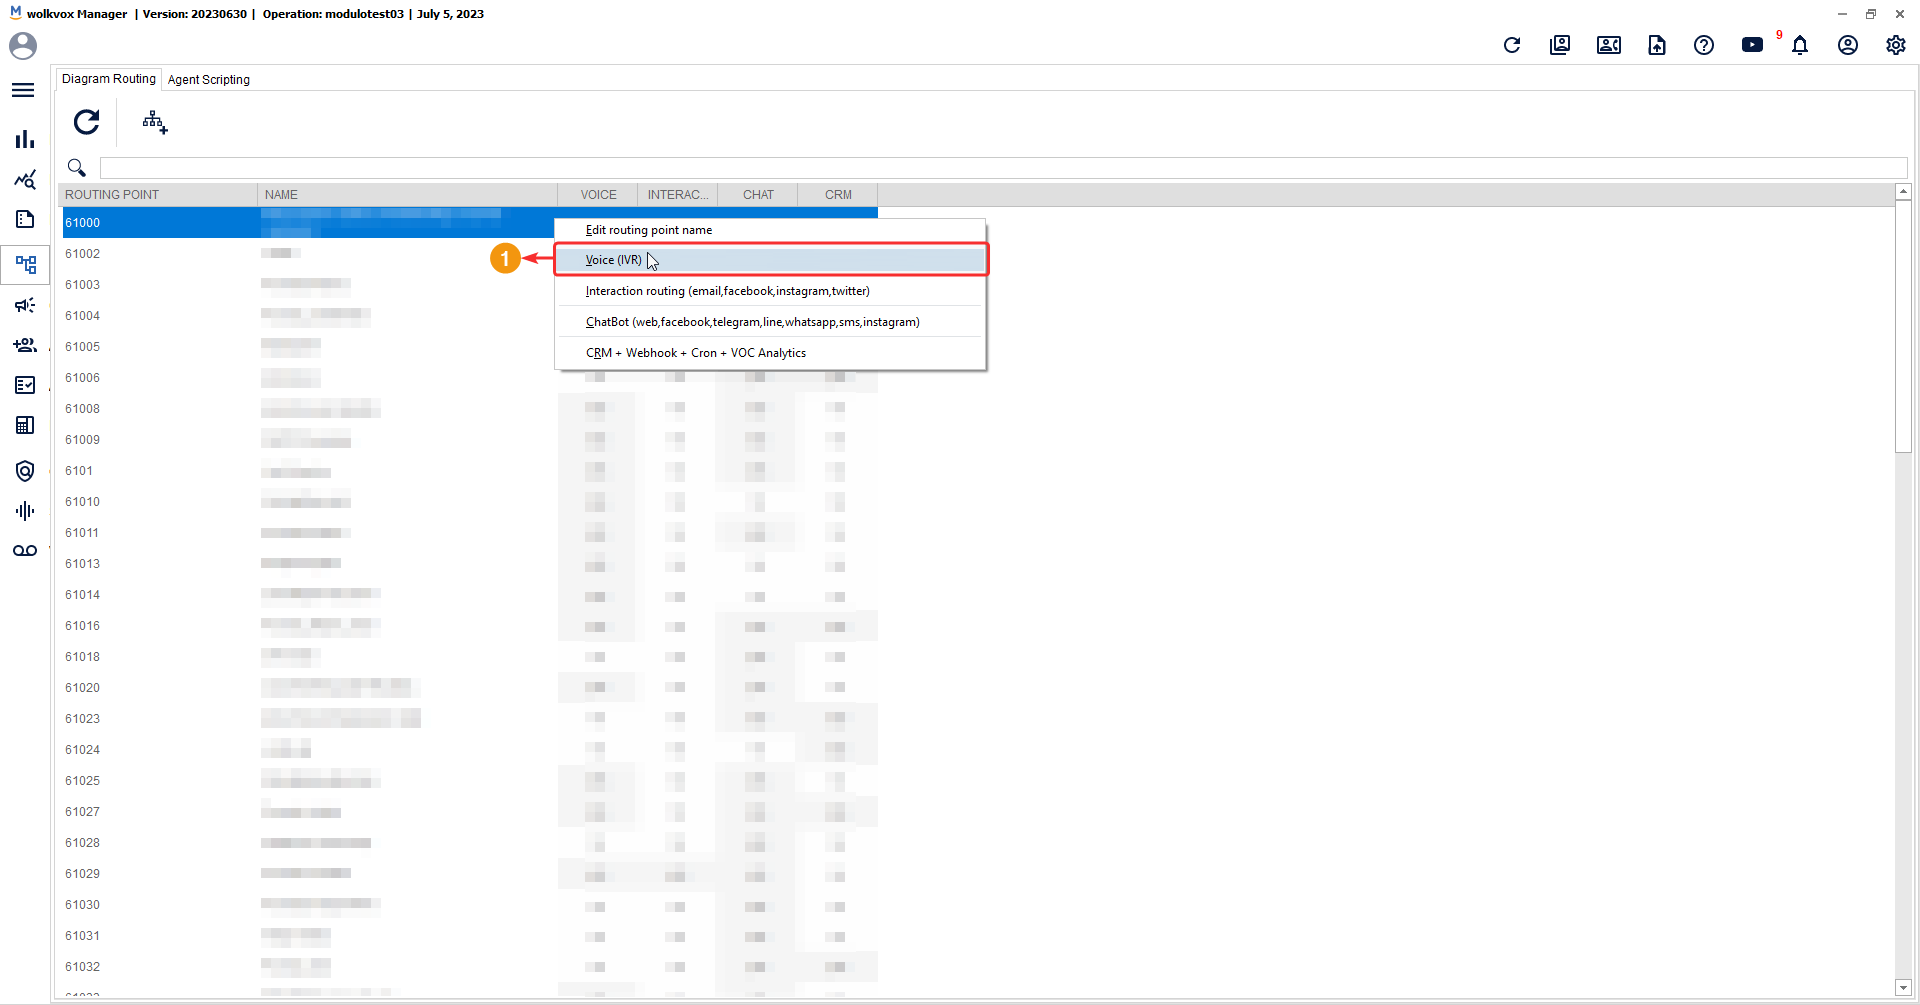
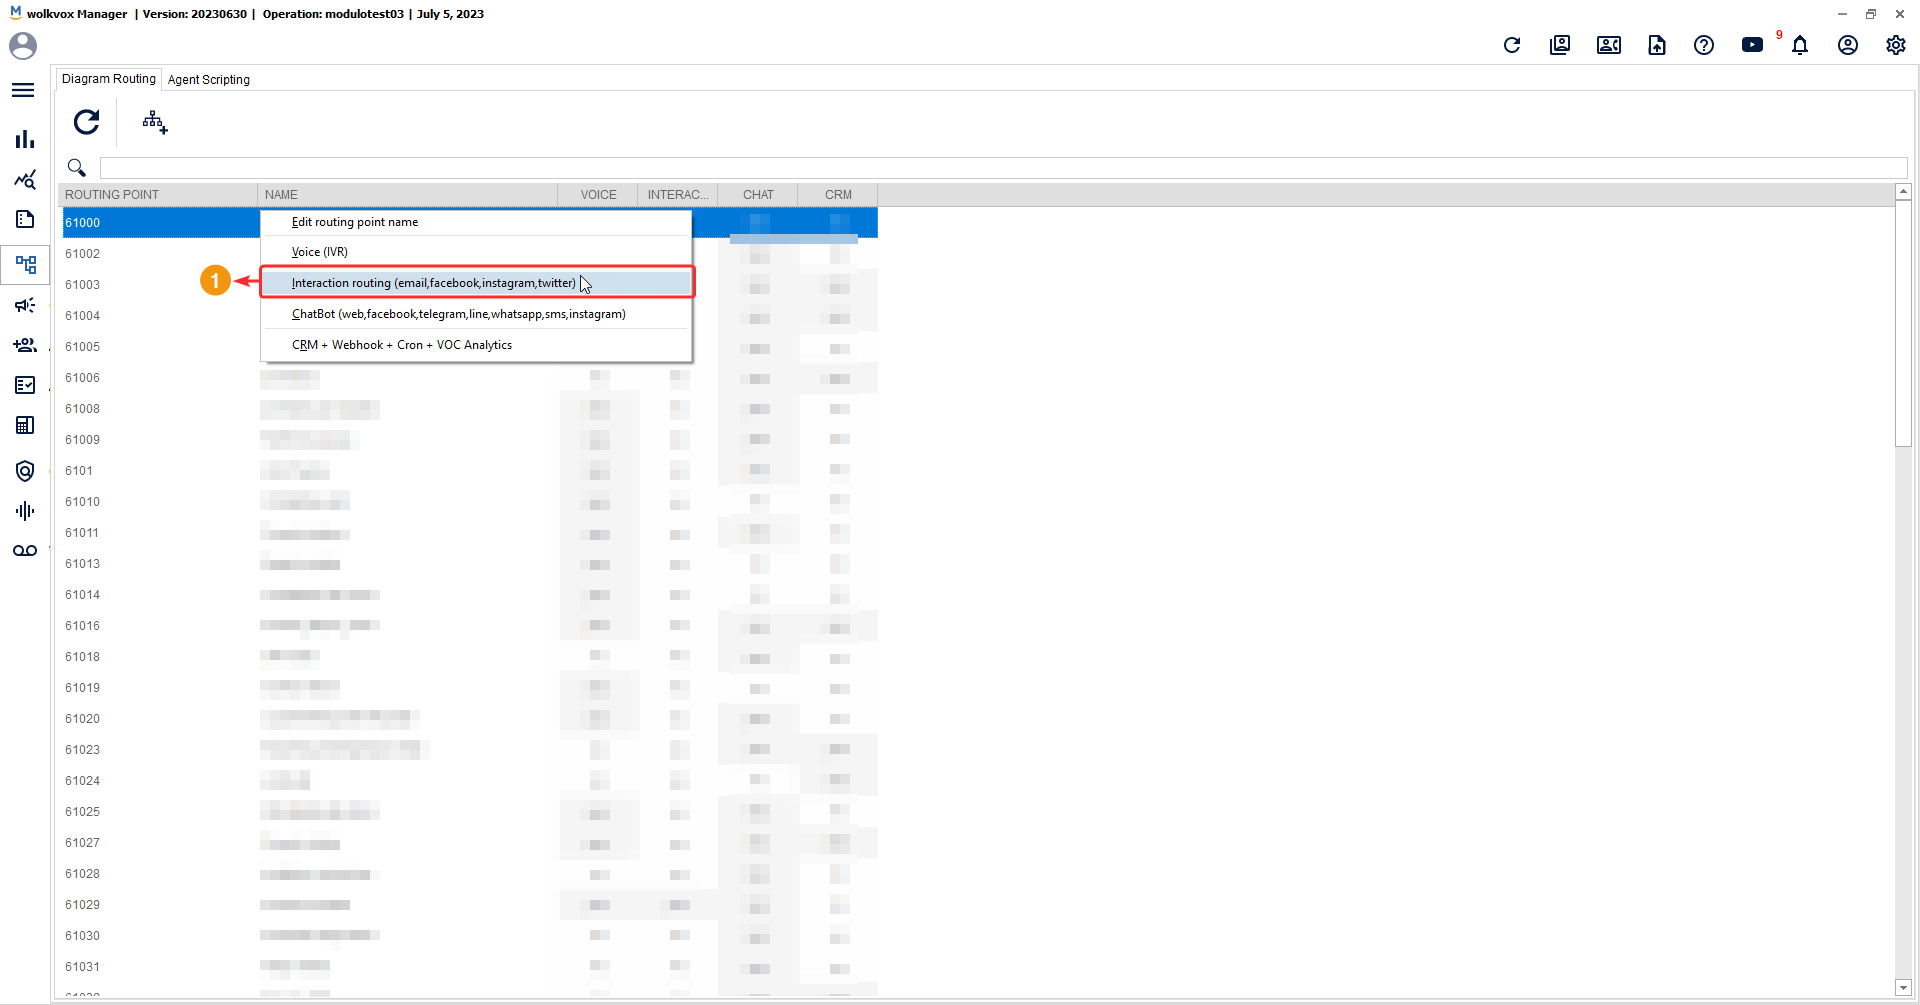
wolkvox Studio presents four types of routing points:
- Voice (IVR): The voice routing point (IVR) is used to create and configure interactive call flows, allowing callers to interact with voice prompts and make selections to access different services or departments. It can include menu options, message recordings, and routing rules based on caller selections, etc.
- Interaction routing (email, Facebook, Instagram, Twitter): The interaction routing point is used to manage and route inbound and outbound communications across different interaction channels such as email, Facebook, Instagram, and Twitter. It allows defining rules and conditions to distribute and efficiently handle these interactions, ensuring timely and appropriate responses.
- ChatBot (Web, Facebook, Telegram, WhatsApp, SMS, Instagram): The ChatBot routing point is used to implement and configure ChatBots across different channels such as website, Facebook, Telegram, WhatsApp, SMS, and Instagram. It enables creating automated and personalized conversation flows, interacting with customers, and providing instant responses or relevant information.
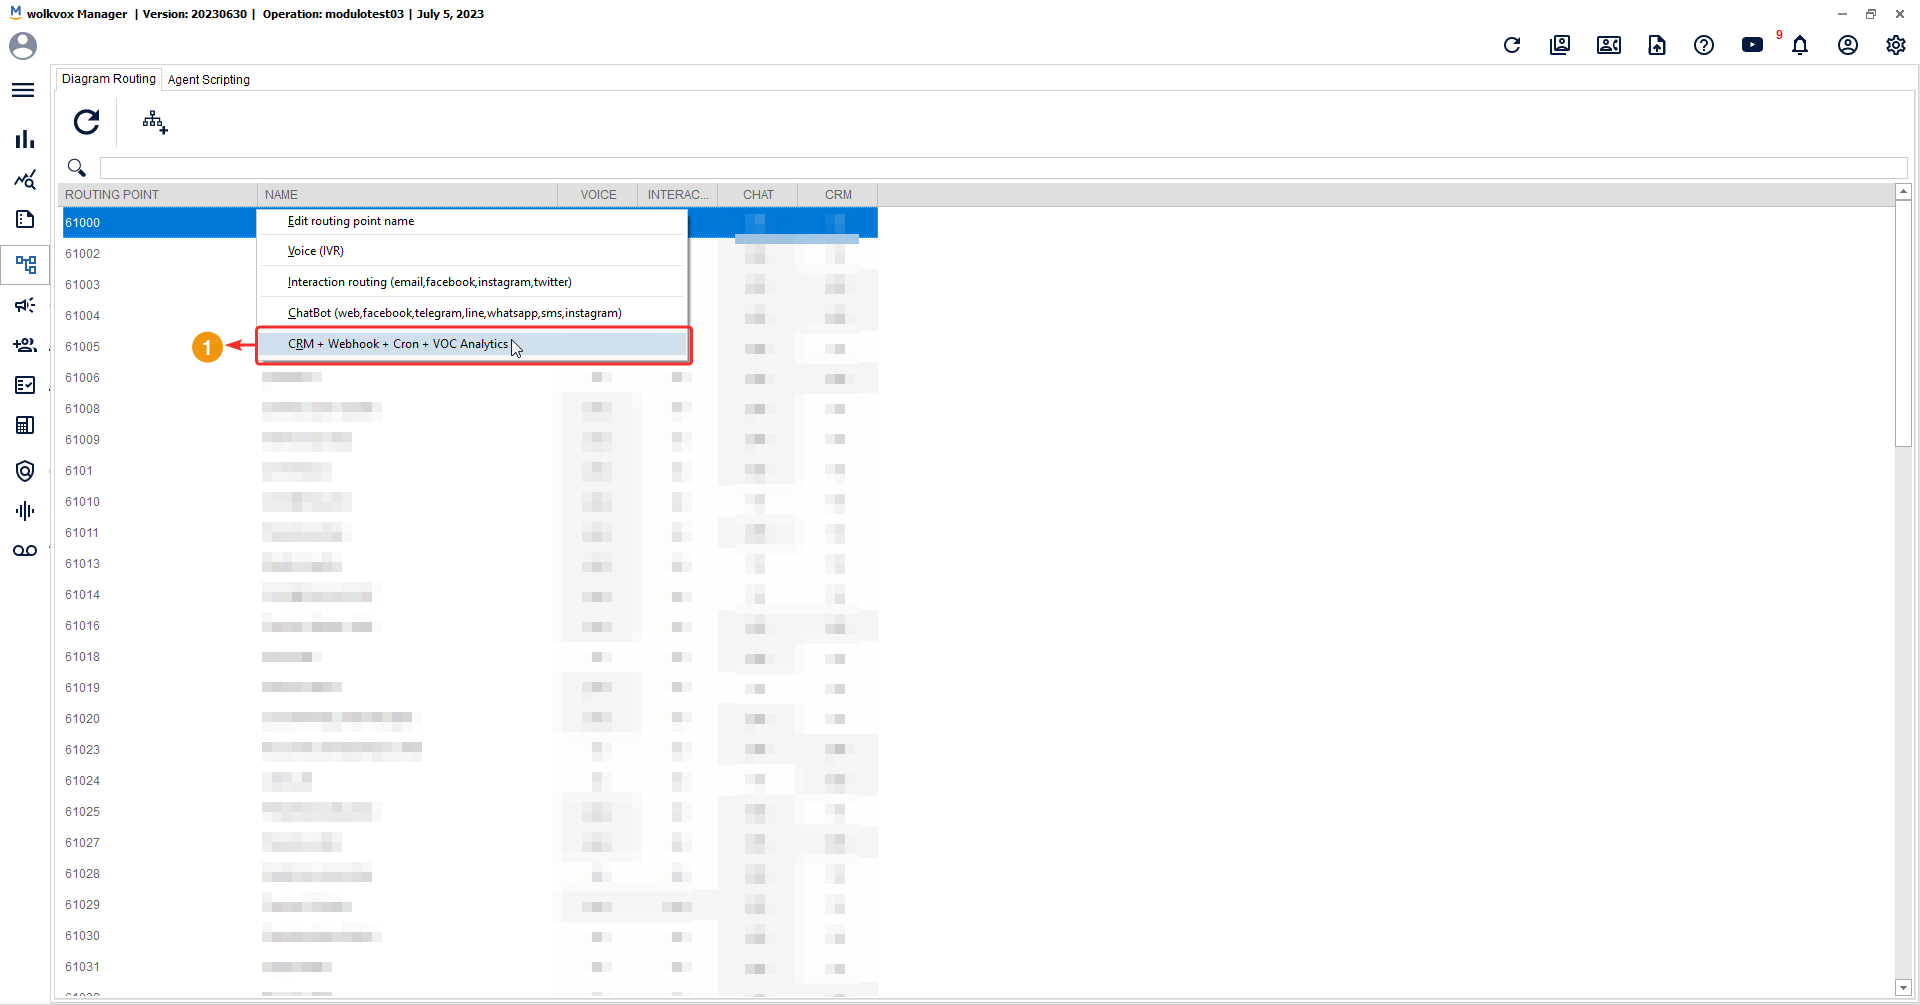
- CRM, Webhook, Cron, VOC analytics: This type of routing point includes integrations with the wolkvox CRM system (Customer Relationship Management), Webhook connections for communication with other applications, scheduling of recurring tasks (Cron), and Voice of the Customer (VOC) analytics, which involves data collection and analysis to gain valuable insights about interactions and the customer experience.
These features are essential to ensure efficient and personalized customer service and optimize workflow in the contact center.
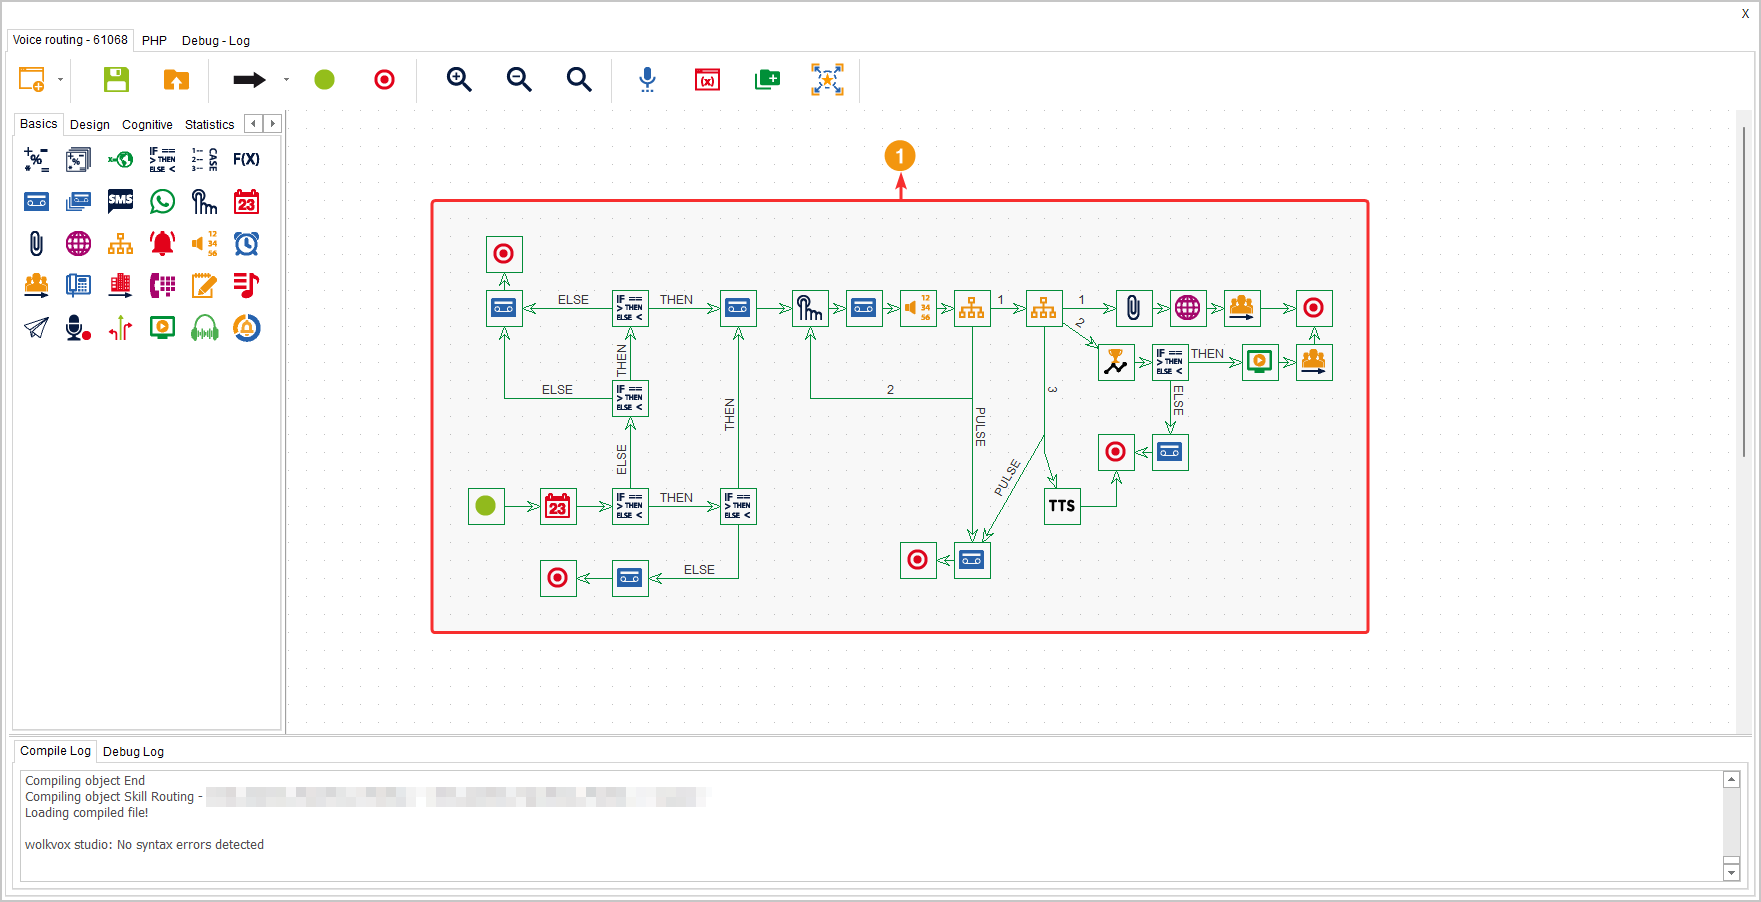
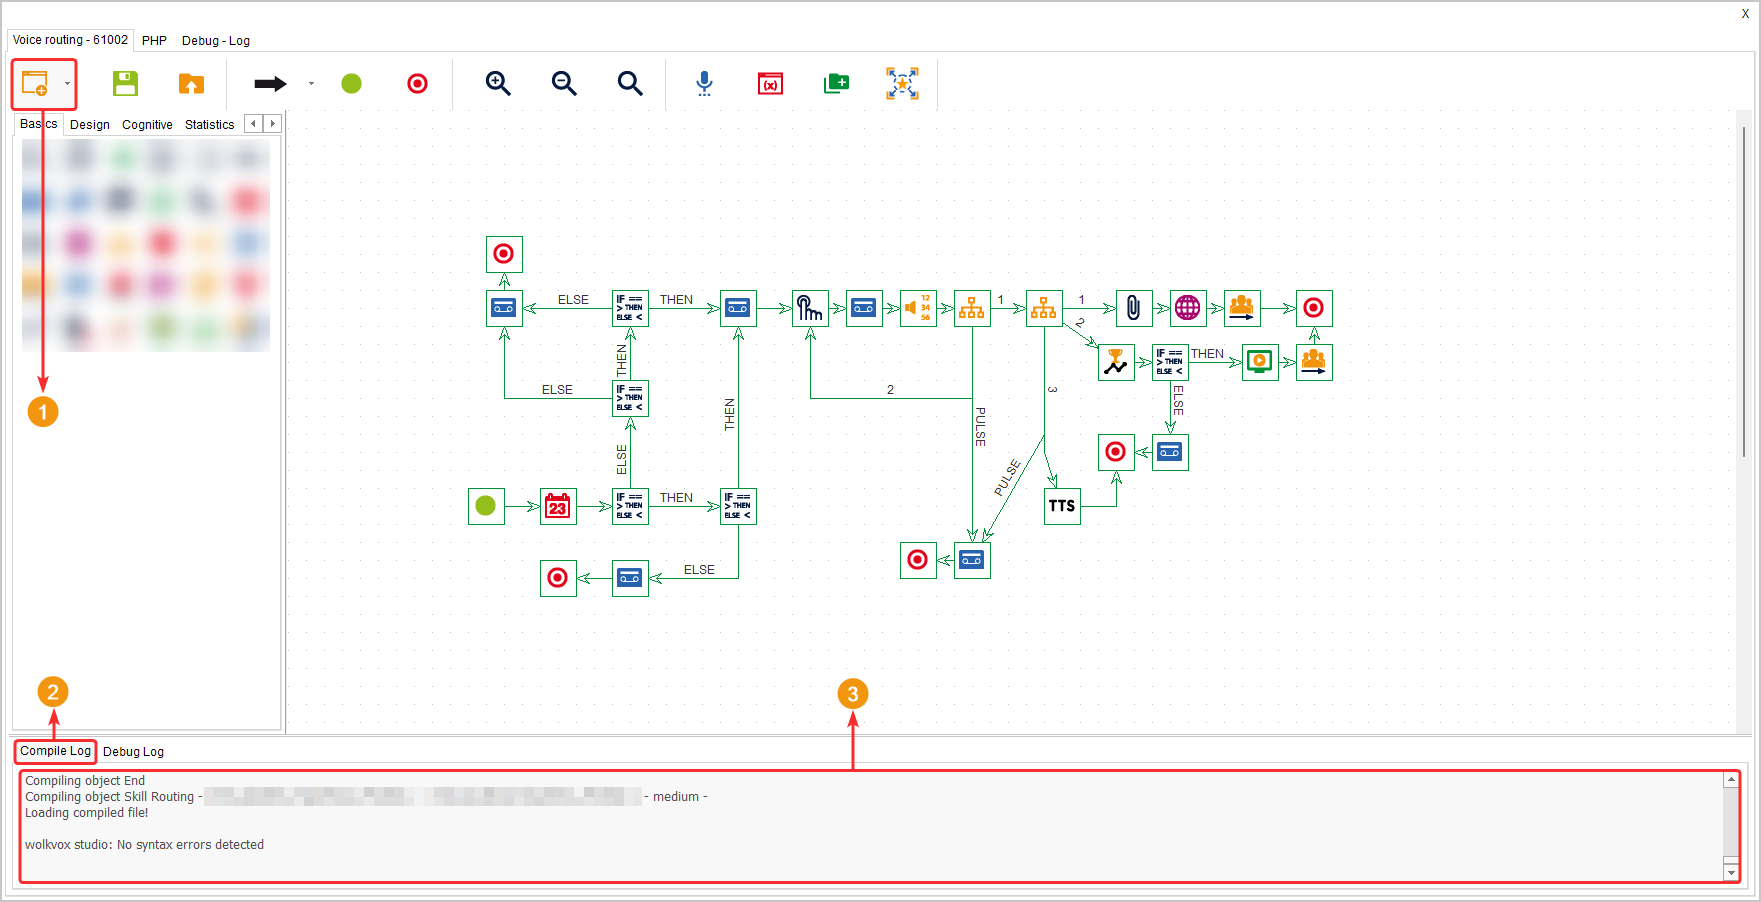
Below is an example of a routing point created in our graphical tool.
Manage routing points #
In the “Diagram Routing” tab, you can create and modify all the routing points in the operations center.

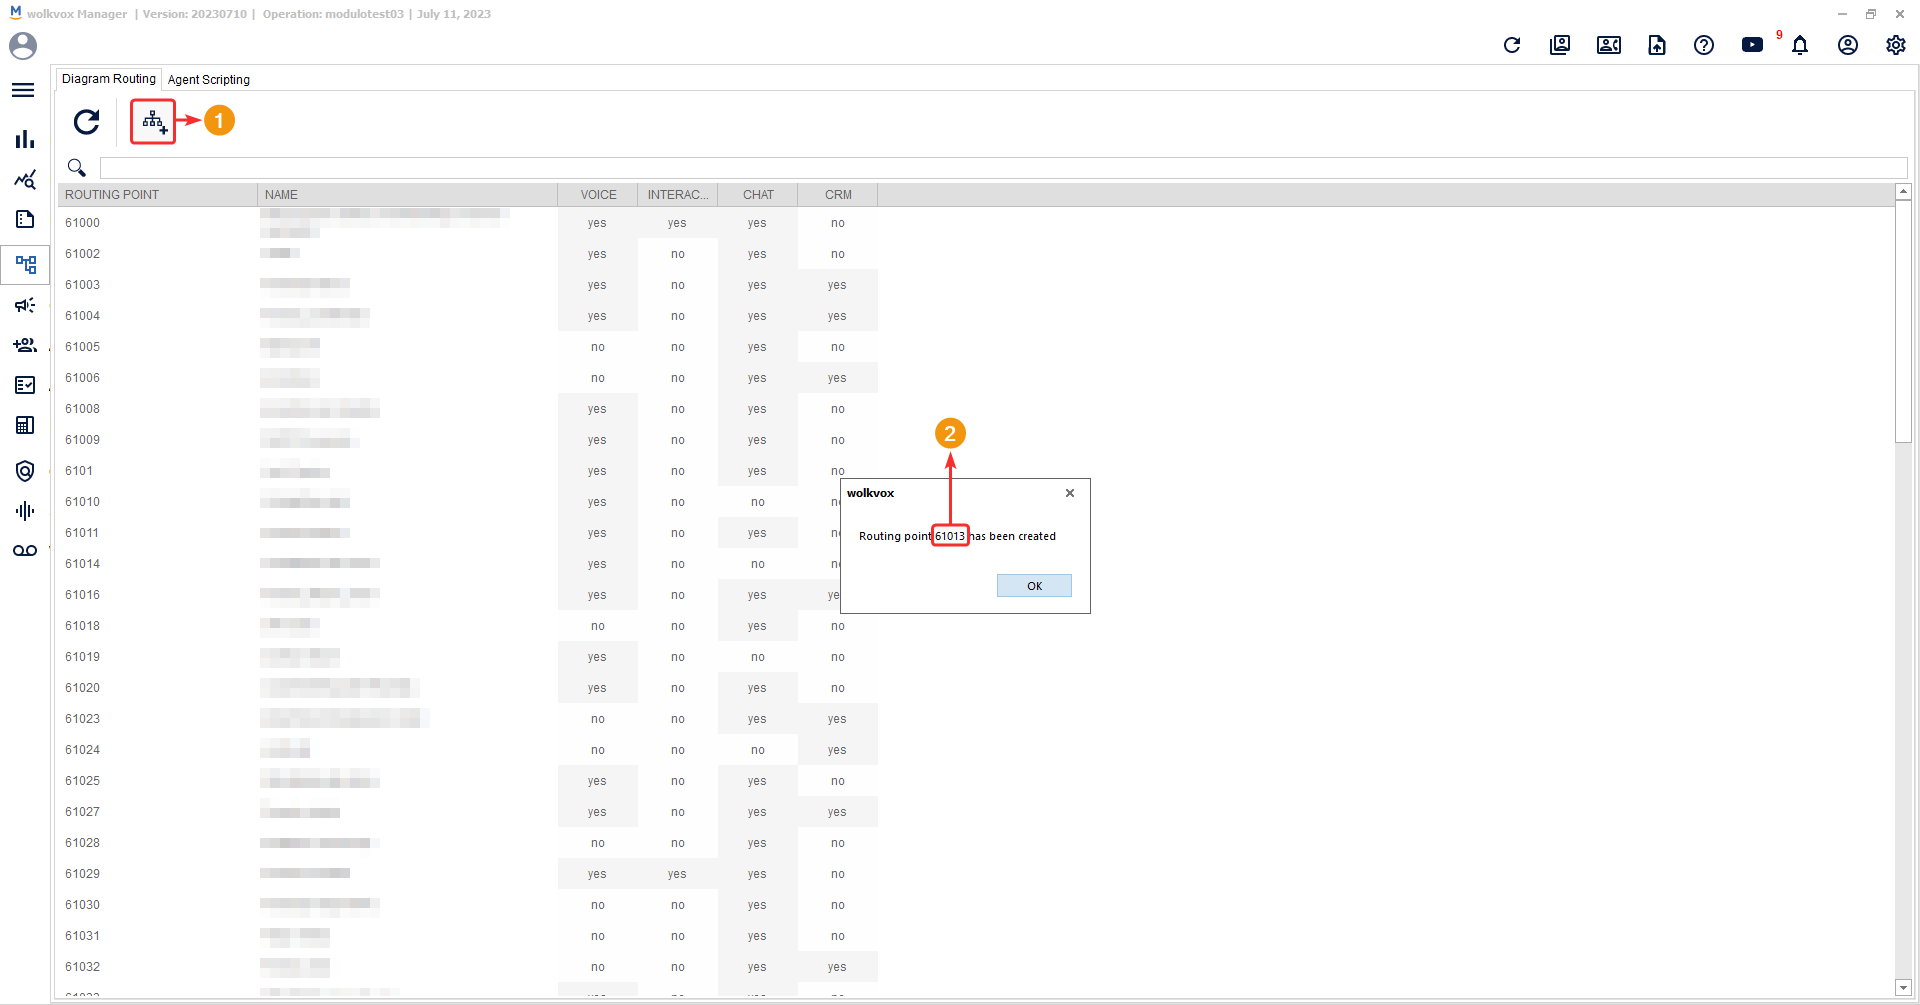
- To create a new routing point click on the highlighted button in the following image.
- A pop-up window will appear indicating the identification number of the new routing point created.
To edit the name of a routing point, right-click on it and select the option ‘Edit routing point name’.

Routing Voice (IVR) #
Routing Voice allows you to build and configure interactive call flows. These components enable the creation of voice menus, call routing, message recording and playback, and the application of conditional logic to provide a personalized and efficient call experience for users.
Some features and functions associated with voice-type routing points may include:
-
Voice menus: Voice-type routing points allow the creation of interactive voice menus that callers can use to select desired actions or services, such as making inquiries, accessing specific information, or being transferred to an agent.
-
Call routing: These routing points are used to define call routing rules and conditions based on callers’ selections and responses. For example, a voice-type routing point can be configured to redirect a call to a specific department or an agent with specialized skills.
-
Message recording and playback: Voice-type routing points also allow for the recording and playback of predefined voice messages to guide callers and provide relevant information during the interaction. These messages can include greetings, instructions, or customized wait messages.
-
Conditional logic: The IVR’s graphical design tool enables the definition of conditional logic in voice-type routing points. This involves setting rules and conditions that determine the next steps in the call flow, such as based on the time of day, selected language, or the caller’s number of previous attempts.
Interaction routing #
This type of routing point is used to configure and control the flow of interactions in channels such as email, Facebook, Instagram, and Twitter. It allows for the efficient distribution and management of incoming and outgoing communications. Using the graphical tool, you can visually design routing flows for interactions, establishing rules and conditions to appropriately handle each type of communication.
For example, you can define rules to automatically route emails to specific departments or agents based on the nature of the inquiry or issue. You can also establish rules to handle interactions on social media platforms, such as sending automated responses, assigning them to a customer support team, or redirecting them to other channels if necessary.
The graphical tool enables you to create a structured process for routing interactions, ensuring efficient distribution, proper tracking, and timely responses across various communication channels. This facilitates effective management of interactions and contributes to a consistent and satisfactory customer service experience.
An interaction-type routing point is used to configure and control the flow of interactions across different communication channels, including email, Facebook, Instagram, and Twitter. It allows for the establishment of rules and conditions to efficiently manage incoming and outgoing communications, thereby enhancing the overall customer service experience.
ChatBot routing #
This type of routing point is used to configure and control the flow of chat conversations across different channels, such as the website, Facebook, Telegram, WhatsApp, SMS, and Instagram. It allows for the creation of automated and personalized conversation flows, interacting with customers and providing instant responses or relevant information.
By using the graphical tool, you can visually design the chat routing flows, defining the available options for customers, automatic responses, routing rules, and actions based on customer interactions. This enables you to create a structured and efficient chat process to deliver a consistent and high-quality customer experience.
A chat routing point in this flowcharting tool of wolkvox Studio is used to design and control the flow of chat conversations, allowing interaction with customers across different channels and providing automatic and personalized responses. It is a key tool for effective management of chat interactions and delivering a high-level customer service experience.
Note on Chatbot Lifespan: If a chat is initiated and transferred to a skill, there is a 23-hour window to be attended to and not be reset.
The waiting time in chats to receive a response from the customer is two hours unless it is a transfer to a skill.

CRM + Webhook + Cron + VOC Analytics routing #
This type of routing point is used to integrate the CRM (Customer Relationship Management) system with the contact and call center software, allowing access to and utilization of CRM data to enhance customer interactions. It also provides the ability to establish connections through Webhooks, which are automatic notifications sent to other applications when specific events occur.
Additionally, the CRM + Webhook + Cron + VOC Analytics routing point allows for scheduling recurring tasks using cron (schedule), making it easy to automatically execute actions at specific times. This is particularly useful for activities such as sending scheduled reminders or performing scheduled operations.
Lastly, this type of routing point includes the functionality of VOC Analytics (Voice of the Customer Analytics), which involves collecting and analyzing data related to customer interactions and experiences. This functionality provides valuable insights into understanding customer needs and preferences, as well as making informed decisions in improving services and business decision-making.
Routing point interface #
The interface of each routing point varies very little in some buttons depending on the type of routing point. In general, routing points have the main menu at the top, on the left they have groups of components that can be dragged onto the canvas, next to the components is the canvas where each call routing and interaction flow can be designed or a flow can be designed according to your needs and actions that each component can perform, and at the bottom there are two useful tools for checking a correct flow build.

Buttons available in the routing points #
Compile
![]()
The ‘Compile’ button allows you to apply the changes made to the routing point flow. When you click this button, a process is activated to verify and prepare the changes made to the flow so that they can be implemented and used effectively. This includes validating the syntax and structure of the flow as well as generating the necessary components for its proper operation. Once the flow is compiled correctly without error messages, the changes are activated and reflected in the operations center sections that are affected by the new flow design.
Save
![]()
Save the routing point you are editing as a file that you can store on your computer. The file format you save is called ‘IPDIALBOX Routing Files’ or ‘.rbx’. This option can be used to save the flow on your computer if you have not finished editing it and want to continue with its design later.
Note: This button only saves the routing point as a file on your computer. It does not apply the changes to the flow that is running in the operations center. If you need to apply and save the changes before continuing with editing, you must compile the routing point.

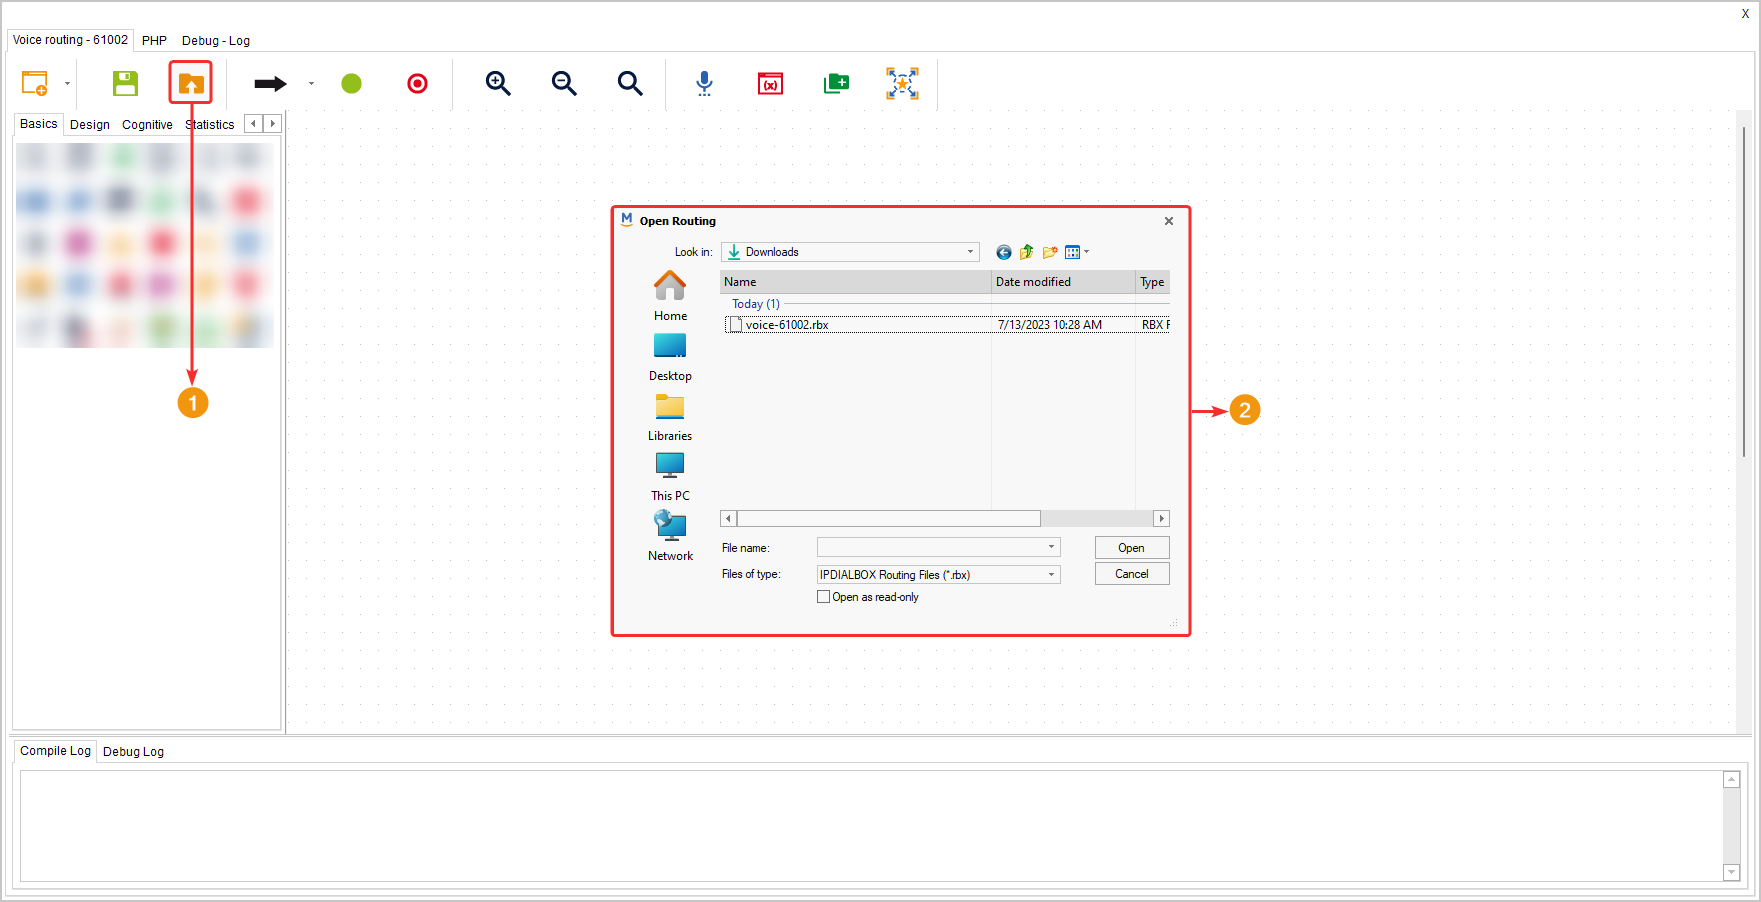
Load
![]()
This button allows you to load and open a ‘.rbx’ format file and apply it to the routing point design canvas. You can use this option to continue editing a flow that you have saved on your computer.
Link
![]()
This button allows you to draw an arrow on the flow canvas in order to connect the components. There are three types of connectors: “straight”, “curved”, and “cubic”. The arrow you see in the image is a “straight connector”. By default, this type of connector is activated. Through this arrow, the system determines the path that the customer should follow based on the design of the flow you are creating.
To draw a line, you can left-click on the arrow button and then left-click and hold on the canvas to draw the desired line. You can draw the line if you only want to draw it and connect the components later. Additionally, you can left-click on a component, already having selected the arrow, and drag the arrow to the other component you want to connect it with.
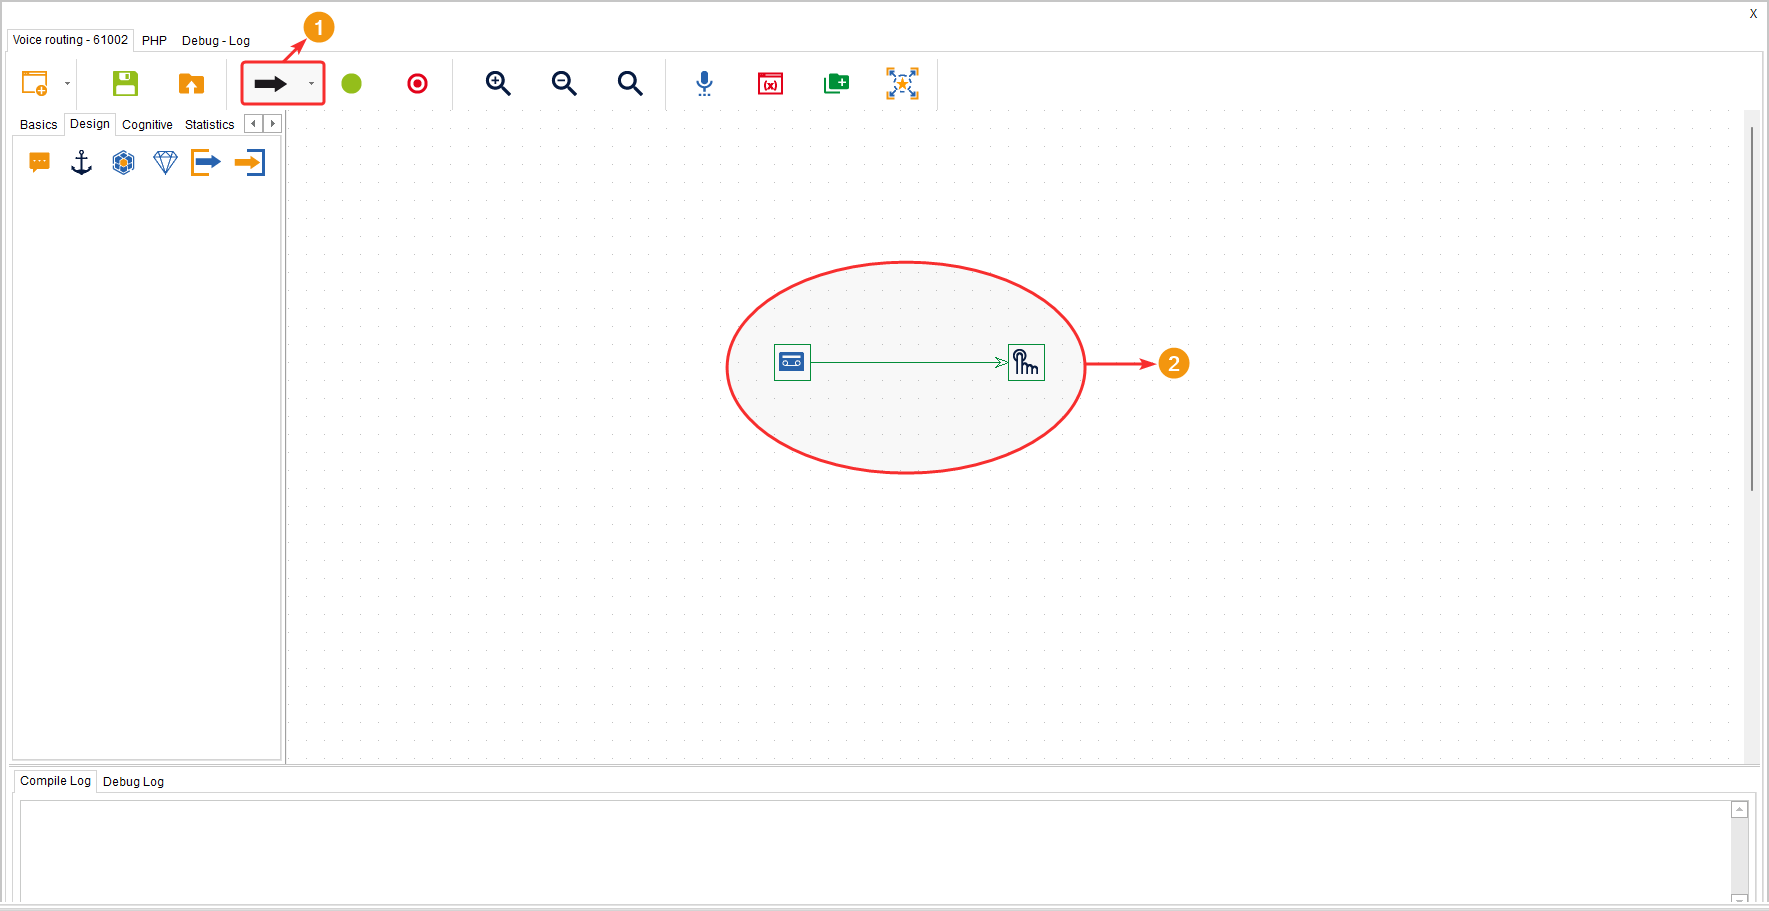
Note: In its dropdown menu, it allows you to switch to curved, cubic, or straight connector.

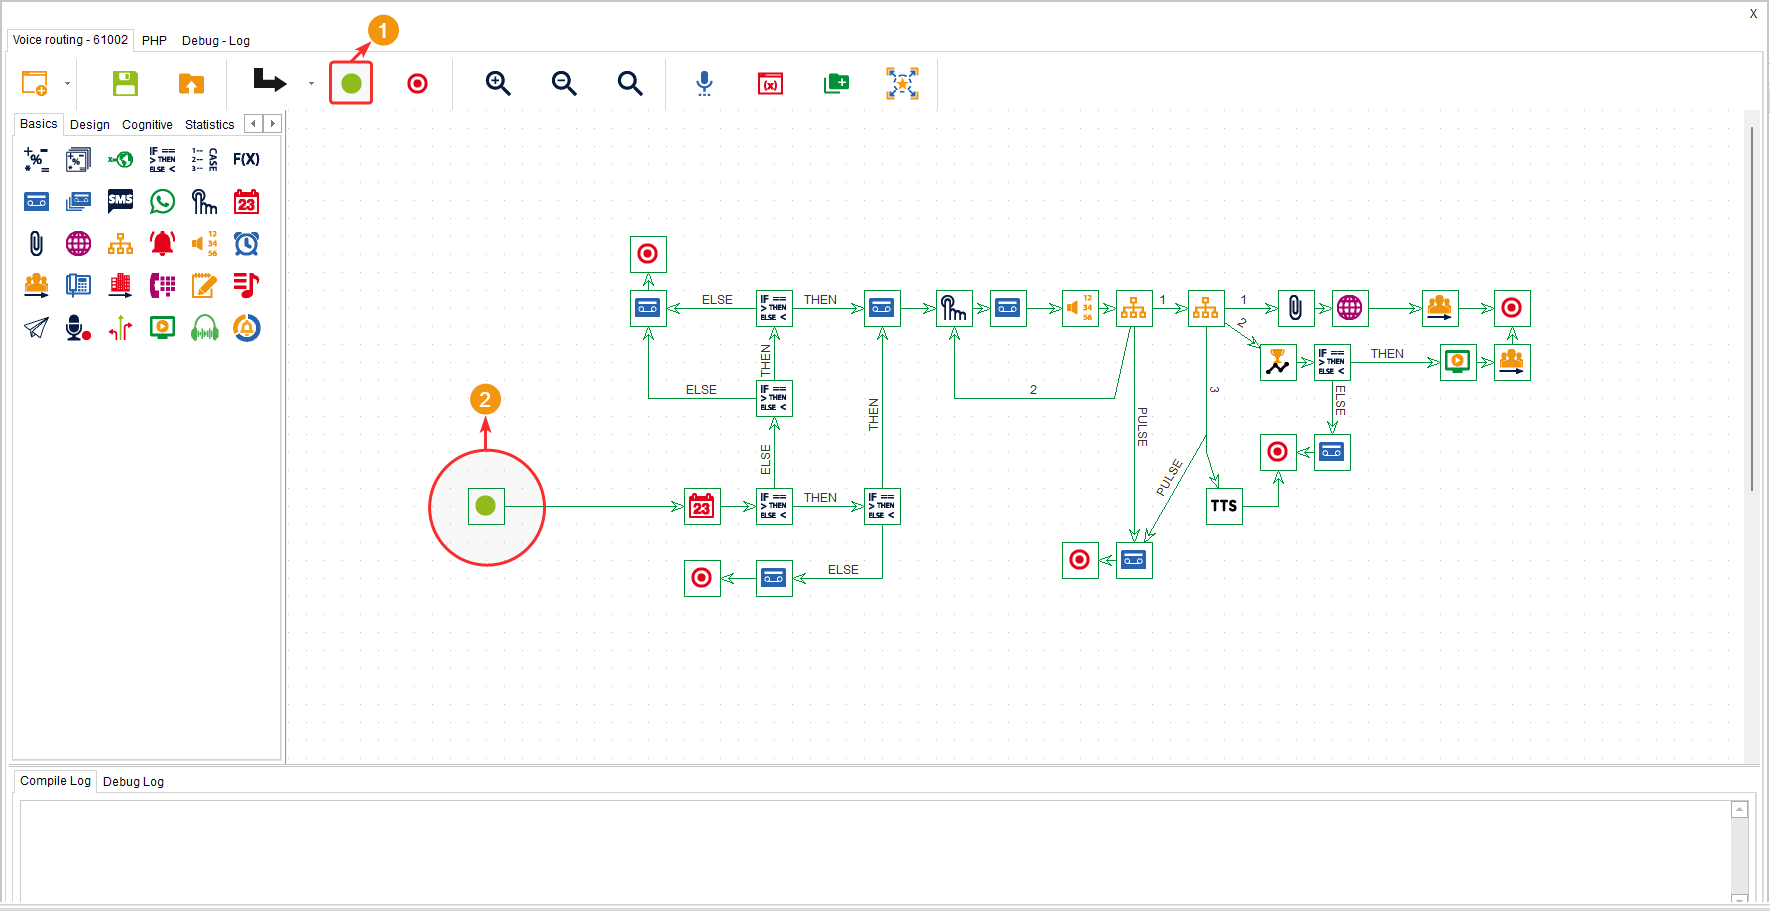
Start
![]()
This component allows you to mark or indicate the beginning of the flow.
Note: It is important to note that there can only be one component of this type in the flow design.
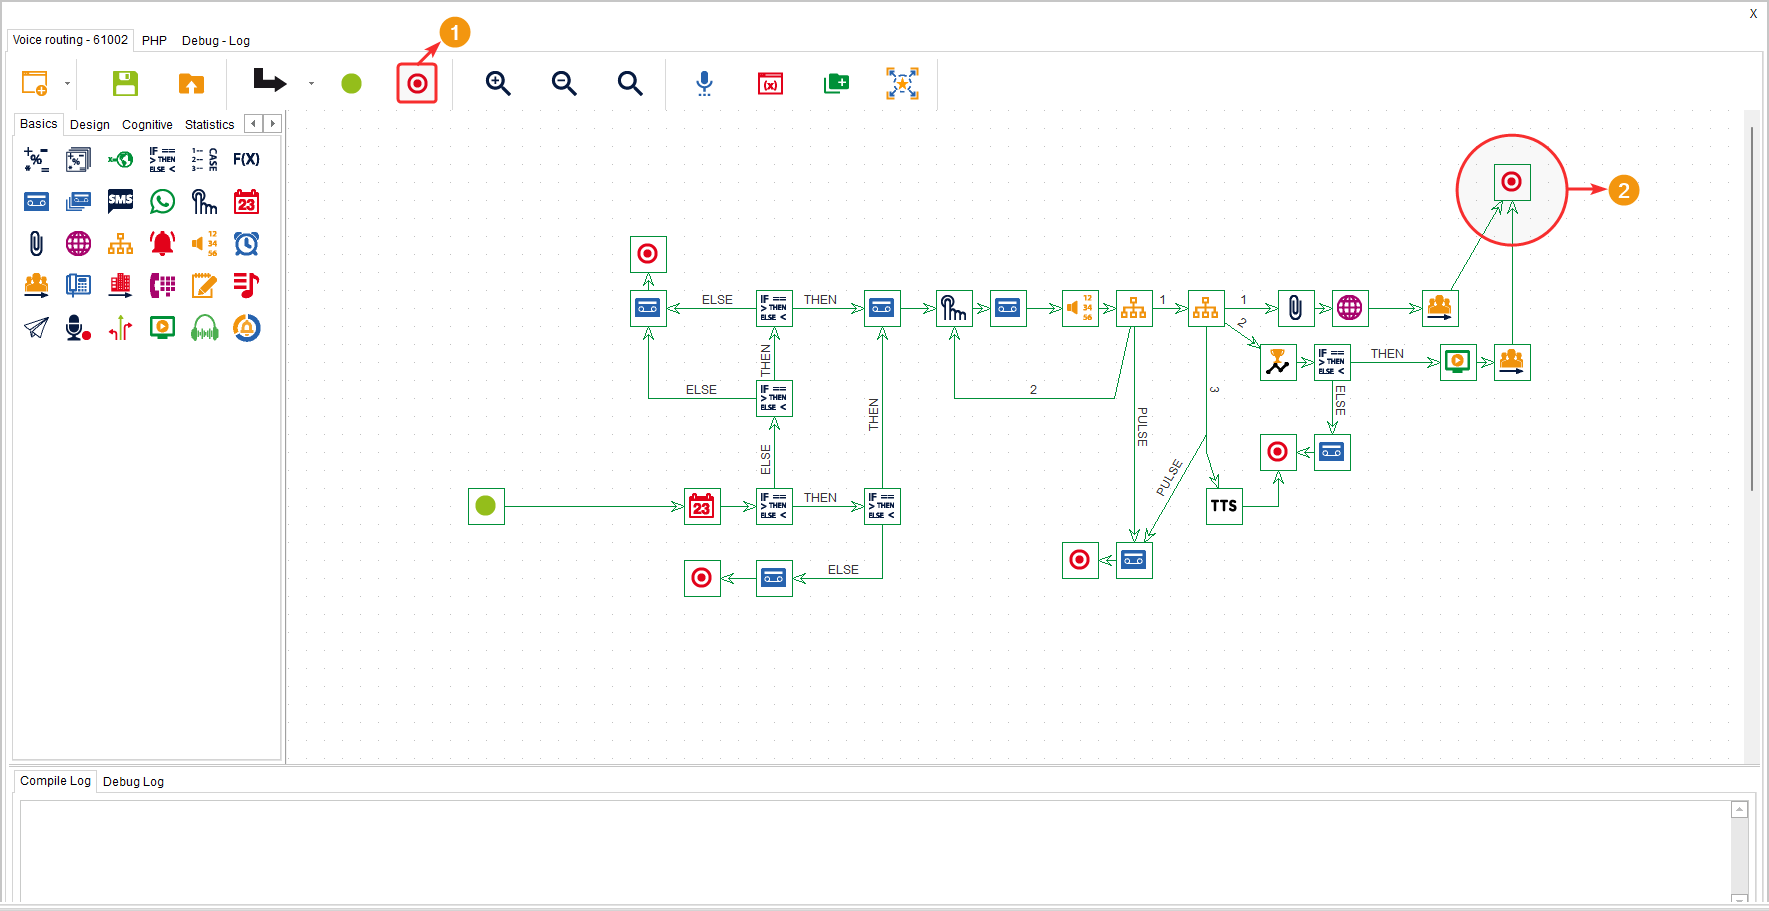
End
![]()
This component allows you to mark or indicate an endpoint of the route you are constructing.
Note: You can add more than one component of this type.
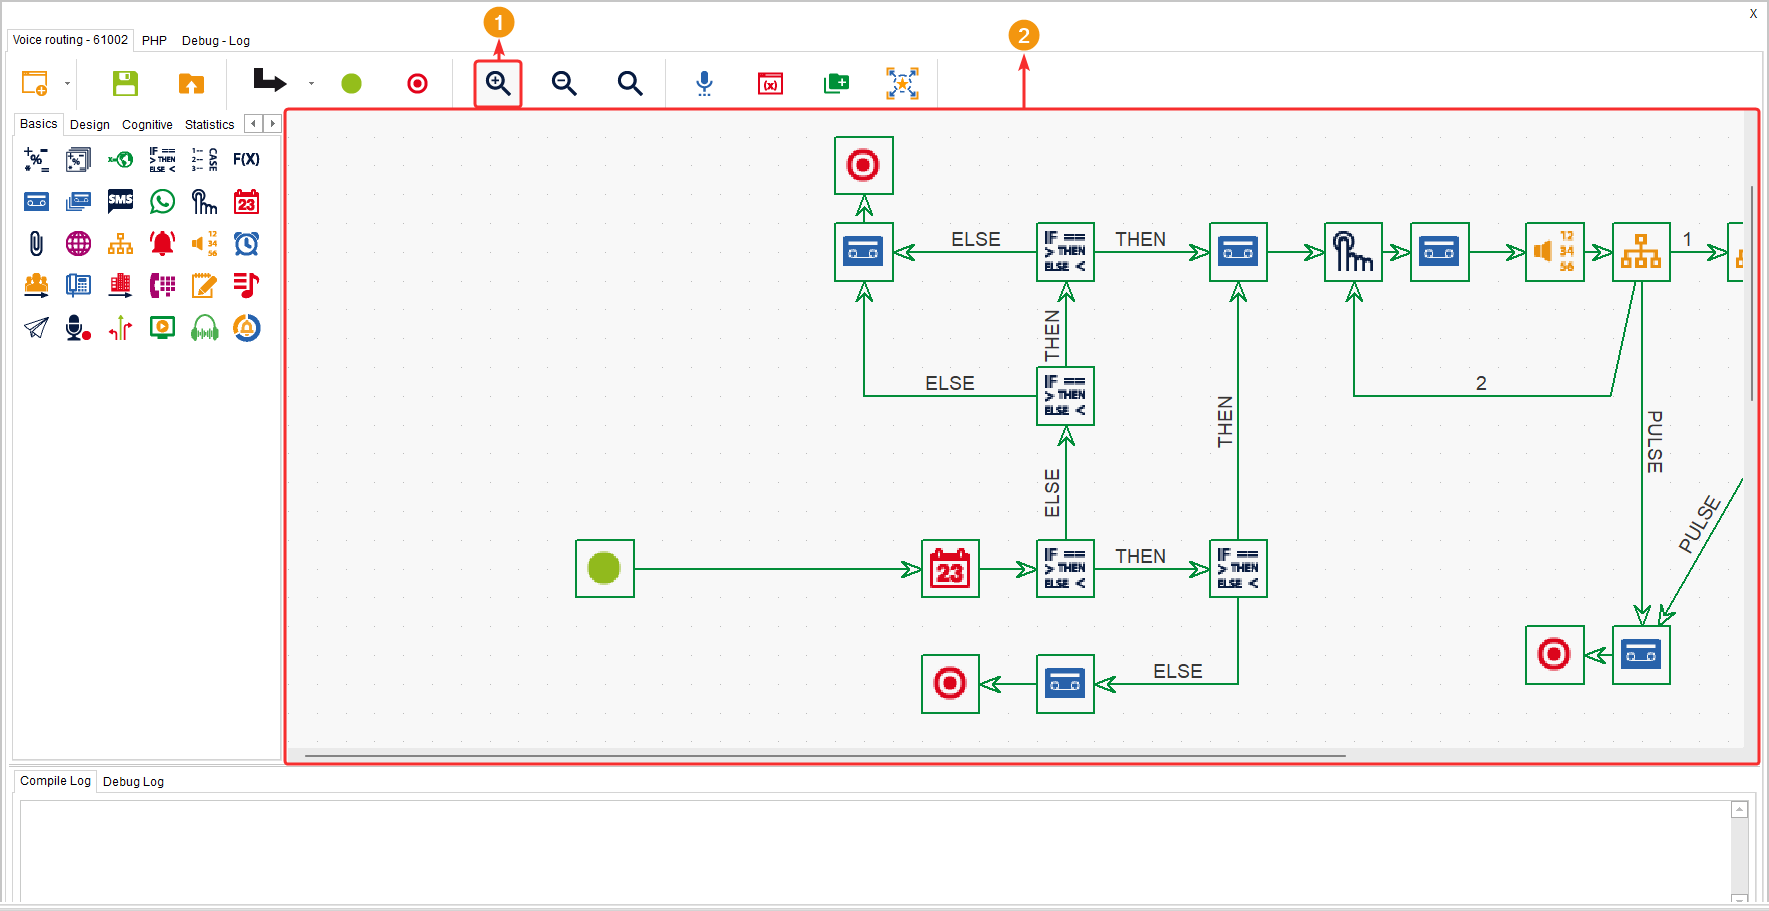
Zoom In
![]()
This button allows you to zoom in on the canvas to view it in large size.
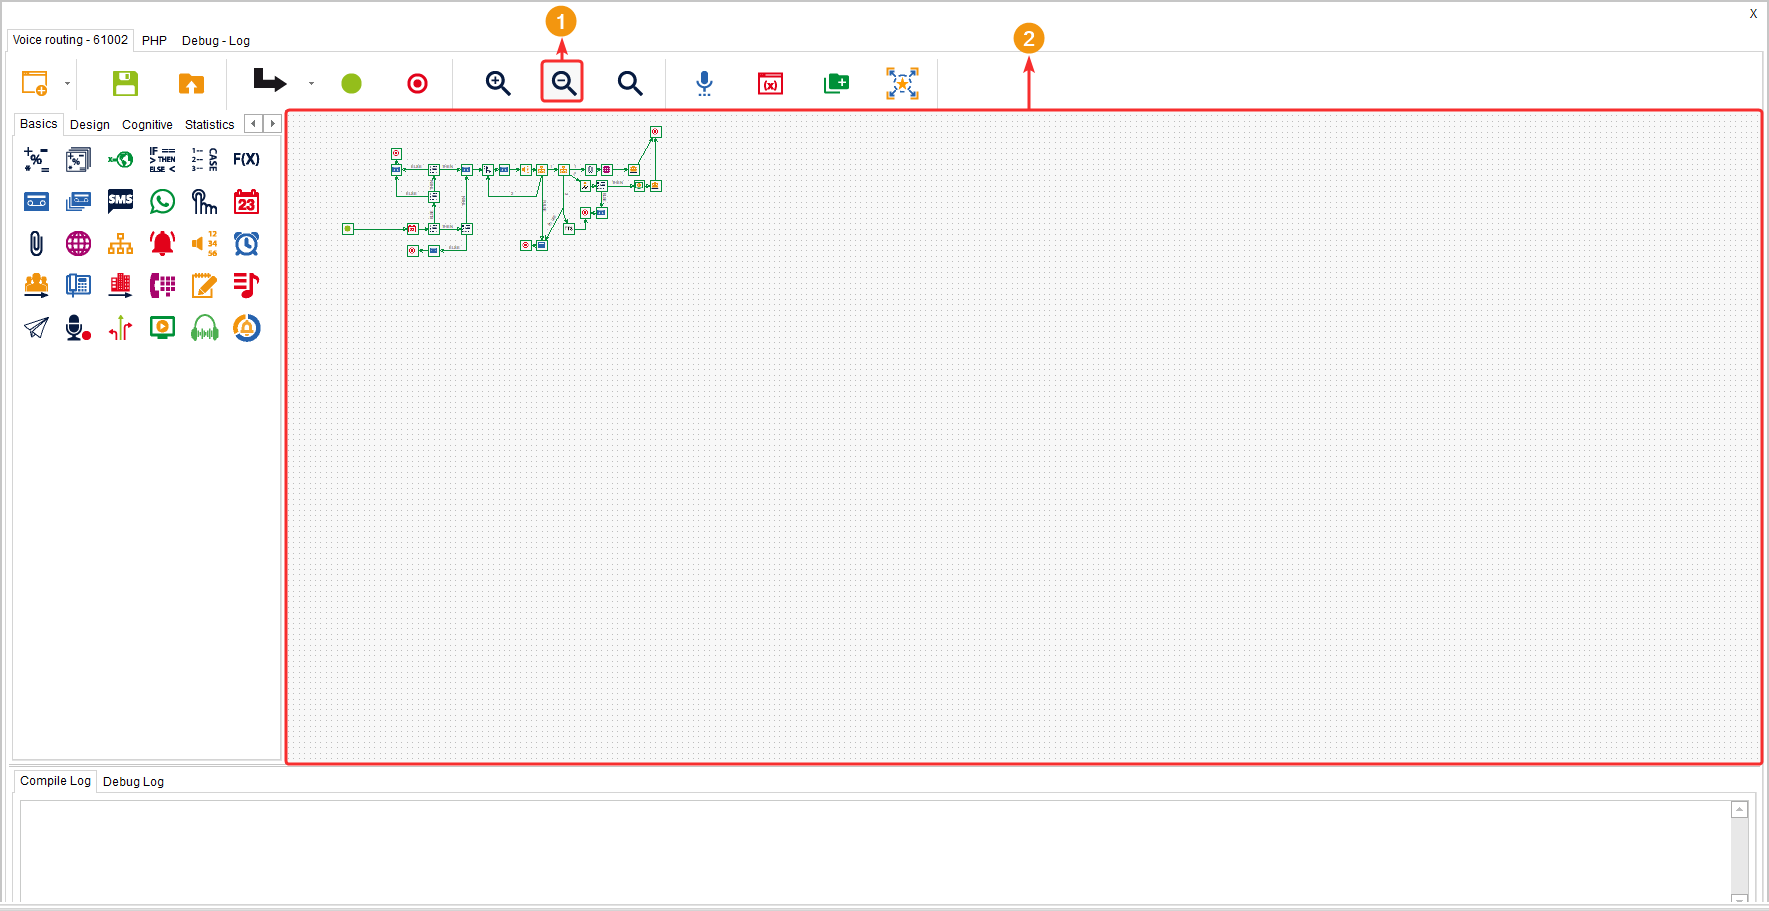
Zoom Out
![]()
This button allows you to zoom out on the canvas to view it in a smaller size.
Search

This button allows you to search for components that contain the word or value you enter in the search field.
The components found that contain the searched values will be highlighted in blue.

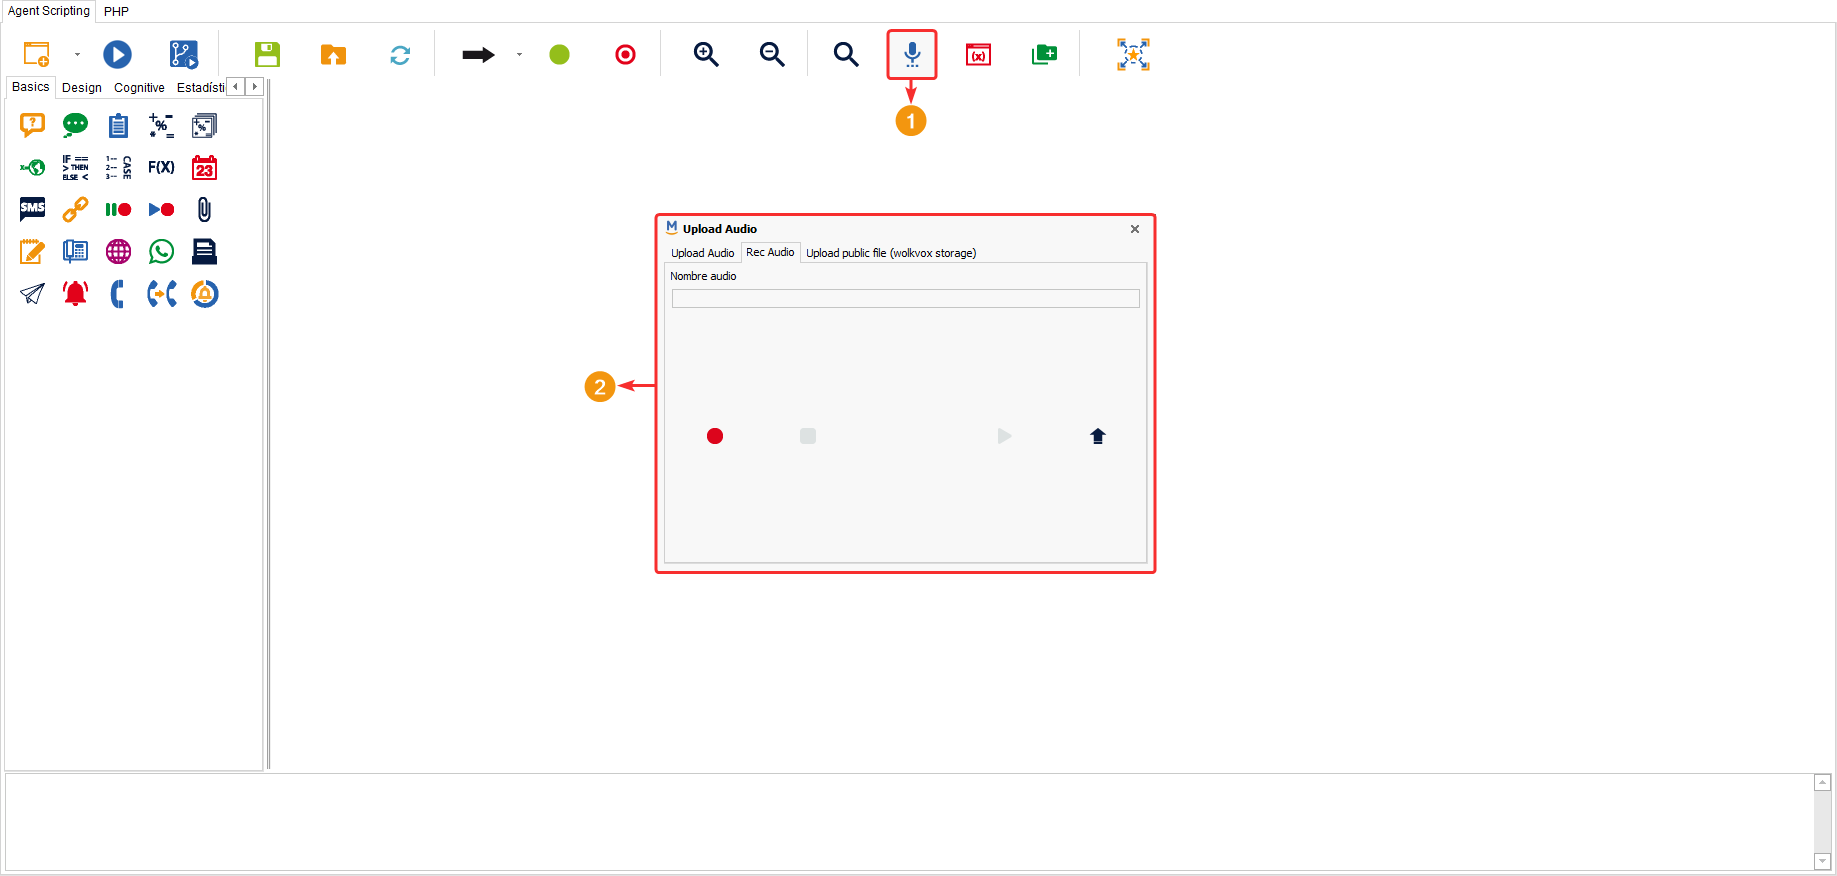
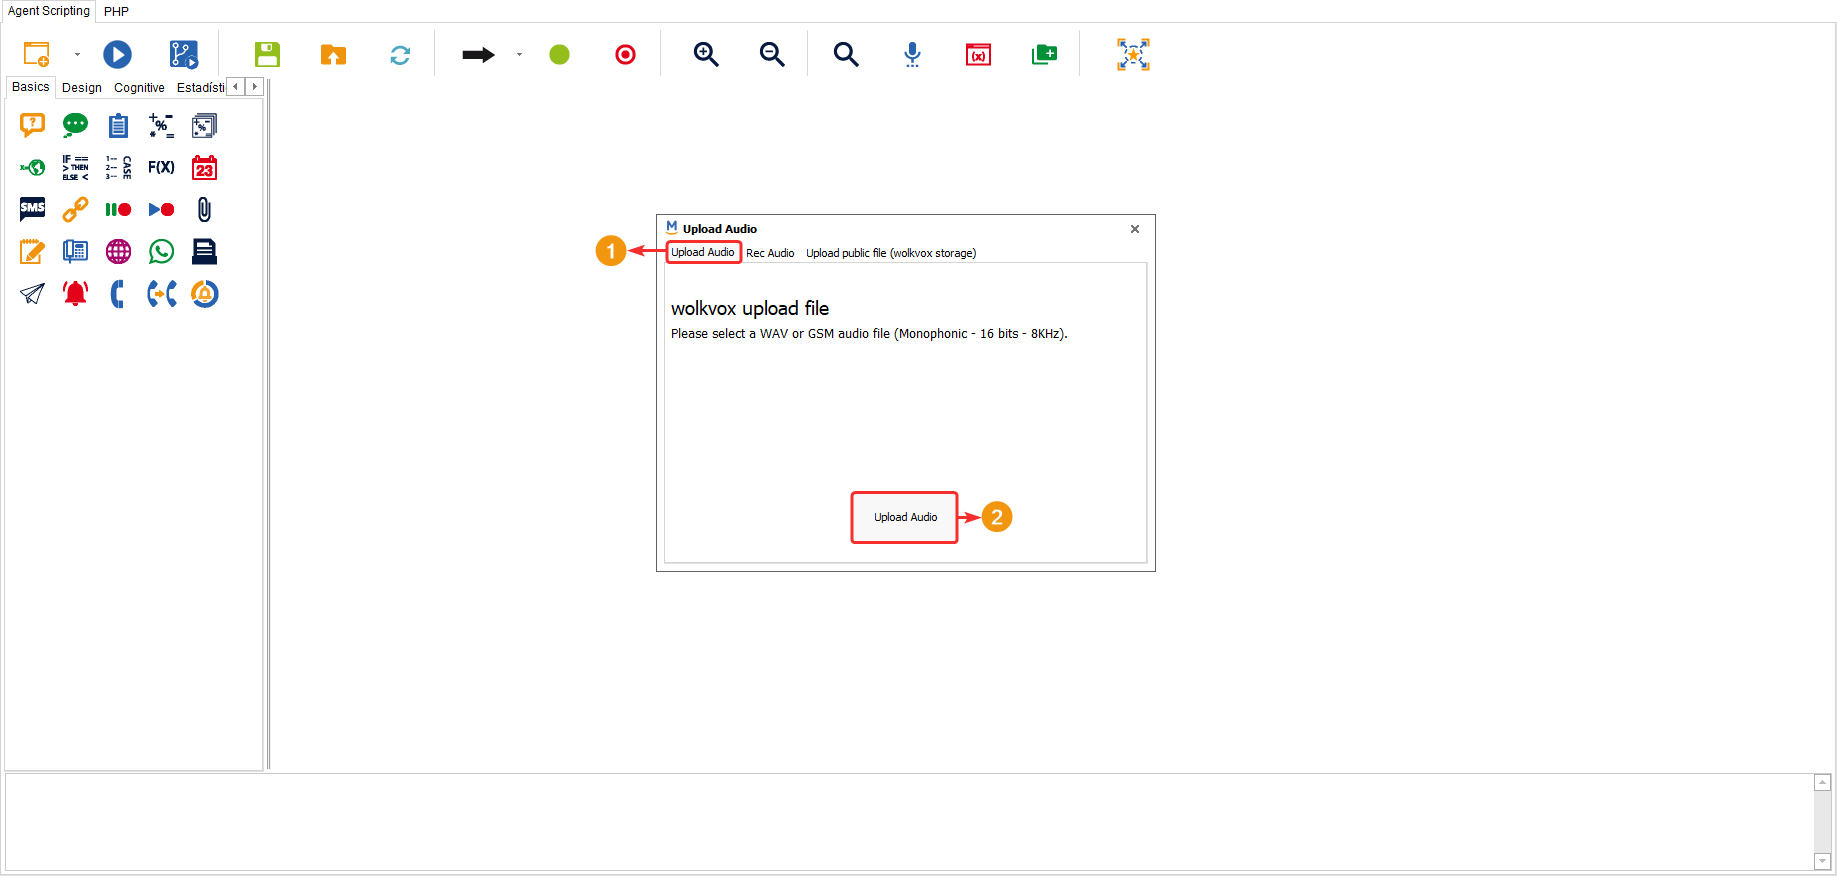
Audio tool
![]()
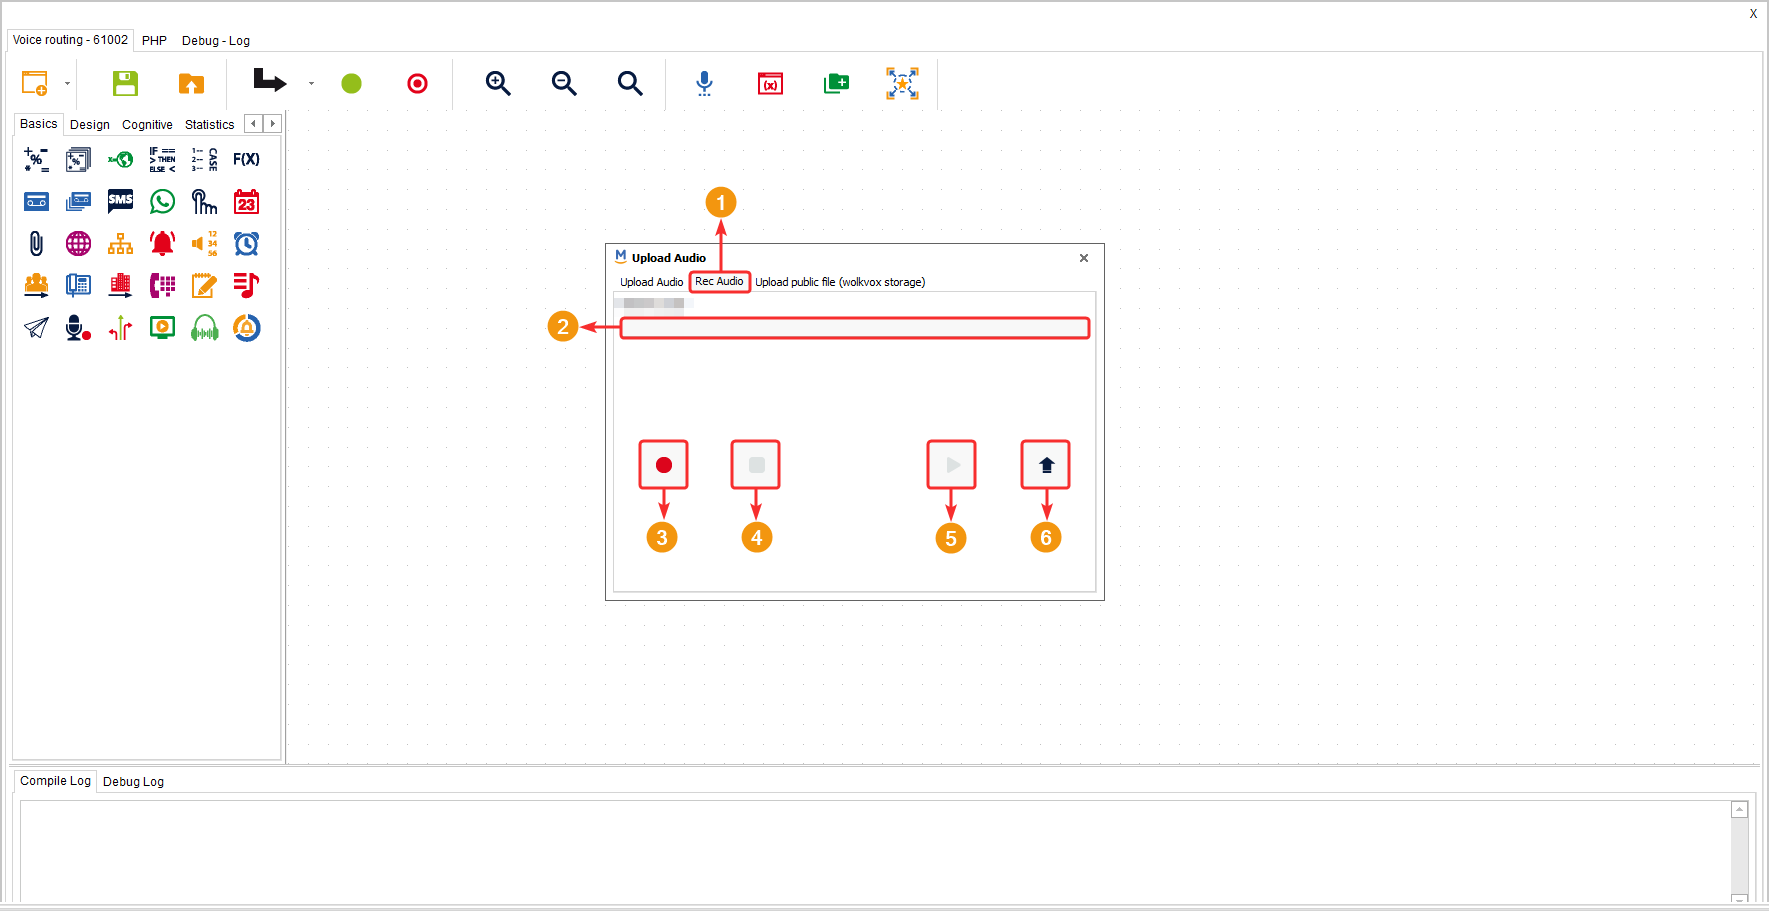
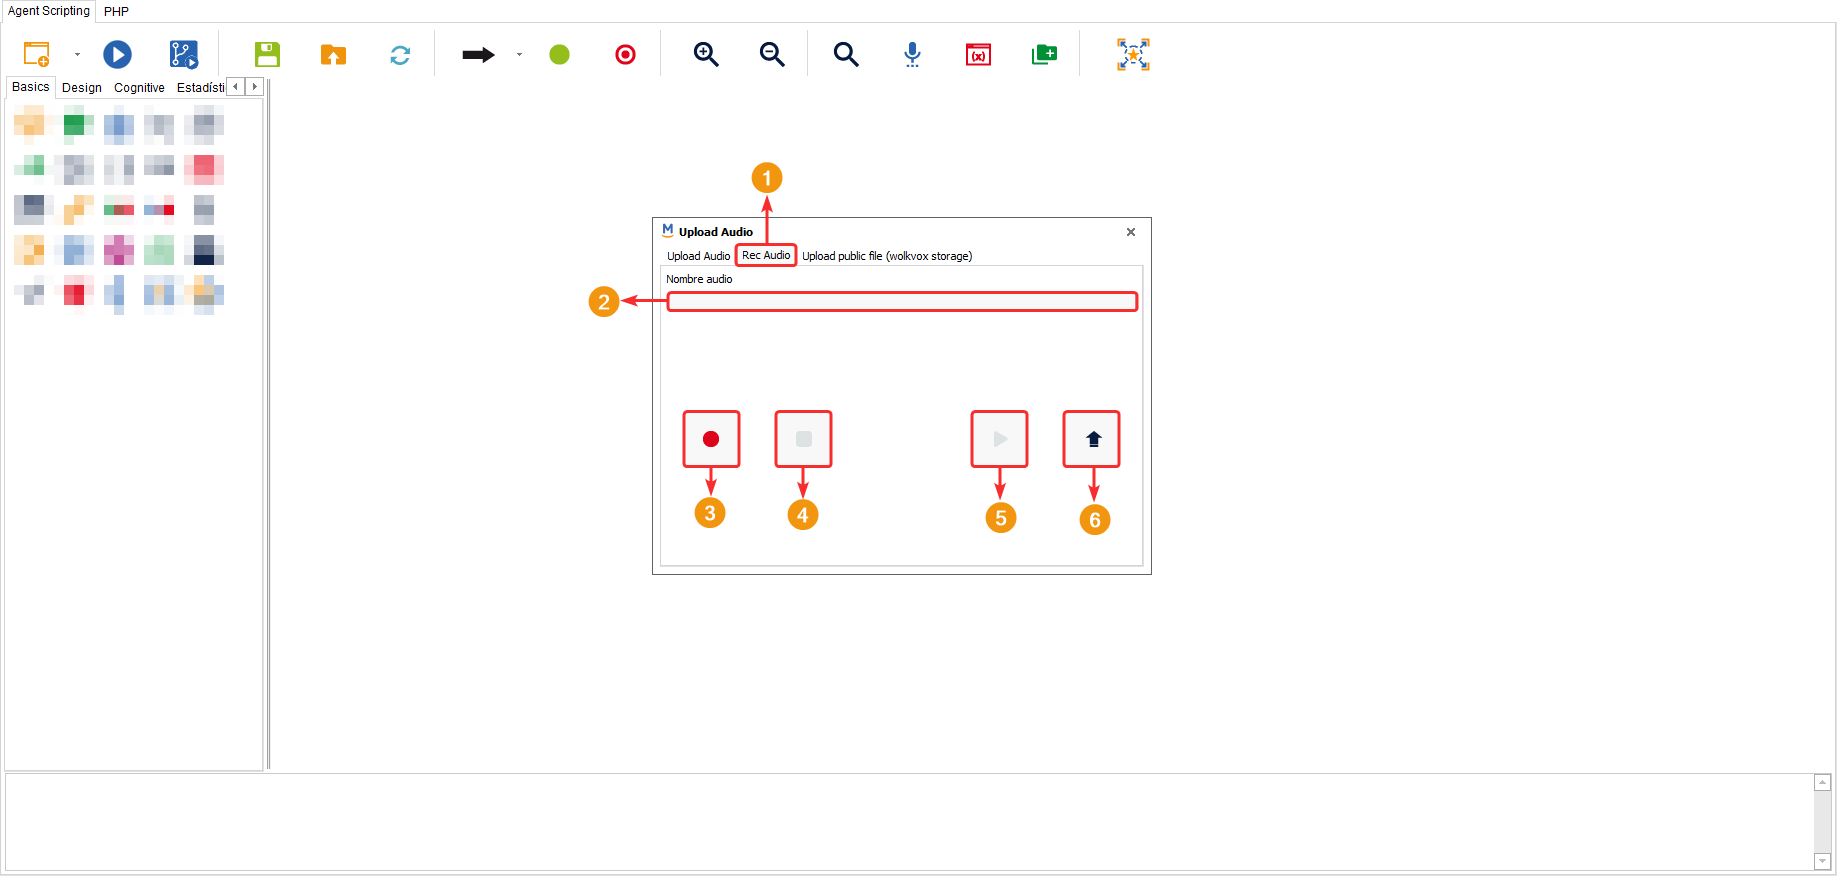
Allows you to open the audio tool window in wolkvox Manager, which enables you to record an audio, upload an audio file, or upload an audio file to wolkvox servers publicly to obtain a file URL.

In the “Upload Audio” tab you can upload an audio file that you have stored on your computer. The file format should be WAV or GSM and it should be monophonic at 16 bits and 8Khz sampling frequency.

- In the “Rec Audio” tab you can record your audio files directly in Wolkvox Studio, which allows you to generate the file in the appropriate format.
- Define a name for the audio to be recorded.
- Click on the circle to start recording.
- Click on the square to stop recording.
- Click on the “play” button to play the recording you just made.
- Click on the arrow pointing upwards to upload the audio you just recorded if it has turned out as you wanted it to.
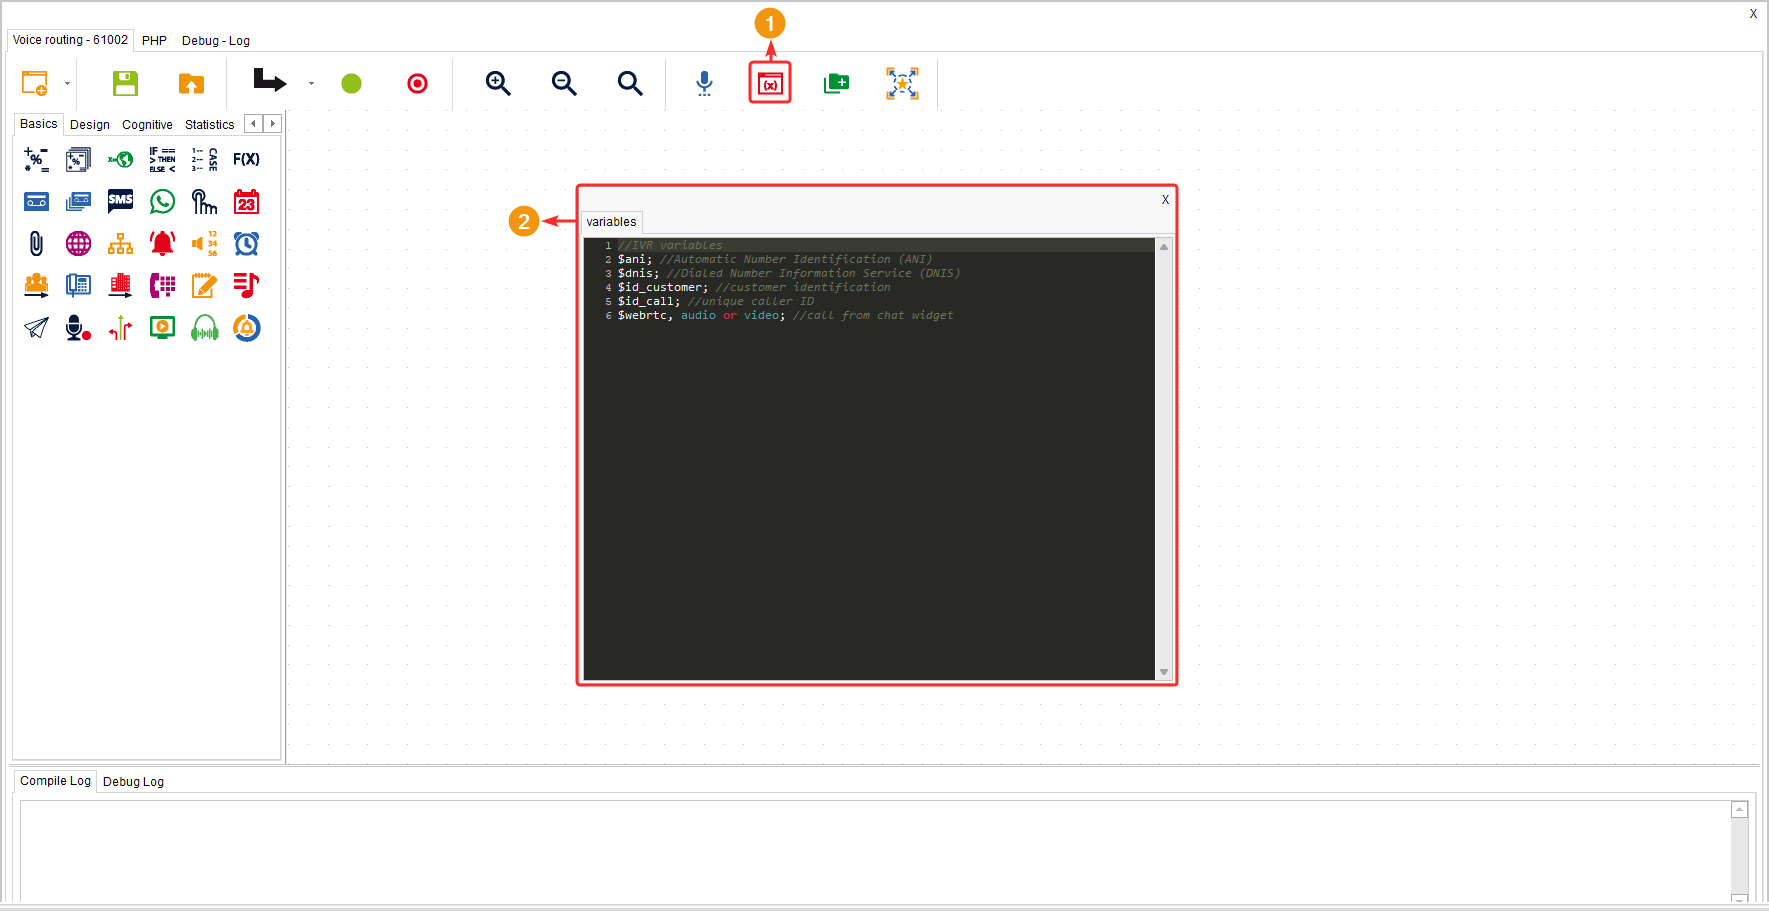
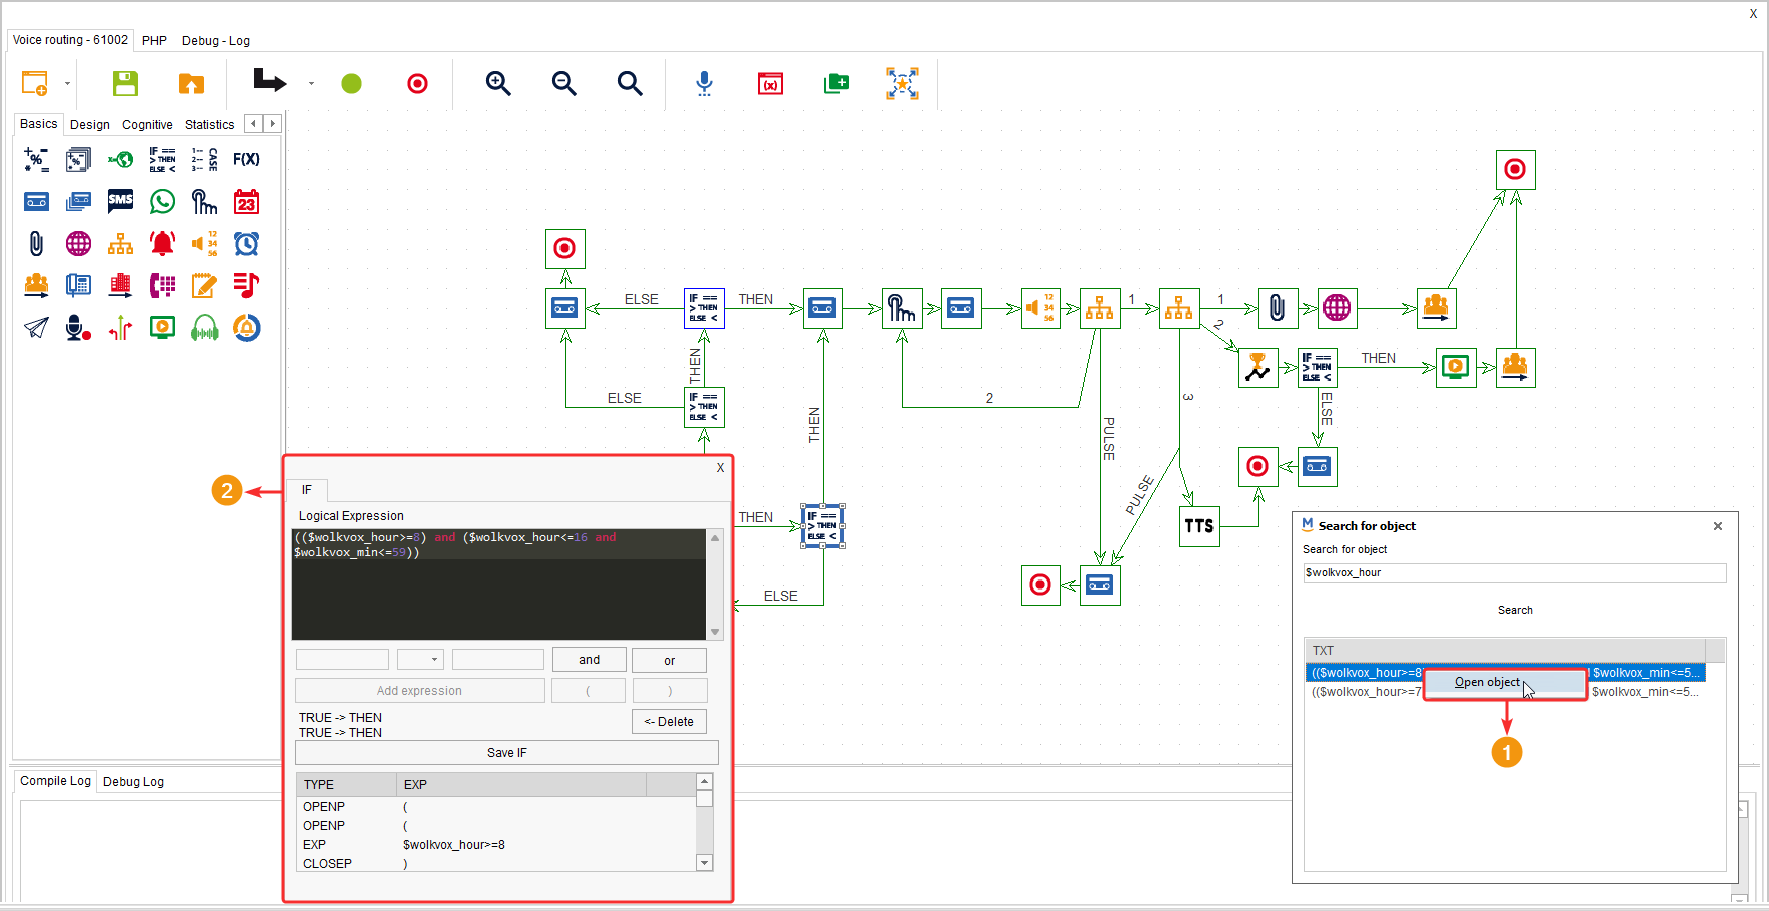
Variables
![]()
This button allows you to open a pop-up window where all the variables that can be used in the type of routing point you are designing are displayed. These variables allow for more personalized information delivery, as by prefixing the variable name with a dollar sign “$”, the system will insert the respective value assigned to the variable.
For example, the variable “$id_call” provides the call identification number, and there is also the variable “$id_customer” that provides the identification number of the customer interacting with the agent.
Remember that depending on the type of routing point you are in, you will see a different variety of variables.
The functionality of each variable is specified in front of its name, following the “//” signs.
For the example in the image, the variable window of a Voice (IVR) routing point was opened, but for other types of routing points, the number of listed variables may be different.
Note: In simple terms, a variable is like a special container that stores important information about customers, agents, and other relevant data in the contact center. We can use it in the call center and contact center software to display or store that information and use it when needed.
Test ChatBot
![]()
This tool is only available in chat-type routing points. Here you can test the designed chat flow for the routing point. You will act as a client in the chat test to verify that your flow works correctly.
- Click on the highlighted button in the following image. A new window will open for the chatbot test.
- In this first section, you can change the basic customer information such as name, phone number, and email.
- The button in the middle allows you to refresh the tool if you have made any changes or if you want to start testing the chat again.
- Next is the section where you can preview the chat. There, you will see all the messages you send to the chat and the ones generated by the chatbot.
- At the bottom is the field where you can write messages to send to the chatbot.

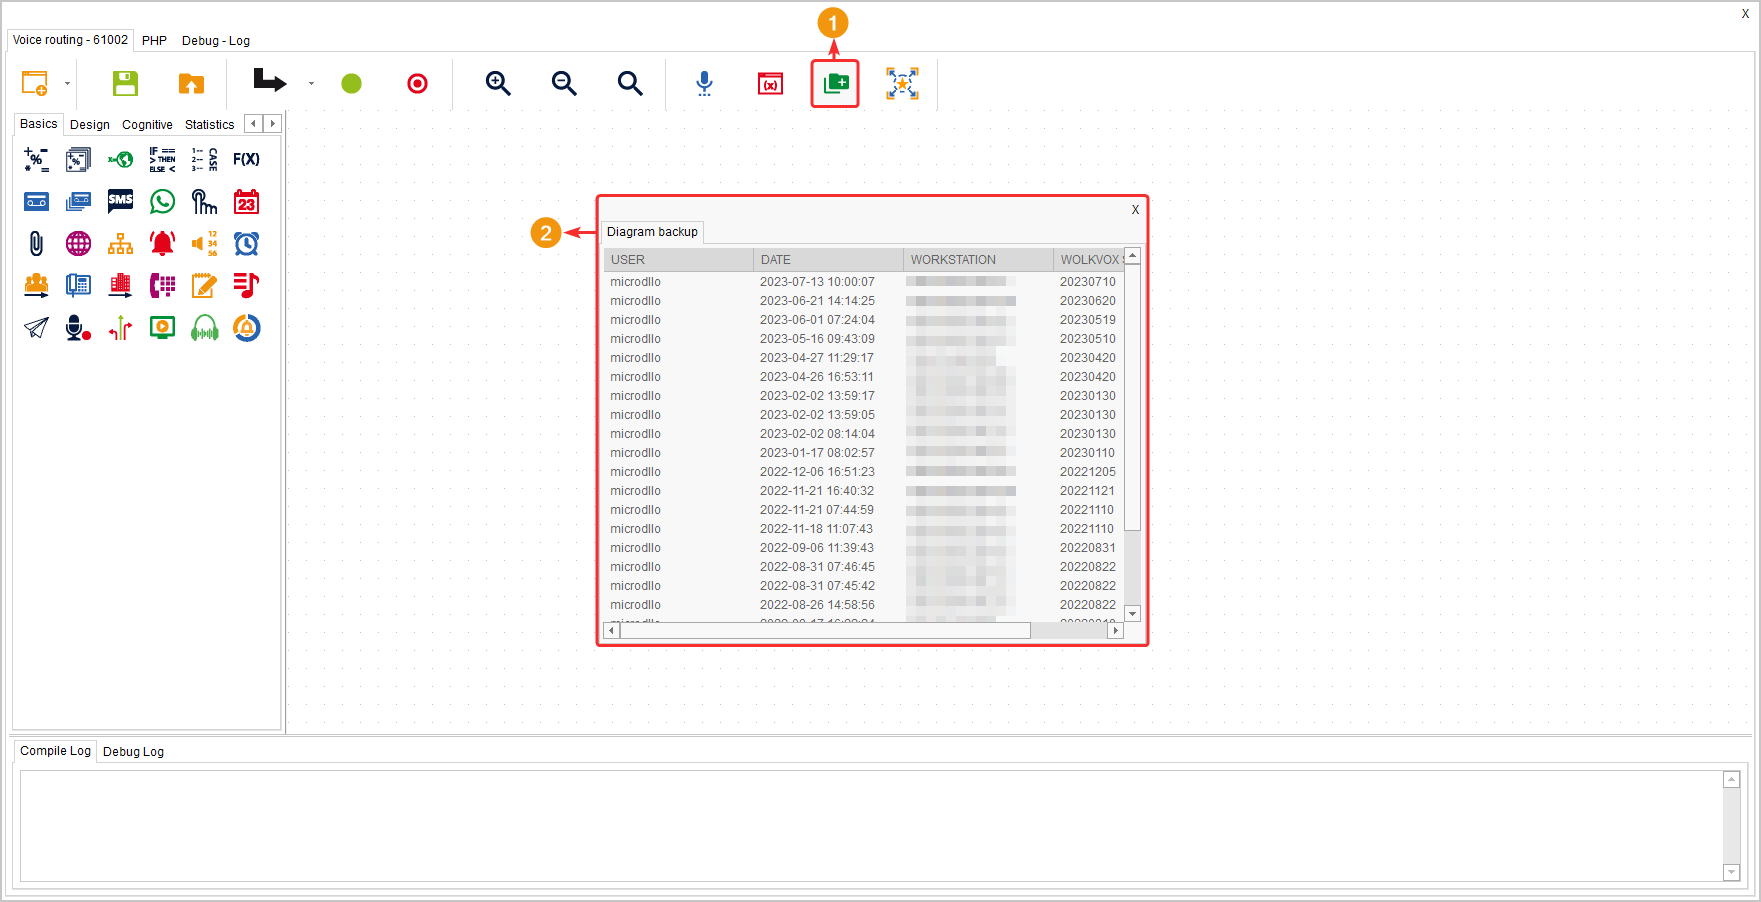
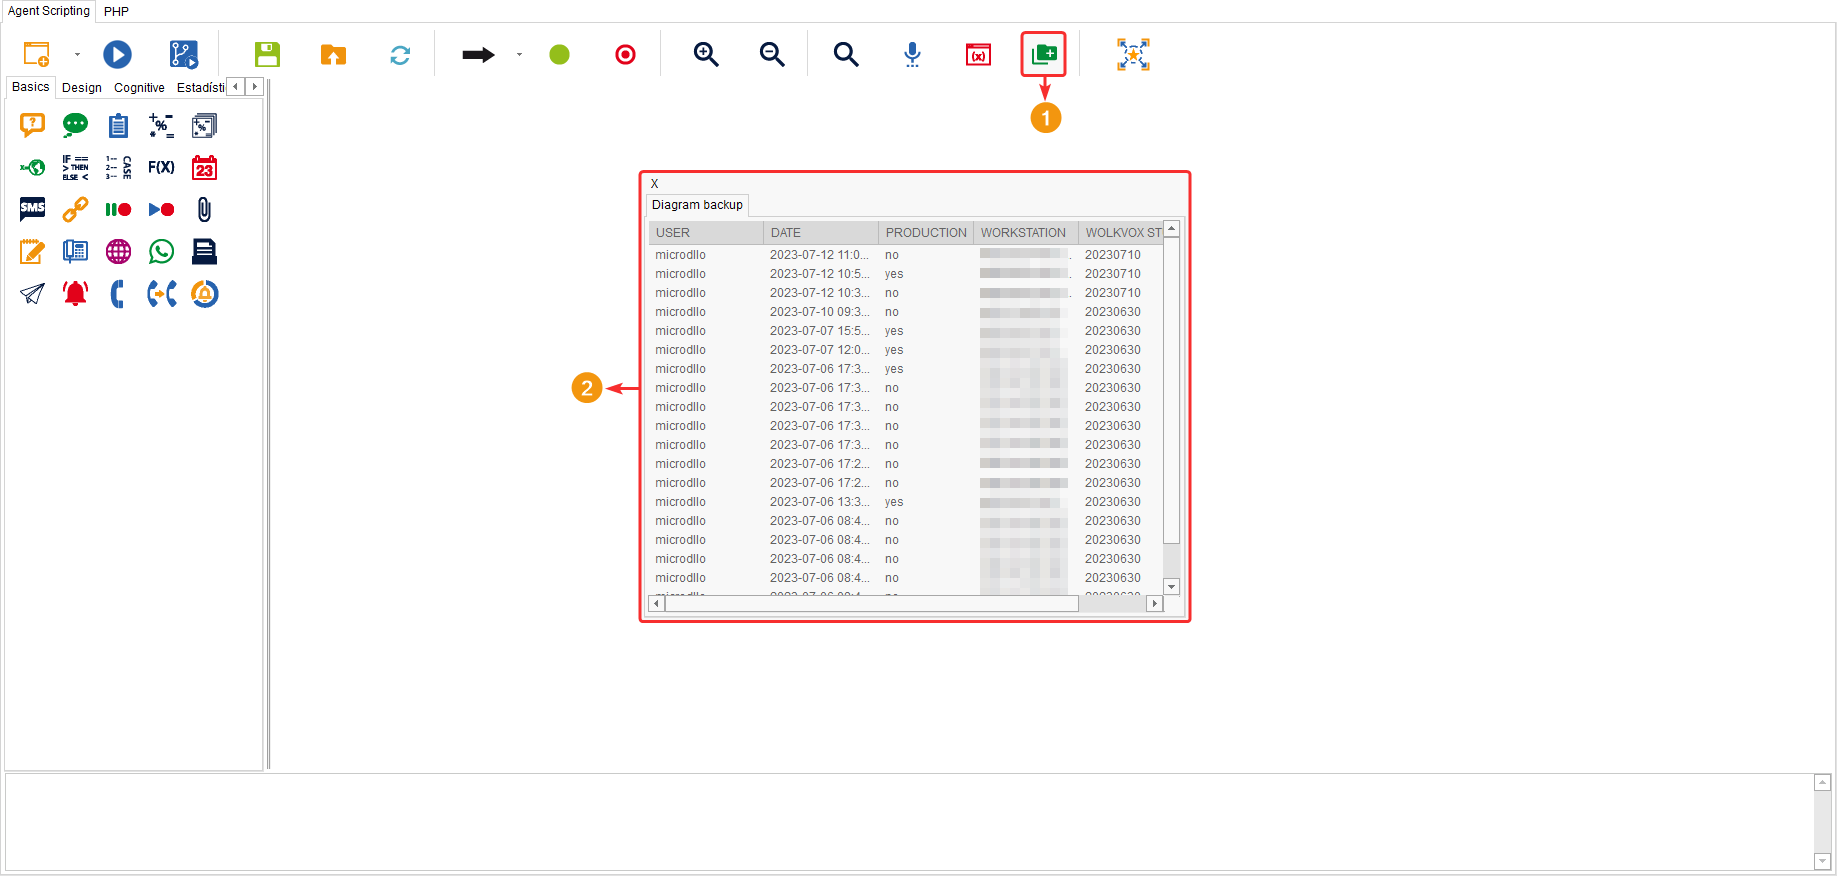
Diagram Backups
![]()
Allows you to view the backups that have been created. Remember that flow backups are made once you click the compile button but no compilation errors appear.
The backup table has the following columns:
User: Name of the user who compiled the flow.
Date: Date and time of backup creation.
Production: Indicates whether the flow is in production or not.
Workstation: Name of the workstation from which the flow was compiled.
wolkvox Studio Version: Displays the version of wolkvox Manager in which the flow was compiled.
Note: If you double left-click on one of the backups you have, the flow design will open as it was in the backup. Also, if you right-click, the option to delete the selected backup will appear.
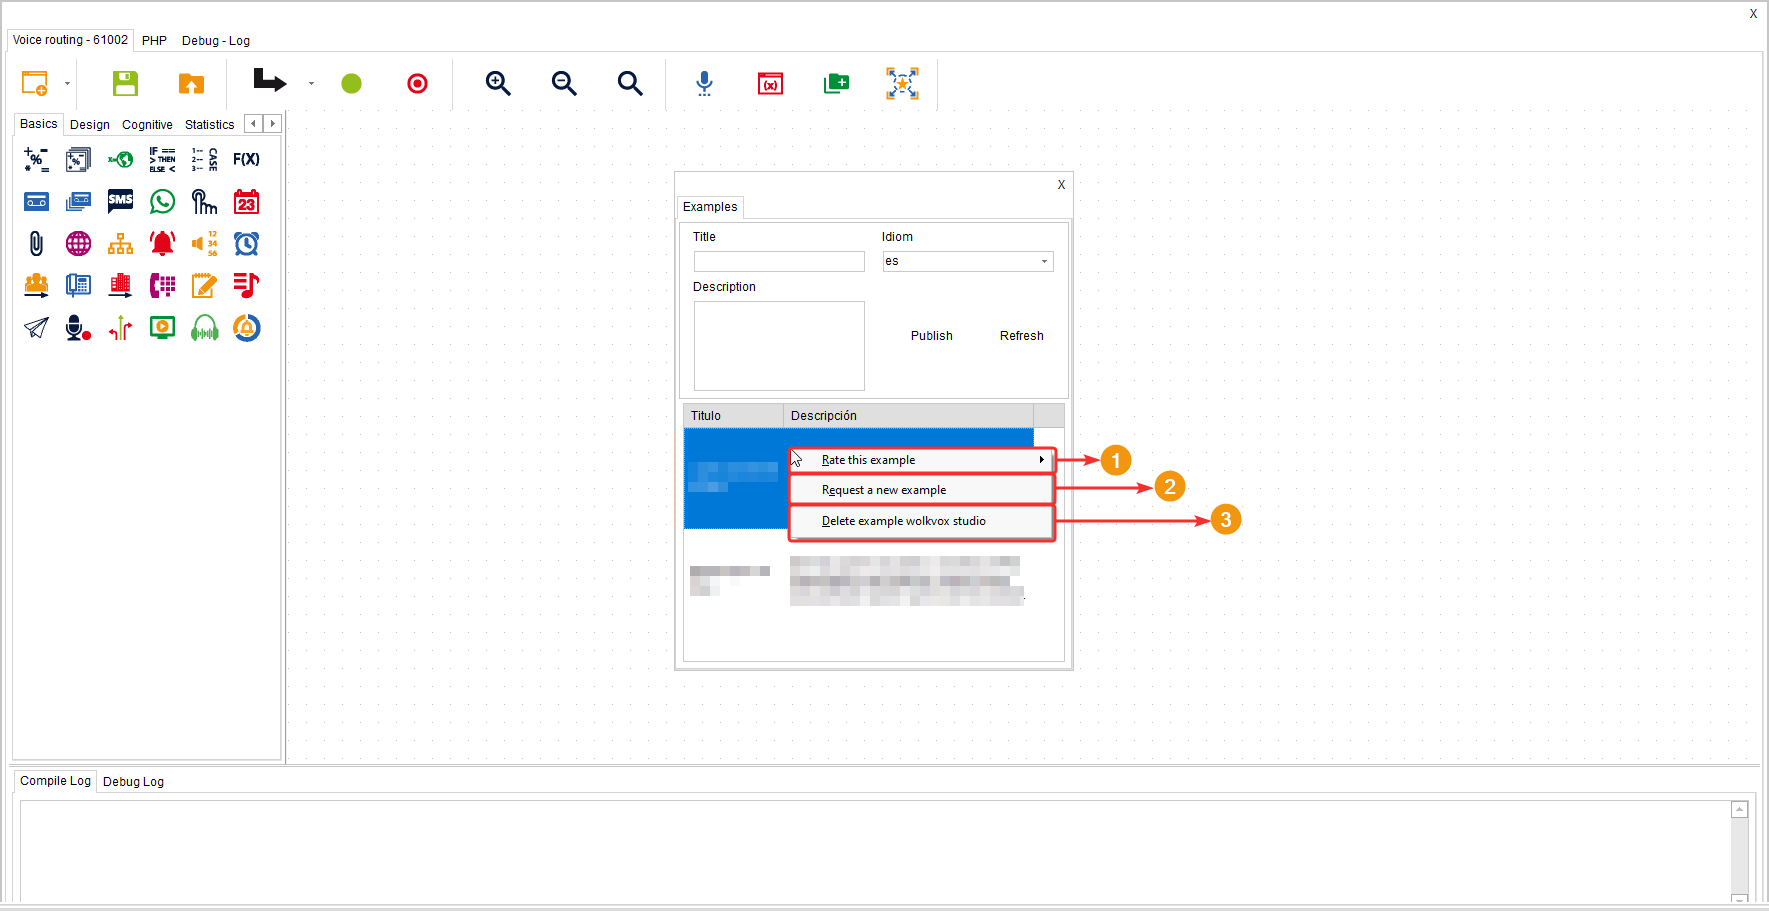
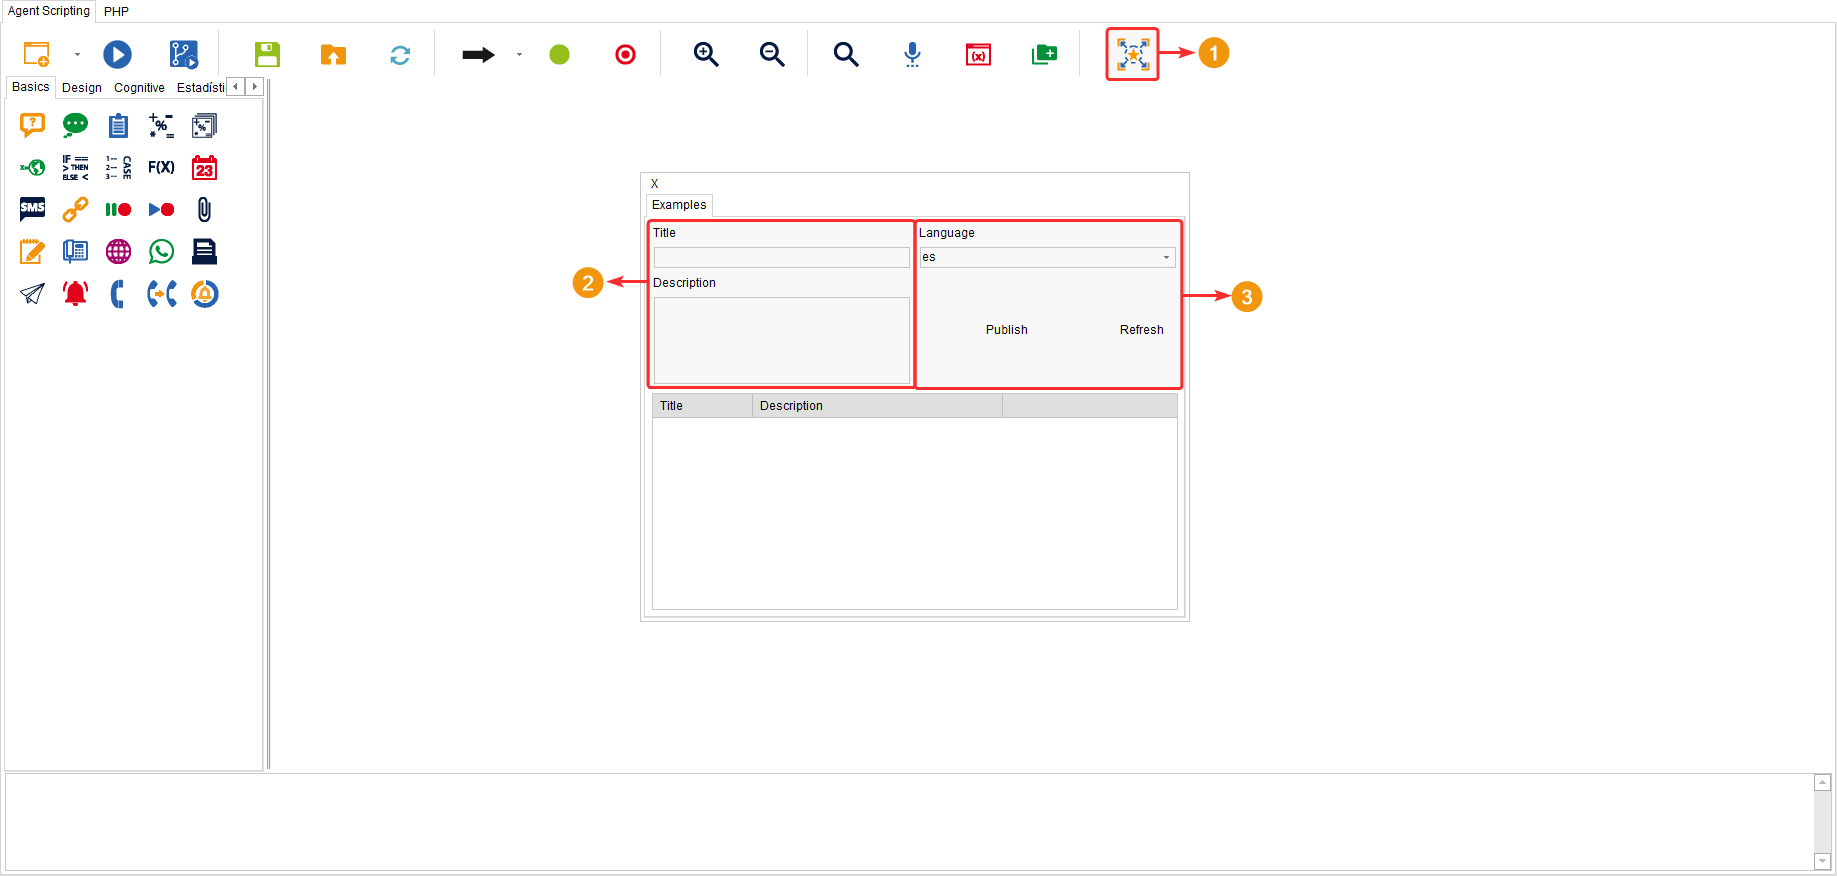
Examples
![]()
This tool functions like a forum where you can create examples of routing point flows, request specific ones based on your requirements, and also rate them to get an idea of how helpful the generated example is for contact centers.
- To add the current flow as an example to the forum, you need to provide a title and a description.
- In the “Language” section, select the language in which the flow is designed. Click on “Publish” to publish the example on the forum, and “Refresh” to update the list of examples.

If you right-click on any listed example in the lower table, you will have the following options.
- You can rate an example using a rating system from 1 to 5 stars by selecting the “Rate this example” option.
- You can request a new example if you select the option “Request a new example”. By clicking on this option, a popup window will open where you have a text field in which you can write the request for the example you need. Click on “Request example” to submit the described example request.
- You can delete an example by clicking on the “Delete example wolkvox Studio” option.
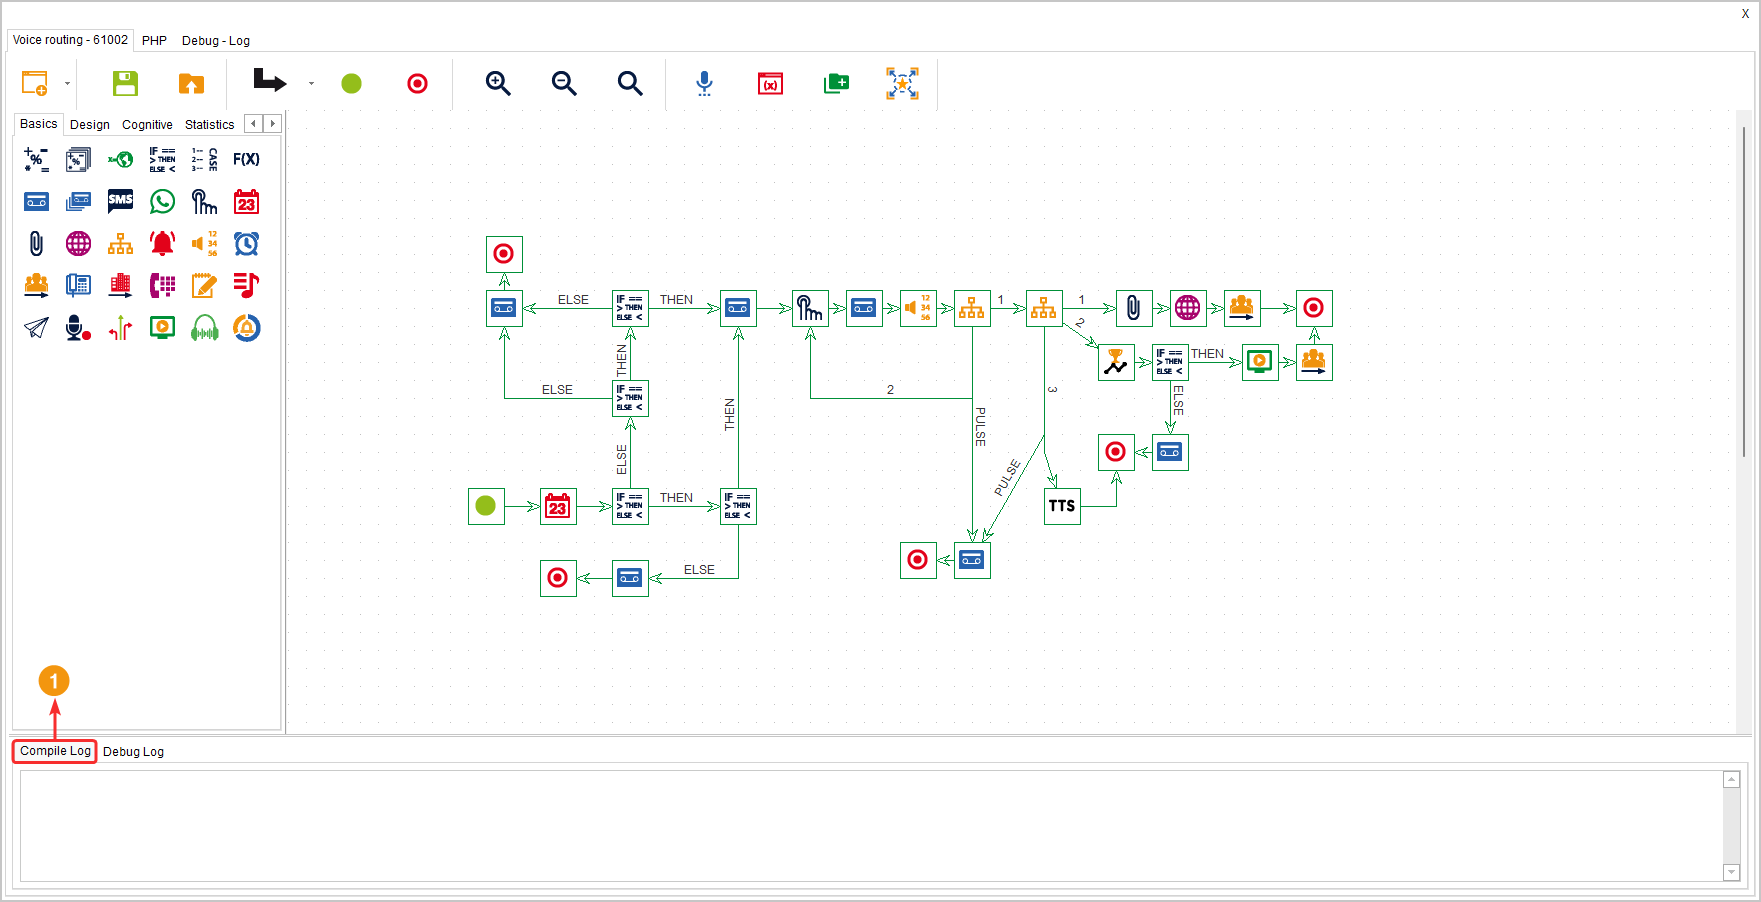
Compile log
This tab allows you to view the result of the flow compilation. A successfully compiled flow should display the following message: “wolkvox studio: No syntax errors detected”.
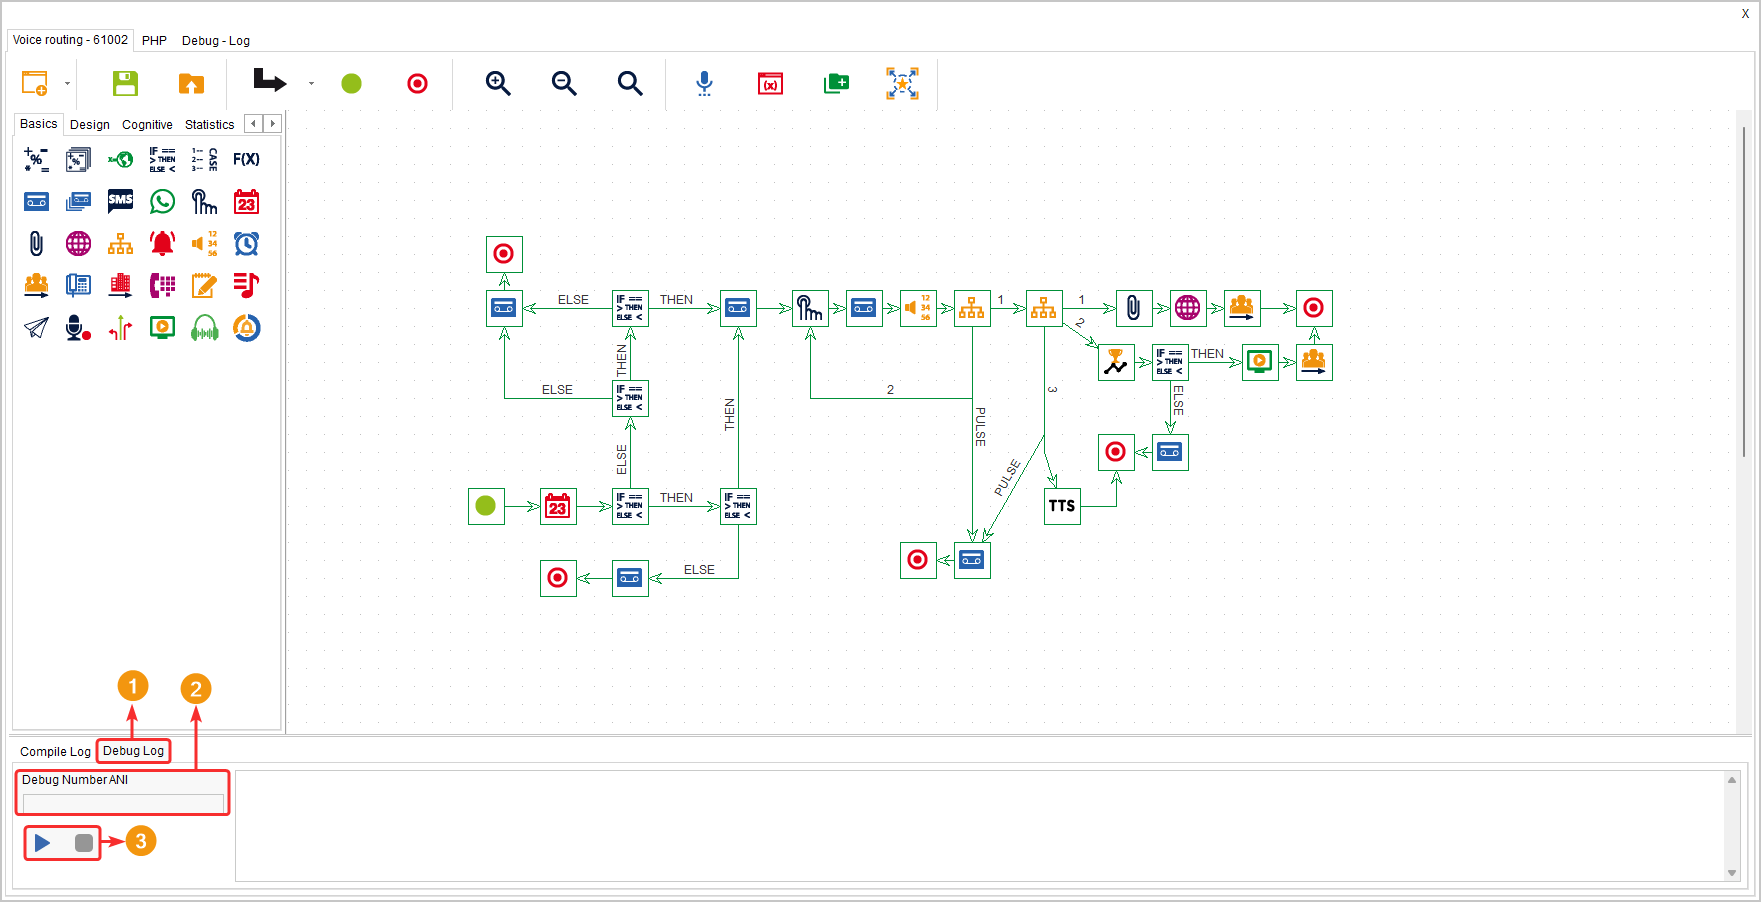
Debug Log
This tab allows you to test the traceability of a call or chat in order to identify any points of failure or restructure the navigation flow.
At the bottom of the voice routing, you will find the Debug Log tab. In the text field, you enter the phone number from which you will make the test call. Then, click “play” and the flow canvas will start marking the navigation of the call in blue. Each step of the routing will be highlighted component by component. In other words, as you progress step by step through the routing paths, the component you are currently on will be highlighted.
- Enter the “Debug Log” tab.
- Enter the phone number from which you will conduct the test. This will represent the calling client going through the current routing point.
- Click the “Play” button. The component that the client would be going through will start to be marked in blue. Click “Stop” when you finish the test.
Note: This tool is only available in Voice (IVR) and ChatBot routing points.
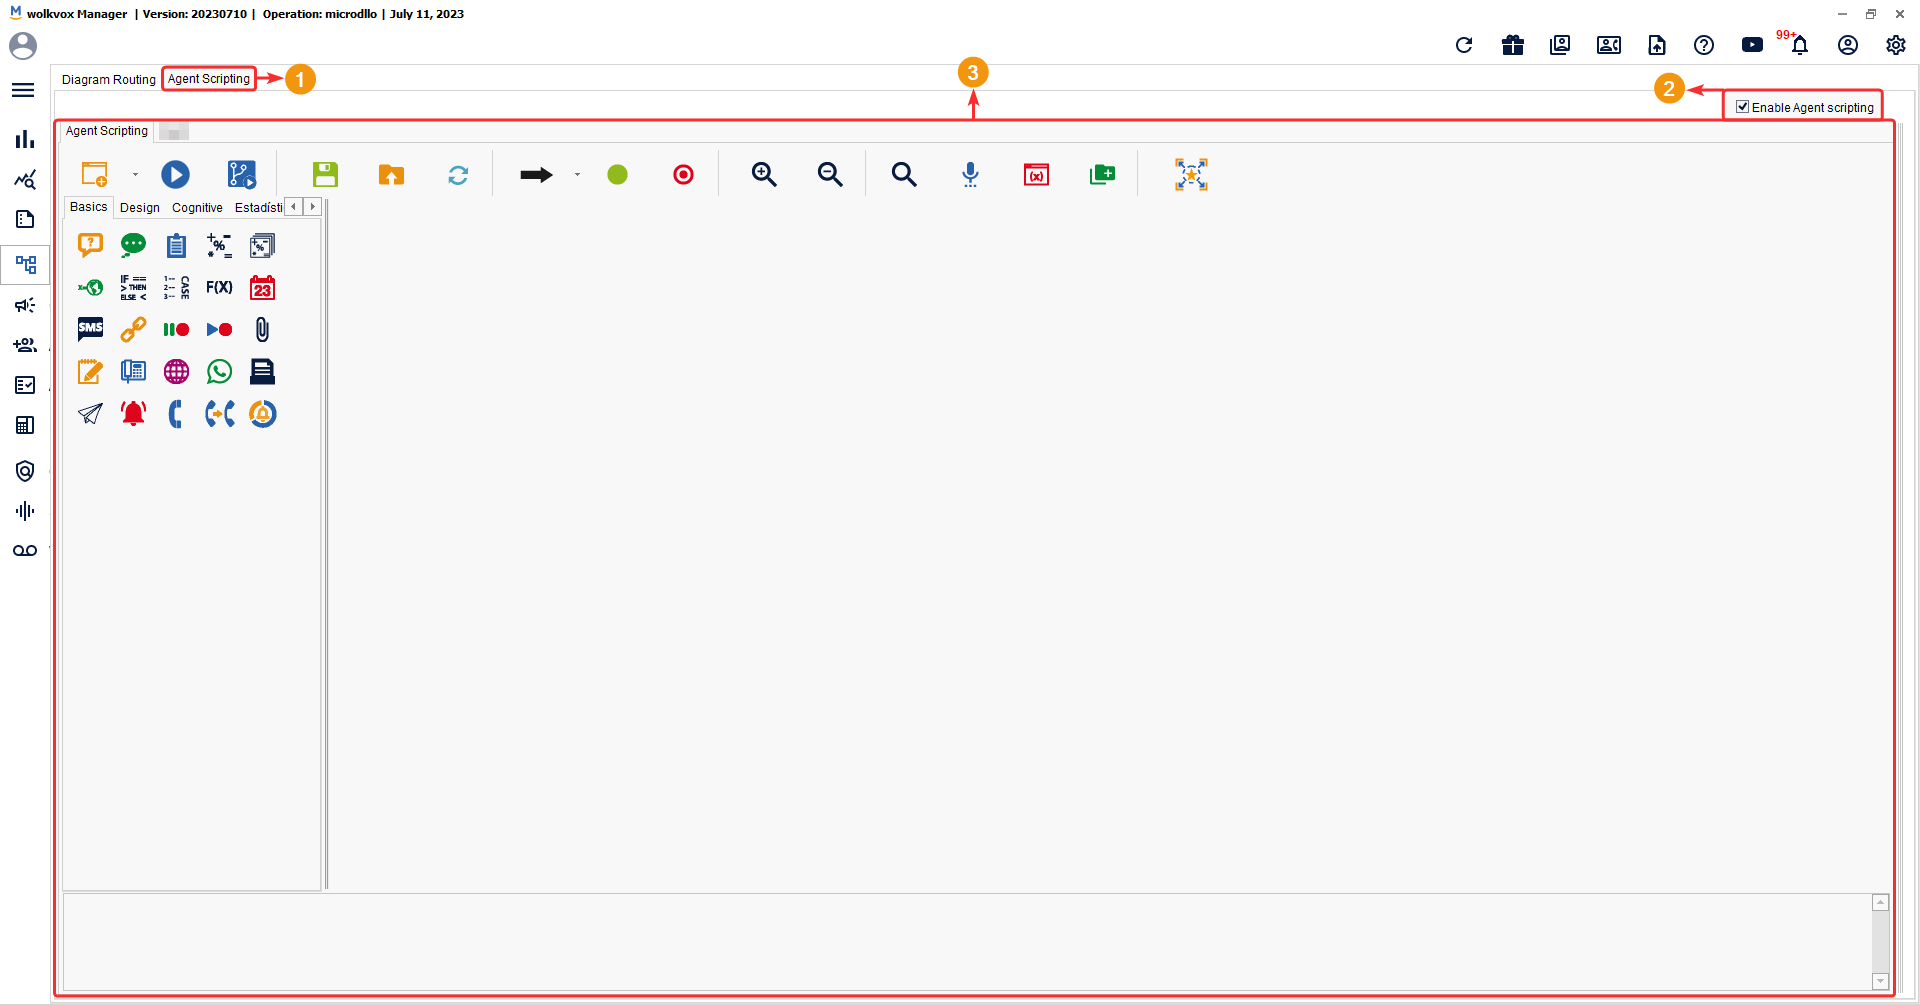
Agent Scripting #
Agent Scripting is a tool to guide agents interactively during the customer service process.
Benefits:
- Minimizes the impact generated by high staff turnover in the contact center.
- Enables newly hired staff to be productive immediately.
Follow these steps to enter the “Agent Scripting” section.
- Enter the “Agent Scripting” tab.
- Make sure you have the tool active by checking the box located in the upper right corner of this section.
- You can identify the entire Agent Scripting tool interface.
Agent Scripting interface #
- At the top is the main menu of Agent Scripting.
- In the highlighted area, the components that allow dragging to the flow design canvas are listed. The components are grouped by tabs for better organization and identification of the components with respect to the functionality of each component.
- The image highlights the location of the canvas where the flow that will be executed as a guide for agents is designed. The components are selected and then placed on this canvas.

Buttons available in the Agent Scripting interface #
Compile

The “Compile” button allows you to apply the changes made in the Agent Scripting flow. When you click this button, a process is triggered to verify and prepare the changes made in the flow, so that they can be implemented and used effectively. This includes syntax and structure validation of the flow, as well as generating the necessary components for proper functioning. Once the flow is compiled, the changes become active and are reflected in the Agent Script section of the Agentbox software intended for agents.
Note: In order for the changes to be saved, the compilation must not display an error message, and a message stating that everything has been compiled correctly should appear. Therefore, for the changes made in the flow to be applied and saved correctly, the message “No syntax errors detected” must appear.
Note: When compiling the flow, a backup will be created.
Important: To compile the flow successfully, you must have the component that marks the start of the flow and at least one “End” component. Also, ensure that they are properly connected and that any other components you have used are configured correctly, without omitting any mandatory configuration options.

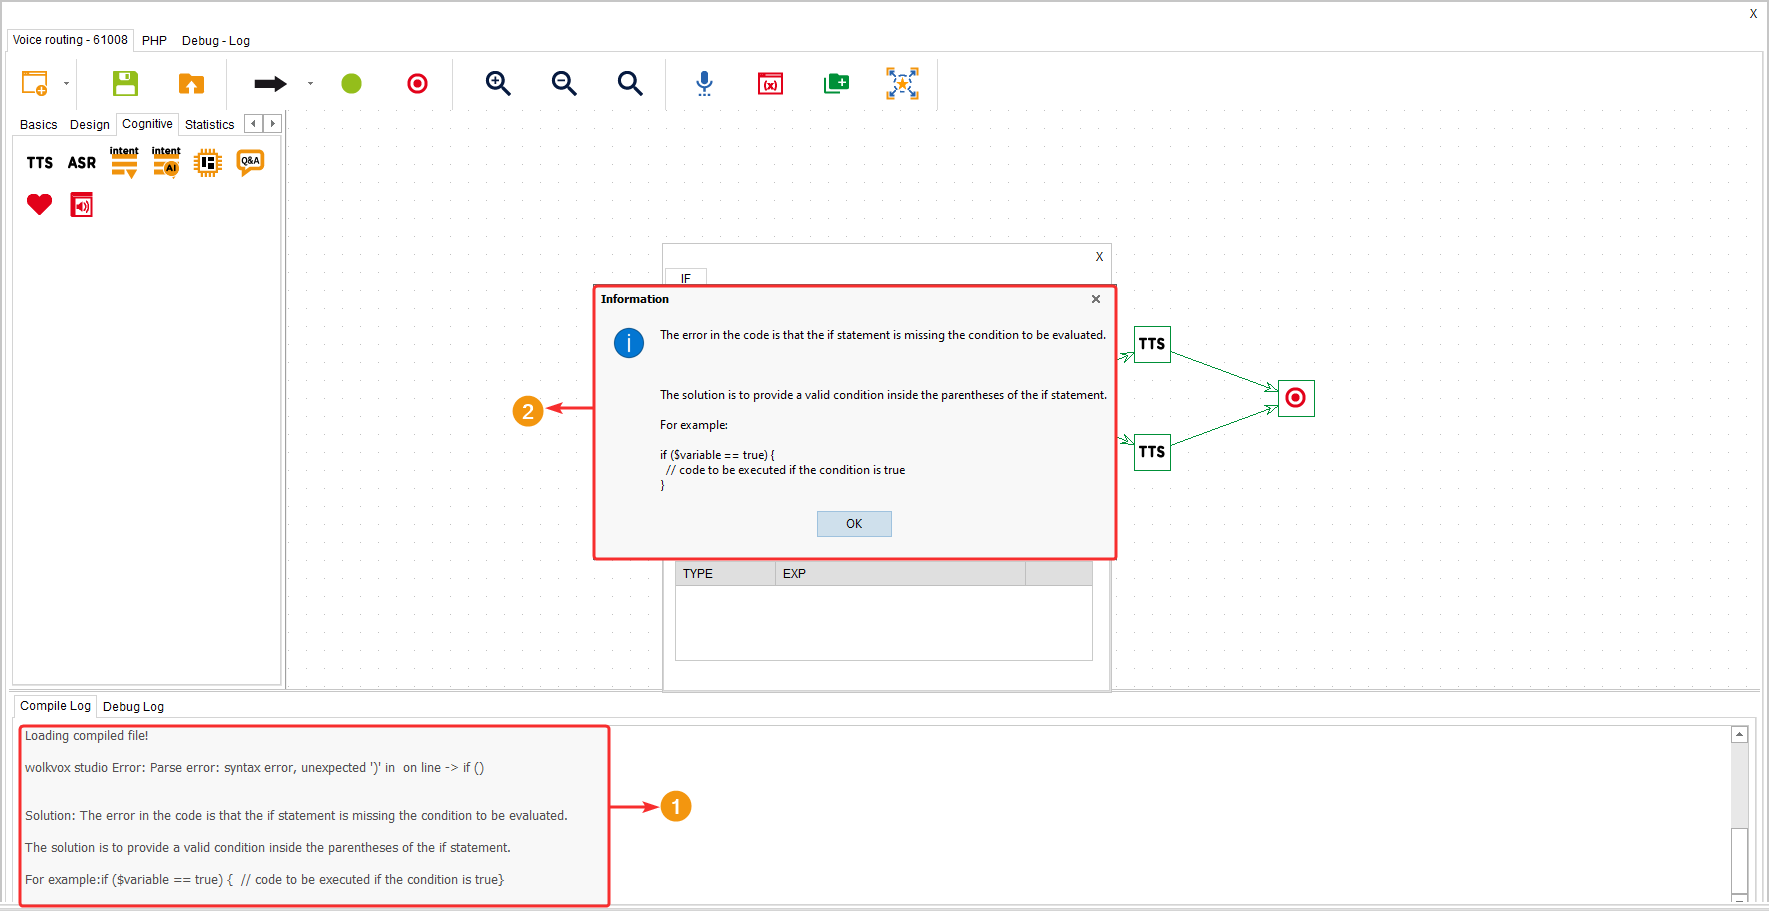
If there is any error in a component that affects the flow compilation, an error message will appear in the compilation panel. A popup window will also appear with a summary of the compilation. The solution to the detected problem will be displayed as well. Lastly, the configuration window of the component where the issue was detected will be opened.
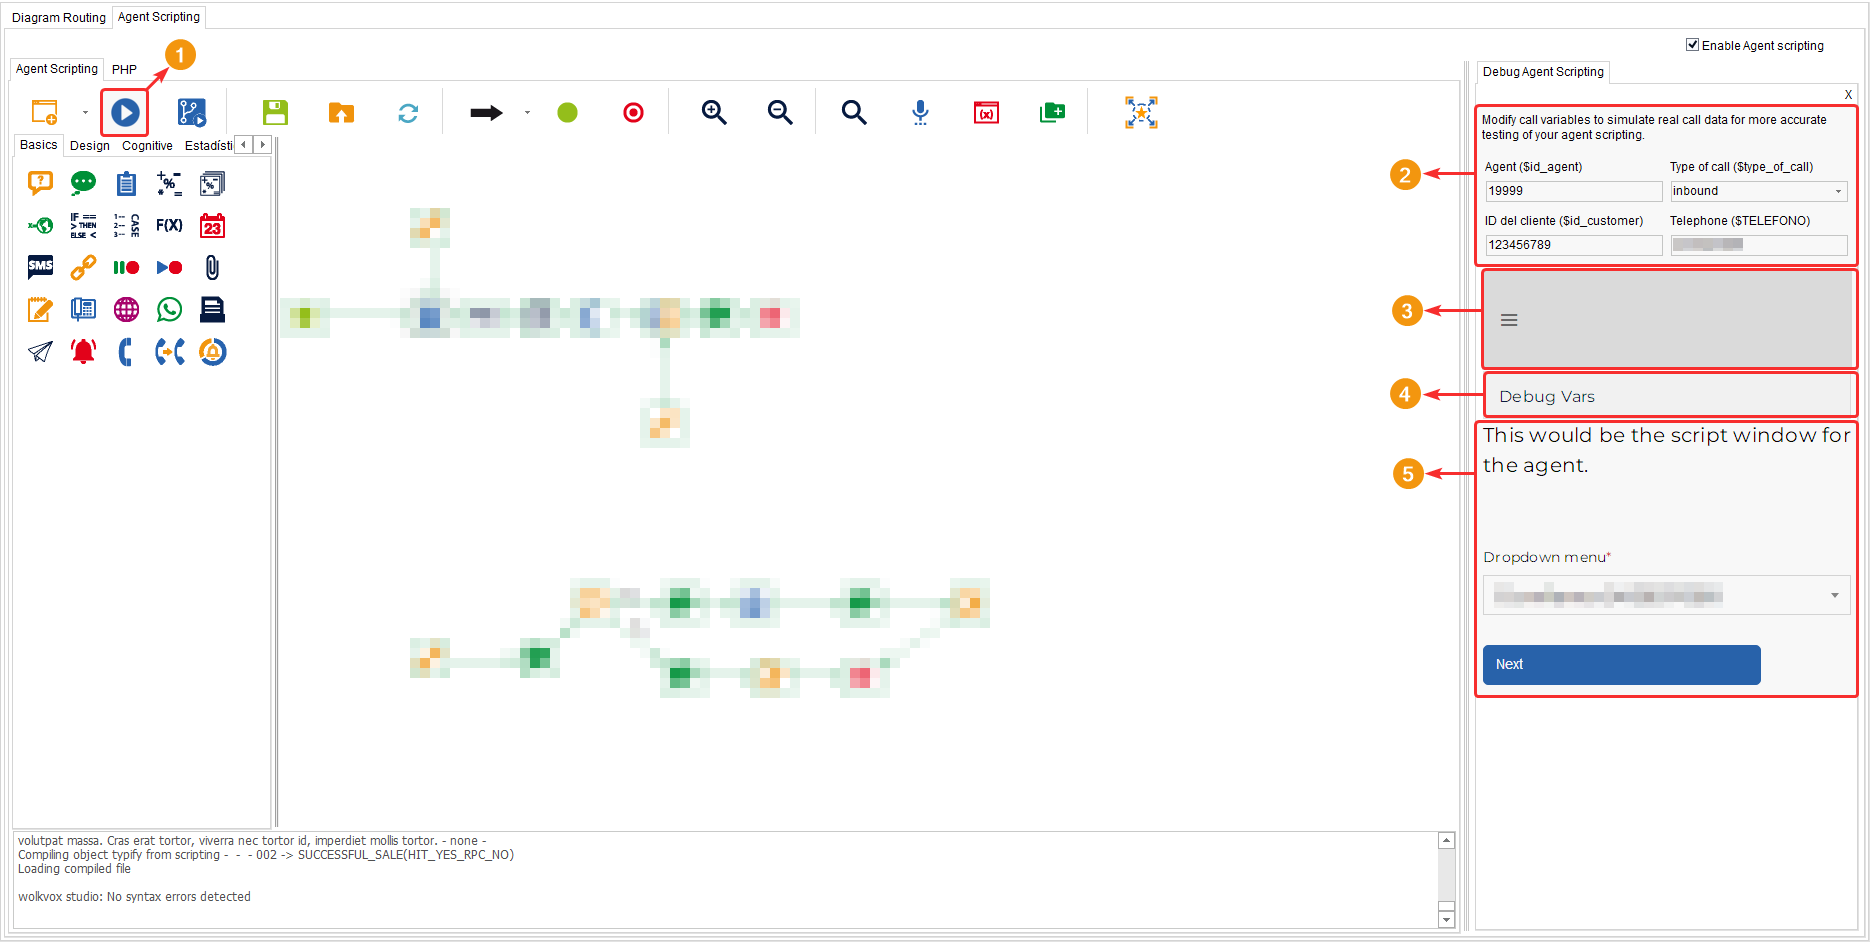
Play AgentScript

This button allows you to test the designed flow, that is, preview the entire flow design before deploying it to production and before applying it to the entire operations center. When you click this button, the flow preview window will appear on the right side of the screen.
- Click on the “Play AgentScripting” button to open the testing section of the designed flow.
- Update the call variables to simulate real call data for more accurate testing of your agent’s scripts.
- This hamburger-style button allows you to open the script menu. Depending on the constructed design, the agent script may or may not have a menu for the agent to navigate through different sections based on the current step or, for example, to find or record other information.
- The “Debug Vars” button allows you to open a section where you can view all the basic variables along with their respective values.
- Depending on its design, different resources will appear in the agent script. There can be input fields, dropdown menus, checkboxes, radio buttons to select single-choice options, text input fields, audio prompts that explain each step of the script to the agent, among many other resources. In the component documentation, you will find a wide variety of options to design an excellent script that assists your agents.
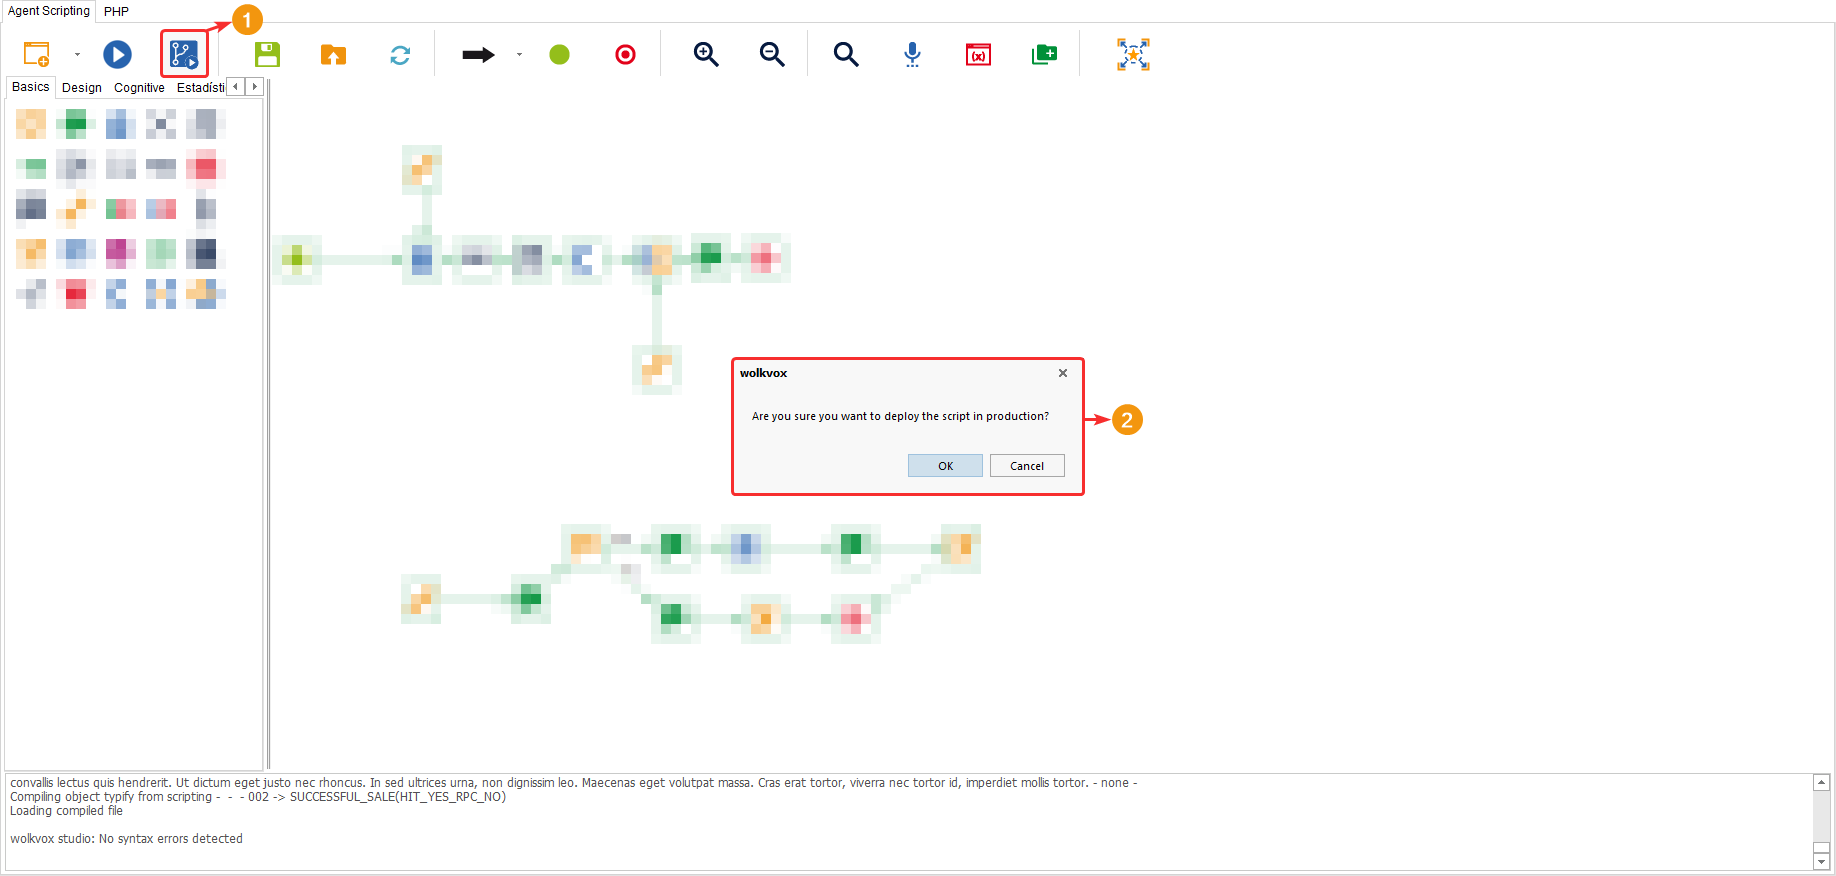
Move to production environment

This allows you to apply the changes made in the script to the entire operation. Unlike routing points, where compiling the script is sufficient to apply the changes, in Agent Scripting, you need to click this button to move the script to production, i.e., immediately apply the changes to the full operation of the call center.
Once you accept that you want to send the script to production, the message “The agentscript is now in production” will appear.
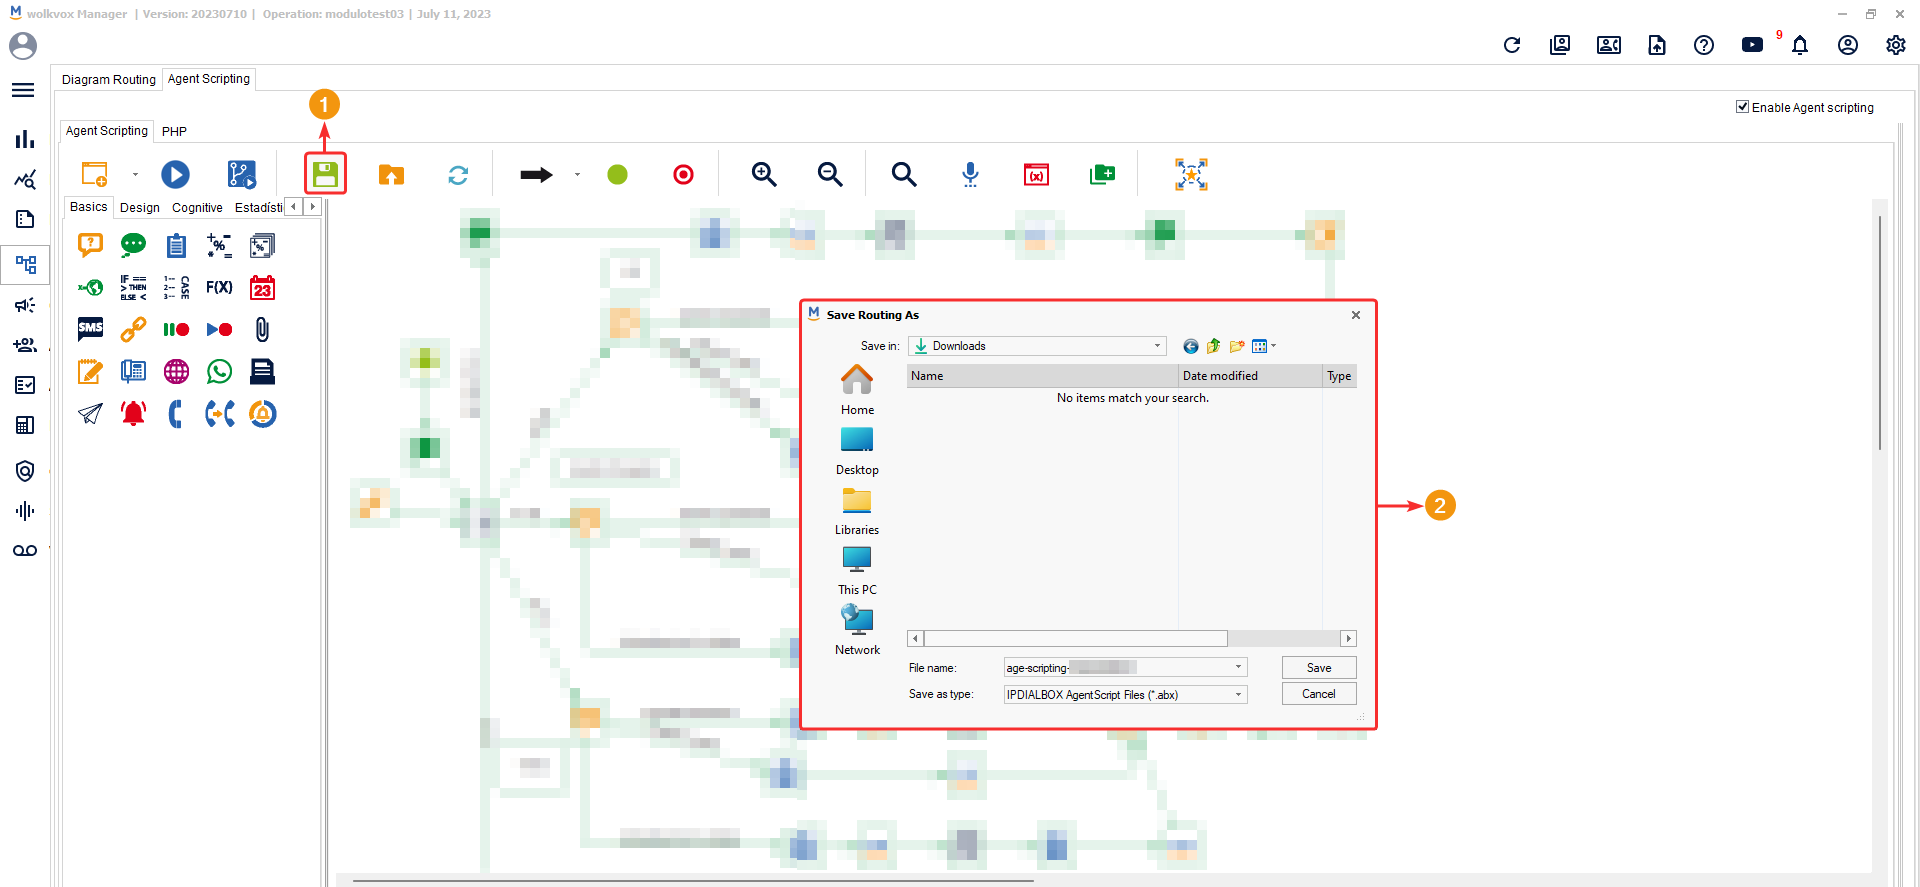
Save

Save the routing point you are editing as a file that you can store on your computer. The file format it saves in is called “IPDIALBOX AgentScript Files” or “.abx”. This option can be used to save the flow on your computer if you haven’t finished editing it and wish to continue its design later on.
Note: This button only saves the routing point as a file on your computer. It does not apply the changes to the flow that is running in the operations center. If you need to apply the changes and have them saved before continuing editing, you must compile the routing point.
Load

This button allows you to load and open a ‘.abx’ format file and apply it to the Agent Scripting canvas. You can use this option to continue editing a flow that you have saved on your computer.

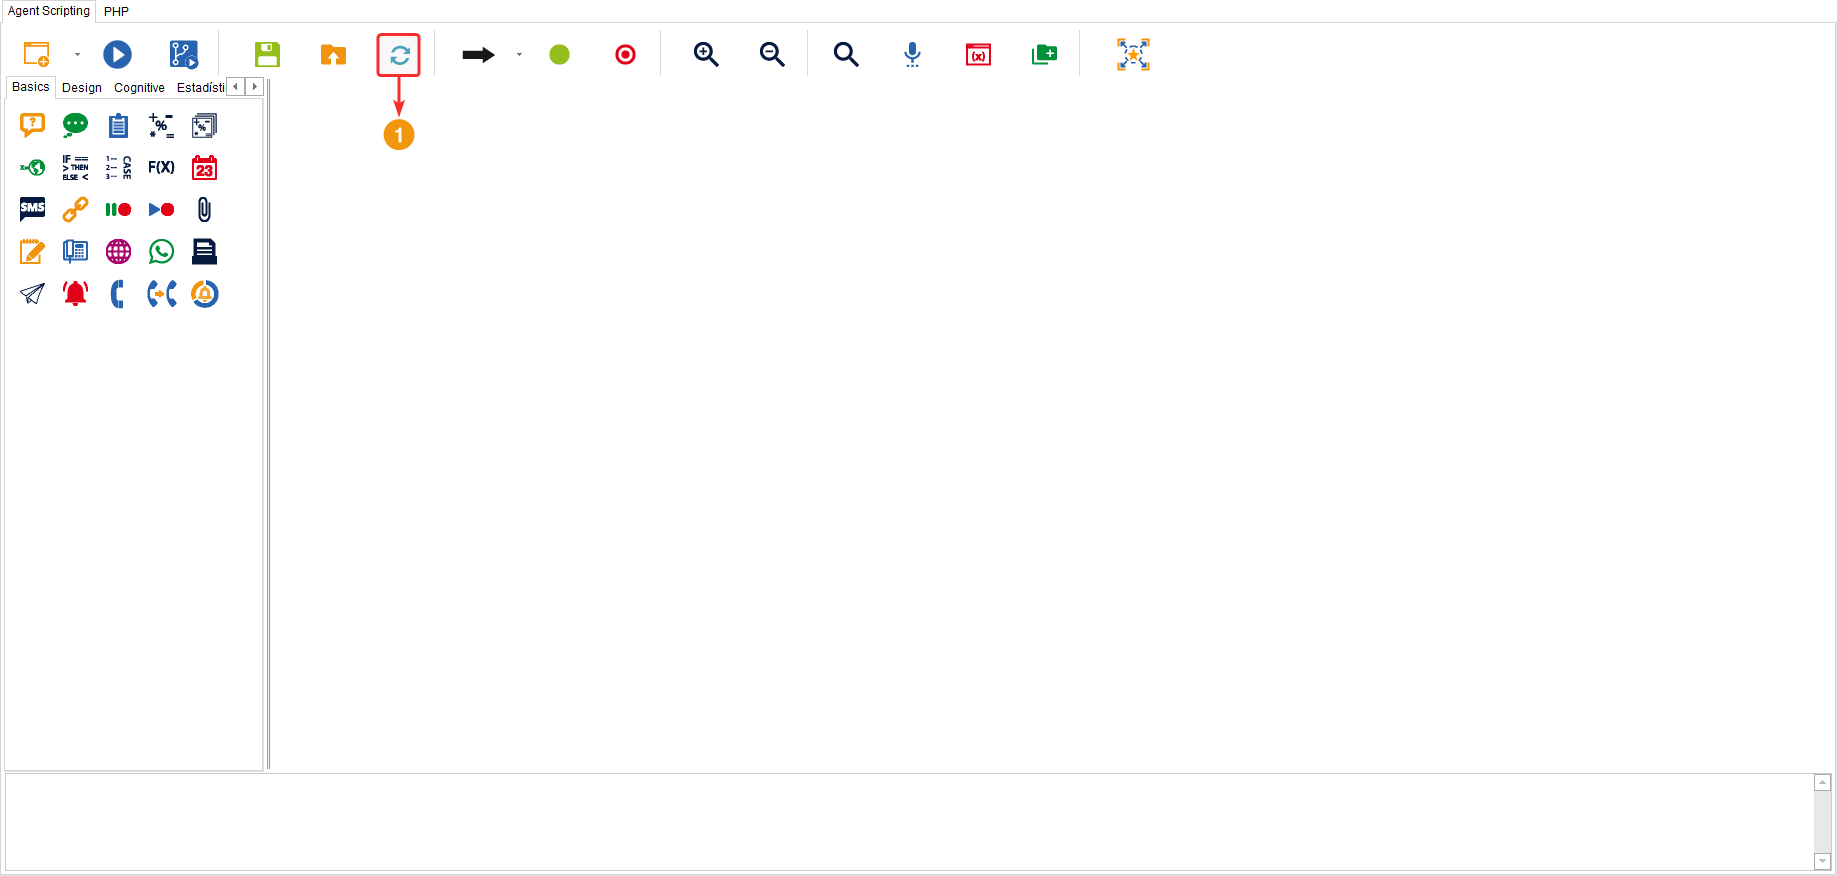
Reload

This button allows you to reload the flow to its last compilation.
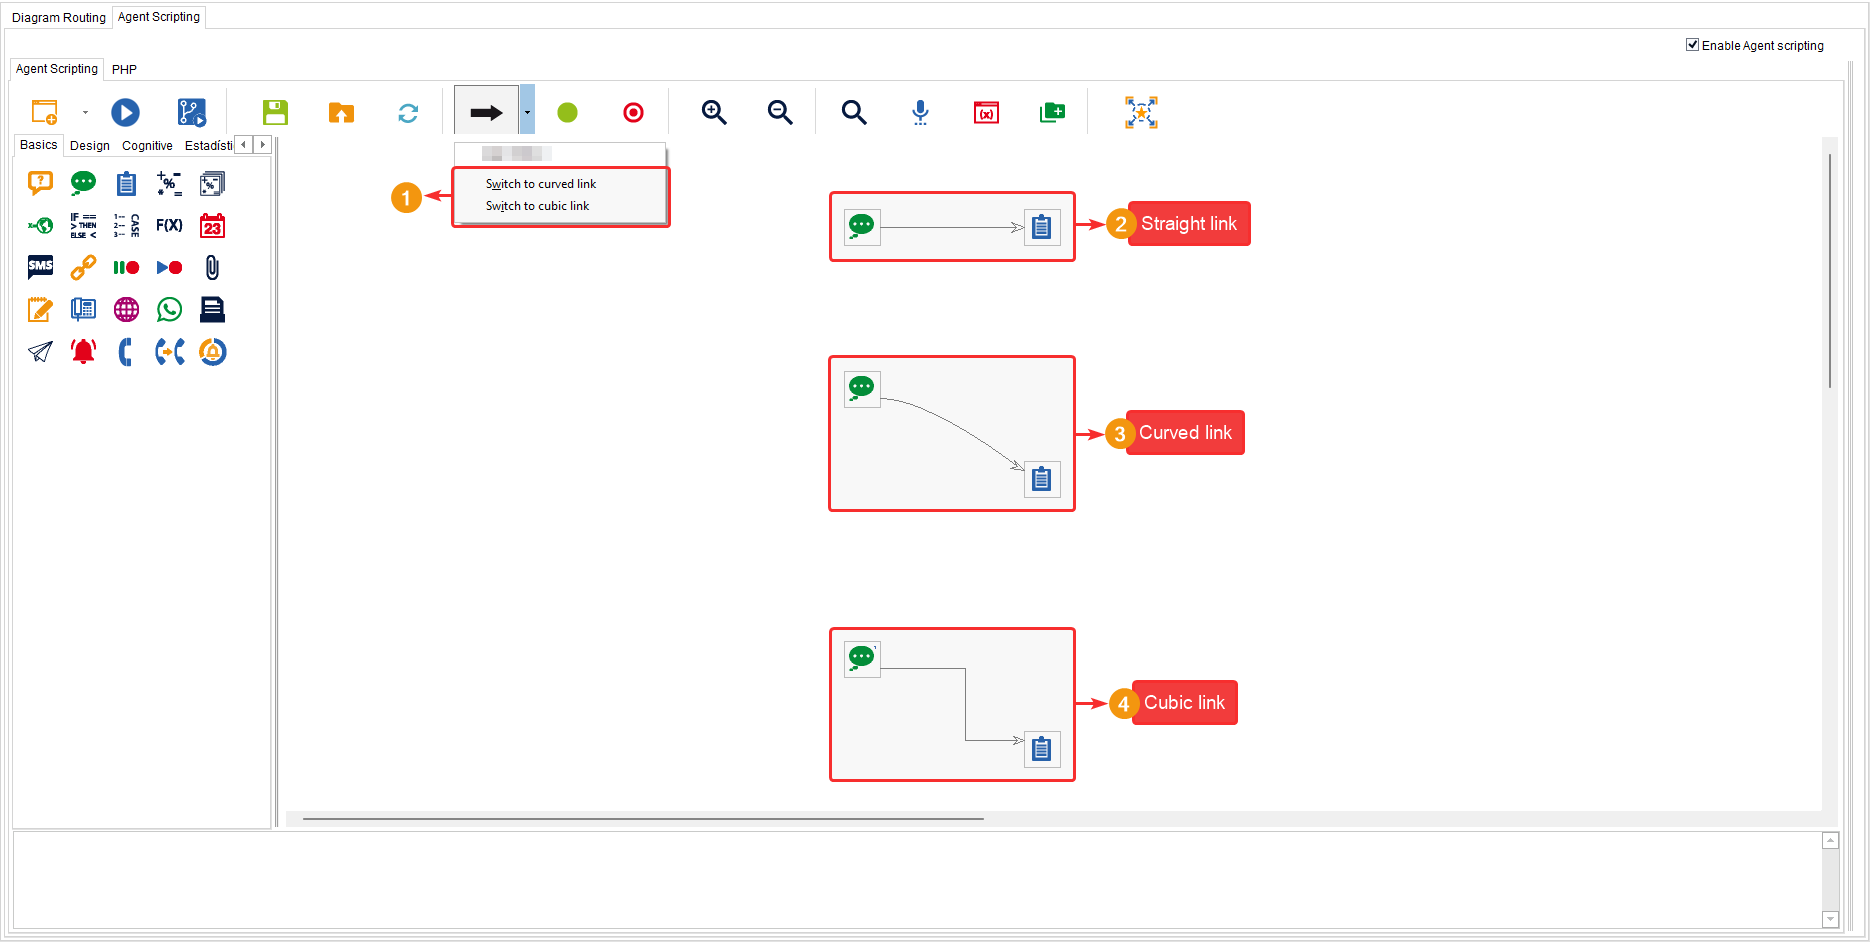
Link

This button allows you to draw an arrow on the flow canvas in order to connect the components. There are three types of connectors: “straight”, “curved”, and “cubic”. The arrow you see in the image is a “straight connector”. By default, this type of connector is activated. Through this arrow, the system determines the path that the customer should follow based on the design of the flow you are creating.
To draw a line, you can left-click on the arrow button and then left-click and hold on the canvas to draw the desired line. You can draw the line if you only want to draw it and connect the components later. Additionally, you can left-click on a component, already having selected the arrow, and drag the arrow to the other component you want to connect it with.

Note: In its dropdown menu, it allows you to switch to curved, cubic, or straight connector.
Similarly, you can create breakpoints in the lines to change the direction of the arrow freely. You can do this by right-clicking on the points where you need to create the breakpoint in the line.
In the example of the image below, the straight connector tool has been selected, and the desired breakpoints in the line have been created.

Start

This component allows you to mark or indicate the beginning of the diagram.
Note: It is important to note that there can only be one component of this type in the flow design.

End

This component allows you to mark or indicate an endpoint of the route you are constructing.
Note: You can add more than one component of this type.

Zoom In

This button allows you to zoom in on the canvas to view it in large size.

Zoom Out
![]()
This button allows you to zoom out on the canvas to view it in a smaller size.

Search
This button allows you to search for components that contain the word or value you enter in the search field.
The components found that contain the searched values will be highlighted in blue.

If you right-click on any of the search results, you can open the configuration of the found and selected component to change any of its options.
Audio tool
![]()
Allows you to open the audio tool window in wolkvox Manager, which enables you to record an audio, upload an audio file, or upload an audio file to wolkvox servers publicly to obtain a file URL.
In the “Upload Audio” tab you can upload an audio file that you have stored on your computer. The file format should be WAV or GSM and it should be monophonic at 16 bits and 8Khz sampling frequency.
- In the “Rec Audio” tab you can record your audio files directly in Wolkvox Studio, which allows you to generate the file in the appropriate format.
- Define a name for the audio to be recorded.
- Click on the circle to start recording.
- Click on the square to stop recording.
- Click on the “play” button to play the recording you just made.
- Click on the arrow pointing upwards to upload the audio you just recorded if it has turned out as you wanted it to.
Variables

This button allows you to open a pop-up window where all the variables that can be used in Agent Scripting are displayed. Through these variables you can deliver more personalized information, since by prefixing the dollar sign “$” to the variable name, the system will place the respective value assigned to the variable.
For example, the variable “$operation” delivers the name of the operations center you are in; or there is also the variable “$id_agent” which delivers the current agent’s extension number.
Note: In simple terms, a variable is like a special container that stores important information about customers, agents, and any other important data in the contact center. We can use it in the call and contact center software to display or store that information and use it when we need it.
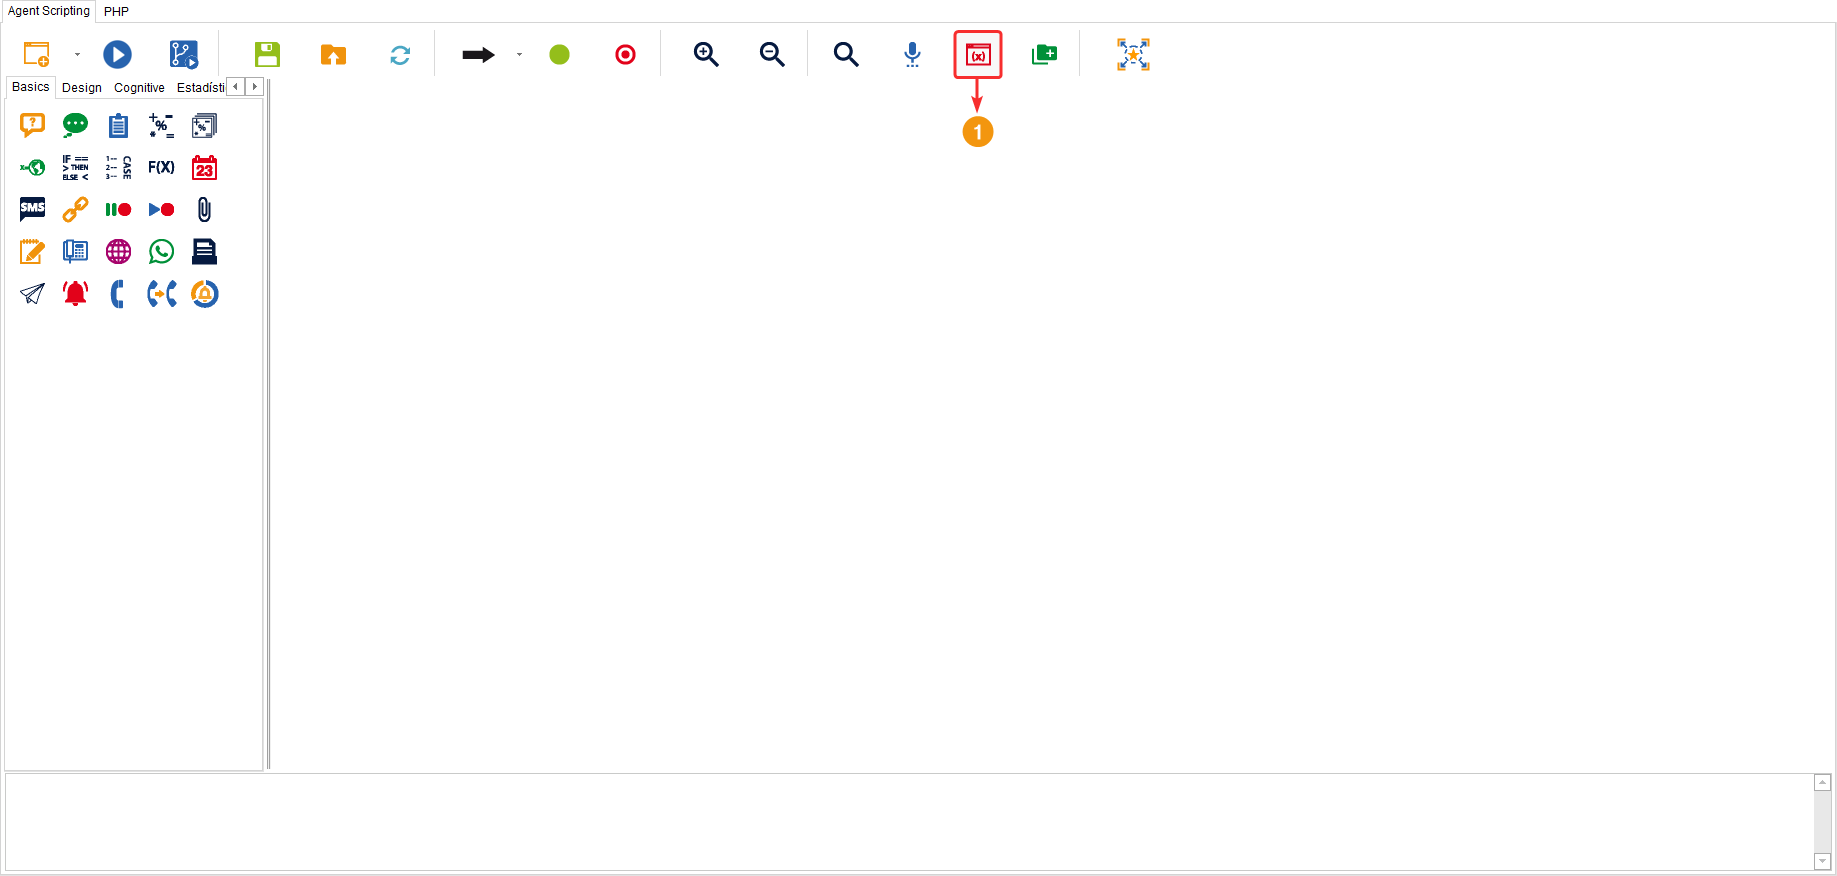
Diagram Backups

Allows you to view the backups that have been created. Remember that flow backups are made once you click the compile button but no compilation errors appear.
The backup table has the following columns:
User: Name of the user who compiled the flow.
Date: Date and time of backup creation.
Production: Indicates whether the flow is in production or not.
Workstation: Name of the workstation from which the flow was compiled.
wolkvox Studio Version: Displays the version of wolkvox Manager in which the flow was compiled.
Note: If you double left-click on one of the backups you have, the flow design will open as it was in the backup. Also, if you right-click, the option to delete the selected backup will appear.
Examples

This tool functions like a forum where you can create examples of scripting flows, request specific ones based on your requirements, and also rate them to get an idea of how helpful the generated example is for contact centers.
- To add the current flow as an example to the forum, you need to provide a title and a description.
- In the “Language” section, select the language in which the flow is designed. Click on “Publish” to publish the example on the forum, and “Refresh” to update the list of examples.
If you right-click on any listed example in the lower table, you will have the following options.
- You can rate an example using a rating system from 1 to 5 stars by selecting the “Rate this example” option.
- You can request a new example if you select the option “Request a new example”. By clicking on this option, a popup window will open where you have a text field in which you can write the request for the example you need. Click on “Request example” to submit the described example request.
- You can delete an example by clicking on the “Delete example wolkvox Studio” option.

Compile Log
In this section, you can view the compilation result of the flow. A successfully compiled flow should display the following message: “wolkvox studio: No syntax errors detected.”

