 Basic configuration requirements for the workstation #
 Basic configuration requirements for the workstation
 wolkvox Agent or Agentbox is a desktop application, and therefore the following minimum conditions are required
Important: these basic configuration requirements also apply to Wolkvox Manager.
- Operating System: Windows (versions 8.1 – 10). 64-bit architecture.
- 64-bit architecture.
- The output to the Wolkvox platform must be through a static IP, as UDP protocol does not recommend any type of load balancing on the network.
- The computer’s suspension time must be set to greater than 1 hour to avoid connection failures between the agent’s computer and the platform. For example, when the agent goes into lunch status for 30 minutes.
- Create an exception in your antivirus for each Wolkvox application so that the antivirus does not scan any files installed belonging to the Wolkvox applications. It is very important that you follow this recommendation to prevent the antivirus from deleting any installation files.
- Workstations must have write permissions on the LOCAL DISC C, as eventually the Wolkvox platform performs some type of update, which implies that a new DLL will be downloaded to the path, C:\ipdialbox.
- The workstation must always be connected to the Internet via a wired connection. It is not recommended that the computer be connected to the Internet through wireless networks.
- To achieve optimal quality in call playback and recording and in customer interaction, we recommend that agents have dedicated professional headsets for call center services with USB connection.
- The optimal screen size required to ensure correct display of functionalities should be 1366×768 or higher.”
Glossary of Terms #
Before starting to read the following documentation, it is recommended to read the glossary of terms in order to have a better context of the situations presented. To see the glossary of terms, click here.
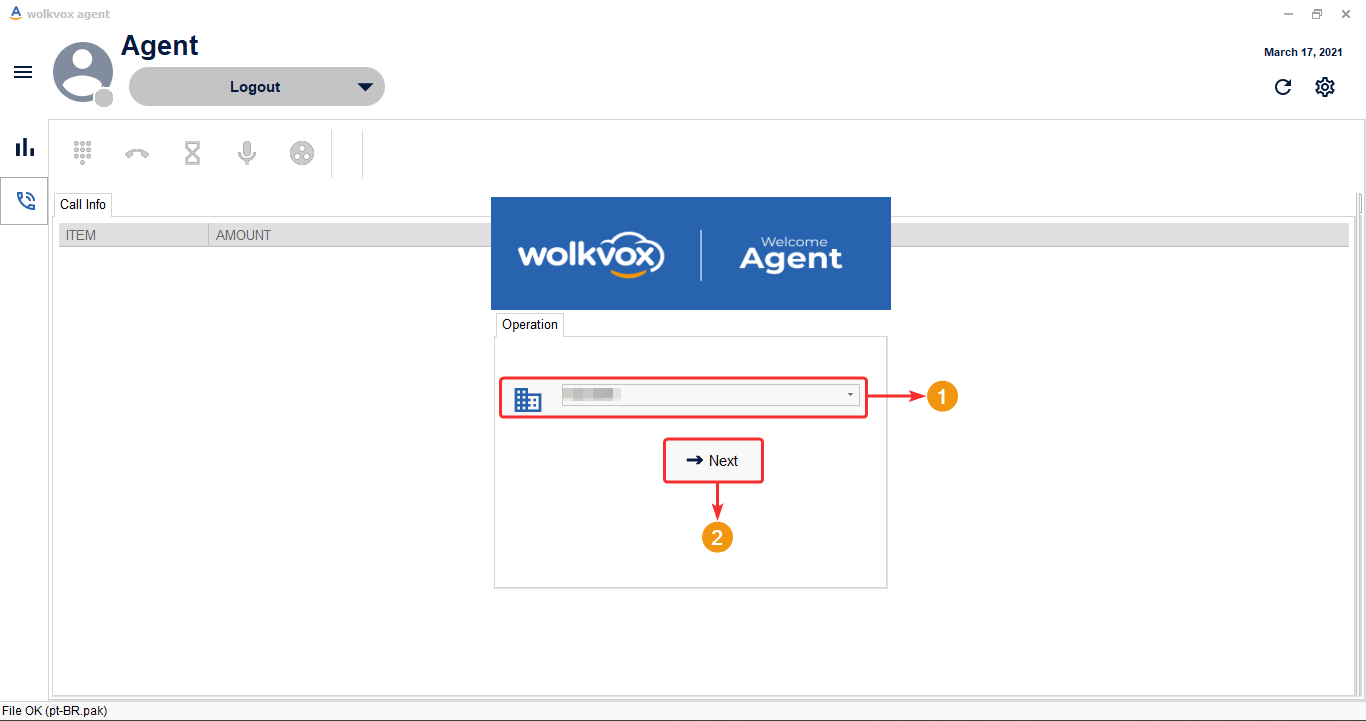
Access the AgentBox application #
Firstly, you must enter the name of your operation or module. If you don’t know the name of the operation or module, you should consult with the responsible persons for your process.
Note #1: If the name of the operation is misspelled, the application displays a message that the operation does not exist.
Note #2: If the page does not load or displays an error when you access it, it could be due to the situation that your connecting IP address is not allowed for access, so you should contact the support team.
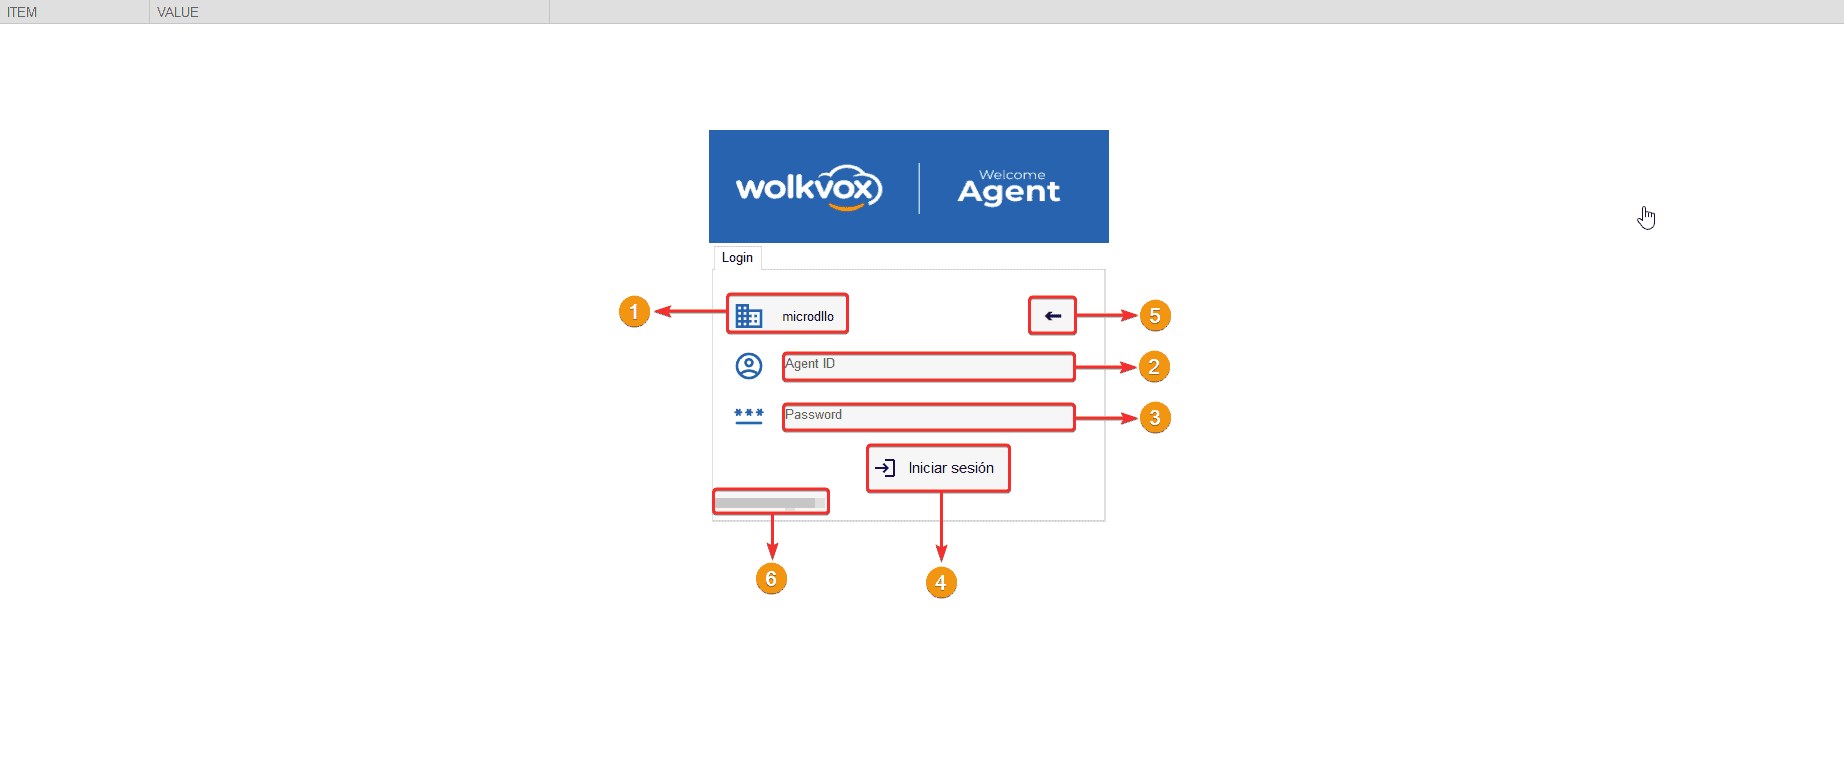
After entering the operation name correctly, the following section will appear where you will find:
- Name of the operation or module you are trying to access.
- Agent ID number.
- Agent password.
- Button to log in if the entered data is correct.
- Button to go back to the previous section and change the operation or module.
- System account name of your device.
If you try to access your account and enter the wrong password five (5) times in a row, your access will be blocked for three (3) minutes. Once this blocking time has passed, you can try to log in again. This blocking is done based on the machine and not taking into account your IP address.
Keep in mind:
- Closing and reopening the application will not unlock the button. You must wait for the blocking time to pass with the application open.
- Changing operations will not remove the temporary block.

Get to know the AgentBox interface #
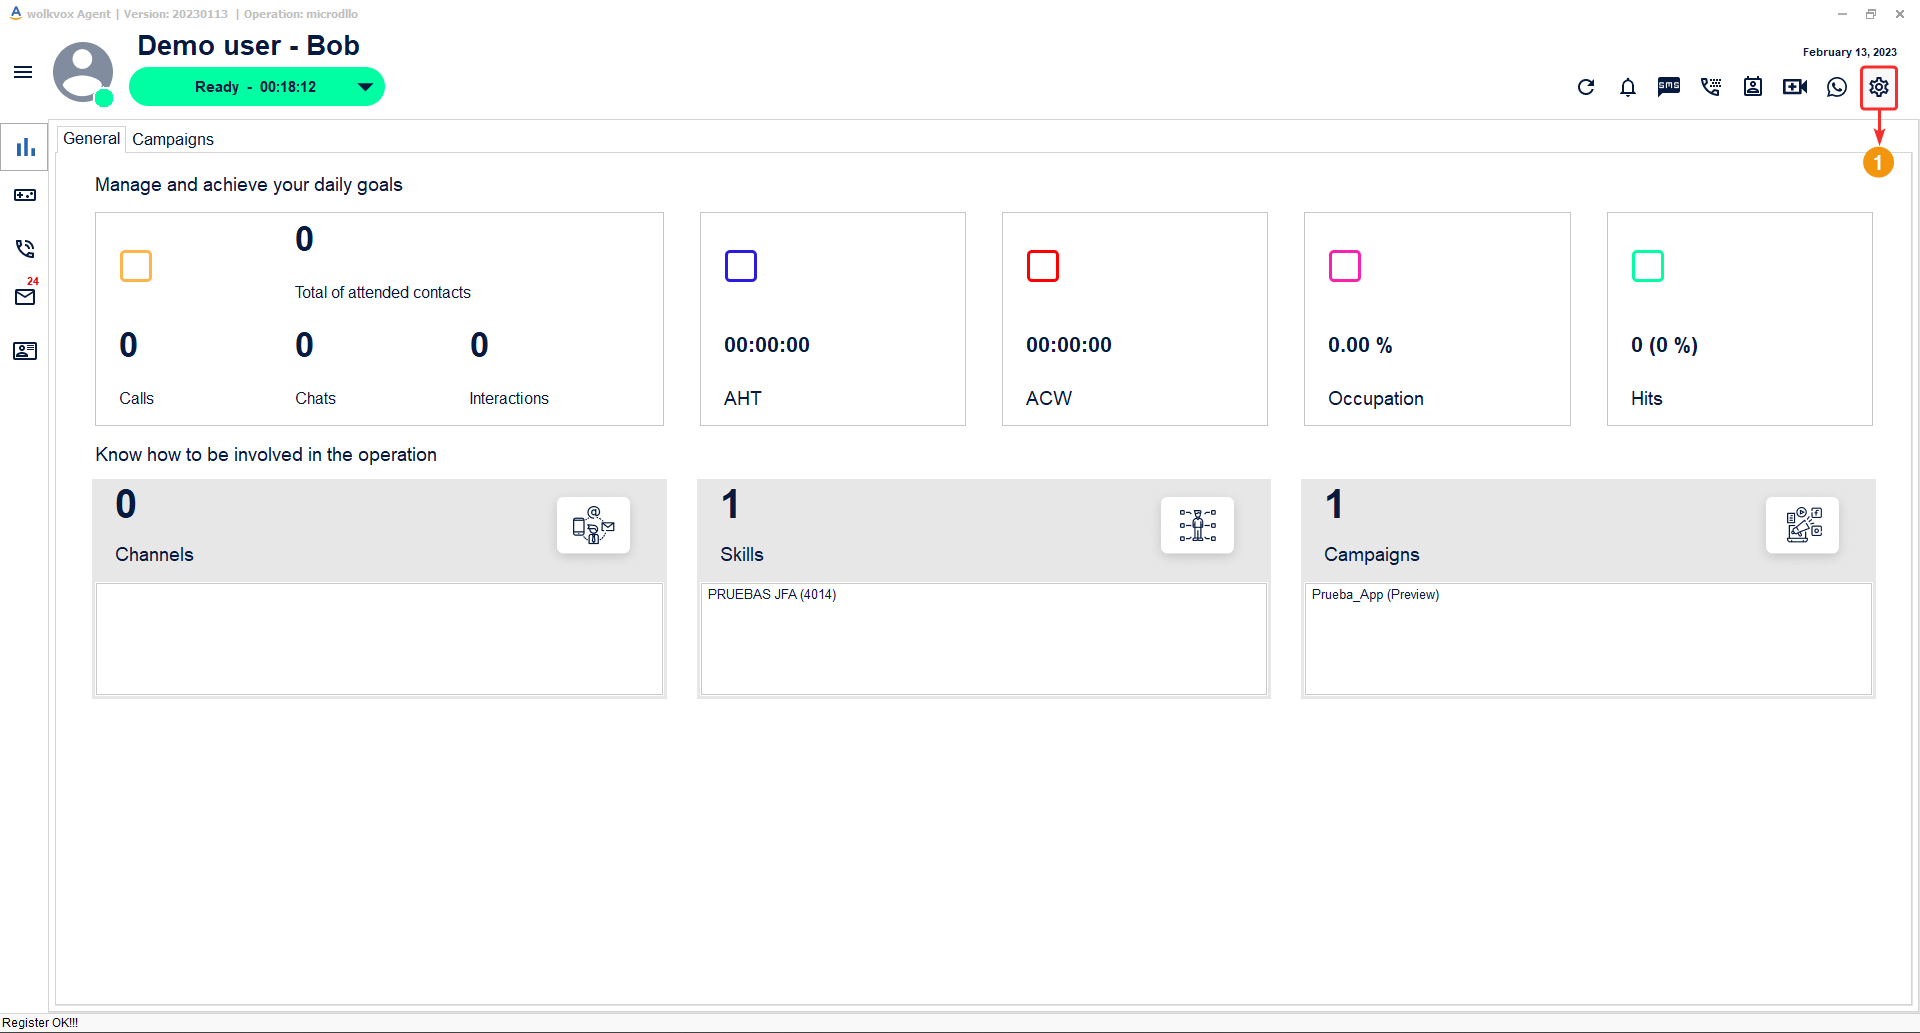
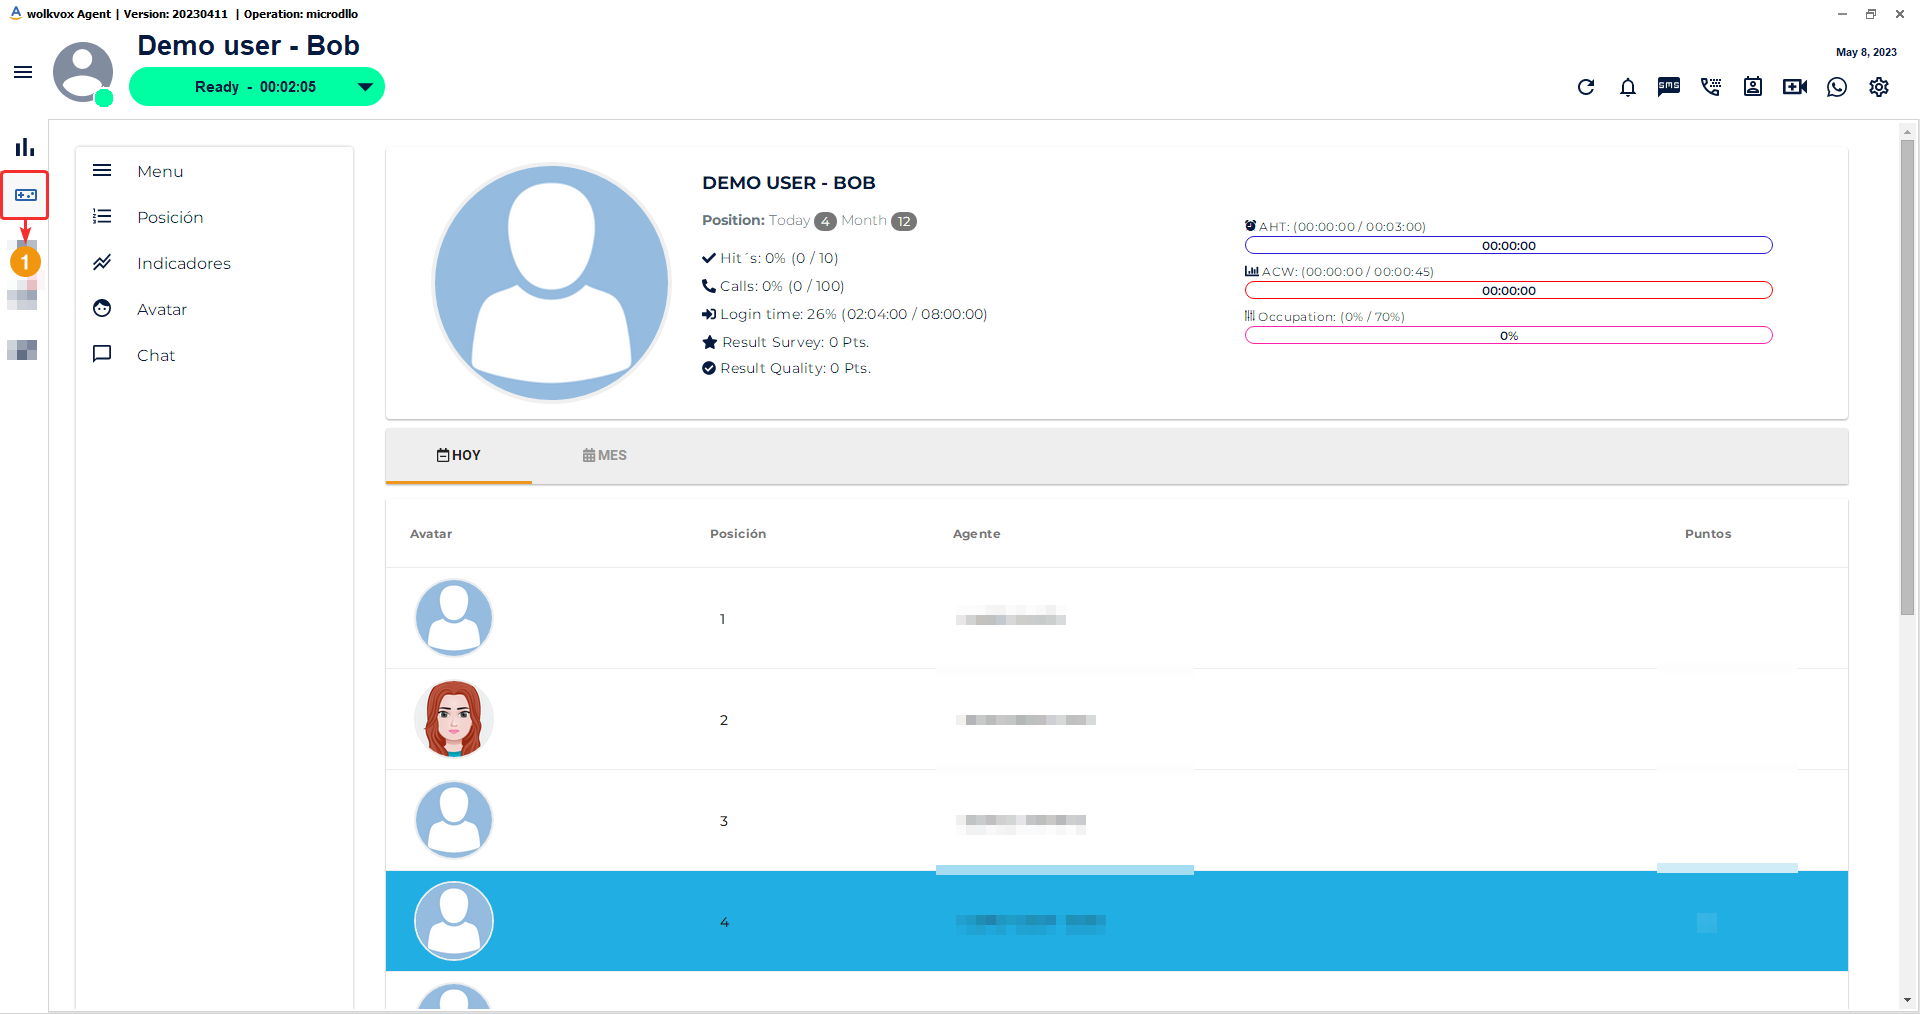
Upon entering the login credentials correctly, you will be shown the following screen.
- In this section, the name of the user who has logged in and their current state is displayed, along with the time they have been in that state.
- In the top right menu of the application, you can access multiple features such as: Reload the application, notifications, smart dialing, chat contacts, wolkvox meet, send a message via WhatsApp, and application settings.
- In the left-hand side menu of the application, you can access multiple tools such as: home page, gamification section, voice section, interactions, and wolkvox CRM.

In the center of the application, the information for each button on the left-hand side menu is displayed. The following image highlights the entire area that this section occupies.

The hamburger button allows expanding the buttons of the left-hand side menu to see their respective label.

General information about the agent. #
- In the following image, you can see the section for general information about the agent, where you can view the agent’s name, the color used to identify the agent’s current status, the time elapsed since the start of the current status, and the button to view and modify the current status. Within the button that allows modifying the current agent status, the time elapsed since the agent started the current status is displayed.
- The agent’s profile picture displays a circle with the respective color of the current status.

Agent Status Types #
Each state has its own color and meaning, below we explain each type of state:
 |
The “Ready” or available state means that the agent is free and ready to receive or make a call. This state is identified by the color green. |
 |
The “ACW” or After Call Work state means that the agent is in the process of classifying a call, that is, the agent after having spoken with a client must proceed to document the most important aspects of the process. After a call, the “ACW” state is automatically activated and does not change to “Ready” until the agent has coded the call. This state is identified by the color red. |
 |
The “Logout” state means that the agent has disconnected from the platform. This state is identified by the color gray. |
 |
The “Auxiliary States” state means that the agent is in a specific process that is different from productive processes. The agent’s supervisor is responsible for creating each auxiliary state. For example, within “Auxiliary States” there can be one or several elements such as: break, training, breakfast, lunch, dinner, bathroom, active pause, among others. |
 |
The “Talk” state means that the agent is busy on a call. After finishing talking to a client, this state automatically changes to the “ACW” state for the agent to classify the call. This state is identified with the color purple. |
Basic settings #
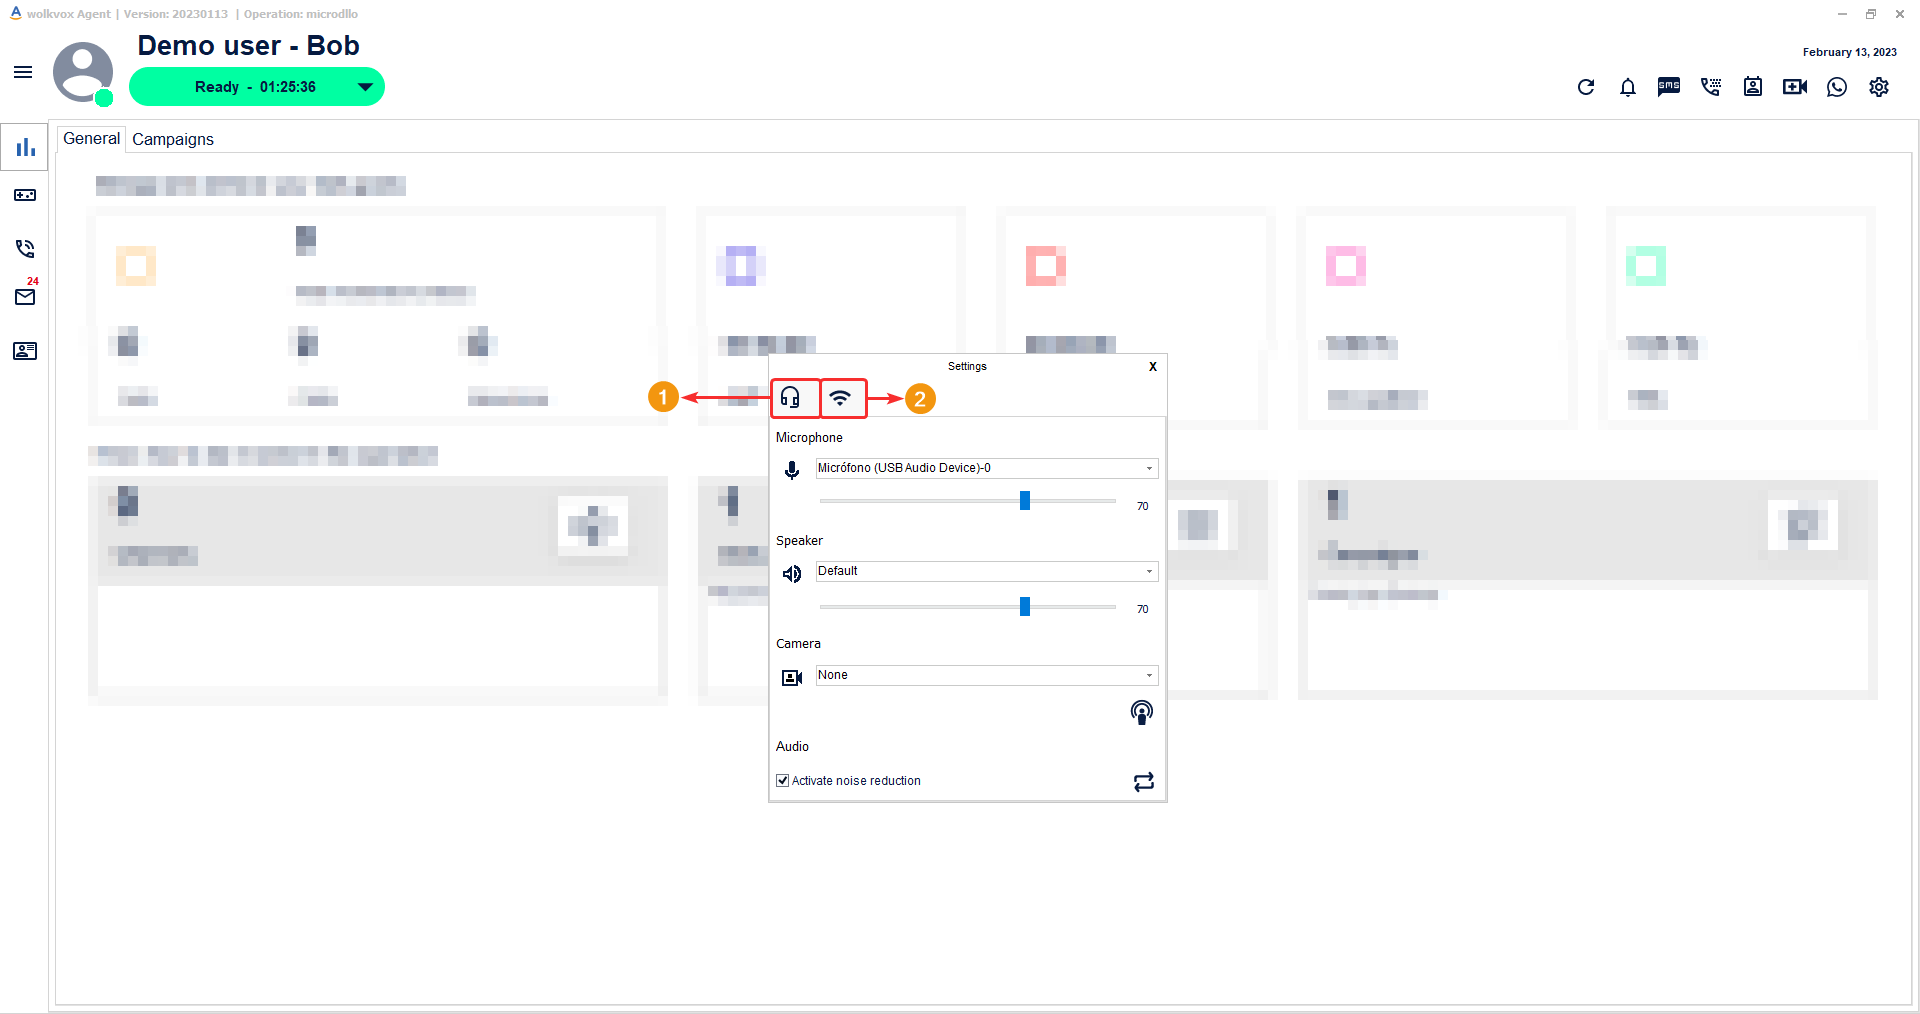
The settings button allows you to access the settings for audio devices, microphone, camera, and network connection.
The following are the two tabs you can access: the first one is “audio settings” and the second one is “internet connection properties”.
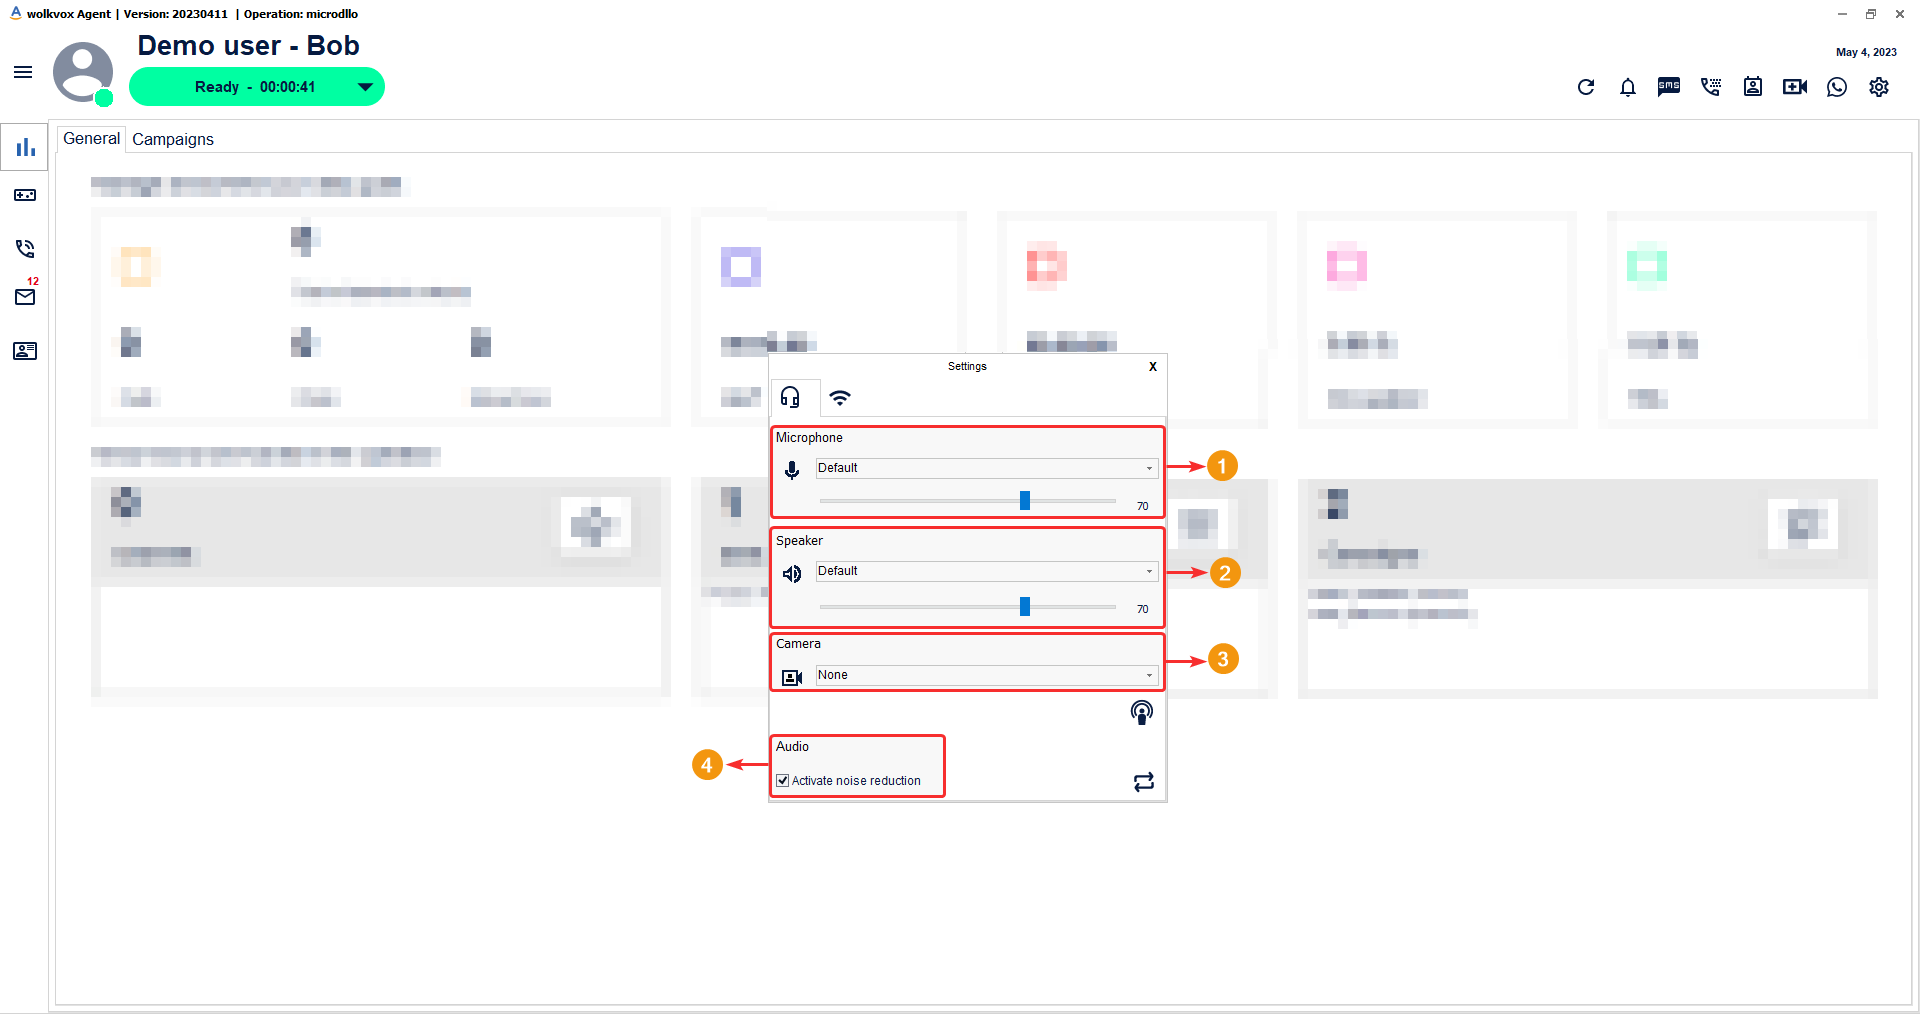
Audio settings #
- The first option you can configure is the microphone (device by which the system captures the agent’s audio). If you click on the microphone selection arrow, a drop-down menu opens where you can choose the preferred device. In this same “Microphone” option, you have the possibility to increase or decrease the volume or sound level. Move the blue dial until you find the desired level.
- The second option in this device tab is “Speaker”. Here, just like with the previous device, you will find a dropdown menu where you can select the preferred speaker where the sounds will be played for the agent. You can move the blue dial to adjust the audio level of the speakers.
- The third option is “Camera”, where you can select the webcam device through the dropdown menu. This option is only enabled if you have a video license configured.
- The last option we find is “Activate noise reduction.” This feature provides better call quality, so we recommend enabling it. (If the square is blue with a white checkmark, the noise reduction feature is enabled).
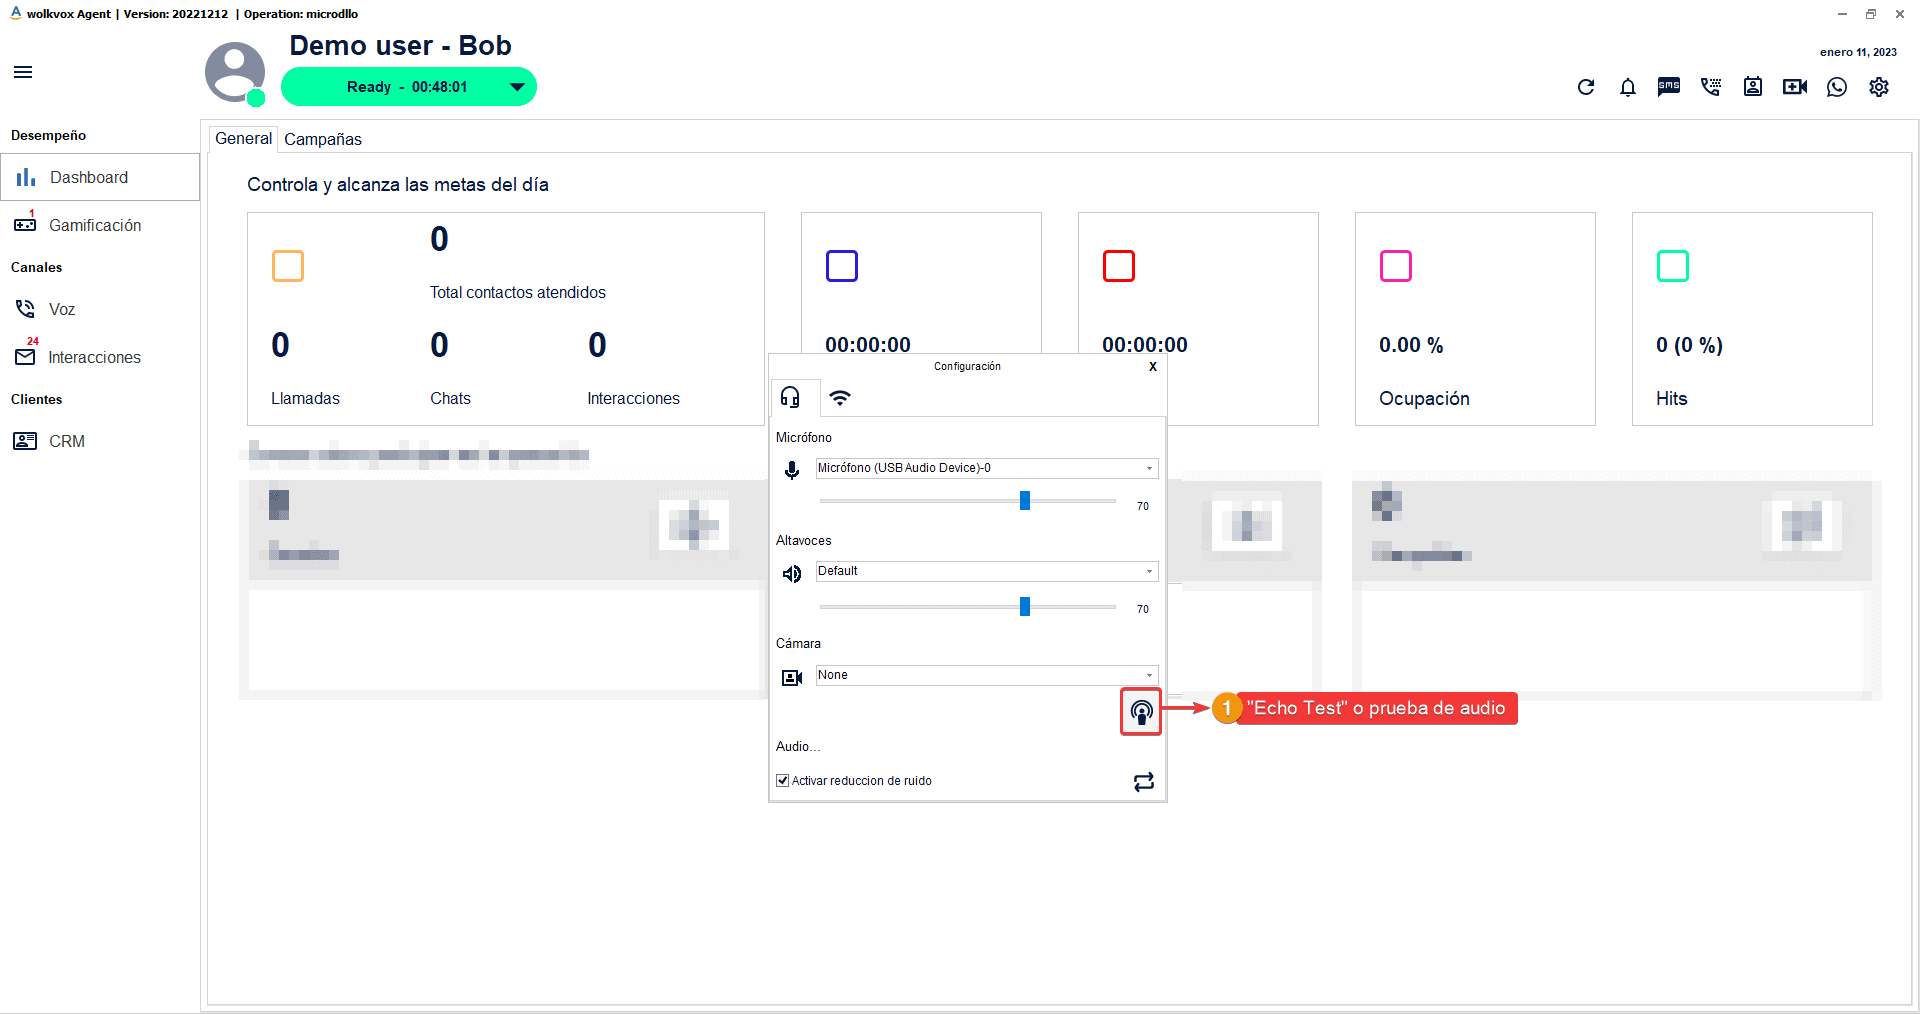
Echo Test #
Then, there’s the “Echo Test” button. The function of this button is to record 5 seconds of the agent’s voice audio so that they can hear themselves and check the audio quality of their device (microphone and speakers).
-
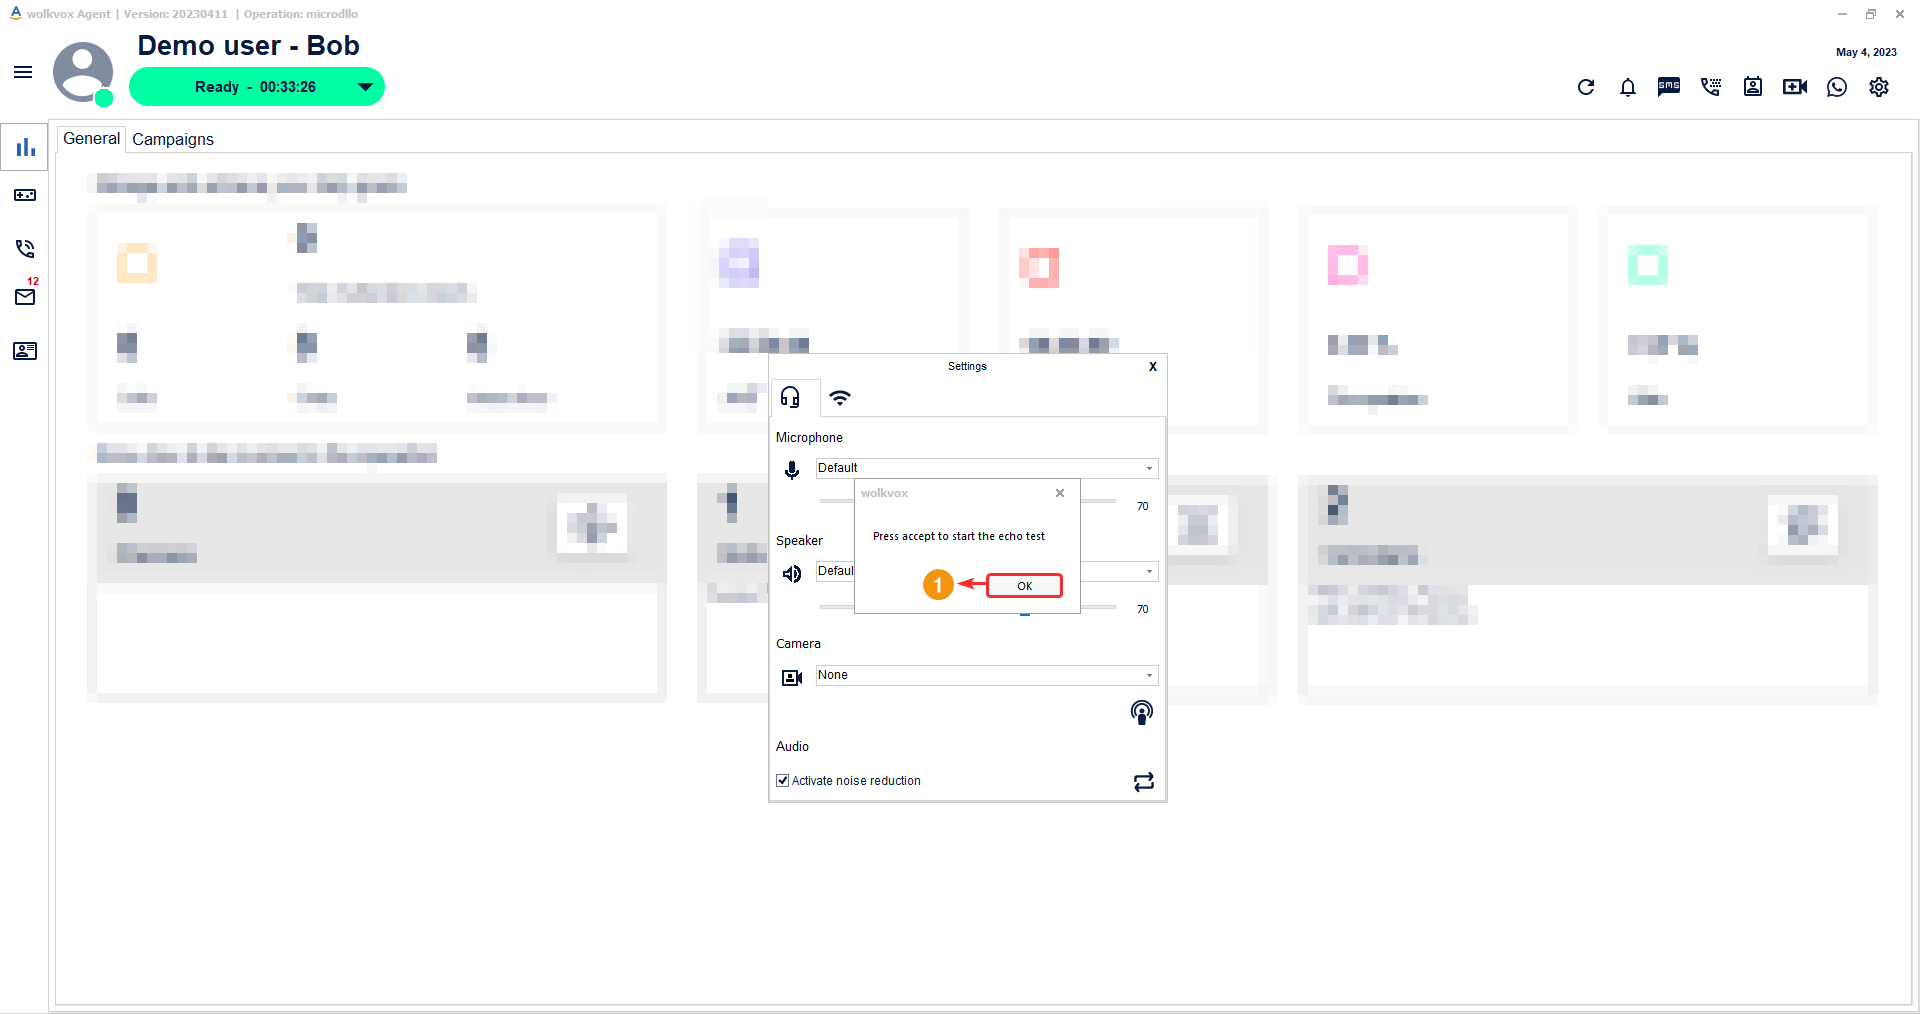
A window appears with a message saying that by clicking “Ok” the audio test will begin. Before starting the test, keep in mind that to perform a complete test, you will need to speak for 5 seconds.
The text “Audio” will appear at the bottom along with a progress bar that fills up until it reaches 5 seconds. The first 5 seconds are used for the agent to speak and for the captured audio to be saved.
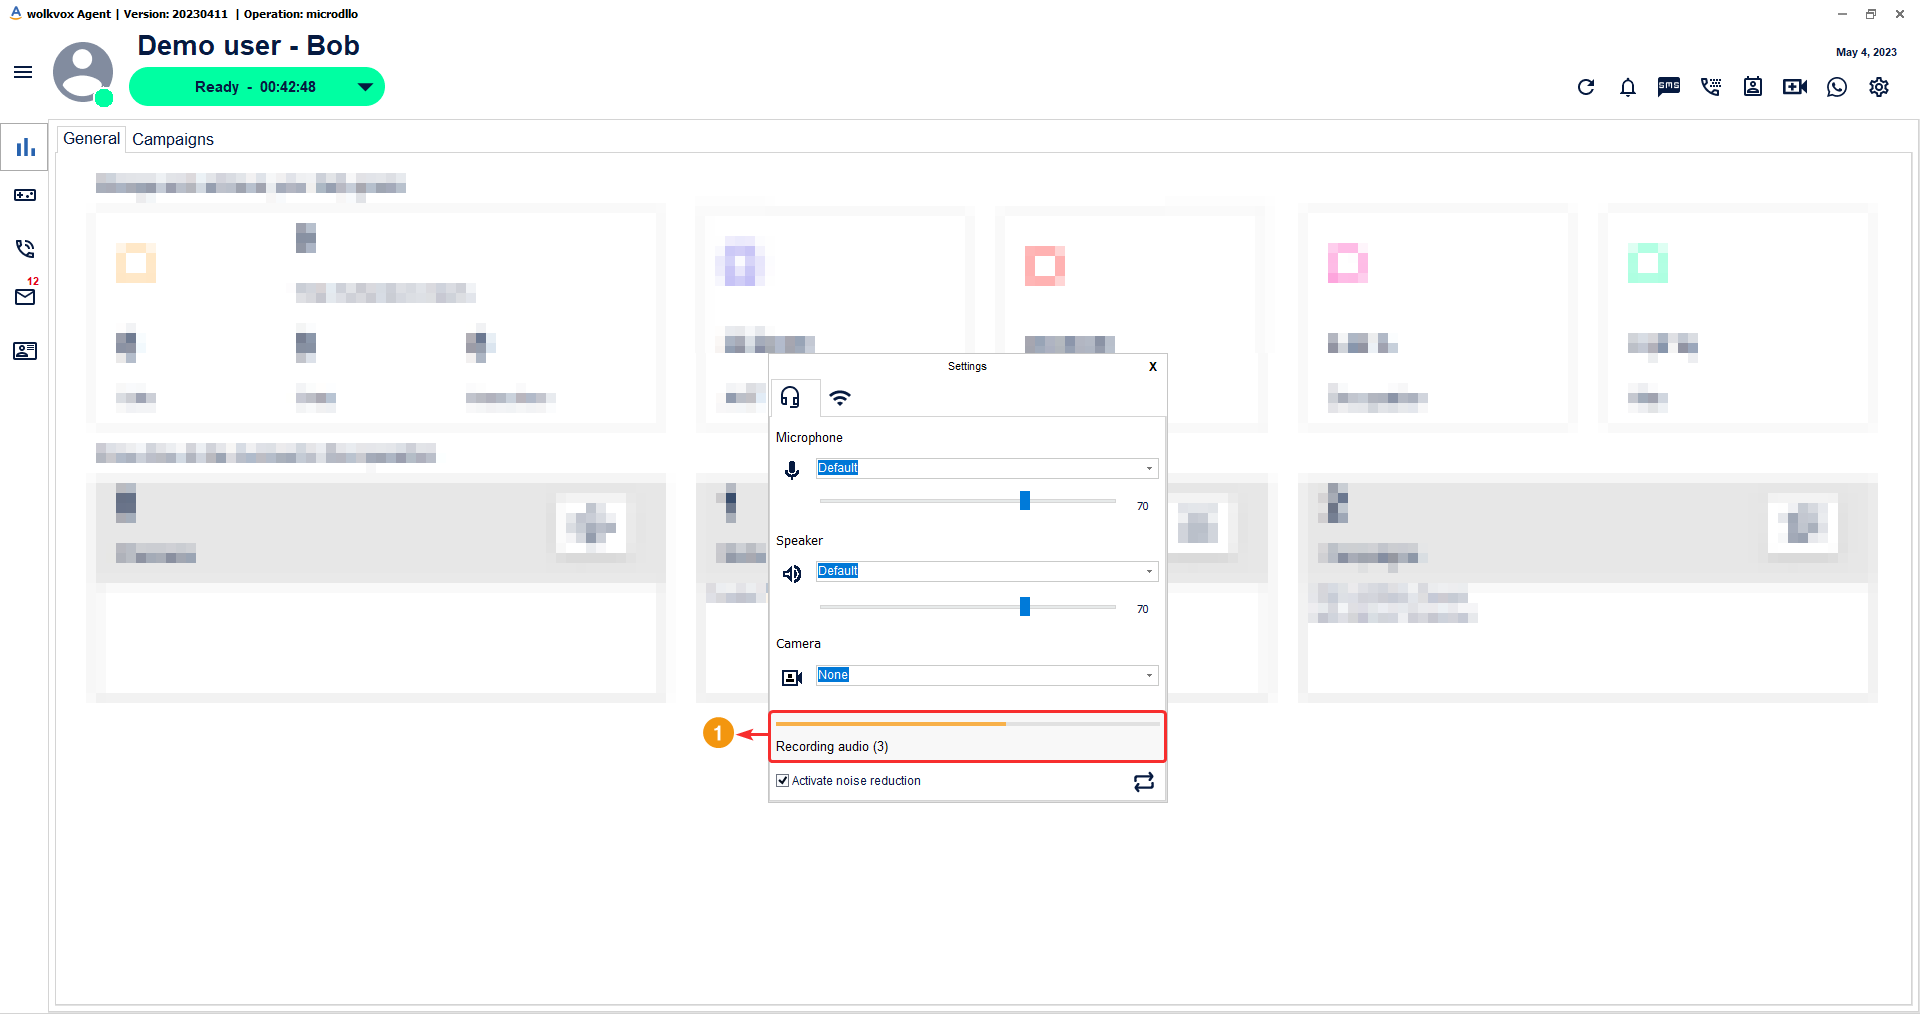
Then, the progress bar restarts but does not capture audio, instead it plays back what was recorded so that the agent can hear themselves and check the audio quality.

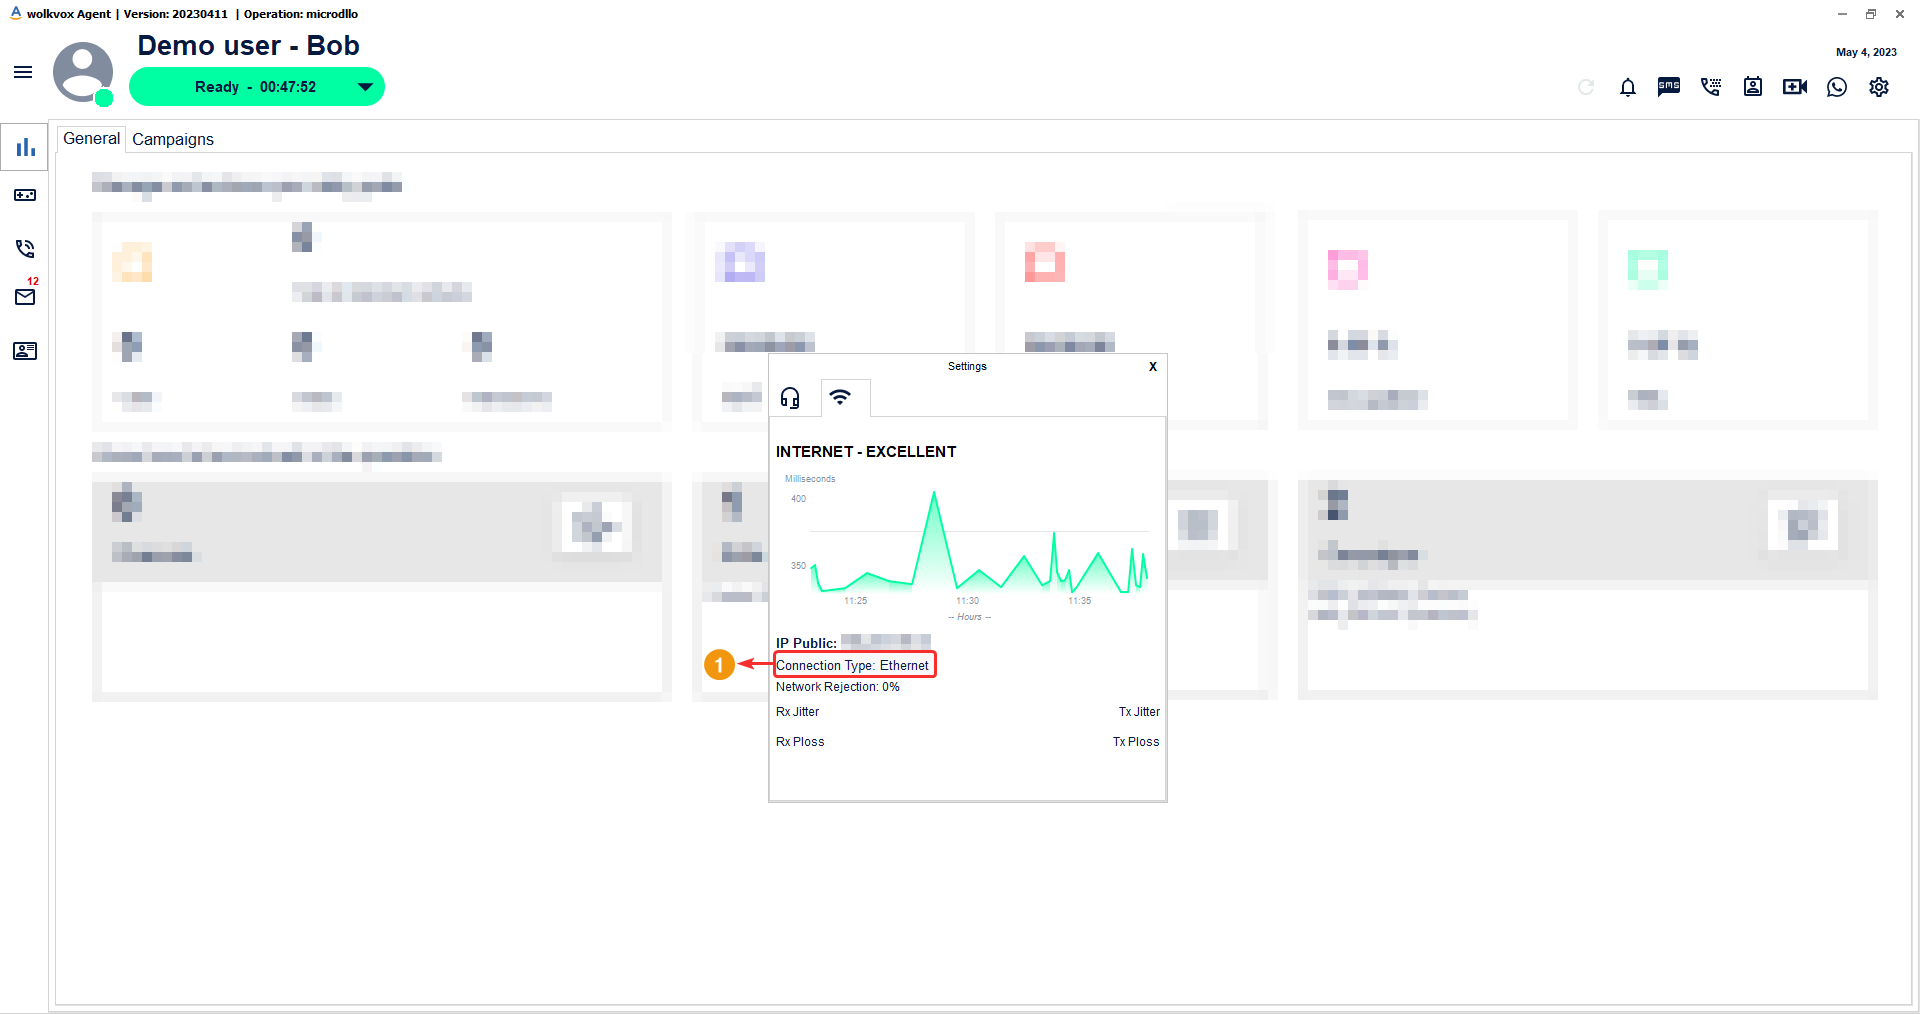
Network settings #
This tab allows you to observe the behavior of the network to which you are connected. This provides important data for network inspection and analysis.

The text at the top of the section shows what quality your internet connection currently has.
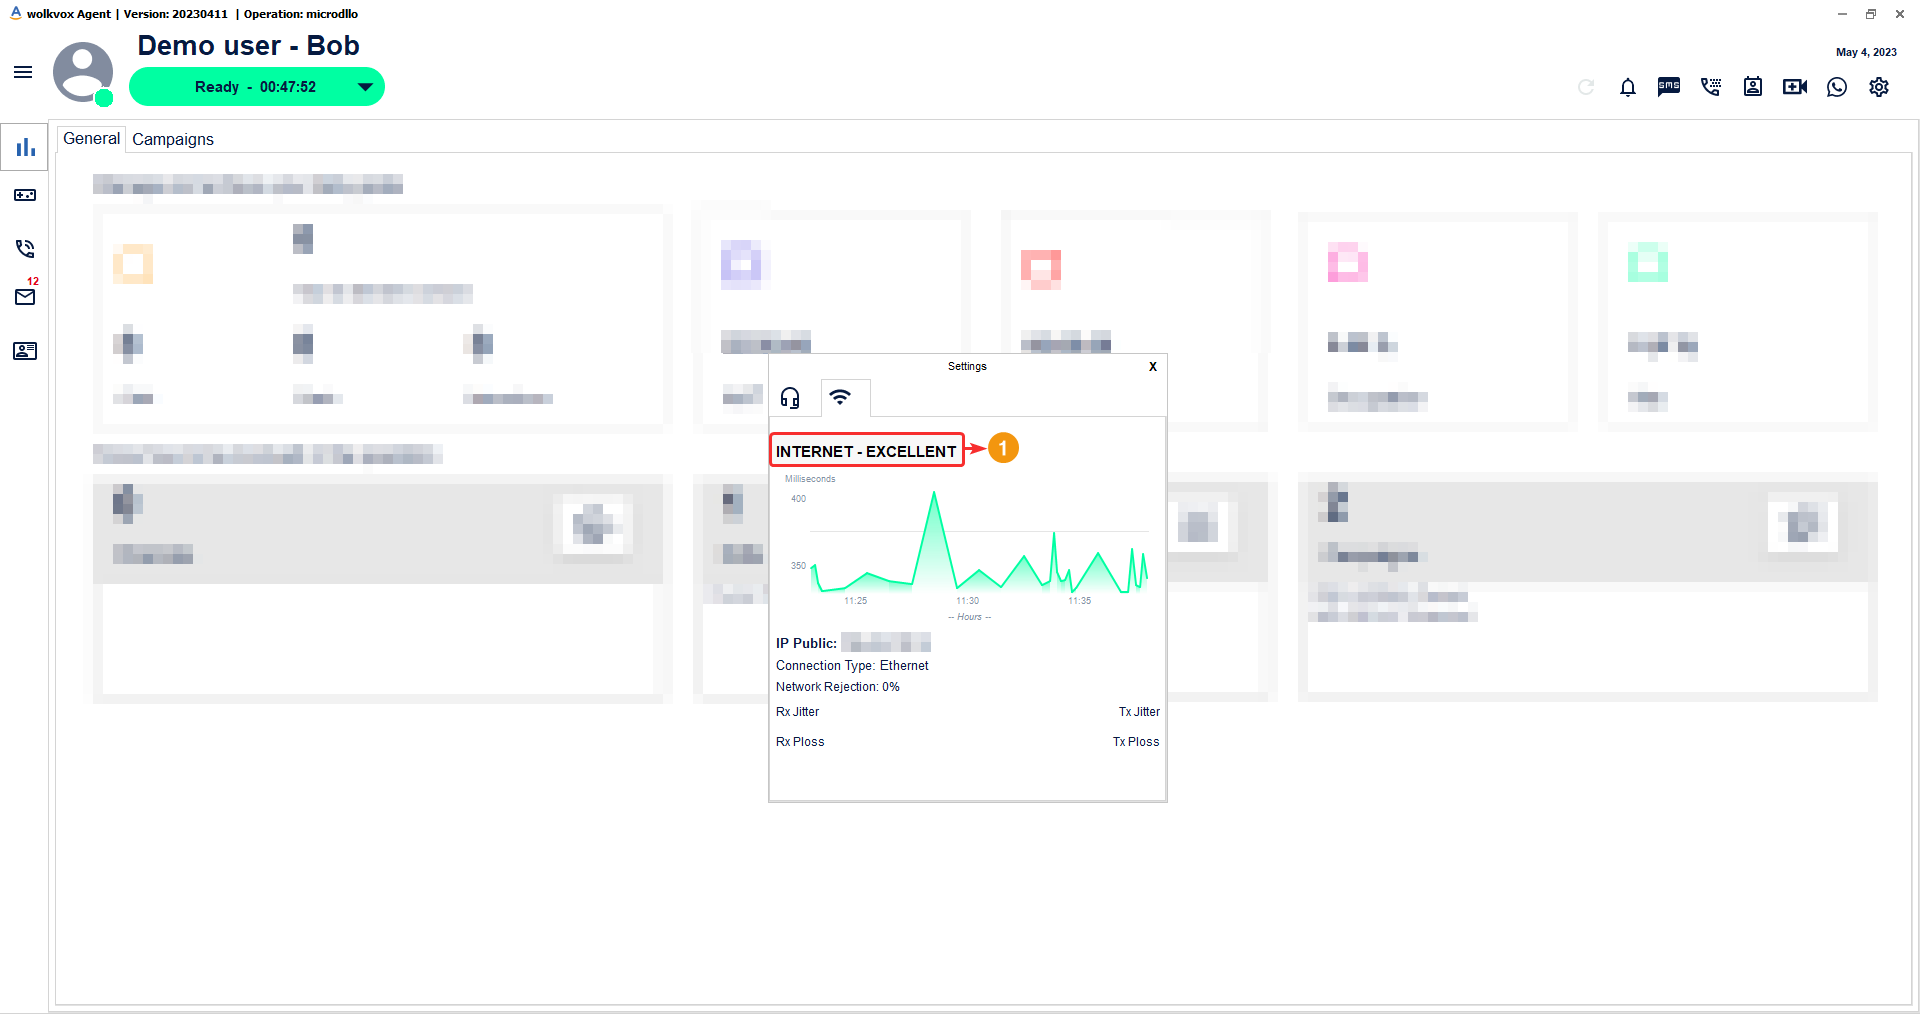
The following graph measures latency over time. The values on the left-hand side correspond to milliseconds, and the values on the bottom row correspond to hours. This graph is very important because it shows the ups, downs, and latency spikes you have had.

After the graph, you can see your public IP address.

In the next field, the type of internet connection you are connected to is detailed.
Dashboard #
The Dashboard is a board that provides a real-time daily report for the agent to be aware of how their process is going towards achieving the objectives.
The data accumulates throughout the day and the next day the data will be reset to zero.
It is divided into three tabs: general, campaigns, and chat and interactions.
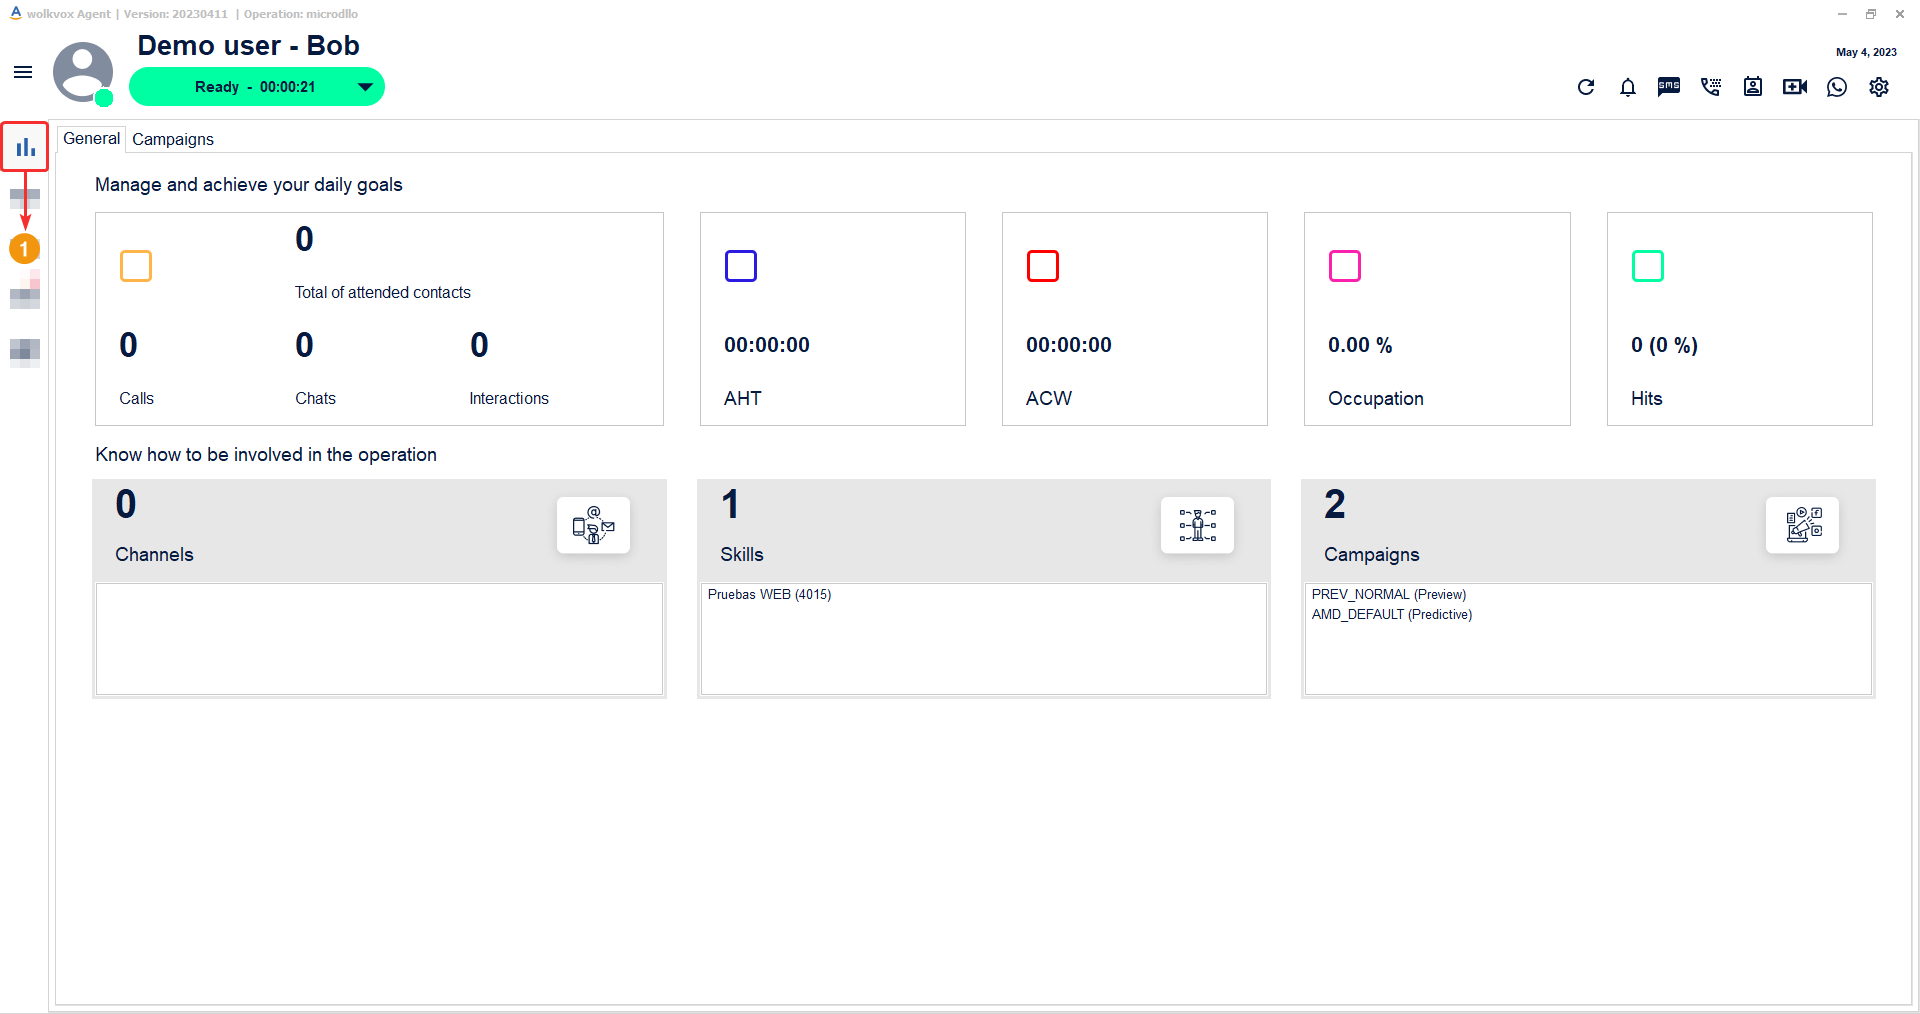
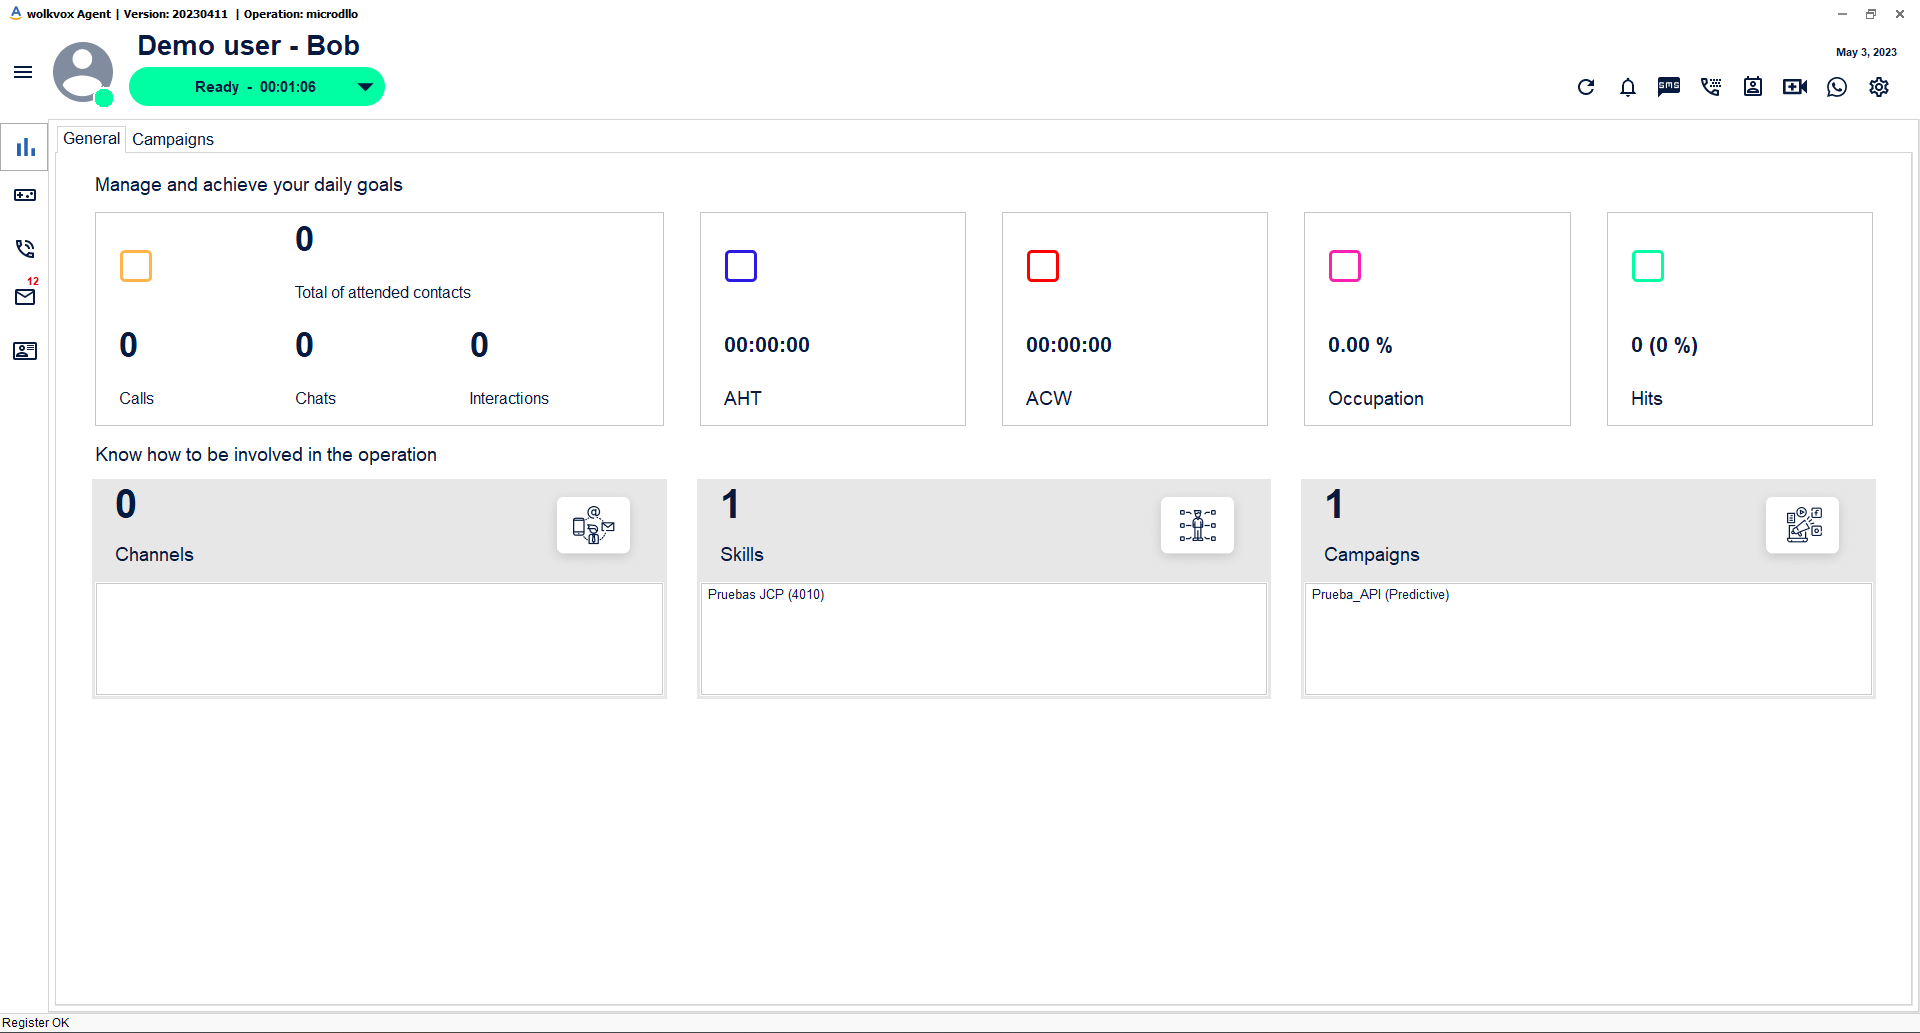
General #
In the “General” tab of the Dashboard, you can find the agent’s overall statistics. It contains two sections with several blocks which we explain below.
The first section helps the agent analyze their indicators.
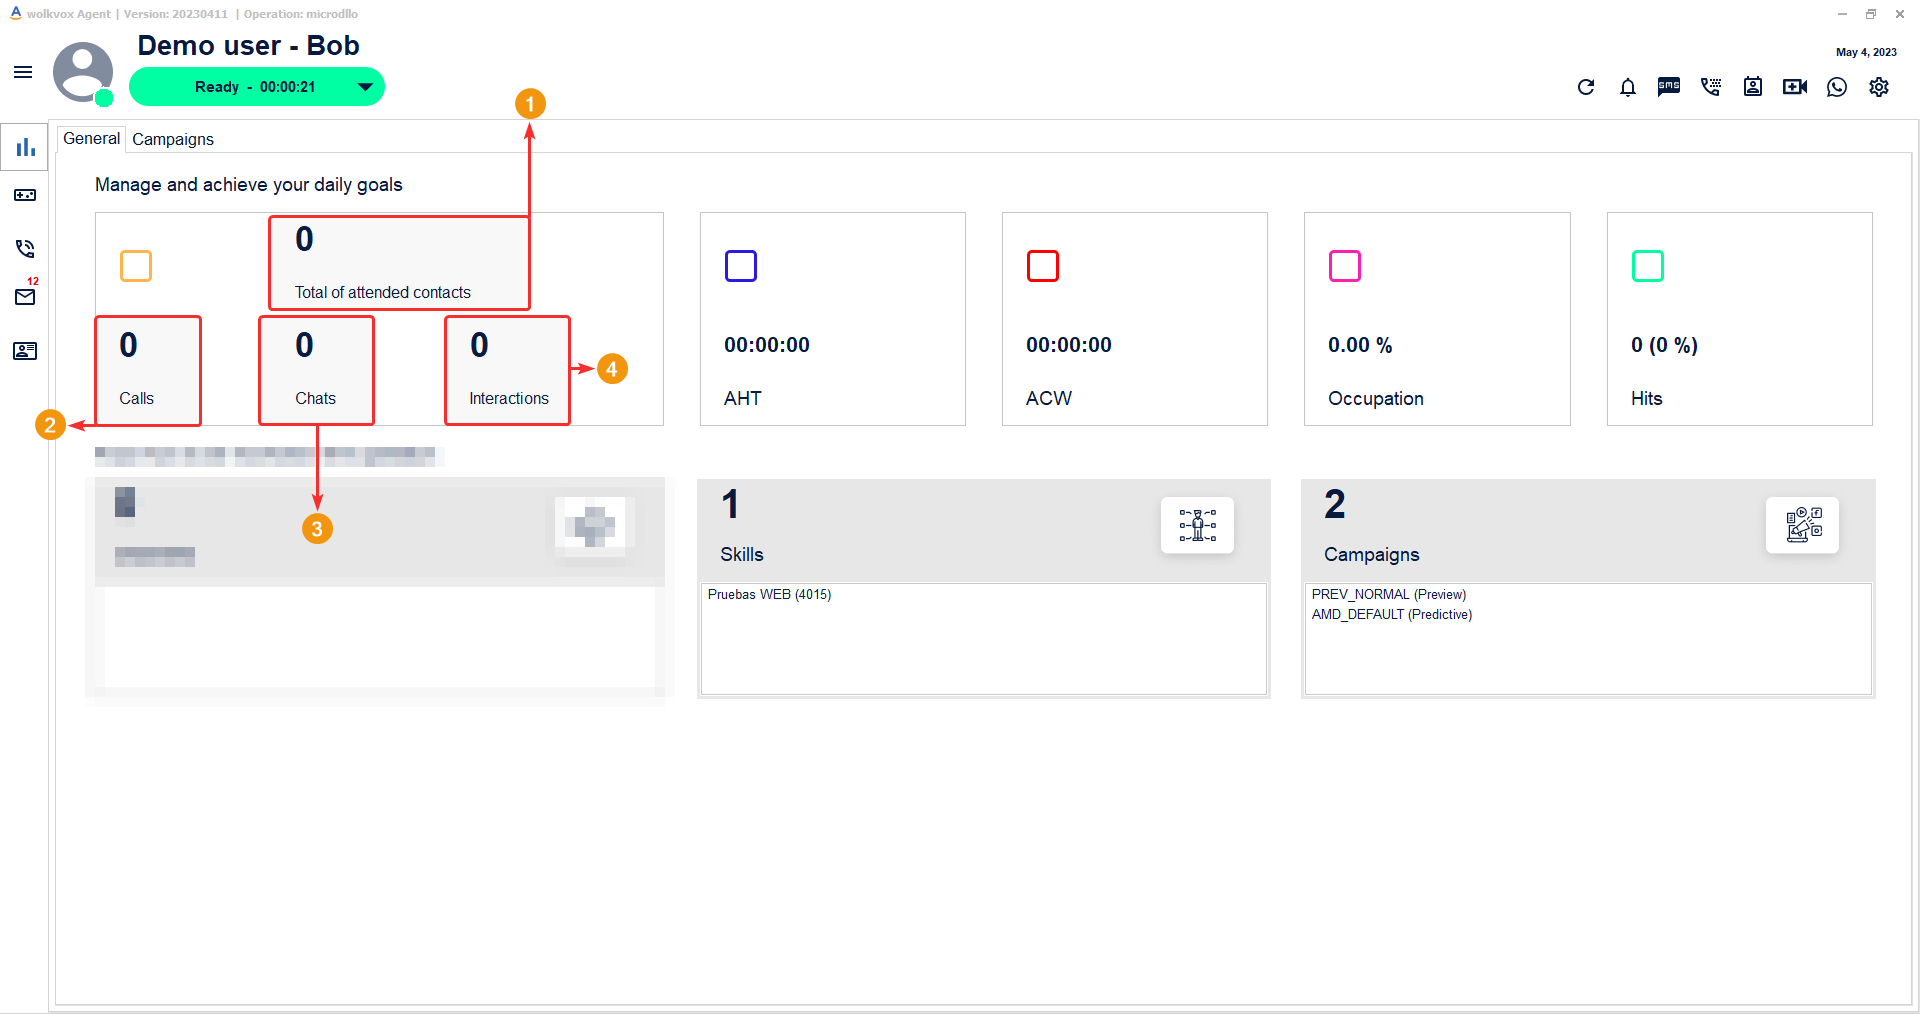
In the first block (identified with an orange square), we have the following information:
- Total contacts handled: It shows the total number of contacts that have been handled.
- Calls: It is the number of calls made so far.
- Chats started.
- Interactions: It shows the number of interactions (email and social media) that have been handled.
In the second block (identified with a blue square) you can find the AHT (Average Handle Time) statistic, which is a metric that measures the average time it takes for the agent to complete a customer interaction process. That is, from the beginning of the contact to the end of documentation or classification.
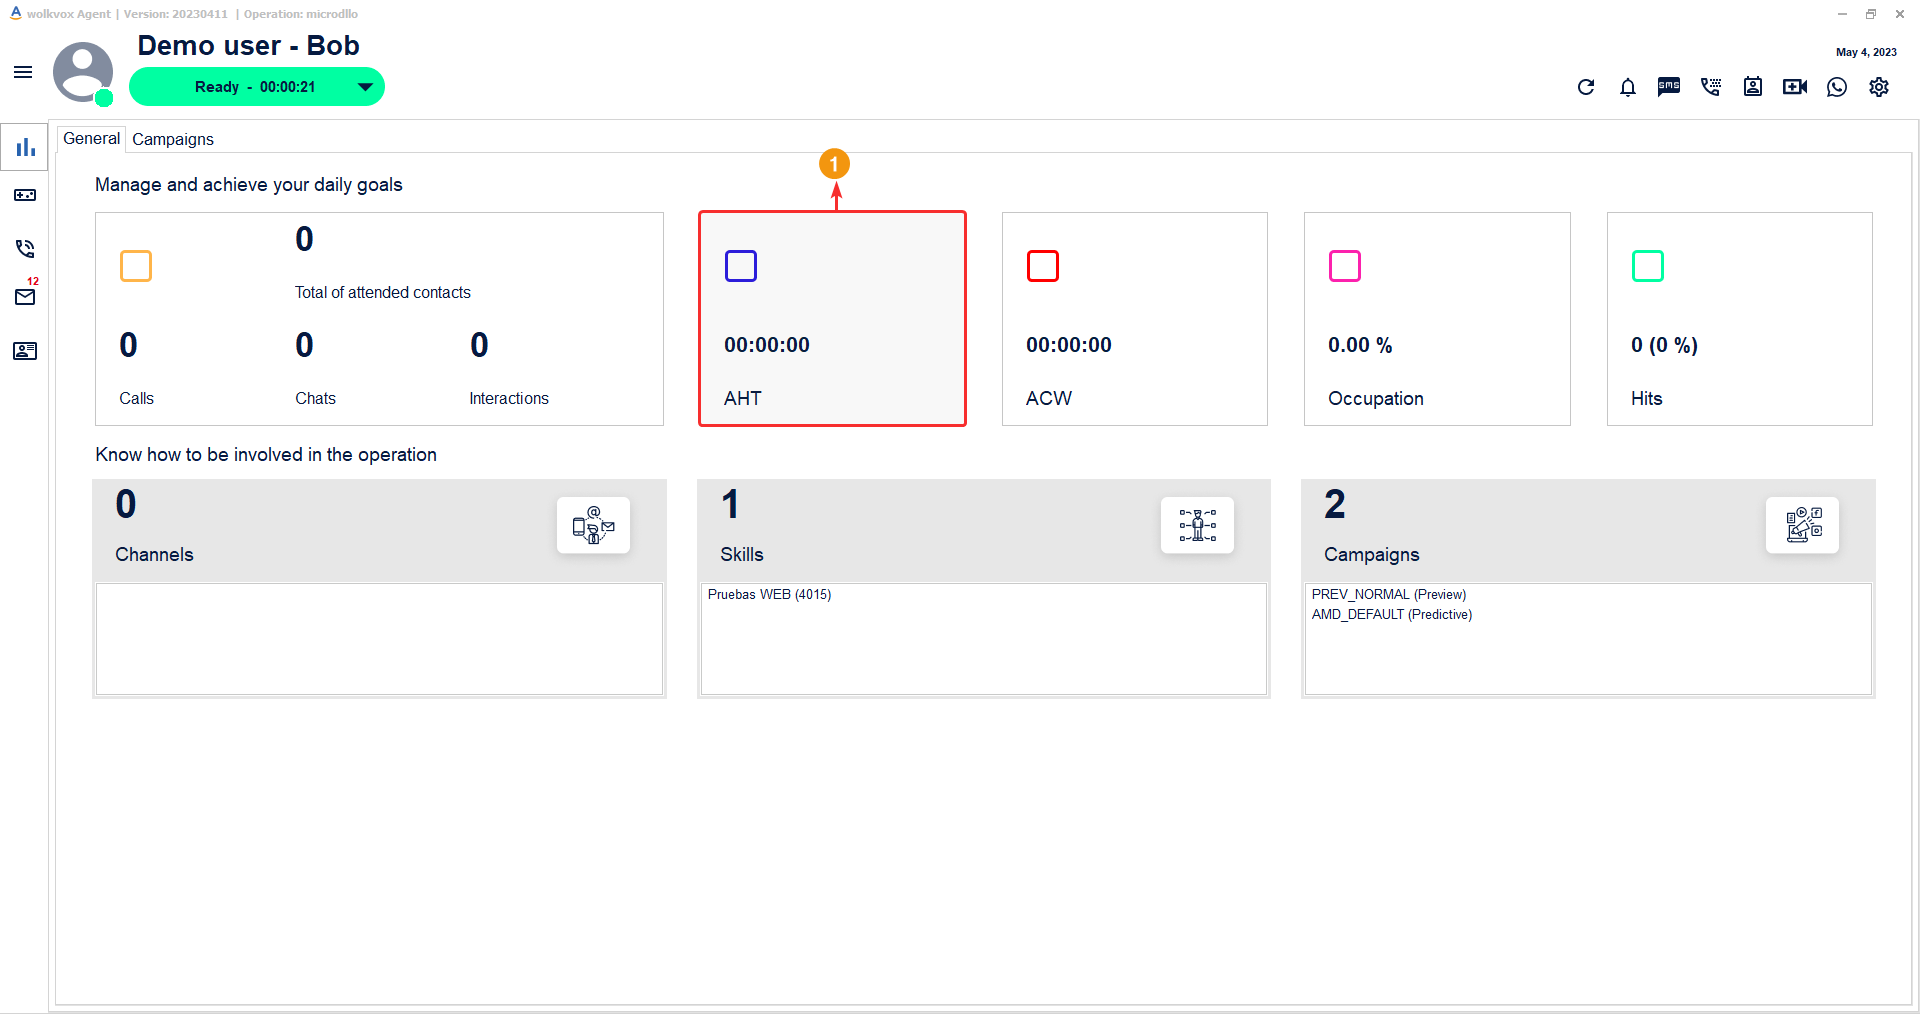
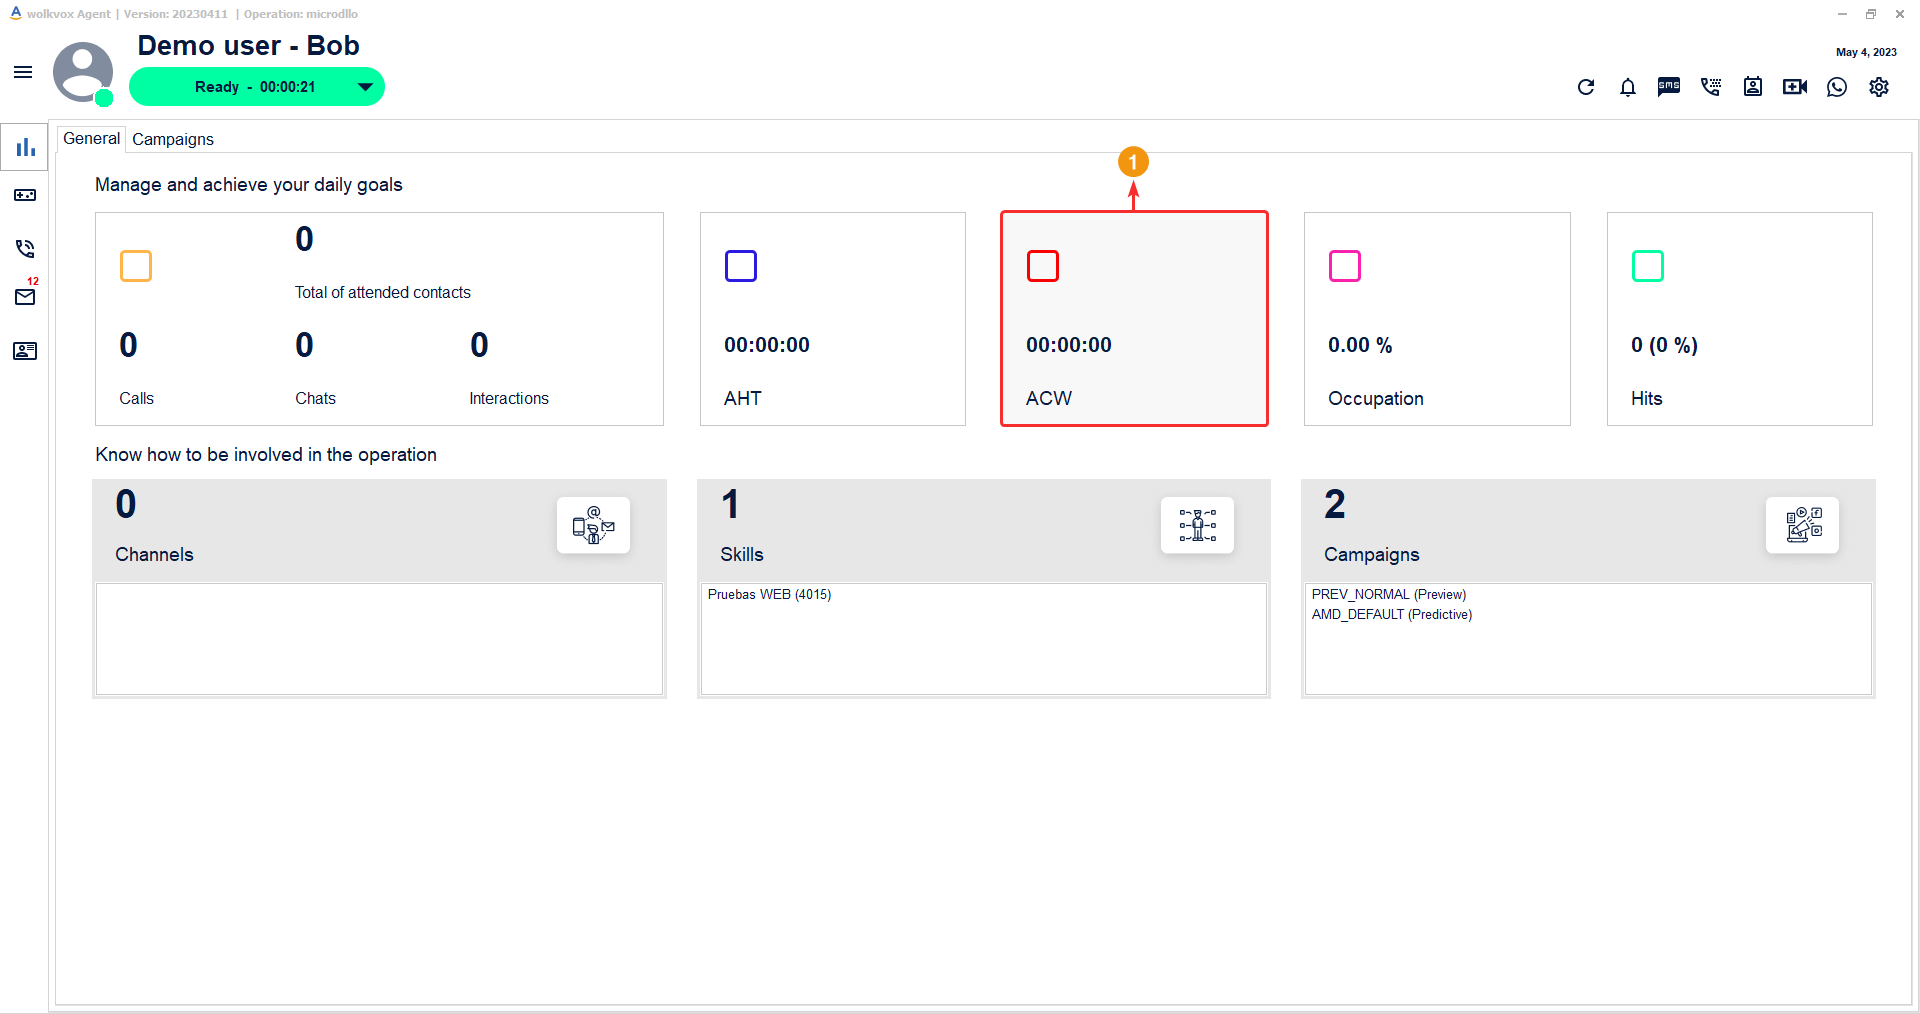
In the third block (identified by a red square) we have ACW (After Call Working), also known as Post-Call Work, which is a metric that measures the time it takes for the agent to complete the tasks that correspond after ending the contact with a customer such as call documentation or classification.
In the fourth block (identified with a fuchsia color) you can find the occupancy percentage, which measures the agent’s actual occupancy within productive time. That is, the entire customer contact process, time in “Ready” status, including ACW but excluding the time the agent has been in auxiliary statuses.

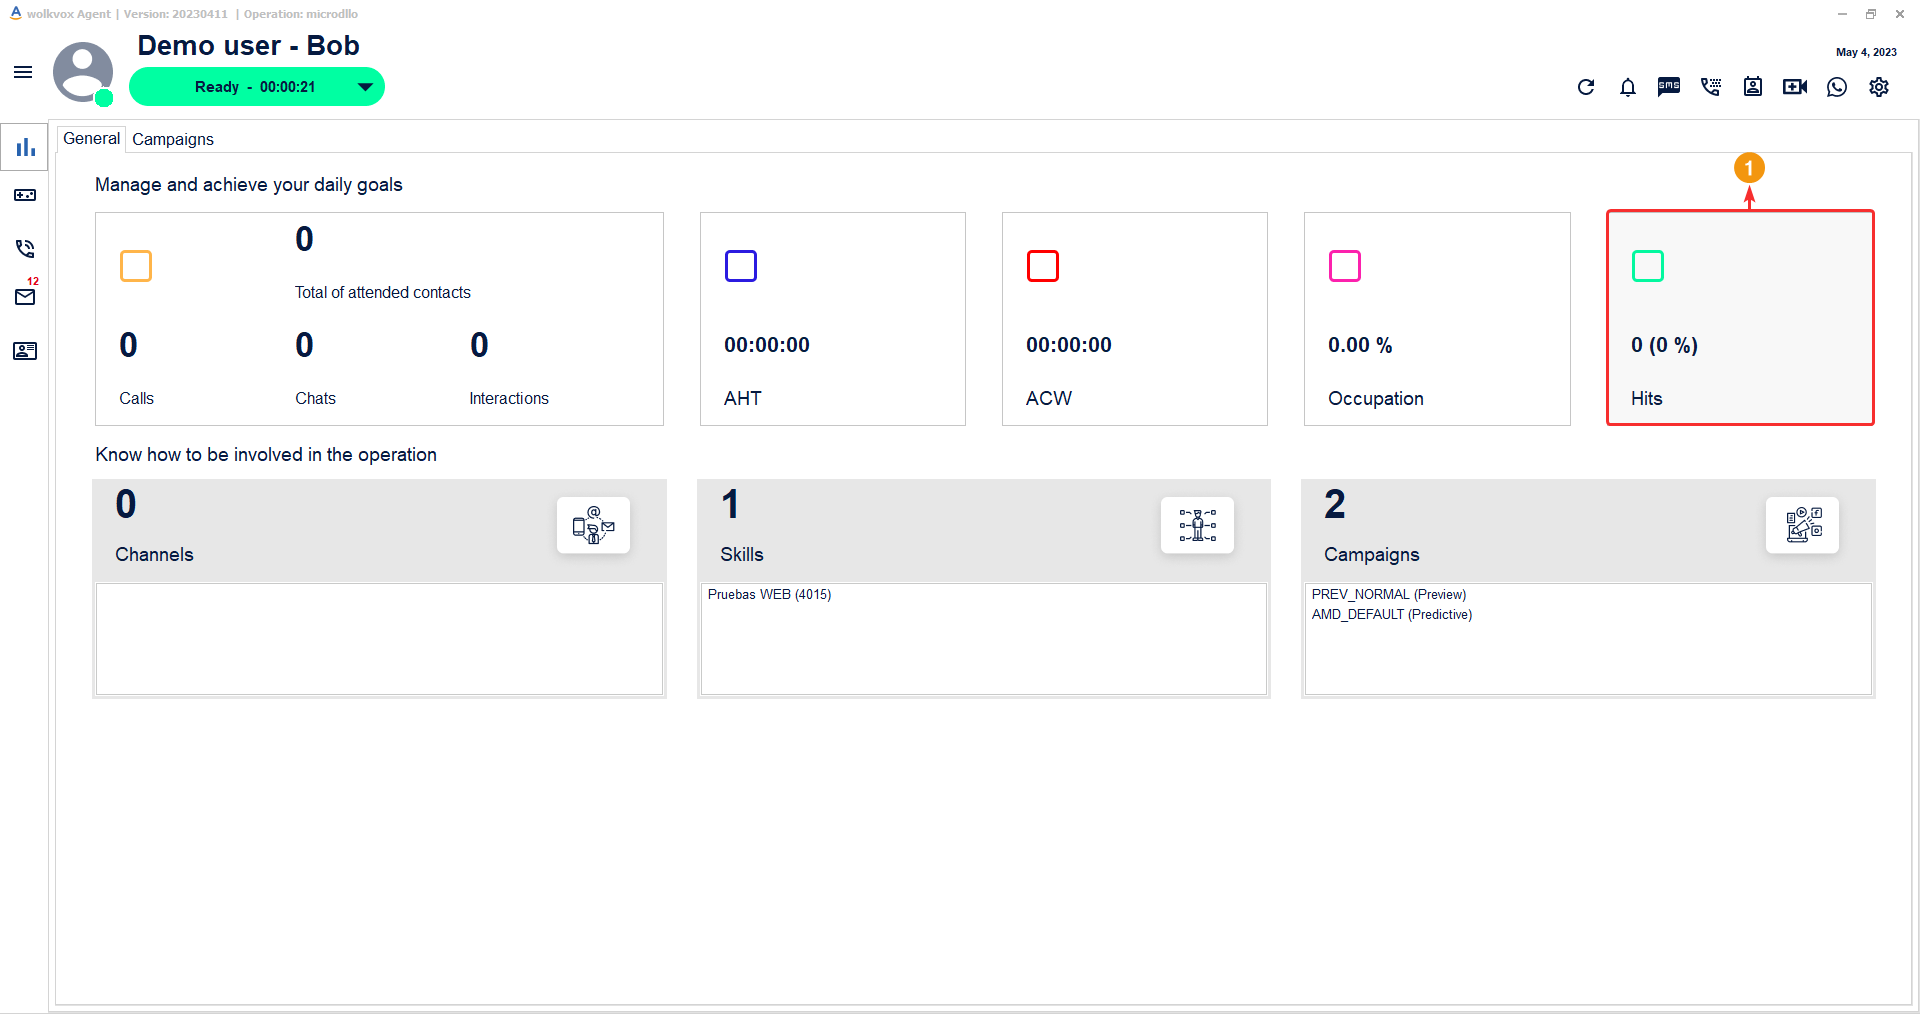
In the fifth and final block (identified with a green square), you will find the counter for calls qualified as HIT, which are defined as calls that have been successful, such as successful sales, customer retention, payment agreements, appointment scheduling, among others.
The classification of a call as successful will depend on the process in which the agent is involved.
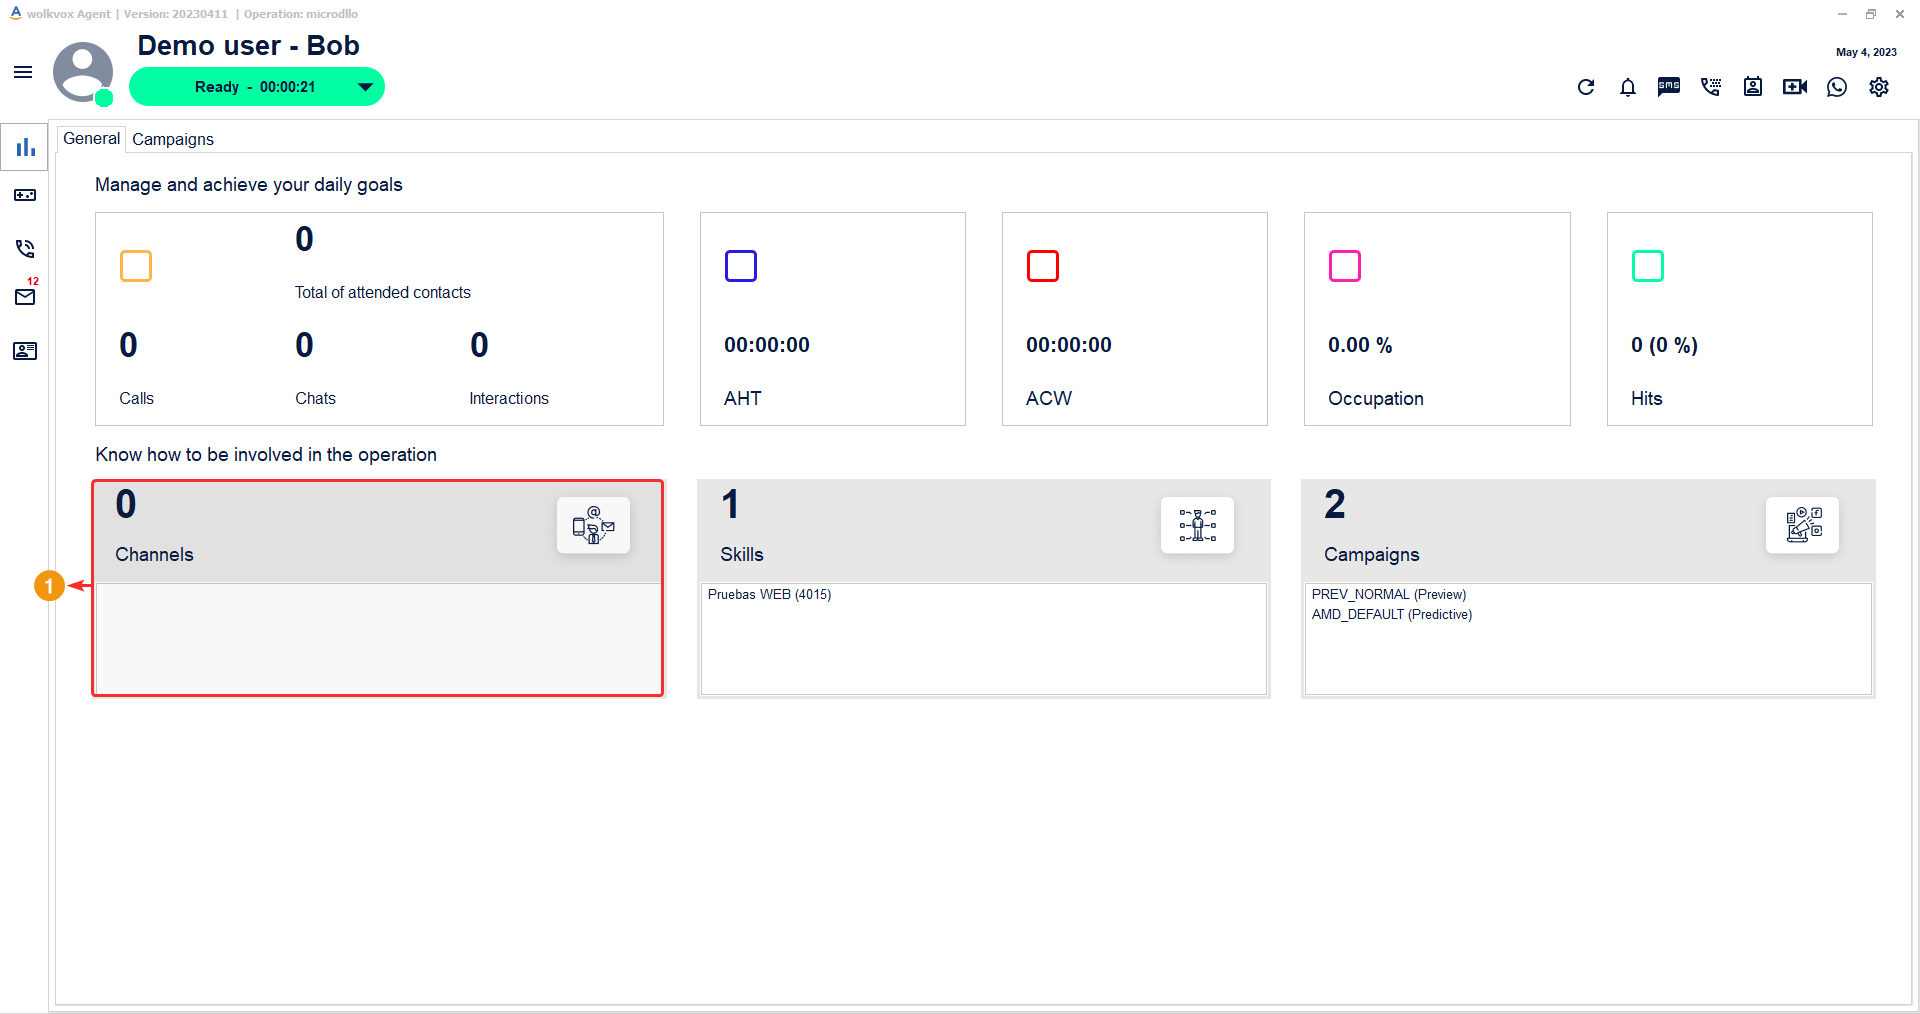
The highlighted block provides information about the channels that the agent handles, it mentions the number of channels assigned to the agent and the list of which those channels are.
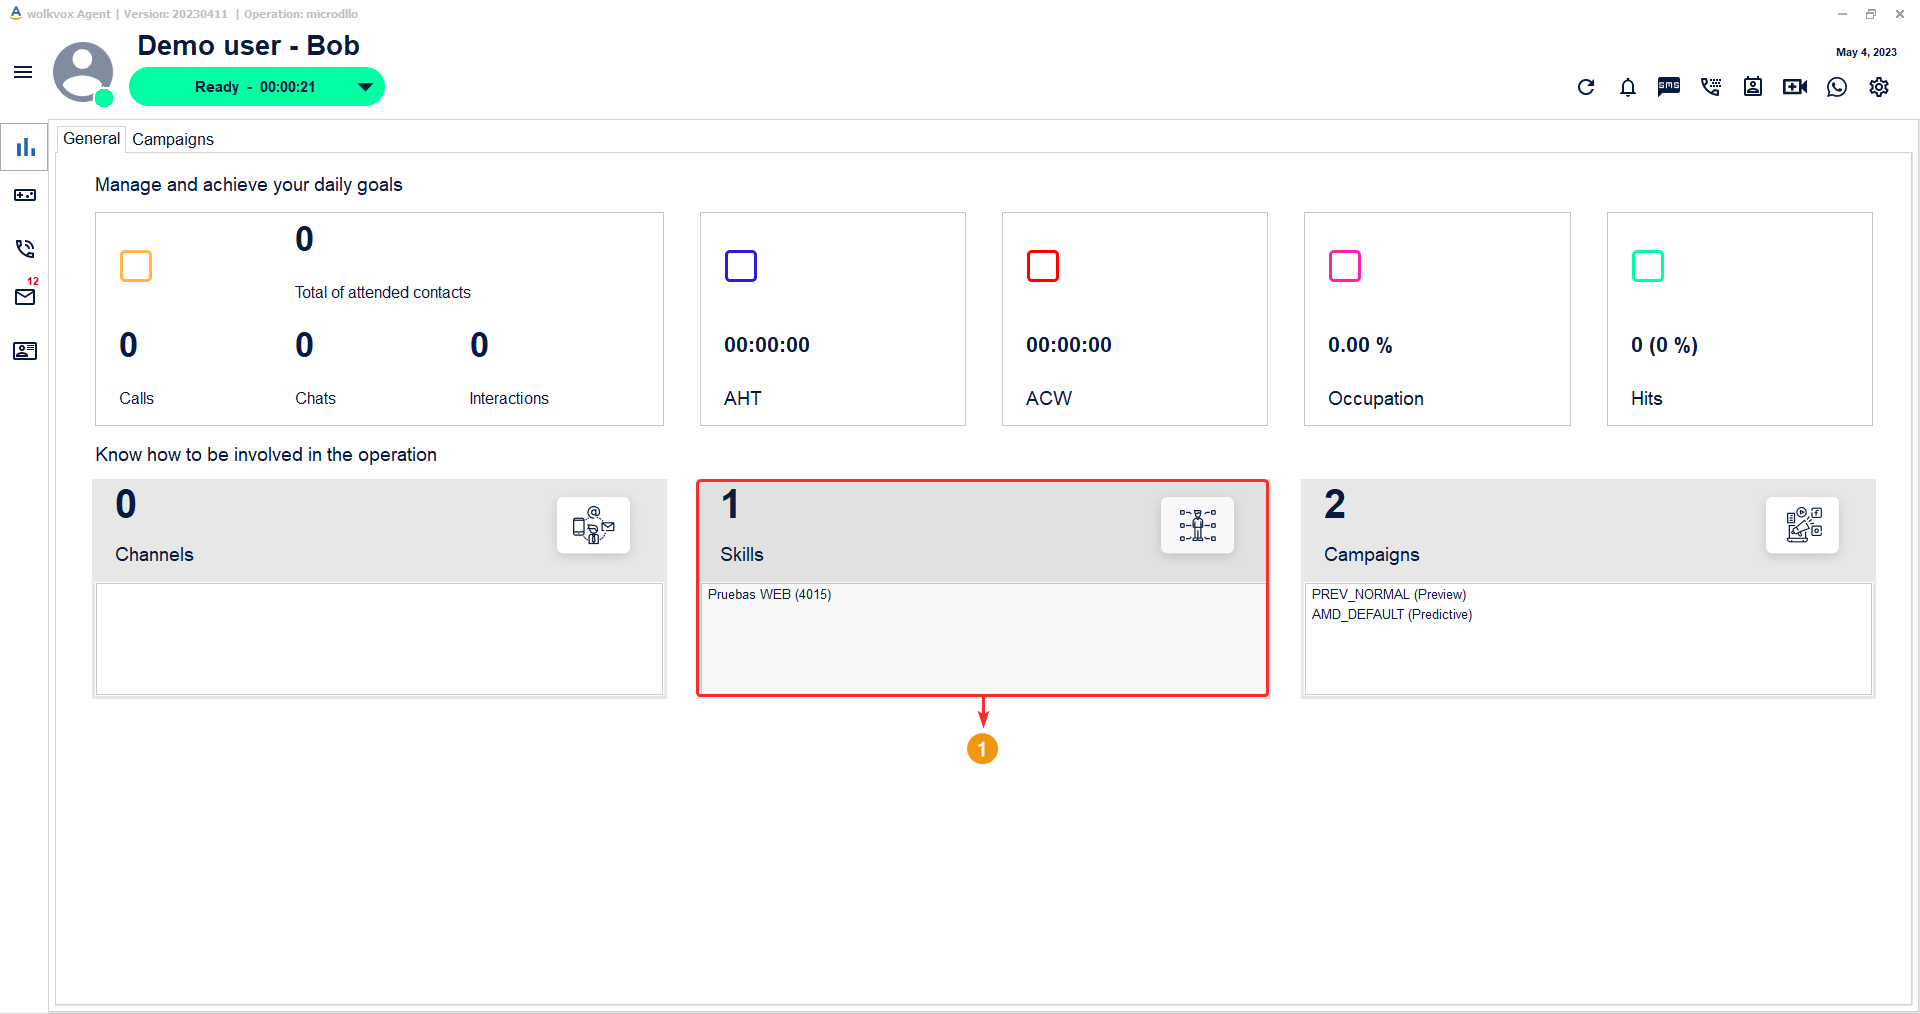
En el segundo bloque encuentras información acerca de los skills del agente, menciona cuántos tiene asignados y el listado de cuáles son.
In the second block, you find information about the agent’s skills, it mentions how many are assigned and the list of which they are.
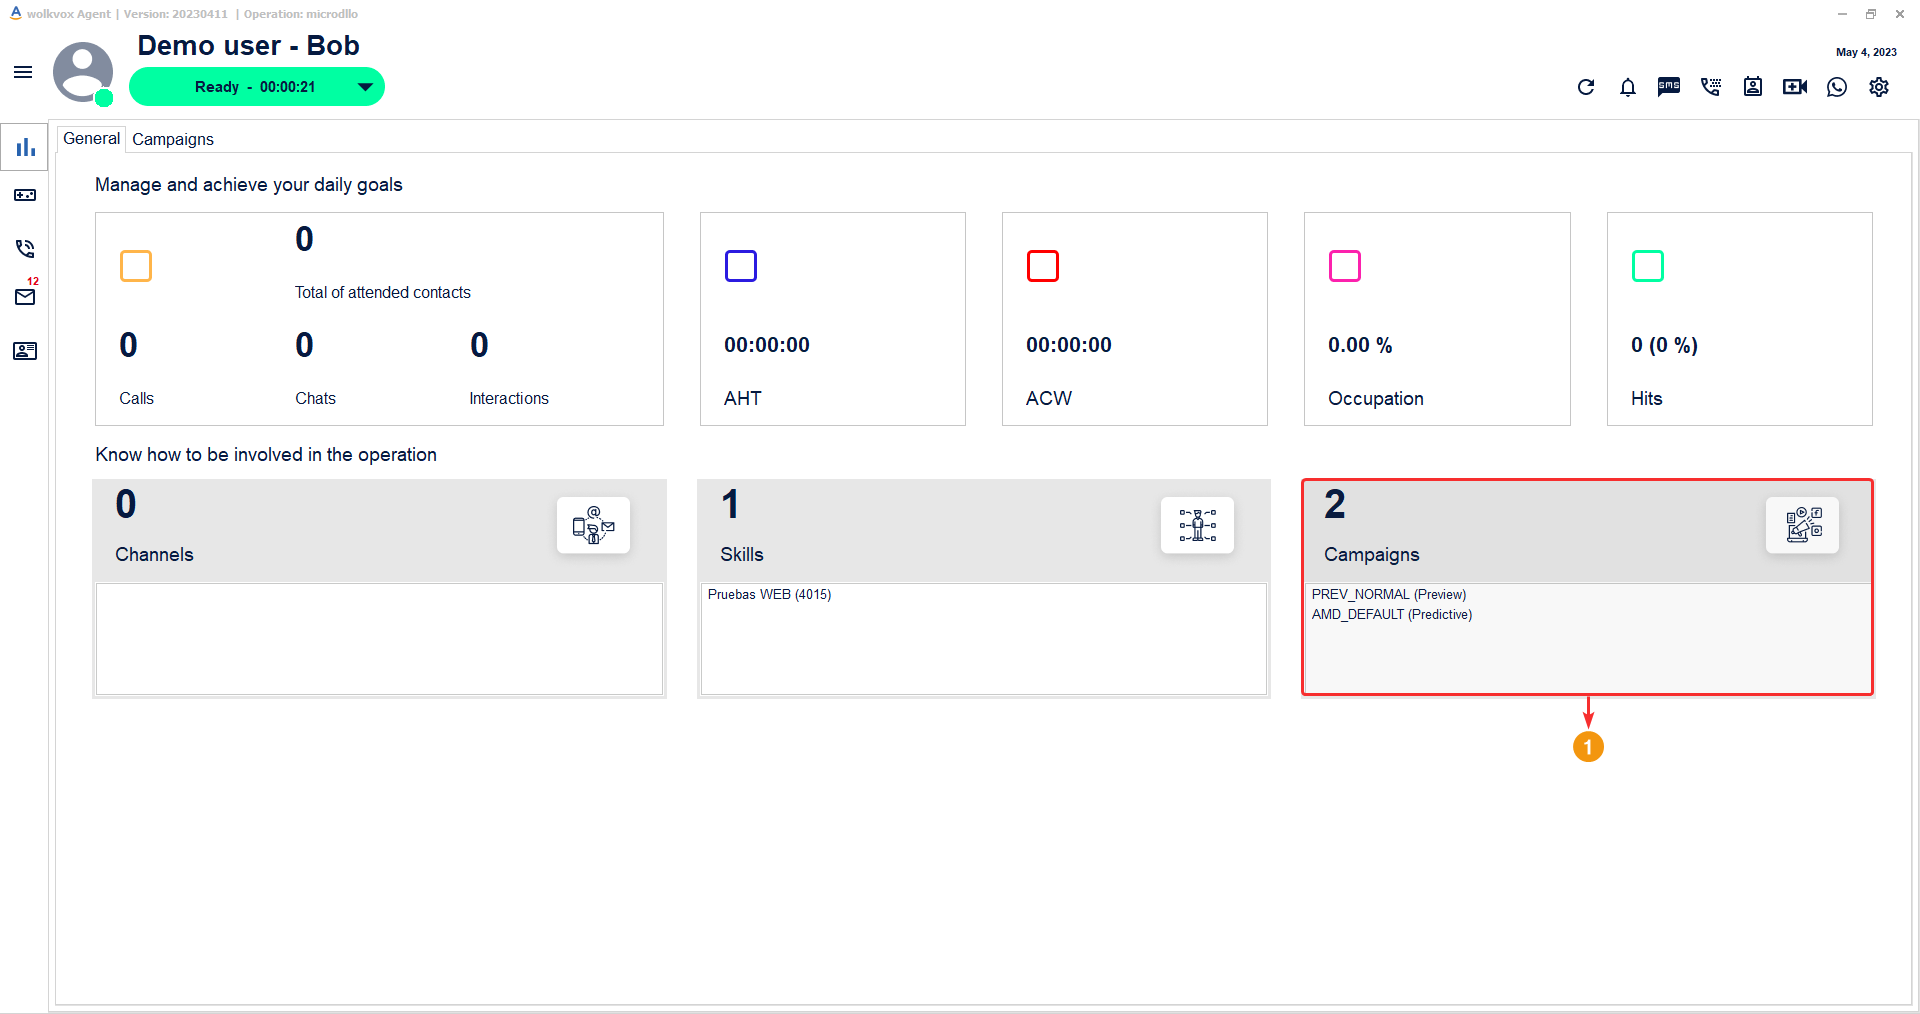
The last block provides information about the campaigns in which the agent is enrolled. It provides information on how many campaigns the agent is participating in and the list of which campaigns are assigned to the agent.
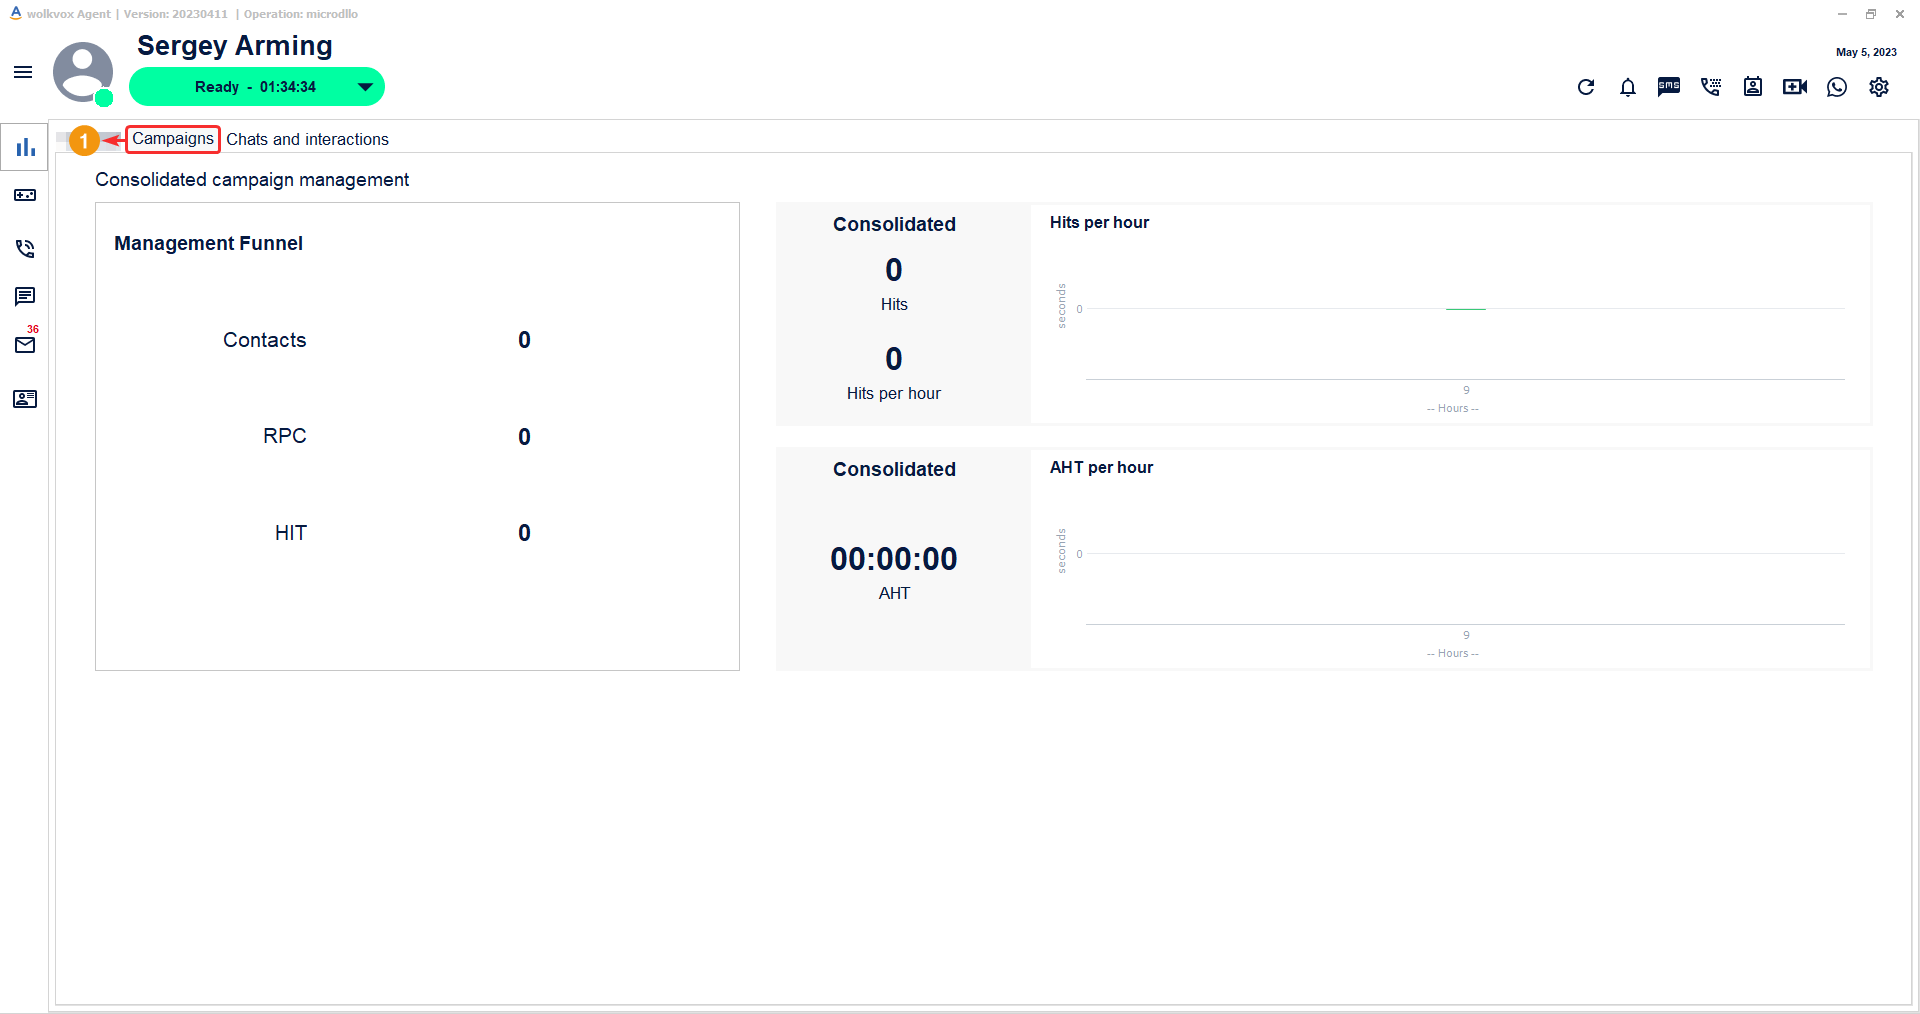
Campaigns #
In this tab, you can see statistics more focused on the agent’s fulfillment of campaign objectives.
Here we find three blocks to observe the statistics.
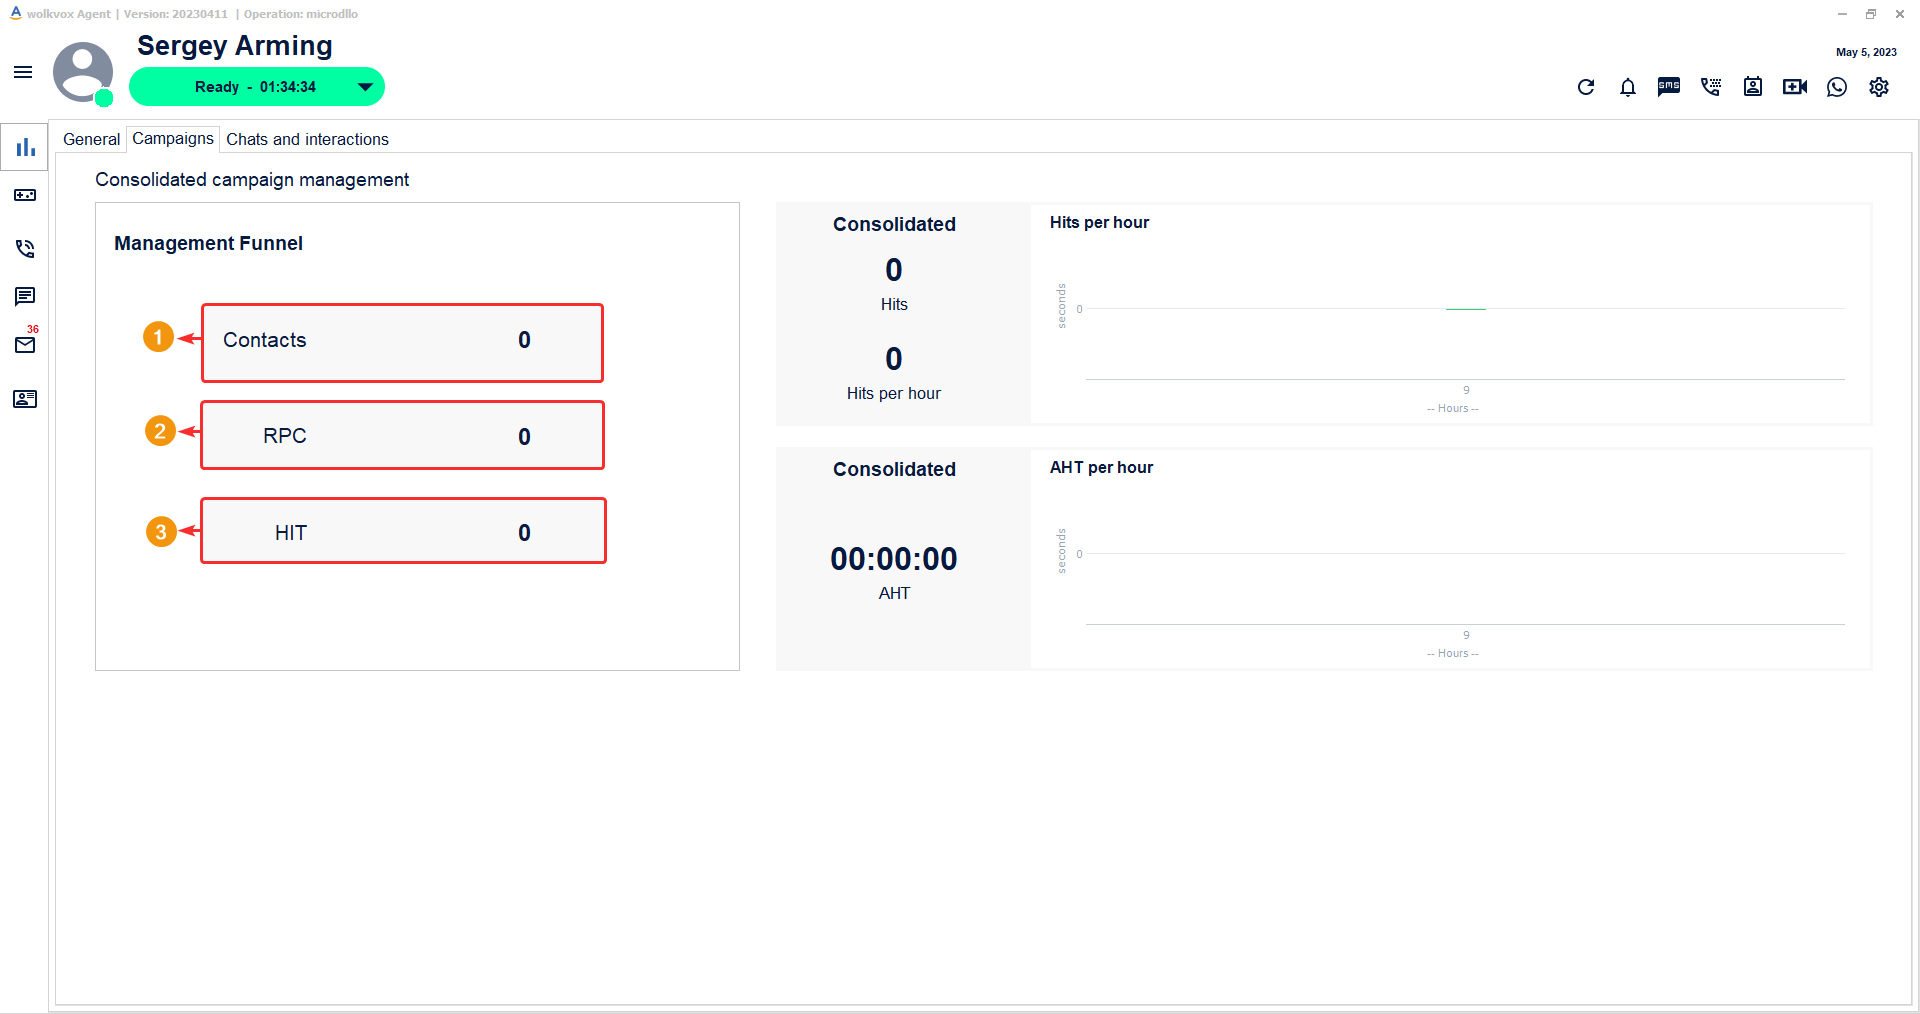
The first block is called “Management Funnel”, which shows the following data:
- Contacts: Displays the percentage of contacts called on the day.
- RPC: Also known as FCR (first call resolution). It is a key indicator to determine the percentage of calls that have achieved the resolution of a procedure with a customer in a single interaction in order to avoid callbacks.
- HIT: It is an important metric that measures the success rate of calls.
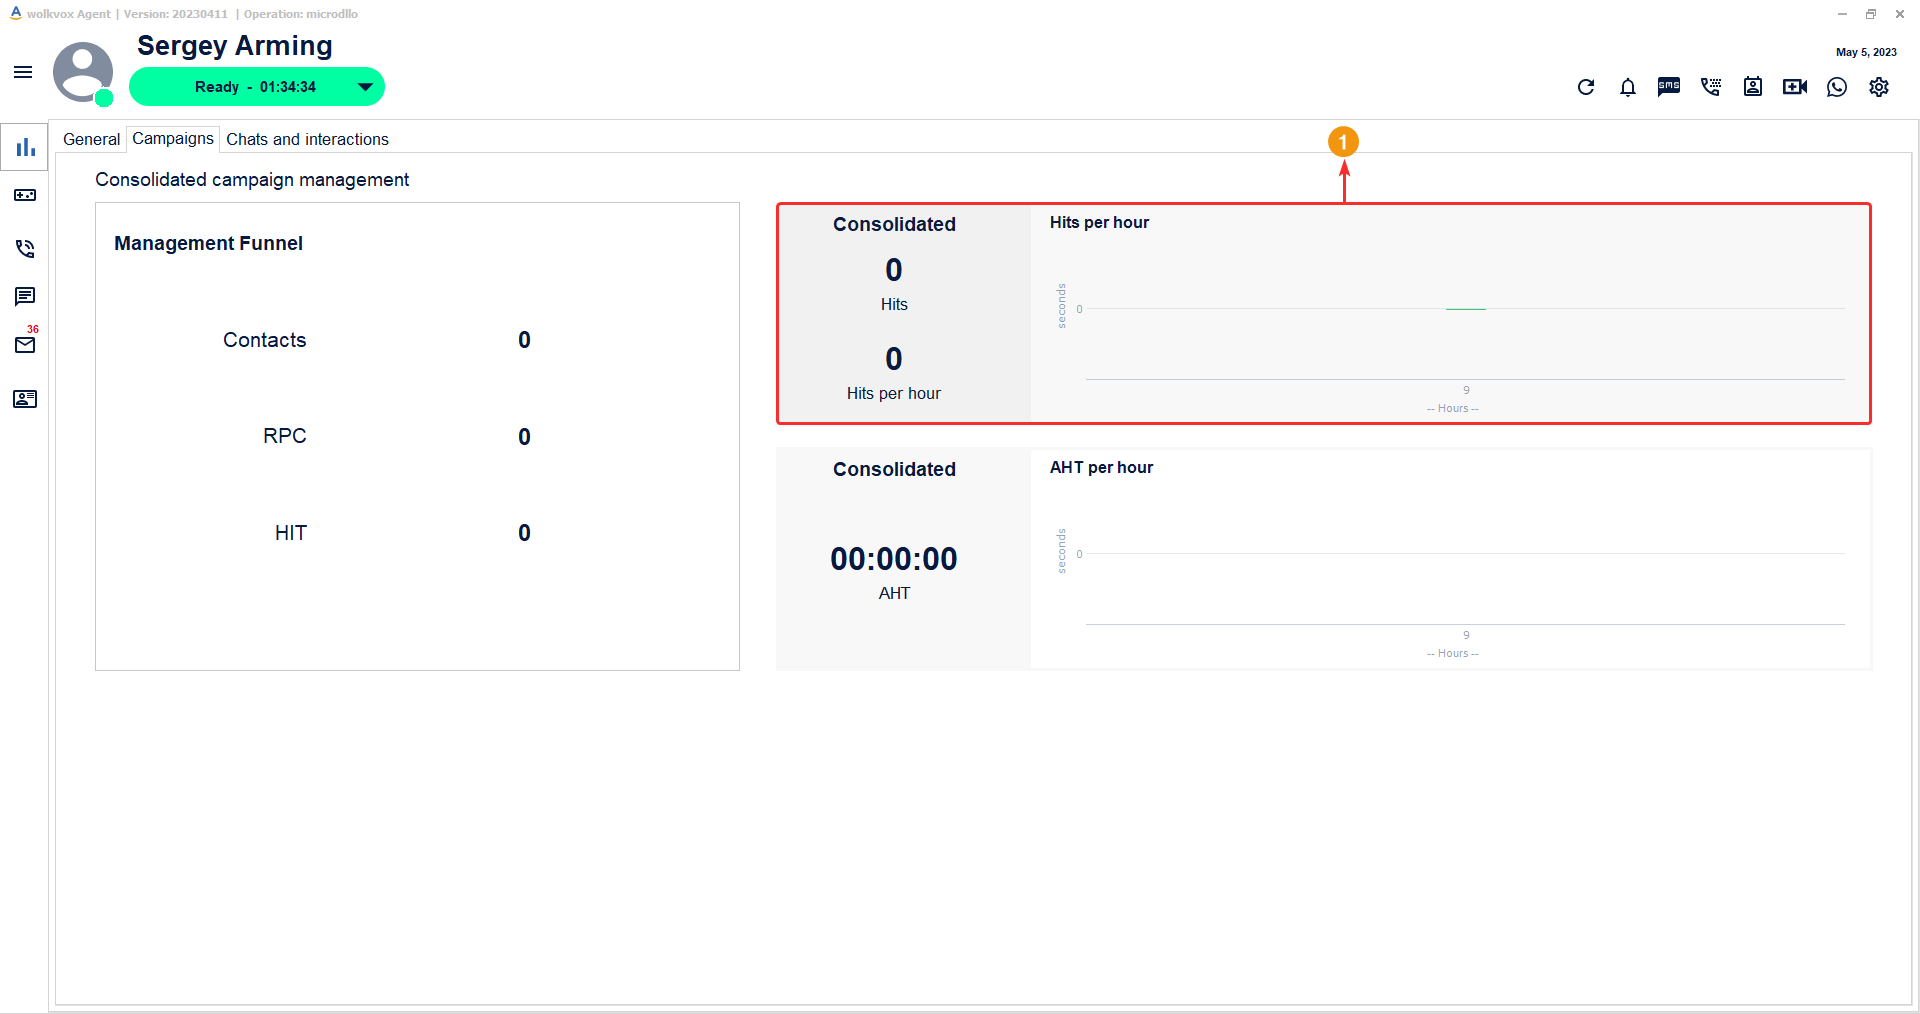
The next block corresponds to the consolidated HITs, which shows the following data:
- Total number of consolidated HITs up to the current time.
- HITs per hour: It is the average of HITs that the agent performs every hour during their work schedule.
- The chart in this block is composed of a column indicating the quantity of HITs and a row indicating the hour. The bars that appear in the chart correspond to the number of HITs that the agent consolidated in the specified hour.
Gamification #
This tab allows you to view management indicators with a game or competition dynamic to achieve the best results. In this section, you can see your position relative to your coworkers.
Note: The administrator of your operation is in charge of activating or deactivating the gamification service. Therefore, if you don’t see this section in your Agentbox software, it means that the service is not activated.
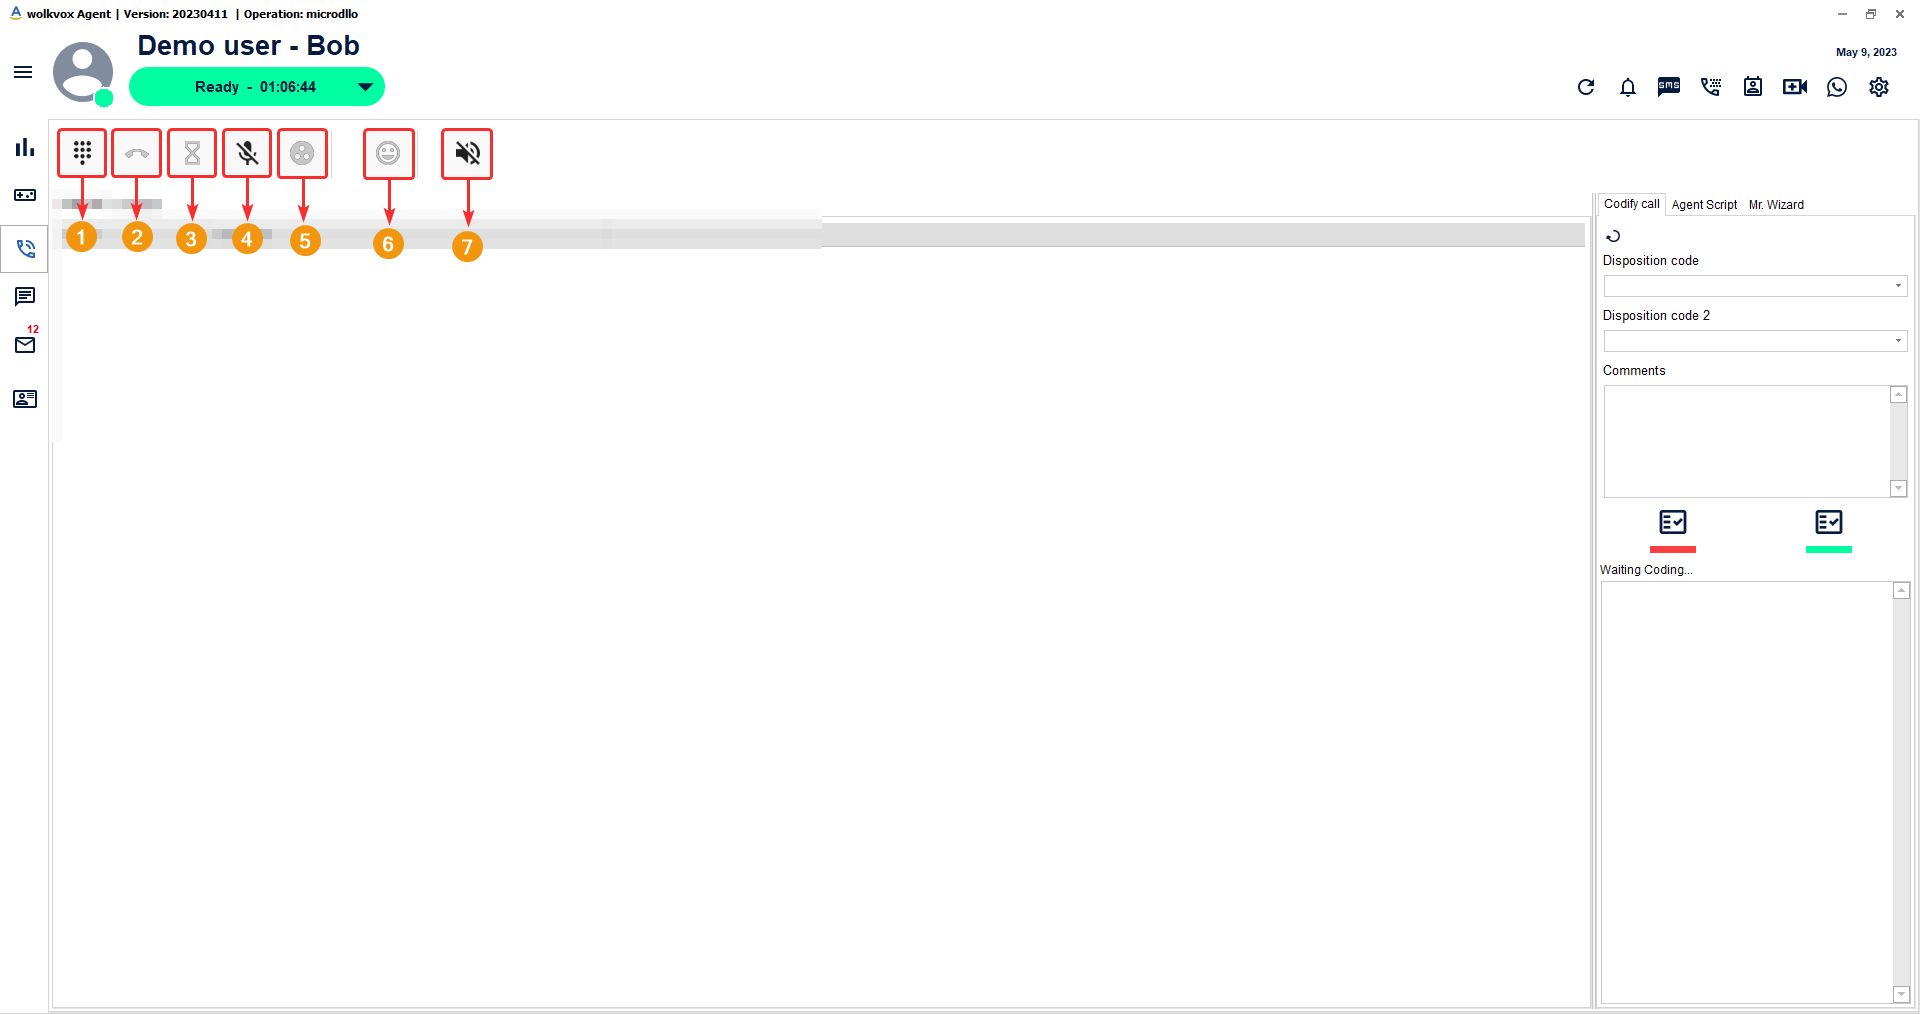
Voice channel or calls #
The highlighted button in the following image corresponds to the voice channel. From there, incoming calls are managed and manual calls can be made.

Next, the functionality of each button is explained:
- Show Phone: Opens a new window where we can manually dial a number.
- Hang up: If the agent clicks on this button, it ends the call.
- Hold: Allows the call to be put on hold. The person in charge of the process may have assigned a sound or audio for the customer to listen to while the agent is doing other activities.
- Mute: Silences the agent’s microphone.
- Conference: Allows the user on the line to be added to a conference room or group call.
- Intelligent Survey: Performs the action of transferring the customer from the call to a survey for them to answer depending on how it was constructed. This survey button only appears when the agent is on a call.
Manually dial phone number #
- In the highlighted area, six buttons are listed that allow you to select a line through which you want to make the call. At the bottom of this group of buttons, a text appears indicating whether the call is free or busy.
- In the designated field, you must enter the phone number you wish to call.
- You also have a digital keyboard at your disposal to enter the number you want to call.
- The “Dial” button allows you to call the dialed number.
- If you want to transfer the call to another agent in your operation, you can add the agent’s extension number in this field.
- The “Transfer” button allows you to transfer the selected call to the agent’s extension number written in the previous field. Remember that the call will be transferred from the selected phone line.

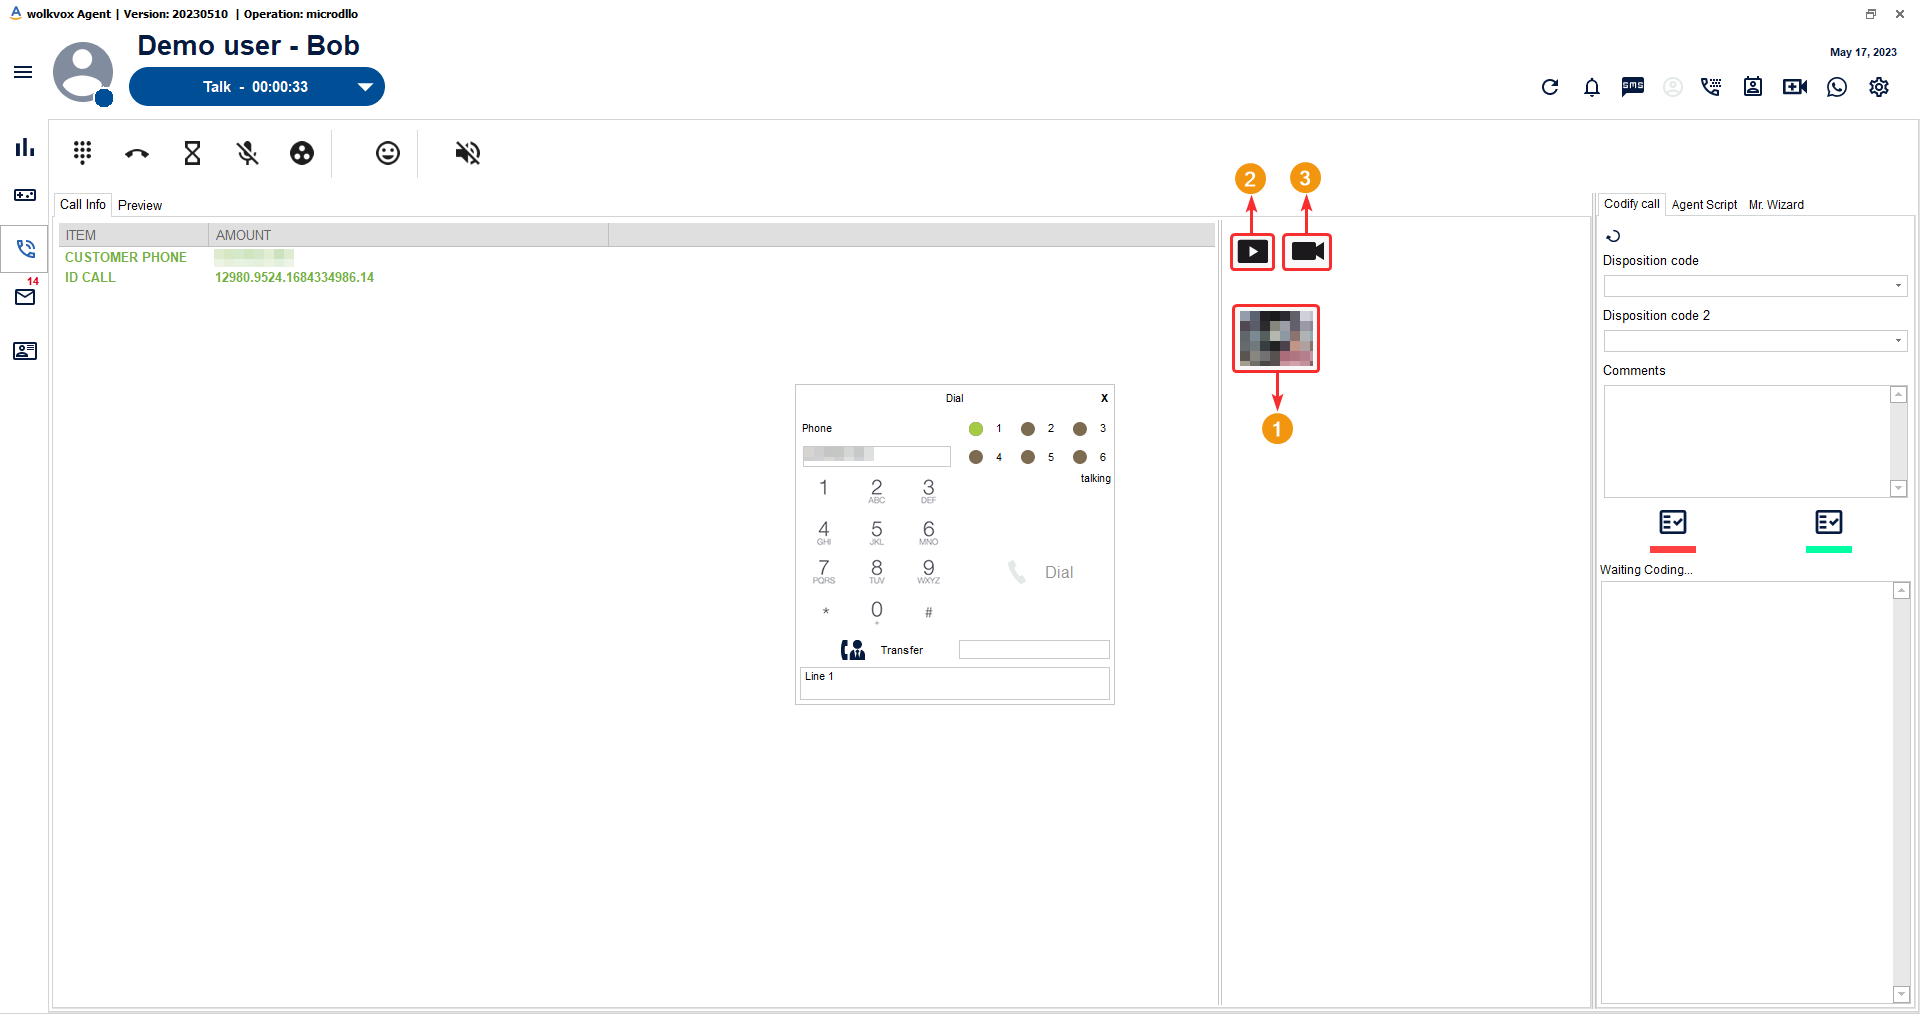
If the video call service is active in your operation, you will see the following buttons during a call.
- You can preview your webcam.
- Click on this button to switch the view and see your screen.
- Turn on and off your webcam.
Coding a call, Agent Scripting tool, and Mr. Wizard voice #
In this “Voice” section, you will have three very important tools for carrying out your activities.
- Codify call: In this tab, you will be able to encode the call, that is, define the code that summarizes or establishes the conclusion of the call. These codes are created by the administrator of your operation. For example, there may be codes to define that a call was related to a sale, a support solution, a call that lost contact at some point during it, etc.
- Agent Script: This tab allows access to the script constructed by the administrator of your operation. This script can have multiple objectives. It can simply contain a series of steps that you should follow to assist your customer, or it may contain a menu with different options depending on the objective of the call, where each option has a different script. Each script can even have text and buttons, and you may need to select one of the buttons depending on the outcome of each step in the call. In other words, this option is very diverse as the design and content will depend on the objective set by the administrator of your operation.
- Mr. Wizard: This powerful tool allows you to see the overall sentiment of the call, that is, how the customer is feeling about the assistance you are providing. You also have a transcription tool that converts the call into text, and an artificial intelligence tool that can provide answers to questions you ask. The availability of Mr. Wizard will depend on the training done by the administrator of your operation to the intelligent system. It’s important to note that the availability of Mr. Wizard depends on the administrator of your operation, as they have the ability to activate or deactivate the service.

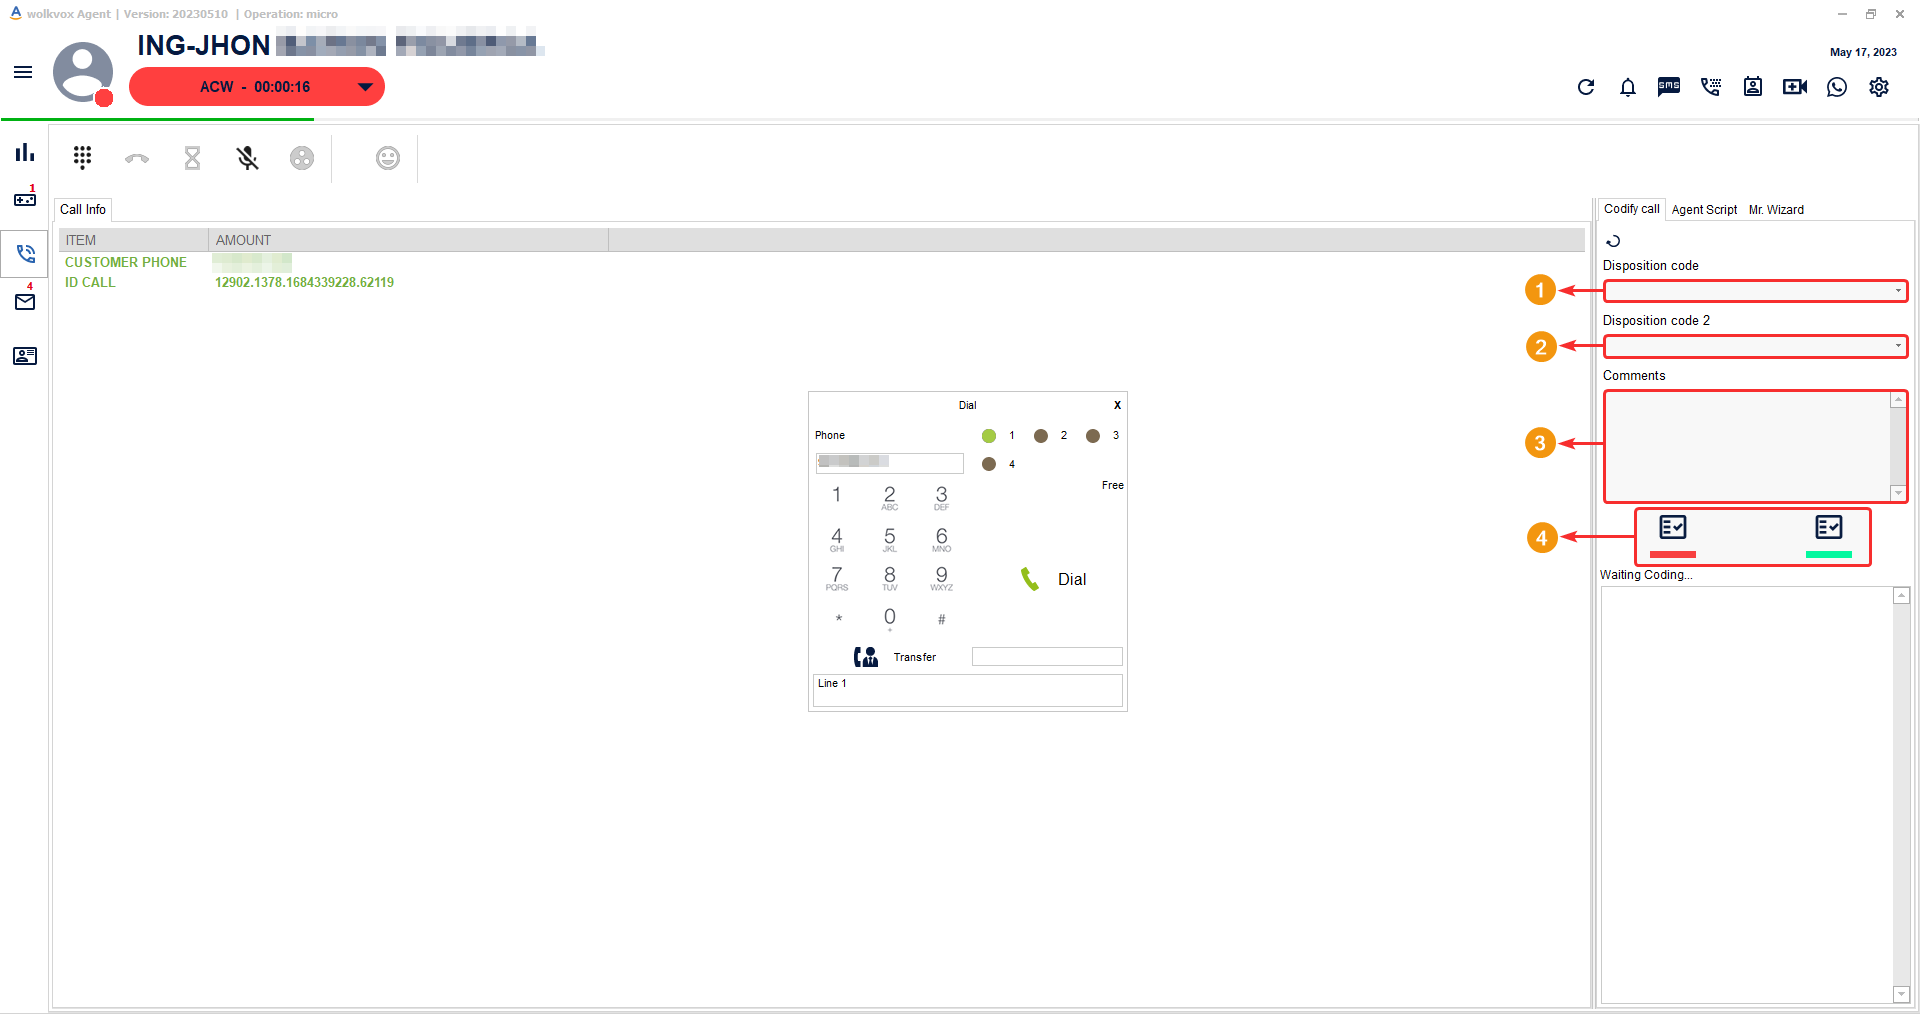
Codify call #
This tab allows you to encode or categorize the call with a customer (it should be noted that the administrator or team leader can configure the application so that this tab is not available and the agent has to encode the calls in the “Agent Script” tab).
- Firstly, you can see one or two fields called “Disposition Code”. The operation manager can set it to display only one activity code to categorize the call or have two codes. The activity codes appear in the dropdown menu, and you must select an activity code based on the outcome of the call (completing the activity code fields is a requirement to finish the ACW state).
- The second Disposition code will be available only if the administrator of your operation has enabled it.
- Then there is a comments field where the agent can leave some notes regarding the process they had with the customer.
- To submit the encoding, there are two buttons: “Encode” and “Encode and Ready”. The first one only encodes the call, and the agent remains in the “ACW” state, while the second one, in addition to encoding the call, changes the agent’s state to “Ready” so that they can receive calls.
Agent Script #
This tool consists of a script that allows the agent to follow a series of steps or instructions to assist the customer. This tool is very robust, so it may not have the same design in all operations. The administrator of your operation can design the options you see in this tool in various ways. For example, they can create a linear script that you must follow step by step when assisting the customer, or they may design this section with a menu with multiple buttons, where each button leads to different scripts depending on the objective of each call. This tool even allows for call coding, eliminating the need for you to view the previous “Codify call” tab. There may also be cases where you have a series of questions and need to select the customer’s response. The design options for this script-like tool are very diverse.

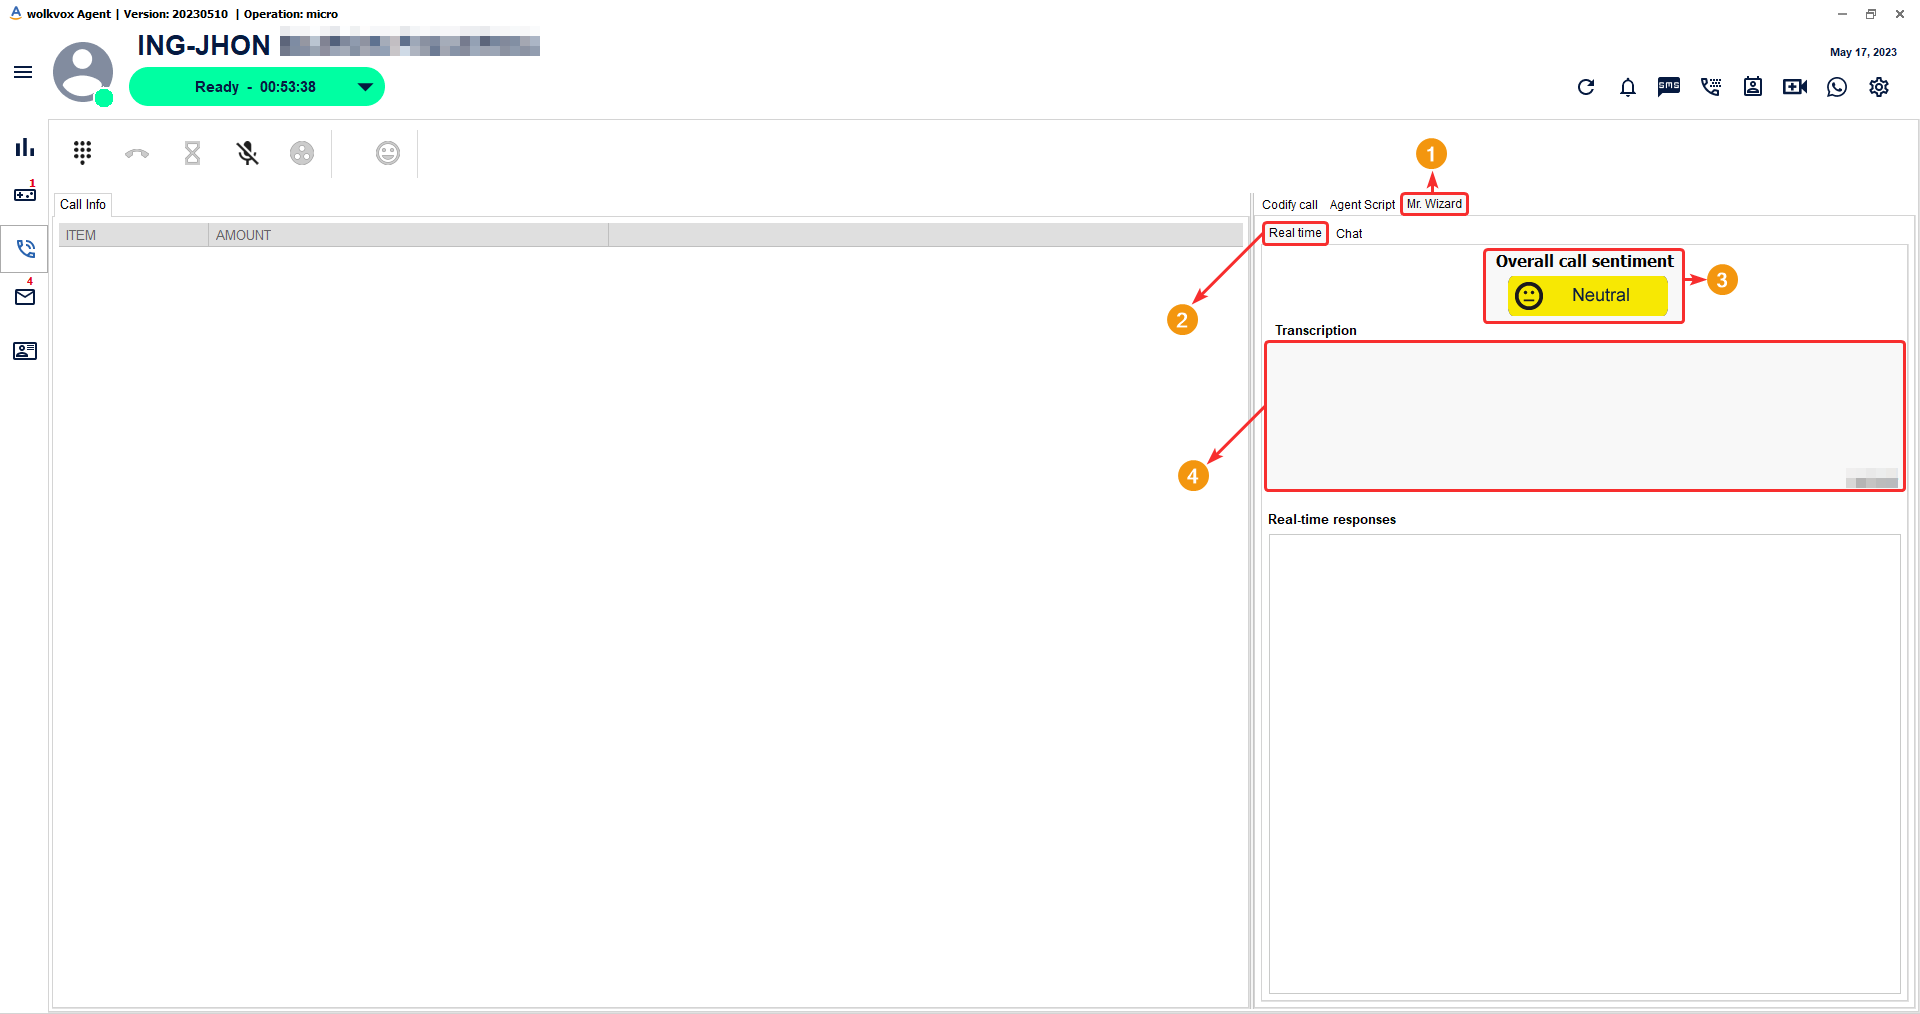
Mr. Wizard #
This tool has the following functionalities:
- Real-time transcription of the ongoing call.
- Analysis of the overall sentiment of the call, I.E., understanding the general mood of the conversation.
- Interaction with an AI-powered chatbot to obtain responses. The chatbot is trained by the administrator of your operation.
- Access Mr. Wizard.
- The first tab contains real-time functionalities.
- You can observe the overall sentiment of the call.
- The call will be transcribed to text in real-time.
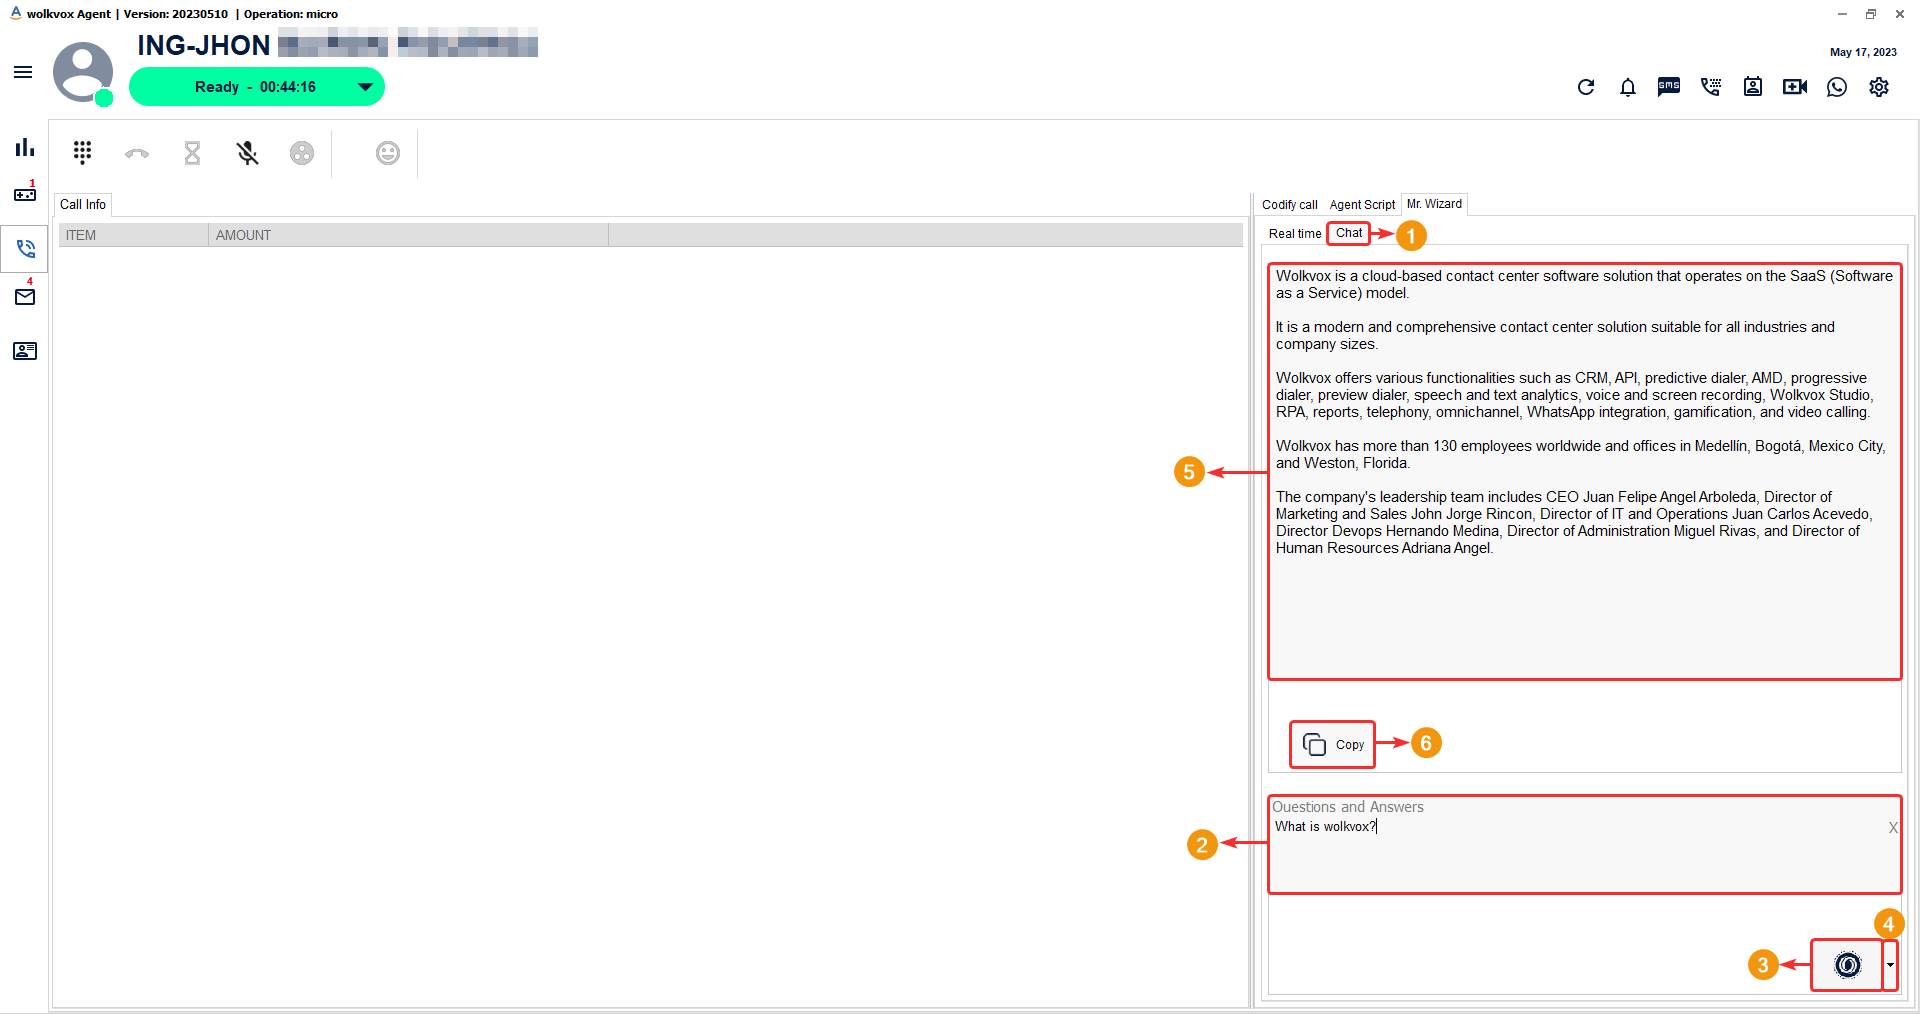
- In the “Chat” tab, you will have access to the question and answer chatbot that will help you address any inquiries you have.
- In the lower field, enter your question.
- Click on the highlighted button in the following image to send the question.
- In fact, this tool has more functionalities. By clicking the arrow on the question send button, you can change Mr. Wizard’s functionality. You can select “spelling and grammar” to correct spelling or “summary” to generate a summary of the entered text.
- The answer provided by Mr. Wizard will appear in the upper field.
- You have a button available to copy the text of the answer given by Mr. Wizard.
Campaigns and Preview Dialing Calls #
The campaign type called “Preview” involves assigning clients to the agent, but the agent’s call is not activated automatically. Instead, the agent decides when to call the next client from their assigned list. This type of dialing or campaign type has the advantage that the agent has time to read information about the client before making the phone call.
![]() If the desired campaign doesn’t appear, you can click on the data refresh button (indicated in the following image). Also, please note that only the campaigns in which the agent is assigned will appear.
If the desired campaign doesn’t appear, you can click on the data refresh button (indicated in the following image). Also, please note that only the campaigns in which the agent is assigned will appear.
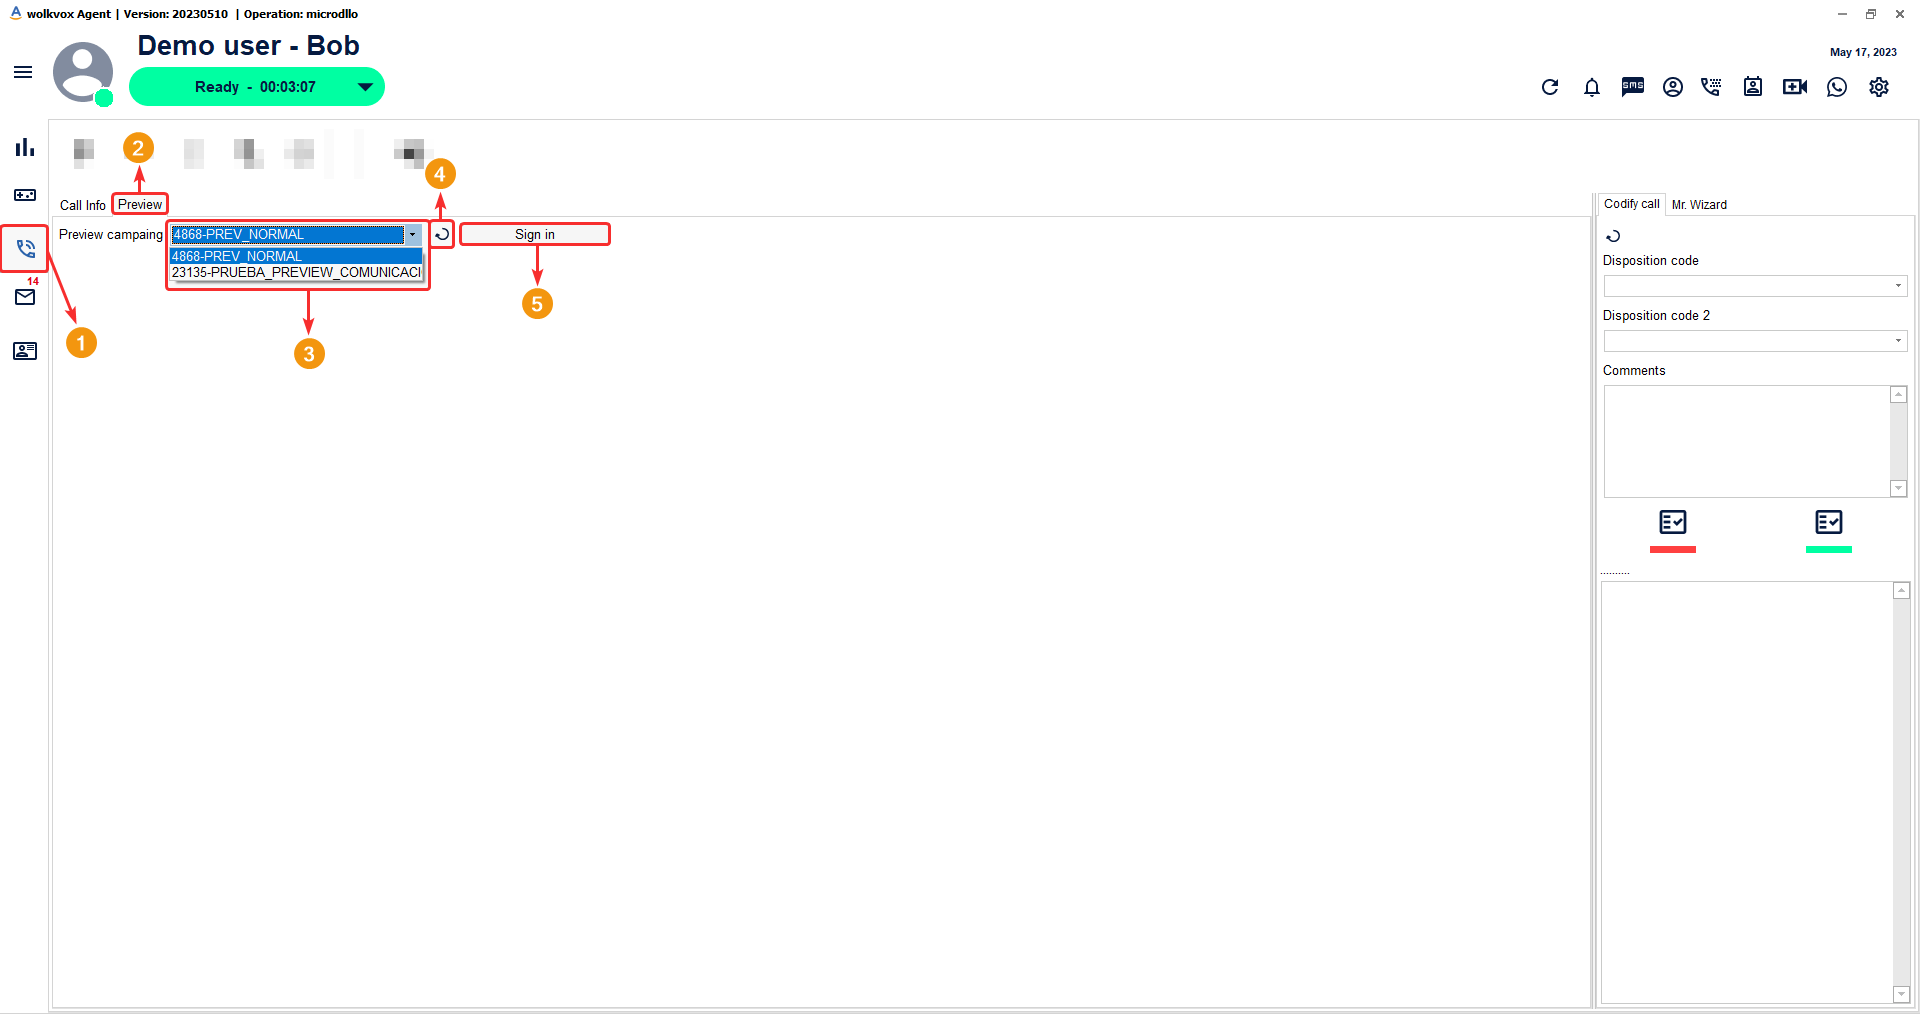
- Enter the voice channel.
- Enter the “Preview” tab. It will only appear if you have at least one record assigned in a campaign.
- To log in to a preview-type campaign, you need to click on the first field to display a list. Then, click on “Sign in” to start your session.
- You can use this button to refresh the system and check for new campaign assignments.
- Click on “Sign in” button to log in to selected preview-type campagin.
Once you enter a preview-type campaign, you will have the following interface:
- Active Campaign: This field displays the campaign you have logged into.
- Sign Out: Allows you to exit the campaign.
- Assigned Records: Shows the total number of assigned customers the agent has in the active campaign.
- Pending Records: Displays the total number of customers yet to be called by the agent.

Customer and Call Management in Preview Campaign #
- This button is called “Next client” and allows you to load the information of the next client you want to call.
- In this table, all the customer data from the campaign database uploaded by your operation’s administrator will be displayed.
- This table shows the registered phone number(s) of the customer. Each field contains the phone number, and on the right side, there is a button with a telephone icon for each field, which allows you to initiate a call to the selected phone number. Important: If you do not see the customer’s phone number but you are still able to call them, it means that the administrator of your operation has chosen to hide customer phone numbers in the campaign.

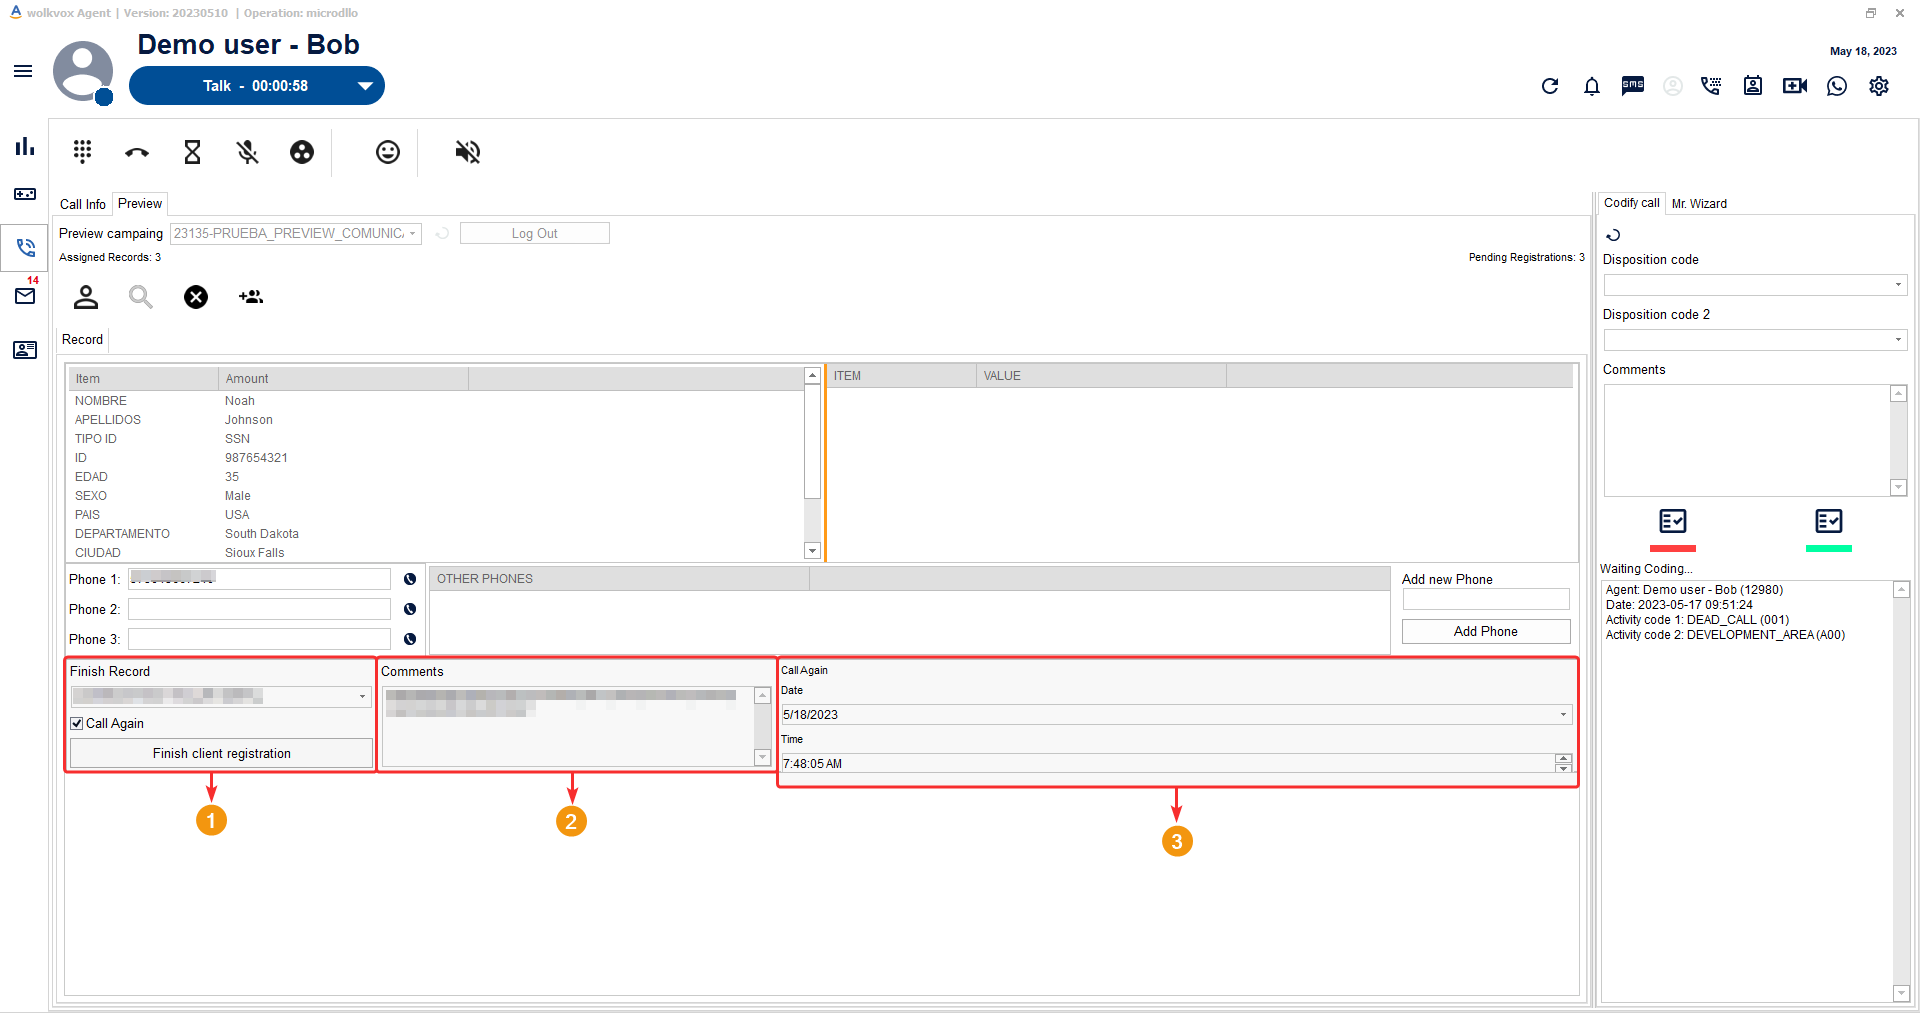
In the following fields, you have:
- The “Finish record” field allows you to conclude the interaction with the current client. It also has a checkbox called “Call Again” to schedule a callback if the current interaction with the client was not completed during this call and requires another one. By activating this checkbox, a “Call Again” field is added to select the date and time for the callback. The “Finish record” field is important to finalize the call with the client and remove it from the pending records. Simply select the coding code indicating the result of the call and click on “Finish client registration”.
- The “Comments” field allows you to add comments to the record in order to indicate the outcome of the record or why you are finalizing the record.
- The “Call Again” field is used to indicate the date and time for the callback. Once this date and time arrives, and you click on “Next client”, a message will appear indicating that a callback has been scheduled for this client.
Below you can see an example of the message displayed when you click on the “Next client” button and have a scheduled callback. Upon closing the message, the customer’s information will be loaded again.

When you are about to make a callback, the following data will be displayed.
- In the “History” panel on the right side, you can find the record of the calls you have made. It includes the date and time of the call, as well as any comments you have added.
- In the “History” table at the bottom, you can find each call that has been made to the customer in this campaign. You can easily identify the date and time of the call, the agent who made the call, the coding codes used to categorize the call, and any comments.

- f you click on any element in the customer information table, you can click on it and a window will open where you can change the data in the selected field. Important: This feature depends on the administrator of your operation. Only they can enable or disable the option for agents to change customer data.
- Once you enter the new data for the field, click on the blue arrow to apply the change.
- You have a panel where you can add a new phone number in case the customer has more than one contact number and it is not in the database.

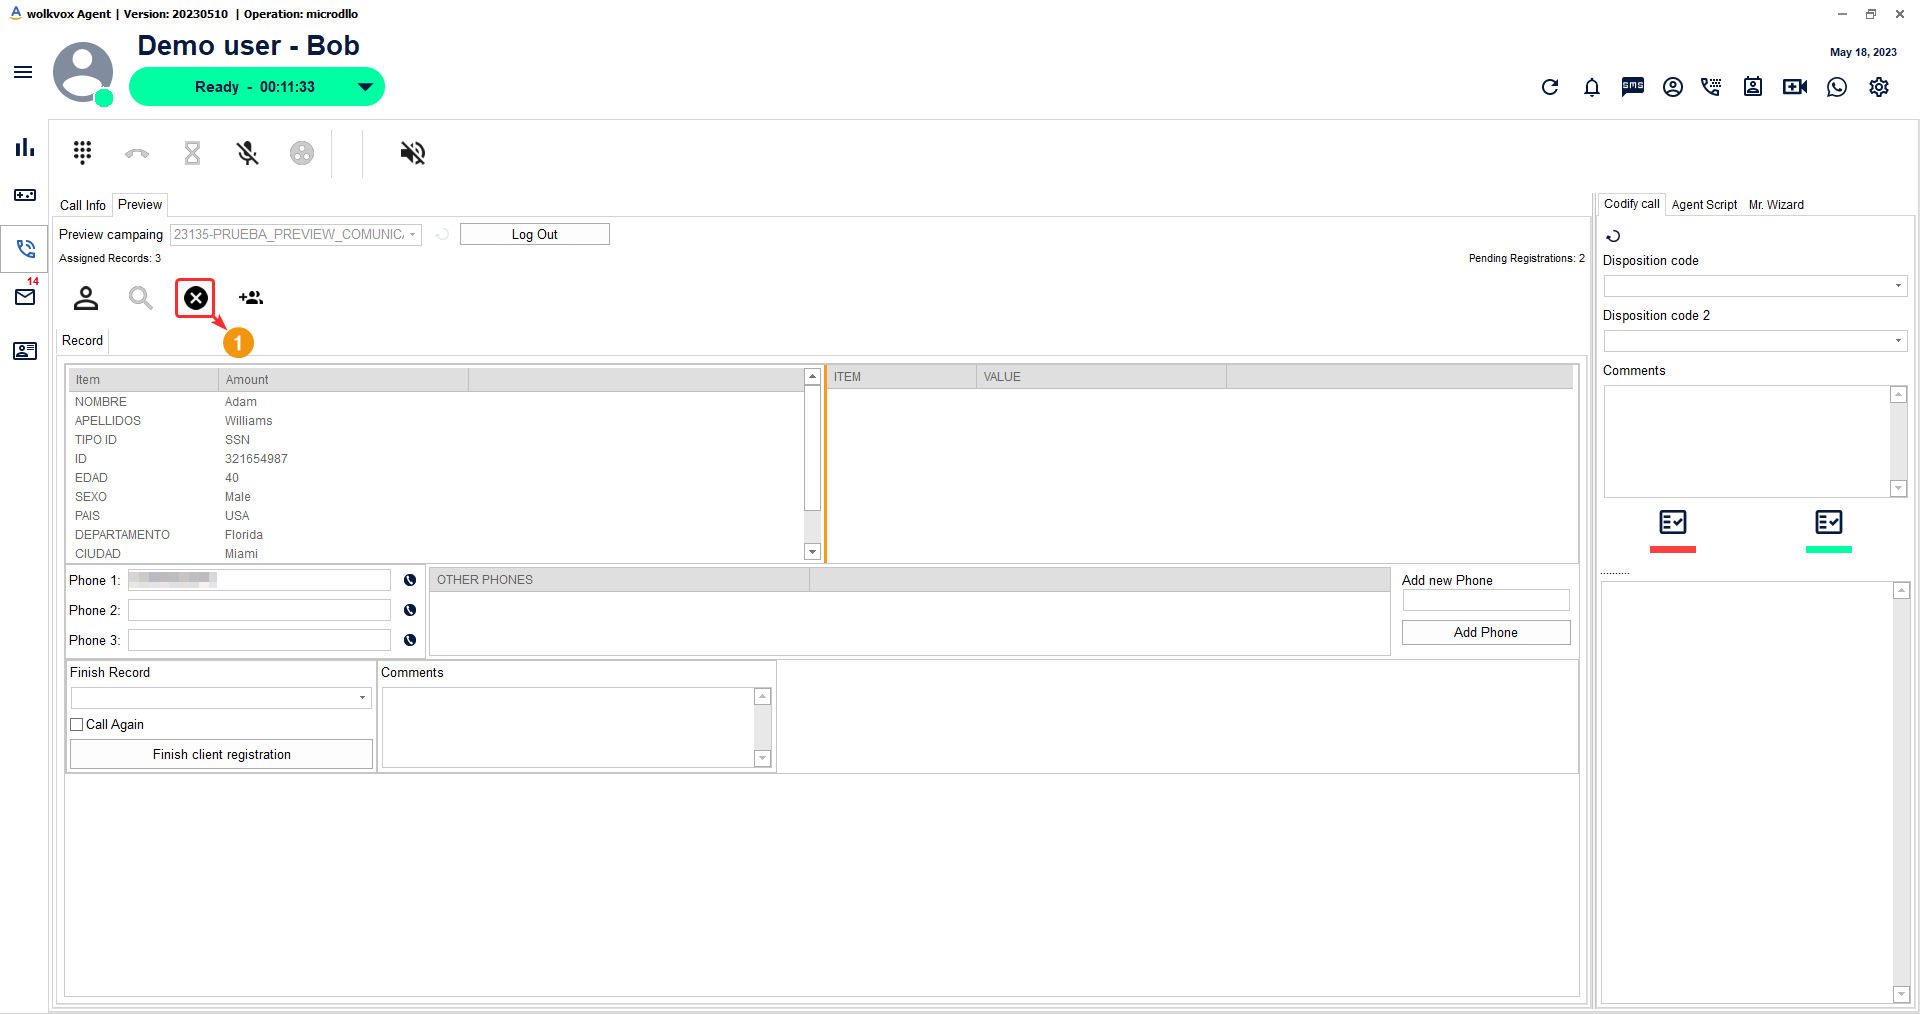
This button allows you to cancel the management of the current record displayed in the table, and then click on “Next client” to continue with the management of another record. It is mainly used if, for some reason, you want to skip or delay the management of the client that appeared in the table.
Add client or referral #
This button allows you to add a record to the current campaign, enabling the agent to add new clients to the campaign’s database.
The mandatory data for this option are: first name, last name, client identification number, and phone number. As optional, there are two additional fields for phone numbers, city, and address.
Once you click the “Add” button, the client will be added to the campaign’s database, and their data will be available for reference.
Important: The option for agents to add new clients to the database can be enabled or disabled by the operation’s administrator.

Campaigns and calls with automatic dialing #
These types of campaigns are divided into two: progressive and predictive.
- Predictive type: This type of dialing is done through an algorithm that aims to keep agents occupied as much as possible during their work shift. The system first dials the customer, and once the call is initiated, it transfers it to an agent’s line.
- Progressive type: Unlike predictive, this dialer only makes calls when agents are available. This system offers greater reliability as we can be sure that an agent will be available when a customer accepts the call.
![]() Campaigns of these types must be initiated by the leaders of your process, the administrator of the Wolkvox Manager application. Once a campaign is started, the automatic dialing will begin.
Campaigns of these types must be initiated by the leaders of your process, the administrator of the Wolkvox Manager application. Once a campaign is started, the automatic dialing will begin.
Once the administrator starts the campaign, the system will start calling customers based on the number of agents, the campaign speed, and the expertise level assigned to each agent.
Each answered call will be transferred to an available agent.
When an agent receives a call, all the call information will be loaded in the “Call info” tab of the “Voice” section.
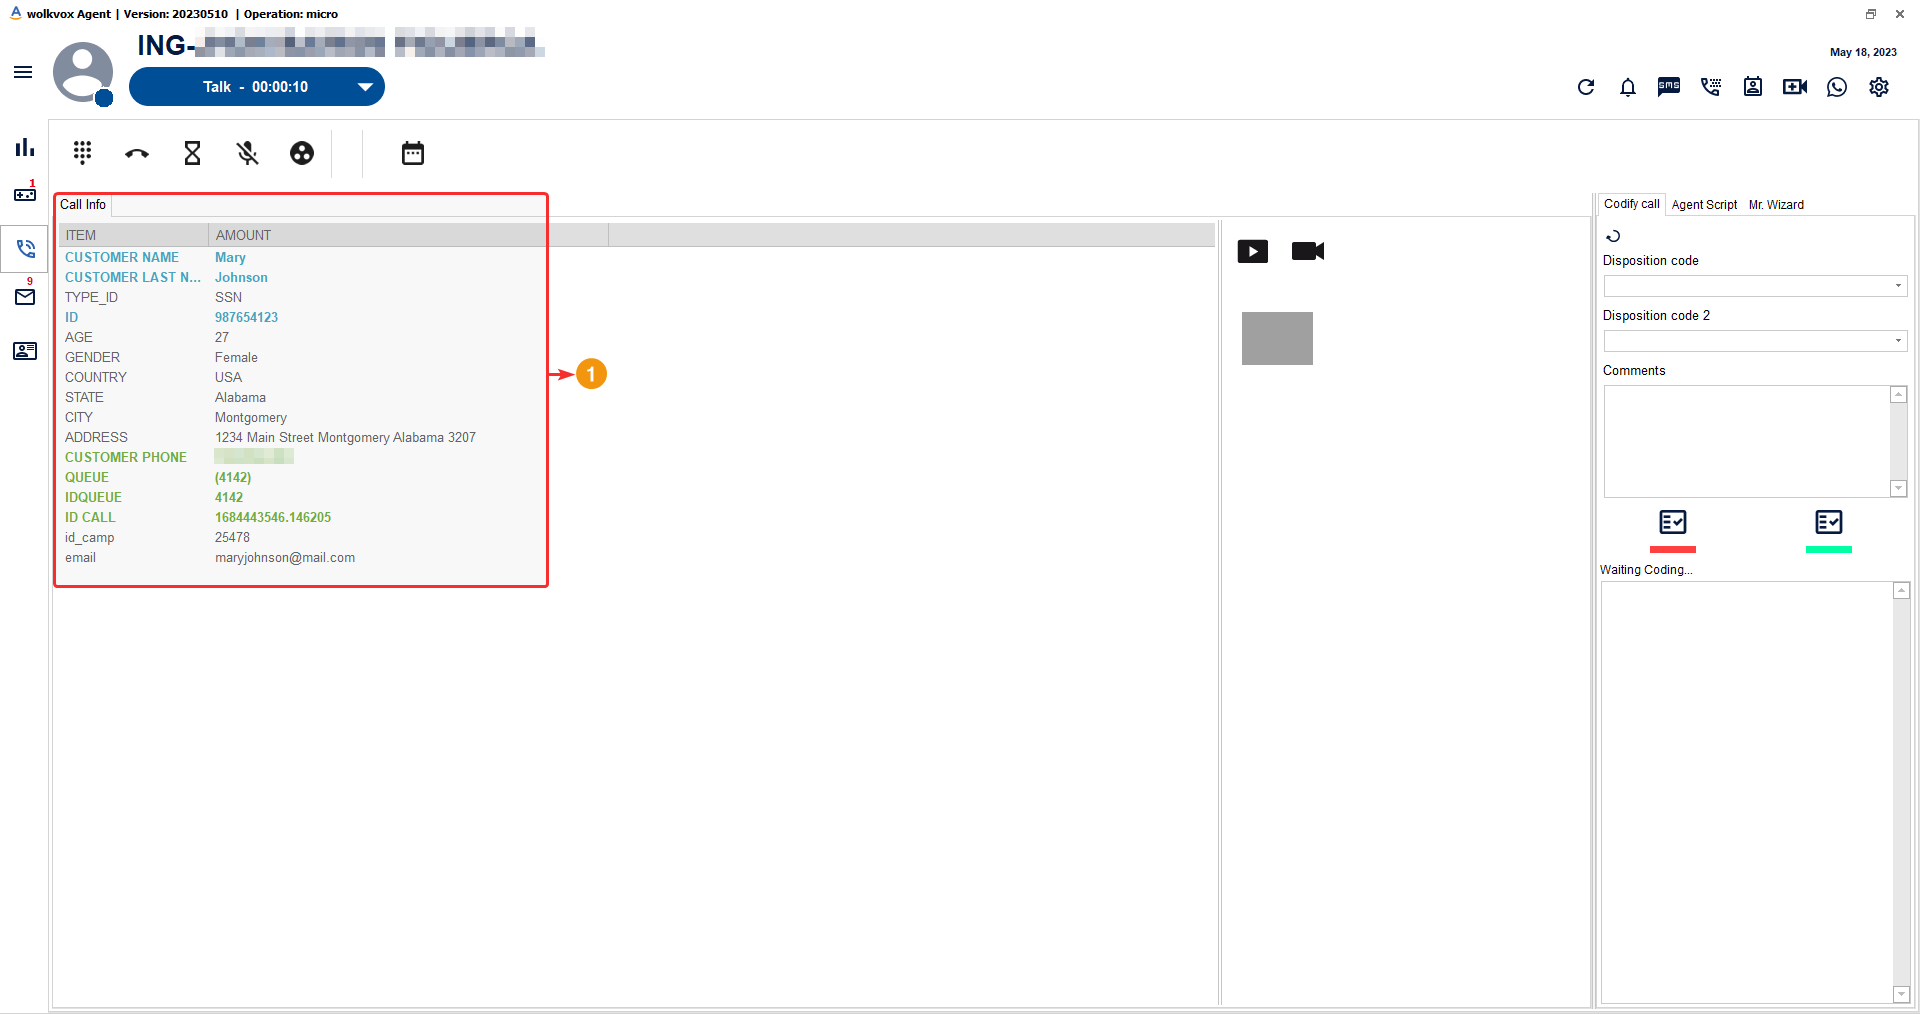
The information provided in this section is as follows:
- Customer’s first and last name.
- Type_ID: Refers to the customer’s identification type.
- ID: The customer’s identification number.
- General customer data such as age, gender, country, state/province, city, and the phone number called.
- Queue: Represents the skill, queue, or agent group through which the call was made.
- ID Queue: The identification number of the skill, queue, or agent group.
- ID Call: A unique identification number for the call.
- Opt1, Opt2, Opt3, Opt4, and others: Additional data loaded in the database by the campaign leader to provide the agent with a broader context during the call.
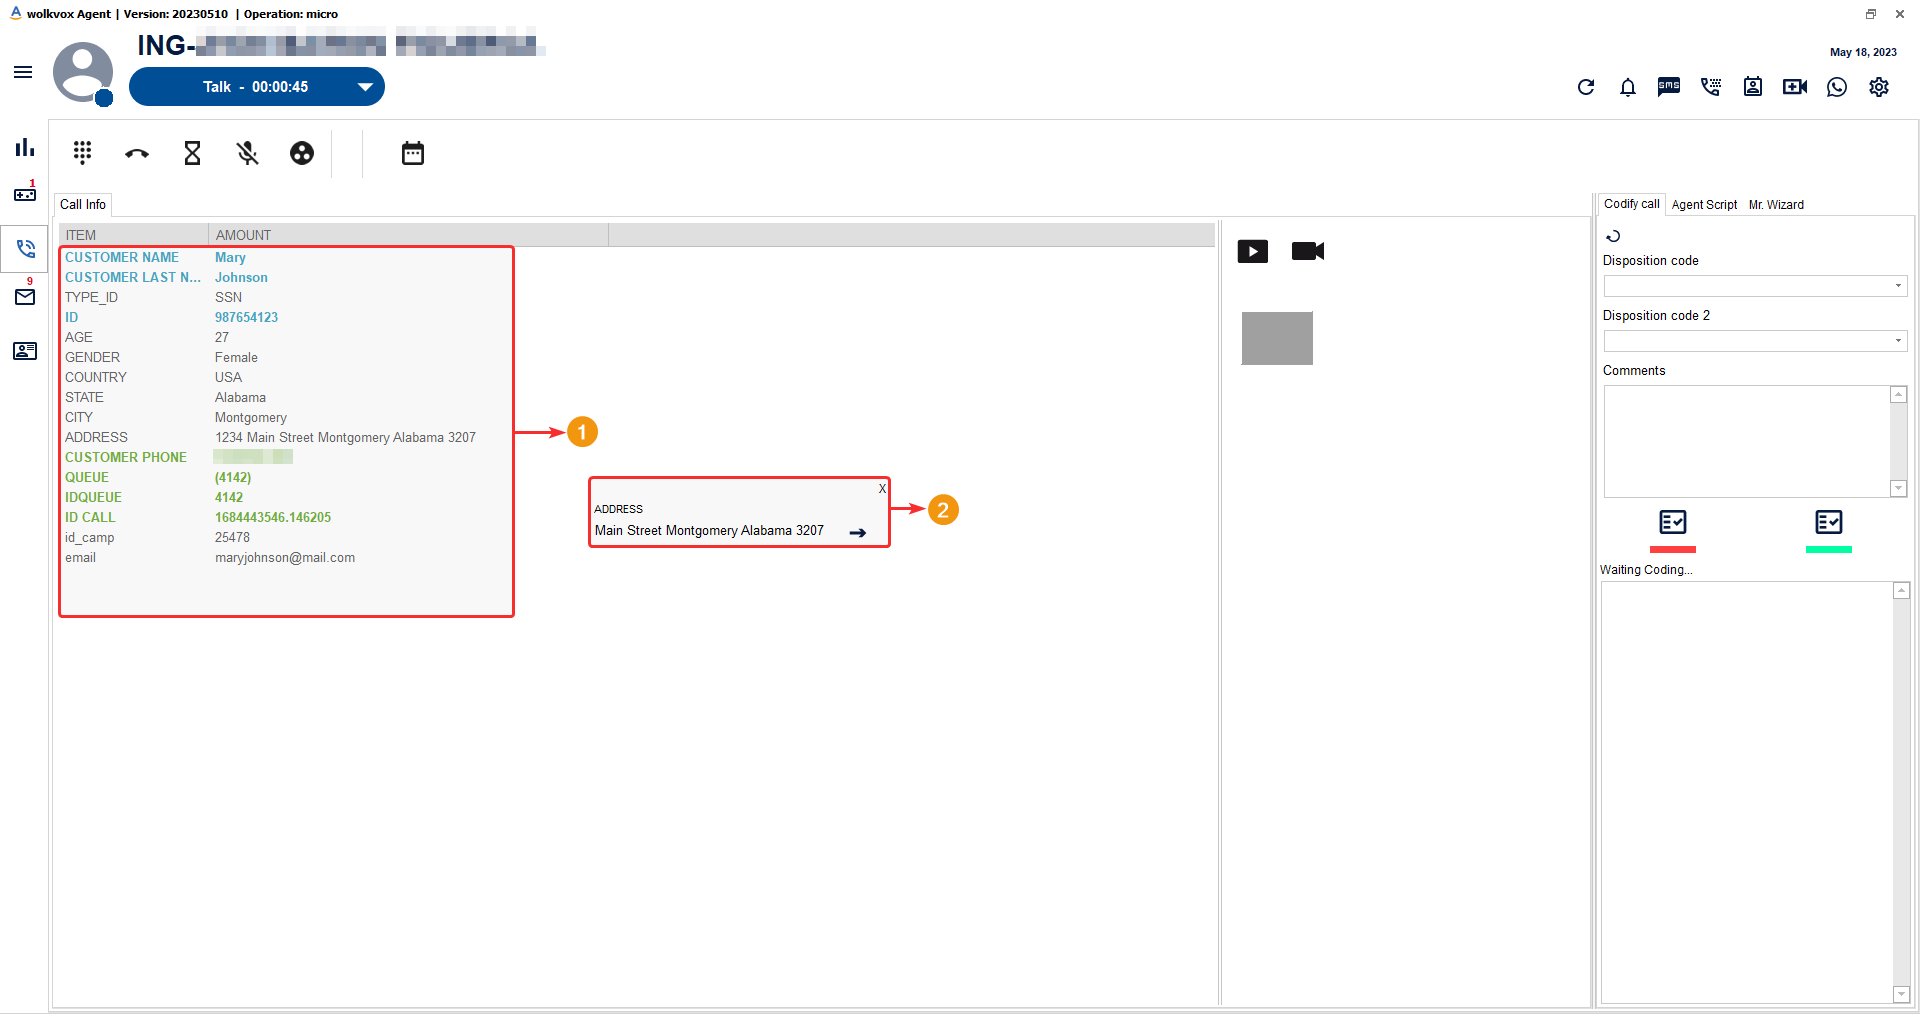
The operation administrator has the authority to enable or disable the option for agents to edit customer information.
- If this option is enabled for your campaign, you can right-click on any data in the customer database and select the “Edit” option.
- A window will open where you can replace the stored data and click the arrow to apply the changes.
Recall or reschedule call #
If you need to make a call to a client again, the “Call Again” button allows you to schedule a call and view the list of pending callbacks.
By clicking on the “Call Again” button, a new window opens where you can see two tabs, “Schedule Call” and “Pending Manual Callbacks”.

Tab “Schedule Call”
The “Schedule Call” tab is the section where you can schedule a call for future dialing.
In the first field, you need to select the date on which you want to make the callback.
In the second field, you select the call time.
In the third field, you can modify the customer’s telephone number if needed, or leave it as is if no changes are required.
Following that, there are two selectable options: “Automatically assign” and “Call Again – Manually”.
By selecting the first option, automatic dialing will occur once the specified date and time arrive. In other words, when that date and time come, the system will search for an available agent and assign the call to them.
On the other hand, with the second option, the call needs to be made manually. With this option, when the specified date and time arrive, the system will alert the agent that it’s time to make the previously scheduled call.

Tab “Pending Manual Calls”
Go to the “Pending Manual Calls” tab.
In this section, there is a table that displays the calls that the agent scheduled as pending.
The button located on the right side of the pending calls table is used to refresh the list of calls.

Interactions #
![]() This section aims to serve as an omnichannel platform to simultaneously attend to your customers present on multiple social platforms. These interactions will be comments left by your customers on posts on any of the aforementioned social media platforms.
This section aims to serve as an omnichannel platform to simultaneously attend to your customers present on multiple social platforms. These interactions will be comments left by your customers on posts on any of the aforementioned social media platforms.
For example, you can view interactions from Email, Facebook, Twitter, and Instagram. It all depends on the platforms integrated into your operation, and this management is done by the wolkvox Manager administrator in your process.
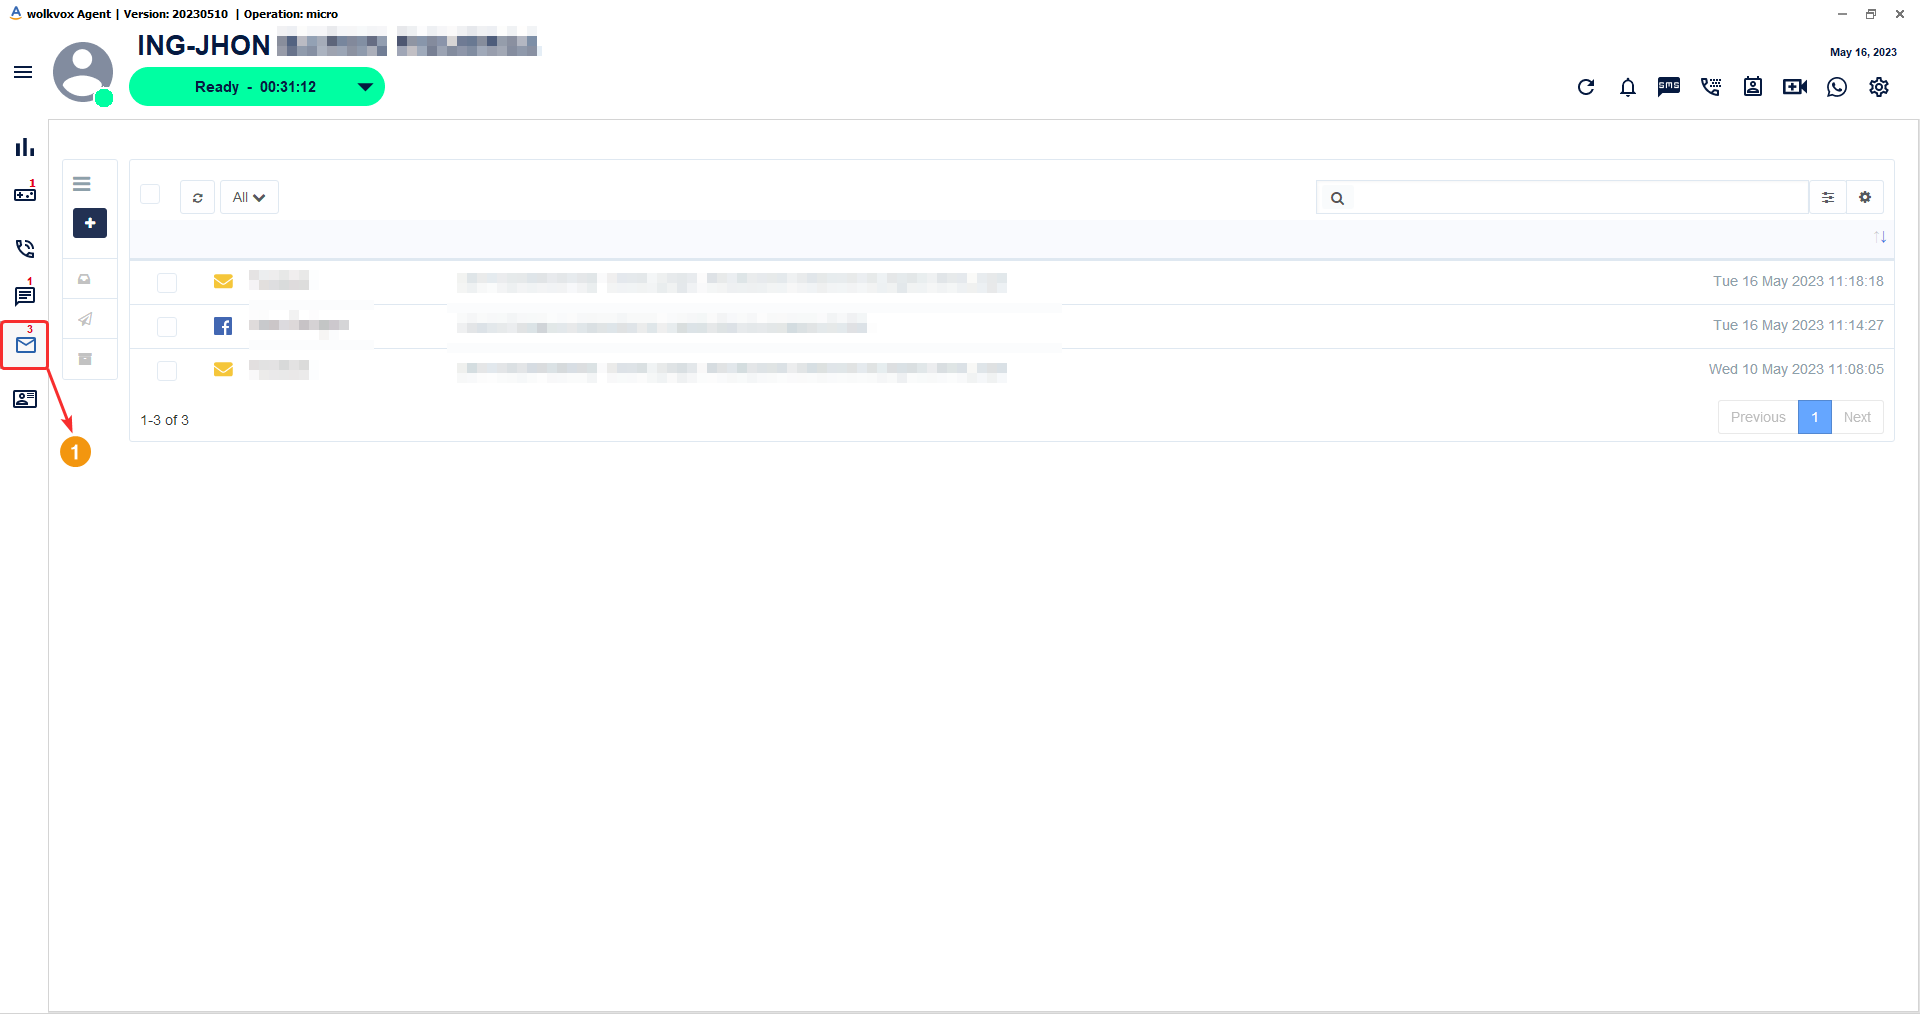
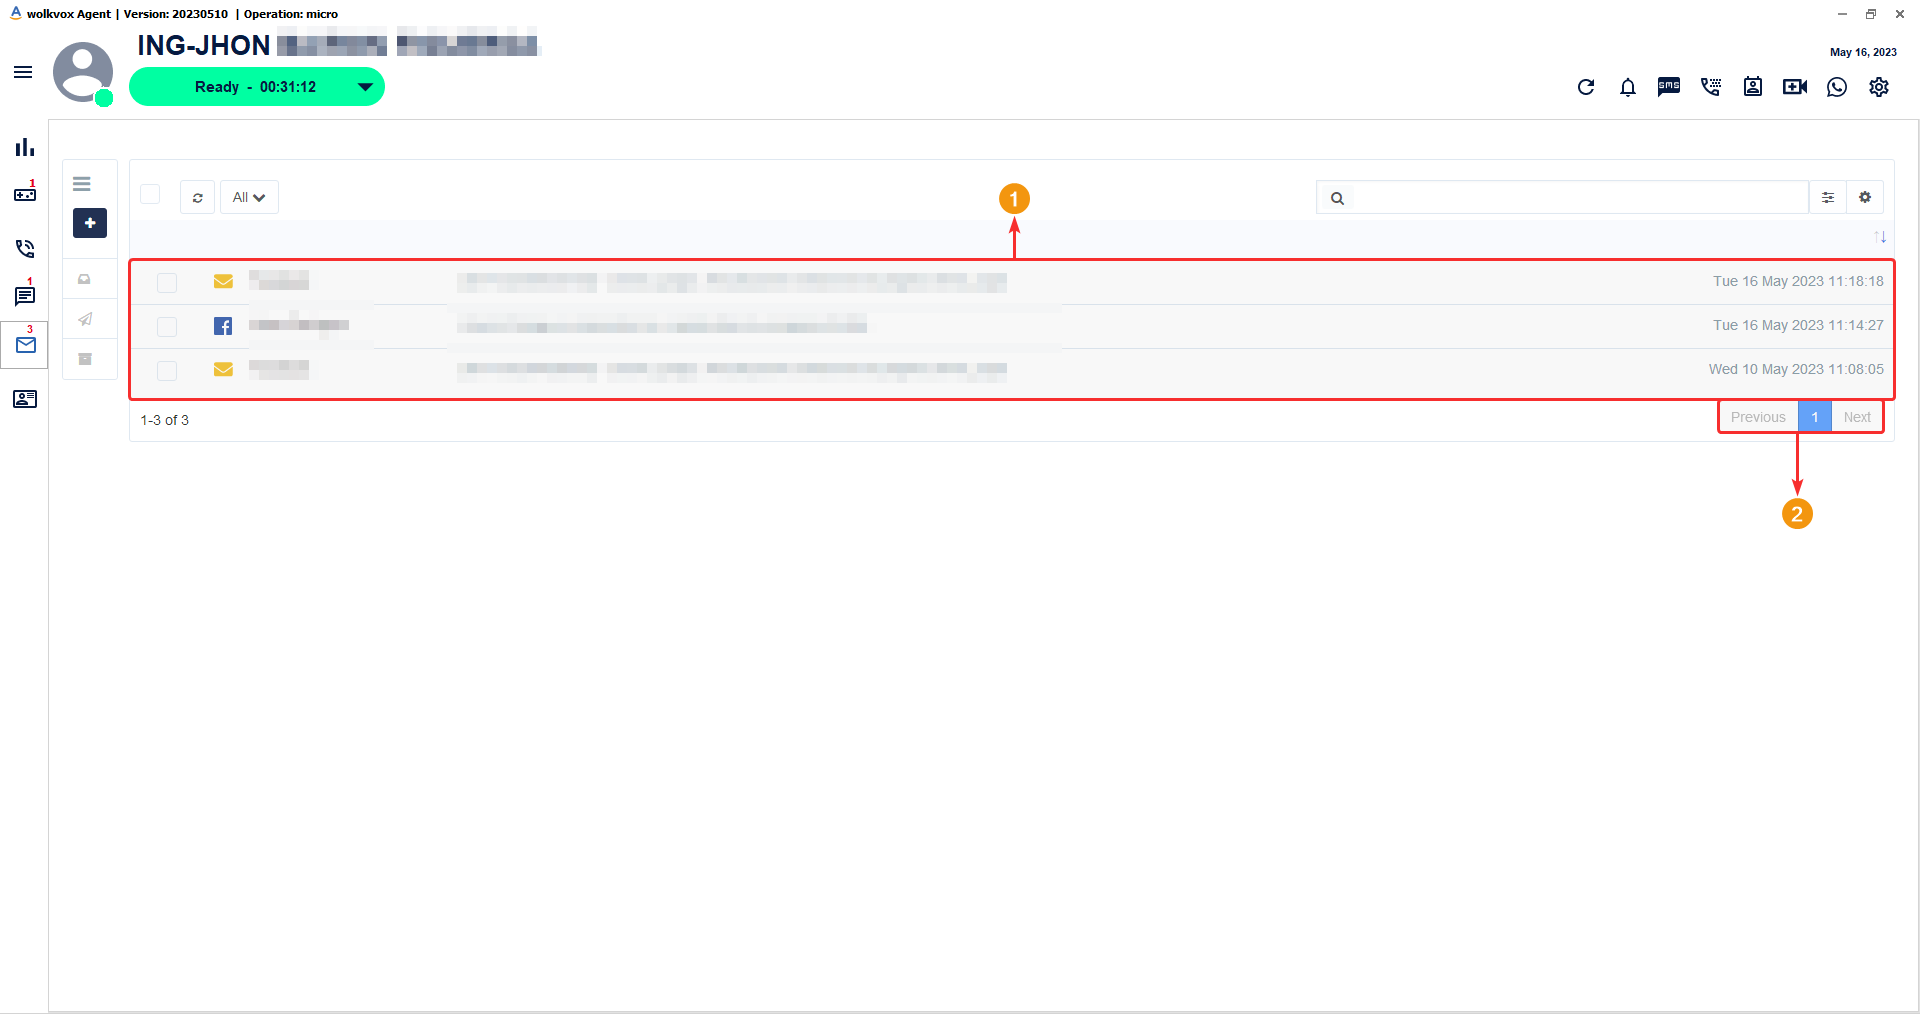
In the central section, you will have all the interactions that have come to you. The administrator of your operation will be responsible for adding you to the skills where customer interactions on social media are received. Remember that the services currently available are: email, Facebook pages, Instagram pages, and Twitter profiles.
You will identify each social media platform with the help of the icon located on the left side of each interaction element.
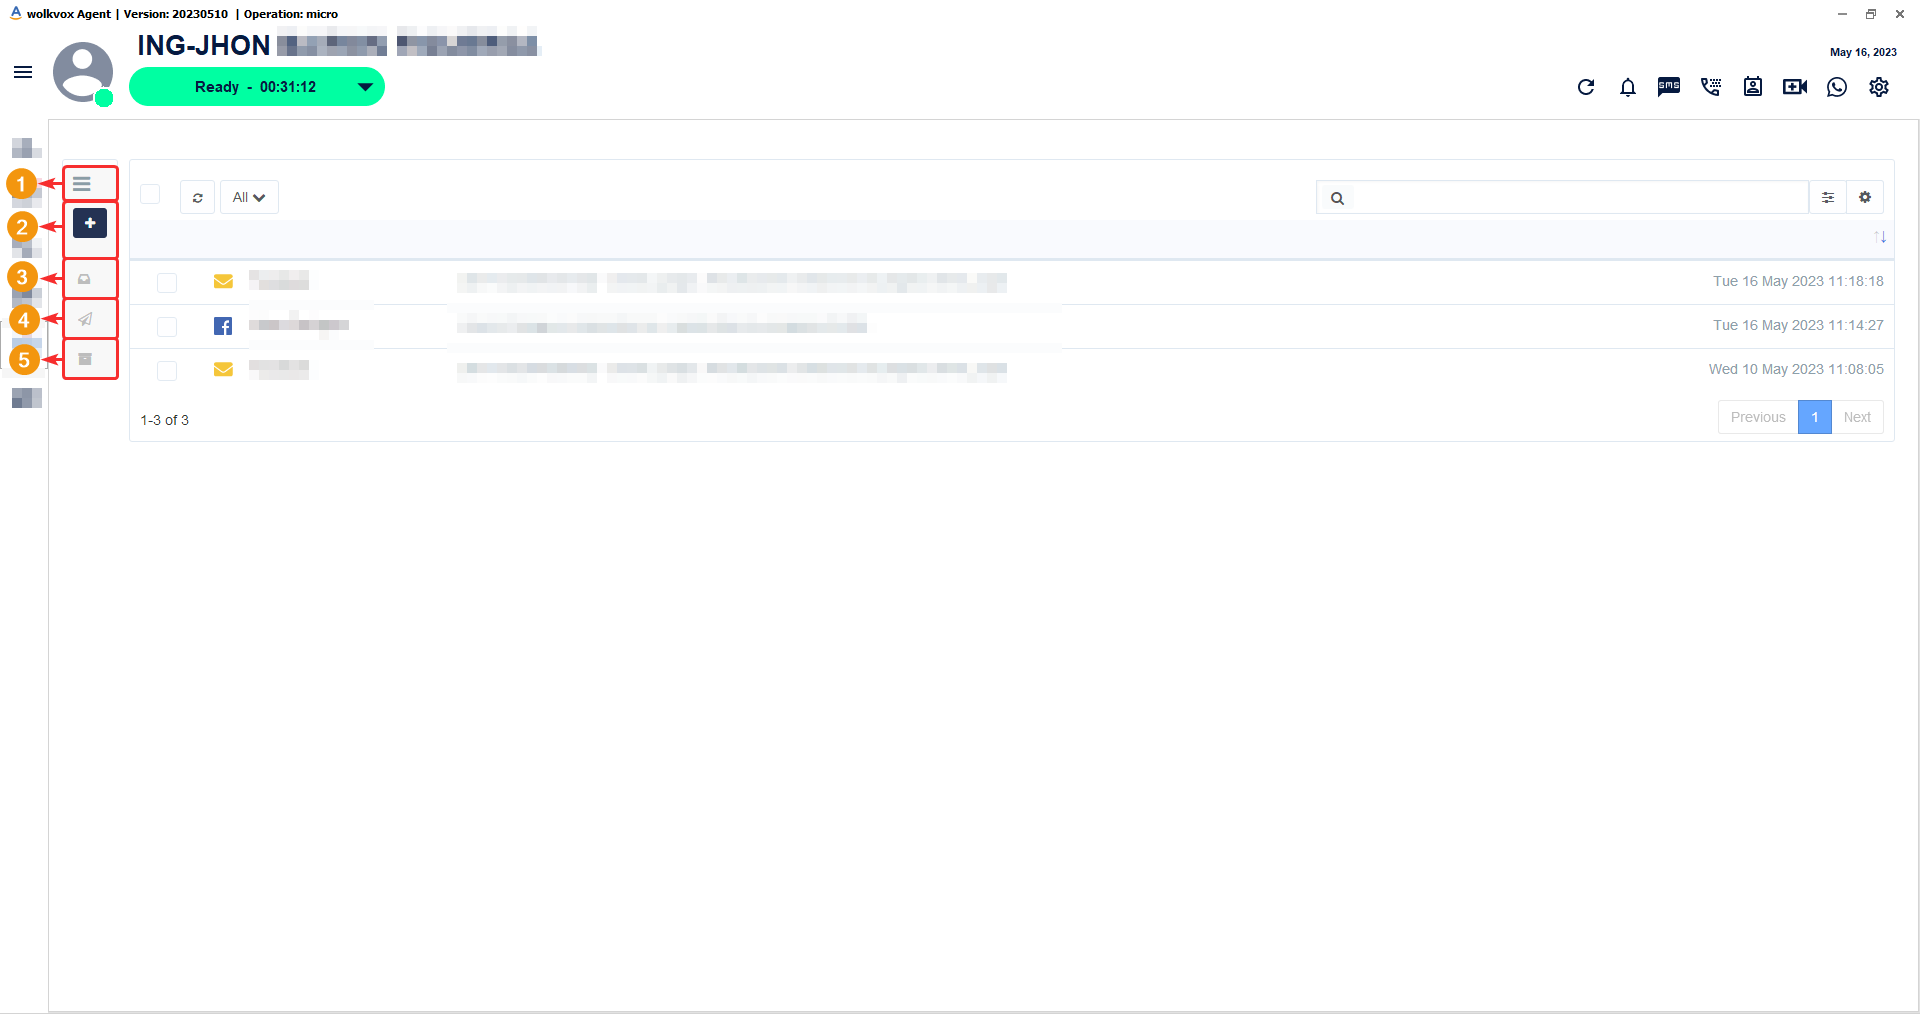
Within this menu, you can interact with the following buttons:
- Expand menu: This button displays the corresponding menu in an expanded manner to view the titles of each button.
- New email: Takes you to the section where you can create a new message to send via email.
- Received messages: Opens the inbox for new emails and messages received via Instagram, Facebook, or Twitter. However, this happens only if the operation or module has the integration configured for any of these channels.
- Sent messages: This button displays the emails sent by the agent.
- Archived messages: It is the mailbox where emails that have been saved by the agent are stored.
Advanced search for interactions #
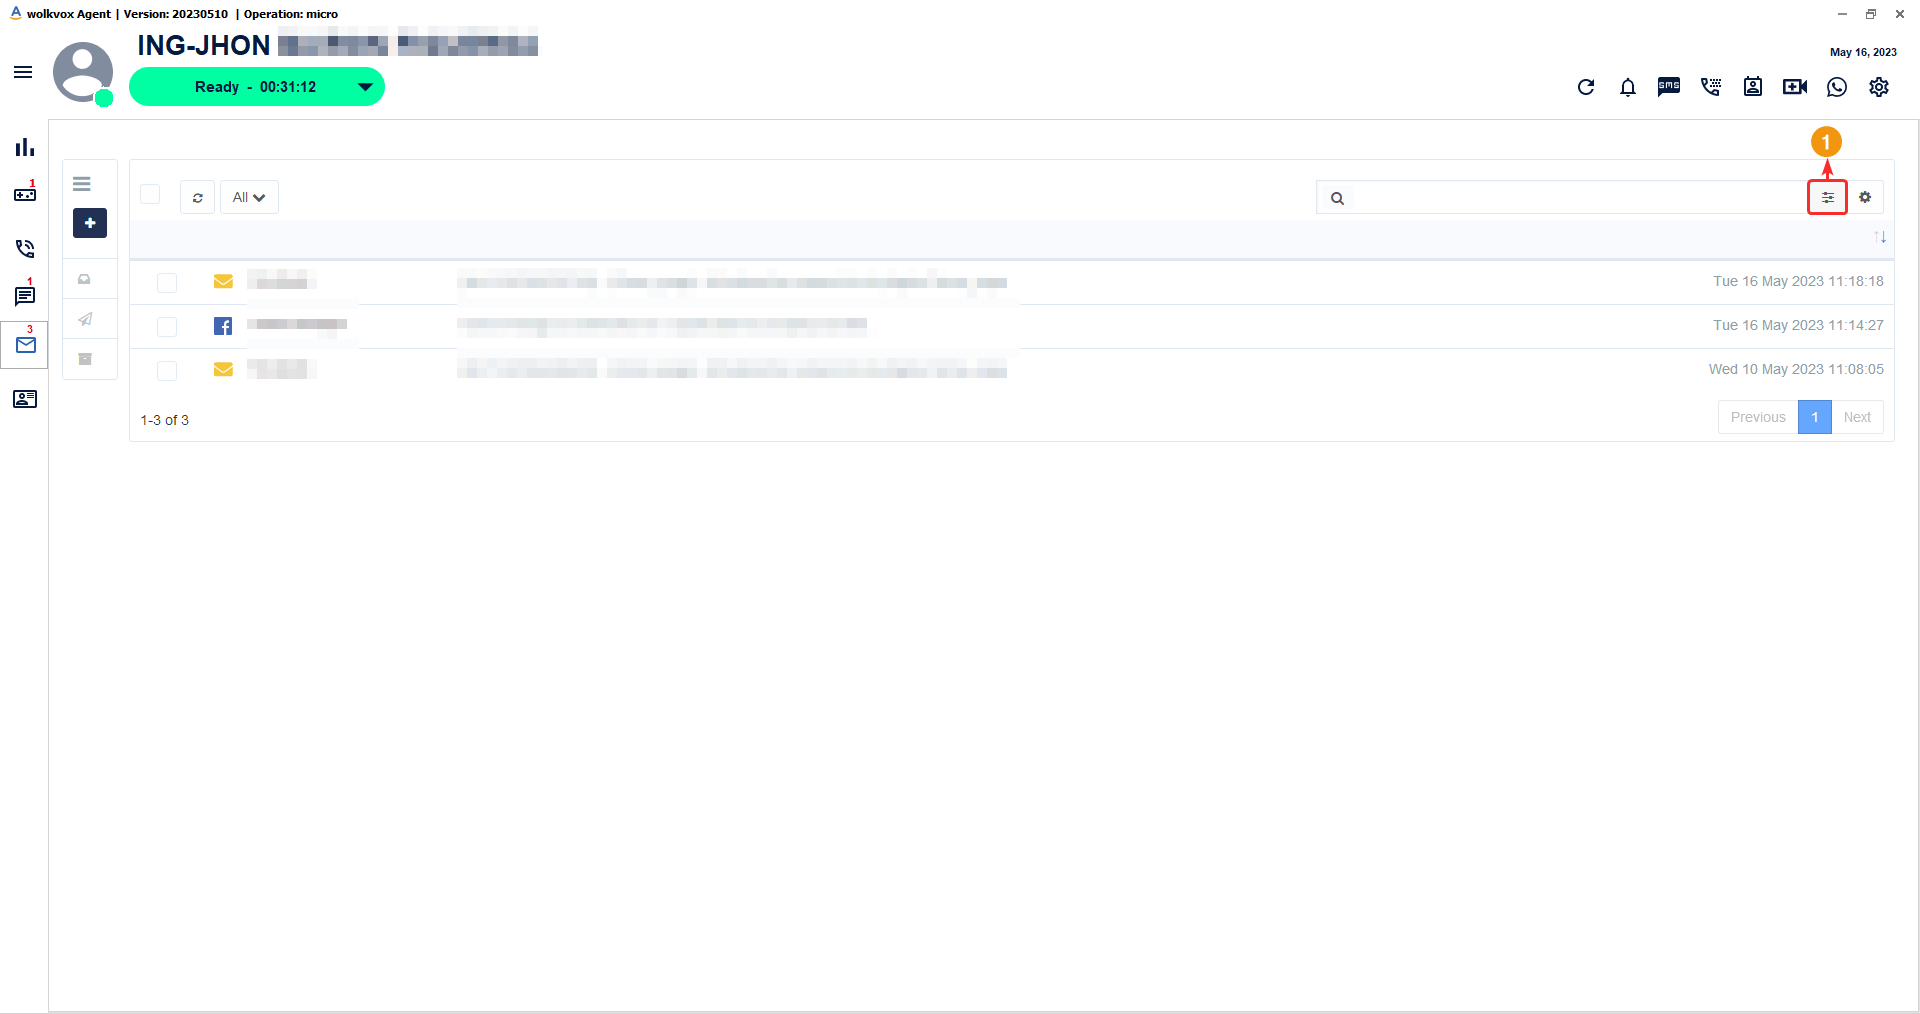
![]() To expedite the search for an interaction when there are many in the inbox, the search field is available where you can enter a keyword related to the desired search. Additionally, the advanced search tool is available to further filter the list of interactions. The following options are explained below.
To expedite the search for an interaction when there are many in the inbox, the search field is available where you can enter a keyword related to the desired search. Additionally, the advanced search tool is available to further filter the list of interactions. The following options are explained below.
This advanced search option allows you to filter interactions based on the sender’s name, recipient’s name, subject of the interaction, date the message was received, or interactions that contain attachments.
Filter by interaction source #
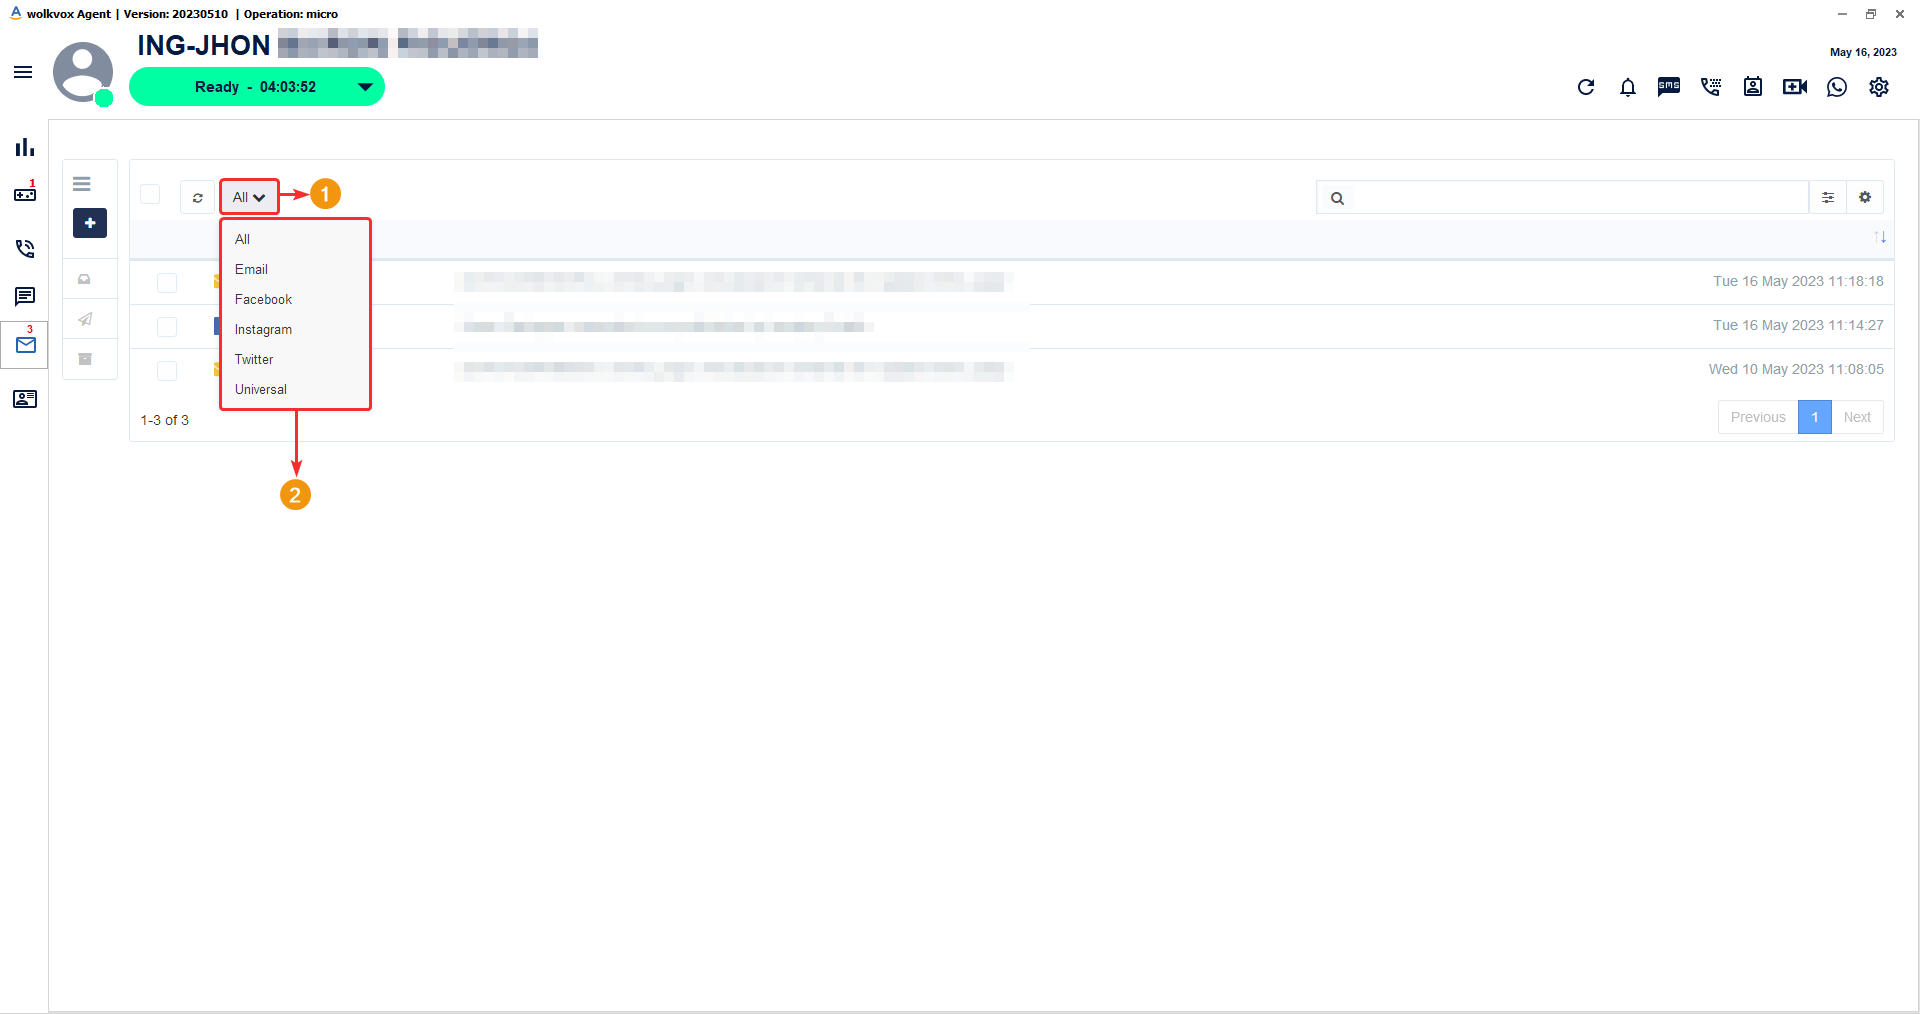
![]() To streamline omnichannel or multi-platform work, it is also possible to filter interactions based on their source (email, Facebook, Instagram, or Twitter).
To streamline omnichannel or multi-platform work, it is also possible to filter interactions based on their source (email, Facebook, Instagram, or Twitter).
Transfer or archive an interaction #
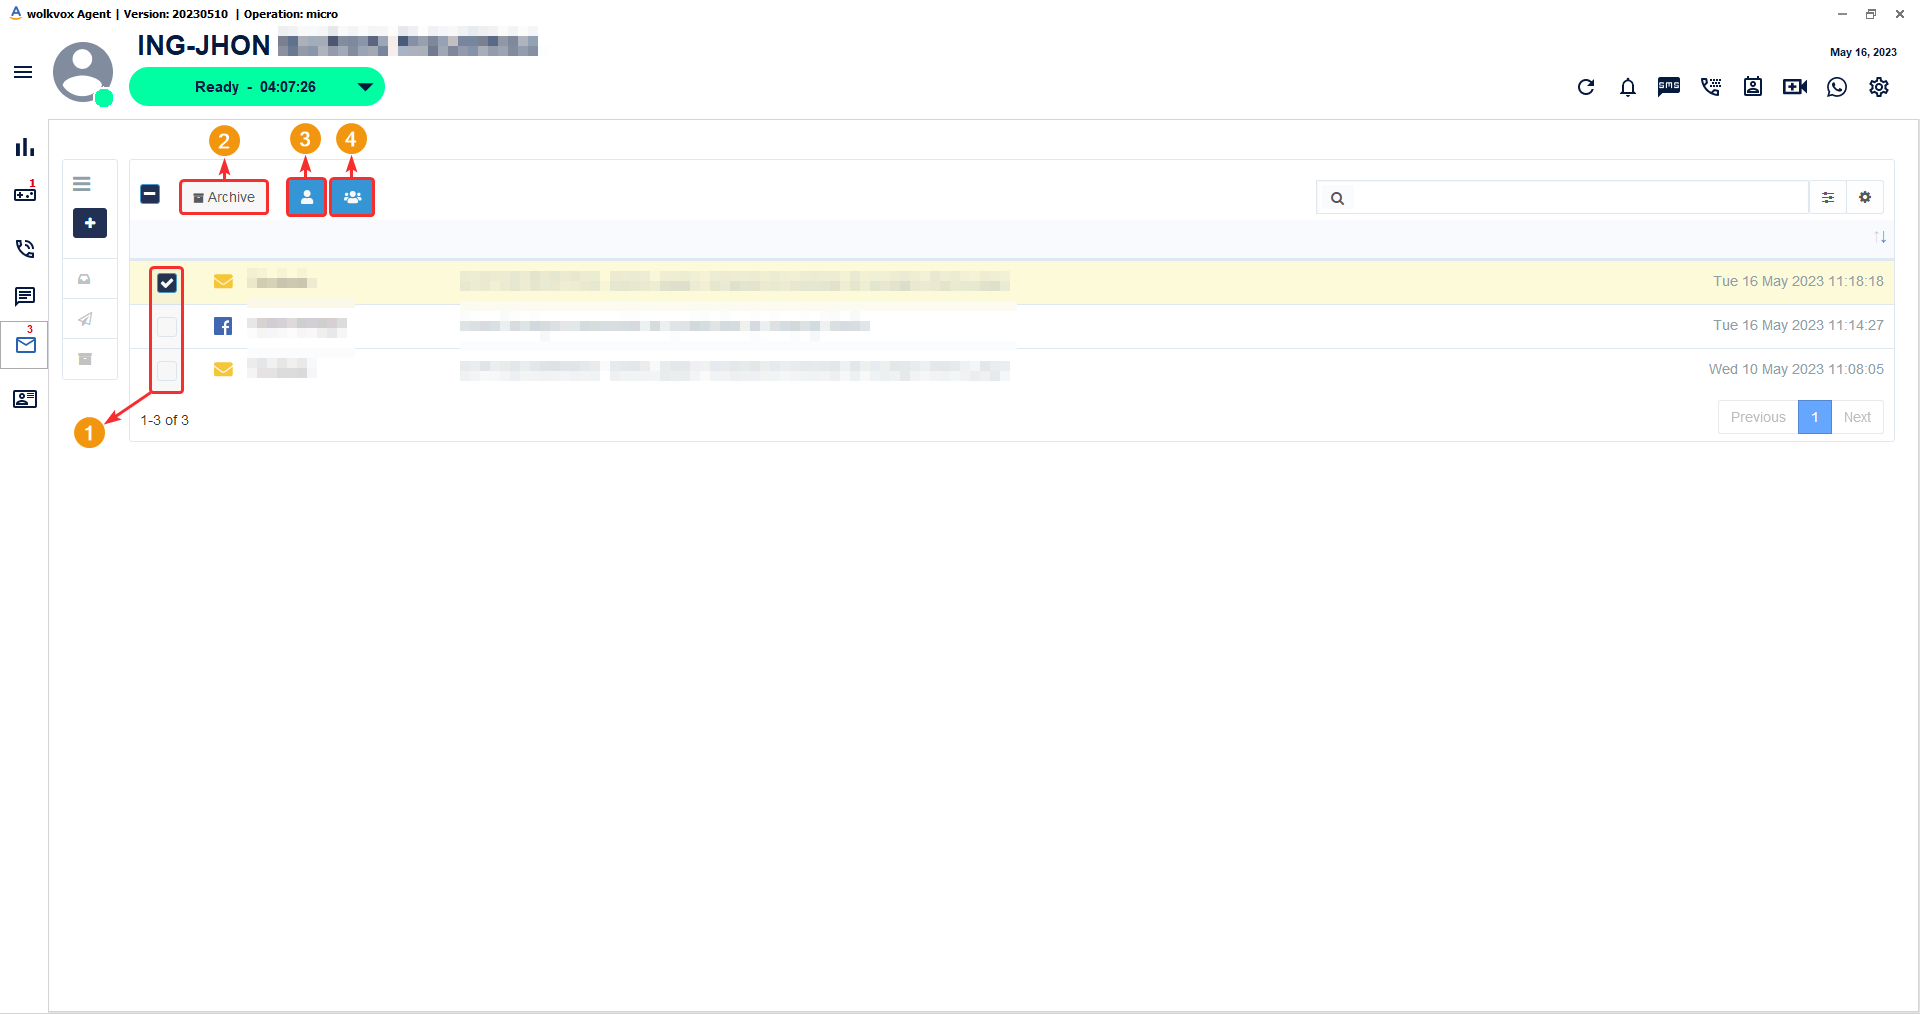
![]() In the list of interactions, each one has a square on the left side that can be clicked to activate the selection of that interaction, in order to display the buttons that serve to:
In the list of interactions, each one has a square on the left side that can be clicked to activate the selection of that interaction, in order to display the buttons that serve to:
- Select the interaction(s).
- You can archive the interaction, meaning you can save the interactions in the “Saved” folder.
- You can transfer the interaction to another agent. Simply click on the button and select the desired agent from the dropdown menu to transfer the interaction to them.
- You can transfer the interaction to another skill. Simply click on the button and select the desired skill from the dropdown menu to transfer the interaction to it.
Interaction in Facebook and Instagram posts and Twitter tweets #
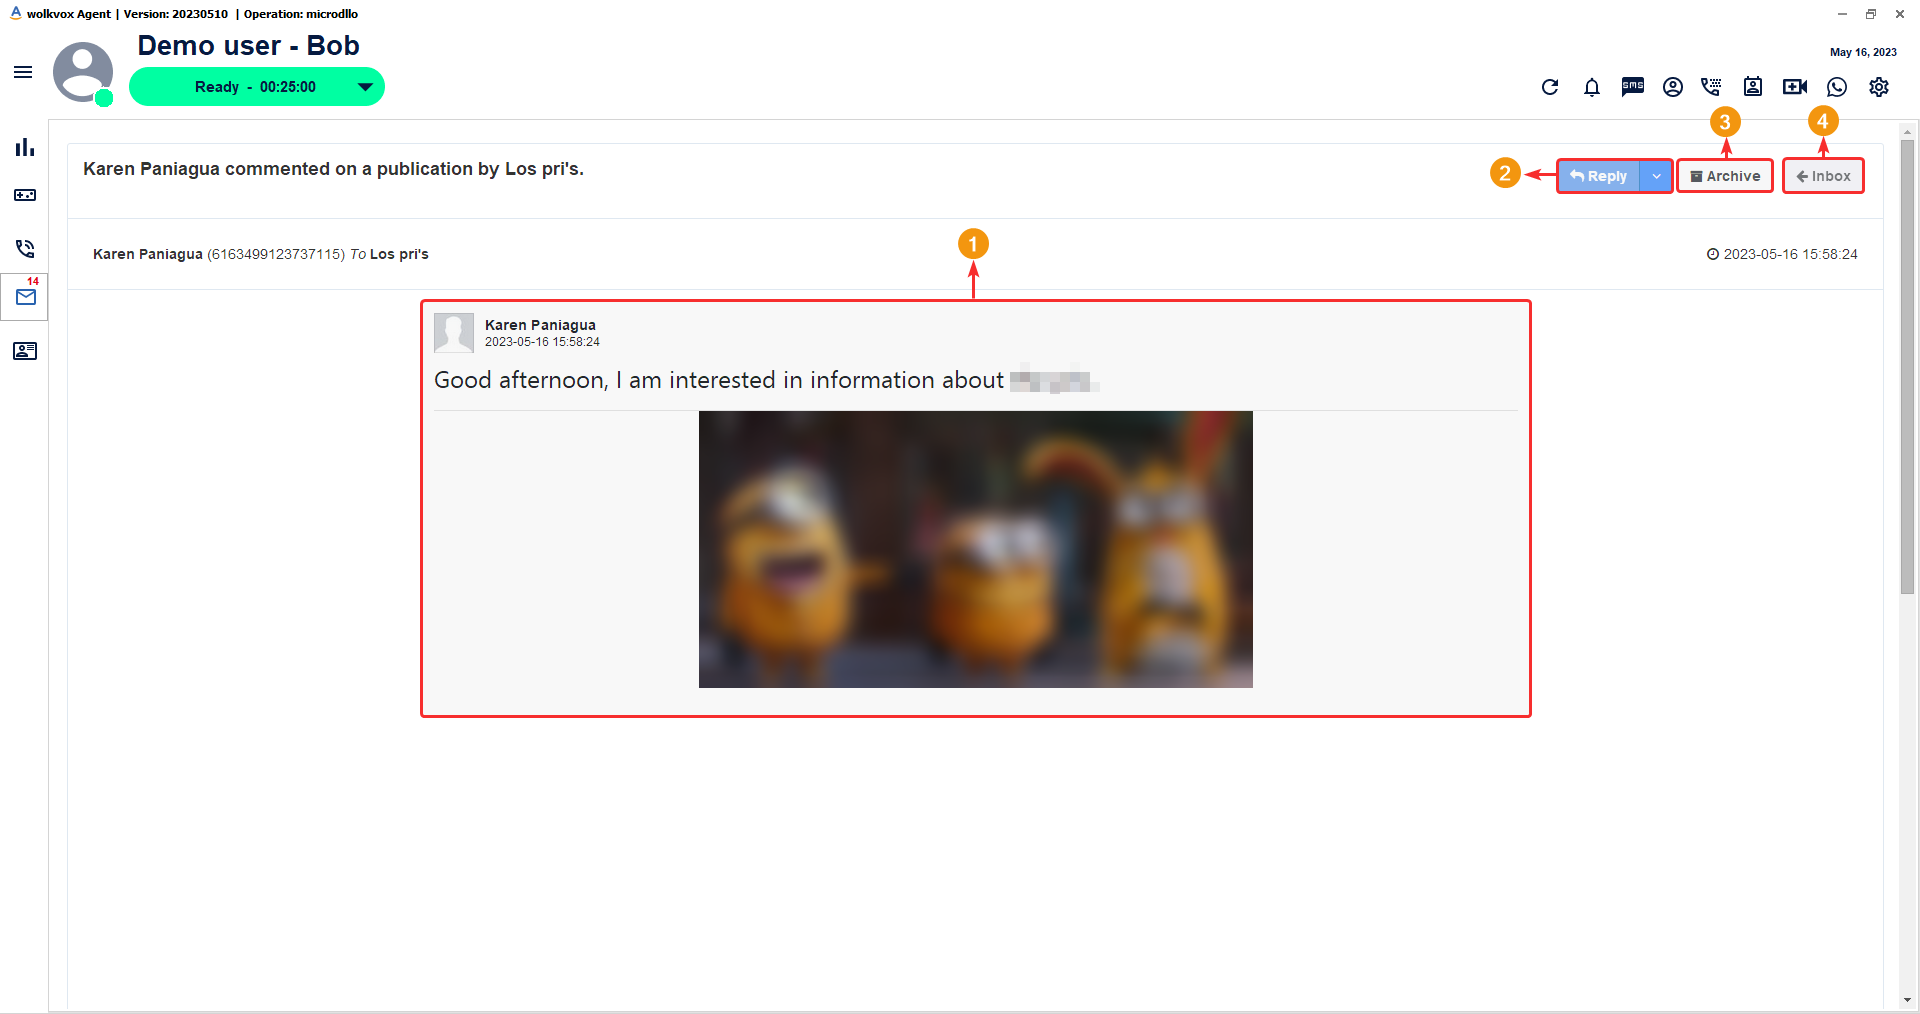
![]() When it comes to an interaction in Instagram or Facebook posts or Twitter tweets, the agent will be able to respond to the interaction through a message in the Messenger chat or in the comment of the post or tweet.
When it comes to an interaction in Instagram or Facebook posts or Twitter tweets, the agent will be able to respond to the interaction through a message in the Messenger chat or in the comment of the post or tweet.
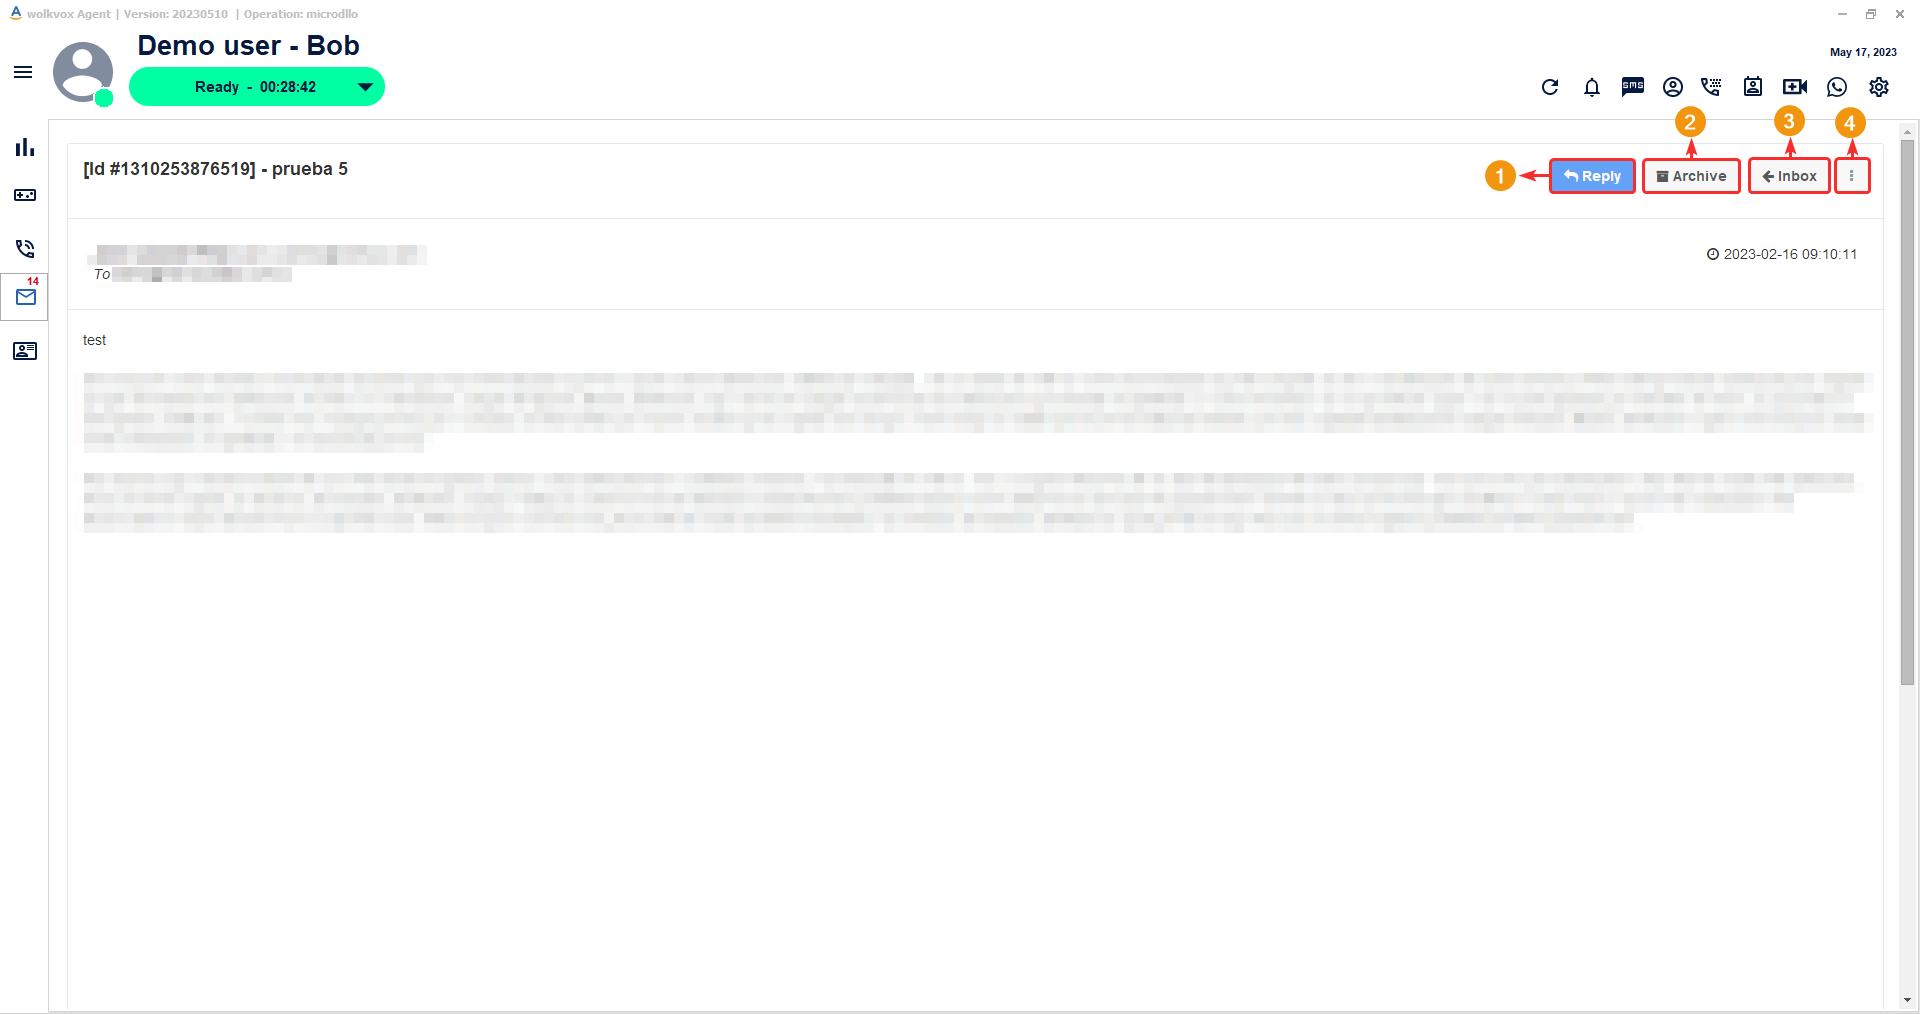
The available buttons in interactions of this type are as follows:
- You can preview the entire interaction created by the client.
- Reply: By clicking on “Reply,” the corresponding field will be enabled at the bottom for the agent to write their response. By clicking on the arrow, a dropdown menu opens, allowing you to select whether you want to reply via Messenger chat or directly in the post.
- Archive: Send the interaction to the archived folder.
- Inbox: By clicking this button, you can go back to the interactions inbox.
In the following image, you can see that you have a comment box where you can write your response and send it via Messenger chat, directly to the post’s comment, or tweet.

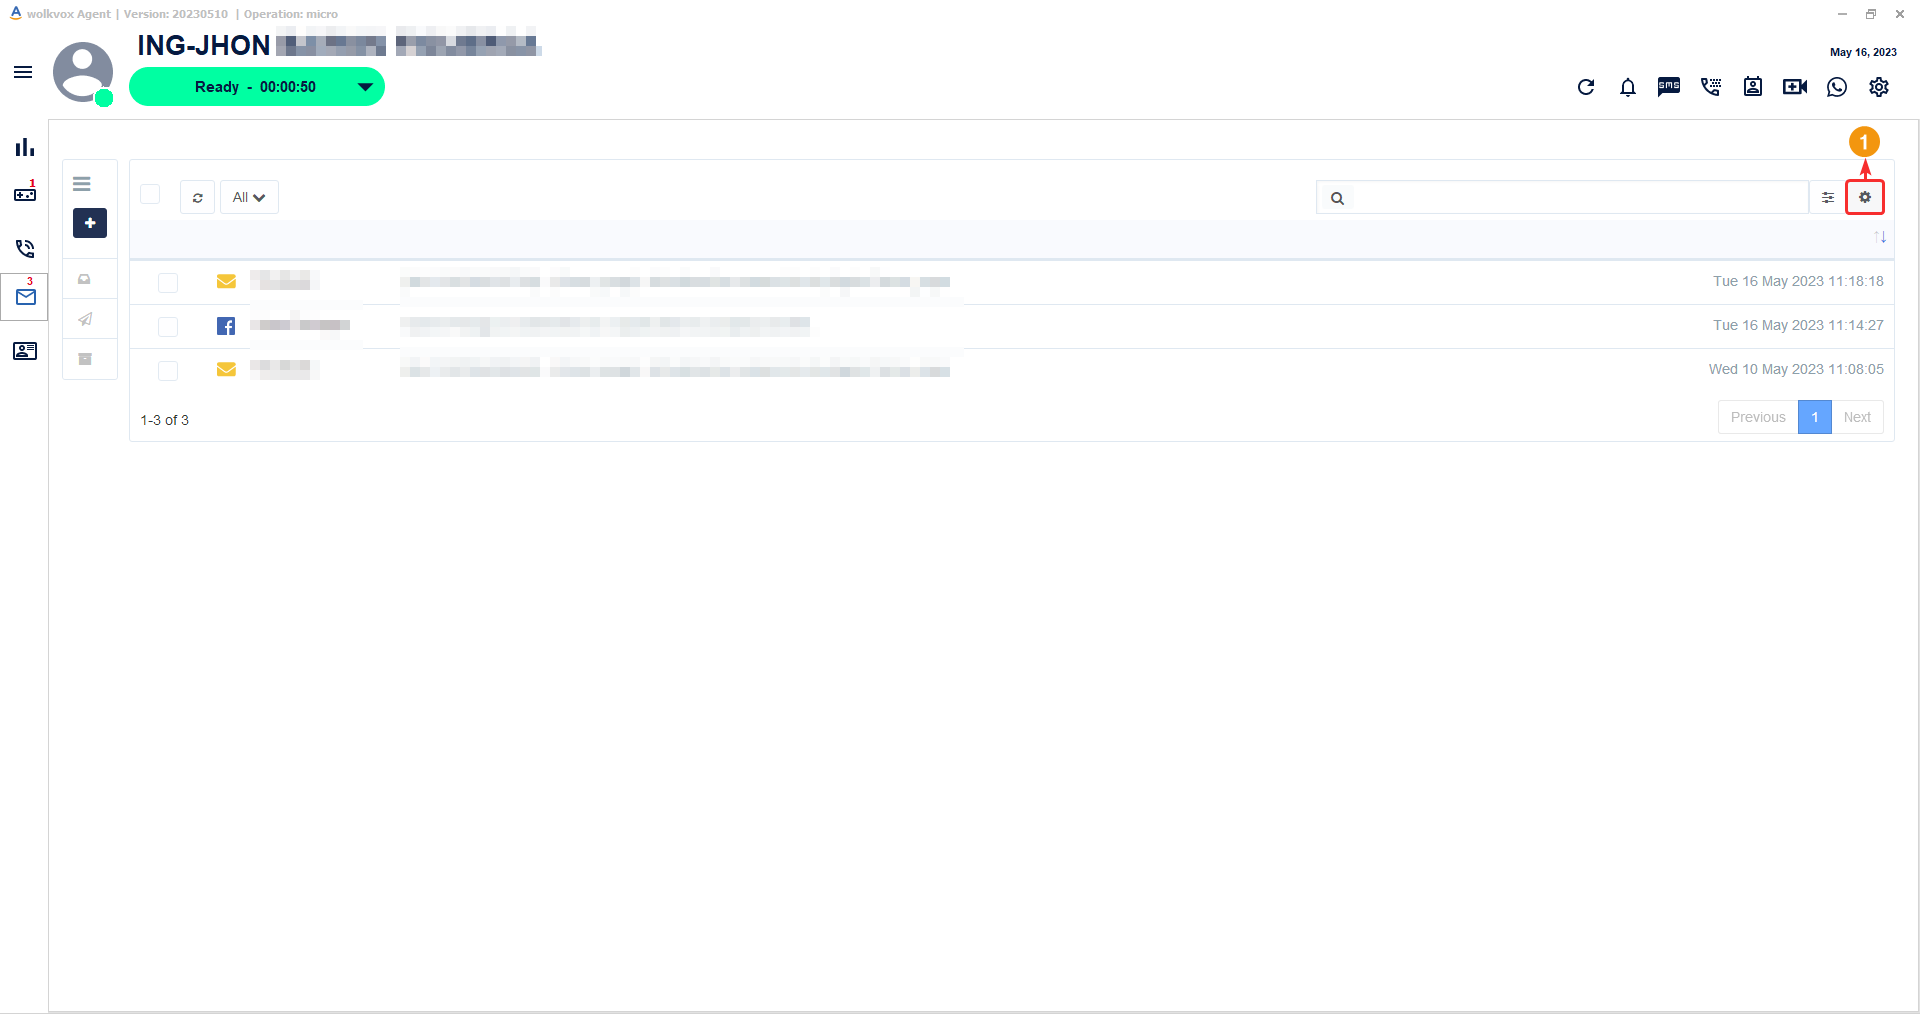
Configure signature #
![]() You can add a signature for email communications. This tool offers multiple editing options to add style to your signature.
You can add a signature for email communications. This tool offers multiple editing options to add style to your signature.
Configure a signature for emails using the highlighted button in the following image.
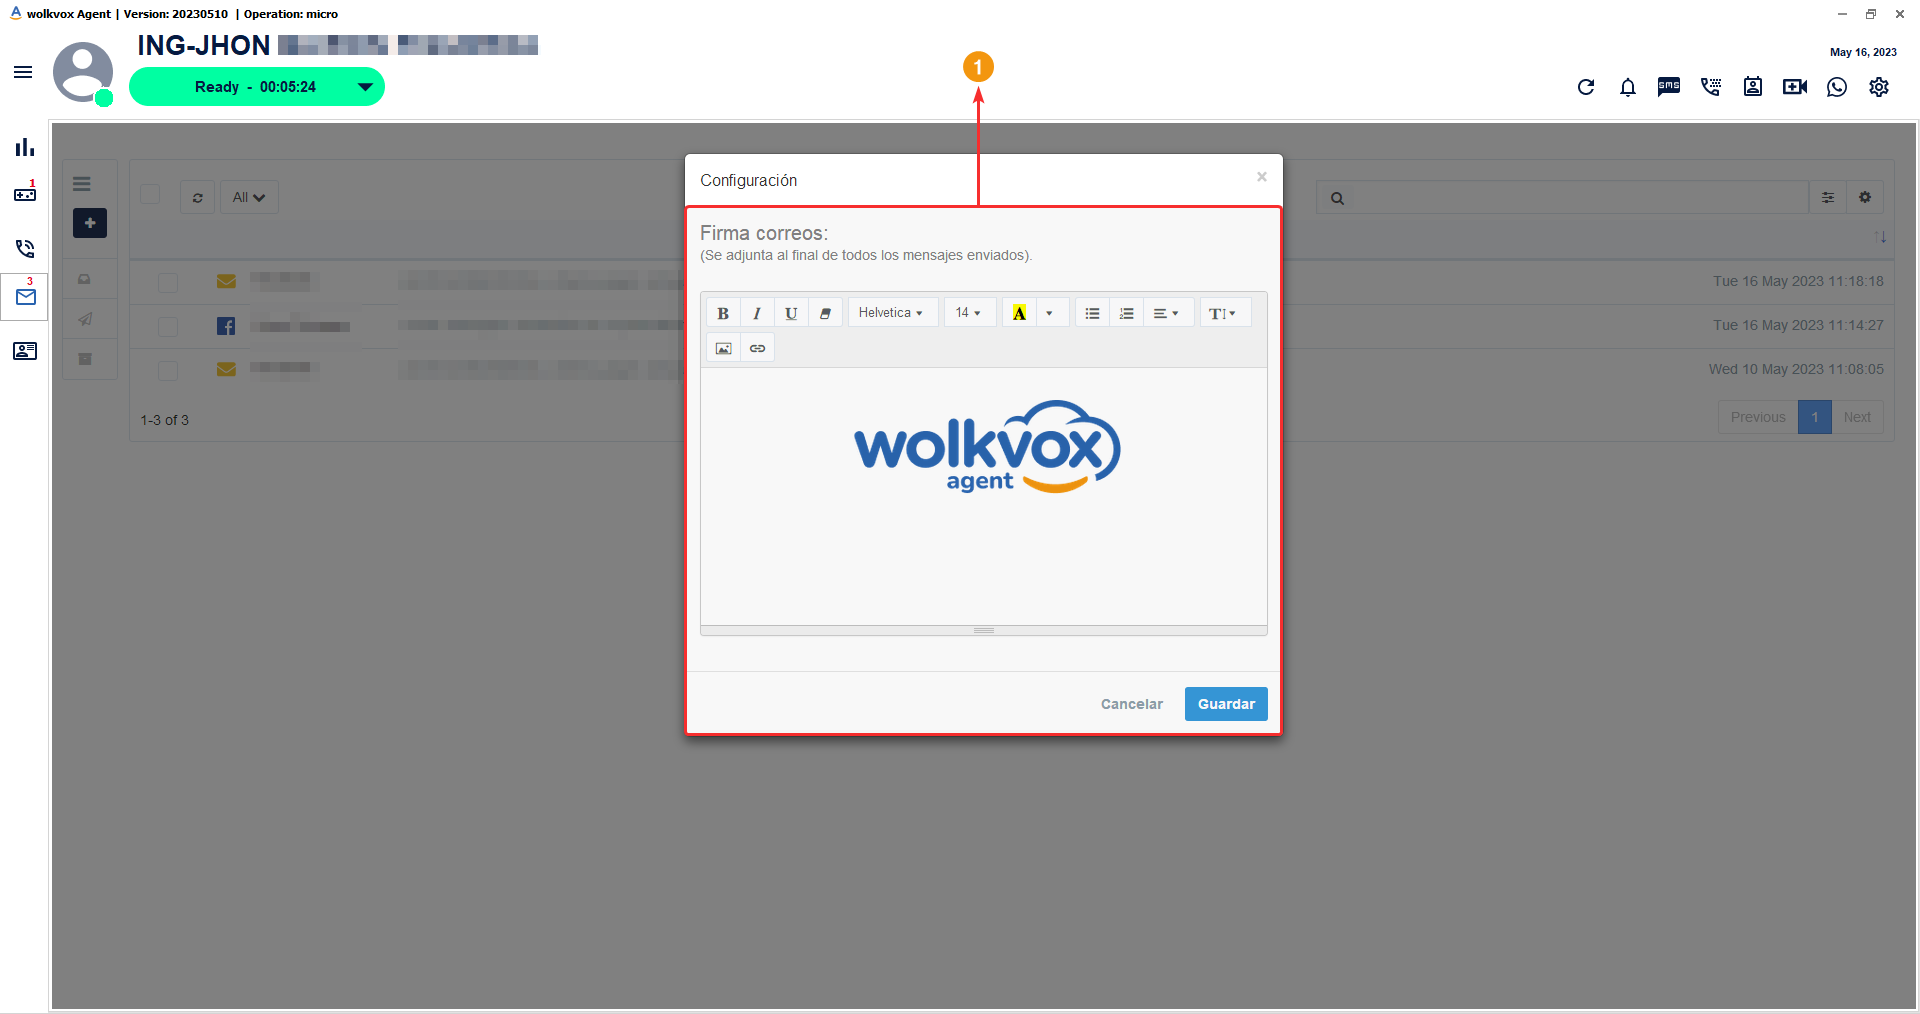
You can customize the email signature using the options in the tools menu. You have the ability to add styles to your text, include images, or insert links.
Email interaction #
Once you enter an email interaction, you will be able to:
- Reply: You can reply to the email message. At the bottom, a field will be enabled for you to reply to the email. Since it’s an email message, you will have options to edit the text, such as changing text styles, text alignment, inserting images, adding tables, attaching files, etc. You can add new recipients, send the message as a copy to other recipients, and even send the message as a blind carbon copy (BCC). Furthermore, you will also be able to change the subject of the message.
- Archive: You can archive the message in the archived interactions folder.
- Inbox: You can return to the inbox.
- In the button with a vertical three-dot icon, you will have two options: reply to all recipients of the email or forward the message.
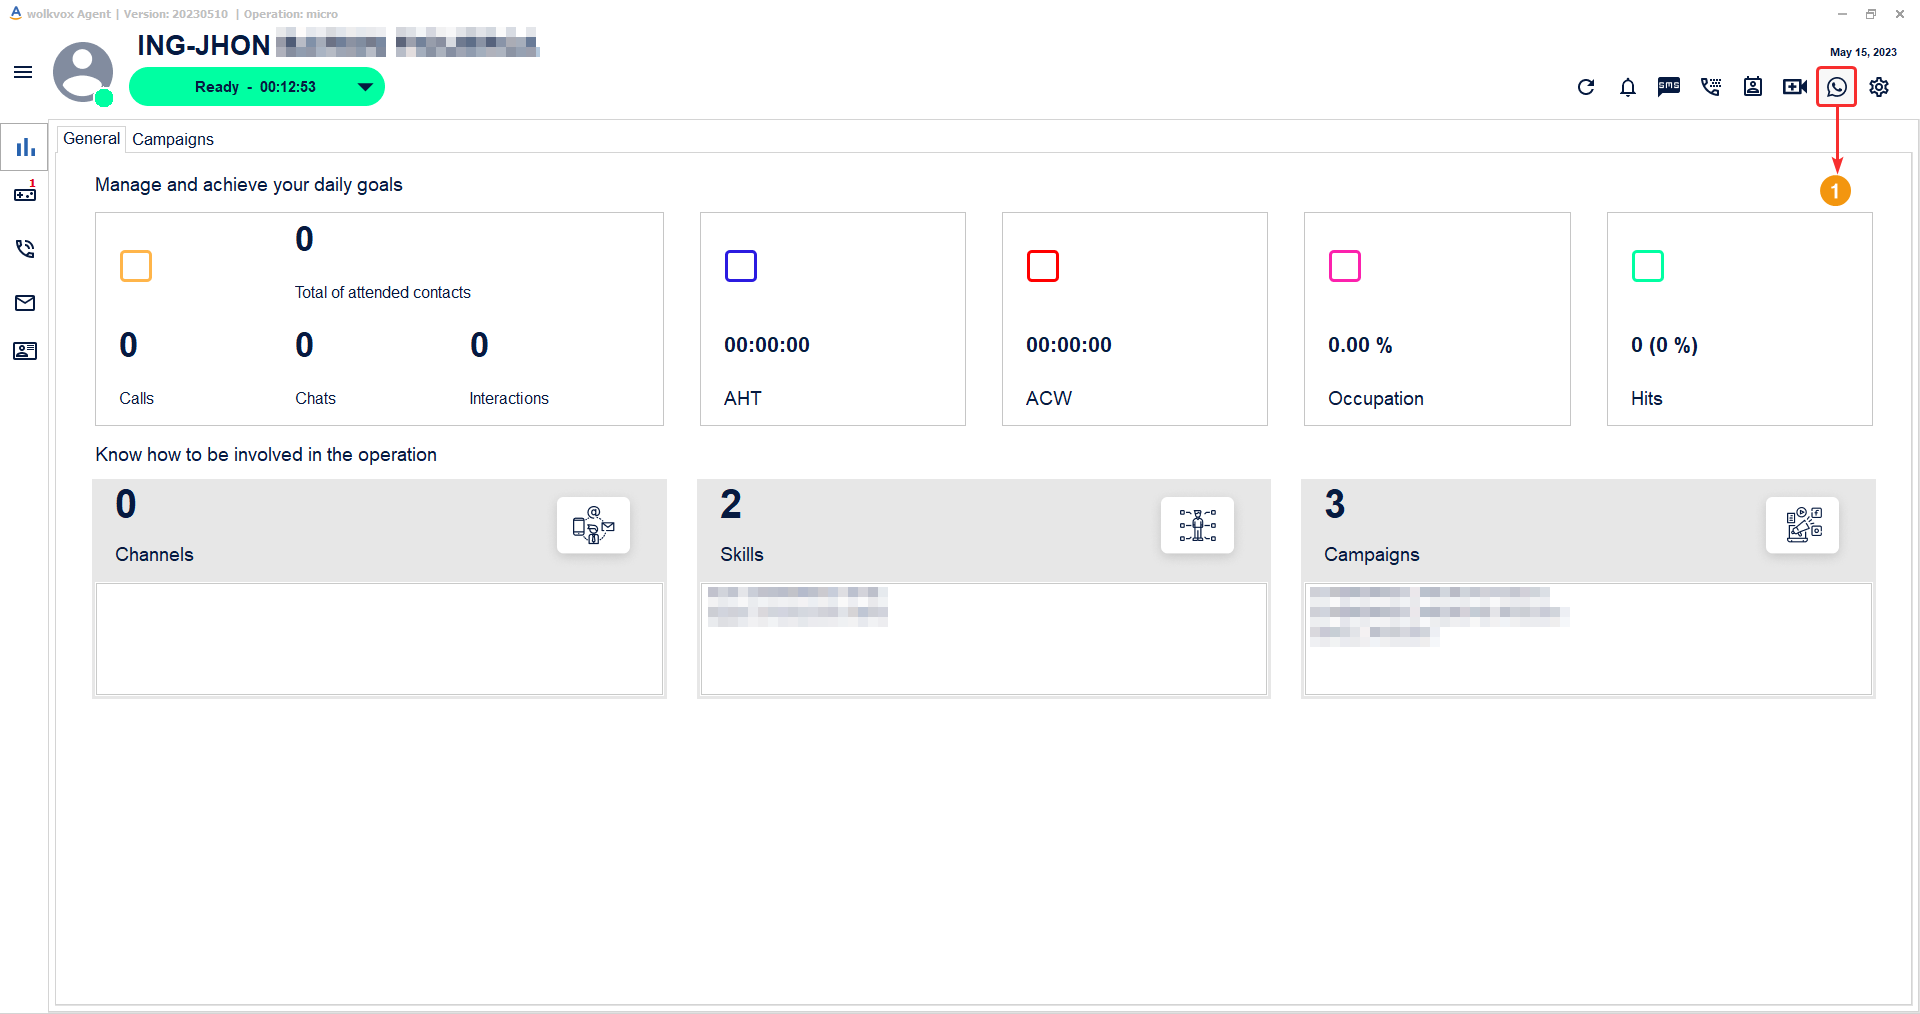
Whatsapp #
This “WhatsApp” button allows you to manually start a conversation with a client. If the button does not appear, it means it has not been enabled for operation.
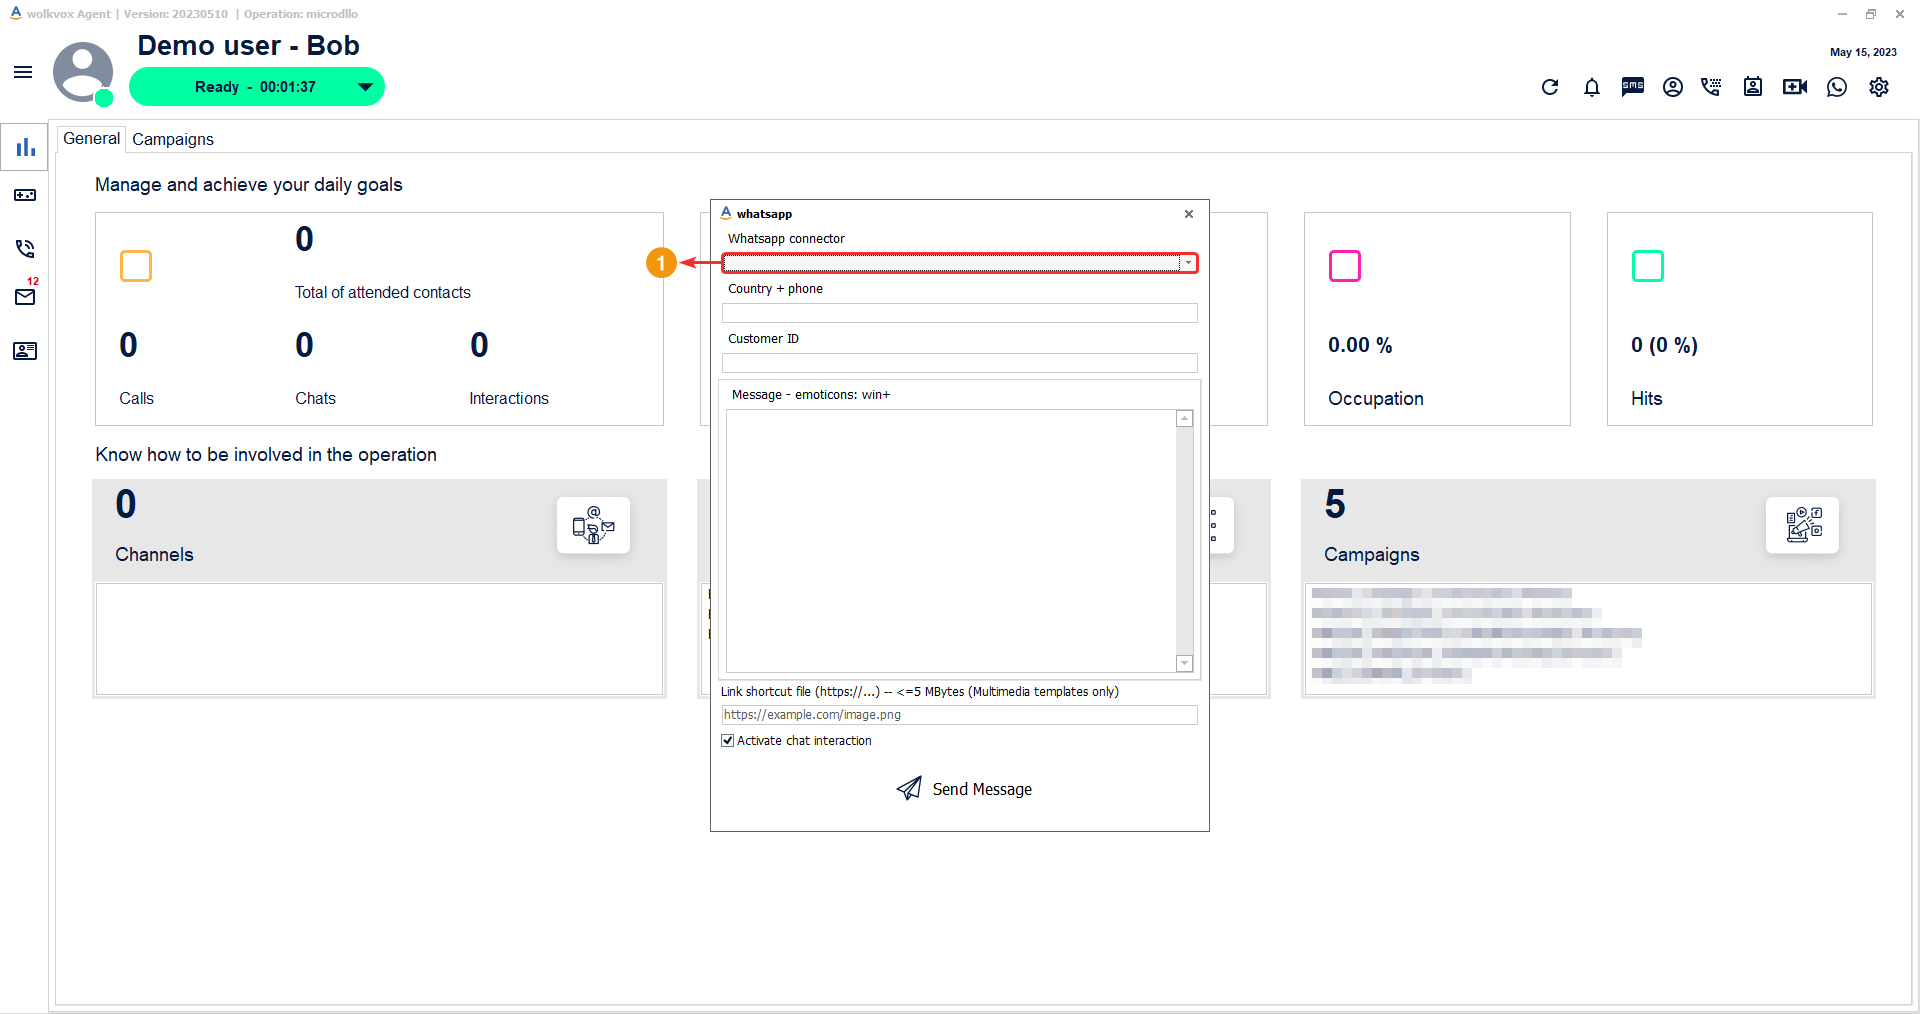
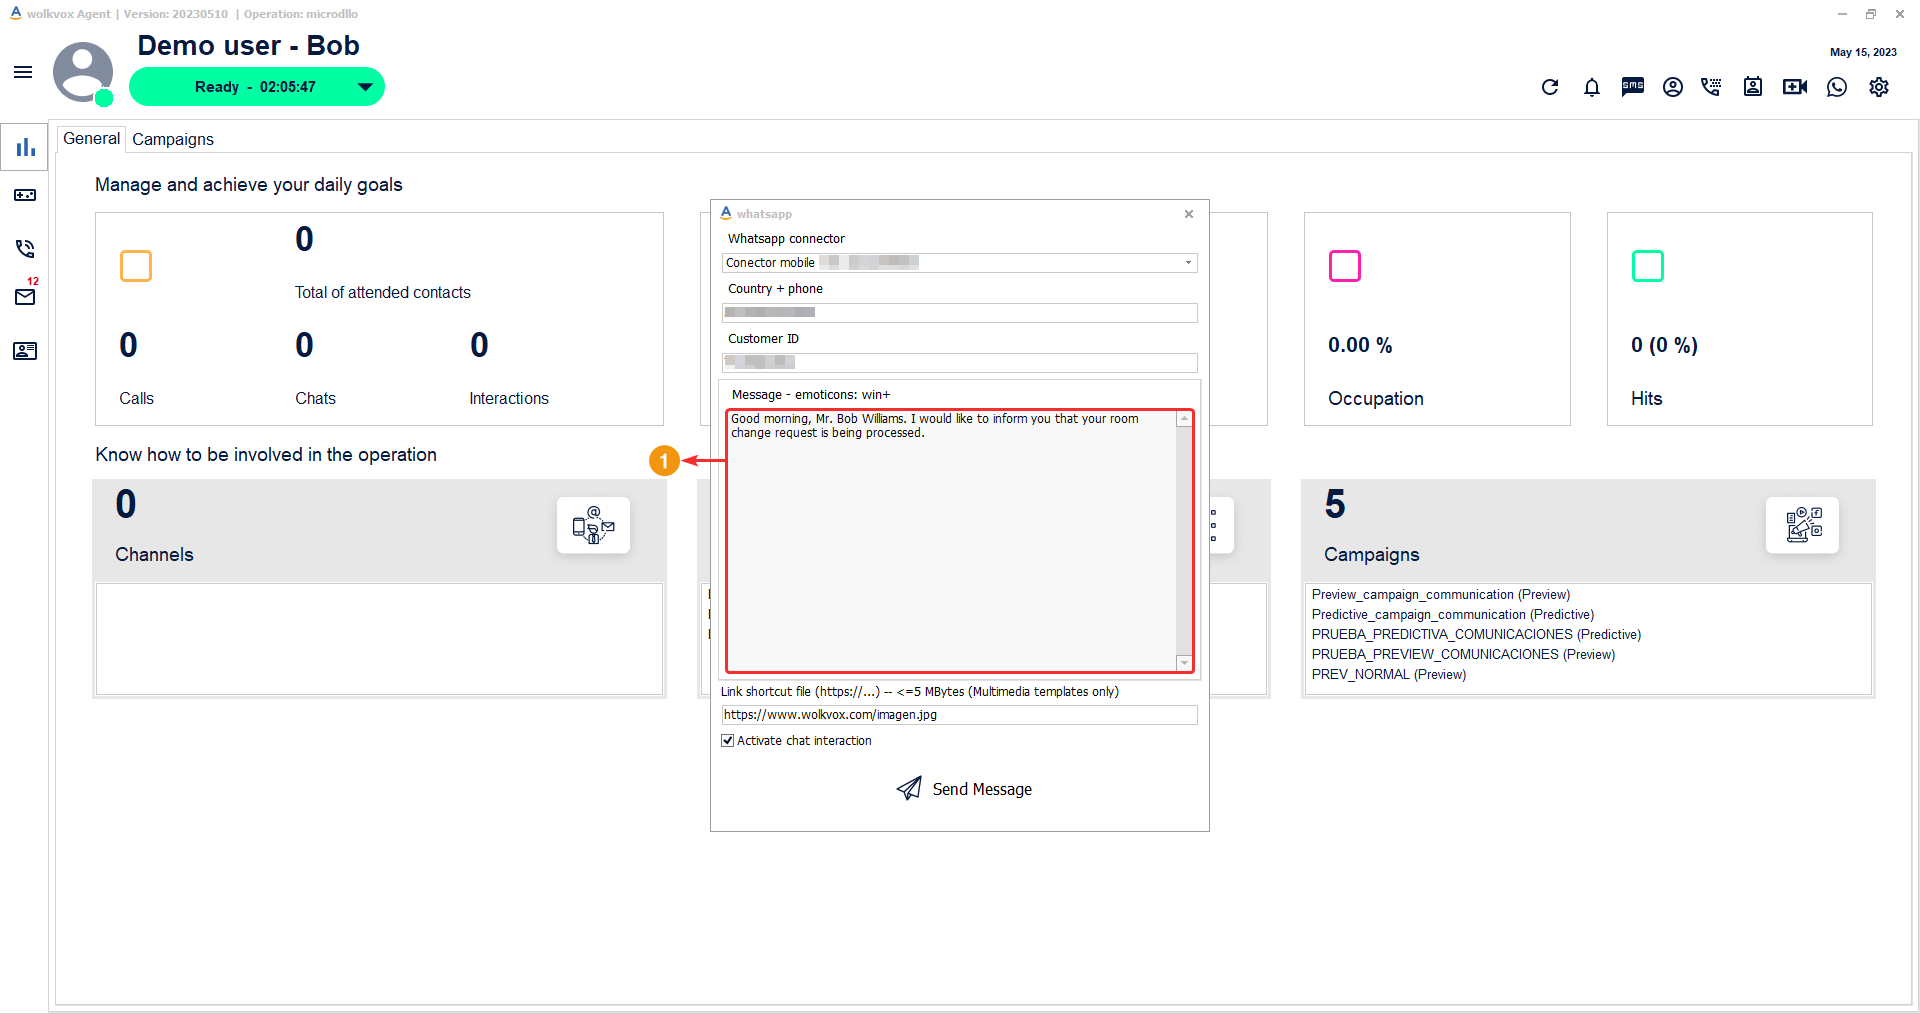
In the WhatsApp message sending window, you will have the following options.
- WhatsApp connector: It is the WhatsApp connector that allows agents to use the WhatsApp platform as an additional communication channel in their operation to provide customer support using this channel. The administrator of your operation will be responsible for defining with the wolkvox support team which WhatsApp connectors will be available and under what names they will appear in the dropdown menu. There are several types of WhatsApp connectors: WhatsApp official connector, WhatsApp official direct (cloud API) connector, WhatsApp official direct (cloud api & credit card) and WhatsApp mobile (unofficial) connector. All connectors require the agent to send the message through a template, except for the “Mobile” type connector; this type of connector allows sending messages without a template.
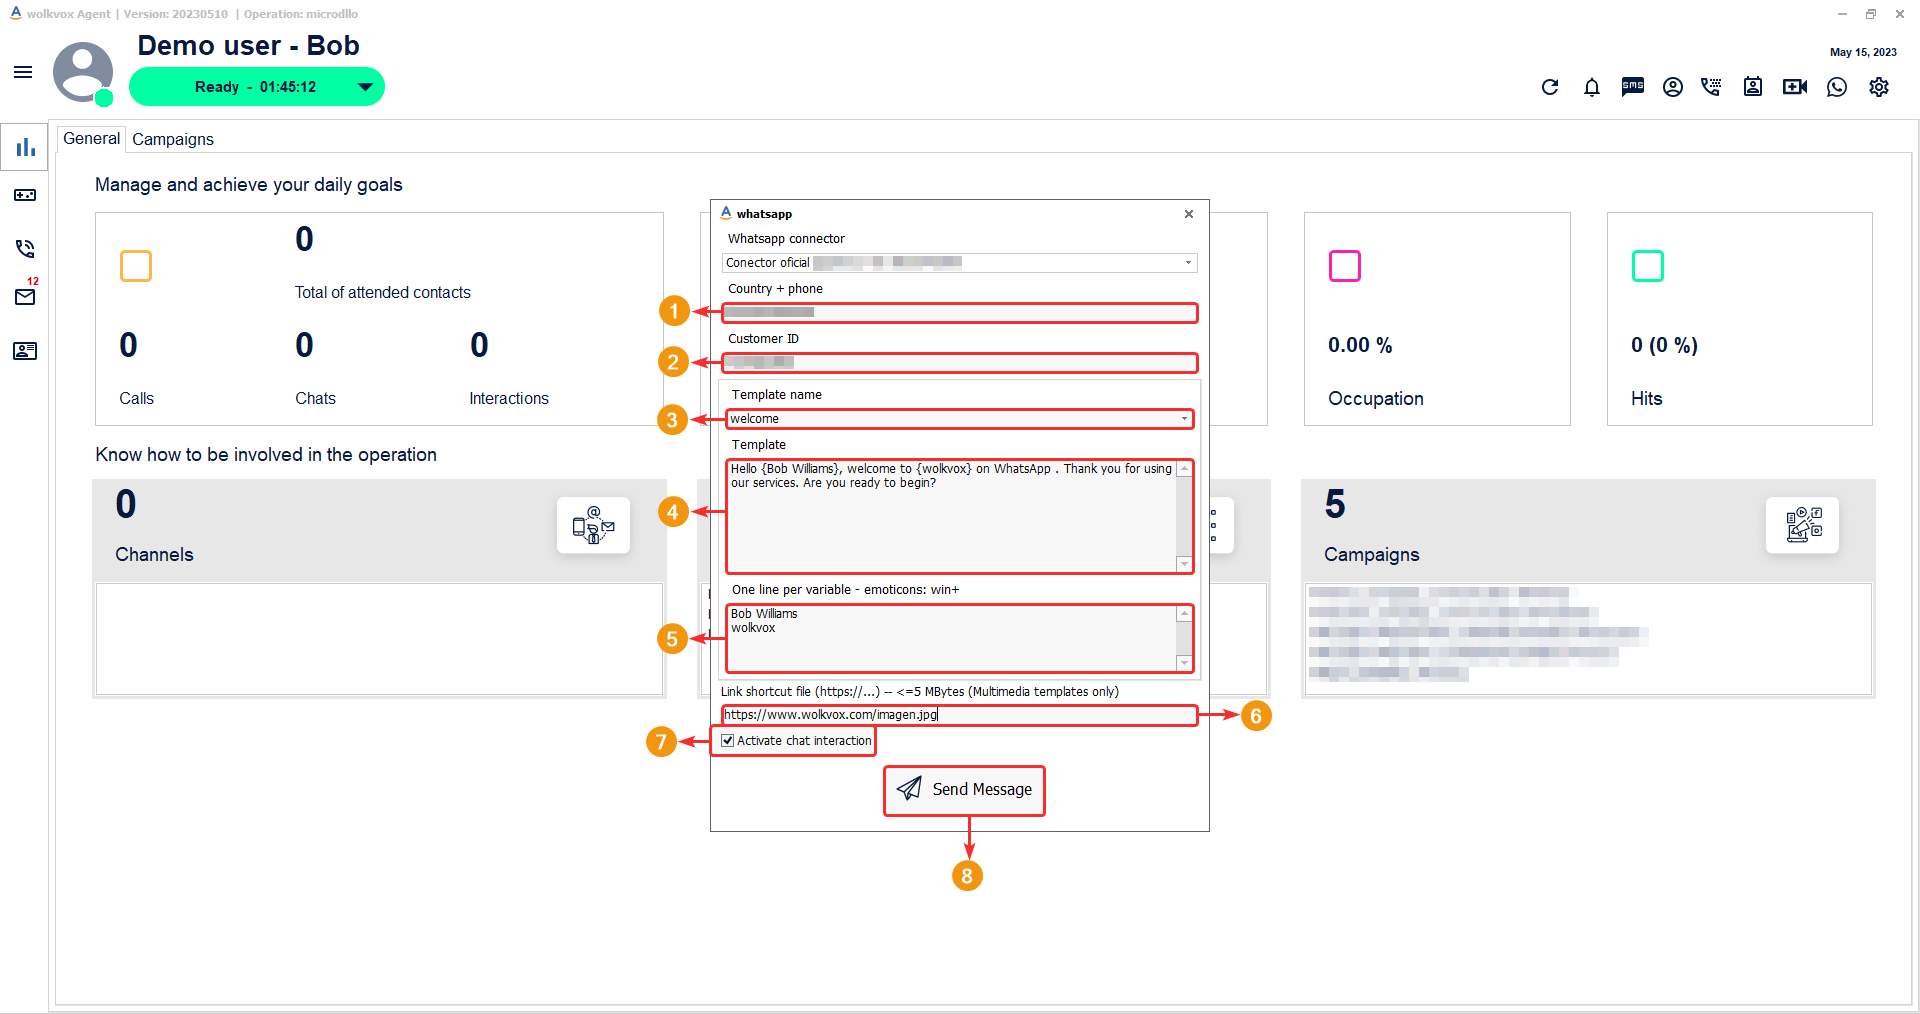
-
Enter the customer’s phone number to whom you want to send the WhatsApp message. Before the phone number, you must add the country code where the phone number is registered. The formula for the field is then: country code + phone number.
-
Write the customer’s identification number.
-
If you are using a connector other than the “Mobile” type, you must select a message template.
-
After selecting a template in the “Template Name” field, the message structure is displayed in the “Template” field. The data enclosed in brackets, such as {1}, {2}, {3}, or any other quantity, are variables that can be modified in the field below called “One line per variable”.
-
In that field, you write the data with which you want to replace the indicated variables. To modify the next variable, you must add a line break, which means pressing “Enter” on the keyboard. Each line break will modify its respective variable. If we don’t write any data, the variable will be left empty, and therefore, that space will also be empty in the message. You can only add information to replace the variables and it is not allowed to add additional information in the message that is not included in the template. You also cannot add more line breaks than the maximum number of variables to be replaced. Note: In this field, you can include emojis. To open the emoji menu while using Windows 10 or newer operating systems, you can press the “Windows” key plus the ” . ” key.
-
The “Link shortcut file” option allows you to add an image, but this is only possible if the selected template has permission to insert images (this type of template is known as a multimedia template).
-
The “Activate chat interaction” option allows the agent to have a conversation with the customer in which they can receive messages from the customer. In other words, with this option enabled, if the customer responds to the messages, they will reach the agent.
-
Finally, click on “Send Message”.
In the “Mobile” connector type, the use of templates is not required to send messages through WhatsApp. You will only have a fie ld called “Message” where you can freely write your message to send.
Note: In this field, you can include emojis. To open the emoji menu while using Windows 10 or newer operating systems, you can press the “Windows” key plus the ” . ” key.
When you start a WhatsApp chat, you should continue the conversation in the left-side menu button called “Chat”.

Chat and conversations #
- In this section, all the chats that come to you via WhatsApp, Facebook Messenger, Line, and Telegram are handled.
- After accessing the ‘Chat’ button, you select the chat or conversation you wish to manage.

Once you select the chat to manage from the conversation list, you will see a section with all the information needed to attend to the customer, as shown in the following image.

The first section you should identify is the conversation history, which contains everything that has been discussed with the agent, including the dates the messages were sent.

Edit contact #
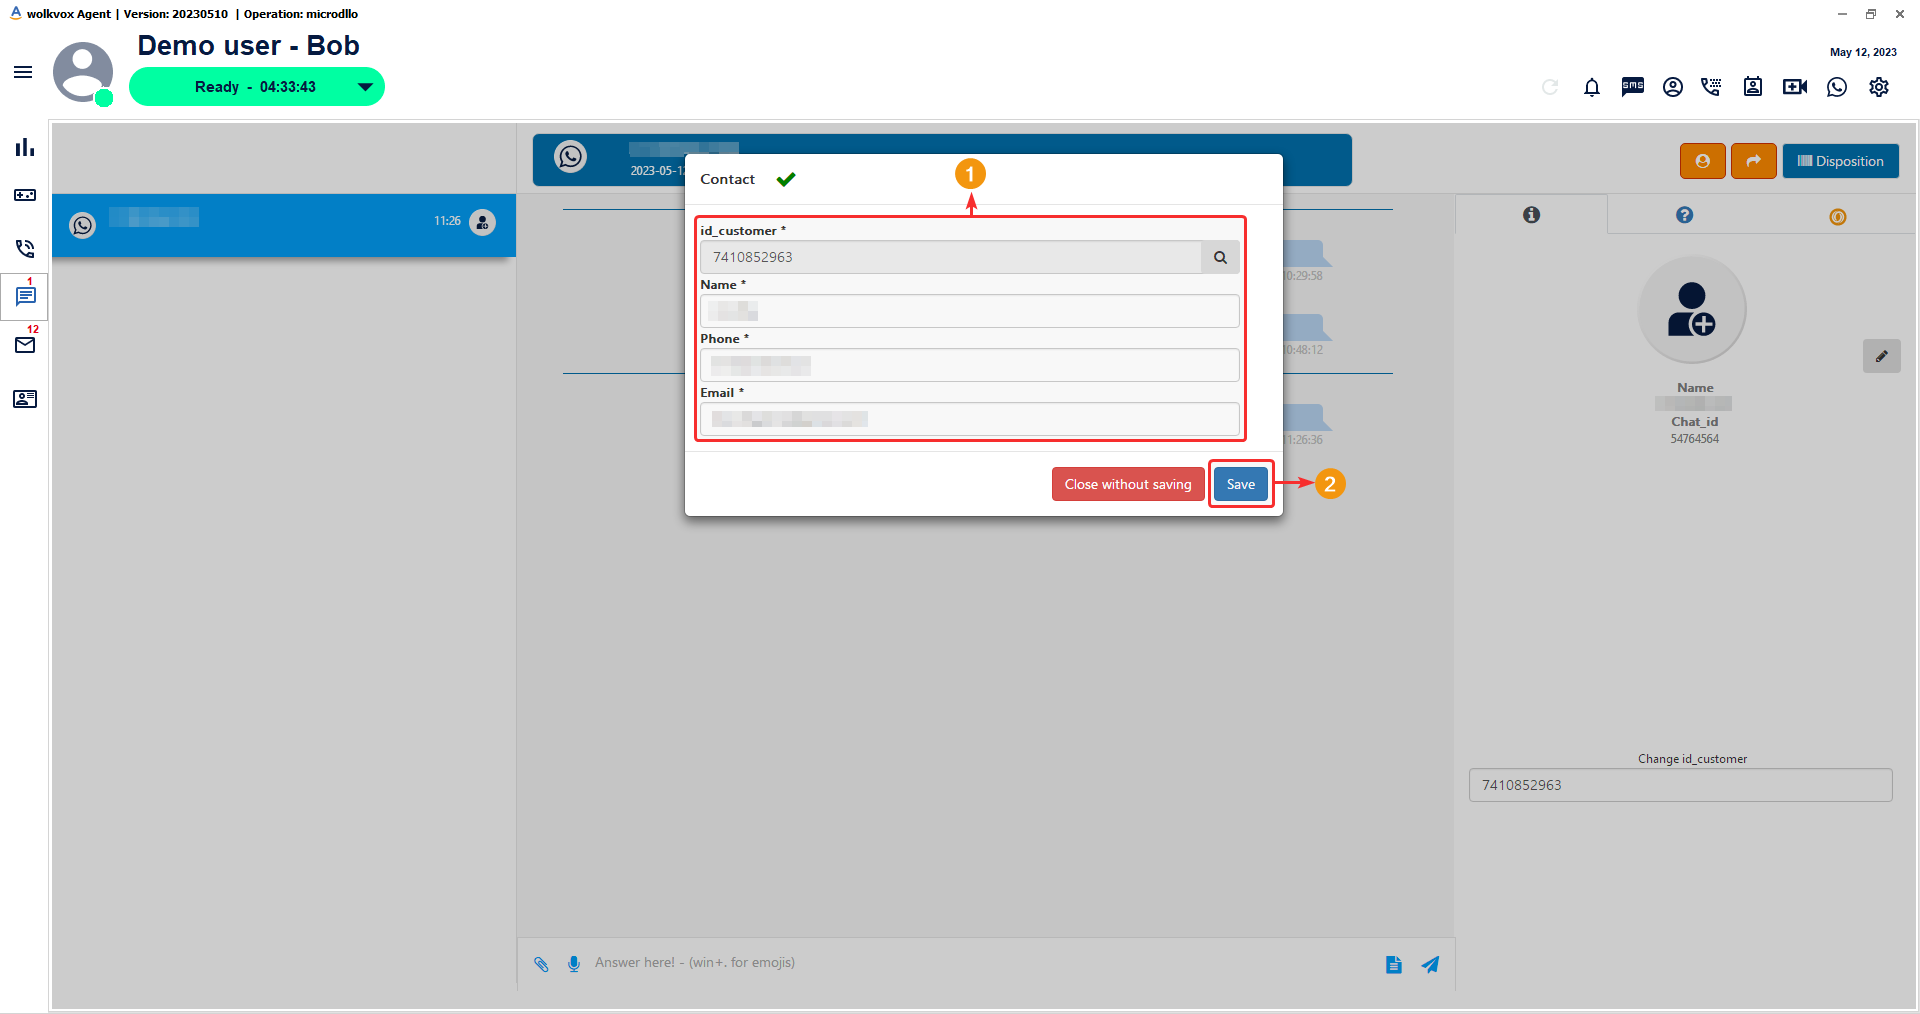
- First, you must enter the client’s identification number in the field indicated in the following image.
- To add or edit the contact in the conversation, you must click on the highlighted button (+).

- According to the identification number you entered earlier, the system will search for it and place the contact information in these fields. You can edit the name, phone number, and email address. If you are creating a new contact, fill in the respective fields with the customer’s information.
-
Click on “Save” to apply the changes.
“Mr. Wizard” tool for chat #
-
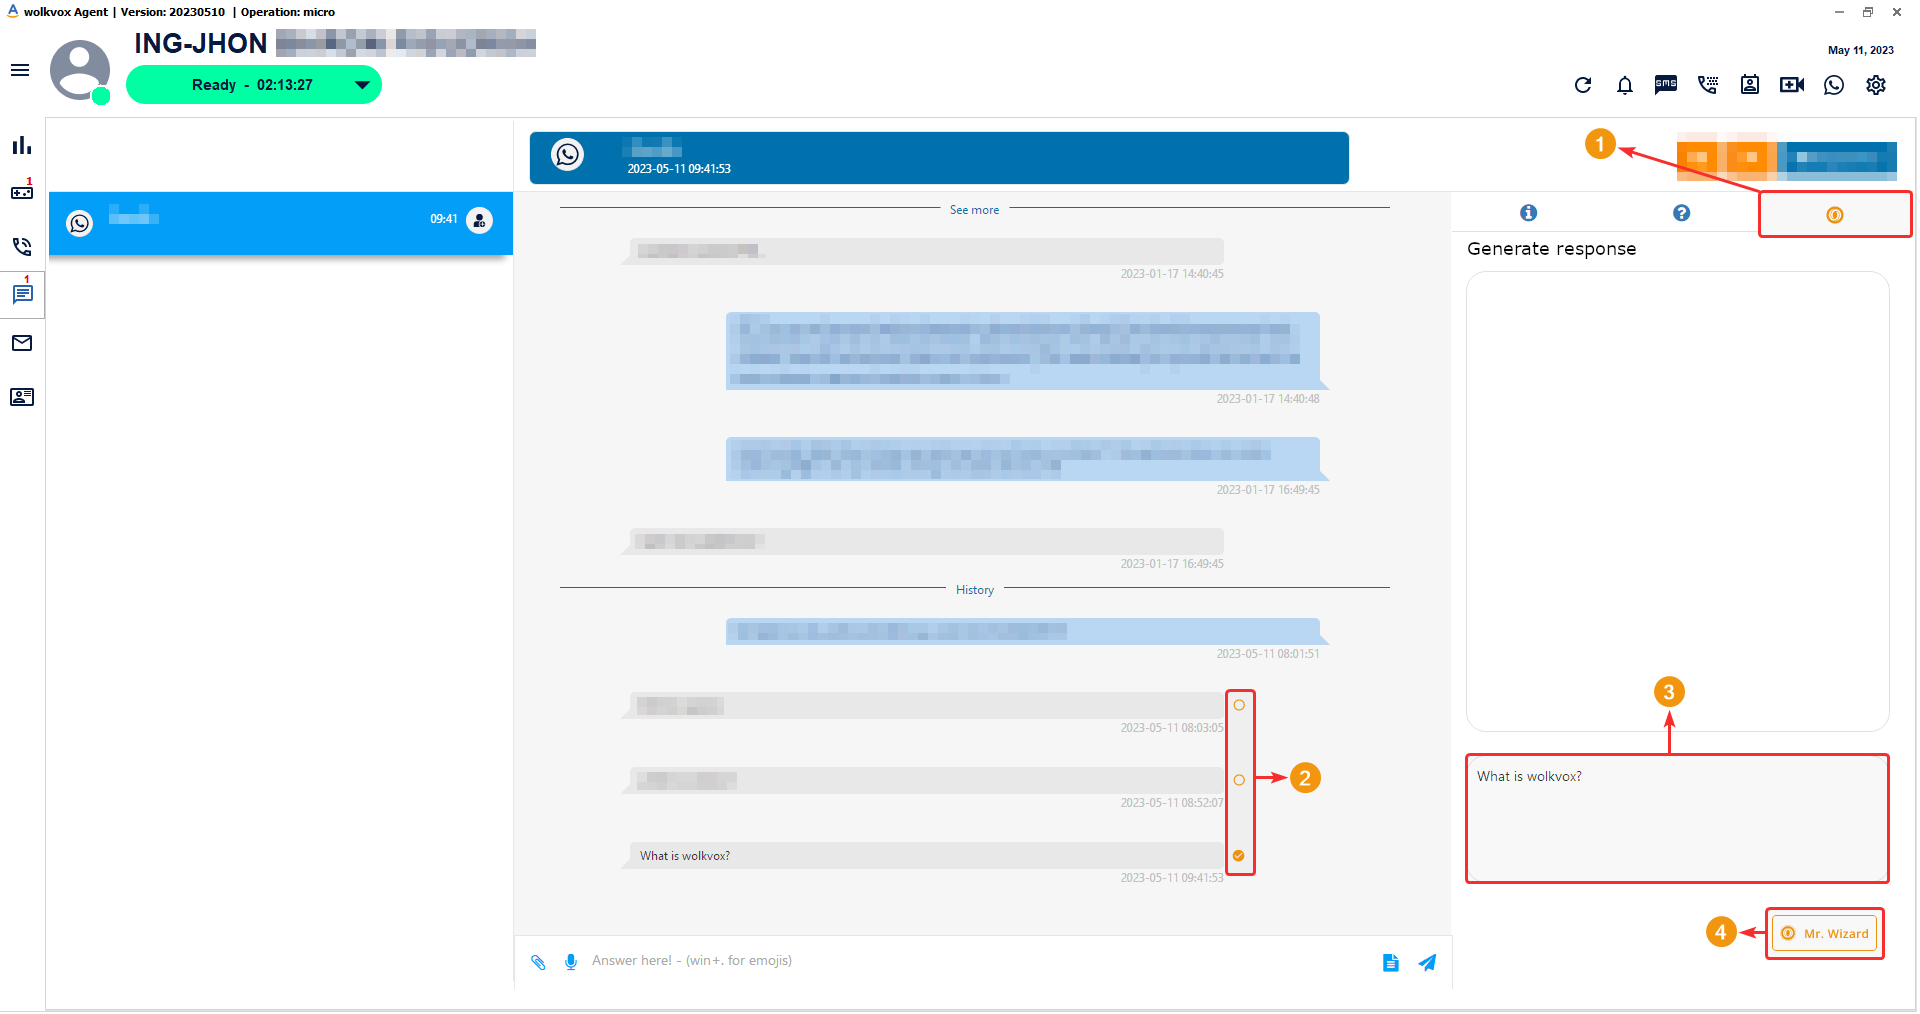
In the wolkvox Agent application, a new button will appear in the chat section to access the Mr. Wizard tool.
-
Next to the last message sent by the client, a checkbox will appear on the left side.
-
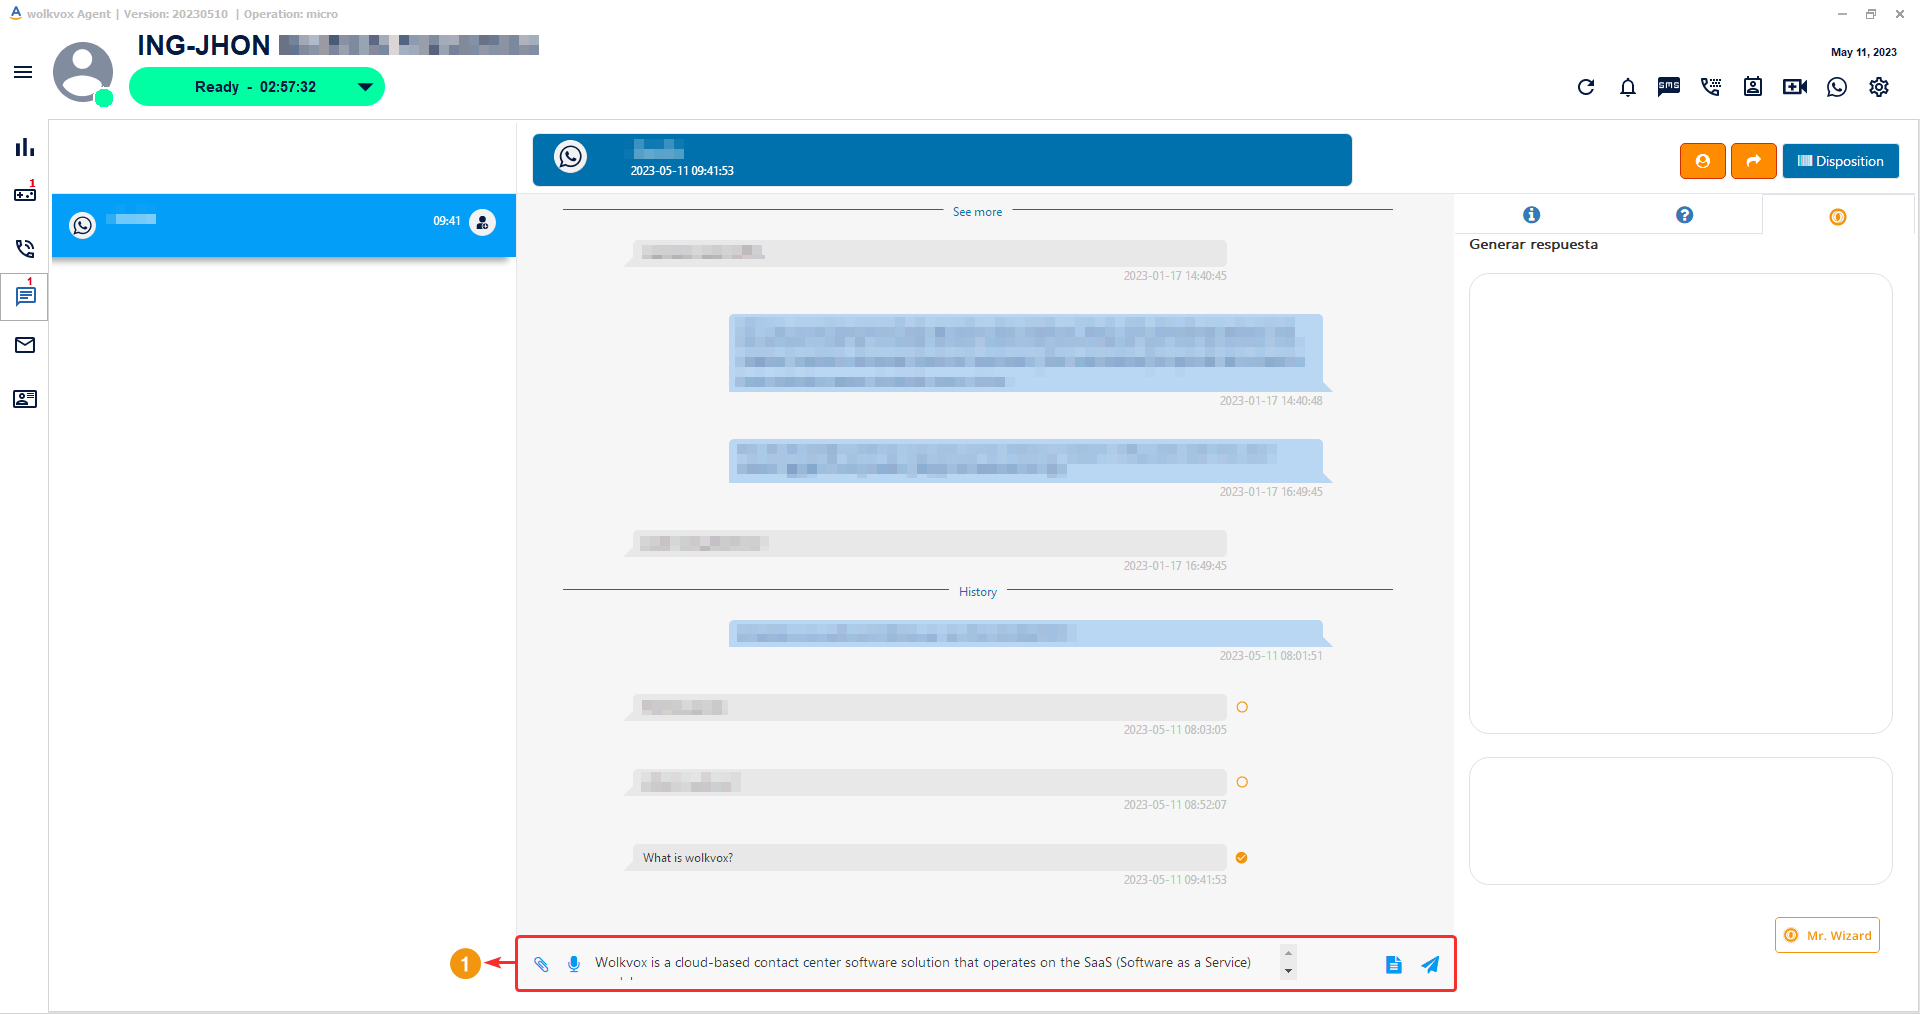
Clicking on this checkbox will list the message in the right area where Mr. Wizard is located. After listing the message, you can write other questions for Mr. Wizard to answer.
-
To send the text to Mr. Wizard and have it answer the questions presented in the message, click on the ‘Mr. Wizard’ button.
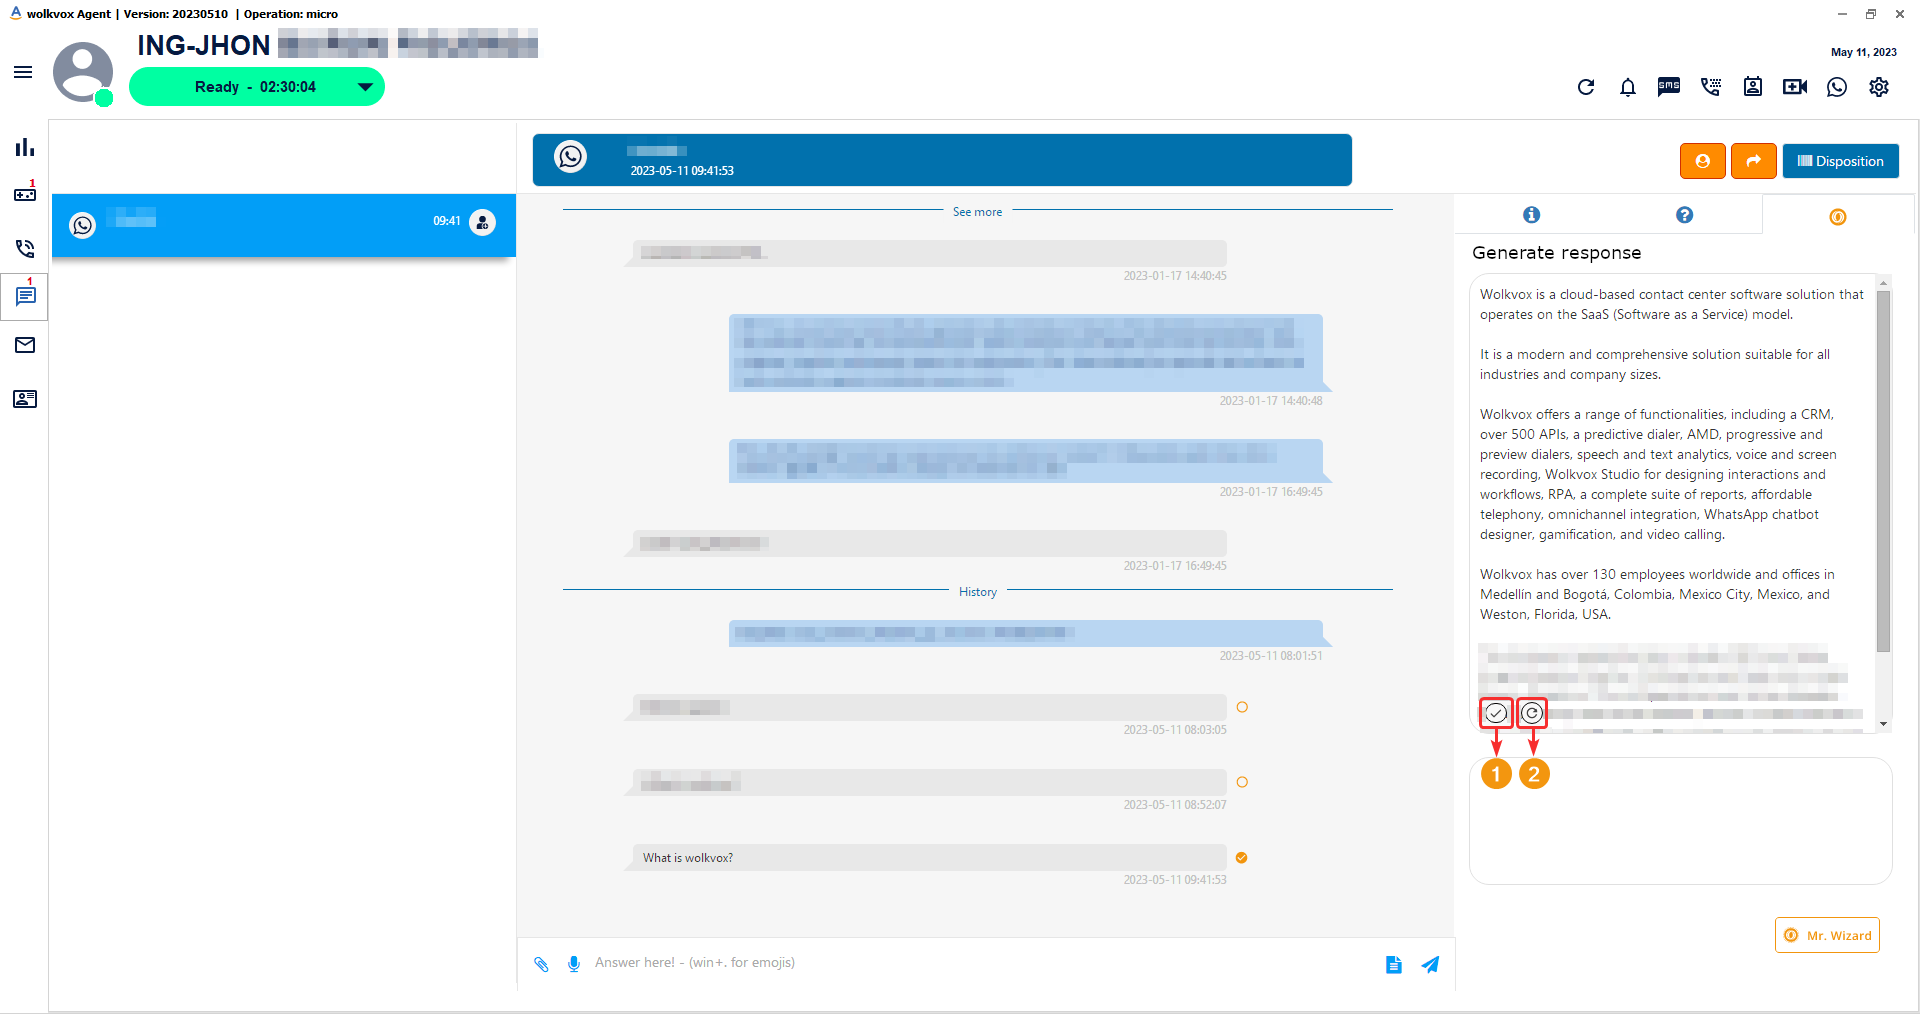
Mr. Wizard will respond according to the training done in the configuration of the tool in wolkvox Manager.

- The first button allows you to add the message generated by Mr. Wizard in the field where the agent responds to the client.
- The second button instructs Mr. Wizard to generate a new response if the first generated response did not meet expectations.
In the following image, you can see how the response sent by Mr. Wizard has been transferred to the field where the agent can respond to the client.
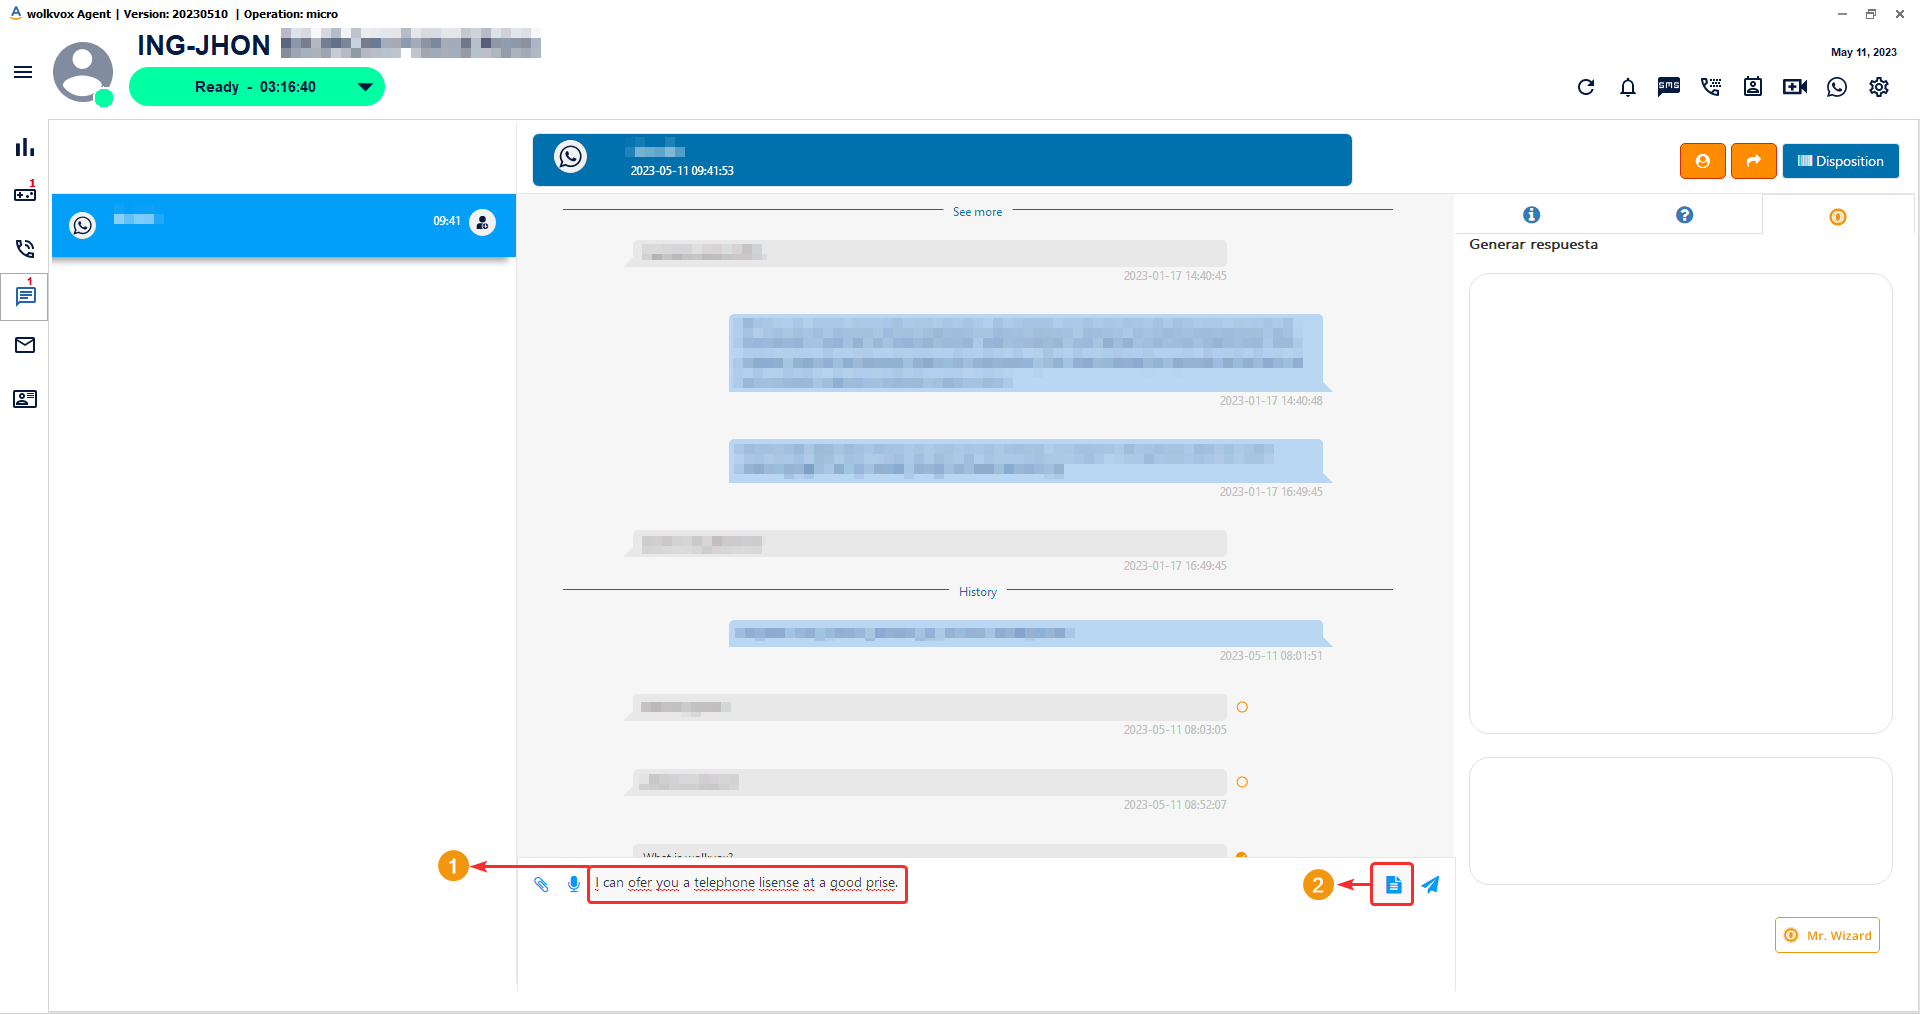
With Mr. Wizard, you can correct the spelling of the text written in the field to send the response to the client.
- Write the text you intend to send to the client.
- On the left side of the ‘Send’ button, it allows Mr. Wizard to analyze the text before sending it.
- A floating window opens where you can see the correction that Mr. Wizard provides to the agent.
- At the bottom of this window, there is a button to replace the text you wrote in the field to send to the client with the text provided by Mr. Wizard.
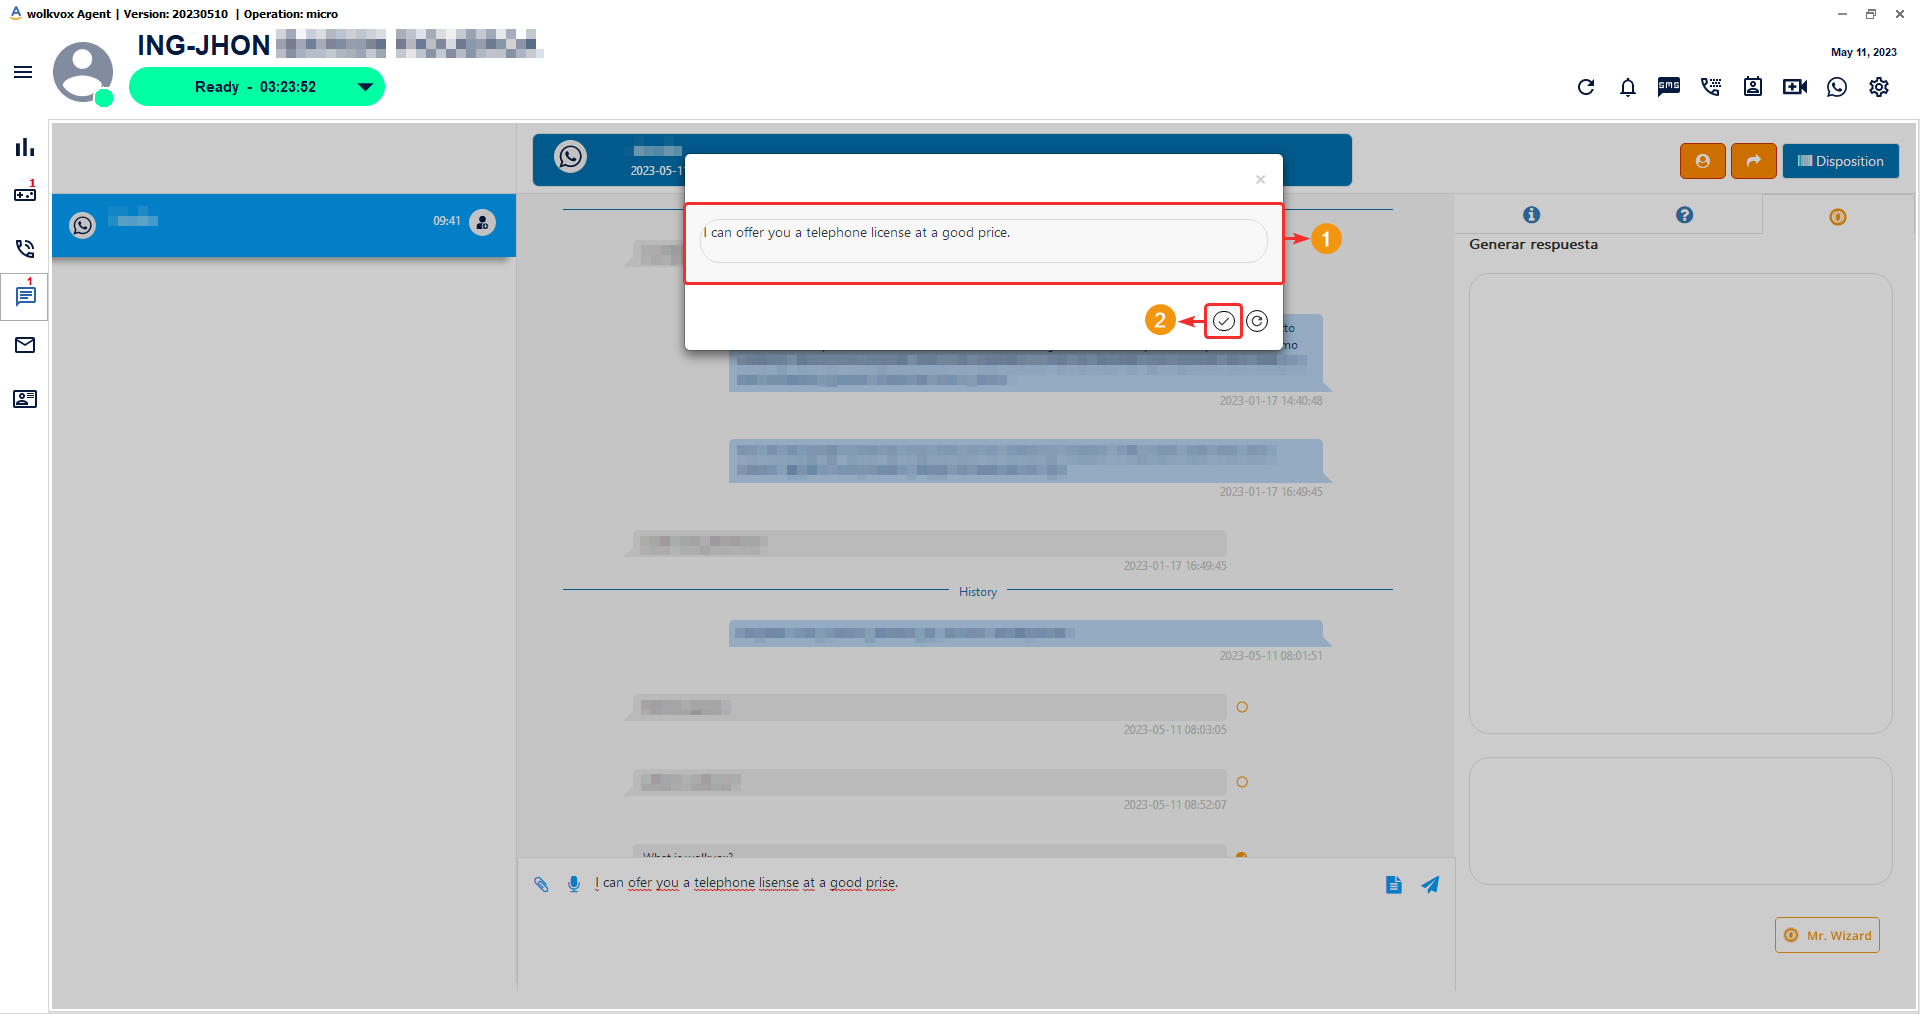
In the following image, you can see that the text previously written by the agent has been replaced with the text provided by Mr. Wizard.

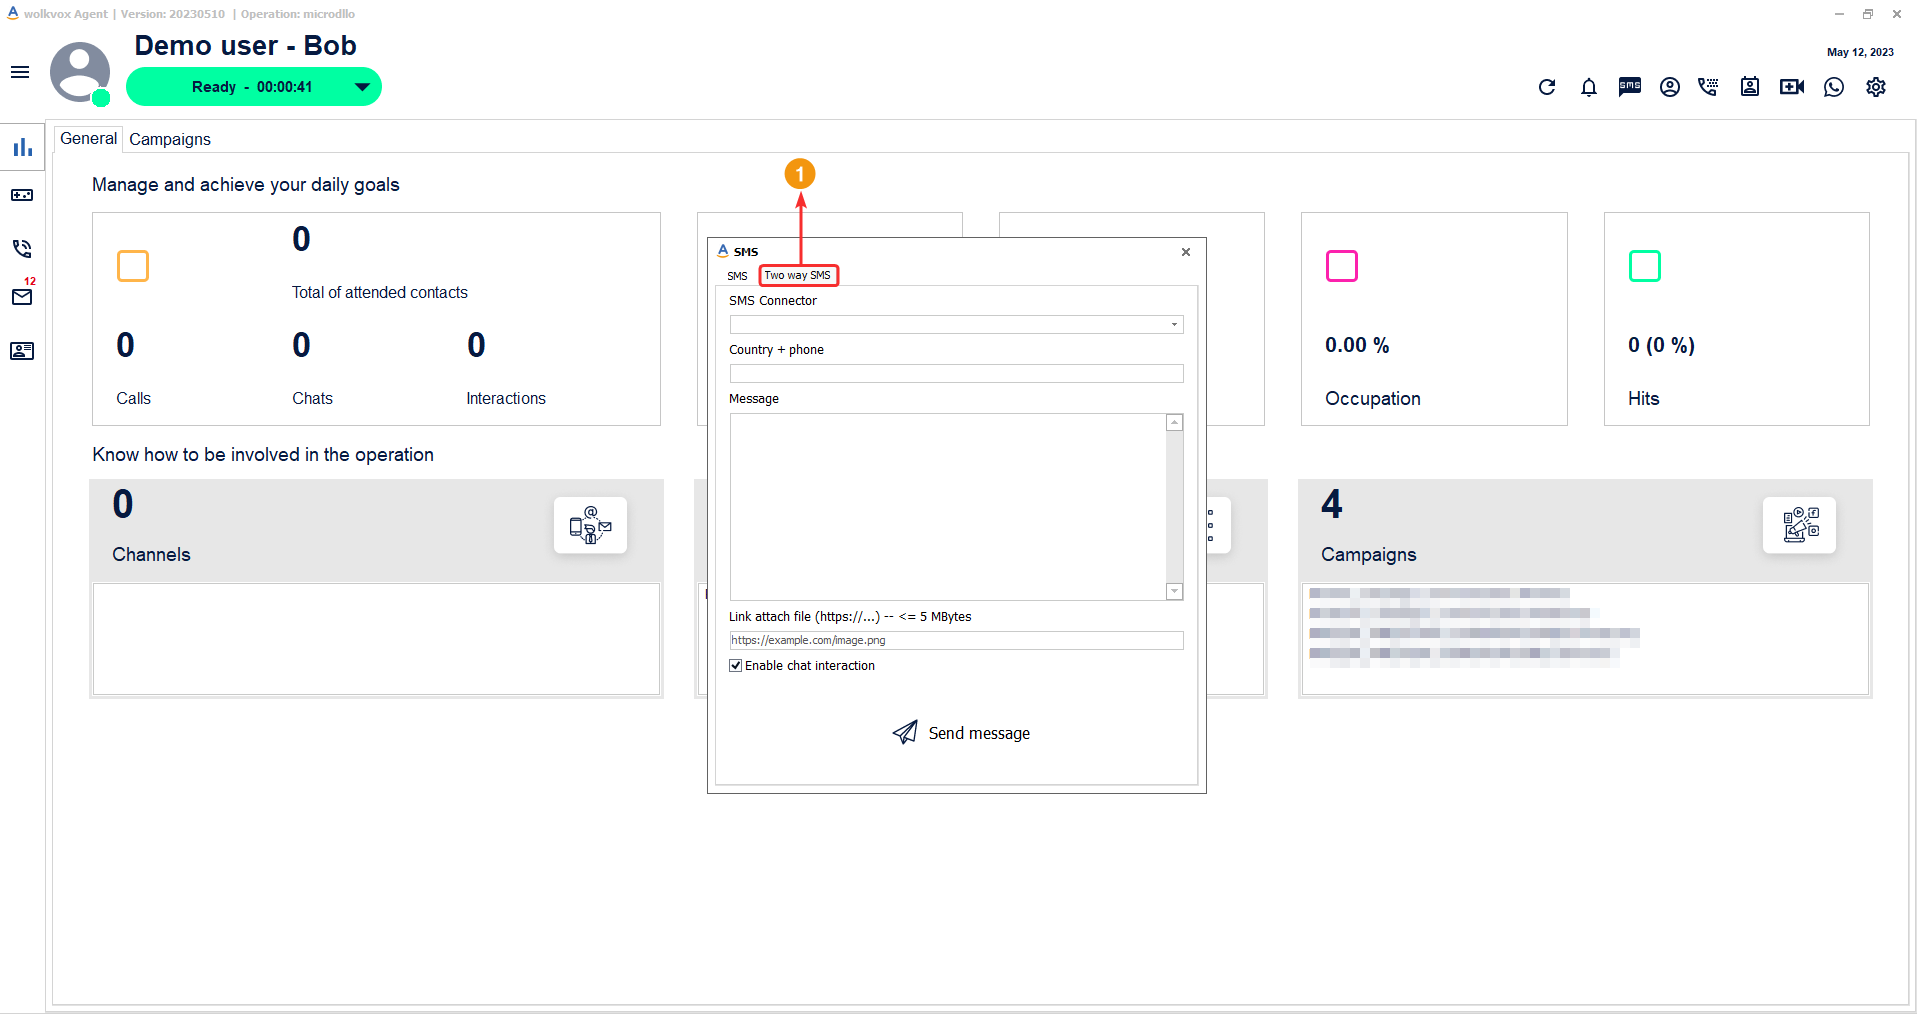
SMS #
This “Send SMS” button allows you to initiate a manual conversation with a customer via text message. If the button does not appear, it means it has not been enabled for your operation.
This tool has two tabs. The first one is “SMS” and only allows sending text messages to customers in countries where two-way SMS is not allowed. The “Two way SMS” tab allows for bidirectional text message sending. Use this tab when you need to send a text message to a customer in a country where this functionality is allowed.
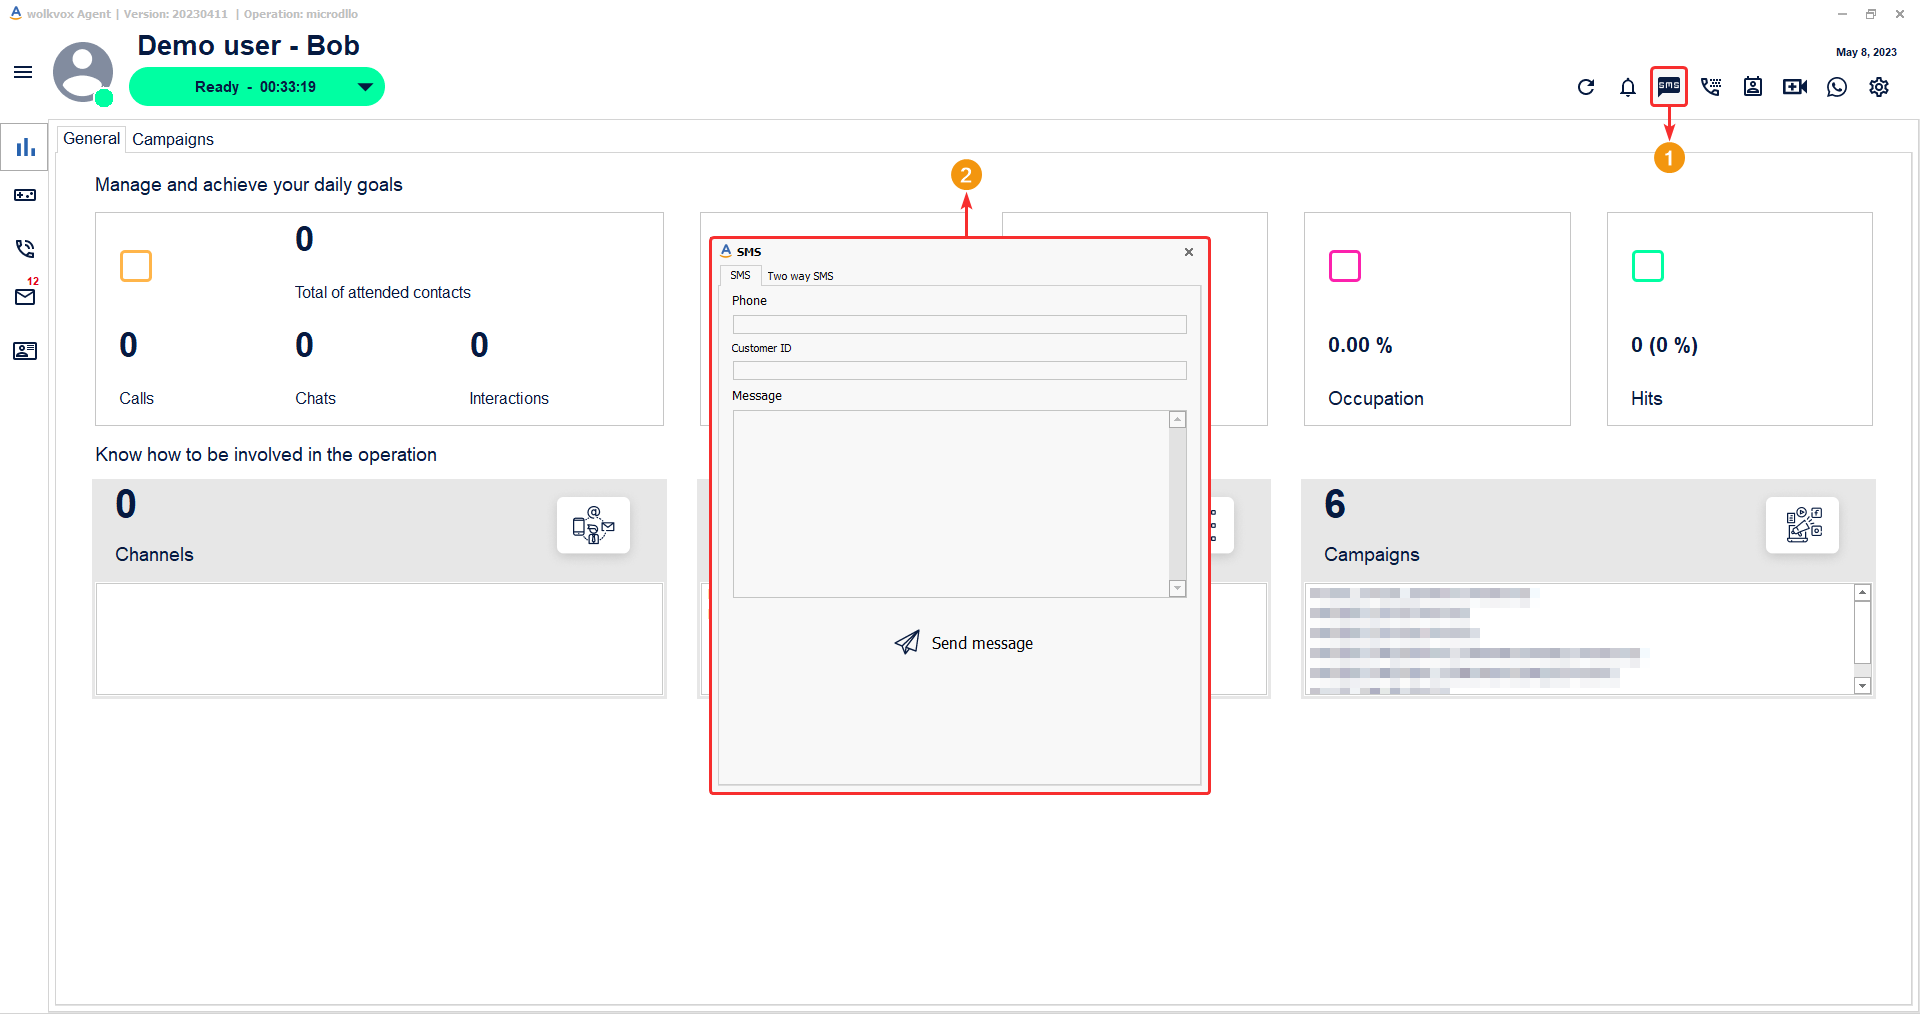
Remember, this first tab called “SMS” only allows for the sending of text messages without bidirectional interaction. Use this tool when you only need to send a text message without receiving a response, and also for countries where bidirectional SMS is not allowed.

To send text messages and have a bidirectional conversation (in countries where it is allowed), use the ‘Two way SMS’ tab.
In the first field, you must enter the dialing plan number + the customer’s phone number.
In the second field, you enter the customer’s identification number.
The third field is where you write the text message to the customer.
You can attach a file via a public URL. Specify the public URL where the file you wish to attach is located in the text message.
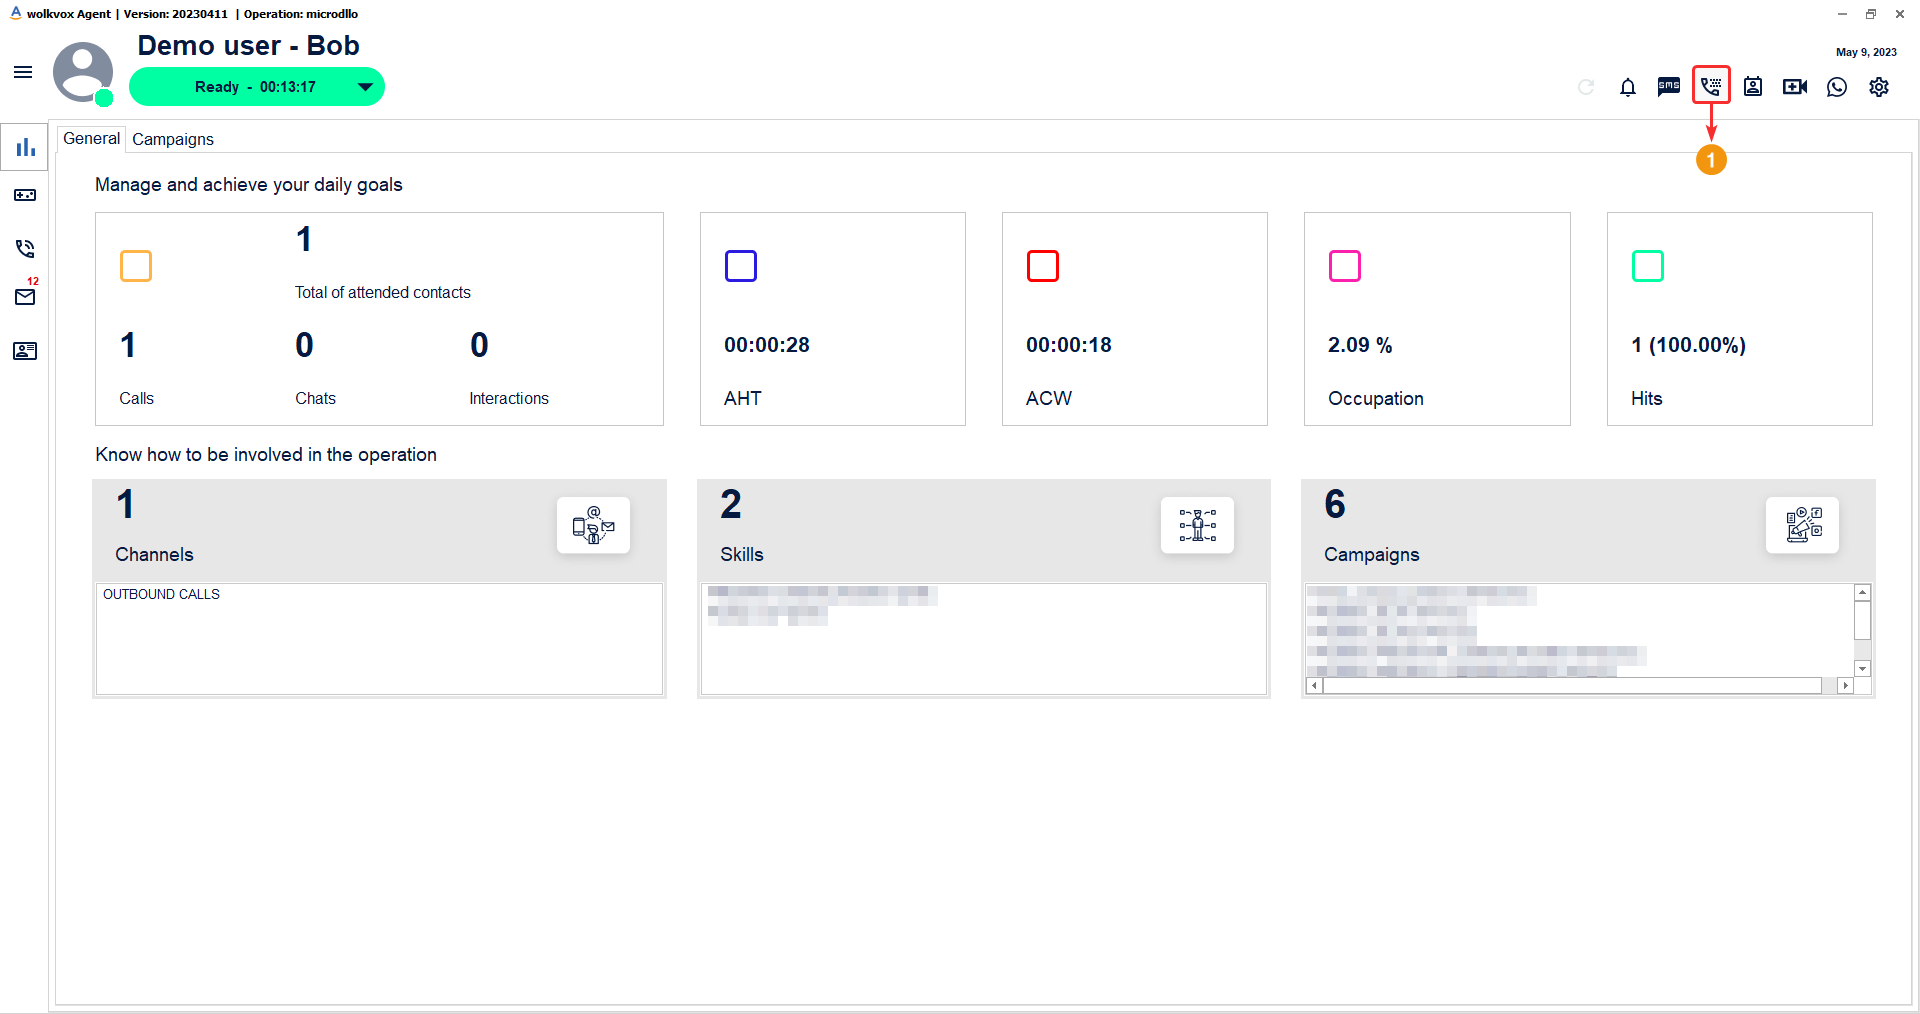
Smart Dial #
The “Intelligent Dial” tool allows you to access basic information about previous calls made. Thanks to this functionality, the agent will be able to know exactly the phone numbers of the customers who were called, the time of contact, and the percentage of time used with the contact.
![]() This button only appears if the service is activated by the administrator of your operation.
This button only appears if the service is activated by the administrator of your operation.
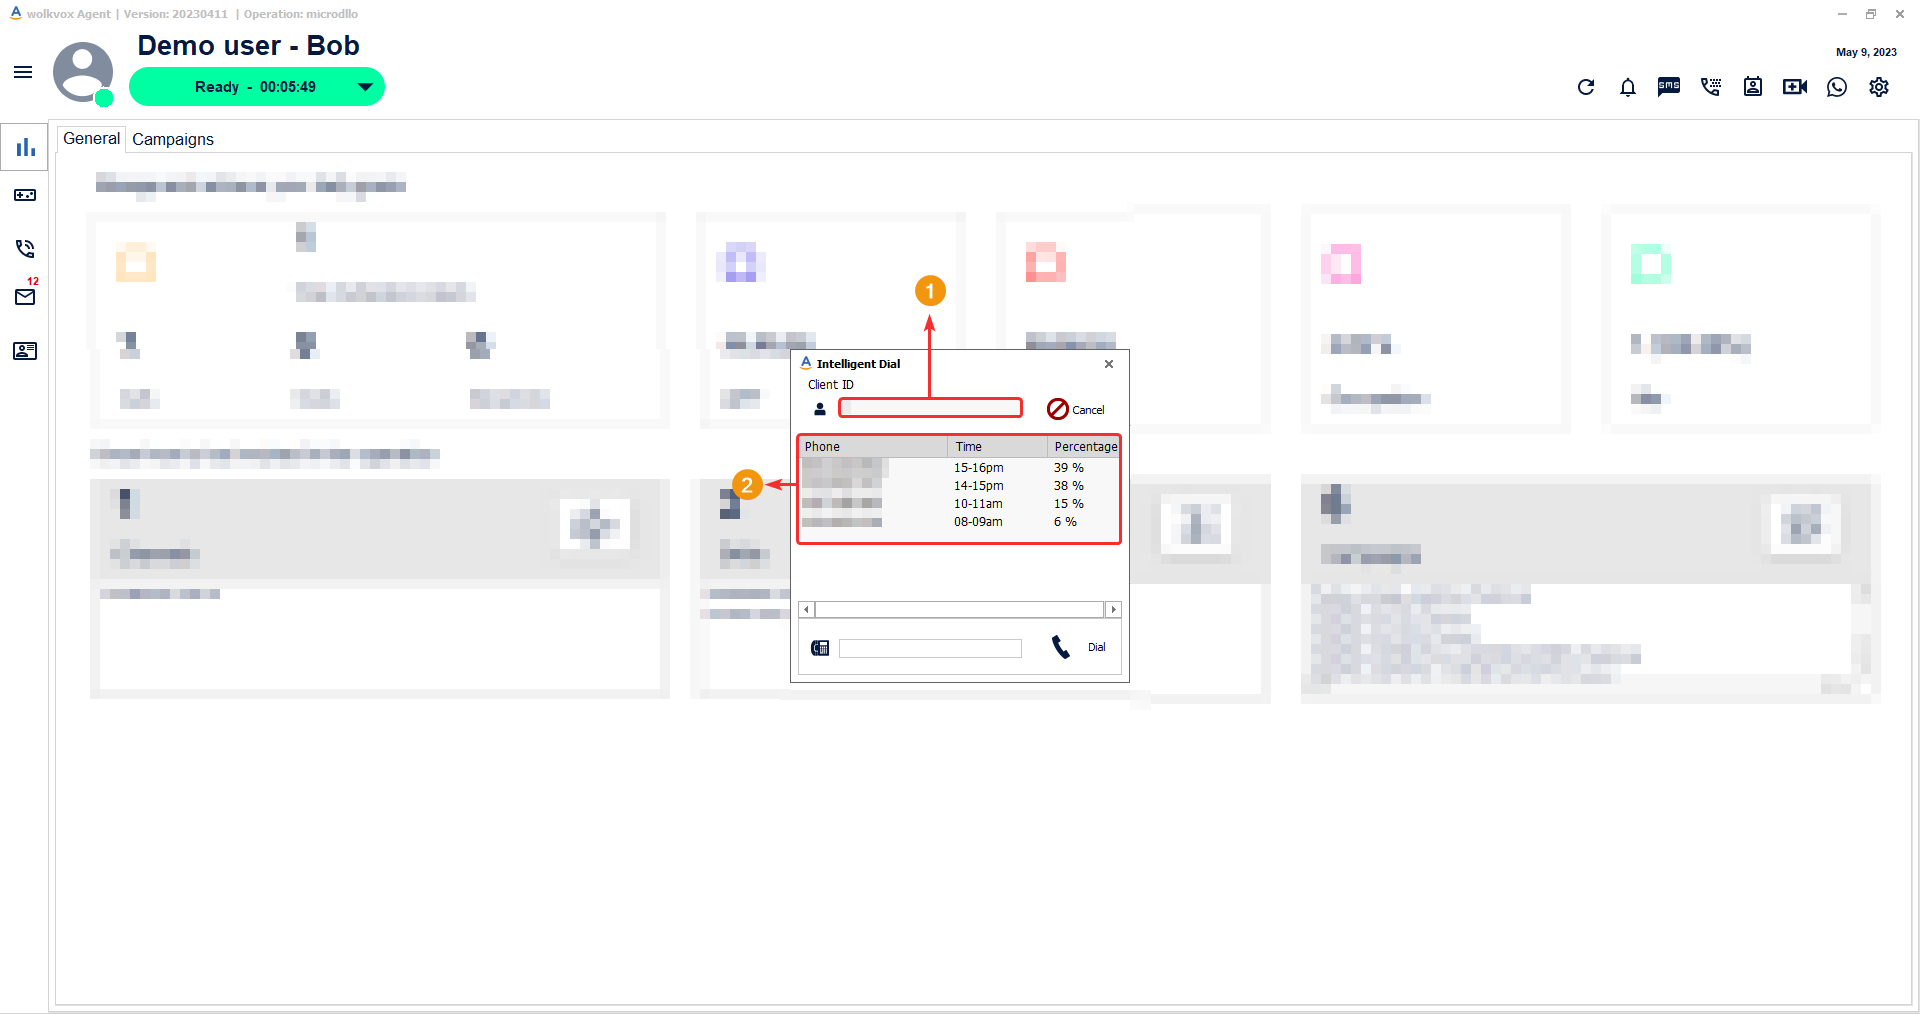
- In the ‘Client ID’ field, you must enter the client’s identification number. Click on ‘Search’. The search result appears in the table.
- In the ‘time’ column, you can see the duration of the call from start to end. In ‘Percentage’, you can see the percentage of time spent on each call. If you double-click a number, the system will start calling the selected number.”
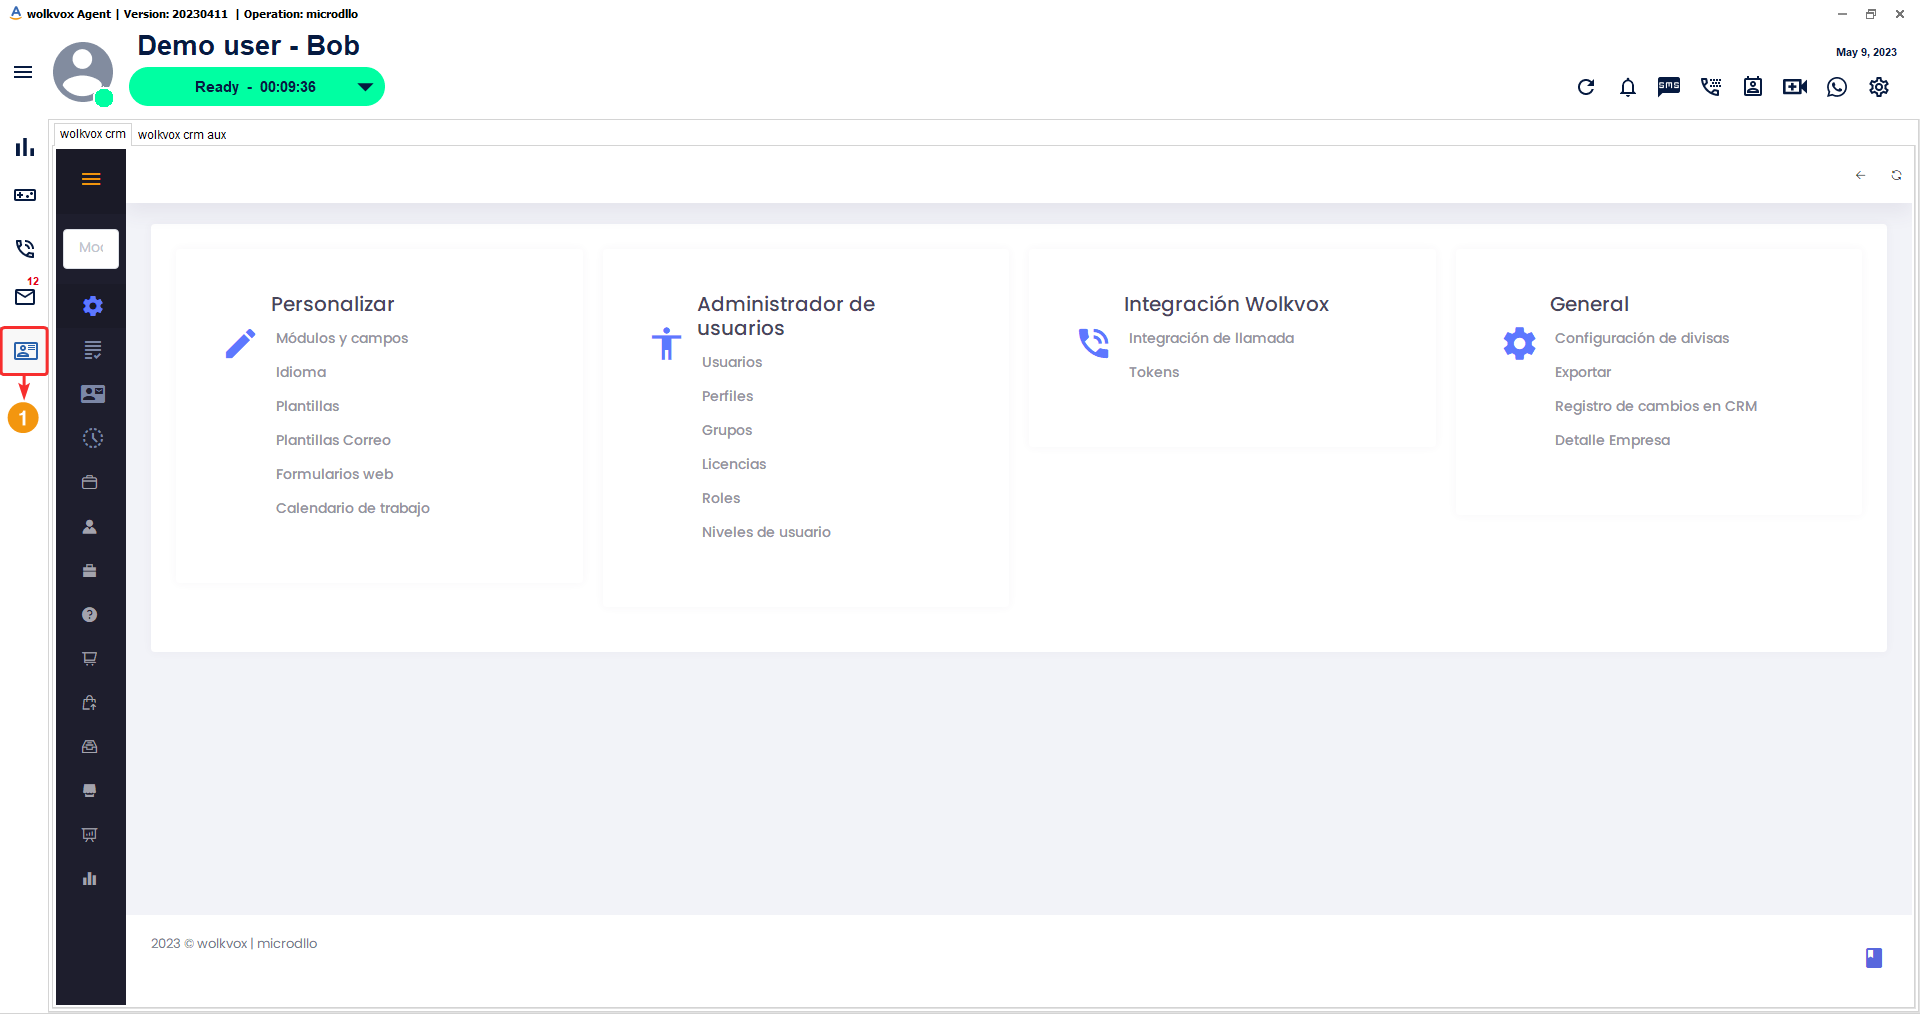
CRM #
On the side menu you will find the “CRM” button that allows access to Wolkvox CRM (fully integrated with your operation), an application for managing customers, projects, companies, contacts, sales, billing, potential customers, collections, quotes, products, cases, among other functions.
Note: This section can be activated by the administrator of your operation.