


 New report “IVR Calls and Minutes by Menu Option” #

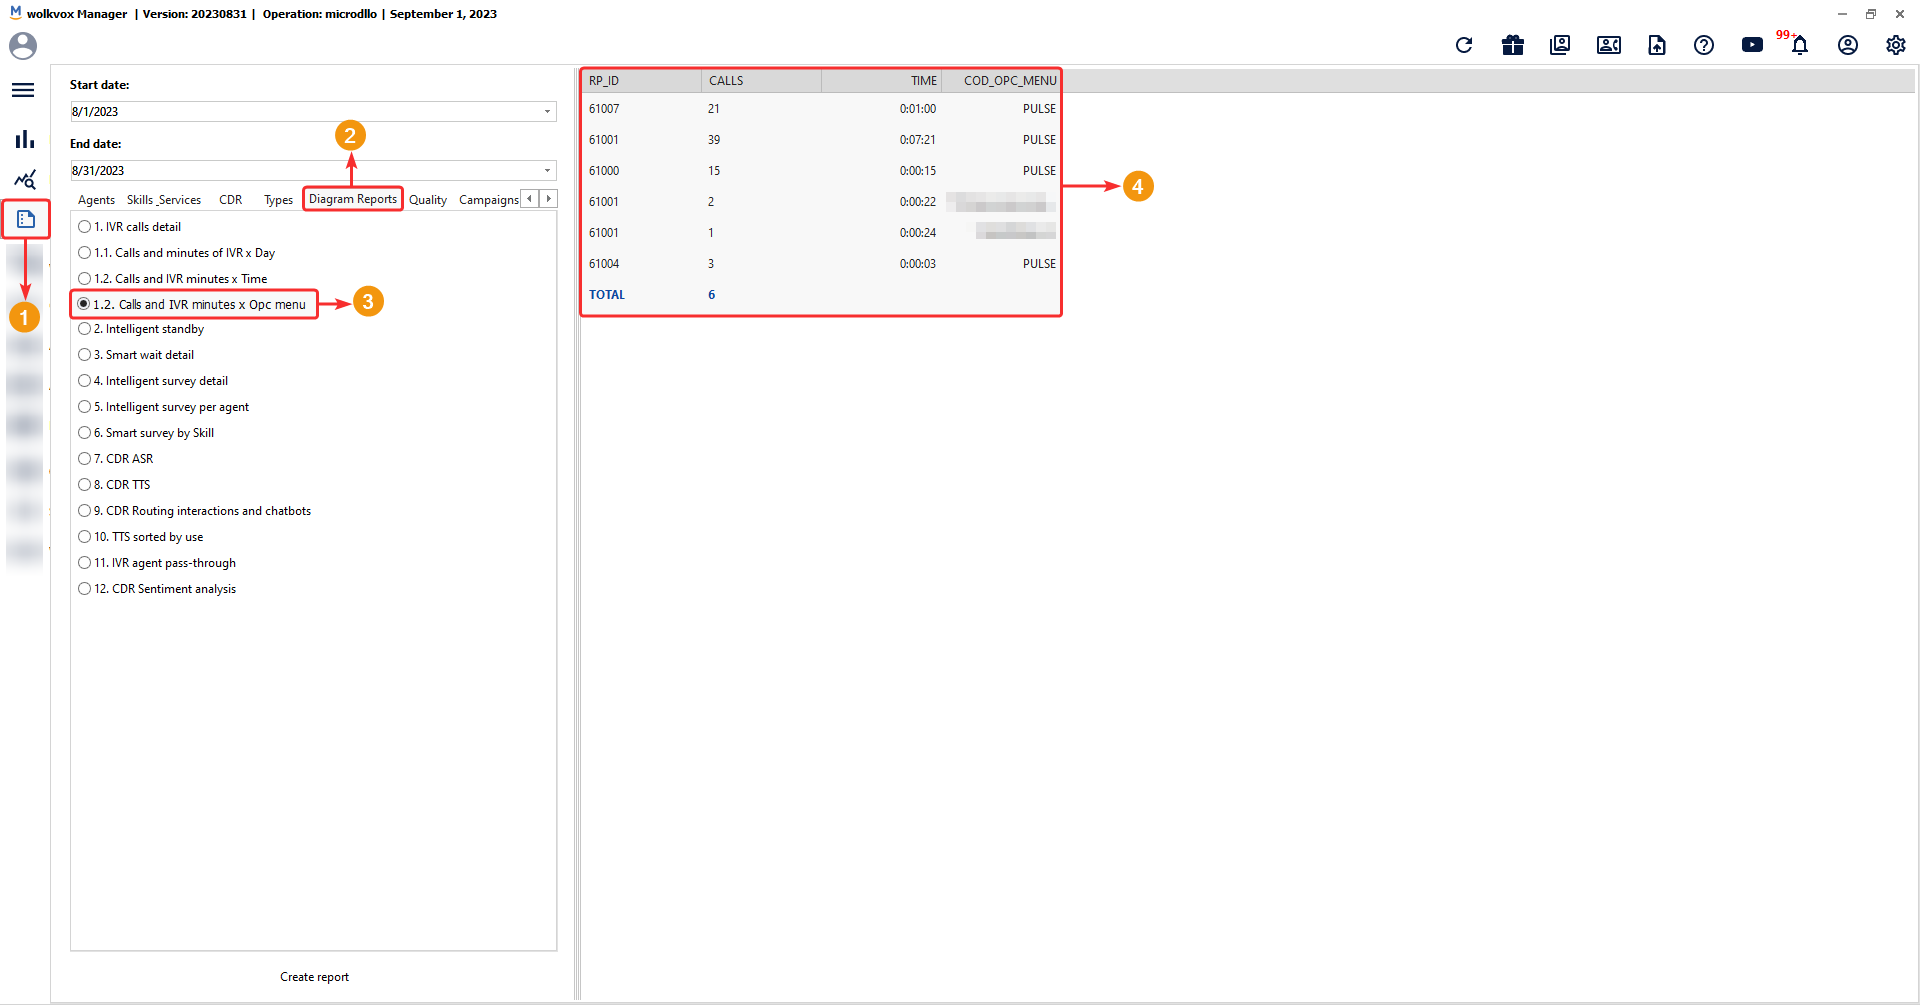
- This new report of IVR calls and minutes by menu option is available in the “Diagram Reports” report group and allows you to see a grouped breakdown of how many times and how much time a menu option in an IVR was used.
- The key benefit of this new feature lies in its ability to provide a detailed and valuable insight into IVR usage and menu options. This enables organizations to accurately assess the effectiveness of their IVR and make informed decisions to improve it. By knowing how many times and how much time menu options in the IVR are used, businesses can identify the most relevant areas for their customers and adjust their IVR accordingly. This leads to an enhanced customer experience as the most used and relevant menu options can be optimized and fine-tuned for more efficient and satisfying interactions. Furthermore, this can help reduce wait times and customer frustration, as popular menu options are optimized for quick and efficient responses.
- This report applies only to voice-type routing points.
- The columns in this report are:
- RP_ID: It is the unique identifier of the routing point.
- Calls: The number of calls that have passed through that menu option in the routing point.
- Time: The total amount of time consumed in that menu option of the routing point.
- Cod_opc_menu: Displays the code or identifier associated with the specific menu option of the routing point.
- To access this report, go to the “Reports” section of the left-hand side menu, then select the date range to obtain the data, choose the “Diagram reports” tab, select “1.3 IVR Calls and Minutes by Menu Option,” and click “Generate report.”
- This new report also has an API. To read the API documentation related to this report, click here.
Multiple Attribute Selection in Quality Analyzer #
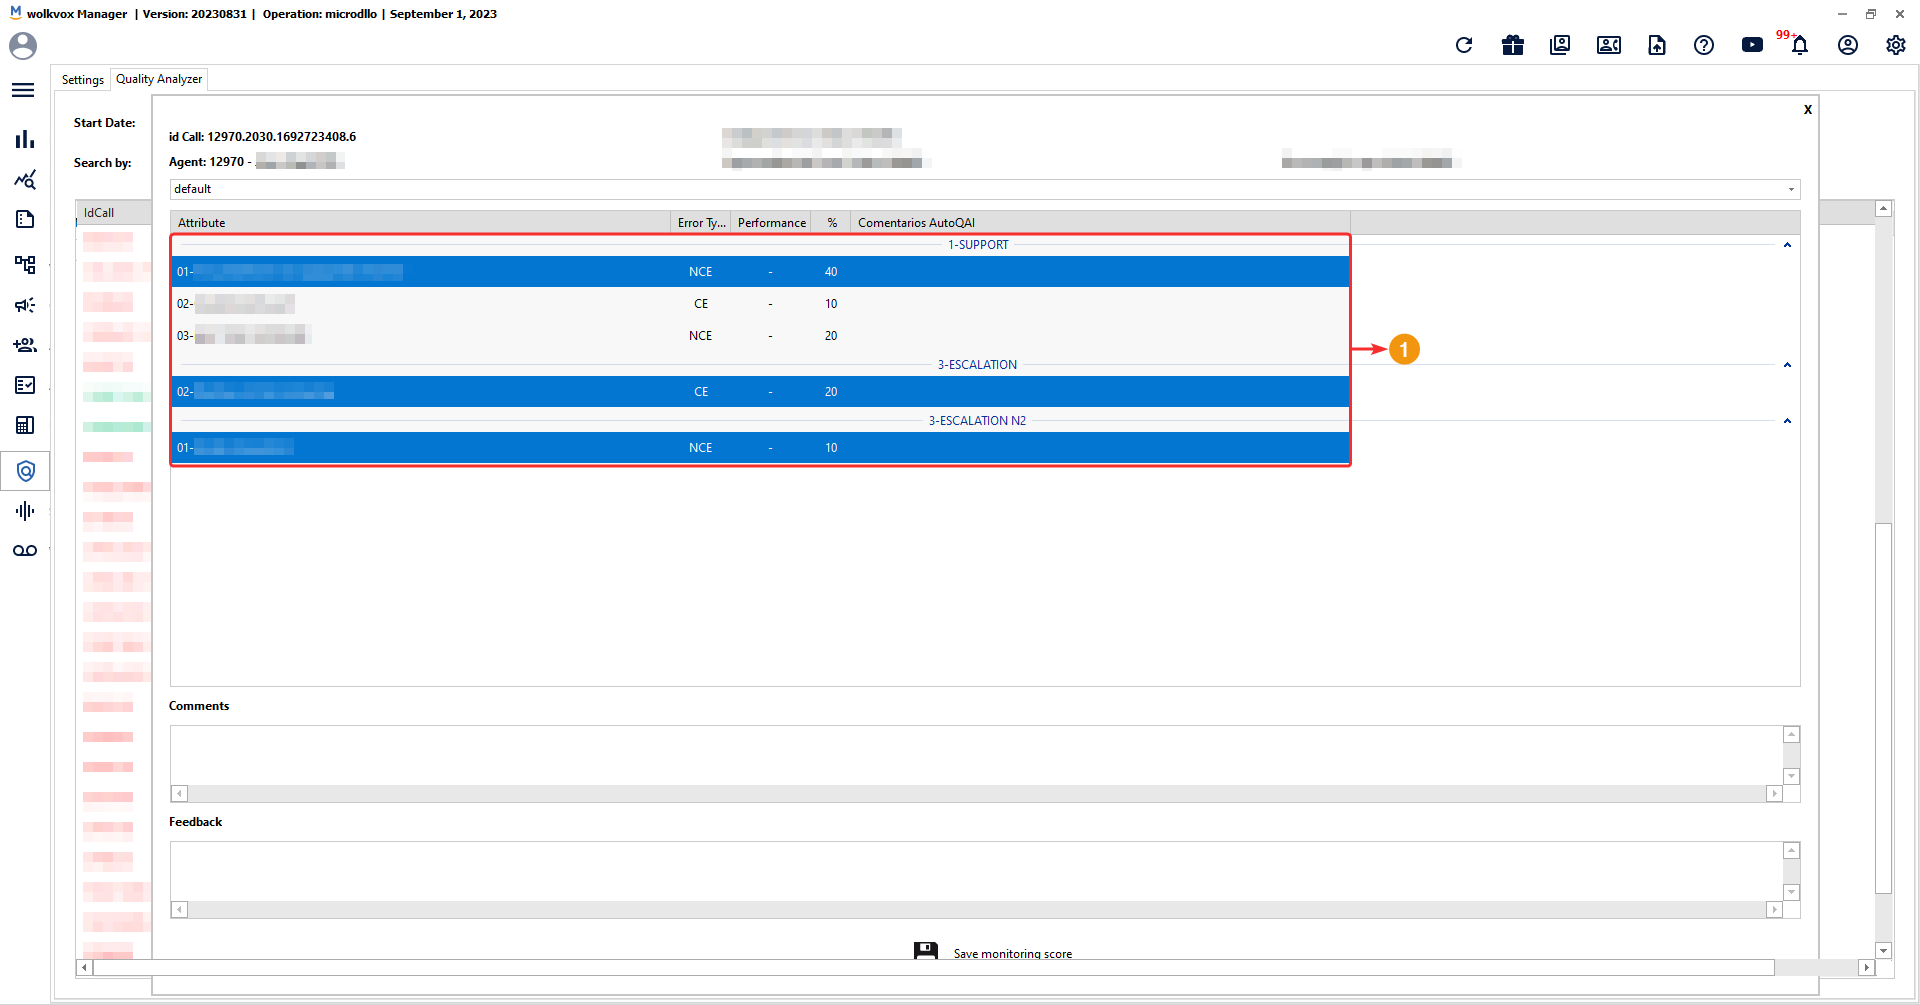
- Now, when evaluating quality attributes in Quality Analyzer, you can choose multiple attributes at once using the “CTRL” key to select each attribute individually or using the “SHIFT” key to quickly select a range of attributes.
- Thanks to this enhancement, you will achieve greater efficiency and time savings.
- The use of “CTRL” and “SHIFT” keys simplifies the selection, which is especially helpful when dealing with extensive sets of attributes. Overall, this usability improvement increases user productivity and enables a more thorough and rapid evaluation of quality attributes.
New Report for Audit Log #
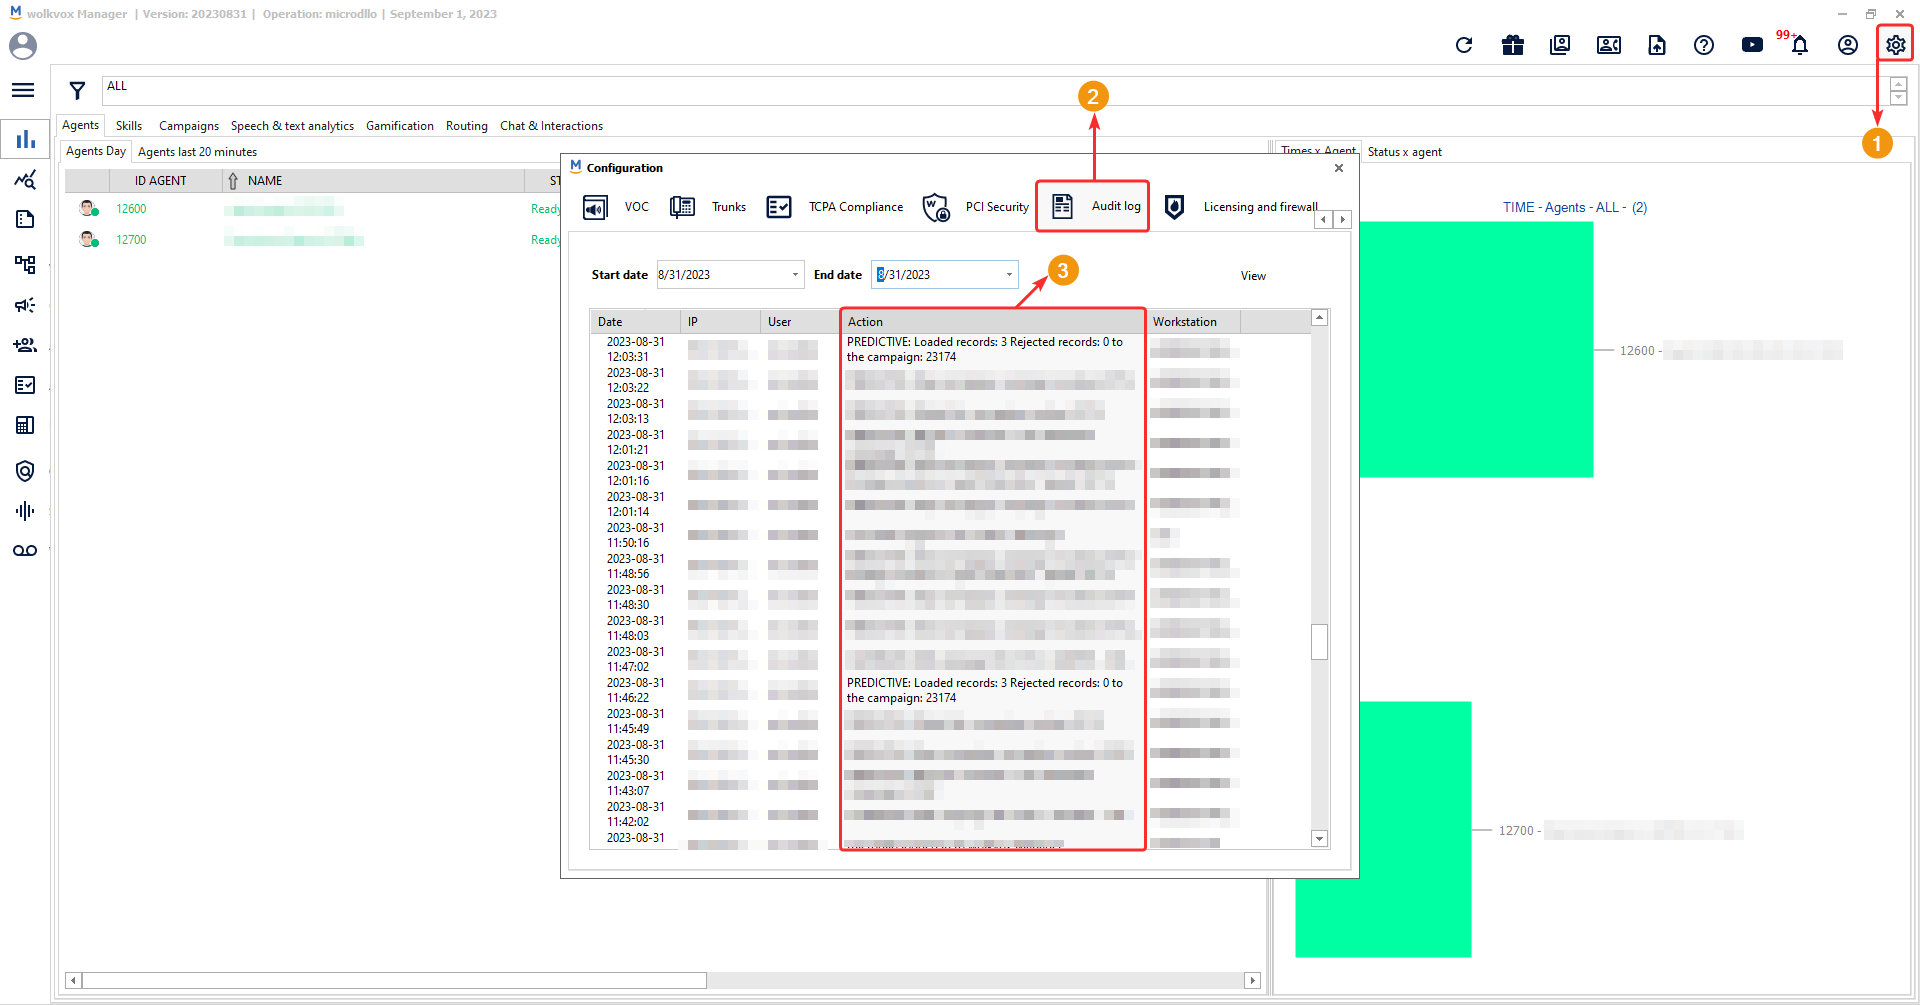
- Now, actions related to uploading records to predictive dialing campaigns will be displayed.
- The report shows the total number of uploaded records, the quantity of rejected records, and the related campaign ID.
- Thanks to this new feature, you can track actions related to record uploads in predictive dialing campaigns in detail. By providing information on the total number of uploaded records, the quantity of rejected records, and the related campaign ID, users can quickly identify any issues with record uploads and take corrective actions promptly.
- Note: Remember that to access the “Audit Log,” you should go to the wolkvox Manager settings (located in the upper right-hand corner of the screen), select the “Audit Log” tab, choose a date range, and click the “View” button.
New Template for Sending Contacts via WhatsApp API Cloud #
- To use this template, you will need to utilize the wolkvox Studio component called “Reply Chat”.
- Thanks to this new feature, you will obtain a standardized and organized structure for efficiently and accurately sending contact information via WhatsApp. By using this template, users can ensure that information is shared uniformly, and all relevant data such as names, phone numbers, emails, and organization details are consistently included in WhatsApp conversations. This enhances the professionalism of communications and minimizes the possibility of errors. Furthermore, by integrating with the “Reply Chat” component of wolkvox Studio, the template seamlessly fits into the existing workflow, making it easy to create and send contacts via WhatsApp API Cloud.
- Important: This feature only applies to WhatsApp API Cloud connectors.
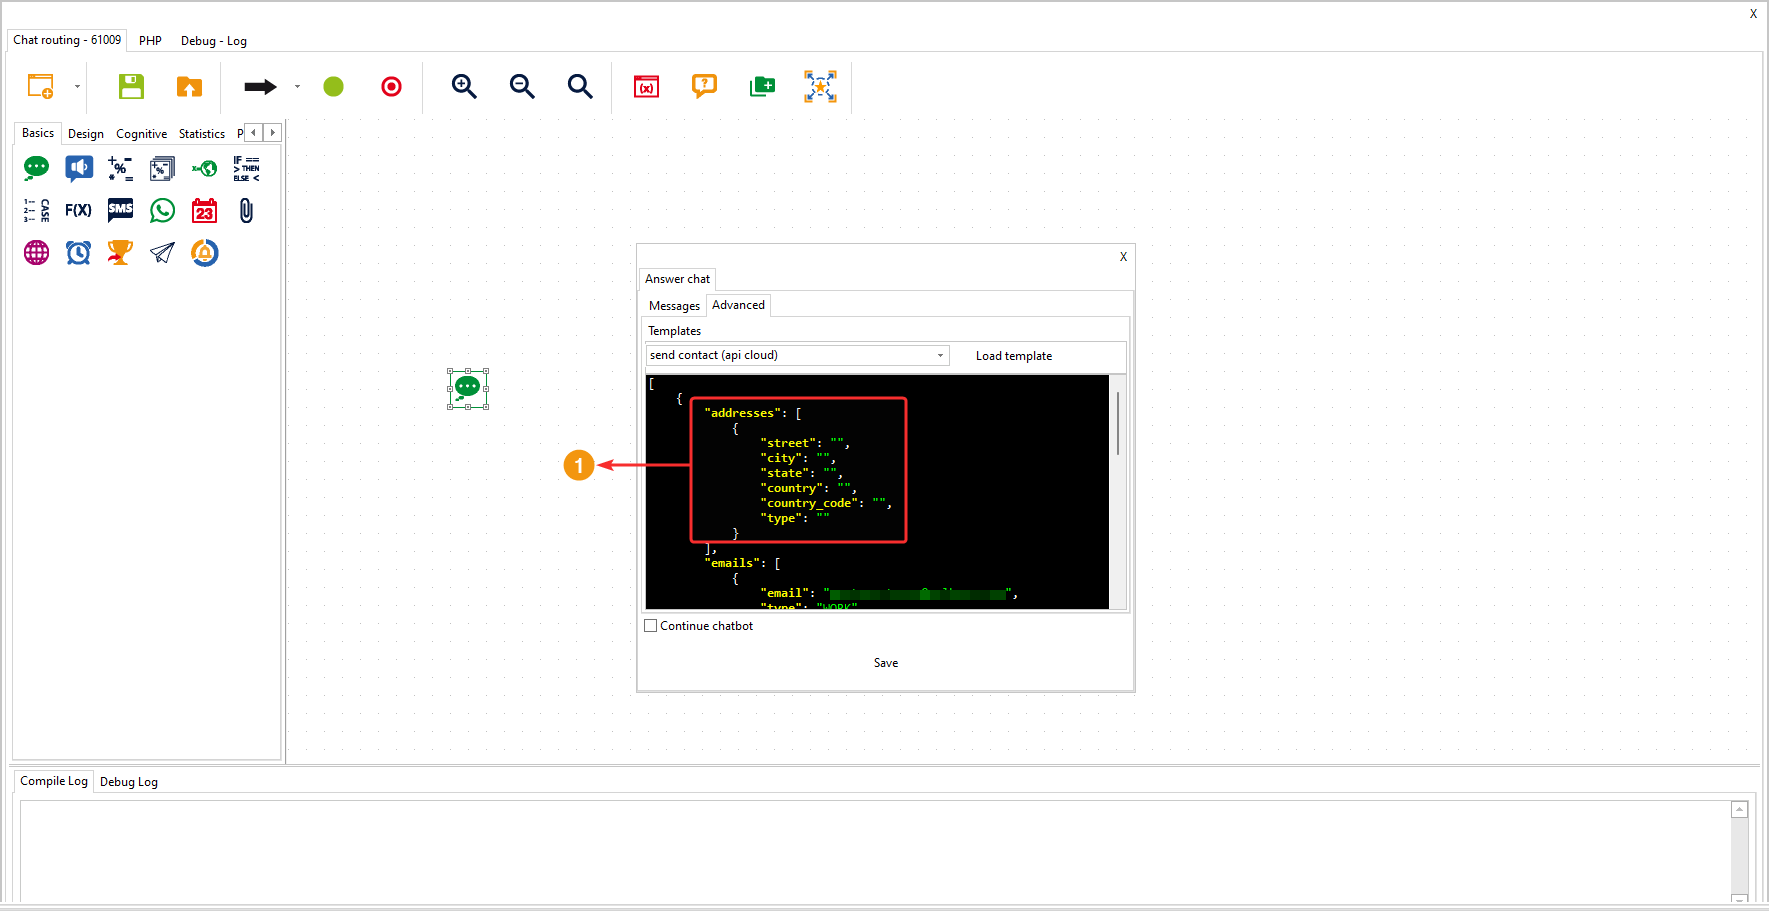
Follow these steps to use the template:
- Access the settings of the “Reply Chat” component.
- Go to the “Advanced” tab.
- Select the option “Send contact (api cloud)” from the dropdown menu.
- Click on “Load template.”
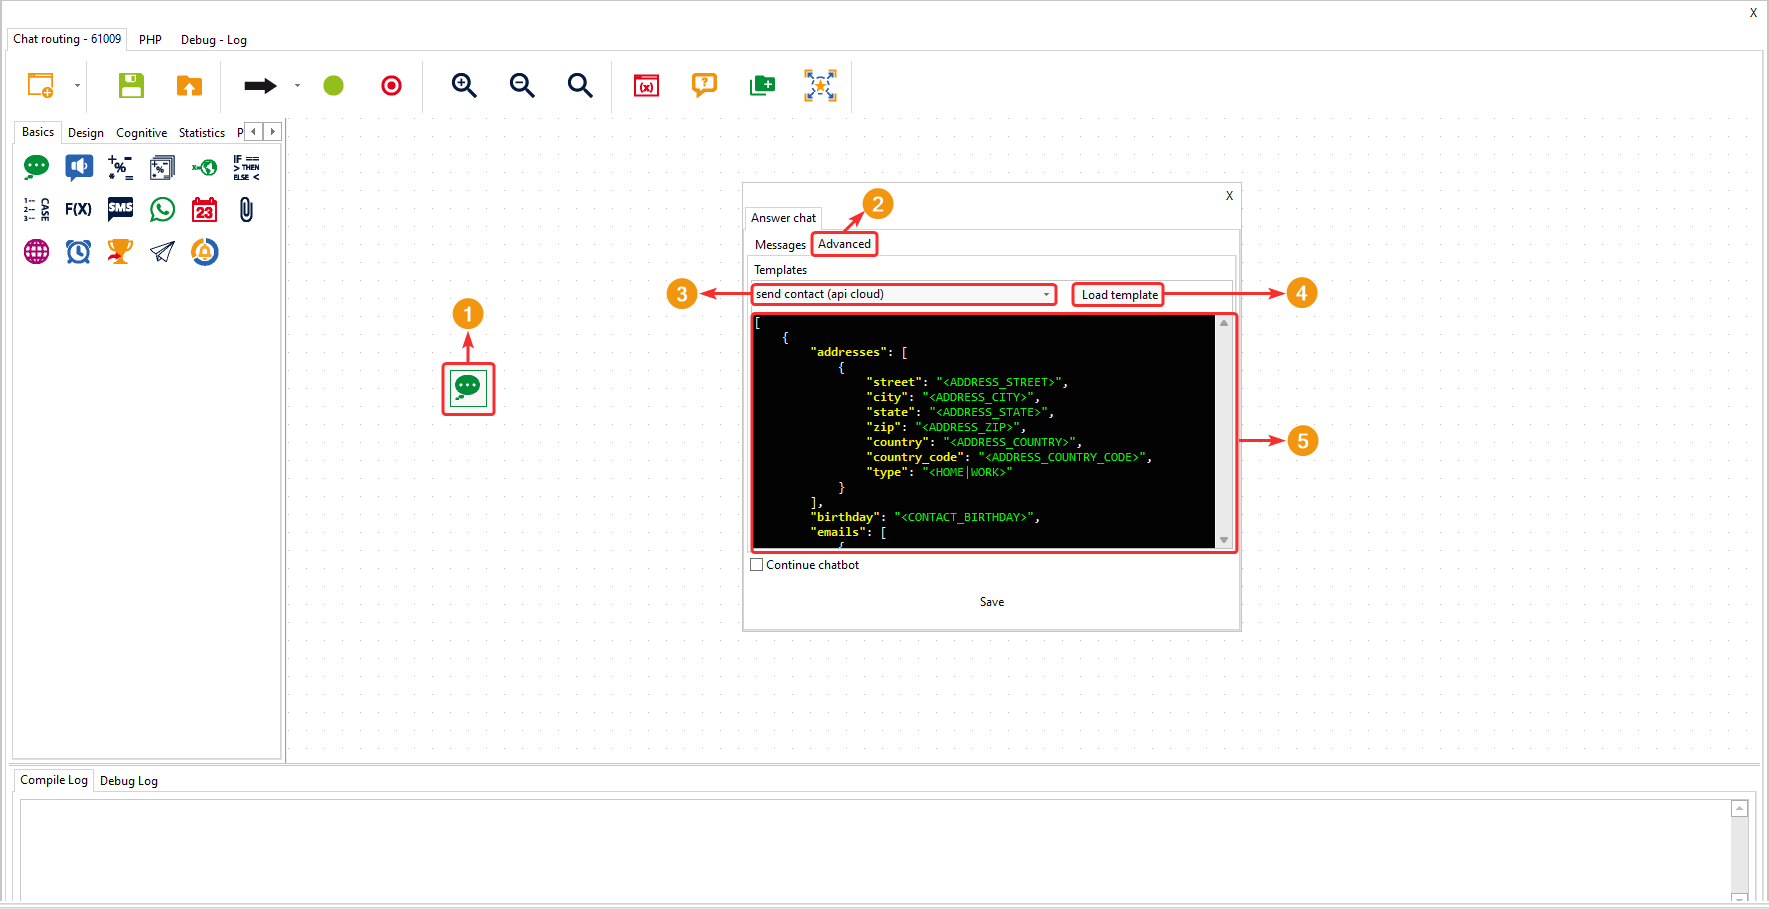
Important: The “addresses” field in the contact template is essential to ensure proper functionality. Do not delete this field, as it contains critical information for data transmission. Only leave the address fields empty if you do not wish to use them.
Here is an explanation of each field:
- addresses: This field allows you to specify the contact’s address. It includes subfields like “street,” “city,” “state,” “zip,” “country,” “country_code,” and “type.” These subfields enable you to provide detailed information about the contact’s address, including its type, which can be “HOME” or “WORK.”
- birthday: Here, you can include the contact’s date of birth.
- emails: This field is used to specify email addresses. Each entry includes an “email” and its “type,” which can be “WORK” or “HOME,” indicating the type of email.
- name: This field is used to specify the contact’s name. It includes subfields like “formatted_name,” “first_name,” “last_name,” “middle_name,” “suffix,” and “prefix,” allowing you to define the contact’s full name with all its details.
- org: Here, you can specify details about the contact’s organization, such as the “company,” “department,” and “title” to which they belong in the organization.
- phones: This field is used to specify contact phone numbers. Each entry includes a “phone,” “wa_id” (WhatsApp ID, if applicable, as it may be empty), and “type,” such as “WORK” or “HOME,” indicating the type of phone.
- urls: Here, you can include URLs related to the contact. Each entry includes a “url” and its “type,” which can be “WORK” or “HOME.”
        [
            {
                "addresses": [
                    {
                        "street": "123 Main Street",
                        "city": "Sample City",
                        "state": "Sample State",
                        "zip": "12345",
                        "country": "Sample Country",
                        "country_code": "SC",
                        "type": "HOME"
                    }
                ],
                "birthday": "01/15/1980",
                "emails": [
                    {
                        "email": "[email protected]",
                        "type": "WORK"
                    }
                ],
                "name": {
                    "formatted_name": "Daniel Smith",
                    "first_name": "Daniel",
                    "last_name": "Smith",
                    "middle_name": "Michael",
                    "suffix": "Jr",
                    "prefix": "Mr"
                },
                "org": {
                    "company": "Sample Company",
                    "department": "Sample Department",
                    "title": "Manager"
                },
                "phones": [
                    {
                        "phone": "+1234567890",
                        "wa_id": "12345678",
                        "type": "WORK"
                    }
                ],
                "urls": [
                    {
                        "url": "https://www.wolkvox.com",
                        "type": "WORK"
                    }
                ]
            }
        ]
